Wrox Press Java Programming 24-Hour Trainer 2nd (2015)
Lesson 19. Developing JavaFX Calculator and Tic-Tac-Toe
Now that you’re familiar with the basics of JavaFX, it’s time to write some practical applications. In this lesson you program the calculator and the game of Tic-Tac-Toe. In Lesson 18 you wrote the application in Java, but this time you create the graphical user interface (GUI) part with a declarative language—FXML. The application logic and event handling remain in Java.
In this lesson you get familiar with Scene Builder—a design tool that enables you to create a GUI by dragging and dropping components (buttons, text fields, labels, and so on) right onto the content panel (the center area of Scene Builder as shown in Figure 19-4 ). While you design the view with Scene Builder it generates a file with the name extension .fxml, which contains XML-like tags with attributes that reflect your design.
You also see how to dynamically change the styling of components using cascading style sheets (CSS).
Designing a Calculator with Scene Builder
I assume that you already have the Efxclipse plug-in installed as described in Lesson 18. Now you need to download and install Scene Builder from Oracle at http://bit.ly/1rnw1S5.
An Alternative Site for Scene Builder Downloads
Starting from Java 8 update 40 Oracle stopped offering installer for Scene Builder. You can download a build of Scene Builder 8, based off of the latest sources from OpenJFX from Gluon.
If you’ve completed the assignment from the Try It section of Lesson 18 you should have a program that shows the GUI of a calculator that might look similar to the one shown in Figure 19-1.
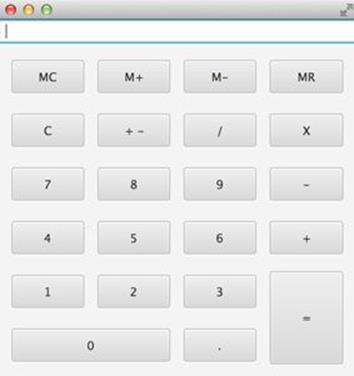
Figure 19-1: The calculator
Now you find out how this calculator can be created using Scene Builder. You still start with creating a JavaFX project in Eclipse by selecting menus File → New → Other → JavaFX.
I’m naming this project Lesson19. During creation of this project I specify the package name mycalculator, the language FXML, and the file name Calculator, and the controller name CalculatorController as shown in Figure 19-2.
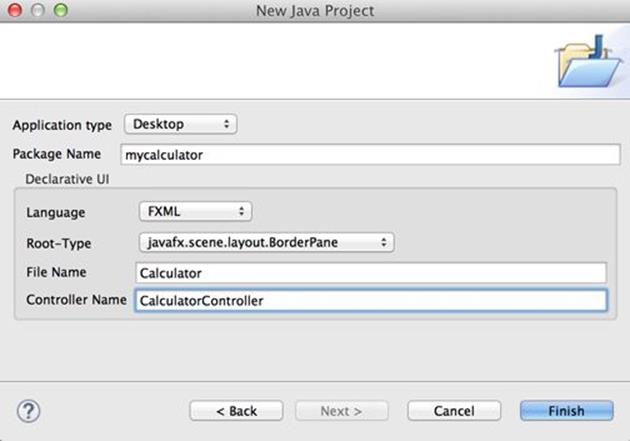
Figure 19-2: Configuring a new JavaFX project in Eclipse
Clicking the Finish button creates a new Eclipse project that includes two Java classes—Main and CalculatorController—the FXML file Calculator.fxml shown on Figure 19-3, and the CSS file called application.css.
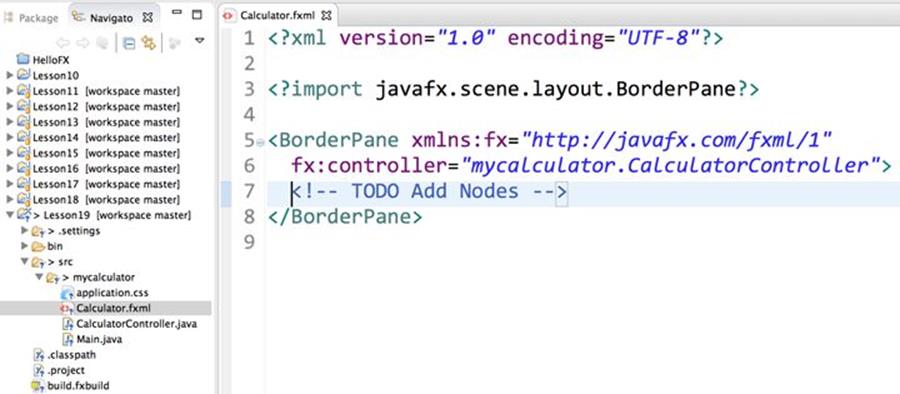
Figure 19-3: The generated project Lesson19
Note that the <BorderPane> contains the attribute fx:controller with the name of the class that plays the role of the controller in your MVC-based application.
The file Calculator.fxml (shown in Figure 19-3) contains the calculator’s GUI represented by XML-like tags. In particular, the tag <BorderPane> corresponds to the JavaFX BorderLayout container.
The Main class launches the application. In Lesson 18 you had to write the Java application manually, but now it is generated by the E(fx)clipse plug-in as shown here:
package mycalculator;
import javafx.application.Application;
import javafx.stage.Stage;
import javafx.scene.Scene;
import javafx.scene.layout.BorderPane;
import javafx.fxml.FXMLLoader;
public class Main extends Application {
@Override public void start(Stage primaryStage) {
try {
BorderPane root = (BorderPane)FXMLLoader.load(getClass()
.getResource("Calculator.fxml"));
Scene scene = new Scene(root,400,400);
scene.getStylesheets().add(getClass()
.getResource("application.css").toExternalForm());
primaryStage.setScene(scene);
primaryStage.show();
} catch(Exception e) {
e.printStackTrace();
}
}
public static void main(String[] args) {
launch(args); }
}
There is a new for you element in this code—the annotation @Override, which indicates that the method start() overrides its superclass’s version. I explain annotations in Lesson 23. In the next section you see how to design the GUI in Scene Builder, which saves it in the .fxml file. Your Mainclass loads it using the class FXMLLoader and creates a Java object in memory according to FXML content.
The generated project includes an empty file application.css , which is the right place for customizing the look of the GUI with CSS.
According to the MVC design pattern, the class CalculatorController is the place where you program event handler methods in Java. It’s empty at this point. You separate the creation of the GUI in a declarative language (FXML) from the application logic written in Java.
Designing the Calculator GUI with Scene Builder
The content of the file Calculator.fxml is generated by Scene Builder. Right-click its name and use the menu Open → Other → Scene Builder. It looks like Figure 19-4.
The middle section is called Content Panel. From the left panel, you drag and drop the GUI controls and containers onto the Content Panel. At the bottom left you see the hierarchy of GUI components, which, at this point, includes nothing but the BorderPane. Now place a TextField in the TOP area of the BorderPane and the GridPane with Button controls in the CENTER.
Open the Controls panel on the left, select a TextField, and drop it on the insert TOP line in the Hierarchy panel. Scene Builder looks like Figure 19-5.
After Saving (Ctrl+S) the current design, open the Calculator.fxml file in Eclipse. You see that Scene Builder has generated the <top> tag inside <BorderPane>:
<BorderPane xmlns:fx="http://javafx.com/fxml/1"
xmlns="http://javafx.com/javafx/8"
fx:controller="mycalculator.CalculatorController">
<top>
<TextField BorderPane.alignment="CENTER" />
</top>
</BorderPane>
Now select GridPane in the Containers panel on the left and drag and drop it on the insert CENTER line in the Hierarchy panel. The Scene Builder looks like Figure 19-6.
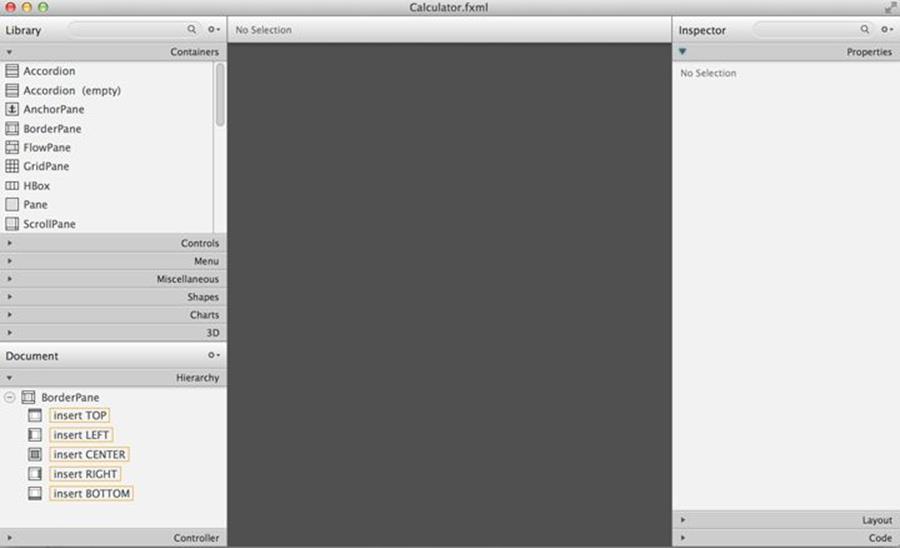
Figure 19-4: Calculator.fxml in Scene Builder
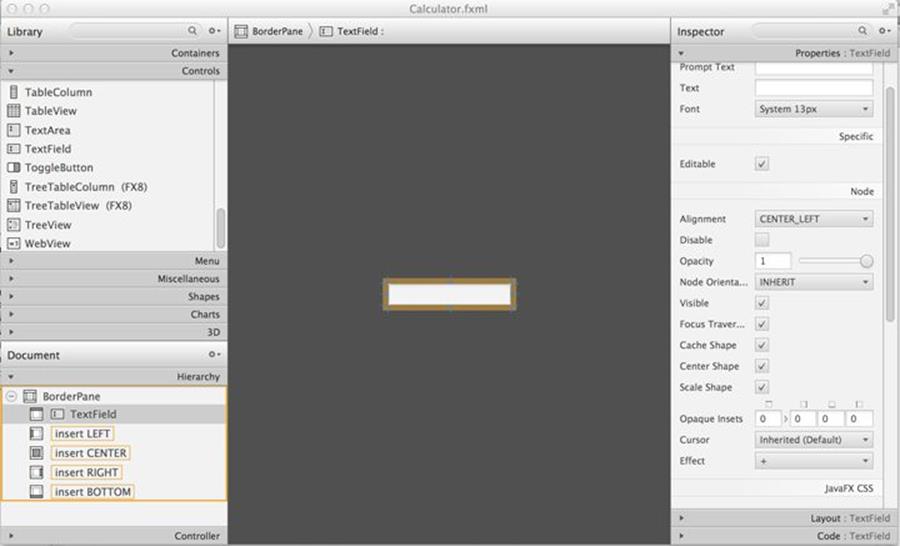
Figure 19-5: The TextField control is placed in the TOP area
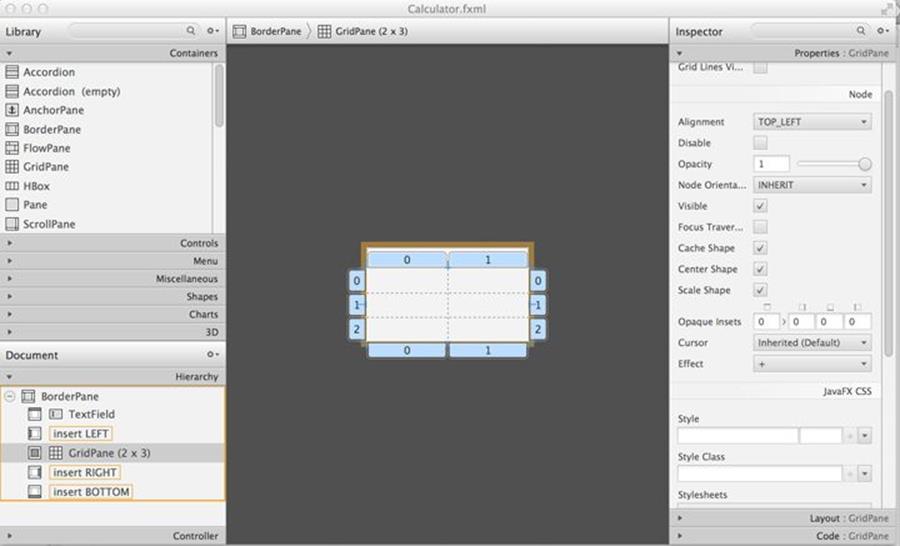
Figure 19-6: Adding the GridPane to the CENTER.
After saving the design, the Calculator.fxml file includes new content:
<BorderPane xmlns:fx="http://javafx.com/fxml/1"
xmlns="http://javafx.com/javafx/8"
fx:controller="mycalculator.CalculatorController">
<top>
<TextField BorderPane.alignment="CENTER" />
</top>
<center>
<GridPane BorderPane.alignment="CENTER">
<columnConstraints>
<ColumnConstraints hgrow="SOMETIMES" minWidth="10.0"
prefWidth="100.0" />
<ColumnConstraints hgrow="SOMETIMES" minWidth="10.0"
prefWidth="100.0" />
</columnConstraints>
<rowConstraints>
<RowConstraints minHeight="10.0" prefHeight="30.0"
vgrow="SOMETIMES" />
<RowConstraints minHeight="10.0" prefHeight="30.0"
vgrow="SOMETIMES" />
<RowConstraints minHeight="10.0" prefHeight="30.0"
vgrow="SOMETIMES" />
</rowConstraints>
</GridPane>
</center>
</BorderPane>
In the GridPaneSample class in Lesson 18 you specify all the attributes of the GridPane by invoking methods in the Java classes, but now they are represented by the FXML tag attributes. By default, a GridPane container is initially created with two columns and three rows, hence you see two tags <ColumnConstraints> and three tags <RowConstraints>.
The little tabs labeled with numbers in Figure 19-6 correspond to the row and column numbers of the grid. But the calculator shown in Figure 19-1 has four columns and six columns filled with buttons. To add more rows and columns you need to right-click the grid and keep selecting the GridPane | Add Rows Below or Add Column After until you see a 4x6 grid as shown in Figure 19-7.
After saving the design, the Calculator.fxml file includes the FXML tags for a 4x6 grid. Next, in Scene Builder you add the padding of 10 pixels to have some space between the grid and the border of the window and the horizontal and vertical gap to have space between the cells of the grid. This is done by filling the values of Padding, Hgap, and Vgap in the GridPane Properties panel on the right as shown on Figure 19-8.

Figure 19-7: The 4x6 GridPane under the TextField
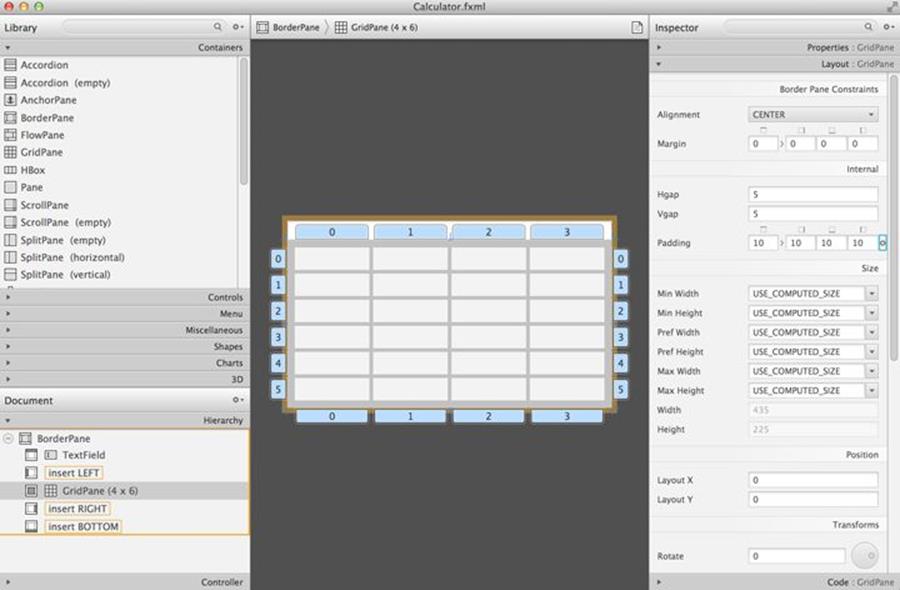
Figure 19-8: Setting Hgap, Vgap, and Padding properties of the GridPane
The next step is to add buttons into the grid cells. Drag and drop a Button from the Controls panels on the left into the top left cell of the grid as shown in Figure 19-9. Drag the button’s right border to make it larger. Set the Margin property to 5 for each side of the button; this is the distance between the button and cell borders. Finally, change the text on the button to read MC to match the top left button from Figure 19-1. Figure 19-9 shows how the Scene Builder’s window should look now.
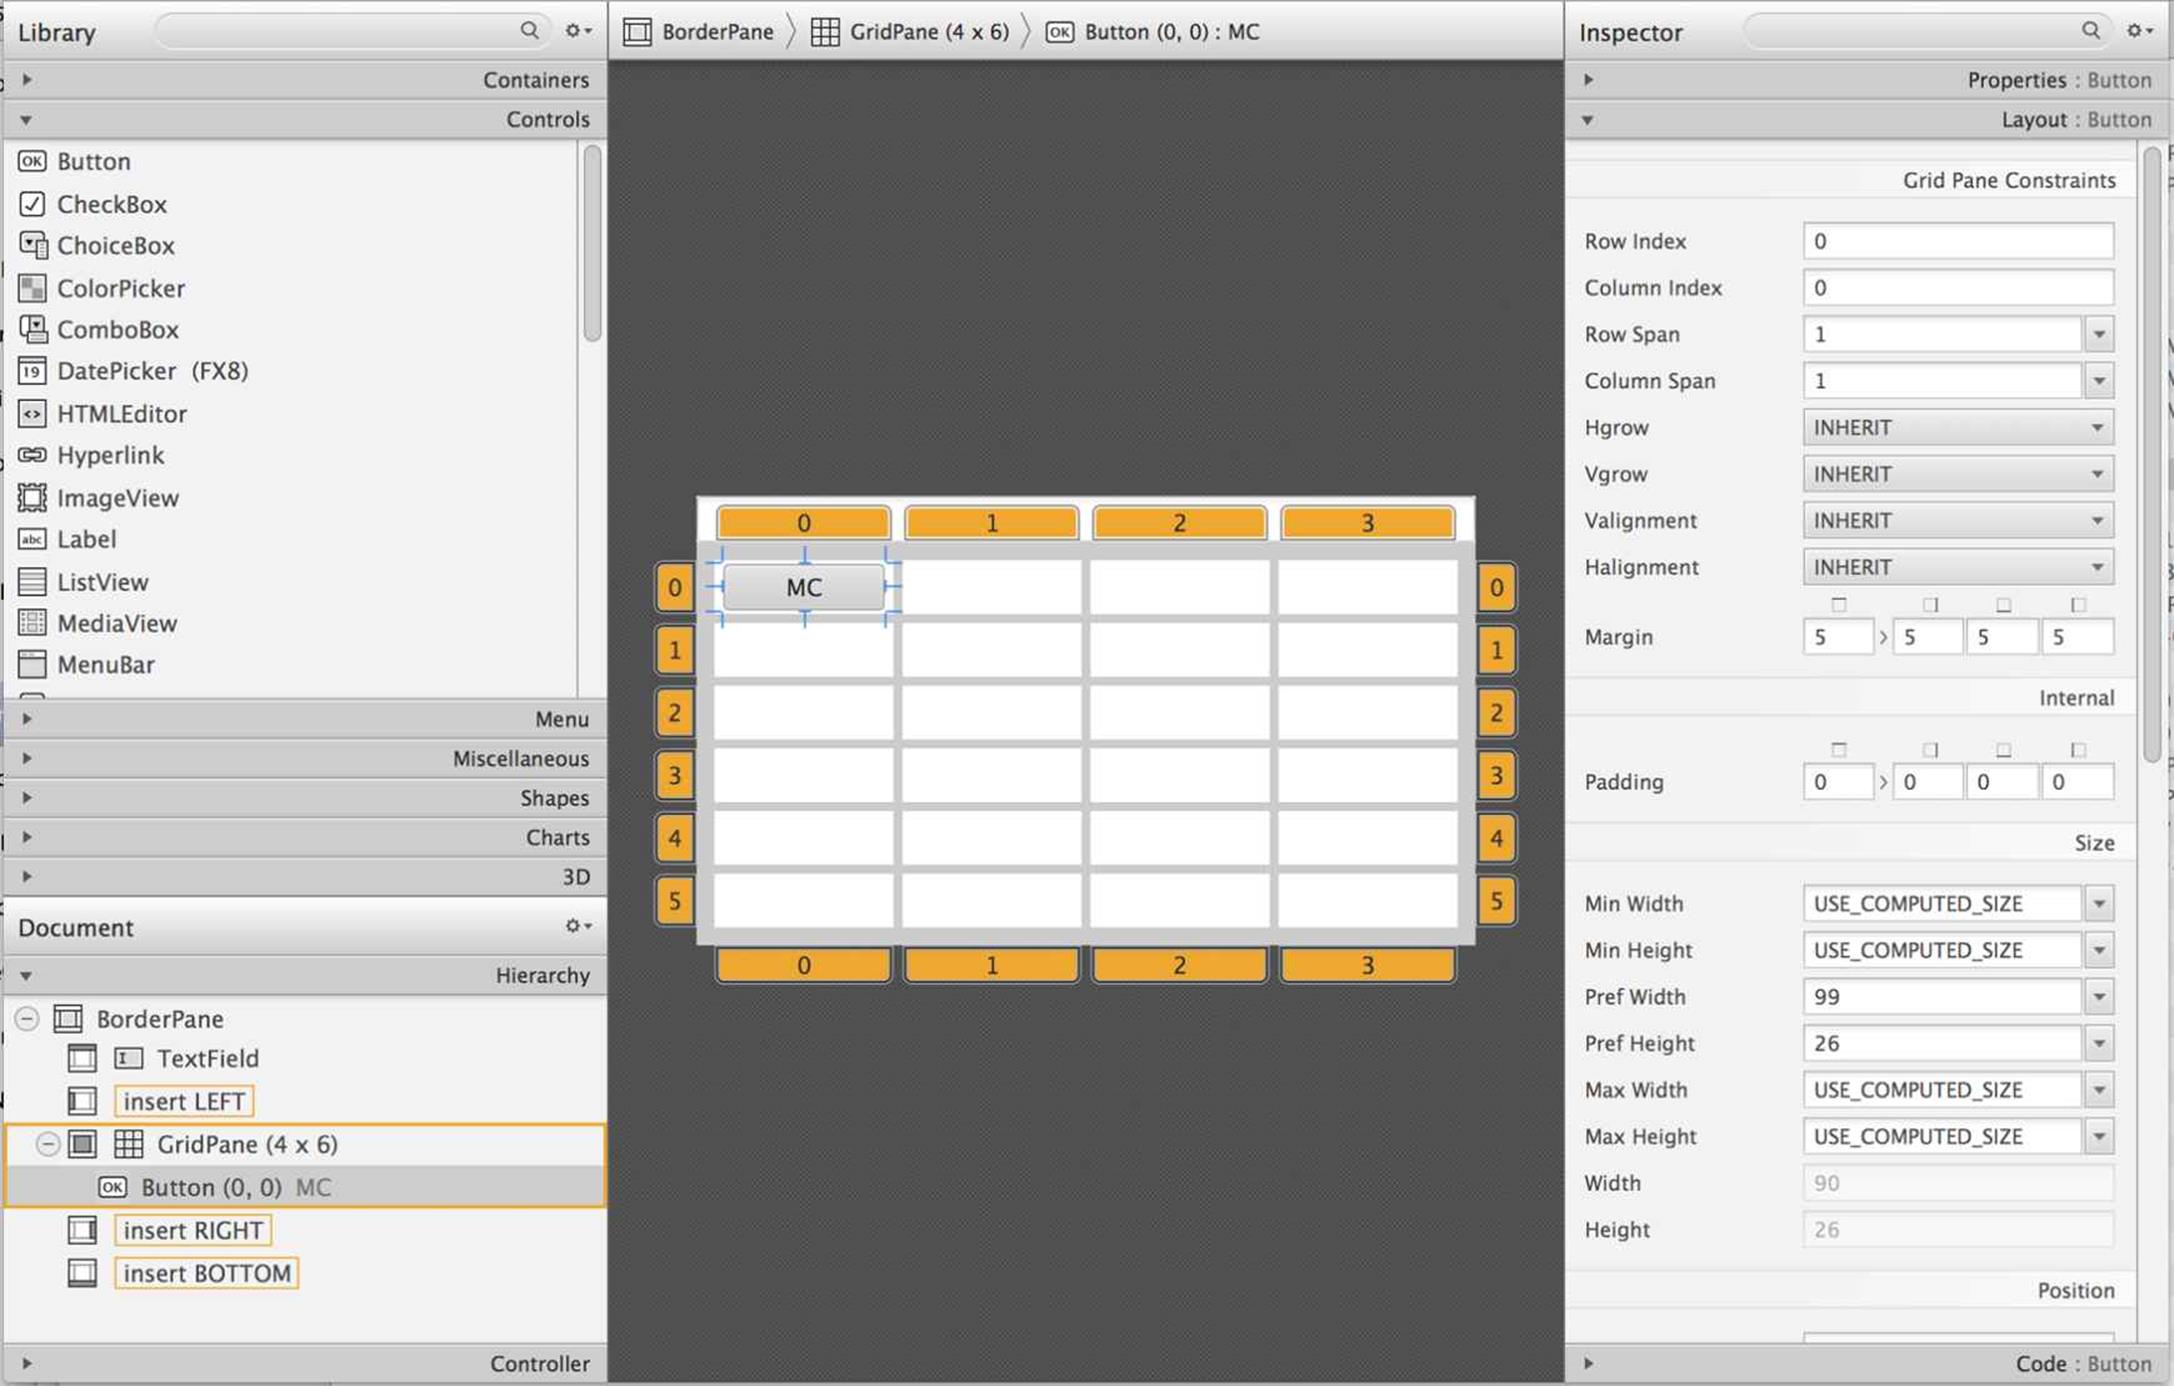
Figure 19-9: The button MC added to the top left grid cell
After saving this design in Calculator.fxml, a new section <children> is inside the <GridPane>. It has just one button for now:
<children>
<Button mnemonicParsing="false" prefHeight="26.0"
prefWidth="99.0" text="MC">
<GridPane.margin>
<Insets bottom="5.0" left="5.0" right="5.0" top="5.0" />
</GridPane.margin>
</Button>
</children>
There is no indication of the cell (0,0) because zeros are the default values for GridPane.columnIndex andGridPane.rowIndex properties. Now you need to replicate this button in other cells. You can use multiple Ctrl+C/Ctrl+V keystrokes and then drag/drop the buttons into other cells. Set the proper text for each button. While doing this, watch how the content of the Calculator.fxml changes as you add more buttons. I find it faster to copy and paste the code directly in the FXML file than use Scene Builder for mass duplication.
Note that in Figure 19-1 the button located in the cell (0,5) spans two columns, and the button with coordinates (3,4) spans two rows. For these buttons you need to enter 2 as the row (or column) span, and select MAX_VALUE as maximum width (or height) using the Properties panel on the right. After all this done, the Scene Builder’s window should look like Figure 19-10.
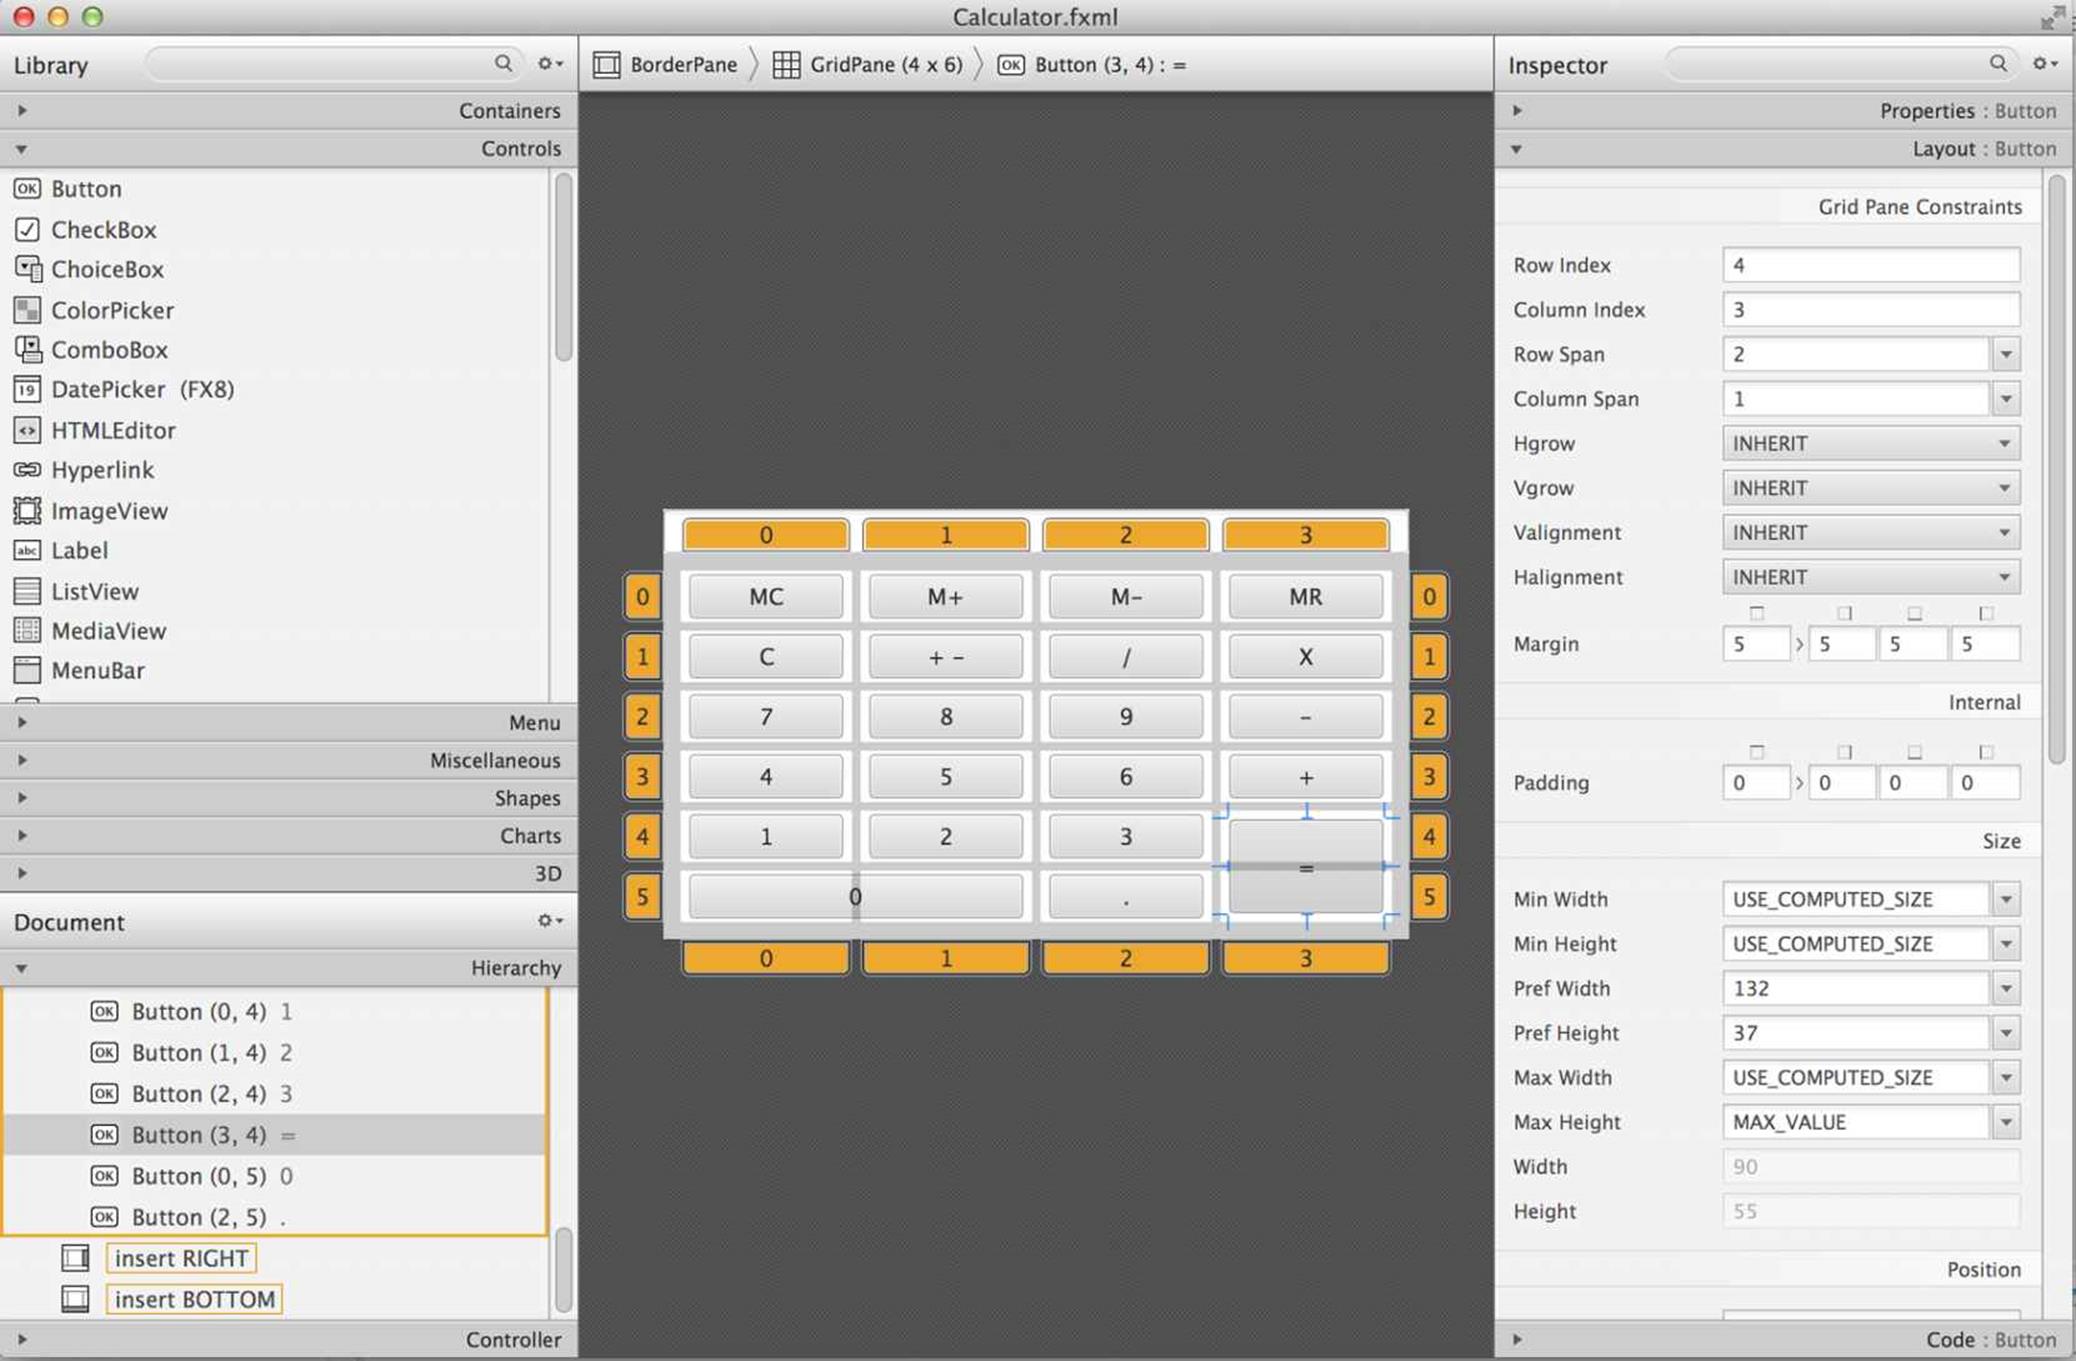
Figure 19-10: All buttons in the grid
Run the Main class and you see the calculator that looks like Figure 19-1.
This concludes a very brief introduction to Scene Builder. If you invest more time into mastering this tool, your productivity in developing GUI applications will increase. Refer to Scene Builder User Guide for more details.
Handling Events in the Controller Class
As per MVC design pattern, you’ve created the view Calculator.fxml. Now you can write a controller and hook it up to the view. When the file Calculator.fxml was initially generated, it included the name of the controller that will be handling events of all components located in the root container:
<BorderPane xmlns="http://javafx.com/javafx/8"
xmlns:fx="http://javafx.com/fxml/1"
fx:controller="mycalculator.CalculatorController">
You add the event handler method to the class CalculatorController and link the GUI components to the corresponding event handlers. Initially the generated class CalculatorController is empty. Add a simple event handler method buttonClickHandler():
package mycalculator;
import javafx.event.ActionEvent;
public class CalculatorController {
public void buttonClickHandler(ActionEvent evt){
System.out.println("Hello from controller!");
}
}
If you remember, the class GridPaneSampleEvents from Lesson 18 invoked the method setOnAction() on the Button objects to assign the event handlers to button clicks. But if you develop the GUI in FXML, there are no Java objects there. Instead, you use the <Button> property onAction to assign the controller’s buttonClickHandler() as the event handler for the calculator’s buttons. The following snippet is for the button with the label 1.
<Button prefHeight="37.0" prefWidth="132.0"
text="1" onAction="#buttonClickHandler" GridPane.rowIndex="4">
<GridPane.margin>
<Insets bottom="5.0" left="5.0" right="5.0" top="5.0" />
</GridPane.margin>
</Button>
The root container knows its controller, and the children of the container know the name of controller’s method that handles events. In the calculator’s example I have just one event handler for all buttons, and I copy and paste onAction="#buttonClickHandler" to each of button. Alternatively, I could assign one event handler for the digit buttons and another for the buttons that perform operations.
Now running the Main class and clicking on any button prints the message “Hello from controller” on the console, which is not exactly what the calculator should do. But at least this proves that controller receives events from the view. The next step is to enable the controller to send data back to the view.
Basically, there are two use cases for clicking the calculator’s buttons:
1. The user clicked the digit button, and the event handler should get the current value from the TextField control, concatenate the label of the clicked button, and set the TextField to the new value.
2. The user clicked the operation button, and the event handler has to recognize the selected operation and apply the appropriate business logic.
You fully implement all calculator’s logic as an assignment in the Try It section of this lesson, but I explain you how to recognize which button has been clicked and how to send the data from controller to view.
Recognizing the Source of the Event
Each JavaFX event is inherited from javafx.event.Event, which has such fields as source and target. The source stores a reference to the object where the event initially occurred. The target defines the object where the event is handled. If the user clicks the component and the program is inside the event handler for this component, both source and target point at the same object.
But each event travels through the container(s), where the component is located. This is a capturing phase. Then the event reaches the target, the event handler processes it, and then event bubbles up back to the root container. But the container(s) may also have event handlers, so while the event travels to the target, it may be processed by the container’s handler, in which case the target doesn’t have the same value as the source.
For example, JavaFX has KeyEvent, which the run time provides to the keyboard event handlers. If your calculator has a keyboard event handler on the BorderPane and on the nested TextField, and the user clicked the key while the focus was in the TextField, the container’s event handler receives the KeyEvent object where the target points at the TextField, while the source points at the BorderPane. By the time the event object reaches the event handler of the TextField, the KeyEvent has both source and target pointing at the TextField.
In your calculator you don’t process container’s events, hence both the source and the target point at the clicked button. So checking the value of the ActionEvent.source gives you the reference to the specific button, and by calling the getText() method on the button you can find out its label and act accordingly. The following version of the calculator recognizes and prints the label of the clicked button on the console.
package mycalculator;
import javafx.event.ActionEvent;
import javafx.scene.control.Button;
public class CalculatorController {
public void buttonClickHandler(ActionEvent evt){
Button clickedButton = (Button) evt.getTarget();
System.out.println("You clicked on " + clickedButton.getText());
}
}
Now let’s separate the processing of the operation and digit buttons using the switch statement. All digits and the period button should simply change the content of the calculator’s TextField. The private method processDigit() should do it. All operation buttons should apply the application logic based on the selected operation. The private method processOperation() should take care of that.
public class CalculatorController {
public void buttonClickHandler(ActionEvent evt){
Button clickedButton = (Button) evt.getTarget();
String buttonLabel = clickedButton.getText();
// Tell apart digits from operations
switch(buttonLabel){
case "0": case "1": case "2": case "3": case "4": case "5":
case "6": case "7": case "8": case "9": case "10": case ".":
processDigit(buttonLabel);
break;
default:
processOperation(buttonLabel);
}
}
private void processDigit(String buttonLabel){
System.out.println("You clicked on " + buttonLabel);
}
private void processOperation(String buttonLabel){
System.out.println("You selected operation " + buttonLabel);
}
}
Run the Main class now, and you see that system console properly recognizes the clicked button and invokes either the method processDigit() or processOperation().
Passing Data from View to Controller and Back
How can the controller class access GUI components that were declared in FXML? If you create both GUI and controller as Java classes, you write the code passing a GUI object to the controller as you did with Calculator and CalclulatorEngine in Lesson 9 in the section "How to Pass Data Between Objects." But when the GUI is declared in FXML, you don’t instantiate the GUI—FXMLLoader does.
For such cases, JavaFX offers a simple solution: assign an ID to a component in the FXML file and the variable with the same name annotated with @FXML in the controller class. This ensures that the Java variable is linked with the GUI component. You read about Java annotations inLesson 23. For now, just trust me that the @FXML annotation magically injects the GUI component’s reference into the controller’s variable. As a matter of fact, why just trust me if you can easily see it in action?
First, add the fx:id attribute to the <TextField> tag of your calculator in Calculator.fxml. I decided to name this ID displayField.
<top>
<TextField fx:id="displayField" BorderPane.alignment="CENTER" />
</top>
Accordingly, declare a variable displayField in the CalculatorController class as follows:
@FXML
private TextField displayField;
Now you can use the variable displayField knowing that it always has the same value as the GUI component having the same ID. The next version of CalculatorController uses this variable in the method processDigit(). First it gets the current value of the displayField via getText(), then attaches the selected digit to it, and puts it back into the variable displayField using the setText() method.
package mycalculator;
import javafx.event.ActionEvent;
import javafx.fxml.FXML;
import javafx.scene.control.Button;
import javafx.scene.control.TextField;
public class CalculatorController {
@FXML
private TextField displayField;
public void buttonClickHandler(ActionEvent evt){
Button clickedButton = (Button) evt.getTarget();
String buttonLabel = clickedButton.getText();
// Tell apart digits from operations
switch(buttonLabel){
case "0": case "1": case "2": case "3": case "4": case "5":
case "6": case "7": case "8": case "9": case "10": case ".":
processDigit(buttonLabel);
break;
default:
processOperation(buttonLabel);
}
}
private void processDigit(String buttonLabel){
displayField.setText(displayField.getText() + buttonLabel);
}
private void processOperation(String buttonLabel){
System.out.println("You selected operation " + buttonLabel);
}
}
In Lesson 3 I mention that if you forget to write the break statement in a case clause, the code falls through. In the method processDigit() I do this on purpose to avoid writing processDigit() and break for each clause. Figure 19-11 shows a screenshot of the running calculator after I clicked the buttons 1,5,9,.,2, and 3.
The processDigit() method illustrated the process of passing data from GUI to controller and back. In the Try It section you need to implement the processOperation() method to complete the calculator.
The @FXML Annotation
You can annotate fields and methods that return void with the @FXML annotation. If you add to the controller class the method initialize() annotated with @FXML, FXMLLoader . Java runtime invokes this method after all GUI components are constructed. In particular, this can be useful if you want to use binding and want to make sure that all GUI components are already constructed.
@FXML public void initialize() {
myComponent1.textProperty().bind(myComponent2);
}
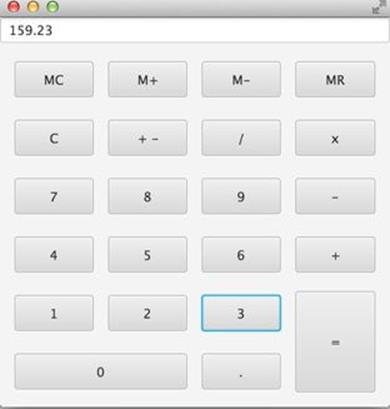
Figure 19-11: The Calculator view after entering the number 159.23
Programming Tic-Tac-Toe
Now that you are familiar with the basics of creating a GUI with FXML and Scene Builder, this section shows you how easy it is to program a tic-tac-toe game.
The Game Strategy
Every game implements some algorithm—a set of rules or a strategy that has to be applied depending on the player’s actions. You need to come up with a simple algorithm for the tic-tac-toe game.
If you aren’t familiar with tic-tac-toe, or if it has a different name in your part of the world, read the Wikipedia article about this game. For the version of the popular game that you’re building, implement the following strategy:
· The game is played by two players on a two-dimensional 3x3 board.
· Two players can play this game. One plays with the symbol X, and the other uses the symbol O.
· The winner must have a full row, column, or diagonal of Xs or Os.
· After each move, the program has to check whether there is a winner.
· The winning combination has to be highlighted.
· After the winner is found or there is no empty square left the players may select Actions → Play to play again.
· In a new game the first player plays with Xs.
Designing Tic-Tac-Toe GUI with FXML and CSS
Create new JavaFX project titled TicTacToe. Select the language FXML, specify the package name tictactoe, the class name TicTacToe and the controller’s name as TicTacToeController. In the generated Main class make two changes: set the scene size to 300 by 320 pixels and disable stage resizing.
public class Main extends Application {
@Override
public void start(Stage primaryStage) {
try {
BorderPane root = (BorderPane)FXMLLoader.load(getClass()
.getResource("TicTacToe.fxml"));
Scene scene = new Scene(root,300,320);
scene.getStylesheets().add(getClass()
.getResource("application.css").toExternalForm());
primaryStage.setScene(scene);
primaryStage.setResizable(false);
primaryStage.show();
} catch(Exception e) {
e.printStackTrace();
}
}
public static void main(String[] args) {
launch(args);
}
}
Your tic-tac-toe game is going to have a menu bar in the Top area of the BorderPane, and in the Center you add a GridPane having three rows and three columns.
JavaFX menus are created as a hierarchy. A Menu component can contain one or more MenuItem’s and other Menu components. You can also create a MenuBar or a ContextMenu that includes one or more Menu components. I’m just explaining how to create a menu for the tic-tac-toe application, but you can read more about JavaFX menus by visiting the Oracle tutorial on this subject.
In Scene Builder, drop the MenuBar component from the Controls panel onto the line that reads “Insert TOP” in the BorderPane at the bottom left panel.
Expand the MenuBar in the Hierarchy panel. It has the default menus named File, Edit, and Help. There is nothing to edit in tic-tac-toe, so right-click Edit and select Delete. Rename the File menu as Actions using the Properties panel of Scene Builder. The Menu File was created with theMenuItem Close, which you should rename as Quit.
Drop a MenuItem onto the menu Actions. Scene Builder automatically creates the menu item Unspecified Action. Rename it as Play.
The Menu Help was originally created with the MenuItem About. Drop another MenuItem component onto the menu Help. Scene Builder by default creates the menu item Unspecified Action. Rename it as How to Play.
Now drop a GridPane from the Containers panel onto the center of the BorderPane and add a column to change the grid dimensions to be 3x3.
Change the preferred height of each row to 100 by selecting each row and entering 100 in the Pref Height field on the right panel named Layout: RowConstraints. Your Scene Builder’s window should look like Figure 19-12.
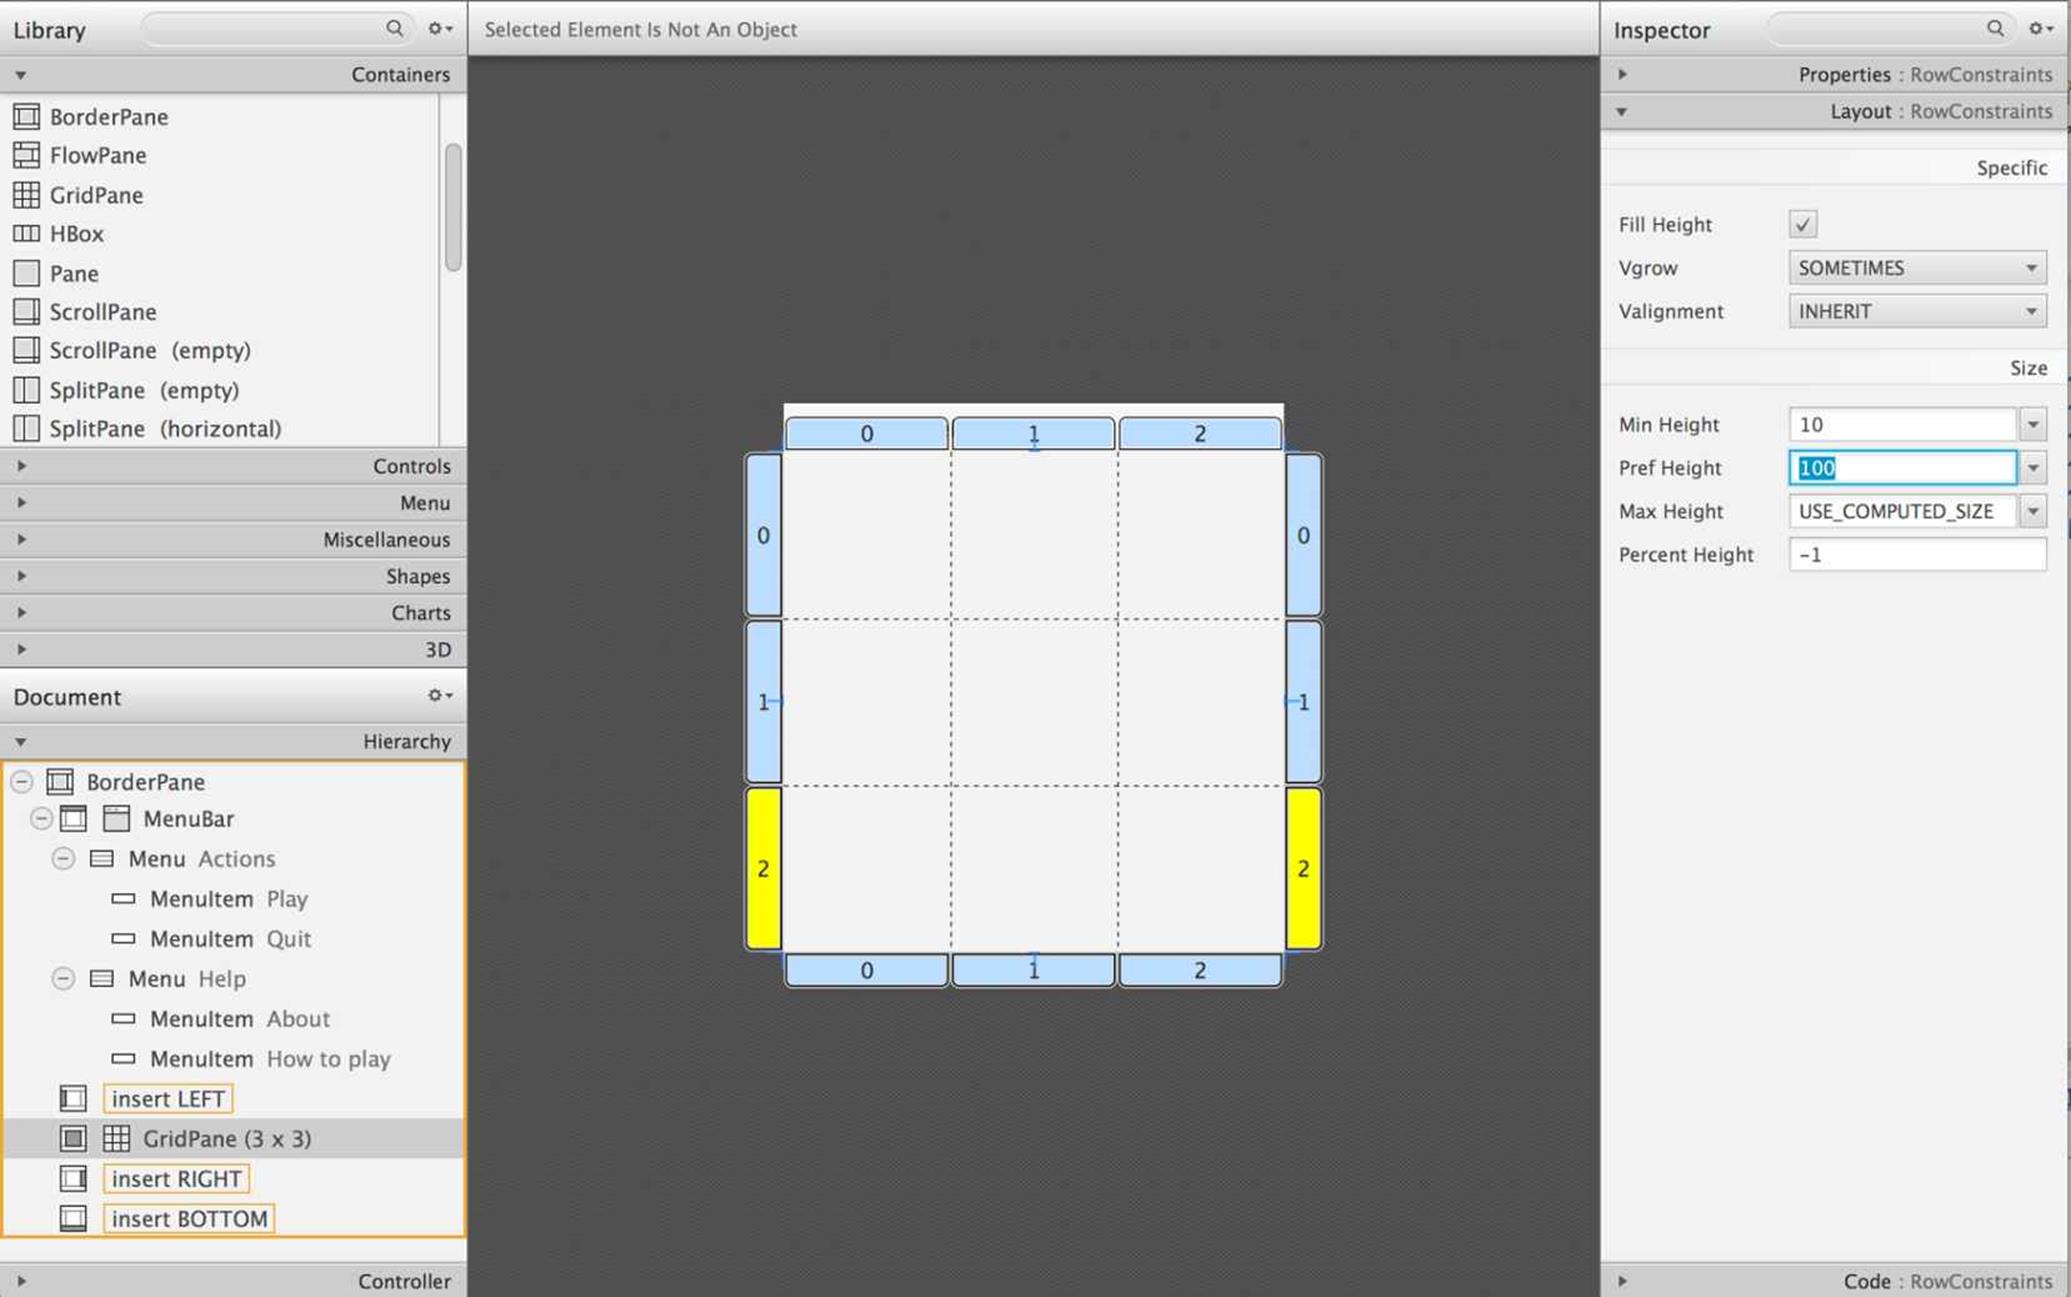
Figure 19-12: The BorderPane layout with the menu bar and the 3x3 grid
If you run the Main class, it opens the window with the menu bar on top as shown in Figure 19-13.

Figure 19-13: TicTacToe with the menu bar and the empty grid
Now you need to add nine buttons to the grid as youdid for the calculator earlier in this lesson. Each button should occupy the entire cell. Buttons should have no labels; you set them programmatically to X or O during the game play.
Open the generated file TicTacToe.fxml in Eclipse and simplify it. Remove rows and columns constraints and add nine buttons with preferred width and height of 100 to the GridPane so it looks like the following snippet:
<?xml version="1.0" encoding="UTF-8"?>
<?import java.lang.*?>
<?import javafx.scene.control.*?>
<?import javafx.scene.layout.*?>
<?import javafx.scene.layout.BorderPane?>
<BorderPane xmlns="http://javafx.com/javafx/8"
xmlns:fx="http://javafx.com/fxml/1"
fx:controller="tictactoe.TicTacToeController">
<top>
<MenuBar BorderPane.alignment="CENTER">
<menus>
<Menu text="Actions">
<items>
<MenuItem text="Play" />
<MenuItem text="Quit" />
</items>
</Menu>
<Menu text="Help">
<items>
<MenuItem text="About" />
<MenuItem text="How to play" />
</items>
</Menu>
</menus>
</MenuBar>
</top>
<center>
<GridPane fx:id ="gameBoard" BorderPane.alignment="CENTER">
<children>
<Button fx:id="b1" prefHeight="100.0" prefWidth="100.0" />
<Button fx:id="b2" prefHeight="100.0" prefWidth="100.0"
GridPane.columnIndex="1" />
<Button fx:id="b3" prefHeight="100.0" prefWidth="100.0"
GridPane.columnIndex="2" />
<Button fx:id="b4" prefHeight="100.0" prefWidth="100.0"
GridPane.rowIndex="1" />
<Button fx:id="b5" prefHeight="100.0" prefWidth="100.0"
GridPane.columnIndex="1" GridPane.rowIndex="1" />
<Button fx:id="b6" prefHeight="100.0" prefWidth="100.0"
GridPane.columnIndex="2" GridPane.rowIndex="1" />
<Button fx:id="b7" prefHeight="100.0" prefWidth="100.0"
GridPane.rowIndex="2" />
<Button fx:id="b8" prefHeight="100.0" prefWidth="100.0"
GridPane.columnIndex="1" GridPane.rowIndex="2" />
<Button fx:id="b9" prefHeight="100.0" prefWidth="100.0"
GridPane.columnIndex="2" GridPane.rowIndex="2" />
</children>
</GridPane>
</center>
</BorderPane>
Run the Main class, and you see the tic-tac-toe board with the menu on top as shown in Figure 19-14. Note that the first button has a focus rendered as a blue border.
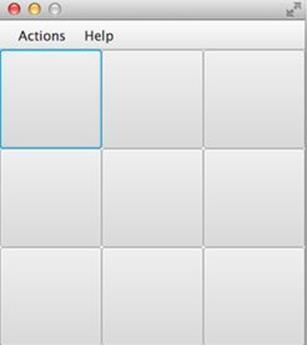
Figure 19-14: TicTacToe with the focus border on the first button
To remove the focus border you need to change the attributes of the buttons in the generated empty application.css file. Theoretically, the style attribute -fx-focus-color: transparent; should do the trick, but in programming not everything works by the book. Here’s the style that removes the focus border:
.button{
-fx-focus-color: transparent;
-fx-background-insets: -1, 0, 1, 1;
}
The class Main loads the file application.css and applies its styles to the matching components on stage. (See Figure 19-15.)

Figure 19-15: TicTacToe without the focus border on the first button
The GUI is ready. Now program the application logic in the controller class. There are two players in this game. The first one places Xs on the blank buttons and the other one uses Os. Hence, you need to keep track of the player’s number. When the player clicks the button, the event handler should place the appropriate label on the button. The code of the TicTacToeController takes care of this functionality:
public class TicTacToeController {
private boolean isFirstPlayer = true;
public void buttonClickHandler(ActionEvent evt){
Button clickedButton = (Button) evt.getTarget();
String buttonLabel = clickedButton.getText();
if ("".equals(buttonLabel) && isFirstPlayer){
clickedButton.setText("X");
isFirstPlayer = false;
} else if("".equals(buttonLabel) && !isFirstPlayer){
clickedButton.setText("O");
isFirstPlayer = true;
}
}
}
Add onAction="#buttonClickHandler" to each Button tag in the TicTacToe.fxml and run the Main program. Start clicking empty squares, and the program takes turns in placing the Xs and Os on them as shown in Figure 19-16.
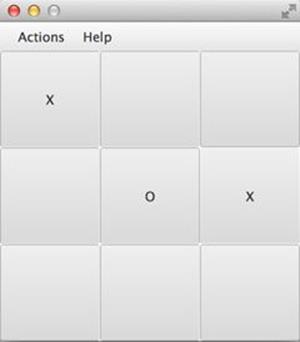
Figure 19-16: The game after the three clicks on the buttons
Increase the size of the letters X and O by adding font style attributes to the application.css file to make it looks like this:
.button{
-fx-focus-color: transparent;
-fx-background-insets: -1, 0, 1, 1;
-fx-font-weight: bold;
-fx-font-size: 36;
-fx-text-fill: blue;
}
Now the tic-tac-toe window shows large and bold Xs and Os in blue, as shown in Figure 19-17.
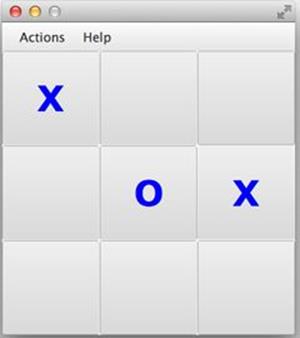
Figure 19-17: TicTacToe with the styled button labels
Styling with Scene Builder
All JavaFX components are pre-styled, and the combination of the styles is called a theme.
The default theme of all JavaFX components is called caspian. By defining your own CSS rules you can override the defaults. Scene Builder includes the View → Show CSS Analyzer menu to enable you to see the default styles of your GUI components. If you’re interested in learning more about styling with Scene Builder, watch the video titled "In-Depth Layout and Styling with the JavaFX Scene Builder“.
Both the FXML and CSS files of the tic-tac-toe game are ready and the class TicTacToeController knows how to properly set the buttons’ labels for the first and second players.
Now’s the time to write some Java code in the controller to implement the game rules.
Implementing Game Strategy in Tic-Tac-Toe Controller
It’s time to implement the game rules in the TicTacToeController class. On each button click you need to check whether there is a winner. If there is, the program should highlight the winning combination.
You’re going to write a method find3InARow(), which checks each row, column, and diagonal on the board to see if they have the same labels. The method find3InARow() is invoked from the method buttonClickHandler(). If the winning combination is found, the program invokes the method highlightWinningCombo() to show the winning combination in a different style.
To compare the labels of the buttons you need to have references to their Button objects, which you get using the injection mechanism offered by the @FXML annotation. You also need to have a reference to the GridPane, which is a container for all buttons. You see its use in the section "Handling the Tic-Tac-Toe Menu Play.”
@FXML Button b1;
@FXML Button b2;
@FXML Button b3;
@FXML Button b4;
@FXML Button b5;
@FXML Button b6;
@FXML Button b7;
@FXML Button b8;
@FXML Button b9;
@FXML GridPane gameBoard;
The code of the method find3InARow() is shown next and is self-explanatory:
private boolean find3InARow(){
//Row 1
if (""!=b1.getText() && b1.getText() == b2.getText()
&& b2.getText() == b3.getText()){
highlightWinningCombo(b1,b2,b3);
return true;
}
//Row 2
if (""!=b4.getText() && b4.getText() == b5.getText()
&& b5.getText() == b6.getText()){
highlightWinningCombo(b4,b5,b6);
return true;
}
//Row 3
if (""!=b7.getText() && b7.getText() == b8.getText()
&& b8.getText() == b9.getText()){
highlightWinningCombo(b7,b8,b9);
return true;
}
//Column 1
if (""!=b1.getText() && b1.getText() == b4.getText()
&& b4.getText() == b7.getText()){
highlightWinningCombo(b1,b4,b7);
return true;
}
//Column 2
if (""!=b2.getText() && b2.getText() == b5.getText()
&& b5.getText() == b8.getText()){
highlightWinningCombo(b2,b5,b8);
return true;
}
//Column 3
if (""!=b3.getText() && b3.getText() == b6.getText()
&& b6.getText() == b9.getText()){
highlightWinningCombo(b3,b6,b9);
return true;
}
//Diagonal 1
if (""!=b1.getText() && b1.getText() == b5.getText()
&& b5.getText() == b9.getText()){
highlightWinningCombo(b1,b5,b9);
return true;
}
//Diagonal 2
if (""!=b3.getText() && b3.getText() == b5.getText()
&& b5.getText() == b7.getText()){
highlightWinningCombo(b3,b5,b7);
return true;
}
return false;
}
To highlight the winning combination you need to dynamically change the styles of the winning buttons by invoking the method setStyle() on them. I want to change the background to a gradient color and the color of the button labels to red. You can read about gradients in the JavaFX CSS Reference and find the popular CSS color names there, too. The first version of the method highlightWinningCombo() may look as follows:
private void highlightWinningCombo(Button first, Button second,
Button third){
first.setStyle("-fx-background-color:
radial-gradient(radius 100%, white, lightyellow, lawngreen);
-fx-text-fill: red;");
second.setStyle("-fx-background-color:
radial-gradient( radius 100%, white, lightyellow, lawngreen);
-fx-text-fill: red;");
third.setStyle("-fx-background-color:
radial-gradient( radius 100%, white, lightyellow, lawngreen);
-fx-text-fill: red;");
}
Figure 19-18 shows how the winning combination may look.
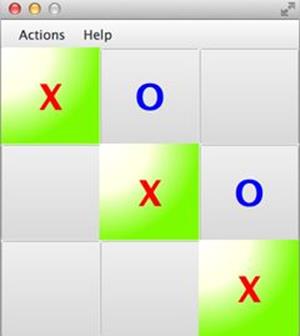
Figure 19-18: Highlighting the winning combination with gradient colors
Changing the styles of the buttons works, but I don’t like the fact that the CSS styles are hardcoded in the Java code. The better way is to define a class selector in the CSS file and apply it when needed. Add the following CSS class selector to the file application.css:
.winning-button {
-fx-background-color:
radial-gradient( radius 100%, white, lightyellow, lawngreen);
-fx-text-fill: red;
}
Now the method highlightWinningCombo() can apply this style to the button by adding the style winning-button as needed. The better version of highlightWinningCombo() looks like this:
private void highlightWinningCombo(Button first, Button second,
Button third){
first.getStyleClass().add("winning-button");
second.getStyleClass().add("winning-button");
third.getStyleClass().add("winning-button");
}
Now if you (or the graphic designer) decide to change the style of the winning button, there is no need to modify Java code and recompile the program. Modifying the content of the file application.css in any plain text editor is all that’s needed.
Handling the Tic-Tac-Toe Menu Play
The good news is that clicks on menu items are processed the same way as clicks on buttons. You just implement the menu Play so the users can start a new game when either a winning combination is found or there is no winner at all.
In the file TicTacToe.fxml, assign an event handler for the menu Play, like so:
<MenuItem text="Play" onAction="#menuClickHandler"/>
When the user clicks the Play menu item, the controller needs to reset the labels of all the buttons and remove styling from the winning buttons. The most concise way to do it is to get a hold of all children of GridPane and call forEach() passing a short lambda expression to it. This is what the method menuClickHandler() looks like:
public void menuClickHandler(ActionEvent evt){
MenuItem clickedMenu = (MenuItem) evt.getTarget();
String menuLabel = clickedMenu.getText();
if ("Play".equals(menuLabel)){
ObservableList<Node> buttons =
gameBoard.getChildren();
buttons.forEach(btn -> {
((Button) btn).setText("");
btn.getStyleClass().remove("winning-button");
});
isFirstPlayer = true; // new game starts with X
}
}
The package javafx.collections contains classes and interfaces or JavaFX Collection API, which is an extension of Java Collections Framework, and you can find the description of all of them in Oracle documentation. Your method menuClickHandler() uses one of these interfaces:ObservableList . This collection was created to listen to the events that may happen to its elements, but I use it to store references to children of the GridPane.
The method getChildren() returns a collection of Node instances (each Button is a descendant of Node). Then you"erase" the label of each button and remove that fancy style of winning buttons. Finally youreset the value of isFirstPlayer so the first move places X on the clicked button. That’s all there is to it. Play the game!
Tic-Tac-Toe: What to Try Next
Your tic-tac-toe game is ready. Of course, there are things that can be improved to make this game more of a commercial grade. For example, you can remove all event handlers by calling removeEventHandler() on all buttons when the winner is found. You may consider offering the user to set the dimensions of the playing board rather than using a 3x3 board. In this case, I recommend you create the GUI in Java and dynamically create arrays of buttons based on the user’s selection. You may add the Save History feature, too.
You can add an option to play against the computer instead of having a second player. In that case, you may need to get familiar with the Minimax, a decision rule algorithm from Game Theory. This YouTube video will help you to see how it can be applied to the tic-tac-toe game.
JavaFX on the Web and Mobile Devices
JavaFX applications can run inside web browsers provided the user’s computer has JavaFX run time installed. There is a Deployment Kit to auto-detect whether the user has such a run time and install it if necessary. Unfortunately the detection and installation process is not a simple one, so using JavaFX application inside web browsers is not a good idea for consumer-oriented applications. It’s possible in controlled environments, such as inside an organization where the required Java run time can be installed on the user’s desktops.
If you’re wondering whether it’s possible to use JavaFX for writing applications for smartphones, Oracle doesn’t offer the JavaFX libraries for mobile platforms, but it’s possible.
To develop JavaFX applications for iOS, you need to install and learn some additional software, namely RoboVM, which is a software development kit (SDK) for converting Java bytecode into the native device code as if it was written in the C programming language.
There is also a community site called JavaFXPorts, where people offer solutions for deployment of JavaFX applications on iOS and Android devices.
Try It
The goal of the next assignment is to implement the application logic for the operation buttons in the Calculator project created earlier in this lesson. By the time the user clicks one of the operation buttons, the displayField variable in CalculatorController already has some value. I’ve written the step-by-step instructions for implementing only the plus operation, and you need to implement other operations similarly.
Lesson Requirements
You should have Eclipse with the E(fx)clipse plug-in installed.
NOTE You can download the code and resources for this Try It from the book’s web page at www.wrox.com/go/javaprog24hr2e. You can find them in the Lesson19.zip.
Step-by-Step
As you see, I use the wrapper class Double to convert String into a numeric value before using it in the addition.
1. Import the Eclipse project Lesson19.
2. Run the Main class from the mycalculator package to see that clicks on digit buttons are properly shown in the display field.
3. To perform an operation on two numbers you need to know their values and the selected operation. The calculator’s display field shows only one number at a time, so you need to store the first entered value in a program variable. You may also store the result of the performed operation ina separate variable. Keep in mind that the value in the display field is represented by a string of characters. Declare the following fields in the CalculatorContoller class:
4. private String previousValue="";
5. private String currentValue="";
private double result;
6. Write a method to add two numbers. Initially, if the user enters the first number and clicks on the plus button, you just need to store the entered value in previousValue and clean the display field so the user can enter the second one. If the user clicks the plus button and the previousValue is not empty, sum the current and previous values and display the result. The first version of the method may look as follows:
7. private void addNumbers(){
8. if ("".equals(previousValue)){
9. previousValue = displayField.getText();
10. displayField.setText("");
11. } else{
12. currentValue = displayField.getText();
13. result = Double.parseDouble(previousValue) +
14. Double.parseDouble(currentValue);
15. displayField.setText("" + result);
16. }
}
17. The controller should call the method addNumbers() if the user clicked one of the buttons: plus or equal. You may also need to remember the last operation being performed. Hence, add the following variable declaration:
18. private String lastOperation;
Modify the method processOperation() in CalculatorController to look like this:
private void processOperation(String buttonLabel){
switch (buttonLabel) {
case "+":
lastOperation = "+";
addNumbers();
break;
case "=":
processOperation(lastOperation); // recursion
}
}
The term recursion describes a situation when a function or a method calls itself. Recursion helps avoiding code duplication. Because you want to repeat the same actions if the user clicks the plus or equal button, using recursion makes sense.
19.Run the Main class, and you should be able to enter and add two numbers. But to support a scenario when the user wants to perform several consecutive additions, you need to add a little more code to catch the moment if the user continues clicking a digit right after the operation has been performed. In this case you need to store the result value in the variable previousValue, and clean the display field so the user can enter the next number to add.
20.Implement other operations similarly to addition. Add input validation: Don’t allow the user to enter more than one period in the number. Don’t allow division by zero.
21.Compare the FXML implementation of the calculator’s GUI with the Java version from Try It section from Lesson 18 .
TIP Please select the videos for Lesson 19 online at www.wrox.com/go/javaprog24hr2e. You will also be able to download the code and resources for this lesson from the website.
All materials on the site are licensed Creative Commons Attribution-Sharealike 3.0 Unported CC BY-SA 3.0 & GNU Free Documentation License (GFDL)
If you are the copyright holder of any material contained on our site and intend to remove it, please contact our site administrator for approval.
© 2016-2026 All site design rights belong to S.Y.A.