Wrox Press Java Programming 24-Hour Trainer 2nd (2015)
Lesson 26. Programming with Servlets
Web applications can serve static or dynamic content. Some examples of static content are text files with HTML markup, images, and video. Dynamic content is formed on the fly. Think of a web application that enables you to browse the inventory of an online store. The content you see on your screen is being created based on your queries—in other words, dynamically.
In the Java EE world, web content can be served by a program running in a container with deployed servlets, Java Server Pages (JSP), JavaServer Faces (JSF), or a third-party framework. You can also create a web application by implementing a SOAP or RESTful Web Service. You can also create a web application based on a Plain Old Java Object (POJO) utilizing WebSocket protocol. Servlets, JSP, and JSF not only return the data, but also present it as formatted HTML pages, hence the term presentation layer (refer to Figure 25-1). Web Services or WebSocket-based applications, on the other hand, return just the data (see Chapter 33).
A servlet is a Java class written by certain rules and deployed in a Java EE–compliant servlet container of your choice. The client program can be a lightweight HTML/JavaScript, a heavyweight applet, or a Swing or JavaFX program. This lesson uses the most popular means of web communication: Web browsers talk to servlets using HTTP, which stands for Hypertext Transfer Protocol.
All examples in this lesson work in any servlet container supporting the Servlet 3.1 specification. The lesson uses a full application server GlassFish, which may be an overkill if your application only needs the servlet support. If you want to experiment with a lightweight servlet container, consider using Apache Tomcat or Jetty. But every Java EE application server comes with a servlet container, and because you are going to study several Java EE technologies, installing a full featured Java EE application server covers you for all upcoming lessons.
The Big Picture
Figure 26-1 depicts a web browser making HTTP requests to the servlet named MyServlet and receiving HTTP responses that MyServlet sends back.
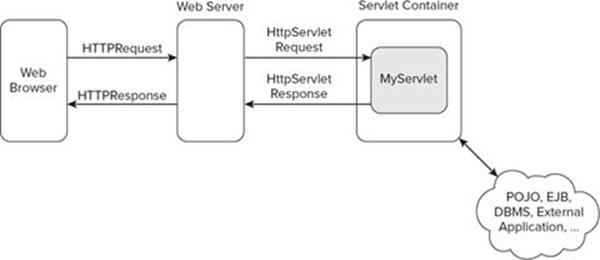
Figure 26-1: A sample client-servlet data flow
Before you even learn how to create and deploy servlets, take a look at the components and the workflow of an imaginary online store, www.MyBooks.com, which is developed and deployed with Java servlets.
· The client’s machine just needs a web browser. The bookstore consists of a number of HTML web pages for interacting with users. The web browser sends the user requests to the server with the name MyBooks.com in the form of an HttpRequest object.
· The computer that hosts MyBooks.com has to run some web server software, usually on port 80. For secure communication with HTTPS (HyperText Transfer Protocol Secure) the default port is 443. These two ports are usually open on any web server, otherwise external clients wouldn’t even be able to make any requests to the resources deployed under such a server.
· The web server “listens to” the users’ requests. If a web server receives a simple request for static HTML content (such as a file or an image), the web server processes the request without needing to engage any additional software, and it sends back HttpResponse with the requested static content inside.
· The website MyBooks.com also runs a servlet container with deployed servlet(s). If the web server receives a user request to find books based on some search criteria, it creates and passes HttpServletRequest to the appropriate servlet (for example, FindBooksServlet), which should be deployed and running in the servlet container. The next section shows sample HTML containing a form that explicitly lists FindBooksServlet by name.
· The servlet invokes the Java code that performs the search and creates (on the fly) the HTML page listing the found books that meet the requested search criteria, and sends it to the web server wrapped in HttpServletResponse.
· The web server extracts the content from HttpServletResponse, wraps it inside the HttpResponse object, and sends it back to the user’s web browser.
· The user’s browser displays the received page without knowing if it was a static HTML page or a freshly baked one.
The user’s web browsers don’t need to know which server-side technology has been used to prepare dynamic content. It could be Java, .NET, Python, PHP, and so on. The browser just knows that to send data to the server using HTTP protocol, the data has to be placed inside HttpRequest. Web browsers also know how to display content arriving from the server in a form of HttpResponse. All other magic that’s happening on the server is of no interest to the web browsers.
The Thin Client
Let’s start with creating a simple HTTP page that can serve as a client for a Java servlet. Listing 26-1 shows a simple HTML file with a form containing a text input field and a Submit button, which users can use to find a book by its title.
Listing 26-1: HTML that gives the 404 error
<html>
<head>
<title>Find a book</title>
</head>
<body>
Enter a word from the book title:
<form action=http://www.MyBooks.com/servlet/FindBooksServlet
method=Get>
<input type=Text name=booktitle>
<input type=Submit value="Search">
</form>
</body>
</html>
In any plain text editor, create a file called BookSearch.html containing the HTML from Listing 26-1. Open this file in a web browser (File → Open), enter any text in the input field, and press Search. You get an error message because there is neither a server behind the URLwww.MyBooks.com nor a servlet called FindBooksServlet at this address. This was just an illustration of what the thinnest client could look like.
Clients communicate with servlets using HTTP protocol, and when no requested network resource is found, the HttpResponse object comes back with an error. If the server responds, but the requested resource (the FindBooksServlet ) is not there, the error code 404 is returned. If the server doesn’t respond, the web client shows an appropriate error code. If the client successfully receives the requested resource from the specified URL, the HTTP status code is anywhere in the range from 200 to 300. The HTTP may also return 304, which indicates that the browser found in its cache an unchanged local copy of the requested resource, so there was no need to send a request to the web server. The list of all possible HTTP status codes is available at www.w3.org/Protocols/rfc2616/rfc2616-sec10.html.
How to Write a Servlet
To create a servlet, write a class that extends from HttpServlet and annotate it with the @WebServlet annotation. The class HttpServlet extends GenericServlet, which defines the method service(). The method service() receives the client’s response and directs it to one of the methods of your class that’s a descendant of HttpServlet. Typically you have to override the methods doGet() and/or doPost(). Which one to override? This depends on the client’s request method. If the client uses the HTTP request with the method Post, override doPost(), if the client uses the Get request (see Listing 26-1), override the callback doGet(), as shown in your_first_servlet.
Listing 26-2: Your first servlet
@WebServlet(urlPatterns="/books", name="FindBooksServlet" )
public class FindBooksServlet extends HttpServlet {
@Override
public void doGet(HttpServletRequest request,
HttpServletResponse response) throws ServletException {
// The code processing the request goes here
// The resulting Web page will be sent back via the
// I/O stream that response variable contains
PrintWriter out = response.getWriter();
out.println("Hello from FindBooks");
}
}
All the classes that support servlets are located in the package javax.servlet and are packaged in a JAR file, the location of which should be listed in the CLASSPATH environment variable. The javax.servlet package is not included with Java SE—you need to either have Java EE 7 SDKinstalled or read the documentation of the servlet container of your choice to know where they are located. GlassFish 4 comes with Java EE 7 files, so no separate download is needed.
If you properly deploy FindBooksServlet on Listing 26-1 gets as a response a web page containing the text “Hello from FindBooks.”
How to Deploy a Servlet
The annotation @WebServlet is where you specify servlet deployment parameters. Prior to Java EE 6 you needed to specify deployment parameters in the web.xml file, but now that’s optional. FindBooksServlet uses the deployment parameters urlPatterns and name. The former is used to match one of the servlets deployed on the server to the URL. The value /books means that whenever the client sends a request containing the pattern books in its URL, the request has to be redirected to the FindBooksServlet . For example, the servlet container forwards the requesthttp://localhost:8080/books to the FindBooksServlet.
Each web server and servlet container has a directory known as a document root. It is used not only for servlet-based websites but also for the deployment of static HTML files. For example, if you put the HTML file TermsAndConditions.html in the subfolder legal of the document root of the server MyBooks.com, users would need to direct their web browsers to www.mybooks.com/legal/TermsAndConditions.html.
You can read the documentation for the server of your choice to find out the location of the document root directory. In the GlassFish application server, the default document root is the directory /glassfish/domains/domain1/docroot. In Apache Tomcat it’s the directory webapps. If you are planning to create a servlet, its deployment directory is also located in the document root, but it’s in the subdirectories WEB-INF and META-INF.
WEB-INF has the subdirectories classes and lib and might contain the optional file web.xml. It may be needed to configure filters; otherwise you can specify all deployment parameters using Java annotations. But if you use both annotations and web.xml, the values in this file override the corresponding values in the annotations. This allows changing deployment parameters without requiring recompilation of the servlets. The WEB-INF directory also may have some container-specific files.
The directory META-INF may have files containing metadata about this web application, like manifest.mf or other data specific to a third-party framework or application server content. For example, Apache Tomcat uses a file called context.xml where you may specify the information about JDBC drivers.
This is what the directory structure of the application deployed in the document root directory can look like:
document root dir
WEB-INF
classes
com
practicaljava
lesson26
FindBooksServlet.class
lib
META-INF
manifest.mf
The class com.practicaljava.lesson26.FindBooksServlet was compiled into the directory classes. If you have some third-party JAR files, add them to the lib directory.
When your web application is complete, most likely it’ll consist of multiple files, and typically the entire directory structure is deployed as one compressed file with the extension .war, which stands for web archive. Such files can be created manually, by your Integrated Development Environment (IDE) plug-ins, or by one of the build tools such as Ant, Maven, or Gradle. Later in this lesson you see how to create a war file with Eclipse for Java EE Developers. Lesson 36 is about automating builds with Gradle, and you’ll see how to automate creation of the .war files.
Configuring Glassfish in Eclipse IDE
In the "Try It" section in Lesson 25 you started and stopped GlassFish Server from a command window. However, it’s a lot more convenient to develop and deploy web applications when you don’t need to leave the IDE. Eclipse for Java EE is a good fit for the development of web projects. It supports a variety of Java EE application servers. In this section you configure GlassFish Server so you can do all the work inside Eclipse.
Using Other IDEs
NetBeans IDE and IntelliJ IDEA also offer good support for Java EE developers.
If your GlassFish instance is still running, stop it from the command line. In Eclipse, switch to Java EE perspective by pressing the Java EE button on the top-right corner of the toolbar, as shown in Figure 26-2.
![]()
Figure 26-2: Switching to Java EE perspective in Eclipse
If you don’t see this button, use the Eclipse menu Window → Open Perspective → Other → Java EE. Go to the Servers view and click the link to add a new server, as shown in Figure 26-3.

Figure 26-3: Configuring a new server in Eclipse
You see a new pop-up window with several server adapters, but to add GlassFish to the list click the Download Additional Server Adapters link (see Figure 26-4).
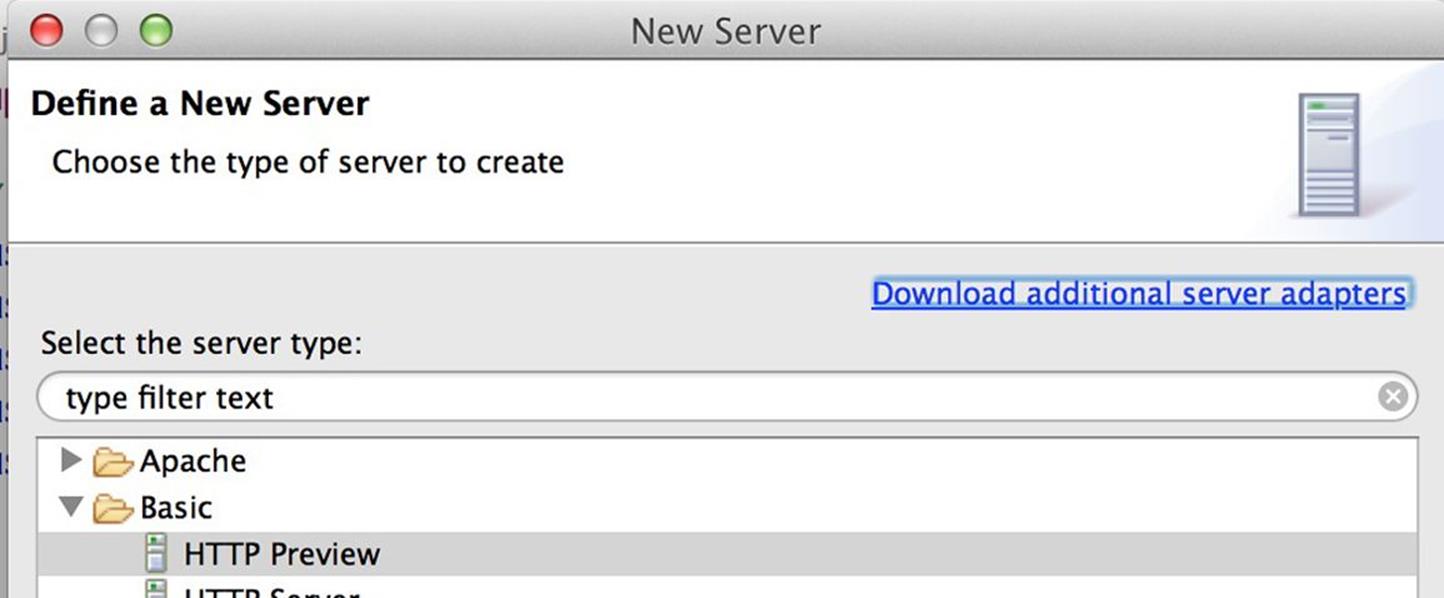
Figure 26-4: Download server adapters
Eclipse searches for available server adapters. If you see GlassFish Tools in the menu, install them. If not, you need to install the tools by selecting Help → Marketplace in Eclipse. In the marketplace window enter GlassFish in the Find field. Select GlassFish Tools for Luna and install them (make sure that during install Oracle Java EE tools are also selected). (See Figure 26-5.)
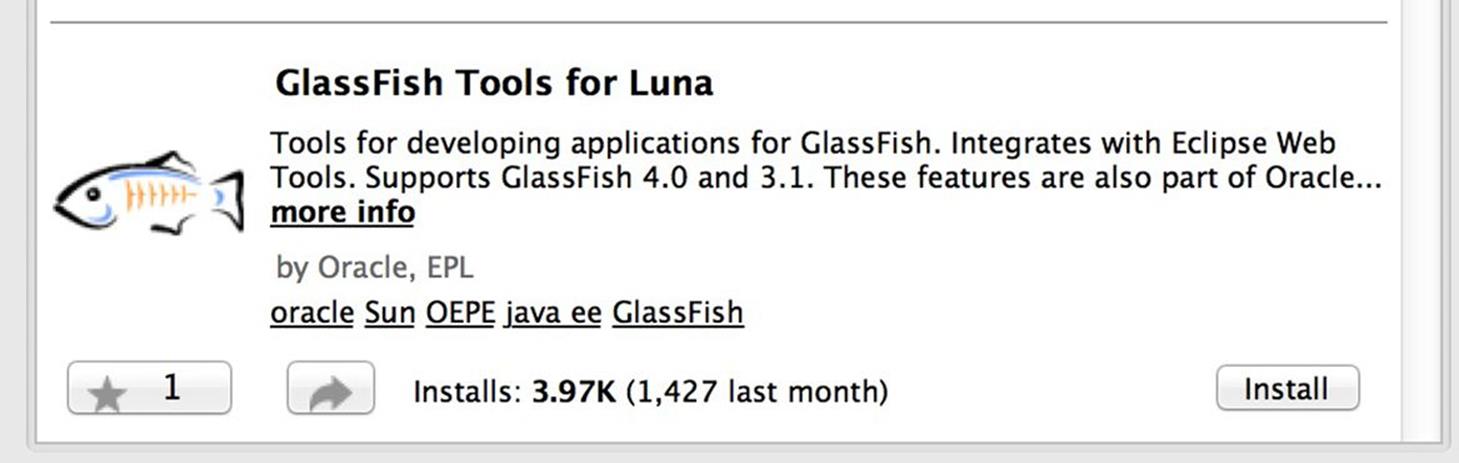
Figure 26-5: Installing GlassFish Tools for Luna from Eclipse Marketplace
Now go back to the Servers view and click the link to create new server. Select GlassFish 4 from the list (see Figure 26-6) and complete the configuration .
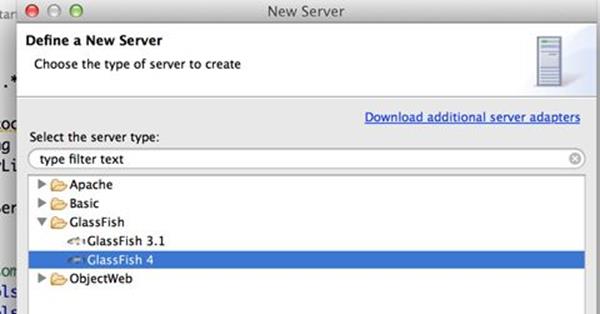
Figure 26-6: Configuring GlassFish in Eclipse
The next pop-up asks you about a default JRE (I use 1.8) and where GlassFish Server should be located. According to my installation I specified /Users/yfain11/glassfish4/glassfish and pressed Next. Accept the default parameters for domain1, don’t enter any passwords for admin in the next window, and press Finish. Eclipse starts GlassFish, and the Eclipse console should look similar to a command window shown in the "Try It" section of Lesson 25.
You may configure several Java EE servers of the same or different vendors in Eclipse IDE. For example, I have Apache Tomcat 8, WildFly 8.1, and GlassFish 4.1 configured in my Eclipse, as shown in Figure 26-7.
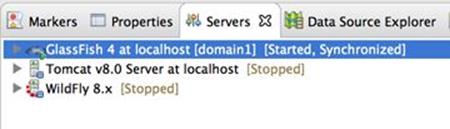
Figure 26-7: Three servers configured in Eclipse
Starting and Stopping Servers in Eclipse
To start or stop the configured server from Eclipse, visit the Servers view, right-click the server name, and select Start or Stop from the pop-up menu. If you want to debug the server-side code, select Debug instead of Start.
How to Create a Servlet in Eclipse
Open File → New → Other → Web and select the Create Dynamic Web Project option. In the pop-up window, name the project Lesson26. Because you are going to deploy the servlet under GlassFish Server, make sure that GlassFish is selected in the Target Runtime combobox. Click Finish, and a new Eclipse project is created. It doesn’t have the same structure as the projects you’ve been creating so far. It has a subfolder called WebContent that contains the WEB-INF and META-INF directories that will be used for deployment in the servlet container of your choice. (See Figure 26-8.)
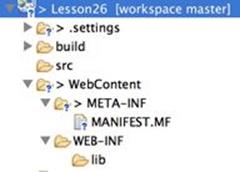
Figure 26-8: Dynamic Web Project Structure
Right-click the project name, select New→Servlet, and then specify com.practicaljava.lesson26 as the name of the package and FindBooksServlet as the class name. Click Next and edit the URL mapping field to be /books (see Figure 26-9; I’ll explain it shortly).
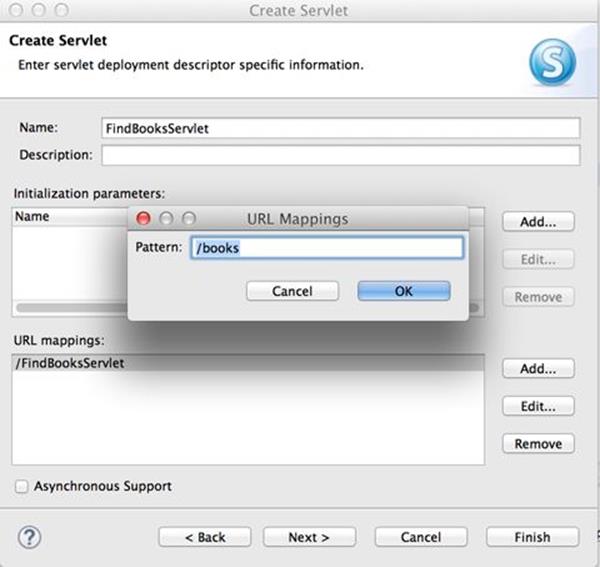
Figure 26-9: Changing the URL mapping for a servlet
Click Next again. The next window asks you which method stubs you’d like to have auto-generated; keep the default doGet() and doPost(). Finally, click Finish, and Eclipse generates the code shown in Listing 26-3 (I just removed some comments).
Listing 26-3: Generated FindBooks servlet
package com.practicaljava.lesson26;
import java.io.IOException;
import javax.servlet.ServletException;
import javax.servlet.annotation.WebServlet;
import javax.servlet.http.;
import javax.servlet.http.HttpServletRequest;
import javax.servlet.http.HttpServletResponse;
@WebServlet(urlPatterns = {"/books"})
public class FindBooksServlet extends HttpServlet {
private static final long serialVersionUID = 1L;
public FindBooks() {
super();
}
protected void doGet(HttpServletRequest request,
HttpServletResponse response) throws ServletException,
IOException{
// TODO Auto-generated method stub
}
protected void doPost(HttpServletRequest request,
HttpServletResponse response) throws ServletException,
IOException{
// TODO Auto-generated method stub
}
}
I explain the servlet’s data flow in the section "Browser-Servlet Data Flow.” Meanwhile let’s see the servlet FindBooksServlet in action. Add the following two lines in the doGet() method to get access to the output stream and send the message “Hello from FindBooks”:
PrintWriter out = response.getWriter();
out.println("Hello from FindBooks");
Don’t forget to add the import statement for PrintWriter. The final step is to deploy the servlet under GlassFish Server. Open the Servers view, right-click the server, and select Add and Remove from the pop-up menu. Select the project Lesson26 in the left panel and add it to the right one. Click Finish.
The servlet deployment is finished. Now right-click the class name FindBooksServlet in the Eclipse project, select Run on Server → GlassFish, and click Finish. If the server was not running, Eclipse first starts the server and then forms the URL to access the servlet FindBooks. Eclipse runs its internal web browser and displays the message shown in Figure 26-10.
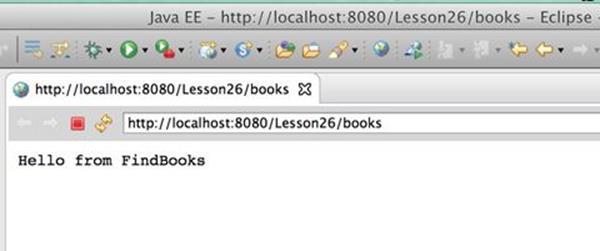
Figure 26-10: Running the servlet in Eclipse internal browser
You can copy this URL into any other web browser on your computer; the response will be the same. Starting the server from inside Eclipse doesn’t change the fact that it listens to the port 8080, and any client can request and deploy servlets via this port.
Please note that the URL ends with /books and not FindBooksServlet. Take another look at Figure 26-8. You’ve changed the URL mapping instructing the servlet container to route all HTTP requests that include /books to the servlet FindBooksServlet. Eclipse has generated the proper annotation in the servlet’s class that may look similar to this one:
@WebServlet(urlPatterns = {"/books"})
public class FindBooksServlet extends HttpServlet
Servlets belong to the presentation layer, so let’s change the web page presentation a little bit. Replacing the code of the doGet() method with following three lines shows the output on yellow background and in the header <H2> style:
PrintWriter out = response.getWriter();
out.println("<html><body bgcolor=yellow>");
out.println("<h2>Hello from FindBooks</h2>");
The browser renders this HTML page, as shown in Figure 26-11.
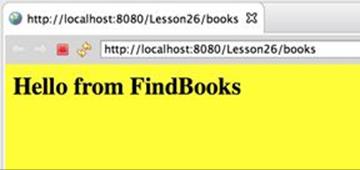
Figure 26-11: Changing the presentation of a web page from the servlet
Having HTML markup embedded inside servlets has some drawbacks though. You need to recompile the Java code every time the presentation changes. There are more drawbacks in having HTML embedded in Java, which are covered at the beginning of the next lesson.
Hot Deployment
When you modify the code of a Java servlet or other application class, the server might need to be restarted or the servlet might need to be redeployed. This depends on the hot deployment (without the server restart) capabilities of a specific server you use. If you want to automate redeployments of your server-side Java code, consider using a third-party tool JRebel, which automatically reloads all your Java modifications in the server.
Deploying a Web Application as WAR
A real-world web application may consist of multiple files, and it would be easier if all of them are placed into a single archive file and deployed by placing such a file in the document root directory of your servlet container. Usually you create build scripts that that compile all required files, archive them in a WAR file, and copy this file into the deployment directory. You get familiar with a build tool called Gradle in Lesson 36.
But if you want to quickly create a WAR file by Eclipse means, just right-click the project name and select the menu Export → Web → WAR file.
In a couple of seconds you have Lesson26.war, a file that you can deploy in any Java EE–compliant container. Seasoned software developers wouldn’t like this way of building WARs; they would argue that creating build scripts up front is the right thing to do. Because you’re just making your first steps in the server-side development, though, using convenient features offered by IDE is justifiable.
Browser-Servlet Data Flow
One servlet can serve multiple users, so let’s review the entire process of client-servlet communication. Regular Java Servlets run in a container, which automatically spawns a new thread for every client’s request without requiring you to do any thread programming. This sounds great and can work fine if the number of users is limited. Later in the section on asynchronous servlets you see a more scalable way of reusing threads, but for now you can concentrate on a traditional single-thread model—one thread per user.
A web page may include an HTML form, a link, or a JavaScript code that can sendan HTTP request (for example, Get or Post ) to the web server. When the very first user’s request hits the FindBooksServlet , the container check whether this servlet is up and running. If not, the container loads and instantiates it and calls the servlet’s method init(). Even if you didn’t override this method, it exists in the superclass HttpServlet.
Servlet Life Cycle Events
If you’d like to perform some actions when the servlet is initialized or about to be destroyed, use ServletContextListener to intercept these events.
Then the container calls the method service() on your servlet’s superclass, which redirects the request to doGet(), doPost(), or similar doXXX(), passing the arguments HttpServletRequest and HttpServletResponse. Your code can get the data that came from the web page by calling the method getParameter() on the HttpServletRequest object supplied by the servlet container to doGet(), doPost() and so on.
After you get the parameter(s), process it in the business layer, which can be implemented either as POJOs talking to some data store or as an EJB. Return the result to the client by getting the reference to the PrintWriter object; it knows how to send text data to the user. For non-textual results, use the class OutputStream instead of PrintWriter. Don’t forget to set the content type (the MIME type) by calling setContentType(). For example, if you are sending an object containing PDF content and want the browser to automatically open Acrobat Reader, call the functionresponse.setContentType(“application/pdf”);.
The servlet container controls when the servlet is loaded, and when its init(), service(), and destroy() methods are called. The method destroy() is called when a server administrator decides to unload the servlet, the server is shutting down, or the server needs to free some memory.
If the HTTP client sent some data to the servlet, it can get them by calling getParameter() on the HttpServletRequest object. The following code gets the name of the book entered by the user in a field named booktitle and responds with the price of $65:
public void doGet(HttpServletRequest req, HttpServletResponse res)
throws ServletException, IOException {
String title = req.getParameter("booktitle");
PrintWriter out = res.getWriter();
res.setContentType("text/html");
out.println("<html><body>");
out.println("<h2>the book "+title+" costs only $65");
out.println("</body></html>");
}
HTTP Get and Post Requests
HTTP specification defines several methods for data exchange on the web, but with servlets the Get and Post methods were the most widely used ones. (In Lesson 33 you see the use of other HTTP methods.) If you don’t specify the method, Get is used by default. Because I’ve used the method=Get in the tag <form> in Listing 26-1 , the servlet container invokes the method doGet() on FindBooksServlet . With Get, the web browser appends the values entered in the form to the end of the URL after the question mark. For example, if the user enters the word Apollo as a book title, the URL may look like this:
http://www.mybooks.com?booktitle=Apollo
If a form (or a script) submits multiple values, the URL includes several key/value pairs separated by the & symbol after the question mark:
http://www.mybooks.com?booktitle=Apollo&author=Smith
With Get it’s easy to copy and paste or bookmark the URL with parameters. On the other hand, with Get the data is not protected; you can see it in clear text.
The method Post is typically used to send data to the server. It also may be used for sending the binary data (for example, uploading an image) to the server. Of course, the log-in forms shouldn’t use Get because you don’t want the user’s ID and password to be shown in the URL. To processPost requests, servlets have to override the method doPost(). It’s common to use Get for data retrieval and Post for sending data to the server.
Session Tracking
HTTP is a stateless protocol. If a user retrieves a web page with a list of books from the FindBooksServlet (or any other server-side program) and then goes to another web page, this second page does not know what was shown or selected on the first one. To preserve data to more than one web page, session tracking has to be implemented.
A session is a logical task, which the user is trying to complete by visiting a website. For example, the process of buying a book may involve several steps: book selection, input of billing and shipping information, and so on. These steps combined are an example of a session. When a purchase order is placed, the session is over.
The session information can be stored either on the client or on the server side. On the client side the user’s session data can be stored using cookies (explained in the next section) or URL rewriting—this information is being sent back and forth from the client to the server as a part of the URL.
The server-side alternative for storing session data is a session tracking application programming interface (API) that offers a number of methods defined in the interface HttpSession. In this case the session data is stored only on the server, but the client gets only a session ID to identify a series of HTTP requests made by the same user. To create a session on the server, call the method on the HttpServletRequest object getSession(true), which means “get a reference to an existing session, or create the new one.” Calling this method without an argument gives you either a reference to the existing session or null. The next sections provide more details about session tracking.
Cookies
A cookie is a small piece of data that your servlet can send to the web client to be stored as a file on the user’s computer. On every subsequent request from that client, the browser checks the local non-expired cookies (domain specific) and sends them to the server, uniquely associating the request with a given session. The cookies are persistent, but the user may disable them by selecting the appropriate setting in his web browser. Here’s how the servlet can send a business-related Cookie to the client:
Cookie myCookie = new Cookie("bookName",
"Java Programming 24-hour trainer");
// Set the lifetime of the cookie for 24 hours
myCookie.setMaxAge(60*60*24);
response.addCookie(myCookie);
This is how a servlet can retrieve a client’s cookies that arrive with HttpServletRequest:
Cookie[] cookies = request.getCookies();
if (cookies != null){
// Get each cookie (a name/value pair)
for (i=0; i < cookies.length; i++){
Cookie currentCookie = cookie[i];
String name = currentCookie.getName();
String value = currentCookie.getValue();
}
}
Even though you can store multiple cookies on the client, as in the preceding code, it’s not a good idea to send the application data back and forth over the network. Typically the session data is stored in the HttpSession object described later in the section Server-Side HttpSession.
Other cookies
Besides the cookies that your servlet creates and sends to the web browser, search analytics engines may send their own cookies, too.
HTML 5 Web Storage
HTML 5 supports web storage (local storage) that allows storage of key value pairs on the user’s disk drive, but as opposed to cookies, these data always stay on the client side.
URL Rewriting
If a client disables cookies, the URL rewriting may be used for keeping track of the user’s session. In this case the session ID and other required session data are attached to the URL string and are being sent back and forth with each client/server communication. If you’ve noticed something such as jsessionid=12345 in the URL string of any website, it means that URL rewriting is being used.
Session ID and Security
OWASP stands for Open Source Web Application Security Project. It publishes a document titled "Top 10 Security Risks." One of the top 10 risks is broken authentication and session management. Hackers can hijack a session ID presenting themselves as legitimate users.
Some applications configure the servers to switch from cookies to URL re-writing for delivering the session ID to allow the users who turned off the cookies to still use their application. Such configuration results in attaching the session ID to the URL, which makes hijacking the session easier. It’s recommended to add a section <session-config> to the web.xml of your Java EE application server that includes the element <tracking-mode>COOKIE</tracking-mode> so that only cookies can be used for storing session IDs. This doesn’t guarantee that the user’s session ID won’t be stolen, but will definitely lower the risk.
Server-Side HttpSession
You should keep the data that belong to a user’s session (such as the shopping cart) inside the HttpSession object in the servlet container, which creates one such object per client. The servlet can store there any Serializable objects. The following line creates a session object (or finds a previously created one):
HttpSession mySession = request.getSession(true);
The getSession(true) call means “find this client’s session object or create a new one if not found.” For example, a shopping process usually consists of a number of subsequent servlet calls (list an inventory, add an item to the shopping cart, enter shipping information, and so on). The method call getSession(true) should be used in the very first servlet request that opens the business process qualified for a session opening. At this moment the application server generates a unique session ID (available by calling session.getId()) and sends it to the user’s web browser using either a special cookie JSESSIONID or uses URL rewriting. When the browser sends an HTTP request to the server, the session ID is located in the request’s header so the servlet container can find the matching session object.
The call getSession(false) means “find my session object,” assuming that it has been created in the previous steps of the session. If this call returns null, the session object has been timed out or destroyed and you might want to display a message saying that the session has expired, and the user has to start the process from scratch.
I’ll illustrate the concept of using Httpsession object by showing you an example, which includes an HTML page and a servlet. The HTML page has a form where you can enter a book title and a price to be added to your shopping cart on the server. Each time you add a book, the servlet returns a new HTML page that lists the content of the shopping cart and the form to add more books.
The initial file ShoppingCart.html is located in the document root directory of the project Lesson26. In the Eclipse Dynamic Web Project, the document root is represented by the directory WebContent. Here’s the content of ShoppingCart.html:
<html>
<head>
<title>Add a book to shopping cart</title>
</head>
<body>
Add the book title and price to the shopping cart:
<form action=shoppingcart method=Get>
<input type=Text name=booktitle>
<input type=Text name=price>
<input type=Submit value="Add to shopping cart">
</form>
</body>
</html>
Because this file is deployed in the same web application (that is, Lesson26) as the servlet, the form’s action parameter doesn’t include the complete URL of the servlet; the pattern—shopingcart—is all you need, assuming that the servlet is annotated with @WerServlet("/shoppingcart"). In Eclipse, you right-click the file ShoppingCart.html and select the Run on Server. The following URL is constructed (see Figure 26-12):
http://localhost:8080/Lesson26/ShoppingCart.html
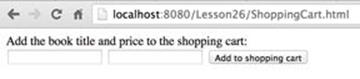
Figure 26-12: Opening ShoppingCart.html deployed on the server
Don’t enter the book title and the price just yet; the servlet is not ready. Before showing you the code of the servlet, let’s agree that each shopping cart item will be represented as an instance of the following class Book:
class Book implements Serializable {
String title;
double price;
}
Note that the class Book implements Serializable because you’re planning to keep it in the HttpSession object.
Next comes the ShoppingCartServlet class that has the URL mapping /shoppingcart; the web browser’s request tries to find the server-side object that goes by the name shoppingcart. The doGet() method starts with printing the browser’s cookies on the system console. I just want you to see that the value of the cookie JSESSIONID remains the same with each request made from the same browser. After that, the code works with the session object; the program comments give you some more explanations:
@WebServlet("/shoppingcart")
public class ShoppingCartServlet extends HttpServlet {
protected void doGet(HttpServletRequest request,
HttpServletResponse response)
throws ServletException, IOException {
Cookie[] cookies = request.getCookies();
for (int i=0; i < cookies.length; i++){
Cookie currentCookie = cookies[i];
String name = currentCookie.getName();
String value = currentCookie.getValue();
System.out.println("Received the cookie "
+ name + "=" + value);
}
// Get or create a session object
HttpSession session = request.getSession(true);
// Try to get the shopping cart
ArrayList<Book> myShoppingCart=(ArrayList<Book>)
session.getAttribute("shoppingCart");
if (myShoppingCart == null){
// This is the first call – instantiate the shopping cart
myShoppingCart = new ArrayList<>();
}
// create an instance of a book object for received params
Book selectedBook = new Book();
selectedBook.title=request.getParameter("booktitle");
selectedBook.price = Double.parseDouble(
request.getParameter("price"));
// Add the book to our shopping cart
myShoppingCart.add(selectedBook);
// Put the shopping cart back into the session object
session.setAttribute("shoppingCart", myShoppingCart);
// Prepare the Web page and send it to the browser
PrintWriter out = response.getWriter();
// Add the content of the shopping cart to the Web page
out.println("<body>Your shopping cart content:");
myShoppingCart.forEach(book ->
out.printf("<br>Title: %s, price: %.2f",
book.title, book.price)
);
//Add the HTML form to the Web page
out.println("<p>Add another book to the shopping cart:");
out.println("<form action=shoppingcart method=Get>");
out.println("<input type=Text name=booktitle>");
out.println("<input type=Text name=price>");
out.println(
"<input type=Submit value='Add to shopping cart'>");
out.println("</form>");
out.println("</body>");
}
}
The very first time the servlet tries to get the shopping cart (represented by an ArrayList) from the session object, it won’t be there, so the new instance of the ArrayList<Book> is created. Then the code gets the values of parameters booktitle and price (received from the web page), creates a new Book instance, adds it to myShoppingCart collection, and places it in the HttpSession instance for storage.
This code loops through the myShoppingCart collection using forEach() and a lambda expression just to send the content of the shopping cart with HTML to the web page. Finally, the servlet sends to the browser the same HTML form so the user can continue adding new books to the shopping cart. Figure 26-13 shows how my browser looks after adding several books to the shopping cart.
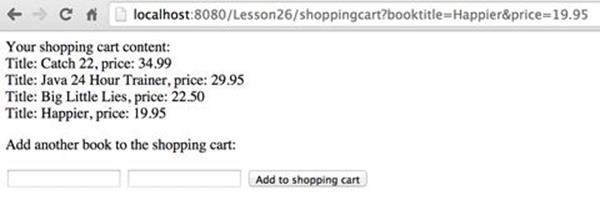
Figure 26-13: The web page after adding four books to the shopping cart
The ShoppingCartServlet doesn’t have code to close the session. But you could add a Place Order to the Web Page button, and the corresponding method placeOrder() in the servlet, which could close the session by making the following call:
session.invalidate();
The simplest way of adding a Place Order button to ShoppingCart.html is to add yet another button of Submit type to the form:
<input type=Submit name=placeorder value="Place Order">
And in the doGet() method, check whether the user clicked on the button. If yes, invalidate the session.
if (request.getParameter("placeorder") != null) {
session.invalidate();
}
If the session has not been invalidated explicitly, the application server does it automatically after a specific period (timeout). You can set the timeout programmatically by calling the method setMaxInactiveInterval() on the HttpSession object, or you can make it configurable in the external file web.xml. If the user closes the browser, the cookie associated with the session is destroyed and the session is closed.
Session Life Cycle Events
If you’d like to perform some actions when the HTTP session is created, invalidated, or timed out, use HttpSessionListener. To intercept adding or removing an attribute to a session, use HttpSessionAttributeListener.
Filters
Even after a servlet is deployed, you still can change the way it processes requests and responses without modifying the servlet’s code. You can create filters, which are the Java classes that can be configured to process HTTP requests before they are passed to the servlet or when the servlet is about to return the response to the client. Filters are good for adding such functionality as authentication, logging, encryption, data compression, image conversion, and so on. Filters can even block request and response objects from passing any further.
None of these actions depend on the business logic implemented by servlets. Besides, you can create one filter (such as to authenticate the user) and apply it to multiple servlets deployed in the servlet container. What if you need to compress and encrypt the data before sending them to the client? Write two separate filters and chain them so both are applied to the same servlet. Filter classes are deployed in the WEB-INF/classes directory—in the same place where other compiled classes reside.
To create a filter, write a class that implements the interface Filter annotated with @WebFilter. There are three methods in this interface: doFilter(), init(), and destroy(). To allow filter chaining, you need to implement the FilterChain interface. The following code is a sample of a filter class to be used with two servlets: FindBooksServlet and ShoppingCartServlet:
@WebFilter(servletNames={"/FindBooksServlet","
/ShoppingCartServlet"})
public class MyAuthenticationFilter implements Filter {
FilterConfig config;
@Override
public void doFilter(ServletRequest request,
ServletResponse response, FilterChain chain)
throws IOException, ServletException {
// user authentication code goes here
//Call the next filter, if need be
chain.doFilter(request, response);
}
@Override
public void init(FilterConfig filterConfig)
throws ServletException {
this.config = filterConfig;
}
@Override
public void destroy() {
// Clean up system resources here
}
}
The container gives the filter both request and response objects. You can check passed parameters by the client (such as by checking ID/password), perform authentication, and, if the user is not valid, call response.getWriter() and send the user the message “You don’t belong here” without even passing control to the servlet.
The method destroy() is called once before the container removes the filter; if the filter has created some resources such as Database Management System (DBMS) connections, close them in the destroy() method.
The method init() is invoked on the filter object only once during its instantiation. The the servlet container gives to the init() method the instance of the FilterConfig object, which gives you access to the servlet context and initialization parameters if these are specified in the @WebFilterannotation (or in the file web.xml); for example:
@WebFilter(servletNames={"/FindBooksServlet",
"/ShoppingCartServlet"},
initParams={@WebInitParam(name="community",
value="adults")})
To assign several filters to the same servlet, configure them in the web.xml file in the the order you want them to be chained. So when you call chain.doFilter(), the container knows which filter to invoke next.
Asynchronous Servlets
It’s great that servlets automatically create and allocate a separate thread for each user’s request, but each thread takes up system resources (both memory bytes and CPU cycles), and after a certain number of concurrent requests the server simply stops responding. Imagine if thousands of users simultaneously hit the FindBooksServlet that has to perform a three-second long DBMS search for each request. During these three seconds, the container is idling, but it holds the lock on each thread, doing nothing but waiting for the result of the DBMS query (running on another server!).
Is hard to say how many simultaneous blocking threads a specific servlet container can process in a timely manner; it all depends on the business application and the server hardware/software. Consider running load tests of your application with JMeter or similar software to get the real numbers for your hardware/software combination. I’ve seen a situation when a server started failing after just one of thousands of concurrent requests.
The idea of asynchronous servlets is to minimize the time of thread locking by reusing threads in the servlet container. If User A makes a request that takes three seconds on a DBMS server, his servlet container’s thread is given to the request of User B, and when User A’s result comes back from the DBMS, the container allocates this (or another) thread to return the result to User A. This architecture can substantially increase the number of concurrent requests that can be processed on the same server.
Java EE 7 includes Servlets 3.1, which supports asynchronous processing. In doGet() or doPost() you can instantiate the object AsyncContext, which creates an asynchronous worker thread and doesn’t lock the client’s thread while preserving the client’s request and response objects. For example, the following servlet emulates a three-second blocking process, which runs in a separate thread:
@WebServlet(urlPatterns = {"/booksasync"}, asyncSupported=true)
public class FindBooksAsyncServlet extends HttpServlet {
protected void doGet(HttpServletRequest request,
HttpServletResponse response)
throws ServletException, IOException{
// Don't send response when doGet ends
AsyncContext aContext = request.startAsync();
//Provide Runnable implementation to start method
aContext.start(() ->{
// a blocking operation goes here
try{
String title = aContext.getRequest()
.getParameter("booktitle");
PrintWriter out;
try {
// Emulate a 3-second process
Thread.currentThread().sleep(3000);
HttpServletResponse resp =
(HttpServletResponse) aContext.getResponse();
out = resp.getWriter();
out.println("Hello from Async FindBooks");
} catch (IOException e) {
e.printStackTrace();
}
}catch( InterruptedException e){
e.printStackTrace();
}finally{
aContext.complete(); // close the response obj
}
});
}
}
For simplicity, I used sleep() on a Thread in this example just to emulate a long-running process. But keep in mind that in a real-world you should create threads in Java EE containers by using such classes as ManagedExecutorService, ManagedThreadFactory.
To catch some important events in the life cycle of asynchronous servlets, you can add AsyncListener on AsyncContext and provide callbacks onComplete(), onError(), and onTimeout().
Try It
Write a simple HTML client with one text input field that has a Submit button. The user enters the stock symbol for which she wants to get a price quote. Generate a random quote and return a web page with the quote. Reuse the code from StockServerImpl from Listing 24-2 to generate the price quotes.
Lesson Requirements
You should have Java installed.
NOTE You can download the code and resources for this “Try It” from the book’s web page at www.wrox.com/go/javaprog24hr2e. You can find them in Lesson26.zip.
Step-by-Step
1. In the Eclipse project Lesson26 create an HTML client similar to the one from html_that_gives_404 to allow the user to enter the stock symbol. Name it tryit.html.
2. Create a servlet called StockServerServlet that takes one parameter, the stock symbol, and instantiates a class called StockQuoteGenerator that should have the code similar to Listing 24-2. You don’t use RMI here, and there’s no need to implement Remote interface.
3. Pass the stock symbol received from the client to StockQuoteGenerator and get the price.
4. Return the dynamically created HTML page to the client via the response object.
5. Test the servlet in the Eclipse IDE: right-click on the HTML file and select Run As → Run on Server. Enter the stock symbol and get the price quote.
6. Undeploy the Lesson26 project from GlassFish in Eclipse because you’ll need to deploy this application directly in GlassFish. Stop GlassFish in Eclipse.
7. Export the project Lesson26 into a Lesson26.war file. Deploy this web application in GlassFish by copying it into the directory glassfish/domains/domain1/autodeploy of your GlassFish Server, installed in Chapter 25.
8. Start GlassFish Server from the command line, as described in the "Try It" section of Lesson 25.
9. Open the following URL in your web browser: http://localhost:8080/Lesson26/tryit.html. you should see the same Web page as in Step 5 above. Test this Web application by entering various stock symbols. You should be getting price quotes.
TIP Please select the videos for Lesson 26 online at www.wrox.com/go/javaprog24hr2e. You will also be able to download the code and resources for this lesson from the website.
All materials on the site are licensed Creative Commons Attribution-Sharealike 3.0 Unported CC BY-SA 3.0 & GNU Free Documentation License (GFDL)
If you are the copyright holder of any material contained on our site and intend to remove it, please contact our site administrator for approval.
© 2016-2026 All site design rights belong to S.Y.A.