Wrox Press Java Programming 24-Hour Trainer 2nd (2015)
Lesson 27. JavaServer Pages
The JavaServer Pages (JSP) technology was created as a next step in servlet evolution. JSP 2.3 is part of the Java EE 7 specification, and with JSP you can do everything that you can do with servlets, but more easily. In early Java EE specifications JSP was the only standardized web framework. But starting from Java EE 4 yet another web framework was introduced: JavaServlet Faces (JSF). While JSF has more features than JSP, I still see a lot more enterprise applications that use JSP, so this edition of the book covers JSP but not JSF. Now let’s see why using servlets is not enough for developing of the presentation tier for all Java EE web applications.
Let’s say you’ve created and deployed a servlet, which displays “Hello World.” The servlet gets a hold of the output stream of the response object and executes the following line of code:
out.println("<html><body>Hello World </body></html>");
Now imagine that you run a software company that employs Alex, an expensive Java developer, and Matilda, a junior web designer who doesn’t know Java but does know HTML. What if you need to change the layout of this HTML page, such as by adding several empty lines on top? It’s not a big problem—Alex can modify the preceding line of code, recompile it, and redeploy the servlet. But for making small changes in the HTML-based user interface (UI) it’s more cost-efficient to use Matilda. This is where JSP becomes very handy. Ask Matilda to create the following text file, HelloWorld.jsp:
<html>
<body>
Hello World
</body>
</html>
Place this file into the document root directory (see Chapter 26) in your servlet container running at, say, MyBooks.com. Now the users can access this JSP by entering the following URL in their web browsers:
http://www.MyBooks.com/HelloWorld.jsp
Upon the first request to this page, the JSP container (all servlet containers support JSP, too) automatically generates, compiles, and deploys a servlet based on the content of the file HelloWorld.jsp. All subsequent calls to this JSP will be processed a lot faster because the servlet HelloWorldwill already be deployed, loaded in memory, and running. As a matter of fact, JSP, as well as servlets, can be preloaded so that even the first user’s request is responsive. You might think that you could make a simple web page by creating HelloWorld.html without all this extra code generation. This is true, as long as your page is static and does not use any external dynamically changed data. Remember that HTML is not a programming language but a markup language—it can’t even add two and two, but JSP can (see MyCalculator.jsp in Listing 27-1).
Embedding Java Code into HTML
JSP defines tags that enable you to embed Java code into an HTML page. When the servlet is automatically generated behind the scenes, this Java code will also be included and executed as part of this servlet. JSP tags are included in angle brackets: for example, the <%=...%> tag displays the value of the variable or expression: <%=2+2%>. During the servlet generation process performed by the JSP engine, these tags are replaced with the regular Java code. For example, the tag <%=2+2%> is automatically replaced by a JSP container with the following Java statement:
out.println(2+2);
Listing 27-1 shows the content of the two-plus-two calculator called MyCalculator.jsp. <br> is an HTML tag for inserting line breaks. Note that Alex, the programmer, had to write only the expression inside the JSP tag; the rest was done by Matilda. Consider this task separation an example of the designer-developer workflow.
Listing 27-1: MyCalculator.jsp
<html>
<body>
HTML created by Matilda goes here...
<br>
You may not know that 2 + 2 is <%= 2 + 2%>
<br>
More HTML created by Matilda goes here...
</body>
</html>
Deploying any JSP is a simple matter of copying the JSP file into the document root directory of your JSP container. Of course, if your JSPs are part of a multifile project, most likely you’ll be deploying them in a war file, as described in Chapter 26.
As described in Lesson 26, create a Dynamic Web Project in Eclipse and name it Lesson27. Right-click the WebContent directory (the document root) and create a new JSP file named index.jsp by selecting the menu File → New → Other → Web → JSP file.
While creating the project make sure that GlassFish server is selected as the Target run time. Eclipse generates a file with the following content:
<%@ page language="java" contentType="text/html; charset=UTF-8"
pageEncoding="UTF-8"%>
<!DOCTYPE html PUBLIC "-//W3C//DTD HTML 4.01 Transitional//EN"
"http://www.w3.org/TR/html4/loose.dtd">
<html>
<head>
<meta http-equiv="Content-Type" content="text/html; charset=UTF-8">
<title>Insert title here</title>
</head>
<body>
</body>
</html>
Add the following line in the <body> section of this file:
<h1>Hello World</h1>
The tag <h1> formats the text as a header, and Eclipse shows you how the future web page will be rendered (see the top portion on Figure 27-1).
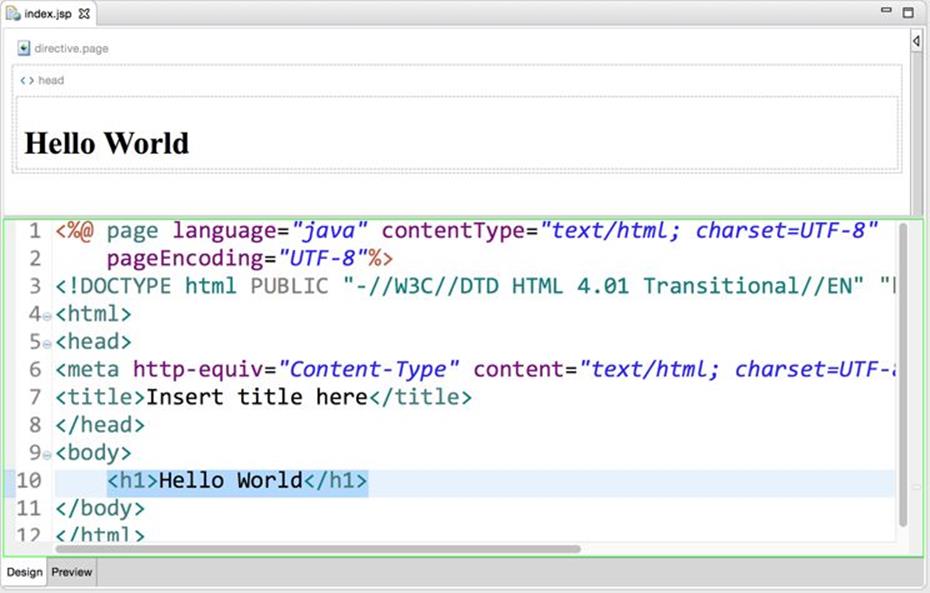
Figure 27-1: Viewing the page as you’re adding tags
Right-click the name index.jsp and select Run on Server. If the GlassFish server is not running Eclipse launches it and deploys the Lesson27 project, and you see the Hello World web page in the internal Eclipse web browser, as shown in Figure 27-2.
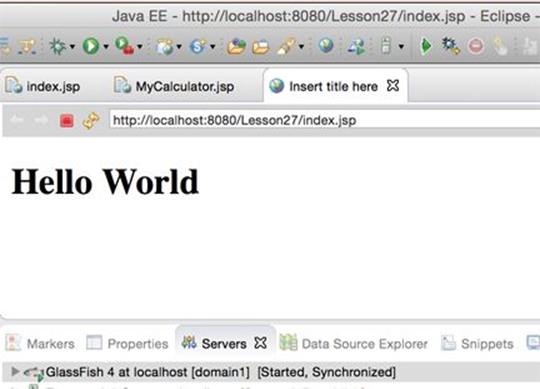
Figure 27-2: Runninng index.jsp in an Eclipse internal browser
Enter the same URL in your web browser, and you see the same result. The server is up and running on port 8080, and the application is deployed, so it’s irrelevant which web browser you use as a client as long as it supports HTTP protocol.
Now test a JSP expression. Make a copy of index.jsp named MyCalculator.jsp in the project Lesson27 (Ctrl+C/Ctrl+V) and replace the content in the <body> part with the content from the <body> section from Listing 27-1. Run MyCalculator.jsp and you see the web page in Eclipse, as shown in Figure 27-3.
The expression <%2+2%> has been precompiled and replaced with 4. A JSP is nothing more than a servlet that is automatically generated from a file containing valid HTML and JSP tags.
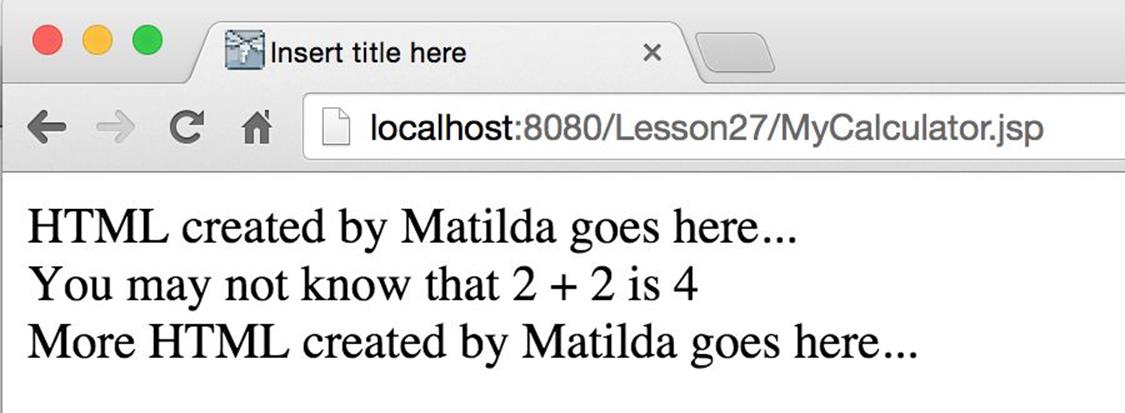
Figure 27-3: Running MyCalculator.jsp
If you need to change the appearance of the page (colors, fonts, data allocation) without changing the expression (2+2), Matilda can do it easily! After the changes are applied, the JSP is automatically regenerated into a new servlet and redeployed. Usually you do not even have to restart the server. The only exceptions are preloaded JSPs that are configured to be initialized on server startup. Any business logic changes inside the JSP tags will be programmed by Alex.
Implicit JSP Objects
Because JSPs are built on top of servlets, the main concepts remain the same. Following is the list of predefined variables that you can use in JSP pages. These variables are initialized by the JSP container, and you can use them without explicit declarations.
· request has the same use as HttpServletRequest.
· response has the same use as HttpServletResponse.
· out represents the output write stream JspWriter. This variable points at the same object as HttpServletResponse.getWriter() in servlets. For example, simplest JSP that returns a result from a Java class called CurrencyConverter might look like this:
·<html>
· <body>
· <% out.println(CurrencyConverter.getDollarRate()); %>
· </body>
</html>
· session represents an instance of the user’s HTTPSession object.
· exception represents an instance of the Throwable object and contains error information. This variable is available only from the JSP error page (described later in the section “Error Pages”).
· page represents the instance of the JSP’s servlet.
· pageContext represents the JSP context and is used with Tag Libraries (described later in this lesson in the section of that name).
· application provides access to web context. Its use is similar to that of ServletContext.
· config provides initialization information used by the JSP container. Its use is similar to that of the class ServletConfig.
Overview of the JSP Tags
Each JSP tag starts and ends with an angle bracket and can be included in any HTML file, but you need to save your JSPs in .jsp files for proper identification and processing by JSP containers. This section is a brief overview of JSP tags. For more detailed coverage refer to the JSP documentation at http://docs.oracle.com/javaee/5/tutorial/doc/bnagx.html.
Directives
Directives do not generate screen output, but instruct the JSP container about the rules that have to be applied to the JSP. Some of the JSP directives are page, include, attribute, and taglib.
Page directives start with <%@ page and are only in effect within the current page. Directives are used with such attributes as import, extends, session, errorPage, contentType, and some others. For example, to import the java.io package use this directive:
<%@ page import="java.io.*" %>
Include directives to allow the inclusion of any text from a file or any code from another JSP, at the time when the page is compiled into a servlet, as in the following example:
<%@ jsp:include page="calcBankRates.jsp" %>
<%@ include file="bankRates.txt" %>
To use a third-party library of custom tags you need to specify where this library is located, as in the following example:
<%@ taglib uri="my_taglib.tld" prefix="test" %>
The attribute directive enables you to define attributes of custom tags, like this:
<%@ attribute name="corporate_logo_file_name" %>
Declarations
Declarations are used to declare variables before they are used. You can declare a variable salary like this:
<%! double salary; %>
The variable salary is visible only inside this page. You can declare Java methods in the JSP page the same way:
<%! private void myMethod(){
...
}%>
The code contained in the declaration block turns into the Java code in the generated servlet.
Expressions
Expressions start with <%= and can contain any Java expression, which will be evaluated. The result will be displayed in the HTML page, replacing the tag itself, like this:
<%= salary*1.2 %>
Scriptlets
Initially scriptlets were created to give JSP developers a place to put any valid Java code to be included in the generated servlet’s _jspService() method, which is an equivalent of the servlet’s method service(); for example, a scriptlet can look like this:
<% lastName = "Smith"; %>
With the creation of JSP Standard Tag Libraries (JSTL) and Expression Language (EL) there is now no need to use scriptlets, but this syntax still works.
Although directives, declarations, expressions, and scriplets may mix in your Java code inside the JSP, it’s not a good idea. JSP was created to avoid embedding HTML into Java code, and you should also avoid embedding Java into HTML. You see how to avoid embedding Java into HTML in the section on tag_libraries. This thread on Stack Overflow has several good recommendations on how to remove Java code from JSP.
Comments
Comments that start with <%-- and end with --%> are visible in the JSP source code, but they are not be included in the resulting HTML page:
<%-- Some comments --%>
If you’d like to keep the comments in the resulting web page, use regular HTML comment notation:
<!-- Some comments -->
Standard Actions
Although the directive include adds the content of the included page during compile time, the element jsp:include does it during run time:
<jsp:include page "header.jsp" />
The element forward enables you to redirect the program flow from the current JSP to another one while preserving the request and response objects. The other way of redirecting the flow is to use response.sendRedirect(someURL) in the Java code, but in this case new request and responseobjects are created, which forces a web browser to make a new request to the server:
<jsp:forward page = "someOther.jsp" />
The plugin element ensures that your JSP includes an applet or a Java bean (described later in the “Java Beans” section). During run time the web browser replaces this tag with one of the HTML tags <object> or <embed> to embed the required Java class into the web page:
<jsp:plugin type=applet code="PriceQuotes.class" >
The nested tag <jsp:param> is used to pass parameters to an applet or a bean:
<jsp:plugin type=applet code="Login.class">
<jsp:params>
<jsp:param name="userID" value="SCOTT" />
<jsp:param name="password" value="TIGER" />
</jsp:params>
</jsp:plugin>
Even though it’s possible to create web pages with embedded Java plug-ins, this is discouraged. These days people use a variety of web browsers and devices, and the chances that the user has the right version of the JRE installed on his or her device are slim. This was the main reason why Java Applets (they operate inside web browsers) are rarely being used with the exception of the back-office enterprise applications where the company system administrators can push the right version of the web browser and JRE to each user’s desktop.
Error Pages
Say you have a JSP called calcTax.jsp containing code that may throw Java exceptions. Instead of scaring users with stack trace output screens, prepare a friendly taxErrors.jsp explaining the problem in plain English.
calcTax.jsp may have an HTML <form> tag in which the user enters gross income and the number of dependents. The request for tax calculations is sent to the server’s CalcTax Java class, which might throw an exception during its processing. Include in calcTax.jsp the name of the error page that has to be shown in case of exceptions:
<html>
Some code to calculate tax and other HTML stuff goes here
...
<%@ page errorPage=taxErrors.jsp %>
</html>
Next comes the error page taxErrors.jsp, which illustrates how to use the JSP variable exception, which displays the error message in a user-friendly way and also contains more technical error description for the technical support team:
<html>
<body>
Unfortunately there was a problem during your tax calculations.
We are working on this issue - please try again in 10 minutes.
If the problem persists, please contact our award-winning
technical support team at (212) 555-2222 and provide them with
the following information:
<br>
<%=exception.toString()>
</body>
</html>
Java Beans
JavaBeans specification defines a bean as a Java class that implements the Serializable interface and that has a public no-argument constructor, private fields, and public setter and getter methods. The similar concept of Data Transfer Objects (DTOs) was introduced in Listing 21-2). Java beans are used mainly for data storing and exchange. In JSP they help avoiding mixing Java code and HTML (see also the section “Tag Libraries” later in this lesson; they also help to avoid mixing Java and HTML).
Think of the MVC pattern implemented in JSP-based web applications. The JSP belongs to the view tier; the servlet can play a role of a controller; and the Java bean can represent a model. Instead of programming business logic inside JSP, separate presentation from business logic processing and data storage. First, this enables you to split the work more easily between Alex and Matilda, and second, you’re able to have more than one presentation solution (for example, a different UI for mobile devices) while reusing the same Java code.
Using Java beans is the first step in separating processing logic and presentation. Listing 27-2 shows an example of a bean, called Student.
Listing 27-2: Student bean
import java.io.Serializable;
class Student implements Serializable{
private String lastName;
private String firstName;
private boolean undergraduate;
Student(){
// constructor's code goes here
}
public String getLastName(){
return lastName;
}
public String getFirstName(){
return firstName;
}
public void setLastName(String value){
lastName = value;
}
public void setFirstName (String value){
firstName = value;
}
public void setUndergraduate(boolean value){
undergraduate = value;
}
public boolean isUndergraduate (){
return undergraduate;
}
}
Don’t confuse JavaBeans with Enterprise Java Beans (EJB), which is a different concept that’s covered in Chapter 31.
Using JavaBeans in JSP
To use a bean with JSP, first you need to specify its name and location, and after that you can set or get its properties. Following are some examples of bean usage:
<jsp:useBean id="Student" class="com.harvard.Student" />
<jsp:getProperty name="Student" property="LastName" />
<jsp:setProperty name="Student" property="LastName" value="Smith"/>
The next code snippet populates the Student bean’s properties LastName and FirstName. This code snippet can be located in the HTML document with the tag <form>, which has two HTML text input fields called LName and FName:
<jsp:setProperty name="Student" property="LastName"
value="<%= request.getParameter("LName") %>" />
<jsp:setProperty name="Student" property="FirstName"
value="<%=request.getParameter("FName") %>" />
If all bean property names are the same as the names of the HTML form fields, mapping the HTML form’s and the bean’s fields becomes even simpler with the asterisk notation:
<jsp:setProperty name="Student" property="*" />
How Long Does a Bean Live?
If a JSP variable is declared inside a scriptlet, it has a local scope. To give it an instance scope, declare the variable using the declaration tag. You can define a bean’s scope using the scope attribute of the tag jsp:useBean. The following list defines the various scopes.
· page: The bean is available only within the current page and will be destroyed as soon as the user exits the page. This is a default scope. For example:
·<jsp:useBean id="Student" class="com.harvard.Student"
scope="page" />
· request: The bean is alive for as long as the request object is alive. Even if the control is redirected to a different JSP by means of the tag jsp:forward, the bean remains available on the new page because it’s using the same request object, like this:
·<jsp:useBean id="Student" class="com.harvard.Student"
scope="request" />
· session: The bean is available for all pages until the user’s session ends (see the section “Session Tracking” in Chapter 26).
·<jsp:useBean id="Student" class="com.harvard.Student"
scope="session" />
· application: The bean is available for all users and all pages—this is a global bean.
·<jsp:useBean id="Student" class="com.harward.Student"
scope="application" />
Loading JSP from Servlets
In line with the separation of presentation and processing, JSP should have a bare minimum of any processing. When the servlet receives the data to be sent to the user, instead of sending hard-coded HTML tags to the client it should load and send the JSP page to the client. The JSP should be laid out by a web designer.
Should Servers Be Preparing Web Pages?
While sending a pre-created JSP to the clients is better than hard-coding HTML inside servlets, the trend is to have the server sending only the data to the client without any layout. In modern web applications, the UI is programmed using HTML, JavaScript, and Cascading Style Sheets (CSS), and you should consider sparing servers from laying out web pages. In Lesson 33 you find out how to create RESTFul Web Services, where server-side POJOs send only the data to the web browser. Learning how to develop web pages in HTML and JavaScript is out of the scope of this book, but this process is described in detail in another book I co-authored: Enterprise Web Development (O’Reilly, 2014).
Let’s say you have a servlet that needs to load a JSP based on the user’s selection in the HTML window. If you don’t need to get new copies of the request and response objects you’ll need to create an instance of the RequestDispatcher class and call its method forward(), providingHttpServletRequest and HttpServletResponse as arguments, as shown in Listing 27-3. The servlet MyServlet returns to the web browser, either the JSP showing the data of the Toyota dealership or the JSP showing the data about Nissan vehicles.
Listing 27-3: Servlet loading JSP
public class MyServlet extends HttpServlet{
public void doGet(HttpServletRequest req,
HttpServletResponse res)
throws ServletException {
ServletContext context = getServletContext();
RequestDispatcher requestDisp = null;
String make = req.getParameter("carMake");
if (make.equals("Toyota") {
requestDisp = context.getRequestDispatcher("/Toyota.jsp");
requestDisp.forward(req,res);
}
else if (make.equals("Nissan") {
requestDisp = context.getRequestDispatcher("/Nissan.jsp");
requestDisp.forward(req,res);
}
}
}
In some cases the current servlet performs all interactions with the user and just needs to load the code of another servlet or JSP. For this purpose, use the method include() instead of forward():
requestDisp.include(req,res);
Because this redirection happens on the server side, the initial URL is still displayed in the web browser’s address bar. To provide the new URL (to allow the user to bookmark the resulting page, for example), use response.sendRedirect("/some_new_URL").
Tag Libraries
Yet another way of minimizing the amount of code in JSP is to use tag libraries containing custom and reusable tags—either your own original library or a library created by someone else. Each custom tag looks similar to a regular one, but under the hood it can be supported by a Java class (or classes) written by a programmer to provide the required functionality.
If you want to create your own custom tags to be used with JSP you have to do the following:
· Create a tag library descriptor—an XML file with the extension .tld. It has to be deployed in the directory WEB-INF/tags.
· Create Java classes that provide business logic supporting the tags. Such classes are usually deployed as jars in the WEB-INF/lib directory.
· Register the tag library with the web application.
Listing 27-4 shows a sample tag library descriptor file. The tag DowJones should display a Dow Jones index value. The empty value in <bodycontent> means that this is a simple JSP tag with no content and could be used like this: <sts:DowJones/>.
Listing 27-4: Sample .tld file
<?xml version="1.0" encoding="UTF-8" ?>
<taglib xmlns="http://java.sun.com/xml/ns/j2ee"
xmlns: xsi="http://www.w3.org/2001/XMLSchema-instance"
xsi: schemaLocation="http://java.sun.com/xml/ns/j2ee
http://java.sun.com/xml/ns/j2ee/web-jsptaglibrary_2_0.xsd"
version="2.0" >
<tlib-version>1.0</ tlib-version>
<shortname>sts</shortname>
<uri>http://www.mystockserver.com:8080/taglib</uri>
<info>Wall Street tag library</info>
<tag>
<name>DowJones</name>
<tagclass>DowJonesHandler</tagclass>
<bodycontent>empty</bodycontent>
<info>Displays the Dow Jones index</info>
</tag>
</taglib>
The class supporting a JSP tag (for example, DowJonesHandler) has to implement the interface javax.servlet.jsp.tagext.SimpleTag or extend SimpleTagSupport. The JSP container will call DowJonesHandler’s methods to set the JSP context (setPageContext()) to start the execution of the tag’s code — doStartTag(), and so on. This class gives you a default implementation of the SimpleTag interface and initialized references to the pageContext and parent. Place required logic for the tag in the doTag() method, which is called by the container at request time:
import javax.servlet.jsp.*;
import javax.servlet.jsp.tagext.*;
import java.io.*;
public class DowJonesHandler extends SimpleTagSupport{
public int doTag() throws JspException, IOException{
String dowQuote;
// Obtain the DowJones quote by accessing
// http://finance.yahoo.com/q?d=t&s=^DJI or similar
dowQuote=...;
// and write it to the client
JspWriter out = getJspContext().getOut();
out.print("The last price is " + dowQuote);
}
}
To make a tag library recognizable by your JSP container, you should register it by inserting the following fragment into the file web.xml:
<taglib>
<taglib-uri>
http://www.mystockserver.com/taglib
</taglib-uri>
<taglib-location>
/WEB-INF/taglib.tld
</taglib-location>
</taglib>
When you’ve done all this, create a simple file called test.jsp and start using your tag library. The sample JSP in Listing 27-5 uses the tag <DowJones>.
Listing 27-5: Using a custom tag in a JSP
<html>
<head>
<%@ taglib uri=http://www.mystockserver.com/taglib
prefix="sts" %>
</head>
<body>
Today's Dow Jones index: <sts:DowJones/>
</body>
</html>
If a tag requires some parameters, they should be specified in the .tld file with the tag <attribute>; for example:
<tag>
...
<attribute>
<name>tradeDate</name>
<required>false</required>
</attribute>
</tag>
The setter method has to be provided in the tag handler class for each parameter. Setters have to be named according to the same naming convention as Java beans:
public void setTradeDate(String tradeDate){
...
}
Custom tag libraries are created by application developers to fit the needs of a specific project(s). Third parties can also provide non-standard-based tag libraries. Apache hosts standard tag libraries based on the JSTL described next.
JSTL
JSP Standard Tag Library (JSTL) is a standardized specification for library components that includes actions that are reusable for many JSP-based applications. Standard JSTL guarantees that any Java EE–compliant JSP container will include and support these components. There are five JSTL libraries. They contain an iterator, if statements, tags for XML processing, tags for executing SQL, tags for internationalization, and commonly used functions.
Whereas the JSP in Listing 27-3 had to specify the location of the tag library on your server, standardized libraries have predefined URLs. For example, to use the forEach iterator you’d need to specify the following URI: http://java.sun.com/jsp/jstl/core. XML processing tags are located at the following URI:http://java.sun.com/jsp/jstl/xml. Accordingly, the code fragment that uses the iterator can look like this:
<%@ taglib uri="http://java.sun.com/jsp/jstl/core" prefix="c" %>
<c:forEach var="item" items="${sessionScope.cart.items}">
...
</c:forEach>
For learning programming with JSTL and Expression Language please refer to the Oracle tutorial at the following URL: http://download.oracle.com/javaee/5/tutorial/doc/bnake.html.
Try It
Rewrite the sample stock server application that you created in the “Try It” of Listing 24-2 from Lesson 24 for generating the price quotes.
Lesson Requirements
You should have Java installed.
NOTE You can download the code and resources for this “Try It” from the book’s web page at www.wrox.com/go/javaprog24hr2e. You can find them in the Lesson27.zip file in the download.
Step-by-Step
1. In the document root folderof Eclipse project Lesson27 create an HTML file GetPriceQuote.html that has a <form> tag with two <input> fields—a text and a Submit button—so the user can enter the stock symbol and send a request for the price quote. The action attribute of the form should point at the URL of the StockQuote.jsp . The <body> section of GetPriceQuote.html may look like this:
2. <body>
3. <form action=http://localhost:8080/Lesson27/StockQuote.jsp
4. method=Get>
5. <input type="text" name="symbol"
6. placeholder="Enter stock symbol">
7. <input type="submit" value="Get Price Quote">
8. </form>
9. </body>
10. In document root create a new JSP file named StockQuote.jsp that should display a requested price quote.
11. Create a Java package lesson27.tryit.
12. Create a class called lesson27.tryit.StockPriceGenerator to implement randomly generated stock quotes for the specified stock with code similar to what is shown in Listing 24-2 from Lesson 24, but it has to be a POJO.
13.Create a Java bean lesson27.tryit.Stock that has a private field symbol and public getter and setter method to get and set the symbol’s value. The class Stock should implement Serializable.
14.Use JSP tags to include the StockPriceGenerator Java class in StockQuote.jsp, and display the price quote generated by its method getQuote() as well as the list of all available stock symbols by calling getNasdaqSymbols().
15.The JSP should use StockPriceGenerator, Stock, <jsp:useBean>, and <jsp:setProperty>. For example:
16. <%@page import="lesson27.tryit.StockPriceGenerator"%>
17. ...
18. <body>
19. <jsp:useBean id="stock" class="lesson27.tryit.Stock" />
20. <jsp:setProperty property="*" name="stock" />
21. <%!StockPriceGenerator stockServer=new StockPriceGenerator();%>
22.
23. Symbol: <%=stock.getSymbol()%>
24. Price: <%=stockServer.getPrice(stock.getSymbol())%>
25. </body>
26.Restart GlassFish server if it’s already running. Run and test GetPriceQuote.html from Eclipse and your web browser. Figure 27-3 shows how it looks in my Eclipse internal web browser.
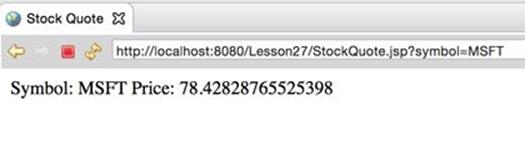
Figure 27-4: Running GetPriceQuote.html
TIP Please select the videos for Lesson 27 online at www.wrox.com/go/javaprog24hr2e. You will also be able to download the code and resources for this lesson from the website.
All materials on the site are licensed Creative Commons Attribution-Sharealike 3.0 Unported CC BY-SA 3.0 & GNU Free Documentation License (GFDL)
If you are the copyright holder of any material contained on our site and intend to remove it, please contact our site administrator for approval.
© 2016-2026 All site design rights belong to S.Y.A.