Wrox Press Java Programming 24-Hour Trainer 2nd (2015)
Lesson 29. Introducing JNDI
Instead of having distributed Java programs that instantiate lots of reusable objects over and over again, it’s better if these objects are pre-created and published at a known server, where they can be easily and quickly found. Lesson 24 introduces a registry concept, in which a Java object can be published under some name so the client can look it up.
Java Naming and Directory Interface (JNDI) is also about registering and finding objects in distributed applications. JNDI is an application programming interface (API) that can be used for binding and accessing objects located in Java EE or specialized naming servers that play roles similar to that of a company telephone directory assistance service. But instead of looking for people’s information, you look for objects. Various software vendors offer specialized directory assistance software, and JNDI provides a standard API to read from and write to such directories.
Every Java EE application server comes with an administrator’s console that allows you to manage objects in a JNDI tree. This lesson introduces you to the JNDI concepts, and you see how to use JNDI for publishing (and looking up) administered objects (that is, configured by the server administrator). Some examples of administered objects are database connection pools and message queues (explained in Lesson 30).
Naming and Directory Services
A naming service enables you to add, change, or delete names of objects that exist in some naming hierarchy so other Java classes can look them up to find their location. One more analogy: In a library, you find the name of the physical location of the book in a directory and then go to the shelf to pick up the book. A naming service provides a unique name for every entry that is registered with (bound to) this service. Every naming service has one or more contexts—think of directories and subdirectories in a file system, where any directory tree with children is a context. The naming tree originates from a root node, which is also known as an initial context (like a root directory on the disk).
A directory service enables you to search the naming tree by object attributes rather than object names. One example is that of the domain name system, which is a distributed naming system that takes the domain name of a networked computer or service and returns the IP address and port number of the resource.
To allow clients to do lookups, there has to be a process that initially binds the objects to a naming tree. This can be handled via a sever administration console or an independent program that (for example) binds employee names to a directory server of some organization. Java EE servers bind such objects as EJB, Servlets, JMS, and database connection pools to their naming servers during startup.
All classes and interfaces that support JNDI are located in the package javax.naming that comes with Java EE SDK.
Using the Class InitialContext
The class InitialContext represents the root of a JNDI tree in a naming server. There are two ways of getting a reference to a particular resource that was bound to this tree:
· If your Java code runs inside Java EE server, it can can inject the JNDI resource into your program by using @Resource annotation. Your program can also run a lookup() on the InitialContext object.
· If an external Java program needs a JNDI resource (for example, a standalone messaging program needs to get references to the message queues bound to the JNDI tree of an application server), it has to get a reference to the InitialContext and then invoke the method lookup() .
Getting a Reference to InitialContext
Explicit instantiation of InitialContext is needed only if you are planning to use lookup() as opposed to resource injection, which is explained in the next section. If a Java program runs inside the application server, instantiating the InitialContext object comes down to one line of code:
Context initContext = new InitialContext();
If a Java program runs outside of the application server, you need to specify the location of the server, the names of the vendor-specific classes implementing InitialContext, and the access credentials. For example, for the WildFly application server, the following code may be used (given that you know the security credentials):
final Properties env = new Properties();
env.put(Context.INITIAL_CONTEXT_FACTORY,
"org.jboss.naming.remote.client.InitialContextFactory");
env.put(Context.PROVIDER_URL, “http-remoting://127.0.0.1:8080");
env.put(Context.SECURITY_PRINCIPAL, “Alex123”);
env.put(Context.SECURITY_CREDENTIALS, “MySecretPwd”;
Context initContext = new InitialContext(env);
If an external program needs to access the InitialContext object in the GlassFish server, the code may look like this:
final Properties env = new Properties();
env.setProperty("java.naming.factory.initial",
"com.sun.enterprise.naming.SerialInitContextFactory");
env.setProperty("java.naming.factory.url.pkgs",
"com.sun.enterprise.naming");
env.setProperty("java.naming.factory.state",
"com.sun.corba.ee.impl.presentation.rmi.JNDIStateFactoryImpl");
env.setProperty("org.omg.CORBA.ORBInitialHost", "localhost");
env.setProperty("org.omg.CORBA.ORBInitialPort", "8080");
InitialContext initContext = new InitialContext(env);
You need to read the documentation that comes with your application server to get the proper code for accessing JNDI from an external program.
After receiving a reference to InitialContext, you can invoke a lookup() method specifying the name of the required resource. Lesson 30 explains Java messaging in detail, but for now I’ll just show you an example of getting a reference to a message queue named test:
Destination destination = (Destination)
initContext.lookup(“jms/queue/test");
The next code samples show how to get a reference to an EJB and a default JDBC data source:
MySessionBean msb = (MySessionBean) initContext.lookup(
"java:comp/env/ejb/mySessionBean");
DataSource ds = (DataSource) initContext.lookup(
"java:comp/env/jdbc/DefaultDataSource");
The next section shows you an example of preferable way of getting JNDI resources by injection.
Injecting JNDI Resources
Most likely, your Java programs that need JNDI resources will run inside some Java EE application server, which greatly simplifies getting a hold of such resources. In this case you don’t even need to instantiate InitialContext or invoke lookup().
Resource injection with the annotation @Resource is a cleaner and simpler way of providing these resources to your Java EE components. In Lesson 30 you use resource for getting references to JMS objects, which look as follows:
import javax.annotation.Resource;
...
@Resource(name="MyTestConnectionFactory")
private ConnectionFactory factory;
@Resource(name="MyJMSTestQueue")
private Queue ioQueue;
For example, you could place this code in a Java servlet, which sends messages to a Queue bound to the JNDI tree under the name MyJMSTestQueue with the help of the ConnectionFactory that has the JNDI name MyTestConnectionFactory. These resources are injected into variablesioQueue and factory by the servlet container—no need to do a lookup.
Depending on its location, the time of injection varies. If you put the @Resource annotation at the class level, the resource is injected during run time when the application looks it up. If you put this annotation above the field or setter method declaration, the resource is injected in the component when the application is initialized.
If you need to override resources specified in annotations, you can do it in XML configuration files. You see more examples of using resource injection with EJB in Chapter 31. Later in this lesson you use resource injection of JDBC DataSource. Meanwhile, take a look at the GlassFish Administration Console.
Administering JNDI Objects in Glassfish
Each Java EE application server offers a tool that allows administration of its service modules; we are interested in binding objects to their directory names. When you start GlassFish there is a message on the console: “Waiting for DAS to start...” DAS stands for Domain Administration Server, which authenticates the user with administrative privileges and responds to requests from a graphical web browser-based Admin Console. To use the console enter the following URL in your browser: http://localhost:4848/. You see the console, as in Figure 29-1.
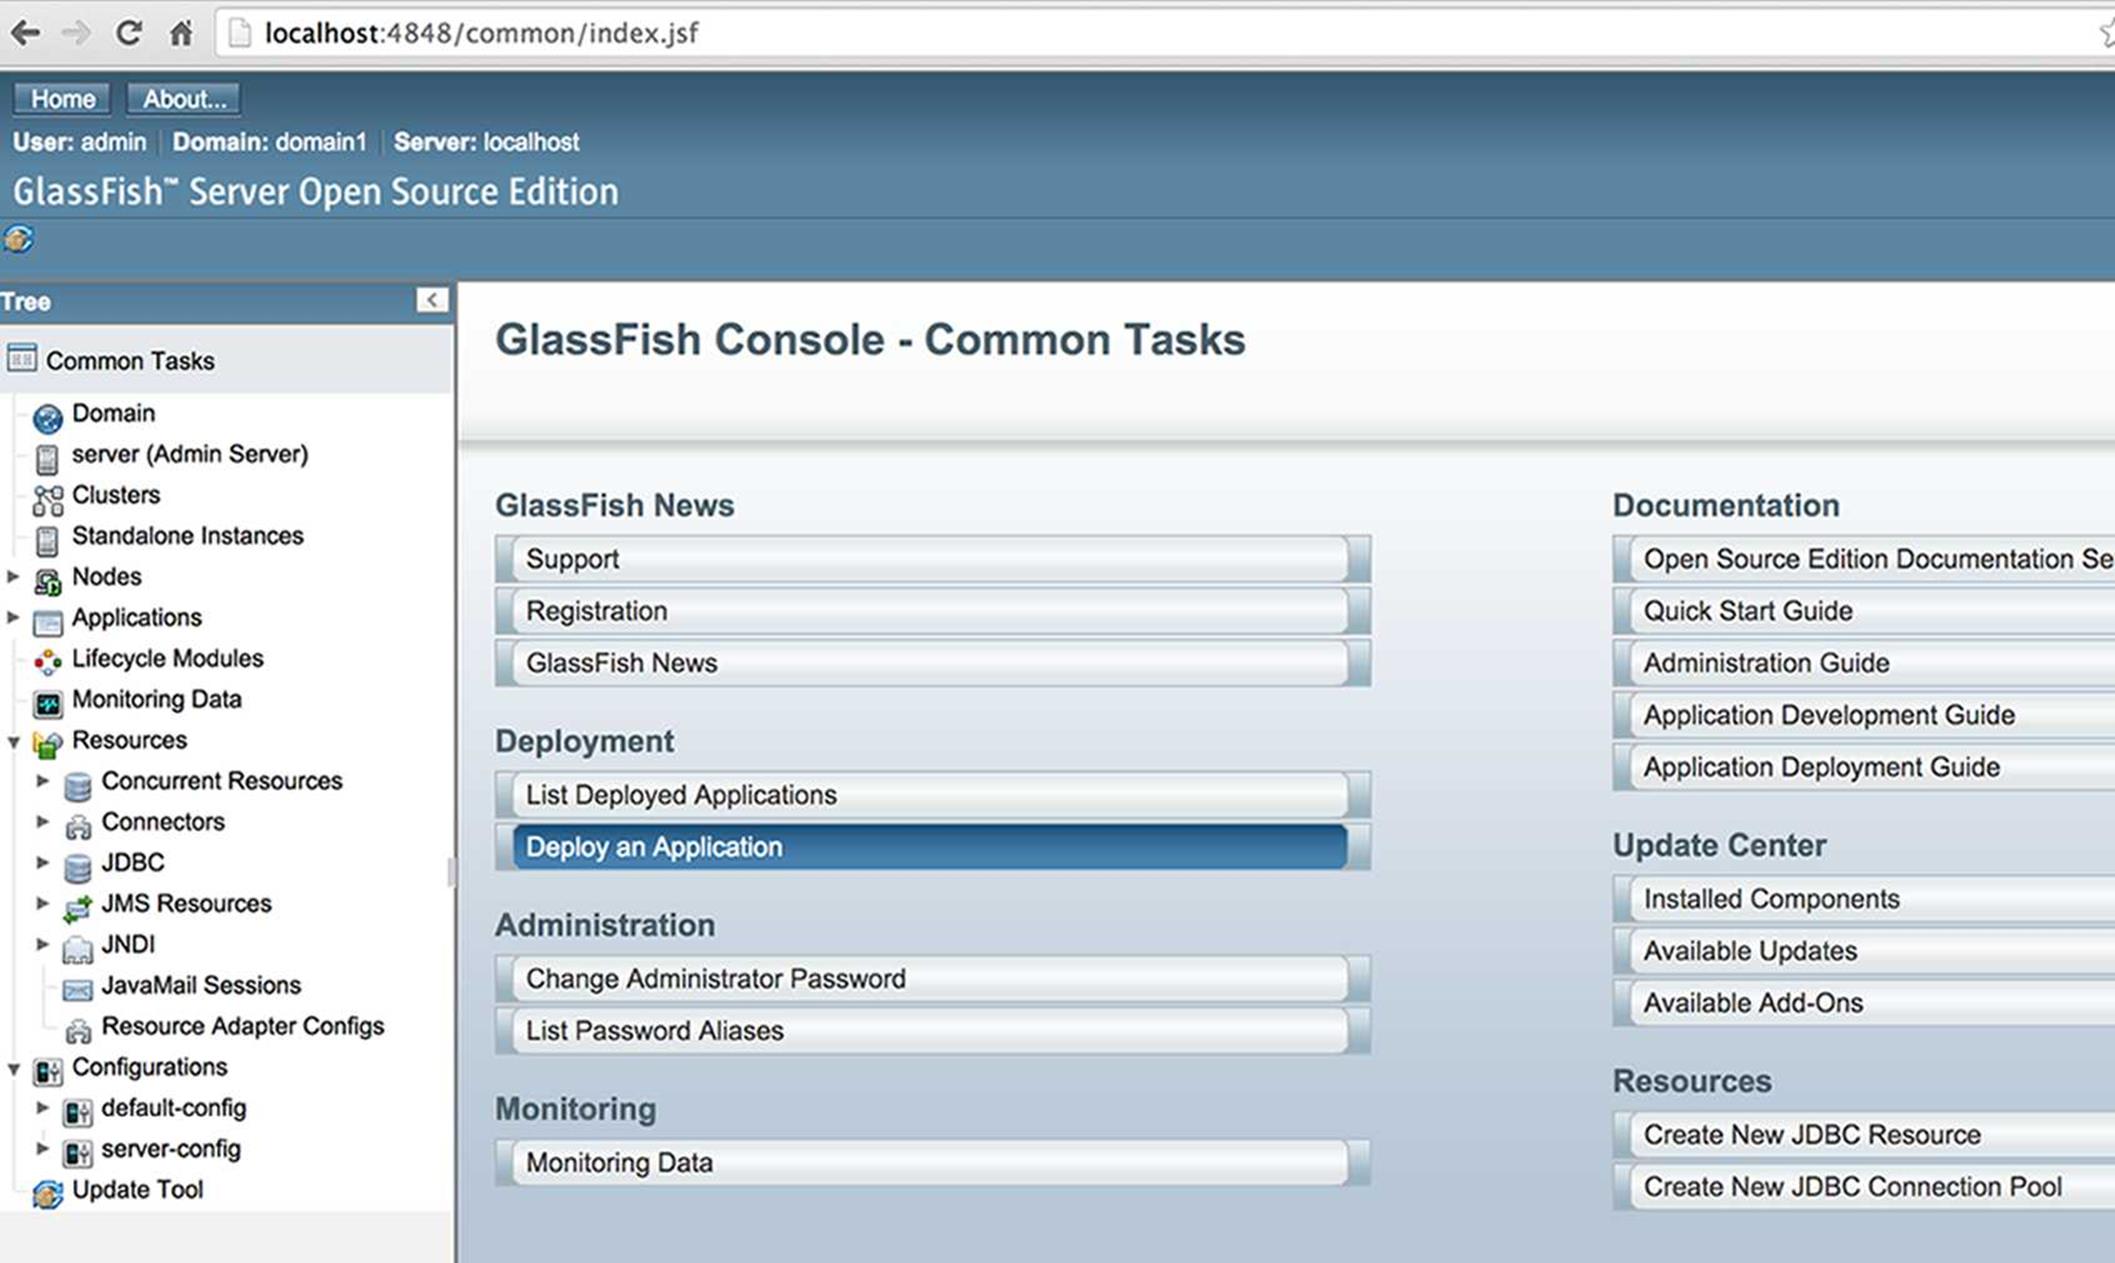
Figure 29-1: GlassFish Administration Console
Administration Console enables you to configure your instance(s) of GlassFish server and administer various resources that should be available to Java EE applications. In Lesson 30 you see how to configure JMS resources.
Datasource and JNDI
In Lesson 21, in the section "Connection Pools and Datasource,” you learn that creating a new connection object for each request is a slow operation, and it’s better to work with database connection pools that reuse pre-created JDBC connections.
Typically the administrator of the Java EE server pre-creates the pools of database connections and configures the minimum and maximum number of connections and some other parameters on connection pools. To configure a new DBMS connection pool in GlassFish, use the Administration Console’s entry JDBC Connection Pools (see Figure 29-2) and press the button New.
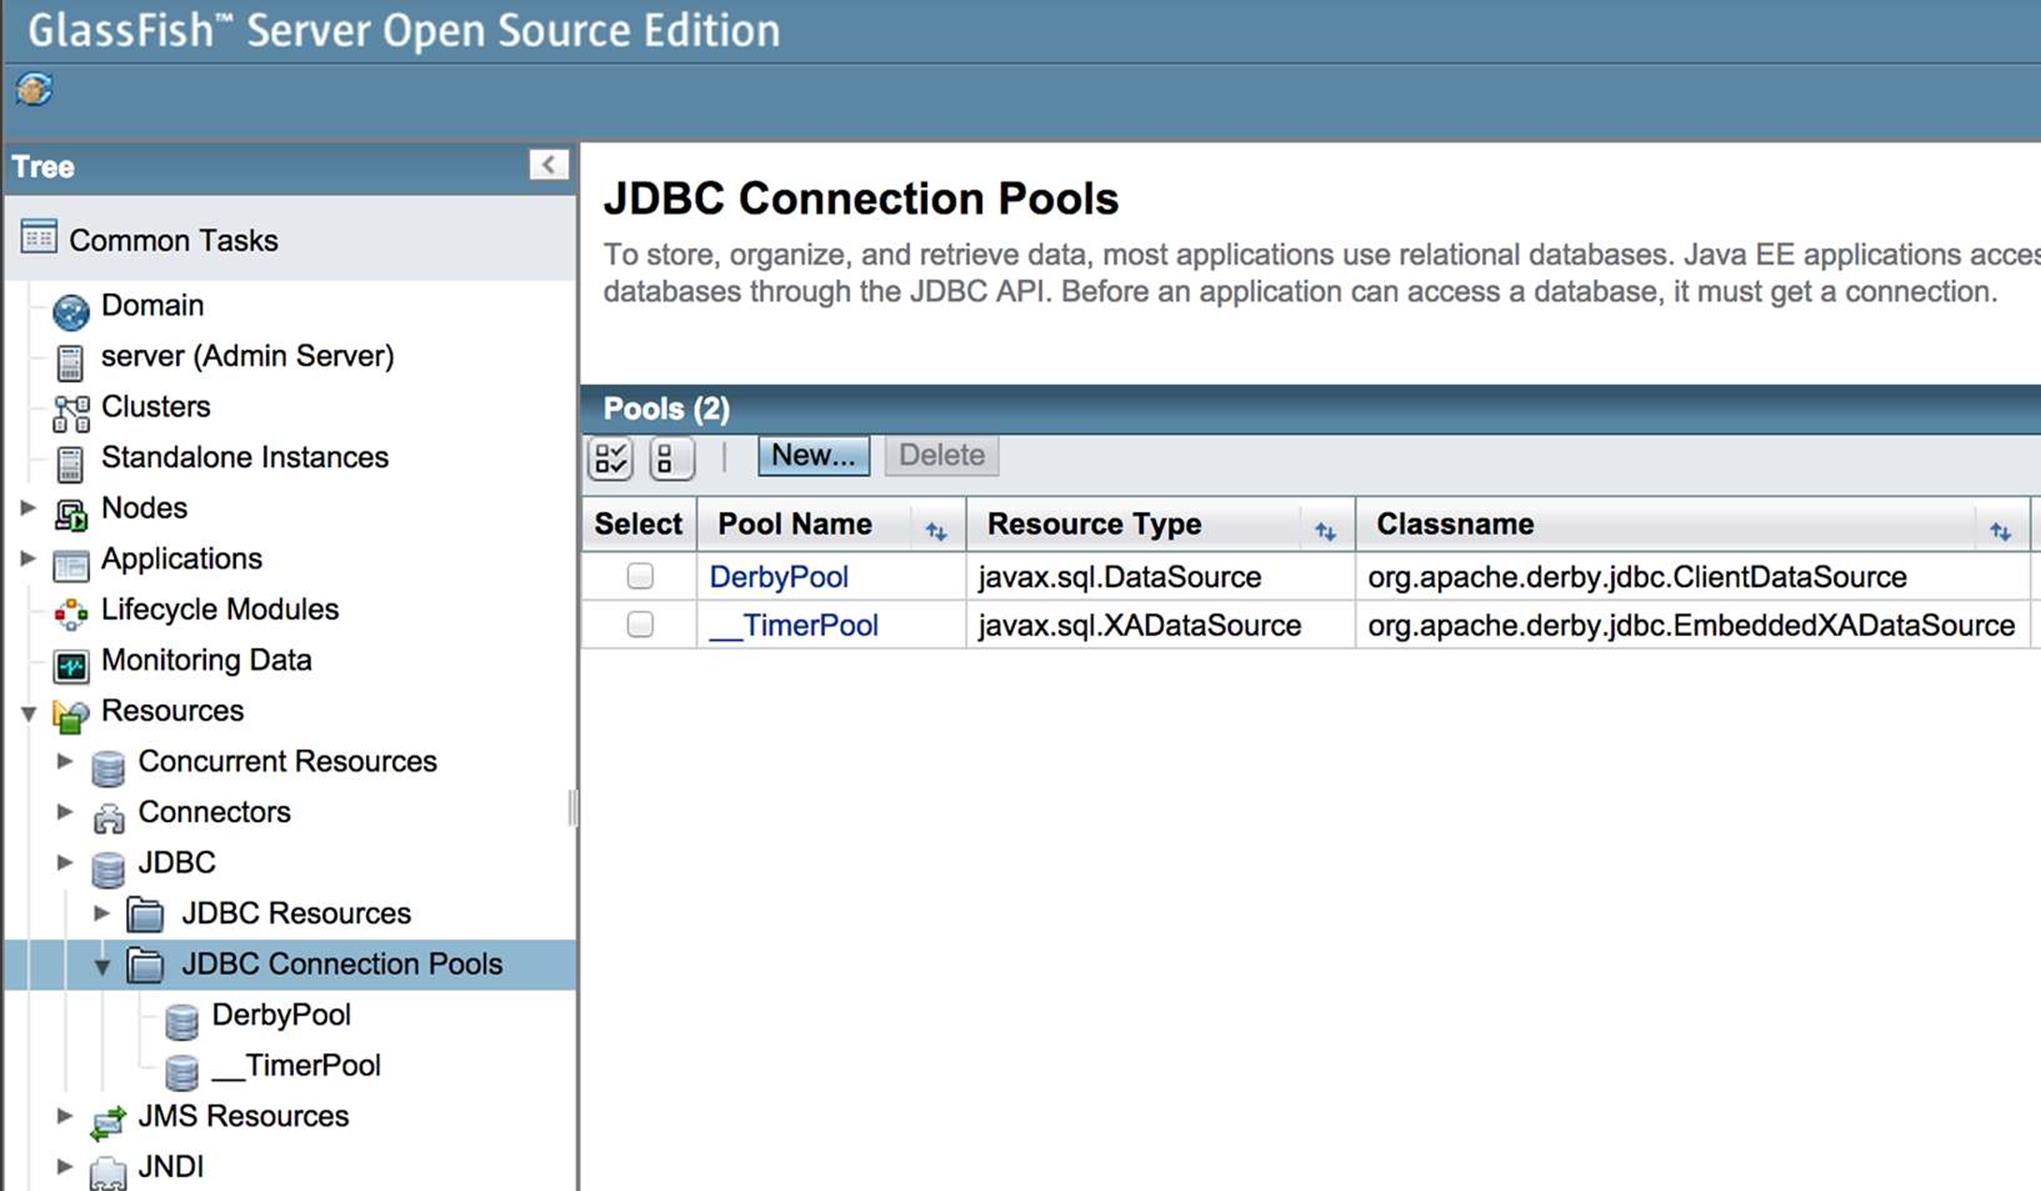
Figure 29-2: JDBC connection pools in GlassFish
Then you’d need to add parameters for the new pool. GlassFish includes DerbyDB database server and has a preconfigured pool for it. Figure 29-3 shows a snapshot of the GlassFish administration console, where the existing resource named DerbyPool represents a pool of JDBC connections. The object javax.sql.DataSource is a factory of database connections. The administrator configures this factory as a JNDI resource, specifying what JDBC driver to use, how many connections to create initially, and the maximum number of connections allowed.
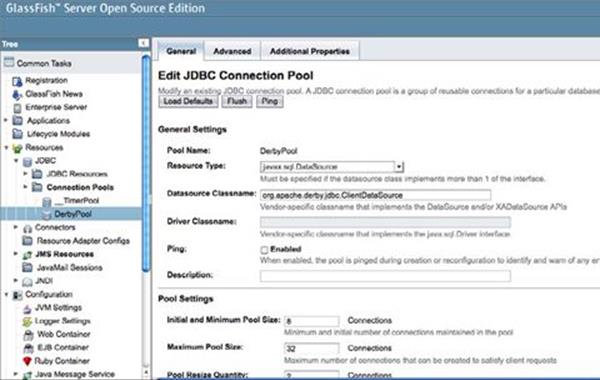
Figure 29-3: DerbyPool is configured to have from 8 to 32 connections
Configuring GlassFish Resources
GlassFish (and other Java EE servers) has an alternative way of creating and configuring resources by using an XML configuration file. GlassFish resources can be specified in the file glassfish-resources.xml that the server loads on startup.
The Java program that needs a JDBC connection gets access to the connection pool by its JNDI name (DerbyPool in this case) and makes a getConnection() call on this resource. If unused connections are available, the Java class immediately gets an instance of the Connection object that internally implements PooledConnection. If many users are making concurrent requests, all connections may be taken, and there is a slight delay until one of the busy connections is returned to the pool. Connection is auto-closable, and it gets returned to the pool on closing. Connections returned to the pool are not destroyed; they are preserved by the application server for future requests.
You can do either a JNDI lookup of the DataSource object or inject it to your Java code. In Lesson 21 you’ve been using a standalone Java program, which invoked DriverManager.getConnection() to get the Connection object. But now you can use getConnection() on the DataSource object taken from the pool. If the name of the configured DataSource object is DerbyPool, the sample code to obtain a pooled database connection may look as follows:
InitialContext ic = new InitialContext();
DataSource ds = (DataSource) ic.lookup("DerbyPool");
Connection myConnection = ds.getConnection();
//The rest of the JDBC processing goes here as in Lesson 21
Injecting a DataSource using the @Resource syntax would look like this:
@Resource(name="java:global/DerbyPool")
DataSource ds;
You have a chance to work with the DataSource while working on the assignment from the "Try It” section of this lesson.
Lightweight Directory Access Protocol
Lightweight Directory Access Protocol (LDAP) servers are specialized software products that store directory entries in hierarchical trees and are highly optimized for reading. This makes them a good choice for such directory services as employee lists or phone directories in an organization. Directories are mainly read, not changed, and this is where LDAP servers shine.
From the enterprise Java perspective you should keep LDAP solutions in mind when a really fast lookup of some Java objects is needed, such as with JMS connection factories, queues, or topics. Java developers use the JNDI API to bind, look up, and update the entries in LDAP. JNDI is to LDAP servers as JDBC is to DBMSes.
These are some popular LDAP servers:
· Oracle Directory Server (Oracle)
· Microsoft Active Directory (Microsoft)
· OpenLDAP (open-source, community developed)
· ApacheDS (open-source, Apache)
· OpenDJ (open-source, community developed)
The LDAP directory tree has a root entry, which consists of one or more distinguished names (unique identifiers). Typically the top of the hierarchy is an object with the prefix o for organization. One level below has the prefix ou for organizational unit, cn stands for common name, and so on. Unlike with other naming services, the search string starts from the very lowest hierarchical entry and the root entry has to be specified last. Here’s an example of a distinguished name that can be used in a search:
cn=jsmith, ou=accounting, o=oracle.com
This means “Find the entry that goes by the name jsmith located under accounting node, which in turn is located under oracle.com." The preceding search string corresponds to the following hierarchy in an LDAP tree:
o = oracle.com
ou = accounting
cn = jsmith
The next Java code snippet specifies the JNDI properties, connects to the LDAP server running on port 389, and looks for the object called CustomerHomethere:
Hashtable<String, String> env = new Hashtable<>();
env.put(Context.INITIAL_CONTEXT_FACTORY,
"com.sun.jndi.ldap.LdapCtxFactory");
env.put(Context.PROVIDER_URL, "ldap://localhost:389");
env.put(Context.SECURITY_AUTHENTICATION,"simple");
env.put(Context.SECURITY_PRINCIPAL, "cn=Directory Manager");
env.put(Context.SECURITY_CREDENTIALS,"myPassword");
DirContext ctx = new InitialDirContext(env);
CustomerHome custHome =(CustomerHome) ctx.lookup("cn=CusomerHome,
ou=RealBigProject, o=trump.com");
To study distributed applications you can run all the examples from this book (clients and servers) on a single computer, but real-world distributed applications can be constructed in various ways; for example:
· Computer #1 runs the LDAP server.
· Computer #2 runs an application server that has registered (published) some objects with the LDAP server on Computer #1.
· Computer #3 has a client program that finds object references on Computer #1 and invokes their methods on Computer #2.
· Computer #4 runs a DBMS server that is being used by the application server running on Computer #2.
· Computer #5 publishes financial market data, and Computer #2 subscribes to this service.
...and so on, and so on.
September 11
When the terrorists attacked and destroyed the World Trade Center, I was working for a firm that lost the data center as a result of this attack. I was working on a financial trading application that utilized messaging. The JMS objects that were using New York’s data center were bound to an LDAP server located in North Carolina. When the reserved data center started functioning in New Jersey, we just ran the program to rebind the JMS objects to the LDAP server so they would point at the messaging server in a new location. Because of such a flexible architecture, the firm’s trading application was not operational for only three days.
This lesson has shown you how to use JNDI and given some examples of why you may want to use it. Comparing the code in Listing 30-1 with the one in messageservlet is just one example that shows that naming and binding specific physical objects under a generic JNDI name enables you to remove these physical locations from your program code. Lesson 30 and Chapter 31 give more examples of using JNDI.
Try It
In this assignment you need to create a servlet deployed under GlassFish server, which should obtain a connection to DerbyDB by using the resource injection of a DataSource object.
Lesson Requirements
You should have Java and GlassFish 4 installed. GlassFish has to be configured in Eclipse IDE as described in Lesson 26 in Configuring GlassFish in Eclipse IDE.
NOTE You can download the code and resources for this “Try It” from the book’s web page at www.wrox.com/go/javaprog24hr2e. You can find them in the file Lesson29.zip.
Step-by-Step
1. Open the command (or Terminal ) window, switch to the folder glassfish/javadb/bin and start the instance of the DerbyDB that comes with GlassFish. You need to run startNetworkServer.exe (or startNetworkServer if you use Mac OS).
2. Start GlassFish from the Eclipse IDE.
3. In Eclipse, create a new Dynamic Web Project Lesson29 specifying GlassFish as the target run time.
4. Create a new servlet called MyDerbyClientServlet. This servlet should get the DataSource injected and use it for a connection to DerbyDB. Modify the generated code so the servlet looks as follows:
5. @WebServlet("/MyDerbyClientServlet")
6. public class MyDerbyClientServlet extends HttpServlet {
7. @Resource(name="java:global/DerbyPool")
8. DataSource ds;
9. protected void doGet(HttpServletRequest request,
10. HttpServletResponse response)
11. throws ServletException, IOException {
12.
13. try {
14. Connection myPooledConnection = ds.getConnection();
15. System.out.println("Got pooled connection to DerbyDB");
16.
17. } catch (SQLException e) {
18. e.printStackTrace();
19. }
20. }
21. }
22.Deploy the servlet: Right-click GlassFish in the Server view and select Add and Remove. Check the Eclipse console and locate the message that the Lesson29 application is loaded.
23.Right-click the servlet name and select Run on Server. You should see the message “Got pooled connection to DerbyDB” in the Console view.
24.Open GlassFish Administration Console and go to the Additional Properties tab of DerbyPool. Modify the database name to be Lesson29. 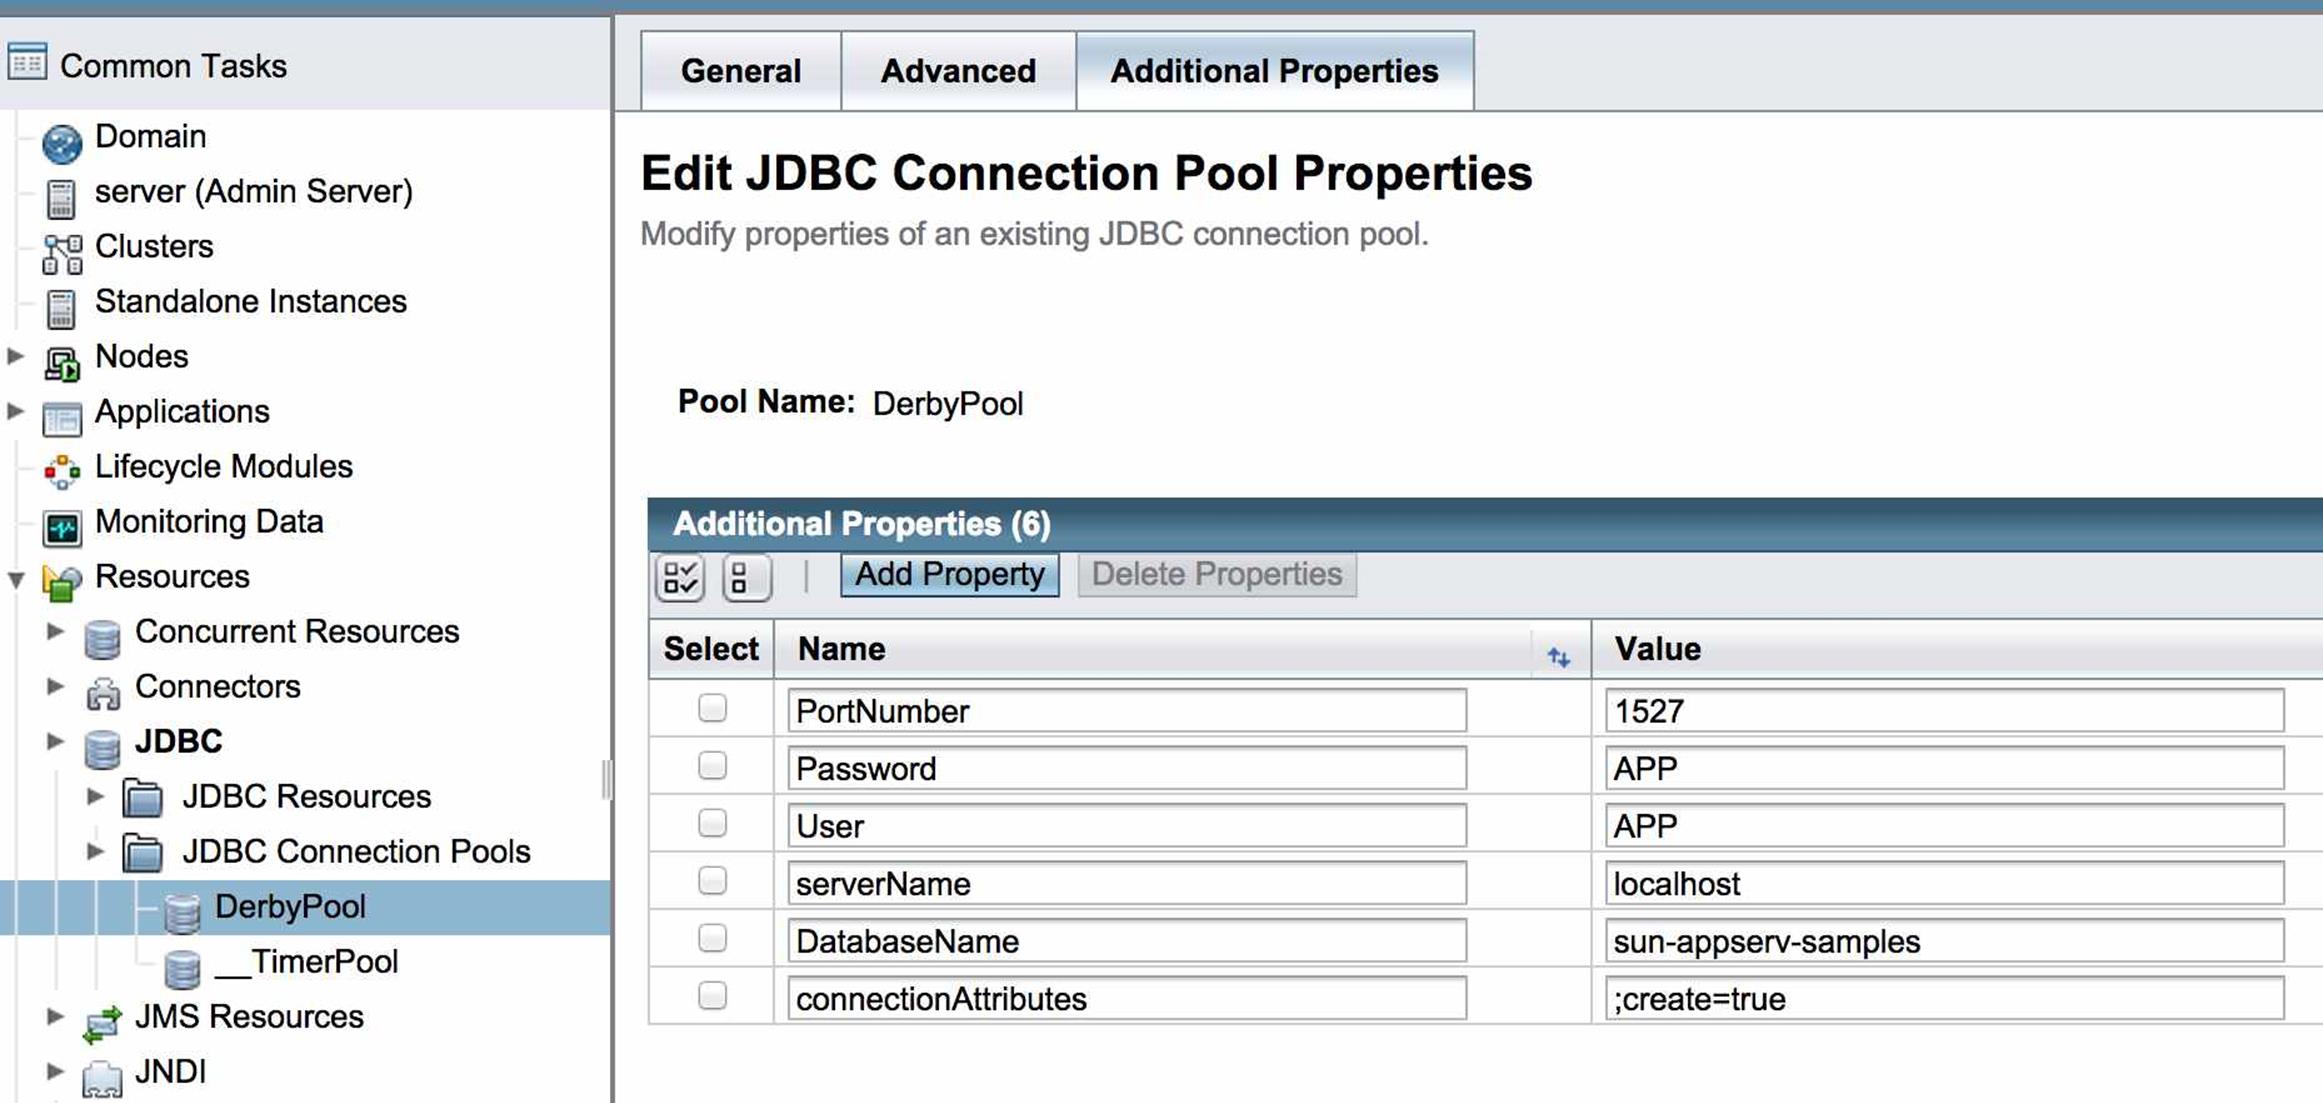
Figure 29-4: Additional Properties of the connection pool
25.Revisit Lesson 21 and create the Employee table as described in "Installing Derby DB” and “Creating a Database.”
26.Add the code to MyDerbyClientServlet that retrieves the data from Employee table (use employeelist_program as a reference).
27.Run the servlet MyDerbyClientServlet. It should retrieve the data from Employee and print them in Eclipse Console view.
TIP Please select the videos for Lesson 29 online at www.wrox.com/go/javaprog24hr2e. You will also be able to download the code and resources for this lesson from the website.