Wrox Press Java Programming 24-Hour Trainer 2nd (2015)
Lesson 28. Developing Web Applications with WebSockets
HTTP-based technologies like Java Servlets, JSP, or JSF use the request-response model. A web browser establishes a connection with the web server and sends a request, and then the server responds using the same connection; this is called a half-duplex communication. Think of a narrow bridge where cars can go only in one direction at a time.
As opposed to HTTP, WebSocket protocol is a two-way street (a full-duplex communication). The data travels in both directions over the same connection. The client doesn’t have to initiate the request; the server can push the data to the client when the new data is available.
Another important advantage that WebSocket protocol has over HTTP protocol is that the former adds almost no overhead to the data payload. The following list includes some of the web applications that can benefit from using the server-side data push with WebSocket protocol:
· Live trading/auctions/sports notifications
· Controlling medical equipment over the web
· Chat applications
· Multiplayer online games
Although you can create a Java client that uses raw socket connections and the Java can push the data to the client as needed, the server may be located behind the firewall or a proxy server and the company policy wouldn’t allow the opening of arbitrary ports for connections. Similarly to HTTP/HTTPS, the WebSocket protocol uses standard port 80 for requests and port 443 for secure connections. These ports are usually open. Besides, all HTML5-compliant web browsers support WebSocket protocol out of the box.
WebSocket protocol was standardized by the open standards organization Internet Engineering Task Force (IETF), and is supported by HTML5 and Java EE 7 (JSR 356). Besides the Java EE applications servers, websockets are supported by such popular servlet containers as Apache Tomcat 8 and Jetty 9.
This lesson shows you how to use websockets for the data exchange between web browsers and Java EE servers. But first, let’s go over the limitations of HTTP protocol.
HTTP Drawbacks
When you see constantly refreshing data on a web page (for example a new mail notification or a stock price change), the browser actually makes multiple requests in certain time intervals asking the server, “Do you have something for me?” If the new data is available, the browser refreshes a specified location on a web page. Just visit an actively traded stock on the Google Finance page during the stock exchange business hours, and it’ll give you an impression that the server pushes the latest prices, but this is not the case. The Google Finance web application makes multiple AJAX requests asking for data, and the server responds.
To see it, open the Developer Tools panel in Chrome web browser (using View → Developer → Developer Tools). Then select the Network tab and click the XHR tab, where you can see the AJAX requests issued by the browser. In Figure 28-1 you can see a snapshot of my screen while I was monitoring the price of Apple stock.
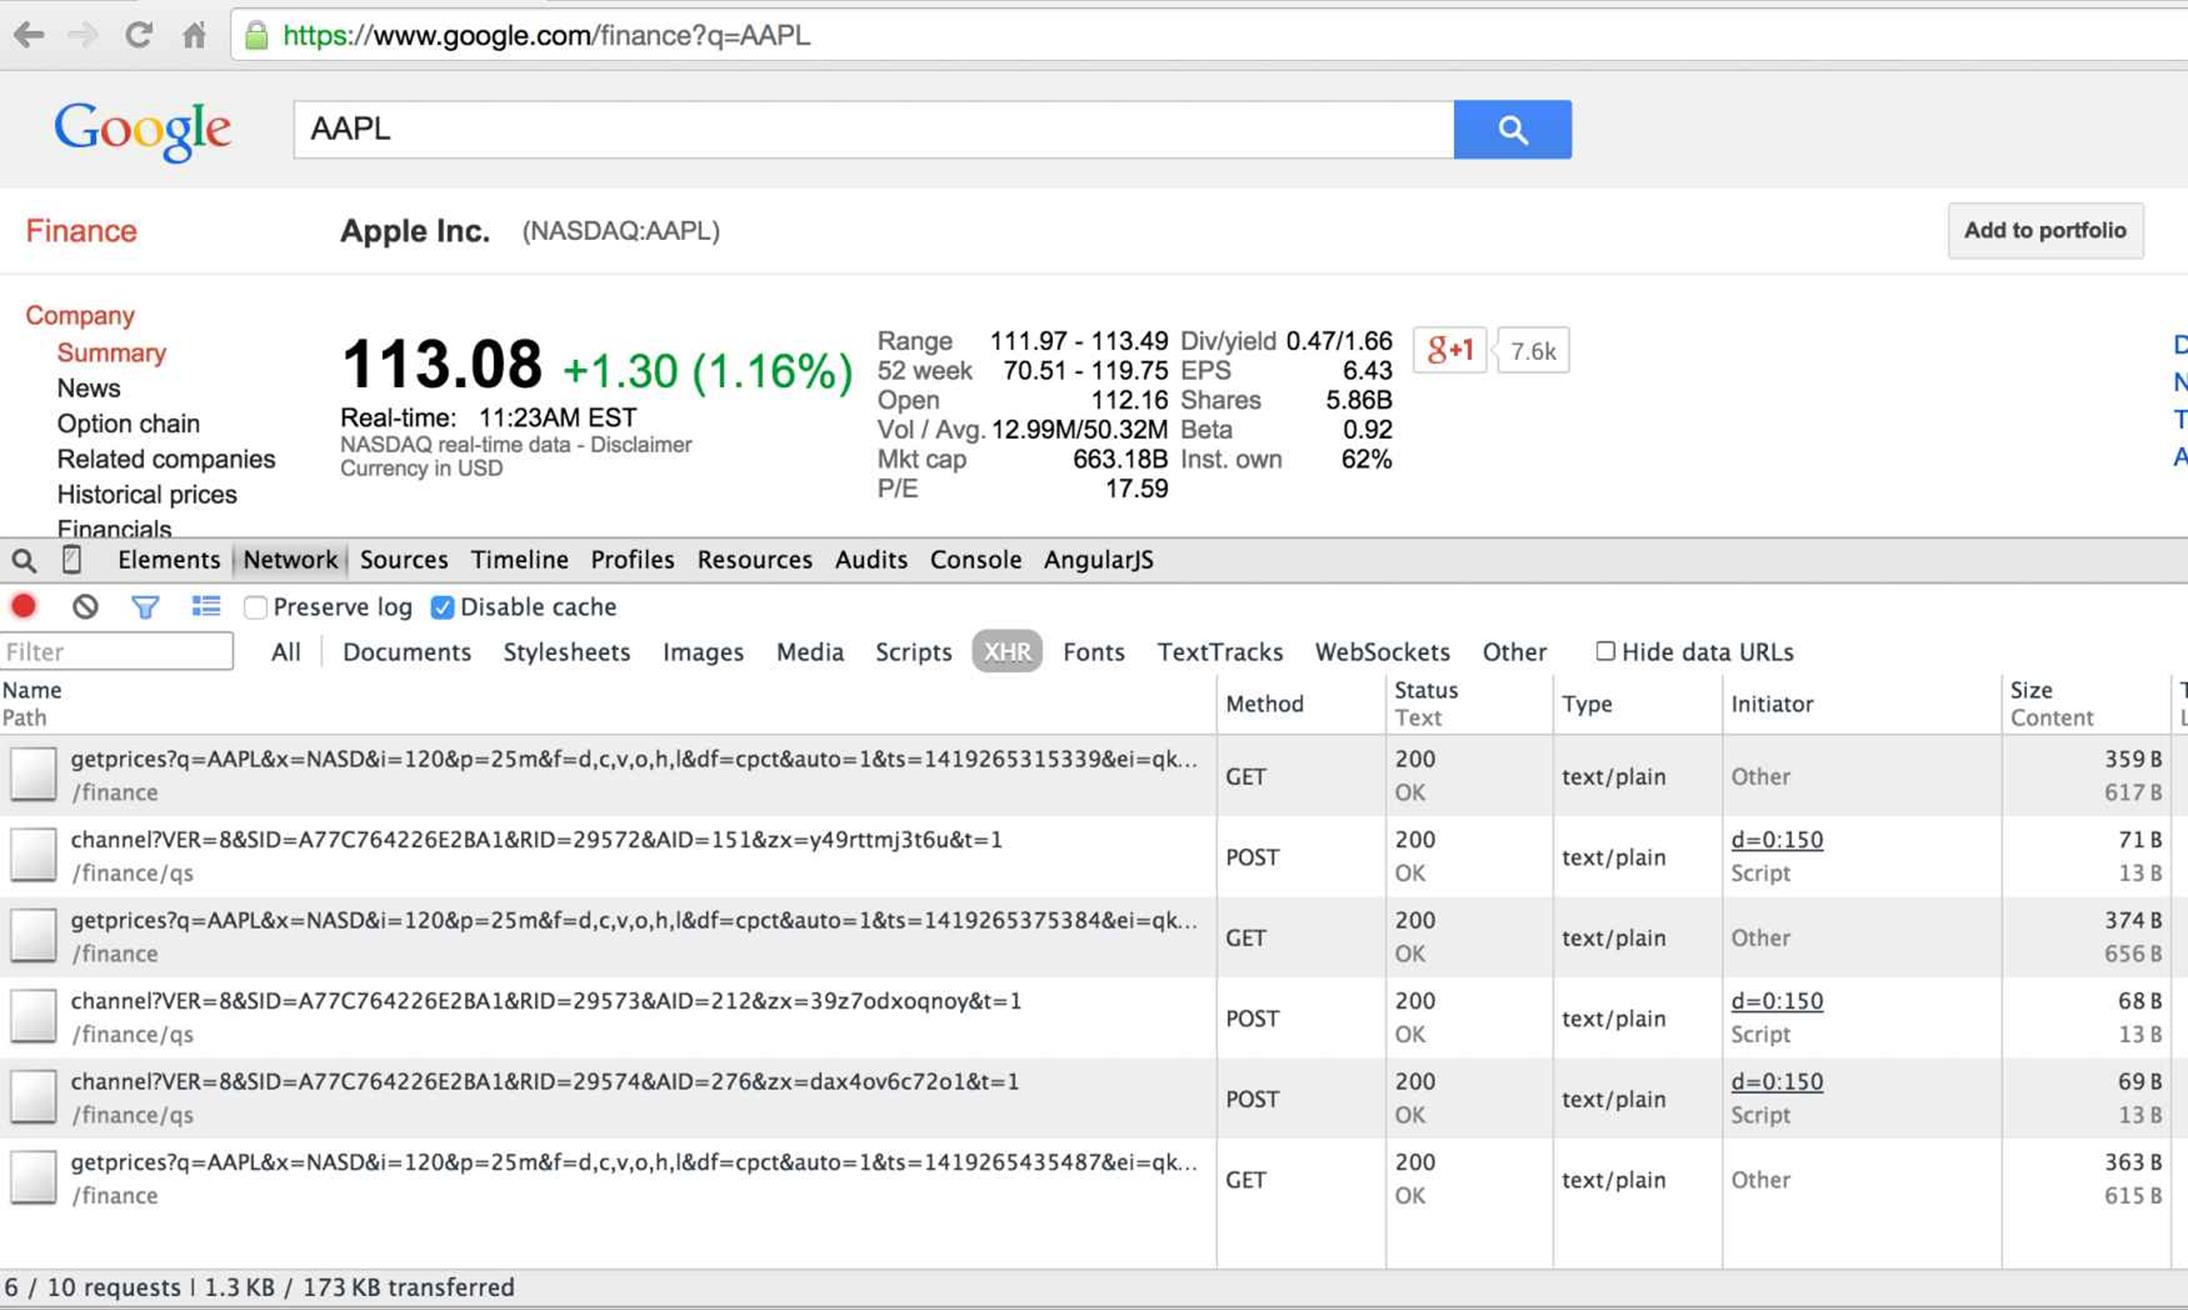
Figure 28-1: Monitoring AJAX requests in the Chrome browser
Note the size of these HTTP GET and POST requests on the right. Web browsers add hundreds of bytes to the actual data in the form of HTTP requests, and the server adds HTTP headers to the response, too. Besides, some of the polling requests might not even be needed because the stock price has not changed!
HTTP Hacks for Server-Side Data Push
Because HTTP doesn’t support a real server-side data push, software developers came up with several hacks to emulate the push. Before the WebSocket protocol was created, the following hacks were used to update the data on the web page without requiring a user to click or touch the graphical user interface (GUI) controls such as buttons, links, and so on:
· Polling
· Long polling
· Streaming
· Server-Side Events
With polling, the web browser in the specified time intervals establishes the connection with the server and polls the server asking for new data. Many such requests may return no new data, so each client sends and receives hundreds of bytes that contain only HTTP request and response objects without any useful data payload. With polling, the web browser connects-disconnects-reconnects with the server for each request.
With long polling, the web browser establishes one HTTP connection with the server and keeps it alive until the new data arrives from the server and then reconnects.
Typically a connection is established using the browser’s XmlHttpRequest object (for more information you need to get familiar with AJAX techniques, which is not covered in this book).
With streaming, the web browser establishes one HTTP connection with the server. As soon as the server gets the data ready, it starts streaming content (adding more and more data to the HTTP response object) without closing the connection. The server pushes the data to the client, pretending that the HTTP response never ends.
With Server-Side Events (SSE), web browsers can subscribe to events sent by a server. All modern browsers support the EventSource object, which can handle the Document Object Model (DOM) events. SSE allows the switch from a request-response model to a one-directional data push from server to browser.
All of the methods described here emulate a server-side data push while using request-response-based HTTP. With the WebSocket protocol you become HTTP-free, and web browsers use a bidirectional TCP-based communication with the server.
Client-Server Communication with Websockets
When a client communicates with the server via WebSocket protocol, we say that they use websockets. This section discusses the entire client-server data flow starting from the client’s requesting upgrade from HTTP to WebSocket protocol and ending with the client receiving the data from the server.
Besides being bidirectional, websockets have literally no overhead as only a couple of extra bytes are being added for framing the payload (the exact number of bytes varies depending on the size of the payload). Compare that with the hundreds of bytes in HTTP-based communications. The smaller overhead reduces the latency between the client and the server.
Web Browser as a WebSocket Client
A WebSocket client is typically programmed in JavaScript running inside a web browser. All web browsers released in 2012 or later support the WebSocket object, and the website http://caniuse.com/websockets can tell you if a specific older version of a web browser supports it, too. In JavaScript, you start with creating an instance of this object establishing a connection to the server, and then the client’s part of communications comes down to processing events dispatched by the browser when the connection is opened, the message arrives from the server, and so on. Accordingly, your client-side code can perform the following actions:
1. Initiate the connection to the server’s endpoint—create an instance of the WebSocket object providing the server’s URL
2. Write an onOpen() callback function
3. Write an onMessage() callback function
4. Write an onClose() callback function
5. Write an onError() callback function
Because this book doesn’t cover JavaScript programming, here I just show you an easy-to-read code fragment that performs all of the preceding steps in JavaScript running in a web browser. If you’re interested in reading more about HTML5 programming, you could read Enterprise Web Development (O’Reilly Media, 2014), which I coauthored. The following sample JavaScript code connects to the WebSocket echo server and defines all possible callback functions:
if (window.WebSocket) {
ws = new WebSocket("ws://www.websocket.org/echo");
ws.onopen = function() {
console.log("onopen");
};
ws.onmessage = function(e) {
console.log("echo from server : " + e.data);
};
ws.onclose = function() {
console.log("onclose");
};
ws.onerror = function() {
console.log("onerror");
};
} else {
console.log("WebSocket object is not supported");
}
When the new instance of the WebSocket is created, it makes a handshake request to the server specified as a URL. The URLs start with ws and wss as opposed to http and https. The handshake’s HTTP header includes the following attributes:
Upgrade: websocket
Connection: Upgrade
The request header also contains a unique value in the Sec-Websocket-Key attribute. If the server supports the WebSocket protocol, it returns HTTP status code 101 (switching protocols). The server applies a special hash code to Sec-Websocket-Key, generates another key, and places it in theSec-Websocket-Accept attribute of the HTTP response header. This proves that the server supports the WebSocket protocol. After that, the client opens a WebSocket connection with the server. Now both the client and the server know each other and can start sending messages to each other without any further ceremony. If the server doesn’t support websockets, it returns the status code 400—bad request.
When the server’s message is received, the callback method annotated with @OnMessage is invoked on the client.
If the client sends a message, the callback method annotated with @OnMessage is invoked on the server. If the server returns an error, the @OnError callback is invoked on the client. The @OnClose annotated method is invoked when the connection is closed.
Similar to raw socket connections, websockets do not define the data format of the message exchange. It’s the responsibility of the application to decide which subprotocol to use, and when the client instantiates a WebSocket object, it can pass to the constructor an optional parameter for the subprotocol, in which case the handshake will include the additional attribute Sec-WebSocket-Protocol.
To send a message from JavaScript, you can use one of the overloaded methods send(), which can take string or binary data (Blob or ArrayBuffer). When the client receives a message, you can do the type check in JavaScript as follows:
webSocket.onmessage = function(messageEvent) {
if (typeof messageEvent.data === "string"){
console.log("Received text data: " + messageEvent.data);
} elseif (messageEvent.data instanceof Blob){
console.log("Received blob data")
} elseif (messageEvent.data instanceof ArrayBuffer){
console.log("Received ArrayBuffer data")
}
};
Communication with the Server Using WebSockets
There are two ways of implementing a WebSocket endpoint in Java on the server. To create a programmatic endpoint you need to extend your class from javax.websocket.Endpoint and override the methods onOpen(), onMessage(), onError(), and onClose().
To create an annotated endpoint you need to annotate a POJO with @ServerEndPoint, and each of the callback methods with @OnOpen, @OnMessage, @OnError, and @OnClose. This lesson uses only the annotated endpoints, which are easier to write and read.
Server-side WebSocket endpoints are deployed in .war files of your web modules. No other configuration is needed. In Lesson 36, you’ll see how to automate deployment with Gradle.
With websockets, the client and server are peers and can initiate the message exchange independently from each other. Hence they need to know about each other. When a server-side callback method is invoked, it gets a Session object, which you can use to get a reference to the peer—the client—and start sending messages to it without the need of receiving any special requests. The next section demonstrates how to do such a server data push.
Hello WebSocket Example
Let’s create a Hello World-style WebSocket application. I’m not going to create an example, where the client makes a request and the server responds to it. I want the server to send the message to the client first. On the Java side I’m using just one callback method, greetTheClient() annotated with @OnOpen, that will be invoked on the server as soon as the client connects. The endpoint class will be annotated with @ServerEndPoint.
In Eclipse, create a Dynamic Web Project called Lesson28 with the target runtime GlassFish. Then create a Java class HelloWebSocket that looks like this:
import java.io.IOException;
import javax.websocket.OnOpen;
import javax.websocket.server.ServerEndpoint;
import javax.websocket.Session;
@ServerEndpoint("/hello")
public class HelloWebSocket {
@OnOpen
public void greetTheClient(Session session){
try {
session.getBasicRemote().sendText("Hello stranger");
} catch (IOException ioe) {
System.out.println(ioe.getMessage());
}
}
}
When the client connects to this WebSocket endpoint, the callback method greetTheClient() is invoked and the Session object that represents a conversation between peers is passed as an argument. The method getBasicRemote() returns the reference to the client’s endpoint, and sendText() sends a text message to this client. There is no special data request from the client; the server sends the message “Hello stranger” as soon as the connection is opened.
Now let’s create a simple HTML client that receives and displays the server’s message. In Eclipse, right-click the document root folder WebContent, and create there an HTML file index.html by using the menu File → New → Other → HTML File. When you see a Select HTML Template pop-up window, just select the template New HTML File (5). Eclipse creates a new file with the following HTML content:
<!DOCTYPE html>
<html>
<head>
<meta charset="UTF-8">
<title>Insert title here</title>
</head>
<body>
</body>
</html>
Now add one empty HTML tag <span> where the server’s message will be displayed. You also need a simple JavaScript code that opens the connection and declares the function to handle the onmessage callback. This is how your client should look (the manually added content is shown in bold):
<!DOCTYPE html>
<html>
<head>
<meta charset="UTF-8">
<title>Insert title here</title>
</head>
<body>
<span id="messageGoesHere"></span>
<script type="text/javascript">
var ws = new WebSocket("ws://localhost:8080/Lesson28/hello");
ws.onmessage = function(event) {
var mySpan = document.getElementById("messageGoesHere");
mySpan.innerHTML=event.data;
};
</script>
</body>
</html>
When the web browser loads this file, it runs the script, instantiates the WebSocket object, and registers the onmessage() callback function. There you get a reference to the <span> tag by calling getElementById() and set its content to the payload event.data, which contains “Hello stranger."
Deploy the project Lesson28 under GlassFish (right-click the server and select the “Add and Remove” menu), right-click the file index.html, and run it on the server. You see a web page with the text Hello stranger.
Passing Parameters with @PathParam
If you want to make your Hello WebSocket application more personal, you could ask the user for her name, save it in a JavaScript variable, and attach the name to the URI so the web client would connect to the following URI:
ws://localhost:8080/Lesson28/hello/Mary
Accordingly, on the server side you need to use a different URI value in @ServerEndpoint and the @PathParam annotation:
@ServerEndpoint("/hello/{userName}")
public class HelloWebSocket {
@OnOpen
public void greetTheClient(Session session,
@PathParam String userName){
...
}
The value “Mary” is injected in the method argument userName, and you can process it as any other method argument.
That’s all there is to it. This was an example of a server data push to the client. Now imagine that the server would be retrieving stock quotes or auction bids from a third-party server. The same technique can be used for refreshing the data in the browser’s window without any polling requests from the client.
Monitoring WebSocket Network Traffic
Google Chrome browser allows monitoring of the WebSockets traffic. I’m using the HelloWebSocket example from the previous section to show you what went over the wire. First, open the URL http://localhost:8080/Lesson28/index.html in Chrome, and then open Developer Tools and refresh the web page. The Network tab includes the WebSockets section. The data is sent in chunks called frames, and you can see “Hello stranger” in the Data column under the tab Frames, as shown in Figure 28-2.
In Figure 28-2, note that the length of the frame is only 14 bytes, where the length of the data is 13 bytes. No HTTP headers are present during the message exchange. The headers were only present during the initial handshake and the protocol upgrade. You can see them under the Headers tab, as shown in Figure 28-3.
You can see that the request header asked for a connection upgrade, and the GlassFish server has accepted it in the response header.
Chrome Developer Tools offer an easy way to monitor traffic between WebSocket peers. But if you’d like to peek inside the frames of WebSocket messages, use the network packet analyzer called WireShark.
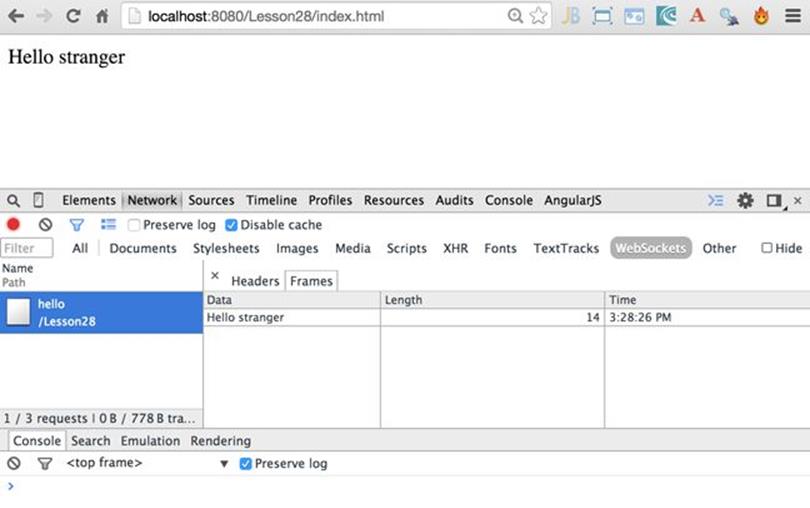
Figure 28-2: Monitoring WebSocket frames
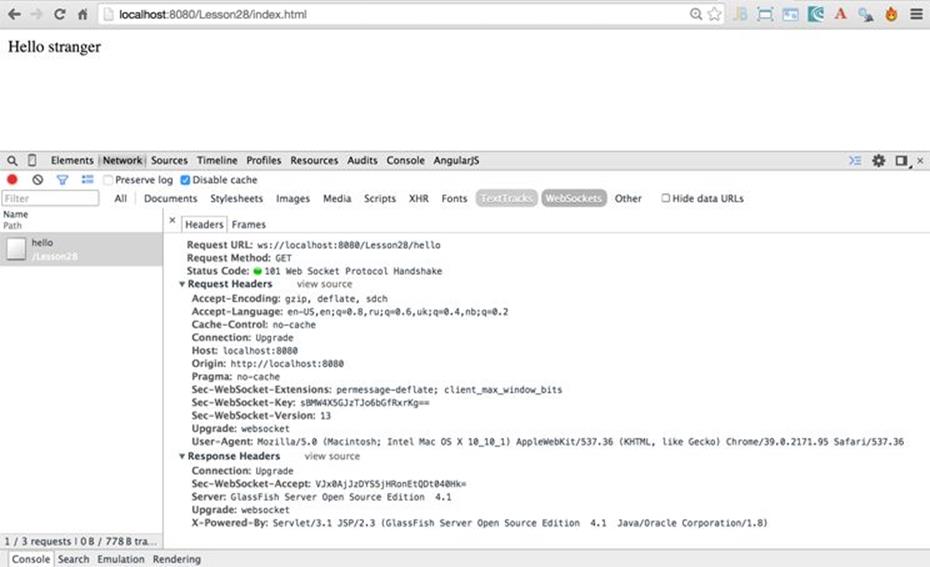
Figure 28-3: The handshake HTTP headers
Sending Messages
If you want to send the message from a JavaScript client, just use the method WebSocket.send(), which can take text or binary objects as arguments. On the Java side you use different methods of sending data depending on the object data type. For example, use the method sendText() from the object javax.websocket.RemoteEndpoint.Basic as you did in the HelloWebSocket example:
session.getBasicRemote().sendText("Hello stranger");
The method getBasicRemote() returned an instance of the RemoteEndpoint.Basicobject, which performs a blocking call to the peer. For sending asynchronous non-blocking messages, use the object RemoteBasic.Async instead, which you can obtain by calling getAsyncRemote() on theSession object.
If you’re not planning to send text, use such methods as sendObject(), sendBinary(), or sendStream(). The sender and receiver should ensure that the data types of the messages being sent are the same.
The server can also send a special control message known as ping to check whether the connection is alive. The ping may contain a small amount (up to 125 bytes) of application data, but usually it’s just some control word to identify the ping:
session.getBasicRemote().sendPing(ByteBuffer applicationData);
If the connection is alive, the web browser returns a pong of type PongMessage, which can be handled by the server endpoint in the @OnMessage annotated method.
The client can’t initiate a ping, though. You need to manually program some ping counter, and if pings are not coming from the server for more than a specified time interval, the client should reconnect.
Receiving Messages Using @OnMessage
The method in your Java class that’s responsible for handling messages should be annotated with @OnMessage annotation. The method must have at least one argument defining the type of the expected message.
If such a method returns a value, it’s sent to the peer as a message and should be handled there as any other WebSocket message. For example, the following message handler expects a String message and returns a String that is sent as a message to the peer:
@OnMessage
public String getStockPrice(String symbol){
String stockPrice;
// The code to get the stock price goes here
return stockPrice;
}
The online documentation for the @OnMessage annotation offers a choice of parameters:
· Exactly one parameter (text, binary, or a PongMessage)
· Zero to n String or Java primitive parameters annotated with the PathParam annotation for server endpoints
· An optional Session parameter
The String type parameters are used for sending textual data, ByteBuffer is for any binary data-like images, videos, or any BLOB. The server-side ping and the client side pong (the PongMessage ) are used in WebSockets for heartbeats—to keep the client-server connection alive.
Your endpoint class can declare up to three message handlers annotated with @OnMessage: one for each message type (text, binary, and pong).
An optional parameter Session (you used it in the HelloWebSocket example with @OnOpen) is needed if the server has to perform actions like sending a message to a specific client, getting parameters associated with the client’s request (for example, user preferences), or close the current conversation.
Endpoint Instances
By default, a WebSocket container creates a separate endpoint instance for each client’s connection, and the Session object can be used for storing the client’s state on the server. If you prefer to have one endpoint instance shared by multiple clients, you need to use the @OnOpen annotation with an additional optional parameter ServerEndpointConfig.Configurator (see the javadoc for details) and override the method getEndpointInstance() on the configurator.
A message handler method can return void, primitives and their wrapper classes, a byte array byte[], ByteBuffer, or your custom objects for which the encoder exists (covered in the next section).
Java-Based WebSocket Clients
JSR 356 describes how to write WebSocket clients in Java using an annotation @ClientEndpoint. Programming WebSocket Java clients is very similar to what you did on the server; you still need to annotate methods with @OnOpen, @OnMessage, and so on.
A web browser offers an instance of the WebSocket object so it can connect to the server endpoint without any special preparations. But if you write a WebSocket client in Java, you need to obtain the reference to the WebSocketContainer object first, and then you can connect to the server with the method connectToServer() providing the URI of the server’s endpoint. To compile a Java client, you have to include in the CLASSPATH some implementation (jars) of JSR-356 for the client—for example, Project Tyrus. Refer to Oracle’s WebSocket tutorialfor details of developing WebSocket clients in Java.
Encoders and Decoders
WebSocket protocol doesn’t define an application-specific protocol for data exchange, but it has a place to specify one of the supported subprotocol names that can be used in your application. For example, one of the popular messaging protocols is called STOMP, and you can find some relevant examples by searching for “Stomp Over WebSocket” online.
Besides, the Java implementation of the WebSocket protocol allows you to transform the message payload from one format to another during the client-server data exchange. Custom classes that perform this transformation are called decoders and encoders.
For example, a web browser sends a JSON-formatted string (see Lesson 33 if you’re new to JSON) to your Java WebSocket endpoint. You can create a class JsonToPojoDecoder that parses the incoming string and turns it into a POJO of specified type. Similarly, you can create a class PojoToJsonEncoder that serializes each POJO to a JSON string on the way from the Java EE server to the user’s web browser. The diagram in Figure 28-4 depicts the decoder and encoder classes in a message exchange.
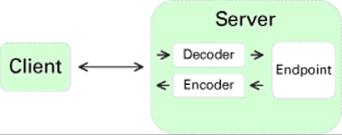
Figure 28-4: Encoders and decoders in the message exchange
Now I’ll show a sample application to get a stock price quote that uses a decoder and encoder.
Earlier, in the HelloWebSocket example, you used only the value parameter "/hello"in the annotation @ServerEndpoint. But this annotation has four more optional parameters: decoders, encoders, subprotocols, andconfigurator. You use the decoders and encoders parameters in the classStockServerEndpoint shown next (import statements are omitted for brevity):
@ServerEndpoint(value = "/stockprice",
encoders = {StockEncoder.class},
decoders = {StockDecoder.class})
public class StockWebsocketEndpoint {
@OnMessage
public Stock getPriceQuote(Stock stock){
stock.price =Math.random()*100;
return stock;
}
}
This endpoint invokes the method getPriceQuote() when the message arrives from the peer. This method generates a random stock price. Note that both the argument and the return value of the method getPriceQuote() are of Java type Stock shown next:
public class Stock {
public String symbol;
public double price;
}
If a WebSocket client is also written in Java there is no problem here. But a typical client is written in JavaScript, which runs in a browser and sends the data to the server as text. Accordingly, the client running in the web browser may expect the data as a formatted text and not a Java object.
To do these data conversions, write a decoder that converts the text into the Stock object and an encoder that converts a Stock object into text. The decoder class has to implement either Decoder.Text or Decoder.Binary interface. Our class StockDecoder implements Decoder.Text:
public class StockDecoder implements Decoder.Text<Stock>{
@Override
public void init(EndpointConfig config) {}
public Stock decode(String symbol) throws DecodeException {
System.out.println("In Decoder: converting " + symbol +
" into Stock object");
Stock stock = new Stock();
stock.symbol=symbol;
return stock;
}
public boolean willDecode(String symbol) {
System.out.println("Allowing decoding");
return (symbol != null);
}
public void destroy() {}
}
You can find details of the Decoder.Text in the online documentation. In short, the method decode() intercepts the incoming message from the client, and your code transforms the message into a required Java object. The returned value from decode() is passed to the getPriceQuote() method of the StockWebsocketEndpoint class. The method decode() just creates an instance of the Stock object and assigns the received name of the stock to its field symbol.
The method willDecode() checks whether the given String can be encoded into the requested object—the Stock. You just checked it for null, but if some prerequisites would have to be met to allow the transformation, you could implement that logic here. In the example you don’t need to perform any actions on initialization or destruction of the decoder instance; hence why the mandatory methods init() and destroy() have no code.
The encoder class is engaged when the method getPriceQuote() is returning the instance of the Stock object with populated symbol and price. You need to serialize the Java object into text to be sent to the browser. This is how your class StockEncoder will look:
public class StockEncoder implements Encoder.Text<Stock>{
public void init(EndpointConfig config) {}
public String encode(Stock stock) throws EncodeException {
System.out.println(
"In Encoder: Serializing Stock object into String");
return stock.symbol + ": " + stock.price;
}
public void destroy() {}
}
The method encode takes a Stock object as an argument and turns it into a String by concatenating symbol and price. I purposely use such simple conversion because my goal is to explain how the encoder works and not the conversion options. But you can implement any transformation you like here. Most likely, you’ll be doing Java to JSON conversion if the client runs in a web browser.
You’re done coding the server side. The code is for the HTML page decodersdemo.html that will be sending the price quote requests:
<!DOCTYPE html>
<html>
<head>
<meta charset="UTF-8">
<title>Insert title here</title>
</head>
<body>
<form>
<input id="stockSymbol" type="text">
<input onClick= "getPriceQuote()" type="button"
value="Get Price">
</form>
<span id="priceQuote"></span>
<script type="text/javascript">
var ws = new WebSocket(
"ws://localhost:8080/Lesson28/stockprice");
ws.onmessage = function(event) {
var mySpan = document.getElementById("priceQuote");
mySpan.innerHTML=event.data;
};
function getPriceQuote(){
var symbol = document.getElementById("stockSymbol");
ws.send(symbol.value);
}
</script>
</body>
</html>
This web page has an input field and a Get Price button. When the browser loads this page, it executes the JavaScript code that connects to the server endpoint ws://localhost:8080/Lesson28/stockprice. The user enters the stock symbol and clicks the button, which invokes the JavaScript function getPriceQuote() that sends the entered symbol to the WebSocket server for processing.
On the server, the decoder converts the symbol into a Stock object, and the Java method getPriceQuote() populates its price field. The encoder turns the Stock object into text and sends it back to the web browser.
Figure 28-5 shows how my web page looked when I directed my web browser to http://localhost:8080/Lesson28/decodersdemo.html, entered IBM in the input field, and clicked the Get Price button.
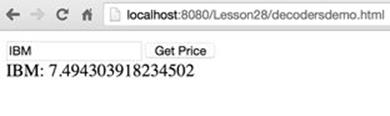
Figure 28-5: Testing decodersdemo.html
Debugging JavaScript
Google Chrome (as well as all other web browsers) offers an easy way to debug JavaScript. For example, I made a typo in the JavaScript function getPriceQuote(), but there is no compiler that could have pointed out my error. The symbol was arriving to my Java endpoint asundefined. Using Chrome Developer Tools I put a breakpoint inside the function getPriceQuote() and quickly found the typo. You can read about debugging JavaScript in Chrome in the product documentation.
Publishing to All Clients
Pretty often you need to write a program that publishes the same message to all connected clients. For example, multiple clients of the online auctions have to be notified when a new bid is placed on the product. Another example is when a new stock price quote needs to be pushed from the server to all connected clients. With WebSockets it’s a pretty easy task.
I’ll show you a basic example when a WebSocket endpoint pushes the server’s time to all connected clients. If you can publish the server’s time to all connected clients, you can publish any application-specific data.
The following endpoint WebSocketClock schedules the task that gets and formats the server’s time every second and publishes the time to all connected clients. I schedule this timer once when the first client connects to the endpoint. The method sendTimeToAll() finds all connected clients by invoking getOpenSessions() on the Session object. Then on each session it calls getBasicRemote().sendText().
@ServerEndpoint("/clock")
public class WebSocketClock {
static ScheduledExecutorService timer =
Executors.newSingleThreadScheduledExecutor();
private static Set<Session> allSessions;
DateTimeFormatter timeFormatter =
DateTimeFormatter.ofPattern("HH:mm:ss");
@OnOpen
public void showTime(Session session){
allSessions = session.getOpenSessions();
// start the scheduler on the very first connection
// to call sendTimeToAll every second
if (allSessions.size()==1){
timer.scheduleAtFixedRate(
() -> sendTimeToAll(session),1,1,TimeUnit.SECONDS);
}
}
private void sendTimeToAll(Session session){
allSessions = session.getOpenSessions();
for (Session sess: allSessions){
try{
sess.getBasicRemote().sendText("Local time: " +
LocalTime.now().format(timeFormatter));
} catch (IOException ioe) {
System.out.println(ioe.getMessage());
}
}
}
}
The web client looks similar to the Hello WebSocket example:
<!DOCTYPE html>
<html>
<head>
<meta charset="UTF-8">
</head>
<body>
<span id="messageGoesHere"></span>
<script type="text/javascript">
var ws = new WebSocket("ws://localhost:8080/Lesson28/clock");
ws.onmessage = function(event) {
var mySpan = document.getElementById("messageGoesHere");
mySpan.innerHTML=event.data;
};
ws.onerror = function(event){
console.log("Error ", event)
}
</script>
</body>
</html>
Figure 28-6 shows a screenshot where the Eclipse internal browser, Chrome, and Firefox show the current time published by the WebSocket endpoint.
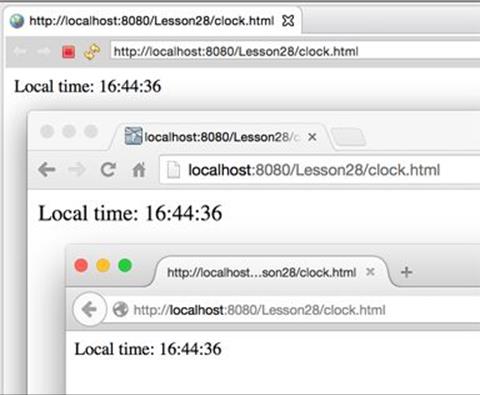
Figure 28-6: Three web clients get current time published by a WebSocket endpoint
You’ll find this example useful while working on the “Try It” assignment, where you’ll need to push the stock price quote to multiple clients.
Optimizing Performance in Message Publishing
Iterating through all open sessions works fine if the number of connected clients is small. But if you have hundreds of clients, consider grouping the Session objects into separate collections in an @OnOpen message handler and sending messages to each group in parallel from multiple threads. Important: By default, a Java EE server creates a new instance of the server endpoint class for each client’s connection, so if you’ll be creating your own session collections they must be static:
private static Set<Session> sessionsChunk1 =
Collections.synchronizedSet(new HashSet<>());
private static Set<Session> sessionsChunk2 =
Collections.synchronizedSet(new HashSet<>());
...
Try It
Rewrite the sample Stock Server application that you created in the “Try It” of Lesson 27, but this time do it using WebSockets. Create an HTML-based WebSocket client.
Lesson Requirements
You should have Java, GlassFish, and Eclipse installed.
NOTE You can download the code and resources for this “Try It” from the book’s web page at www.wrox.com/go/javaprog24hr2e. You can find them in the Lesson28 folder in the download.0
Step-by-Step
1. Reuse the dynamic web project Lesson28 that you created earlier in this lesson. If you don’t have it, download and import it from the book’s website.
2. Create an HTML client GetPriceQuote.html similar to the one from the section Decoders and Encoders. It should have one text input field to enter the stock symbol and the Get Price button. The user has to enter the stock symbol she wants to get a price quote for and press the button. The server should generate random quotes for the selected stock.
3. Create a server endpoint similar to the class StockWebSocketEndpointfrom the section Decoders and Encoders, but this time reuse the classes Stock and StockPriceGenerator from the Try It section from Lesson 27.
4. Implement a timer that generates a new random price quote every five seconds. For the reference use the ScheduledExecutorService from the class WebSocketClock from the section "Pushing to All Clients.”
5. Deploy the project Lesson28 in GlassFish and start the server.
6. Run the web page GetStockPrice.html inside Eclipse or in your web browser and test the application. Enter one of the stock symbols; the web page should should refresh the stock price every five seconds. The user should be able to enter a new stock symbol at any time and the price for the newly selected stock should be displayed and refreshed.
TIP Please select the videos for Lesson 28 online at www.wrox.com/go/javaprog24hr2e. You will also be able to download the code and resources for this lesson from the website.
All materials on the site are licensed Creative Commons Attribution-Sharealike 3.0 Unported CC BY-SA 3.0 & GNU Free Documentation License (GFDL)
If you are the copyright holder of any material contained on our site and intend to remove it, please contact our site administrator for approval.
© 2016-2026 All site design rights belong to S.Y.A.