Linux Bible 9th Ed (2015)
Part IV. Becoming a Linux Server Administrator
Chapter 21. Troubleshooting Linux
IN THIS CHAPTER
1. Troubleshooting boot loaders
2. Troubleshooting system initialization
3. Fixing software packaging problems
4. Checking network interface issues
5. Dealing with memory problems
6. Using rescue mode
In any complex operating system, lots of things can go wrong. You can fail to save a file because you are out of disk space. An application can crash because the system is out of memory. The system can fail to boot up properly for, well, lots of different reasons.
In Linux, the dedication to openness and the focus on making the software run with maximum efficiency has led to an amazing number of tools you can use to troubleshoot every imaginable problem. In fact, if software isn't working as you would like, you even have the ultimate opportunity to rewrite the code yourself (although we don't cover how to do that here).
This chapter takes on some of the most common problems you can run into on a Linux system and describes the tools and procedures you can use to overcome those problems. Topics are broken down by areas of troubleshooting, such as the boot process, software packages, networking, memory issues, and rescue mode.
Boot-Up Troubleshooting
Before you can begin troubleshooting a running Linux system itself, that system needs to boot up. For a Linux system to boot up, a series of things has to happen. A Linux system installed directly on a PC architecture computer goes through the following steps to boot up:
· Turning on the power
· Starting the hardware (from BIOS or UEFI firmware)
· Finding the location of the boot loader and starting it
· Choosing an operating system from the boot loader
· Starting the kernel and initial RAM disk for the selected operating system
· Starting the initialization process (init or systemd)
· Starting all the services associated with the selected level of activity (runlevel or default target)
The exact activities that occur at each of these points have undergone a transformation in recent years. Boot loaders are changing to accommodate new kinds of hardware. The initialization process is changing so services can start more efficiently, based on dependencies and in reaction to the state of the system (such as what hardware is plugged in or what files exist) rather than a static boot order.
Troubleshooting the Linux boot process begins when you turn on your computer and ends when all the services are up and running. At that point, typically a graphical or text-based login prompt is available from the console, ready for you to log in.
After reading the short descriptions of startup methods, go to “Starting from the firmware” to understand what happens at each stage of the boot process and where you might need to troubleshoot. Because the general structure of the Linux boot process is the same for the three Linux systems featured here (Fedora, RHEL, and Ubuntu), I go through the boot process only once, but I describe the differences between them as I go.
Understanding Startup Methods
It's up to the individual Linux distribution how the services associated with the running Linux system are started. After the boot loader starts the kernel, how the rest of the activities (mounting filesystems, setting kernel options, running services, and so on) are done is all managed by the initialization process.
As I describe the boot process, I focus on two different types of initialization: System V init and systemd. I also briefly mention a third type called Upstart, which has been deployed until recently on Debian and Ubuntu distribution, but is now being replaced withsystemd. (Ubuntu 14.04, LTS used in this book still uses Upstart by default.)
Starting with System V init scripts
The System V init facility consists of the init process (the first process to run after the kernel itself), an /etc/inittab file that directs all start-up activities, and a set of shell scripts that starts each of the individual services. The first Fedora releases and up to RHEL 5 used the System V init process. RHEL 6 contains a sort of hybrid of System V init, with the init process itself replaced by the Upstart init process.
System V init was developed for UNIX System V at AT&T in the mid-1980s when UNIX systems first incorporated the start-up of network interfaces and the services connected to them. It has been supplanted only over the past few years by Upstart and systemd to better suit the demands of modern operating systems.
In System V init, sets of services are assigned to what is referred to as runlevels. For example, the multi-user runlevel can start basic system services, network interfaces, and network services. Single-user mode just starts enough of the basic Linux system so someone can log in from the system console, without starting network interfaces or services.After a System V init system is up and running, you can use commands such as reboot, shutdown, and init to change runlevels. You can use commands such as service and chkconfig to start/stop individual services or enable/disable services, respectively.
The System V init scripts are set to run in a specific order, with each script having to complete before the next can start. If a service fails, there is no provision for that service to restart automatically. In contrast, systemd and Upstart were designed to address these and other System V init shortcomings.
Starting with systemd
The systemd facility is quickly becoming the present and future of the initialization process for many Linux systems. It was adopted in Fedora 15, in RHEL 7, and is scheduled to replace Upstart in Debian and Ubuntu 15.04. Although systemd is more complicated than System V init, it also offers many more features, such as these:
· Targets—Instead of runlevels, systemd focuses on targets. A target can start a set of services, as well as create or start other types of units (such as directory mounts, sockets, swap areas, and timers).
· System V compatibility—There are targets that align with System V runlevels, if you are used to dealing with runlevels. For example, graphical.target aligns with runlevel 5 while multi-user.target is essentially runlevel 3. However, there are many more targets than runlevels, giving you the opportunity to more finely manage sets of units. Likewise, systemd supports System V init scripts and commands such as chkconfig and service for manipulating those services.
· Dependency-based start-up—When the system starts up, any service in the default target (graphical.target for desktops and multi-user.target for most servers) that has had its dependencies met can start. This feature can speed up the boot process, by ensuring that a single stalled service doesn't stall other services from starting if they don't need the stalled service.
· Resource usage—With systemd, you can use cgroups to limit how much of your system's resources is consumed by a service. For example, you can limit the amount of memory, CPU, or other resources an entire service can consume, so a runaway process or a service that spins off an unreasonable number of child processes cannot consume more than the entire service is allowed.
When a systemd-enabled Linux system starts up, the first running process (PID 1) is the systemd daemon (instead of the init daemon). Later, the primary command for managing systemd services is the systemctl command. Managing systemd journal (log) messages is done with the journalctl command. You also have the ability to use old-style System V init commands, such as init, poweroff, reboot, runlevel, and shutdown to manage services.
Starting with Upstart
As noted earlier, the Debian and Ubuntu Linux distributions used the Upstart project for a while to replace the older System V init facility. Although those distributions plan to move soon to systemd, if you are using a recent Debian or Ubuntu (pre-14.10) system, chances are that Upstart is controlling the startup of your system services.
Like systemd, Upstart allowed services to start in parallel, after their particular dependencies were met. Another of Upstart's major improvements over System V init is that it can start services by reacting when certain events occur (such as when a piece of hardware is connected).
If you are using a Linux system the employs Upstart, you should know a few things about it. The first process that starts on an Upstart system is still called the init process, but it is actually an Upstart daemon. After it is running, services in an Upstart system register events with the Upstart daemon. When an event occurs, Upstart can start, stop, or change a process to react to that event.
Because Upstart is being phased out of the Linux distributions covered in this book (Fedora, RHEL, Debian, and Ubuntu), our discussion of understanding and troubleshooting the boot process is focused on the traditional System V init process and the newersystemd facility.
Starting from the firmware (BIOS or UEFI)
When you physically turn on a computer, firmware is loaded to initialize the hardware and find an operating system to boot. On PC architectures, that firmware has traditionally been referred to as BIOS (Basic Input Output System). In recent years, a new type of firmware has become available (to replace BIOS on some computers), called UEFI (Unified Extensible Firmware Interface). The two are mutually exclusive.
UEFI was designed to allow a secure boot feature, which can be used to ensure that only operating systems whose components have been signed can be used during the boot process. UEFI can still be used with nonsigned operating systems by disabling the secure boot feature.
For Ubuntu, Secure boot was first supported in 12.04.2. RHEL 7 also officially supports secure boot. The main job of BIOS and UEFI firmware is to initialize the hardware and then hand off control of the boot process to a boot loader. The boot loader then finds and starts the operating system. After an operating system is installed, typically you should let the firmware do its work and not interrupt it.
There are, however, occasions when you want to interrupt the firmware. For this discussion, we focus on how BIOS generally works. Right after you turn on the power, you should see a BIOS screen that usually includes a few words noting how to go into Setup mode and change the boot order. If you press the function key noted (often F1, F2, or F12) to choose one of those two items, here's what you can do:
· Setup utility—The setup utility lets you change settings in the BIOS. These settings can be used to enable or disable certain hardware components or turn on or off selected hardware features.
· Boot order—Computers are capable of starting an operating system, or more specifically, a boot loader that can start an operating system, from several different devices attached to the computer. Those devices can include a CD drive, DVD drive, hard disk, USB driver, or network interface card. The boot order defines the order in which those devices are checked. By modifying the boot order, you can tell the computer to temporarily ignore the default boot order and try to boot from the device you select.
For my Dell workstation, after I see the BIOS screen, I immediately press the F2 function key to go to into Setup or F12 to temporarily change the boot order. The next sections explore what you can troubleshoot from the Setup and Boot Order screens.
Troubleshooting BIOS setup
As I already noted, you can usually let the BIOS start without interruption and have the system boot up to the default boot device (probably the hard drive). However, here are some instances when you may want to go into Setup mode and change something in the BIOS:
· To see an overview of your hardware—If your troubleshooting problem is hardware-related, the BIOS setup is a great place to start examining your system. The Setup screen tells you the type of system, its BIOS version, its processors, its memory slots and types, whether it is 32-bit or 64-bit, which devices are in each slot, and many details about the types of devices attached to the system.
If you can't get an operating system booted at all, the BIOS Setup screen may be the only way to determine the system model, processor type, and other information you need to search for help or call for support.
· To disable/enable a device—Most devices connected to your computer are enabled and made available for use by the operating system. To troubleshoot a problem, you may need to disable a device.
For example, let's say your computer has two network interface cards (NICs). You want to use the second NIC to install Linux over a network, but the installer keeps trying to use the first NIC to connect to the network. You can disable the first NIC so the installer doesn't even see the NIC when it tries to connect to the network. Or, you can keep the NIC visible to the computer, but simply disable the NIC's ability to PXE boot.
Maybe you have an audio card and you want to disable the integrated audio on the motherboard. That can be done in the BIOS as well.
Conversely, sometimes you want to enable a device that has been disabled. Perhaps you were given a computer that had a device disabled in the BIOS. From the operating system, for example, it may look like you don't have a parallel (LPT) port or CD drive. Looking at the BIOS tells you whether those devices are not available simply because they have been disabled in the BIOS.
· To change a device setting—Sometimes, the default settings that come in your BIOS don't work for your situation. You might want to change the following settings in the BIOS:
· NIC PXE boot settings—Most modern NICs are capable of booting from servers found on the network. If you need to do that, and you find that the NIC doesn't come up as a bootable device on your Boot Order screen, you may have to enable that feature in the BIOS.
· Virtualization settings—If you want to run a RHEL system as a virtual host, the computer's CPU must include Intel Virtual Technology or AMD Secure Virtual Machine (SVM) support. It is possible, however, that even if your CPU comes with that support, it may not be enabled in the BIOS. To enable it, go to the BIOS Setup screen and look for a Virtualization selection (possibly under the Performance category). Make sure it is set to On.
Troubleshooting boot order
Depending on the hardware attached to your computer, a typical boot order might boot a CD/DVD drive first, then the hard drive, then a USB device, and finally the network interface card. The BIOS would go to each device, looking for a boot loader in the master boot record for that device. If the BIOS finds a boot loader, it starts it. If no boot loader is located, the BIOS moves on to the next device, until all are tried. If no boot loader is found, the computer fails to boot.
One problem that could occur with the boot order is that the device you want to boot may not appear in the boot order at all. In that case, going to the Setup screen, as described in the previous section, to either enable the device or change a setting to make it bootable, may be the thing to do.
If the device you want to boot from does appear in the boot order, typically you just have to move the arrow key to highlight the device you want and press Enter. The following are reasons for selecting your own device to boot:
· Rescue mode—If Linux does not boot from the hard disk, selecting the CD drive or a USB drive allows you to boot to a rescue mode (described later in this chapter) that can help you repair the hard disk on an unbootable system. See the section “Troubleshooting in Rescue Mode” later in this chapter for further information.
· Fresh install—Sometimes, the boot order has the hard disk listed first. If you decide you need to do a fresh install of the operating system, you need to select the boot device that is holding your installation medium (CD, DVD, USB drive, or NIC).
Assuming you get past any problems you have with the BIOS, the next step is for the BIOS to start the boot loader.
Troubleshooting the GRUB boot loader
Typically, the BIOS finds the master boot record on the first hard disk and begins loading that boot loader in stages. Chapter 9, “Installing Linux,” describes the GRUB boot loader that is used with most modern Linux systems, including RHEL, Fedora, and Ubuntu. The GRUB boot loader in RHEL 6, described here, is an earlier version than the GRUB 2 boot loader included with RHEL 7, Fedora, and Ubuntu. (Later, I introduce you to the GRUB 2 boot loader as well.)
In this discussion, I am interested in the boot loader from the perspective of what to do if the boot loader fails or what ways you might want to interrupt the boot loader to change the behavior of the boot process.
Here are a few ways in which the boot loader might fail in RHEL 6 and some ways you can overcome those failures:
· Could not locate active partition—When a boot loader is installed on a storage medium, the partition is usually marked as bootable. If you see this message, it means that no bootable partition was found. If you feel sure the boot loader is on the disk, try using the fdisk command (probably from rescue media) to make the partition bootable and try again. See the section “Partitioning Hard Disks” of Chapter 12, “Managing Disks and Filesystems,” for more information on the fdisk command.
· Selected boot device not available—You might see a message like this when the master boot record has been deleted from the hard drive. Or it may just be that the contents of the hard disk expect to be loaded from another boot loader, such as a boot CD. First, try seeing if the system will boot from other media. If it turns out that the master boot record was erased, you can try booting rescue media to attempt to recover the contents of the disk. However, if the master boot record is lost, it is possible that other data on the disk is either also erased or would require disk forensics to find. If the master boot record was simply overwritten (which could happen if you installed another operating system on a different disk partition), it could be possible to reinstall the master boot record from rescue mode (described in the section “Troubleshooting in Rescue Mode” later in this chapter).
· Text-based GRUB prompt appears—It is possible for the BIOS to start GRUB and go straight to a GRUB prompt, with no operating system selections available. This probably means that the master boot record portion of GRUB was found, but when GRUB looked on the hard drive to find the next stage of the boot process and a menu of operating systems to load, it could not find them. Sometimes this happens when the BIOS detects the disks in the wrong order and looks for the grub.conf file on the wrong partition.
One workaround to this problem, assuming grub.conf is on the first partition of the first disk, is to list the contents of this file and enter the root, kernel, and initrd lines manually. To list the file, type cat (hd0,0)/grub/grub.conf. If that doesn't work, try hd0,1 to access the next partition on that disk (and so on) or hd1,0 to try the first partition of the next disk (and so on). When you find the lines representing the grub.conf file, manually type the root, kernel, and initrd lines for the entry you want (replacing the location of the hard drive you found on the root line). Then type boot. The system should start up, and you can go and manually fix your boot loader files. See Chapter 9 for more information on the GRUB boot loader.
If the BIOS finds the boot loader in the master boot record of the disk and that boot loader finds the GRUB configuration files on the disk, the boot loader starts a countdown of about three to five seconds. During that countdown, you can interrupt the boot loader (before it boots the default operating system) by pressing any key.
When you interrupt the boot loader, you should see a menu of available entries to boot. Those entries can represent different available kernels to boot. But they may also represent totally different operating systems (such as Windows, BSD, or Ubuntu).
Here are some reasons to interrupt the boot process from the boot menu to troubleshoot Linux:
· To start in a different runlevel—RHEL 6 systems typically start in runlevel 3 (boot to text prompt) or 5 (boot to graphical interface). You can override the default runlevel by putting a different runlevel number at the end of the kernel line from the boot menu. To do this, highlight the operating system entry you want, type e, highlight the kernel, type e, and add the new runlevel to the end of the line (for example, add a space and the number 1 to go into single-user mode). Then press Enter, and type b to boot the new entry.
Why would you boot to different runlevels for troubleshooting? Runlevel 1 bypasses authentication, so you boot directly to a root prompt. This is good if you have forgotten the root password and need to change it (type passwd to do that). Runlevel 3 bypasses the start of your desktop interface. Go to runlevel 3 if you are having problems with your video driver and want to try to debug it without it trying to automatically start up the graphical interface.
· To select a different kernel—When RHEL installs a new kernel via yum, it always keeps at least one older kernel around. If the new kernel fails, you can always boot the previous, presumably working, older kernel. To boot a different kernel from the GRUB menu, just use the arrow key to highlight the one you want, and press Enter to boot it.
· To select a different operating system—If you happen to have another operating system installed on your hard drive, you can select to boot that one instead of RHEL. For example, if you have Fedora and RHEL on the same computer, and RHEL isn't working, you can boot to Fedora, mount the RHEL filesystems you need, and try to fix the problem.
· To change boot options—On the kernel line, notice that there are lots of options being passed to the kernel. At the very least, those options must contain the name of the kernel (such as vmlinuz-2.6.32.el6.x86_64) and the partition containing the root filesystem (such as /dev/mapper/abc-root). If you want, you can add other options to the kernel line.
You may want to add kernel options to add features to the kernel or temporarily disable hardware support for a particular component. For example, adding init=/bin/bash causes the system to bypass the init process and go straight to a shell (similar to runninginit 1). In RHEL 7, adding 1 as a kernel option is not supported, so init=/bin/bash is the best way to get into a sort of single-user mode. Adding nousb would temporarily disable the USB ports (presumably to make sure anything connected to those ports would be disabled as well).
Assuming you have selected the kernel you want, the boot loader tries to run the kernel, including the content of the initial RAM disk (which contains drivers and other software needed to boot your particular hardware).
Starting the kernel
After the kernel starts, there isn't much to do except watch for potential problems. For RHEL, you see a Red Hat Enterprise Linux screen with a slow-spinning icon. If you want to watch messages detailing the boot process scroll by, press the Esc key.
At this point, the kernel tries to load the drivers and modules needed to use the hardware on the computer. The main things to look for at this point (although they may scroll by quickly) are hardware failures that may prevent some feature from working properly. Although much more rare than it used to be, there may be no driver available for a piece of hardware, or the wrong driver may get loaded and cause errors.
In addition to scrolling past on the screen, messages produced when the kernel boots are copied to the kernel ring buffer. As its name implies, the kernel ring buffer stores kernel messages in a buffer, throwing out older messages after that buffer is full. After the computer boots up completely, you can log into the system and type the following command to capture these kernel messages in a file (then view them with the less command):
# dmesg > /tmp/kernel_msg.txt
# less /tmp/kernel_msg.txt
I like to direct the kernel messages into a file (choose any name you like) so the messages can be examined later or sent to someone who can help debug any problems. The messages appear as components are detected, such as your CPU, memory, network cards, hard drives, and so on.
In Linux systems that support systemd, kernel messages are stored in the systemd journal. So instead of using the dmesg command, you can run journalctl to see kernel messages from boot time to the present. For example, here are kernel messages output from a RHEL 7 system:
# journalctl -k
Sep 07 12:03:07 host kernel: CPU0 microcode updated early to revision
0xbc
Sep 07 12:03:07 host kernel: Initializing cgroup subsys cpuset
Sep 07 12:03:07 host kernel: Initializing cgroup subsys cpu
Sep 07 12:03:07 host kernel: Initializing cgroup subsys cpuacct
Sep 07 12:03:07 host kernel: Linux version 3.10.0-123.6.3.el7.x86_64
Sep 07 12:03:07 host kernel: Command line:
BOOT_IMAGE=/vmlinuz-3.10.0-123.6.3.el7.x86_64 root=/dev/mapper/vg
Sep 07 12:03:07 host kernel: e820: BIOS-provided physical RAM map:
...
Look for drivers that fail to load or messages that show that certain features of the hardware failed to be enabled. For example, I once had a TV tuner card (for watching television on my computer screen) that set the wrong tuner type for the card that was detected. Using information about the TV card's model number and the type of failure, I found that passing an option to the card's driver allowed me to try different settings until I found the one that matched my tuner card.
In describing how to view kernel startup messages, I have gotten ahead of myself a bit. Before you can log in and see the kernel messages, the kernel needs to finish bringing up the system. As soon as the kernel is done initially detecting hardware and loading drivers, it passes off control of everything else that needs to be done to boot the system to the initialization system.
Troubleshooting the initialization system
The first process to run on a system where the kernel has just started depends on the initialization facility that system is using. For System V init, the first process to run is the init process. For systemd, the first process is systemd. Depending on which you see running on your system (type ps -ef | head to check), follow either the System V or systemd descriptions below. RHEL 6, which contains a hybrid of Upstart and System V init, is used in the example of System V initialization.
Troubleshooting System V initialization
Most Linux systems up to a few years ago used System V init to initialize the services on the Linux system. In RHEL 6, when the kernel hands off control of the boot process to the init process, the init process checks the /etc/inittab file for directions on how to boot the system.
The inittab file tells the init process what the default runlevel is and then points to files in the /etc/init directory to do such things as remap some keystrokes (such as Ctrl+Alt+Delete to reboot the system), start virtual consoles, and identify the location of the script for initializing basic services on the system: /etc/rc.sysinit.
When you're troubleshooting Linux problems that occur after the init process takes over, two likely culprits are the processing by the rc.sysinit file and the runlevel scripts.
Troubleshooting rc.sysinit
As the name implies, the /etc/rc.sysinit script initializes many basic features on the system. When that file is run by init, rc.sysinit sets the system's hostname, sets up the /proc and /sys filesystems, sets up SELinux, sets kernel parameters, and performs dozens of other actions.
One of the most critical functions of rc.sysinit is to get the storage set up on the system. In fact, if the boot process fails during processing of rc.sysinit, in all likelihood, the script was unable to find, mount, or decrypt the local or remote storage devices needed for the system to run.
The following is a list of some common failures that can occur from tasks run from the rc.sysinit file and ways of dealing with those failures.
· Local mounts fail—If an entry in the /etc/fstab fails to mount, the boot process ends before runlevel services start. This typically happens when you add an entry to the /etc/fstab that has a mistake in it, but you neglected to test it before you rebooted. When thefstab file fails, you are dropped to a shell for the root user with the root filesystem mounted read-only. To fix the problem, you need to remount the root filesystem, correct the fstab file, mount the filesystem entry to make sure it now works, and reboot. Here's what that sequence of commands looks like:
·# mount -o remount,rw /
·# vim /etc/fstab
·# mount -a
# reboot
NOTE
The vim command is used particularly when editing the /etc/fstab file because it knows the format of that file. When you use vim, the columns are in color and some error checking is done. For example, entries in the Mount Options field turn green when they are valid and black when they are not.
· Hostname not set—If your hostname is not set properly, you can check through the processing of rc.sysinit to see what might have gone wrong. To set the system's hostname, rc.sysinit uses the value of the HOSTNAME= in the /etc/sysconfig/network file. If that is not set, the name localhost is used instead. The hostname value can also be acquired from the DHCP server.
· Cannot decrypt filesystem—The rc.sysinit script looks in the /etc/crypttab file for information needed to decrypt encrypted filesystems. If that file becomes corrupted, you may need to find a backup of the file to be able to decrypt your filesystem. If you are prompted for a password and you don't know what that is, you might be out of luck.
Other features are set up by the rc.sysinit file as well. The rc.sysinit script sets the SELinux mode and loads hardware modules. The script constructs software RAID arrays and sets up Logical Volume Management volume groups and volumes. Troubles occurring in any of these areas are reflected in error messages that appear on the screen after the kernel boots and before runlevel processes start up.
Troubleshooting runlevel processes
In Red Hat Enterprise Linux 6.x and earlier, when the system first comes up, services are started based on the default runlevel. There are seven different runlevels, from 0 to 6. The default runlevel is typically 3 (for a server) or 5 (for a desktop). Here are descriptions of the runlevels in Linux systems up to RHEL 6:
· 0—Shutdown runlevel. All processes are stopped and the computer is powered down.
· 1—Single-user runlevel. Only those processes that are needed to boot the computer (including mounting all filesystems) and have the system available from the console are run. Networking and network services are not started. This runlevel bypasses normal authentication and boots up to a root user prompt (called sulogin). If you boot up to this mode, you can use it to immediately become root user to change a forgotten root password. (You could also use the word single instead of 1 to get to single-user runlevel. The difference between single and 1 is that single does not start scripts in the /etc/rc1.d directory.)
· 2—Multiuser runlevel. This runlevel is rarely used today. The original meaning of this runlevel has been lost. Early UNIX systems used this runlevel to start tty processes for systems where there were multiple dumb terminals connected to the system for people to use. This allowed many people to access a system simultaneously from character-based terminals (lots of people working from a shell with no graphical interface). Network interfaces were not started, usually because always-up network interfaces were not common. These days, runlevel 2 usually starts network interfaces, although not all network services are started.
· 3—Multiuser plus networking runlevel. This runlevel is typically used on Linux servers that do not boot up to a graphical interface, but rather just a plain text prompt at the console. The network is started, as are all network services. A graphical desktop environment may or may not be installed (typically not) on machines that boot to runlevel 3, but the graphical environments must be started after boot time to be used.
· 4—Undefined. This runlevel tends to start the same services as runlevel 3. It can be used if you want to have different services available from runlevels 3 and 4. This runlevel is typically not used. Instead, runlevel 3 or 5 is used to boot to, with an administrator simply turning services on or off as required for the running system.
· 5—Multiuser, networking, plus graphical interface runlevel. This is the runlevel typically used with desktop Linux systems. It typically starts networking and all networked services; plus, it launches a graphical login prompt at the console. When the users log in, they see a graphical desktop environment.
· 6—Reboot runlevel. This is like runlevel 0 in that it brings down all services and stops all processes. However, runlevel 6 then starts the system back up again.
Runlevels are meant to set the level of activity on a Linux system. A default runlevel is set in the /etc/inittab file, but you can change the runlevel any time you like using the init command. For example, as root, you might type init 0 to shutdown, init 3 if you want to kill the graphical interface (from runlevel 5) but leave all other services up, or init 6 to reboot.
Normal default runlevels (in other words, the runlevel you boot to) are 3 (for a server) and 5 (for a desktop). Often, servers don't have desktops installed, so they boot to runlevel 3 so they don't incur the processing overhead or the added security risks for having a desktop running on their web servers or file servers.
You can go either up or down with runlevels. For example, an administrator doing maintenance on a system may boot to runlevel 1 and then type init 3 to boot up to the full services needed on a server. Someone debugging a desktop may boot to runlevel 5 and then go down to runlevel 3 to try to fix the desktop (such as install a new driver or change screen resolution) before typing init 5 to return to the desktop.
The level of services at each runlevel is determined by the runlevel scripts that are set to start. There are rc directories for each runlevel: /etc/rc0.d/, /etc/rc1.d/, /etc/rc2.d/, /etc/rc3.d/, and so on. When an application has a startup script associated with it, that script is placed in the /etc/init.d/ directory and then symbolically linked to a file in each /etc/rc?.d/ directory.
Scripts linked to each /etc/rc?.d directory begin with either the letter K or S, followed by two numbers and the service name. A script beginning with K indicates that the service should be stopped, while one beginning with an S indicates it should be started. The two numbers that follow indicate the order in which the service is started. Here are a few files you might find in the /etc/rc3.d/ directory, which are set to start up (with a description of each to the right):
· S01sysstat—Start gathering system statistics.
· S08iptables—Start iptables firewall.
· S10network—Start network interfaces.
· S12rsyslog—Start system logging.
· S28autofs—Start automounter.
· S50bluetooth—Start Bluetooth service.
· S55sshd—Start the secure shell service.
· S58ntpd—Start NTP time synchronization service.
· S85httpd—Start the Apache web service.
· S90crond—Start the crond service.
· S91smb—Start the samba service.
· S97rhnsd—Start the Red Hat Network service.
· S99local—Start user-defined local commands.
This example of a few services started from the /etc/rc3.d directory should give you a sense of the order in which processes boot up when you enter runlevel 3. Notice that the sysstat service (which gathers system statistics) and the iptables service (which creates the system's firewall) are both started before the networking interfaces are started. Those are followed by rsyslog (system logging service) and then the various networked services.
By the time the runlevel scripts start, you should already have a system that is basically up and running. Unlike some other Linux systems that start all the scripts for runlevel 1, then 2, then 3, and so on, RHEL goes right to the directory that represents the runlevel, first stopping all services that begin with K and starting all those that begin with S in that directory.
As each S script runs, you should see a message saying whether the service started. Here are some things that might go wrong during this phase of system startup:
· A service can fail. A service may require access to network interfaces to start properly or access to a disk partition that is not mounted. Most services time out, fail, and allow the next script to run. After you are able to log in, you can debug the service. Some techniques for debugging services include adding a debug option to the daemon process so it spews more data into a log file or running the daemon process manually so error messages come straight to your screen. See Chapter 15 for further information on starting services manually.
· A service can hang. Some services that don't get what they need to start can hang indefinitely, keeping you from logging in to debug the problem. Some processes take longer to come up the first time after a fresh install, so you might want to wait for a few minutes to see if the script is still working and not just spinning forever.
If you cannot get past a hanging service, you can reboot into an interactive startup mode, where you are prompted before starting each service. To enter interactive startup mode in RHEL, reboot and interrupt the boot loader (press any key when you see the 5 second countdown). Highlight the entry you want to boot, and type e. Highlight the kernel line, and type e. Then add the word confirm to the end of the kernel line, press Enter, and type b to boot the new kernel.
Figure 21.1 shows an example of the messages that appear when RHEL boots up in interactive startup mode.
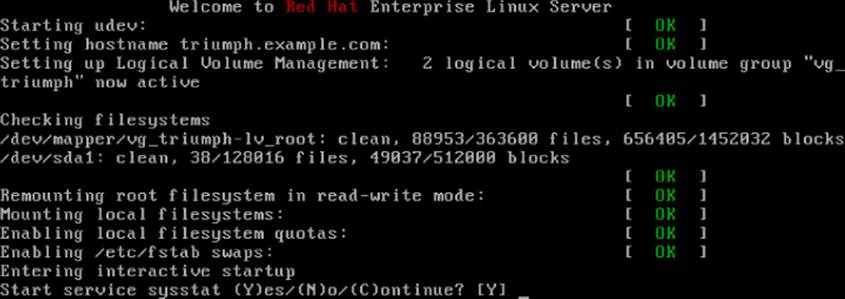
Figure 21.1 Confirm each service in RHEL interactive startup mode.
Most messages shown in Figure 21.1 are generated from rc.sysinit.
After the Welcome message, udev starts (to watch for new hardware that is attached to the system and load drivers as needed). The hostname is set, Logical Volume Management (LVM) volumes are activated, all filesystems are checked (with the added LVM volumes), any filesystems not yet mounted are mounted, the root filesystem is remounted read-write, and any LVM swaps are enabled. Refer to Chapter 12 for further information on LVM and other partition and filesystem types.
The last “Entering interactive startup” message tells you that rc.sysinit is finished and the services for the selected runlevel are ready to start. Because the system is in interactive mode, a message appears asking if you want to start the first service (sysstat). Type Y to start that service and go to the next one.
After you see the broken service requesting to start, type N to keep that service from starting. If, at some point, you feel the rest of the services are safe to start, type C to continue starting the rest of the services. After your system comes up, with the broken services not started, you can go back and try to debug those individual services.
One last comment about startup scripts: The /etc/rc.local file is one of the last services to run at each runlevel. As an example, in runlevel 5, it is linked to /etc/rc5.d/S99local. Any command you want to run every time your system starts up can be put in the rc.localfile.
You might use rc.local to send an e-mail message or run a quick iptables firewall rule when the system starts. In general, it's better to use an existing startup script or create a new one yourself (so you can manage the command or commands as a service). Know that the rc.local file is a quick and easy way to get some commands to run each time the system boots.
Troubleshooting systemd initialization
The latest versions of Fedora, RHEL, and soon Ubuntu use systemd instead of System V init as their initialization system. When the systemd daemon (/usr/lib/systemd/systemd) is started after the kernel starts up, it sets in motion all the other services that are set to start up. In particular, it keys off the contents of the /etc/systemd/system/default.target file. For example:
# cat /etc/systemd/system/default.target
...
[Unit]
Description=Graphical Interface
Documentation=man:systemd.special(7)
Requires=multi-user.target
After=multi-user.target
Conflicts=rescue.target
Wants=display-manager.service
AllowIsolate=yes
[Install]
Alias=default.target
The default.target file is actually a symbolic link to a file in the /lib/systemd/system directory. For a server, it may be linked to the multi-user.target file; for a desktop, it is linked to the graphical.target file (as is shown here).
Unlike with the System V init facility, which just runs service scripts in alphanumeric order, the systemd service needs to work backward from the default.target to determine which services and other targets are run. In this example, default.target is a symbolic link to the graphical.target file. When you list the contents of that file, you can see the following:
· The multi-user.target is required to start first.
· The display-manager.service is started after that.
By continuing to discover what those two units require, you can find what else is required. For example, multi-user.target requires the basic.target (which starts a variety of basic services) and display-manager.service (which starts up the display manager, gdm) to launch a graphical login screen.
To see services the multi-user.target starts, list contents of the /etc/systemd/system/multi-user.target.wants directory. For example:
# ls /etc/systemd/system/multi-user.target.wants/
abrt-ccpp.service chronyd.service nfs.target
abrtd.service crond.service nmb.service
abrt-oops.service cups.path remote-fs.target
abrt-vmcore.service httpd.service rngd.service
abrt-xorg.service irqbalance.service smb.service
atd.service mcelog.service sshd.service
auditd.service mdmonitor.service vmtoolsd.service
autofs.service ModemManager.service vsftpd.service
avahi-daemon.service NetworkManager.service
These files are symbolic links to files that define what starts for each of those services. On your system, these may include remote shell (sshd), printing (cups), auditing (auditd), networking (NetworkManager), and others. Those links were added to that directory either when the package for a service is installed or when the service is enabled from a systemctl enable command.
Keep in mind that, unlike System V init, systemd can start, stop, and otherwise manage unit files that represent more than just services. It can manage devices, automounts, paths, sockets, and other things. After systemd has started everything, you can log into the system to investigate and troubleshoot any potential problems.
After you log in, running the systemctl command lets you see every unit file that systemd tried to start up. Here is an example:
# systemctl
UNIT LOAD ACTIVE SUB
DESCRIPTION
proc-sys-fs-binfmt_misc.automount loaded active waiting
Arbitrary Executable File Formats File System
sys-devices-pc...:00:1b.0-sound-card0.device loaded active plugged
631xESB/632xESB High Definition Audio Control
sys-devices-pc...:00:1d.2-usb4-4\x2d2.device loaded active plugged
DeskJet 5550
...
-.mount loaded active mounted
/
boot.mount loaded active mounted
/boot
...
autofs.service loaded active running
Automounts filesystems on demand
cups.service loaded active running
CUPS Printing Service
httpd.service loaded failed failed
The Apache HTTP Server
From the systemctl output, you can see whether any unit file failed. In this case, you can see that the httpd.service (your Web server) failed to start. To further investigate, you can run journalctl -u for that service to see whether any error messages were reported:
# journalctl -u httpd.service
...
Sep 07 18:40:52 host systemd[1]: Starting The Apache HTTP Server...
Sep 07 18:40:53 host httpd[16365]: httpd: Syntax error on line 361 of
/etc/httpd/conf/httpd.conf: Expected but saw
Sep 07 18:40:53 host systemd[1]: httpd.service:
main process exited, code=exited, status=1/FAILURE
Sep 07 18:40:53 host systemd[1]: Failed to start The Apache HTTP
Server.
Sep 07 18:40:53 host systemd[1]: Unit httpd.service entered failed
state.
From the output, you can see that there was a mismatch of the directives in the httpd.conf file (I had Director instead of Directory). After that was corrected, I could start the service (systemctl start httpd). If more unit files appear as failed, you can run the journalctl -u command again, using those unit filenames as arguments.
The next section describes how to troubleshoot issues that can arise with your software packages.
Troubleshooting Software Packages
Software packaging facilities (such as yum for RPM and apt-get for DEB packages) are designed to make it easier for you to manage your system software. (See Chapter 10, “Getting and Managing Software,” for the basics on how to manage software packages.) Despite efforts to make it all work, however, sometimes software packaging can break.
The following sections describe some common problems you can encounter with RPM packages on a RHEL or Fedora system and how you can overcome those problems.
Sometimes, when you try to install or upgrade a package using the yum command, error messages tell you that the dependent packages you need to do the installation you want are not available. This can happen on a small scale (when you try to install one package) or a grand scale (where you are trying to update or upgrade your entire system).
Because of the short release cycles and larger repositories of Fedora and Ubuntu, inconsistencies in package dependencies are more likely to occur than they are in smaller, more stable repositories (such as those offered by Red Hat Enterprise Linux). To avoid dependency failures, here are a few good practices you can follow:
· Use recent, well-tested repositories. There are thousands of software packages in Fedora. If you use the main Fedora repositories to install software from the current release, it is rare to have dependency problems.
When packages are added to the repository, as long as the repository maintainers run the right commands to set up the repository (and you don't use outside repositories), everything you need to install a selected package should be available. However, when you start using third-party repositories, those repositories may have dependencies on repositories that they can't control. For example, if a repository creates a new version of its own software that requires later versions of basic software (such as libraries), the versions they need might not be available from the Fedora repository.
· Consistently update your system. Running yum update every night makes it less likely that you will encounter major dependency problems than if you update your system only every few months. In Fedora, there is a yum-updatesd package that lets you do nightly checks for updates and then send e-mail to a user of your choice if updates are available. In RHEL, you could build a cron job to check for or run nightly updates. See the sidebar “Using cron for Software Updates” for details on how to do that.
· Occasionally upgrade your system. Fedora and Ubuntu have new releases every six months. Fedora stops supplying updated packages for each version 13 months after it is released. So, although you don't have to upgrade to the new release every six months, you should upgrade once per year or face possible dependency and security problems when Fedora stops supplying updates. If you are looking for a stable system, Red Hat Enterprise Linux is a better bet because it provides updates for each major release for seven years or more.
NOTE
If you use the apt-get command in Ubuntu to update your packages, keep in mind that there are different meanings to the update and upgrade options in Ubuntu with apt-get than with the yum command (Fedora and RHEL).
In Ubuntu, apt-get update causes the latest packaging metadata (package names, version numbers, and so on) to be downloaded to the local system. Running apt-get upgrade causes the system to upgrade any installed packages that have new versions available, based on the latest downloaded metadata.
In contrast, every time you run a yum command in Fedora or RHEL, the latest metadata about new packages is downloaded. When you then run yum update, you get the latest packages available for the current release of Fedora or RHEL. When you run yum upgrade, the system actually attempts to upgrade to a whole new version of those distributions (such as Fedora 20 to Fedora 21).
When you encounter a dependency problem, here are a few things you can do to try to resolve the problem:
· Use stable repositories. For recent releases of well-known distributions (RHEL, Fedora, or Ubuntu, for example), dependency problems are rare and often fixed quickly. However, if you are relying on repositories for older releases or development-oriented repositories (such as Fedora's Rawhide repository), expect to find more dependency problems. Reinstalling or upgrading can often fix dependency problems.
· Only use third-party apps and repositories when necessary. The further you are from the core of a Linux distribution, the more likely you are to someday have dependency problems. Always look in the main repositories for your distribution before you look elsewhere for a package or try to build one yourself.
Even if it works when you first install it, a package someone just handed to you might not have a way to be upgraded. A package from a third-party repository may break if the creators don't provide a new version when dependent packages change.
· Solve kernel-related dependencies. If you get third-party RPM packages for such things as video cards or wireless network cards that contain kernel drivers and you install a later kernel, those drivers no longer work. The result might be that the graphical login screen doesn't start when the system boots or your network card fails to load, so you have no wireless networking.
Because most Linux systems keep the two most recent kernels, you can reboot, interrupt GRUB, and select the previous (still working) kernel to boot from. That gets your system up and running, with the old kernel and working drivers, while you look for a more permanent fix.
The longer-term solution is to get a new driver that has been rebuilt for your current kernel. Sites such as rpmfusion.org build third-party, non–open source driver packages and upgrade those drivers when a new kernel is available. With the rpmfusion.orgrepository enabled, your system should pick up the new drivers when the new kernel is added.
As an alternative to sites such as rpmfusion.org, you can go straight to the website for the manufacturer and try to download their Linux drivers (Nvidia offers Linux drivers for its video cards), or if source code is available for the driver, you can try to build it yourself.
· Exclude some packages from update. If you are updating lots of packages at once, you can exclude the packages that fail to get the others to work as you pursue the problem with the broken ones. Here's how to update all packages needing upgrade, except for a package named somepackage (replace somepackage with the name of the package you want to exclude):
# yum -y --exclude=somepackage update
· Try preupgrade for upgrades. If you are upgrading Fedora from one version to another (for example, Fedora 20 to Fedora 21), you can use the preupgrade tool instead of just typing yum upgrade. The advantage of running preupgrade first is that it checks dependencies and downloads all needed packages before committing your system to the upgrade so you don't end up with a half upgraded system. You can also keep using your system during this process.
If you do have dependency problems during preupgrade, you can work them out before the upgrade actually takes place. Removing packages that have dependency problems is one way to deal with the problem (yum remove somepackage). After the upgrade is done, you can often add the package back in, using a version of the package that may be more consistent with the new repositories you are using.
Using cron for Software Updates
The cron facility provides a means of running commands at predetermined times and intervals. You can set the exact minute, hour, day, or month that a command runs. You can configure a command to run every five minutes, every third hour, or at a particular time on Friday afternoon.
If you want to use cron to set up nightly software updates, you can do that as the root user by running the crontab -e command. That opens a file using your default editor (vi command by default) that you can configure as a crontab file. Here's an example of what the crontab file you create might look like:
# min hour day/month month day/week command
59 23 * * * yum -y update | mail root@localhost
A crontab file consists of five fields, designating day and time, and a sixth field, containing the command line to run. I added the comment line to indicate the fields. Here, the yum -y update command is run, with its output mailed to the userroot@localhost. The command is run at 59 minutes after hour 23 (11:59 p.m.). The asterisks (*) are required as placeholders, instructing cron to run the command on every day of the month, month, and day of the week.
When you create a cron entry, make sure you either direct the output to a file or pipe the output to a command that can deal with the output. If you don't, any output is sent to the user that ran the crontab -e command (in this case, root).
In a crontab file, you can have a range of numbers, a list of numbers, or skip numbers. For example, 1, 5, or 17 in the first field causes the command to be run 1, 5, and 17 minutes after the hour. An */3 in the second field causes the command to run every three hours (midnight, 3 a.m., 6 a.m., and so on). A 1-3 in the fourth field tells cron to run the command in January, February, and March. Days of the week and months can be entered as numbers or words.
For more information on the format of a crontab file, type man 5 crontab. To read about the crontab command, type man 1 crontab.
Fixing RPM databases and cache
Information about all the RPM packages on your system is stored in your local RPM database. Although it happens much less often than it did with earlier releases of Fedora and RHEL, it is possible for the RPM database to become corrupted. This stops you from installing, removing, or listing RPM packages.
If you find that your rpm and yum commands are hanging or failing and returning an rpmdb open fails message, you can try rebuilding the RPM database. To verify that there is a problem in your RPM database, you can run the yum check command. Here is an example of what the output of that command looks like with a corrupted database:
# yum check
error: db4 error(11) from dbenv->open: Resource temporarily
unavailable
error: cannot open Packages index using db4 - Resource temporarily
unavailable (11)
error cannot open Packages database in /var/lib/rpm
CRITICAL:yum.main:
Error: rpmdb open fails
The RPM database and other information about your installed RPM packages are stored in the /var/lib/rpm directory. You can remove the database files that begin with __db* and rebuild them from the metadata stored in other files in that directory.
Before you start, it's a good idea to back up the /var/lib/rpm directory. Then you need to remove the old __db* files and rebuild them. Type the following commands to do that:
# cp -r /var/lib/rpm /tmp
# cd /var/lib/rpm
# rm __db*
# rpm --rebuilddb
New __db* files should appear after a few seconds in that directory. Try a simple rpm or yum command to make sure the databases are now in order.
Just as RPM has databases of locally installed packages, the Yum facility stores information associated with Yum repositories in the local /var/cache/yum directory. Cached data includes metadata, headers, packages, and yum plug-in data.
If there is ever a problem with the data cached by yum, you can clean it out. The next time you run a yum command, necessary data is downloaded again. Here are some reasons for cleaning out your yum cache:
· Metadata is obsolete. The first time you connect to a Yum repository (by downloading a package or querying the repository), metadata is downloaded to your system. The metadata consists of information on all the available packages from the repository.
As packages are added and removed from the repository, the metadata has to be updated, or your system will be working from old packaging information. By default, if you run a yum command, yum checks for new metadata if the old metadata is more than 90 minutes old (or by however many minutes metadata_expire= is set to in the /etc/yum.conf file).
If you suspect the metadata is obsolete but the expire time has not been reached, you can run yum clean metadata to remove all metadata, forcing new metadata to be uploaded with the next upload. Alternatively, you could run yum makecache to get metadata from all repositories up to date.
· You are running out of disk space. Normally, yum might cache as much as a few hundred megabytes of data in /var/cache/yum directories. However, depending on the settings in your /etc/yum.conf file (such as keepcache=1, which keeps all downloaded RPMs, even after they are installed), the cache directories can contain multiple gigabytes of data.
To clean out all packages, metadata, headers, and other data stored in the /var/cache/yum directory, type the following:
# yum clean all
At this point, your system gets up-to-date information from repositories the next time a yum command is run.
The next section covers information about network troubleshooting.
Troubleshooting Networking
With more and more of the information, images, video, and other content we use every day now available outside our local computers, a working network connection is required on almost every computer system. So, if you drop your network connection or can't reach the systems you want to communicate with, it's good to know that there are many tools in Linux for looking at the problem.
For client computers (laptops, desktops, and handheld devices), you want to connect to the network to reach other computer systems. On a server, you want your clients to be able to reach you. The following sections describe different tools for troubleshooting network connectivity for Linux client and server systems.
Troubleshooting outgoing connections
You open your web browser, but are unable to get to any website. You suspect that you are not connected to the network. Maybe the problem is with name resolution, but it may be with the connection outside your local network.
To check whether your outgoing network connections are working, you can use many of the commands described in Chapter 14, “Administering Networking.” You can test connectivity using a simple ping command. To see if name-to-address resolution is working, use host and dig.
The following sections cover problems you can encounter with network connectivity for outgoing connections and what tools to use to uncover the problems.
View network interfaces
To see the status of your network interfaces, use the ip command. The following output shows that the loopback interface (lo) is up (so you can run network commands on your local system), but eth0 (your first wired network card) is down (state DOWN). If the interface had been up, an inet line would show the IP address of the interface. Here, only the loopback interface has an inet address (127.0.0.1).
# ip addr show
1: lo: <LOOPBACK,UP,LOWER_UP> mtu 16436 qdisc noqueue state UNKNOWN
link/loopback 00:00:00:00:00:00 brd 00:00:00:00:00:00
inet 127.0.0.1/8 scope host lo
inet6 ::1/128 scope host
valid_lft forever preferred_lft forever
2: eth0: <NO-CARRIER,BROADCAST,MULTICAST,UP> mtu 1500 state DOWN
qlen 1000
link/ether f0:de:f1:28:46:d9 brd ff:ff:ff:ff:ff:ff
In RHEL 7 and Fedora, by default, network interfaces are now named based on how they are connected to the physical hardware. For example, in RHEL 7, you might see a network interface of enp11s0. That would indicate that the NIC is a wired Ethernet card (en) on PCI board 11 (p11) and slot 0 (s0). A wireless card would start with wl instead of en. The intention is to make the NIC names more predictable, because when the system is rebooted, it is not guaranteed which interfaces would be named eth0, eth1, and so on by the operating system.
Check physical connections
For a wired connection, make sure your computer is plugged into the port on your network switch. If you have multiple NICs, make sure the cable is plugged into the correct one. If you know the name of a network interface (eth0, p4p1, or other), to find which NIC is associated with the interface, type ethtool -p eth0 from the command line and look behind your computer to see which NIC is blinking (Ctrl+C stops the blinking). Plug the cable into the correct port.
If, instead of seeing an interface that is down, the ip command shows no interface at all, check that the hardware isn't disabled. For a wired NIC, the card may not be fully seated in its slot or the NIC may have been disabled in the BIOS.
On a wireless connection, you may click the NetworkManager icon and not see an available wireless interface. Again, it could be disabled in the BIOS. However, on a laptop, check to see if there is a tiny switch that disables the NIC. I've seen several people shred their networking configurations only to find that this tiny switch on the front or side of their laptops had been switched to the off position.
Check routes
If your network interface is up, but you still can't reach the host you want to reach, try checking the route to that host. Start by checking your default route. Then try to reach the local network's gateway device to the next network. Finally, try to ping a system somewhere on the Internet:
# route
route
Kernel IP routing table
Destination Gateway Genmask Flags Metric Ref Use Iface
192.168.0.0 * 255.255.255.0 U 2 0 0 eth0
default 192.168.0.1 0.0.0.0 UG 0 0 eth0
The default line shows that the default gateway (UG) is at address 192.168.0.1 and that the address can be reached over the eth0 card. Because there is only the eth0 interface here and only a route to the 192.168.0.0 network is shown, all communication not addressed to a host on the 192.168.0.0/24 network is sent through the default gateway (192.168.0.1). The default gateway is more properly referred to as a router.
To make sure you can reach your router, try to ping it. For example:
# ping -c 2 192.168.0.1
PING 192.168.0.1 (192.168.0.1) 56(84) bytes of data.
From 192.168.0.105 icmp_seq=1 Destination Host Unreachable
From 192.168.0.105 icmp_seq=2 Destination Host Unreachable
--- 192.168.0.1 ping statistics ---
2 packets transmitted, 0 received, +2 errors, 100% packet loss
The “Destination Host Unreachable” message tells you that the router is either turned off or not physically connected to you (maybe the router isn't connected to the switch you share). If the ping succeeds and you can reach the router, the next step is to try an address beyond your router.
Try to ping a widely accessible IP address. For example, the IP address for the Google public DNS server is 8.8.8.8. Try to ping that (ping -c2 8.8.8.8). If that ping succeeds, your network is probably fine, and it is most likely your hostname-to-address resolution that is not working properly.
If you can reach a remote system, but the connection is very slow, you can use the traceroute command to follow the route to the remote host. For example, this command shows each hop taken en route to http://www.google.com:
# traceroute www.google.com
The output shows the time taken to make each hop along the way to the Google site. Instead of traceroute, you can use the mtr command (yum install mtr) to watch the route taken to a host. With mtr, the route is queried continuously, so you can watch the performance of each leg of the journey over time.
Check hostname resolution
If you cannot reach remote hosts by name, but you can reach them by pinging IP addresses, your system is having a problem with hostname resolution. Systems connected to the Internet do name-to-address resolution by communicating to a domain name system (DNS) server that can provide them with the IP addresses of the requested hosts.
The DNS server your system uses can be entered manually or picked up automatically from a DHCP server when you start your network interfaces. In either case, the names and IP addresses of one or more DNS servers end up in your /etc/resolv.conf file. Here is an example of that file:
search example.com
nameserver 192.168.0.254
nameserver 192.168.0.253
When you ask to connect to a hostname in Fedora or Red Hat Enterprise Linux, the /etc/hosts file is searched; then the first name server entry in resolv.conf is queried; then each subsequent name server is queried. If a hostname you ask for is not found, all those locations are checked before you get some sort of “Host Not Found” message. Here are some ways of debugging name-to-address resolution:
· Check if DNS server can be reached. Knowing the name server addresses, you can try to ping each name server's IP address to see if it is accessible. For example: ping -c 2 192.168.0.254. If the IP address can be reached, it could be that either you were assigned the wrong address for the DNS server or it is currently down.
· Check if DNS server is working. You specifically try to use each DNS server with the host or dig command. For example, either of these two commands can be used to see if the DNS server at 192.168.0.254 can resolve the hostname www.google.com into an IP address. Repeat this for each name server's IP address until you find which ones work:
·# host www.google.com 192.168.0.254
# dig @192.168.0.254 www.google.com
· Correct your DNS servers. If you determine that you have the wrong IP addresses set for your DNS servers, changing them can be a bit tricky. Search /var/log/messages for your DNS servers' IP addresses. If NetworkManager is used to start your networking and connect to a DHCP server, you should see name server lines with the IP addresses being assigned. If the addresses are wrong, you can override them.
With NetworkManager enabled, you can't just add name server entries to the /etc/resolv.conf file because NetworkManager overwrites that file with its own name server entries. Instead, add a PEERDNS=no line to the ifcfg file for the network interface (for example,ifcfg-eth0 in the /etc/sysconfig/network-scripts directory). Then set DNS1=192.168.0.254 (or whatever your DNS server's IP address is). The new address is used the next time you restart your networking.
If you are using the network service, instead of NetworkManager, you can still use PEERDNS=no to prevent the DHCP server from overwriting your DNS addresses. However, in that case, you can edit the resolv.conf file directly to set your DNS server addresses.
The procedures just described for checking your outgoing network connectivity apply to any type of system, whether it is a laptop, desktop, or server. For the most part, incoming connections are not an issue with laptops or desktops because most requests are simply denied. However, for servers, the next section describes ways of making your server accessible if clients are having trouble reaching the services you provide from that server.
Troubleshooting incoming connections
If you are troubleshooting network interfaces on a server, there are different considerations than on a desktop system. Because most Linux systems are configured as servers, you should know how to troubleshoot problems encountered by those who are trying to reach your Linux servers.
I'll start with the idea of having an Apache web server (httpd) running on your Linux system, but no web clients can reach it. The following sections describe things you can try to see where the problem is.
Check if the client can reach your system at all
To be a public server, your system's hostname should be resolvable so any client on the Internet can reach it. That means locking down your system to a particular, public IP address and registering that address with a public DNS server. You can use a domain registrar (such as http://www.networksolutions.com) to do that.
When clients cannot reach your website by name from their web browsers, if the client is a Linux system, you can go through ping, host, traceroute, and other commands described in the previous section to track down the connectivity problem. Windows systems have their own version of ping that you can use from those systems.
If the name-to-address resolution is working to reach your system and you can ping your server from the outside, the next thing to try is the availability of the service.
Check if the service is available to the client
From a Linux client, you can check if the service you are looking for (in this case httpd) is available from the server. One way to do that is using the nmap command.
The nmap command is a favorite tool for system administrators checking for various kinds of information on networks. However, it is a favorite cracker tool as well because it can scan servers, looking for potential vulnerabilities. So it is fine to use nmap to scan your own systems to check for problems. But know that using nmap on another system is like checking the doors and windows on someone's house to see if you can get in. You look like an intruder.
Checking your own system to see what ports to your server are open to the outside world (essentially, checking what services are running) is perfectly legitimate and easy to do. After nmap is installed (yum install nmap), use your system hostname or IP address to usenmap to scan your system to see what is running on common ports:
# nmap 192.168.0.119
Starting Nmap 5.21 ( http://nmap.org ) at 2012-06-16 08:27 EDT
Nmap scan report for spike (192.168.0.119)
Host is up (0.0037s latency).
Not shown: 995 filtered ports
PORT STATE SERVICE
21/tcp open ftp
22/tcp open ssh
80/tcp open http
443/tcp open https
631/tcp open ipp
MAC Address: 00:1B:21:0A:E8:5E (Intel Corporate)
Nmap done: 1 IP address (1 host up) scanned in 4.77 seconds
The preceding output shows that TCP ports are open to the regular (http) and secure (https) web services. When you see that the state is open, it indicates that a service is listening on the port as well. If you get to this point, it means your network connection is fine and you should direct your troubleshooting efforts to how the service itself is configured (for example, you might look in /etc/httpd/conf/httpd.conf to see if specific hosts are allowed or denied access).
If TCP ports 80 and/or 443 are not shown, it means they are being filtered. You need to check whether your firewall is blocking (not accepting packets to) those ports. If the port is not filtered, but the state is closed, it means that the httpd service either isn't running or isn't listening on those ports. The next step is to log into the server and check those issues.
Check the firewall on the server
From your server, you can use the iptables command to list the filter table rules that are in place. Here is an example:
# iptables -vnL
Chain INPUT (policy ACCEPT 0 packets, 0 bytes)
pkts bytes target prot opt in out source destination
...
0 0 ACCEPT tcp -- * * 0.0.0.0/0 0.0.0.0/0 state NEW
tcp dpt:80
0 0 ACCEPT tcp -- * * 0.0.0.0/0 0.0.0.0/0 state NEW
tcp dpt:443
...
For the RHEL 7 and Fedora 20 systems where the firewalld service is enabled, you can use the Firewall configuration window to open the ports needed. With the public Zone and Services tab selected, click the check boxes for http and https to immediately open those ports for all incoming traffic.
If your system is using the basic iptables service, there should be firewall rules like the two shown in the preceding code among your other rules. If there aren't, add those rules to the /etc/sysconfig/iptables file. Here are examples of what those rules might look like:
-A INPUT -m state --state NEW -m tcp -p tcp --dport 80 -j ACCEPT
-A INPUT -m state --state NEW -m tcp -p tcp --dport 443 -j ACCEPT
With the rules added to the file, clear out all your firewall rules (systemctl stop iptables.service or service iptables stop), and then start them again (systemctl start iptables.service or service iptables start).
If the firewall is still blocking client access to the web server ports, here are a few things to check in your firewall:
· Check rules order. Look at rules in /etc/sysconfig/iptables, and see if a DROP or REJECT rule comes before the rules opening ports 80 and/or 443. Moving the rules to open those ports before any final DROP or REJECT lines can solve the problem.
· Look for denied hosts. Check whether any rules drop or reject packets from particular hosts or networks. Look for rules that include -s or --source, followed by an IP address or address range and then a -j DROP or ACCEPT. Modify the rule or add a rule prior to your rules to make an exception for the host you want to allow to access your service.
If the port is now open, but the service itself is closed, check that the service itself is running and listening on the appropriate interfaces.
Check the service on the server
If there seems to be nothing blocking client access to your server through the actual ports providing the service you want to share, it is time to check the service itself. Assuming the service is running (depending on your system, type service httpd status or systemctl status httpd to check), the next thing to check is that it is listening on the proper ports and network interfaces.
The netstat command is a great general-purpose tool for checking network services. The following command lists the names and process IDs (p) for all processes that are listening (l) for TCP (t) and UDP (u) services, along with the port number (n) they are listening on. The following command line filters out all lines except those associated with the httpd process:
# netstat -tupln | grep httpd
tcp 0 0 :::80 :::* LISTEN 2567/httpd
tcp 0 0 :::443 :::* LISTEN 2567/httpd
The previous example shows that the httpd process is listening on port 80 and 443 for all interfaces. It is possible that the httpd process might be listening on selected interfaces. For example, if the httpd process were only listening on the local interface (127.0.0.1) for HTTP requests (port 80) the entry would look as follows:
tcp 0 0 127.0.0.1:80 :::* LISTEN 2567/httpd
For httpd, as well as for other network services that listen for requests on network interfaces, you can edit the service's main configuration file (in this case, /etc/httpd/conf/httpd.conf) to tell it to listen on port 80 for all addresses (Listen 80) or a specific address (Listen 192.168.0.100:80).
Troubleshooting Memory
Troubleshooting performance problems on your computer is one of the most important, although often elusive, tasks you need to complete. Maybe you have a system that was working fine, but begins to slow down to a point where it is practically unusable. Maybe applications begin to just crash for no apparent reason. Finding and fixing the problem may take some detective work.
Linux comes with many tools for watching activities on your system and figuring out what is happening. Using a variety of Linux utilities, you can do such things as find out which processes are consuming large amounts of memory or placing high demands on your processors, disks, or network bandwidth. Solutions can include:
· Adding capacity—Your computer may be trying to do what you ask of it, but failures might occur because you don't have enough memory, processing power, disk space, or network capacity to get reasonable performance. Even nearing the boundaries of resource exhaustion can cause performance problems. Improving your computer hardware capacity is often the easiest way of solving performance problems.
· Tuning the system—Linux comes with default settings that define how it internally saves data, moves data around, and protects data. System tunable parameters can be changed if the default settings don't work well for the types of applications you have on your system.
· Uncovering problem applications or users—Sometimes, a system performs poorly because a user or an application is doing something wrong. Misconfigured or broken applications can hang or gobble up all the resources they can get. An inexperienced user might mistakenly start multiple instances of a program that drain system resources. As a system administrator, you want to know how to find and fix these problems.
To troubleshoot performance problems in Linux, you use some of the basic tools for watching and manipulating processes running on your system. Refer to Chapter 6, “Managing Running Processes,” if you need details on commands such as ps, top, kill, and killall. In this section, I add commands such as memstat to dig a little deeper into what processes are doing and where things are going wrong.
The most complex area of troubleshooting in Linux relates to managing virtual memory. The next sections describe how to view and manage virtual memory.
Uncovering memory issues
Computers have ways of storing data permanently (hard disks) and temporarily (random access memory, or RAM, and swap space). Think of yourself as a CPU, working at a desk trying to get your work finished. You would put data that you want to keep permanently in a filing cabinet across the room (that's like hard disk storage). You would put information that you are currently using on your desk (that's like RAM memory on a computer).
Swap space is a way of extending RAM. It is really just a place to put temporary data that doesn't fit in RAM but is expected to be needed by the CPU at some point. Although swap space is on the hard disk, it is not a regular Linux filesystem in which data is stored permanently.
Compared to disk storage, random access memory has the following attributes:
· Nearer the processor—Like the desk being near you as you work, memory is physically near the CPU on the computer's motherboard. So any data the CPU needs, it can just grab immediately if the data is in RAM.
· Faster—Its proximity to the CPU and the way it is accessed (solid state versus optical) makes it much faster for the CPU to get information from RAM than it can from a hard disk. It's quicker to look at a piece of paper on your desk (a small, close space) than to walk to a row of file cabinets and start searching for what you want.
· Less capacity—A new computer might have a 1TB hard drive but 8GB or 16GB of RAM. Although it would make the computer run faster to put every file and every piece of data the processor may need into RAM, in most cases there just wouldn't be the room. Also, both the physical memory slots on the computer and the computer system itself (64-bit computers can address more RAM than 32-bit computers) can limit how much RAM a computer is capable of having.
· More expensive—Although RAM is tremendously more affordable than it was a decade or two ago, it is still much more expensive (per GB) than hard disks.
· Temporary—RAM holds data and metadata that the CPU is using now for the work it is doing (plus some content the Linux kernel is keeping around because it suspects a process will need it before long). When you turn off the computer, however, everything in RAM is erased. When the CPU is done with data, that data is discarded if it is no longer needed, left in RAM for possible later use, or marked to be written to disk for permanent storage if it needs to be saved.
It is important to understand the difference between temporary (RAM) and permanent (hard disk) storage, but that doesn't tell the whole story. If the demand for memory exceeds the supply of RAM, the kernel can temporarily move data out of RAM to an area called swap space.
If we revisit the desk analogy, this would be like saying, “There is no room left on my desk, yet I have to add more papers to it for the projects I'm currently working on. Instead of storing papers I'll need soon in a permanent file cabinet, I'll have one special file cabinet (like a desk drawer) to hold those papers I'm still working with, but that I'm not ready to store permanently or throw away.”
Refer to Chapter 12, “Managing Disks and Filesystems,” for more information on swap files and partitions and how to create them. For the moment, however, there are a few things you should know about these kinds of swap areas and when they are used:
· When data is swapped from RAM to a swap area (swapped out), you get a performance hit. Remember, writing to disk is much slower than writing to RAM.
· When data is returned from swap to RAM because it is needed again (swapped in), you get another performance hit.
· When Linux runs out of space in RAM, swapping is like being wounded in battle. It's not something you aspire to, but it's better than being killed. In other words, all your processes stay active and they don't lose any data or fail completely, but the system performance can significantly slow down.
· If both RAM and swap are full, and no data can be discarded or written to disk, your system can reach an out-of-memory (OOM) condition. When that happens, the kernel OOM killer kicks in and begins killing off processes, one by one, to regain as much memory as the kernel needs to begin functioning properly again.
The general rule has always been that swapping is bad and should be avoided. However, some would argue that, in certain cases, more aggressive swapping can actually improve performance.
Think of the case where you open a document in a text editor and then minimize it on your desktop for several days as you work on different tasks. If data from that document were swapped out to disk, more RAM would be available for more active applications that could put that space to better use. The performance hit would come the next time you needed to access the data from the edited document and the data was swapped in from disk to RAM. The settings that relate to how aggressively a system swaps are referred to asswappiness.
As much as possible, Linux wants to make everything that an open application needs immediately available. So, using the desk analogy, if I am working on nine active projects and there is space on the desk to hold the information I need for all nine projects, why not leave them all within reach on the desk? Following that same way of thinking, the kernel sometimes keeps libraries and other content in RAM that it thinks you might eventually need, even if a process is not looking for it immediately.
The fact that the kernel is inclined to store information in RAM that it expects may be needed soon (even if it is not needed now) can cause an inexperienced system administrator to think that the system is almost out of RAM and that processes are about to start failing. That is why it is important to know the different kinds of information being held in memory—so you can tell when real out-of-memory situations can occur. The problem is not just running out of RAM; it is running out of RAM when only nonswappable data is left.
Keep this general overview of virtual memory (RAM and swap) in mind, as the next section describes ways to go about troubleshooting issues related to virtual memory.
Checking for memory problems
Let's say that you are logged into a Linux desktop, with lots of applications running, and everything begins to slow down. To find out if the performance problems have occurred because you have run out of memory, you can try commands such as top and ps to begin looking for memory consumption on your system.
To run the top command to watch for memory consumption, type top and then type a capital M. Here is an example:
# top
top - 22:48:24 up 3:59, 2 users, load average: 1.51, 1.37, 1.15
Tasks: 281 total, 2 running, 279 sleeping, 0 stopped, 0 zombie
Cpu(s): 16.6%us, 3.0%sy, 0.0%ni, 80.3%id, 0.0%wa, 0.0%hi,
0.2%si, 0.0%st
Mem: 3716196k total, 2684924k used, 1031272k free, 146172k
buffers
Swap: 4194296k total, 0k used, 4194296k free, 784176k
cached
PID USER PR NI VIRT RES SHR S %CPU %MEM TIME+ COMMAND
6679 cnegus 20 0 1665m 937m 32m S 7.0 25.8 1:07.95 firefox
6794 cnegus 20 0 743m 181m 30m R 64.8 5.0 1:22.82
npviewer.bin
3327 cnegus 20 0 1145m 116m 66m S 0.0 3.2 0:39.25
soffice.bin
6939 cnegus 20 0 145m 71m 23m S 0.0 2.0 0:00.97 acroread
2440 root 20 0 183m 37m 26m S 1.3 1.0 1:04.81 Xorg
2795 cnegus 20 0 1056m 22m 14m S 0.0 0.6 0:01.55 nautilus
There are two lines (Mem and Swap) and four columns of information (VIRT, RES, SHR, and %MEM) relating to memory in the top output. In this example, you can see that RAM is not exhausted from the Mem line (only 268492k of 3716196k is used) and that nothing is being swapped to disk from the Swap line (0k used).
However, adding up just these first six lines of output in the VIRT column, you would see that 4937MB of memory has been allocated for those applications, which exceeds the 3629MB of total RAM (3716196k) that is available. That's because the VIRT column shows only the amount of memory that has been promised to the application. The RES line shows the amount of nonswappable memory that is actually being used, which totals only 1364MB.
Notice that, when you ask to sort by memory usage by typing a capital M, top knows to sort on that RES column. The SHR column shows memory that could potentially be shared by other applications (such as libraries), and %MEM shows the percentage of total memory consumed by each application.
If you think that the system is reaching an out-of-memory state, here are a few things to look for:
· The free space shown on the Mem line would be at or near zero.
· The used space shown on the Swap line would be nonzero and would continue to grow. That should be accompanied with a slowdown of system performance.
· As the top screen redraws every few seconds, if there is a process with a memory leak (continuously asking for and using more memory, but not giving any memory back), the amount of VIRT memory grows, but more important, the RES memory continues to grow for that process.
· If the Swap space actually runs out, the kernel starts to kill off processes to deal with this out-of-memory condition.
Dealing with memory problems
In the short term, you can do several things to deal with this out-of-memory condition:
· Kill a process. If the memory problem is due to one errant process, you can simply kill that process. Assuming you are logged in as root or as the user who owns the runaway process, type k from the top window, and then enter the PID of the process you want to kill and choose 15 or 9 as the signal to send.
· Drop page caches. If you just want to clear up some memory right now, as you otherwise deal with the problem, you can tell the system to drop inactive page caches. When you do this, some memory pages are written to disk; others are just discarded (because they are stored permanently and can be gotten again from disk when they are needed).
This action is the equivalent of cleaning your desk and putting all but the most critical information into the trash or into a file cabinet. You may need to retrieve information again shortly from a file cabinet, but you almost surely don't need it all immediately. Keeptop running in one Terminal window to see the Mem line change as you type the following (as root) into another Terminal window:
# echo 3 > /proc/sys/vm/drop_caches
· Kill an out-of-memory process. Sometimes, memory exhaustion has made the system so unusable that you may not be able to get a response from a shell or GUI. In those cases, you might be able to use Alt+SysRq keystrokes to kill an out-of-memory process. The reason you can use Alt+SysRq keystrokes on an otherwise unresponsive system is that the kernel processes Alt+SysRq requests ahead of other requests.
To enable Alt+SysRq keystrokes, the system must have already set /proc/sys/kernel/sysrq to 1. An easy way to do this is to add kernel.sysrq = 1 to the /etc/sysctl.conf file. Also, you must run the Alt+SysRq keystrokes from a text-based interface (such as the virtual console you see when you press Ctrl+Alt+F2).
With kernel.sysrq set to 1, you can kill the process on your system with the highest OOM score by pressing Alt+SysRq+f from a text-based interface. A listing of all processes running on your system appears on the screen, with the name of the process that was killed listed at the end. You can repeat those keystrokes until you have killed enough processes to be able to access the system normally from the shell again.
NOTE
There are many other Alt+SysRq keystrokes you can use to deal with an unresponsive system. For example, Alt+SysRq+e terminates all processes except for the init process. Alt+SysRq+t dumps a list of all current tasks and information about those tasks to the console. To reboot the system, press Alt+SysRq+b. See the sysrq.txt file in the /usr/share/doc/kernel-doc*/Documentation directory for more information about Alt+SysRq keystrokes.
Troubleshooting in Rescue Mode
If your Linux system becomes unbootable, your best option for fixing it is probably to go into rescue mode. To go into rescue mode, you bypass the Linux system installed on your hard disk and boot some rescue medium (such as a bootable USB key or boot CD). After the rescue medium boots, it tries to mount any filesystems it can find from your Linux system so you can repair any problems.
For many Linux distributions, the installation CD or DVD can serve as boot media for going into rescue mode. Here's an example of how to use a Fedora installation DVD to go into rescue mode to fix a broken Linux system:
1. Get the installation CD or DVD image you want to use, and burn it to the appropriate medium (CD or DVD). See Appendix A, “Media,” for information on burning CDs and DVDs. (For my example, I used a Red Hat Enterprise Linux 7 Server installation DVD.)
2. Insert the CD or DVD into the drive on the computer that has the broken Linux system installed, and reboot.
3. The moment you see the BIOS screen, press the function key noted on that screen for selecting the boot device (possibly the F12 or F2 function key).
4. Choose the drive (CD or DVD) from the list of bootable devices, and press Enter.
5. When the RHEL 7 boot menu appears, use the arrow keys to highlight the word Troubleshooting and press Enter. In other Linux boot media, the selection could say Rescue Mode or something similar. On the next screen that appears, select Rescue a Red Hat Enterprise Linux system and press Enter.
6. After a few moments, the Linux system on the rescue medium boots up. When prompted, select your language and keyboard. You are asked if you want to start network interfaces on the system.
7. If you think you might need to get something from another system on your network (such as RPM packages or debugging tools), select Yes and try to configure your network interfaces. You are then asked if you want to try to mount filesystems from your installed Linux system under /mnt/sysimage.
8. Select Continue to have your filesystems mounted (if possible) under the /mnt/sysimage directory. If this is successful, a Rescue message appears, telling you your filesystems have been mounted under /mnt/sysimage.
9. Select OK to continue. You should see a shell prompt for the root user (#). You are ready to begin troubleshooting from rescue mode. After you are in rescue mode, the portion of your filesystem that is not damaged is mounted under the /mnt/sysimage directory. Type ls /mnt/sysimage to check that the files and directories from the hard disk are there.
Right now, the root of the filesystem (/) is from the filesystem that comes on the rescue medium. To troubleshoot your installed Linux system, however, you can type the following command:
# chroot /mnt/sysimage
Now the /mnt/sysimage directory becomes the root of your filesystem (/) so it looks like the filesystem installed on your hard disk. Here are some things you can do to repair your system while you are in rescue mode:
· Fix /etc/fstab. If your filesystems couldn't mount because of an error in your/etc/fstab file, you could try to correct any entries that might have problems (such as wrong device names or a mount point directory that doesn't exist). Type mount -a to make sure all the filesystems mount.
· Reinstall missing components. It might be that the filesystems are fine, but the system failed to boot because some critical command or configuration file is missing. You might be able to fix the problem by reinstalling the package with the missing components. For example, if someone had deleted /bin/mount by mistake, the system would have no command to mount filesystems. Reinstalling the util-linux package would replace the missing mount command.
· Check the filesystems. If your booting problems stem from corrupt filesystems, you can try running the fsck command (filesystem check) to see if there is any corruption on the disk partition. If there is, fsck attempts to correct problems it encounters.
When you are finished fixing your system, type exit to exit the chroot environment and return to the filesystem layout that the live medium sees. If you are completely finished, type reboot to restart your system. Be sure to pop out the medium before the system restarts.
Summary
Troubleshooting problems in Linux can start from the moment you turn on your computer. Problems can occur with your computer BIOS, boot loader, or other parts of the boot process that you can correct by intercepting them at different stages of the boot process.
After the system has started, you can troubleshoot problems with software packages, network interfaces, or memory exhaustion. Linux comes with many tools for finding and correcting any part of the Linux system that might break down and need fixing.
The next chapter covers the topic of Linux security. Using the tools described in that chapter, you can provide access to those services you and your users need, while blocking access to system resources that you want to protect from harm.
Exercises
The exercises in this section enable you to try out useful troubleshooting techniques in Linux. Because some of the techniques described here can potentially damage your system, I recommend you do not use a production system that you cannot risk damaging. See Appendix B for suggested solutions.
These exercises relate to troubleshooting topics in Linux. They assume you are booting a PC with standard BIOS. To do these exercises, you need to be able to reboot your computer and interrupt any work it may be doing.
1. Boot your computer, and as soon as you see the BIOS screen, go into Setup mode as instructed on the BIOS screen.
2. From the BIOS Setup screen, determine if your computer is 32-bit or 64-bit, if it includes virtualization support, and if your network interface card is capable of PXE booting.
3. Reboot and just after the BIOS screen disappears, when you see the countdown to booting the Linux system, press any key to get to the GRUB boot loader.
4. From the GRUB boot loader, add an option to boot up to runlevel 1, so you can do some system maintenance.
5. Reboot a computer with Red Hat Enterprise Linux 6 installed and, from the GRUB boot loader, add an option that causes system services to prompt you to confirm as each service is started.
6. After the system boots up, look at the messages that were produced in the kernel ring buffer that show the activity of the kernel as it booted up.
7. In Fedora or RHEL, run a trial yum update and exclude any kernel package that is available.
8. Check to see what processes are listening for incoming connections on your system.
9. Check to see what ports are open on your external network interface.
10.Run the top command in a Terminal window. Open a second Terminal window, clear your page cache, and notice on the top screen if more RES memory is now available.
All materials on the site are licensed Creative Commons Attribution-Sharealike 3.0 Unported CC BY-SA 3.0 & GNU Free Documentation License (GFDL)
If you are the copyright holder of any material contained on our site and intend to remove it, please contact our site administrator for approval.
© 2016-2025 All site design rights belong to S.Y.A.