CompTIA Linux+ / LPIC-1 Cert Guide (Exams LX0-103 & LX0-104/101-400 & 102-400) (2016)
Chapter 20. System Security
This chapter covers the following topics:
![]() Gaining Access to the root Account
Gaining Access to the root Account
![]() Providing Services on Demand
Providing Services on Demand
![]() Using TCP Wrappers for Securing Services
Using TCP Wrappers for Securing Services
![]() Understanding Permissions Problems
Understanding Permissions Problems
![]() GnuPG Keys
GnuPG Keys
![]() Secure Shell
Secure Shell
![]() Additional Security Features
Additional Security Features
This chapter covers the following objectives:
![]() Perform security administration tasks: 110.1
Perform security administration tasks: 110.1
![]() Set up host security: 110.2
Set up host security: 110.2
![]() Securing data with encryption: 110.3
Securing data with encryption: 110.3
One of the most important tasks that all Linux administrators face is securing each of the systems in the network. Security breaches can occur both locally and remotely, so you need to know how to protect your systems from more than one threat.
In this chapter you learn the basic concepts of securing network services, securing data using encryption techniques, and securing local user accounts.
“Do I Know This Already?” Quiz
The “Do I Know This Already?” quiz enables you to assess whether you should read this entire chapter or simply jump to the “Exam Preparation Tasks” section for review. If you are in doubt, read the entire chapter. Table 20-1 outlines the major headings in this chapter and the corresponding “Do I Know This Already?” quiz questions. You can find the answers in Appendix A, “Answers to the ‘Do I Know This Already?’ Quizzes and Review Questions.”
Table 20-1 “Do I Know This Already?” Foundation Topics Section-to-Question Mapping
1. Which file provides users the ability to execute commands as other users, such as the root user?
a. /etc/sudo
b. /etc/su
c. /etc/suers
d. /etc/sudoers
2. Which of the following options provide a login shell when using the su command? (Choose two.)
a. -l
b. -s
c. --
d. -
e. -k
3. Which of the following services can launch other services on demand? (Choose two.)
a. inetd
b. xinetd
c. linetd
d. dinet
4. Which of the following files are used by TCP wrappers? (Choose two.)
a. /etc/wrap.allow
b. /etc/wrap.deny
c. /etc/hosts.allow
d. /etc/hosts.deny
5. Which of the following commands can be used to display all the SUID files on the system?
a. search
b. locate
c. ls
d. find
6. Which option to the gpg command generates private and public keys?
a. --key-gen
b. --gen-key
c. --key
d. --gen
e. --keygen
7. Which files contains a list of SSH host public keys? (Choose two.)
a. /etc/ssh/ssh_known_hosts
b. /etc/ssh_known_hosts
c. /etc/known_hosts
d. ~/.ssh/known_hosts
8. Which commands can change the password aging for user accounts? (Choose two.)
a. fuser
b. chage
c. usermod
d. ulimit
e. lsof
Foundation Topics
Gaining Access to the root Account
The best security practice is to avoid logging in as the root user unless you need to perform specific administration commands. In most cases you should not log in as the root user directly, but rather gain root access by executing either the su command or the sudo command.
The su Command
To gain access to another user account with the su command, use the following syntax:
su account_name
For example, to switch to the root account, execute the following command:
su root

This provides you with a non-login shell for the root user. Typically you want a login shell as this provides you with the full user environment (environment variables, shell customizations, etc.). This can be accomplished by using the –l option or just a – option:
su – root
su –l root
To gain access to a regular user account, you must provide the account name. However, if you don’t provide an account name, the su command assumes you want to switch to the root account. As a result, the following commands are all the same:
su – root
su –l root
su –
su -l
When switching from the root account to a regular user account, no password is required. This allows the root user to switch to a regular user account to test that account’s features (or troubleshoot problems for the user) without having to change that user’s password.
To switch from a regular user account to any other account requires knowing the password of the account you are switching to.
Note
Some distributions’ versions of the su command allow for the use of X and remote X; simply use the sux command instead of the su command. This is most notably present on the openSUSE and SUSE Linux Enterprise distributions.
The sudo Command
The problem with the su command is that to provide a user with elevated privileges, you would need to provide the user with the root password. This would allow that user full administrative access to the system.
Often you want to allow a regular user to execute some commands as the root user, but not all commands. For example, if a network error occurs on a user’s workstation, you want that user to be allowed to restart the networking service. On some systems this can be accomplished by executing the following command:
/etc/rc.d/init.d/network restart
To execute this command successfully, the user needs to have root privileges. Instead of providing the user with the root password, you can set up the sudo command to allow the user to run just the necessary command. To do this, you need to log in as the root user and then execute the following command:
visudo
This command allows you to edit the /etc/sudoers file, the file that allows you to provide root access for specific commands to specific users. The visudo command automatically assumes you want to use the vi editor to edit this file. To use a different editor, such as the nano editor, execute a command like the following:
export EDITOR=nano
Note
Why use the visudo command instead of editing the /etc/sudoers file directly? The visudo command performs some error checking when you exit the editor to make sure you didn’t make any formatting mistakes.
The /etc/sudoers file has many options. For the certification exam you just need to know how to provide a user with the ability to execute commands as the root user. For example, if you want a user account with the name of “ross” to be able to run all commands as the root user, add the following line:
ross ALL=(ALL) ALL
To limit a user to a specific command, such as the /etc/rc.d/init.d/network command, add the following line:
ross ALL=(ALL) /etc/rc.d/init.d/network
For a user to execute a command as root, he uses the sudo command. The syntax is as follows:
sudo /etc/rc.d/init.d/network restart
The user then is prompted for his own password (not the root password). If the correct password is given and the access is permitted based on an entry in the /etc/sudoers file, the command is executed as the root user. If the user attempts to execute a command that he is not authorized to execute, an error message appears on the screen and the attempt is logged.
Providing Services on Demand
A Linux system provides many services. Therein lies one of its greatest strengths, and for a weak-willed sysadmin, one of its greatest weaknesses. If you configure your server to provide too many services that run constantly, performance suffers.
The three strata of service configuration for a server are
![]() Always on—This level is for services that should be always running because clients expect their presence.
Always on—This level is for services that should be always running because clients expect their presence.
![]() On demand—This level is for periodically used services, those that should be present but not on using RAM and CPU constantly.
On demand—This level is for periodically used services, those that should be present but not on using RAM and CPU constantly.
![]() Off or disabled—This level represents those services that you’re not going to run regardless, such as ISDN services on an Ethernet-connected server and so on.
Off or disabled—This level represents those services that you’re not going to run regardless, such as ISDN services on an Ethernet-connected server and so on.
Although having standard services capable of being started on demand is advantageous, many services require the starting of multiple child processes or the generation of various security keys that make them less likely candidates for being run on demand. Examples of such services includehttpd (which needs to start several to many child processes), sshd (which needs to generate keys and so on), and ssl (which can also require the generation of keys when starting).
Using inetd and xinetd
The older of two services, the inetd daemon, is intended to provide services upon client demand. The idea behind inetd is to provide a method to start and run services on demand, particularly to start the service on receipt of a client connection request. The inetd configuration file (/etc/inetd.conf) contains a line for each service inetd controls.
The xinetd service is the newer of the two services and provides more atomic control, using a main configuration file (/etc/xinetd.conf) to point to a directory (typically /etc/xinetd.d) that contains a single text configuration file for each controlled service, such as /etc/xinetd.d/telnet.
Note
Writing about inetd/xinetd without switching back and forth in a confusing manner is difficult; therefore, I cover both in one section, splitting into notes and tips when needed or when one deserves more attention. The two services are similar, with the main difference being the layout of the configuration files. Additionally, whenever you see a directory that ends in “.d” you can typically find a directory that contains include files that affect a particular service or set of services.
A number of services are governed by inetd/xinetd; the more familiar of these include
![]() finger—Used to provide user login information and is considered to be a security risk.
finger—Used to provide user login information and is considered to be a security risk.
![]() imap—A daemon that enables users to store their email on a server rather than download it to a client. This is often moved to a full-time service.
imap—A daemon that enables users to store their email on a server rather than download it to a client. This is often moved to a full-time service.
![]() ktalk/ntalk—Used to provide chat/instant messenger–type services; they’re not needed often.
ktalk/ntalk—Used to provide chat/instant messenger–type services; they’re not needed often.
![]() rsh/rexec/rlogin—The unsecure “r” services; these should be disabled and replaced by ssh and scp.
rsh/rexec/rlogin—The unsecure “r” services; these should be disabled and replaced by ssh and scp.
![]() telnet—Another unsecure service, but one frequently used for providing a shell session to a remote client.
telnet—Another unsecure service, but one frequently used for providing a shell session to a remote client.
inetd Configuration Files
The inetd server is much older than xinetd, and the main difference between the two is the structure of the configuration files.
The inetd server uses a single configuration file, typically the /etc/inetd.conf file. This file contains comments that begin with # and entries that each define a single service. An example of a couple (many more exist) of typical lines from /etc/inetd.conf are
ftp stream tcp nowait root /usr/sbin/in.ftpd in.ftpd
telnet stream tcp nowait root /usr/sbin/in.telnetd in.telnetd
The lines shown here are broken up into the following fields and definitions:
![]() Service name—This name must match a valid service name entry in the /etc/services file.
Service name—This name must match a valid service name entry in the /etc/services file.
![]() Socket type—This can be any of the following: stream, dgram, raw, rdm, or seqpacket.
Socket type—This can be any of the following: stream, dgram, raw, rdm, or seqpacket.
![]() Protocol—This is one of the protocols defined in the /etc/protocols file; typically it’s either tcp or udp.
Protocol—This is one of the protocols defined in the /etc/protocols file; typically it’s either tcp or udp.
![]() wait or nowait parameter—Use the wait parameter for single-threaded servers that grab the socket and operate until timeout; use nowait for multithreaded servers that free up the socket when not active.
wait or nowait parameter—Use the wait parameter for single-threaded servers that grab the socket and operate until timeout; use nowait for multithreaded servers that free up the socket when not active.
![]() User/group—The user or group this service should run as, giving you the ability to restrict a risky service to an account that’s not root.
User/group—The user or group this service should run as, giving you the ability to restrict a risky service to an account that’s not root.
![]() Server program—The full path and name to the program that provides the service.
Server program—The full path and name to the program that provides the service.
![]() Server argument(s)—Any parameters the service might need to run properly.
Server argument(s)—Any parameters the service might need to run properly.
xinetd Configuration Files
The xinetd daemon initially uses the /etc/xinetd.conf file to set a few daemon configuration settings and the defaults that will be picked up by all xinetd’s governed services and to specify the include directory. (These defaults are overridden by any settings in the individual service configuration files.)
The “include” directory is typically /etc/xinetd.d, which contains a single text file for each governed service. The service configuration files contain the definition of a service and any special settings that need to be set for correct functioning. Figure 20-1 shows the relationships between the components of the xinetd services and files.
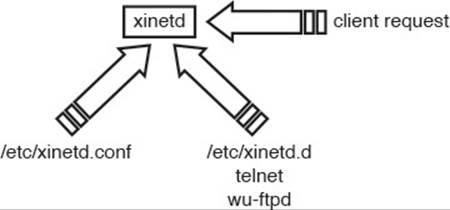
Figure 20-1 How xinetd works
As you can see, xinetd reads /etc/xinetd.conf and gets its configuration, including the “include” directory location; then it waits for a client request for one of its services. When a client request arrives, xinetd looks at the packets and finds the target port/service and looks up that service by name in the /etc/xinetd.d directory. This directory contains one file per service, named exactly as the service name appears in the /etc/services file.
The /etc/xinetd.conf file is simple by nature, as shown in Example 20-1.
Example 20-1 Contents of an /etc/xinetd.conf File
# Simple configuration file for xinetd
# Some defaults, and include /etc/xinetd.d/
defaults
{
instances = 60
log_type = SYSLOG authpriv
log_on_success = HOST PID
log_on_failure = HOST
cps = 25 30
}
includedir /etc/xinetd.d
The file contains a few lines that set the default limitations for the services governed by xinetd. If an individual service has a conflicting setting in its configuration file, that individual file setting takes precedence.
You’re likely to see questions about how to have a service run as a different user, which is accomplished by editing the service’s configuration file and changing the user line.
Several of these lines bear defining:
![]() instances—This sets the total number of daemon instances allowed; this daemon is limited to 60 instances.
instances—This sets the total number of daemon instances allowed; this daemon is limited to 60 instances.
![]() cps—This limits the number of connections per second allowed through xinetd. Any more than the maximum (25) causes the service to be disabled for 30 seconds and then check whether it can accept more connections.
cps—This limits the number of connections per second allowed through xinetd. Any more than the maximum (25) causes the service to be disabled for 30 seconds and then check whether it can accept more connections.
The other settings are log related, logging the host and PID for successful connections and just the host for unsuccessful connections
An individual service configuration file from the /etc/xinetd.d directory such as telnet would contain the output shown in Example 20-2.
Example 20-2 Contents of an /etc/xinetd.d Service File
service telnet
{
disable = yes
flags = REUSE
socket_type = stream
wait = no
user = root
server = /usr/sbin/in.telnetd
log_on_failure += USERID
access_times = 08:00-17:00
only_from = snowblower
}
These files contain a number of settings:
![]() service—This keyword must be followed by the service name, such as telnet.
service—This keyword must be followed by the service name, such as telnet.
![]() disable—Values include yes (which disables the service and no connections are accepted) and no (which doesn’t disable or enables the service for connections).
disable—Values include yes (which disables the service and no connections are accepted) and no (which doesn’t disable or enables the service for connections).
![]() flags—Many and varied flags exist; the most common is REUSE, which allows the port and service to accept multiple connections.
flags—Many and varied flags exist; the most common is REUSE, which allows the port and service to accept multiple connections.
![]() socket type—This can be stream, dgram, raw, rdm, or seqpacket.
socket type—This can be stream, dgram, raw, rdm, or seqpacket.
![]() wait—Use the wait parameter for single-threaded servers that grab the socket and operate until timeout; use nowait for multithreaded servers that free up the socket when not active.
wait—Use the wait parameter for single-threaded servers that grab the socket and operate until timeout; use nowait for multithreaded servers that free up the socket when not active.
![]() user—The user or group this service should run as, giving you the ability to restrict a risky service to an account that’s not root.
user—The user or group this service should run as, giving you the ability to restrict a risky service to an account that’s not root.
![]() server—This is the full path and filename of the server or daemon program run when a client requests a connection.
server—This is the full path and filename of the server or daemon program run when a client requests a connection.
![]() log_on_failure—This can also be log_on_success, and values include HOST, USERID, and PORT, to name a few options.
log_on_failure—This can also be log_on_success, and values include HOST, USERID, and PORT, to name a few options.
![]() access_times—This setting lets you set access timeframes for the service, such as from 8 a.m. to 5 p.m. in the previous file.
access_times—This setting lets you set access timeframes for the service, such as from 8 a.m. to 5 p.m. in the previous file.
![]() only_from—This can be a list of hostnames, IPs, globs of addresses, and defined networks by name from the /etc/networks file.
only_from—This can be a list of hostnames, IPs, globs of addresses, and defined networks by name from the /etc/networks file.
To enable a service governed by xinetd, such as the previous telnet service, use the chkconfig telnet on command. This changes the previous file to contain the following line:
disable = no
The service is now enabled and can accept requested connections. Changes to the file for a service don’t require any restarting of services or xinetd; those changes take place for the next and subsequent instances of the service whose file you changed.
If you edit the /etc/xinetd.d/telnet file by hand, the xinetd service might have to be restarted for the change to take effect. This is done automatically by the chkconfig command.
To disable the service completely from being initiated and governed by xinetd, use the chkconfig telnet off command.
This disables the service and xinetd ignores requests for this service from this point on.
The inetd service must be restarted after a new configuration is written to the /etc/inetd.conf file, but the xinetd service reads the service configuration files in the /etc/xinetd.d directory dynamically and requires restarting only if you manually edit /etc/xinetd.conf file.
Using TCP Wrappers for Securing Services
If you want to protect your on-demand services, use TCP wrappers as one of the layers of protection for seldom-used services.
The common concept of using TCP wrappers is that only services in the /etc/inetd.conf file can be wrapped or protected, but that’s untrue. The TCP wrappers package includes a library called libwrap.a that an increasing number of Linux services reference for security.
inetd and TCP Wrappers
When used with inetd, the concept of using TCP wrappers is to place a controlling daemon with instructions as to who’s allowed and denied in front of each service that runs on your machine. Most services in the era of widespread inetd usage didn’t have any built-in protection, so they were configured to be run as parameters of the tcpd daemon.
The tcpd daemon is set up to refer to the /etc/hosts.allow and /etc/hosts.deny files for the hosts that are allowed and denied access to services protected by tcpd.
xinetd and TCP Wrappers
If you are using xinetd or running a current distribution of Linux, many of the services are developed to use the libwrap.a library, finally divorcing TCP wrappers from the /etc/inetd.conf file.
In the case of current distributions and xinetd, any service capable of referencing libwrap.a has the potential to benefit from the protection that the /etc/hosts.allow and /etc/hosts.deny files provide.
Additionally, if you wanted to run a set of services that were both secure and fast, you would use TCP wrappers and a standalone daemon, instead of putting the service under inetd or xinetd control. Anytime you put services behind inetd or xinetd, they must be started to function, and that means a small though noticeable delay—often enough that a client request times out.
The hosts.allow and hosts.deny Files
The two tables that affect which clients can connect to which services (provided the service uses libwrap.a or is controlled by inetd/xinetd) are /etc/hosts.allow and /etc/hosts.deny.
The format of a typical hosts.allow or hosts.deny file is as follows:
daemons: hosts : option : option
Daemons or services can be specified several ways, including
![]() ALL—This means just that, all services.
ALL—This means just that, all services.
![]() service—A single service name affects only that service.
service—A single service name affects only that service.
![]() daemon,daemon—Multiple daemons affected by an entry should be separated by spaces or commas.
daemon,daemon—Multiple daemons affected by an entry should be separated by spaces or commas.
Hosts can be specified by many methods, including
![]() hostname—This affects a single unqualified hostname, typically from the local domain.
hostname—This affects a single unqualified hostname, typically from the local domain.
![]() hostname.example.com—This affects a resolvable, fully qualified hostname, typically from a remote domain.
hostname.example.com—This affects a resolvable, fully qualified hostname, typically from a remote domain.
![]() @group—This is used by NIS to denote a Net group and is unlikely to appear on the exam.
@group—This is used by NIS to denote a Net group and is unlikely to appear on the exam.
![]() 10.1.1.0/255.255.255.0—This notation affects the hosts 10.1.1.1–10.1.1.255. The /XX notation for bits can be used, too, such as /24 to denote a default Class C subnet mask.
10.1.1.0/255.255.255.0—This notation affects the hosts 10.1.1.1–10.1.1.255. The /XX notation for bits can be used, too, such as /24 to denote a default Class C subnet mask.
![]() /path/filename—This causes the listed file (full path and filename) to be referred to as the list of hosts that will be affected.
/path/filename—This causes the listed file (full path and filename) to be referred to as the list of hosts that will be affected.
Wrapper Read Order
The following rules are important to understand when using TCP wrappers to protect services:
1. The /etc/hosts.allow file is read and parsed first. Any matches in it cause access to be allowed, skipping the /etc/hosts.deny file entirely.
2. The TCP wrapper files are read each time a service is requested. Therefore, any changes to the hosts.deny and hosts.allow files are immediately used.
3. The files are read sequentially. This means that two conflicting entries in the same file cause the first one to be matched, ignoring the second and subsequent entries.
4. The files are read only if they exist. If they don’t exist, no rules can be applied, allowing complete access for services as far as TCP wrappers are concerned.
The most important point about how these files are processed is the order in which rules are matched from the files.
Format of hosts.allow and hosts.deny
It’s important to choose what you want to deny or allow with the following guidelines:
![]() Deny by default—You deny all host access to all services by inserting an entry that reads ALL: ALL in the /etc/hosts.deny file; then you can allow any specific hosts with entries in the /etc/hosts.allow file.
Deny by default—You deny all host access to all services by inserting an entry that reads ALL: ALL in the /etc/hosts.deny file; then you can allow any specific hosts with entries in the /etc/hosts.allow file.
![]() Allow by default—If you trust everyone more than not, don’t have an allow file and just put the bad hosts or domains in the deny file.
Allow by default—If you trust everyone more than not, don’t have an allow file and just put the bad hosts or domains in the deny file.
![]() Mix and match—The most complex style, this is when you don’t have a clear delineation of good and bad. You should carefully inspect the allow files for lines that invalidate your deny rules.
Mix and match—The most complex style, this is when you don’t have a clear delineation of good and bad. You should carefully inspect the allow files for lines that invalidate your deny rules.
Sample Configurations
Scenario #1: Deny all access, as shown in Figure 20-2.
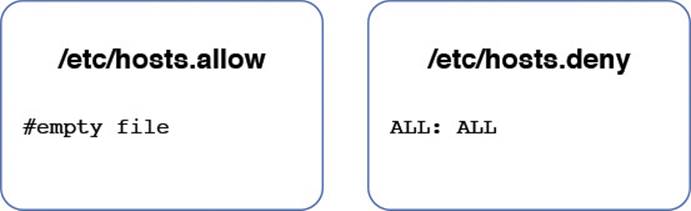
Figure 20-2 How all access is denied.
In this scenario, all access is denied. The presence of an /etc/hosts.allow file in this example is unnecessary because we’re denying everyone, so no allow rules are needed.
Scenario #2: Deny all access from a specific domain, with the exception of one machine within the domain, as shown in Figure 20-3.
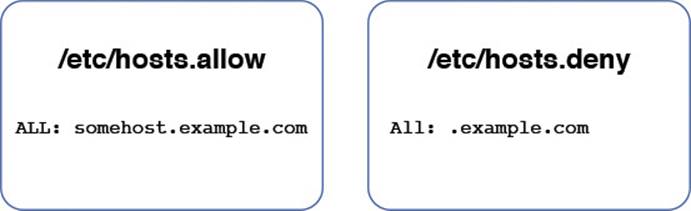
Figure 20-3 The order in which the allow and deny rules are read.
The rule in the /etc/hosts.allow file is read before any rules from the /etc/hosts.deny file. As a result, the somehost.example.com machine is permitted access to the local system. All other machines from this domain are denied access based on the rule in the /etc/hosts.deny file. If a machine from any other domain attempts to connect to the local system, that machine is granted access since no rule would apply to that situation.
Another way to accomplish the preceding is to not have the /etc/hosts.allow file and in the /etc/hosts.deny file have the following line:
ALL: EXCEPT somehost.example.com
Scenario #3: Allow all systems to connect to the named and sendmail servers. Deny access to all other servers, as shown in Figure 20-4.
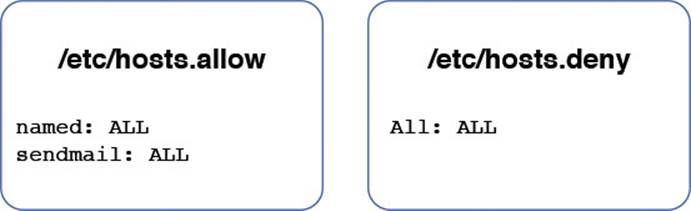
Figure 20-4 Using Service Names to allow access
To have more granular control of who can access services, you can use service names to deny and allow access to just that service. The following /etc/hosts.deny file entry allows access to all services but named:
named: ALL
Using Rule Options
Remember that the /etc/hosts.allow and /etc/hosts.deny files have the possibility of four configuration fields:
daemons: hosts : option : option
The real strength of using TCP wrappers comes out when you use the option fields to add characteristics to the entries that control access to services. Options can be a single keyword or take the form of keyword values when using programs or utilities that need arguments.
For example, if you wanted to log the fact that a host had attempted to access one of your services configured to be denied, you might use the following line in the /etc/hosts.deny file:
service: badhost : severity auth.info
This entry not only denies the host access to the service, but also logs to the auth facility any messages that are severity level info or higher when the denial occurs.
Two useful keywords in the option fields are twist and spawn. You use the twist keyword when you want to booby-trap what would appear to be a service with another program or action. For example, if you wanted to cause a message to be sent back to an offending host that tries to use your finger daemon, you might employ the following entry in the /etc/hosts.deny file:
in.fingerd: ALL : twist /bin/echo "421 Buzz off!"
This sends a standardized message to the host’s console telling it access is denied.
The last keyword we cover is spawn. Often you want to allow some host to connect to a service, but at the same time be notified of the access. For example, to be notified via email every time someone accesses telnet so you can in turn email him with an SSH FAQ and scolding note to stop using telnet, you would use the following entry in the access file:
in.telnetd: ALL : spawn /bin/echo 'date' from %h | mail root
This works for just about any service, as long as it can use the TCP wrappers or can be configured to work from inetd or xinetd.
If you spawn a command, it runs the command as a child of the current shell, but if you use twist to run the command, it replaces the current process with the command you run.
Watch carefully for denial file modifications, such as twist and spawn statements. Being able to verify which entries are valid or invalid is essential.
Understanding Permission Problems
When you install a distribution, a number of files are set with special bits or permissions, mostly to make it easier for normal users to accomplish mild setup tasks. You should run a find command that shows these files right after you install the system and then keep that output in a file in a different location for referral later.
Note
One of the first changes to your system that a hacker or cracker makes is to set permissions on certain programs to allow an otherwise normal user special or root privileges.
As a reminder, the special bits that can be set for files include
![]() SUID—Represented by the numeral 4, the Set User ID special bit allows processes to run with the permissions of the file’s owner.
SUID—Represented by the numeral 4, the Set User ID special bit allows processes to run with the permissions of the file’s owner.
![]() SGID—Represented by the numeral 2, the Set Group ID special bit allows processes to run with the permissions of the file’s group owner. If it’s set on a directory, it forces group ownership inheritance for all objects created in that directory.
SGID—Represented by the numeral 2, the Set Group ID special bit allows processes to run with the permissions of the file’s group owner. If it’s set on a directory, it forces group ownership inheritance for all objects created in that directory.
![]() Sticky bit—When set on a directory it keeps any nonowners from deleting files in the directory.
Sticky bit—When set on a directory it keeps any nonowners from deleting files in the directory.
It’s important to know how to find the files on the system that have special bits set. In particular, the SUID and SGID special bits are used to gain access to elevated levels of capability and could be disastrous if set on utilities such as passwd, shutdown, and useradd.
Finding Files by Permissions
It’s important to periodically run a find command to see which special bits are set on which files. To find all the files on your entire system that are owned by the root user with any special bit set and mail that list to yourself, use the following command:
find / -user root -perm +7000 -exec ls -l {} \; | mail –s "Files with
any special bit set" root
This command finds the files that have any sort of special bit set, produces an ls –l listing from each, and sends an email that has the entire listing of files to the root user with the subject line in quotation marks.
When you use the -perm option with permissions, it matters whether you use a + or a - symbol or don’t use one at all. If you are searching for a particular permission setting, such as all the files that have an exact permission setting, use the find / -perm 4777 command.
This command finds only files whose permission trios and special bit match exactly the permissions specified. If you use the + and - symbols to search for special bits, the - symbol means to look for the exact combination of special bits that match the first numeral, such as 6, which would be 4 and 2—or SUID and SGID. To find any or all of the bits set that match the first numeral, you use the + symbol.
Once a week, run the same report again and then compare the first one with subsequent reports with the diff command to see what has changed. I suggest automating this with a script.
You’ll probably see questions about the find command and the permissions, so be prepared to parse the commands to see which perform the specified tasks.
GnuPG Keys
Sometimes you want to encrypt data. In these cases an option that exists in Linux is GnuPG (Gnu Privacy Guard). This software creates private and public keys that can be used to encrypt data.
To create these keys, execute the gpg –gen-key command.
This tool first prompts you for several bits of information, including which sort of key you want (normally you should choose #1, RSA, and RSA), the size of the RSA keys, and how long the keys will be valid, as shown in Example 20-3.
Example 20-3 Output of the gpg --gen-key Command
gpg (GnuPG) 1.4.18; Copyright (C) 2014 Free Software Foundation, Inc.
This is free software: you are free to change and redistribute it.
There is NO WARRANTY, to the extent permitted by law.
Please select what kind of key you want:
(1) RSA and RSA (default)
(2) DSA and Elgamal
(3) DSA (sign only)
(4) RSA (sign only)
Your selection? 1
RSA keys may be between 1024 and 4096 bits long.
What keysize do you want? (2048)
Requested keysize is 2048 bits
Please specify how long the key should be valid.
0 = key does not expire
<n> = key expires in n days
<n>w = key expires in n weeks
<n>m = key expires in n months
<n>y = key expires in n years
Key is valid for? (0)
Key does not expire at all
Is this correct? (y/N) y
Next, you are prompted to input data to identify your key, including your real name, email address, and comment field (which can be useful to describe your key). You are also instructed to enter a passphrase (see Example 20-4).
Example 20-4 Output of the gpg --gen-key Command
You need a user ID to identify your key; the software constructs the user ID
from the Real Name, Comment and Email Address in this form:
"Heinrich Heine (Der Dichter) <heinrichh@duesseldorf.de>"
Real name: Steve Smith
Email address: test@test.com
Comment: Test key
You selected this USER-ID:
"Steve Smith (Test key) <test@test.com>"
Change (N)ame, (C)omment, (E)mail or (O)kay/(Q)uit? o
You need a Passphrase to protect your secret key.
Enter passphrase:
Repeat passphrase:
After entering your passphrase, the utility needs to make use of random data to generate the keys. This may take some time as the following message indicates:
We need to generate a lot of random bytes. It is a good idea to
perform
some other action (type on the keyboard, move the mouse, utilize the
disks) during the prime generation; this gives the random number
generator a better chance to gain enough entropy.
You could open a terminal window and perform some other work as the random data is generated by your actions and system actions. Once enough random data has been collected, you receive the message shown in Example 20-5.
Example 20-5 Output of the gpg --gen-key Command
gpg: /home/test/.gnupg/trustdb.gpg: trustdb created
gpg: key 8C85EB9D marked as ultimately trusted
public and secret key created and signed.
gpg: checking the trustdb
gpg: 3 marginal(s) needed, 1 complete(s) needed, PGP trust model
gpg: depth: 0 valid: 1 signed: 0 trust: 0-, 0q, 0n, 0m, 0f, 1u
pub 2048R/8C85EB9D 2015-03-06
Key fingerprint = 4178 1944 9909 64B2 0A53 5CE8 9417 5E52 8C85
EB9D
uid Steve Smith (Test key) <test@test.com>
sub 2048R/83AAAB8C 2015-03-06
A key part of the previous output is the public key identifier (8c85EB9D in this case). This can be used to refer to your keys.
Note that these keys are stored in the .gnupg directory within your home directory. Each user has her own GnuPG keys.
To encrypt a file and send to another person, you first should export your public key to a file. By providing this file to someone else, she can decrypt the file that you encrypt with your private key. By default the gpg utility generates a binary file with your public key. Use the –a option to generate a text-based public key file (which is easier for others to manage):
gpg -a -o pub_key_file --export 8c85EB9D
To encrypt a file, use the following syntax:
gpg -e recipient file
The recipient could be something like “bob@test.com.” The gpg command creates an encrypted file named file.gpg (where “file” is the original filename).
You then need to provide the recipient with the encrypted file and with the public key that you created (the pub_key_file from the previous example). If you directly transfer this public key, the user could import it by executing the gpg –import pub_key_file command.
Or you can upload your public key to a key server using the following syntax:
gpg --keyserver server_URL --send-keys 8c85EB9D
Perform an Internet search to find available key servers and replace “server_URL” with the URL of the key server. If you upload your key to a key server, the recipient can download the key using the following syntax:
gpg --recv-keys 950B76C6
Note that you can see what keys have been imported to your account by executing the gpg –list-keys command.
Once the user has imported your key and has the encrypted file, the file can be decrypted with the gpg file.gpg command.
Another use of GnuPG is to digitally sign a file. Software packages are often digitally signed to provide administrators with a means to verify the source of the software package. To verify a package, execute the gpg –verify pkg_name command.
Secure Shell
By this time, you are probably aware that the Telnet protocol sends passwords and data in clear-text and shouldn’t be trusted for important sessions and tasks. The Secure Shell (SSH) suite includes a protocol, a daemon, and client utilities that make your host-to-host shell sessions much more secure—about as secure as being at the physical console.
One of the features that makes SSH desirable as a remote protocol is its end-to-end encryption, which encrypts not only the username and password but also all communications.
The SSH suite replaces telnet, as well as rsh, rexec, rcp, and other unsecure utilities. You can use SSH to connect for a shell session, or you can use the scp command to remotely transfer files through the secure pipe that SSH builds between the hosts.
SSH Components
SSH includes a number of programs and files:
![]() ssh—Used for remote shell sessions on another host, it replaces the telnet, rsh, and rexec commands.
ssh—Used for remote shell sessions on another host, it replaces the telnet, rsh, and rexec commands.
![]() scp—Used for remote copying operations, it replaces the rcp command.
scp—Used for remote copying operations, it replaces the rcp command.
![]() sshd—The SSH daemon.
sshd—The SSH daemon.
![]() ssh-agent—Runs as a wrapper to the user’s session and provides authentication when requested.
ssh-agent—Runs as a wrapper to the user’s session and provides authentication when requested.
![]() ssh-add—Loads the user’s key(s) into the agent.
ssh-add—Loads the user’s key(s) into the agent.
The SSH package configuration files are somewhat scattered. SSH daemon and global configuration files are kept in the /etc/ssh directory, with local or user-specific configuration files being kept in the ~/.ssh directory for each user.
The global configuration files include
![]() /etc/ssh/sshd_config—The main configuration for the sshd daemon.
/etc/ssh/sshd_config—The main configuration for the sshd daemon.
![]() /etc/ssh/ssh_host_[dr]sa_key—These files, the ssh_host_dsa_key file and the ssh_host_rsa_key file, are in the same directory and are the private parts of the host’s key structure and should be protected from public view. The permissions for these files are 600 or rw for the root user and no permissions for anyone else.
/etc/ssh/ssh_host_[dr]sa_key—These files, the ssh_host_dsa_key file and the ssh_host_rsa_key file, are in the same directory and are the private parts of the host’s key structure and should be protected from public view. The permissions for these files are 600 or rw for the root user and no permissions for anyone else.
![]() /etc/ssh/ssh_host_[dr]sa_key.pub—These files, the ssh_host_dsa_key.pub file and the ssh_host_rsa_key.pub file, are in the same directory and are the public parts of the host’s key structure. These must be world-readable and write-only by the root user, or set to 644.
/etc/ssh/ssh_host_[dr]sa_key.pub—These files, the ssh_host_dsa_key.pub file and the ssh_host_rsa_key.pub file, are in the same directory and are the public parts of the host’s key structure. These must be world-readable and write-only by the root user, or set to 644.
![]() /etc/nologin—This isn’t a part of SSH. However, if it’s present, no one can log in via SSH except the root. Non-root users see the contents of the /etc/nologin file and then are denied access to the system.
/etc/nologin—This isn’t a part of SSH. However, if it’s present, no one can log in via SSH except the root. Non-root users see the contents of the /etc/nologin file and then are denied access to the system.
A couple of special file pairs affect how SSH works, particularly the /etc/ssh/ssh_known_hosts and ~/.ssh/known_hosts files. The global file (/etc/ssh/ssh_known_hosts) is used to check the public key of a host attempting to attach via SSH. The local file (~/.ssh/known_hosts) is the file from which the client gets the public key of the remote server. If a new connection is begun to a previously unknown host, the user sees a message informing him that the host is an unknown host and asking whether he wants to store the host’s key in his known hosts file. If the user answers in the affirmative, the host’s public key is added to the ~/.ssh/known_hosts file.
The /etc/ssh/ssh_known_hosts file should be world-readable and root-writable. The ~/.ssh/known_hosts file must be owned by and writable for the user.
A file of interest is one that affects only a particular user’s environment: the ~/.ssh/authorized_keys file. This file is used to store the public keys that can be used for logging as this user. These are matched with the keys presented by an ssh or scp client upon login request.
Using SSH Client Utilities
The SSH client utilities are versatile, with a number of options available to customize the experience. You just need the basics for the exam, but I include a few fun things I’ve picked up along the way.
The SSH client command is used to replace the RSH and Telnet programs specifically. Its syntax is as follows:
ssh -l username remotehost
If you don’t specify a username with the -l option, the ssh command assumes you want to use the account name of whom you are locally logged in as. For example, if you are logged in as the user “ross” and you execute the ssh command without the –l option, the command attempts to log you in as “ross” on the remote system.
For example, I could attach to the host mp3server as the user snuffy with this command:
ssh -l snuffy mp3server
If I have not connected to this server before, I get a message similar to what’s shown here:
The authenticity of host 'mp3server (192.168.33.44)' can't be
established.
RSA key fingerprint is 73:4f:fa:b0:42:a4:3a:a8:64:2c:ad:26:1d:b1:21
:e0.
Are you sure you want to continue connecting (yes/no)?
If I answer with yes, the host’s public key is added to my ~/.ssh/known_hosts file and looks something like this:
192.168.3.44 ssh-rsa AAAAB3NzaC1yc2EAAAABIwAAAIEA1gFIB9VQpF
KWAZUzNM+ac/U81Tk9R8OCFfUkegVJXwj6nqCISPyV2iJwaukcVVaVAQ+JR
3EhvOvh4PhoSg4yzBSUkJ8aUBYoRSGj7PCD+vyWyi1922HGxWbWooMBAO/
Was8I7N0zQ6jxDO9qNOHcrIFeU7qbOCrKjQDM08HQjk0=
Rather than work with RCP or FTP, most of my file transfer work is with SCP. The scp command uses the SSH protocol and encrypts the files sent from one host to another host.
For example, if I wanted to transfer file1 from my root user’s home directory on my machine to the same location on a host named remotehost, I could use the following command:
scp /root/file1 root@remotehost:/root/file1
This would prompt me with the RSA key question (as shown in the previous ssh example) if I have not connected to this system previously from this account. I would be prompted for the password and then it would transfer the files. The output from a file transfer looks like this:
root@192.168.1.73's password:
mypubkey.txt 100% |**********************| 1379 00:00
You can copy files from your host to another as shown previously or copy files from a remote host to your system by reversing the source and target specification.
You can even copy files from one remote system to another remote system. For example, the following command recursively copies the /data directory and all its contents from the remote1 host to the remote2 host after prompting you for the password for both hosts:
scp -r root@remote1:/data root@remote2:/data
Another use of the SSH protocol is to log in to a host and use SSH to forward the output from an X client back to your display. This is feature can be specifically invoked with the -x option. This feature is referred to as an X11 tunnel.
SSH allows for skipping the password prompt when signing on between computers, which can be convenient if you use the ssh or scp command frequently and don’t mind the possibility that someone could sit down at your accidentally unlocked station and have her way with your network!
Note
There has been a lot of talk about why it’s important to delete .rhosts files from user directories. Basically, if you have a user that has a hostname in her .rhosts file and that host also has the user’s hostname in its /etc/hosts_equiv file, that user can log in without a password by using the rlogin command! This would be a security risk, so my advice is to delete these files with the following command:
find /home -iname .rhost -exec rm -f {} \;
This deletes all .rhosts files it finds in users’ home directories and does not prompt you for each deletion.
When I need to enable SSH usage without a password, here are the steps I take. In this example I have two machines, fattyre and murphy, both of which are Linux workstations with the necessary SSH software loaded as per the defaults. This demonstration assumes that fattyre and murphy are both in each other’s /etc/hosts files or resolvable via DNS.
Here’s how you can enable SSH usage without passwords:
1. Log in to fattyre as the root user
2. For this example, use a new user named user1. Create it with the useradd –m user1 command.
3. Set user1’s password with the passwd command to whatever you want: passwd user1.
4. Switch to the user1 user account with the su – user1 command.
5. Create and set the permissions for the .ssh directory with the mkdir .ssh ; chmod 700 .ssh command.
6. Generate an RSA key: ssh-keygen -b 1024 -t rsa.
7. When prompted for the location for the file, press Enter to accept the default.
8. When prompted for a passphrase, enter seatec astronomy.
9. Reenter the passphrase when prompted.
10. Change into the .ssh directory and set the permissions on the id_rsa.pub file with these commands:
cd .ssh ; chmod 644 id_rsa.pub
11. Copy the id_rsa.pub file to a new file called authorized_keys:
cp id_rsa.pub authorized_keys
Note
The next steps take place on the host murphy.
12. Ensure you can contact the host fattyre with a ping:
ping fattyre
13. Sign on to the host murphy as the root user.
14. Add a user named user2 with the useradd –m user2 command.
15. Set the password for user2:
passwd user2
16. Enter the password twice to confirm it.
17. Switch to the user2 account with the su – user2 command.
18. Make a directory and set its permissions with the following command:
mkdir .ssh ; chmod 700 .ssh
Note
The next steps take place on the host fattyre.
19. Connect to the murphy host as user2:
ssh -l user2 murphy
20. When prompted about the RSA key, answer yes and then enter user2’s password.
21. While logged in as user2 on the host murphy via SSH, copy the authorized_keys file from the fattyre host with the following command:
scp user1@fattyre:~/.ssh/authorized_keys ~/.ssh
The output of the scp program should look similar to this:
authorized_keys 100% |************************| 236 00:00
22. Exit user2 on the host murphy and return to being user1 on fattyre.
23. On fattyre as user1, invoke the ssh-agent as a wrapper to your shell with the ssh-agent $SHELL command.
24. Add your key to the agent:
ssh-add
25. When prompted for the passphrase, enter no more tears.
26. You then see output similar to this:
Identity added: /home/ssha/.ssh/id_rsa (/home/ssha/.ssh/id_rsa)
27. Now try to log in as user2 on murphy, and watch what happens:
ssh -l user Murphy
28. You shouldn’t see any password prompt; you should see only the confirmation of where you last logged in from:
Last login: Wed May 26 13:46:55 from fattyre
If you do see a prompt for the passphrase, enter no more tears as you did before.
That’s all it takes to get two accounts and machines set up to use SSH utilities without having to enter anything but the ssh-agent command along with the passphrase. Remember that ssh-agent resides in memory and wraps a security blanket around your shell session, answering any SSH-related security requests for you. The ssh-add utility is for adding your key information into the agent and doesn’t have to be run again as long as your key information remains the same.
Additional Security Features
Security is an important matter, so security features have been discussed throughout this book. As a result, some of the certification topics that align to this chapter have been discussed in detail in other chapters of this book. Table 20-2 serves as a reference guide for these topics.
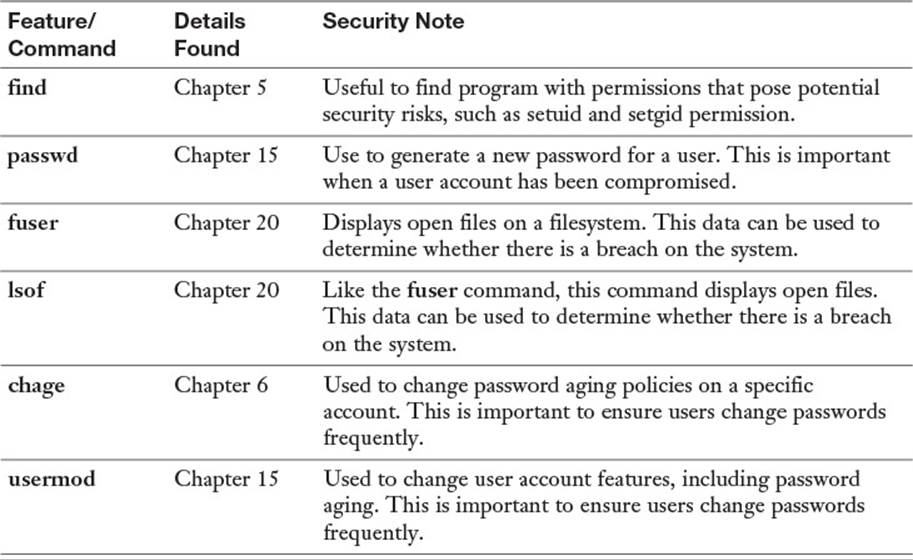

Table 20-2 Additional Security Utilities
Summary
In this chapter you learned how to secure the system using a variety of techniques. You learned how to secure network access to services with inetd, xinetd, and TCP wrappers. You also discovered how to utilize Secure Shell and GnuPG to secure data.
Exam Preparation Tasks
As mentioned in the section “How to Use This Book” in the Introduction, you have a few choices for exam preparation: the exercises here, Chapter 21, “Final Preparation,” and the practice exams on the DVD.
Review All Key Topics
Review the most important topics in this chapter, noted with the Key Topics icon in the outer margin of the page. Table 20-3 lists a reference of these key topics and the page numbers on which each is found.
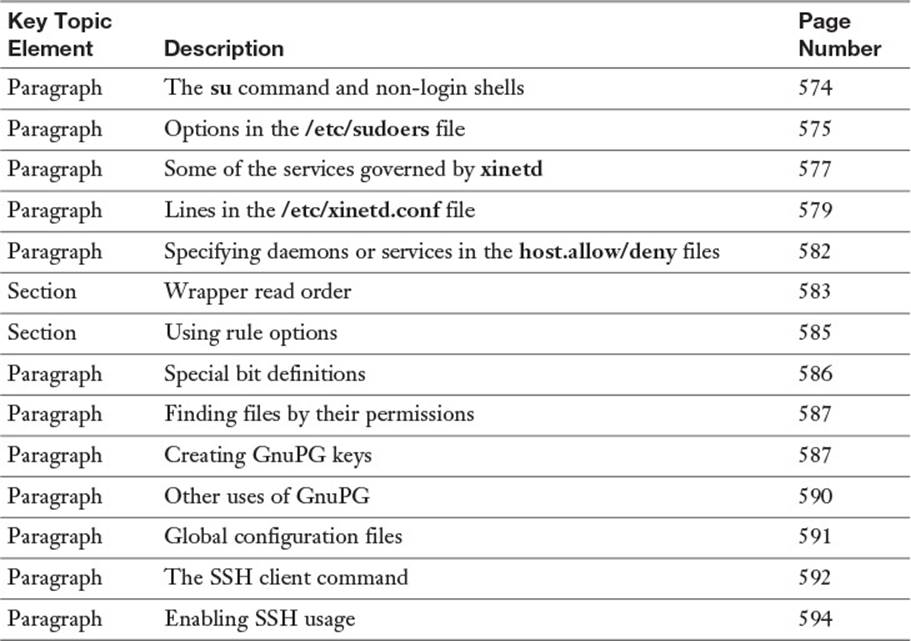
Table 20-3 Key Topics for Chapter 20
Define Key Terms
Define the following key terms from this chapter and check your answers in the glossary:
daemon
TCP wrappers
SUID
SGID
GnuPG
public key
private key
SSH
telnet
RCP
FTP
Review Questions
1. When a user on host1 uses the SSH client to successfully connect to host2 for the first time, which file is updated with SSH-related information?
a. ~/.ssh/known_hosts on host1
b. /etc/ssh/known_hosts on host2
c. ~/.ssh/authorized_keys on host2
d. /etc/ssh/authorized_keys on host1
2. You are ordered to deny access to the Telnet service on your server for the host snuffypc and to use the TCP wrappers files and utilities to accomplish this. In the blank, write the full path and filename of the file that should contain this entry:
_________________________________________________________
3. You are the root user on your managed systems. You need to send the /root/file6 file from host1 to host3 in the same location, but you’re on host2. Which of the following commands accomplishes the task? (Choose all that apply.)
a. scp root@host1:~/file6 root@host3
b. scp root@host1:/root/file6 root@host3
c. scp root@host1:/root/file6 root@host3:~
d. scp root@host1:file6 root@host3
4. You just downloaded a new public key and imported it into your GPG key ring. Fill in the blank with the command and any necessary options that show you the contents of your key ring:
_________________________________________________________
5. One of the systems you manage is acting funny, leading you to believe some files might have special bits set that allow standard users to run important utilities as root. Which of the following search commands shows you all files that have any combination of special bits set?
a. find / -perm -7000
b. find / -perm +7000
c. find / -perms 7000
d. locate --permissions=rws
6. You need to be able to attach, via a shell session, to other hosts over a secure and encrypted connection and to log on to the remote system without entering a password every time. Which of the following is the program or utility that directly makes this possible?
a. ssh-add
b. ssh-keygen
c. ssh-agent
d. .ssh/authorized_keys
7. A security situation requires you to create a 1K RSA public/private key combination for your currently logged-in account. Fill in the blank with the correct command, with any necessary options and arguments, to accomplish this:
_________________________________________________________