Ansible for DevOps: Server and configuration management for humans (2015)
Chapter 11 - Automating Your Automation - Ansible Tower and CI/CD
At this point, you should be able to convert almost any bit of your infrastructure’s configuration into Ansible playbooks, roles, and inventories. And before deploying any infrastructure changes, you should test the changes in a non-production environment (just like you would with application releases). Manually running a playbook that configures your entire infrastructure, then making sure it does what you expect, is a good start towards order and stability.
Since all your infrastructure is defined in code, you can start automating all the aspects of infrastructure deployment, and even run unit, functional, and integration tests on your infrastructure, just like you do for your applications.
This section will cover different levels of infrastructure automation and testing, and highlight tools and techniques you can use to automate and streamline infrastructure operations.
Ansible Tower
Throughout this book, all the examples use Ansible’s CLI to run playbooks and report back the results. For smaller teams, especially when everyone on the team is well-versed in how to use Ansible, YAML syntax, and follows security best practices with playbooks and variables files, using the CLI can be a sustainable approach.
But for many organizations, there are needs that stretch basic CLI use too far:
· The business needs detailed reporting of infrastructure deployments and failures, especially for audit purposes.
· Team-based infrastructure management requires varying levels of involvement in playbook management, inventory management, and key and password access.
· A thorough visual overview of the current and historical playbook runs and server health helps identify potential issues before they affect the bottom line.
· Playbook scheduling can help ensure infrastructure remains in a known state.
Ansible Tower checks off these items—and many more—and provides a great mechanism for team-based Ansible usage. The product is currently free for teams managing ten or fewer servers (it’s basically an ‘unlimited trial’ mode), and has flexible pricing for teams managing dozens to thousands of servers.
While this book includes a brief overview of Tower, and how you can get started with Tower, it is highly recommended that you read through Ansible, Inc’s extensive Tower User Guide, which includes details this book won’t be covering such as LDAP integration and multiple-team playbook management workflows.
Getting and Installing Ansible Tower
Ansible has a very thorough Ansible Tower User Guide, which details the installation and configuration of Ansible Tower. For the purposes of this chapter, since we just want to download and try out Tower locally, we are going to use Ansible’s official Vagrant box to quickly build an Ansible Tower VM.
Make sure you have Vagrant and VirtualBox installed, then create a directory (e.g. tower) and do the following within the directory:
1. vagrant init tower http://vms.ansible.com/ansible-tower-2.1.4-virtualbox.box (Create a new Vagrantfile using the Tower base box from Ansible).
2. vagrant up (Build the Tower VM).
3. vagrant ssh (Log into the VM, and Tower will display a message with connection information).
|
|
The above installation instructions and Vagrant box come from a blog post on Ansible’s official blog, Ansible Tower and Vagrant. |

You can now visit the URL provided by the login welcome message (something like https://10.42.0.42/), and after confirming a security exception for the Ansible Tower certificate, login with the credentials from step 3.
At this point, you will need to register a free trial license of Ansible Tower, which can be done following the instructions on the screen. The free trial allows you to use all of Tower’s features for up to 10 servers, and is great for experimenting and seeing how Tower fits into your workflow. After you get the license (it’s a block of JSON which you paste into the license field), you should get to Tower’s default dashboard page:
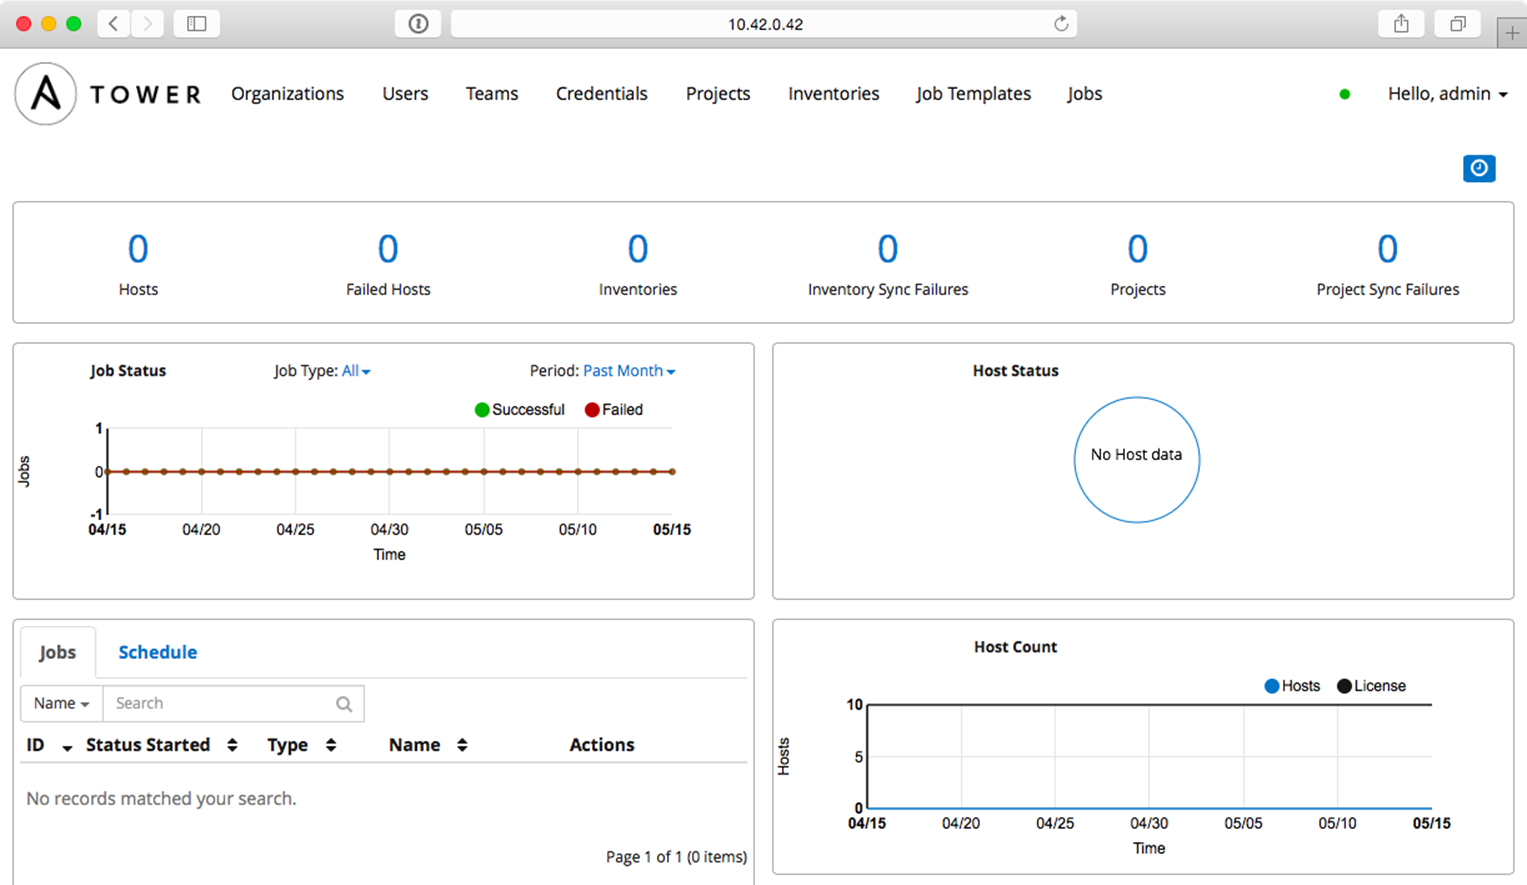
Ansible Tower’s Dashboard
Using Ansible Tower
Ansible Tower is centered around the idea of organizing Projects (which run your playbooks via Jobs) and Inventories (which describe the servers on which your playbooks should be run) inside of Organizations. Organizations can then be set up with different levels of access based on Users and Credentials grouped in different Teams. It can be a little overwhelming at first, but once you get the initial structure configured, you’ll see how powerful and flexible Tower’s Project workflow is.
Let’s get started with our first project!
The first step is to make sure you have a test playbook you can run using Ansible Tower. Generally, your playbooks should be stored in a source code repository (e.g. Git or Subversion), with Tower configured to check out the latest version of the playbook from the repository and run it. Since we’re only going to run a simple example, we will create a playbook in Tower’s default projects directory located in /var/lib/awx/projects:
1. Log into the Tower VM: vagrant ssh
2. Switch to the awx user: sudo su - awx
3. Go to Tower’s default projects directory: cd /var/lib/awx/projects
4. Create a new project directory: mkdir ansible-for-devops && cd ansible-for-devops
5. Create a new playbook file, main.yml, within the new directory, with the following contents:
1 ---
2 - hosts: all
3 gather_facts: no
4 connection: local
5
6 tasks:
7 - name: Check the date on the server.
8 command: date
Switch back to your web browser and get everything set up to run the test playbook inside Ansible Tower’s web UI:
1. Create a new Organization, called ‘Ansible for DevOps’.
2. Add a new User to the Organization, named John Doe, with the username johndoe and password johndoe1234.
3. Create a new Team, called ‘DevOps Engineers’, in the ‘Ansible for DevOps’ Organization.
4. Under the Team’s Credentials section, add in SSH credentials by selecting ‘Machine’ for the Credential type, and setting ‘Name’ to Vagrant, ‘Type’ to Machine, ‘SSH Username’ to vagrant, and ‘SSH Password’ to vagrant.
5. Under the Team’s Projects section, add a new Project. Set the ‘Name’ to Tower Test, ‘Organization’ to Ansible for DevOps, ‘SCM Type’ to Manual, and ‘Playbook Directory’ to ansible-for-devops (Tower automatically detects all folders placed inside /var/lib/awx/projects, but you could also use an alternate Project Base Path if you want to store projects elsewhere).
6. Under the Inventories section, add an Inventory. Set the ‘Name’ to Tower Local, and ‘Organization’ set to Ansible for DevOps. Once the inventory is saved: 1. Add a ‘Group’ with the Name localhost. Click on the group once it’s saved. 2. Add a ‘Host’ with the Host Name 127.0.0.1.
|
|
New Credentials have a somewhat dizzying array of options, and offer login and API key support for a variety of services, like SSH, AWS, Rackspace, VMWare vCenter, and SCM systems. If you can login to a system, Tower likely supports the login mechanism! |

Now that we have all the structure for running playbooks configured, we need only create a Job Template so we can run the playbook on the localhost and see whether we’ve succeeded. Click on ‘Job Templates’, and create a new Job Template with the following configuration:
· Name: Tower Test
· Inventory: Tower Local
· Project: Tower Test
· Playbook: main.yml
· Machine Credential: Vagrant
Save the Job Template, then click the small Rocketship button to start a job using the template. You’ll be redirected to a Job status page, which provides live updates of the job status, and then a summary of the playbook run when complete:
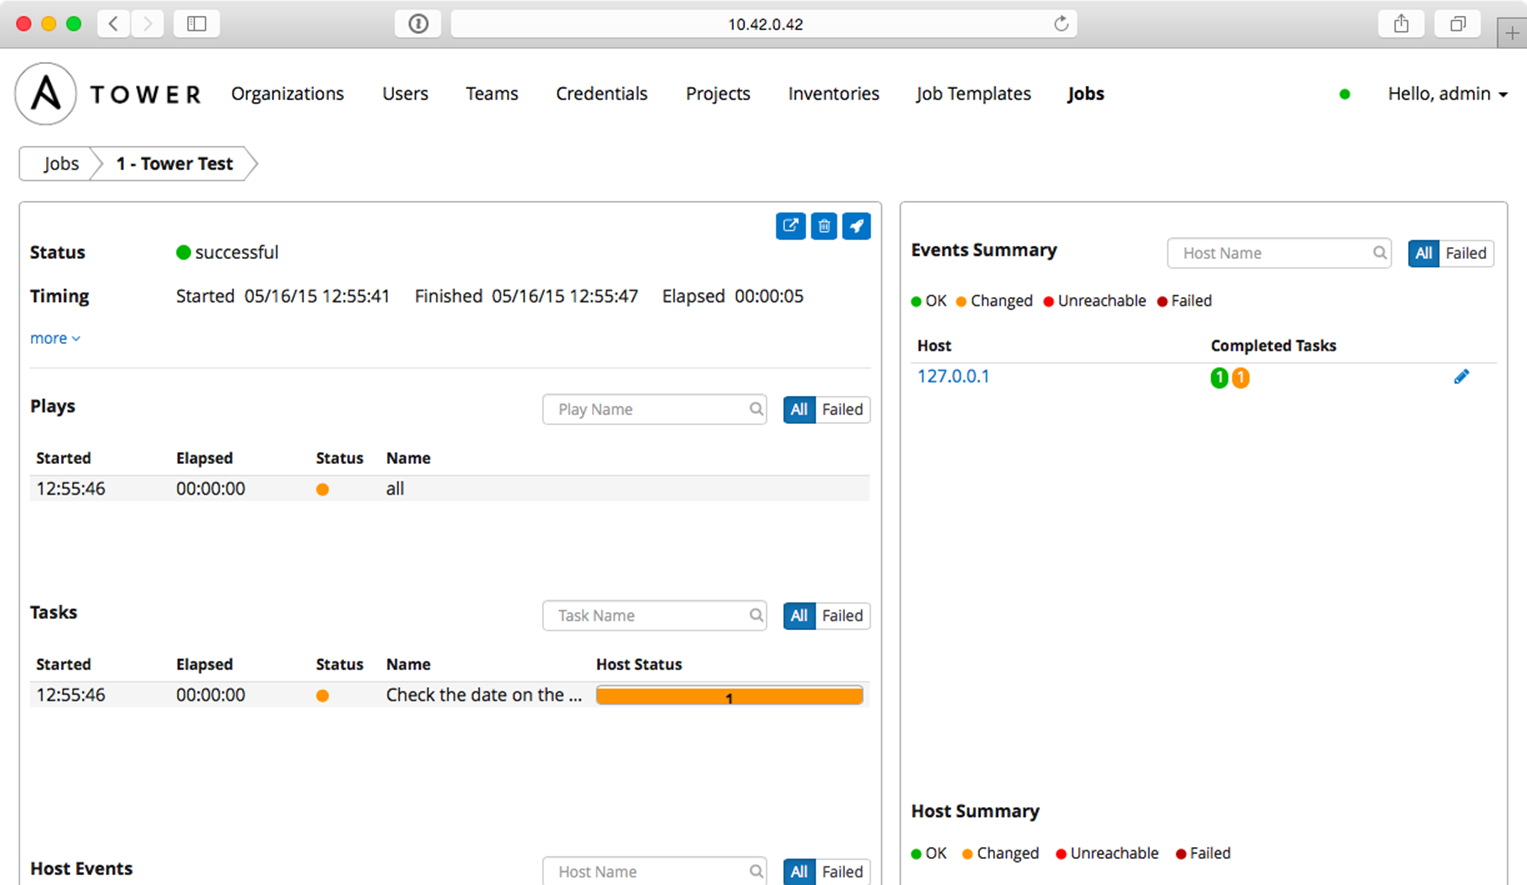
Tower Test job completed successfully!
You can view the playbook run’s standard output in real-time (or review it after the fact) with the ‘View standard out’ button. You can also stop a running job, delete a job’s record, or relaunch a job with the same parameters using the respective buttons on the job’s page.
The job’s dashboard page is very useful for giving an overview of how many hosts were successful, how many tasks resulted in changes, and the timing of the different parts of the playbook run.
Other Tower Features of Note
In our simple walkthrough above, we used Tower to run a simple playbook on the local server; setting up Tower to run playbooks on real-world infastructure or other local VMs is just as easy, and the tools Ansible Tower provides are very handy, especially when working in larger team environments.
This book won’t walk through the entirety of Ansible Tower’s documentation, but a few other simple features you should try out include:
· Setting up scheduled Job runs (especially with the ‘Check’ option instead of ‘Run’) for CI/CD.
· Integrating user accounts and Teams with LDAP users and groups for automatic team-based project management.
· Setting different levels of permissions for Users and Teams so certain users can edit certain jobs, others can only run certain jobs, and yet others can only view the results of job runs within an Organization.
· Configuring Ansible Vault credentials so you can easily and automatically use Vault-protected variables in your playbooks.
· Setting up Provisioning Callbacks so newly-provisioned servers can self-provision via a URL per Job Template.
· Surveys, which allow users to add extra information based on a ‘Survey’ of questions per job run.
· Inventory Scripts, which allow you to build inventory dynamically.
· Built-in Munin monitoring (to monitor the Tower server), available with the same admin credentials at https://[tower-hostname]/munin.
Ansible Tower continues to improve rapidly, and is one of the best ways to run Ansible Playbooks from a central CI/CD-style server with team-based access and extremely detailed live and historical status reporting.
Tower Alternatives
Ansible Tower is purpose-built for use with Ansible playbooks, but there are many other ways to run playbooks on your servers with a solid workflow. If price is a major concern, and you don’t need all the bells and whistles Tower provides, you can use other popular tools like Jenkins, Rundeck, or Go CI.
All these tools provide flexiblity and security for running Ansible Playbooks, and each one requires a different amount of setup and configuration before it will work well for common usage scenarios. One of the most popular and long-standing CI tools is Jenkins, so we’ll explore how to configure a similar Playbook run in Jenkins next.
Jenkins CI
TODO.
Unit, Integration, and Functional Testing
When determining how you should test your infrastructure, you need to understand the different kinds of testing, and then determine the kinds of testing on which you should focus more effort.
Unit testing, when applied to applications, is testing that applies to the smallest units of code (usually functions or class methods). In Ansible, unit testing would typically apply to individual playbooks. You could run individual playbooks in an isolated environment, but that’s often not worth the effort. What is worth your effort is at least checking the playbook syntax, to make sure you didn’t just commit a YAML file that will break an entire deployment because of a missing quotation mark, or a whitespace issue!
Integration testing, which is definitely more valuable when it comes to Ansible, is the testing of small groupings of individual units of code, to make sure they work correctly together. Breaking your infrastructure definition into many task-specific roles and playbooks allows you to do this; if you’ve structured your playbooks so they have no or limited dependencies, you could test each role individually in a fresh virtual machine, before you use the role as part of a full infrastructure deployment.
Functional testing involves the whole shebang. Basically, you set up a complete infrastructure environment, and then run tests against it to make sure everything was successfully installed, deployed, and configured. Ansible’s own reporting is helpful in this kind of testing (and often, all that is necessary), and there are also external tools that can be used to test infrastructure even more deeply.
It is often possible to perform all the testing you need on your own local workstation, using Virtual Machines (as demonstrated in earlier chapters), using tools like VirtualBox or VMWare. And with most cloud services providing robust control APIs and hourly billing, it’s often simple, inexpensive, and just as fast to test directly on cloud instances that mirror your production infrastructure!
We’ll begin with some of the simplest tests you can run against Ansible configuration, along with some common debugging techniques, then progress on to some more advanced, full-fledged functional testing methods using tools to fully automate the process.
Debugging and Asserting
TODO:
· debug
· fail/assert
Checking syntax and performing dry runs
TODO:
· ansible-playbook --syntax-check
· ansible-playbook --check
· Ansible lint
Automated testing on GitHub using Travis CI
Automated testing using a continuous integration tool like Travis CI (which is free for public projects and integrated very well with GitHub) allows you to run tests against Ansible playbooks or roles you have hosted on GitHub with every commit.
There are four main things that should be tested when building and maintaining Ansible playbooks or roles:
1. The playbook or role’s syntax (are all the .yml files formatted correctly?).
2. Whether the playbook or role will run through all the included tasks without failing.
3. The playbook or role’s idempotence (if run again, it should not make any changes!).
4. The playbook or role’s success (does the role do what it should be doing?).
Ultimately, the most important aspect is #4, because what’s the point of a playbook or role if it doesn’t do what you want it to do (e.g. start a web server, configure a database, deploy an app, etc.)?
We’re going to assume, for the rest of this example, that you’re testing a role you have on GitHub, though the example can be applied just as easily for standalone Ansible playbooks.
Setting up a role for testing
Since you’re going to need a simple Ansible playbook and inventory file to test your role, you can create both inside a new ‘tests’ directory in your Ansible role:
1 # Directory structure:
2 my_role/
3 tests/
4 test.yml <-- your test playbook
5 inventory <-- an inventory file to use with the playbook
Inside the inventory file, add:
1 localhost
We just want to tell Ansible to run commands on the local machine (we’ll use the –connection=local option when running the test playbook).
Inside test.yml, add:
1 ---
2 - hosts: localhost
3 remote_user: root
4 roles:
5 - github-role-project-name
Substitude your own role name for github-role-project-name (e.g. ansible-role-django). This is a typical Ansible playbook, and we tell Ansible to run the tasks on localhost, with the root user (otherwise, you could run tasks with travis if you want, and use sudo on certain tasks). You can add vars, vars_files, etc. if you want, but we’ll keep things simple, because for many smaller roles, the role is pre-packaged with sane defaults and all the other info it needs to run.
The next step is to add a .travis.yml file to your role so Travis CI will pick it up and use it for testing. Add that file to the root level of your role, and add the following to kick things off:
1 ---
2 language: python
3 python: "2.7"
4
5 before_install:
6 # Make sure everything's up to date.
7 - sudo apt-get update -qq
8
9 install:
10 # Install Ansible.
11 - pip install ansible
12
13 # Add ansible.cfg to pick up roles path.
14 - "printf '[defaults]\nroles_path = ../' > ansible.cfg"
15
16 script:
17 # We'll add some commands to test the role here.
The only surprising part here is the printf line in the install section; I’ve added that line to create a quick and dirty ansible.cfg configuration file Ansible will use to set the roles_path one directory up from the current working directory. That way, we can include roles like github-role-project-name, or if we use ansible-galaxy to download dependencies (as another command in the install section), we can just use - galaxy-role-name-here to include that role in our test.yml playbook.
Now that we have the basic structure, it’s time to start adding the commands to test our role.
Testing the role’s syntax
This is the easiest test; ansible-playbook has a built in command that will check a playbook’s syntax (including all the included files and roles), and return 0 if there are no problems, or an error code and some output if there were any syntax issues.
1 ansible-playbook -i tests/inventory tests/test.yml --syntax-check
Add this as a command in the script section of .travis.yml:
1 script:
2 # Check the role/playbook's syntax.
3 - ansible-playbook -i tests/inventory tests/test.yml --syntax-check
If there are any syntax errors, Travis will fail the build and output the errors in the log.
Role success - first run
The next aspect to check is whether the role runs correctly or fails on its first run.
1 # Run the role/playbook with ansible-playbook.
2 - "ansible-playbook -i tests/inventory tests/test.yml --connection=local --sudo"
This is a basic ansible-playbook command, which runs the playbook test.yml against the local host, using --sudo, and with the inventory file we added to the role’s tests directory.
Ansible returns a non-zero exit code if the playbook run fails, so Travis will know whether the command succeeded or failed.
Role idempotence
Another important test is the idempotence test—does the role change anything if it runs a second time? It should not, since all tasks you perform via Ansible should be idempotent (ensuring a static/unchanging configuration on subsequent runs with the same settings).
1 # Run the role/playbook again, checking to make sure it's idempotent.
2 - >
3 ansible-playbook -i tests/inventory tests/test.yml --connection=local --sudo
4 | grep -q 'changed=0.*failed=0'
5 && (echo 'Idempotence test: pass' && exit 0)
6 || (echo 'Idempotence test: fail' && exit 1)
This command runs the exact same command as before, but pipes the results through grep, which checks to make sure ‘changed’ and ‘failed’ both report 0. If there were no changes or failures, the idempotence test passes (and Travis sees the 0 exit and is happy), but if there were any changes or failures, the test fails (and Travis sees the 1 exit and reports a build failure).
Role success - final result
The last thing I check is whether the role actually did what it was supposed to do. If it configured a web server, is the server responding on port 80 or 443 without any errors? If it configured a command line application, does that command line application work when invoked, and do the things it’s supposed to do?
1 # Request a page via the web server, to make sure it's running and responds.
2 - "curl http://localhost/"
In this example, I’m testing a web server by loading ‘localhost’; curl will exit with a 0 status (and dump the output of the web server’s response) if the server responds with a 200 OK status, or will exit with a non-zero status if the server responds with an error status (like 500) or is unavailable.
Taking this a step further, you could even run a deployed application or service’s own automated tests after ansible is finished with the deployment, thus testing your infrastructure and application in one go—but we’re getting ahead of ourselves here… that’s a topic for later!
Some notes about Travis CI
There are a few things you need to know about Travis CI, especially if you’re testing Ansible, which will rely heavily on the VM environment inside which it is running:
· Ubuntu 12.04: As of this writing, the only OS available via Travis CI is Ubuntu 12.04. Most of my roles work with Ubuntu/Debian/RedHat/CentOS, so it’s not an issue for me… but if your roles strictly target a non-Debian-flavored distro, you probably won’t get much mileage out of Travis. (There is an open issue to get Travis upgraded to Ubuntu 14.04, at least).
· Preinstalled packages: Travis CI comes with a bunch of services installed out of the box, like MySQL, Elasticsearch, Ruby, etc. In the .travis.yml before_install section, you may need to do some apt-get remove --purge [package] commands and/or other cleanup commands to make sure the VM is fresh for your Ansible role’s run.
· Networking/Disk/Memory: Travis CI continously shifts the VM specs you’re using, so don’t assume you’ll have X amount of RAM, disk space, or network capacity. You can add commands like cat /proc/cpuinfo, cat /proc/meminfo, free -m, etc. in the .travis.yml before_install section if you need to figure out the resources available in your VM.
See much more information about the VM environment on the Travis CI Build Environment page.
Real-world examples
This style of testing is integrated into many of the geerlingguy.* roles on Ansible Galaxy; here are a few example roles that use Travis CI integration in the way outlined above:
· https://github.com/geerlingguy/ansible-role-apache
· https://github.com/geerlingguy/ansible-role-gitlab
· https://github.com/geerlingguy/ansible-role-mysql
Automated testing with test-runner
TODO:
· debops/test-runner
Functional testing using serverspec
TODO:
· server-spec
· Caveat: Ansible already testing things as it goes. Do you really need another layer of testing?
Summary
Tools to help manage, test, and run playbooks regularly and easily, such as Travis CI, Jenkins, and Ansible Tower, also help deliver certainty when applying changes to your infrastructure using Ansible. In addition the information contained in this chapter, read through the Testing Strategies documentation in Ansible’s documentation for a comprehensive overview of infrastructure testing and Ansible.
________________________________________
/ The first rule of any technology used \
| in a business is that automation |
| applied to an efficient operation will |
| magnify the efficiency. The second is |
| that automation applied to an |
| inefficient operation will magnify the |
\ inefficiency. (Bill Gates) /
----------------------------------------
\ ^__^
\ (oo)\_______
(__)\ )\/\
||----w |
|| ||
All materials on the site are licensed Creative Commons Attribution-Sharealike 3.0 Unported CC BY-SA 3.0 & GNU Free Documentation License (GFDL)
If you are the copyright holder of any material contained on our site and intend to remove it, please contact our site administrator for approval.
© 2016-2025 All site design rights belong to S.Y.A.