A practical guide to Fedora and Red Hat Enterprise Linux, 7th Edition (2014)
Part III: System Administration
Chapter 11. Files, Directories, and Filesystems
In This Chapter
Important Files and Directories
Ordinary Files, Directories, Links, and Inodes
Device Special Files
Filesystems
mount: Mounts a Filesystem
fstab: Keeps Track of Filesystems
fsck: Checks Filesystem Integrity
The XFS Filesystem
Objectives
After reading this chapter you should be able to:
![]() List four important directories and describe their uses
List four important directories and describe their uses
![]() List common system startup configuration files and describe their uses
List common system startup configuration files and describe their uses
![]() List typical network configuration files and describe their uses
List typical network configuration files and describe their uses
![]() List common login configuration files and describe their uses
List common login configuration files and describe their uses
![]() List a few device filenames and describe their uses
List a few device filenames and describe their uses
![]() Define the seven types of files found on the system
Define the seven types of files found on the system
![]() Describe several filesystem types found on a Linux system
Describe several filesystem types found on a Linux system
![]() View, check, tune, mount, and unmount local filesystems
View, check, tune, mount, and unmount local filesystems
Filesystems hold directories of files. These structures store user data and system data that are the basis of users’ work on the system and the system’s existence. This chapter discusses important files and directories, various types of files and ways to work with them, and the use and maintenance of filesystems.
Important Files and Directories
This section details the files most commonly used to administer the system. For a more general list of files, refer to “Important Standard Directories and Files” on page 189.
lost+found
Holds preallocated disk blocks of directories that fsck uses to store pointers to unlinked files (files that have lost their directory [and therefore filename] information). Having these blocks available ensures that fsck does not have to allocate data blocks during recovery, a process that could further damage a corrupted filesystem. See page 525 for more information on fsck. However, fsck will allocate blocks if they do not exist.
Each ext2, ext3, and ext4 filesystem contains a lost+found directory in the filesystem’s root directory. If, for example, a filesystem is mounted at /home, there will be a /home/lost+found directory. There is always a /lost+found directory. These directories are normally created by mkfs when it writes an ext2/ext3/ext4 filesystem to a partition. Although rarely necessary, you can create a lost+found directory manually using mklost+found.
![]() ~/.bash_profile
~/.bash_profile
Contains an individual user’s login shell (page 1259) initialization script. The shell executes the commands in this file in the same environment as the shell each time a user logs in. (For information about executing a shell script in this manner, refer to the discussion of the . [dot] command on page 332.) The file must be located in a user’s home directory. It is not run from terminal emulator windows because you do not log in in those windows.
The default Fedora/RHEL .bash_profile file executes the commands in ~/.bashrc.
You can use .bash_profile to specify the editor you want to use, run stty to establish the terminal characteristics, set up aliases, and perform other housekeeping functions when a user logs in.
A simple .bash_profile file that sets EDITOR to vi and CONTROL-H as the erase key follows:
$ cat .bash_profile
export EDITOR=$(which vi)
stty erase '^h'
Using command substitution and which vi sets EDITOR to the absolute pathname of the vi editor. For more information refer to “Startup Files” on page 329.
![]() ~/.bashrc
~/.bashrc
Contains an individual user’s interactive, nonlogin shell initialization script. The shell executes the commands in this file in the same environment as the (new) shell each time a user creates a new interactive shell, including when a user opens a terminal emulator window. (For information about executing a shell script in this manner, refer to the discussion of the . [dot] command on page 332.) The .bashrc script differs from .bash_profile in that it is executed each time a new shell is spawned, not just when a user logs in. The default Fedora/RHEL .bash_profile file executes the commands in ~/.bashrc so that these commands are executed when a user logs in. For more information refer to “Startup Files” on page 329.
![]() /dev
/dev
Contains files representing pseudodevices and physical devices that might be attached to the system. The /dev/sda device was traditionally the first SCSI disk; now it is the first drive, including IDE, SATA, and USB drives. Other similar drives are named /dev/sdb, /dev/sdc, etc.
These names, such as /dev/sda, represent the order of the devices on the bus the devices are connected to, not the devices themselves. For example, if you swap the data cables on the disks referred to as /dev/sda and /dev/sdb, the drive’s designations will change. Similarly, if you remove the device referred to as /dev/sda, the device that was referred to as /dev/sdb will now be referred to as /dev/sda. See /dev/disk/by-uuid (below) for a way to refer to specific devices and not to their order on the bus.
/dev/disk/by-path
Holds symbolic links to local devices. The names of the devices in this directory identify the devices. Each entry points to the device in /dev that it refers to (sr0 is the CD/DVD drive).
$ ls -l /dev/disk/by-path
lrwxrwxrwx. 1 root root 9 06-05 17:29 pci-0000:00:10.0-scsi-0:0:0:0 -> ../../sda
lrwxrwxrwx. 1 root root 10 06-05 17:29 pci-0000:00:10.0-scsi-0:0:0:0-part1 -> ../../sda1
lrwxrwxrwx. 1 root root 10 06-05 17:29 pci-0000:00:10.0-scsi-0:0:0:0-part2 -> ../../sda2
/dev/disk/by-uuid
Holds symbolic links to local devices. The names of the devices in this directory consist of the UUID (page 1280) numbers of the devices. Each entry points to the device in /dev that it refers to. See page 524 for more information. The dm in the partition names stands for device mapper,which is used by LVM (page 44).
$ ls -l /dev/disk/by-uuid
lrwxrwxrwx. 1 root root 10 06-05 17:29 24908841-6308-4304-a52f-c1a76c69bd57 -> ../../sda1
lrwxrwxrwx. 1 root root 10 06-05 17:29 2d9ea1c9-bfbb-4302-b715-1b258c946c55 -> ../../dm-1
lrwxrwxrwx. 1 root root 10 06-05 17:29 cfd3669e-b888-4691-bf54-e229c16eba06 -> ../../dm-0
/dev/null
Also called a bit bucket. Output sent to this file disappears. The /dev/null file is a device file. Input you redirect to come from this file appears as null values, creating an empty file. You can create an empty file named nothing by giving one of the following commands:
$ cat /dev/null > nothing
$ cp /dev/null nothing
or, without explicitly using /dev/null,
$ > nothing
The last command redirects the output of a null command to the file with the same result as the previous commands. You can use any of these commands to truncate an existing file to zero length without changing its permissions. You can also use /dev/null to get rid of output you do not want:
$ grep portable * 2> /dev/null
This command displays all lines in all files in the working directory that contain the string portable. Any output to standard error (page 333), such as a permission or directory error, is discarded, while output to standard output appears on the screen. See also page 158.
/dev/pts
A hook into the Linux kernel. This pseudofilesystem is part of the pseudoterminal support. Pseudoterminals are used by remote login programs, such as ssh and telnet, as well as xterm and other graphical terminal emulators. The following sequence of commands demonstrates that Sam is logged in on /dev/pts/1. After using tty to verify the pseudoterminal he is logged in on and using ls to show that this pseudoterminal exists, Sam redirects the output of an echo command to /dev/pts/1, whereupon the output appears on his screen:
$ tty
/dev/pts/1
$ ls /dev/pts
0 1 2 ptmx
$ echo Hi there > /dev/pts/1
Hi there
/dev/random and /dev/urandom
Interfaces to the kernel’s random number generator. You can use either file with dd to create a file filled with pseudorandom bytes. However, if there is not enough entropy, urandom can generate potentially inferior results (although for most purposes the difference is irrelevant). Following is an example:
$ dd if=/dev/urandom of=randfile bs=1 count=100
100+0 records in
100+0 records out
100 bytes (100 B) copied, 0.000884387 seconds, 113 kB/s
The preceding command reads from /dev/urandom and writes to the file named randfile. The block size is 1, and the count is 100; thus randfile is 100 bytes long. For bytes that are more random, you can read from /dev/random. See the urandom and random man pages for more information.
Tip: Using random can cause the system to hang
Reading from /dev/random can cause the system to hang for a long time if there is not enough entropy. This problem is common on virtual systems. You can create entropy and free the system by moving the mouse, typing on the keyboard, or copying files. Alternately, you can read from /dev/urandom.
Optional
Wiping a file
You can use a similar technique to wipe data from a file before deleting it, making it almost impossible to recover data from the deleted file. You might want to wipe a file for security reasons.
In the following example, ls shows the size of the file named secret. Using a block size of 1 and a count corresponding to the number of bytes in secret, dd wipes the file. The conv=notrunc argument ensures that dd writes over the data in the file and not another (erroneous) place on the disk.
$ ls -l secret
-rw-r--r--. 1 sam pubs 5733 01-27 13:12 secret
$ dd if=/dev/urandom of=secret bs=1 count=5733 conv=notrunc
5733+0 records in
5733+0 records out
5733 bytes (5.7 kB) copied, 0.0358146 seconds, 160 kB/s
$ rm secret
For added security, run sync to flush the disk buffers after running dd and repeat the two commands several times before deleting the file. Alternately you can use shred (page 223) to wipe a file. See wipe.sourceforge.net for more information about wiping files.
/dev/shm
Implements shared memory, which provides an efficient way for processes to share information.
/dev/zero
Input you take from this file contains an infinite string of zeros (numerical zeros, not ASCII zeros). You can fill a file (e.g., a swap file; page 513) or overwrite a file with zeros with a command such as the following:
$ dd if=/dev/zero of=zeros bs=1024 count=10
10+0 records in
10+0 records out
10240 bytes (10 kB) copied, 0.000160263 seconds, 63.9 MB/s
$ od -c zeros
0000000 \0 \0 \0 \0 \0 \0 \0 \0 \0 \0 \0 \0 \0 \0 \0 \0
*
0024000
The od utility shows the contents of the new file.
If you try to fill a file with zeros using /dev/null, you fill the partition in which you are working:
$ cp /dev/zero bigzero
cp: error writing 'bigzero': No space left on device
cp: failed to extend ‘bigzero’: No space left on device
$ rm bigzero
![]() /etc
/etc
Holds machine–local system configuration files.
/etc/aliases
Used by the mail delivery system to hold aliases for users. Edit this file to suit local needs. For more information refer to /etc/aliases on page 746.
/etc/alternatives
Holds symbolic links so you can call a utility by a name other than that of the file that holds the utility. For example, when you give the command cancel, the shell calls cancel.cups using the following links:
$ ls -l /usr/bin/cancel
lrwxrwxrwx. 1 root root 30 06-04 19:31 /usr/bin/cancel -> /etc/alternatives/print-cancel
$ ls -l /etc/alternatives/print-cancel
lrwxrwxrwx. 1 root root 20 06-04 19:31 /etc/alternatives/print-cancel -> /usr/bin/cancel.cups
The alternatives directory also allows a utility to appear in more than one directory and can ease an administrator’s learning curve by providing familiar commands to do similar tasks (e.g., mailq can call sendmail or postfix commands depending on which server is being used).
In addition, this directory allows you to call one utility by several names. Although the alternatives directory does not allow developers to do anything they could not do without it, it provides an orderly way to keep and update these links. Use whereis (page 255) to find all links to a utility.
![]() /etc/at.allow, /etc/at.deny, /etc/cron.allow, and /etc/cron.deny
/etc/at.allow, /etc/at.deny, /etc/cron.allow, and /etc/cron.deny
By default, users can use the at and crontab utilities. The at.allow and cron.allow files list the users who are allowed to use at and crontab, respectively. The at.deny and cron.deny files specify users who are not permitted to use the corresponding utilities. As Fedora/RHEL is configured, an empty at.deny file and the absence of an at.allow file allows anyone to use at; the absence of cron.allow and an empty cron.deny file allows anyone to use crontab. To prevent anyone except a user running with root privileges from using at, remove the at.deny file. To prevent anyone except a user running with root privileges from using crontab, create a cron.allow file with the single entry root. For more information on crontab, refer to “Scheduling Tasks” on page 607.
/etc/default
A directory that holds files that set default values for system services and utilities such as NFS and useradd. Look at the files in this directory for more information.
/etc/fstab
filesystem (mount) table—Contains a list of mountable devices as specified by the system administrator. See page 524 for more information.
![]() /etc/group
/etc/group
Groups allow users to share files or programs without giving all system users access to those files or programs. This scheme is useful when several users are working with files that are not public. The /etc/group file associates one or more usernames with each group (GID [group ID number]). Members of the group named wheel are administrators and can use sudo to gain root privileges; see “Administrator and the wheel group” on page 429 for a finer-grained way to control file access.
Each entry in the /etc/group file has four colon-separated fields that describe one group:
group-name:password:group-ID:login-name-list
The group-name is the name of the group. The password is an optional hashed (page 1252) password. This field frequently contains an x, indicating that group passwords are not used. The group-ID is a number, with 1–499 reserved for system accounts. The login-name-list is a comma-separated list of users who belong to the group. If an entry is too long to fit on one line, end the line with a backslash (\), which quotes the following RETURN, and continue the entry on the next line. A sample entry from a group file follows. The group is named pubs, has no password, and has a group ID of 1103:
pubs:x:1103:max,sam,zach,mark
You can use the groups utility to display the groups to which a user belongs:
$ groups sam
sam : sam pubs
Each user has a primary group, which is the group that user is assigned to in the /etc/passwd file. By default, Fedora/RHEL has user private groups: Each user’s primary group has the same name as the user. In addition, a user can belong to other groups, depending on which login-name-lists the user appears on in the /etc/group file. In effect, you simultaneously belong both to your primary group and to any groups you are assigned to in /etc/group. When you attempt to access a file you do not own, Linux checks whether you are a member of the group that has access to the file. If you are, you are subject to the group access permissions for the file. If you are not a member of the group that has access to the file and you do not own the file, you are subject to the public access permissions for the file.
When you create a file, Linux assigns it to your primary group. Refer to page 600 for information on using system-config-users to work with groups.
![]() /etc/hostname
/etc/hostname
Holds the name of the system. Use hostnamectl (page 219) to change the hostname of a system. See page 300 for more information on hostnames.
![]() /etc/hosts
/etc/hosts
Stores the names, IP addresses, and optionally aliases of other systems. Typically, this file holds the hostname and IP address of the local system. It also holds a special entry for localhost. This entry supports the loopback service, which allows the local system to talk to itself (e.g., for RPC services). The IP address of the loopback service is always 127.0.0.1 (IPv4) or ::1 (IPv6), while 127.0.1.1 names the local system. See page 300 for more information. Following is a simple /etc/hosts file:
$ cat /etc/hosts
127.0.0.1 localhost localhost.localdomain localhost4 localhost4.localdomain4
::1 localhost localhost.localdomain localhost6 localhost6.localdomain6
127.0.1.1 tiny
192.168.0.9 jam
192.168.0.10 plum
192.168.0.12 dog
...
If you are not using NIS or DNS to look up hostnames (called hostname resolution), you must include in /etc/hosts all systems that the local system should be able to contact by hostname. (A system can always contact another system by using the IP address of the system.) The hosts entry in the /etc/nsswitch.conf file (page 495) controls the order in which hostname resolution services are checked.
/etc/hosts.allow /etc/hosts.deny
As part of the client/server model, TCP wrappers use these files for access control. See page 485 for more information.
/etc/init.d
A symbolic link to /etc/rc.d/init.d (page 448).
![]() /etc/inittab
/etc/inittab
initialization table—A system running systemd ignores this file.
/etc/motd
Contains the message of the day, which can be displayed each time someone logs in using a textual login. This file typically contains site policy and legal information. Keep this file short because users tend to see the message many times.
/etc/mtab
A symbolic link to the kernel mount table at /proc/self/mounts. When you call mount without any arguments, it consults this file and displays a list of mounted devices. Each time you (or systemd) call mount or umount, these utilities make the necessary changes to mtab. Although this is an ASCII text file, you should not edit it. See also /etc/fstab.
/etc/nsswitch.conf
Specifies whether a system uses NIS, DNS, local files, or a combination as the source of certain information and in which order it consults these services (page 495).
/etc/pam.d
Files in this directory specify the authentication methods used by PAM (page 476) applications.
![]() /etc/passwd
/etc/passwd
Describes users to the system. Do not edit this file directly; instead, use one of the utilities discussed in “Configuring User and Group Accounts” on page 598. Each line in passwd has seven colon-separated fields that describe one user:
login-name:password:user-ID:group-ID:info:directory:program
The login-name is the user’s username—the name you enter in response to the login: prompt or on a GUI login screen. The value of the password is the character x. The /etc/shadow file (page 511) stores the real password, which is hashed (page 1252). For security reasons, every account should have a password. By convention, disabled accounts have an asterisk (*) in this field.
The user-ID is a number, with 0 indicating the root account and 1–999 being reserved for system accounts. The group-ID identifies the user’s primary group. It is a number, with 0–999 being reserved for system accounts; see /etc/group (page 506). You can change these values and set maximum values in /etc/login.defs.
The info is information that various programs, such as accounting and email programs, use to identify the user further. Normally it contains at least the first and last names of the user. It is referred to as the GECOS (page 1251) field.
The directory is the absolute pathname of the user’s home directory. The program is the program that runs once the user logs in to a textual session. If program is not present, a value of /bin/bash is assumed. You can put /bin/tcsh here to log in using the TC Shell or /bin/zsh to log in using the Z Shell, assuming the shell you specify is installed. The chsh utility (page 464) changes this value.
The program is usually a shell, but it can be any program. The following line in the passwd file creates a “user” whose only purpose is to execute the who utility:
who:x:1000:1000:execute who:/usr:/usr/bin/who
Logging in with who as a username causes the system to log you in, execute the who utility, and log you out. The output of who flashes by quickly because the new login prompt clears the screen immediately after who finishes running. This entry in the passwd file does not provide a shell, so you cannot stay logged in after who finishes executing.
This technique is useful for providing special accounts that might do only one thing. The ftp account, for example, enables anonymous FTP (page 713) access to an FTP server. Because no one logs in on this account, the shell is set to /bin/false (which returns a false exit status) or to/sbin/nologin (which does not permit a nonprivileged user to log in). When you put a message in /etc/nologin.txt, nologin displays that message (except it has the same problem as the output of who—it is removed so quickly it is hard to see).
Security: Do not replace a login shell with a shell script
Do not use shell scripts as replacements for shells in /etc/passwd. A user might be able to interrupt a shell script, giving him full shell access when you did not intend to do so. When installing a dummy shell, use a compiled program, not a shell script.
/etc/printcap
The printer capability database for LPD/LPR (page 556). It is not used with CUPS (Chapter 13), the Fedora/RHEL default printing system. This file describes system printers and is derived from 4.3BSD UNIX.
![]() /etc/profile and /etc/profile.d
/etc/profile and /etc/profile.d
Contain systemwide interactive shell initialization scripts for environment and startup programs. When you log in, the shell immediately executes the commands in /etc/profile. This script executes all the commands in all the files in the /etc/profile.d directory (next) that have a filename extension of .sh. Both profile and the files in profile.d are executed in the same environment as the shell. (For information on executing a shell script in this manner, refer to the discussion of the . [dot] command on page 332.) As the comments at the beginning of profile say, if you want to make a systemwide change to users’ environments, place a script with a filename extension of .sh in profile.d. Do not modify profile because it might be replaced when the system is updated; a file you create in profile.d will not be replaced.
The system administrator can create a file with a filename extension of .sh in profile.d to establish systemwide environment parameters that individual users can override in their ~/.bash_profile (page 502) files. For example, this file can set shell variables, execute utilities, set up aliases, and take care of other housekeeping tasks. Following is an example of a file in /etc/profile.d that displays the message of the day (the /etc/motd file), sets the file-creation mask (umask; page 469), and sets the interrupt character to CONTROL-C:
# cat /etc/profile.d/simple.sh
cat /etc/motd
umask 022
stty intr '^c'
See the /etc/profile file and the files in /etc/profile.d on the local system for more complex examples.
/etc/protocols
Provides protocol numbers, aliases, and brief definitions for DARPA Internet TCP/IP protocols. Do not modify this file.
/etc/rc.d
Holds SysVinit initialization scripts and links. See page 448 for more information.
![]() /etc/resolv.conf
/etc/resolv.conf
The resolver (page 854) configuration file; provides access to DNS. This file is built by NetworkManager (page 637) if it is running.
The following example shows the resolv.conf file for the example.com domain. A resolv.conf file usually contains at least two lines—a search line (optional) and a nameserver line:
$ cat /etc/resolv.conf
search example.com
nameserver 10.0.0.50
nameserver 10.0.0.51
The search keyword might be followed by a maximum of six domain names. The first domain is interpreted as the host’s local domain. These names are appended one at a time to all DNS queries, shortening the time needed to query local hosts. The domains are searched in order in the process of resolving hostnames that are not fully qualified. See FQDN on page 1250.
When you put search example.com in resolv.conf, any reference to a host within the example.com domain or a subdomain (such as marketing.example.com) can use the abbreviated form of the host. For example, instead of issuing the command ping speedy.marketing.example.com, you can use ping speedy.marketing; however, a trailing period causes DNS to assume the name is complete so it appends no suffix. The following line in resolv.conf causes the marketing subdomain to be searched first, followed by sales, and finally the entire example.com domain:
search marketing.example.com sales.example.com example.com
It is a good idea to put the most frequently used domain names first to try to outguess possible conflicts. If both speedy.marketing.example.com and speedy.example.com exist, for example, the order of the search determines which one is selected when you invoke DNS. Do not overuse this feature: The longer the search path, the more network DNS requests generated, and the slower the response. Three or four names are typically sufficient.
Up to a maximum of three nameserver lines indicate which systems the local system queries to resolve hostnames to IP addresses, and vice versa. These machines are consulted in the order they appear, with a timeout between queries. The first timeout is a few seconds; each subsequent timeout is twice as long as the previous one. The preceding file causes this system to query 10.0.0.50, followed by 10.0.0.51 when the first system does not answer within a few seconds. The resolv.conf file might be automatically updated when a PPP (Point-to-Point Protocol) or DHCP (Dynamic Host Configuration Protocol) controlled interface is activated.
/etc/rpc
Maps RPC services to RPC numbers. The three columns in this file show the name of the server for the RPC program, the RPC program number, and any aliases.
![]() /etc/services
/etc/services
Lists system services. The three columns in this file show the informal name of the service, the port number/protocol the service uses most frequently, and any aliases for the service. This file does not specify which services are running on the local system, nor does it map services to port numbers. The services file is used internally to map port numbers to services for display purposes; editing this file does not change which ports and protocols the local system uses.
![]() /etc/shadow
/etc/shadow
Contains SHA2 (page 1272) or MD5 (page 1260) hashed user passwords, depending on system configuration. Each entry occupies one line composed of nine fields, separated by colons:
login-name:password:last-mod:min:max:warn:inactive:expire:flag
The login-name is the user’s username—the name that the user enters in response to the login: prompt or on a GUI login screen. The password is a hashed password that passwd puts in this file. New accounts that are not set up with a password are given a value of !, !!, or * in this field to prevent the user from logging in until you assign a password to that user (page 600).
The last-mod field indicates when the password was last modified. The min is the minimum number of days that must elapse before the password can be changed; the max is the maximum number of days before the password must be changed. The warn field specifies how much advance warning (in days) will be given to the user before the password expires. The account will be closed if the number of days between login sessions exceeds the number of days specified in the inactive field. The account will also be closed as of the date in the expire field. The last field in an entry, flag, is reserved for future use. You can use the Password Info tab in system-config-users (page 600) or chage to modify these fields.
The shadow password file must be owned by root and must not be publicly readable or writable. Setting ownership and permissions in this way makes it more difficult for someone to break into the system by identifying accounts without passwords or by using specialized programs that try to match hashed passwords.
A number of conventions exist for creating special shadow entries. An entry of *LK* or NP in the password field indicates locked or no password, respectively. No password is different from an empty password; no password implies that this is an administrative account that no one ever logs in on directly. Occasionally programs will run with the privileges of this account for system maintenance functions. These accounts are set up under the principle of least privilege (page 423).
Entries in the shadow file must appear in the same order as in the passwd file. There must be exactly one shadow entry for each passwd entry.
/etc/sysconfig
A directory containing a hierarchy of system configuration files. For more information refer to the /usr/share/doc/initscripts*/sysconfig.txt file.
![]() /etc/sysconfig/network
/etc/sysconfig/network
Describes the network setup for the local system.
![]() /proc
/proc
Provides a window into the Linux kernel. Through the /proc pseudofilesystem you can obtain information on any process running on the system, including its current state, memory usage, CPU usage, terminal association, parent, and group. You can extract information directly from the files in /proc. An example follows:
$ sleep 1000 &
[1] 3104
$ cd /proc/3104
$ ls -l
dr-xr-xr-x. 2 sam pubs 0 04-09 14:00 attr
-r-------- 1 sam pubs 0 04-09 14:00 auxv
-r--r--r-- 1 sam pubs 0 04-09 14:00 cgroup
--w------- 1 sam pubs 0 04-09 14:00 clear_refs
-r--r--r-- 1 sam pubs 0 04-09 14:00 cmdline
-rw-r--r-- 1 sam pubs 0 04-09 14:00 coredump_filter
-r--r--r-- 1 sam pubs 0 04-09 14:00 cpuset
lrwxrwxrwx 1 sam pubs 0 04-09 14:00 cwd -> /home/sam
-r-------- 1 sam pubs 0 04-09 14:00 environ
lrwxrwxrwx 1 sam pubs 0 04-09 14:00 exe -> /bin/sleep
dr-x------ 2 sam pubs 0 04-09 14:00 fd
...
$ cat status
Name: sleep
State: S (sleeping)
Tgid: 3104
Pid: 3104
PPid: 1503
TracerPid: 0
Uid: 1000 1000 1000 1000
Gid: 1000 1000 1000 1000
FDSize: 256
Groups: 4 20 24 46 105 119 122 1000
VmPeak: 3232 kB
VmSize: 3232 kB
VmLck: 0 kB
...
In this example, bash creates a background process (PID 3104) for sleep. Next the user changes directories to the directory in /proc that has the same name as the PID of the background process (cd /proc/3104). This directory holds information about the process it is named for—the sleepprocess in the example. The ls –l command shows that some entries in this directory are links (cwd is a link to the directory the process was started from, and exe is a link to the executable file that this process is running) and some appear to be ordinary files. All appear to be empty. However, when you use cat to display one of these pseudofiles (status in the example), cat displays output. Obviously it is not an ordinary file.
You can also obtain information about the local system by examining pseudofiles in /proc. The following examples display information about the CPU and RAM (memory).
$ cat /proc/cpuinfo
processor : 0
vendor_id : GenuineIntel
cpu family : 6
model : 23
model name : Intel(R) Core(TM)2 Quad CPU Q9650 @ 3.00GHz
stepping : 10
microcode : 0xa0b
...
$ cat /proc/meminfo
MemTotal: 1012484 kB
MemFree: 221216 kB
Buffers: 14176 kB
Cached: 267940 kB
SwapCached: 2124 kB
Active: 215912 kB
Inactive: 412792 kB
![]() swap
swap
Swap space is used by the virtual memory subsystem of the kernel. When it runs low on real memory (RAM), the kernel writes memory pages from RAM to the swap space. Which pages are written and when they are written are controlled by finely tuned algorithms in the Linux kernel. When needed by running programs, the kernel brings these pages back into RAM—a technique called paging (page 1265). When a system is running very short on memory, an entire process might be paged out to disk.
Running an application that requires a large amount of virtual memory might result in the need for additional swap space. Swap space can be added and deleted from the system dynamically: If you run out of swap space, you can use mkswap to create a swap file and swapon to enable it. Normally the kernel uses a disk partition as swap space, but it can also use a file for this purpose. However, a disk partition provides much better performance than a file.
If you are creating a file as swap space, first use df to ensure the partition you are creating it in has adequate space for the file. The following commands first use dd and /dev/zero (page 505) to create an empty file (do not use cp because you might create a file with holes, which might not work) in the working directory. Next mkswap takes as an argument the name of the file created in the first step to set up the swap space. For security reasons, change the file so it cannot be read from or written to by anyone except a user with root privileges. Use swapon with the same argument to turn the swap file on; then use swapon –s to confirm the swap space is available. The final two commands turn off the swap file and remove it:
# dd if=/dev/zero of=swapfile bs=1024 count=65536
65536+0 records in
65536+0 records out
67108864 bytes (67 MB) copied, 0.40442 s, 166 MB/s
# mkswap swapfile
Setting up swapspace version 1, size = 65532 KiB
no label, UUID=49ec7f5b-1391-4b24-bd0a-a07e55752666
# chmod 600 swapfile
# swapon swapfile
# swapon -s
Filename Type Size Used Priority
/dev/dm-1 partition 2031612 0 -1
/swapfile file 65532 0 -2
# swapoff swapfile
# rm swapfile
rm: remove regular file 'swapfile'? y
![]() /sys
/sys
A pseudofilesystem that was added in the Linux 2.6 kernel to make it easy for programs running in kernelspace, such as device drivers, to exchange information with programs running in userspace. See page 516 for more information.
/usr/libexec
Holds binary files that are not executed directly by a user.
/usr/share/magic
Most files begin with a unique identifier called a magic number. This file is a text database listing all known magic numbers on the system. When you use the file utility, it consults /usr/share/magic to determine the type of a file. Occasionally you might acquire a new tool that creates a new type of file that is unrecognized by the file utility. In this situation you need to update the /usr/share/magic file; refer to the magic man page for details. See also “magic number” on page 1259.
![]() /var/log
/var/log
Holds system log files, many of which are generated by syslogd (page 620). You can use a text display program such as less, tail, or cat, or the graphical program gnome-system-log (gnome-system-log package) to view the files in this directory. To run gnome-system-log, enter gnome-system-log from a terminal emulator or in an Enter a Command window (ALT-F2).
![]() /var/log/messages
/var/log/messages
Contains messages from daemons, the Linux kernel, and security programs. For example, you will find filesystem full warning messages, error messages from system daemons (e.g., NFS, ntpd, printer daemons), SCSI and IDE disk error messages, and more in messages. Check/var/log/messages periodically to keep informed about important system events. Much of the information displayed on the system console is also sent to messages. If the system experiences a problem and you cannot access the console, check this file for messages about the problem. See page 620 for information on syslogd, which generates many of these messages.
/var/log/secure
Holds messages from security-related programs such as su and the sshd daemon.
File Types
Linux supports many types of files. This section discusses the following types of files:
• Ordinary files, directories, links, and inodes (next)
• LE Symbolic links (page 515)
• Device special files (page 515)
• FIFO special files (named pipes) (page 516)
• Sockets (page 517)
• Block and character devices (page 518)
• Raw devices (page 518)
Ordinary Files, Directories, Links, and Inodes
Ordinary and directory files
An ordinary file stores user data, such as textual information, programs, or images, such as a jpeg or tiff file. A directory is a standard-format disk file that stores information, including names, about ordinary files and other directory files.
Inodes
An inode is a data structure (page 1245), stored on disk, that defines a file’s existence and is identified by an inode number. Use ls with the –i option to display the inode number of a file. An inode contains critical information about a file, such as the UID of the owner, where it is physically located on the disk, access mode, and how many hard links point to it. In addition, SELinux (page 472) stores extended information about files in inodes. Directory files, not inodes, hold filename information. This setup allows an inode to be associated with more than one filename and to be pointed to from more than one directory.
When you move (mv) a file, including a directory file, within a filesystem, you change the filename portion of the directory entry associated with the inode that describes the file. You do not create a new inode. If you move a file to another filesystem, mv first creates a new inode on the destination filesystem and then deletes the original inode. You can also use mv to move a directory recursively from one filesystem to another. In this case mv copies the directory and all the files in it and deletes the original directory and its contents.
Hard links
When you make an additional hard link (ln; page 204) to a file, you add a directory entry that points to the inode that describes the file. You do not create a new inode. It is not possible to create a hard link to a directory.
When you remove (rm) a file, you delete the directory entry that describes the file. When you remove the last hard link to a file, the operating system puts all blocks the inode pointed to back in the free list (the list of blocks that are available for use on the disk) and frees the inode to be used again.
The . and .. directory entries
Every directory contains at least two entries (. and ..). The . entry is a link to the directory itself. The .. entry is a link to the parent directory. In the case of the root directory, there is no parent; the .. entry is a link to the root directory itself.
![]() Symbolic links
Symbolic links
Because each filesystem has a separate set of inodes, you can create hard links to a file only from within the filesystem that holds that file. To get around this limitation, Linux provides symbolic links, which are files that point to other files. Files that are linked by a symbolic link do not share an inode. As a consequence, you can create a symbolic link to a file from any filesystem. You can also create a symbolic link to a directory, device, or other special file. For more information refer to “Symbolic Links” on page 206.
Device Special Files
Device special files (also called device files and special files) represent Linux kernel routines that provide access to an operating system feature. FIFO (first in, first out) special files allow unrelated programs to exchange information. Sockets allow unrelated processes on the same or different systems to exchange information. One type of socket, the UNIX domain socket, is a special file. Symbolic links are another type of special file.
![]() Device files
Device files
Device files include both block and character special files and represent device drivers that allow the system to communicate with peripheral devices, such as terminals, printers, and hard disks. By convention, device files appear in the /dev directory and its subdirectories. Each device file represents a device; hence, the system reads from and writes to the file to read from and write to the device it represents. The following example shows part of a listing for the /dev directory:
$ ls -l /dev
crw-rw----. 1 root video 10, 175 01-25 12:17 agpgart
crw-------. 1 root root 10, 235 01-25 12:17 autofs
drwxr-xr-x. 2 root root 640 01-25 04:17 block
drwxr-xr-x. 2 root root 80 01-25 04:17 bsg
drwxr-xr-x. 3 root root 60 01-25 04:17 bus
lrwxrwxrwx. 1 root root 3 01-25 04:17 cdrom -> sr0
drwxr-xr-x. 2 root root 2760 01-25 12:17 char
crw-------. 1 root root 5, 1 01-25 12:17 console
lrwxrwxrwx. 1 root root 11 01-25 04:17 core -> /proc/kcore
...
brw-rw----. 1 root disk 8, 0 01-25 04:17 sda
brw-rw----. 1 root disk 8, 1 01-25 12:17 sda1
brw-rw----. 1 root disk 8, 2 01-25 04:17 sda2
...
The first character of each line is always –, b, c, d, l, or p, representing the file type—ordinary (plain), block, character, directory, symbolic link, or named pipe (next), respectively. The next nine characters identify the permissions for the file, followed by the number of hard links and the names of the owner and the group. Where the number of bytes in a file would appear for an ordinary or directory file, a device file shows major and minor device numbers (page 517) separated by a comma. The rest of the line is the same as for any other ls –l listing (page 191).
![]() udev
udev
The udev utility manages device naming dynamically. It replaces devfs and moves the device-naming functionality from the kernel to userspace. Because devices are added to and removed from a system infrequently, the performance penalty associated with this change is minimal. The benefit of the move is that a bug in udev cannot compromise or crash the kernel.
![]() /sys
/sys
The udev utility is part of the hotplug system (next). When a device is added to or removed from the system, the kernel creates a device name in the /sys pseudofilesystem and notifies hotplug of the event, which is received by udev. The udev utility then creates the device file, usually in the/dev directory, or removes the device file from the system. The udev utility can also rename network interfaces. See the page at www.kernel.org/pub/linux/utils/kernel/hotplug/udev.html for more information.
![]() Hotplug
Hotplug
The hotplug system allows you to plug a device into a running system and use it immediately. Although hotplug was available in the Linux 2.4 kernel, the 2.6 kernel integrates hotplug with the unified device driver model framework (the driver model core) so any bus can report an event when a device is added to or removed from the system. User software can be notified of the event so it can take appropriate action. See linux-hotplug.sourceforge.net for more information.
FIFO Special File (Named Pipe)
A FIFO special file, also called a named pipe, represents a pipe: You read from and write to the file to read from and write to the pipe. The term FIFO stands for first in, first out—the way any pipe works. In other words, the first information you put in one end is the first information that comes out the other end. When you use a pipeline on a command line to send the output of a program to the printer, the printer outputs the information in the same order that the program produced it and sent it to the pipeline.
Unless you are writing sophisticated programs, you will not be working with FIFO special files. However, programs use named pipes for interprocess communication. You can create a pipe using mkfifo:
$ mkfifo AA
$ ls -l AA
prw-rw-r--. 1 sam pubs 0 01-27 17:55 AA
The p at the left end of the output indicates the file is a pipe.
Both UNIX and Linux systems have included pipes for many generations. Without named pipes, only processes that were children of the same ancestor could use pipes to exchange information. Using named pipes, any two processes on a single system can exchange information. When one program writes to a FIFO special file, another program can read from the same file. The programs do not have to run at the same time or be aware of each other’s activity. The operating system handles all buffering and information storage. This type of communication is termed asynchronous(async) because the programs on the opposite ends of the pipe do not have to be synchronized.
Sockets
Like FIFO special files, UNIX/Linux domain sockets allow asynchronous processes that are not children of the same ancestor to exchange information. These sockets are the central mechanism of the interprocess communication that forms the basis of the networking facility. They differ from TCP/IP sockets, which are not represented in the filesystem. When you use networking utilities, pairs of cooperating sockets manage the communication between the processes on the local system and the remote system. Sockets form the basis of such utilities as ssh and scp.
Major and Minor Device Numbers
A major device number points to a driver in the kernel that works with a class of hardware devices: terminal, printer, tape drive, hard disk, and so on. In the listing of the /dev directory on page 516, all the hard disk partitions have a major device number of 8.
A minor device number identifies a particular piece of hardware within a class. Although all hard disk partitions are grouped together by their major device number, each has a different minor device number (sda1 is 1, sda2 is 2, and so on). This setup allows one piece of software (the device driver) to service all similar hardware yet still be able to distinguish among different physical units.
![]() Block and Character Devices
Block and Character Devices
This section describes typical device drivers. Because device drivers can be changed to suit a particular purpose, the descriptions in this section do not pertain to every system.
Block device
A block device is an I/O (input/output) device that has the following characteristics:
• Able to perform random access reads
• Has a specific block size
• Handles only single blocks of data at a time
• Accepts only transactions that involve whole blocks of data
• Able to have a filesystem mounted on it
• Has the Linux kernel buffer its input and output
• Appears to the operating system as a series of blocks numbered from 0 through n – 1, where n is the number of blocks on the device
Block devices commonly found on a Linux system include hard disks, USB flash drives, CDs, and DVDs.
Character device
A character device is any device that is not a block device. Examples of character devices include printers, terminals, tape drives, and modems.
The device driver for a character device determines how a program reads from and writes to that device. For example, the device driver for a terminal allows a program to read the information you type on the terminal in two ways. First, a program can read single characters from a terminal inraw mode—that is, without the driver interpreting characters. (This mode has nothing to do with the raw device described next.) Alternately, a program can read one line at a time. When a program reads one line at a time, the driver handles the erase and kill characters so the program never sees typing mistakes that have been corrected. In this case, the program reads everything from the beginning of a line to the RETURN that ends a line; the number of characters in a line can vary.
Raw Devices
Device driver programs for block devices usually have two entry points so they can be used in two ways: as block devices or as character devices. The character device form of a block device is called a raw device. A raw device is characterized by
• Direct I/O (no buffering through the Linux kernel).
• One-to-one correspondence between system calls and hardware requests.
• Device-dependent restrictions on I/O.
fsck
An example of a utility that uses a raw device is fsck. It is more efficient for fsck to operate on the disk as a raw device rather than being restricted by the fixed size of blocks in the block device interface. Because it has full knowledge of the underlying filesystem structure, fsck can operate on the raw device using the largest possible units. When a filesystem is mounted, processes normally access the disk through the block device interface, which explains why it is important to allow fsck to modify only unmounted filesystems. On a mounted filesystem, there is the danger that while fsck is rearranging the underlying structure through the raw device, another process could change a disk block using the block device, resulting in a corrupted filesystem.
Filesystems
Table 11-1 lists some types of filesystems available under Linux.
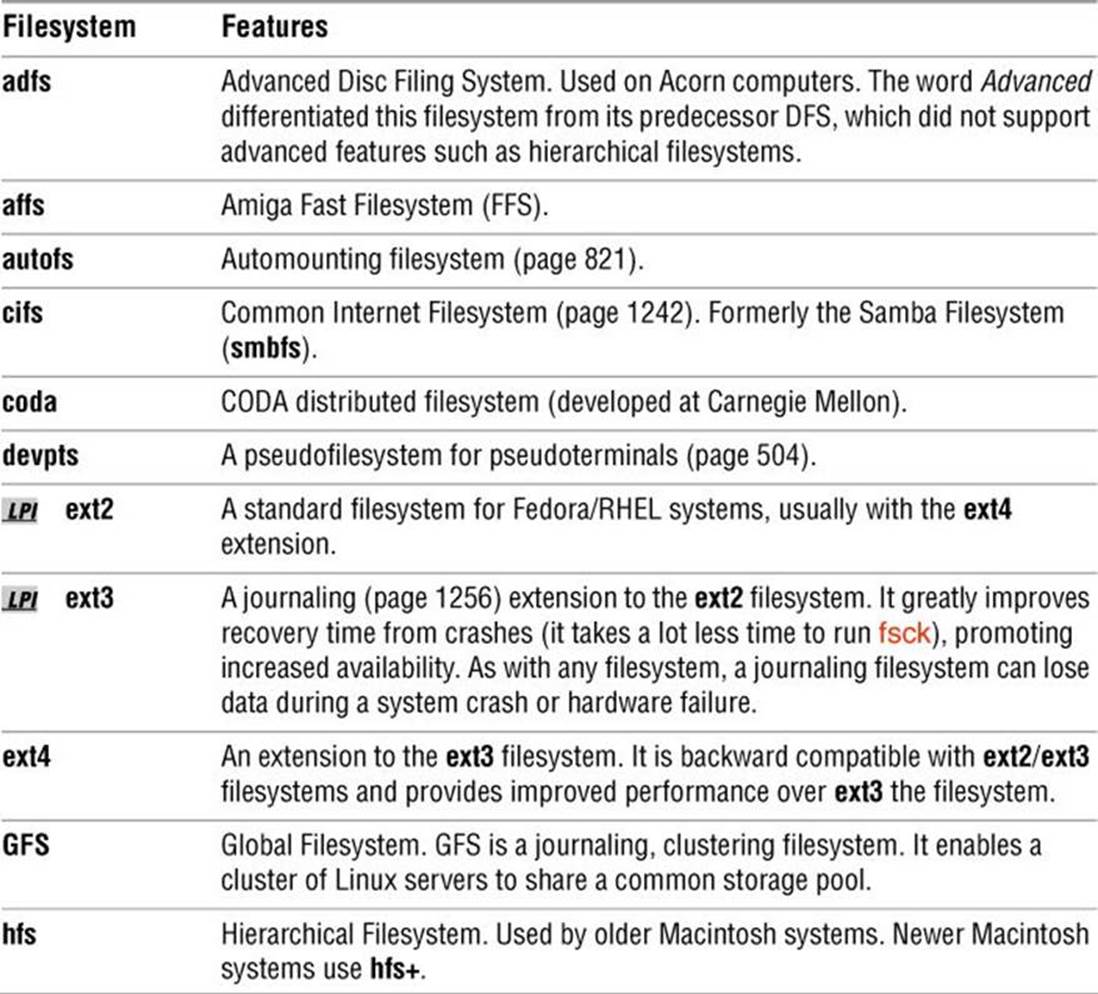
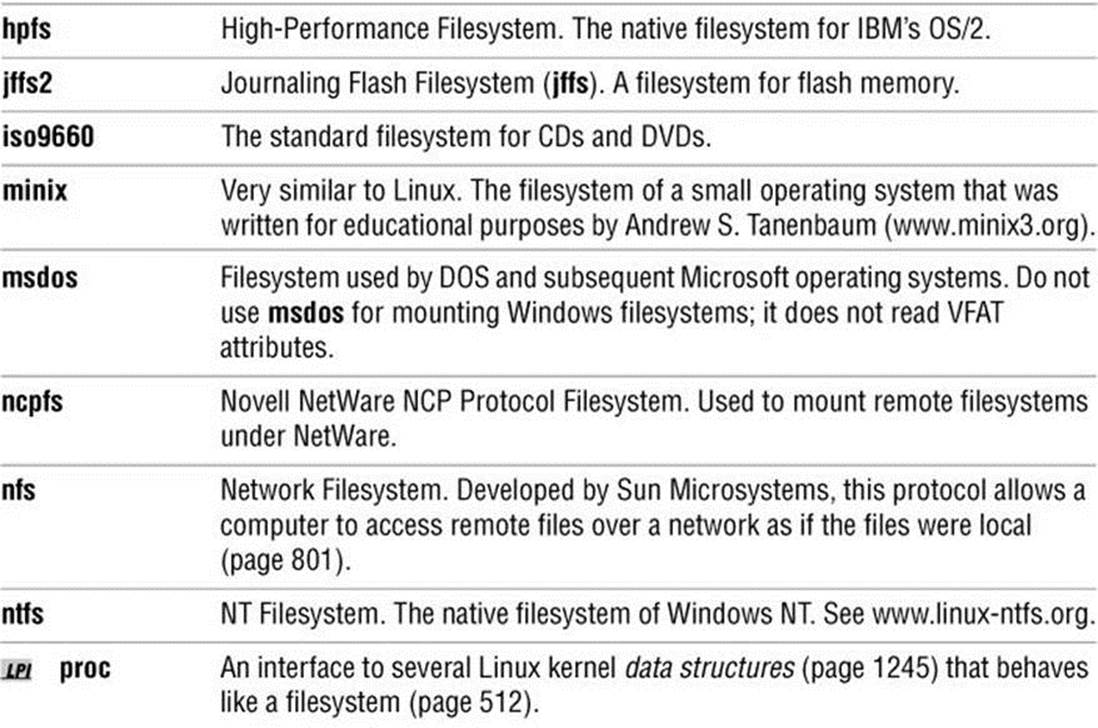
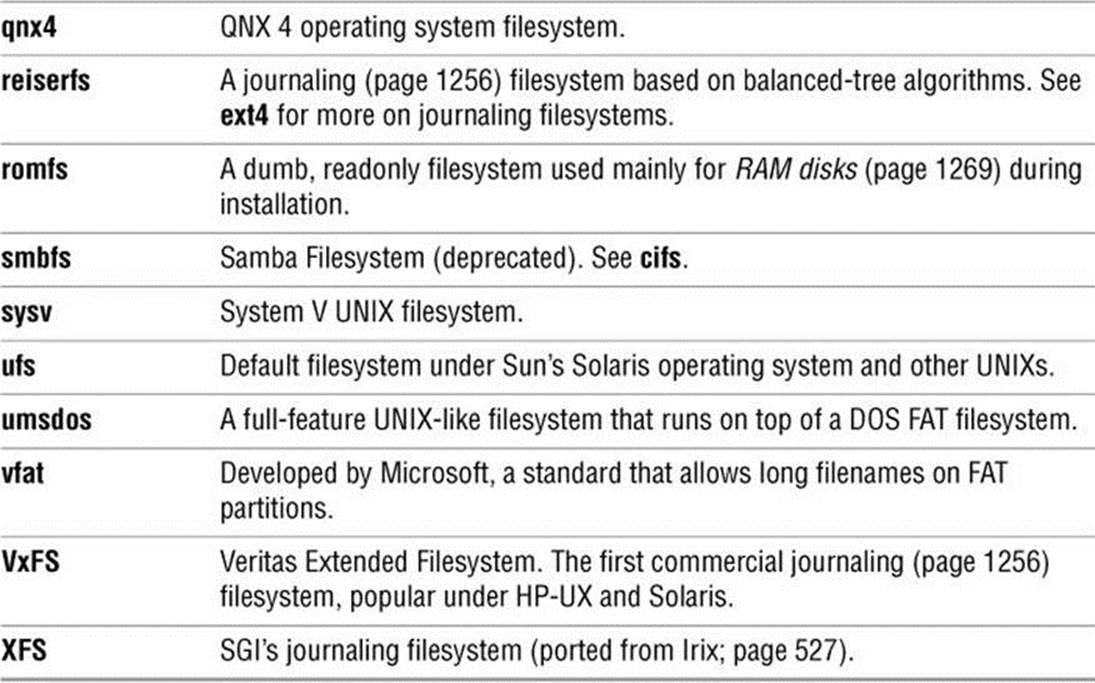
Table 11-1 Filesystems
![]() mount: Mounts a Filesystem
mount: Mounts a Filesystem
The mount utility connects directory hierarchies—typically filesystems—to the Linux directory hierarchy. These directory hierarchies can be on remote and local disks, CDs, DVDs, and USB flash drives. Linux can also mount virtual filesystems that have been built inside ordinary files, filesystems built for other operating systems, and the special /proc filesystem (page 512), which maps Linux kernel information to a pseudodirectory. This section covers mounting local filesystems; refer to page 801 for information on using NFS to mount remote directory hierarchies. See/dev on page 503 for information on device names.
![]() Mount point
Mount point
The mount point for the filesystem/directory hierarchy that you are mounting is a directory in the local filesystem. This directory must exist before you can mount a filesystem; its contents disappear as long as a filesystem is mounted on it and reappear when you unmount the filesystem. See page 38 for a discussion of mount points.
Without any arguments, mount lists the mounted filesystems, showing the physical device holding each filesystem, the mount point, the type of filesystem, and any options set when each filesystem was mounted. The mount utility gets this information from the /etc/mtab file (page 508), which is a link to /proc/self/mounts. On a system running systemd page 438, mount lists so many virtual filesystems it can be difficult to find the physical filesystems. Instead you can use findmnt with the –t (––types) option to display one type of filesystem such as ext4:
$ findmnt -t ext4
TARGET SOURCE FSTYPE OPTIONS
/ /dev/mapper/fedora-root ext4 rw,relatime,seclabel,data=ordered
|––/boot /dev/sda1 ext4 rw,relatime,seclabel,data=ordered
The first entry in the preceding example shows an LV mounted by the LVM (page 44) device mapper on / (root). As explained on page 40, the /boot partition cannot reside on an LV; it is mounted on /dev/sda1.
Caution: Do not mount anything on root (/)
Always mount network directory hierarchies and removable devices at least one level below the root level of the filesystem. The root filesystem is mounted on /; you cannot mount two filesystems in the same place. If you were to try to mount something on /, all files, directories, and filesystems that were under the root directory would no longer be available, and the system would crash.
Optional
An easy way to know when a filesystem is not mounted is to create a file named NOTMOUNTED in the directory that is the mount point. That way, ls shows NOTMOUNTED when the filesystem is not mounted, making it clear the filesystem is not mounted. When the filesystem is mounted, the NOTMOUNTED file is hidden and ls does not display its name.
Give the following touch command (you will probably need to work with root privileges) to create a file named NOTMOUNTED in the /p02 directory. You must give the command while the filesystem that gets mounted on /p02 is not mounted. Otherwise the file appears when the filesystem is mounted. The subsequent commands show ls displaying NOTMOUNTED while the filesystem is not mounted and displaying the files on the mounted filesystem.
$ su -c 'touch /p02/NOTMOUNTED'
$ ls /p02
NOTMOUNTED
$ su -c 'mount /p02'
$ ls /p02
memo1
...
When you add a line for a filesystem to the /etc/fstab file (page 506), you can mount that filesystem by giving the associated mount point or device name as the argument to mount. For example, the following command mounts a backup volume at /backup:
$ mount /backup
This command works because /etc/fstab contains the additional information needed to mount the file. A nonprivileged user is able to mount the file because of the user option.
/dev/sda7 /backup ext4 user,noauto,rw 0 0
On the local system, the mount point and device name will differ from those in this example. You can specify a filesystem type of auto (in place of ext4) to cause the system to probe the filesystem to determine its type.You can also manually mount filesystems that do not appear in /etc/fstab. For example, you can mount a CD-ROM, filesystem type ISO9660 (page 1256), at /media/cd using the following command:
# mount –t iso9660 /dev/cdrom /media/cd
![]() Mount Options
Mount Options
The mount utility takes many options, which you can specify either on the command line or in the /etc/fstab file (page 524). For a complete list of mount options for local filesystems, see the mount man page; for remote directory hierarchies, see page 807 and the nfs man page.
The system mounts most filesystems specified in fstab when it boots. You can specify the noauto option to cause Linux not to mount a filesystem automatically.
Security: Mount removable devices with the nosuid option
Always mount removable devices with the nosuid option so a malicious user cannot, for example, put a setuid copy of bash on a disk and have a shell with root privileges. By default, Fedora/RHEL uses the nosuid option when mounting removable media. See page 806 for more information.
Unless you specify the user, users, or owner option, only a user running with root privileges can mount and unmount a filesystem. The user option allows any user to mount the filesystem, but the filesystem can be unmounted only by the user who mounted it; the users option allows any user to mount and unmount the filesystem. These options are frequently specified for CD, DVD, and USB flash drives. The owner option, which is used only under special circumstances, is similar to the user option except that the user mounting the device must own the device.
Three options can help ensure the security of the system when you allow nonprivileged users to mount filesystems. The noexec option prevents a user from running an executable file on the mounted filesystem, nosuid forces mounted setuid and setgid executable files to run with regular permissions (no effective user or group ID change) on the mounted filesystem (page 806), and nodev prevents the system from recognizing a device special file on the mounted filesystem (page 806). The user and users option imply all three of these options; owner implies nosuid andnodev.
![]() umount: Unmounts a Filesystem
umount: Unmounts a Filesystem
The umount utility unmounts a filesystem as long as it does not contain any files or directories that are in use (open). For example, a logged-in user’s working directory cannot be on the filesystem you want to unmount. The next command unmounts the CD mounted earlier:
$ umount /media/cdrom
Unmount a USB flash drive or a remote (NFS) directory hierarchy the same way you would unmount a partition of a hard drive.
The umount utility consults /etc/fstab to get the necessary information and then unmounts the appropriate filesystem from its server. When a process has a file open on the filesystem you are trying to unmount, umount displays a message similar to the following:
umount: /home: device is busy
Tip: When you cannot unmount a device because it is in use
When a process has a file open on a device you need to unmount, use fuser to determine which process has the file open and to kill it. For example, when you want to unmount a CD, give the command fuser –ki /media/cdrom (substitute the mount point for the diskette on the local system for /media/cdrom). After checking with you, this command kills the process(es) using the CD. You can also use lsof (page 624) to find open files.
Use the –a option to umount to unmount all mounted filesystems that are not in use. You can never unmount the filesystem mounted at /. You can combine –a with the –t option to unmount filesystems of a given type (e.g., ext4 or nfs). For example, the following command unmounts all mounted nfs directory hierarchies that are not in use:
# umount -at nfs
![]() du: Displays Disk Usage Information
du: Displays Disk Usage Information
The du (disk usage) utility displays estimates of file space usage. It is commonly called with the –h (––human-readable) option which causes du to display file sizes in kilobytes, megabytes, and gigabytes instead of blocks and with the –s (––summarize) option which causes du to display a total for each of its directory arguments instead of displaying the size of each file in the directory. The first of the following examples shows du listing the sizes of each file in the /etc directory (without the –s option); the second uses the –s option to cause du to list the size of the /etc directory itself. When run without root privileges, the examples display an error message for each file the user is not permitted to read.
# du -h /etc | head -4
76K /etc/logrotate.d
12K /etc/highlight
4.0K /etc/terminfo
8.0K /etc/wpa_supplicant
# du -sh /etc
37M /etc
![]() fstab: Keeps Track of Filesystems
fstab: Keeps Track of Filesystems
The system administrator maintains the /etc/fstab file, which lists local and remote directory hierarchies, most of which the system mounts automatically when it boots. The fstab file has six columns; a hyphen is a placeholder for a column that has no value:
1. Name—The name, label, or UUID number of a local block device (page 518) or a pointer to a remote directory hierarchy. When you install the system, Fedora/RHEL uses UUID numbers for fixed devices (but not for LVs). Using UUID numbers in fstab during installation circumvents the need for consistent device naming. Because udev (page 516) manages device naming dynamically, the installer might not be aware, for example, that the first disk is not named /dev/hda1 but rather /dev/sda1, but it always knows the UUID number of a device. Using UUID numbers to identify devices also keeps partitions and mount points correctly correlated when you remove or exchange devices. When run with root privileges, blkid (page 464) displays device UUID numbers. See /dev/disk/by-uuid (page 503) for more information on UUID numbers. You can use the volume label of a local filesystem by using the form LABEL=xx, where xx is the volume label. For information on labeling devices, refer to e2label on page 465.
A remote directory hierarchy appears as hostname:pathname, where hostname is the name of the remote system that houses the filesystem, and pathname is the absolute pathname (on the remote system) of the directory that is to be mounted.
2. Mount point—The name of the directory file that the filesystem/directory hierarchy is to be mounted on. If it does not already exist, create this directory using mkdir. See pages 38 and 521.
3. Type—The type of filesystem/directory hierarchy that is to be mounted. Local filesystems are generally of type ext2, ext4, or iso9660, and remote directory hierarchies are of type nfs or cifs. Table 11-1 on page 519 lists filesystem types.
4. Mount options—A comma-separated list of mount options, such as whether the filesystem is mounted for reading and writing (rw, the default) or readonly (ro). See pages 522 and 807 and refer to the mount and nfs man pages for lists of options.
5. Dump—Previously used by dump to determine when to back up the filesystem.
6. Fsck—Specifies the order in which fsck checks filesystems. Root (/) should have a 1 in this column. Filesystems that are mounted to a directory just below the root directory should have a 2. Filesystems that are mounted on another mounted filesystem (other than root) should have a3. For example, if local is a separate filesystem from /usr and is mounted on /usr (as /usr/local), then local should have a 3. Filesystems and directory hierarchies that do not need to be checked (for example, remotely mounted directory hierarchies and CDs/DVDs) should have a 0.
The following example shows a typical fstab file:
# cat /etc/fstab
...
/dev/mapper/fedora-root / ext4 defaults 1 1
UUID=24908841-6308-4304-a52f-c1a76c69bd57 /boot ext4 defaults 1 2
/dev/mapper/fedora-swap swap swap defaults 0 0
See page 520 for information about mount and the types of devices it mounts.
![]() fsck: Checks Filesystem Integrity
fsck: Checks Filesystem Integrity
The fsck (filesystem check) utility verifies the integrity of many types of filesystems and, if possible, repairs problems it finds. Use xfs_repair (page 528) to repair XFS filesystems. Because many filesystem repairs can destroy data, particularly on nonjournaling filesystems (page 1256), such as ext2, by default fsck asks you for confirmation before making each repair.
Caution: Do not run fsck on a mounted filesystem
Do not run fsck on a mounted filesystem. When you attempt to check a mounted filesystem, fsck warns you and asks whether you want to continue. Reply no. You can run fsck with the –N option on a mounted filesystem because it will not write to the filesystem; as a result, no harm can come from running it. See page 518 for more information.
When fsck repairs a damaged filesystem, it might find unlinked files: files that have lost their directory information. These files have no filenames. The fsck utility gives these files their inode numbers as names and stores them in the lost+found directory (page 502) in the filesystem that holds the file. You can use file (page 229) to determine the type of these files and less to view readable files. Because ls –l displays the name of the owner of these files, you can return them to their owners.
The following command checks all unmounted filesystems that are marked to be checked in /etc/fstab (page 524) except for the root filesystem:
# fsck -AR
The –A option causes fsck to check filesystems listed in fstab. When used with the –A option, the –R option causes fsck not to check the root filesystem. You can check a specific filesystem with a command similar to one of the following:
# fsck /home
or
# fsck /dev/sda1
![]() tune2fs: Changes Filesystem Parameters
tune2fs: Changes Filesystem Parameters
The tune2fs utility displays and modifies filesystem parameters on ext2, ext3, and ext4 filesystems. This utility can also set up journaling on an ext2 filesystem, turning it into an ext3 filesystem. With the introduction of increasingly reliable hardware and software, systems tend to be rebooted less frequently, so it is important to check filesystems regularly. By default, fsck is run on each partition while the system is brought up, before the partition is mounted. (The checks scheduled by tune2fs are separate and scheduled differently from the checks that are done following a system crash or hard disk error [see the previous section].)
Depending on the flags, fsck might do nothing more than display a message saying the filesystem is clean. The larger the partition, the more time it takes to check it, assuming a nonjournaling filesystem. These checks are often unnecessary. The tune2fs utility helps you to find a happy medium between checking filesystems each time you reboot the system and never checking them. It does so by scheduling when fsck checks a filesystem (these checks occur only when the system is booted).1 You can use two scheduling patterns: time elapsed since the last check and number of mounts since the last check. The following command causes fsck to check /dev/sda1 after it has been mounted 8 times or after 15 days have elapsed since its last check, whichever happens first:
1. For systems whose purpose in life is to run continuously, this kind of scheduling does not work. You must develop a schedule that is not based on system reboots but rather on a clock. Each filesystem must be unmounted periodically, checked with fsck (preceding section), and then remounted.
# tune2fs -c 8 -i 15 /dev/sda1
tune2fs 1.42.7 (21-Jan-2013)
Setting maximal mount count to 8
Setting interval between checks to 1296000 seconds
A maximum mount count of –1 or 0 causes fsck and the kernel to ignore the mount count information. The next tune2fs command is similar but works on a different partition (an LV) and sets the current mount count to 4. When you do not specify a current mount count, it is set to zero:
# tune2fs -c 8 -i 15 -C 4 /dev/mapper/fedora-root
tune2fs 1.42.7 (21-Jan-2013)
Setting maximal mount count to 8
Setting current mount count to 4
Setting interval between checks to 1296000 seconds
The –l option lists a variety of information about the partition. You can combine this option with others.
# tune2fs -l /dev/mapper/fedora-root
tune2fs 1.42.7 (21-Jan-2013)
Filesystem volume name: <none>
Last mounted on: /
Filesystem UUID: 2d9ea1c9-bfbb-4302-b715-1b258c946c55
Filesystem magic number: 0xEF53
Filesystem revision #: 1 (dynamic)
Filesystem features: has_journal ext_attr resize_inode dir_index
filetype needs_recovery extent flex_bg sparse_super large_file huge_file
uninit_bg dir_nlink extra_isize
Filesystem flags: signed_directory_hash
Default mount options: user_xattr acl
Filesystem state: clean
Errors Continue
Filesystem OS type: Linux
Inode count: 2457600
Block count: 9824256
...
Last mount time: Wed Jun 5 17:29:12 2013
Last write time: Mon Jun 10 19:00:09 2013
Mount count: 4
Maximum mount count: 8
Last checked: Tue Jun 4 19:27:35 2013
Check interval: 1296000 (2 weeks, 1 day)
...
Set the filesystem parameters on the local system so they are appropriate to the way you use it. When using the mount count to control when fsck checks filesystems, use the –C option to stagger the checks to ensure all checks do not occur at the same time. Always make sure new and upgraded filesystems have checks scheduled as you desire.
![]() ext2 to ext3
ext2 to ext3
To change an ext2 filesystem to an ext3 filesystem, you must put a journal (page 1256) on the filesystem, and the kernel must support ext3 filesystems. Use the –j option to set up a journal on an unmounted filesystem:
# tune2fs -j /dev/sda1
tune2fs 1.42.7 (21-Jan-2013)
Creating journal inode: done
This filesystem will be automatically checked every 8 mounts or
15 days, whichever comes first. Use tune2fs -c or -i to override.
Before you can use fstab (page 506) to mount the changed filesystem, you must modify its entry in the fstab file to reflect its new type. To do so, change the third column to ext3.
![]() ext3 to ext2
ext3 to ext2
The following command changes an unmounted or readonly ext3 filesystem to an ext2 filesystem:
# tune2fs -O ^has_journal /dev/sda1
tune2fs 1.42.7 (21-Jan-2013)
Speeding lookups
The dir_index option, which is turned off by default, adds a balanced-tree binary hash lookup method for directories. This feature improves scalability of directories with large numbers of files, although it means that the hash needs to be updated each time a directory changes. Turn on usingtune2fs –O dir_index and reboot to create the hash.
Refer to the tune2fs man page for more details.
The XFS Filesystem
XFS (xfs.org) is a high-performance, journaling, 64-bit filesystem created by Silicon Graphics, Inc. It supports filesystems as large as 64 exabytes (page 1249), containing files up to 8 exabytes in size, and directory structures with tens of millions of entries. XFS is the default filesystem under RHEL 7 (beta) and is available under Fedora.
Following is a list of XFS filesystem features:
• Defragmentation with filesystems mounted and active
• Expansion (growing the filesystem) with filesystems mounted and active
• Backup and restore facilities specific to XFS
• Improved filesystem performance, especially when reading and writing large files, provided by B+ trees that contain metadata that describe extents
• Parallel (simultaneous) I/O provided by allocation groups, allowing multiple application threads to perform I/O simultaneously, enhancing filesystem throughput on multiprocessor systems; throughput is even better when the filesystem spans multiple devices
• Metadata consistency and quick crash recovery ensured by metadata journaling
• Reduced fragmentation and reduced CPU usage provided by delayed allocation (allocate-on-flush) that causes the kernel to batch disk writes
• Multiple name/value pairs per file provided by extended attributes (xattr)
• Quota journaling speeds crash recovery
• Quotas for directory hierarchies provided by project quotas
mkfs.xfs
To create an XFS partition on a clean disk, first use parted (page 614) or gnome-disks (page 78) to create a partition (you may have to label the disk first), and then use mkfs.xfs to create a filesystem on the partition. The mkfs.xfs utility has many options; see the mkfs.xfs man page for details.
# mkfs.xfs /dev/sdb1
meta-data=/dev/sdb1 isize=256 agcount=4, agsize=6103424 blks
= sectsz=512 attr=2, projid32bit=0
data = bsize=4096 blocks=24413696, imaxpct=25
= sunit=0 swidth=0 blks
naming =version 2 bsize=4096 ascii-ci=0
log =internal log bsize=4096 blocks=11920, version=2
= sectsz=512 sunit=0 blks, lazy-count=1
realtime =none extsz=4096 blocks=0, rtextents=0
Once you have created an XFS filesystem, you can put an entry for it in fstab (page 524) and mount it (page 520) as you would any other type of filesystem. The following command mounts the XFS filesystem created above on the mount point named /myxfs.
# mount /dev/sdb1 /myxfs
xfs_repair
XFS has its own set of tools for working with XFS filesystems. Give the command apropos xfs to display a list of XFS utilities. The fsck (fsck.xfs) utility does nothing when run against an XFS filesystem; use xfs_repair in its place. A filesystem must not be mounted when you usexfs_repair to check or repair it. Run xfs_repair with the –n (no change) option to verify the integrity of a filesystem; run xfs_repair without an option to repair a filesystem. The following message explains that you must mount the XFS filesystem to play the changes stored in the log before you repair it. After mounting the filesystem, unmount it and run xfs_repair to repair the filesystem.
# xfs_repair /dev/sdb1
Phase 1 - find and verify superblock...
Phase 2 - using internal log
- zero log...
ERROR: The filesystem has valuable metadata changes in a log which needs to
be replayed. Mount the filesystem to replay the log, and unmount it before
re-running xfs_repair. If you are unable to mount the filesystem, then use
the -L option to destroy the log and attempt a repair.
Note that destroying the log may cause corruption -- please attempt a mount
of the filesystem before doing this.
# mount /dev/sdb1 /myxfs
# umount /dev/sdb1
# xfs_check /dev/sdb1
# xfs_repair /dev/sdb1
Phase 1 - find and verify superblock...
Phase 2 - using internal log
- zero log...
- scan filesystem freespace and inode maps...
- found root inode chunk
Phase 3 - for each AG...
- scan and clear agi unlinked lists...
- process known inodes and perform inode discovery...
- agno = 0
- agno = 1
- agno = 2
- agno = 3
- process newly discovered inodes...
Phase 4 - check for duplicate blocks...
- setting up duplicate extent list...
- check for inodes claiming duplicate blocks...
- agno = 0
- agno = 1
- agno = 2
- agno = 3
Phase 5 - rebuild AG headers and trees...
- reset superblock...
Phase 6 - check inode connectivity...
- resetting contents of realtime bitmap and summary inodes
- traversing filesystem ...
- traversal finished ...
- moving disconnected inodes to lost+found ...
Phase 7 - verify and correct link counts...
done
xfs_fsr
The xfs_fsr (filesystem reorganizer) utility improves the organization of a file on a mounted XFS filesystem. Give the command xfs_fsr followed by the name of the file you want to reorganize.
Chapter Summary
Filesystems hold directories of files. These structures store user data and system data that are the basis of users’ work on the system and the system’s existence. Linux supports many types of files, including ordinary files, directories, links, and special files. Special files provide access to operating system features. The kernel uses major and minor device numbers to identify classes of devices and specific devices within each class. Character and block devices represent I/O devices such as hard disks and printers. Inodes, which are identified by inode numbers, are stored on disk and define a file’s existence.
When the system comes up, the /etc/fstab file controls which filesystems are mounted and how they are mounted (readonly, read-write, and so on). After a system crash, filesystems are automatically verified and repaired if necessary by fsck. You can use tune2fs to force the system to causefsck to verify a filesystem periodically when the system boots.
Exercises
1. What is the function of the /etc/hosts file? Which services can you use in place of or to supplement the hosts file?
2. What does the /etc/resolv.conf file do? What do the nameserver lines in this file do?
3. What is an inode? What happens to the inode when you move a file within a filesystem?
4. What does the .. entry in a directory point to? What does this entry point to in the root (/) directory?
5. What is a device file? Where are device files located?
6. What is a FIFO? What does FIFO stand for? What is another name for a FIFO? How does a FIFO work?
Advanced Exercises
7. Write a line for the /etc/fstab file that mounts the /dev/sdb1 ext4 filesystem on /extra with the following characteristics: The filesystem will not be mounted automatically when the system boots, and anyone can mount and unmount the filesystem.
8. Without using rm, how can you delete a file? (Hint: How do you rename a file?)
9. After burning an ISO image file named image.iso to a CD on /dev/hdc, how can you can verify the copy from the command line?
10. Why should /var reside on a separate partition from /usr?
11. Create a FIFO. Using the shell, demonstrate that two users can use this FIFO to communicate asynchronously.
12. How would you mount an ISO image so you could copy files from it without burning it to a CD?