A practical guide to Fedora and Red Hat Enterprise Linux, 7th Edition (2014)
Part III: System Administration
Chapter 10. System Administration: Core Concepts
In This Chapter
Running Commands with root Privileges
Using su to Gain root Privileges
Using sudo to Gain root Privileges
The systemd init Daemon
Setting and Changing Runlevels
Configuring Daemons (Services)
Single-User Mode
Rescue an Installed System
X Window System
Textual Administration Utilities
SELinux
Setting Up a Server
Setting Up a chroot Jail
DHCP: Configures Network Interfaces
nsswitch.conf: Which Service to Look at First
Objectives
After reading this chapter you should be able to:
![]() Explain the need for and the responsibility of a privileged user (root)
Explain the need for and the responsibility of a privileged user (root)
![]() Gain root privileges using su and sudo
Gain root privileges using su and sudo
![]() Describe the startup sequence using systemd
Describe the startup sequence using systemd
![]() Manage which services start at boot time
Manage which services start at boot time
![]() List four characteristics of a well-maintained system
List four characteristics of a well-maintained system
![]() Start and stop services on a running system
Start and stop services on a running system
![]() Boot into single-user mode for system maintenance
Boot into single-user mode for system maintenance
![]() Shut down a running system
Shut down a running system
![]() Secure a system by applying updates, monitoring logs, and controlling access to files using SELinux, setuid permission, and PAM
Secure a system by applying updates, monitoring logs, and controlling access to files using SELinux, setuid permission, and PAM
![]() Use system administration tools to monitor and maintain the system
Use system administration tools to monitor and maintain the system
![]() List common steps for installing, configuring, and securing a server
List common steps for installing, configuring, and securing a server
![]() Configure a system using a static IP address or using DHCP
Configure a system using a static IP address or using DHCP
The job of a system administrator is to keep one or more systems in a useful and convenient state for users. On a Linux system, the administrator and user might both be you, with you and the computer being separated by only a few feet. Alternately, the system administrator might be halfway around the world, supporting a network of systems, with you being one of thousands of users. Or a system administrator can be one person who works part-time taking care of a system and perhaps is also a user of the system. In some cases several administrators might work together full-time to keep many systems running.
A well-maintained system:
• Runs quickly enough so users do not get frustrated waiting for the system to respond or complete a task
• Has enough storage to accommodate the reasonable needs of users
• Provides a working environment appropriate to each user’s abilities and requirements
• Is secure from malicious and accidental acts altering its performance or compromising the security of the data it holds and exchanges with other systems
• Is backed up regularly, with recently backed-up files readily available to users
• Has recent copies of the software that users need to get their jobs done
• Is easier to administer than a poorly maintained system
In addition, a system administrator should be available to help users with all types of system-related problems—from logging in to obtaining and installing software updates to tracking down and fixing obscure network issues.
Part III of this book breaks system administration into nine chapters.
• Chapter 9 covers bash (Bourne Again Shell) to a depth that you can use it interactively to administer a system and begin to understand complex administration shell scripts.
• Chapter 10 covers the core concepts of system administration, including working with root (Superuser) privileges, system operation, configuration tools and other useful utilities, general information about setting up and securing a server (including a section on DHCP), and PAM.
• Chapter 11 covers files, directories, and filesystems from an administrator’s point of view.
• Chapter 12 covers installing software on the system, including the use of yum, BitTorrent, and curl.
• Chapter 13 discusses how to set up local and remote printers that use the CUPS printing system.
• Chapter 14 explains how to rebuild the Linux kernel and work with GRUB, the Linux boot loader.
• Chapter 15 covers additional system administrator tasks and tools, including setting up users and groups, backing up files, scheduling tasks, printing system reports, and general problem solving.
• Chapter 16 goes into detail about how to set up a LAN, including setting up and configuring network hardware and configuring software.
• Chapter 17 describes how to set up virtual machines locally (gnome-boxes, KVM/QEMU, and VMware) and in the cloud (AWS).
Because Linux is readily configurable and runs on a wide variety of platforms, this chapter cannot discuss every system configuration or every action you might have to take as a system administrator. Instead, this chapter seeks to familiarize you with the concepts you need to understand and the tools you will use to maintain a Linux system. Where it is not possible to go into depth about a subject, the chapter provides references to other sources.
This chapter assumes you are familiar with the following terms:
block device (page 1239)
daemon (page 1245)
device (page 1246)
device filename (page 1247)
disk partition (page 1247)
environment (page 1249)
filesystem (page 1250)
fork (page 1250)
kernel (page 1257)
login shell (page 1259)
mount (page 1261)
process (page 1267)
root filesystem (page 1271)
runlevel (page 1271)
signal (page 1273)
spawn (page 1274)
system console (page 1276)
X server (page 1281)
Tip: If there is a problem, check the log files
If something on the system is not working as expected, check the log files in /var/log. This directory holds many files and subdirectories. If you cannot connect to a server, also check the log files on the server.
Tip: If something does not work, see if the problem is caused by SELinux
If a server or other system software does not work properly, especially if it displays a permissions-related error message, the problem might lie with SELinux. To see whether SELinux is the cause of the problem, put SELinux in permissive mode and run the software again. If the problem goes away, you need to modify the SELinux policy. Remember to turn SELinux back on. See the tip on page 473 and refer to “Setting the Targeted Policy using system-config-selinux” on page 475.
Tip: If you cannot access a remote system, check the firewall
If a server does not appear to work or you cannot access a remote system, make sure the firewall is not the problem. On a non-production system, use systemctl to turn the firewall off (page 900) and see if the problem goes away. Then turn the firewall back on and open only the necessary port using firewall-cmd (page 906).
![]() Running Commands with root Privileges
Running Commands with root Privileges
Some commands can damage the filesystem or crash the operating system. Other commands can invade users’ privacy or make the system less secure. To keep a Linux system up and running as well as secure, most systems are configured not to permit ordinary users to execute some commands and access certain files. Linux provides several ways for a trusted user to execute these commands and access these files. A user running with these privileges is sometimes referred to as an administrator, privileged user, or Superuser.
Security: Administrator
During installation (page 68) and whenever you add or modify a user (pages 112 and 598), you have the opportunity to specify that user as an administrator. Two characteristics give an administrator special privileges. First, an administrator is a member of the wheel group (page 429) and as such can use sudo to authenticate using her password; she does not need to know the root password. Second, polkit (www.freedesktop.org/wiki/Software/polkit) is set up so that an administrator can do some kinds of administrative work on the desktop (e.g., updating software and adding a printer) without needing to enter a password.
![]() The Special Powers of a Privileged User
The Special Powers of a Privileged User
root privileges
A user running with root privileges has the following powers—and more.
• Some commands, such as those that add new users, partition hard drives, and change system configuration, can be executed only by a user working with root privileges. Such a user can configure tools, such as sudo, to give specific users permission to perform tasks that are normally reserved for a user running with root privileges.
• Read, write, and execute file access and directory access permissions do not affect a user with root privileges. A user with root privileges can read from, write to, and execute all files, as well as examine and work in all directories.
Exceptions to these privileges exist. For example, SELinux mandatory access can be configured to limit root access to a file. Also, a user working with root privileges cannot make sense of an encrypted file without possessing the key.
• Some restrictions and safeguards that are built into some commands do not apply to a user with root privileges. For example, a user with root privileges can change any user’s password without knowing the old password.
Security: Console security
Linux is not secure from a person who has physical access to the computer. Additional security measures, such as setting boot loader and BIOS passwords, can help secure the computer. However, if someone has physical access to the hardware, as system console users typically do, it is very difficult to secure a system from that user.
# prompt
When you are running with root privileges in a command-line environment, by convention the shell displays a special prompt to remind you of your status. By default, this prompt is (or ends with) a hashmark (#).
Caution: Least privilege
When you are working on any computer system, but especially when you are working as the system administrator (working with root privileges), perform any task while using the least privilege possible. When you can perform a task logged in as an ordinary user, do so. When you must run a command with root privileges, do as much as you can as an ordinary user, log in or use su or sudo so you have root privileges, complete the part of the task that has to be done with root privileges, and revert to being an ordinary user as soon as you can. Because you are more likely to make a mistake when you are rushing, this concept becomes even more important when you have less time to apply it.
![]() Gaining root Privileges
Gaining root Privileges
Classically a user gained root privileges by logging in as the user named root or by giving an su (substitute user) command and providing the root password. More recently the use of sudo has taken over this classic technique of gaining root privileges. With sudo, the user logs in as herself, gives an sudo command, and provides her own password (not the root password) to gain root privileges. “Advantages of sudo” on page 428 discusses some of the advantages of sudo.
Graphical environment
When an ordinary user executes a privileged command in a graphical environment, the system prompts for the root password or the user’s password, depending on how the system is set up.
Some distributions lock the root account by not assigning a root password. On these systems, you cannot gain root privileges using a technique that requires you to supply the root password unless you unlock the root account as explained on page 438. Fedora/RHEL assigns a root password when the system is installed, so you can use these techniques from the start.
Tip: There is a root account, but no root password
As installed, some systems (not Fedora/RHEL) lock the root account by not providing a root password. This setup prevents anyone from logging in to the root account (except when you bring the system up in single-user mode [page 450]). There is, however, a root account (a user with the username root—look at the first line in /etc/passwd). This account/user owns files (give the command ls –l /usr/bin) and runs processes (give the command ps –ef and look at the left column of the output). The root account is critical to the functioning of a Linux system.
When properly set up, the sudo utility enables you to run a command as though it had been run by a user logged in as root. This book uses the phrase working (or run) with root privileges to emphasize that, although you might not be logged in as root, when you use su orsudo you have the powers of the root user.
The following list describes some of the ways you can gain or grant root privileges. Some of these techniques depend on you supplying the password for the root account. Again, if the root account is locked, you cannot use these techniques unless you unlock the root account (set up a rootpassword), as explained on page 438. Other techniques depend on the sudoers file being set up to allow you to gain root privileges (page 433). If this file is not set up in this manner, you cannot use these techniques.
• When you bring the system up in single-user/rescue mode (page 450), you log in as the user named root.
• You can give an su (substitute user) command while you are logged in as yourself. When you then provide the root password, you will be running with root privileges. See page 425.
• The sudo utility allows specified users to run selected commands with root privileges while they are logged in as themselves. You can set up sudo to allow certain users to perform specific tasks that require root privileges without granting these users systemwide root privileges. See page 428.
• Once the system is up and running in multiuser mode (page 452), you can log in as root. When you then supply the root password, you will be running with root privileges.
• Some programs ask for a password (either your password or the root password, depending on the command and the configuration of the system) when they start or when you ask them to perform certain tasks. When you provide a password, the program runs with root privileges. You stop running as a privileged user when you quit using the program. This setup keeps you from remaining logged in with root privileges when you do not need or intend to be.
![]() Setuid file
Setuid file
• Any user can create a setuid (set user ID) file. Setuid programs run on behalf of the owner of the file and have all the access privileges the owner has. While you are working with root privileges, you can change the permissions of a file owned by root to setuid. When an ordinary user executes a file that is owned by root and has setuid permissions, the program has effective root privileges. In other words, the program can do anything a program running with root privileges can do that the program normally does. The user’s privileges do not change. When the program finishes running, all user privileges are as they were before the program started. Setuid programs owned by root are both extremely powerful and extremely dangerous to system security, which is why a system contains very few of them. Examples of setuid programs that are owned by root include passwd, at, and crontab. For more information refer to “Setuid and Setgid Permissions” on page 196 and “Real UID Versus Effective UID” (next).
Logging in
The /etc/securetty file controls which terminals (ttys) a user can log in on as root.
Using the /etc/security/access.conf file, PAM controls the who, when, and how of logging in. Initially this file contains only comments. See page 476, the comments in the file, and the access.conf man page for details.
Security: root-owned setuid programs are extremely dangerous
Because root-owned setuid programs allow someone who does not know the root password and cannot use sudo to gain root privileges, they are tempting targets for a malicious user. Also, programming errors that make normal programs crash can become root exploits in setuid programs. A system should have as few of these programs as possible. You can disable setuid programs at the filesystem level by mounting a filesystem with the nosuid option (page 522). You can also use SELinux (page 472) to disable setuid programs. See page 458for a find command that lists all setuid files on the local system. Future releases of Fedora/RHEL will remove most setuid files; see fedoraproject.org/wiki/Features/RemoveSETUID.
Security: Do not allow root access over the Internet
Prohibiting a user from logging in as root over a network is the default policy of Fedora/RHEL. The /etc/securetty file must contain the names of all devices you want a user to be able to log in on as root.
You can, however, log in as root over a network using ssh (page 685). As shipped by Fedora/RHEL, PAM configuration for ssh does not call the modules that use the securetty or access.conf configuration files. Also, in /etc/ssh/sshd_config, Fedora/RHEL setsPermitRootLogin to yes (it is set by default) to permit root to log in using ssh (page 705). For a more secure system, change PermitRootLogin to no.
![]() Real UID Versus Effective UID
Real UID Versus Effective UID
UID and username
A UID (user ID) is the number the system associates with a username. UID 0 is typically associated with the username root. To speed things up, the kernel keeps track of a user by UID, not username. Most utilities display the associated username in place of a UID.
The kernel associates two UIDs with each process: a real UID and an effective UID. The third column of the /etc/passwd file (or NIS/LDAP) specifies your real UID. When you log in, your real UID is associated with the process running the login shell. Because you have done nothing to change it, the effective UID associated with the process running the login shell is the same as the real UID associated with that process.
process privilege
The kernel determines which privileges a process has based on that process’ effective UID. For example, when a process asks to open a file or execute a program, the kernel looks at the effective UID of the process to determine whether it is allowed to do so. When a user runs a setuid program (page 196), the program runs with the UID of the owner of the program, not the user running the program.
terminology: root privileges
When this book uses the phrase run with root privileges or gain root privileges, it means run with an effective UID of 0 (root).
![]() Using su to Gain root Privileges
Using su to Gain root Privileges
When you install Fedora/RHEL, you assign a password to the root account. Thus you can use su to gain root privileges without any further setup.
The su (substitute user) utility can spawn a shell or execute a program with the identity and privileges (effective UID) of a specified user, including root:
• Follow su on the command line with the name of a user; if you are working with root privileges or if you know the user’s password, the newly spawned shell will take on the identity (effective UID) of that user.
• When you give an su command without an argument, su defaults to spawning a shell with root privileges (you have to supply the root password). That shell runs with an effective UID of 0 (root).
Spawning a root Shell
When you give an su command to work with root privileges, su spawns a new shell, which displays the # prompt. That shell runs with an effective UID of 0 (root). You can return to your normal status (and your former shell and prompt) by terminating this shell: Press CONTROL-D or give anexit command.
![]() who, whoami
who, whoami
The who utility, when called with the arguments am i, displays the real UID (translated to a username) of the process that called it. The whoami utility displays the effective UID (translated to a username) of the process that called it. As the following example shows, the su utility (the same is true for sudo) changes the effective UID of the process it spawns but leaves the real UID unchanged.
$ who am i
sam pts/2 2013-06-12 13:43 (192.168.206.1)
$ whoami
sam
$ su
Password:
# who am i
sam pts/2 2013-06-12 13:43 (192.168.206.1)
# whoami
root
![]() id
id
Giving an su command without any arguments changes your effective user and group IDs but makes minimal changes to the environment. For example, PATH has the same value as it did before you gave the su command. The id utility displays the effective UID and GID of the process that called it as well as the groups the process is associated with. In the following example, the information that starts with context pertains to SELinux:
$ pwd
/home/sam
$ echo $PATH
/usr/local/bin:/usr/bin:/usr/local/sbin:/usr/sbin:/home/sam/.local/bin:/home/sam/bin
$ id
uid=1000(sam) gid=1400(pubs) groups=1400(pubs),10(wheel) context=unconfined_u: ...
$ su
Password:
# pwd
/home/sam
# echo $PATH
/usr/local/bin:/usr/bin:/usr/local/sbin:/usr/sbin:/home/sam/.local/bin:/home/sam/bin
# id
uid=0(root) gid=0(root) groups=0(root) context=unconfined_u: ...
# exit
exit
$
When you give the command su – (you can use –l or ––login in place of the hyphen), su provides a root login shell: It is as though you logged in as root. Not only do the shell’s effective user and group IDs match those of root, but the environment is the same as when you log in as root. The login shell executes the appropriate startup files (page 329) before displaying a prompt, and the working directory is set to what it would be if you had logged in as root (/root). PATH is also set as though you had logged in as root. However, as who shows, the real UID of the new process is not changed from that of the parent process.
$ su -
Password:
# pwd
/root
# echo $PATH
/usr/local/sbin:/usr/local/bin:/sbin:/bin:/usr/sbin:/usr/bin:/root/bin
# who am i
sam pts/2 2013-06-12 13:43 (192.168.206.1)
Executing a Single Command
You can use su with the –c option to run a command with root privileges, returning to the original shell when the command finishes executing. In the following example, Sam tries to display the /etc/shadow file while working as himself, a nonprivileged user. The cat utility displays an error message. When he uses su to run cat to display the file, su prompts him for a password, he responds with the root password, and the command succeeds. The quotation marks are necessary because su –c takes the command it is to execute as a single argument.
$ cat /etc/shadow
cat: /etc/shadow: Permission denied
$ su -c 'cat /etc/shadow'
Password:
root:$6$il96HvSfmvep.m2F$2RI1LZ ... fYc3wYZFQ/:15861:0:99999:7:::
bin:*:15839:0:99999:7:::
daemon:*:15839:0:99999:7:::
adm:*:15839:0:99999:7:::
...
The next example first shows that Sam is not permitted to kill (page 465) a process. With the use of su –c and the root password, however, Sam is working with root privileges and is permitted to kill the process.
$ kill -15 4982
-bash: kill: (4982) - Operation not permitted
$ su -c "kill -15 4982"
Password:
$
The final example combines the – and –c options to show how to run a single command with root privileges in the root environment:
$ su -c pwd
Password:
/home/sam
$ su - -c pwd
Password:
/root
Security: Root privileges, PATH, and security
The fewer directories you keep in PATH when you are working with root privileges, the less likely you will be to execute an untrusted program while working with root privileges. If possible, keep only the default directories, along with /usr/bin and /usr/sbin, in root’sPATH. Never include the working directory in PATH (as . or : : anywhere in PATH, or : as the last element of PATH). For more information refer to “PATH: Where the Shell Looks for Programs” on page 359.
![]() Using sudo to Gain root Privileges
Using sudo to Gain root Privileges
If sudo (www.sudo.ws) is not set up so you can use it, and a root password exists and you know what it is, see “Administrator and the wheel group” on the next page for instructions on setting up sudo so you can use it to gain root privileges.
Advantages of sudo
Using sudo rather than the root account for system administration offers many advantages.
• When you run sudo, it requests your password—not the root password—so you have to remember only one password.
• The sudo utility logs all commands it executes. This log can be useful for retracing your steps for system auditing and if you make a mistake.
• The sudo utility logs the username of a user who issues an sudo command. On systems with more than one administrator, this log tells you which users have issued sudo commands. Without sudo, you would not know which user issued a command while working with rootprivileges.
• The sudo utility allows implementation of a finer-grained security policy than does the use of su and the root account. Using sudo, you can enable specific users to execute specific commands—something you cannot do with the classic root account setup.
• Using sudo makes it harder for a malicious user to gain access to a system. When there is an unlocked root account, a malicious user knows the username of the account she wants to crack before she starts. When the root account is locked, the user has to determine the username andthe password to break into a system.
• Managing root passwords over many systems is challenging. Remembering each system’s password is difficult without writing them down (and storing them in a safe), and then retrieving a password is time-consuming. Keeping track of which users know which root passwords is impossible. Using sudo, even for full root-shell access, makes the tasks of gaining root privileges on a large number of systems and tracking who can gain root privileges on each system much easier.
Security of sudo
Some users question whether sudo is less secure than su. Because both rely on passwords, they share the same strengths and weaknesses. If the password is compromised, the system is compromised. However, if the password of a user who is allowed by sudo to do one task is compromised, the entire system might not be at risk. Thus, if used properly, the finer granularity of sudo’s permissions structure can make it a more secure tool than su. Also, when sudo is used to invoke a single command, it is less likely that a user will be tempted to keep working with root privileges than if the user opens a root shell using su.
Using sudo might not always be the best, most secure way to set up a system. On a system used by a single user, there is not much difference between using sudo and carefully using su and a root password. In contrast, on a system with several users, and especially on a network of systems with central administration, sudo can be set up to be more secure than su.
Using sudo
Administrator and the wheel group
When you add or modify a user, you can specify that the user is an administrator by making the user a member of the wheel group. When you specify an account type of Administrator in the Users window (Figure 4-17, page 112), the user becomes a member of the wheel group. Based on the following line in the /etc/sudoers file, members of the wheel group can use sudo to gain root privileges:
%wheel ALL=(ALL) ALL
To make a user a member of the wheel group, working with root privileges, run usermod with the –a and –G wheel options to add the user to the wheel group. Substitute a username for sam in the following example.
# usermod -a -G wheel sam
# grep wheel /etc/group
wheel:x:10:root,sam
The grep command shows Sam as a member of the wheel group. See /etc/group on page 506 for more information on groups.
Timestamp
By default, sudo asks for your password (not the root password) the first time you run it. At that time, sudo sets your timestamp. After you supply a password, sudo will not prompt you again for a password for five minutes (by default), based on your timestamp.
Executing a Single Command
In the following example, Sam tries to set the system clock while working as himself, a nonprivileged user. The date utility displays an error message followed by the expanded version of the date Sam entered. When he uses sudo to run date to set the system clock, sudo prompts him for his password, and the command succeeds.
$ date 12121500
date: cannot set date: Operation not permitted
Thu Dec 12 15:00:00 PST 2013
$ sudo date 12121500
[sudo] password for sam:
Thu Dec 12 15:00:00 PST 2013
Next Sam uses sudo to unmount a filesystem. Because he gives this command within five minutes of the previous sudo command, he does not need to supply a password:
$ sudo umount /music
$
Now Sam uses the –l option to check which commands sudo will allow him to run. Because the sudoers file is set up as explained in “Administrator and the wheel group,” on the previous page, he is allowed to run any command as any user.
$ sudo -l
...
User sam may run the following commands on this host:
(ALL) ALL
Tip: Granting root privileges to edit a file
With the –e option, or when called as sudoedit, sudo edits with root privileges the file named by its argument. By default sudo uses the vi editor; see page 432 for instructions on how to specify a different editor.
Any user who can run commands with root privileges can use the –e option. To give other users permission to edit any file using root privileges, specify in the sudoers file that that user can execute the command sudoedit. For more information refer to “User Privilege Specifications” on page 433.
Calling an editor in this manner runs the editor in the user’s environment, maintaining the concept of least privilege. The sudo utility first copies the file to be edited to a temporary file that is owned by the user. If the file does not exist, sudo creates a new file that is owned by the user. Once the user has finished editing the file, sudo copies it back in place of the original file (maintaining the original permissions).
Spawning a root Shell
When you have several commands you need to run with root privileges, it might be easier to spawn a root shell, give the commands without having to type sudo in front of each one, and exit from the shell. This technique defeats some of the safeguards built into sudo, so use it carefully and remember to return to a nonroot shell as soon as possible. See the caution on least privilege on page 423. Use the sudo –i option (page 432) to spawn a root shell:
$ pwd
/home/sam
$ sudo -i
# id
uid=0(root) gid=0(root) groups=0(root),1(bin),2(daemon),3(sys) ...
# pwd
/root
# exit
logout
$
In this example, sudo spawns a root shell, which displays a # prompt to remind Sam that he is running with root privileges. The id utility displays the effective UID of the user running the shell. The exit command (you can also use CONTROL-D) terminates the root shell, returning Sam to his normal status and his former shell and prompt.
sudo’s environment
The pwd builtin in the preceding example shows one aspect of the modified environment created by the –i option. This option spawns a root login shell (a shell with the same environment as a user logging in as root would have) and executes root’s startup files (page 329). Before issuing thesudo –i command, the pwd builtin shows /home/sam as Sam’s working directory; after the command, it shows /root, root’s home directory, as the working directory. Use the –s option (page 432) to spawn a root shell without modifying the environment. When you call sudo without an option, it runs the command you specify in an unmodified environment. To demonstrate this feature, the following example calls sudo without an option to run pwd. The working directory of a command run in this manner does not change.
$ pwd
/home/sam
$ sudo pwd
/home/sam
Redirecting output
The following command fails because although the shell that sudo spawns executes ls with root privileges, the nonprivileged shell that the user is running redirects the output. The user’s shell does not have permission to write to /root.
$ sudo ls > /root/ls.sam
-bash: /root/ls.sam: Permission denied
There are several ways around this problem. The easiest is to pass the whole command line to a shell running under sudo:
$ sudo bash -c "ls > /root/ls.sam"
The bash –c option spawns a shell that executes the string following the option and then terminates. The sudo utility runs the spawned shell with root privileges. You must quote the string to prevent the nonprivileged shell from interpreting special characters. You can also spawn a root shell using sudo –i, execute the command, and exit from the privileged shell. (See the preceding section.)
Optional
Another way to deal with the issue of redirecting output of a command run by sudo is to use tee (page 162):
$ ls | sudo tee /root/ls.sam
...
This command line sends standard output of ls through sudo to tee, which copies its standard input to the file named by its argument and to standard output. If you do not want to display the output, you can have the nonprivileged shell redirect the output to /dev/null (page503). The next example uses this technique to do away with the displayed output and uses the –a option to tee to append to the file instead of overwriting it:
$ ls | sudo tee -a /root/ls.sam > /dev/null
Options
You can use command-line options to control how sudo runs a command. Following is the syntax of an sudo command line:
sudo [options] [command]
where options is one or more options and command is the command you want to execute. Without the –u option, sudo runs command with root privileges. Some of the more common options follow; see the sudo man page for a complete list.
–b
(background) Runs command in the background.
–e
(edit) With this option, command is a filename and not a command. This option causes sudo to edit the file named command with root privileges using the editor named by the SUDO_EDITOR, VISUAL, or EDITOR environment variable. Default is the vi editor. Alternately, you can use the sudoedit utility without any options. Using this technique, the editor does not run with root privileges. See the tip on page 430.
–i
(initial login environment) Spawns the shell that is specified for root (or another user specified by –u) in /etc/passwd, running root’s (or the other user’s) startup files, with some exceptions (e.g., TERM is not changed). Does not take a command. See “Spawning a root Shell” on page 426for an example.
–k
(kill) Resets the timestamp (page 429) of the user running the command, which means the user must enter her password the next time she runs sudo.
–L
(list defaults) Lists the parameters that you can set on a Defaults line (page 436) in the sudoers file. Does not take a command.
–l
(list commands) Lists the commands the user who is running sudo is allowed to run on the local system. Does not take a command.
–s
(shell) Spawns a new root (or another user specified by –u) shell as specified in the /etc/passwd file. Similar to –i but does not change the environment. Does not take a command.
–u user
Runs command with the privileges of user. Without this option, sudo runs command with root privileges.
![]() sudoers: Configuring sudo
sudoers: Configuring sudo
As installed, sudo is not as secure and robust as it can be if you configure it carefully. The sudo configuration file is /etc/sudoers. You can edit this file to give specific users the ability to run only certain commands with root privileges as opposed to any commands. You can also limit these users to running commands only with certain options or arguments. Or you can set up sudo so a specific user cannot use a specific option or argument when running a command with root privileges.
The best way to edit sudoers is to use visudo by giving the command: su -c visudo or sudo visudo. The visudo utility locks, edits, and checks the grammar of the sudoers file. By default, visudo calls the vi editor. You can set the SUDO_EDITOR, VISUAL, or EDITOR environment variable to cause visudo to call a different editor. The following command causes visudo to use the nano editor (page 270):
$ export EDITOR=$(which nano)
Replace nano with the textual editor of your choice. Put this command in a startup file (page 329) to set this variable each time you log in.
Caution: Always use visudo to edit the sudoers file
A syntax error in the sudoers file can prevent you from using sudo to gain root privileges. If you edit this file directly (without using visudo), you will not know that you introduced a syntax error until you find that you cannot use sudo. The visudo utility checks the syntax of sudoers before it allows you to exit. If it finds an error, it gives you the choice of fixing the error, exiting without saving the changes to the file, or saving the changes and exiting. The last choice is usually a poor one, so visudo marks it with (DANGER!).
In the sudoers file, comments, which start with a hashmark (#), can appear anywhere on a line. In addition to comments, this file holds three types of entries: user privilege specifications, aliases, and defaults. Each of these entries occupies a line. You can continue a line by terminating it with a backslash (\).
User Privilege Specifications
The format of a line that specifies user privileges is as follows (the whitespace around the equal sign is optional). In each case,
user_list host_list = [(runas_list)] command_list
• The user_list specifies the user(s) this specification line applies to. This list can contain usernames, groups (prefixed with %), and user aliases (next section). You can use the builtin alias ALL to cause the line to apply to all users.
• The host_list specifies the host(s) this specification line applies to. This list can contain one or more hostnames, IP addresses, or host aliases (next section). You can use the builtin alias ALL to cause the line to apply to all systems that refer to this sudoers file.
• The runas_list specifies the user(s) the commands in the command_list can be run as when sudo is called with the –u option (page 432). This list can contain usernames, groups (prefixed with %), and runas aliases (next section). It must be enclosed within parentheses. Withoutrunas_list, sudo assumes root. You can use the builtin alias ALL to cause the line to apply to all usernames and groups.
• The command_list specifies the utilities this specification line applies to. This comma-separated list can contain names of utilities, names of directories holding utilities, and command aliases (next section). All names must be absolute pathnames; directory names must end with a slash (/). Precede a command with an exclamation point (!) to exclude that command. You can use the builtin alias ALL to cause the line to apply to all commands.
Including the string sudoedit in the command_list gives users in the user_list permission to edit files using root privileges. See the tip on page 430 for more information.
If you follow a command in the command_list with two adjacent double quotation marks (""), the user will not be able to specify any command-line arguments, including options to that command. Alternately, you can specify arguments, including wildcards, to limit the arguments a user is allowed to specify with that command.
Examples
The following user privilege specification allows Sam to use sudo to mount and unmount filesystems (run mount and umount with root privileges) on all systems (as specified by ALL) that refer to the sudoers file containing this specification:
sam ALL=(root) /bin/mount, /bin/umount
The (root) runas_list is optional. If you omit it, sudo allows the user to run the commands in the command_list with root privileges. In the following example, Sam takes advantage of these permissions. He cannot run umount directly; instead, he must call sudo to run it.
$ whoami
sam
$ umount /music
umount: only root can unmount /dev/sdb7 from /music
$ sudo umount /music
[sudo] password for sam:
$
If you replace the line in sudoers described above with the following line, Sam is not allowed to unmount /p03, although he can still unmount any other filesystem and can mount any filesystem:
sam ALL=(root) /bin/mount, /bin/umount, !/bin/umount /p03
The result of the preceding line in sudoers is shown next. The sudo utility does not prompt for a password because Sam has entered his password within the last five minutes.
$ sudo umount /p03
Sorry, user sam is not allowed to execute '/bin/umount /p03' as root on localhost.
The following line limits Sam to mounting and unmounting filesystems mounted on /p01, /p02, /p03, and /p04:
sam ALL= /bin/mount /p0[1-4], /bin/umount /p0[1-4]
The following commands show the result:
$ sudo umount /music
Sorry, user sam is not allowed to execute '/bin/umount /music' as root on localhost.
$ sudo umount /p03
$
Administrator: using the wheel group
As explained under “Administrator and the wheel group” on page 429, the following lines in sudoers allow users who are members of the wheel group (administrators) to use sudo to gain root privileges:
## Allows people in group wheel to run all commands
%wheel ALL=(ALL) ALL
This user privilege specification applies to all systems (as indicated by the ALL to the left of the equal sign). As the comment indicates, this line allows members of the wheel group (specified by preceding the name of the group with a percent sign: %wheel) to run any command (the rightmost ALL) as any user (the ALL within parentheses). When you call it without the –u option, the sudo utility runs the command you specify with root privileges, which is what sudo is used for most of the time.
If you modified the preceding line in sudoers as follows, it would allow members of the wheel group to run any command as any user with one exception: They would not be allowed to run passwd to change the root password (although they could gain root privileges and edit it manually).
%wheel ALL=(ALL) ALL, !/usr/bin/passwd root
Optional
In the %wheel ALL=(ALL) ALL line in /etc/sudoers, if you replaced (ALL) with (root) or if you omitted (ALL), you would still be able to run any command with root privileges. You would not, however, be able to use the –u option to run a command as another user. Typically, when you can have root privileges, this limitation is not an issue. Working as a user other than root allows you to use the least privilege possible to accomplish a task, which is a good idea.
For example, if you are in the wheel group, the default entry in the sudoers file allows you to give the following command to create and edit a file in Sam’s home directory. Because you are working as Sam, he will own the file and be able to read from and write to it.
$ sudo -u sam vi ~sam/reminder
$ ls -l ~sam/reminder
-rw-r--r--. 1 sam pubs 15 03-09 15:29 /home/sam/reminder
Aliases
An alias enables you to rename and/or group users, hosts, or commands. Following is the format of an alias definition:
alias_type alias_name = alias_list
where alias_type is the type of alias (User_Alias, Runas_Alias, Host_Alias, Cmnd_Alias), alias_name is the name of the alias (by convention all uppercase), and alias_list is a comma-separated list of one or more elements that make up the alias. Preceding an element of an alias with an exclamation point (!) negates it.
User_Alias
The alias_list for a user alias is the same as the user_list for a user privilege specification (previous section). The following lines from a sudoers file define three user aliases: OFFICE, ADMIN, and ADMIN2. The alias_list that defines the first alias includes the usernames zach, sam, and sls; the second includes two usernames and members of the admin group; and the third includes all members of the admin group except Sam.
User_Alias OFFICE = zach, sam, sls
User_Alias ADMIN = max, zach, %admin
User_Alias ADMIN2 = %admin, !sam
Runas_Alias
The alias_list for a runas alias is the same as the runas_list for a user privilege specification (previous section). The following SM runas alias includes the usernames sam and sls:
Runas_Alias SM = sam, sls
Host_Alias
Host aliases are meaningful only when the sudoers file is referenced by sudo running on more than one system. The alias_list for a host alias is the same as the host_list for a user privilege specification (previous section). The following line defines the LCL alias to include the systems named guava and plum:
Host_Alias LCL = guava, plum
If you want to use fully qualified hostnames (hosta.example.com instead of just hosta) in this list, you must set the fqdn flag (next section). However, doing so might slow the performance of sudo.
Cmnd_Alias
The alias_list for a command alias is the same as the command_list for a user privilege specification (previous section). The following command alias includes three files and by including a directory (denoted by its trailing /), incorporates all the files in that directory:
Cmnd_Alias BASIC = /bin/cat, /usr/bin/vi, /bin/df, /usr/local/safe/
Defaults (Options)
You can change configuration options from their default values by using the Defaults keyword. Most values in this list are flags that are implicitly Boolean (can either be on or off) or strings. You turn on a flag by naming it on a Defaults line, and you turn it off by preceding it with a !. The following line in the sudoers file turns off the lecture and fqdn flags and turns on tty_tickets:
Defaults !lecture,tty_tickets,!fqdn
This section lists some common flags; see the sudoers man page for a complete list.
env_reset
Causes sudo to reset the environment variables to contain the LOGNAME, SHELL, USER, USERNAME, MAIL, and SUDO_* variables only. Default is on. See the sudoers man page for more information.
fqdn
(fully qualified domain name) Performs DNS lookups on FQDNs (page 1250) in the sudoers file. When this flag is set, you can use FQDNs in the sudoers file, but doing so might negatively affect sudo’s performance, especially if DNS is not working. When this flag is set, you must use the local host’s official DNS name, not an alias. If hostname returns an FQDN, you do not need to set this flag. Default is on.
insults
Displays mild, humorous insults when a user enters a wrong password. Default is off. See also passwd_tries.
lecture=freq
Controls when sudo displays a reminder message before the password prompt. Possible values of freq are never, once, and always. Specifying !lecture is the same as specifying a freq of never. Default is once.
mail_always
Sends email to the mailto user each time a user runs sudo. Default is off.
mail_badpass
Sends email to the mailto user when a user enters an incorrect password while running sudo. Default is off.
mail_no_host
Sends email to the mailto user when a user whose username is in the sudoers file but who does not have permission to run commands on the local host runs sudo. Default is off.
mail_no_perms
Sends email to the mailto user when a user whose username is in the sudoers file but who does not have permission to run the requested command runs sudo. Default is off.
mail_no_user
Sends email to the mailto user when a user whose username is not in the sudoers file runs sudo. Default is on.
mailsub=subj
(mail subject) Changes the default email subject for warning and error messages from the default *** SECURITY information for %h *** to subj. The sudo utility expands %h within subj to the local system’s hostname. Place subj between quotation marks if it contains shell special characters.
mailto=eadd
Sends sudo warning and error messages to eadd (an email address; default is root). Place eadd between quotation marks if it contains shell special characters.
passwd_timeout=mins
The mins is the number of minutes before a sudo password prompt times out. A value of 0 (zero) indicates the password does not time out. Default is 5.
passwd_tries=num
The num is the number of times the user can enter an incorrect password in response to the sudo password prompt before sudo quits. Default is 3. See also insults and lecture.
rootpw
Causes sudo to accept only the root password in response to its prompt. Because sudo issues the same prompt whether it is asking for your password or the root password, turning this flag on might confuse users. Default is off, causing sudo to accept the password of the user running sudo.
shell_noargs
Causes sudo, when called without any arguments, to spawn a root shell without changing the environment. Default is off. This option causes the same behavior as the sudo –s option.
timestamp_timeout=mins
The mins is the number of minutes that the sudo timestamp (page 429) is valid. Set mins to –1 to cause the timestamp to be valid forever; set to 0 (zero) to cause sudo to always prompt for a password. Default is 5.
tty_tickets
Causes sudo to authenticate users on a per-tty basis, not a per-user basis. Default is on.
umask=val
The val is the umask (page 469) that sudo uses to run the command that the user specifies. Set val to 0777 to preserve the user’s umask value. Default is 0022.
Locking the root Account (Removing the root Password)
If you decide you want to lock the root account, give the command su –c 'passwd –l root'. This command renders the encrypted password in /etc/shadow invalid by prepending two exclamation points (!!) to it. You can unlock the account again by removing the exclamation points or by giving the command shown in the following example.
Unlocking the root account
If you decide you want to unlock the root account after locking it, give the following command. This command assumes you can use sudo to gain root privileges and unlocks the root account by assigning a password to it:
$ sudo passwd root
[sudo] password for sam:
Changing password for user root.
New password:
Retype new password:
passwd: all authentication tokens updated successfully.
![]() The systemd init Daemon
The systemd init Daemon
The init daemon is the system and service manager for Linux. As explained on page 374, it is the first true process Linux starts when it boots and, as such, has a PID of 1 and is the ancestor of all processes. The init daemon has been around since the early days of UNIX, and many people have worked to improve it. The first Linux init daemon was based on the UNIX System V init daemon and is referred to as SysVinit (System V init daemon).
Because SysVinit does not deal well with modern hardware, including hotplug (page 516) devices, USB hard and flash drives, and network-mounted filesystems, Fedora 15 replaced it with the systemd init daemon, which is described in this section. Several other replacements for SysVinit are also available. Ubuntu uses Upstart (upstart.ubuntu.com), Solaris uses SMF (Service Management Facility), and MacOS uses launchd.
The name systemd comprises system, which systemd manages, followed by d. Under UNIX/Linux, daemon names frequently end in d: systemd is the system daemon. At boot time, systemd renames itself init, so you will not see a process named systemd. However, init is simply a link to systemd:
$ ls -l /sbin/init
lrwxrwxrwx. 1 root root 22 05-28 12:17 /sbin/init -> ../lib/systemd/systemd
The name is also a play on words with System D, a reference to the French débrouillard (to untangle) or démerder. System D is a manner of responding to challenges that requires fast thinking, adapting, and improvising.
The systemd init daemon is a drop-in replacement for SysVinit; most of the administration tools that worked with SysVinit and Upstart work with systemd. Although systemd is relatively new, most of the user interfaces pertinent to administrators will remain stable (www.freedesktop.org/wiki/Software/systemd/InterfaceStabilityPromise).
More Information
Local
Use apropos to list man pages that pertain to systemd (apropos systemd). Some of the most interesting of these are systemd, systemctl, systemd.unit, and systemd.special.
Web
systemd home page: www.freedesktop.org/wiki/Software/systemd
Fedora systemd home page: fedoraproject.org/wiki/Systemd
SysVinit to systemd conversion notes: fedoraproject.org/wiki/SysVinit_to_Systemd_Cheatsheet
Blog about systemd by its creator, Lennart Poettering: 0pointer.de/blog/projects/systemd.html
systemd compatibility with SysV: www.freedesktop.org/wiki/Software/systemd/Incompatibilities
systemd stability promise: www.freedesktop.org/wiki/Software/systemd/InterfaceStabilityPromise
cgroups (control groups): www.kernel.org/doc/Documentation/cgroups/cgroups.txt
Service Units and Target Units
The systemd init daemon is based on the concept of units, each of which has a name and type. Typically information about a unit is stored in a file that has the same name as the unit (e.g., dbus.service). The types of units are service, socket, device, mount, automount, target, snapshot, timer, swap, and path. This section discusses service and target units, which are critical to controlling daemons and runlevel under systemd.
Service unit
A service unit refers to a daemon (service) that systemd controls, including those controlled natively by systemd and those controlled by systemd via SysVinit init scripts. The systemd init daemon controls almost all services natively.
Target unit
A target unit groups other units. Of concern in this section are targets that control the system runlevel. By default, Fedora activates graphical.target, which brings the system to a runlevel that equates to what was formerly called runlevel 5 (multiuser graphical mode). Activating multi-user.target brings the system to what was formerly called runlevel 3 (multiuser textual mode). Table 10-1 on page 449 lists all predefined target units (runlevels).
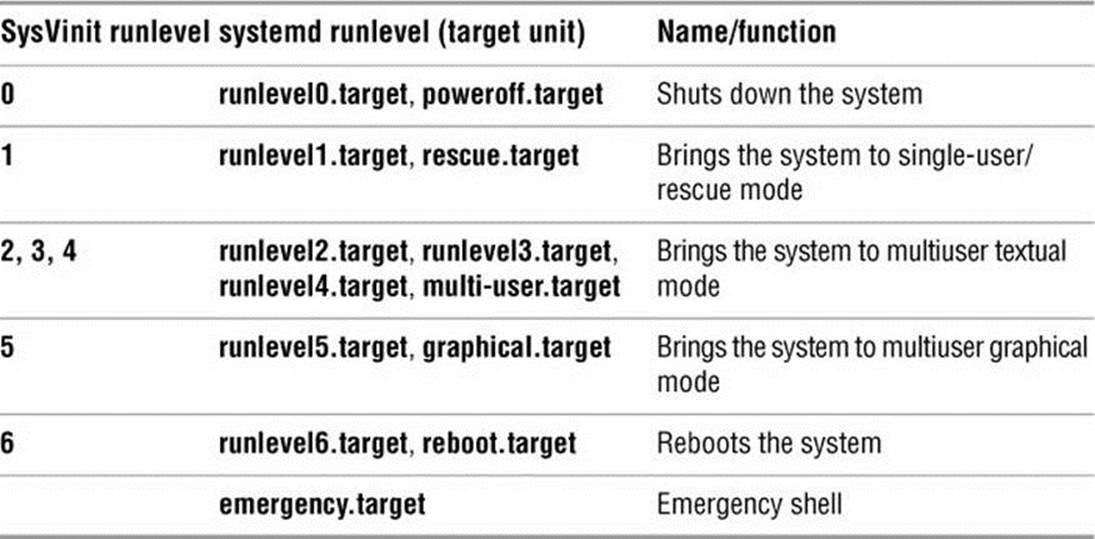
Table 10-1 Runlevels (target units)
Terminology: server, service, daemon
A daemon, such as atd or cupsd, provides a service that runs on a server. The daemon itself is also sometimes referred to as a server. These three terms can be used interchangeably.
Runlevels
The systemd init daemon does not support runlevels the way SysVinit did. It supports target units, which parallel runlevels but are different. To ease the transition, this book continues to use the term runlevel to refer to target units. One difference between SysVinit runlevels and systemd target units is that the former can be changed only when the system changes runlevels whereas the latter can be activated by any of a large group of triggers. Another difference is that a systemd-based system can activate more than one target unit at a time, allowing the system to be in more than one “runlevel” at a time. For example, graphical.target pulls in multi-user.target so they are both active at the same time.
Tip: systemd runlevels differ from SysVinit runlevels
For consistency and clarity during the transition from SysVinit to systemd, this book refers to systemd target units as runlevels. Target units are not true runlevels, but they perform a function similar to the function performed by SysVinit runlevels.
A systemd-based system can activate more than one target unit at a time, allowing the system to be in more than one “runlevel” at a time. A system running SysVinit can be in only one runlevel at a time.
Wants and Requires
Under systemd, the terms wants and requires specify units that are to be activated when the unit that wants or requires the other unit is activated. A unit that requires another unit will not start if the other unit is not available. Wants is similar to requires, except a unit that wants another unit will not fail if the wanted unit is not available.
Displaying Properties
The following systemctl show command displays the Requires properties of the graphical.target unit. It shows that graphical.target requires multi-user.target:
$ systemctl show --property "Requires" graphical.target
Requires=multi-user.target
This relationship causes systemd not to start graphical.target if multi-user.target is not available. It means graphical.target requires units that multi-user.target requires and wants units that multi-user.target wants. Because of this relationship, multi-user.target (runlevel) is active at the same time graphical.target (runlevel) is active.
You can also use the systemctl show command to display the Wants properties of a target:
$ systemctl show --property "Wants" multi-user.target
Wants=vmtoolsd.service abrt-xorg.service rpcbind.service ...
lines 1-1/1 (END) q
The list is long. Although systemctl passes the output through a pager, it runs off the right edge of the screen. When the command displays (END), press q to return to the shell prompt. Sending the output through the fmt text formatter with a line-length specification of 10 displays the list one service per line:
$ systemctl show --property "Wants" multi-user.target | fmt -10
Wants=vmtoolsd.service
abrt-xorg.service
rpcbind.service
remote-fs.target
sm-client.service
sssd.service
...
To see whether a target wants a specific service, send the output of the previous command through grep:
$ systemctl show --property "Wants" multi-user.target | fmt -10 | grep atd
Wants=atd.service
The output shows that multi-user.target wants the atd.service service. Because graphical.target requires multi-user.target and multi-user.target wants atd.service, systemd will start atd.service when the system enters the runlevel defined by graphical.target.
/etc/systemd/system Hierarchy: Controls Services and the Persistent Runlevel
The services wanted by a runlevel target appear in directories named *.wants under the /etc/systemd/system directory:
$ ls -ld /etc/systemd/system/*.wants
...
drwxr-xr-x. 2 root root 4096 06-04 19:29 /etc/systemd/system/graphical.target.wants
drwxr-xr-x. 2 root root 4096 06-05 19:44 /etc/systemd/system/multi-user.target.wants
...
The following command lists the runlevel targets that want atd.service:
$ ls /etc/systemd/system/*.wants/atd.service
/etc/systemd/system/multi-user.target.wants/atd.service
As explained in the previous section, you can also display this information using the systemctl show command.
The directory hierarchy with its root at /etc/systemd/system controls the persistent runlevel of the system. That is, this directory hierarchy specifies which daemons will be started when the system boots or otherwise changes runlevel or when the daemon is activated for another reason.
All service unit files are kept in the /lib/systemd/system directory. All plain files in the /etc/systemd/system hierarchy are links to files in the /usr/lib/systemd/system or/lib/systemd/system hierarchy. For example, atd.service shown in the preceding example is a link to the appropriate service unit file in /usr/lib/systemd/system:
$ ls -l /etc/systemd/system/multi-user.target.wants/atd.service
lrwxrwxrwx. 1 root root 35 07-02 12:56 /etc/systemd/system/multi-user.target.wants/atd.service -> /usr/lib/systemd/system/atd.service
The service unit file provides systemd with information it needs to start the service and specifies the system runlevel target that wants the service:
$ cat /lib/systemd/system/atd.service
[Unit]
Description=Job spooling tools
After=syslog.target systemd-user-sessions.service
[Service]
EnvironmentFile=/etc/sysconfig/atd
ExecStart=/usr/sbin/atd -f $OPTS
[Install]
WantedBy=multi-user.target
When you instruct systemd to start a service when the system boots (make the service persistent), it places a link to the service file in the directory specified by WantedBy in the service file. Continuing with the example, systemd places a link to atd.service in the multi-user.target.wantsdirectory as shown previously. When you instruct systemd to not start a service when the system boots, it removes the link. “Setting the Persistent State of a Daemon” on page 445 explains how to use systemctl to make these changes.
The persistent (default) runlevel is also controlled by a link:
$ ls -l /etc/systemd/system/default.target
lrwxrwxrwx. 1 root root 36 06-04 19:34 /etc/systemd/system/default.target ->
/lib/systemd/system/graphical.target
See “Setting the Persistent Runlevel” on page 444 for more information.
Custom Service Files
As explained in the previous section, files in the /etc/systemd/system directory hierarchy are symbolic links to files in the /lib/systemd/system directory hierarchy. The systemd init daemon treats files in the /etc/systemd/system directory hierarchy and files in the /lib/systemd/systemdirectory hierarchy the same way, with files in /etc/systemd/system overriding files with the same name in /lib/systemd/system. An important difference between these directory hierarchies is that /lib/systemd/system is managed by yum/RPM while /etc/systemd/system is managed by the system administrator.
Put custom service files in the /etc/systemd/system hierarchy. If you want to modify a service file, copy it from the /lib/systemd/system hierarchy to the /etc/systemd/system hierarchy and edit the copy. The custom file in the /etc/systemd/system hierarchy will not be overwritten byyum/RPM and will take precedence over a file with the same name in the /lib/systemd/system hierarchy.
Determining Whether systemd Runs a Daemon Natively
To ease migration from SysVinit to systemd and to provide compatibility with software intended for other distributions, systemd can control daemons via SysVinit scripts (page 448). You can use the systemctl status command to determine whether systemd is controlling a daemon natively or via a SysVinit script. Following, systemctl displays the status of cups and network:
$ systemctl status cups.service
cups.service - CUPS Printing Service
Loaded: loaded (/usr/lib/systemd/system/cups.service; enabled)
Active: active (running) since Wed 2013-06-05 17:29:38 PDT; 2h 30min ago
$ systemctl status network.service
network.service - LSB: Bring up/down networking
Loaded: loaded (/etc/rc.d/init.d/network)
Active: inactive (dead)
The systemctl utility does not require a period and unit type (.service in the preceding example) following a unit name (cups and network in the preceding example). The lines that start with Loaded name the file controlling each daemon (service). The cups daemon is controlled by/usr/lib/systemd/system/cups.service. The location of the file (the /usr/lib/systemd hierarchy) and its filename extension (.service) indicate systemd is running the daemon natively. The network daemon is controlled by /etc/rc.d/init.d/network. The location of the file (the init.d directory) and the lack of a filename extension indicate systemd is running the daemon via a SysVinit script. See fedoraproject.org/wiki/User:Johannbg/QA/Systemd/compatability for a list of services that have been ported to systemd (and are run natively by systemd).
![]() service
service
Although it is deprecated, you can use service to display information similar to that displayed by systemctl status. However, service does not accept a period and unit type.
$ service cups status
Redirecting to /bin/systemctl status cups.service
cups.service - CUPS Printing Service
Loaded: loaded (/usr/lib/systemd/system/cups.service; enabled)
Active: active (running) since Wed 2013-06-05 17:29:38 PDT; 2h 30min ago
...
$ service network status
Configured devices:
lo Wired_connection_1 ens33
Currently active devices:
lo ens33
Setting and Changing Runlevels
The runlevel specifies which daemons are running and which interfaces are available on a system. See “Runlevels” on page 440 and Table 10-1 on page 449 for more information. This section describes how to set the persistent (default) runlevel (the runlevel the system boots to) and how to change the current runlevel.
![]() Setting the Persistent Runlevel
Setting the Persistent Runlevel
Under systemd no true runlevels exist; see “Runlevels” on page 449. For example, the default runlevel under Fedora is graphical.target and has an alternative name of runlevel5.target. Under SysVinit this runlevel is referred to as runlevel 5 (multiuser graphical mode). The/etc/systemd/system/default.target file is a link to the file that specifies the target the system will boot to by default:
$ ls -l /etc/systemd/system/default.target
lrwxrwxrwx. 1 root root 36 06-04 19:34 /etc/systemd/system/default.target ->
/lib/systemd/system/graphical.target
The following command shows runlevel5.target is a link to graphical.target:
$ ls -l /lib/systemd/system/runlevel5.target
lrwxrwxrwx. 1 root root 16 06-04 20:02 /lib/systemd/system/runlevel5.target ->
graphical.target
The multi-user.target file (and the link to it, runlevel3.target) causes the system to boot to the multiuser runlevel (multiuser textual mode; SysVinit runlevel 3). The following command replaces the link shown in the previous example and will cause the system enter multiuser textual mode each time it is booted. This command does not change the current runlevel. (Newer versions of systemd use the command systemctl set-default target, where target is replaced with the new runlevel target, in place of the following ln command.)
# ln -sf /lib/systemd/system/multi-user.target /etc/systemd/system/default.target
The ln –s (symbolic) option creates a symbolic link, and the –f (force) option overwrites any existing file.
The systemctl list-units command with the ––type=target option lists all active target units. Before rebooting the system, this command shows that both graphical.target and multi-user.target are active.
$ systemctl list-units --type=target | egrep 'multi-user|graphical'
graphical.target loaded active active Graphical Interface
multi-user.target loaded active active Multi-User System
After giving the ln command and rebooting the system, graphical.target is no longer active but multi-user.target is:
$ systemctl list-units --type=target | egrep 'multi-user|graphical'
multi-user.target loaded active active Multi-User System
See page 452 for instructions on how to boot to a specific runlevel using target units.
![]() Changing the Current Runlevel
Changing the Current Runlevel
The systemctl isolate command changes the current runlevel of the system. The following command changes the runlevel to multiuser graphical mode (graphical.target). When the system is rebooted, it will return to the default runlevel as specified by the link at/etc/systemd/system/default.target.
# systemctl isolate graphical.target
After a moment systemctl shows that, again, both graphical.target and multi-user.target are active:
$ systemctl list-units --type=target | egrep 'multi-user|graphical'
graphical.target loaded active active Graphical Interface
multi-user.target loaded active active Multi-User System
The preceding examples were run from an ssh login. If you give these commands from a terminal emulator running on the console, the system will log you out each time it changes runlevels.
![]() Configuring Daemons (Services)
Configuring Daemons (Services)
Two states are important when you consider a daemon: its current state and its persistent state (the state it will be in after the system is booted). Possible states are running and stopped. When you install a package that includes a daemon, the daemon is stopped and is not set up to start when the system is booted.
chkconfig and service
The systemctl utility controls the current and persistent states of daemons that run natively under systemd. The service and chkconfig utilities originally controlled daemons that run under SysVinit and were upgraded to control daemons that run under Upstart. Now these utilities have been retrofitted to control daemons that run under systemd, which they do by calling systemctl. You can still use service to control the current state of a daemon and chkconfig to control the persistent state of a daemon.
The next sections describe the systemctl commands that control daemons.
Setting the Persistent State of a Daemon
The systemctl disable command causes a daemon not to start when the system is booted. This command has no effect on the current state of the daemon. You do not need to specify the .service part of the service name.
# systemctl disable atd.service
rm '/etc/systemd/system/multi-user.target.wants/atd.service'
The preceding command removes the link that causes systemd to start atd when the system enters multi-user runlevel and, by inheritance, graphical runlevel. See “/etc/systemd/system Hierarchy: Controls Services and the Persistent Runlevel” on page 441 for a discussion of these links.
The following commands each verify that the atd daemon will not start when the system boots. The first command shows no links in the *.wants directories for atd.service. The second uses the systemctl is-enabled command, which returns disabled.
$ ls /etc/systemd/system/*.wants/atd.service
ls: cannot access /etc/systemd/system/*.wants/add.service: No such file or directory
$ systemctl is-enabled atd.service
disabled
The systemctl enable command causes a daemon to start when the system is booted. This command has no effect on the current state of the daemon. The following command creates the link that causes systemd to start atd when the system enters multiuser textual mode and, by inheritance, multiuser graphical mode.
# systemctl enable atd.service
ln -s '/usr/lib/systemd/system/atd.service' '/etc/systemd/system/multi-user.target.wants/atd.service'
As in the preceding example, the next two commands check whether the daemon will start when the system is booted.
$ ls /etc/systemd/system/*.wants/atd.service
/etc/systemd/system/multi-user.target.wants/atd.service
$ systemctl is-enabled atd.service
enabled
Changing the Current State of a Daemon
The systemctl stop command immediately stops a daemon from running. This command has no effect on whether the daemon starts when the system is booted. The following command works on the atd daemon, which is run natively by systemd. It will also work on a daemon systemd controls via a SysVinit script. You do not need to specify the .service part of the service name.
# systemctl stop atd.service
The preceding command stops the atd daemon and displays no output. The following commands each verify that the atd daemon is not running.
$ systemctl status atd.service
atd.service - Job spooling tools
Loaded: loaded (/usr/lib/systemd/system/atd.service; enabled)
Active: inactive (dead) since Wed 2013-07-24 18:03:18 PDT; 53s ago
Main PID: 404 (code=exited, status=0/SUCCESS)
CGroup: name=systemd:/system/atd.service
Jul 24 18:03:18 guava.example.com systemd[1]: Stopping Job spooling tools...
Jul 24 18:03:18 guava.example.com systemd[1]: Stopped Job spooling tools.
$ systemctl is-active atd.service
inactive
The systemctl status command shows an Active status of inactive (dead). The systemctl is-active command displays a status of inactive. You can also use ps –ef | grep atd to determine whether the daemon is running.
The systemctl start command immediately starts a daemon running. This command has no effect on whether the daemon starts when the system is booted.
# systemctl start atd.service
The next two commands each show the daemon is running.
$ systemctl status atd.service
atd.service - Job spooling tools
Loaded: loaded (/usr/lib/systemd/system/atd.service; enabled)
Active: active (running) since Wed 2013-07-24 18:06:55 PDT; 41s ago
Main PID: 2010 (atd)
CGroup: name=systemd:/system/atd.service
|+2010 /usr/sbin/atd -f
Jul 24 18:06:55 guava.example.com systemd[1]: Started Job spooling tools.
$ systemctl is-active atd.service
active
![]() system-config-services: Configures Services
system-config-services: Configures Services
The system-config-services utility (system-config-services package) displays the Service Configuration window (Figure 10-1). Open this window by giving the command system-config-services from an Enter a Command window (ALT-F2) or a terminal emulator. This utility uses a GUI to provide the functionality of the systemctl start and stop commands (see “Changing the Current State of a Daemon” on page 446) as well as the enable and disable commands (see “Setting the Persistent State of a Daemon” on page 445). It turns system services on and off immediately, and it controls which services are started when the system boots.
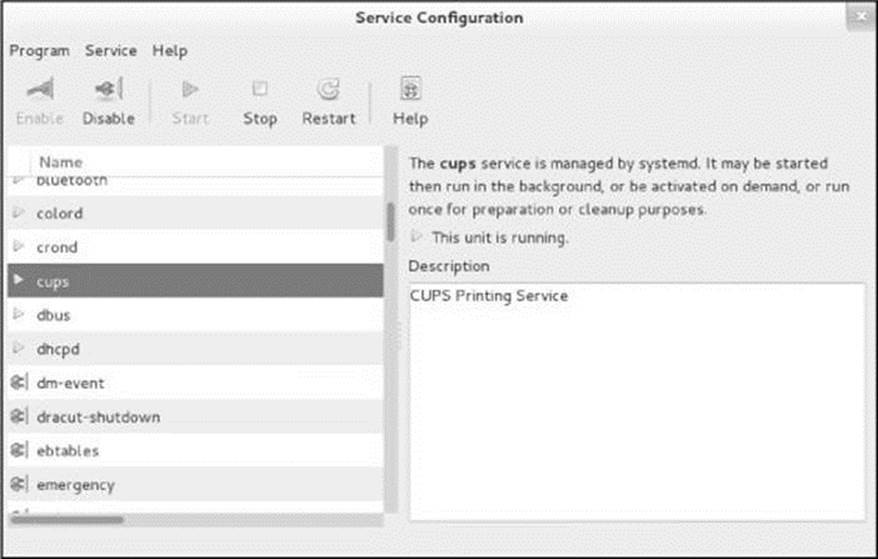
Figure 10-1 The Service Configuration window
The left side of the Service Configuration window displays a scrollable list of services (daemons). Scroll to and highlight the service you want to work with; the right side of the window displays a description of the service. Click the buttons on the toolbar to start (triangle), stop (square), enable (plugged in plug), or disable (unplugged plug) the highlighted service. The Start and Stop buttons turn the service on or off immediately; the Enable and Disable buttons specify whether the service will run the next time the system boots.
Optional
![]() SysVinit (rc) Scripts: Start and Stop System Services
SysVinit (rc) Scripts: Start and Stop System Services
rc scripts
The SysVinit daemon is driven by init (initialization) scripts. These scripts, also called rc (run command) scripts, are shell scripts located in the /etc/rc.d/init.d directory. A symbolic link at /etc/init.d points to /etc/rc.d/init.d. The scripts are run via symbolic links in the/etc/rc.d/rcn.d directories, where n is the runlevel the system is entering.
Tip: Most of the files in the /etc/rc.d/rcn.d and /etc/rc.d/init.d directories are gone
Under systemd, Linux uses targets with the names of runlevels to aid migration and provide compatibility with software for other distributions (see Table 10-1). Most of the files in the /etc/rc.d/rcn.d and /etc/rc.d/init.d directories have gone away; they have been replaced by systemd service files.
The /etc/rc.d/rcn.d directories contain scripts whose names begin with K and scripts whose names begin with S. When entering a new runlevel, each K (kill) script is executed with an argument of stop, and then each S (start) script is executed with an argument of start. Each of theK files is run in numerical order. The S files are run in similar fashion. This arrangement allows the person who sets up these files to control which services are stopped and which are started, and in what order, whenever the system enters a given runlevel. Using scripts with startand stop arguments promotes flexibility because it allows one script to both start and kill a process, depending on which argument it is called with.
You can use systemctl (page 445) or system-config-services (previous page) to run SysVinit scripts.
System Operation
This section covers the basics of how the system functions and can help you make intelligent decisions as a system administrator. It is a guide to bringing a system up and keeping it running day to day.
Runlevels
As described on page 440, systemd has done away with traditional runlevels although vestiges remain. Table 10-1 lists the runlevels (target units) as they exist under systemd.
Default (persistent) runlevel
By default, systems boot to multiuser graphical mode (graphical.target). See “Setting the Persistent Runlevel” on page 444 for instructions on how to change this default.
runlevel
The runlevel utility (runlevel man page) displays the previous and current runlevels. This utility is a transitional tool; it provides compatibility with SysVinit. In the following example, the N indicates the system does not know which was the previous runlevel, and the 5 indicates the system is in multiuser graphical mode.
$ runlevel
N 5
who
The who utility with the –r option also displays the current runlevel:
$ who -r
run-level 5 2013-07-21 14:41
![]() telinit
telinit
The telinit utility (telinit man page) allows a user working with root privileges to bring the system down, reboot the system, or change between runlevels. The telinit utility is a transitional tool; it provides compatibility with SysVinit and calls systemctl. The format of a telinit command is
telinit runlevel
where runlevel is one of the runlevels described in Table 10-1.
![]() Booting the System
Booting the System
Booting a system is the process of reading the Linux kernel (page 1257) into system memory and starting it running. Refer to “GRUB: The Linux Boot Loader” on page 590 for more information on the initial steps of bringing a system up.
Tip: List the kernel boot messages
To save a list of kernel boot messages, run dmesg immediately after booting the system and logging in:
$ dmesg > dmesg.boot
This command saves the kernel messages in a file named dmesg.boot. This list can be educational; it can also be useful when you are having a problem with the boot process. For more information see page 595.
![]() systemd init daemon
systemd init daemon
As the last step of the boot procedure, Linux starts the systemd init daemon (page 438) as PID number 1. This daemon is the first genuine process to run after booting and is the parent of all system processes.
Reinstalling the MBR
If the MBR (master boot record) is overwritten, the system will not boot; you might need to regenerate and rewrite the MBR as explained on page 456.
Single-User Mode
When the system is in single-user mode, only the system console is enabled. You can run programs from the console in single-user mode just as you would from any terminal in multiuser mode with two differences: You cannot run graphical programs (because you are working in textual mode) and few of the system daemons are running.
With the system in single-user/rescue mode, you can perform system maintenance that requires filesystems to be unmounted or that requires just a quiet system—no one except you using it, so no user programs interfere with disk maintenance and backup programs. The classical UNIX term for this state is quiescent. You can often boot to single-user mode when the system will not boot normally, allowing you to change or replace configuration files, check and repair partitions using fsck (page 525), rewrite boot information (page 456), and more.
![]() Booting the System to Single-User/Rescue Mode
Booting the System to Single-User/Rescue Mode
This section explains how to bring a system up to single-user/rescue mode by booting from the hard disk and giving GRUB the appropriate instructions.
Displaying the GRUB menu
The first step in bringing a system up in single-user mode from the hard disk is to display the GRUB menu (Figure 10-2). Boot the system normally (turn on the power or reboot the system). The GRUB menu will be hidden or displayed. Either way, if you hold down the SHIFT key as the system is booting, GRUB displays its menu and stops booting the system. As the system is initially configured, you must press a key as the system starts to boot or, after a few seconds, it will boot normally.
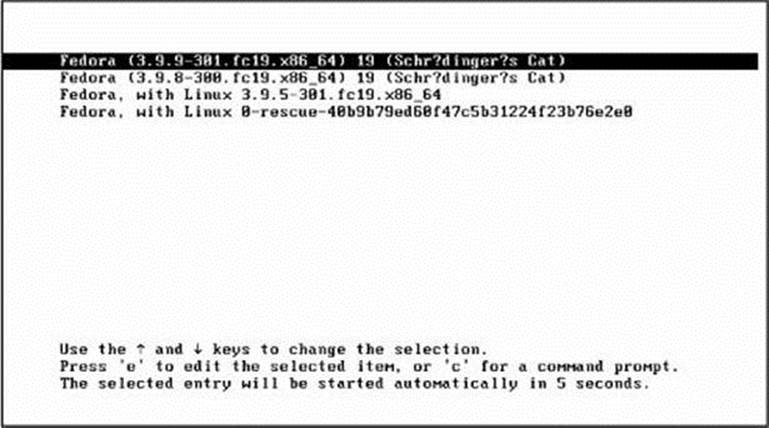
Figure 10-2 The GRUB menu
Selecting single-user/rescue mode
Unless you have modified the GRUB setup (page 591), the GRUB menu starts with a few lines similar to the following:
Fedora (3.9.9-301.fc19.x86_64) 19 (Schrödinger's Cat)
Fedora, with Linux 3.9.5-301.fc19.x86_64
Fedora, with Linux 0-rescue-40b9b79ed60f47c5b31224f23b76e2e0
Typically the first line is highlighted.
Tip: Single-user/rescue mode versus rescuing an installed system
When you bring a system up in single-user/rescue mode, it boots from the hard disk and displays a bash prompt. This section explains how to bring a system up in single-user/rescue mode.
When you bring a system up to rescue an installed system, you boot from an Install or Network Image and select Rescue installed system from the Troubleshooting menu as explained on page 456.
Editing the GRUB menu
With the GRUB menu displayed, follow these instructions to bring the system up in single-user/rescue mode:
1. Highlight the kernel you want to boot—GRUB highlights the default kernel when it displays its menu.
2. Press e to edit to the GRUB boot command line for the highlighted kernel.
3. Use the DOWN ARROW key to move the cursor as far down as it will go and then use the UP ARROW key to move it up two lines. The cursor will be at the beginning of the kernel line (the line that begins with eight SPACEs followed by the word linux). This line is long and wraps several times.
4. Use the RIGHT ARROW key to move the cursor until it is just past the first argument following linux; it will be just before the word root=. Enter SPACE single SPACE and press CONTROL-X to boot the system using the modified kernel line. After a few moments, the system displays
Give root password for maintenance
(or type Control-D to continue):
5. Enter the root password; Linux displays a shell root prompt (#).
Booting to a target unit
The system is running in rescue.target (single-user) mode and you are logged in as root. In place of single in step number 4 on the previous page, you can specify one of the target units from Table 10-1 on page 449 (e.g., systemd.unit=rescue.target also boots the system to rescue mode).
![]() Going to Graphical Multiuser Mode
Going to Graphical Multiuser Mode
Graphical multiuser mode (the old runlevel 5) is the default state for a system. In this mode all appropriate filesystems are mounted, and users can log in from all connected terminals, dial-up lines, and network connections. All support services and daemons are enabled and running. When the system is in multiuser mode, it displays a graphical login screen on the console.
If you booted to single-user mode to fix something, give a reboot command, which reboots the system starting with the BIOS. If the system entered single-user mode automatically to allow you to repair the filesystem, give an exit command that causes the system to continue booting: systemd brings the system to the default runlevel—usually multiuser graphical mode. Alternately, you can give the following command while working with root privileges to bring the system to multiuser graphical mode, even if that is not the default mode:
# systemctl isolate graphical.target
Logging In
Textual login: init, agetty, and login
With a textual login, the system uses systemd, agetty, and login to allow a user to log in; login uses PAM modules (page 476) to authenticate a user. When you enter your username, agetty establishes the characteristics of the terminal. It then overlays itself with a login process and passes to the login process whatever you entered in response to the login: prompt. One authentication technique uses PAM: The login process consults the /etc/passwd file to see whether any username there matches the username you entered. Next, PAM examines the /etc/shadow file to see whether a password is associated with the username. If it is, login prompts you for a password; if not, it continues without requiring a password. When your username requires a password, login verifies the password you enter by checking the /etc/shadow file again. If either your username or your password is not correct, login displays Login incorrect, pauses, and prompts you to log in again.
By default, all passwords in the /etc/shadow file are hashed using the 512-bit SHA2 (page 1272) hash function. When you log in, the login process hashes the password you type at the prompt and compares it to the hashed password in /etc/shadow. If the two passwords match, you are authenticated. See page 136 for more information on selecting a secure password.
With NIS or LDAP, login compares the username and password with the information in the appropriate naming service instead of (or in addition to) the passwd and shadow files. If the system is configured to use both methods (/etc/passwd and NIS/LDAP), it checks the /etc/nsswitch.conffile (page 495) to see in which order it should consult them.
![]() Graphical login
Graphical login
By default, with a graphical login the systemd daemon spawns gdm (GNOME display manager) on the first free virtual terminal, providing features similar to those offered by agetty and login. The gdm utility starts an X server and presents a login window. The gdm display manager then uses PAM to authenticate the user and runs the scripts in the /etc/gdm/PreSession directory. These scripts launch the user’s session.
PAM
PAM (page 476)—the Pluggable Authentication Module facility—gives you greater control over user logins than the /etc/passwd and /etc/shadow files do. Using PAM, you can specify multiple levels of authentication, mutually exclusive authentication methods, or parallel methods, each of which is by itself sufficient to grant access to the system. For example, you can have different authentication methods for console logins and for ssh logins. Similarly, you can require modem users to authenticate themselves using two or more methods (such as a smartcard or badge reader and a password). PAM modules also provide security technology vendors with a convenient way to interface their hardware or software products with a system.
Initializing the session
When both the username and the password are correct, login or the scripts in PreSession consult the appropriate services to initialize the user and group IDs, establish the user’s home directory, and determine which shell or desktop manager the user works with.
The login utility and PreSession scripts assign values to variables and look in the /etc/group file (page 506) to identify the groups the user belongs to. When login has finished its work, it overlays itself with the login shell, which inherits the variables set by login. In a graphical environment, the PreSession scripts start the desktop manager.
During a textual login, the login shell assigns values to additional shell variables and executes the commands in the system startup files /etc/profile and /etc/bashrc. Some systems have other system startup files as well. Although the actions performed by these scripts are system dependent, they typically display the contents of the /etc/motd (message of the day) and /etc/issue files, let you know if you have email, and set umask (page 469), the file-creation mask.
Along with executing the system startup commands, the shell executes the commands from the personal startup files in the user’s home directory. These scripts are described on page 329. Because the shell executes personal startup files after the system startup files, a sophisticated user can override any variables or conventions that were established by the system. A new user, by contrast, can remain uninvolved in these matters.
Logging Out
With a shell prompt displayed in a textual environment, you can either execute a program or exit from the shell. If you exit from the shell, the process running the shell dies, and the parent process wakes up. When the shell is a child of another shell, the parent shell wakes up and displays a prompt. Exiting from a login shell causes the operating system to send systemd a signal that one of its children has died. Upon receiving this signal, systemd takes appropriate action. In the case of a process controlling a line for a terminal, systemd calls the appropriate tty service, which then respawns agetty so another user can log in. When you exit from a GUI, the GNOME display manager, gdm, displays a Login screen.
![]() Bringing the System Down
Bringing the System Down
Textual
The reboot, halt, and poweroff systemctl commands perform the tasks needed to bring the system down safely. These utilities can restart the system (reboot), prepare the system to be turned off (halt), and, on most hardware, power down the system (poweroff).
From the console, any user can run these commands without authentication as long as no other user is logged in on the system. From a remote login, any user can run these commands but must first authenticate with an administrator’s (page 422) password; systemctl uses sudo to authenticate. A user running with root privileges can always run these commands without further authentication. The following example shows Sam, working as himself remotely and providing his password, shutting down the system.
$ systemctl poweroff
==== AUTHENTICATING FOR org.freedesktop.login1.power-off ===
Authentication is required for powering off the system.
Multiple identities can be used for authentication:
1. Sam the Great (sam)
2. Max Wild (max)
Choose identity to authenticate as (1-2): 1
Password:
==== AUTHENTICATION COMPLETE ===
The legacy reboot, shutdown, halt, and poweroff utilities call systemctl.
Graphical
Bring the system down by clicking your name or Live System User at the upper-right corner of the screen, clicking Power Off from the menu GNOME displays, and then clicking the button labeled Power Off from the small window GNOME displays.
CONTROL-ALT-DEL: Reboots the System
In a textual environment, pressing the CONTROL-ALT-DEL keys simultaneously (also referred to as the three-finger salute or the Vulcan death grip) on the console causes systemctl to reboot the system. In a graphical environment, the X Window System traps this key set and GNOME displays the Power Off dialog box.
![]() Going to Single-User Mode
Going to Single-User Mode
The following steps describe a method of manually bringing the system down to single-user mode. In some cases it might be easier to simply reboot the system and bring it up in single-user mode; see page 450. Before starting, make sure you give other users enough warning before switching to single-user mode; otherwise, they might lose the data they are working on. Because going from multiuser to single-user mode can affect other users, you must work with root privileges to perform these tasks.
1. Give the command touch /etc/nologin to prevent users from logging on as you bring the system down. See the nologin man page for more information.
2. Use wall (see the wall man page) to warn everyone who is using the system to log out.
3. If you are sharing files via NFS, use exportfs –ua to disable network access to the shared filesystems. (Use exportfs without an argument to see which filesystems are being shared.)
4. Confirm no critical processes are running in the background (e.g., an unattended compile).
5. Give the command systemctl isolate rescue.target (page 445) to bring the system down to single-user mode. After a few moments, the system displays
Give root password for maintenance
(or type Control-D to continue):
When you type the root password, bash displays the root prompt (#). The system does not run most services in rescue mode. The systemctl or runlevel utilities can confirm the current runlevel.
6. Use umount –a to unmount all mounted devices that are not in use. Use mount without an argument to make sure no devices other than root (/) are mounted before continuing. Alternately, you can perform maintenance tasks that do not require devices to be unmounted.
Turning the Power Off
Once the system is in single-user mode, give the command systemctl poweroff to bring the system down. If the system does not power off by itself, turn the power off when prompted to do so or when the system starts rebooting.
Crash
A crash occurs when the system stops suddenly or fails unexpectedly. A crash might result from software or hardware problems or from a loss of power. As a running system loses power, it might behave in erratic or unpredictable ways. In a fraction of a second, some components are supplied with enough voltage; others are not. Buffers are not flushed, corrupt data might be written to hard disks, and so on. IDE and SATA drives do not behave as predictably as SCSI drives under these circumstances. After a crash, you must bring the operating system up carefully to minimize possible damage to the filesystems. On many occasions, little or no damage will have occurred.
Repairing a Filesystem
Although the filesystems are checked automatically during the boot process if needed, you will have to check them manually if a problem cannot be repaired automatically. By default, when fsck cannot repair a filesystem automatically at boot time, Linux enters single-user mode so you can run fsck manually. If necessary, you can explicitly boot the system to single-user mode (page 450). Do not mount any devices other than root, which Linux mounts automatically.
With the system in single-user mode, give a mount command to make sure none of the local filesystems you want to check are mounted. Then run fsck (page 525) on these filesystems, repairing them as needed. Make note of any ordinary files or directories that you repair (and can identify), and inform their owners that these files might not be complete or correct. Look in the lost+found directory (page 502) in each filesystem for missing files. After successfully running fsck, if the system entered single-user mode automatically, type exit to exit from the single-user shell and resume booting the system; otherwise, give a reboot command.
Caution: Back up a badly damaged filesystem before running fsck on it
When a filesystem is badly broken, fsck sometimes makes the situation worse while trying to repair it. In these cases, it might be possible to recover more data by copying the readable data from the broken filesystem before attempting to repair it. When a damaged filesystem holds important data, use dd (dd man page) to make a full binary backup of an unmounted filesystem before attempting to repair it using fsck.
If files are not correct or are missing altogether, you might have to re-create them from a backup copy of the filesystem. For more information refer to “Backing Up Files” on page 602.
![]() Reinstalling the MBR
Reinstalling the MBR
To reinstall the MBR, as is necessary when it gets overwritten by a Windows installation, boot the system from an Install or Network Image and select Troubleshooting![]() Rescue a Fedora system. Then mount the system image as described in “Rescue an Installed System” below and rungrub2-mkconfig (page 593) to regenerate the grub.cfg file and grub2-install (page 594) to install it on the appropriate device:
Rescue a Fedora system. Then mount the system image as described in “Rescue an Installed System” below and rungrub2-mkconfig (page 593) to regenerate the grub.cfg file and grub2-install (page 594) to install it on the appropriate device:
# chroot /mnt/sysimage
# grub2-mkconfig -o /boot/grub2/grub.cfg
# grub2-install /dev/sda
Exit from the rescue shell and reboot the system.
When the System Does Not Boot
When a system will not boot from the hard disk, boot the system to rescue an installed system (next) or single-user/rescue mode (page 450). If the system comes up, run fsck (page 525) on the root filesystem on the hard disk and try booting from the hard disk again. If the system still does not boot, you might have to regenerate the grub.cfg file and reinstall the master boot record (previous).
Rescue an Installed System
When you rescue an installed system you can fix a system that does not boot normally: You can change or replace configuration files, check and repair partitions using fsck (page 525), rewrite boot information, and more. To rescue an installed system, boot the system from an Install or Network Image and select Troubleshooting from the Install Image Boot menu (Figure 3-4, page 61) and Rescue a Fedora system from the Troubleshooting menu (Figure 3-5, page 61). When the system comes up it displays the pseudographical Rescue screen (Figure 10-3).
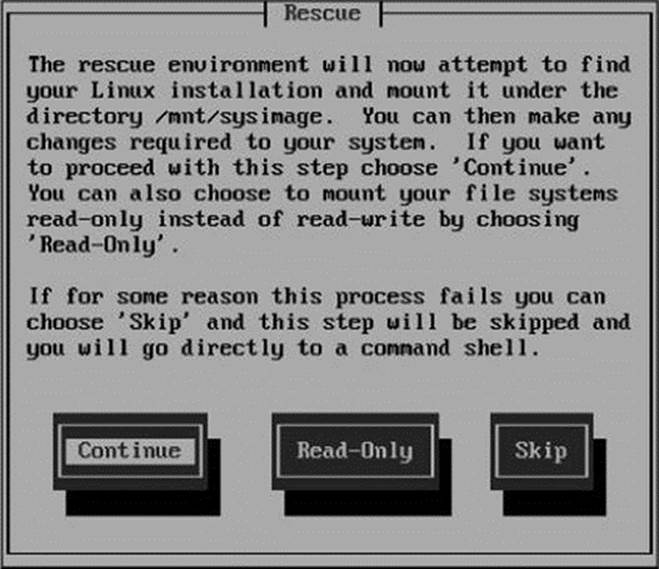
Figure 10-3 The Rescue screen
This screen gives you the choice between having the system look for and mount an existing Linux installation, and simply displaying a shell prompt. Because it is not a true graphical screen, the mouse does not work on the Rescue screen. Use TAB to move the highlight between buttons andSPACE to select the highlighted button.
Select Continue or Read-Only to have the system search for an existing system; select Skip to not have it search. If you have the system search and it finds an existing system, Continue then mounts the system in read-write mode; Read-Only mounts it read-only. If the mount is successful, the next two screens tell you that the existing system was mounted under /mnt/sysimage. Select OK two times. The next screen allows you to start a shell, run a diagnostic, or reboot. Use the ARROW keys to highlight Start shell and press RETURN.
With the existing installation mounted, once the system displays a shell prompt (similar to bash-4.2#), you can give the command chroot /mnt/sysimage to access the existing installation as it would be if you had booted normally, with the existing installation’s root directory available as /(root). See page 487 for more information on chroot. At this point you can reinstall the MBR if necessary (prevous page). If you choose not to mount the existing installation, you are running a rescue system with standard tools mounted in standard locations (/usr/bin, /usr/sbin, and so on). You can fix or mount partitions from the local installation. When you exit from the rescue shell, you can reboot the system. Remove the installation medium if you want to boot from the hard drive.
Avoiding a Trojan Horse
A Trojan horse is a program, usually embedded in or masquerading as another program. The program does something destructive and/or disruptive to a system while appearing to be benign. Because of the way it is disguised, a user typically runs it without realizing what he is doing. As an example, you could store the following script in an executable file named mkfs:
while true
do
echo 'Good Morning Mr. Jones. How are you? Ha Ha Ha.' > /dev/console
done
If you are working with root privileges when you run this command, it will continuously write a message to the console. If the programmer were malicious, it could do worse. The only thing missing in this plot is access permissions.
A malicious user could implement this Trojan horse by changing root’s PATH variable to include a publicly writable directory at the start of the PATH string. (The catch is that you need to be able to write to /etc/profile or /root/.bash_profile—where the PATH variable is set for root—and only a user working with root privileges can do that.) Then you would need to put the bogus mkfs program file in that directory. Because the fraudulent version appears in a directory mentioned earlier than the real one in PATH, the shell would run it rather than the real version. Thus, the next time a user working with root privileges tries to run mkfs, the fraudulent version would run.
Trojan horses that lie in wait for and take advantage of the misspellings most people make are among the most insidious types. For example, you might type sl instead of ls. Because you do not regularly execute a utility named sl and you might not remember typing the command sl, it is more difficult to track down this type of Trojan horse than one that takes the name of a more familiar utility.
A good way to help prevent the execution of a Trojan horse is to make sure your PATH variable does not contain a single colon (:) at the beginning or end of the PATH string or a period (.) or double colon (::) anywhere in the PATH string. This precaution helps ensure that you will not execute a file in the working directory by accident.
To check for a possible Trojan horse, examine the filesystem periodically for files with setuid (page 196) permission. The following command lists these files:
![]() Listing setuid files
Listing setuid files
# find / -perm /4000 -exec ls -lh {} \; 2> /dev/null
...
-rwsr-xr-x. 1 root root 53K Jun 11 11:48 /usr/bin/crontab
-rwsr-xr-x. 1 root root 32K Jun 13 02:48 /usr/bin/su
-rwsr-xr-x. 1 root root 23K May 29 07:52 /usr/bin/pkexec
-rwsr-xr-x. 1 root root 28K Jun 21 17:51 /usr/bin/passwd
-rws--x--x. 1 root root 24K Jun 13 02:48 /usr/bin/chsh
---s--x--x. 1 root root 124K Feb 28 04:55 /usr/bin/sudo
-rwsr-xr-x. 1 root root 44K Jun 13 02:48 /usr/bin/mount
-rwsr-xr-x. 1 root root 37K Mar 19 12:59 /usr/bin/newgrp
-rwsr-xr-x. 1 root root 77K Mar 19 12:59 /usr/bin/gpasswd
...
This command uses find (page 229) to locate all files that have their setuid bit set (mode 4000). The slash preceding the mode causes find to report on any file that has this bit set, regardless of how the other bits are set. The output sent to standard error is redirected to /dev/null so it does not clutter the screen.
![]() Listing setgid files
Listing setgid files
You can display all files with setgid permission (page 196) by substituting 2000 for 4000 in the preceding command.
Run software only from sources you trust
Another way a Trojan horse can enter a system is via a tainted ~/.bashrc (page 502) file. A bogus sudo command or alias in this file can capture a user’s password, which might then be used to gain root privileges. Because a user has write permission to this file, any program the user executes can easily modify it. The best way to prevent this type of Trojan horse from entering a system is to run software only from sources you trust.
You can set up a program, such as AIDE (Advanced Intrusion Detection Environment; aide package), that will take a snapshot of the system and periodically check files for changes. For more information see aide.sourceforge.net.
![]() X Window System
X Window System
When you start an X Window System (graphical) session, you set up a client/server environment. One process, called the X server, displays a desktop and windows under X. Each application program and utility that makes a request of the X server is a client of that server. Examples of X clients include xterm, Compiz, gnome-calculator, and such general applications as word processing and spreadsheet programs. A typical request from a client is to display an image or open a window.
Tip: The roles of X client and server might be counterintuitive
The terms client and server, when referring to X, have the opposite meanings of how you might think of them intuitively: The server runs the mouse, keyboard, and display; the application program is the client.
This disparity becomes even more apparent when you run an application program on a remote system. You might think of the system running the program as the server and the system providing the display as the client, but in fact it is the other way around. With X, the system providing the display is the server, and the system running the program is the client.
Events
The server also monitors keyboard and mouse actions (events) and passes them to the appropriate client. For example, when you click the border of a window, the server sends this event to the window manager (client). Characters you type into a terminal emulation window are sent to that terminal emulator (client). The client takes appropriate action when it receives an event—for example, making a window active or displaying the typed characters on the server.
Separating the physical control of the display (the server) from the processes needing access to the display (the client) makes it possible to run the server on one computer and the client on another computer. Most of the time, this book discusses running the X server and client applications on a single system. “Remote Computing and Local Displays” on the next page describes using X in a distributed environment.
Optional
You can run xev (X event) by giving the command xev from a terminal emulator window and then watch the information flow from the client to the server and back again. This utility opens the Event Tester window, which has a box in it. The X server sends the client (xev) events each time anything happens, such as moving the mouse pointer, clicking a mouse button, moving the mouse pointer into the box, typing, or resizing the window. The xev utility displays information about each event in the window you opened it from. You can usexev as an educational tool: Start it and see how much information is processed each time you move the mouse. Close the Event Tester window to exit from xev.
This section provides basic information about starting and configuring X from the command line. For more information see the Xserver man page and the man pages listed at the bottom of the Xserver man page.
Starting X from a Character-Based Display
Once you have logged in on a virtual console (page 121), you can start an X Window System server by using startx. See “Setting the Persistent Runlevel” on page 444 for instructions on setting Fedora to boot to single-user/rescue mode (specify a target of rescue.target) where it displays a textual interface. When you run startx, the X server displays an X screen, using the first available virtual console. The following command causes startx to run in the background so you can switch back to this virtual console and give additional commands:
$ startx &
Remote Computing and Local Displays
Typically the X server and the X client run on the same machine. To identify a remote X server (display) an X client (application) is to use, you can either set a global shell variable or use a command-line option. Before you can connect to a remote X server, you must make these changes on the server:
1. Turn off the Xorg –nolisten tcp option (next).
2. Run xhost to give the client permission to connect to the X server (next page).
3. Open TCP port 6000 (page 906).
Unless you have a reason to leave these features off, turn them back on when you finish with the examples in this section—leaving them off weakens system security. These tasks must be performed on the X server because the features protect the server. You do not have to prepare the client. The examples in this section assume the server is named plum and the client is named guava.
![]() The Xorg –nolisten tcp Option
The Xorg –nolisten tcp Option
As Fedora/RHEL is installed, the X server starts with the –nolisten tcp option, which protects the X server by preventing TCP connections to the X server. To connect to a remote X server, you must turn this option off on the server. To turn it off, while working with root privileges edit the file named /etc/gdm/custom.conf and add the following line just below [security]:
max@plum:~$ cat /etc/gdm/custom.conf
[security]
DisallowTCP=false
To effect this change, restart the X server and gdm (GNOME display manager) by giving the following command while working with root privileges.
# systemctl restart gdm.service
Use the command ps –ef | grep Xorg to display the options the X server is running with. See library.gnome.org/admin/gdm/3.0/configuration.html.en#daemonconfig for more information.
Security: Security and the Xorg –nolisten tcp option
In a production environment, if you need to place an X server and the clients on different systems, it is best to forward (tunnel) X over ssh. This setup provides a secure, encrypted connection. The method described in this section is useful on local, secure networks and for understanding how X works. See “Forwarding X11” on page 707 for information on setting up ssh so it forwards X.
![]() xhost Grants Access to a Display
xhost Grants Access to a Display
As installed, xhost protects each user’s X server. A user who wants to grant access to his X server needs to run xhost. Assume Max is logged in on the system named plum and wants to allow a user on guava to use his display (X server). Max runs this command:
max@plum:~$ xhost +guava
guava being added to access control list
max@plum:~$ xhost
access control enabled, only authorized clients can connect
INET:guava
...
Without any arguments, xhost describes its state. In the preceding example, INET indicates an IPv4 connection. If Max wants to allow all systems to access his display, he can give the following command:
$ xhost +
access control disabled, clients can connect from any host
Security: Security and xhost
Giving a remote system access to your display using xhost means any user on the remote system can watch everything you type in a terminal emulation window, including passwords. For this reason, some software packages, such as the Tcl/Tk development system (www.tcl.tk), restrict their own capabilities when xhost permits remote access to the X server. If you are concerned about security or want to take full advantage of systems such as Tcl/Tk, use a safer means of granting remote access to your X session. See the xauth manpage for information about a more secure replacement for xhost.
If you frequently work with other users via a network, you might find it convenient to add an xhost line to your .bash_profile file (page 330)—but see the tip on the previous page regarding security and xhost. Be selective in granting access to your X display using xhost; if another system has access to your display, you might find your work frequently interrupted.
![]() The DISPLAY Variable
The DISPLAY Variable
The most common method of identifying a display is to use the DISPLAY shell environment variable to hold the X server ID string. This locally unique identification string holds the screen number of a display:
$ echo $DISPLAY
:0
The format of the complete (globally unique) ID string for a display is
[hostname]:display-number[.screen-number]
where hostname is the name of the system running the X server, display-number is the number of the logical (physical) display (0 unless multiple monitors or graphical terminals are attached to the system, or if you are running X over ssh), and screen-number is the logical number of the (virtual) terminal (0 unless you are running multiple instances of X). When you are working with a single physical screen, you can shorten the identification string. For example, you can use plum:0.0 or plum:0 to identify the only physical display on the system named plum. When the X server and the X clients are running on the same system, you can shorten this identification string even further to :0.0 or :0. An ssh connection shows DISPLAY as localhost:10.0. You might have to connect using ssh –X to see this value. See “X11 forwarding” on page 687 for information on setting up ssh so it forwards X.
Tip: When you change the value of DISPLAY
When you change the value of the DISPLAY variable, all X programs send their output to the new display named by DISPLAY.
If DISPLAY is empty or not set, the screen you are working from is not running X. An application (the X client) uses the value of the DISPLAY variable to determine which display, keyboard, and mouse (collectively, the X server) to use. One way to run an X application, such as gnome-calculator, on the local system but have it use the X display on a remote system is to change the value of the DISPLAY variable on the client system so it identifies the remote X server.
sam@guava:~$ export DISPLAY=plum:0.0
sam@guava:~$ gnome-calculator &
The preceding example shows Sam running gnome-calculator with the default X server running on the system named plum. After setting the DISPLAY variable to the ID of the plum server, all X programs (clients) Sam starts use plum as their server (i.e., output appears on plum’s display and input comes from plum’s keyboard and mouse). Try running xterm in place of gnome-calculator and see which keyboard it accepts input from. If this example generates an error, refer to the two preceding sections, which explain how to set up the server to allow a remote system to connect to it.
The ––display Option
For a single command, you can usually specify the X server on the command line:
sam@guava:~$ gnome-calculator --display plum:0.0
Many X programs accept the ––display option. Those that do not accept this option send their output to the display specified by the DISPLAY variable.
Stopping the X Server
How you terminate a window manager depends on which window manager is running and how it is configured. If X stops responding, switch to a virtual terminal, log in from another terminal or a remote system, or use ssh to access the system. Then kill (page 465) the process running Xorg.
Remapping Mouse Buttons (CLI)
Throughout this book, each description of a mouse click refers to the button by its position (left, middle, or right, with left implied when no button is specified) because the position of a mouse button is more intuitive than an arbitrary name or number. X numbers buttons starting at the left and continuing with the mouse wheel. The buttons on a three-button mouse are numbered 1 (left), 2 (middle), and 3 (right). A mouse wheel, if present, is numbered 4 (rolling it up) and 5 (rolling it down). Clicking the wheel is equivalent to clicking the middle mouse button. The buttons on a two-button mouse are 1 (left) and 2 (right).
If you are right-handed, you can conveniently press the left mouse button with your index finger; X programs take advantage of this fact by relying on button 1 for the most common operations. If you are left-handed, your index finger rests most conveniently on button 2 or 3 (the right button on a two- or three-button mouse).
“Left-handed mouse” on page 110 describes how to use a GUI to change a mouse between right-handed and left-handed, causing X to swap the functions of the left and right buttons. You can also change how X interprets the mouse buttons using xmodmap. If you are left-handed and using a three-button mouse with a wheel, the following command causes X to interpret the right button as button 1 and the left button as button 3:
$ xmodmap -e 'pointer = 3 2 1 4 5'
Warning: Only changing the first 5 of 24 buttons.
The warning says that xmodmap is not changing the settings of the last 19 buttons, which is fine. Omit the 4 and 5 if the mouse does not have a wheel. The following command works for a two-button mouse without a wheel:
$ xmodmap -e 'pointer = 2 1'
Use the xmodmap –pp option to display all the buttons X has defined for the mouse and how those buttons are mapped. After making the changes described above for the mouse with a wheel, xmodmap shows the following mapping.
$ xmodmap -pp
There are 24 pointer buttons defined.
Physical Button
Button Code
1 3
2 2
3 1
4 4
5 5
6 6
7 7
...
Changing the order of the first three buttons is critical to making the mouse suitable for a left-handed user. When you remap the mouse buttons, remember to reinterpret the descriptions in this book accordingly. When this book asks you to click the left button or does not specify which button to click, use the right button, and vice versa.
System Administration Tools
This section describes a few of the textual (command-line) tools that can help you be an efficient and thorough system administrator. Some are simply mentioned here and are described in detail elsewhere in the book. It also presents a list of graphical administration tools available under Fedora/RHEL. You can learn more about these tools by reading the appropriate man or info pages.
Textual Administration Utilities
blkid: Displays Block Device Information
The blkid utility, which must be run with root privileges, displays the label, UUID value, and filesystem type for block devices:
# blkid
/dev/sda1: UUID="c07cf9ea-df3c-42a6-8bca-38dbc154a52c" TYPE="ext4"
/dev/sda2: UUID="KyxKaK-k5W1-uljD-sbxD-2X75-M67C-fkkpn1" TYPE="LVM2_member"
/dev/mapper/fedora-swap: UUID="ca3835a5-5789-4aa0-a114-1a1783606d87" TYPE="swap"
/dev/mapper/fedora-root: UUID="10f4196d-b561-4830-a603-8eb98e5704c0" TYPE="ext4"
/dev/mapper/fedora-home: UUID="5d5391fe-252a-4a06-a117-aadc81994057" TYPE="ext4"
chsh: Changes the Login Shell for a User
The chsh utility changes the login shell for a user. When you call chsh without an argument, you change your login shell. When an ordinary user changes his login shell with chsh, he must specify an installed shell that is listed in the file /etc/shells, exactly as it is listed there; chsh rejects other entries. When working with root privileges, you can change any user’s shell to any value by calling chsh with the username as an argument. The chsh ––list-shells command displays the list of available shells. In the following example, a user working with root privileges changes Sam’s shell to tcsh:
# chsh sam
Changing shell for sam.
New shell [/bin/bash]: /bin/tcsh
Shell changed.
See page 329 for more information.
clear: Clears the Screen
The clear utility clears the screen. You can also use CONTROL-L from bash to clear the screen. The value of the environment variable TERM (page 1153) determines how to clear the screen.
dmesg: Displays System Messages
The dmesg utility displays recent system log messages (the kernel ring buffer; page 595).
e2label: Works with Volume Labels
The e2label utility displays or creates a volume label on an ext2, ext3, or ext4 filesystem. You must run this utility with root privileges. An e2label command has the following format:
e2label device [newlabel]
where device is the name of the device (e.g., /dev/hda2, /dev/sdb1, /dev/sr0) you want to work with. When you include the optional newlabel parameter, e2label changes the label on device to newlabel. Without this parameter, e2label displays the label. You can also create a volume label using the –L option of tune2fs (page 526). See also blkid on the previous page.
![]() kill: Sends a Signal to a Process
kill: Sends a Signal to a Process
The kill builtin sends a signal to a process. This signal might or might not terminate (kill) the process, depending on which signal it is and how the process is designed. Refer to “trap: Catches a Signal” on page 1047 for a discussion of the various signals and their interaction with a process. Running kill is definitely not the first method to try when a process needs to be aborted. See also killall (page 467) and pkill (page 468).
Usually a user can kill a process by working in another window or by logging in on another terminal. Sometimes, however, you might have to work with root privileges to kill a process for a user. To kill a process, you need to know its PID. The ps utility can provide this information once you determine the name of the program the user is running and/or the username of the user. The top utility (page 612) can also be helpful in finding and killing a runaway process (use the top k command).
Caution: kill: Use the kill signal (–KILL or –9) as a method of last resort
When you do need to use kill, send the termination signal (kill –TERM or kill –15) first. Only if the termination signal does not work should you attempt to use the kill signal (kill –KILL or kill – 9).
Because of its inherent dangers, using a kill signal is a method of last resort, especially when you are working with root privileges. One kill command issued while working with root privileges can bring the system down without warning. The kill signal can also cause the target program to corrupt its configuration or state.
![]() ps
ps
In the following example, Sam complains that gnome-calculator is stuck and that he cannot do anything from the gnome-calculator window—not even close it. A more experienced user could open another window and kill the process, but in this case you kill it for Sam. You use ps to produce a long list of all processes and a pipeline to send standard output of ls to grep to find which one is running gnome-calculator:
$ ps -ef | grep gnome-calculator
sam 3730 2424 0 14:07 ? 00:00:00 gnome-calculator
sam 3766 3568 0 14:14 pts/3 00:00:00 grep gnome-calculator
If several people are running gnome-calculator, look in the left column to find the correct username so you can kill the correct process.
pgrep
You can also use the pgrep utility to list all processes owned by Sam with the string calc in the name of the program the process is running:
$ pgrep -u sam -l calc
3730 gnome-calculato
Now that you know Sam’s process running gnome-calculator has a PID of 3730, you can use kill to terminate it. The safest way to do so is to log in as Sam (perhaps you could allow him to log in for you or su to sam [su sam] if you are logged in as root) and give any of the following commands (all of which send a termination signal to process 3730):
$ kill 3730
or
$ kill -15 3730
or
$ kill –TERM 3730
Only if this command fails should you send the kill signal:
$ kill –KILL 3730
The –KILL option instructs kill to send a SIGKILL signal, which the process cannot ignore. Although you can give the same command while you are working with root privileges, a typing mistake in this situation can have much more far-reaching consequences than if you make the same mistake while you are working as a nonprivileged user. A nonprivileged user can kill only her own processes, whereas a user with root privileges can kill any process, including system processes.
As a compromise between speed and safety, you can combine the su or sudo and kill utilities by using the su –c or the sudo –u option. The following command runs the kill command with the identity of Sam (Sam’s privileges):
# su sam -c "kill -TERM 3730"
or
$ sudo -u sam kill -TERM 3730
See also killall (next) and pkill (next page).
![]() killall: Kills a Command
killall: Kills a Command
The killall utility is similar to kill (previous) but uses a command name instead of a PID number. Give the following command to kill all your processes that are running gnome-calculator or vi:
$ killall gnome-calculator vi
Running this command while working with root privileges kills all processes running gnome-calculator or vi. See also kill (page 465) and pkill (next page).
lshw: Displays Hardware Information
The lshw utility (lshw package) lists system hardware. This utility provides complete information only when run with root privileges. Use the –short option to display a brief listing. See page 636 for more information.
![]() mkfs: Creates a Filesystem
mkfs: Creates a Filesystem
The mkfs utility creates a new filesystem on a device, destroying all data on the device as it does so. This utility is a front end for many utilities, each of which builds a different type of filesystem. By default, mkfs builds an ext2 filesystem and works on a hard disk partition. Although it can take many options and arguments, you can use mkfs simply as
# mkfs device
where device is the name of the device (e.g., /dev/hda2, /dev/sdb1, /dev/sr0) you want to make a filesystem on. Use the –t option to specify a type of filesystem. For example, the following command creates an ext4 filesystem on /dev/sda2:
# mkfs -t ext4 /dev/sda2
pidof: Displays PID Numbers of Commands
The pidof utility displays the PID number of each process running the command you specify:
$ pidof httpd
567 566 565 564 563 562 561 560 553
If it is difficult to find the right process, try using top. Refer to the man pages for these utilities for more information, including lists of options.
ping: Sends a Packet to a Remote System
The ping utility sends packets to a remote system. This utility determines whether you can reach a remote system through the network and tells you how long it takes to exchange messages with the remote system. Refer to “ping: Tests a Network Connection” on page 305.
![]() pkill: Kills a Command
pkill: Kills a Command
The pkill utility, which has a syntax similar to pgrep, kills a process based on the command line that initiated the process. The next command sends a termination signal to all processes owned by username sam that have the string calc in the command line that started the process.
$ pkill -u sam calc
Caution dictates that you give the same command using pgrep (page 466) in place of pkill before attempting to kill a process.
reset (link to tset): Resets a Terminal
The reset utility, which is a link to tset, resets terminal characteristics. The value of the TERM environment variable (page 1153) determines how the screen will be reset. The screen is cleared, the kill and interrupt characters are set to their default values, and character echo is turned on. When given from a graphical terminal emulator, this command also changes the size of the window to its default. The reset utility is useful for restoring the screen to a sane state after it has been corrupted, such as after attempting to cat a binary file. In this sense, it is similar to an stty sanecommand.
setserial: Works with a Serial Port
The setserial utility (setserial package) gets and sets serial port information. When run with root privileges, this utility can configure a serial port. It does not configure the hardware. The following command sets the input address of /dev/ttys0 to 0x100, the interrupt (IRQ) to 5, and the baud rate to 115,000 baud:
# setserial /dev/ttys0 port 0x100 irq 5 spd_vhi
You can also use setserial to check the configuration of a serial port:
# setserial /dev/ttys0
/dev/ttyS0, UART: 16550A, Port: 0x0100, IRQ: 5, Flags: spd_vhi
Normally the system calls setserial as it is booting if a serial port needs custom configuration.
stat: Displays Information About a File or Filesystem
The stat utility displays information about a file or filesystem. Giving the –f (filesystem) option followed by the mount point for a filesystem displays information about the filesystem, including the maximum number of characters allowed in a filename (Namelen in the following example). See the stat man page for more information.
$ stat -f /dev/sda
File: "/dev/sda"
ID: 0 Namelen: 255 Type: tmpfs
Block size: 4096 Fundamental block size: 4096
Blocks: Total: 127271 Free: 127207 Available: 127207
Inodes: Total: 127271 Free: 126600
![]() umask: Specifies the File Permission Mask
umask: Specifies the File Permission Mask
The umask shell builtin specifies the mask the system uses to set up access permissions when it creates a file. A umask command has the following format:
umask [mask]
where mask is a three- or four-digit octal number or a symbolic value such as you would use with chmod (page 193). A mask that you specify using octal numbers specifies the permissions that are not allowed; the digits correspond to the permissions for the owner of the file, members of the group the file is associated with, and everyone else. Because mask specifies the permissions that are not allowed, the system uses binary arithmetic to subtract each of the three digits from 7 when you create a file. If the file is an ordinary file (and not a directory file), the system then removes execute permissions from the file. The result is three or four octal numbers that specify the access permissions for the file (the numbers you would use with chmod).
You must use binary or octal arithmetic when performing permissions calculations. To calculate file permissions given a umask value, subtract the umask value from octal 777. For example, assume a umask value of 003:
777 starting permissions for calculation
–003 subtract umask value
774 resulting permissions for a directory
111 remove execute permissions
664 resulting permissions for an ordinary file
To calculate permissions for a directory, umask subtracts the umask value from 777: In the example where umask has a value of 003, octal 7 minus octal 0 equals octal 7 (for two positions). Octal 7 minus octal 3 equals octal 4. Or using binary arithmetic, 111 – 011 = 100. The result is that the system gives permissions of 774 (rwxrwxr––) to a directory.
To calculate permissions for an ordinary file, the system changes the execute bit (001 binary) to 0 for each position. If the execute bit is not set, the system does not change the execute bit. In the example, removing the execute bit from octal 7 yields octal 6 (removing 001 from 111 yields 110; two positions). Octal 4 remains octal 4 because the execute bit is not set (the 001 bit is not set in 100, so it remains 100). The result is that the system gives permissions of 664 (rw–rw–r––) to an ordinary file.
The following commands set the file-creation mask and display the mask and its effect when you create a file and a directory. The mask of 022, when subtracted from 777, gives permissions of 755 (rwxr–xr–x) for a directory. For an ordinary file, the system subtracts execute permissions from 755 yielding permissions of 644 (rw–r––r––).
$ umask 022
$ umask
0022
$ touch afile
$ mkdir adirectory
$ ls -ld afile adirectory
drwxr-xr-x. 2 sam pubs 4096 07-25 14:39 adirectory/
-rw-r--r--. 1 sam pubs 0 07-25 14:39 afile
A mask that you specify using symbolic values specifies the permissions that are allowed. The next example sets the same mask using symbolic values. The –S option displays the mask symbolically:
$ umask u=rwx,g=rx,o=rx
$ umask
0022
$ umask -S
u=rwx,g=rx,o=rx
![]() uname: Displays System Information
uname: Displays System Information
The uname utility displays information about the system. Without arguments, it displays the name of the operating system (Linux). The –r (release) option displays the kernel release (e.g., 3.10.3-300.fc19.x86_64). The –a (all) option displays the operating system name, hostname, kernel release, release date of the operating system, and type of hardware you are using:
$ uname -a
Linux guava.example.com 3.9.9-302.fc19.x86_64 #1 SMP Sat Jul 6 13:41:07 UTC 2013 x86_64 x86_64 x86_64 GNU/Linux
Graphical Configuration Tools
The Fedora/RHEL graphical configuration tools bring up graphical displays when called from a GUI; some display a textual interface when called from a command line in a non-GUI environment. In general, these tools, which are listed in Table 10-2, are simple to use and require little explanation beyond what the tool presents. Some have Help selections on their toolbars. Most do not have man pages, but some have a useful ––help option. Many of the older tools have been replaced by the gnome-control-center (the Settings window; page 107).
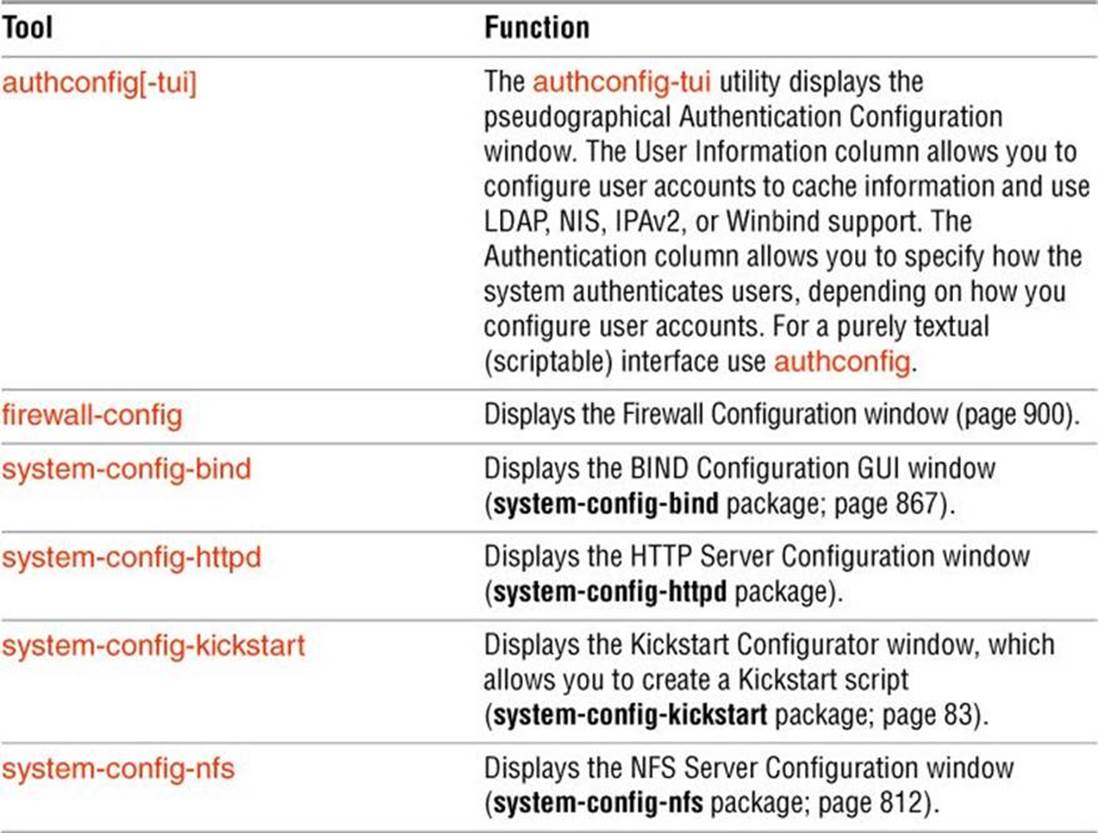
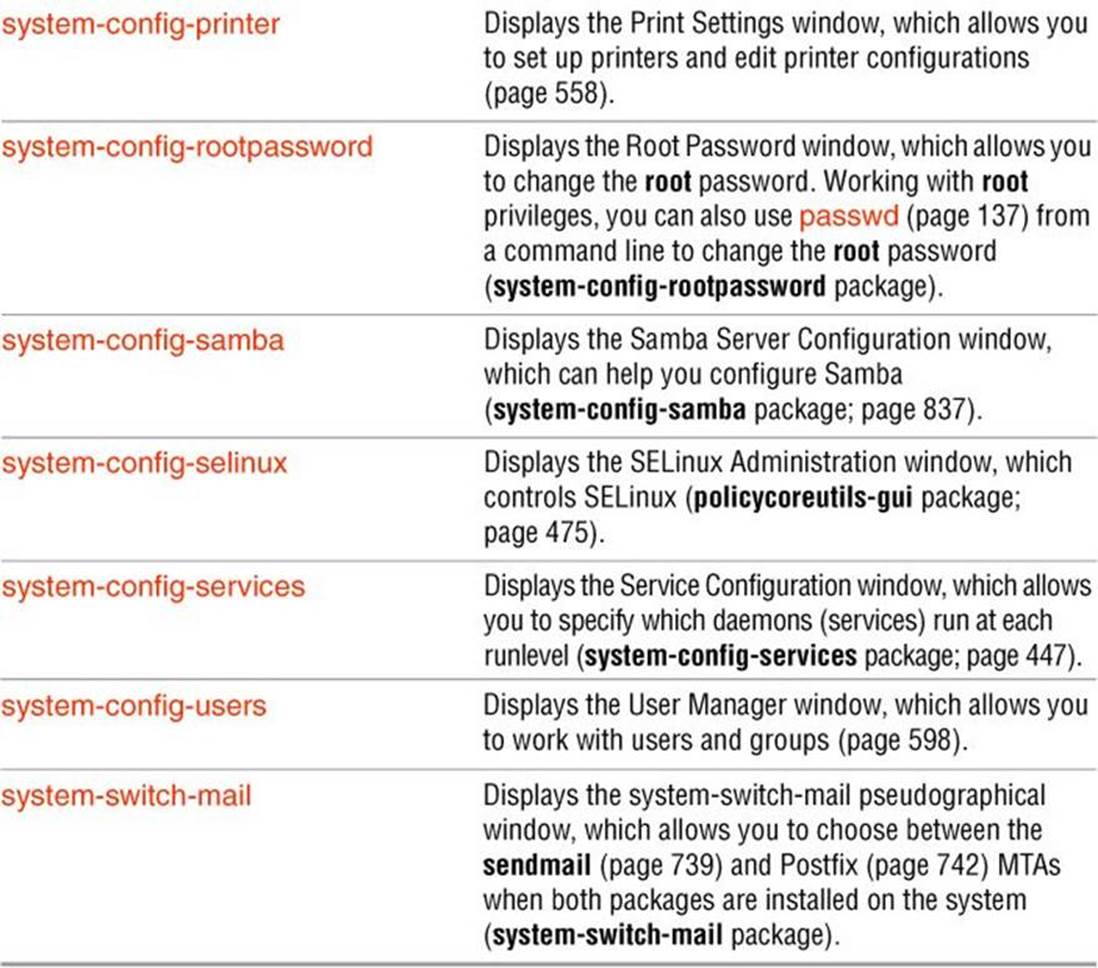
Table 10-2 Graphical configuration tools
SELinux
Traditional Linux security, called DAC (Discretionary Access Control), is based on users and groups. ACLs (page 198) implement DAC and can achieve fine-grained control over which users and processes can access files and how they can access them. Fine-grained access control is particularly important on servers, which often hold programs that require root privileges to run. The problem is that under DAC, the owner of a file has control over the permissions to the file, which is not always ideal.
SELinux (Security-Enhanced Linux), developed by the NSA (U.S. National Security Agency), implements MAC (Mandatory Access Control) in the Linux kernel. MAC, which is under the control of the system administrator, enforces security policies that limit what a user or program can do. It defines a security policy that controls some or all objects, such as files, devices, sockets, and ports, and some or all subjects, such as processes. Using SELinux, you can grant a process only those permissions it needs to be functional, following the principle of least privilege (page 423). Users are assigned roles that determine the primary function of the user. SELinux roles are conceptually similar to groups, except under SELinux, a user must actively switch between permitted roles. MAC is an important tool for limiting security threats that come from user errors, software flaws, and malicious users. The kernel checks MAC rules after it checks DAC rules; either can deny access.
Tip: DAC versus MAC: who has the final say?
Both DAC (Discretionary Access Control) and MAC (Mandatory Access Control) are effective at controlling access. The difference is that DAC is under the control of the user who owns a file and is therefore more easily subverted than is MAC, which is under the control of the system administrator. The kernel checks MAC rules after it checks DAC rules; either can deny access.
Modes
SELinux can be in one of three modes (states):
• Enforcing/Active—The default state, wherein SELinux security policy is enforced. A user or program can do only that which is permitted by the security policy.
• Permissive/Warn—The diagnostic state, wherein SELinux sends warning messages to a log but does not enforce the security policy. You can use the log to build a security policy that matches your requirements.
• Disabled—SELinux does not enforce a security policy nor does it issue warnings because no policy is loaded.
Running SELinux in permissive or enforcing state is estimated to degrade system performance between 0 and 7 percent, depending on tuning and usage. If you are unsure whether to use SELinux, selecting permissive state allows you to change to disabled or enforcing state easily at a later date.
Policies
SELinux implements one of the following policies:
• Targeted—Applies SELinux MAC controls only to certain (targeted) processes (default).
• MLS—Multilevel Security protection for servers.
• Minimum—Protects virtual machines only.
This section discusses the targeted policy. With this policy, daemons and system processes that do not have a specified policy are controlled by traditional Linux DACs.
Tip: Is SELinux causing a problem?
If a server or other system software does not work when you set it up, improper SELinux configuration may be the cause of the problem. Many services include instructions for secure use with SELinux (e.g., smb.conf) or have a man page in the selinux-policy-develpackage (e.g., after you install the package, give the command man 8 httpd_selinux). You can also check /var/log/audit/audit.log if you suspect the SELinux policy needs to be adjusted.
More Information
Web
NSA: www.nsa.gov/research/selinux/docs.shtml
Fedora SELinux Wiki: fedoraproject.org/wiki/SELinux
SELinux Project: selinuxproject.org
SELinux HOWTO: wiki.centos.org/HowTos/SELinux
Warning about disabling SELinux: stopdisablingselinux.com
Fedora SELinux mailing list: admin.fedoraproject.org/mailman/listinfo/selinux
Tip: Turning off SELinux
There are two ways to disable SELinux. You can either modify the /etc/selinux/config file so it includes the line SELINUX=disabled and reboot the system, or you can use system-config-selinux (as explained on page 475). However, see stopdisablingselinux.com.
If there is a chance you will want to enable SELinux in the future, putting SELinux in permissive mode is a better choice than disabling it. This strategy allows you to turn on SELinux more quickly when you decide to use it.
config: The SELinux Configuration File
The /etc/selinux/config file, which has a link at /etc/sysconfig/selinux, controls the state of SELinux on the local system. Although you can modify this file, it might be more straightforward to work with system-config-selinux (next page). In the following example, the policy is set to targeted, but that setting is of no consequence because SELinux is disabled:
$ cat /etc/selinux/config
# This file controls the state of SELinux on the system.
# SELINUX= can take one of these three values:
# enforcing - SELinux security policy is enforced.
# permissive - SELinux prints warnings instead of enforcing.
# disabled - No SELinux policy is loaded.
SELINUX=disabled
# SELINUXTYPE= can take one of these two values:
# targeted - Targeted processes are protected,
# minimum - Modification of targeted policy. Only selected processes are protected.
# mls - Multi Level Security protection.
SELINUXTYPE=targeted
To put SELinux in enforcing mode, change the line containing the SELINUX assignment to SELINUX=enforcing. Similarly, you can change the policy by setting SELINUXTYPE. The change takes effect when the system reboots.
Tip: If you will use SELinux in the future
If you will use SELinux in the future but not now, turn it on when you install Linux and run it in permissive state with the policy set to the policy you will eventually use. Permissive state writes the required extended information to inodes, but it does not stop you from doing anything on the system.
If you turn on SELinux after it has been disabled, when you reboot the system SELinux has to add extended attributes to the files in the filesystem. This process can take a long time on a large filesystem. If you are never going to use SELinux, disable it.
getenforce, setenforce, and sestatus: Work with SELinux
The getenforce and setenforce utilities report on and temporarily set the SELinux state. The sestatus utility displays a summary of SELinux on the local system:
# getenforce
Enforcing
# setenforce permissive
# sestatus
SELinux status: enabled
SELinuxfs mount: /sys/fs/selinux
SELinux root directory: /etc/selinux
Loaded policy name: targeted
Current mode: permissive
Mode from config file: permissive
Policy MLS status: enabled
Policy deny_unknown status: allowed
Max kernel policy version: 28
Setting the Targeted Policy Using system-config-selinux
The system-config-selinux utility (policycoreutils-gui package) displays the SELinux Administration window (Figure 10-4), which controls SELinux. Open this window by giving the command system-config-selinux from an Enter a Command window (ALT-F2) or a terminal emulator.
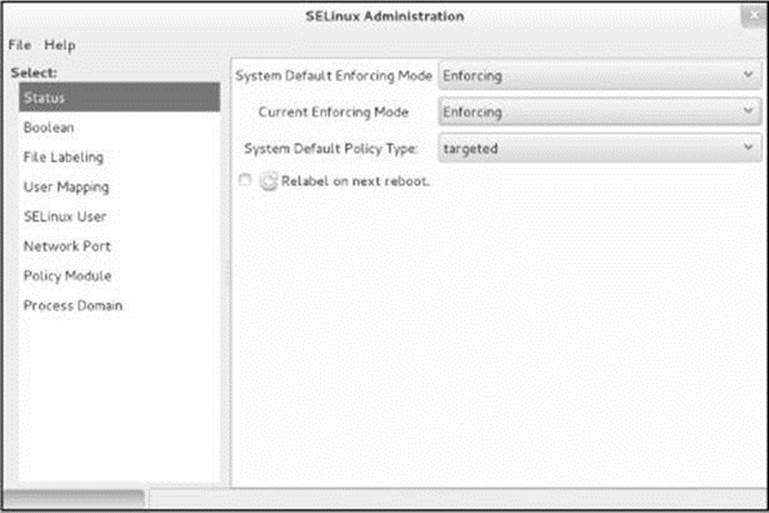
Figure 10-4 The SELinux Administration window
With Status highlighted on the left side of the SELinux Administration window, choose Enforcing (default), Permissive, or Disabled from the drop-down list labeled System Default Enforcing Mode. The mode you choose becomes effective next time the system boots. You can use the drop-down list labeled Current Enforcing Mode to change between Enforcing and Permissive modes immediately. When you change the mode using this list, the system resumes the default mode when you reboot it.
To modify the SELinux policy, highlight Boolean on the left side of the SELinux Administration window and scroll through the list of modules. For example, the SpamAssassin (page 753) module has two policies: Allow spamd to read/write user home directories and Allow user spamassassin clients to use the network.
The first of these policies has a tick in the check box in the column labeled Active (on the left), so SELinux allows the SpamAssassin daemon (spamd) to read from and write to the home directories of users. The second of these policies does not have a tick in the check box in the column labeled Active, so SELinux does not allow user SpamAssassin clients to use the network. Add or remove ticks in these check boxes to turn on or off these policies.
To find Booleans that pertain to NFS, type nfs in the text box labeled Filter and press RETURN. The SELinux Administration window displays all Booleans with the string nfs in their descriptions. The modules with ticks in the column labeled Active are in use.
The last item on the left side of the SELinux Administration window, Process Domain, allows you put a single module into permissive mode as needed. This selection avoids putting the entire system into permissive mode when just one or two modules are not working properly with the system in enforcing mode.
PAM
PAM (Linux-PAM or Linux Pluggable Authentication Modules) allows a system administrator to determine how applications use authentication (page 1238) to verify the identity of a user. PAM provides shared libraries of modules (located in /lib64/security or /lib/security) that, when called by an application, authenticate a user. The configuration files kept in the /etc/pam.d directory determine the method of authentication and contain a list (i.e., stack) of calls to the modules. PAM might also use other files, such as /etc/passwd, when necessary. The term “Pluggable” in PAM’s name refers to the ease with which you can add and remove modules from an authentication stack.
The configuration files stored in /etc/pam.d describe the authentication procedure for each application. These files usually have names that are the same as or similar to the names of the applications that they authenticate for. For example, authentication for the login utility is configured in/etc/pam.d/login. The name of the file is the name of the PAM service that the file configures. Occasionally one file might serve two programs. PAM accepts only lowercase letters in the names of files in the /etc/pam.d directory.
Authentication stack
The files in /etc/pam.d list the set of modules to be used for each application to perform each task. Each such set of the modules is called an authentication stack or simply a stack. PAM calls the modules one at a time in order, going from the top of the stack (the first module listed in the configuration file) to the bottom. Each module reports success or failure back to PAM. When all stacks of modules (with some exceptions) within a configuration file have been called, the PAM library reports success or failure back to the application.
Instead of building the authentication code into each application, PAM provides shared libraries that keep the authentication code separate from the application code. The techniques of authenticating users stay the same from application to application. In this way PAM enables a system administrator to change the authentication mechanism for a given application without modifying the application.
PAM provides authentication for a variety of system-entry services (such as login, ftp, su, and sudo). You can take advantage of its ability to stack authentication modules to integrate system-entry services with different authentication mechanisms, such as RSA, DCE, Kerberos, and smartcards.
From login to using su or sudo to shutting the system down, whenever you are asked for a password (or not asked for a password because the system trusts you are who you say you are), PAM makes it possible for the system administrator to configure the authentication process. It also makes the configuration process essentially the same for all applications that use PAM for authentication.
Caution: Do not create /etc/pam.conf
You might have encountered PAM on other systems where all configuration is arranged in a single file (/etc/pam.conf). This file does not exist on Fedora/RHEL systems. Instead, the /etc/pam.d directory contains individual configuration files, one per application that uses PAM. This setup makes it easy to install and uninstall applications that use PAM because you do not have to modify the /etc/pam.conf file each time. If you create a /etc/pam.conf file on a system that does not use this file, the PAM configuration might become confused. Do not use PAM documentation from a different system. Also, the requisite control flag is not available on some systems that support PAM.
Error messages
PAM warns you about errors it encounters, logging them to /var/log/messages or /var/log/secure. Review these files if you are trying to figure out why a changed PAM file is not working properly. To prevent a malicious user from seeing information about PAM, PAM sends error messages to a file rather than to the screen.
More Information
Local
Linux-PAM System Administrators’ Guide: /usr/share/doc/pam-1.1.6/html/Linux-PAM_SAG.html
pam man page
PAM modules: apropos pam_ lists man pages describing PAM modules
Web
Description: www.netbsd.org/docs/guide/en/chap-pam.html
HOWTO
User Authentication HOWTO
Configuration Files, Module Types, and Control Flags
Login module
Following is an example of a PAM configuration file. Comment lines begin with a hashmark (#).
$ cat /etc/pam.d/login
#%PAM-1.0
auth [user_unknown=ignore success=ok ignore=ignore default=bad] pam_securetty.so
auth substack system-auth
auth include postlogin
account required pam_nologin.so
account include system-auth
password include system-auth
# pam_selinux.so close should be the first session rule
session required pam_selinux.so close
session required pam_loginuid.so
session optional pam_console.so
# pam_selinux.so open should only be followed by sessions to be executed in the user context
session required pam_selinux.so open
session required pam_namespace.so
session optional pam_keyinit.so force revoke
session include system-auth
session include postlogin
-session optional pam_ck_connector.so
The first line is a special comment; it will become significant only if another PAM format is released. Do not use #% other than in the first line of the preceding example.
The rest of the lines tell PAM to do something as part of the authentication process. The first word on each line is a module type indicator: account, auth, password, or session (Table 10-3). The second is a control flag (Table 10-4) that indicates the action PAM should take if authentication fails. The rest of the line contains the name of a PAM module (located in /lib64/security or /lib/security) and any arguments for that module. The PAM library itself uses the /etc/pam.d files to determine which modules to delegate work to. Lines that have a control flag of include include the file named in the third field.
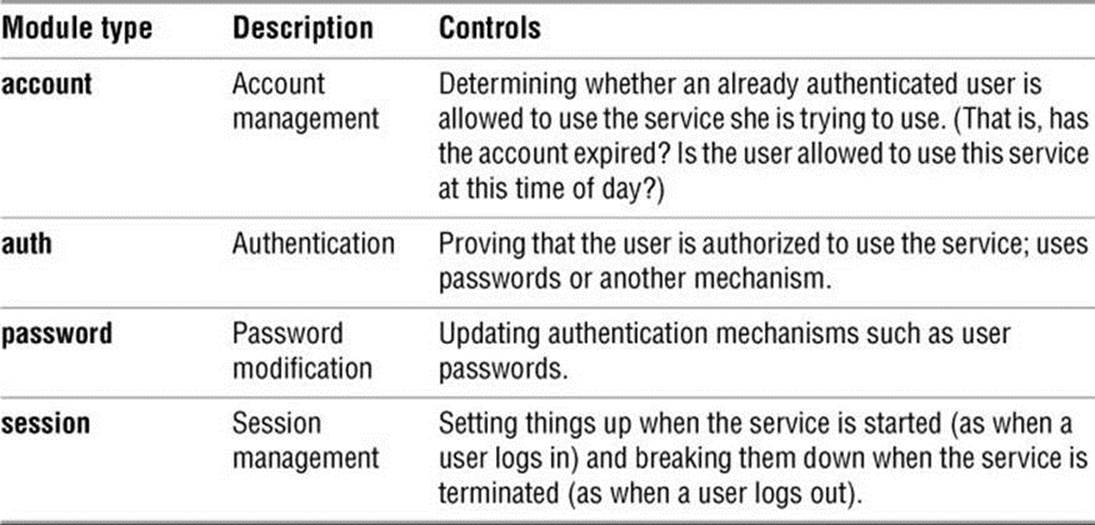
Table 10-3 Module type indicators
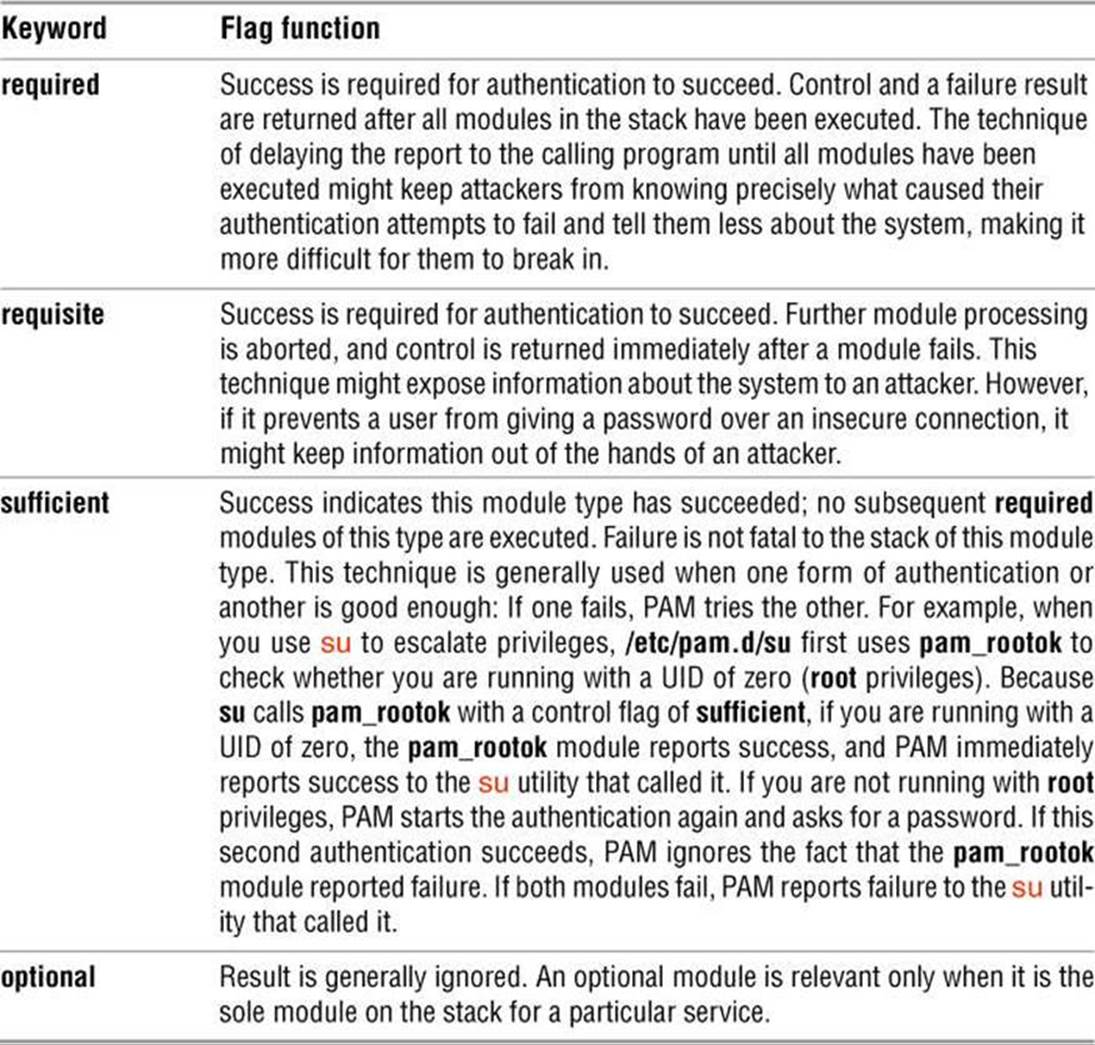
Table 10-4 Control flag keywords
You can use one of the control flag keywords listed in Table 10-4 to set the control flags.
PAM uses each of the module types as requested by the application. That is, the application asks PAM separately to authenticate, check account status, manage sessions, and change the password. PAM uses one or more modules from the /lib64/security or /lib/security directory to accomplish each of these tasks.
Example
Part of the login service’s authentication stack follows:
$ cat /etc/pam.d/login
auth [user_unknown=ignore success=ok ignore=ignore default=bad] pam_securetty.so
auth include system-auth
account required pam_nologin.so
...
The login utility first asks for a username and then calls PAM to run this stack to authenticate the user. Refer to Table 10-3 and Table 10-4.
1. PAM first calls pam_securetty (secure tty; pam_securetty man page) as an auth (authentication) module to make sure the root user logs in only from an allowed terminal. This module looks at the /etc/securetty file for a list of terminals that the user named root is allowed to log in from. Thus PAM implements the longtime UNIX practice of not allowing root to use telnet to log in on the system (telnet uses login for authentication). This technique is not used but could be added to the sshd, vsftpd, and other PAM configuration files.
Within the brackets ([]) in the control flag field are value=action pairs. When the module returns value, PAM evaluates action. In the example, when the module returns user_unknown, the result of running the module is ignored, and when the module returns success, the user is allowed to continue authentication. See the pam_securetty man page for details.
The pam_securetty module is required to succeed if the authentication stack is to succeed. The pam_securetty module reports failure only if someone is trying to log in as root from an unauthorized terminal. Otherwise (if the username being authenticated is not root or if the username is root and the login attempt is being made from a secure terminal), the pam_securetty module reports success.
Success and failure within PAM are opaque concepts that apply only to PAM. They do not equate to “true” and “false” as used elsewhere in the operating system.
2. Next, PAM includes the /etc/pam.d/system-auth file (system-auth man page). This file provides a common interface with which to call PAM.
3. The pam_nologin module (pam_nologin man page) makes sure that if the /etc/nologin file exists, only the root user is allowed to log in. (That is, the pam_nologin module reports success only if /etc/nologin does not exist or if the root user is logging in.) Thus, when a shutdown has been scheduled to occur in the near future, the system keeps users from logging in, only to have the system shut down moments later.
The account module type works like the auth module type but is called after the user has been authenticated; it acts as an additional security check or requirement that must be met for a user to gain access to the system. For example, account modules might enforce a policy that a user can log in only during business hours or check whether a password has expired.
The session module type sets up and tears down the session (perhaps mounting and unmounting the user’s home directory). One common session module is the pam_console module, which sets the system up especially for users who log in at the physical console, rather than remotely. A local user is able to access the flash and DVD drives, the sound card, and sometimes other devices as defined by the system administrator.
The password module type is a bit unusual: All modules in the stack are called once and told to get all information they need to store the password to persistent memory, such as a disk, but not actually to store it. If it determines that it cannot or should not store the password, a module reports failure. If all password modules in the stack report success, they are called a second time and told to store to persistent memory the password they obtained on the first pass. The password module is responsible for updating the authentication information (i.e., changing the user’s password).
Any one module can act as more than one module type; many modules can act as all four module types. For example, pam_unix can be called as an auth module to check a username and password against the passwd and shadow files, as an account module to check password expiration, as a password module to update a password (i.e., if login prompts with your password has expired, enter a new password), or as a session module to record login and logout timestamps for wtmp (for use with the last utility).
Modifying the PAM Configuration
Caution: Do not lock yourself out of the system
Editing PAM configuration files correctly requires careful attention. It is easy to lock yourself out of the system with a mistake. To avoid this problem, keep backup copies of the PAM configuration files you edit, test every change thoroughly, and make sure you can still log in after the change is installed. Keep a root shell open (use su or sudo –i) until you have finished testing. If a change fails and you cannot log in, use the root shell to replace the newly edited files with the backup copies.
Some UNIX systems require that a user be a member of the wheel group to use the su command. Although Fedora/RHEL is not configured this way by default, PAM allows you to change this behavior by editing the /etc/pam.d/su file:
$ cat /etc/pam.d/su
...
# Uncomment the following line to implicitly trust users in the "wheel" group.
#auth sufficient pam_wheel.so trust use_uid
# Uncomment the following line to require a user to be in the "wheel" group.
#auth required pam_wheel.so use_uid
...
The lines of the su module contain comments that include the lines necessary to permit only users who are in the wheel group to use su (required) and to permit members of the wheel group to run su without supplying a password (sufficient). Uncomment one of these lines when you want the system to follow one of these rules.
Setting Up a Server
This section discusses issues you might need to address when setting up a server: how to write configuration files; how to specify hosts and subnets; how to use rpcbind, rpcinfo, and TCP wrappers (hosts.allow and hosts.deny); and how to set up a chroot jail. Chapters 13 and 18–26 cover setting up specific servers; Chapter 16 discusses setting up a LAN.
Standard Rules in Configuration Files
Most configuration files, which are typically named *.conf, rely on the following conventions:
• Blank lines are ignored.
• A # anywhere on a line starts a comment that continues to the end of the line. Comments are ignored.
• When a name contains a SPACE, you must quote the SPACE by preceding it with a backslash (\) or by enclosing the entire name within single or double quotation marks.
• To make long lines easier to read and edit, you can break them into several shorter lines. To break a line, insert a backslash (\) immediately followed by a NEWLINE (press RETURN in a text editor). When you insert the NEWLINE before or after a SPACE, you can indent the following line to make it easier to read. Do not break lines in this manner while editing on a Windows machine, as the NEWLINEs might not be properly escaped (Windows uses a RETURN-LINEFEED combination to end lines).
Configuration files that do not follow these conventions are noted in the text.
Specifying Clients
Table 10-5 shows some common ways to specify a host or a subnet. In most cases you can specify multiple hosts or subnets by separating their specifications with SPACEs.
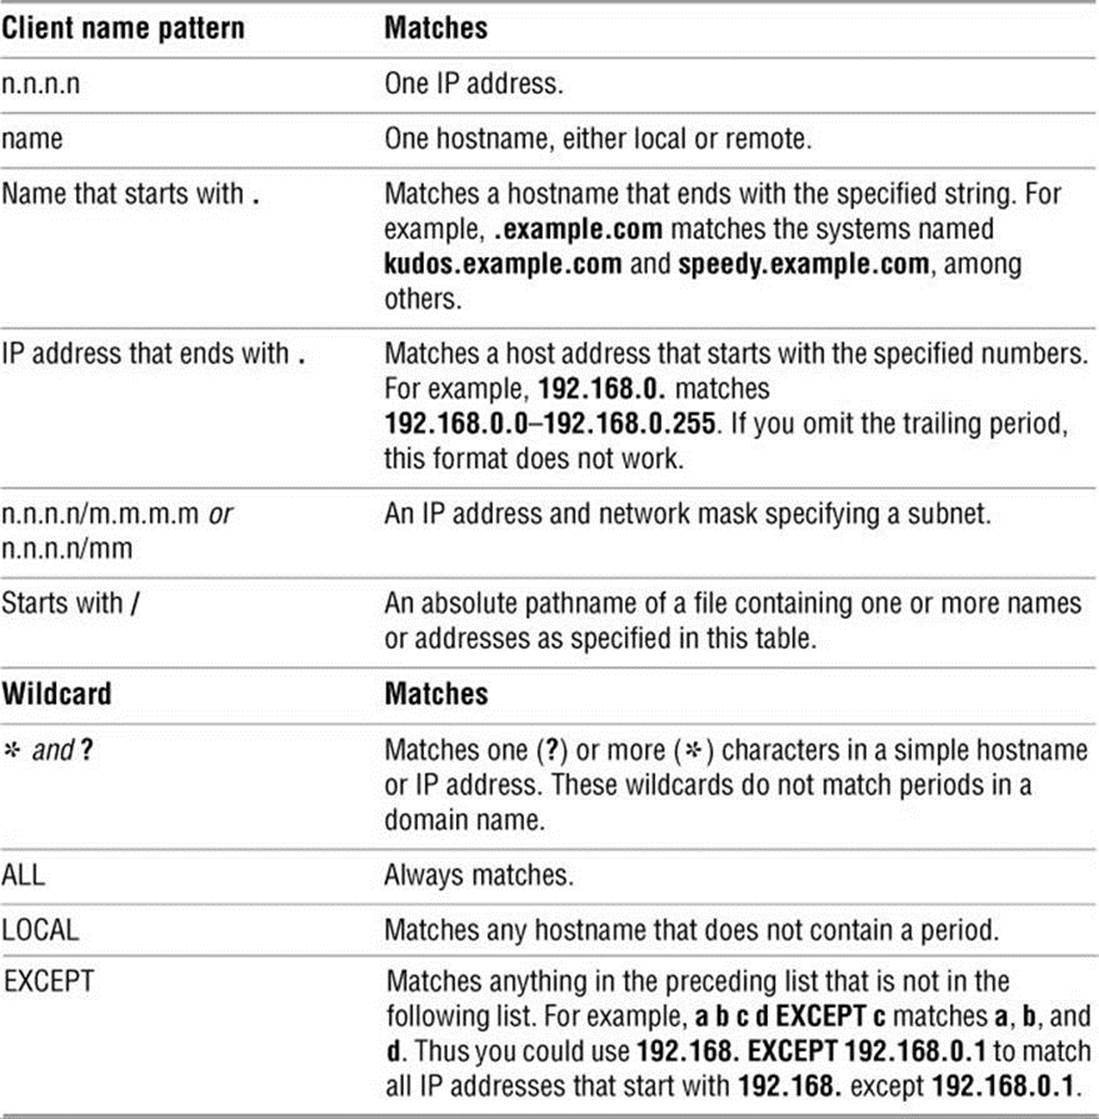
Table 10-5 Specifying a client
Examples
Each of the following examples specifies one or more systems:

Specifying a Subnet
When you set up a server, you frequently need to specify which clients are allowed to connect to it. Sometimes it is convenient to specify a range of IP addresses, called a subnet. The discussion on page 298 explains what a subnet is and how to use a network mask to specify a subnet. Usually you can specify a subnet as
n.n.n.n/m.m.m.m
or
n.n.n.n/maskbits
where n.n.n.n is the base IP address and the subnet is represented by m.m.m.m (the network mask) or maskbits (the number of bits used for the network mask). For example, 192.168.0.1/255.255.255.0 represents the same subnet as 192.168.0.1/24. In binary, decimal 255.255.255.0 is represented by 24 ones followed by 8 zeros. The /24 is shorthand for a network mask with 24 ones. Each line in Table 10-6 presents two notations for the same subnet, followed by the range of IP addresses the subnet includes.
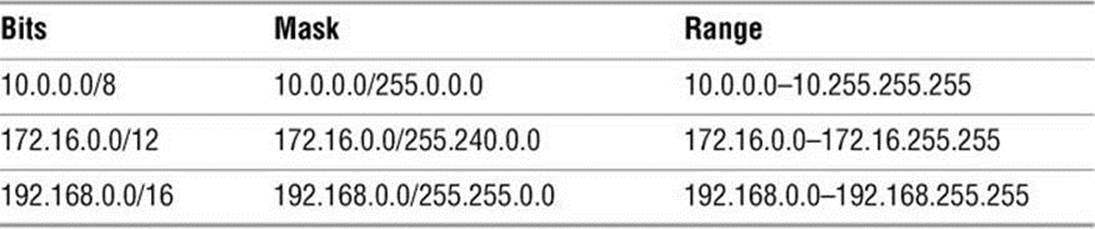
Table 10-6 Different ways to represent a subnet
rpcinfo: Displays Information About rpcbind
The rpcinfo utility (rpcbind package) displays information about programs registered with rpcbind and makes RPC calls to programs to see whether they are alive. For more information on rpcbind, refer to “RPC Network Services” on page 317. The rpcinfo utility takes the following options and arguments:
Syntax
rpcinfo –p [host]
rpcinfo [–n port] [–u | –t] host program [version]
rpcinfo –b | –d program version
–b
(broadcast) Makes an RPC broadcast to version of program and lists hosts that respond.
–d
(delete) Removes local RPC registration for version of program. Available to a user running with root privileges only.
–n
(port number) With –t or –u, uses the port numbered port instead of the port number specified by rpcbind.
–p
(probe) Lists all RPC programs registered, with rpcbind on host or on the local system when you do not specify host.
–t
(TCP) Makes a TCP RPC call to version (if specified) of program on host and reports whether it receives a response.
–u
(UDP) Makes a UDP RPC call to version (if specified) of program on host and reports whether it receives a response.
Examples
The following command displays the RPC programs registered with the rpcbind daemon on the system named plum. If you get a No route to host error make sure the firewall on the remote system allows inbound traffic on TCP port 111.
$ rpcinfo -p plum
program vers proto port service
100000 4 tcp 111 portmapper
100000 3 tcp 111 portmapper
...
100021 1 udp 44202 nlockmgr
100021 3 udp 44202 nlockmgr
...
100003 2 tcp 2049 nfs
100003 3 tcp 2049 nfs
...
Use the –u option to display a list of versions of a daemon, such as nfs, registered on a remote system (plum):
$ rpcinfo -u plum nfs
program 100003 version 2 ready and waiting
program 100003 version 3 ready and waiting
program 100003 version 4 ready and waiting
Specify localhost to display a list of versions of a daemon registered on the local system:
$ rpcinfo -u localhost ypbind
program 100007 version 1 ready and waiting
program 100007 version 2 ready and waiting
Locking down rpcbind
Because the rpcbind daemon holds information about which servers are running on the local system and which port each server is running on, only trusted systems should have access to this information. One way to ensure only selected systems have access to rpcbind is to lock it down in the /etc/hosts.allow and /etc/hosts.deny files (below). Put the following line in hosts.deny to prevent all systems from using rpcbind on the local (server) system:
rpcbind: ALL
Alternately you can block TCP port 111 using firewall-cmd (page 906). Test this setup from a remote system by giving the following command:
$ rpcinfo -p hostname
rpcinfo: can't contact portmapper: RPC: Authentication error; ...
Replace hostname with the name of the remote system that you changed the hosts.deny file on. The change is usually immediate; in most cases you do not need to restart rpcbind.
Next add the following line to the hosts.allow file on the server system:
rpcbind: host-IP
where host-IP is the IP address of the trusted, remote system that you gave the preceding rpcinfo command from. Use only IP addresses with rpcbind in hosts.allow; do not use system names that rpcbind could get stuck trying to resolve. If you give the same command, rpcinfo should display a list of the servers that RPC knows about, including rpcbind. See page 776 for more examples.
Security: Set the clocks
The rpcbind daemon relies on the client and the server clocks being synchronized. A simple DoS attack (page 1248) can be initiated by setting the server clock to the wrong time.
Securing a Server
Two ways you can secure a server are by using TCP wrappers and by setting up a chroot jail. This section describes both techniques. Alternately, you can use firewall-cmd (page 906) to secure a system. A firewall covers protocols such as httpd that are not protected by libwrap, which is required for TCP wrappers.
![]() TCP Wrappers: Secure a Server (hosts.allow and hosts.deny)
TCP Wrappers: Secure a Server (hosts.allow and hosts.deny)
Follow these guidelines when you open a local system to access from remote systems:
• Open the local system only to systems you want to allow to access it.
• Allow each remote system to access only the data you want it to access.
• Allow each remote system to access data only in the appropriate manner (readonly, read/write, write only).
![]() ldd & libwrap
ldd & libwrap
As part of the client/server model, TCP wrappers, which can be used for any daemon that is linked against libwrap, relies on the /etc/hosts.allow and /etc/hosts.deny files as the basis of a simple access control list. This access control language defines rules that selectively allow clients to access server daemons on a local system based on the client’s address and the daemon the client tries to access. The output of ldd shows that one of the shared library dependencies of sshd is libwrap:
$ ldd /usr/sbin/sshd | grep libwrap
libwrap.so.0 => /lib64/libwrap.so.0 (0x00007fe99c955000)
![]() hosts.allow and hosts.deny
hosts.allow and hosts.deny
Each line in the hosts.allow and hosts.deny files has the following format:
daemon_list : client_list [: command]
where daemon_list is a comma-separated list of one or more server daemons (e.g., rpcbind, vsftpd, sshd), client_list is a comma-separated list of one or more clients (see Table 10-5 on page 482), and the optional command is the command that is executed when a client from client_list tries to access a server daemon from daemon_list.
When a client requests a connection to a server, the hosts.allow and hosts.deny files on the server system are consulted in the following order until a match is found:
1. If the daemon/client pair matches a line in hosts.allow, access is granted.
2. If the daemon/client pair matches a line in hosts.deny, access is denied.
3. If there is no match in hosts.allow or hosts.deny, access is granted.
The first match determines whether the client is allowed to access the server. When either hosts.allow or hosts.deny does not exist, it is as though that file were empty. Although not recommended, you can allow access to all daemons for all clients by removing both files.
Examples
For a more secure system, put the following line in hosts.deny to block all access:
$ cat /etc/hosts.deny
...
ALL : ALL : echo '%c tried to connect to %d and was blocked' >> /var/log/tcpwrappers.log
This line prevents any client from connecting to any service, unless specifically permitted to do so in hosts.allow. When this rule is matched, it adds a line to the file named /var/log/tcpwrappers.log. The %c expands to client information, and the %d expands to the name of the daemon the client attempted to connect to.
With the preceding hosts.deny file in place, you can include lines in hosts.allow that explicitly allow access to certain services and systems. For example, the following hosts.allow file allows any client to connect to the OpenSSH daemon (ssh, scp, sftp) but allows telnet connections only from the same network as the local system and users on the 192.168. subnet:
$ cat /etc/hosts.allow
sshd: ALL
in.telnet: LOCAL
in.telnet: 192.168.* 127.0.0.1
...
The first line allows connection from any system (ALL) to sshd. The second line allows connection from any system in the same domain as the server (LOCAL). The third line matches any system whose IP address starts with 192.168. as well as the local system.
Setting Up a chroot Jail
On early UNIX systems, the root directory was a fixed point in the filesystem. On modern UNIX variants, including Linux, you can define the root directory on a per-process basis. The chroot utility allows you to run a process with a root directory other than /.
The root directory appears at the top of the directory hierarchy and has no parent. Thus a process cannot access files above the root directory because none exist. If, for example, you run a program (process) and specify its root directory as /home/sam/jail, the program would have no concept of any files in /home/sam or above: jail is the program’s root directory and is labeled / (not jail).
By creating an artificial root directory, frequently called a (chroot) jail, you prevent a program from accessing, executing, or modifying—possibly maliciously—files outside the directory hierarchy starting at its root. You must set up a chroot jail properly to increase security: If you do not set up the chroot jail correctly, you can make it easier for a malicious user to gain access to a system than if there were no chroot jail.
Using chroot
Creating a chroot jail is simple: Working with root privileges, give the command /usr/sbin/chroot directory. The directory becomes the root directory, and the process attempts to run the default shell. Working with root privileges, the following command sets up a chroot jail in the (existing)/home/sam/jail directory running bash (/usr/bin/bash):
# /usr/sbin/chroot /home/sam/jail /usr/bin/bash
/usr/sbin/chroot: failed to run command '/usr/bin/bash': No such file or directory
This example sets up a chroot jail, but when the system attempts to run the bash shell, the operation fails. Once the jail is set up, the directory that was named jail takes on the name of the root directory, /. As a consequence, chroot cannot find the file identified by the pathname/usr/bin/bash. In this situation the chroot jail works correctly but is not useful.
Getting a chroot jail to work the way you want is more complicated. To have the preceding example run bash in a chroot jail, create a usr/bin directory in jail (/home/sam/jail/usr/bin) and copy /usr/bin/bash to this directory. Because the bash binary is dynamically linked to shared libraries, you need to copy these libraries into jail as well. The libraries go in lib64 (64-bit system) or lib (32-bit system).
![]() ldd
ldd
The next example creates the necessary directories, copies bash, uses ldd to display the shared library dependencies of bash, and copies the necessary libraries to lib64. The linux-vdso.so.1 file is a DSO (dynamically shared object) provided by the kernel to speed system calls; you do not need to copy it.
$ pwd
/home/sam/jail
$ mkdir -p usr/bin lib64
$ cp /usr/bin/bash usr/bin
$ ldd usr/bin/bash
linux-vdso.so.1 => (0x00007fffe3f26000)
libtinfo.so.5 => /lib64/libtinfo.so.5 (0x00007fdb3b7f1000)
libdl.so.2 => /lib64/libdl.so.2 (0x00007fdb3b5ed000)
libc.so.6 => /lib64/libc.so.6 (0x00007fdb3b22c000)
/lib64/ld-linux-x86-64.so.2 (0x00007fdb3ba2d000)
$ cp /lib64/{libtinfo.so.5,libdl.so.2,libc.so.6,ld-linux-x86-64.so.2} lib64
Now start the chroot jail again. Although all the setup can be done by an ordinary user, you must work with root privileges to run chroot:
$ su
Password:
# /usr/sbin/chroot /home/sam/jail /usr/bin/bash
bash-4.2# pwd
/
bash-4.2# ls
bash: ls: command not found
bash-4.2#
This time chroot finds and starts bash, which displays its default prompt (bash-4.2#). The pwd command works because it is a shell builtin (page 170). However, bash cannot find the ls utility because it is not in the chroot jail. You can copy /bin/ls and its libraries into the jail if you want users in the jail to be able to use ls. An exit command allows you to escape from the jail.
To set up a useful chroot jail, first determine which utilities the users of the chroot jail need. Then copy the appropriate binaries and their libraries into the jail. Alternately, you can build static copies of the binaries and put them in the jail without installing separate libraries. (The statically linked binaries are considerably larger than their dynamic counterparts. The size of the base system with bash and the core utilities exceeds 50 megabytes.) You can find the source code for most common utilities in the bash and coreutils SRPM (source rpm) packages.
The chroot utility fails unless you run it with root privileges. The result of running chroot with root privileges is a root shell (a shell with root privileges) running inside a chroot jail. Because a user with root privileges can break out of a chroot jail, it is imperative that you run a program in the chroot jail with reduced privileges (i.e., privileges other than those of root).
There are several ways to reduce the privileges of a user. For example, you can put su or sudo in the jail and then start a shell or a daemon inside the jail, using one of these programs to reduce the privileges of the user working in the jail. A command such as the following starts a shell with reduced privileges inside the jail:
# /usr/sbin/chroot jailpath /usr/bin/su user -c /usr/bin/bash
where jailpath is the pathname of the jail directory, and user is the username under whose privileges the shell runs. The problem with this scenario is that sudo and su, as compiled for Fedora/RHEL, call PAM. To run one of these utilities you need to put all of PAM, including its libraries and configuration files, in the jail, along with sudo (or su) and the /etc/passwd file. Alternately, you can recompile su or sudo. The source code calls PAM, however, so you would need to modify the source so it does not call PAM. Either one of these techniques is time consuming and introduces complexities that can lead to an unsecure jail.
The following C program1 runs a program with reduced privileges in a chroot jail. Because this program obtains the UID and GID of the user you specify on the command line before calling chroot(), you do not need to put /etc/passwd in the jail. The program reduces the privileges of the specified program to those of the specified user. This program is presented as a simple solution to the preceding issues so you can experiment with a chroot jail and better understand how it works.
1. Thanks to David Chisnall and the Étoilé Project (etoileos.com) for the uchroot.c program.
$ cat uchroot.c
/* See svn.gna.org/viewcvs/etoile/trunk/Etoile/LiveCD/uchroot.c for terms of use. */
#include <stdio.h>
#include <stdlib.h>
#include <pwd.h>
int main(int argc, char * argv[])
{
if(argc < 4)
{
printf("Usage: %s {username} {directory} {program} [arguments]\n", argv[0]);
return 1;
}
/* Parse arguments */
struct passwd * pass = getpwnam(argv[1]);
if(pass == NULL)
{
printf("Unknown user %s\n", argv[1]);
return 2;
}
/* Set the required UID */
chdir(argv[2]);
if(chroot(argv[2])
||
setgid(pass->pw_gid)
||
setuid(pass->pw_uid))
{
printf("%s must be run as root. Current uid=%d, euid=%d\n",
argv[0],
(int)getuid(),
(int)geteuid()
);
return 3;
}
return execv(argv[3], argv + 3);
}
The first of the following commands compiles uchroot.c using cc (gcc package), creating an executable file named uchroot. Subsequent commands move uchroot to /usr/local/bin and give it appropriate ownership.
$ cc -o uchroot uchroot.c
$ su
password:
# mv uchroot /usr/local/bin
# chown root:root /usr/local/bin/uchroot
# exit
$ ls -l /usr/local/bin/uchroot
-rwxr-xr-x. 1 root root 8924 07-26 14:24 /usr/local/bin/uchroot
Using the setup from earlier in this section, give the following command to run a shell with the privileges of the user sam inside a chroot jail:
# /usr/local/bin/uchroot sam /home/sam/jail /usr/bin/bash
Tip: Keeping multiple chroot jails
If you plan to deploy multiple chroot jails, it is a good idea to keep a clean copy of the bin and lib directories somewhere other than in one of the active jails.
Running a Service in a chroot Jail
Running a shell inside a jail has limited usefulness. In reality, you are more likely to want to run a specific service inside the jail. To run a service inside a jail, make sure all files needed by that service are inside the jail. Using uchroot, the format of a command to start a service in a chrootjail is
# /usr/local/bin/uchroot user jailpath daemonname
where jailpath is the pathname of the jail directory, user is the username that runs the daemon, and daemonname is the pathname (inside the jail) of the daemon that provides the service.
Some servers are already set up to take advantage of chroot jails. For example, you can set up DNS so that named runs in a jail (page 883), and the vsftpd FTP server can automatically start chroot jails for clients (page 729).
Security Considerations
Some services need to be run by a user or process with root privileges but release their root privileges once started (Apache, Procmail, and vsftpd are examples). If you are running such a service, you do not need to use uchroot or put su or sudo inside the jail.
A process run with root privileges can potentially escape from a chroot jail. For this reason, you should reduce privileges before starting a program running inside the jail. Also, be careful about which setuid (page 196) binaries you allow inside a jail—a security hole in one of them could compromise the security of the jail. In addition, make sure the user cannot access executable files that he uploads to the jail.
![]() DHCP: Configures Network Interfaces
DHCP: Configures Network Interfaces
Instead of storing network configuration information in local files on each system, DHCP (Dynamic Host Configuration Protocol) enables client systems to retrieve the necessary network configuration information from a DHCP server each time they connect to the network. A DHCP server assigns IP addresses from a pool of addresses to clients as needed. Assigned addresses are typically temporary but need not be.
This technique has several advantages over storing network configuration information in local files:
• A new user can set up an Internet connection without having to deal with IP addresses, netmasks, DNS addresses, and other technical details. An experienced user can set up a connection more quickly.
• DHCP facilitates assignment and management of IP addresses and related network information by centralizing the process on a server. A system administrator can configure new systems, including laptops that connect to the network from different locations, to use DHCP; DHCP then assigns IP addresses only when each system connects to the network. The pool of IP addresses is managed as a group on the DHCP server.
• DHCP facilitates the use of IP addresses by more than one system, reducing the total number of IP addresses needed. This conservation of addresses is important because the Internet has run out of IPv4 addresses. Although a particular IP address can be used by only one system at a time, many end-user systems require addresses only occasionally, when they connect to the Internet. By reusing IP addresses, DHCP has lengthened the life of the IPv4 protocol.
DHCP is particularly useful for an administrator who is responsible for maintaining a large number of systems because new systems no longer need to be set up with unique configuration information.
How DHCP Works
Using dhclient, the client contacts the server daemon, dhcpd, to obtain the IP address, netmask, broadcast address, nameserver address, and other networking parameters. In turn, the server provides a lease on the IP address to the client. The client can request the specific terms of the lease, including its duration; the server can limit these terms. While connected to the network, a client typically requests extensions of its lease as necessary so its IP address remains the same. This lease might expire once the client is disconnected from the network, with the server giving the client a new IP address when it requests a new lease. You can also set up a DHCP server to provide static IP addresses for specific clients (refer to “Static Versus Dynamic IP Addresses” on page 298).
When you start Fedora/RHEL, the system runs a DHCP client, connects to a DHCP server if it can find one, and configures its network interface.
DHCP Client
A DHCP client requests network configuration parameters from the DHCP server and uses those parameters to configure its network interface.
Prerequisites
Make sure the following package is installed:
• dhclient
dhclient: The DHCP Client
When a DHCP client system connects to the network, dhclient requests a lease from the DHCP server and configures the client’s network interface(s). Once a DHCP client has requested and established a lease, it stores the lease information in a file named dhclient-*-interface.lease, which resides in the /var/lib/NetworkManager directory. The interface is the name of the interface the client uses, such as eth0. The system uses this information to reestablish a lease when either the server or the client needs to reboot. The DHCP client configuration file, /etc/dhcp/dhclient.conf, is required only for custom configurations. The /usr/share/doc/dhclient* directory holds a well-commented dhclient.conf file.
The following dhclient.conf file specifies a single interface, ens33:
$ cat /etc/dhcp/dhclient.conf
interface "ens33"
{
send dhcp-client-identifier 1:xx:xx:xx:xx:xx:xx;
send dhcp-lease-time 86400;
}
In the preceding file, the 1 in the dhcp-client-identifier specifies an Ethernet network and xx:xx:xx:xx:xx:xx is the MAC address (page 1259) of the device controlling that interface. See page 494 for instructions on how to determine the MAC address of a device. The dhcp-lease-time is the duration, in seconds, of the lease on the IP address. While the client is connected to the network, dhclient automatically renews the lease each time half of the lease time is up. A lease time of 86,400 seconds (one day) is a reasonable choice for a workstation.
DHCP Server
A DHCP server maintains a list of IP addresses and other configuration parameters. Clients request network configuration parameters from the server. The DHCP server does not ship with a working configuration. See the /usr/share/doc/dhcp*/*example files for sample dhcpd.conf files that include a lot of documentation.
Prerequisites
Install the following package:
• dhcp
Enable and start dhcpd
Run systemctl to cause the dhcpd service (dhcpd daemon) to start each time the system enters multiuser mode and then start the dhcpd service. Use the systemctl status command to make sure the service is running.
# systemctl enable dhcpd.service
# systemctl start dhcpd.service
After modifying dhcpd configuration files, give the second command again, replacing start with restart to cause dhcpd to reread those files.
dhcpd: The DHCP Daemon
A simple DHCP server (dhcpd) allows you to add clients to a network without maintaining a list of assigned IP addresses. A simple network, such as a home-based LAN sharing an Internet connection, can use DHCP to assign a dynamic IP address to almost all nodes. The exceptions are servers and routers, which must be at known network locations if clients are to find them. If servers and routers are configured without DHCP, you can specify a simple DHCP server configuration in /etc/dhcp/dhcpd.conf:
$ cat /etc/dhcp/dhcpd.conf
default-lease-time 600;
max-lease-time 86400;
option subnet-mask 255.255.255.0;
option broadcast-address 192.168.1.255;
option routers 192.168.1.1;
option domain-name-servers 192.168.1.1;
option domain-name "example.com";
subnet 192.168.1.0 netmask 255.255.255.0 {
range 192.168.1.2 192.168.1.200;
}
By default, dhcpd serves requests on all nonbroadcast network interfaces.
The preceding configuration file specifies a LAN where both the router and the DNS server are located on 192.168.1.1. The default-lease-time specifies the number of seconds the dynamic IP lease will remain valid if the client does not specify a duration. The max-lease-time is the maximum time allowed for a lease.
The information in the option lines is sent to each client when it connects. The names following the word option specify what the following argument represents. For example, the option broadcast-address line specifies the broadcast address of the network. The routers and domain-name-servers options can be followed by multiple values separated by commas.
The subnet section includes a range line that specifies the range of IP addresses the DHCP server can assign. In the case of multiple subnets, you can define options, such as subnet-mask, inside the subnet section. Options defined outside all subnet sections are global and apply to all subnets.
The preceding configuration file assigns addresses in the range from 192.168.1.2 to 192.168.1.200. The DHCP server starts at the bottom of this range and attempts to assign a new IP address to each new client. Once the DHCP server reaches the top of the range, it starts reassigning IP addresses that have been used in the past but are not currently in use. If you have fewer systems than IP addresses, the IP address of each system should remain fairly constant. Two systems cannot use the same IP address at the same time.
Once you have configured a DHCP server, restart it using systemctl (previous page). When the server is running, clients configured to obtain an IP address from the server using DHCP should be able to do so. See the /usr/share/doc/dhcp*/*example files for sample dhcpd.conf files.
Static IP Addresses
As mentioned earlier, routers and servers typically require static IP addresses. Although you can manually configure IP addresses for these systems, it might be more convenient to have the DHCP server provide them with static IP addresses. See page 641 if you want to configure a system to use a static IP address without using DHCP.
When a system that requires a specific static IP address connects to the network and contacts the DHCP server, the server needs a way to identify the system so it can assign the proper IP address to that system. The DHCP server uses the MAC address (page 1259) of the system’s NIC (network interface card) as an identifier. When you set up the server, you must know the MAC address of each system that requires a static IP address.
Determining a MAC address
The ip utility displays the MAC addresses of the Ethernet cards in a system. In the following example, the MAC address is the colon-separated series of hexadecimal number pairs following link/ether:
$ ip link show ens33
2: ens33: <BROADCAST,MULTICAST,UP,LOWER_UP> mtu 1500 qdisc pfifo_fast state UP mode DEFAULT qlen 1000
link/ether 00:0c:29:13:f4:35 brd ff:ff:ff:ff:ff:ff
Run ip on each system that requires a static IP address. Once you have determined the MAC addresses of these systems, you can add a host section to the /etc/dhcp/ dhcpd.conf file for each one, instructing the DHCP server to assign a specific address to that system. The following hostsection assigns the address 192.168.1.1 to the system with the MAC address of BA:DF:00:DF:C0:FF:
$ cat /etc/dhcp/dhcpd.conf
...
host router {
hardware ethernet BA:DF:00:DF:C0:FF;
fixed-address 192.168.1.1;
option host-name router;
}
The name following host is used internally by dhcpd. The name specified after option host-name is passed to the client and can be a hostname or an FQDN. After making changes to dhcpd.conf, restart dhcpd using systemctl (previous page).
![]() nsswitch.conf: Which Service to Look at First
nsswitch.conf: Which Service to Look at First
Once NIS and DNS were introduced, finding user and system information was no longer a simple matter of searching a local file. When once you looked in /etc/passwd to get user information and in /etc/hosts to find system address information, now you can use several methods to obtain this type of information. The /etc/nsswitch.conf (name service switch configuration) file specifies which methods to use and the order in which to use them when looking for a certain type of information. You can also specify which action the system should take based on whether a method succeeds or fails.
Syntax
Each line in nsswitch.conf specifies how to search for a piece of information, such as a user’s password. A line in nsswitch.conf has the following syntax:
info: method [[action]] [method [[action]]...]
where info is the type of information the line describes, method is the method used to find the information, and action is the response to the return status of the preceding method. The action is enclosed within square brackets.
When called upon to supply information that nsswitch.conf describes, the system examines the line with the appropriate info field. It uses the methods specified on this line, starting with the method on the left. By default, when it finds the desired information, the system stops searching. Without an action specification, when a method fails to return a result, the system tries the next action. It is possible for the search to end without finding the requested information.
Information
The nsswitch.conf file commonly controls searches for usernames, passwords, host IP addresses, and group information. The following list describes most of the types of information (info in the syntax given earlier) that nsswitch.conf controls searches for:
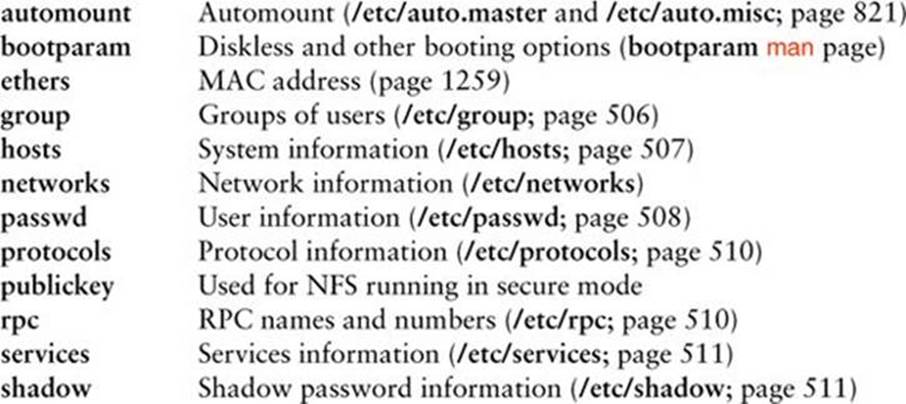
Methods
Following is a list of the methods that nsswitch.conf uses to search for information (method in the syntax shown on the previous page). For each type of information, you can specify one or more of the following methods:2
2. Other, less commonly used methods also exist. See the default /etc/nsswitch.conf file and the nsswitch.conf man page for more information. Although NIS+ belongs in this list, it is not implemented as a Linux server and is not discussed in this book.

Search Order
The information provided by two or more methods might overlap: For example, both files and nis might provide password information for the same user. With overlapping information, you need to consider which method you want to be authoritative (take precedence) and then place that method at the left of the list of methods.
The default nsswitch.conf file lists methods without actions, assuming no overlap (which is normal). In this case, the order is not critical: When one method fails, the system goes to the next one and all that is lost is a little time. Order becomes critical when you use actions between methods or when overlapping entries differ.
The first of the following lines from nsswitch.conf causes the system to search for password information in /etc/passwd and if that fails, to use NIS to find the information. If the user you are looking for is listed in both places, the information in the local file is used and is considered authoritative. The second line uses NIS to find an IP address given a hostname; if that fails, it searches /etc/hosts; if that fails, it checks with DNS to find the information.
passwd files nis
hosts nis files dns
Action Items
Each method can optionally be followed by an action item that specifies what to do if the method succeeds or fails. An action item has the following format:
[[!]STATUS=action]
where the opening and closing square brackets are part of the format and do not indicate that the contents are optional; STATUS (uppercase by convention) is the status being tested for; and action is the action to be taken if STATUS matches the status returned by the preceding method. The leading exclamation point (!) is optional and negates the status.
STATUS
STATUS might have any of the following values:
NOTFOUND—The method worked, but the value being searched for was not found. The default action is continue.
SUCCESS—The method worked, and the value being searched for was found; no error was returned. The default action is return.
TRYAGAIN—The method failed because it was temporarily unavailable. For example, a file might be locked or a server overloaded. The default action is continue.
UNAVAIL—The method failed because it is permanently unavailable. For example, the required file might not be accessible or the required server might be down. The default action is continue.
action
There are two possible values for action:
return—Returns to the calling routine with or without a value.
continue—Continues with the next method. Any returned value is overwritten by a value found by a subsequent method.
Example
The following line from nsswitch.conf causes the system first to use DNS to search for the IP address of a given host. The action item following the DNS method tests whether the status returned by the method is not (!) UNAVAIL.
hosts dns [!UNAVAIL=return] files
The system takes the action associated with the STATUS (return) if the DNS method does not return UNAVAIL (!UNAVAIL)—that is, if DNS returns SUCCESS, NOTFOUND, or TRYAGAIN. As a consequence, the following method (files) is used only when the DNS server is unavailable. If the DNS server is not unavailable (read the two negatives as “is available”), the search returns the domain name or reports that the domain name was not found. The search uses the files method (checks the local /etc/hosts file) only if the server is not available.
compat Method: ± in passwd, group, and shadow Files
You can put special codes in the /etc/passwd, /etc/group, and /etc/shadow files that cause the system, when you specify the compat method in nsswitch.conf, to combine and modify entries in the local files and the NIS maps. That is, a plus sign (+) at the beginning of a line in one of these files adds NIS information; a minus sign (–) removes information.
For example, to use these codes in the passwd file, specify passwd: compat in the nsswitch.conf file. The system then goes through the passwd file in order, adding or removing the appropriate NIS entries when it reaches each line that starts with a + or –.
Although you can put a plus sign at the end of the passwd file, specify passwd: compat in nsswitch.conf to search the local passwd file, and then go through the NIS map, it is more efficient to put passwd: file nis in nsswitch.conf and not modify the passwd file.
Getting Help
Fedora/RHEL comes with extensive documentation (pages 113 and 128). Fedora maintains a page that points to many useful support documents at docs.fedoraproject.org; fedoraproject.org/en/get-help has links to ask.fedoraproject.org, email lists, and IRC chatrooms; Red Hat maintains a similar page at access.redhat.com and keeps documentation at access.redhat.com/docs. Although some sections of these Red Hat sites require an account to access, anyone can get an account for free. You can also find help on the Linux SIG site (formerly SAGE; www.usenix.org/lisa). The Internet is another rich source of information on managing a Linux system; refer to Appendix B (page 1149) and to the author’s home page (www.sobell.com) for pointers to useful sites.
You need not act as a Fedora/RHEL system administrator in isolation; a large community of Fedora/RHEL experts is willing to assist you in getting the most out of a Linux system. Of course, you will get better help if you have already tried to solve a problem yourself by reading the available documentation. If you are unable to solve a problem by consulting the documentation, a well-thought-out question posed to the appropriate newsgroup (such as comp.os.linux.misc) or mailing list can often generate useful information. Be sure to describe the problem accurately and identify the system carefully. Include information about the version of Fedora/RHEL running on the system and any software packages and hardware you think relate to the problem. The newsgroup comp.os.linux.answers contains postings of solutions to common problems and periodic postings of the most up-to-date versions of FAQs and HOWTO documents. See www.catb.org/~esr/faqs/smart-questions.html for a helpful paper by Eric S. Raymond and Rick Moen titled “How to Ask Questions the Smart Way.”
Chapter Summary
A system administrator is someone who keeps the system in a useful and convenient state for its users. Much of the work you do as the system administrator will require you to work with root privileges. A user with these privileges (sometimes referred to as Superuser) has extensive systemwide powers that normal users do not have. A user with root privileges can read from and write to almost any file and can execute programs that ordinary users are not permitted to execute.
The system administrator controls system operation, including configuring the system; booting up; running systemctl to set up services; working in single-user, multiuser, and rescue modes; bringing the system down; and handling system crashes. Fedora/RHEL provides both graphical and textual configuration tools.
When you bring the system up in single-user mode, only the system console is functional. While working in single-user mode, you can back up files and use fsck to check the integrity of filesystems before you mount them. The systemctl utility can bring the system to its default multiuser state. With the system running in multiuser mode, you can still perform many administration tasks, such as adding users and printers.
When you install a Fedora/RHEL system, you specify a password for the root account. You use this password to gain root privileges, either by logging in as the user named root or by using su and providing the root password. Alternately, you can configure sudo, which grants rootprivileges based on your password. A system that does not have a root password and that relies on sudo to escalate permissions can be more secure than one with a root password.
The systemd init daemon, which replaces the traditional System V init daemon (SysVinit), is event based: It can start and stop services upon receiving information that something on the system has changed (an event). Events include adding devices to and removing them from the system as well as bringing the system up and shutting it down. The systemctl utility works with systemd and can turn services on and off and alter their persistent state (i.e., whether they come up when the system boots).
You can use TCP wrappers to control who can use which system services by editing the hosts.allow and hosts.deny files in the /etc directory. Setting up a chroot jail limits the portion of the filesystem a user sees, so it can help control the damage a malicious user can do.
You can set up a DHCP server so you do not have to configure each system on a network manually. DHCP can provide both static and dynamic IP addresses. Whether a system uses NIS, DNS, local files, or a combination (and in which order) as a source of information is determined by/etc/nsswitch.conf. Linux-PAM enables you to maintain fine-grained control over who can access the system, how they can access it, and what they can do.
Exercises
1. How does single-user mode differ from multiuser mode?
2. How would you communicate each of the following messages?
a. The system is coming down tomorrow at 6:00 in the evening for periodic maintenance.
b. The system is coming down in five minutes.
c. Zach’s jobs are slowing the system down drastically, and he should postpone them.
d. Zach’s wife just had a baby girl.
3. What do the letters of the su command stand for? (Hint: It is not Superuser.) What can you do using su besides give yourself root privileges? How would you log in as Zach if you did not know his password but knew the root password? How would you establish the same environment that Zach has when he first logs in?
4. How would you allow a user to execute a specific, privileged command without giving the user the root password or permission to use sudo to run any command with root privileges?
5. How do you kill process 1648? How do you kill all processes running kmail? In which instances do you need to work with root privileges?
6. How can you disable SELinux?
7. Develop a strategy for coming up with a password that an intruder would not be likely to guess but that you will be able to remember.
Advanced Exercises
8. Give the command:
$ /usr/sbin/fuser -uv /
What does the output list? Why is it so long? Give the same command while working with root privileges (or ask the system administrator to do so and email you the results). How does this list differ from the first? Why is it different?
9. When it puts files in a lost+found directory, fsck has lost the directory information for the files and thus has lost the names of the files. Each file is given a new name, which is the same as the inode number for the file:
$ ls –l lost+found
–rw–r––r–– 1 max pubs 110 06-10 10:55 51262
How can you identify these files and restore them?
10. Take a look at /usr/bin/lesspipe.sh. Explain its purpose and describe six ways it works.
11. Why are root-owned setuid shell scripts inherently unsafe?
12. When a user logs in, you would like the system to first check the local /etc/passwd file for a username and then check NIS. How do you implement this strategy?
13. Some older kernels contain a vulnerability that allows a local user to gain root privileges. Explain how this kind of vulnerability negates the value of a chroot jail.