A practical guide to Fedora and Red Hat Enterprise Linux, 7th Edition (2014)
Part III: System Administration
Chapter 13. Printing with CUPS
In This Chapter
The System Configures a Local Printer Automatically
JumpStart I: Configuring a Printer Using system-config-printer
JumpStart II: Setting Up a Local or Remote Printer
Working with the CUPS Web Interface
The CUPS Web Interface
CUPS on the Command Line
Traditional UNIX Printing
Printing from Windows
Printing to Windows
Objectives
After reading this chapter you should be able to:
![]() Explain the purpose of a printing subsystem
Explain the purpose of a printing subsystem
![]() Describe the capabilities of CUPS
Describe the capabilities of CUPS
![]() Define IPP and explain its role with CUPS
Define IPP and explain its role with CUPS
![]() Use system-config-printer to install and manage local and remote printers
Use system-config-printer to install and manage local and remote printers
![]() Use the CUPS Web interface to install and manage local and remote printers
Use the CUPS Web interface to install and manage local and remote printers
![]() Share local printers
Share local printers
![]() Print from a Windows system to a Linux printer
Print from a Windows system to a Linux printer
![]() Print from a Linux system to a Windows printer
Print from a Linux system to a Windows printer
![]() Use command-line tools to submit, list, and cancel print jobs
Use command-line tools to submit, list, and cancel print jobs
![]() Limit printing using quotas
Limit printing using quotas
A printing system handles the tasks involved in getting a print job from an application (or the command line) through the appropriate filters (page 1250) and into a queue for a suitable printer and then getting it printed. When a printer fails, the printing system can redirect jobs to other, similar printers.
Introduction
LPD and LPR
Originally, UNIX had two printing systems: the BSD LPD (Line Printer Daemon) and the System V LPR (Line Printer system). Linux adopted these systems at first, and both UNIX and Linux have seen modifications to and replacements for these systems. Today CUPS is the default printing system under Linux.
CUPS
CUPS (Common UNIX Printing System) is a cross-platform print server built around IPP (next). CUPS provides many printer drivers and can print different types of files, including PostScript. Because it is built on IPP and written to be portable, CUPS runs under many operating systems, including Linux and Windows. Other UNIX variants, including Mac OS X, use CUPS; recent versions of Windows include the ability to print to IPP printers. Thus CUPS is an ideal solution for printing in a heterogeneous environment. CUPS provides System V and BSD command-line interfaces and, in addition to IPP, supports LPD/LPR, HTTP, SMB, and JetDirect (socket) protocols, among others.
If the printer you are configuring is on an older Linux system or another UNIX-like operating system that does not run CUPS, the system probably runs LPD/LPR. Most devices that connect printers directly to a network support LPR/LPD; some support IPP.
IPP
The IPP project (Internet Printing Protocol; www.pwg.org/ipp) began in 1996, when Novell and several other companies designed a protocol for printing over the Internet. IPP enables users to
• Determine the capabilities of a printer.
• Submit jobs to a printer.
• Determine the status of a printer.
• Determine the status of a print job.
• Cancel a print job.
IPP is an HTTP-based client/server protocol in which the server side can be a print server or a network-capable stand-alone printer.
Network printers
Printers connected directly to a network are functionally equivalent to printers connected to a system running a print server: They listen on the same ports as systems running print servers, and they queue jobs.
Printers and queues
On a modern computing system, when you “send a job to the printer,” you add the job to the list of jobs waiting their turn to be printed on a printer. This list is called a print queue or simply a queue. The phrase configuring (or setting up) a printer is often used to mean configuring a (print) queue. This chapter uses these phrases interchangeably.
Configuration tools
This chapter explores two tools you can use to configure a print queue: system-config-printer (page 558) and the CUPS Web interface (page 565), with an emphasis on the former.
Using the CUPS Web interface is very similar to using system-config-printer; thus much of the discussion of system-config-printer applies to the CUPS Web interface. However, system-config-printer is a native application written in Python, not a Web interface.
Prerequisites
Make sure the following packages are installed (most are installed with the base Fedora/RHEL system):
• cups
• system-config-printer (optional)
• cups-pdf (optional; sets up a virtual PDF printer)
The CUPS Web interface requires an X server and a Web browser. Although it is a poor solution, a text Web browser such as elinks (elinks package) will work, too.
Enable and start cups
Run systemctl to cause the cups service (cupsd daemon) to start each time the system enters multiuser mode and then start the cups service. Use the systemctl status command to make sure the service is running.
# systemctl enable cups.service
# systemctl start cups.service
After modifying cups configuration files, give the second command again, replacing start with restart to cause cups to reread those files.
More Information
Local
CUPS Documentation: With the CUPS Web interface up (page 567), point a local browser at localhost:631/help
Web
Information on printers and printing under Linux, including forums and articles: www.linuxfoundation.org/collaborate/workgroups/openprinting
A support database with details about many printers, including notes and driver information: www.openprinting.org/printers
CUPS home page: www.cups.org
IPP information: www.pwg.org/ipp
HOWTO
The SMB HOWTO has a section titled “Sharing a Windows Printer with Linux Machines.”
Notes
SELinux
When SELinux is set to use a targeted policy, CUPS is protected by SELinux. You can disable this protection if necessary. For more information refer to “Setting the Targeted Policy using system-config-selinux” on page 475.
Firewall
A CUPS server normally uses TCP port 631 and UDP port 631 for an IPP connection and TCP port 80 for an LPR/LPD connection. If the server accepts print jobs from remote systems and is running a firewall or is behind a firewall, you need to open one or both of these ports. Give the following commands to open the ports each time the system boots (permanently) and on the running system; see page 906 for information on firewall-cmd.
# firewall-cmd --add-port=631/tcp
# firewall-cmd --permanent --add-port=631/tcp
# firewall-cmd --add-port=631/udp
# firewall-cmd --permanent --add-port=631/udp
# firewall-cmd --add-port=80/tcp
# firewall-cmd --permanent --add-port=80/tcp
PDF printer
You can set up a virtual PDF printer by installing the cups-pdf package, or you can set up this printer manually.
![]() The System Configures a Local Printer Automatically
The System Configures a Local Printer Automatically
In most cases, when you connect a printer to the local system and turn it on, the system displays a message as it install drivers. When the drivers are installed, the printer is ready for use. Two graphical tools allow you to add and modify printers as well as work with print jobs. You can use Printers from the Settings window (page 107) for most work with printers and system-config-printer (next) for more complex printer-related tasks. Use one of these tools to verify that the printer is installed, send a test page to the printer, and change the configuration of the printer.
![]() JumpStart I: Configuring a Printer Using system-config-printer
JumpStart I: Configuring a Printer Using system-config-printer
The Print Settings window (Figure 13-1) enables you to add, remove, and configure local and remote printers. Open this window by giving the command system-config-printer from an Enter a Command window (ALT-F2) or a terminal emulator. This JumpStart explains how to modify the configuration of an existing printer. See page 560 for instructions on how to set up a new printer.
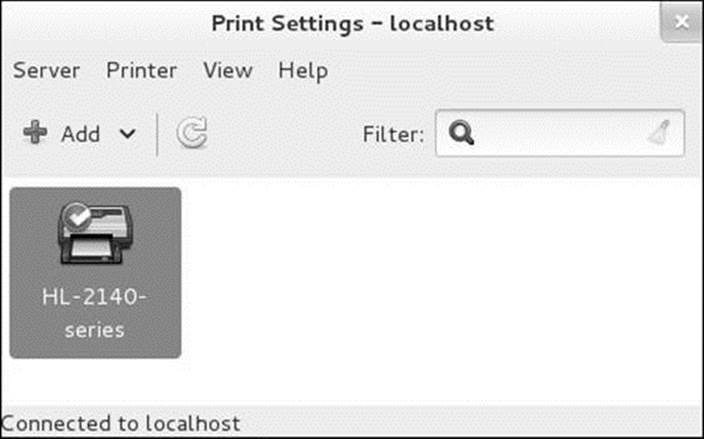
Figure 13-1 The Print Settings window
Default printer
Highlight a printer in the Print Settings window and select menubar: Printer![]() Set as Default from the window menu to specify the highlighted printer as the default printer. If just one printer appears in the Print Settings window, it is the default printer; you do not have to set it up as such. The tick on the printer in Figure 13-1 indicates the default printer.
Set as Default from the window menu to specify the highlighted printer as the default printer. If just one printer appears in the Print Settings window, it is the default printer; you do not have to set it up as such. The tick on the printer in Figure 13-1 indicates the default printer.
Server Settings
Select menubar: Server![]() Settings from the Print Settings window to display the Server Settings window. The top two check boxes in this window specify whether the local system publishes printers it shares (so remote systems can find the printers) and whether it allows printing from the Internet. If you elect to share printers, system-config-printer asks whether you want to adjust the firewall to allow incoming IPP connections. When you click Adjust Firewall, system-config-printer opens TCP port 631 and UDP port 631. You control whether a specific printer is shared from the Policies selection of the Printer Properties window (next).
Settings from the Print Settings window to display the Server Settings window. The top two check boxes in this window specify whether the local system publishes printers it shares (so remote systems can find the printers) and whether it allows printing from the Internet. If you elect to share printers, system-config-printer asks whether you want to adjust the firewall to allow incoming IPP connections. When you click Adjust Firewall, system-config-printer opens TCP port 631 and UDP port 631. You control whether a specific printer is shared from the Policies selection of the Printer Properties window (next).
Configuration Tabs
Double-click a printer in the Print Settings window or highlight a printer and select menubar: Printer![]() Properties to display the Printer Properties window (Figure 13-2) for that printer.
Properties to display the Printer Properties window (Figure 13-2) for that printer.
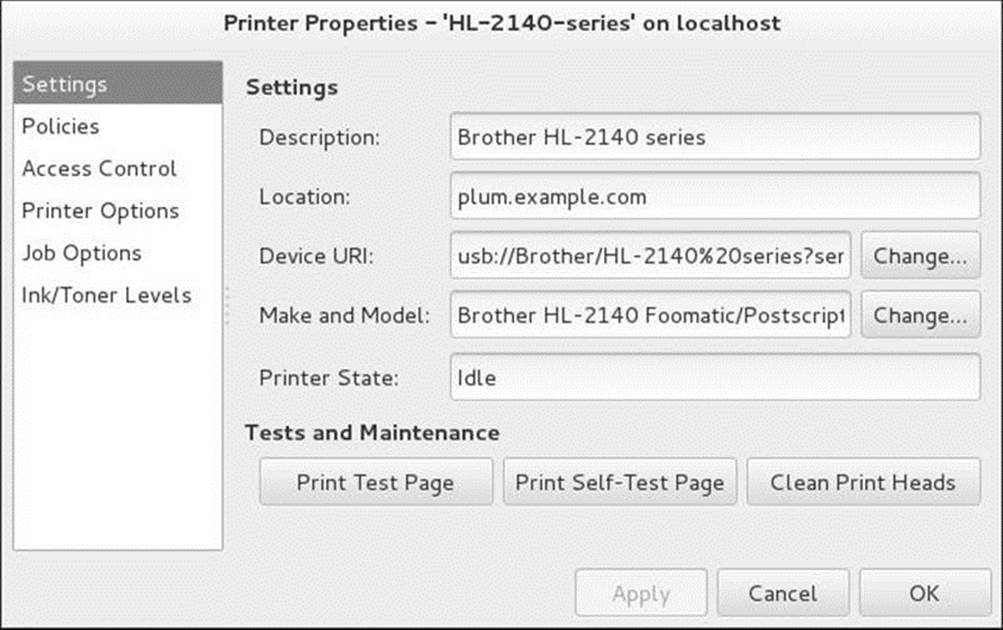
Figure 13-2 The Printer Properties window
This section describes the six tabs found in the frame at the left side of the Printer Properties window. These tabs allow you to configure the printer you chose in the Print Settings window.
Settings
Figure 13-2 shows the Settings tab for a Brother printer. The text boxes labeled Description and Location hold information that can help users identify the printer. The system does not use this information; change it as you like. For example, it might be helpful to put the physical location of the printer, such as Sam’s Office, in the text box labeled Location. The text boxes labeled Device URI and Make and Model specify the location of the printer on the computer or network and type of the printer.
Policies
The Policies tab enables you to control printer state, sharing, and banners. Under the word State are check boxes labeled Enabled, Accepting jobs, and Shared. Table 13-1 describes the effects of putting ticks in the first two check boxes. Putting a tick in the check box labeled Shared shares the printer with other systems if the local system publishes shared printers (see “Server Settings”). The Policies tab also controls whether the printer prints banners before and after jobs and what CUPS does when the printer reports an error.
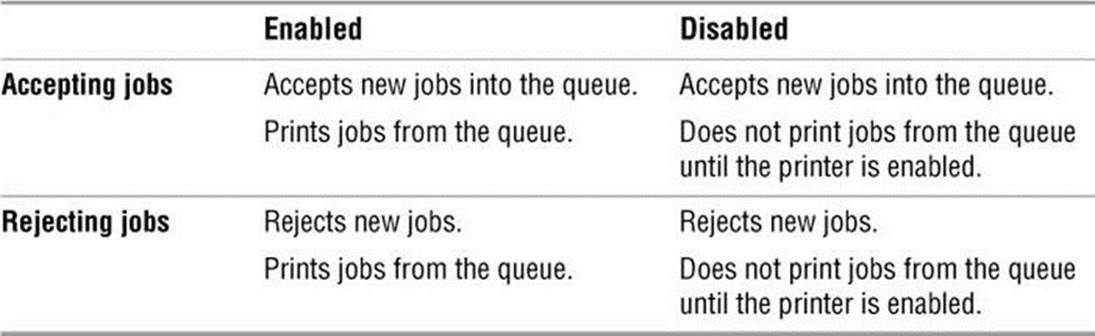
Table 13-1 Printer status
Access Control
The Access Control tab enables you to set the policy for printer access. By default, anyone can use the printer. To restrict access, you can create a blacklist of users who are not allowed to use it. Alternately, you can prohibit anyone from using the printer and then create a whitelist of users who are allowed to use it.
Printer Options
The Printer Options tab controls image quality, paper size and source (tray), and other generic printer options.
Job Options
The Job Options tab controls the number of copies, orientation (portrait or landscape), scaling, margins, and more. Options specified by an application sending a job to the printer override options you set in this tab. Scroll down to see all options.
Ink/Toner Levels
The Ink/Toner Levels tab reports on ink/toner (marker) levels and displays status messages.
![]() JumpStart II: Setting Up a Local or Remote Printer
JumpStart II: Setting Up a Local or Remote Printer
This section describes how to set up three types of printers for local use: a printer attached to the local system, a printer hosted by another system, and a printer that resides on the local network (a network printer). For instructions on how to use the CUPS Web interface to perform the same tasks, see page 565.
To add a printer to the local system, click Add on the toolbar in the Print Settings window (Figure 13-1, page 558). The system-config-printer utility looks for printers attached to the system or the local network. It then asks whether you want to adjust the firewall so the local system can detect printers on the network and, when you click Adjust Firewall, displays the Select Device screen of the New Printer window (Figure 13-3).
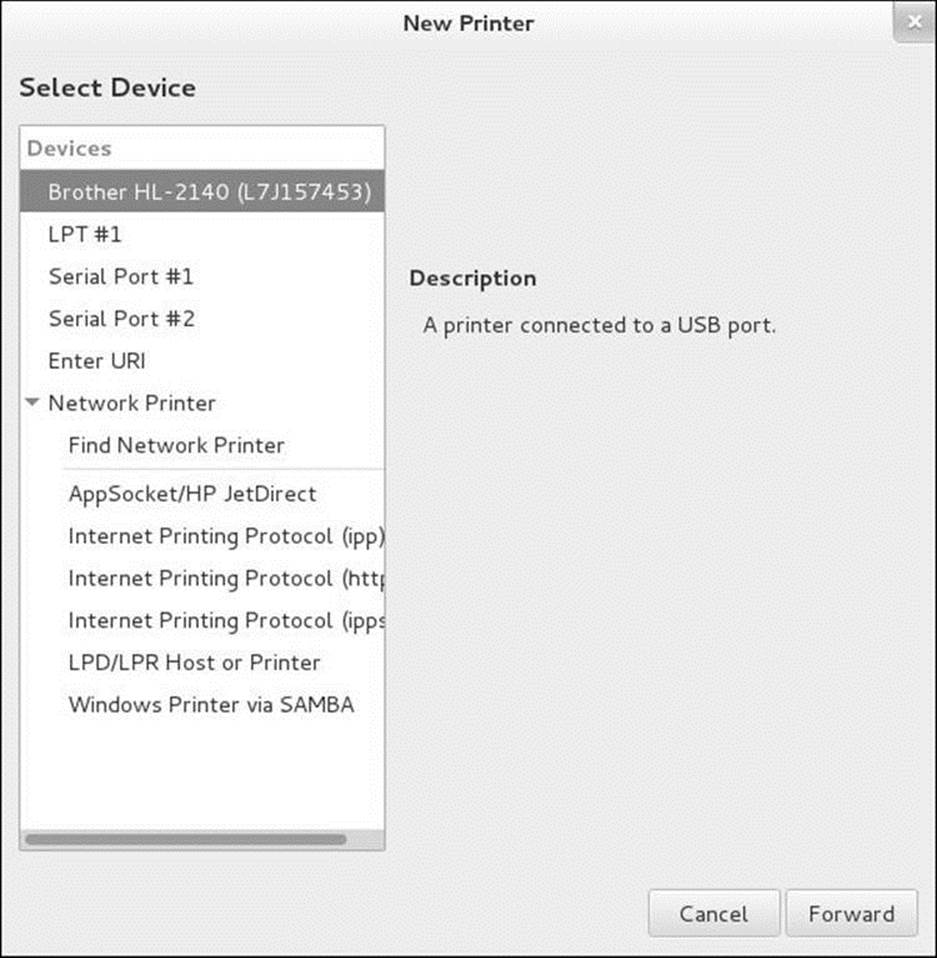
Figure 13-3 The New Printer window, Select Device screen I
To configure a printer, highlight the printer in the frame labeled Select Device. The system-config-printer utility displays a description of the printer you highlighted. Click the triangle to the left of Network Printer to display network printers.
Tip: Avoid repeated requests for authentication
When you run system-config-printer as a nonprivileged user it repeatedly asks you to authenticate yourself. To avoid that annoyance, run system-config-printer from a terminal emulator command line while working with root privileges by using the following command. You will need to supply the root password one time.
$ su -c system-config-printer
Specifying a URI
The easiest way to locate a remote printer that is not listed is to select Find Network Printer under Network Printer in the frame labeled Select Device. Then enter in the text box labeled Host the name of the host the printer is attached to (the server) or, for a network printer, the name of the printer. You can specify an IP address instead of a hostname. Click Find. If it finds a printer, system-config-printer displays the name of the printer under Network Printer and a description of the printer on the right side of the window (Figure 13-4). For IPP printers, system-config-printerdisplays a URI (page 1279), which is the printer’s location on the network; see page 568 for more information. The system-config-printer utility might offer you a choice of connection types; a CUPS printer is a better choice.
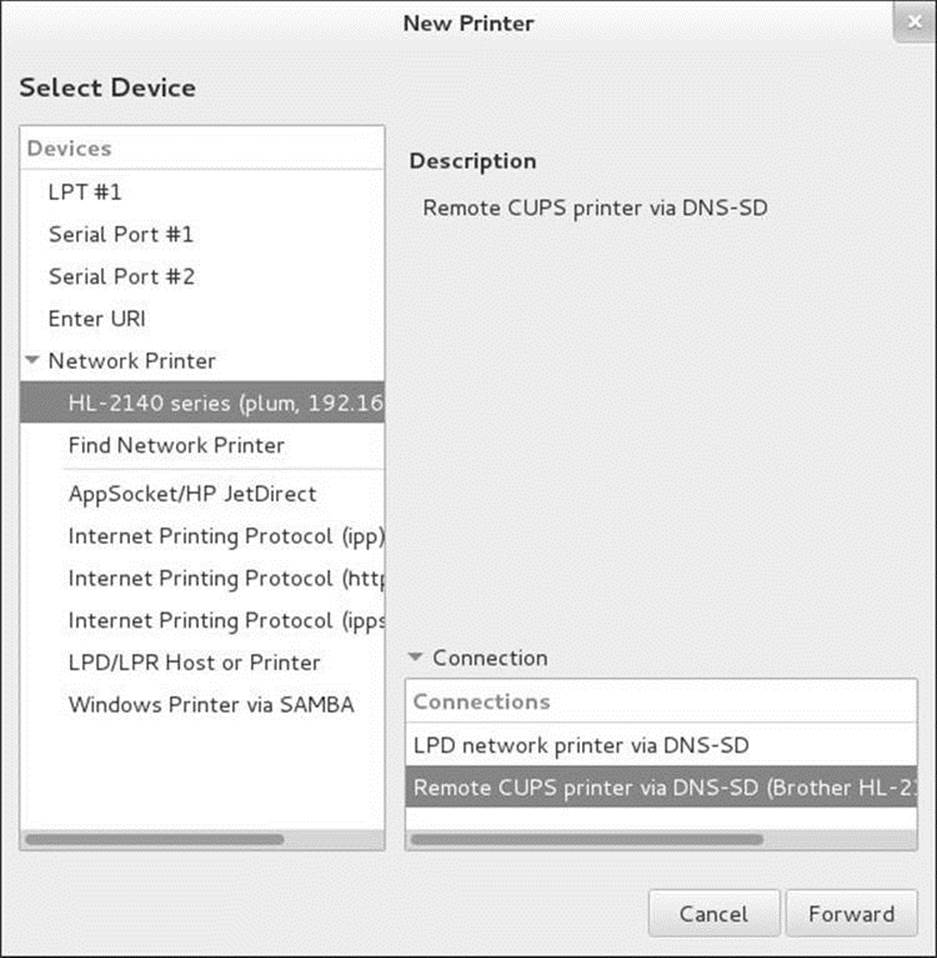
Figure 13-4 The New Printer window, Select Device screen II
If the printer is not listed, select one of the first few entries (for a local printer) or one of the selections under Network Printer (for a remote printer) from the frame labeled Select Device; system-config-printer displays appropriate text boxes on the right side of the window. All selections under Network Printer require you to specify a host and a queue or port number to locate the printer on the network.
To specify the queue for an LPD/LPR printer, use the form printer-name; for an IPP printer, use the form ipp://hostname/printers/printer-name; for an HP JetDirect–compatible network printer, specify the printer-name and Port number. Replace hostname with the name of the host the printer is attached to (the server) and printer-name with the name of the printer on the server.
If you are unsure of the name of a printer, give the command lpstat –p on the server to display the names of all printers on that system. After selecting or specifying a printer, click the button labeled Verify (if present) to make sure the printer is accessible and then click Forward. Thesystem-config-printer utility searches for the printer driver.
Next the utility might ask you which printer options you want to install. Specify the options and click Forward.
If system-config-printer displays the Choose Driver screen of the New Printer window (there are two Choose Driver screens, the first is shown in Figure 13-5), you can specify a printer make (a manufacturer such as Brother). Typically system-config-printer selects the make automatically. Alternately, you can specify a PPD file (page 568) or search for a driver to download. Click Forward.
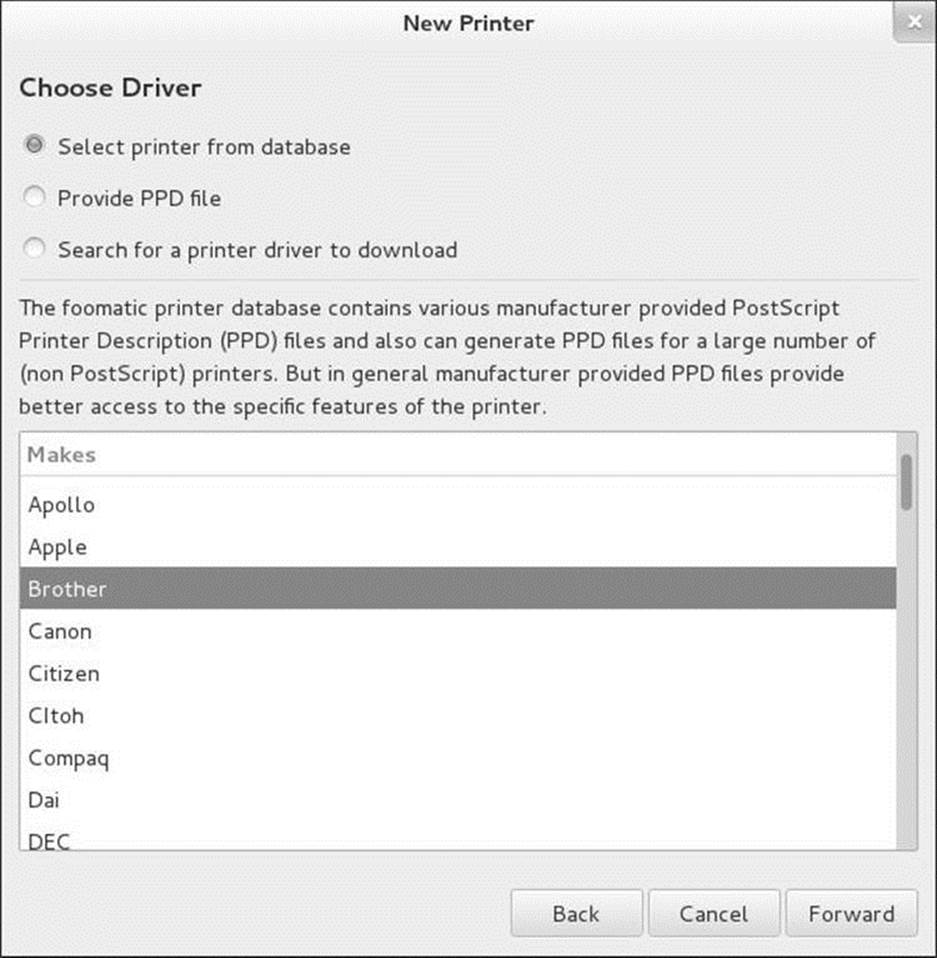
Figure 13-5 Selecting a printer make/manufacturer
The next screen (the second Choose Driver screen; Figure 13-6), which system-config-printer might not display, allows you to specify the model of the printer and select which driver you want to use (if more than one is available). A selection is usually highlighted automatically.
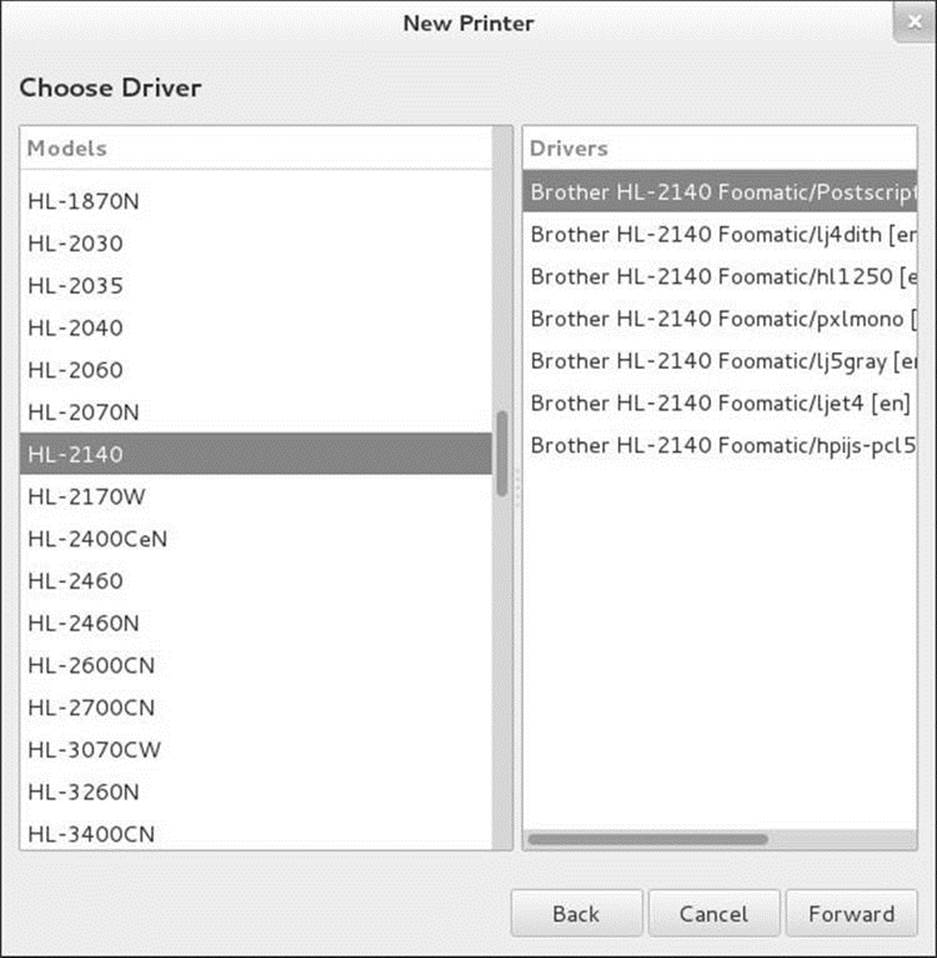
Figure 13-6 Selecting a printer model and driver
The system-config-printer utility might display a screen showing installable (printer-specific) options. Generally you do not need to make changes to this screen. Click Forward.
Tip: If a printer is not listed...
If the printer you are configuring is not listed, you can select Generic (at the top of the list in the first Choose Driver screen) as the make of the printer and choose a type of generic printer from the list box labeled Models in the second Choose Driver screen. ChoosePostScript from the list of drivers if the printer is PostScript-capable. Alternately, you can specify a PostScript printer such as the Apple Laser-Writer 12/640ps. (Select Apple from the first Choose Driver screen and 12/640ps from the second Choose Driver screen.) In both cases, select a PostScript driver from the list box labeled Drivers.
If the printer is not PostScript-capable, check whether the printer supports PCL; if it does, select another, similar PCL printer. If it does not support PCL, select Generic (at the top of the list in the first Choose Driver screen) and then choose text-only from the second Choose Driver screen; you will not be able to print graphics, but you should be able to print text.
Or you can check whether the printer can emulate another printer (i.e., if it has an emulation mode). If it can, check whether the manufacturer and model of the printer it can emulate are listed and set it up that way.
If all else fails, determine which listed printer is most similar to the one you are configuring and specify that printer. You can also try configuring the printer using the CUPS Web interface (page 565), which offers a different choice of models.
On the next screen (Describe Printer; Figure 13-7), you must specify a name for the printer; specifying the description and location is optional. The name of the printer must start with a letter and cannot contain SPACEs. If you use only one printer, the name you choose is not important. If you use two or more printers, the name should help users distinguish between them. CUPS uses the printer name as the name of the print queue on the local system. Click Apply.
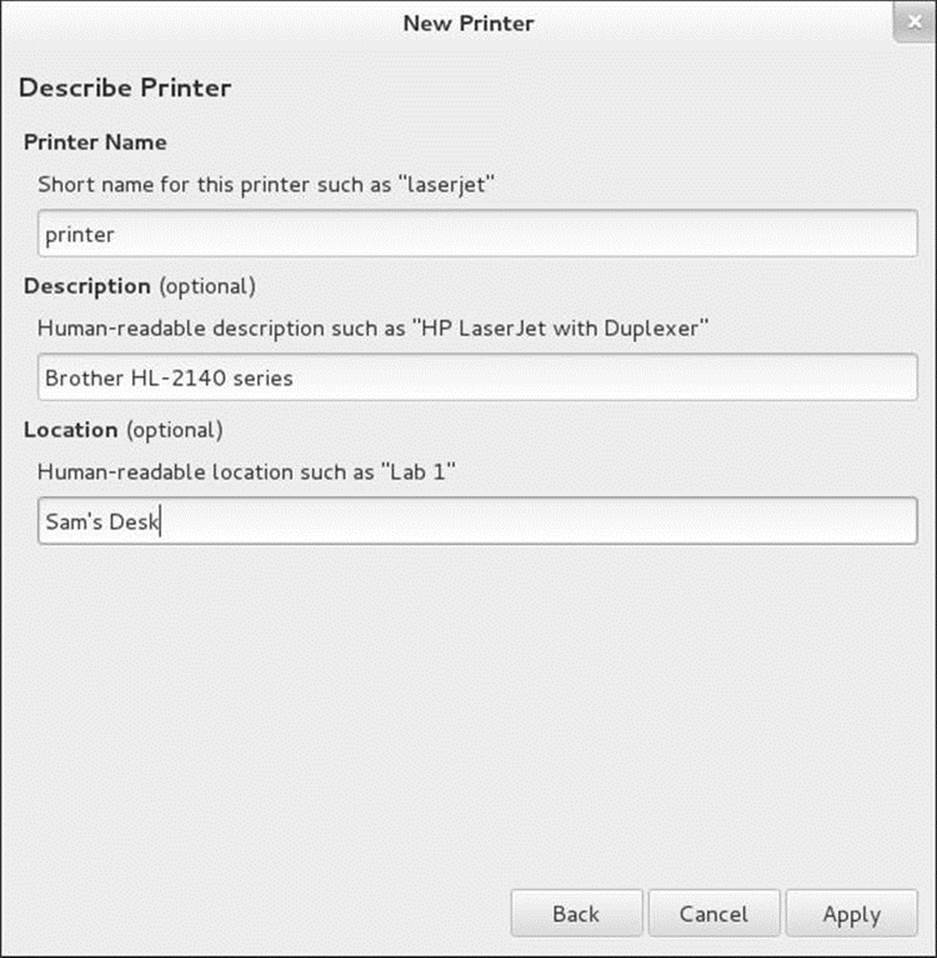
Figure 13-7 Specifying the name of the printer
At this point, the system-config-printer utility closes the New Printer window, asks whether you want to print a test page, and displays the new printer in the Print Settings window. If you have more than one print queue and want to set up the new print queue to be the default, highlight the printer and select menubar: Printer![]() Set As Default. You then have the option of setting the printer as the system-wide default or your personal default printer.
Set As Default. You then have the option of setting the printer as the system-wide default or your personal default printer.
![]() Working with the CUPS Web Interface
Working with the CUPS Web Interface
The CUPS Web interface allows you to do the same things as system-config-printer (pages 558 and 560). Because the two interfaces are functionally similar, this section does not go into as much detail as the section on system-config-printer. This section describes how to configure/reconfigure for local use a printer attached to the local system, a printer hosted by another system, or a printer that resides on the local network (a network printer).
Username and password
At some point the CUPS Web interface asks for a username and password. Supply root and the root password.
Display the CUPS Web interface by pointing a Web browser at localhost:631 on the system on which you are configuring the printer (Figure 13-8).

Figure 13-8 The CUPS Home page
Security: Remote administration
When you provide a username and password to the CUPS Web interface, they are transmitted in cleartext over HTTP. The lack of encryption is a security issue when you are administrating printers over an unsecure network.
Clicking the Administration tab at the top of the page displays the Administration page. On this page click Add Printer (under the word Printers) to display the first Add Printer page. This page is functionally equivalent to the Select Device screen of the New Printer window displayed bysystem-config-printer (Figure 13-3, page 561).
Clicking the Printers tab at the top of the page displays a page that lists the configured printers. Clicking the name of the printer in the column labeled Queue Name displays a page that allows you to work with that printer and queue (Figure 13-9).

Figure 13-9 A CUPS printer page
On the Printer page, select Print Test Page from the Maintenance drop-down list to test the printer. If you want to make this printer the default printer, select Set As Server Default from the Administration drop-down list.
![]() Configuring Printers
Configuring Printers
You can use the CUPS Web interface, the CUPS command-line interface, or the system-config-printer utility to manage printers and queues.
Modifying a Printer
“JumpStart II: Setting Up a Local or Remote Printer” (page 560) explains how to configure a printer using system-config-printer. “Working with the CUPS Web Interface” (page 565) discusses how to configure a printer using the CUPS Web interface.
This section explains how to use either of these tools to modify a printer that is already configured. In both cases, modifying a printer takes you through the same steps as setting up a printer, except the fields are filled in so you only need to modify the ones that need to be changed.
Using system-config-printer
Open the Print Settings window, select the printer whose configuration you want to modify, and proceed as explained on page 558. Reconfiguring an existing printer follows the same steps as installing a new printer.
Using the CUPS Web interface
Open the CUPS Web interface as explained on page 565. To modify a printer, click the Printers tab at the top of the page and then click the name of the printer you want to modify. The CUPS Web interface displays two drop-down lists near the top of the page: Administration andMaintenance (Figure 13-9). These lists allow you to work with the selected printer. The Administration drop-down list allows you to modify the printer; this selection takes you through the same steps as when you set up a new printer. From this list you can also delete and set default options for the printer as well as set the printer as the default printer and specify which users are allowed to use the printer. From the Maintenance drop-down list, you can print a test page and pause the printer. You can also reject, move, and cancel all jobs. In addition to these tasks, you might be able to reprint jobs.
The CUPS Web Interface
To connect to the CUPS Web interface (page 565), point a Web browser running on the local system at localhost:631. You must supply the username root and the root password to change a printer configuration using the CUPS Web interface.
This section describes two tasks: modifying jobs and setting up printer classes. You can also perform these tasks from the command line using lpadmin (page 569) or from system-config-printer (page 558) by selecting menu bar: Printer![]() View Print Queue or menu bar: Printer
View Print Queue or menu bar: Printer![]() Create class, respectively.
Create class, respectively.
Jobs
Click the Jobs tab near the top of the page to display the Jobs page, which lists jobs in the print queues. From this page you can cancel print jobs and move them to other queues. Click Show Completed Jobs to display a list of recently completed jobs. In some cases, you can reprint completed jobs from this page. You can perform the same tasks from the Printer page.
Classes
CUPS allows you to organize similar printers into a group called a class. To clients, a class of printers appears as a single printer. For each class, you must specify a name; optionally, you can specify a location and description. A printer can belong to more than one class. CUPS prints jobs sent to a class on the first available printer in the class. For example, you might be able to divide your print jobs into black-and-white jobs and color jobs. If more than one printer can fulfill each of these roles, you can allow users to select a printer manually, or you can define two printer classes (black-and-white and color) and have users send their jobs to a certain class of printers. Place printers that are members of the same class physically close to each other so users can easily find their output.
Tip: Plan for the future
If you expect to add printers to the network, you might want to configure classes containing the existing printers when you set up the network. You can then add printers later without having to change printer configurations on client systems.
To define a class, first click the Administration tab at the top of the page and then click Add Class. At a minimum, you must enter a name for the class. You might also enter a description and location. The Members list displays the names of all CUPS printers and classes. Highlight the printers you want to be members of the class you are defining; hold SHIFT and click another printer to highlight more than one printer. To define a class that includes printers that are not adjacent in the list, define the class to have a single printer and then modify the class after you create it to add other printers. To modify existing classes, click Manage Classes in the Administration tab.
CUPS on the Command Line
In addition to using system-config-printer and the CUPS Web interface, you can control CUPS and manage print queues from the command line. This section describes the utilities that enable you to manage printers and print queues and establish printing quotas.
lpinfo: Displays Available Drivers
PPD files
The lpinfo utility provides information about the printer drivers and interfaces available to CUPS. The –m option displays the list of available PostScript Printer Definition (PPD) files/drivers.
$ lpinfo -m | head
foomatic:Alps-MD-1000-md2k.ppd Alps MD-1000 Foomatic/md2k
foomatic:Alps-MD-1000-ppmtomd.ppd Alps MD-1000 Foomatic/ppmtomd
foomatic:Alps-MD-1300-md1xMono.ppd Alps MD-1300 Foomatic/md1xMono
foomatic:Alps-MD-1300-md2k.ppd Alps MD-1300 Foomatic/md2k
foomatic:Alps-MD-1300-ppmtomd.ppd Alps MD-1300 Foomatic/ppmtomd
foomatic:Alps-MD-1500-md1xMono.ppd Alps MD-1500 Foomatic/md1xMono
foomatic:Alps-MD-1500-md2k.ppd Alps MD-1500 Foomatic/md2k
foomatic:Alps-MD-1500-ppmtomd.ppd Alps MD-1500 Foomatic/ppmtomd
foomatic:Alps-MD-2000-md2k.ppd Alps MD-2000 Foomatic/md2k
foomatic:Alps-MD-2000-ppmtomd.ppd Alps MD-2000 Foomatic/ppmtomd
URIs
CUPS uses URIs (page 561) to identify printer ports by type and location, just as a browser identifies documents by protocol and location. A parallel port has a URI with the format parallel:/dev/lp0; a remote LPD printer uses the format lpd://192.168.0.101, and a USB printer uses the format usb://Brother/HL-2140%20series. When run with root privileges, lpinfo with the –v option displays a list of available connections:
# lpinfo -v
network ipps
network ipp
network socket
network https
network http
network lpd
network beh
direct parallel:/dev/lp0
serial serial:/dev/ttyS0?baud=115200
serial serial:/dev/ttyS1?baud=115200
direct hp
network smb
direct hpfax
direct usb://Brother/HL-2140%20series?serial=L7J157453
The –v option to lpinfo does not display every possible network address for the socket, HTTP, IPP, LPD, and SMB protocols because there are more than 4 billion of these addresses in the IPv4 address space.
lpadmin: Configures Printers
You can use the lpadmin utility to add and remove printers from the system, modify printer configurations, and manage printer classes. This utility has three major options: –d (set the default printer), –x (remove a printer), and –p (add or modify a printer). The first two options are simple; examples follow the next subsection. Each of these three options takes the name of a printer as an argument. The name of the printer must start with a letter and cannot contain SPACEs.
Adding or Modifying a Printer
Add a printer or modify an existing printer by giving a command in the following format:
# lpadmin –p printer-name options
where printer-name is the name of the printer and options is a combination of options from the following list:
–c class
Adds the printer to the class class, creating the class if necessary.
–D info
The info is a string that describes the printer for the benefit of users; it has no meaning to the system. Enclose info within quotation marks if it contains SPACEs.
–E
Enables the printer, instructing CUPS to accept jobs into its print queue.
–L loc
The loc is a string that indicates the physical location of the printer (e.g., office, building, floor). It has no meaning to the system. Enclose loc within quotation marks if it contains SPACEs.
–m model
The model is the name of the PPD file (page 568) that describes the printer. Use lpinfo –m to display a list of installed PPD files. If you have a manufacturer-provided PPD file, copy it to /usr/share/cups/model. Use the –P option to specify the pathname of the file. Specifying –m postscript.ppd.gz, for example, is the same as specifying –P /usr/share/cups/model/postscript.ppd.gz.
–P file
The file is the absolute pathname of the PPD file (page 568) that describes the printer. Use lpinfo –m to display a list of installed PPD files. If you have a manufacturer-provided PPD file, copy it to /usr/share/cups/model. See –m for an alternate way to specify a PPD file.
–r class
Removes the printer from the class class. This option removes the class if, after removing the printer, the class would be empty.
–v URI
The URI is the device to which the printer is attached. Use lpinfo –v to list possible devices.
![]() Example lpadmin Commands
Example lpadmin Commands
At a minimum, you need to provide a device and a model when you add a printer to the system. The following command adds a Brother HL-2140 printer to the system and enables it for use. This printer is connected locally to a USB port and is named HL2140.
# lpadmin -p HL2140 -E -v usb://Brother/HL-2140%20series -m Brother-HL-2140-hpijs-pcl5e.ppd
The printer information generated by the preceding command is stored in the /etc/cups/printers.conf file:
# cat /etc/cups/printers.conf
# Printer configuration file for CUPS v1.6.3
# Written by cupsd on 2013-07-30 20:07
# DO NOT EDIT THIS FILE WHEN CUPSD IS RUNNING
<DefaultPrinter HL-2140-series>
Info Brother HL-2140 series
Location guava
MakeModel Brother HL-2140 Foomatic/hpijs-pcl5e (recommended)
DeviceURI usb://Brother/HL-2140%20series
State Idle
StateTime 1302648023
Type 8433684
Product (HL-2140 series)
Filter application/vnd.cups-raw 0 -
Filter application/vnd.cups-postscript 100 foomatic-rip
Filter application/vnd.cups-pdf 0 foomatic-rip
Filter application/vnd.cups-command 0 commandtops
Accepting Yes
Shared Yes
JobSheets none none
QuotaPeriod 0
PageLimit 0
KLimit 0
OpPolicy default
ErrorPolicy stop-printer
</Printer>
The lpadmin command decompresses and copies the printer driver information from the /usr/share/cups/model/stcolor.ppd.gz file to /etc/cups/ppd. The resulting file is given the printer’s name: /etc/cups/ppd/HL-2140-series.ppd.
You can modify a printer configuration with lpadmin using the same options that you used to add it. When you specify the name of an existing printer, lpadmin modifies the printer rather than creating a new one.
The next command configures an HP LaserJet–compatible printer with a JetDirect interface that is connected directly to the LAN at 192.168.1.103 and names this printer HPLJ. Specifying socket in the protocol part of the URI instructs CUPS to use the JetDirect protocol, a proprietary protocol developed by HP for printers connected directly to a network.
# lpadmin -p HPLJ -E -v socket://192.168.1.103 -m laserjet.ppd.gz
The lpstat utility with the –d option displays the name of the default printer:
# lpstat -d
system default destination: MainPrinter
CUPS automatically makes the first printer you define the default printer. The following command makes HPLJ the default printer:
#lpstat -d HPLJ
The following command removes the configuration for the HL2140 printer:
#lpstat -x HL2140
Printing Quotas
CUPS provides rudimentary printing quotas. You can define two forms of quotas: page count and file size. File size quotas are almost meaningless because a small PostScript file can take a long time to interpret and can require a lot more ink to print than a large one. Page quotas are more useful, although their implementation is flawed. To determine the number of pages in a document, CUPS examines the PostScript input. If a job is submitted in the printer’s native language, such as PCL, CUPS bypasses this accounting mechanism. Also, if mpage is used to create a PostScript file with multiple pages printed on each sheet, CUPS counts each page in the original document, rather than each sheet of paper it prints on.
Use job-quota-period and either job-page-limit or job-k-limit to establish a quota for each user on a given printer. The job-quota-period option specifies the number of seconds that the quota remains valid. The following command establishes a quota of 20 pages per day per user for the printer named HPLJ:
#lpadmin -p HPLJ -o job-quota-period=86400 -o job-page-limit=20
The job-k-limit option works similarly but defines a file size limit in kilobytes. The limit is the total number of kilobytes that each user can print during the quota period. After a user has exceeded her quota, she will not be allowed to print until the next quota period.
![]() Managing Print Queues
Managing Print Queues
When a printer is operating normally, it accepts jobs into its print queue and prints those jobs in the order in which they are received. You can give the command cupsreject followed by the name of a printer to cause a printer to not accept jobs into its print queue; enter the commandcupsaccept to re-enable it. You can also use system-config-printer to control the print queue; refer to “Settings” on page 559. Two factors determine how a printer handles a job: if the printer is accepting jobs and if it is enabled. Table 13-1 on page 560 describes what happens with the various combinations of the two factors.
The utilities that change these factors are cupsdisable, cupsenable, cupsreject, and cupsaccept. Each utility takes the name of a printer as an argument. The following commands first disable and then enable the printer named HPLJ:
# cupsdisable HPLJ
# cupsenable HPLJ
The next commands cause HPLJ to reject and then accept jobs:
# cupsreject HPLJ
# cupsaccept HPLJ
![]() Sharing CUPS Printers
Sharing CUPS Printers
This section describes how to use textual tools to share local printers. Alternately, you can use system-config-printer (page 558) to share printers: Display the Server Settings window by selecting menubar: Server![]() Settings and put a tick in the check box labeled Publish shared printers connected to this system. Using this technique allows you to choose whether to share each printer.
Settings and put a tick in the check box labeled Publish shared printers connected to this system. Using this technique allows you to choose whether to share each printer.
IPP facilitates remote printing. The Listen directive in the CUPS configuration file, /etc/cups/cupsd.conf, specifies which IP address and port or which domain socket path CUPS binds to and accepts requests on. The Listen directive has the following format:
Listen IP:port | path
where IP is the IP address that CUPS accepts connections on, port is the port number that CUPS listens on for connections on IP, and path is the pathname of the domain socket CUPS uses to communicate with printers. CUPS typically uses port 631 and by default binds to localhost. Thus it accepts connections from the loopback service of the local system only. CUPS uses /var/run/cups/cups.sock, a local domain socket, to communicate with local printers. It can also use a Port directive to specify the port number it listens to for HTTP requests.
$ grep -i listen /etc/cups/cupsd.conf
# Only listen for connections from the local machine.
Listen localhost:631
Listen /var/run/cups/cups.sock
To allow other systems to connect to the CUPS server on the local system, you must instruct CUPS to bind to an IP address that the other systems can reach. First remove or comment out the Listen localhost:631 directive; leave the other Listen directive in place:
# Listen localhost:631
Listen /var/run/cups/cups.sock
In place of the commented-out Listen directive, use an access control list to permit only selected machines to connect to local printers. An access control list is defined inside a <Location> container (see page 948 for the Apache equivalent). The following example allows only the system at IP address 192.168.1.101 and the local system to print to the specified printer.
<Location />
Order Allow,Deny
# Allow access from the local system and 192.168.1.101
Allow from localhost
Allow from 192.168.1.101
# Uncomment the following to permit access from all local interfaces
# Allow @LOCAL
</Location>
The @LOCAL macro is internal to CUPS and specifies the local system. This macro accepts communication from any address that resolves to the local system. Specify Allow @LOCAL to share the printer with all local interfaces.
When you change cupsd.conf, you must restart the cupsd daemon (page 557).
The Order Allow,Deny directive denies print requests by default and allows requests from specified addresses. An Order Deny,Allow directive would allow access by default and denies access only to clients specified in Deny from directives. You can use domain names, including wildcards, and IP ranges with either wildcards or net-masks in Allow from and Deny from directives. These directives work the same way they do in Apache. For more information refer to “Order” on page 961.
With the Order Deny,Allow directive, Deny from specifies the only IP addresses CUPS does not accept connections from. When you use the Order Allow,Deny directive, Allow from specifies the only IP addresses CUPS accepts connections from.
After you restart cupsd, remote systems can print on the local system’s printers using the IP address and port number specified by the Listen directive. If the server is running a firewall, you need to allow remote systems to connect through it on port 631; see page 557. You might also need to modify the SELinux policy (page 475) depending on the system setup.
![]() Traditional UNIX Printing
Traditional UNIX Printing
Before the advent of GUIs and WYSIWYG (page 1281) word processors, UNIX users would create documents using an editor such as vi and a typesetting markup language such as TeX or nroff/troff, convert the resulting files to PostScript using an interpreter, and send the PostScript files to the printer using lpr (BSD) or lp (System V). Linux implements both BSD and System V command-line printing utilities for compatibility. However, these utilities are now wrappers around the equivalent functionality in CUPS rather than core components of the printing system. The corresponding utilities are functionally equivalent; use whichever you prefer (Table 13-2).
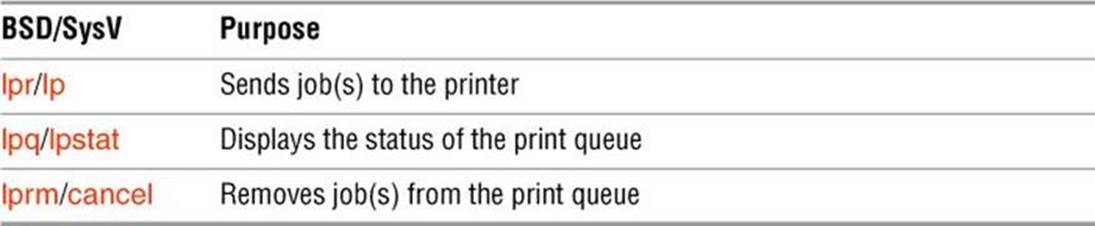
Table 13-2![]() BSD and System V command-line print utilities
BSD and System V command-line print utilities
From the command line, you can print a text, PostScript, or PDF file using lp:
$ lp memo.txt
request id is MainPrinter-25 (1 file(s))
The preceding command adds memo.txt to the print queue of the default printer and assigns it job number 25. When this printer is available, it prints the file. You can specify a printer using the –d option:
$ lp -d HL2140 graph.ps
request id is HL2140-26 (1 file(s))
The lpr –P option is equivalent to the lp –d option.
Without arguments, lp and lpr send their standard input to the printer:
$ cat memo2.txt | lp
request id is MainPrinter-27 (1 file(s))
The lpq and lpstat commands display information about the print queue:
$ lpstat
MainPrinter-25 zach 13312 Sun Feb 23 18:28:38 2014
HL2140-26 zach 75776 Sun Feb 23 18:28:48 2014
MainPrinter-27 zach 8192 Sun Feb 23 18:28:57 2014
Use cancel or lprm to remove jobs from the print queue. By default, only the owner of a print job or a user working with root privileges can remove a job.
$ cancel 27
$ lpstat
MainPrinter-25 zach 13312 Sun Feb 23 18:28:38 2014
HL2140-26 zach 75776 Sun Feb 23 18:28:48 2014
While working with root privileges, give the command cancel –a or lprm – to remove all jobs from the print queues.
Printing from Windows
This section explains how to use printers on Linux CUPS servers from Windows machines. CUPS is easier to manage and can be made more secure than using Samba to print from Windows.
Printing Using CUPS
Modern versions of Windows (2000 and later) support IPP and as a result can communicate directly with CUPS. To use this feature, you must have CUPS configured on the Linux print server to allow remote IPP printing; you also need to create a new printer on the Windows system that points to the IP address of the Linux print server.
First set up the /etc/cups/cupsd.conf file to allow network printing from a client, as explained in “Sharing CUPS Printers” on page 572. Setting up CUPS to allow printing from a Windows machine is exactly the same as setting it up to allow printing from a Linux client system. If necessary, open the firewall as explained on page 557.
Windows XP
From Windows XP, go to Control Panel![]() Printers and Faxes and click Add Printer. Click Next in the introductory window and select A network printer or a printer attached to another computer. Click Next. Select Connect to a printer on the Internet or on a home or office network. Continue following the next paragraph at “Enter URL.”
Printers and Faxes and click Add Printer. Click Next in the introductory window and select A network printer or a printer attached to another computer. Click Next. Select Connect to a printer on the Internet or on a home or office network. Continue following the next paragraph at “Enter URL.”
Windows 7
From Windows 7, go to Control Panel![]() Devices and Printers and click Add a printer. Click Add a network, wireless, or Bluetooth printer. Assuming Windows does not find the printer, click The printer that I want isn’t listed. Click the radio button labeled Select a shared printer by name.
Devices and Printers and click Add a printer. Click Add a network, wireless, or Bluetooth printer. Assuming Windows does not find the printer, click The printer that I want isn’t listed. Click the radio button labeled Select a shared printer by name.
Enter URL
Enter the following information in the text box (under Windows XP it is labeled URL):
http://hostname:631/printers/printer-name
where hostname is the name or IP address of the Linux CUPS server system and printer-name is the name of the printer on that system. For example, for the printer named dog88 on the system named dog at IP address 192.168.0.12, you could enter http://dog:631/printers/dog88 orhttp://192.168.0.12:631/printers/dog88. If you use a hostname, it must be defined in the hosts file on the Windows machine. Click Next. Windows requests that you specify the manufacturer and model of the printer or provide a driver for the printer. If you supply a printer driver, use the Windows version of the driver.
After Windows copies some files, the printer appears in the Printers and Faxes/Devices and Printers window. Under Windows 7 you need to click through two more screens. Right-click the printer and select Set as Default Printer to make it the default printer. You can specify comments, a location, and other attributes of the printer by right-clicking the printer and selecting Properties or Printer Properties.
Printing Using Samba
This section assumes that Samba (page 827) is installed and working on the Linux system that controls the printer you want to use from Windows. Samba must be set up so that the Windows user who will be printing is mapped to a Linux user (including mapping the Windows guest user to the Linux user nobody). Make sure these users have Samba passwords. Refer to “Samba Users, User Maps, and Passwords” on page 829.
Windows supports printer sharing via SMB, which allows a printer to be shared transparently between Windows systems using the same mechanism as file sharing.
Samba allows Windows users to use printers connected to Linux systems just as they would use any other shared printers. Because all Linux printers traditionally appear to be PostScript printers, the Linux print server appears to share a PostScript printer. Windows does not include a generic PostScript printer driver. Instead, Windows users must select a printer driver for a PostScript printer. The Apple LaserWriter 12/640ps driver is a good choice.
When you use rpm to install Samba, it creates a directory named /var/spool/samba that is owned by the root account and that anyone can read from and write to. The sticky bit (page 1275) is set for this directory, allowing a Windows user who starts a print job as a Linux user to be able to delete that job, but denying users the ability to delete the print jobs of other users. Make sure this directory is in place and has the proper ownership and permissions:
$ ls -ld /var/spool/samba
drwxrwxrwt. 2 root root 4096 02-03 15:23 /var/spool/samba
Uncomment following two lines in the [global] section of the /etc/samba/smb.conf file.
[global]
...
printing = cups
printcap name = cups
The printer’s share is listed in the [printers] section in smb.conf. In the following example, the path is the path Samba uses as a spool directory and is not a normal share path. The settings allow anyone, including guest, to use the printer. The [printers] section in the default smb.conf file has the following entries, which are appropriate for most setups:
[printers]
comment = All Printers
path = /var/spool/samba
browseable = no
guest ok = no
writable = no
printable = yes
Ideally each user who plans to print should have an account. Otherwise, when multiple users share the same account (e.g., the nobody account), they can delete one another’s print jobs.
Printing to Windows
CUPS views a printer on a Windows machine exactly the same way it views any other printer. The only difference is the URI you need to specify when connecting it. To configure a printer connected to a Windows machine, click the Administration tab in the CUPS Web interface and selectAdd Printer, just as you would for a local printer.
When you are asked to select the device, choose Windows Printer via SAMBA. Enter the URI of the printer in the following format:
smb://windows_system/printer_name
where windows_system can be an IP address or a hostname. After you have added the printer, you can use it as you would any other printer.
Alternately, you can use system-config-printer (page 558) to set up a Windows printer. When you choose to install a Windows printer, you can specify a URL as described previously, or you can click Browse. By default, this setup prompts the user if authentication is required; you can choose Set authentication details now if you prefer.
Chapter Summary
A printing system such as CUPS sets up printers. It also moves print jobs from an application or the command line through the appropriate filters and into a queue for a suitable printer and then prints those jobs.
CUPS is a cross-platform print server built around IPP (Internet Printing Protocol). It handles setting up and sending jobs through print queues. The easiest way to configure printers is using Printers from the Settings window or the Print Settings window (system-config-printer). You can also configure CUPS using the Web interface, which you can access by pointing a Web browser at localhost:631 on the system the printer is connected to. From the Web interface, you can configure print queues and modify print jobs in the queues.
You can use the traditional UNIX commands from a command line to send jobs to a printer (lpr/lp), display a print queue (lpq/lpstat), and remove jobs from a print queue (lprm/cancel). In addition, CUPS provides the lpinfo and lpadmin utilities, which allow you to configure printers from the command line.
CUPS and Samba enable you to print on a Linux printer from a Windows machine and vice versa.
Exercises
1. Which commands can you use from the command line to send a file to the default printer?
2. Which command would you give to cancel all print jobs on the system?
3. Which commands list your outstanding print jobs?
4. What is the purpose of sharing a Linux printer using Samba?
5. Name three printing protocols that CUPS supports. Which is the CUPS native protocol?
Advanced Exercises
6. Which command lists the installed printer drivers available to CUPS?
7. How would you send a text file to a printer connected to the first parallel port without using a print queue? Why is doing so a bad idea?
8. Assume you have a USB printer with a manufacturer-supplied PostScript printer definition file named newprinter.ppd. Which command would you use to add this printer to the system on the first USB port with the name USBPrinter?
9. How would you define a quota that allows each user to print up to 50 pages per week to the printer named LaserJet?
10. Define a set of access control rules for a <Location> container inside /etc/cups/cupsd.conf that would allow anyone to print to all printers as long as they were either on the local system or in the mydomain.com domain.
All materials on the site are licensed Creative Commons Attribution-Sharealike 3.0 Unported CC BY-SA 3.0 & GNU Free Documentation License (GFDL)
If you are the copyright holder of any material contained on our site and intend to remove it, please contact our site administrator for approval.
© 2016-2026 All site design rights belong to S.Y.A.