A practical guide to Fedora and Red Hat Enterprise Linux, 7th Edition (2014)
Part III: System Administration
Chapter 14. Building a Linux Kernel
In This Chapter
Downloading, Installing, and Prepping the Kernel Source Code
Configuring and Compiling the Linux Kernel
Installing the Kernel, Modules, and Associated Files
GRUB: The Linux Boot Loader
Configuring GRUB
grub2-mkconfig: Generates the grub.cfg File
grub2-install: Installs the MBR and GRUB Files
dmesg: Displays Kernel Messages
Objectives
After reading this chapter you should be able to:
![]() Download, install, and prep the kernel source code
Download, install, and prep the kernel source code
![]() Choose kernel compile options
Choose kernel compile options
![]() Configure the system to use the newly compiled kernel
Configure the system to use the newly compiled kernel
![]() Explain the purpose of the GRUB boot loader
Explain the purpose of the GRUB boot loader
![]() Modify the boot loader configuration
Modify the boot loader configuration
![]() Troubleshoot kernel messages using dmesg
Troubleshoot kernel messages using dmesg
After you have installed a system, you might want to reconfigure and build a new Linux kernel. Fedora/RHEL comes with a prebuilt kernel that simplifies the installation process. However, this kernel might not be properly configured for all system features. By configuring and building a new kernel, you can create one that is customized for a system and its unique needs. A customized kernel is typically smaller than a generic one. However, compiling and maintaining a custom kernel takes a lot of time and work.
Sometimes you do not need to build a new kernel. Instead, you can dynamically change many aspects of the installed kernel. Two ways to make these changes are by using boot command-line parameters (page 70) or by modifying /etc/sysctl.conf, which sysctl (next) reads when the system boots.
You can add the same parameters you use on the boot command line to /boot/grub2/grub.cfg or to its symbolic link, /etc/grub2.cfg. For example, acpi=off prevents acpid (the advanced configuration and power interface daemon) from starting. See page 70 for more information.
sysctl
The sysctl utility can modify kernel parameters while the system is running. This utility takes advantage of the facilities of /proc/sys, which defines the parameters that sysctl can modify.
The command sysctl –a displays a complete list of sysctl parameters. An example of displaying and changing the domainname kernel parameter follows. The double quotation marks are not required in this example, but you must quote any characters that would otherwise be interpreted by the shell. You must work with root privileges when you change a parameter.
$ sysctl kernel.domainname
kernel.domainname = (none)
$ su -c 'sysctl -w kernel.domainname="example.com"'
kernel.domainname = example.com
$ sysctl kernel.domainname
kernel.domainname = example.com
Caution: Have the installation medium handy when you build a new kernel
When you build a new Linux kernel to install a new version or to change the configuration of the existing version, make sure you have the installation medium handy. This disk allows you to reboot the system, even when you have destroyed the system software completely. Having this medium available can mean the difference between momentary panic and a full-scale nervous breakdown. Refer to “Rescue an Installed System” on page 456 for more information.
Tip: Secure Boot
On newer machines, Secure Boot might keep a custom kernel from booting. On these machines you need to disable Secure Boot or set up your own keys and sign the kernel with them. For more information visit bothfedoraproject.org/wiki/Secureboot#Questions_and_Answers and jwboyer.livejournal.com/46149.html.
Before you can start building a new kernel, you must download, install, and prep the source code. You also need to build a configuration file that describes the new kernel you want to build. This chapter describes the steps involved in completing these tasks.
Downloading, Installing, and Prepping the Kernel Source Code
This section describes how to download kernel source code on the local system. If you want to download code that has not been customized (patched) by Fedora/RHEL, visit kernel.org/pub. This section also covers prepping and installing the kernel source code. See “Configuring and Compiling the Linux Kernel” on page 584 for information on how to proceed after you have downloaded, installed, and prepped the kernel source code.
Prerequisites
Install the following packages:
• rpmdevtools
• yum-utils (installed with the default system)
• ncurses-devel (used to configure the kernel using make menuconfig)
• libglade2-devel (used to configure the kernel using make gconfig)
Tip: Compiling a kernel takes a lot of disk space
Make sure you have enough disk space before you compile a kernel. When you compile a default kernel, it occupies approximately 3.5 gigabytes. This disk space must be available on the filesystem in which you compile the kernel.
More Information
Local
The kernel package includes the latest documentation, some of which might not be available in other documents. You might wish to review the README files included within the source code directories and the relevant files in the Documentation subdirectory.
Howto
Detailed, somewhat dated, generic guide to installing and configuring the Linux kernel: Linux Kernel-HOWTO
Web
Kernel source code: kernel.org
Secure Boot: fedoraproject.org/wiki/Secureboot#Questions_and_Answers and jwboyer.livejournal.com/46149.html
All builds of all packages for multiple architectures plus source code: koji.fedoraproject.org
Downloading the Source Code
rpmdev-setuptree
After you download the required packages (previous section), run rpmdev-setuptree. This utility sets up an SRPM build environment comprising an rpmbuild directory hierarchy in your home directory:
$ rpmdev-setuptree
$ ls rpmbuild
BUILD RPMS SOURCES SPECS SRPMS
After you compile the kernel, the five directories rpmdev-setuptree creates will hold files as follows: BUILD holds the results of compiling the kernel, RPMS holds compiled RPM files, SOURCES holds source and patch files, SPECS holds the kernel specification file, and SRPMS holds source RPM files, if any.
Caution: Do not work with root privileges
You do not need to—nor should you—work with root privileges for any portion of configuring or building the kernel except for installing software packages and installing the kernel (the last step). The kernel README file says, “Don’t take the name of root in vain.”
The sections on building, customizing, and installing the kernel use su –c when it is necessary to work with root privileges. This practice helps keep you from working with root privileges when you do not mean to. It also provides a better record for you to review in the shell history (page 376) should something go wrong. For more information on su –c, refer to “Executing a Single Command” on page 427.
![]() yumdownloader
yumdownloader
The easiest way to download the updated kernel source code for the most recently released version of the kernel is to use yumdownloader. Work in and download the kernel source code RPM file to your home directory:
$ cd
$ yumdownloader --source kernel
Loaded plugins: langpacks, refresh-packagekit
Enabling updates-source repository
Enabling fedora-source repository
...
kernel-3.9.8-300.fc19.src.rpm | 69 MB 00:27
Tip: About the examples in this section
The examples in this section show Sam, whose home directory is /home/sam (~sam), working with the kernel named kernel-3.9.8-300.fc19. When you build a kernel, you will probably work in your home directory, and the name of the kernel you work with will differ from the name of Sam’s kernel. Make the necessary substitutions as you follow the examples.
Installing the Source Code
yum-builddep
With the kernel source code RPM package file in your home directory, run yum-builddep to download and install the packages needed to build the source code package (dependencies). Because you are installing packages, you must work with root privileges. Replace sam and 3.9.8-300.fc19in the following example with your username and the name of the kernel you are using to specify the location of the RPM file on the system.
$ su -c 'yum-builddep ~sam/kernel-3.9.8-300.fc19.src.rpm'
Password:
Loaded plugins: langpacks, refresh-packagekit
Getting requirements for kernel-3.9.8-300.fc19.src
...
Install 15 Packages (+37 Dependent packages)
Total download size: 36 M
Installed size: 108 M
Is this ok [y/d/N]: y
...
Complete!
Finally, working from your home directory as a nonprivileged user, use rpm to install the kernel source code in the rpmbuild directory hierarchy in your home directory:
$ rpm -Uvh kernel-3.9.8-300.fc19.src.rpm
1:kernel warning: user mockbuild does not exist - using root
warning: group mockbuild does not exist - using root
warning: user mockbuild does not exist - using root
...
1:kernel-3.9.8-300.fc19 ################################# [100%]
You can ignore errors, such as those shown above, about groups and users that do not exist.
Prepping the Source Code
The final step before you can work with the source code is to prep it. Prepping unpacks compressed files and applies patches. The following rpmbuild command uses the –bp option to prep the source code:
$ cd /home/sam/rpmbuild/SPECS
$ rpmbuild -bp --target $(arch) kernel.spec
Building target platforms: x86_64
Building for target x86_64
Executing(%prep): /bin/sh -e /var/tmp/rpm-tmp.qVGqoc
+ umask 022
+ cd /home/sam/rpmbuild/BUILD
...
If rpmbuild cannot find a package it needs to prep the code, it displays a message such as the following:
error: Failed build dependencies:
elfutils-libelf-devel is needed by kernel-3.9.8-300.fc19.x86_64
zlib-devel is needed by kernel-3.9.8-300.fc19.x86_64
binutils-devel is needed by kernel-3.9.8-300.fc19.x86_64
In this case, install the needed packages (you might have to install different packages than those in the example):
$ su -c 'yum install elfutils-libelf-devel zlib-devel binutils-devel'
After you install the packages, give the preceding rpmbuild command again. With the kernel source code installed and prepped on the local system, you can configure, compile, and install it.
Configuring and Compiling the Linux Kernel
This section describes how to configure and compile the kernel.
Tip: Where are the kernel source code and the kernel specification file?
After installing and prepping the source code as described in the previous section, Sam’s source code is in /home/sam/rpmbuild/BUILD/kernel-3.9.fc19/linux-3.9.8-300.fc19.x86_64/, and his kernel specification file is in /home/sam/rpmbuild/SPECS. Your source code will be in a similarly named directory (~/rpmbuild/BUILD/kernel*/linux*) and your kernel specification file will be in the directory named ~/rpmbuild/SPECS.
Most of the work in this section is done in the directory in which the source code is located (linux*). Labeling and installing the kernel is done in the SPECS directory.
Labeling the Kernel
To prevent overwriting existing kernel files and to identify various compilations of the kernel, you can change the buildid variable in the kernel.spec file. This variable is initially set to .local. Whatever value you assign to this variable is placed at the end of the kernel name and release number to identify the kernel. You can make note of patches applied to the kernel in this string to help people track down problems later. Use cd to change directories to ~/rpmbuild/SPECS, edit kernel.spec, and change local in the line
# % define buildid .local
to a value that identifies the kernel you are building. You must also remove the leading hash mark (#), the SPACE following the hash mark, and the SPACE between % and define:
%define buildid .sam1307021000
.config: Configures the Kernel
Before you can compile the code and create a Linux kernel, you must decide on and specify which features you want the kernel to support. You can configure the kernel to support most features in one of two ways: by building the feature into the kernel or by specifying the feature as a loadable kernel module (page 589), which is loaded into the kernel only as needed. In deciding which method to use, you must weigh the size of the kernel against the time it takes to load a module. Make the kernel as small as possible while minimizing how often modules have to be loaded.
The .config file in the ~/rpmbuild/BUILD/kernel*/linux* directory controls which features the new kernel will support and how it will support them. The next section provides instructions for replacing an existing custom kernel. “Customizing a Kernel” on page 586 explains how to create a default version of the .config file if it does not exist and how to edit the file if it does exist.
Replacing a Custom Kernel
If you have already configured a custom kernel, you might want to replace it with a similarly configured, newer kernel. Each kernel potentially has new configuration options, however—which explains why it is poor practice to use an old .config file for compiling a new kernel. This section explains how to upgrade an existing .config file so it includes options that are new to the new kernel and maintains the existing configuration for the old options.
Work in the ~/rpmbuild/BUILD/kernel*/linux* directory. The system keeps a copy of the configuration file for the kernel the local system is running in /boot. The following command copies this file to .config in the working directory:
$ pwd
/home/sam/rpmbuild/BUILD/kernel-3.9.fc19/linux-3.9.8-300.fc19.x86_64
$ cp /boot/config-$(uname -r) .config
In this command, the shell executes uname –r and uses command substitution (page 410) to replace $(uname –r) with the output of the command, which is the name of the release of the kernel running on the local system.
Next give the command make oldconfig to patch the .config file with options from the new kernel that are not present in the old kernel. This command displays each kernel option that is the same in the new and old kernels and automatically sets the state of the option in the new kernel the same way it was set in the old kernel. It stops when it finds an option that appears in the new kernel but not in the old kernel. It then displays a prompt, which is similar to [N/y/?] (NEW), showing possible responses and indicating that this option is new. The prompt shows the default response as an uppercase letter; you can type this letter (uppercase or lowercase) and press RETURN, or just press RETURN to select this response. In the example, the Tickless System option is new, and the default response is Y for yes, include the option in the new kernel. To select a nondefault response (n means no, do not include the option, and m means include the option as a module), you must type the letter and press RETURN. Enter ? followed by RETURN to display more information about the option.
$ make oldconfig
scripts/kconfig/conf --oldconfig Kconfig
*
* Linux Kernel Configuration
*
*
* Code maturity level options
*
Prompt for development and/or incomplete code/drivers (EXPERIMENTAL) [Y/n/?] y
*
* General setup
*
Local version - append to kernel release (LOCALVERSION) []
Automatically append version information to version string (LOCALVERSION_AUTO) [N/y/?] n
...
*
* Processor type and features
*
Tickless System (Dynamic Ticks) (NO_HZ) [Y/n/?] (NEW) ? ?
This option enables a tickless system: timer interrupts will
only trigger on an as-needed basis both when the system is
busy and when the system is idle.
Tickless System (Dynamic Ticks) (NO_HZ) [Y/n/?] (NEW) ? RETURN
High Resolution Timer Support (HIGH_RES_TIMERS) [Y/n/?] y
Symmetric multi-processing support (SMP) [Y/n/?] y
Subarchitecture Type
> 1. PC-compatible (X86_PC)
2. AMD Elan (X86_ELAN)
...
#
# configuration written to .config
#
Customizing a Kernel
The ~/rpmbuild/BUILD/kernel*/linux* directory and the configs subdirectory provide sample configuration files for various processors, multiple processors, and configurations. You might want to look at these files before you get started or use one of them as your starting point. To use one of these files, copy it to .config.
You can use one of three standard commands to build the .config file that configures a Linux kernel:
$ make config
$ make menuconfig
$ make gconfig
See “Prerequisites” on page 581 for a list of packages required to run all but the first of these commands.
If a .config file does not exist in the working directory, each of these commands except the first sets up a .config file that matches the kernel the local system is running and then allows you to modify that configuration. The commands can set up this .config file only if the configuration file for the locally running kernel is at /boot/config-$(uname –r). See the preceding section if you want to build a new kernel with a configuration similar to that of an existing kernel.
The make config command is the simplest of the three commands, uses a textual interface, and does not require additional software. It is, however, the most unforgiving and hardest to use of the configuration interfaces. The make menuconfig command uses a pseudographical interface and also displays a textual interface. The make gconfig command uses GTK+ (www.gtk.org) and displays a graphical interface.
Each command asks the same questions and produces the same result, given the same responses. The first and second commands work in character-based environments; the third command works in graphical environments. For many administrators working with a GUI, the third method is the easiest to use.
The make gconfig command displays the Linux Kernel Configuration window, which you can view in three configurations: single, split, or full view. Choose a view by clicking one of the three icons to the right of the save icon on the toolbar. Figure 14-1 shows the split view. In this view, the left frame shows the options and the top-right view lists the features for each option. The bottom-right view describes the highlighted option or feature. Figure 14-2 shows the full view.
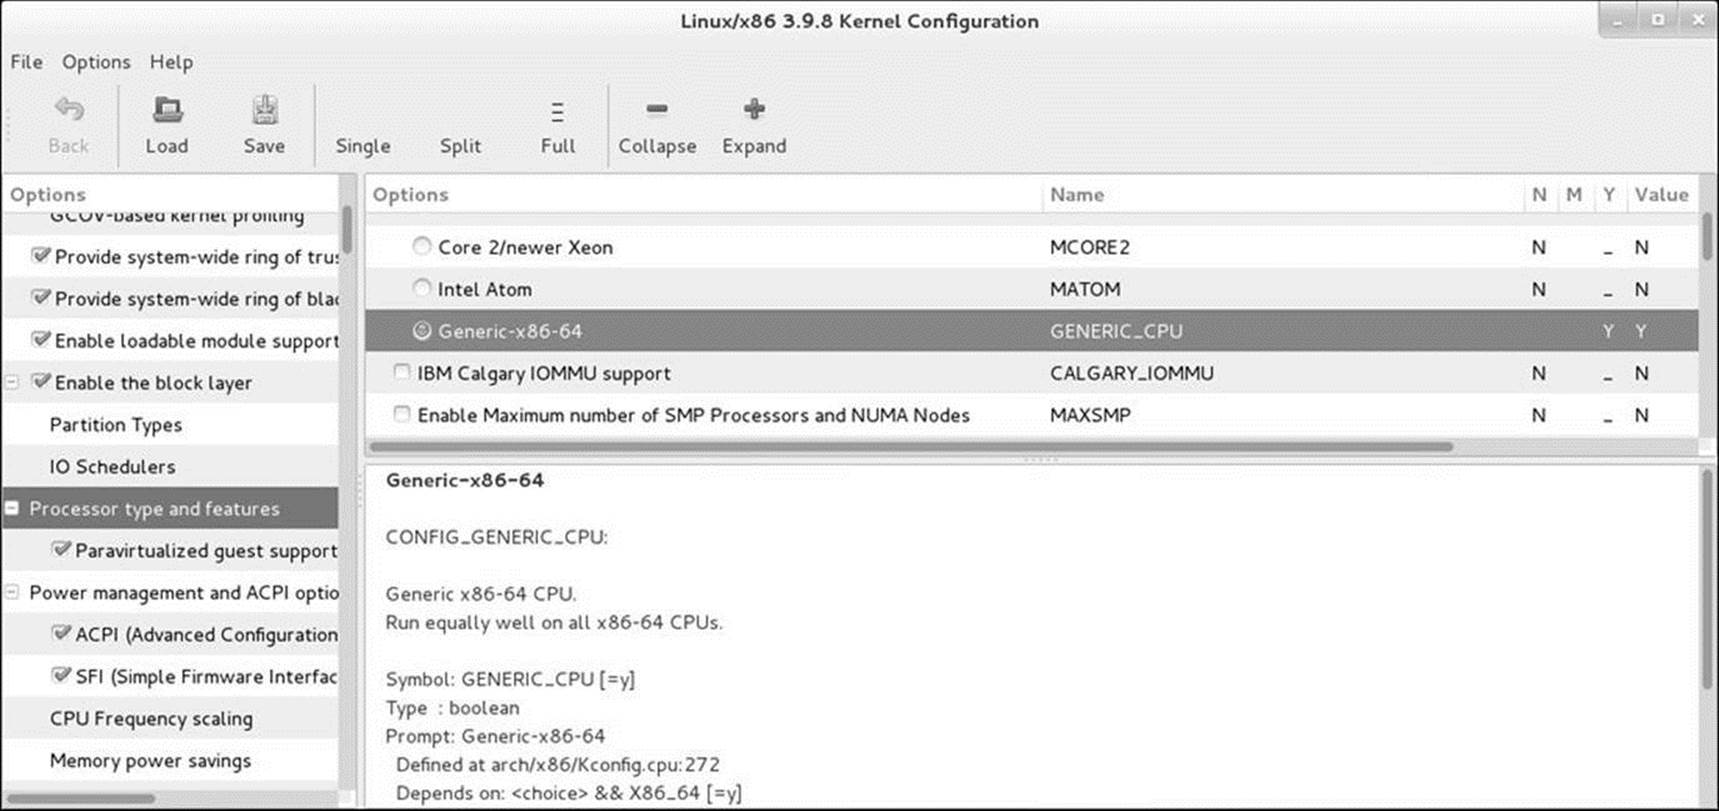
Figure 14-1 The Linux Kernel Configuration window, split view
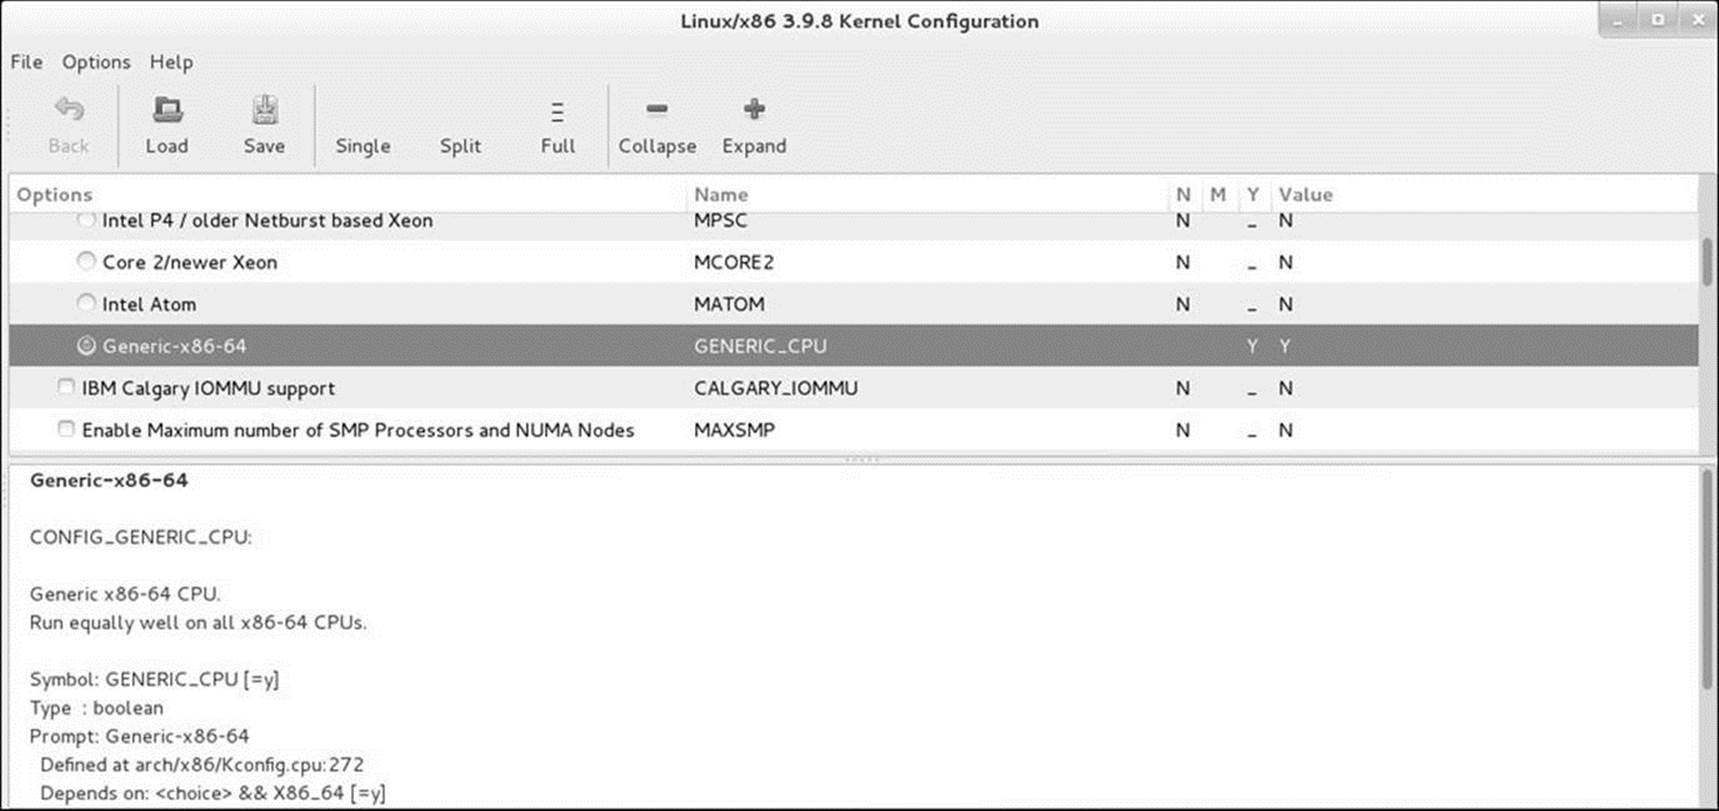
Figure 14-2 The Linux Kernel Configuration window, full view
At the far right of all views are four columns labeled N, M, Y, and Value. An N appears in the N column if the feature on that line is not being used. An M in the M column means the feature is included as a module. A Y in the Y column means the feature is compiled in the kernel. An underscore in any of these columns means that the value that would appear in that column is valid for the feature (e.g., an underscore in the column labeled M means that that feature can be included as a module, although it is not included as a module). The Value column holds the value of the feature (N, M, or Y).
In any view, you can double-click the check boxes and radio buttons next to the features to select or deselect that feature. An empty check box/radio button indicates that the feature is disabled, a tick indicates that it is to be compiled in the kernel, and a minus sign means that it is to be compiled as a module. With a choice highlighted, you can also press M for module, N for not included, and Y for compiled into the kernel. Select menubar: Options![]() Show All Options to display all options and features.
Show All Options to display all options and features.
Go through the options and mark the features as you would like them to be configured in the new kernel. At any time during the configuration process, you can store the currently defined configuration to a file, load a configuration from a file, or exit with or without saving your changes. The selections to do so are available in menubar: File. When you are done, select menubar: File![]() Save and close the window.
Save and close the window.
Cleaning the Source Tree
After generating a .config file, but before compiling or recompiling the kernel, purge the source tree of all potentially stale *.o files using the following command:
$ make clean
CLEAN arch/x86/boot/compressed
CLEAN arch/x86/boot
CLEAN arch/x86/kernel/acpi/realmode
CLEAN arch/x86/kernel/cpu
...
CLEAN Documentation/watchdog/src
CLEAN .tmp_versions
...
This command ensures that make correctly applies any numbering scheme you use when you compile the kernel.
Copying the Configuration File
Before compiling the kernel, you must copy the .config file you want to use to the directory you will compile the kernel in. This file must have a name that corresponds to the kernel in use on the local system (e.g., config-i686-generic):
$ cp .config ~/rpmbuild/SOURCES/config-$(arch)-generic
Compiling a Kernel Image File and Loadable Modules
The next command compiles the kernel and modules. Compiling the kernel takes upwards of several hours, depending on the power of the system you are using.
$ pwd
/home/sam/rpmbuild/SPECS
$ rpmbuild -bb --target $(arch) kernel.spec
Building target platforms: x86_64
Building for target x86_64
Executing(%prep): /bin/sh -e /var/tmp/rpm-tmp.0TbzHg
+ umask 022
+ cd /home/sam/rpmbuild/BUILD
...
Wrote: /home/sam/rpmbuild/RPMS/x86_64/kernel-debug-modules-extra-3.9.8-300.sam1307021000.fc19.x86_64.rpm
Wrote: /home/sam/rpmbuild/RPMS/x86_64/kernel-debug-debuginfo-3.9.8-300.sam1307021000.fc19.x86_64.rpm
Executing(%clean): /bin/sh -e /var/tmp/rpm-tmp.zcobng
+ umask 022
+ cd /home/sam/rpmbuild/BUILD
+ cd kernel-3.9.fc19
+ rm -rf /home/sam/rpmbuild/BUILDROOT/kernel-3.9.8-300.sam1307021000.fc19.x86_64
+ exit 0
Using Loadable Kernel Modules
A loadable kernel module (page 1258) (sometimes called a module or loadable module) is an object file—part of the kernel—that is linked into the kernel at runtime. Modules can be inserted into and removed from a running kernel at almost any time (except when a module is being used). This ability gives the kernel the flexibility to be as small as possible at any given time. Modules are a good way to code some kernel features, including drivers that are not used continually (such as a tape driver). Module filenames end in .ko and are stored in subdirectories in /lib/modules. Under Fedora/RHEL, kernel modules are compiled along with the kernel as explained in the preceding section.
Table 14-1 lists some of the tools available to help you work with modules. Refer to the corresponding man pages for options and more information.
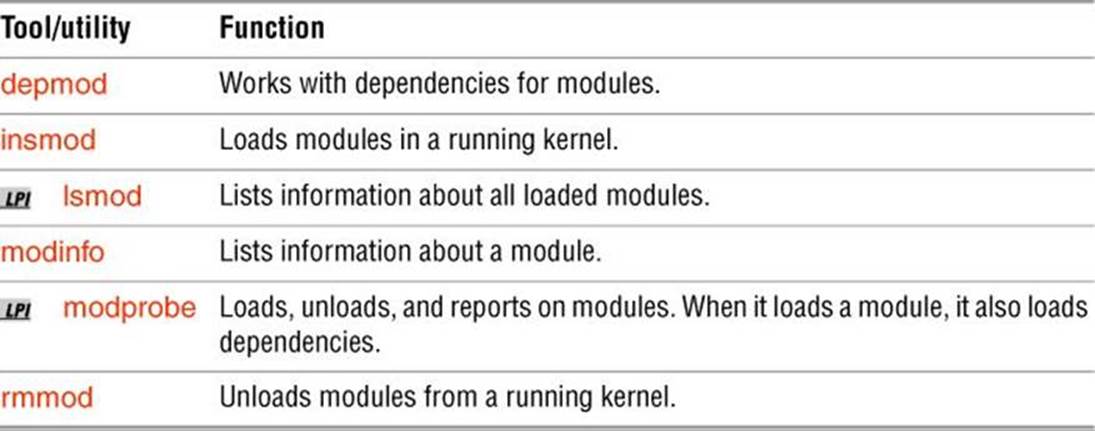
Table 14-1 Tools for working with modules
Installing the Kernel, Modules, and Associated Files
The next step, which you must execute with root privileges, is to copy the compiled kernel, modules, and associated files to the appropriate directories—usually /boot and a subdirectory of /lib/modules. When you have a partition mounted at /boot, the files are kept in the root of this partition (/boot). Because you have created an RPM package, installing these files is quite easy. The following command installs the new kernel files from the rpmbuild directory hierarchy in Sam’s home directory into the proper directories:
$ su -c 'rpm -ivh /home/sam/rpmbuild/RPMS/x86_64/kernel-3.9.8-300.sam1307021000.fc19.x86_64.rpm'
Preparing... ################################# [100%]
Updating / installing...
1:kernel-3.9.8-300.sam1307021000.fc################################# [100%]
Installing the kernel in this manner updates the grub.cfg (page 593) GRUB configuration file to include the new kernel.
Reboot
Reboot the system by clicking your name at the upper-right corner of the screen and selecting Shut Down and then selecting Restart. If you are working at the console, press CONTROL-ALT-DEL. You can also give a reboot command from the console, a character-based terminal, or a terminal emulator. When the system is rebooted, you can use uname to verify the new kernel is loaded:
$ uname -r
3.9.8-300.sam1307021000.fc19.x86_64
![]() GRUB: The Linux Boot Loader
GRUB: The Linux Boot Loader
![]() MBR
MBR
A boot loader is a very small program that the bootstrap (page 1240) process uses as it brings a computer from an off or reset state to a fully functional state. The boot loader frequently resides on the starting sectors of a hard disk called the MBR (master boot record).
GPT
In place of MBR you can set up GPT (GUID Partition Table) on a new system; changing an installed system from MBR to GPT is a destructive process. GPT has several advantages over MBR including the ability to work with disks larger than two terabytes. Linux and newer versions of Windows support GPT and it is the default for RHEV-H (Red Hat Enterprise Virtualization Hypervisor) machines. You must use parted (page 614) and not fdisk to manage partitions under GPT. For more information visit wiki.archlinux.org/index.php/GUID_Partition_Table.
![]() BIOS
BIOS
The BIOS (page 1239), which is stored in an EEPROM (page 1248) on the system’s motherboard, gains control of a system when you turn on or reset the computer. After testing the hardware, the BIOS transfers control to the MBR, which usually passes control to the partition boot record. This transfer of control starts the boot loader, which is responsible for locating the operating system kernel (kept in the / or /boot directory), loading that kernel into memory, and starting it running. If you use a /boot directory, which might be mounted on a separate partition, this directory or partition must be present for the system to boot Linux. Refer to “Booting the System” on page 450 for more information on what happens from this point forward.
![]() LBA addressing mode and the /boot partition
LBA addressing mode and the /boot partition
All newer hard disks support LBA (logical block addressing) mode. LBA permits the /boot directory to appear anywhere on the hard disk. For LBA to work, it must be supported by the hard disk, the BIOS, and the operating system (GRUB in the case of Linux). Although GRUB supports LBA mode, some BIOSes do not. For this reason, it is a good idea to place the /boot directory in its own partition located near the beginning of the hard disk. With this setup, the root (/) filesystem can be anywhere on any hard drive that Linux can access regardless of LBA support. In some instances, without a separate /boot partition, the system might boot at first but then fail as you update the kernel and the kernel files move further from the beginning of the disk.
LVM
Systems that use LVM require a separate boot partition that is not an LV. For more information on LVM see page 44.
GRUB 2
Fedora 16 and RHEL 7 introduced GRUB 2 (Grand Unified Boot loader 2), which this book refers to simply as GRUB. This book refers to the first release as GRUB legacy. GRUB 2 is a complete rewrite of GRUB legacy; few of the configuration files are the same.
A product of the GNU Project, the GRUB loader conforms to the multiboot specification (page 1261), which allows it to load many free operating systems directly as well as to chain load (page 1241) proprietary operating systems. The GRUB loader can recognize various types of filesystems and kernel executable formats, allowing it to load an arbitrary operating system. When you boot the system, GRUB can display a menu of choices that is generated by the /boot/grub2/grub.cfg file (page 593). At this point you can modify a menu selection, choose which operating system or kernel to boot, or do nothing and allow GRUB to boot the default system.
When you install GRUB at the time you install Linux, the installation program configures GRUB automatically. See the grub2 info page and www.gnu.org/software/grub for more information on GRUB.
![]() Configuring GRUB
Configuring GRUB
As mentioned earlier, GRUB 2 uses a different set of files than GRUB legacy. You control most of the frequently changed aspects of GRUB by editing the /etc/default/grub file (next) and running grub2-mkconfig, which generates the /boot/grub2/grub.cfg file (page 593). You can edit files in the /etc/grub.d directory (page 592) to perform advanced configuration of the GRUB menu. The grub.cfg file is comparable to the GRUB legacy /boot/grub/menu.lst file, but it is a poor idea to edit the grub.cfg file because it is generated by grub2-mkconfig and is usually overwritten by that utility.
/etc/default/grub: The Primary GRUB Configuration File
Changing the values of variables in the /etc/default/grub file allows you to modify many aspects of how the system boots and how GRUB displays its menu (Figure 10-2, page 451). In most cases, you can force GRUB to display its menu by holding down the SHIFT key as the system boots (page 450).
The effects of some of the variables you can set in the /etc/default/grub file depend on whether GRUB finds one or more than one bootable operating systems on the machine. Some variables do not need to be set. Toward this end, GRUB does not evaluate a line that begins with a hashmark (#; these lines are comments). Remove or add a hashmark to cause GRUB to evaluate or not evaluate an assignment, respectively.
The /etc/default/grub file is shown following.
$ cat /etc/default/grub
GRUB_TIMEOUT=5
GRUB_DISTRIBUTOR="$(sed 's, release .*$,,g' /etc/system-release)"
GRUB_DEFAULT=saved
GRUB_DISABLE_SUBMENU=true
GRUB_TERMINAL_OUTPUT="console"
GRUB_CMDLINE_LINUX="rd.lvm.lv=fedora/swap rd.md=0 rd.dm=0 vconsole.keymap=us $([ -x /usr/sbin/rhcrashkernel-param ] && /usr/sbin/rhcrashkernel-param || :) rd.luks=0 vconsole.font=latarcyrheb-sun16 rd.lvm.lv=fedora/root rhgb quiet"
GRUB_DISABLE_RECOVERY="true"
You can assign values to the following variables:
GRUB_TIMEOUT=num
The num specifies the number of seconds GRUB waits before booting the system. Set num to –1 to cause GRUB to wait until the user selects a menu item. Setting num to 0 causes the SHIFT key to lose its effect: The user will not be able to display the GRUB menu before the system boots.
GRUB_DISTRIBUTOR=string
The string specifies the name of the distribution as displayed by GRUB. The string as supplied with Fedora is executable and is replaced with its output because it is enclosed within $(...) (command substitution; page 410):
$(sed 's, release .*$,,g' /etc/system-release)
The sed command truncates everything following Fedora from the system-release file.
GRUB_DEFAULT=num | saved
The num specifies the ordinal number of the default menu entry. The default menu entry is the one GRUB boots if you do not select a different entry as GRUB boots the system. Menu entries are numbered starting with 0, so setting this variable to 0 specifies the first menu entry. SettingGRUB_DEFAULT to saved causes GRUB to boot the most recently booted menu entry.
GRUB_DISABLE_SUBMENU=true | false
When set to true, causes grub2-mkconfig not to generate submenu entries for the GRUB menu. Setting it to false causes submenu entries to be generated.
GRUB_TERMINAL_OUTPUT="console"
Specifies the terminal output device such as console or serial.
GRUB_CMDLINE_LINUX=string
GRUB appends string to the linux boot line that GRUB passes to the kernel when booting in both normal and single-user/rescue modes (page 450). As supplied with Fedora, the string is long, supplying Fedora the information it needs to boot. For more information refer to “Seeing What Is Going on” on page 59. You can also add boot command-line parameters to string; see page 451 for instructions on editing the GRUB menu. Separate each word from the next with a SPACE and, if string includes SPACEs, enclose string within double quotation marks.
GRUB_DISABLE_RECOVERY=true | false
When set to true, causes grub2-mkconfig not to generate recovery entries for the GRUB menu. Setting it to false causes recovery entries to be generated.
/etc/grub.d/*: GRUB Configuration Templates
The files in the /etc/grub.d directory determine many aspects of the GRUB menu. The grub2-mkconfig utility (next) processes these files in numerical order. See the README file in this directory for more information.
You can add files to this directory and modify the existing files, but it is not usually necessary to do so. Each of these files must be executable in order for grub2-mkconfig to process it.
As installed, the /etc/grub.d directory holds the following files:
00_header
Runs the initial GRUB setup and provides the header information that appears at the beginning of the grub.cfg file.
10_linux
Creates a menu entry for each kernel specified by a file named /boot/vmlinu[xz]–* or /vmlinu[xz]–*. If GRUB_DISABLE_RECOVERY is set to false or commented out, this file also creates a recovery menu entry for each of these kernels.
20_linux_xen
Configures the Xen kernel, which has a different initrd configuration from the Linux kernel.
20_ppc_terminfo
Configures a terminal for a PPC system.
30_os-prober
Creates menus for Linux and other operating systems located on partitions other than / and /boot.
40_custom
Accepts manual custom menu entries.
41_custom
Accepts automated custom menu entries.
grub2-mkconfig: Generates the grub.cfg File
The grub2-mkconfig utility is a shell script that generates output based on the contents of the /etc/default/grub file (page 591) and the files in the /etc/grub.d directory (prevous page). By default grub2-mkconfig sends its output to standard output. Typically this utility is run with the –ooption sending the output to /boot/grub2/grub.cfg. A sample run of grub2-mkconfig is shown here:
# grub2-mkconfig -o /boot/grub2/grub.cfg
Generating grub.cfg ...
Found linux image: /boot/vmlinuz-3.10.3-300.fc19.x86_64
Found initrd image: /boot/initramfs-3.10.3-300.fc19.x86_64.img
Found linux image: /boot/vmlinuz-3.9.9-302.fc19.x86_64
Found initrd image: /boot/initramfs-3.9.9-302.fc19.x86_64.img
Found linux image: /boot/vmlinuz-0-rescue-40b9b79ed60f47c5b31224f23b76e2e0
Found initrd image: /boot/initramfs-0-rescue-40b9b79ed60f47c5b31224f23b76e2e0.img
done
By default, grub2-mkconfig searches for Linux and other operating system kernel files and creates a menu entry (boot specification) in its output file for each kernel it finds. It also adds an initrd (initial RAM disk) line to grub.cfg for each file in /boot whose name starts with the stringinitramfs– and whose version number matches one of the kernel files it found. For example, if grub2-mkconfig finds the kernel file named vmlinuz-3.10.3-300.fc19.x86_64 in /boot and then finds initramfs-3.10.3-300.fc19.x86_64.img, it creates an initrd line for that RAM disk image file.
Listing installed kernel packages
Each time grub2-mkconfig runs, it searches for kernel files. If a kernel file is no longer present, it will no longer include a menu entry for that kernel. Similarly, if a new kernel file is present, it will include a menu entry for that kernel. You can remove a kernel’s menu entry by removing the kernel package, which removes the kernel files, and rerunning grub2-mkconfig.
The command uname –r displays the name of the kernel the system is running. The following commands display the name of the kernel the system is running and list the installed kernel packages. See page 547 for more information about using rpm to query packages.
$ uname -r
3.10.3-300.fc19.x86_64
$ rpm -qa | grep kernel-3
kernel-3.9.9-301.fc19.x86_64
kernel-3.10.3-300.fc19.x86_64
kernel-3.9.9-302.fc19.x86_64
yum removes a kernel
The easiest way to remove a kernel package is to use the yum remove command. Substitute the name of the kernel package you want to remove for the one in the following example. The following command removes the first kernel package listed by the previous rpm command:
# yum -y remove kernel-3.9.9-301.fc19.x86_64
Loaded plugins: langpacks, refresh-packagekit
Resolving Dependencies
--> Running transaction check
---> Package kernel.x86_64 0:3.9.9-301.fc19 will be erased
...
Running transaction
Erasing : kernel-modules-extra-3.9.9-301.fc19.x86_64 1/2
Erasing : kernel-3.9.9-301.fc19.x86_64 2/2
Verifying : kernel-modules-extra-3.9.9-301.fc19.x86_64 1/2
Verifying : kernel-3.9.9-301.fc19.x86_64 2/2
Removed:
kernel.x86_64 0:3.9.9-301.fc19
Dependency Removed:
kernel-modules-extra.x86_64 0:3.9.9-301.fc19
Complete!
It is good practice to keep at least one known-good kernel in addition to the one the system is running. See page 535 for more information on the yum remove command.
![]() grub2-install: Installs the MBR and GRUB Files
grub2-install: Installs the MBR and GRUB Files
The grub2-install utility installs the MBR (page 590) and the files GRUB needs to boot the system. This utility takes a single argument—the name of the device that is to hold the MBR. You can specify the device name as a GRUB device name (e.g., hd0) or a device filename (e.g.,/dev/sda). The following example shows grub2-install installing files in the default location (/boot/grub) and the MBR on device /dev/sda:
# grub2-install /dev/sda
Installation finished. No error reported.
See page 456 for instructions on how to reinstall the MBR.
![]() dmesg: Displays Kernel Messages
dmesg: Displays Kernel Messages
The dmesg utility displays the kernel-ring buffer, where the kernel stores messages. When the system boots, the kernel fills this buffer with messages related to hardware and module initialization. Messages in the kernel-ring buffer are often useful for diagnosing system problems.
When you run dmesg, it displays a lot of information. It is frequently easier to use a pipeline to send the output of dmesg through grep to find what you are looking for. For example, if you find that your hard disks are performing poorly, you can use dmesg to check whether they are running in DMA mode:
$ dmesg | grep DMA
...
[ 0.859219] ata1: PATA max UDMA/33 cmd 0x1f0 ctl 0x3f6 bmdma 0x10c0 irq 14
[ 0.859220] ata2: PATA max UDMA/33 cmd 0x170 ctl 0x376 bmdma 0x10c8 irq 15
...
The preceding lines tell you which mode each ATA device is operating in. If you are having problems with the Ethernet connection, search the dmesg buffer for eth:
$ dmesg | grep eth
[ 5.509495] e1000 0000:02:01.0 eth0: (PCI:66MHz:32-bit) 00:0c:29:13:f4:35
[ 5.509500] e1000 0000:02:01.0 eth0: Intel(R) PRO/1000 Network Connection
[ 6.086764] systemd-udevd[314]: renamed network interface eth0 to ens33
If everything is working properly, dmesg displays the hardware configuration information for each network interface.
The –H (––human) option causes dmesg to send its output through a pager, display relative times in the left column, and display important messages in color. This option is useful when you want to scan dmesg output.
Chapter Summary
You can build a Linux kernel from the source code. Sometimes you do not need to build a kernel; instead, you can change many aspects of the kernel by using boot options in /etc/grub.cfg. You can dynamically change options by modifying /etc/sysctl.conf.
Before you can build a Linux kernel, you must download the kernel source files to the local system. After you have downloaded the source files, you need to install and prep the source code, configure and compile the kernel and the loadable modules, and install the kernel and loadable modules.
The GRUB boot loader is a small program that controls the process of bringing the system up. You must configure the boot loader so that it recognizes the new kernel.
The dmesg utility displays the kernel-ring buffer, where the kernel stores messages. You can use this utility to help diagnose boot-time problems.
Exercises
1. What is the purpose of the kernel?
2. How would you display a list of all loaded modules in the current kernel?
3. Which command would you give to upgrade the kernel from an rpm file, and how is this different from upgrading other packages?
4. How would you display information from the kernel about the hard disk on the first SATA channel?
5. The acpi=off kernel argument prevents acpid from starting. How would you use this argument?
6. What is a boot loader?
Advanced Exercises
7. How would you label the kernel before compiling it? Why would you want to label the kernel?
8. You have just installed an Adaptec SCSI card. How can you find out whether it has been recognized and which entry in /dev represents it?
9. When you install an experimental kernel for testing purposes, how do you instruct GRUB not to load it by default?
10. How would you obtain a list of all network-related kernel parameters?
All materials on the site are licensed Creative Commons Attribution-Sharealike 3.0 Unported CC BY-SA 3.0 & GNU Free Documentation License (GFDL)
If you are the copyright holder of any material contained on our site and intend to remove it, please contact our site administrator for approval.
© 2016-2026 All site design rights belong to S.Y.A.