A practical guide to Fedora and Red Hat Enterprise Linux, 7th Edition (2014)
Part III: System Administration
Chapter 17. Setting Up Virtual Machines Locally and in the Cloud
In This Chapter
VMs (Virtual Machines)
gnome-boxes
QEMU/KVM
VMware Player: Installing Fedora on VMware
Cloud Computing
AWS: Setting Up a Virtual System in the Cloud
Objectives
After reading this chapter you should be able to:
![]() List three advantages of using a VM (virtual machine) over a physical machine
List three advantages of using a VM (virtual machine) over a physical machine
![]() Talk about the different VM solutions
Talk about the different VM solutions
![]() Use gnome-boxes to instantiate a VM
Use gnome-boxes to instantiate a VM
![]() Install KVM and instantiate a VM
Install KVM and instantiate a VM
![]() Install VMware Player and instantiate a VM
Install VMware Player and instantiate a VM
![]() Set up and log in on a system in the cloud using AWS
Set up and log in on a system in the cloud using AWS
The cloud is a colloquial term that refers to a public or private system that provides access to hardware and/or software computing resources via a network. A virtual machine is a software/hardware emulation of a physical computer. By its nature, the cloud relies on virtual machines. This chapter covers both of these topics.
VMs (Virtual Machines)
A VM (virtual machine; also guest or domain) appears to the user and to the software running on it as a complete physical machine. It is, however, one of potentially many such VMs running on a single physical machine (the host or node). Just as a multitasking operating system allows you to run many programs on a single physical system, a hypervisor allows you to run many operating systems (VMs) on a single physical system.
The software that provides the virtualization is called a hypervisor. Each VM can run a different operating system from the other VMs. For example, on a single host you could have VMs running Windows 8, Ubuntu 13.10, Ubuntu 14.04, and Fedora 19. Some hypervisors can emulate architectures other than the local architecture. On these systems you can run operating systems under different architectures (e.g., i386, ia64, ppc64).
VMs provide many advantages over single, physical machines:
• Isolation—Each VM is isolated from the other VMs running on the same host: If one VM crashes or is compromised, the others are not affected.
• Security—When a single system running several servers is compromised, all servers are compromised. If each server is running on its own VM, only the compromised server is affected; other servers remain secure.
• Power consumption—Using VMs, a single powerful machine can replace many less powerful machines, thereby cutting power consumption.
• Development and support—Multiple VMs, each running a different version of an operating system and/or different operating system, can facilitate development and support of software designed to run in many environments. With this organization you can easily test a product in different environments before releasing it. Similarly, when a user submits a bug, you can reproduce the bug in the same environment it occurred in.
• Servers—In some cases, different servers require different versions of system libraries. In this instance, you can run each server on its own VM, all on a single physical machine.
• Testing—Using VMs, you can experiment with cutting-edge releases of operating systems and applications without concern for the base (stable) system, all on a single physical machine.
• Networks—You can set up and test networks of systems on a single physical machine.
• Sandboxes—A VM presents a sandbox—an area (system) you can work in without regard for the results of your work or for the need to clean up.
• Snapshots—You can take a snapshot of a VM and return the VM to the state it was in when you took the snapshot simply by reloading the VM from the snapshot.
• Forensics—An investigator can load data, take a snapshot, and repeatedly manipulate and examine the data, always able to return to the original data.
• Migration and duplication—You can migrate and copy VMs to other hosts quickly and easily.
• Dynamic resource allocation—You can easily change the resources a VM has access to, allowing you to dynamically alter resource allocation of several VMs on a single host.
When setting up a host to run VMs, keep in mind that each VM requires the same resources as a physical machine. Multiple VMs running on a single host require, at a minimum, the sum of the resources required by each of the VMs.
• Network I/O—Make sure the network I/O from all the VMs you are setting up on a host will not overload the network connection of the host.
• Disk I/O—Make sure the disk I/O from all the VMs you are setting up on a host will not overload the I/O capabilities of the local disks, SAN (page 1271), or NAS (page 1262).
• RAM—Allocate enough RAM so your VMs do not have to swap (page 1276), the same as you would for a physical system.
There are some situations in which virtualization does not give you an advantage. VMs do not give a physical machine more resources but they do allow you to make better use of existing resources. Following are cases in which virtualization might not be a good idea.
• Some software does not run well or at all under a VM.
• Some software is not supported when it is run under a VM.
• A server that uses most of a machine’s resources and is suffering from performance issues is not a good candidate for virtualization. The virtualized server will still use most of the system’s resources. It will only make things worse if you run additional VMs on the same host.
• Heavily used databases and Web servers can cause and suffer from resource contention and might not be good candidates for virtualization.
• VMs do not keep time accurately; they tend to suffer more from drift than physical systems. Systems that require accurate timekeeping, such as VoIP systems, might not be good candidates for virtualization.
• Graphics-intensive applications, especially those that make use of 3D graphics, might not work well when virtualized.
Implementations
libvirt
Many VM platforms, including QEMU, KVM, Xen, and VMware, can take advantage of on the libvirt1 library and management tool that provides a consistent interface to create, monitor, and control VMs. While libvirt is not usually required, it can make the job of an administrator easier.
Xen
Xen (www.cl.cam.ac.uk/research/srg/netos/xen, xenproject.org, and wiki.xen.org/ wiki/Fedora_Host_Installation), which was created at the University of Cambridge and is now being developed in the open-source community, is an open-source hypervisor. Xen introduces minimal performance overhead compared with running each of the operating systems natively.
VMware
VMware, Inc. (www.vmware.com) offers VMware Player, a free, downloadable, proprietary product you can install and run as an application under Fedora/RHEL. See page 671. VMware also offers ESXi, a hypervisor that runs directly on a machine (bare metal) without the need for an underlying operating system.
KVM
KVM (the Kernel-based Virtual Machine; www.linux-kvm.org) is an open-source hypervisor that runs as part of the Linux kernel. See page 663.
QEMU
QEMU (Quick EMUlator; wiki.QEMU.org), written by Fabrice Bellard, is an open-source hypervisor that runs as a user application with no CPU requirements. It can run code written for a different CPU than that of the host machine. See page 663.
GNOME Boxes
The gnome-boxes utility (live.gnome.org/Boxes) is a simple although powerful GUI front end to libvirt that is designed to be run by end users. See the next section.
VirtualBox
VirtualBox (www.virtualbox.org) is a VM developed by innotek GmbH, which was purchased by Sun Microsystems (now Oracle). It has been open source since version 4.
virt-manager
The virt-manager utility is a GUI front end to libvirt that manages VMs. It typically manages QEMU/KVM VMs, although it can manage many different types of VMs. See page 665.
gnome-boxes
The gnome-boxes utility, also called GNOME Boxes (live.gnome.org/Boxes), can connect to a VM or a remote system. It has a deceptively simple interface and can automatically detect VMs and perform an unattended installation of a VM running any one of several different operating systems. It is not as powerful as virt-manager (page 665), which is designed for use by a system administrator, but it is very easy to use and convenient if you want to test a system quickly or if you do not want to get involved in the details of setting up a VM. Both gnome-boxes and virt-manager use the libvirt library and QEMU. You might need to enable hardware virtualization in the BIOS before gnome-boxes will work; see “CPU” on the next page for more information.
1. Visit libvirt.org and access.redhat.com/site/documentation/en-US/Red_Hat_Enterprise_Linux/6/html/Virtualization_Getting_Started_Guide/sec_libvirt-libvirt-tools.html.
ISO image file
Download an ISO image file of the operating system you want to install on the VM. See page 46 for instructions on downloading a Fedora ISO image file.
Give the following command from a terminal emulator to set up a VM running Fedora 19 from an ISO image file; gnome-boxes will display the Create a Box window shown in Figure 17-1.
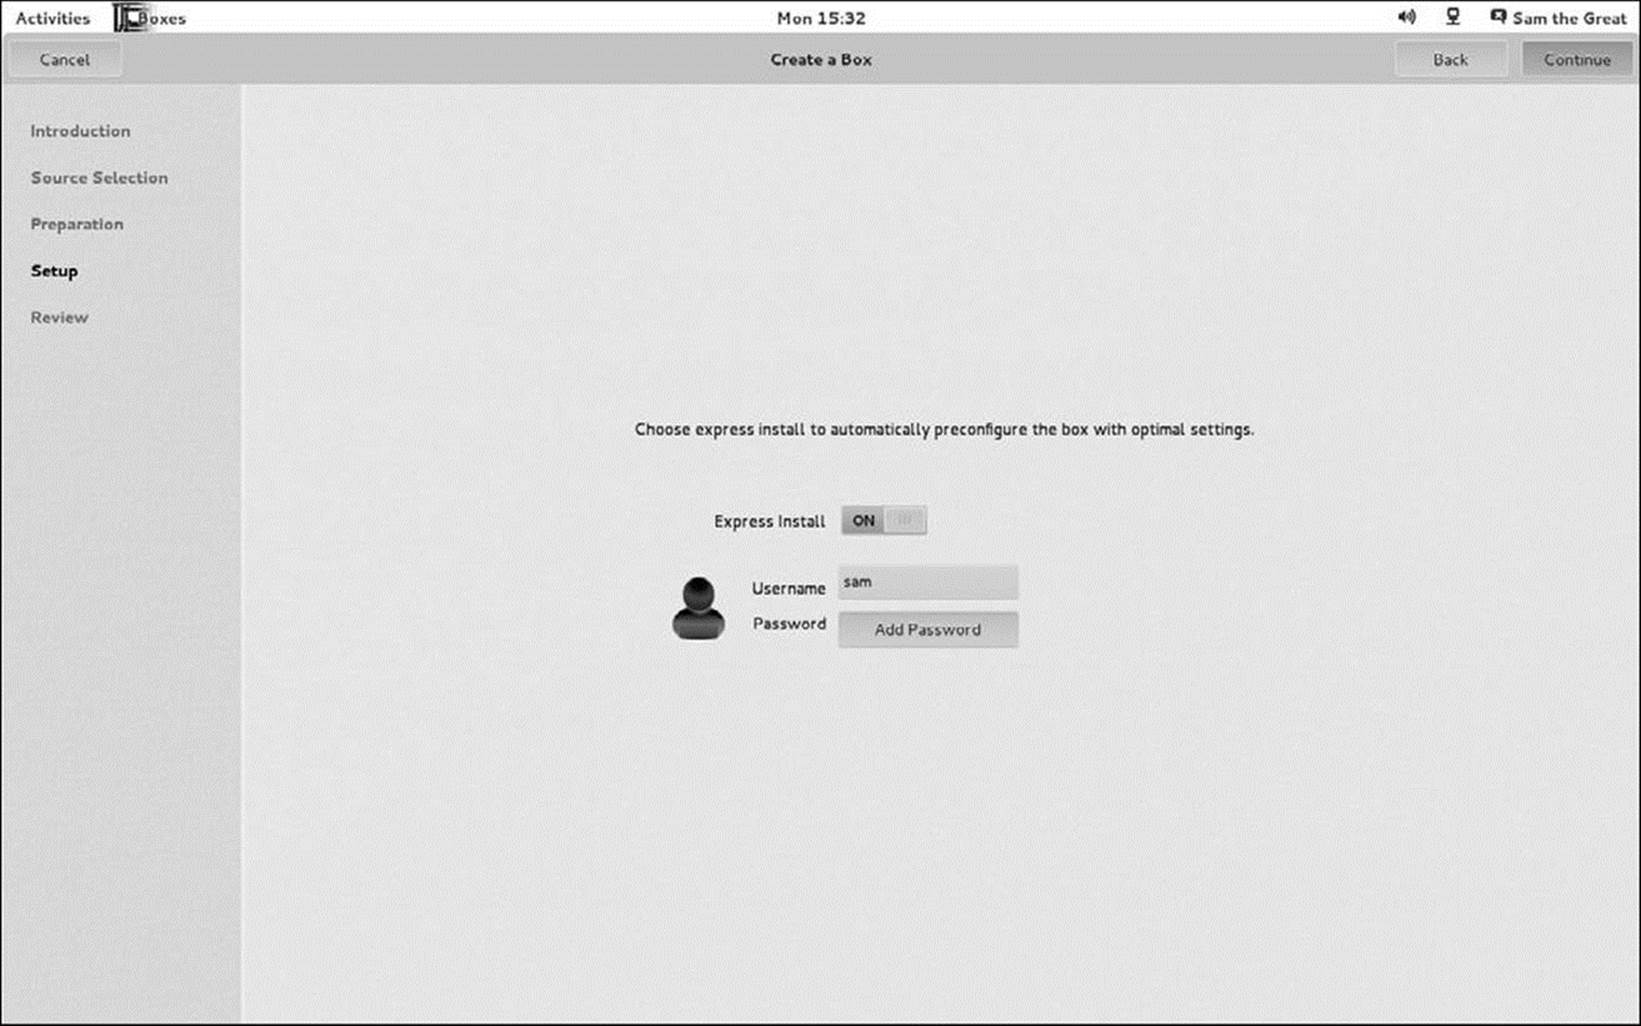
Figure 17-1 The gnome-boxes Create a Box window
$ gnome-boxes Fedora-19-x86_64-DVD.iso
For the simplest installation, leave the switch labeled Express Install set to ON, enter a password, and click Continue. The gnome-boxes utility displays a summary of the VM it will create. When you click Create, gnome-boxes begins to install Fedora. The gnome-boxes window shows the same things the console display shows when you install the operating system on a physical machine. Follow the instructions on page 59 to install the operating system.
You can also start gnome-boxes by giving the command gnome-boxes from an Enter a Command window (ALT-F2) or a terminal emulator. When you set the switch labeled Express Install to OFF or when you click Customize on the second Create a Box window, gnome-boxes allows you to customize the VM.
QEMU/KVM
QEMU (Quick EMUlator) is a flexible hypervisor that runs in userspace (page 1279). Because QEMU can emulate processors in software, you can use it to host guest operating systems running on a variety of processors. The KVM (Kernel-based Virtual Machine) kernel module allows a program running in userspace (e.g., QEMU) to take advantage of hardware virtualization features of processors including Intel, AMD, PPC, and ARM. See “CPU” below. When the host and guest architectures are the same, QEMU uses the KVM to provide hardware acceleration for VMs, allowing them to run more quickly and use fewer host resources.
Prerequisites
Host resources
A VM takes up about as much hard disk space and RAM as a native system; see “Requirements” on page 30 for information about how much space to allocate for a Fedora/RHEL system. Because a VM takes its resources from the host system, these resources must be available for each VM running simultaneously on a host. When it is not running, a VM does not use RAM or CPU resources but does occupy space on the hard disk.
CPU
QEMU/KVM can take advantage of the CPU virtualization extensions (hardware virtualization) available on most CPUs manufactured in the last few years. You might need to enable hardware virtualization in the BIOS (page 31) before you can use these extensions. Although QEMU/KVM does not require the host to have these extensions, a host without them will use software virtualization and run more slowly than a host with them. Run the following command on the host to see whether the CPU has these extensions. If the command does not produce any output, the CPU does not support hardware virtualization or hardware virtualization has not been enabled in the BIOS.
$ egrep '^flags.*(vmx|svm)' /proc/cpuinfo
flags : fpu vme de pse tsc msr pae mce cx8 apic sep mtrr pge mca cmov pat pse36 clflush dts acpi mmx fxsr sse sse2 ss ht tm pbe syscall nx lm constant_tsc arch_perfmon pebs bts rep_good nopl aperfmperf pni dtes64 monitor ds_cpl vmx smx est tm2 ssse3 cx16 xtpr pdcm sse4_1 xsave lahf_lm dtherm tpr_shadow vnmi flexpriority
...
Packages
QEMU/KVM is contained in many packages. When installing a new system, select a Base Environment of Infrastructure Server and an Add On of Virtualization from the Software Selection screen (Figure 3-7, page 66). On an existing system, use the following command to install thevirtualization group of software packages:
# yum -y group install virtualization
Enable and start libvirtd
Run systemctl to cause the libvirt-guests service (libvirtd daemon) to start each time the system enters multiuser mode and then start the libvirt-guests service. Use the systemctl status command to make sure the service is running.
# systemctl enable libvirt-guests.service
# systemctl start libvirt-guests.service
KVM kernel modules
The following command verifies that the KVM kernel modules are loaded:
$ lsmod | grep kvm
kvm_intel 137762 6
kvm 439197 1 kvm_intel
If the preceding command does not list kvm_intel or kvm_amd, KVM is not configured properly. The system may not support hardware virtualization; see “CPU” (previous page).
Network
By default, libvirt creates a private network that VMs can use. This network uses a 192.168.x.x subnet. The host network cannot reach this subnet directly. However, the VMs can use the host as a gateway and connect to the network via that gateway. To allow VMs to be reached from outside this private network, you can use iptables DNAT rules to forward ports or you can set up a bridged network. For more information refer to “Connecting Several Servers to a Single Internet Connection” on page 928 and visit wiki.libvirt.org/page/Networking.
ISO image file
Download an ISO image file of the operating system you want to install on the VM. See page 46 for instructions on downloading a Fedora ISO image file.
virt-manager: Installing Fedora on QEMU/KV
The virt-manager2 utility displays the Virtual Machine Manager window. Open this window by giving the command virt-manager from an Enter a Command window (ALT-F2) or a terminal emulator. A message about searching for a hypervisor will appear and then a dialog box will request authentication. Figure 17-2 shows two VMs running on the local system. When you first run virt-manager, this window will show no VMs, only localhost (QEMU).
2. Visit access.redhat.com/site/documentation/en-US/Red_Hat_Enterprise_Linux/6/html/Virtualization_Tuning_and_Optimization_Guide/chap-Virtualization_Tuning_Optimization_Guide-Virt_Manager.html.
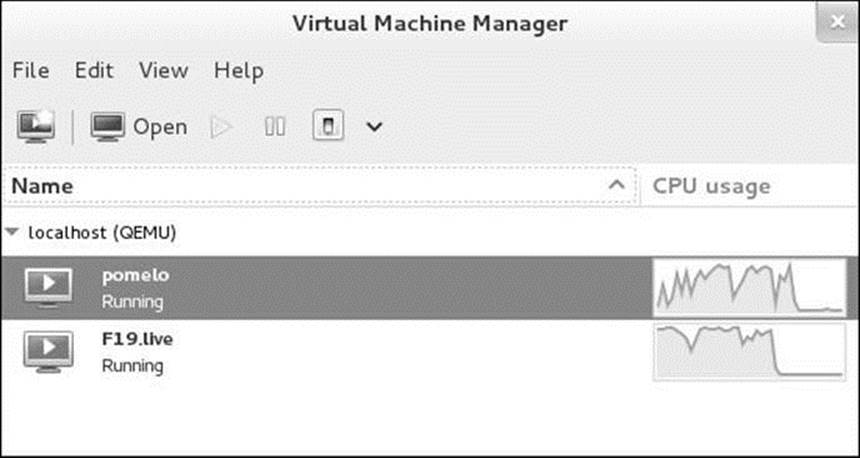
Figure 17-2 Virtual Machine Manager window
To install a new VM, click the icon at the far left of the toolbar (the terminal with an arrow and a yellow star on it); virt-manager opens Step 1 of 5 of the New VM window (Figure 17-3).
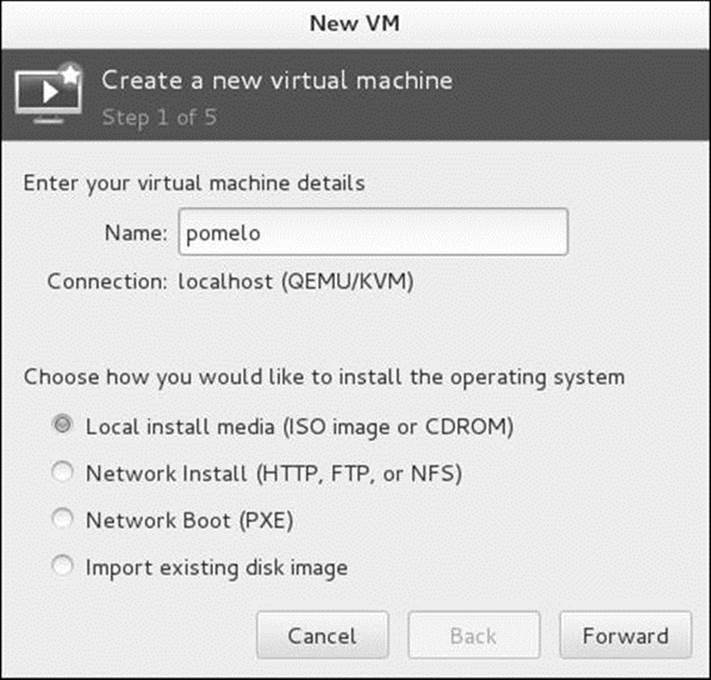
Figure 17-3 The New VM window, Step 1 of 5
This window allows you to specify the name of the VM and the location of the installation medium for the guest operating system. First, enter the name you want to assign to the VM in the text box labeled Name. Then, in the lower portion of the window, click a radio button to specify the source of the operating system you will install on the VM. This example uses a Fedora ISO image file. The other radio buttons allow you to perform a network installation or a network boot (PXE). You can also import an existing disk image. Click Forward.
Tip: Duplicating a VM
You can copy the image file of a VM that is shut down and, in Step 1 of 5, import that file as an existing disk image to create another, identical VM.
In the Step 2 of 5 window (Figure 17-4), click the radio button labeled Use CDROM or DVD and select a device from the drop-down list to specify one of these media. Because the example in this section uses an ISO image file, Figure 17-4 shows the radio button labeled Use ISO imageselected. Enter the absolute pathname of the ISO image file in the text box below this radio button or click Browse to open the Locate ISO Media Volume window. To select a file on the local system, click Browse Local at the lower-left of the window, select the appropriate directory, highlight the ISO image file, and click Open. At the bottom of the Step 2 of 5 window are two drop-down lists that allow you to specify an operating system type (OS type) and version; virt-manager might select the version automatically. After specifying these items click Forward.
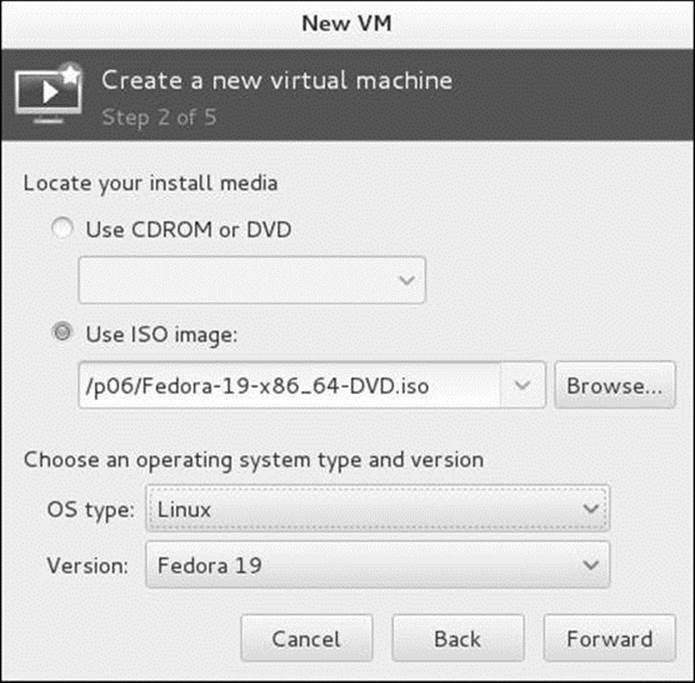
Figure 17-4 The New VM window, Step 2 of 5
The next window, Step 3 of 5, has two spin boxes that allow you to specify how much memory (RAM) the VM will use and, if the host has multiple CPUs or a multicore processor, how many CPUs the VM will run on. After specifying these items click Forward.
The Step 4 of 5 window (Figure 17-5, next page) allows you to specify storage (disk space) for the VM. A VM that runs a live system does not need any storage. To specify storage make sure there is a tick in the check box labeled Enable storage for this virtual machine. By default, virt-manager allocates eight gigabytes of storage, which is enough for a system to experiment with. See page 31 for information on estimating hard disk storage needs. You can cause virt-manager to allocate space on the disk immediately or as needed (see the following tip). To specify a file on the local system that the VM will use for storage, click the radio button labeled Select managed or other existing storage. Then enter the absolute pathname of a new (nonexistent) ordinary file in the text box below this label either by entering the pathname in the text box or by clickingBrowse and specifying the file in the resulting window. Click Forward.

Figure 17-5 The New VM window, Step 4 of 5
Tip: Allocate disk space all at once or as needed?
You can cause virt-manager to allocate space on the disk immediately or as needed. Allocating it immediately takes more time in the setup phase but makes the installation phase go more quickly. If you allocate storage as needed, you can run into problems if the local system runs out of disk space. On the other hand, allocating storage as needed allows you to specify a maximum amount of storage but use only what the VM needs.
The Step 5 of 5 window summarizes the selections you have made. Putting a tick in the check box labeled Customize configuration before install causes virt-manager to open the Details window before starting to install the operating system. You can also display this window after the operating system is installed. See page 670. The Advanced options section allows you to specify a network other than the default, specify a MAC address (page 296), and specify the type and architecture of the VM; virt-manager fills in these fields with appropriate values. You can specify an architecture other than that of the host. If the summary information looks accurate, click Finish.
Tip: Speed things up and lose portability
The Processor tab of the Details window has a plus sign (+) labeled Configuration. Click the plus sign to display a button labeled Copy host CPU configuration. Copying the host CPU configuration can improve performance by 20–30 percent but means you cannot migrate the VM to a host with a different CPU.
The virt-manager utility displays the Creating Virtual Machine window as it allocates disk storage and retrieves the installation image. If you chose to allocate all storage immediately and you are using a lot of storage, this step might take a while to complete.
When the VM starts booting from the ISO image file, virt-manager displays the Console window. This window is the console for the VM; it shows the same things the console display shows when you began installing the operating system on a physical machine. If the virt-manager window does not display the entire VM screen select main menu: View![]() Resize to VM from the Console window; virt-manger will enlarge the window. Follow the instructions on page 59 to install the operating system.
Resize to VM from the Console window; virt-manger will enlarge the window. Follow the instructions on page 59 to install the operating system.
Tip: The Console window does not define the VM
You can close and open the Console window for a VM as you please without affecting the state of the VM. For example, if you close the Console window while you are installing Fedora, the installation proceeds as it would if you left the window open. When you open the Console window again, it will show the installation continuing (or waiting for input) as though you had never closed the window. The Virtual Machine Manager window works the same way: Closing it has no effect on the states of the VMs. However, you must shut down or save (suspend) VMs before shutting down the host.
The Console Window
To display the Console window for a VM from the Virtual Machine Manager window (Figure 17-2, page 665), double-click the VM icon (the picture of a monitor with a triangle/arrow in it) to the left of the name of the VM whose console you want to display. Alternately, you can use the virt-viewer command-line tool to display a Console window: Give the command virt-viewer followed by the name of the VM. Figure 17-6 shows the top of a Console window.

Figure 17-6 The top of the Console window
The name of the Console window is the name of the VM followed by Virtual Machine. Selections on main menu: Virtual Machine drop-down menu allow you to control the state of the machine. Some of the same selections are available by right-clicking the VM icon in the Virtual Machine Manager window. Useful selections on this menu are
• Run—Boots the VM if it is off
• Restore—Restores a suspended VM
• Shut Down/Force Off—Powers off the VM; not a graceful shutdown, data might be lost
• Shut Down/Save—Suspends the VM to disk
Selections on the main menu: View drop-down menu allow you to display the Console or Details window, expand the Console window to fill the screen, resize the VM (useful when the window is bigger or smaller than the VM), and toggle the display of the toolbar.
The Details Window
Display the Details window for a VM by selecting main menu: View![]() Details from the Console window. Figure 17-7 shows the Overview tab of a Details window.
Details from the Console window. Figure 17-7 shows the Overview tab of a Details window.
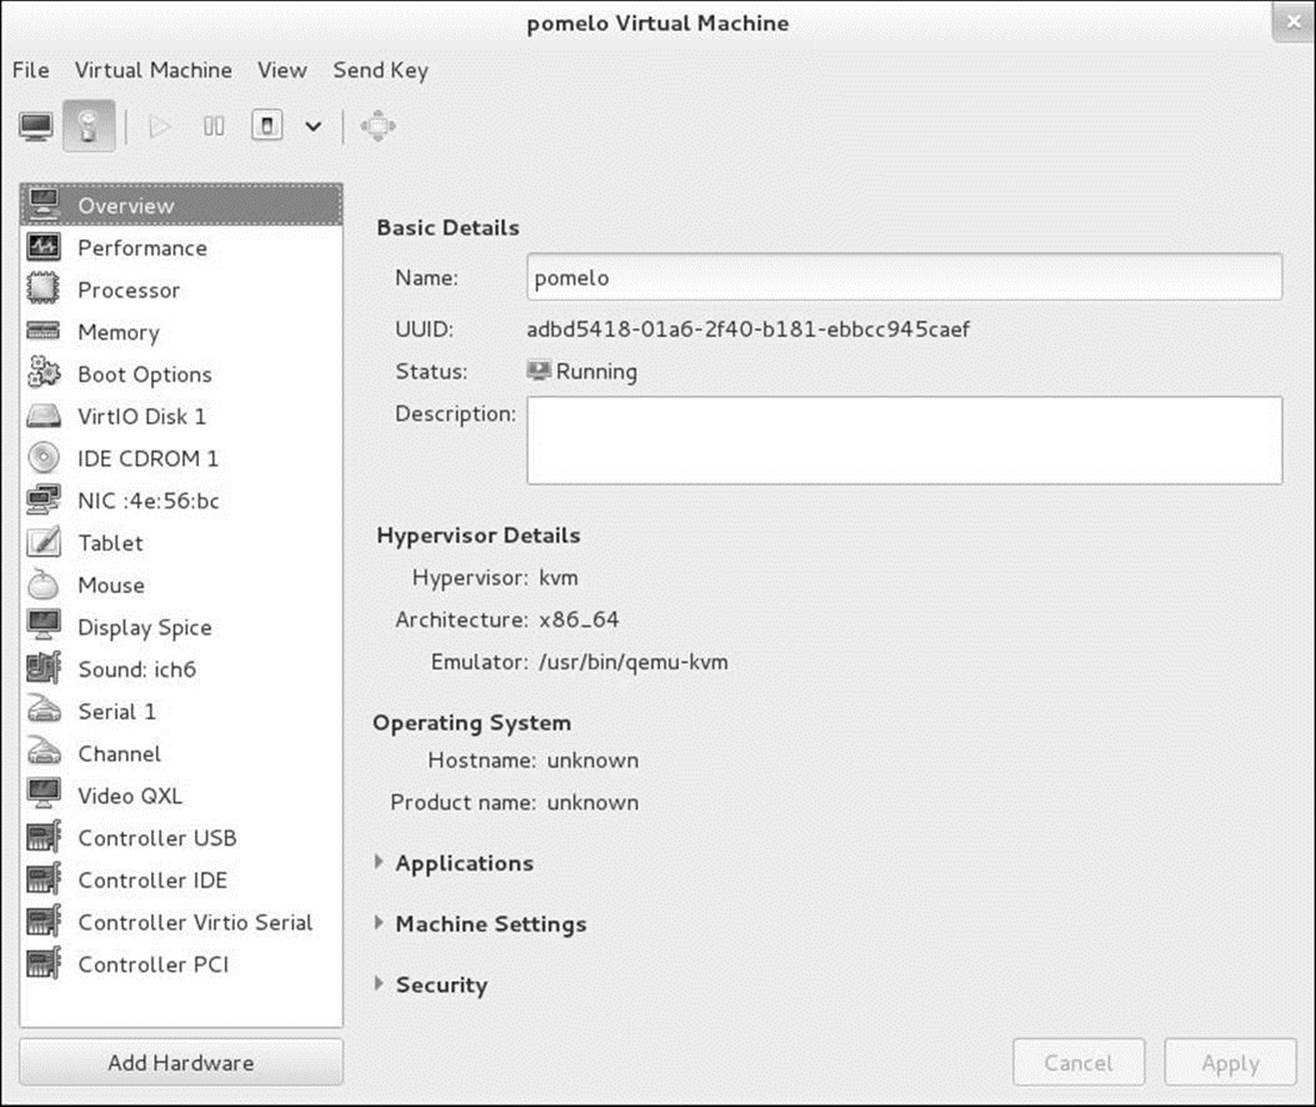
Figure 17-7 The Details window
The Details window displays information about a VM. You can change some of the information with the VM running; to change other information (e.g., the name of the VM) the VM must be shut down. The Overview tab allows you to change the name and enter a description of the VM. The Processor and Memory tabs allow you to change the number of processors and the amount of RAM allocated to the VM, respectively. To speed up the VM, see the tip on page 668. The Performance tab displays graphs of VM performance.
virsh: Work with VMs on the Command Line
The virsh utility is a powerful tool for working with QEMU/KVM VMs from the command line. It has an extensive set of commands that allow you to create, manipulate, and display VMs. You can run it interactively or from the shell command line. The following command lists all the virshcommands by groups:
$ virsh help | less
Grouped commands:
Domain Management (help keyword 'domain'):
attach-device attach device from an XML file
attach-disk attach disk device
...
The preceding command lists the group of Domain Management commands first. The string help keyword 'domain' indicates you can display a complete list of this group of commands by giving the command virsh help domain. The next command lists all the virsh command groups:
$ virsh help | grep keyword
Domain Management (help keyword 'domain'):
Domain Monitoring (help keyword 'monitor'):
Host and Hypervisor (help keyword 'host'):
Interface (help keyword 'interface'):
Network Filter (help keyword 'filter'):
Networking (help keyword 'network'):
Node Device (help keyword 'nodedev'):
Secret (help keyword 'secret'):
Snapshot (help keyword 'snapshot'):
Storage Pool (help keyword 'pool'):
Storage Volume (help keyword 'volume'):
Virsh itself (help keyword 'virsh'):
The following command lists the VM created earlier in this section. You must run this command with root privileges because the VM was instantiated using root privileges.
$ su -c 'virsh list'
Password:
Id Name State
----------------------------------------------------
2 pomelo running
You can run virsh interactively by giving the command virsh (or su –c virsh). See the virsh man page or use the virsh help facilities for more information.
VMware Player: Installing Fedora on VMware
VMware Player, which must be run on a GUI, is available for no cost for noncommercial applications. To download this application, visit www.vmware.com/products/player, scroll down to the section labeled “Free for Personal Use,” and click the highlighted word Download. Alternately, you can visit www.vmware.com/go/downloadplayer. Next, click the button labeled Download adjacent to the version you want to install. Generally you will install the version that corresponds to the operating system running on the host: Linux 32 bit, Linux 64 bit, or Windows. The Windows version works on both 32- and 64-bit versions of Windows. If you are given a choice, save the file.
Linux
Verify the file you downloaded is correct by comparing two SHA1 (page 1272) values. Give the command sha1sum VMware-Player*bundle to display the first SHA1 value. The second SHA1 value is on the VMware Web page, following SHA1SUM when you click Show Details below the name of the version of vmplayer you just downloaded. The two values must be identical.
The next section explains how to install VMware Player on a Linux system. See page 673 if you are installing it on a Windows system.
Installing VMware Player on a Linux System
You might need to enable hardware virtualization in the BIOS before VMware Player will work; see “CPU” on page 664 for more information. The file you downloaded, VMware-Player*bundle, is a shell script that installs VMware Player. After giving yourself execute permission to the file, run this script with root privileges; ignore any error messages.
$ chmod 755 VMware-Player*bundle
$ su -c ./VMware-Player*bundle
Password:
Extracting VMware Installer...done.
After a moment VMware displays a window holding a license agreement; click the radio button labeled I accept ... and click Next (you have to accept the license agreement twice). VMware displays several screens of questions; accept the default answers by clicking Next on each screen. Do not enter information on the screen that asks for a license key. Click the button labeled Install when it appears; VMware installs Player. When the installer displays Installation was successful, VMware Player is installed, but not ready to run. Click Close.
Downloading and Installing Utilities for Compiling the Kernel Modules
When you start vmplayer for the first time, and each time you install a new kernel, it compiles and loads some kernel modules. To do so, vmplayer requires kernel header files and utilities (e.g., gcc). Before running vmplayer, give the following command to download and install the files and utilities vmplayer requires to compile and load the kernel modules. You need to repeat this step each time you install a new kernel.
$ su -c 'yum -y install gcc binutils kernel-headers kernel-devel'
VMware Tools
The open-vm-tools package, installed by default, obviates the need for installing VMware Tools (page 676). Before running vmplayer, give the following command to make sure this package is installed on the local system.
$ su -c 'yum -y install open-vm-tools'
Running VMware Player
Now vmplayer is ready to build the kernel modules. Working as yourself (not a privileged user), give the command vmplayer; vmplayer displays the VMware Kernel Module Updater window while it is compiling and installing the kernel modules.
If necessary, accept the end-user license agreement. If you are given a chance to update the Player software, do so at your discretion. However, vmplayer might display a Software Updates window that has a button labeled Get More Information; this window links to a page on which you can purchase VMware Workstation. You do not need to purchase anything to run vmplayer. Player displays the VMware Player window, Welcome To VMware Player screen (Figure 17-8). Continue at “Installing Fedora on VMware Player.”

Figure 17-8 VMware Player window, Welcome To VMware Player screen
Installing VMware Player on a Windows System
Once you have downloaded VMware Player, open Explorer and display the Downloads directory. Double-click the VMware-player*.exe file. Click Yes if you are asked whether you want to allow the program to make changes to the computer; Windows loads the VMware Player installation wizard. Click Next repeatedly until the button labeled Continue appears. Click Continue to start the installation. When the wizard displays Setup Wizard Complete, click Finish. If you are given a chance to update the software (Player), do so at your discretion.
Double-click the VMware Player icon on the desktop to start Player. Accept the license agreement; VMware Player displays the VMware Player window, Welcome To VMware Player screen (Figure 17-8).
Installing Fedora on VMware Player
Once you have installed VMware Player on either a Linux or Windows system, you can install an operating system on Player. This section explains how to install Fedora. You can install another operating system in a similar manner.
First, download the ISO image file for the version of Fedora you want to install. If the host is running a 64-bit operating system you can install either a 32- or 64-bit version of Fedora. If it is running a 32-bit operating system you can install only a 32-bit version. See page 46 for instructions on locating and downloading a Fedora ISO image file. You do not need to burn an installation image; you will install the operating system from the image file.
Creating a VM
This section uses the 32-bit live version of Fedora that has a filename of Fedora-Live-Desktop-i686-19-1.iso.
On the left side of the VMware Player window is a tab labeled Home. Additional tabs will appear for each VM you create. With multiple VMs, you can click these tabs to switch between VMs.
Click Create a New Virtual Machine. On the first New Virtual Machine Wizard screen, click the radio button labeled I will install the operating system later and click Next. This step is critical. On the second screen, click the radio button with the label appropriate to the operating system you are installing. To follow this example, click the radio button labeled Linux. The drop-down list labeled Version allows you to specify a distribution and number of bits. Select Fedora (implies 32-bit) or Fedora 64-bit depending on which version of Fedora you are installing. Click Next.
The third screen (Figure 17-9) allows you to specify the name of the VM and the location of the directory that holds the VM files. By default the name is the name of the distribution (Fedora) and the location is a directory that has the same name as the VM. Under Linux, this directory is a subdirectory of vmware which is a subdirectory of your home directory. Under Windows this directory is a subdirectory of Documents/Virtual Machines, which is a subdirectory of your home directory. In Figure 17-9, the name of the VM has been changed to F19a; Player has changed the default location to /home/sam/vmware/F19a. Click Next.
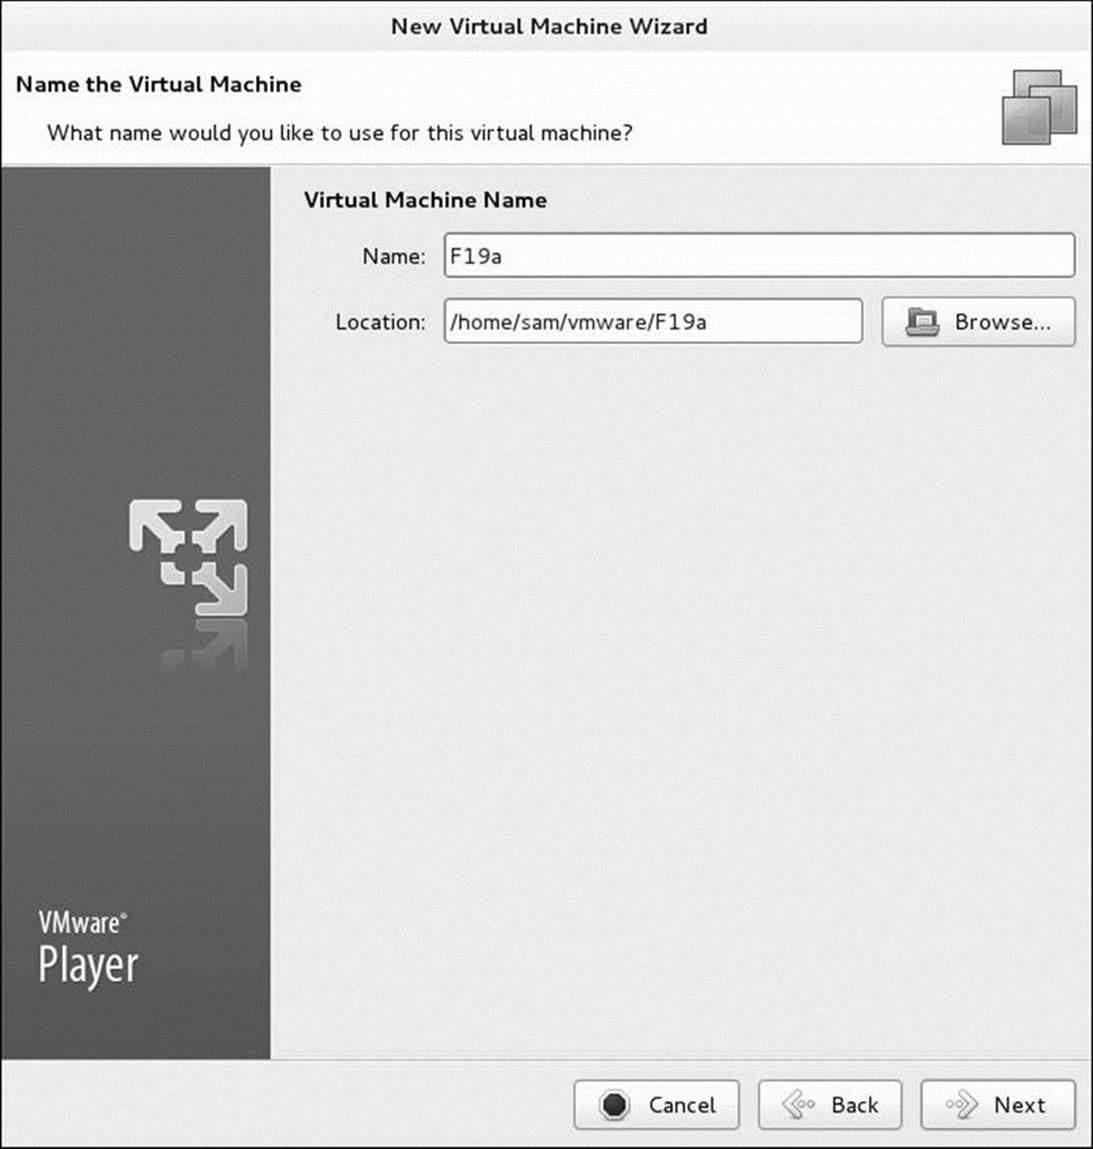
Figure 17-9 New Virtual Machine Wizard window, Virtual Machine Name screen
The next screen allows you to specify a maximum disk size. By default, Player does not allocate disk space on the host when you create the VM, but rather allocates disk space as needed. See the tip on page 667. The 20-gigabyte default is good for a system to experiment with. Unless you have reason to do otherwise, accept the default of splitting the virtual disk into multiple files. Click Next.
On the next screen you can customize the hardware or you can wait until the following screen to do so. Click Finish. If the next screen holds information about installing the guest operating system and VMware Tools, click Close.
Player displays the VMware Player window again, this time with a tab for the VM you just created under the tab labeled Home on the left. In the example the tab is labeled F19a; click that tab to select the VM. On the right side of this window is a picture of the state of the VM; because it has not been started, the picture is blank. The two buttons on the bottom of the right side are labeled Play virtual machine and Edit virtual machine settings.
Installing the Operating System
You have created a VM without an operating system. The next step is to install Fedora (or another operating system) on the VM. To do so you must tell the VM which medium to boot from. It is as though you had a new physical computer: You have to put the installation medium (e.g., DVD or flash drive) with Fedora on it in the system before you boot the system.
Click Edit virtual machine settings; Player displays the Hardware tab of the Virtual Machine Settings window. On the left side, click CD/DVD(IDE); Player displays information about the virtual DVD drive on the right side of the window. Click the radio button labeled Use ISO image and then the button labeled Browse. Highlight the ISO image file (Fedora-Live-Desktop-i686-19-1.iso in the example) and click the button labeled Open. The window should look similar to the one shown in Figure 17-10. Click OK or Save; Player redisplays the VMware Player window.
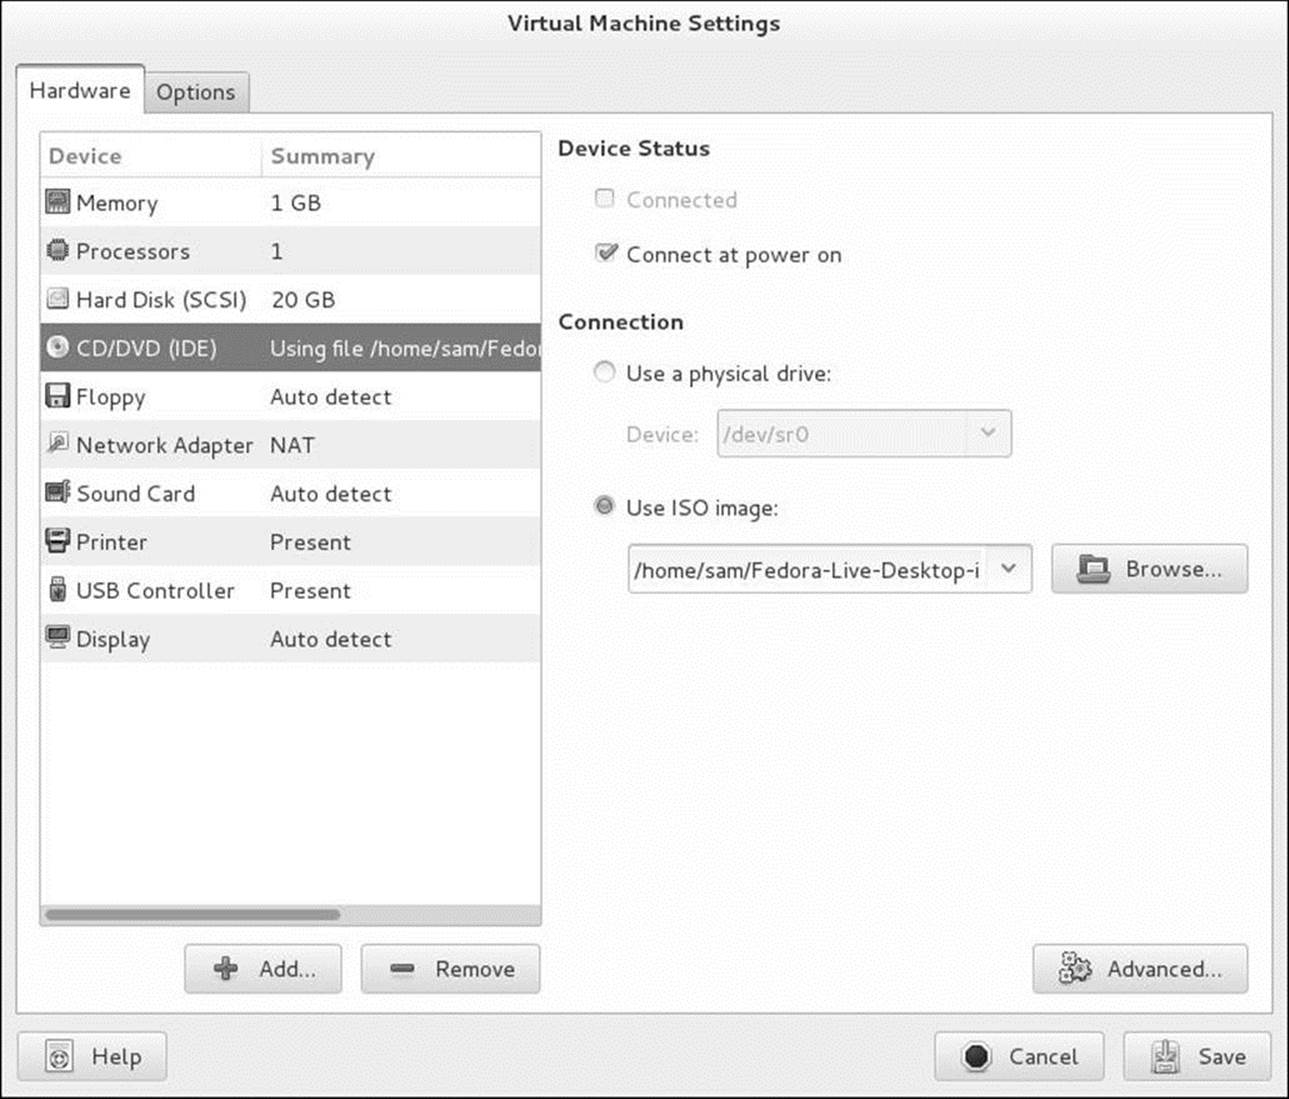
Figure 17-10 Virtual Machine Settings window, Hardware tab, CD/DVD selection
In the VMware Player window, click Play virtual machine. Player will boot the operating system you selected. Run the live system or install Fedora as explained in Chapter 3. Player might display a window asking whether you want to download and install VMware Tools. It is not necessary to install VMware Tools under Linux; see the next section. Under Windows, wait to install VMware Tools until after you have installed the full operating system as explained in the next section.
VMware Tools
VMware Tools is software that resides on the VM and improves its performance, functionality, and the ease with which it can be managed. For example, VMware Tools can improve graphics and mouse performance. It enables the VM and host to share folders, drag and drop, synchronize time, as well as copy and paste.
Linux
The Linux open-vm-tools package holds an open-source implementation of VMware Tools. Because VMware has merged the functionality of VMware Tools into the kernel and open-vm-tools, you do not need to install VMware Tools on a Linux system when open-vm-tools is installed.
Windows
With the guest operating system installed on the VM, select from the VMware menu Player: Manage![]() Install VMware Tools. Alternately, the VMware Player window might display a button labeled Install Tools; clicking this button performs the same function as making the menu selection. If you are prompted to download VMware Tools, do so.
Install VMware Tools. Alternately, the VMware Player window might display a button labeled Install Tools; clicking this button performs the same function as making the menu selection. If you are prompted to download VMware Tools, do so.
Once the software is downloaded and ready to install, Windows asks whether you want to allow VMware to make changes to the computer; click Yes. You might need to supply the root password for the VM in order to install VMware Tools. Also, you might need to unmount the virtual DVD from the virtual DVD drive before you can install VMware Tools. If you are prompted with Disconnect anyway and override the lock? click Yes. When the Software Updates window displays All updates finished, click Close. VMware Tools is installed.
Cloud Computing
Cloud computing is the result of evolution and the combination of virtualization, networking, and powerful hardware. Cloud computing allows users to reap the benefits of these tools without knowing how to use each individually, needing only a lightweight system to access the cloud.
The cloud as a service
As an alternative to setting up the hardware and software to run a cloud, you can purchase a cloud computing platform as a service. Buying the service means the provider takes care of the infrastructure, software, and management (including scaling), and it is faster to set up and (frequently) cheaper to build than setting up and running your own cloud server.
OpenShift
OpenShift (www.openshift.com) is a cloud computing platform as a service from Red Hat. The open-source software that runs the service is named OpenShift Origin. OpenShift maintains the service and scales as needed.
AWS
AWS (Amazon Web Services) is a popular cloud computing platform as a service from Amazon. See the next section.
Eucalyptus
Eucalyptus (www.eucalyptus.com) produces open-source software for building cloud computing platforms. Because of its AWS compatibility, you can develop on Eucalyptus and migrate to AWS.
OpenStack
OpenStack (www.openstack.org) is a community-based collaboration of developers that produces open-source software for building cloud computing platforms.
AWS: Setting Up a Virtual System in the Cloud
This section explains how to start a virtual Linux system in the cloud using Amazon EC2 (Amazon Elastic Compute Cloud; aws.amazon.com/ec2). Although there are several open-source cloud platforms, this book covers AWS because it is very popular, easy to set up and use, inexpensive, and readily available.
The AWS system is complex and has many facets. This section briefly explains how to set up a very basic system. It does not go into detail about different services AWS offers and other types of systems you can set up. It is intended to get you started using AWS.
Because AWS allows you to create many virtual systems, each of these systems is referred to as an instance. You will be able to use ssh to connect to the instance you set up (Linux; Windows users use RDP). Amazon typically charges for the use of each instance and for storage, but offers a year of free (minimal) use to get users familiar with AWS.
Caution: Using AWS costs money
When you set up an AWS account as explained in this section, you must provide a credit card number. Amazon typically charges for the time you run an instance of a virtual machine and it charges for storage even when the virtual machine is not running.
Getting Started
To get started, visit aws.amazon.com/console. The AWS account username and password are different from your Amazon shopping account. Create a new account and log in or log in to an existing account. Select AWS Management Console; AWS displays the Amazon Web Services page.
Under Compute & Networking click EC2 Virtual Servers in the Cloud. To create an instance (a new VM in the cloud), click the button labeled Launch Instance. Amazon displays the Create a New Instance window. You can launch many different kinds of virtual systems from this window. This example creates a RHEL 6.4 64-bit system.
Tip: Fedora quick-launch images
Fedora provides quick-launch images you can use in place of those supplied by AWS. You can use these images to build a VM in the AWS cloud. Visit cloud.fedoraproject.org for more information.
Launching an Instance
Click the radio button labeled Classic Wizard at the left side of the page; AWS displays the Launch with the Classic Wizard window on the right (Figure 17-11). Click within this window to open the Request Instances Wizard window. Scroll through the list of operating systems. Click the radio button labeled 32 bit or 64 bit for the system you want. This example launces a 64-bit RHEL system. Click Select adjacent to the type of system you want to launch.
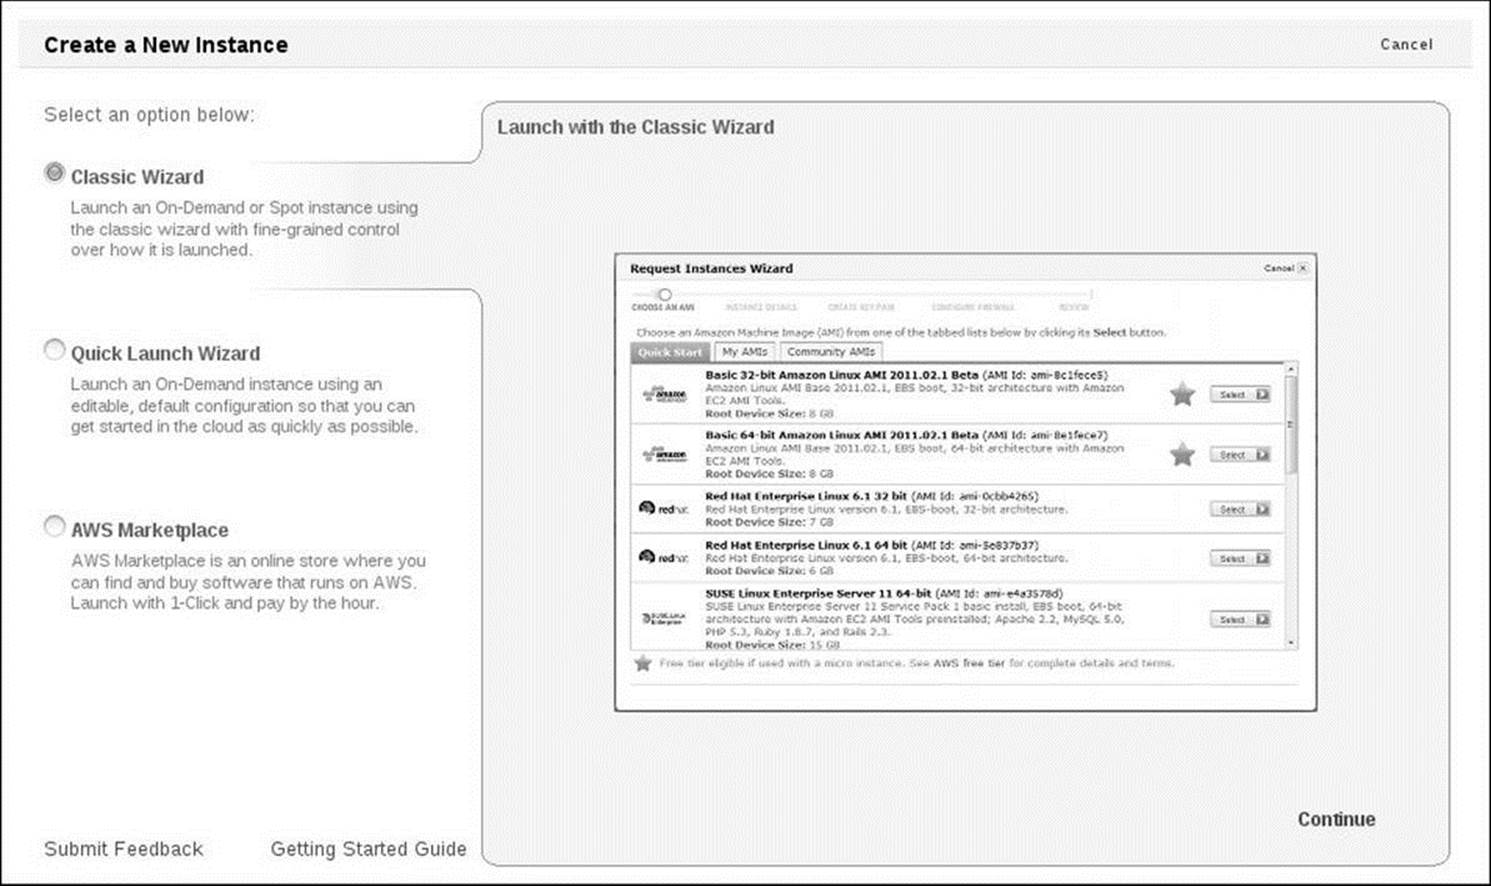
Figure 17-11 The Launch with the Classic Wizard window
When you click Select, AWS displays the Instance Details screen (this screen has many pages). You can accept the defaults (click Continue) on all the screens until you get to the screen that has a radio button labeled Create a new Key Pair. The key pair is used to encrypt the connection to the machine you set up; see “Public Key (Asymmetric) Encryption” on page 1157 for more information. Enter the name you want to use for the key pair in the text box labeled Enter a name for your key pair and click Create & Download your Key Pair. This example uses the nameec2.key. Save the key pair in the directory you will be working in. Amazon appends the filename extension .pem to the name you specified. After downloading the *.pem file, you must change its permissions so no one can write to it and only the owner (you) can read it. If the key pair is named ec2.key.pem, the following command changes its permissions appropriately.
$ chmod 400 ec2.key.pem
The next screen allows you to define a security group. By default AWS sets up a security group named quick-start-1 that has only port 22 open so you can log in to the machine using ssh. You do not need to change anything on this page; click Continue.
The final screen, named Review, displays information about the machine you are about to launch; click Launch.
Managing an Instance
After you click Launch, Amazon displays a message saying that your instances are now launching. Click View your instances in the Instances page; Amazon displays the Instances page (Figure 17-12). This page lists all the instances that you have created (and not terminated).
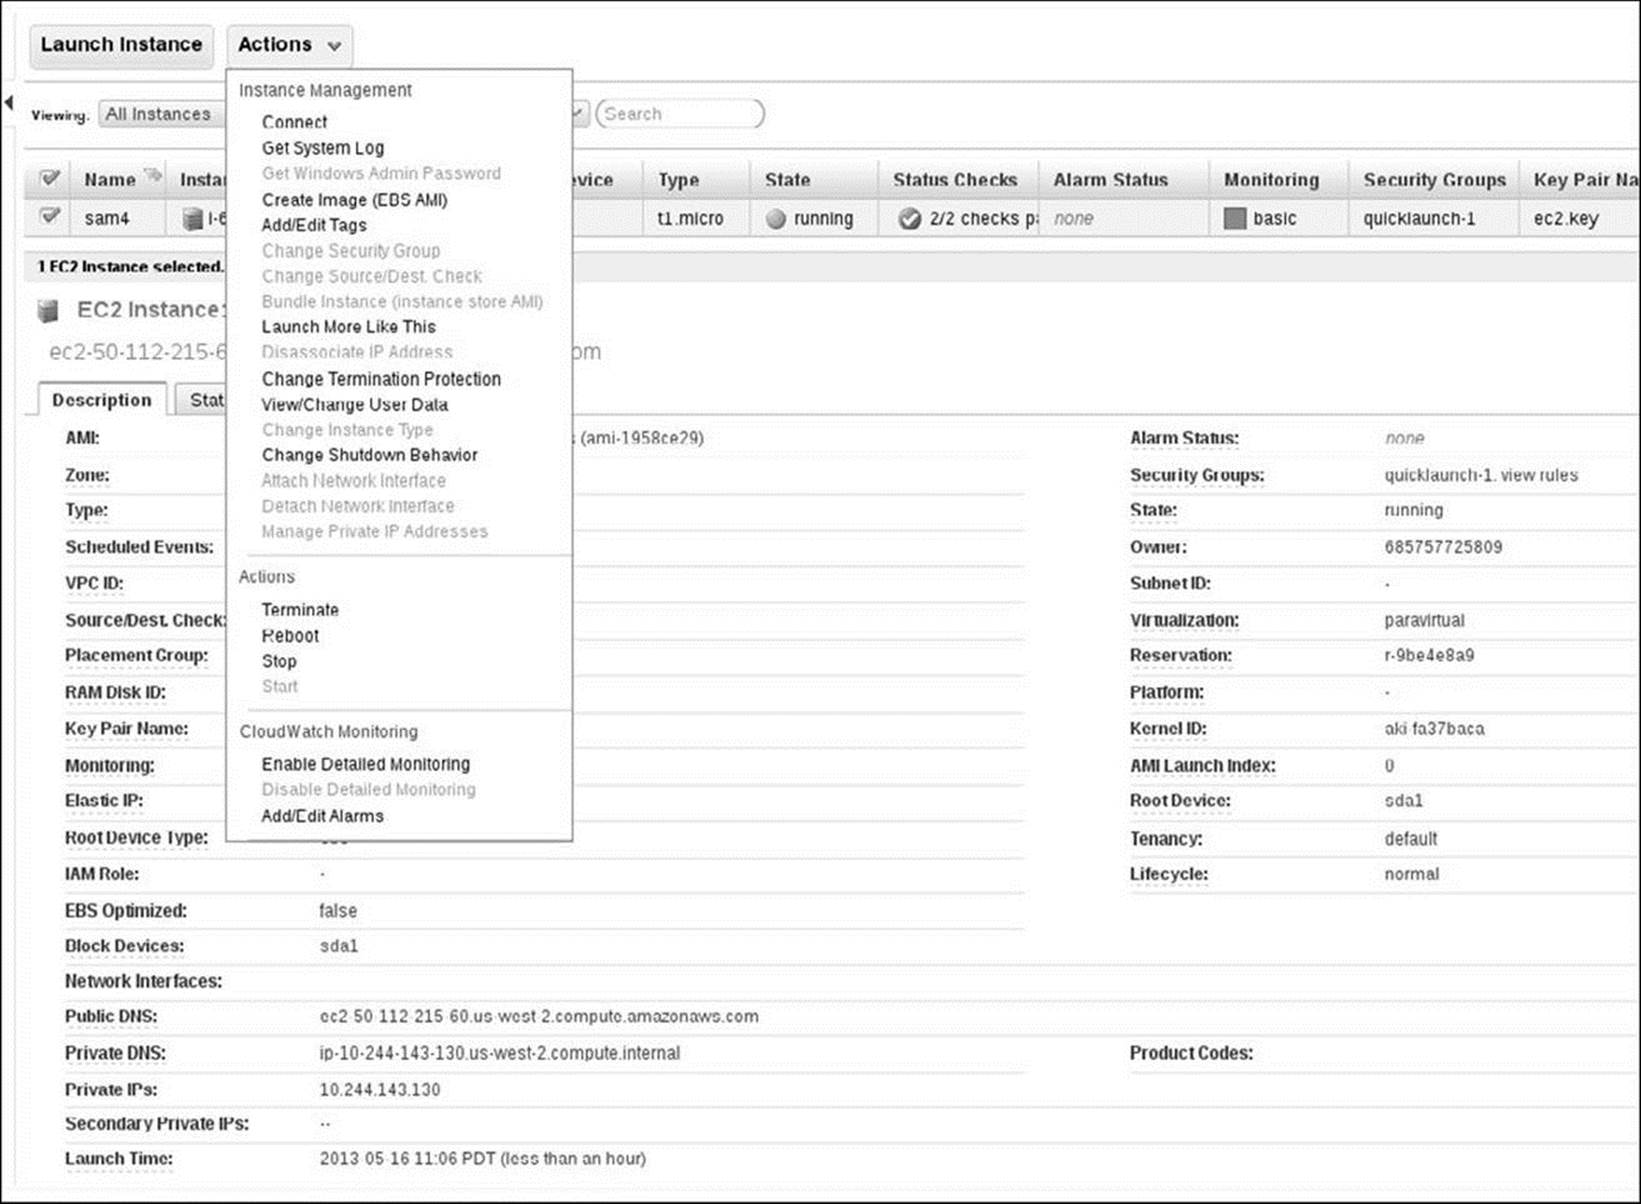
Figure 17-12 The Instances page showing the Actions drop-down menu
On the Instances page, put tick in the check box at left end of the instance you just launched (near the top of the page). The column labeled State tells you when the instance is running. Allow the mouse pointer to hover over the word empty in the column labeled Name and click the resulting pencil. Enter the name you want to assign to the system in the pop-up text box and click Save. This example uses the name sam4.
Click the Actions button at the top of the page to display a drop-down menu of items that allow you to control the instance (Figure 17-12). The items on that menu include
• Connect—Displays a window explaining how to connect to the instance you created, including the ssh command line you can use to connect to the instance.
• Terminate—Terminates the instance; you lose all information stored on the instance.
• Reboot—Reboots the instance.
• Stop—Shuts down the instance; the storage remains intact.
• Start—Boots the instance.
The lower portion of the page displays information about the instance. Make sure the tab labeled Description in the lower portion of the page is selected. When the instance is running, important information in the lower portion of the page includes
• Key Pair Name—The name of the key pair that allows you to log in on this instance.
• Public DNS—The URL of the instance; this URL allows you to connect to the instance (you might have to scroll down to see this entry).
• Security Groups—The firewall rules for the instance; click view rules; port 22 (ssh) should be open so you can connect to the instance.
Connecting to an Instance
Using the information in the bottom portion of the Instances page, you can construct an ssh command that will connect to the instance. In this example the filename of the key pair file is ec2.key.pem (it is in the working directory) and the Public DNS is ec2-54-244-133-141.us-west-2.compute.amazonaws.com. The default name of the user whose account you will connect to is ec2-user. The following command uses this information to connect to the instance; your information will be different. The –i option specifies the file that holds the private key for public key authentication.
$ ssh -i ec2.key.pem ec2-user@ec2-54-244-133-141.us-west-2.compute.amazonaws.com
The authenticity of host 'ec2-54-244-133-141.us-west-2.compute.amazonaws.com (54.244.133.141)' can't be established.
RSA key fingerprint is ef:73:ff:49:1c:dc:72:f9:8e:44:33:a4:ca:d5:16:96.
Are you sure you want to continue connecting (yes/no)? yes
Warning: Permanently added 'ec2-54-244-133-141.us-west-2.compute.amazonaws.com,54.244.133.141' (RSA) to the list of known hosts.
[ec2-user@ip-10-250-71-103 ~]$
The first time you connect to an instance and each time you restart an instance, ssh asks you to verify you are connecting to the right system (page 691).
Tip: AWS provides a new URL each time you start an instance
Each time you stop and restart an instance, AWS provides the instance with a new URL so you must use a slightly different command to connect to the instance. The Instance page (Figure 17-12) displays the URL of the instance on the line labeled Public DNS.
Caution: Leaving an instance running or stopped costs money
In any state except terminated, AWS charges you for an instance. When the instance is running you are charged for the instance and the volume (storage) it uses. When the instance is stopped, you pay for the volume only. When you terminate the instance AWS normally deletes the volume so you pay nothing. Terminate an instance using the Actions drop-down list and make sure the volume has been deleted.
Gaining root Privileges
The default RHEL system is set up without a root password—you must use sudo to gain root privileges. The /etc/sudoers file enables the ec2-user to execute any command without providing a password. See “Executing a Single Command” (page 430) and “Spawning a root Shell” (page430) for more information. See page 600 for information on adding users.
Terminating an Instance
On the Instances page (Figure 17-12, page 679), click Actions and select Terminate to delete the instance you created. AWS asks you to confirm; click Yes, Terminate. Click EC2 Dashboard at the top of the left column; AWS displays the EC2 Dashboard. It may take a few minutes for the instance to terminate. When it does, this page should show 0 Running Instances and 0 Volumes.
Chapter Summary
A VM (virtual machine) appears to the user and to the software running on it as a complete physical machine. It is, however, one of potentially many such VMs running on a single physical machine (the host). Each VM is called a guest. The software that provides the virtualization is called a hypervisor.
Advantages VMs have over physical machines include isolation, security, lower power consumption, dynamic resource allocation, and easy migration and duplication. There are many implementations of VMs. This chapter discusses GNOME Boxes, KVM, QEMU, and VMware. The libvirtlibrary and management tool provides a consistent interface to QEMU, KVM, and VMware.
GNOME Boxes has an easy-to-use interface and does not involve the user in details. It is not as powerful as virt-manager, which is designed for system administrators. Both of these tools are based on QEMU and can take advantage of libvirt. QEMU is a flexible hypervisor that runs in userspace and can emulate processors in software. KVM is a kernel module that allows a program running in userspace to take advantage of hardware virtualization. The virsh utility runs from the command line and allows you to create, manipulate, and display VMs. VMware Player is a proprietary VM that is available at no cost for noncommercial applications.
Cloud computing is the result of evolution and the combination of virtualization, networking, and powerful hardware. Cloud computing puts powerful VMs at remote locations; a user needs only a lightweight system to access the VMs over a network.
As an alternative to setting up the hardware and software to run a cloud, you can purchase a cloud computing platform as a service. Buying the service means the provider takes care of the infrastructure, software, and management, and it is faster to set up and (frequently) cheaper to build than setting up and running your own cloud server. Eucalyptus and OpenStack are popular open-source packages for building cloud computing platforms. OpenShift (Red Hat) and AWS (Amazon) provide cloud computing platforms as services.
Exercises
1. Does a VM require fewer resources than a physical machine?
2. What is KVM?
3. What is QEMU?
4. What is libvirt?
5. List three advantages VMs have over physical machines.
Advanced Exercises
6. What is the purpose of VMware Tools? Do you need to install VMware Tools when running vmplayer on a Linux system? Why or why not?
7. Is hardware virtualization supported on the local system?
8. What is the virt-manager utility?
9. What happens when you close the virt-manager console window of a running VM? What happens if you reboot the host system without first shutting down a VM?