A practical guide to Fedora and Red Hat Enterprise Linux, 7th Edition (2014)
Part IV: Using Clients and Setting Up Servers
Chapter 20. Sendmail: Setting Up Mail Servers, Clients, and More
In This Chapter
Introduction to sendmail
JumpStart I: Configuring sendmail on a Client
JumpStart II: Configuring sendmail on a Server
Configuring sendmail
SpamAssassin
Webmail
Setting Up an IMAP or POP3 Mail Server
Authenticated Relaying
Objectives
After reading this chapter you should be able to:
![]() Explain what sendmail is
Explain what sendmail is
![]() Explain the purpose and give examples of an MUA, an MTA, and an MDA
Explain the purpose and give examples of an MUA, an MTA, and an MDA
![]() Describe the role of SMTP, IMAP, and POP
Describe the role of SMTP, IMAP, and POP
![]() Configure the local SMTP service to use a smarthost for outgoing mail
Configure the local SMTP service to use a smarthost for outgoing mail
![]() Configure the local SMTP server to accept incoming mail, relay outgoing mail for specific hosts, and deliver mail directly to the remote systems
Configure the local SMTP server to accept incoming mail, relay outgoing mail for specific hosts, and deliver mail directly to the remote systems
![]() Configure mail aliases and mail forwarding
Configure mail aliases and mail forwarding
![]() Install and configure SpamAssassin on a mail client and a mail server
Install and configure SpamAssassin on a mail client and a mail server
![]() Install and configure a Webmail service (SquirrelMail)
Install and configure a Webmail service (SquirrelMail)
![]() Setup a mailing list (Mailman)
Setup a mailing list (Mailman)
![]() Install and configure an IMAP server (Dovecot)
Install and configure an IMAP server (Dovecot)
![]() Describe the process and purpose of authenticated relaying
Describe the process and purpose of authenticated relaying
Sending and receiving email require three pieces of software. At each end, there is a client, called an MUA (mail user agent), which is a bridge between a user and the mail system. Common MUAs are Evolution, KMail, Thunderbird, mutt, and Outlook. When you send an email, the MUA hands it to an MTA (mail transfer agent, such as exim4 or sendmail), which transfers it to the destination server. At the destination, an MDA (mail delivery agent, such as procmail) puts the mail in the recipient’s mailbox file. On Linux systems, the MUA on the receiving system either reads the mailbox file or retrieves mail from a remote MUA or MTA, such as an ISP’s SMTP (Simple Mail Transfer Protocol) server, using POP (Post Office Protocol) or IMAP (Internet Message Access Protocol).
SMTP
Most Linux MUAs expect a local MTA such as sendmail to deliver outgoing email. On some systems, including those with a dial-up connection to the Internet, the MTA sends email to an ISP’s mail server. Because most MTAs use SMTP (Simple Mail Transfer Protocol) to deliver email, they are often referred to as SMTP servers.
Tip: You do not need to set up sendmail to send and receive email
Most MUAs can use POP or IMAP to receive email from an ISP’s server. These protocols do not require an MTA such as sendmail. As a consequence, you do not need to install or configure sendmail (or another MTA) to receive email. Although you still need SMTP to send email, the SMTP server can be at a remote location, such as your ISP. Thus you might not need to concern yourself with it either.
In the default Fedora setup, the sendmail MTA uses procmail as the local MDA. In turn, procmail writes email to the end of the recipient’s mailbox file. You can also use procmail to sort email according to a set of rules, either on a per-user basis or globally. The global filtering function is useful for systemwide filtering to detect spam and for other tasks, but the per-user feature is largely superfluous on a modern system. Traditional UNIX MUAs were simple programs that could not filter mail and thus delegated this function to MDAs such as procmail. Modern MUAs, by contrast, incorporate this functionality. Although by default RHEL uses postfix as the MTA, this chapter explains how to set up sendmail as the MTA.
![]() Introduction to sendmail
Introduction to sendmail
When the network that was to evolve into the Internet was first set up, it connected a few computers, each serving a large number of users and running several services. Each computer was capable of sending and receiving email and had a unique hostname, which was used as a destination for email.
Today the Internet has a large number of transient clients. Because these clients do not have fixed IP addresses or hostnames, they cannot receive email directly. Users on these systems usually maintain an account on an email server run by their employer or an ISP, and they collect email from this account using POP or IMAP. Unless you own a domain where you want to receive email, you will not need to set up sendmail to receive mail from nonlocal systems.
Outbound Email
When used as a server, sendmail accepts outbound email and directs it to the system it is addressed to (the destination system). This section describes the different ways you can set up sendmail to perform this task.
Accepting Email for Delivery
You can set up a sendmail server so it accepts outbound email from the local system only, from specified systems (such as a LAN), or from all systems. Accepting email from unknown systems makes it likely the server will propagate spam.
Delivering Email
Direct connection
You can set up a sendmail server so it connects directly to the SMTP server on nonlocal destination systems. This SMTP server then delivers the email. Typically, sendmail delivers local email directly.
Smarthost
Alternately, you can set up a sendmail server so it sends email bound for nonlocal systems to an SMTP server that relays the mail to its destination. This type of server is called a smarthost or SMTP relay.
Port 25
By default, SMTP uses port 25. Some Windows viruses use a simple, self-contained SMTP server to propagate themselves. As a partial defense against these types of viruses, some ISPs and larger organizations block all outgoing connections that originate or terminate on port 25, with the exception of connections to their own SMTP server (smarthost). Blocking this port prevents local systems from making a direct connection to send email. These organizations require you to use a smarthost for email bound for nonlocal systems.
Inbound Email
Although not typical, you can set up sendmail to accept email for a registered domain name as specified in the domain’s DNS MX record (page 859). However, most mail clients (MUAs) do not interact directly with sendmail to receive email. Instead, they use POP or IMAP—protocols that include features for managing mail folders, leaving messages on the server, and reading only the subject of an email without downloading the entire message. If you want to collect email from a system other than the one running the incoming mail server, you might need to set up a POP or IMAP server, as discussed on page 763.
![]() Alternatives to sendmail
Alternatives to sendmail
Over the years, sendmail has grown to be enormously complex. Its complexity makes it challenging to configure if you want to set up something more than a simple mail server. Its size and complexity also add to its vulnerability. For optimal security, make sure you run the latest version ofsendmail and always keep sendmail up-to-date. Or you might want to consider using one of the following alternatives.
![]() exim4
exim4
The default MTA under Ubuntu, exim4 (www.exim.org; exim package), was introduced in 1995 by the University of Cambridge. It can be configured in several different ways and includes many features other MTAs lack.
![]() Postfix
Postfix
Postfix (www.postfix.org; postfix package) is an alternative MTA. Postfix is fast and easy to administer but is compatible enough with sendmail to not upset sendmail users. Postfix has a good reputation for ease of use and security and is a drop-in replacement for sendmail.
![]() Qmail
Qmail
Qmail (www.qmail.org) is a direct competitor of Postfix and has the same objectives. By default, Qmail stores email using the maildir format as opposed to the mbox format that other MTAs use (page 745).
More Information
Web
sendmail: www.sendmail.org
exim4: www.exim.org, wiki.debian.org/PkgExim4
procmail: www.procmail.org
IMAP and POP3: www.dovecot.org, cyrusimap.org
SpamAssassin: spamassassin.apache.org, wiki.apache.org/spamassassin
Spam database: razor.sourceforge.net
Mailman: www.list.org
SquirrelMail: www.squirrelmail.org
Dovecot: www.dovecot.org
Postfix: www.postfix.org
Qmail: www.qmail.org
Local
Dovecot: /usr/share/doc/dovecot*
man pages: sendmail, aliases, makemap, spamassassin spamc spamd
SpamAssassin: /usr/share/doc/spamassassin*, give the following command:
$ perldoc Mail::SpamAssassin::Conf
![]() Setting Up a sendmail Mail Server
Setting Up a sendmail Mail Server
This section explains how to set up a sendmail mail server.
Prerequisites
Install the following packages:
• sendmail
• sendmail-cf (required to configure sendmail)
Restart sendmail
As installed, sendmail is active and enabled so it will run when the system is booted. After changing its configuration files, give the following command to restart sendmail, causing it to reread its configuration files:
# systemctl restart sendmail.service
Notes
Firewall
An SMTP server normally uses TCP port 25. If an SMTP server system that receives nonlocal mail is running a firewall, you need to open this port. Give the following commands to open the port each time the system boots (permanently) and on the running system; see page 906 for information on firewall-cmd.
$ sudo -c 'firewall-cmd --add-port=25/tcp'
$ sudo -c 'firewall-cmd --permanent --add-port=25/tcp'
cyrus
This chapter covers the IMAP and POP3 servers included in the dovecot package. Fedora/RHEL also provides IMAP and POP3 servers in the cyrus-imapd package.
FQDN
If the local system does not have an FQDN (page 1250), sendmail will start very slowly. As a consequence, the system might boot slowly. See /etc/hostname on page 507 for instructions on how to determine if the system has an FQDN and how to give the local system an FQDN.
![]() JumpStart I: Configuring sendmail on a Client
JumpStart I: Configuring sendmail on a Client
Tip: You might not need to configure sendmail to send email
With sendmail running, give the command described under “Test” on page 744. As long as sendmail can connect to port 25 outbound, you should not need to set up sendmail to use an SMTP relay as described in this section. If you receive the mail sent by the test, you can skip this section. However, see “FQDN,” above.
This JumpStart configures an outbound sendmail server. This server
• Uses a remote SMTP server—typically an ISP—to relay outbound email to its destination (a smarthost or SMTP relay).
• Sends to the SMTP server email originating from the local system only. It does not forward email originating from other systems.
• Does not handle inbound email. As is frequently the case, you need to use POP or IMAP to receive email.
Change sendmail.mc
To set up this server, you must edit /etc/mail/sendmail.mc and restart sendmail (page 742).
The dnl (page 749) at the start of the following line in sendmail.mc indicates that this line is a comment:
dnl define('SMART_HOST','smtp.your.provider')dnl
You can ignore the dnl at the end of the line. To specify a remote SMTP server, you must open sendmail.mc in an editor and change the preceding line, deleting dnl from the beginning of the line and replacing smtp.your.provider with the FQDN of your ISP’s SMTP server (obtain this name from your ISP). Be careful not to alter the back ticks (') and the single quotation marks (') in this line. If your ISP’s SMTP server is at smtp.myisp.com, you would change the line to
define('SMART_HOST','smtp.myisp.com')dnl
Tip: Do not alter the back ticks (') or the single quotation marks (')
Be careful not to alter the back ticks (') or the single quotation marks (') in any line in sendmail.mc. These symbols control the way the m4 preprocessor converts sendmail.mc to sendmail.cf; sendmail will not work properly if you do not preserve these symbols.
Restart sendmail so that it regenerates the sendmail.cf file from the sendmail.mc file you edited (page 742).
Test
Test sendmail with the following command:
$ echo "my sendmail test" | /usr/sbin/sendmail user@remote.host
Replace user@remote.host with an email address on another system where you receive email. You need to send email to a remote system to make sure that sendmail is relaying your email.
![]() JumpStart II: Configuring sendmail on a Server
JumpStart II: Configuring sendmail on a Server
If you want to receive inbound email sent to a registered domain that you own, you need to set up sendmail as an incoming mail server. This JumpStart describes how to set up such a server. This server
• Accepts outbound email from the local system only.
• Delivers outbound email directly to the recipient’s system, without using an SMTP relay (smarthost).
• Accepts inbound email from any system.
This server does not relay outbound email originating on other systems. Refer to “access: Sets Up a Relay Host” on page 752 if you want the local system to act as a relay. For this configuration to work, you must be able to make outbound connections from and receive inbound connections to port 25.
The line in sendmail.mc that limits sendmail to accepting inbound email from the local system only is
DAEMON_OPTIONS('Port=smtp,Addr=127.0.0.1, Name=MTA')dnl
To allow sendmail to accept inbound email from other systems, remove the parameter Addr=127.0.0.1, from the preceding line:
DAEMON_OPTIONS('Port=smtp, Name=MTA')dnl
By default, sendmail does not use a remote SMTP server to relay email, so there is nothing to change to cause sendmail to send email directly to recipients’ systems. (JumpStart I set up a SMART_HOST to relay email.)
Once you have restarted sendmail (page 742), it will accept mail addressed to the local system, as long as a DNS MX record (page 859) points at the local system. If you are not running a DNS server, you must ask your ISP to set up an MX record.
![]() Working with sendmail Messages
Working with sendmail Messages
Outbound email
When you send email, the MUA passes the email to sendmail, which creates in the /var/spool/mqueue (mail queue) directory two files that hold the message while sendmail processes it. To create a unique filename for a particular piece of email, sendmail generates a random string and uses that string in filenames pertaining to the email. The sendmail daemon stores the body of the message in a file named df (data file) followed by the generated string. It stores the headers and envelope information in a file named qf (queue file) followed by the generated string.
If a delivery error occurs, sendmail creates a temporary copy of the message that it stores in a file whose name starts with tf (temporary file) and logs errors in a file whose name starts xf. Once an email has been sent successfully, sendmail removes all files pertaining to that email from themqueue directory.
Mail addressed to the local system
By default, sendmail delivers email addressed to the local system to users’ files in the mail spool directory, /var/spool/mail, in mbox format. Within this directory, each user has a mail file named with the user’s username. Mail remains in these files until it is collected, typically by an MUA. Once an MUA collects the mail from the mail spool, the MUA stores the mail as directed by the user, usually in the user’s home directory.
Mail addressed to nonlocal systems
The scheme that sendmail uses to process email addressed to a nonlocal system depends on how it is configured: It can send the email to a smarthost, it can send the email to the system pointed to by the DNS MX record of the domain the email is addressed to, or it can refuse to send the email.
mbox versus maildir
The mbox format holds all messages for a user in a single file. To prevent corruption, a process must lock this file while it is adding messages to or deleting messages from the file; thus the MUA cannot delete a message at the same time the MTA is adding messages. A competing format,maildir, holds each message in a separate file. This format does not use locks, allowing an MUA to delete messages from a user at the same time as mail is delivered to the same user. In addition, the maildir format is better able to handle larger mailboxes. The downside is that the maildirformat adds overhead when you are using a protocol such as IMAP to check messages. The dovecot package supports both mbox and maildir formats. Qmail (page 742), an alternative to sendmail, supports the maildir format only.
Mail Logs
The sendmail daemon stores log messages in /var/log/maillog. Other mail servers, such as Dovecot, might also log information to this file. Following is a sample log entry:
/var/log/maillog
# cat /var/log/maillog
...
Jun 18 11:55:46 guava sendmail[2159]: r5IItjl5002157: to=<mgs@sobell.com>,
ctladdr=<sam@guava.example.com> (1000/1400), delay=00:00:01, xdelay=00:00:01,
mailer=esmtp, pri=120315, relay=gmail-smtp-in.l.google.com. [74.125.129.27],
dsn=2.0.0, stat=Sent (OK 1371581746 o4si8984494pac.163 - gsmtp)
Each log entry starts with a timestamp, the name of the system sending the email, the name of the mail server (sendmail), and a unique identification number. The address of the recipient follows the to= label and the address of the sender follows ctladdr=. Additional fields provide the name of the mailer and the time it took to send the message. If a message is sent correctly, the stat= label is followed by Sent.
A message is marked Sent when sendmail sends it; Sent does not indicate the message has been delivered. If a message is not delivered because an error occurred farther down the line, the sender usually receives an email saying that it was not delivered and giving a reason why.
See the sendmail documentation for more information on log files. If you send and receive a lot of email, the maillog file can grow quite large. The logrotate (page 618) syslog entry archives and rotates these files regularly.
Aliases and Forwarding
You can use the aliases, ~/.forward (page 747), and virtusertable (page 753) files to forward email. Table 20-1 on page 753 compares the three files.
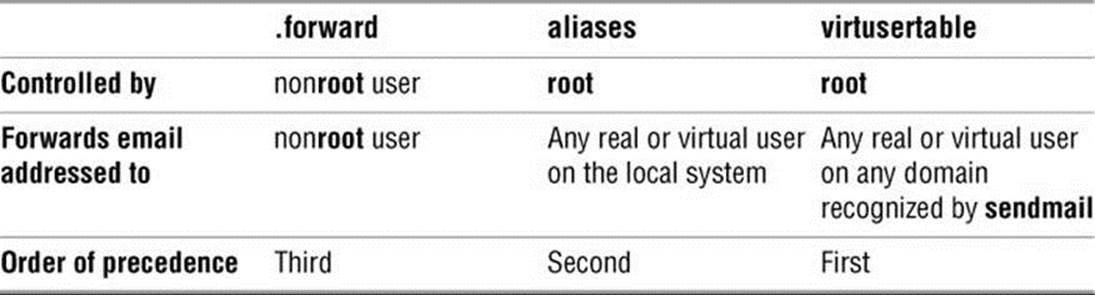
Table 20-1 Comparison of forwarding techniques
![]() /etc/aliases
/etc/aliases
Most of the time when you send email, it goes to a specific person; the recipient, user@system, maps to a real user on the specified system. Sometimes, however, you might want email to go to a class of users and not to a specific recipient. Examples of classes of users include postmaster,webmaster, root, and tech_support. Different users might receive this email at different times or the email might go to a group of users. You can use the /etc/aliases file to map local addresses and classes to local users, files, commands, and local as well as nonlocal addresses.
Each line in /etc/aliases contains the name of a local (pseudo)user, followed by a colon, whitespace, and a comma-separated list of destinations. The default installation includes a number of aliases that redirect messages for certain pseudousers to root. These have the form
adm: root
Sending messages to the root account is a good way to make them easy to review. However, because root’s email is rarely checked, you might want to send copies to a real user. You can set up an alias to forward email to more than one user. The following line forwards mail sent to abuse on the local system to sam and max in addition to root:
abuse: root, sam, max
It is common to forward mail sent to many special accounts to root. If Zach is to read mail sent and forwarded to root, you could fix each alias individually. Alternately, you can simply add the following line to the end of the aliases file (order does matter in this case). This line forwards to Zach all mail sent and forwarded to root:
...
root: zach
You can create simple mailing lists with this type of alias. For example, the following alias sends copies of all email sent to admin on the local system to several users, including Zach, who is on a different system:
admin: sam, helen, max, zach@example.com
You can direct email to a file by specifying an absolute pathname in place of a destination address. The following alias, which is quite popular among less conscientious system administrators, redirects email sent to complaints to /dev/null (page 503), where it disappears:
complaints: /dev/null
You can also send email to standard input of a command by preceding the command with the pipeline character (|). This technique is commonly used by mailing list software such as Mailman (page 762). For each list it maintains, Mailman has entries, such as the following one forpainting_class, in the aliases file:
painting_class: "|/var/lib/mailman/mail/mailman post painting_class"
![]() newaliases
newaliases
After you edit /etc/aliases, you must either run newaliases while you are working with root privileges or restart sendmail to re-create the /etc/aliases.db file that sendmail reads.
praliases
You can use praliases to list aliases currently loaded by sendmail:
# praliases | head -5
@:@
abuse:root
adm:root
amanda:root
daemon:root
![]() ~/.forward
~/.forward
Systemwide aliases are useful in many cases, but nonroot users cannot make or change them. Sometimes you might want to forward your own mail: Maybe you want mail from several systems to go to one address, or perhaps you want to forward your mail while you are working at another office. The ~/.forward file allows ordinary users to forward their email.
Lines in a .forward file are the same as the right column of the aliases file explained earlier in this section: Destinations are listed one per line and can be a local user, a remote email address, a filename, or a command preceded by the pipeline character (|).
Mail that you forward does not go to your local mailbox. If you want to forward mail and keep a copy in your local mailbox, you must specify your local username preceded by a backslash to prevent an infinite loop. The following example sends Sam’s email to himself on the local system and on the system at example.com:
$cat ~sam/.forward
sams@example.com
\sam
Related Programs
sendmail
The sendmail packages include several programs. The primary program, sendmail, reads from standard input and sends an email to the recipient specified by its argument. You can use sendmail from the command line to check that the mail delivery system is working and to email the output of scripts. See page 744 for an example. The command apropos sendmail displays a list of sendmail-related files and utilities.
![]() mailq
mailq
The mailq utility displays the status of the outgoing mail queue. When there are no messages in the queue, it reports the queue is empty. Unless they are transient, messages in the queue usually indicate a problem with the local or remote MTA configuration or a network problem.
# mailq
/var/spool/mqueue is empty
Total requests: 0
mailstats
The mailstats utility reports on the number and sizes of messages sendmail has sent and received since the date it displays on the first line:
# mailstats
Statistics from Fri Dec 27 16:02:34 2013
M msgsfr bytes_from msgsto bytes_to msgsrej msgsdis msgsqur Mailer
0 0 0K 17181 103904K 0 0 0 prog
4 368386 4216614K 136456 1568314K 20616 0 0 esmtp
9 226151 26101362K 479025 12776528K 4590 0 0 local
====================================================================
T 594537 30317976K 632662 14448746K 25206 0 0
C 694638 499700 146185
In the preceding output, each mailer is identified by the first column, which displays the mailer number, and by the last column, which displays the name of the mailer. The second through fifth columns display the number and total sizes of messages sent and received by the mailer. The sixth, seventh, and eighth columns display the number of messages rejected, discarded, and quarantined, respectively. The row that starts with T lists the column totals, and the row that starts with C lists the number of TCP connections.
![]() Configuring sendmail
Configuring sendmail
The sendmail configuration files reside in /etc/mail, where the primary configuration file is sendmail.cf. This directory contains other text configuration files, such as access, mailertable, and virtusertable. The sendmail daemon does not read these files but instead reads the corresponding*.db files in the same directory.
makemap
You can use makemap or give the command make from the /etc/mail directory to generate the *.db files, although this step is not usually necessary: When you restart sendmail (page 742), it automatically generates these files.
The sendmail.mc and sendmail.cf Files
The sendmail.cf file is not intended to be edited and contains a large warning to this effect:
$ cat /etc/mail/sendmail.cf
...
######################################################################
#####
##### DO NOT EDIT THIS FILE! Only edit the source .mc file.
#####
######################################################################
...
Editing sendmail.mc and Generating sendmail.cf
The sendmail.cf file is generated from sendmail.mc using the m4 macro processor. It can be helpful to use a text editor that supports syntax highlighting, such as vim, to edit sendmail.mc.
dnl
Many of the lines in sendmail.mc start with dnl, which stands for delete to new line; this token causes m4 to delete from the dnl to the end of the line (the next NEWLINE character). Because m4 ignores anything on a line after a dnl instruction, you can use dnl to introduce comments; it works the same way as # does in a shell script.
Many of the lines in sendmail.mc end with dnl. Because NEWLINEs immediately follow these dnls, these dnls are superfluous; you can remove them if you like.
After you edit sendmail.mc, you need to regenerate sendmail.cf to make your changes take effect. Restarting the sendmail service regenerates sendmail.cf.
About sendmail.mc
Lines near the beginning of sendmail.mc provide basic configuration information:
include('/usr/share/sendmail-cf/m4/cf.m4')dnl
VERSIONID('setup for linux')dnl
OSTYPE('linux')dnl
The include statement tells m4 where to find the macro definition file it will use to process the rest of this file; it points to the file named cf.m4. The cf.m4 file contains other include statements that include parts of the sendmail configuration rule sets.
The VERSIONID statement defines a string that indicates the version of this configuration. You can change this string to include a brief comment about changes you have made to this file or other information. The value of this string is not significant to sendmail.
Do not change the OSTYPE statement unless you are migrating a sendmail.mc file from another operating system.
Other statements you might want to change are explained in the following sections and in the sendmail documentation.
Tip: Quoting m4 strings
The m4 macro processor, which converts sendmail.mc to sendmail.cf, requires strings to be preceded by a back tick (') and closed with a single quotation mark ('). Make sure not to change these characters when you edit the file or sendmail will not work properly.
Masquerading
Typically you want your email to appear to come from the user and the domain where you receive email; sometimes the outbound server is in a different domain than the inbound server. You can cause sendmail to alter outbound messages so that they appear to come from a user and/or domain other than the one they are sent from: In other words, you masquerade (page 1260) the message.
Several lines in sendmail.mc pertain to this type of masquerading. Each is commented out in the file distributed by Fedora/RHEL:
dnl MASQUERADE_AS('mydomain.com')dnl
dnl MASQUERADE_DOMAIN(localhost)dnl
dnl FEATURE(masquerade_entire_domain)dnl
The MASQUERADE_AS statement causes email you send from the local system to appear to come from the specified domain (mydomain.com in the commented-out line). Remove the leading dnl and change mydomain.com to the domain name you want mail to appear to come from.
The MASQUERADE_DOMAIN statement causes email from the specified system or domain to be masqueraded, just as local email is. That is, email from the system specified in this statement is treated as though it came from the local system: It is changed so that it appears to come from the domain specified in the MASQUERADE_AS statement. Remove the leading dnl and change localhost to the name of the system or domain that sends the email you want to masquerade. If the name you specify has a leading period, it specifies a domain. If there is no leading period, the name specifies a system or host. The sendmail.mc file can include as many MASQUERADE_DOMAIN statements as necessary.
The masquerade_entire_domain feature statement causes sendmail also to masquerade subdomains of the domain specified in the MASQUERADE_DOMAIN statement. Remove the leading dnl to masquerade entire domains.
Accepting Email from Unknown Hosts
As configured by Fedora/RHEL, sendmail accepts email from domains it cannot resolve (and that might not exist). To turn this feature off and cut down the amount of spam you receive, add dnl to the beginning of the following line:
FEATURE('accept_unresolvable_domains')dnl
When this feature is off, sendmail uses DNS to look up the domains of all email it receives. If it cannot resolve the domain, it rejects the email.
Setting Up a Backup Server
You can set up a backup mail server to hold email when the primary mail server experiences problems. For maximum coverage, the backup server should be on a different connection to the Internet from the primary server.
Setting up a backup server is easy. Just remove the leading dnl from the following line in the backup mail server’s sendmail.mc file:
dnl FEATURE('relay_based_on_MX')dnl
DNS MX records (page 859) specify where email for a domain should be sent. You can have multiple MX records for a domain, each pointing to a different mail server. When a domain has multiple MX records, each record usually has a different priority; the priority is specified by a two-digit number, where lower numbers specify higher priorities.
When attempting to deliver email, an MTA first tries to deliver email to the highest-priority server. If that delivery attempt fails, it tries to deliver to a lower-priority server. If you activate the relay_based_on_MX feature and point a low-priority MX record at a secondary mail server, the mail server will accept email for the domain. The mail server will then forward email to the server identified by the highest-priority MX record for the domain when that server becomes available.
Other Files in /etc/mail
The /etc/mail directory holds most of the files that control sendmail. This section discusses three of those files: mailertable, access, and virtusertable.
mailertable: Forwards Email from One Domain to Another
When you run a mail server, you might want to send mail destined for one domain to a different location. The sendmail daemon uses the /etc/mail/mailertable file for this purpose. Each line in mailertable holds the name of a domain and a destination mailer separated by whitespace; whensendmail receives email for the specified domain, it forwards it to the mailer specified on the same line. Fedora/RHEL enables this feature by default: Put an entry in the mailertable file and restart sendmail to use it.
The following line in mailertable forwards email sent to tcorp.com to the mailer at plum.com:
$ cat /etc/mail/mailertable
tcorp.com smtp:[plum.com]
The square brackets in the example instruct sendmail not to use MX records but rather to send email directly to the SMTP server. Without the brackets, email could enter an infinite loop.
A period in front of a domain name acts as a wildcard and causes the name to match any domain that ends in the specified name. For example, .tcorp.com matches sales.tcorp.com, mktg.tcrop.com, and so on.
Restarting the sendmail service regenerates mailertable.db from mailertable.
access: Sets Up a Relay Host
On a LAN, you might want to set up a single server to process outbound mail, keeping local mail inside the network. A system that processes outbound mail for other systems is called a relay host. The /etc/mail/access file specifies which systems the local server relays email for. As configured by Fedora/RHEL, this file lists only the local system:
$ cat /etc/mail/access
...
# by default we allow relaying from localhost...
Connect:localhost.localdomain RELAY
Connect:localhost RELAY
Connect:127.0.0.1 RELAY
You can add systems to the list in access by adding an IP address followed by whitespace and the word RELAY. The following line adds the 192.168. subnet to the list of hosts the local system relays mail for:
Connect:192.168. RELAY
Restarting the sendmail service regenerates access.db from access.
virtusertable: Serves Email to Multiple Domains
You can set up DNS MX records (page 859) so a single system serves email to multiple domains. On a system that serves mail to many domains, you need a way to sort the incoming mail so it goes to the correct places. The /etc/mail/virtusertable file can forward inbound email addressed to different domains (aliases cannot do this).
As sendmail is configured by Fedora/RHEL, virtusertable is enabled. You need to put forwarding instructions in the virtusertable file and restart sendmail to serve the specified domains. The virtusertable file is similar to the aliases file (page 746), except the left column contains full email addresses, not just local ones. Each line in virtusertable starts with the address the email was sent to, followed by whitespace and the address sendmail will forward the email to. As with aliases, the destination can be a local user, an email address, a file, or a pipeline symbol (|), followed by a command.
The following line from virtusertable forwards mail addressed to zach@tcorp.com to zcs, a local user:
zach@tcorp.com zcs
You can also forward email for a user to a remote email address:
sams@plum.com sams@tcorp.com
You can forward all email destined for a domain to another domain without specifying each user individually. To forward email for every user at plum.com to tcorp.com, specify @plum.com as the first address on the line. When sendmail forwards email, it replaces the %1 in the destination address with the name of the recipient. The next line forwards all email addressed to plum.com to tcorp.com, keeping the original recipients’ names:
@plum.com %1@tcorp.com
Finally you can specify that email intended for a specific user should be rejected by using the error namespace in the destination. The next example bounces email addressed to spam@tcorp.com with the message 5.7.0:550 Invalid address:
spam@tcorp.com error:5.7.0:550 Invalid address
.forward, aliases, and virtusertable
The .forward (page 747), aliases (page 746), and virtusertable files all do the same thing: They forward email addressed to one user to another user. They can also redirect email to a file or to serve as input to a program. The difference between them is scope and ownership; see Table 20-1.
SpamAssassin
Spam—or more correctly UCE (unsolicited commercial email)—accounts for more than three-fourths of all email. SpamAssassin evaluates each piece of incoming email and assigns it a number that indicates the likelihood that the email is spam. The higher the number, the more likely the email is spam. You can filter email based on its rating. SpamAssassin is effective as installed, but you can modify its configuration files to make it better fit your needs. See page 742 for sources of more information on SpamAssassin.
How SpamAssassin Works
spamc and spamd
SpamAssassin comprises the spamd daemon and the spamc client. Although it includes the spamassassin utility, the SpamAssassin documentation suggests using spamc and not spamassassin to filter mail because spamc is much quicker to load than spamassassin. Whilespamassassin works alone, spamc calls spamd. The spamd daemon spawns children; when spamd is running, ps displays several spamd child processes in addition to the parent spamd process:
$ ps -ef | grep spam
root 2235 1 2 12:43 ? 00:00:01 /usr/bin/spamd --pidfile ...
root 2236 2235 0 12:43 ? 00:00:00 spamd child
root 2237 2235 0 12:43 ? 00:00:00 spamd child
sam 2241 1816 0 12:44 pts/1 00:00:00 grep --color=auto spam
The spamc utility is a filter: It reads each piece of email from standard input, sends the email to spamd for processing, and writes the modified email to standard output. The spamd daemon uses several techniques to identify spam:
• Header analysis—Checks for tricks people who send spam use to make you think email is legitimate.
• Text analysis—Checks the body of an email for characteristics of spam.
• Blacklists—Checks lists to see whether the sender is known for sending spam email.
• Database—Checks the signature of the message against Vipul’s Razor (razor.sourceforge.net), a spam-tracking database.
You can set up SpamAssassin on a mail server so it processes all email being delivered to local systems before it is sent to users (page 756). Alternately, individual users can run it from their mail clients (page 757). Either way, the local system must run spamd and each email message must be filtered through this daemon using spamc.
Prerequisites
Install the following packages:
• spamassassin
• procmail (runs SpamAssassin on a mail server; page 756)
Enable and start spamassassin
Run systemctl to cause the spamassassin service (spamd daemon) to start when the system enters multiuser mode and then start spamassassin. Use the systemctl status command to make sure the service is running.
# systemctl enable spamassassin.service
# systemctl start spamassassin.service
Testing SpamAssassin
With spamd running, you can see how spamc works by sending it a string:
$ echo "hi there" | spamc
X-Spam-Checker-Version: SpamAssassin 3.3.2 (2011-06-06) on guava.example.com
X-Spam-Flag: YES
X-Spam-Level: ******
X-Spam-Status: Yes, score=6.9 required=5.0 tests=EMPTY_MESSAGE,MISSING_DATE,
MISSING_HEADERS,MISSING_MID,MISSING_SUBJECT,NO_HEADERS_MESSAGE,NO_RECEIVED,
NO_RELAYS autolearn=no version=3.3.2
X-Spam-Report:
* -0.0 NO_RELAYS Informational: message was not relayed via SMTP
* 1.2 MISSING_HEADERS Missing To: header
* 0.1 MISSING_MID Missing Message-Id: header
* 1.8 MISSING_SUBJECT Missing Subject: header
* 2.3 EMPTY_MESSAGE Message appears to have no textual parts and no
* Subject: text
* -0.0 NO_RECEIVED Informational: message has no Received headers
* 1.4 MISSING_DATE Missing Date: header
* 0.0 NO_HEADERS_MESSAGE Message appears to be missing most RFC-822
* headers
hi there
Subject: [SPAM]
X-Spam-Prev-Subject: (nonexistent)
Of course, SpamAssassin complains because the string you gave it did not contain standard email headers. The logical line that starts with X-Spam-Status contains the heart of the report on the string hi there. First it says Yes (it considers the message to be spam). SpamAssassin uses a rating system that assigns a number of hits to a piece of email. If the email receives more than the required number of hits (5.0 by default), SpamAssassin marks it as spam. The string failed for many reasons that are enumerated on this status line. The reasons are detailed in the section labeled X-Spam-Report.
The following listing is from a real piece of spam processed by SpamAssassin. It received 24.5 hits, indicating that it is almost certainly spam.
X-Spam-Status: Yes, hits=24.5 required=5.0
tests=DATE_IN_FUTURE_06_12,INVALID_DATE_TZ_ABSURD,
MSGID_OE_SPAM_4ZERO,MSGID_OUTLOOK_TIME,
MSGID_SPAMSIGN_ZEROES,RCVD_IN_DSBL,RCVD_IN_NJABL,
RCVD_IN_UNCONFIRMED_DSBL,REMOVE_PAGE,VACATION_SCAM,
X_NJABL_OPEN_PROXY
version=2.55
X-Spam-Level: ************************
X-Spam-Checker-Version: SpamAssassin 2.55 (1.174.2.19-2003-05-19-exp)
X-Spam-Report: This mail is probably spam. The original message has been attached
along with this report, so you can recognize or block similar unwanted
mail in future. See http://spamassassin.org/tag/ for more details.
Content preview: Paradise SEX Island Awaits! Tropical 1 week vacations
where anything goes! We have lots of WOMEN, SEX, ALCOHOL, ETC! Every
man’s dream awaits on this island of pleasure. [...]
Content analysis details: (24.50 points, 5 required)
MSGID_SPAMSIGN_ZEROES (4.3 points) Message-Id generated by spam tool (zeroes variant)
INVALID_DATE_TZ_ABSURD (4.3 points) Invalid Date: header (timezone does not exist)
MSGID_OE_SPAM_4ZERO (3.5 points) Message-Id generated by spam tool (4-zeroes variant)
VACATION_SCAM (1.9 points) BODY: Vacation Offers
REMOVE_PAGE (0.3 points) URI: URL of page called “remove”
MSGID_OUTLOOK_TIME (4.4 points) Message-Id is fake (in Outlook Express format)
DATE_IN_FUTURE_06_12 (1.3 points) Date: is 6 to 12 hours after Received: date
RCVD_IN_NJABL (0.9 points) RBL: Received via a relay in dnsbl.njabl.org
[RBL check: found 94.99.190.200.dnsbl.njabl.org.]
RCVD_IN_UNCONFIRMED_DSBL (0.5 points) RBL: Received via a relay in unconfirmed.dsbl.org
[RBL check: found 94.99.190.200.unconfirmed.dsbl.org.]
X_NJABL_OPEN_PROXY (0.5 points) RBL: NJABL: sender is proxy/relay/formmail/spam-source
RCVD_IN_DSBL (2.6 points) RBL: Received via a relay in list.dsbl.org
[RBL check: found 211.157.63.200.list.dsbl.org.]
X-Spam-Flag: YES
Subject: [SPAM] re: statement
Configuring SpamAssassin
SpamAssassin looks in many locations for configuration files; for details, refer to the spamassassin man page. The easiest configuration file to work with is /etc/mail/spamassassin/local.cf. You can edit this file to configure SpamAssassin globally. Users can override these global options and add their own options in the ~/.spamassassin/user_prefs file. You can put the options discussed in this section in either of these files.
For example, you can configure SpamAssassin to rewrite the Subject line of email it rates as spam. The rewrite_header keyword in the configuration files controls this behavior. The word Subject following this keyword tells SpamAssassin to rewrite Subject lines. Remove the # from the following line to turn on this 'margin-top:6.0pt;margin-right:0cm;margin-bottom:6.0pt; margin-left:0cm;line-height:normal;page-break-after:avoid'>
# rewrite_header Subject *****SPAM*****
The required_score keyword specifies the minimum score a piece of email must receive before SpamAssassin considers it to be spam. The default is 5.00. Set the value of this keyword to a higher number to cause SpamAssassin to mark fewer pieces of email as spam.
required_score 5.00
Sometimes mail from addresses that should be marked as spam is not, or mail from addresses that should not be marked as spam is. Use the whitelist_from keyword to specify addresses that should never be marked as spam and blacklist_from to specify addresses that should always be marked as spam:
whitelist_from sams@example.com
blacklist_from *@spammer.net
You can specify multiple addresses, separated by SPACEs, on the whitelist_from and blacklist_from lines. Each address can include wildcards. To whitelist everyone sending email from the example.com domain, use whitelist_from *@example.com. You can use multiple whitelist_from andblacklist_from lines.
Running SpamAssassin on a Mail Server
This section explains how to set up SpamAssassin on a mail server so it processes all email being delivered to local systems before it is sent to users. It shows how to use procmail as the MDA and have procmail send email through spamc.
First, make sure the MTA (sendmail) uses procmail as the MDA. The first two of the following lines in sendmail.mc specify the procmail path, command, and flags. The MAILER line defines procmail as the mailer. You should not have to make changes to these lines.
define(`PROCMAIL_MAILER_PATH', `/usr/bin/procmail')dnl
FEATURE(local_procmail, `', `procmail -t -Y -a $h -d $u')dnl
MAILER(procmail)dnl
Also make sure the procmail package is installed on the server system. Next, if the /etc/procmailrc configuration file does not exist, create it so it is owned by root and has 644 permissions and the following contents. If it does exist, append the last two lines from the following file to it:
$ cat /etc/procmailrc
DROPPRIVS=yes
:0 fw
| /usr/bin/spamc
The first line of this file ensures that procmail runs with the least possible privileges. The next two lines implement a rule that uses a pipeline to send each user’s incoming email through spamc. The :0 tells procmail that a rule follows. The f flag indicates a filter; the w flag causes procmailto wait for the filter to complete and check the exit code. The last line specifies the /usr/bin/spamc utility as the filter.
With this file in place, all email the server receives for local delivery passes through SpamAssassin, which rates it according to the options in the global configuration file. Users with accounts on the server system can override the global SpamAssassin configuration settings in their~/.spamassassin/user_prefs files.
When you run SpamAssassin on a server, you typically want to rate the email conservatively so fewer pieces of good email are marked as spam. Setting required_hits in the range of 6–10 is generally appropriate. Also, you do not want to remove any email automatically because you could prevent a user from getting a piece of nonspam email. When the server marks email as possibly being spam, users can manually or automatically filter the spam and decide what to do with it.
Using SpamAssassin with a Mail Client
Alternately, individual users can run it from their mail clients.
With the SpamAssassin (spamd) daemon running and the configuration files set up, you are ready to have SpamAssassin filter your email. To do so, you need to set up two rules in your mail client: The first passes each piece of email through SpamAssassin using spamc (page 753), and the second filters email based on whether the X-Spam-Flag line has a YES or NO on it.
This section explains how to set up Evolution to work with SpamAssassin. You can set up other mail clients similarly. Evolution is set up to work with SpamAssassin only when you use an IMAP server. With this setup, you must specify you want to use SpamAssassin in two places: Mail Preferences and Mail Accounts. If you have multiple accounts, you must specify each account you want to check for spam.
Open the Evolution Preferences window by selecting Evolution menubar: Edit![]() Preferences. Click the Mail Preferences icon and then the Junk tab. See Figure 20-1. Put a tick in the check box labeled Check custom headers for junk. Two custom header tests that work with SpamAssassin are installed by default. The first checks if X-Spam-Flag is set to YES; the second checks if X-Spam-Level is set to *****. One of these tests will return a true value if SpamAssassin has rated a piece of email as spam.
Preferences. Click the Mail Preferences icon and then the Junk tab. See Figure 20-1. Put a tick in the check box labeled Check custom headers for junk. Two custom header tests that work with SpamAssassin are installed by default. The first checks if X-Spam-Flag is set to YES; the second checks if X-Spam-Level is set to *****. One of these tests will return a true value if SpamAssassin has rated a piece of email as spam.
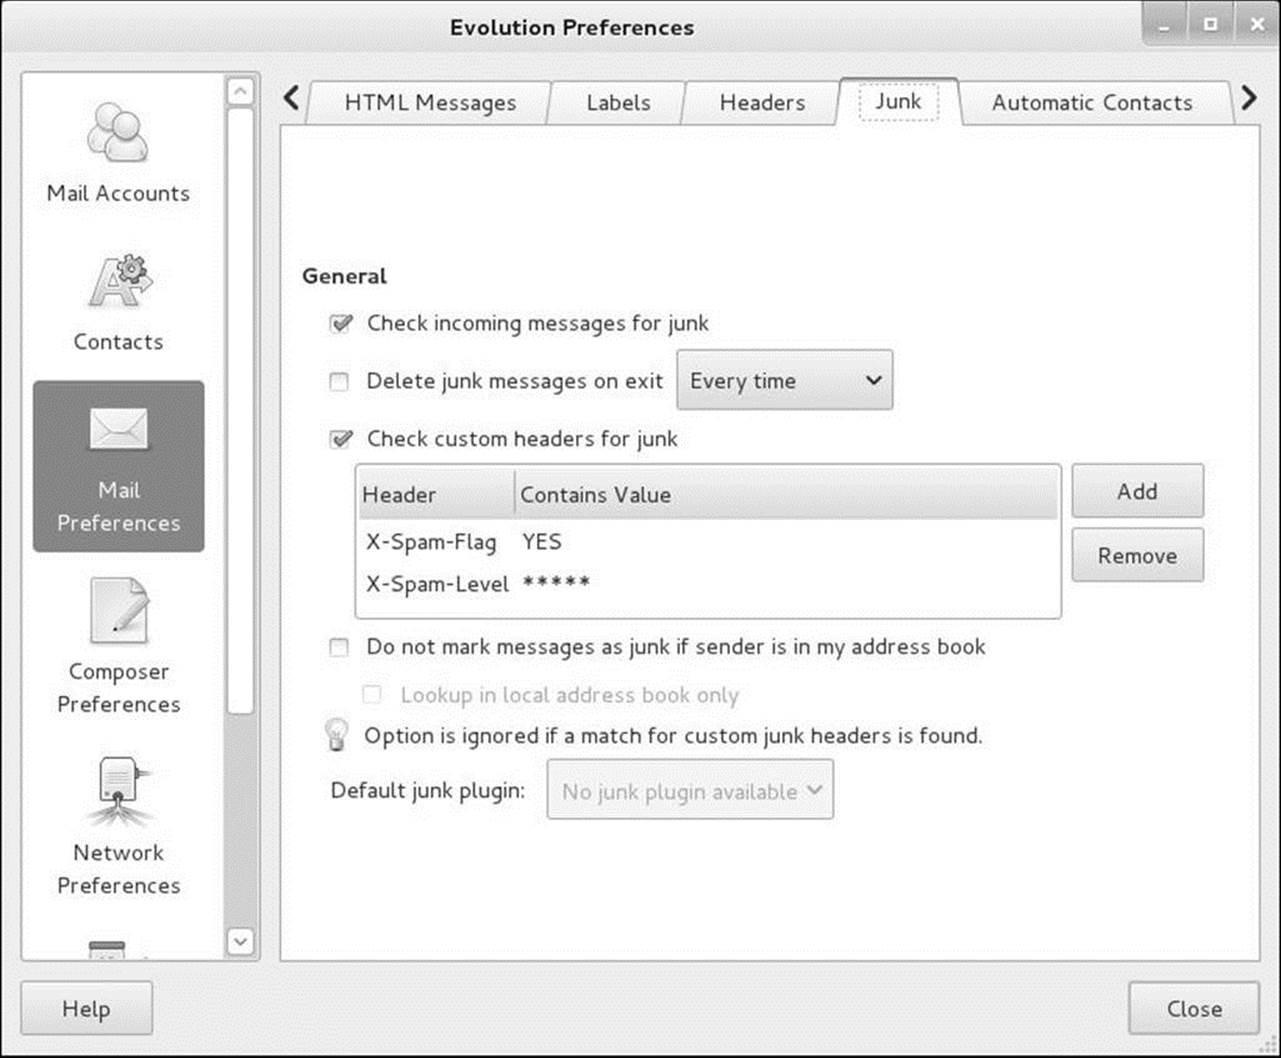
Figure 20-1 Evolution Preferences window
Next, display the Account Editor window by clicking the Mail Accounts icon in the Evolution Preferences window, highlighting the account you want to work with, and clicking Edit. In the Receiving Email tab the Server Type must be IMAP for these instructions to work. Click the Receiving Options tab (Figure 20-2). Under Options, put a tick in the check box labeled Apply filters to new messages in Inbox on this server. Click OK to close the Account Editor window. Click Close to close the Evolution Preferences window.
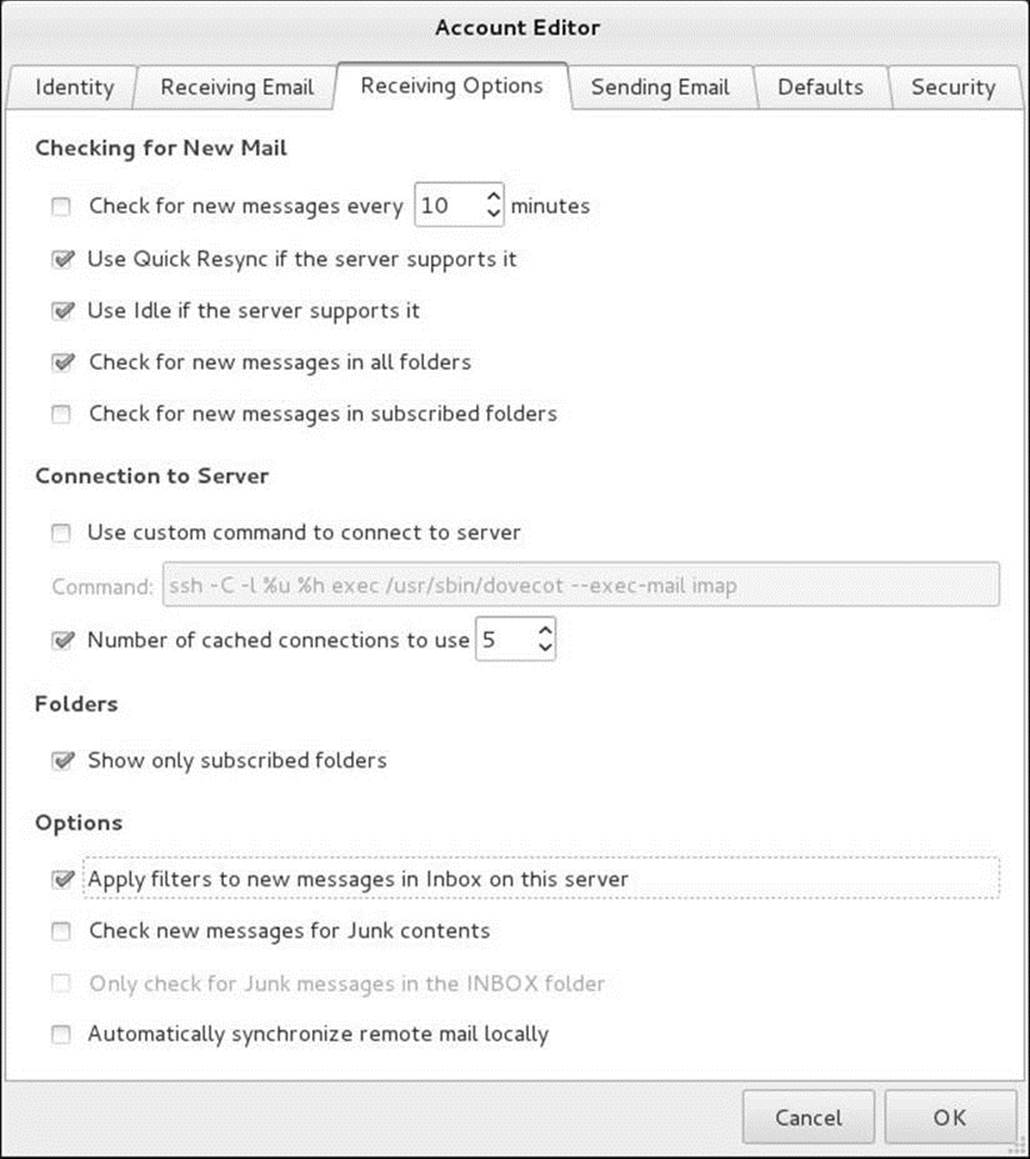
Figure 20-2 Account Editor window, Receiving Options tab
SELinux
When SELinux is set to use a targeted policy, the SpamAssassin daemon, spamd, is protected by SELinux. You can disable this protection if necessary. For more information refer to “Setting the Targeted Policy with system-config-selinux” on page 475.
Additional Email Tools
This section covers Webmail and mailing lists. In addition, it discusses how to set up IMAP and POP3 servers.
Webmail
Traditionally you read email using a dedicated email client such as mail or Evolution. Recently it has become more common to use a Web application to read email. If you have an email account with a commercial provider such as Gmail, HotMail, or Yahoo! Mail, you use a Web browser to read email. Email read in this manner is called Webmail. Unlike email you read on a dedicated client, you can read Webmail from anywhere you can open a browser on the Internet: You can check your email from an Internet cafe or a friend’s computer, for example.
SquirrelMail
SquirrelMail provides Webmail services. It is written in PHP and supports the IMAP and SMTP protocols. For maximum compatibility across browsers, SquirrelMail renders pages in HTML 4.0 without the use of JavaScript.
SquirrelMail is modular, meaning you can easily add functionality using plugins. Plugins can allow you to share a calendar, for example, or give you the ability to change passwords using the Webmail interface. See the plugins section of the SquirrelMail Web site (www.squirrelmail.org) for more information.
To use SquirrelMail, you must run IMAP (page 763) because SquirrelMail uses IMAP to receive and authenticate email. You must also run Apache (Chapter 26) so a user can use a browser to connect to SquirrelMail.
Prerequisites
Install the following packages:
• squirrelmail
• httpd (page 935)
• sendmail (page 740)
• dovecot (page 763) or another IMAP server
Startup
You do not need to start SquirrelMail, nor do you have to open any ports for it. However, you need to configure, start, and open ports (if the server is running on a system with a firewall) for sendmail (page 743), IMAP (page 763), and Apache (page 936).
Configuration
The SquirrelMail files reside in /usr/share/squirrelmail. Create the following link to make SquirrelMail accessible from the Web:
# ln -s /usr/share/squirrelmail /var/www/html/mail
Give the following commands to configure SquirrelMail:
# cd /usr/share/squirrelmail/config
# ./conf.pl
SquirrelMail Configuration : Read: config_default.php (1.4.0)
---------------------------------------------------------
Main Menu --
1. Organization Preferences
2. Server Settings
3. Folder Defaults
4. General Options
5. Themes
6. Address Books
7. Message of the Day (MOTD)
8. Plugins
9. Database
10. Languages
D. Set pre-defined settings for specific IMAP servers
C Turn color on
S Save data
Q Quit
Command >>
This menu has multiple levels. When you select a setting (and not a submenu), conf.pl displays information that can help you decide how to answer the question it poses. Set the server’s domain name (number 1 on the Server Settings page) and the name of the IMAP server you are using (Don the main menu). SquirrelMail provides several themes; if you do not like the way SquirrelMail looks, choose another theme from Themes (number 5). When you are finished making changes, exit from conf.pl. Run conf.pl whenever you want to change the configuration of SquirrelMail.
SquirrelMail provides a Web page that tests its configuration. Point a browser on the server at localhost/mail/src/configtest.php. Replace localhost with the IP address or FQDN of the server to view the page from another system. SquirrelMail checks its configuration and displays the results on this page. Figure 20-3 shows that SquirrelMail cannot connect to the IMAP server on the local system, probably because IMAP has not been installed.
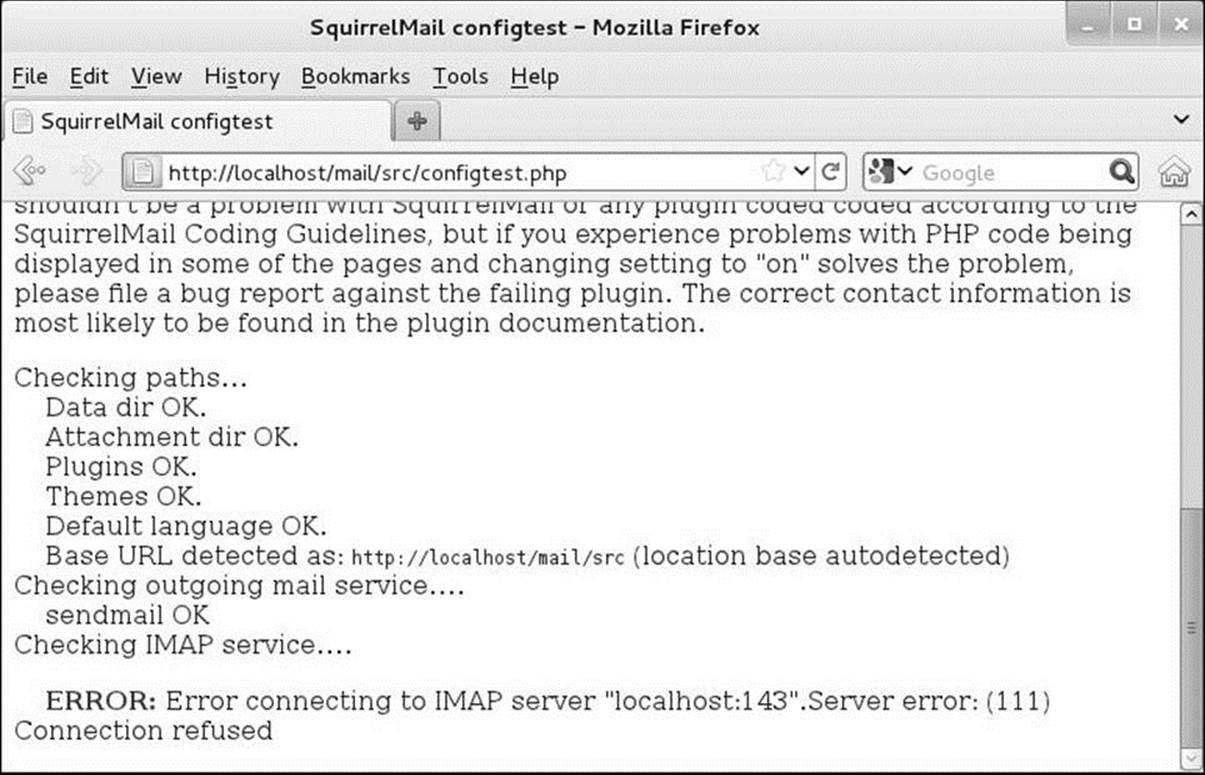
Figure 20-3 SquirrelMail running a configuration test
Logging in
Point a Web browser at localhost/mail or localhost/mail/src/login.php to display the SquirrelMail login page (Figure 20-4). Replace localhost with the IP address or FQDN of the server to view the page from another system. Enter the username and password of a user who has an account on the server system.
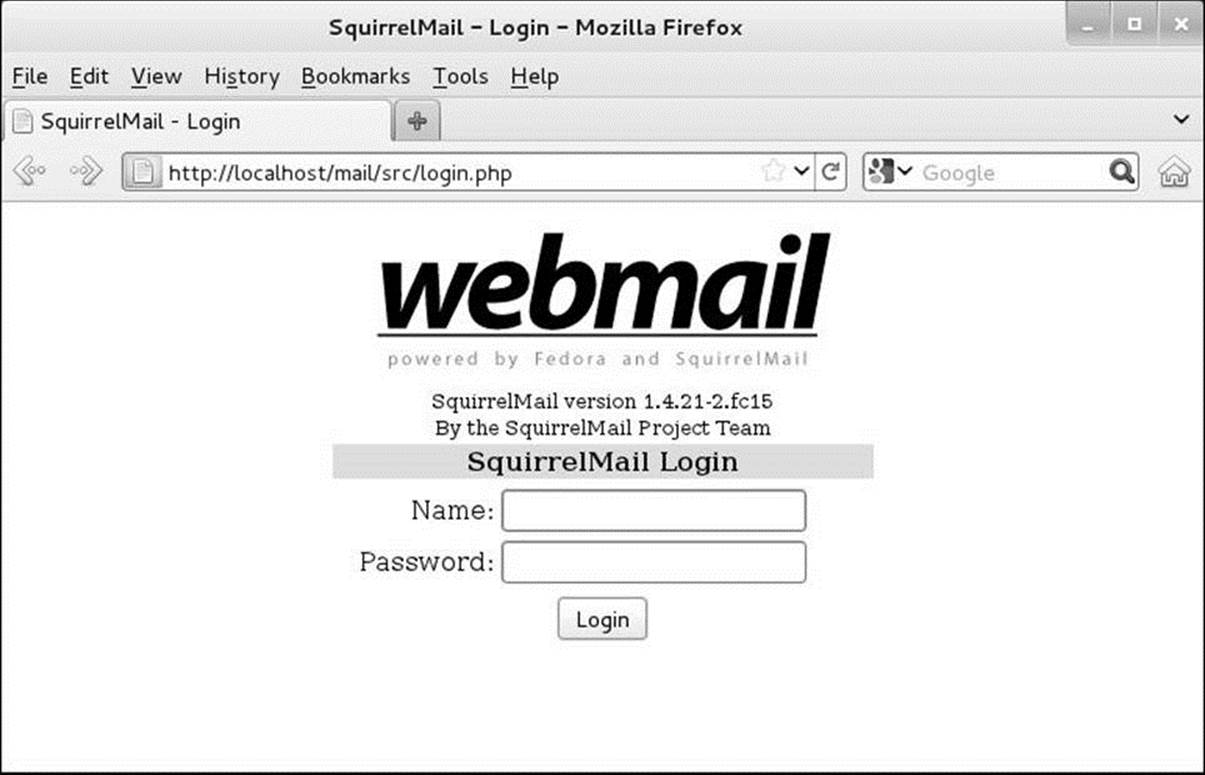
Figure 20-4 SquirrelMail login page
Mailing Lists
A mailing list can be an asset if you regularly send email to the same large group of people. It offers several advantages over listing numerous recipients in the To or Cc field of an email or sending the same email individually to many people:
• Anonymity—None of the recipients of the email can see the addresses of the other recipients.
• Archiving—Email sent to the list is stored in a central location where list members or the public, as specified by the list administrator, can browse through it.
• Access control—You can specify who can send email to the list.
• Consistency—When you send mail to a group of people using To or Cc, it is easy to forget people who want to be on the list and to erroneously include people who want to be off the list.
• Efficiency—A mailing list application spreads email transmissions over time so it does not overload the mail server.
Mailman
Mailman, the GNU list manager, is written mostly in Python and manages email discussions and email newsletter lists. Because it is integrated with the Web, Mailman makes it easy for users to manage their accounts and for administrators to manage lists. For more information, see the Mailman home page (www.list.org) and, once you have installed Mailman, the files in the /usr/share/doc/mailman* directory.
Prerequisites
Install the mailman package and an MTA such as sendmail (page 742). To use the Web interface you must install Apache (page 935).
Mailman site list
Give the following newlist command to create a site list, substituting the name of your mailing site for painting_class. You must also create a site list named mailman (substitute mailman for painting_class); otherwise Mailman will not start.
# /usr/lib/mailman/bin/newlist
Enter the name of the list: painting_class
Enter the email of the person running the list: helen@example.com
Initial painting_class password:
To finish creating your mailing list, you must edit your /etc/aliases (or equivalent) file
by adding the following lines, and possibly running the 'newaliases' program:
## painting_class mailing list
painting_class: "|/usr/lib/mailman/mail/mailman post painting_class"
painting_class-admin: "|/usr/lib/mailman/mail/mailman admin painting_class"
painting_class-bounces: "|/usr/lib/mailman/mail/mailman bounces painting_class"
painting_class-confirm: "|/usr/lib/mailman/mail/mailman confirm painting_class"
painting_class-join: "|/usr/lib/mailman/mail/mailman join painting_class"
painting_class-leave: "|/usr/lib/mailman/mail/mailman leave painting_class"
painting_class-owner: "|/usr/lib/mailman/mail/mailman owner painting_class"
painting_class-request: "|/usr/lib/mailman/mail/mailman request painting_class"
painting_class-subscribe: "|/usr/lib/mailman/mail/mailman subscribe painting_class"
painting_class-unsubscribe: "|/usr/lib/mailman/mail/mailman unsubscribe painting_class"
Hit enter to notify painting_class owner...
Before users on the list can receive email, you need to copy the lines generated by newlist (the ones that start with the name of the new mailing site) to the end of /etc/aliases (page 746) and run newaliases (page 747).
Tip: You must create a site list named mailman
You must use the newlist utility to create a site list named mailman in addition to the site lists you want to set up. If you do not create this site list, you will not be able to start Mailman.
mm_cfg.py
The main Mailman configuration file is /etc/mailman/mm_cfg.py. When you install Mailman, it assigns the value of fqdn to DEFAULT_EMAIL_HOST (the default domain for mailing lists) and DEFAULT_URL_HOST (the default Web server for Mailman) in this file. Change the values assigned to these variables as needed, making sure to enclose the values within single quotation marks, and start or restart Mailman. The following example uses www.example.com as the default Web server and mail.example.com as the default mail server:
# grep '^DEFAULT' /etc/mailman/mm_cfg.py
DEFAULT_URL_HOST = 'www.example.com'
DEFAULT_EMAIL_HOST = 'mail.example.com'
mailman configuration file
You can configure many aspects of Mailman mailing lists by modifying the file named /etc/mailman/sitelist.cfg. See the comments in this file for more information.
Enable and start mailman
After setting up the mailman site list and a site list of your choice, Run systemctl to start the mailman service when the system enters multiuser mode and then start the mailman service. Use the systemctl status command to make sure the service is running.
# systemctl enable mailman.service
# systemctl start mailman.service
After modifying any Mailman configuration files or adding a new site list, give the second command again, replacing start with restart to cause Mailman to reread its configuration files. Remember also to start sendmail and Apache as needed.
Web interface
You must modify the last line of the /etc/httpd/conf.d/mailman.conf file before the Mailman Web interface will work. Remove the leading hashmark (#) and change the domain name to that of the host for the Web interface as previously established in mm_cfg.py:
# tail -1 /etc/httpd/conf.d/mailman.conf
RedirectMatch ^/mailman[/]*$ http://www.example.com/mailman/listinfo
Restart Apache. Assuming the host for the Web interface is example.com, anyone can point a browser at example.com/mailman to display a list of available mailing lists. Click the name of a mailing list to display a page that allows you to view the list’s archives, send a message, or subscribe to the list. At the bottom of the page is a link to the administrative interface for the list.
If Mailman says there are no publicly-advertised Mailman mailing lists, add the following line to mm_cfg.py and restart Mailman.
VIRTUAL_HOST_OVERVIEW = Off
Setting Up an IMAP or POP3 Mail Server
Dovecot
IMAP (Internet Message Access Protocol) and POP (Post Office Protocol) allow users to retrieve and manipulate email remotely. This section explains how to set up servers for these protocols. Dovecot (www.dovecot.org and wiki.dovecot.org) implements these protocols. After you install Dovecot, see /usr/share/doc/dovecot* for more information.
Prerequisites
Install the dovecot package. The rpm installation script creates the self-signed certificates dovecot requires in the files named /etc/pki/dovecot/certs/dovecot.pem and /etc/pki/dovecot/private/dovecot.pem. Typically, you do not need to modify the dovecot configuration file (/etc/dovecot/dovecot.conf).
Enable and start dovecot
Run systemctl to cause dovecot to start when the system enters multiuser mode and then start dovecot. Use the systemctl status command to make sure the service is running.
# systemctl enable dovecot.service
# systemctl start dovecot.service
After modifying a dovecot configuration file, give the same command, replacing start with restart, to cause dovecot to reread its configuration files.
Authenticated Relaying
If you travel with a portable computer such as a laptop, you might connect to the Internet through a different connection at each location where you work. Perhaps you travel for work, or maybe you just bring your laptop home at night.
This section does not apply if you always dial in to the network through your ISP. In that case, you are always connected to your ISP’s network and it is as though you never moved your computer.
On a laptop you do not use a local instance of sendmail to send email. Instead, you use SMTP to connect to an ISP or to a company’s SMTP server (a smarthost), which then relays your outgoing mail. To avoid relaying email for anyone, including malicious users who would send spam, SMTP servers restrict who they relay email for, based on IP address. By implementing authenticated relaying, you can cause the SMTP server to authenticate, based on user identification. In addition, SMTP can encrypt communication when you send mail from your email client and use an SMTP server.
An authenticated relay provides several advantages over a plain connection:
• You can send email from any Internet connection.
• The secure connection makes it more difficult to intercept email as it traverses the Internet.
• The outgoing mail server requires authentication, preventing it from being used for spam.
You set up authenticated relaying by creating an SSL certificate or using an existing one, enabling SSL in sendmail, and telling your email client to connect to the SMTP server using SSL. If you have an SSL certificate from a company such as VeriSign, you can skip the next section in which you create a self-signed certificate.
Creating a Self-Signed Certificate for sendmail
The default location for SSL certificates is /etc/pki/tls/certs (PKI stands for public key infrastructure). Working with root privileges, give the command make sendmail.pem in this directory to generate the required certificates. Apache uses a similar procedure for creating a certificate (page970).
# cd /etc/pki/tls/certs
# make sendmail.pem
...
Generating a 2048 bit RSA private key
....................................+++
...................................................................+++
writing new private key to '/tmp/openssl.snxDrO'
-----
You are about to be asked to enter information that will be incorporated
into your certificate request.
What you are about to enter is what is called a Distinguished Name or a DN.
There are quite a few fields but you can leave some blank
For some fields there will be a default value,
If you enter '.', the field will be left blank.
-----
Country Name (2 letter code) [XX]:US
State or Province Name (full name) []:California
Locality Name (eg, city) [Default City]:San Francisco
Organization Name (eg, company) [Default Company Ltd]:Sobell Associates Inc.
Organizational Unit Name (eg, section) []:
Common Name (eg, your name or your server's hostname) []:sobell.com
Email Address []:mgs@sobell.com
..............++++++
You can enter any information you wish in the certificate.
Enabling SSL in sendmail
Once you have a certificate, instruct sendmail to use it by uncommenting (removing the leading dnl from) the following lines in sendmail.mc:
TRUST_AUTH_MECH('EXTERNAL DIGEST-MD5 CRAM-MD5 LOGIN PLAIN')dnl
define('confAUTH_MECHANISMS', 'EXTERNAL GSSAPI DIGEST-MD5 CRAM-MD5 LOGIN PLAIN')dnl
These lines specify the authentication mechanisms.
Next, uncomment the following lines in sendmail.mc to tell sendmail where the certificate is:
define(`confCACERT_PATH', `/etc/pki/tls/certs')dnl
define(`confCACERT', `/etc/pki/tls/certs/ca-bundle.crt')dnl
define(`confSERVER_CERT', `/etc/pki/tls/certs/sendmail.pem')dnl
define(`confSERVER_KEY', `/etc/pki/tls/certs/sendmail.pem')dnl
Encrypted connections are made in one of two ways: SSL (simpler) or TLS. SSL requires a dedicated port and has the client and the server negotiate a secure connection and continue the transaction as if the connection were not encrypted. TLS has the client connect to the server using an insecure connection and then issue a STARTTLS command to negotiate a secure connection. TLS runs over the same port as an unencrypted connection. Because many clients support only SSL, it is a good idea to instruct sendmail to listen on the SMTPS port. The final line you must uncomment in sendmail.mc instructs sendmail to listen on the SMTPS (SMTP secure) port:
DAEMON_OPTIONS('Port=smtps, Name=TLSMTA, M=s')dnl
Enabling SSL in the Mail Client
Enabling SSL in a mail client is usually quite simple. For example, Evolution provides the Edit![]() Preferences
Preferences![]() Mail Accounts
Mail Accounts![]() Edit
Edit![]() Receiving Email
Receiving Email![]() Security
Security![]() Encryption Method combo box that allows you to choose the type of encryption you want to use: No encryption,STARTTLS encryption, or SSL on a dedicated port. There is a similar combo box under the Sending Email tab. Alternately, you can specify the type of encryption you want to use when you set up Evolution.
Encryption Method combo box that allows you to choose the type of encryption you want to use: No encryption,STARTTLS encryption, or SSL on a dedicated port. There is a similar combo box under the Sending Email tab. Alternately, you can specify the type of encryption you want to use when you set up Evolution.
Chapter Summary
The sendmail daemon is an MTA (mail transfer agent). When you send a message, sendmail works with other software to get the email to the proper recipients. You can set up sendmail to send email to an SMTP server that then relays the email to its destination or you can have sendmailsend email directly to the SMTP servers for the domains receiving the email. By default, sendmail stores incoming messages in the mail spool directory, /var/spool/mail.
The sendmail.cf file controls many aspects of how sendmail works. If you edit this file, restart the sendmail service to regenerate sendmail.cf. The system administrator can use the /etc/aliases file and ordinary users can use ~/.forward files to reroute email to one or more local or remote addresses, to files, or as input to programs.
You can use a program such as SpamAssassin to grade and mark email as to the likelihood of it being spam. You can then decide what to do with the marked email: You can look at each piece of potential spam and decide where to put it, or you can have your MUA automatically put potential spam in a special mailbox for spam.
Other programs that can help with email include SquirrelMail, which provides Webmail services, and Mailman, which provides mailing list support. IMAP (Internet Message Access Protocol) and POP (Post Office Protocol) allow users to retrieve and manipulate email remotely. The Dovecot system provides IMAP and POP servers.
Exercises
1. By default, email addressed to system goes to root. How would you also save a copy in /var/logs/systemmail?
2. How would Max store a copy of his email in ~/mbox and send a copy to max@example.com?
3. If your firewall allowed only the machine with the IP address 192.168.1.1 to send email outside the network, how would you instruct the local copy of sendmail to use this server as a relay?
4. What does dnl stand for in the m4 macro language? What are dnl commands used for?
5. SpamAssassin is installed on your mail server, with the threshold set to an unusually low value of 3, resulting in a lot of false positives. What rule could you give to your mail client to allow it to identify spam with a score of 5 or higher?
6. Describe the software and protocols used when Max sends an email to Sam on a remote Linux system.
Advanced Exercises
7. Your company’s current mail server runs on a commercial UNIX server, and you are planning to migrate it to Linux. After copying the configuration files across to the Linux system, you find that it does not work. What might you have forgotten to change?
8. Assume a script stores certain information in a variable named RESULT. What line could you put in the script that would send the contents of RESULT to the email address specified by the first argument on the command line?
9. Give a simple way of reading your email that does not involve the use of an MUA.
10. If you accidentally delete the /etc/aliases file, how could you easily re-create it (assuming that you had not restarted sendmail)?
All materials on the site are licensed Creative Commons Attribution-Sharealike 3.0 Unported CC BY-SA 3.0 & GNU Free Documentation License (GFDL)
If you are the copyright holder of any material contained on our site and intend to remove it, please contact our site administrator for approval.
© 2016-2026 All site design rights belong to S.Y.A.