A practical guide to Fedora and Red Hat Enterprise Linux, 7th Edition (2014)
Part IV: Using Clients and Setting Up Servers
Chapter 21. NIS and LDAP
In This Chapter
How NIS Works
Running an NIS Client
yppasswd: Changes NIS Passwords
Setting Up an NIS Server
yppasswdd: The NIS Password Update Daemon
LDAP
Setting Up an LDAP Server
Tools for Working with LDAP
Objectives
After reading this chapter you should be able to:
![]() Describe the architecture and use of NIS
Describe the architecture and use of NIS
![]() List advantages and disadvantages of NIS
List advantages and disadvantages of NIS
![]() Install an NIS server using static port assignments
Install an NIS server using static port assignments
![]() Port existing local users to an NIS server
Port existing local users to an NIS server
![]() Configure a client to use the NIS server for authentication
Configure a client to use the NIS server for authentication
![]() Describe the architecture and use of LDAP
Describe the architecture and use of LDAP
![]() List advantages and disadvantages of LDAP
List advantages and disadvantages of LDAP
![]() Install and configure an OpenLDAP server to hold contact information
Install and configure an OpenLDAP server to hold contact information
![]() Determine required and optional attributes from a published schema
Determine required and optional attributes from a published schema
![]() Create an LDIF file to add, modify, or delete an entry
Create an LDIF file to add, modify, or delete an entry
![]() Query an LDAP server with multiple clients
Query an LDAP server with multiple clients
NIS (Network Information Service) simplifies the maintenance of common administrative files by keeping them in a central database and having clients contact the database server to retrieve information from the database. Developed by Sun Microsystems, NIS is an example of the client/server paradigm.
Just as DNS addresses the problem of keeping multiple copies of /etc/hosts files up-to-date, so NIS deals with the issue of keeping system-independent configuration files (such as /etc/passwd) current. Most networks today are heterogeneous (page 1253); even though they run different varieties of UNIX or Linux, they have certain common attributes, such as a passwd file.
An LDAP (Lightweight Directory Access Protocol) directory can hold many types of information, including names and addresses, lists of network services, and authentication data. Another example of the client/server paradigm, LDAP is appropriate for any type of relatively static, structured information where fast lookups are required. Many types of clients are set up to communicate with LDAP servers, including email clients, browsers, and authentication servers.
Introduction to NIS
A primary goal of a LAN administrator is to make the network transparent to users. One aspect of this transparency is presenting users with similar environments, including usernames and passwords, when they log in on different machines. From the administrator’s perspective, the information that supports a user’s environment should not be replicated but rather should be kept in a central location and distributed as required. NIS simplifies this task.
As with DNS, users need not be aware that NIS is managing system configuration files. Setting up and maintaining NIS databases are tasks for the system administrator; individual users and users on single-user Linux systems rarely need to work directly with NIS.
Yellow Pages
NIS used to be called the Yellow Pages, and some people still refer to it by this name. Sun renamed the service because another corporation holds the trademark to the Yellow Pages name. The names of NIS utilities and files, however, are reminiscent of the old name: ypcat displays andypmatch searches an NIS file, and the server daemon is named ypserv.
How NIS Works
No encryption
NIS does not encrypt data it transfers over the network—it transfers data as plaintext.
NIS domain
NIS makes a common set of information available to systems on a network. The network, referred to as an NIS domain, is characterized by each system having the same NIS domain name (different than a DNS domain name [page 1247]). Technically an NIS domain is a set of NIS maps (database files).
Master and slave servers
Each NIS domain must have exactly one master server; larger networks might have slave servers. Each slave server holds a copy of the NIS database from the master server. The need for slave servers is based on the size of the NIS domain and the reliability of the systems and network. A system can belong to only one NIS domain at a time.
When a client determines that a server is down or is not responding fast enough, it selects another server, as specified in the configuration file. If it cannot reach a server, the ypbind NIS client daemon terminates with an error.
nsswitch.conf
Whether a system uses NIS, DNS, local files, or a combination of these as the source of certain information, and in which order, is determined by the /etc/nsswitch.conf file (page 495). When it needs information from the NIS database, a client requests the information from the NIS server. For example, when a user attempts to log in, the client system might authenticate the user with username and password information from the NIS server.
You can configure nsswitch.conf to cause /etc/passwd to override NIS password information for the local system. When you do not export the root account to NIS (and you should not), this setup allows you to have a unique root password for each system.
Source files
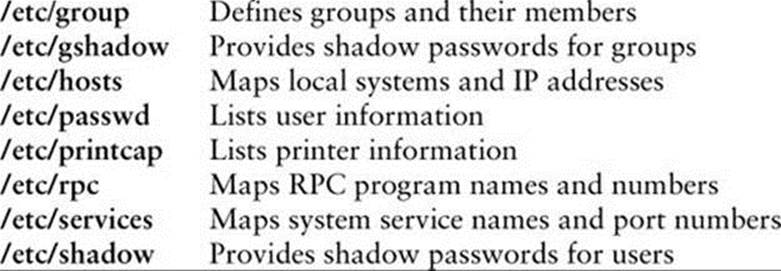
Under Fedora/RHEL, NIS derives the information it offers—such as usernames, passwords, and local system names and IP addresses—from local ASCII configuration files such as /etc/passwd and /etc/hosts. These files are called source files or master files. (Some administrators avoid confusion by using different files to hold local configuration information and NIS source information.) An NIS server can include information from one or more of the following source files:
The information that NIS offers is based on files that change from time to time. NIS is responsible for making the updated information available in a timely manner to all systems in the NIS domain.
NIS maps
Before NIS can store the information contained in a source file, it must be converted to a dbm (page 1246) format file called a map. Each map is indexed on one field (column). Records (rows) from a map can be retrieved by specifying a value from the indexed field. Some files generate two maps, each indexed on a different field. For example, the /etc/passwd file generates two maps: one indexed by username, the other indexed by UID. These maps are named passwd.byname and passwd.byuid, respectively.
Optional
NIS maps correspond to C library functions. The getpwnam() and getpwuid() functions obtain username and UID information, respectively, from /etc/passwd on non-NIS systems. On NIS systems, these functions place RPC calls to the NIS server in a process that is transparent to the application calling the function.
Map names
The names of the maps NIS uses correspond to the files in the /var/yp/nisdomainname directory on the master server, where nisdomainname is the name of the NIS domain. The examples in this chapter use the NIS domain named mgs:
$ ls /var/yp/mgs
group.bygid mail.aliases protocols.byname services.byname
group.byname netid.byname protocols.bynumber services.byservicename
hosts.byaddr passwd.byname rpc.byname ypservers
hosts.byname passwd.byuid rpc.bynumber
Map nicknames
To make it easier to refer to NIS maps, you can assign nicknames to them. The /var/yp/nicknames file on clients holds a list of commonly used nicknames:
$ cat /var/yp/nicknames
passwd passwd.byname
group group.byname
networks networks.byaddr
hosts hosts.byname
protocols protocols.bynumber
services services.byname
aliases mail.aliases
ethers ethers.byname
You can also use the command ypcat –x to display the list of nicknames. Each line in nicknames contains a nickname followed by whitespace and the name of the map corresponding to the nickname. You can add, remove, or modify nicknames by changing the nicknames file.
Displaying maps
The ypcat and ypmatch utilities display information from the NIS maps on the server. Using the nickname passwd, the following command, which you can run on any NIS client in the local domain, displays the information contained in the passwd.byname map:
$ ypcat passwd
sam:$6$ ... pjqI.:1000:1400:Sam the Great:/home/sam:/bin/bash
sls:$6$ ... whe00:1001:1001:Sam sls:/home/sls:/bin/bash
...
By default, NIS stores passwords only for users with UIDs greater than or equal to 500 (see MINUID on page 783). Thus ypcat does not display lines for root, bin, and other system entries. You can display password information for a single user with ypmatch:
$ ypmatch sam passwd
sam:$6$ ... pjqI.:1000:1400:Sam the Great:/home/sam:/bin/bash
You can retrieve the same information by filtering the output of ypcat through grep, but ypmatch is more efficient because it searches the map directly, using a single process. The ypmatch utility works on the key for the map only. To match members of the group or other fields not in a map, such as the GECOS (page 1251) field in passwd, you need to use ypcat and grep:
$ ypcat passwd | grep Great
sam:$6$ ... pjqI.:1000:1400:Sam the Great:/home/sam:/bin/bash
Terminology
This chapter uses the following definitions:
• NIS source files—The ASCII files that NIS obtains information from
• NIS maps—The dbm-format files created from NIS source files
• NIS database—The collection of NIS maps
More Information
Local
man pages: domainname, makedbm, netgroup, revnetgroup, ypbind, ypcat, ypinit, ypmatch, yppasswd, yppoll, yppush, ypset, ypserv, ypserv.conf, ypwhich, ypxfr, ypxfrd (Some of these are available only on a server or client.)
Web
www.linux-nis.org
NIS-HOWTO
Running an NIS Client
This section explains how to set up an NIS client on the local system.
Prerequisites
Install the following packages:
• ypbind
• yp-tools (installed automatically with ypbind)
• rpcbind (installed automatically with the system)
No server
If there is no NIS server for the NIS client to bind to when you start an NIS client or boot the system, the client spends several minutes trying to find a server and then fails.
Check rpcbind is running
A new Fedora/RHEL system boots with rpcbind installed and running. Use the systemctl status command to make sure the service is running.
# systemctl status rpcbind.service
Enable and start ypbind
After you have configured ypbind, run systemctl to cause the ypbind service to start each time the system enters multiuser mode and then start the ypbind service. This service will fail to start (sometimes after a long wait) if it cannot connect to an NIS server. Use the systemctl statuscommand to make sure the service is running or to display error messages if it fails to start.
# systemctl enable ypbind.service
# systemctl start ypbind.service
Notes
If there is no NIS server for the local system’s NIS domain, you need to set one up (page 779). If there is an NIS server, you need to know the name of the NIS domain the system belongs to and the name or IP address of one or more NIS servers for the NIS domain.
An NIS client can run on the same system as an NIS server.
SELinux
When SELinux is set to use a targeted policy, NIS is protected by SELinux. You can disable this protection if necessary. For more information refer to “Setting the Targeted Policy with system-config-selinux” on page 475.
Configuring an NIS Client
This section explains how to set up and start an NIS client.
/etc/sysconfig/network: Specifies the NIS Domain Name
Tip: A DNS domain name is different from an NIS domain name
The DNS domain name is used throughout the Internet to refer to a group of systems. DNS maps these names to IP addresses to enable systems to communicate with one another.
The NIS domain name is used strictly to identify systems that share an NIS server and is normally not seen or used by users and other programs. Although some administrators use one name as both a DNS domain name and an NIS domain name, this practice can degrade security.
Add the following line to the /etc/sysconfig/network file to specify the NIS domain name of the local system:
NISDOMAIN=nisdomainname
The nisdomainname is the name of the NIS domain the local system belongs to. The ypbind and ypserv services execute the network file and set the name of the system’s NIS domain. You can use the nisdomainname utility to set or view the NIS domain name, but setting it in this manner does not maintain the name when the system is rebooted:
# nisdomainname
nisdomainname: Local domain name not set
# nisdomainname mgs
# nisdomainname
mgs
Tip: To avoid confusion, use nisdomainname, not domainname
The domainname and nisdomainname utilities do the same thing: They display or set the system’s NIS domain name. Use nisdomainname to avoid confusion when you are also working with DNS domain names.
Tip: You must set the local system’s NIS domain name
If you do not set the local system’s NIS domain name, when you start ypbind, it logs an error and quits.
/etc/yp.conf: Specifies an NIS Server
Edit /etc/yp.conf to specify one or more NIS servers (masters and/or slaves). As explained by comments in the file, you can use one of three formats to specify each server:
domain nisdomain server server_name
domain nisdomain broadcast (do not use)
ypserver server_name
where nisdomain is the name of the NIS domain that the local (client) system belongs to and server_name is the hostname of the NIS server that the local system queries. It is best to specify server_name as an IP address or a hostname from /etc/hosts. If you specify a hostname that requires a DNS lookup and DNS is down, NIS will not find the server. The second format puts ypbind in broadcast mode and is less secure than the first and third formats because it exposes the system to rogue servers by broadcasting a request for a server to identify itself.
Following is a simple yp.conf file for a client in the mgs domain with a server at 192.168.206.181:
$ cat /etc/yp.conf
domain mgs server 192.168.206.181
You can use multiple lines to specify multiple servers for one or more domains. Specifying multiple servers for a single domain allows the system to change to another server when its current server is slow or down.
When you specify more than one NIS domain, you must set the system’s NIS domain name before starting ypbind so the client queries the proper server. Specifying the NIS domain name in /etc/sysconfig/network before starting the ypbind service takes care of this issue (page 774).
Start ypbind
The ypbind daemon is ypbind-mt renamed—that is, a newer, multithreaded version of the older ypbind daemon. Enable and start ypbind as explained on page 773.
Troubleshooting the Client
After starting ypbind, use nisdomainname to make sure the correct NIS domain name is set. Refer to page 774 if you need to set the NIS domain name. Next use ypwhich to check whether the system is set up to connect to the proper server; the name of this server is set in /etc/yp.conf(page 775):
$ ypwhich
plum
Use rpcinfo to make sure the NIS server is up and running (replace plum with the name of the server that ypwhich returned):
$ rpcinfo -u plum ypserv
program 100004 version 1 ready and waiting
program 100004 version 2 ready and waiting
After starting ypbind, check that it is registered with rpcbind:
$ rpcinfo -u localhost ypbind
program 100007 version 1 ready and waiting
program 100007 version 2 ready and waiting
If rpcinfo does not report that ypbind is ready and waiting, check that ypbind is running (message is from a Fedora system, REHL provides a different message):
$ systemctl status ypbind.service
ypbind.service - NIS/YP (Network Information Service) Clients to NIS Domain Binder
Loaded: loaded (/usr/lib/systemd/system/ypbind.service; enabled)
Active: active (running) since Tue 2013-06-25 11:14:33 PDT; 3min 3s ago
Process: 33952 ExecStartPost=/usr/libexec/ypbind-post-waitbind (code=exited, status=0/SUCCESS)
Process: 33943 ExecStartPre=/usr/sbin/setsebool allow_ypbind=1 (code=exited, status=0/SUCCESS)
Process: 33940 ExecStartPre=/usr/libexec/ypbind-pre-setdomain (code=exited, status=0/SUCCESS)
Main PID: 33947 (ypbind)
Status: "Processing requests..."
CGroup: name=systemd:/system/ypbind.service
+-33947 /usr/sbin/ypbind -n
Jun 25 11:14:32 guava systemd[1]: Starting NIS/YP Clients to NIS Domain Binder...
Jun 25 11:14:33 guava ypbind[33953]: Binding NIS service
Jun 25 11:14:33 guava ypbind[33957]: Binding took 0 seconds
Jun 25 11:14:33 guava ypbind[33961]: NIS domain: mgs, NIS server: plum
Jun 25 11:14:33 guava systemd[1]: Started NIS/YP Clients to NIS Domain Binder.
If NIS still does not work properly, use service to stop the ypbind daemon and then start it manually with debugging turned on:
# systemctl stop ypbind
# ypbind -debug
34003: parsing config file
34003: Trying entry: domain mgs server 192.168.206.181
34003: parsed domain 'mgs' server '192.168.206.181'
34003: add_server() domain: mgs, host: 192.168.206.181, slot: 0
34003: [Welcome to ypbind-mt, version 1.37.1]
34003: ping interval is 20 seconds
34003: rebind interval is 900 seconds
34005: NetworkManager is running.
34005: Network is available.
34005: Switch to online mode
34005: Going online, reloading config file.
34005: parsing config file
34005: Trying entry: domain mgs server 192.168.206.181
34005: parsed domain 'mgs' server '192.168.206.181'
34005: add_server() domain: mgs, host: 192.168.206.181, slot: 0
34005: ping host '192.168.206.181', domain 'mgs'
34005: Answer for domain 'mgs' from server '192.168.206.181'
34005: interface: org.freedesktop.DBus, object path: /org/freedesktop/DBus,
method: NameAcquired
34006: ping host '192.168.206.181', domain 'mgs'
34006: Entry for mgs unchanged, skipping writeout
34006: Answer for domain 'mgs' from server '192.168.206.181'
34006: Pinging all active servers.
34006: Pinging all active servers.
...
The –debug option keeps ypbind in the foreground and causes it to send error messages and debugging output to standard error. Use CONTROL-C to stop ypbind when it is running in the foreground.
yppasswd: Changes NIS Passwords
The yppasswd utility—not to be confused with the yppasswdd daemon (two d’s; page 785) that runs on the NIS server—replaces the functionality of passwd on clients when you use NIS for passwords. Where passwd changes password information in the /etc/shadow file on the local system, yppasswd changes password information in the /etc/shadow file on the NIS master server and in the NIS shadow.byname map. Optionally, yppasswd can also change user information in the /etc/passwd file and the passwd.byname map.
The yppasswd utility changes the way you log in on all systems in the NIS domain that use NIS to authenticate passwords. It cannot change root and system passwords; by default, NIS does not store passwords of users with UIDs less than 500. You have to use passwd to change these users’ passwords locally.
To use yppasswd, the yppasswdd daemon must be running on the NIS master server.
passwd Versus yppasswd
When a user who is authenticated using NIS passwords runs passwd to change her password, all appears to work properly, yet the user’s password is not changed: The user needs to use yppasswd. The root and system accounts, in contrast, must use passwd to change their passwords. A common solution to this problem is first to rename passwd—for example, to rootpasswd—and then to change its permissions so only a user working with root privileges can execute it.1 Second, create a link to yppasswd named passwd. You must work with root privileges when you make these changes.
1. The passwd utility has setuid permission with read and execute permissions for all users and read, write, and execute permissions for root. If, after changing its name and permissions, you want to restore its original name and permissions, first change its name and then give the command chmod 4755 /usr/bin/passwd. You must work with root privileges to make these changes.
# ls -l /usr/bin/passwd
-rwsr-xr-x. 1 root root 27856 06-21 17:51 /usr/bin/passwd
# mv /usr/bin/passwd /usr/bin/rootpasswd
# chmod 700 /usr/bin/rootpasswd
# ln -s /usr/bin/yppasswd /usr/bin/passwd
# ls -l /usr/bin/{yppasswd,passwd,rootpasswd}
lrwxrwxrwx. 1 root root 17 06-24 19:38 /usr/bin/passwd -> /usr/bin/yppasswd
-rwx------. 1 root root 27856 06-21 17:51 /usr/bin/rootpasswd
-rwxr-xr-x. 3 root root 24336 05-07 05:57 /usr/bin/yppasswd
With this setup, a nonroot user changing his password using passwd will run yppasswd, which is appropriate. If root or a system account user runs passwd (really yppasswd), yppasswd displays an error that reminds the administrator to run rootpasswd.
Modifying User Information
As long as the yppasswdd daemon is running on the NIS master server, a user can use the yppasswd utility from an NIS client to change her NIS password while a user running with root privileges can change any user’s password (except that of root or a system account). A user can also use yppasswd to change his login shell and GECOS (page 1251) information if the yppasswdd daemon is set up to permit these changes. Refer to “yppasswdd: The NIS Password Update Daemon” on page 785 for information on how to configure yppasswdd to permit users to change these values. Use the –p option with yppasswd to change the password, –f to change GECOS information, and –l to change the login shell:
$ yppasswd -f
Changing NIS account information for sam on plum.
Please enter password:
Changing full name for sam on plum.
To accept the default, simply press return. To enter an empty
field, type the word "none".
Name [Sam the Great]: Sam-in-Fact
Location []:
Office Phone []:
Home Phone []:
The GECOS information has been changed on plum.
$ ypmatch sam passwd
sam:$6$ ... pjqI.:1000:1400:Sam-in-Fact:/home/sam:/bin/bash
If yppasswd does not work and the server system is running a firewall, refer to “Firewall” on page 780.
Adding and Removing Users
There are several ways to add and remove users from the NIS passwd map. The simplest approach is to keep the /etc/passwd file on the NIS master server synchronized with the passwd map. You can keep these files synchronized by first making changes to the passwd file using standard tools such as useradd and userdel, or their graphical counterparts, and then running ypinit (page 784) to update the map.
Setting Up an NIS Server
This section explains how to install and configure an NIS server.
Prerequisites
Decide on an NIS domain name (page 774) and install the following packages:
• ypserv
• rpcbind (installed by default)
Check rpcbind is running
A new Fedora/RHEL system boots with rpcbind installed and running. Use the systemctl status command to make sure the service is running.
# systemctl status rpcbind.service
After modifying rpcbind configuration files, give the second command again, replacing status with restart to cause rpcbind to reread those files.
Enable and start ypserv
Run systemctl to cause the ypserv service to start each time the system enters multiuser mode and then start the ypserv service. Use the systemctl status command to make sure the service is running.
# systemctl enable ypserv.service
# systemctl start ypserv.service
After modifying ypserv configuration files, give the second command again, replacing start with restart to cause ypserv to reread those files.
Enable and start ypxfrd
The ypxfrd map server service speeds up the process of copying large NIS databases from the master server to slaves. It allows slaves to copy the maps, thereby avoiding the need for each slave to copy the raw data and then compile the maps. When an NIS slave receives a message from the server saying there is a new map, it starts ypxfr, which reads the map from the server.
On the master server only, run systemctl to cause the ypxfrd service to start each time the system enters multiuser mode and then start the ypxfrd service. Use the systemctl status command to make sure the service is running.
# systemctl enable ypxfrd.service
# systemctl start ypxfrd.service
After modifying ypxfrd configuration files, give the second command again, replacing start with restart to cause ypxfrd to reread those files.
Enable and start yppasswdd
In addition, on the master server only, run systemctl to cause the NIS password update service, yppasswdd (page 785), to start each time the system enters multiuser mode and then start the yppasswdd service. This service will not start if the NIS domain name has not been set (page 774). Use the systemctl status command to make sure the service is running.
# systemctl enable yppasswdd.service
# systemctl start yppasswdd.service
After modifying yppasswdd configuration files, give the second command again, replacing start with restart to cause yppasswdd to reread those files. A message saying can not bind UDP usually indicates SELinux is blocking the attempt to bind.
Notes
An NIS client can run on the same system as an NIS server.
There must be only one master server for each domain.
You can run multiple NIS domain servers (for different domains) on a single system.
An NIS server serves the NIS domains listed in /var/yp. For a more secure system, remove the maps directories from /var/yp when disabling an NIS server.
SELinux
When SELinux is set to use a targeted policy, NIS is protected by SELinux. You can disable this protection if necessary. For more information refer to “Setting the Targeted Policy with system-config-selinux” on page 475.
Firewall
The NIS server (ypserv), the map server daemon (ypxfrd), and the NIS password daemon (yppasswdd) use rpcbind (page 483) to choose which ports they accept queries on. The rpcbind server uses port 111 and hands out a random unused port below 1024 when a service, such as ypserv, requests a port. Having ypserv, ypxfrd, and yppasswdd use random port numbers makes it difficult to set up a firewall on an NIS server. You can specify ports by editing the /etc/sysconfig/network file and adding the lines shown following (choose any unused ports less than 1024; see page786 for instructions on specifying a port for yppasswdd):
# cat /etc/sysconfig/network
...
YPSERV_ARGS='--port 114'
YPXFRD_ARGS='--port 116'
If an NIS server system is running a firewall or is behind a firewall, you need to open these ports. Follow the instructions on page 908 to use firewall-cmd to open the ports you specified (both TCP and UDP) in the Ports tab. You must also open TCP and UDP ports 111 for rpcbind. Be sure to change both the Runtime and Permanent Configurations.
Configuring the Server
This section explains how to configure an NIS server.
Specify the System’s NIS Domain Name
Specify the system’s NIS domain name as explained on page 774.
/etc/ypserv.conf: Configures the NIS Server
The /etc/ypserv.sconf file, which holds NIS server configuration information, specifies options and access rules. Options specify server options and have the following format:
option: value
Options
Following is a list of options and their default values:
files
Specifies the maximum number of map files that ypserv caches. Set to 0 to turn off caching. The default is 30.
trusted_master
On a slave server, the name/IP address of the master server from which the slave accepts new maps. The default is no master server, meaning no new maps are accepted.
xfer_check_port
YES (default) requires the master server to run on a privileged port (page 1267). NO allows the master server to run on any port.
Access Rules
Access rules, which specify which hosts and domains can access which maps, have the following format:
host:domain:map:security
where host and domain specify the IP address and NIS domain this rule applies to; map is the name of the map this rule applies to; and security is either none (always allow access), port (allow access from a privileged port), or deny (never allow access).
The following lines appear in the ypserv.conf file supplied with Fedora/RHEL:
$ cat /etc/ypserv.conf
...
# Not everybody should see the shadow passwords, not secure, since
# under MSDOG everbody is root and can access ports < 1024 !!!
* : * : shadow.byname : port
* : * : passwd.adjunct.byname : port
...
# * : * : * : none
These lines restrict the shadow.byname and passwd.adjunct.byname (the passwd map with shadow [asterisk] entries) maps to access from ports numbered less than 1024. However, anyone using a DOS or early Windows system on the network can read the maps because they can access ports numbered less than 1024. If you uncomment it, the last line allows access to the other maps from any port on any host.
The following example describes a LAN with some addresses you want to grant NIS access from and some that you do not; perhaps you have a wireless segment or some public network connections you do not want to expose to NIS. You can list the systems or an IP subnet that you want to grant access to in ypserv.conf. Anyone logging in on another IP address will then be denied NIS services. The following line from ypserv.conf grants access to anyone logging in from an IP address in the range of 192.168.0.1 to 192.168.0.255 (specified as 192.168.0.1 with a network mask [page 483] of /24):
$ cat /etc/ypserv.conf
...
192.168.0.1/24 : * : * : none
/var/yp/securenets: Enhances Security
To enhance system security, you can create the /var/yp/securenets file, which prevents unauthorized systems from sending RPC requests to the NIS server and retrieving NIS maps. Notably securenets prevents unauthorized users from retrieving the shadow map, which contains encrypted passwords. When securenets does not exist or is empty, an NIS server accepts requests from any system.
Each line of securenets lists a netmask and an IP address. NIS accepts requests from systems whose IP addresses are specified in securenets; it ignores and logs requests from other addresses. You must include the (local) server system as localhost (127.0.0.1) in securenets. A simplesecurenets file follows:
$ cat /var/yp/securenets
# you must accept requests from localhost
255.255.255.255 127.0.0.1
#
# accept requests from IP addresses 192.168.0.1 - 192.168.0.62
255.255.255.192 192.168.0.0
#
# accept requests from IP addresses starting with 192.168.14
255.255.255.0 192.168.14.0
/var/yp/Makefile: Creates Maps
The make utility, which is controlled by /var/yp/Makefile, uses makedbm to create the NIS maps that hold the information distributed by NIS. When you run ypinit (page 784) on the master server, ypinit calls make: You do not need to run make manually.
Edit /var/yp/Makefile to set options and specify which maps to create. The following sections discuss /var/yp/Makefile in more detail.
Variables
Following is a list of variables you can set in /var/yp/Makefile. The values following Fedora/RHEL are the values set in the file distributed by Fedora/RHEL.
B
Do not change.
Fedora/RHEL: not set
NOPUSH
Specifies that ypserv is not to copy (push) maps to slave servers. Set to TRUE if you do not have any slave NIS servers; set to FALSE to cause NIS to copy maps to slave servers.
Fedora/RHEL: TRUE
YPPUSH_ARGS
Specifies arguments to yppush to use when it copies maps to slave servers.
MINUID, MINGID
Specify the lowest UID and GID numbers, respectively, to include in NIS maps. In the /etc/passwd and /etc/group files, lower ID numbers belong to root and system accounts and groups. To enhance security, NIS does not distribute password and group information about these users and groups. Set MINUID to the lowest UID number you want to include in the NIS maps and set MINGID to the lowest GID number you want to include.
Fedora/RHEL: 500/500
NFSNOBODYUID, NFSNOBODYGID
Specify the UID and GID, respectively, of the user named nfsnobody. NIS does not export values for this user. Set to 0 to export maps for nfsnobody.
Fedora/RHEL: 65534/65534
MERGE_PASSWD, MERGE_GROUP
When set to TRUE, merge the /etc/shadow and /etc/passwd files in the passwd map and the /etc/gshadow and /etc/group files in the group map, enabling shadow user passwords and group passwords.
Fedora/RHEL: TRUE/TRUE
File Locations
The next sections of /var/yp/Makefile specify standard file locations; you do not normally need to change these entries. This part of the makefile is broken into the following groups:
Commands—Locates gawk and make and sets a value for umask (page 469)
Source directories—Locates directories that contain NIS source files
NIS source files—Locates NIS source files used to build the NIS database
Servers—Locates the file that lists NIS servers
The all: Target
The all: target in /var/yp/Makefile specifies the maps that make is to build for NIS:
all: passwd group hosts rpc services netid protocols mail \
# netgrp shadow publickey networks ethers bootparams printcap \
# amd.home auto.master auto.home auto.local passwd.adjunct \
# timezone locale netmasks
The first line of the all: target lists the maps that make builds by default. This line starts with the word all, followed by a colon (:) and a TAB. Because each of the first three lines of the all: target ends with a backslash, each of the four physical lines in the all: target is part of one long logical line. The last three physical lines are commented out. Uncomment lines and delete or move map names until the list matches your needs.
As your needs change, you can edit the all: target in Makefile and run make in the /var/yp directory to modify the list of maps distributed by NIS.
Start the Servers
Start or restart the master server (ypserv) and then the slave servers after completing the preceding steps. See page 779 for details.
ypinit: Builds or Imports the Maps
The ypinit utility builds or imports and then installs the NIS database. On the master server, ypinit gathers information from the passwd, group, hosts, networks, services, protocols, netgroup, and rpc files in /etc and builds the database. On a slave server, ypinit copies the database from the master server.
You must run ypinit by giving its absolute pathname (/usr/lib64/yp/ypinit or /usr/lib/yp/ypinit). Use the –m option to create the domain subdirectory under /var/yp and build the maps that go in it on the master server; use the –s master option on slave servers to import maps from the master server named master. In the following example, ypinit asks for the name of each of the slave servers; it already has the name of the master server because this command is run on the system running the master server (plum in the example). Terminate the list with CONTROL-D on a line by itself. After you respond to the query about the list of servers being correct, ypinit builds the ypservers map and calls make with /var/yp/Makefile, which builds the maps specified in Makefile. On 32-bit systems use /usr/lib/yp/ypinit –m in place of the command in the example.
# /usr/lib64/yp/ypinit -m
At this point, we have to construct a list of the hosts which will run NIS
servers. plum is in the list of NIS server hosts. Please continue to add
the names for the other hosts, one per line. When you are done with the
list, type a <control D>.
next host to add: plum
next host to add: CONTROL-D
The current list of NIS servers looks like this:
plum
Is this correct? [y/n: y] y
We need a few minutes to build the databases...
Building /var/yp/mgs/ypservers...
Running /var/yp/Makefile...
gmake[1]: Entering directory `/var/yp/mgs'
Updating passwd.byname...
Updating passwd.byuid...
Updating group.byname...
Updating group.bygid...
Updating hosts.byname...
Updating hosts.byaddr...
Updating rpc.byname...
Updating rpc.bynumber...
Updating services.byname...
Updating services.byservicename...
Updating netid.byname...
Updating protocols.bynumber...
Updating protocols.byname...
Updating mail.aliases...
gmake[1]: Leaving directory '/var/yp/mgs'
plum has been set up as a NIS master server.
Now you can run ypinit -s plum on all slave server.
After running ypinit, you must restart the server (page 779).
Troubleshooting the Server
This section suggests some ways to troubleshoot an NIS server. See “Troubleshooting the Client” on page 776 for techniques you can use to troubleshoot an NIS client.
From the server, check that ypserv is connected to rpcbind:
$ rpcinfo -p | grep ypserv
100004 2 udp 114 ypserv
100004 1 udp 114 ypserv
100004 2 tcp 114 ypserv
100004 1 tcp 114 ypserv
Again from the server system, make sure the NIS server is up and running:
$ rpcinfo -u localhost ypserv
program 100004 version 1 ready and waiting
program 100004 version 2 ready and waiting
If the server is not working properly, use systemctl to stop the NIS server. Then start ypserv manually in the foreground with debugging turned on:
# systemctl stop ypserv.service
# ypserv --debug
[ypserv (ypserv) 2.31]
WARNING: no securenets file found!
ypserv.conf: files: 30
ypserv.conf: xfr_check_port: 1
ypserv.conf: 0.0.0.0/0.0.0.0:*:shadow.byname:2
ypserv.conf: 0.0.0.0/0.0.0.0:*:passwd.adjunct.byname:2
...
The ––debug option keeps ypserv in the foreground and causes it to send error messages and debugging output to standard error. Press CONTROL-C to stop ypserv when it is running in the foreground.
yppasswdd: The NIS Password Update Daemon
The NIS password update daemon, yppasswdd, runs on the master server only; it is not necessary to run it on slave servers. If the master server is down and you try to change your password from a client, yppasswd displays an error message. When a user runs yppasswd (page 777) on a client, this utility exchanges information with the yppasswdd daemon to update the user’s password (and optionally other) information in the NIS shadow (and optionally passwd) map and in the /etc/shadow (and optionally /etc/passwd) file on the NIS master server. Password change requests are sent to syslogd (page 620).
If the server system is running a firewall, open a port for yppasswdd. Refer to “Firewall” on page 780.
Start yppasswdd
Start yppasswdd as explained on page 779.
Allow GECOS and Login Shell Modification
As shipped, yppasswdd does not allow users to change their login shell or GECOS (page 1251) information. You can change these settings with options on the command line when you start yppasswdd or, more conveniently, by modifying the /etc/sysconfig/yppasswdd configuration file. The –e chfn option to yppasswdd allows users to change their GECOS information; –e chsh allows users to change their login shell. When you set the options in /etc/sysconfig/yppasswdd, these values are set automatically each time yppasswdd is run. The following example causesyppasswdd to accept calls on port 112 and allows users to change both their GECOS information and their login shell:
# cat /etc/sysconfig/yppasswdd
...
YPPASSWDD_ARGS='--port 112 -e chfn -e chsh'
![]() LDAP
LDAP
LDAP (Lightweight Directory Access Protocol) is an alternative to the older X.500 DAP (Directory Access Protocol). It runs over TCP/IP and is network aware, standards-based, and available on many platforms. A client queries an LDAP server, specifying the data it wants. For example, a query could ask for the first names and email addresses of all people with a last name of Smith who live in San Francisco.
Directory
Because LDAP is designed to work with data that does not change frequently, the server holds a search and read optimized database, called a directory. LDAP clients query and update this directory.
In addition to name and address information, an LDAP directory can hold lists of network services. Or, other services can use it for authentication. LDAP is appropriate for any kind of relatively static structured information where fast lookups are required. Many types of clients are set up to communicate with LDAP servers, including LDAP-specific clients (page 795), email clients, and authentication servers.
OpenLDAP
Fedora/RHEL provides the OpenLDAP (www.openldap.org) implementation of LDAP. OpenLDAP uses the Sleepycat Berkeley Database (Berkeley DB, or BDB, now owned by Oracle), which meets the needs of an LDAP database. It supports distributed architecture, replication, and encryption. BDB differs from a relational database (RDBMS) in that instead of holding information in rows and columns, BDB implements an LDAP directory as a hierarchical data structure that groups information with similar attributes. This chapter describes OpenLDAP.
In addition to BDB, Fedora/RHEL supplies HDB (Hash Database), which is based on BDB but which organizes data in a true hierarchical fashion. HDB provides faster writes than does BDB. It also supports subtree renaming, which allows subtrees to be moved efficiently within a database.
Dynamic configuration
Before the release of version 2.3, OpenLDAP had to be statically configured. This setup was problematic for users with large databases: Each time the configuration was modified, the LDAP daemon had to be restarted, which took a long time. OpenLDAP version 2.3 introduced run-time (dynamic or online) configuration. This setup allows the configuration to be modified without restarting the LDAP daemon. Although the current release (2.4) still allows static configuration, the future points toward dynamic configuration, which is what this chapter describes.
Fedora/RHEL Directory Servers
In addition to OpenLDAP, Fedora provides the 389 Directory Server (389-ds package) and RHEL provides the Red Hat Directory Server, both of which are LDAP servers. For more information see the references on the next page.
Entries and attributes
An entry (a node in the LDAP directory hierarchy, or a container) is the basic unit of information in an LDAP directory. Each entry holds one or more attributes. Each attribute has a name (an attribute type or description) and one or more values. Attribute names come from a standard schema that is held in files in the /etc/openldap/schema directory. This schema is standard across many implementations of LDAP, enabling LDAP clients to obtain data from many LDAP servers. Although it is not usually necessary or advisable, you can augment or modify the standard schema.
DN and RDN
A DN (Distinguished Name) uniquely identifies each entry in an LDAP directory. A DN comprises an RDN (Relative Distinguished Name), which is constructed from one or more attributes in the entry, followed by the DN of the parent entry. Because a DN can change (e.g., a woman might change her last name), and because a consistent, unique identifier is sometimes required, the server assigns a UUID (page 1280) to each entry.
DSE and DC
The DSE (DSA-Specific Entry) is the root (also called the base, suffix, or top-level) entry in an LDAP directory. (DSA stands for Directory System Agent.) The DSE is defined in the file named olcDatabase={3}hdb.ldif. Frequently, the DSE and the domain name are the same. LDAP defines a domain name in terms of its component parts. The following line defines the DSE comprising the DC brillserve and the DC com:
# grep brillserve /etc/openldap/slapd.d/cn=config/olcDatabase={3}hdb.ldif
olcSuffix: dc=brillserve,dc=com
...
LDIF and CN
The LDAP directory specified by the example DSE could contain the following entry, which is specified in LDIF (LDAP Data Interchange Format; see the ldif man page for more information):
dn: cn=Sam the Great,dc=brillserve,dc=com
cn: Sam the Great
cn: the great
objectClass: inetOrgPerson
mail: sam@brillserve.com
givenName: Sam
sn: the Great
displayName: Sam the Great
telephoneNumber: 888 888 8888
homePhone: 111 111 1111
initials: SLS
Each line except the first specifies an attribute. The word on each line preceding the colon is the attribute name. Following the colon and a SPACE is the attribute value. The first line in this example specifies the DN of the entry. The attribute value used in the RDN is a CN (Common Name) from the entry: Sam the Great. This second-level entry is a child of the top-level entry; thus the DN of the parent entry is the DN of the top-level entry (dc=brillserve,dc=com). You can uniquely identify this entry by its DN: cn=Sam the Great,dc=brillserve,dc=com.
Because this entry defines two CNs, a search for Sam the Great or the Great will return this entry. This entry also defines a given name, a surname (sn), an email address (mail), and other attributes.
objectClass attribute
Entries inherit object class attributes from their parents. In addition, each entry must have at least one objectClass attribute. Each objectClass value must be a class defined in the schema. The schema specifies both mandatory and optional (allowed) attributes for an object class. For example, the following entry in the schema defines the object class named person. The MUST and MAY lines specify which attributes the person object class requires (sn [surname] and cn; attribute names are separated by a dollar sign) and which attributes are optional (userPassword,telephoneNumber, seeAlso, and description).
$ cat /etc/openldap/schema/core.schema
...
objectclass ( 2.5.6.6 NAME 'person'
DESC 'RFC2256: a person'
SUP top STRUCTURAL
MUST ( sn $ cn )
MAY ( userPassword $ telephoneNumber $ seeAlso $ description ) )
...
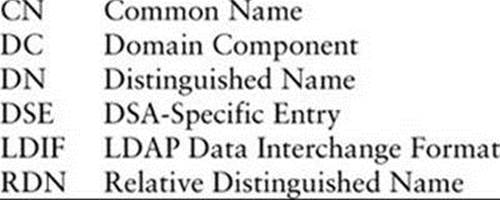
Abbreviations
The following list summarizes the abbreviations covered in this section.
More Information
Local
man pages: ldap.conf, ldapmodify, ldapsearch, ldif, slapd, slapd.conf, slappasswd
Web
LDAP home page: www.openldap.org
Administrator’s Guide: www.openldap.org/doc/admin24
389 Directory Server home page: directory.fedoraproject.org
Red Hat Directory Server manuals: access.redhat.com/site/documentation/Red_Hat_Directory_Server (these manuals apply to both the Fedora and Red Hat Directory Servers)
OpenLDAP Faq-O-Matic: www.openldap.org/faq
book: www.zytrax.com/books/ldap
gq: sourceforge.net/projects/gqclient
HOWTO
LDAP Linux HOWTO
Setting Up an LDAP Server
This section explains how to set up an LDAP server.
Prerequisites
Install the following packages:
• openldap-clients
• openldap-servers
Enable and start slapd
Run systemctl to cause the LDAP daemon, slapd (stand-alone LDAP daemon—the abbreviation does not quite work), to start each time the system enters multiuser mode and then start the slapd service. Use the systemctl status command to make sure the service is running. Do not confuseldap and slapd in the names of utilities, services, and scripts.
# systemctl enable slapd.service
# systemctl start slapd.service
After modifying slapd configuration files, give the second command again, replacing start with restart to cause slapd to reread those files.
Loading the internal schema
Fedora/RHEL does not load the internal LDAP schema when you install the openldap-servers package. You must perform this task manually before you can create a database. Working with root privileges, give the following command to load the schema. This command uses ldapadd to process each file in the /etc/openldap/schema directory that has a filename extension of .ldif. It uses an interactive for...in control structure (page 995).
# for file in /etc/openldap/schema/*.ldif
> do
> ldapadd -Y EXTERNAL -H ldapi:/// -f $file
> done
SASL/EXTERNAL authentication started
SASL username: gidNumber=0+uidNumber=0,cn=peercred,cn=external,cn=auth
SASL SSF: 0
adding new entry "cn=collective,cn=schema,cn=config"
SASL/EXTERNAL authentication started
SASL username: gidNumber=0+uidNumber=0,cn=peercred,cn=external,cn=auth
SASL SSF: 0
adding new entry "cn=corba,cn=schema,cn=config"
...
Notes
Downloading example files
You can download the files necessary to set up and run the LDAP server described in this section from www.sobell.com/RH7/code/chapter_21.
Firewall
A slapd LDAP server normally uses TCP port 389, which is not encrypted. If you are using LDAP for authentication, use LDAP over SSL on port 636. If the server is running a firewall or is behind a firewall, you need to open one of these ports. Give the following commands to open port 389 each time the system boots (permanently) and on the running system; see page 906 for information on firewall-cmd. Replace 389 with 636 to open port 636 instead of 389.
$ su -c 'firewall-cmd --add-port=389/tcp'
$ su -c 'firewall-cmd --permanent --add-port=389/tcp'
Step-by-Step Setup
This section lists the steps involved in setting up an LDAP server at the brillserve.com domain. When you set up an LDAP server, substitute the domain name of the server you are setting up for brillserve.com in the examples. The example in this section is quite simple; you will probably need different entries in the directory you set up.
To experiment with and learn about LDAP, set up and run locally the example server described in this section. Although the example uses brillserve.com, when working from the server system you can refer to the LDAP server as localhost.
Configure the Server
Load the internal LDAP schema as described on the previous page.
Next, set up an LDAP database, the brillserve DC, and the lpadmin CN. You can download the db.ldif file as explained under “Downloading example files” (previous page).
$ cat db.ldif
dn: olcDatabase=hdb,cn=config
objectClass: olcDatabaseConfig
objectClass: olcHdbConfig
olcDatabase: hdb
olcDbDirectory: /var/lib/ldap
olcAccess: {0}to attrs=userPassword,shadowLastChange by self write by anonymous
auth by dn="cn=ldapadmin,dc=brillserve,dc=com" write by * none
olcAccess: {1}to dn.base="" by * read
olcAccess: {2}to * by self write by dn="cn=ldapadmin,dc=brillserve,dc=com" write
by * read olcLastMod: TRUE
olcDbCheckpoint: 512 30
olcDbConfig: {0}set_cachesize 0 2097152 0
olcDbConfig: {1}set_lk_max_objects 1500
olcDbConfig: {2}set_lk_max_locks 1500
olcDbConfig: {3}set_lk_max_lockers 1500
olcDbIndex: objectClass eq
#
# Set up brillserve admin with password
olcSuffix: dc=brillserve,dc=com
olcRootDN: cn=ldapadmin,dc=brillserve,dc=com
olcRootPW: porcupine
The first part of the db.ldif file sets up the LDAP database. The olcSuffix line (third from last in db.ldif) defines the DSE (page 787). The olcRootDN line establishes the user (the LDAP administrator) who can read any information from and write any information to the LDAP directory. The value on this line is the DN for this user. The RDN is the name of the LDAP administrator; the DN includes the DN of the parent node (the DSE as specified on the olcSuffix line). In this example, the name of this user is ldapadmin (specified on the next to last line of db.ldif). This user is an LDAP user and does not need to exist as a user on the system (i.e., the user does not need to be listed in /etc/passwd). The olcRootPW (last) line sets up a password for the LDAP administrator. This example sets up porcupine as a cleartext password; in a real-world setup it is more secure to use an encrypted password (explained shortly).
The following command, run with root privileges, uses ldapadd to add the entries in db.ldif to the database.
$ su -c 'ldapadd -Y EXTERNAL -H ldapi:/// -f db.ldif'
Password:
SASL/EXTERNAL authentication started
SASL username: gidNumber=0+uidNumber=0,cn=peercred,cn=external,cn=auth
SASL SSF: 0
adding new entry "olcDatabase=hdb,cn=config"
If you will be administrating LDAP over a network, use an encrypted password. First use slappasswd to encrypt a password:
# slappasswd
New password:
Re-enter new password:
{SSHA}7h060/qgeUrXl/Tsqy8OlTbGYBOXdc/+
Then copy the output of slappasswd to a new olcRootPW line in db.ldif:
olcRootPW: {SSHA}7h060/qgeUrXl/Tsqy8OlTbGYBOXdc/+
Start and Test the Server
Start the slapd daemon as explained on page 789. Then test the server with the following query:
$ ldapsearch -x -s base namingContexts
# extended LDIF
#
# LDAPv3
# base <> (default) with scope baseObject
# filter: (objectclass=*)
# requesting: namingContexts
#
#
dn:
namingContexts: dc=my-domain,dc=com
namingContexts: dc=brillserve,dc=com
# search result
search: 2
result: 0 Success
# numResponses: 2
# numEntries: 1
The –x on the command line specifies simple authentication, –s base specifies the scope of the search as the base object, and namingContexts is the attribute you are searching for. The output of this command should look similar to that shown in the preceding example. The namingContextsreturned by the search should be the same as the DSE you specified when you configured the server. The dc=my-domain,dc=com entry is a DSE that the server package sets up.
Add Entries to the Directory
You can use many tools, both graphical and textual, to add information to and query an LDAP directory. This section explains how to use the ldapmodify command-line utility to set up an employee LDAP directory. See page 795 for descriptions of other tools.
When you specify the following file on an ldapmodify command line, ldapmodify adds a second-level entry (one below the DSE entry) to the directory:
$ cat AA.ldif
dn: dc=brillserve,dc=com
changetype: add
objectClass: dcObject
objectClass: organization
dc: brillserve
organizationName: ZBrill Associates Inc.
description: root
The first line of AA.ldif specifies the root DN for the entry you are adding. The changetype instruction tells ldapmodify to add the entry to the directory. You can omit this instruction if you use the –a option on the ldapmodify command line or if you use the ldapadd utility in place ofldapmodify. The objectClass lines specify the object classes this entry belongs to. The line that starts with dc specifies the DC (domain component). The organizationName specifies the name of the organization this entry is part of while the description describes the entry. You can put as many entries in a file as you like, but each must be separated from the next by a blank line. For clarity, the examples in this section show one entry per file.
The following command modifies the LDAP directory based on the AA.ldif file. The ldif filename extension is commonly used but is not required for files holding LDIF entries.
$ ldapmodify -xD "cn=ldapadmin,dc=brillserve,dc=com" -w porcupine -f AA.ldif
adding new entry "dc=brillserve,dc=com"
The –x option causes the server to use simple authentication. The argument following –D specifies the DN of the LDAP administrator of the directory the command is to work with (specified in db.com on page 790). By specifying this user, this argument also specifies the DSE of the LDAP directory. (The DN of the parent of the LDAP administrator’s entry specifies the DSE.) The argument following –w is the password for the LDAP administrator. For better security, use –W to cause ldapmodify to prompt for this password. The name of the input file follows the –f option. Theldapmodify utility reports the DN of the new entry.
The ldapsearch utility displays all entries in the LDAP directory in LDIF format. The –LLL option causes ldapsearch to display a minimal amount of information; use fewer Ls to display more information. After executing the preceding command, there is one entry:
$ ldapsearch -x -LLL -b dc=brillserve,dc=com
dn: dc=brillserve,dc=com
objectClass: dcObject
objectClass: organization
dc: brillserve
o: ZBrill Associates Inc.
description: root
The o attribute name is an abbreviation for organizationName.
The next file adds to the LDAP directory the object class organizationalUnit named employees (ou=employees). The DN is ou=employees followed by the DSE:
$ cat BB.ldif
dn: ou=employees,dc=brillserve,dc=com
changetype: add
objectClass: organizationalUnit
ou: employees
$ ldapmodify -xD "cn=ldapadmin,dc=brillserve,dc=com" -w porcupine -f BB.ldif
adding new entry "ou=employees,dc=brillserve,dc=com"
With this object class in place, you can add employees to the LDAP directory. The following file adds an employee:
$ cat CC.ldif
dn: cn=Zach Brill,ou=employees,dc=brillserve,dc=com
changetype: add
cn: Zach Brill
cn: brillserve
objectClass: inetOrgPerson
mail: zbrill@brillserve.com
givenName: Zach
surname: Brill
displayName: Zach Brill
telephoneNumber: 999 999 9999
homePhone: 000 000 0000
initials: ZCB
$ ldapmodify -xD "cn=ldapadmin,dc=brillserve,dc=com" -w porcupine -f CC.ldif
adding new entry "cn=Zach Brill,ou=employees,dc=brillserve,dc=com"
Now ldapsearch shows the employee you just added:
$ ldapsearch -x -LLL -b dc=brillserve,dc=com
dn: dc=brillserve,dc=com
objectClass: dcObject
...
dn: cn=Zach Brill,ou=employees,dc=brillserve,dc=com
cn: Zach Brill
cn: brillserve
objectClass: inetOrgPerson
mail: zbrill@brillserve.com
givenName: Zach
sn: Brill
displayName: Zach Brill
telephoneNumber: 999 999 9999
homePhone: 000 000 0000
initials: ZCB
The DN shows that the new employee is at the third level of the directory structure: The first level is dc=brillserve,dc=com; ou=employees,dc=brillserve,dc=com is at the second level; and cn=Zach Brill,ou=employees,dc=brillserve,dc=com, the employee, is at the third level.
The following example adds another employee at the third level:
$ cat DD.ldif
dn: cn=Sam the Great,ou=employees,dc=brillserve,dc=com
changetype: add
cn: Sam the Great
cn: the great
objectClass: inetOrgPerson
mail: sam@brillserve.com
givenName: Sam
surname: the Great
displayName: Sam the Great
telephoneNumber: 888 888 8888
homePhone: 111 111 1111
initials: SLS
$ ldapmodify -xD "cn=ldapadmin,dc=brillserve,dc=com" -w porcupine -f DD.ldif
adding new entry "cn=Sam the Great,ou=employees,dc=brillserve,dc=com"
The next example uses the ldapmodify modify instruction to replace the mail attribute value and add a title attribute for the employee named Sam the Great. The hyphen on a line by itself separates multiple modifications in a single file. Because the file specifies Sam’s DN, the server knows which entry to modify.
$ cat EE.ldif
dn: cn=Sam the Great,ou=employees,dc=brillserve,dc=com
changetype: modify
replace: mail
mail: sls@brillserve.com
-
add: title
title: CTO
$ ldapmodify -xD "cn=ldapadmin,dc=brillserve,dc=com" -w porcupine -f EE.ldif
modifying entry "cn=Sam the Great,ou=employees,dc=brillserve,dc=com"
You can use ldapsearch to verify the change. The final example deletes Sam from the LDAP directory:
$ cat FF.ldif
dn: cn=Sam the Great,ou=employees,dc=brillserve,dc=com
changetype: delete
$ ldapmodify -xD "cn=ldapadmin,dc=brillserve,dc=com" -w porcupine -f FF.ldif
deleting entry "cn=Sam the Great,ou=employees,dc=brillserve,dc=com"
Tools for Working with LDAP
You can use a variety of tools to work with LDAP. For example, most email clients are able to retrieve data from an LDAP database.
Evolution Mail
This section explains how to use Evolution (Mail) to retrieve data from the example LDAP database created earlier. Evolution must be configured on the local system before you can follow the example in this section. If you just want to experiment with Evolution, you can set it up with an email address such as user@localhost. If you are running KDE, you can use KAddressBook, which is integrated into many KDE tools, including Kontact.
Open the Mail-Evolution window by giving the command evolution from a terminal emulator or an Enter a Command window (ALT-F2). To query an LDAP database, select menubar: File![]() New
New![]() Address Book. Evolution displays a small New Address Book window. Select On LDAP Servers from the drop-down list labeled Type. Evolution displays the Connecting to LDAP tab of the New Address Book window (Figure 21-1).
Address Book. Evolution displays a small New Address Book window. Select On LDAP Servers from the drop-down list labeled Type. Evolution displays the Connecting to LDAP tab of the New Address Book window (Figure 21-1).
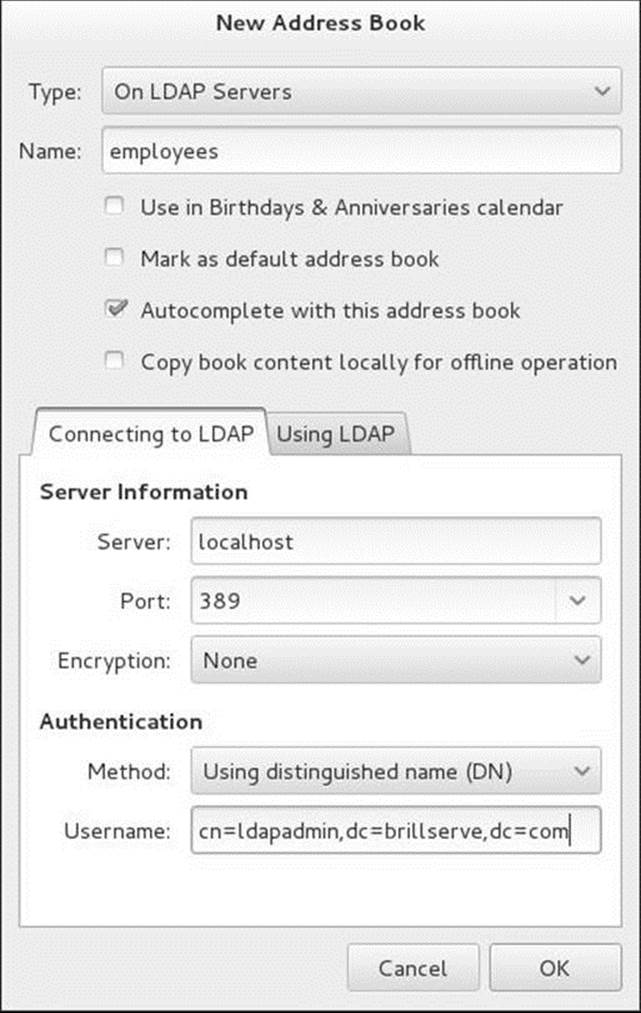
Figure 21-1 The New Address Book window, Connecting to LDAP tab
Connecting to LDAP tab
On LDAP Servers appears in the drop-down list labeled Type. Enter the name Evolution Mail will use to refer to this LDAP directory in the text box labeled Name; the example uses employees. Enter the FQDN of the LDAP server in the text box labeled Server. If you are experimenting on the local system, enter localhost in this box. If appropriate, change the value in the text box labeled Port. To follow the example in this chapter, select None from the drop-down list labeled Encryption.
In the section labeled Authentication, select Using distinguished name (DN) from the drop-down list labeled Method. Enter the DN of the LDAP administrator in the text box labeled Username (the example uses cn=ldapadmin,dc=brillserve,dc=com).
Using LDAP tab
Next, click the tab labeled Using LDAP (Figure 21-2). Click Find Possible Search Bases. If all is working properly, Evolution will display an entry in the drop-down list labeled Search Base. Select the DN of the directory you want to use (the example uses dc=brillserve,dc=com). SelectSubtree from the drop-down list labeled Search Scope to enable searches at all levels of the directory. Click OK.
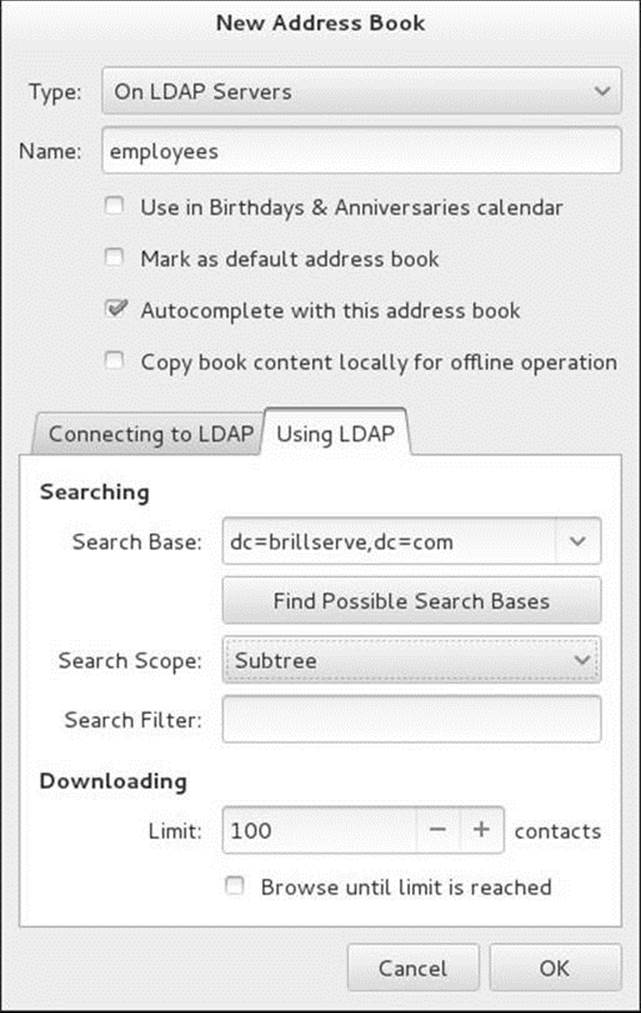
Figure 21-2 The New Address Book window, Using LDAP tab
Next click the Contacts button at the lower-left corner of the Mail-Evolution window. On LDAP Servers appears at the left side of the window. If the name of the address book you specified (employees in the example) does not appear below On LDAP servers, click the triangle to the left of this label. Then click the name of the address book you want to work with. Evolution prompts for the LDAP administrator password. Enter the password (porcupine in the example) and click OK. Evolution highlights the name of the address book; you can now search the LDAP database.
Enter the name of an entry in the text box labeled Search at the upper-right corner of the window and press RETURN. Evolution displays the entry. Figure 21-3 shows the result of following the example in this chapter and entering Zach in the Search text box.
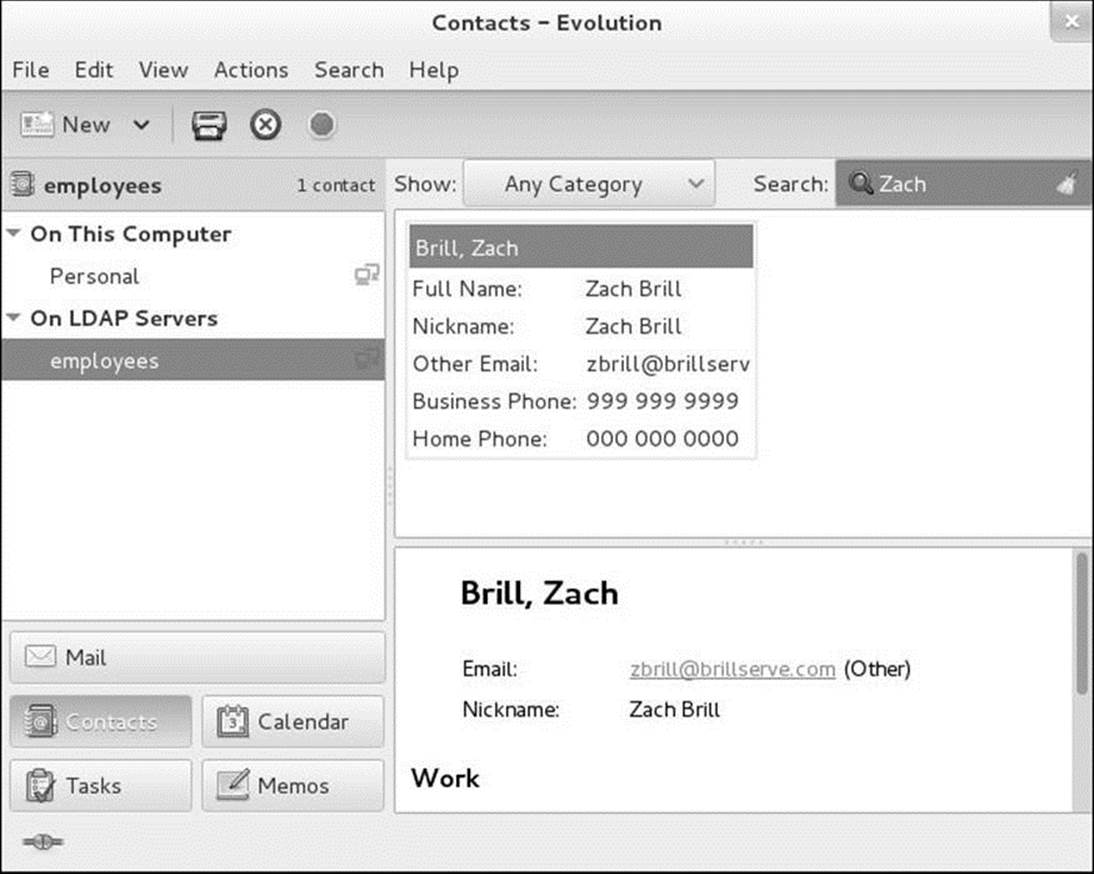
Figure 21-3 Contacts, Evolution window
gq: An LDAP Client (Fedora)
The gq utility (sourceforge.net/projects/gqclient; gq package) is a graphical (GTK+-based) LDAP client you can use to display and modify entries. Open the GQ window by giving the command gq from a terminal emulator or an Enter a Command window (ALT-F2). Before you can work withgq, you must specify the DN for the administrator. Select menubar: File![]() Preferences, click the Servers tab, highlight the server (localhost in the example), click Edit, click the Connections tab, and enter the DN for the administrator (cn=ldapadmin,dc=brillserve,dc=com in the example) in the text box labeled Bind DN. Click Close twice.
Preferences, click the Servers tab, highlight the server (localhost in the example), click Edit, click the Connections tab, and enter the DN for the administrator (cn=ldapadmin,dc=brillserve,dc=com in the example) in the text box labeled Bind DN. Click Close twice.
Click the Browse tab and click the plus signs (+) to the left of entries to display successive levels. Click a CN entry to display information about that CN. Figure 21-4 (next page) shows gq displaying an entry from the example LDAP directory.
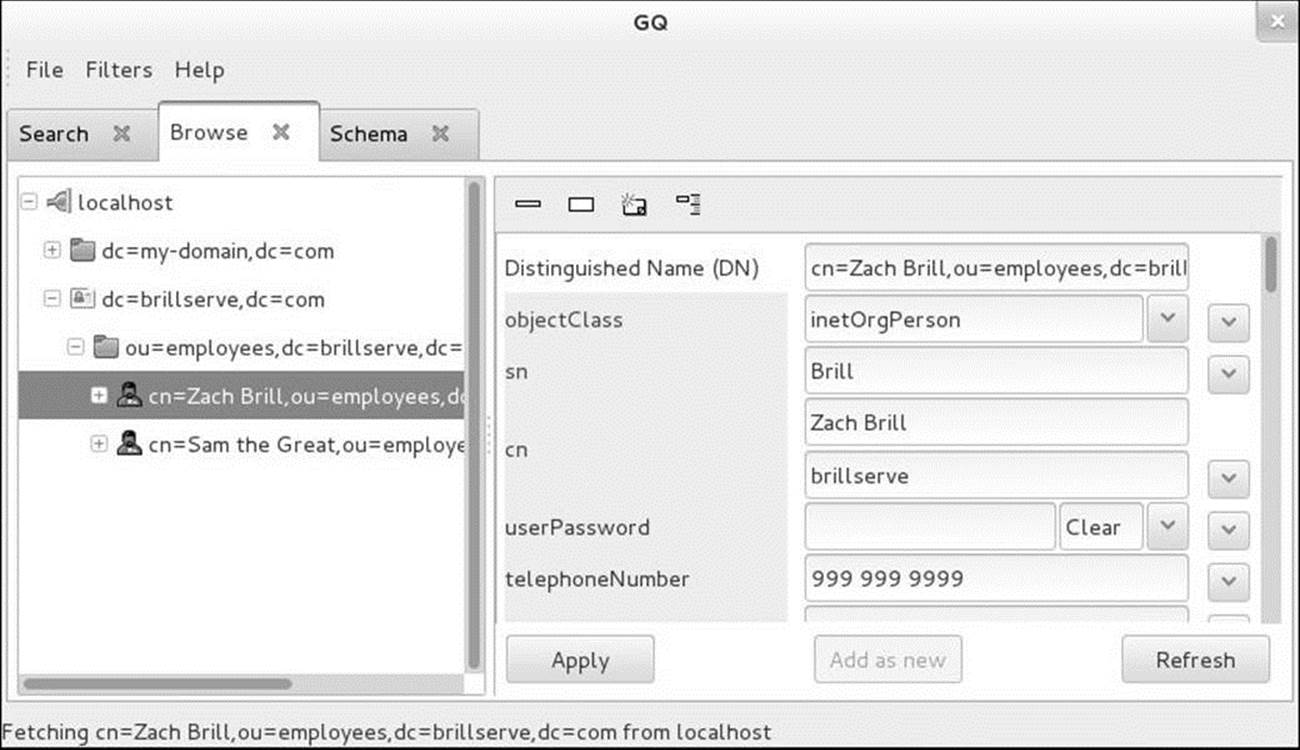
Figure 21-4 Using gq to browse an LDAP directory
You can also use gq for browsing the schema: Click the Schema tab and select the server from the left side of the window (localhost in Figure 21-5, next page). Click the plus sign (+) to the left of objectClasses and then click an object class to view information about that object class, including a list of required and optional attributes.
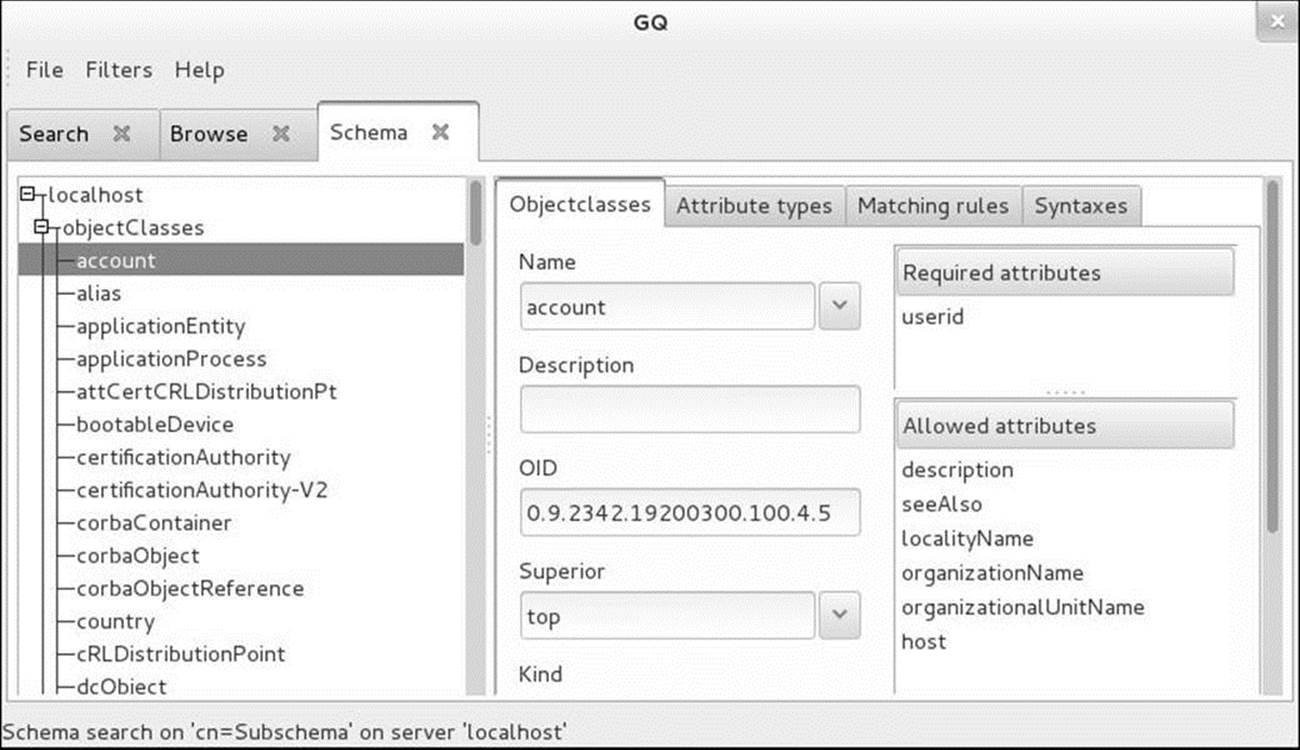
Figure 21-5 The gq Schema tab
Chapter Summary
NIS (Network Information Service) simplifies the management of common administrative files by maintaining them in a central database and having clients contact the database server to retrieve information from the database. The network that NIS serves is called an NIS domain. Each NIS domain has one master server; larger networks might have slave servers.
NIS derives the information it offers from local configuration files, such as /etc/passwd and /etc/hosts. These files are called source files or master files. Before NIS can store the information contained in a source file, it must be converted to dbm-format files, called maps. The ypcat andypmatch utilities display information from NIS maps.
The yppasswd utility replaces the functionality of passwd on clients when you use NIS to authenticate passwords. The /etc/ypserv.conf file, which holds NIS server configuration information, specifies options and access rules for the NIS server. To enhance system security, you can create a/var/yp/securenets file, which prevents unauthorized systems from retrieving NIS maps.
An LDAP (Lightweight Directory Access Protocol) server holds a search- and read-optimized database, called a directory. LDAP clients, such as email clients, query and update this directory. In addition, authentication servers can use an LDAP directory to authenticate users.
Fedora/RHEL provides the OpenLDAP implementation of LDAP. OpenLDAP uses the Sleepycat Berkeley Database, which supports distributed architecture, replication, and encryption.
Exercises
1. What is the difference between the passwd and yppasswd utilities?
2. How would you prevent NIS from exporting the root user and other system users to clients?
3. How would you make NIS user information override local user information on client systems?
4. Why does the /etc/passwd file need two NIS maps?
5. How does an LDAP directory differ from a relational database system?
6. What is the basic unit of information in an LDAP directory? What is the structure of an attribute?
Advanced Exercises
7. How can you use NIS to mirror the functionality of a private DNS server for a small network? Why should NIS not be used this way on a large network?
8. How can you determine whether the working directory is the home directory of an NIS user?
9. a. What advantage does NIS provide when you use it with NFS?
b. Suggest a way to implement NIS maps so they can be indexed on more than one field.
10. Where is the LDAP device object class defined? Which of its attributes are mandatory and which are optional?
11. How would you determine the longer name for the l (lowercase “el”) LDAP object class?