A practical guide to Fedora and Red Hat Enterprise Linux, 7th Edition (2014)
Part V: Programming Tools
Chapter 27 Programming the Bourne Again Shell (bash)
Chapter 28 The Python Programming Language
Chapter 29 The MariaDB SQL Database Management System
Chapter 27. Programming the Bourne Again Shell (bash)
In This Chapter
Control Structures
File Descriptors
Positional Parameters
Special Parameters
Variables
Environment, Environment Variables, and Inheritance
Array Variables
Builtin Commands
Expressions
Shell Programs
A Recursive Shell Script
The quiz Shell Script
Objectives
After reading this chapter you should be able to:
![]() Use control structures to implement decision making and repetition in shell scripts
Use control structures to implement decision making and repetition in shell scripts
![]() Handle input to and output from scripts
Handle input to and output from scripts
![]() Use shell variables (local) and environment variables (global)
Use shell variables (local) and environment variables (global)
![]() Evaluate the value of numeric variables
Evaluate the value of numeric variables
![]() Use bash builtin commands to call other scripts inline, trap signals, and kill processes
Use bash builtin commands to call other scripts inline, trap signals, and kill processes
![]() Use arithmetic and logical expressions
Use arithmetic and logical expressions
![]() List standard programming practices that result in well-written scripts
List standard programming practices that result in well-written scripts
Chapter 5 introduced the shells and Chapter 9 went into detail about the Bourne Again Shell. This chapter introduces additional Bourne Again Shell commands, builtins, and concepts that carry shell programming to a point where it can be useful. Although you might make use of shell programming as a system administrator, you do not have to read this chapter to perform system administration tasks. Feel free to skip this chapter and come back to it if and when you like.
The first part of this chapter covers programming control structures, also called control flow constructs. These structures allow you to write scripts that can loop over command-line arguments, make decisions based on the value of a variable, set up menus, and more. The Bourne Again Shell uses the same constructs found in programming languages such as C.
The next part of this chapter discusses parameters and variables, going into detail about array variables, shell versus environment variables, special parameters, and positional parameters. The exploration of builtin commands covers type, which displays information about a command, andread, which allows a shell script to accept user input. The section on the exec builtin demonstrates how to use exec to execute a command efficiently by replacing a process and explains how to use exec to redirect input and output from within a script.
The next section covers the trap builtin, which provides a way to detect and respond to operating system signals (such as the signal generated when you press CONTROL-C). The discussion of builtins concludes with a discussion of kill, which can abort a process, and getopts, which makes it easy to parse options for a shell script. Table 27-6 on page 1055 lists some of the more commonly used builtins.
Next the chapter examines arithmetic and logical expressions as well as the operators that work with them. The final section walks through the design and implementation of two major shell scripts.
This chapter contains many examples of shell programs. Although they illustrate certain concepts, most use information from earlier examples as well. This overlap not only reinforces your overall knowledge of shell programming but also demonstrates how you can combine commands to solve complex tasks. Running, modifying, and experimenting with the examples in this book is a good way to become comfortable with the underlying concepts.
Tip: Do not name a shell script test
You can unwittingly create a problem if you name a shell script test because a bash builtin has the same name. Depending on how you call your script, you might run either your script or the builtin, leading to confusing results.
![]() Control Structures
Control Structures
The control flow commands alter the order of execution of commands within a shell script. Control structures include the if...then, for...in, while, until, and case statements. In addition, the break and continue statements work in conjunction with the control structures to alter the order of execution of commands within a script.
Getting help with control structures
You can use the bash help command to display information about bash control structures. See page 134 for more information.
![]() if...then
if...then
The if...then control structure has the following syntax:
if test-command
then
commands
fi
The bold words in the syntax description are the items you supply to cause the structure to have the desired effect. The nonbold words are the keywords the shell uses to identify the control structure.
![]() test builtin
test builtin
Figure 27-1 shows that the if statement tests the status returned by the test-command and transfers control based on this status. The end of the if structure is marked by a fi statement (if spelled backward). The following script prompts for two words, reads them, and then uses an if structure to execute commands based on the result returned by the test builtin when it compares the two words. (See the test info page for information on the test utility, which is similar to the test builtin.) The test builtin returns a status of true if the two words are the same and false if they are not. Double quotation marks around $word1 and $word2 make sure test works properly if you enter a string that contains a SPACE or other special character.
$ cat if1
read -p "word 1: " word1
read -p "word 2: " word2
if test "$word1" = "$word2"
then
echo "Match"
fi
echo "End of program."
$ ./if1
word 1: peach
word 2: peach
Match
End of program.
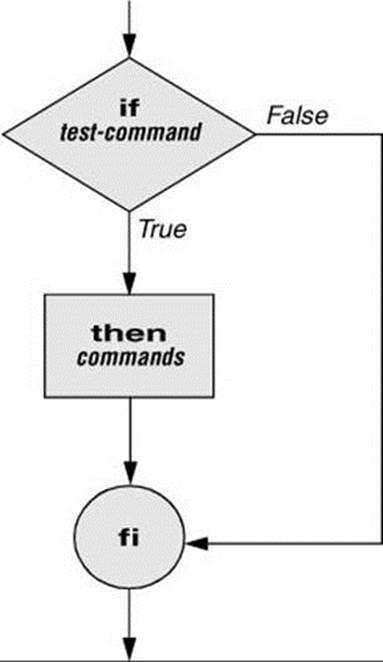
Figure 27-1 An if...then flowchart
In the preceding example the test-command is test "$word1" = "$word2". The test builtin returns a true status if its first and third arguments have the relationship specified by its second argument. If this command returns a true status (= 0), the shell executes the commands between thethen and fi statements. If the command returns a false status (not = 0), the shell passes control to the statement following fi without executing the statements between then and fi. The effect of this if statement is to display Match if the two words are the same. The script always displays End of program.
Builtins
In the Bourne Again Shell, test is a builtin—part of the shell. It is also a stand-alone utility kept in /usr/bin/test. This chapter discusses and demonstrates many Bourne Again Shell builtins. The shell will use the builtin version if it is available and the utility if it is not. Each version of a command might vary slightly from one shell to the next and from the utility to any of the shell builtins. See page 1040 for more information on shell builtins.
Checking arguments
The next program uses an if structure at the beginning of a script to confirm that you have supplied at least one argument on the command line. The test –eq criterion compares two integers; the shell expands the $# special parameter (page 1027) to the number of command-line arguments. This structure displays a message and exits from the script with an exit status of 1 if you do not supply at least one argument.
$ cat chkargs
if test $# -eq 0
then
echo "You must supply at least one argument."
exit 1
fi
echo "Program running."
$ ./chkargs
You must supply at least one argument.
$ ./chkargs abc
Program running.
A test like the one shown in chkargs is a key component of any script that requires arguments. To prevent the user from receiving meaningless or confusing information from the script, the script needs to check whether the user has supplied the appropriate arguments. Some scripts simply test whether arguments exist (as in chkargs); other scripts test for a specific number or specific kinds of arguments.
You can use test to verify the status of a file argument or the relationship between two file arguments. After verifying that at least one argument has been given on the command line, the following script tests whether the argument is the name of an ordinary file (not a directory or other type of file). The test builtin with the –f criterion and the first command-line argument ($1) checks the file.
$ cat is_ordfile
if test $# -eq 0
then
echo "You must supply at least one argument."
exit 1
fi
if test -f "$1"
then
echo "$1 is an ordinary file."
else
echo "$1 is NOT an ordinary file."
fi
You can test many other characteristics of a file using test criteria; see Table 27-1.
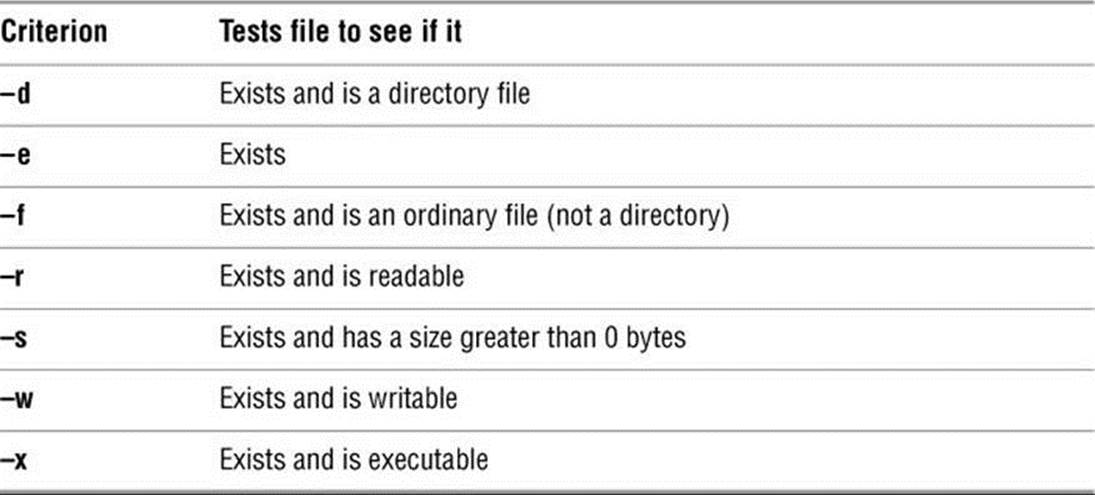
Table 27-1 test builtin criteria
Other test criteria provide ways to test relationships between two files, such as whether one file is newer than another. Refer to examples later in this chapter for more information.
Tip: Always test the arguments
To keep the examples in this book short and focused on specific concepts, the code to verify arguments is often omitted or abbreviated. It is good practice to test arguments in shell programs that other people will use. Doing so results in scripts that are easier to debug, run, and maintain.
![]() [] is a synonym for test
[] is a synonym for test
The following example—another version of chkargs—checks for arguments in a way that is more traditional for Linux shell scripts. This example uses the bracket ([]) synonym for test. Rather than using the word test in scripts, you can surround the arguments to test with brackets. The brackets must be surrounded by whitespace (SPACEs or TABs).
$ cat chkargs2
if [ $# -eq 0 ]
then
echo "Usage: chkargs2 argument..." 1>&2
exit 1
fi
echo "Program running."
exit 0
$ ./chkargs2
Usage: chkargs2 argument...
$ ./chkargs2 abc
Program running.
Usage messages
The error message that chkargs2 displays is called a usage message and uses the 1>&2 notation to redirect its output to standard error (page 335). After issuing the usage message, chkargs2 exits with an exit status of 1, indicating an error has occurred. The exit 0 command at the end of the script causes chkargs2 to exit with a 0 status after the program runs without an error. The Bourne Again Shell returns the exit status of the last command the script ran if you omit the status code.
The usage message is commonly used to specify the type and number of arguments the script requires. Many Linux utilities provide usage messages similar to the one in chkargs2. If you call a utility or other program with the wrong number or wrong kind of arguments, it will often display a usage message. Following is the usage message that cp displays when you call it with only one argument:
$ cp a
cp: missing destination file operand after 'a'
Try 'cp --help' for more information.
![]() if...then...else
if...then...else
The introduction of an else statement turns the if structure into the two-way branch shown in Figure 27-2. The if...then...else control structure has the following syntax:
if test-command
then
commands
else
commands
fi
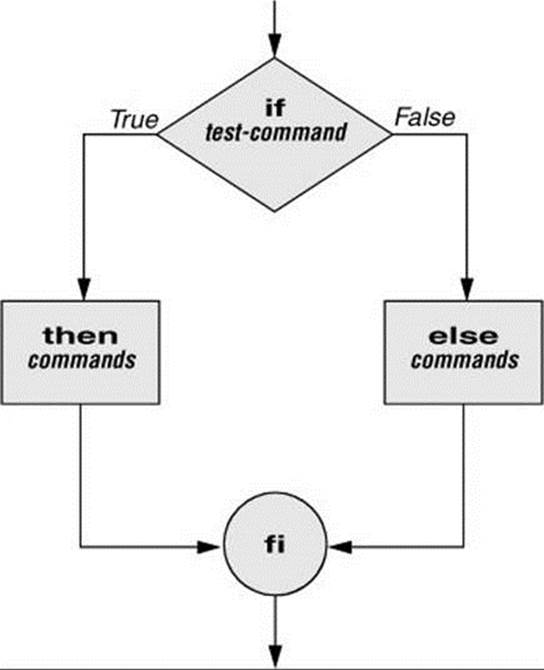
Figure 27-2 An if...then...else flowchart
Because a semicolon (;) ends a command just as a NEWLINE does, you can place then on the same line as if by preceding it with a semicolon. (Because if and then are separate builtins, they require a control operator between them; a semicolon and NEWLINE work equally well [page 341].) Some people prefer this notation for aesthetic reasons; others like it because it saves space.
if test-command; then
commands
else
commands
fi
If the test-command returns a true status, the if structure executes the commands between the then and else statements and then diverts control to the statement following fi. If the test-command returns a false status, the if structure executes the commands following the else statement.
When you run the out script with arguments that are filenames, it displays the files on the terminal. If the first argument is –v (called an option in this case), out uses less (page 220) to display the files one screen at a time. After determining that it was called with at least one argument, outtests its first argument to see whether it is –v. If the result of the test is true (the first argument is –v), out uses the shift builtin (page 1025) to shift the arguments to get rid of the –v and displays the files using less. If the result of the test is false (the first argument is not –v), the script uses catto display the files.
$ cat out
if [ $# -eq 0 ]
then
echo "Usage: $0 [-v] filenames..." 1>&2
exit 1
fi
if [ "$1" = "-v" ]
then
shift
less -- "$@"
else
cat -- "$@"
fi
Optional
In out, the –– argument to cat and less tells these utilities that no more options follow on the command line and not to consider leading hyphens (–) in the following list as indicating options. Thus –– allows you to view a file whose name starts with a hyphen (page 146). Although not common, filenames beginning with a hyphen do occasionally occur. (You can create such a file by using the command cat > –fname.) The –– argument works with all Linux utilities that use the getopts builtin (page 1052) to parse their options; it does not work with more and a few other utilities. This argument is particularly useful when used in conjunction with rm to remove a file whose name starts with a hyphen (rm –– –fname), including any you create while experimenting with the –– argument.
![]() if...then...elif
if...then...elif
The if...then...elif control structure (Figure 27-3) has the following syntax:
if test-command
then
commands
elif test-command
then
commands
. . .
else
commands
fi
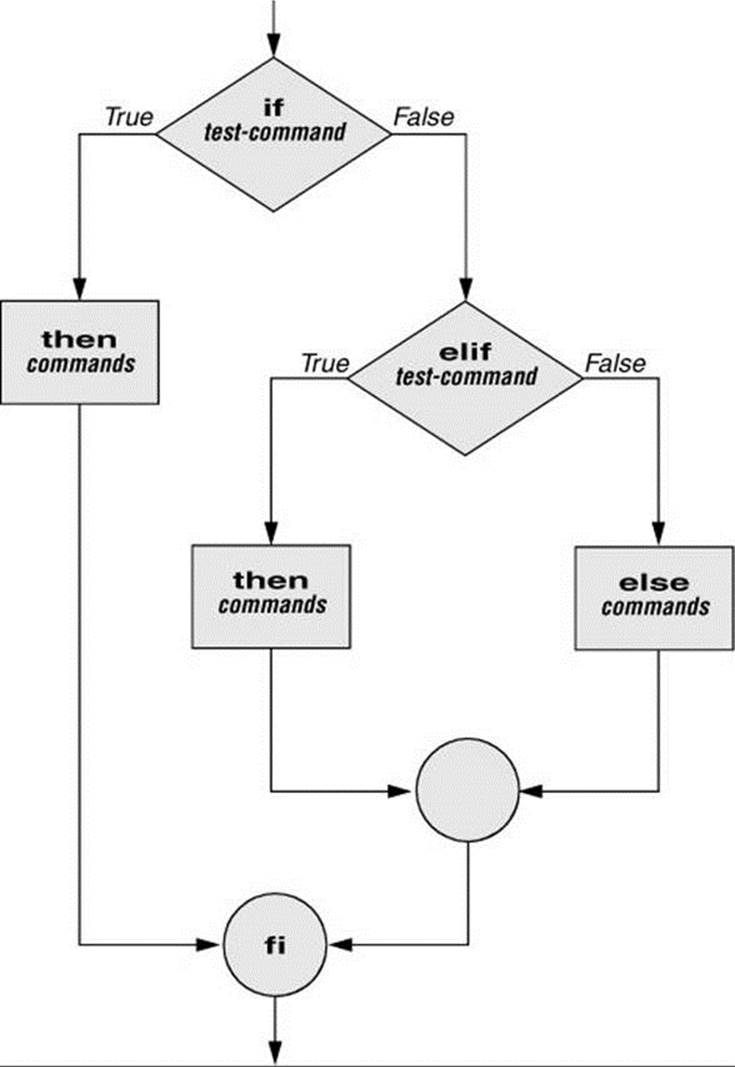
Figure 27-3 An if...then...elif flowchart
The elif statement combines the else statement and the if statement and enables you to construct a nested set of if...then...else structures (Figure 27-3). The difference between the else statement and the elif statement is that each else statement must be paired with a fi statement, whereas multiple nested elif statements require only a single closing fi statement.
The following example shows an if...then...elif control structure. This shell script compares three words the user enters. The first if statement uses the Boolean AND operator (–a) as an argument to test. The test builtin returns a true status if the first and second logical comparisons are true(that is, word1 matches word2 and word2 matches word3). If test returns a true status, the script executes the command following the next then statement, passes control to the statement following fi, and terminates.
$ cat if3
read -p "word 1: " word1
read -p "word 2: " word2
read -p "word 3: " word3
if [ "$word1" = "$word2" -a "$word2" = "$word3" ]
then
echo "Match: words 1, 2, & 3"
elif [ "$word1" = "$word2" ]
then
echo "Match: words 1 & 2"
elif [ "$word1" = "$word3" ]
then
echo "Match: words 1 & 3"
elif [ "$word2" = "$word3" ]
then
echo "Match: words 2 & 3"
else
echo "No match"
fi
$ ./if3
word 1: apple
word 2: orange
word 3: pear
No match
$ ./if3
word 1: apple
word 2: orange
word 3: apple
Match: words 1 & 3
$ ./if3
word 1: apple
word 2: apple
word 3: apple
Match: words 1, 2, & 3
If the three words are not the same, the structure passes control to the first elif, which begins a series of tests to see if any pair of words is the same. As the nesting continues, if any one of the elif statements is satisfied, the structure passes control to the next then statement and subsequently to the statement following fi. Each time an elif statement is not satisfied, the structure passes control to the next elif statement. The double quotation marks around the arguments to echo that contain ampersands (&) prevent the shell from interpreting the ampersands as special characters.
Optional: The lnks Script
The following script, named lnks, demonstrates the if...then and if...then...elif control structures. This script finds hard links to its first argument, a filename. If you provide the name of a directory as the second argument, lnks searches for links in the directory hierarchy rooted at that directory. If you do not specify a directory, lnks searches the working directory and its subdirectories. This script does not locate symbolic links.
$ cat lnks
#!/bin/bash
# Identify links to a file
# Usage: lnks file [directory]
if [ $# -eq 0 -o $# -gt 2 ]; then
echo "Usage: lnks file [directory]" 1>&2
exit 1
fi
if [ -d "$1" ]; then
echo "First argument cannot be a directory." 1>&2
echo "Usage: lnks file [directory]" 1>&2
exit 1
else
file="$1"
fi
if [ $# -eq 1 ]; then
directory="."
elif [ -d "$2" ]; then
directory="$2"
else
echo "Optional second argument must be a directory." 1>&2
echo "Usage: lnks file [directory]" 1>&2
exit 1
fi
# Check that file exists and is an ordinary file
if [ ! -f "$file" ]; then
echo "lnks: $file not found or is a special file" 1>&2
exit 1
fi
# Check link count on file
set -- $(ls -l "$file")
linkcnt=$2
if [ "$linkcnt" -eq 1 ]; then
echo "lnks: no other hard links to $file" 1>&2
exit 0
fi
# Get the inode of the given file
set $(ls -i "$file")
inode=$1
# Find and print the files with that inode number
echo "lnks: using find to search for links..." 1>&2
find "$directory" -xdev -inum $inode -print
Max has a file named letter in his home directory. He wants to find links to this file in his and other users’ home directory file hierarchies. In the following example, Max calls lnks from his home directory to perform the search. The second argument to lnks, /home, is the pathname of the directory where Max wants to start the search. The lnks script reports that /home/max/letter and /home/zach/draft are links to the same file:
$ ./lnks letter /home
lnks: using find to search for links...
/home/max/letter
/home/zach/draft
In addition to the if...then...elif control structure, lnks introduces other features that are commonly used in shell programs. The following discussion describes lnks section by section.
Specify the shell
The first line of the lnks script uses #! (page 338) to specify the shell that will execute the script:
#!/bin/bash
In this chapter, the #! notation appears only in more complex examples. It ensures that the proper shell executes the script, even when the user is running a different shell or the script is called from a script running a different shell.
Comments
The second and third lines of lnks are comments; the shell ignores text that follows a hashmark (#) up to the next NEWLINE character. These comments in lnks briefly identify what the file does and explain how to use it:
# Identify links to a file
# Usage: lnks file [directory]
Usage messages
The first if statement tests whether lnks was called with zero arguments or more than two arguments:
if [ $# -eq 0 -o $# -gt 2 ]; then
echo "Usage: lnks file [directory]" 1>&2
exit 1
fi
If either of these conditions is true, lnks sends a usage message to standard error and exits with a status of 1. The double quotation marks around the usage message prevent the shell from interpreting the brackets as special characters. The brackets in the usage message indicate that the directory argument is optional.
The second if statement tests whether the first command-line argument ($1) is a directory (the –d argument to test returns true if the file exists and is a directory):
if [ -d "$1" ]; then
echo "First argument cannot be a directory." 1>&2
echo "Usage: lnks file [directory]" 1>&2
exit 1
else
file="$1"
fi
If the first argument is a directory, lnks displays a usage message and exits. If it is not a directory, lnks saves the value of $1 in the file variable because later in the script set resets the command-line arguments. If the value of $1 is not saved before the set command is issued, its value is lost.
Test the arguments
The next section of lnks is an if...then...elif statement:
if [ $# -eq 1 ]; then
directory="."
elif [ -d "$2" ]; then
directory="$2"
else
echo "Optional second argument must be a directory." 1>&2
echo "Usage: lnks file [directory]" 1>&2
exit 1
fi
The first test-command determines whether the user specified a single argument on the command line. If the test-command returns 0 (true), the directory variable is assigned the value of the working directory (.). If the test-command returns a nonzero value (false), the elifstatement tests whether the second argument is a directory. If it is a directory, the directory variable is set equal to the second command-line argument, $2. If $2 is not a directory, lnks sends a usage message to standard error and exits with a status of 1.
The next if statement in lnks tests whether $file does not exist. This test keeps lnks from wasting time looking for links to a nonexistent file. The test builtin, when called with the three arguments !, –f, and $file, evaluates to true if the file $file does not exist:
[ ! -f "$file" ]
The ! operator preceding the –f argument to test negates its result, yielding false if the file $file does exist and is an ordinary file.
Next lnks uses set and ls –l to check the number of links $file has:
# Check link count on file
set -- $(ls -l "$file")
linkcnt=$2
if [ "$linkcnt" -eq 1 ]; then
echo "lnks: no other hard links to $file" 1>&2
exit 0
fi
The set builtin uses command substitution (page 410) to set the positional parameters to the output of ls –l. The second field in this output is the link count, so the user-created variable linkcnt is set equal to $2. The –– used with set prevents set from interpreting as an option the first argument produced by ls –l (the first argument is the access permissions for the file and typically begins with –). The if statement checks whether $linkcnt is equal to 1; if it is, lnks displays a message and exits. Although this message is not truly an error message, it is redirected to standard error. The way lnks has been written, all informational messages are sent to standard error. Only the final product of lnks—the pathnames of links to the specified file—is sent to standard output, so you can redirect the output.
If the link count is greater than 1, lnks goes on to identify the inode (page 1254) for $file. As explained on page 206, comparing the inodes associated with filenames is a good way to determine whether the filenames are links to the same file. The lnks script uses set to set the positional parameters to the output of ls –i. The first argument to set is the inode number for the file, so the user-created variable named inode is assigned the value of $1:
# Get the inode of the given file
set $(ls -i "$file")
inode=$1
Finally lnks uses the find utility to search for files having inode numbers that match $inode:
# Find and print the files with that inode number
echo "lnks: using find to search for links..." 1>&2
find "$directory" -xdev -inum $inode -print
The find utility searches the directory hierarchy rooted at the directory specified by its first argument ($directory) for files that meet the criteria specified by the remaining arguments. In this example, the remaining arguments send the names of files having inode numbers matching $inode to standard output. Because files in different filesystems can have the same inode number yet not be linked, find must search only directories in the same filesystem as $directory. The –xdev (cross-device) argument prevents find from searching directories on other filesystems. Refer to page 203 for more information about filesystems and links.
The echo command preceding the find command in lnks, which tells the user that find is running, is included because find can take a long time to run. Because lnks does not include a final exit statement, the exit status of lnks is that of the last command it runs, find.
Debugging Shell Scripts
When you are writing a script such as lnks, it is easy to make mistakes. You can use the shell’s –x option to help debug a script. This option causes the shell to display each command after it expands it but before it runs the command. Tracing a script’s execution in this way can give you information about where a problem lies.
You can run lnks (above) and cause the shell to display each command before it is executed. Either set the –x option for the current shell (set –x) so all scripts display commands as they are run or use the –x option to affect only the shell running the script called by the command line.
$ bash -x lnks letter /home
+ '[' 2 -eq 0 -o 2 -gt 2 ']'
+ '[' -d letter ']'
+ file=letter
+ '[' 2 -eq 1 ']'
+ '[' -d /home ']'
+ directory=/home
+ '[' '!' -f letter ']'
...
PS4
Each command the script executes is preceded by the value of the PS4 variable—a plus sign (+) by default—so you can distinguish debugging output from output produced by the script. You must export PS4 if you set it in the shell that calls the script. The next command sets PS4 to >>>>followed by a SPACE and exports it:
$ export PS4='>>>> '
You can also set the –x option of the shell running the script by putting the following set command near the beginning of the script:
set -x
You can put set –x anywhere in the script to turn debugging on starting at that location. Turn debugging off using set +x. The set –o xtrace and set +o xtrace commands do the same things as set –x and set +x, respectively.
![]() for...in
for...in
The for...in control structure has the following syntax:
for loop-index in argument-list
do
commands
done
The for...in structure (Figure 27-4) assigns the value of the first argument in the argument-list to the loop-index and executes the commands between the do and done statements. The do and done statements mark the beginning and end of the for loop, respectively.
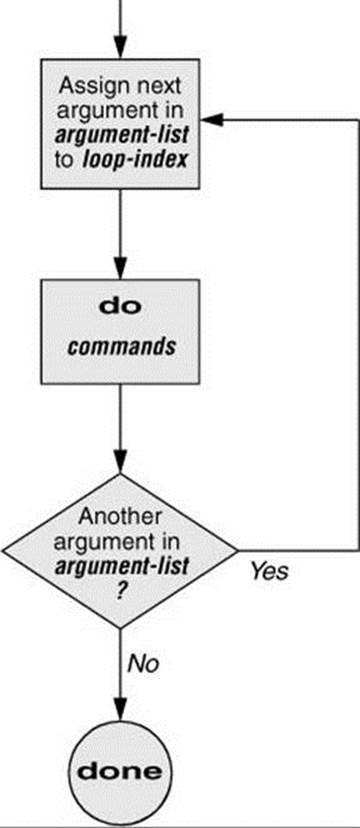
Figure 27-4 A for...in flowchart
After it passes control to the done statement, the structure assigns the value of the second argument in the argument-list to the loop-index and repeats the commands. It repeats the commands between the do and done statements one time for each argument in the argument-list. When the structure exhausts the argument-list, it passes control to the statement following done.
The following for...in structure assigns apples to the user-created variable fruit and then displays the value of fruit, which is apples. Next the structure assigns oranges to fruit and repeats the process. When it exhausts the argument list, the structure transfers control to the statement following done, which displays a message.
$ cat fruit
for fruit in apples oranges pears bananas
do
echo "$fruit"
done
echo "Task complete."
$ ./fruit
apples
oranges
pears
bananas
Task complete.
The next script lists the names of the directory files in the working directory by looping through the files in the working directory and using test to determine which are directory files:
$ cat dirfiles
for i in *
do
if [ -d "$i" ]
then
echo "$i"
fi
done
The ambiguous file reference character * matches the names of all files (except hidden files) in the working directory. Prior to executing the for loop, the shell expands the * and uses the resulting list to assign successive values to the index variable i.
Optional: Step Values
As an alternative to explicitly specifying values for argument-list, you can specify step values. A for...in loop that uses step values assigns an initial value to or increments the loop-index, executes the statements within the loop, and tests a termination condition at the end of the loop.
The following example uses brace expansion with a sequence expression (page 406) to generate the argument-list. This syntax works on bash version 4.0 and above; give the command echo $BASH_VERSION to see which version you are using. The first time through the loop, bash assigns a value of 0 to count (the loop-index) and executes the statement between do and done. At the bottom of the loop, bash tests whether the termination condition has been met (is count>10?). If it has, bash passes control to the statement following done; if not, bash increments count by the increment value (2) and makes another pass through the loop. It repeats this process until the termination condition is met.
$ cat step1
for count in {0..10..2}
do
echo -n "$count "
done
echo
$ ./step1
0 2 4 6 8 10
Older versions of bash do not support sequence expressions; you can use the seq utility to perform the same function:
$ for count in $(seq 0 2 10); do echo -n "$count "; done; echo
0 2 4 6 8 10
The next example uses bash’s C-like syntax to specify step values. This syntax gives you more flexibility in specifying the termination condition and the increment value. Using this syntax, the first parameter initializes the loop-index, the second parameter specifies the condition to be tested, and the third parameter specifies the increment.
$ cat rand
# $RANDOM evaluates to a random value 0 < x < 32,767
# This program simulates 10 rolls of a pair of dice
for ((x=1; x<=10; x++))
do
echo -n "Roll #$x: "
echo -n $(( $RANDOM % 6 + 1 ))
echo " " $(( $RANDOM % 6 + 1 ))
done
![]() for
for
The for control structure has the following syntax:
for loop-index
do
commands
done
In the for structure, the loop-index takes on the value of each of the command-line arguments, one at a time. The for structure is the same as the for...in structure (Figure 27-4, page 995) except in terms of where it gets values for the loop-index. The for structure performs a sequence of commands, usually involving each argument in turn.
The following shell script shows a for structure displaying each command-line argument. The first line of the script, for arg, implies for arg in "$@", where the shell expands "$@" into a list of quoted command-line arguments (i.e., "$1" "$2" "$3" ...). The balance of the script corresponds to the for...in structure.
$ cat for_test
for arg
do
echo "$arg"
done
$ for_test candy gum chocolate
candy
gum
chocolate
The next example uses a different syntax. In it, the loop-index is named count and is set to an initial value of 0. The condition to be tested is count<=10: bash continues executing the loop as long as this condition is true (as long as count is less than or equal to 10; see Table 27-8 on page1059 for a list of operators). Each pass through the loop, bash adds 2 to the value of count (count+=2).
$ cat step2
for (( count=0; count<=10; count+=2 ))
do
echo -n "$count "
done
echo
$ ./step2
0 2 4 6 8 10
Optional: The whos Script
The following script, named whos, demonstrates the usefulness of the implied "$@" in the for structure. You give whos one or more users’ full names or user-names as arguments, and whos displays information about the users. The whos script gets the information it displays from the first and fifth fields in the /etc/passwd file. The first field contains a username, and the fifth field typically contains the user’s full name. You can provide a username as an argument to whos to display the user’s name or provide a name as an argument to display the user-name. The whos script is similar to the finger utility, although whos delivers less information.
$ cat whos
#!/bin/bash
if [ $# -eq 0 ]
then
echo "Usage: whos id..." 1>&2
exit 1
fi
for id
do
gawk -F: '{print $1, $5}' /etc/passwd |
grep -i "$id"
done
In the next example, whos identifies the user whose username is chas and the user whose name is Marilou Smith:
$ ./whos chas "Marilou Smith"
chas Charles Casey
msmith Marilou Smith
Use of "$@"
The whos script uses a for statement to loop through the command-line arguments. In this script the implied use of "$@" in the for loop is particularly beneficial because it causes the for loop to treat an argument that contains a SPACE as a single argument. This example encloses Marilou Smith in quotation marks, which causes the shell to pass it to the script as a single argument. Then the implied "$@" in the for statement causes the shell to regenerate the quoted argument Marilou Smith so that it is again treated as a single argument. The double quotation marks in the grep statement perform the same function.
gawk
For each command-line argument, whos searches the /etc/passwd file. Inside the for loop, the gawk utility extracts the first ($1) and fifth ($5) fields from each line in /etc/passwd. The –F: option causes gawk to use a colon (:) as a field separator when it reads /etc/passwd, allowing it to break each line into fields. The gawk command sets and uses the $1 and $5 arguments; they are included within single quotation marks and are not interpreted by the shell. Do not confuse these arguments with positional parameters, which correspond to command-line arguments. The first and fifth fields are sent to grep (page 232) via a pipeline. The grep utility searches for $id (to which the shell has assigned the value of a command-line argument) in its input. The –i option causes grep to ignore case as it searches; grepdisplays each line in its input that contains $id.
A pipeline symbol (|) at the end of a line
Under bash, a control operator such as a pipeline symbol ( |) implies continuation: bash “knows” another command must follow it. Therefore, in whos, the NEWLINE following the pipeline symbol at the end of the line with the gawk command does not have to be quoted. For more information refer to “Implicit Command-Line Continuation” on page 1063.
![]() while
while
The while control structure has the following syntax:
while test-command
do
commands
done
As long as the test-command (Figure 27-5) returns a true exit status, the while structure continues to execute the series of commands delimited by the do and done statements. Before each loop through the commands, the structure executes the test-command. When the exit status of the test-command is false, the structure passes control to the statement after the done statement.
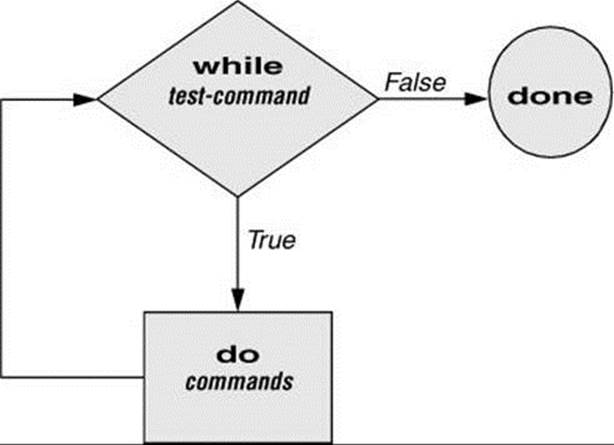
Figure 27-5 A while flowchart
![]() test builtin
test builtin
The following shell script first initializes the number variable to zero. The test builtin then determines whether number is less than 10. The script uses test with the –lt argument to perform a numerical test. For numerical comparisons, you must use –ne (not equal), –eq (equal), –gt (greater than), –ge (greater than or equal to), –lt (less than), or –le (less than or equal to). For string comparisons, use = (equal) or != (not equal) when you are working with test. In this example, test has an exit status of 0 (true) as long as number is less than 10. As long as test returns true, the structure executes the commands between the do and done statements. See page 983 for information on the test builtin.
$ cat count
#!/bin/bash
number=0
while [ "$number" -lt 10 ]
do
echo -n "$number"
((number +=1))
done
echo
$ ./count
0123456789
$
The echo command following do displays number. The –n prevents echo from issuing a NEWLINE following its output. The next command uses arithmetic evaluation [((...)); page 1056] to increment the value of number by 1. The done statement terminates the loop and returns control to thewhile statement to start the loop over again. The final echo causes count to send a NEWLINE character to standard output, so the next prompt is displayed at the left edge of the display rather than immediately following the 9.
Optional: The spell_check Script
The aspell utility (aspell package) checks the words in a file against a dictionary of correctly spelled words. With the list command, aspell runs in list mode: Input comes from standard input and aspell sends each potentially misspelled word to standard output. The following command produces a list of possible misspellings in the file letter.txt:
$ aspell list < letter.txt
quikly
portible
frendly
The next shell script, named spell_check, shows another use of a while structure. To find the incorrect spellings in a file, spell_check calls aspell to check a file against a system dictionary. But it goes a step further: It enables you to specify a list of correctly spelled words and removes these words from the output of aspell. This script is useful for removing words you use frequently, such as names and technical terms, that do not appear in a standard dictionary. Although you can duplicate the functionality of spell_check by using additionalaspell dictionaries, the script is included here for its instructive value.
The spell_check script requires two filename arguments: the file containing the list of correctly spelled words and the file you want to check. The first if statement verifies that the user specified two arguments. The next two if statements verify that both arguments are readable files. (The exclamation point negates the sense of the following operator; the –r operator causes test to determine whether a file is readable. The result is a test that determines whether a file is not readable.)
$ cat spell_check
#!/bin/bash
# remove correct spellings from aspell output
if [ $# -ne 2 ]
then
echo "Usage: spell_check dictionary filename" 1>&2
echo "dictionary: list of correct spellings" 1>&2
echo "filename: file to be checked" 1>&2
exit 1
fi
if [ ! -r "$1" ]
then
echo "spell_check: $1 is not readable" 1>&2
exit 1
fi
if [ ! -r "$2" ]
then
echo "spell_check: $2 is not readable" 1>&2
exit 1
fi
aspell list < "$2" |
while read line
do
if ! grep "^$line$" "$1" > /dev/null
then
echo $line
fi
done
The spell_check script sends the output from aspell (with the list argument, so it produces a list of misspelled words on standard output) through a pipeline to standard input of a while structure, which reads one line at a time (each line has one word on it) from standard input. The test-command (that is, read line) returns a true exit status as long as it receives a line from standard input.
Inside the while loop, an if statement monitors the return value of grep, which determines whether the line that was read is in the user’s list of correctly spelled words. The pattern grep searches for (the value of $line) is preceded and followed by special characters that specify the beginning and end of a line (^ and $, respectively). These special characters ensure that grep finds a match only if the $line variable matches an entire line in the file of correctly spelled words. (Otherwise, grep would match a string, such as paul, in the output ofaspell if the file of correctly spelled words contained the word paulson.) These special characters, together with the value of the $line variable, form a regular expression (Appendix A).
The output of grep is redirected to /dev/null (page 158) because the output is not needed; only the exit code is important. The if statement checks the negated exit status of grep (the leading exclamation point negates or changes the sense of the exit status—true becomesfalse, and vice versa), which is 0 or true (false when negated) when a matching line is found. If the exit status is not 0 or false (true when negated), the word was not in the file of correctly spelled words. The echo builtin sends a list of words that are not in the file of correctly spelled words to standard output.
Once it detects the EOF (end of file), the read builtin returns a false exit status, control passes out of the while structure, and the script terminates.
Before you use spell_check, create a file of correct spellings containing words that you use frequently but that are not in a standard dictionary. For example, if you work for a company named Blinkenship and Klimowski, Attorneys, you would put Blinkenship andKlimowski in the file. The following example shows how spell_check checks the spelling in a file named memo and removes Blinkenship and Klimowski from the output list of incorrectly spelled words:
$ aspell list < memo
Blinkenship
Klimowski
targat
hte
$ cat word_list
Blinkenship
Klimowski
$ ./spell_check word_list memo
targat
hte
Refer to /usr/share/doc/aspell or aspell.net for more information.
until
The until and while structures are similar, differing only in the sense of the test performed at the top of the loop. Figure 27-6 shows that until continues to loop until the test-command returns a true exit status. The while structure loops while the test-command continues to return a true or nonerror condition. The until control structure has the following syntax:
until test-command
do
commands
done
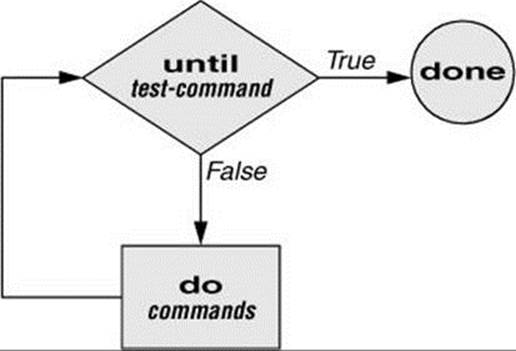
Figure 27-6 An until flowchart
The following script demonstrates an until structure that includes read (page 1041). When the user enters the correct string of characters, the test-command is satisfied and the structure passes control out of the loop.
$ cat until1
secretname=zach
name=noname
echo "Try to guess the secret name!"
echo
until [ "$name" = "$secretname" ]
do
read -p "Your guess: " name
done
echo "Very good."
$ ./until1
Try to guess the secret name!
Your guess: helen
Your guess: barbara
Your guess: rachael
Your guess: zach
Very good
The following locktty script is similar to the lock command on Berkeley UNIX and the Lock Screen menu selection in GNOME. The script prompts for a key (password) and uses an until control structure to lock the terminal. The until statement causes the system to ignore any characters typed at the keyboard until the user types the key followed by a RETURN on a line by itself, which unlocks the terminal. The locktty script can keep people from using your terminal while you are away from it for short periods of time. It saves you from having to log out if you are concerned about other users using your session.
$ cat locktty
#! /bin/bash
trap '' 1 2 3 18
stty -echo
read -p "Key: " key_1
echo
read -p "Again: " key_2
echo
key_3=
if [ "$key_1" = "$key_2" ]
then
tput clear
until [ "$key_3" = "$key_2" ]
do
read key_3
done
else
echo "locktty: keys do not match" 1>&2
fi
stty echo
Tip: Forget your password for locktty?
If you forget your key (password), you will need to log in from another (virtual) terminal and give a command to kill the process running locktty (e.g., killall –9 locktty).
trap builtin
The trap builtin (page 1047) at the beginning of the locktty script stops a user from being able to terminate the script by sending it a signal (for example, by pressing the interrupt key). Trapping signal 20 means that no one can use CONTROL-Z (job control, a stop from a tty) to defeat the lock.Table 27-5 on page 1047 provides a list of signals. The stty –echo command turns on keyboard echo (causes the terminal not to display characters typed at the keyboard), preventing the key the user enters from appearing on the screen. After turning off keyboard echo, the script prompts the user for a key, reads it into the user-created variable key_1, prompts the user to enter the same key again, and saves it in key_2. The statement key_3= creates a variable with a NULL value. If key_1 and key_2 match, locktty clears the screen (with the tput command) and starts an until loop. The until loop keeps reading from the terminal and assigning the input to the key_3 variable. Once the user types a string that matches one of the original keys (key_2), the until loop terminates and keyboard echo is turned on again.
break and continue
You can interrupt a for, while, or until loop by using a break or continue statement. The break statement transfers control to the statement following the done statement, thereby terminating execution of the loop. The continue command transfers control to the done statement, continuing execution of the loop.
The following script demonstrates the use of these two statements. The for...in structure loops through the values 1–10. The first if statement executes its commands when the value of the index is less than or equal to 3 ($index –le 3). The second if statement executes its commands when the value of the index is greater than or equal to 8 ($index –ge 8). In between the two ifs, echo displays the value of the index. For all values up to and including 3, the first if statement displays continue, executes a continue statement that skips echo $index and the second if statement, and continues with the next for statement. For the value of 8, the second if statement displays the word break and executes a break statement that exits from the for loop.
$ cat brk
for index in 1 2 3 4 5 6 7 8 9 10
do
if [ $index -le 3 ] ; then
echo "continue"
continue
fi
#
echo $index
#
if [ $index -ge 8 ] ; then
echo "break"
break
fi
done
$ ./brk
continue
continue
continue
4
5
6
7
8
break
$
case
The case structure (Figure 27-7) is a multiple-branch decision mechanism. The path taken through the structure depends on a match or lack of a match between the test-string and one of the patterns. When the test-string matches one of the patterns, the shell transfers control to the commandsfollowing the pattern. The commands are terminated by a double semicolon (;;) control operator. When control reaches this control operator, the shell transfers control to the command following the esac statement. The case control structure has the following syntax:
case test-string in
pattern-1)
commands-1
;;
pattern-2)
commands-2
;; pattern-3)
commands-3
;;
. . .
esac

Figure 27-7 A case flowchart
The following case structure uses the character the user enters as the test-string. This value is held in the variable letter. If the test-string has a value of A, the structure executes the command following the pattern A. The right parenthesis is part of the case control structure, not part of thepattern. If the test-string has a value of B or C, the structure executes the command following the matching pattern. The asterisk (*) indicates any string of characters and serves as a catchall in case there is no match. If no pattern matches the test-string and if there is no catchall (*) pattern,control passes to the command following the esac statement, without the case structure taking any action.
$ cat case1
read -p "Enter A, B, or C: " letter
case "$letter" in
A)
echo "You entered A"
;;
B)
echo "You entered B"
;;
C)
echo "You entered C"
;;
*)
echo "You did not enter A, B, or C"
;;
esac
$ ./case1
Enter A, B, or C: B
You entered B
The next execution of case1 shows the user entering a lowercase b. Because the test-string b does not match the uppercase B pattern (or any other pattern in the case statement), the program executes the commands following the catchall pattern and displays a message:
$ ./case1
Enter A, B, or C: b
You did not enter A, B, or C
The pattern in the case structure is a glob (it is analogous to an ambiguous file reference). It can include any special characters and strings shown in Table 27-2.
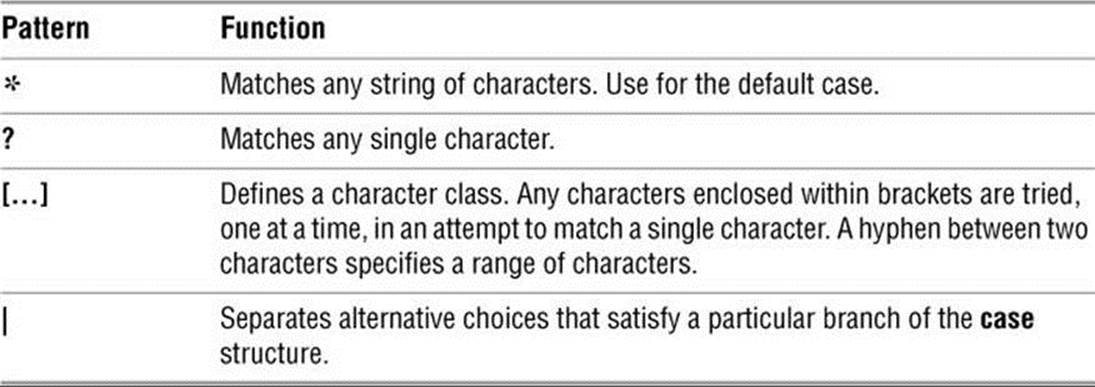
Table 27-2 Patterns
The next script accepts both uppercase and lowercase letters:
$ cat case2
read -p "Enter A, B, or C: " letter
case "$letter" in
a|A)
echo "You entered A"
;;
b|B)
echo "You entered B"
;;
c|C)
echo "You entered C"
;;
*)
echo "You did not enter A, B, or C"
;;
esac
$ ./case2
Enter A, B, or C: b
You entered B
Optional
The following example shows how to use the case structure to create a simple menu. The command_menu script uses echo to present menu items and prompt the user for a selection. (The select control structure [page 1012] is a much easier way of coding a menu.) Thecase structure then executes the appropriate utility depending on the user’s selection.
$ cat command_menu
#!/bin/bash
# menu interface to simple commands
echo -e "\n COMMAND MENU\n"
echo " a. Current date and time"
echo " b. Users currently logged in"
echo " c. Name of the working directory"
echo -e " d. Contents of the working directory\n"
read -p "Enter a, b, c, or d: " answer
echo
#
case "$answer" in
a)
date
;;
b)
who
;;
c)
pwd
;;
d)
ls
;;
*)
echo "There is no selection: $answer"
;;
esac
$ ./command_menu
COMMAND MENU
a. Current date and time
b. Users currently logged in
c. Name of the working directory
d. Contents of the working directory
Enter a, b, c, or d: a
Sun Jan 6 12:31:12 PST 2013
![]() echo –e
echo –e
The –e option causes echo to interpret \n as a NEWLINE character. If you do not include this option, echo does not output the extra blank lines that make the menu easy to read but instead outputs the (literal) two-character sequence \n. The –e option causes echo to interpret several other backslash-quoted characters (Table 27-3). Remember to quote (i.e., place double quotation marks around the string) the backslash-quoted character so the shell does not interpret it but rather passes the backslash and the character to echo. See xpg_echo (page403) for a way to avoid using the –e option.
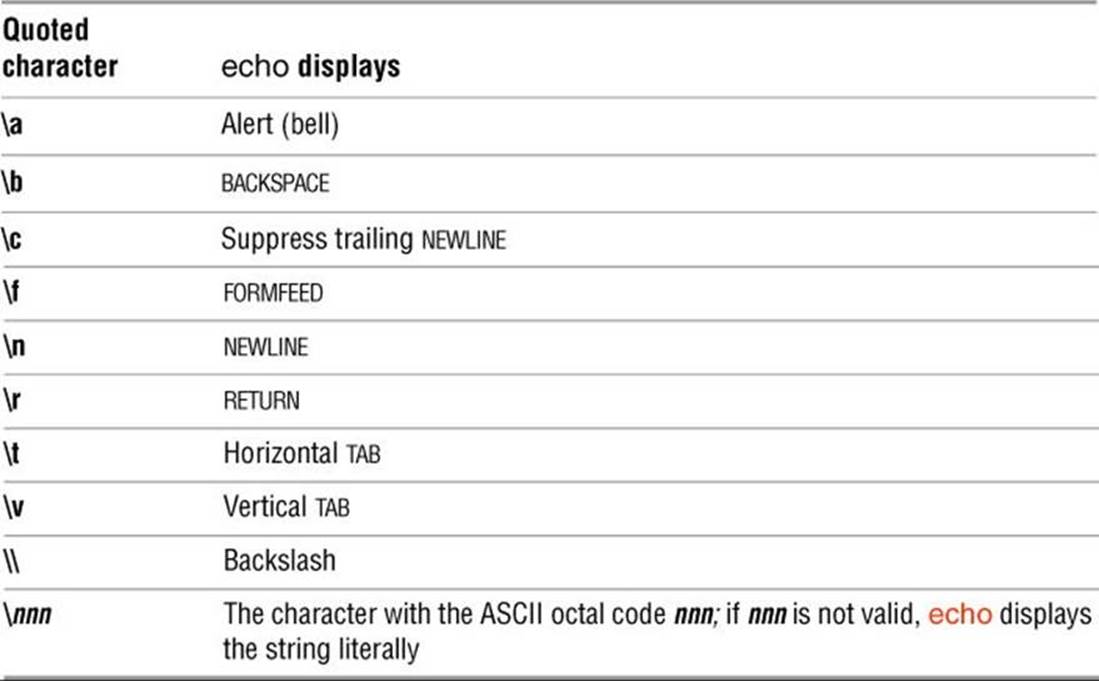
Table 27-3 Special characters in echo (must use –e)
You can also use the case control structure to take various actions in a script, depending on how many arguments the script is called with. The following script, named safedit, uses a case structure that branches based on the number of command-line arguments ($#). It callsvim and saves a backup copy of a file you are editing.
$ cat safedit
#!/bin/bash
PATH=/bin:/usr/bin
script=$(basename $0)
case $# in
0)
vim
exit 0
;;
1)
if [ ! -f "$1" ]
then
vim "$1"
exit 0
fi
if [ ! -r "$1" -o ! -w "$1" ]
then
echo "$script: check permissions on $1" 1>&2
exit 1
else
editfile=$1
fi
if [ ! -w "." ]
then
echo "$script: backup cannot be " \
"created in the working directory" 1>&2
exit 1
fi
;;
*)
echo "Usage: $script [file-to-edit]" 1>&2
exit 1
;;
esac
tempfile=/tmp/$$.$script
cp $editfile $tempfile
if vim $editfile
then
mv $tempfile bak.$(basename $editfile)
echo "$script: backup file created"
else
mv $tempfile editerr
echo "$script: edit error--copy of " \
"original file is in editerr" 1>&2
fi
If you call safedit without any arguments, the case structure executes its first branch and calls vim without a filename argument. Because an existing file is not being edited, safedit does not create a backup file. If you call safedit with one argument, it runs the commands in the second branch of the case structure and verifies that the file specified by $1 does not yet exist or is the name of a file for which the user has read and write permission. The safedit script also verifies that the user has write permission for the working directory. If the user calls safedit with more than one argument, the third branch of the case structure presents a usage message and exits with a status of 1.
Set PATH
At the beginning of the script, the PATH variable is set to search /bin and /usr/bin. Setting PATH in this way ensures that the commands executed by the script are standard utilities, which are kept in those directories. By setting this variable inside a script, you can avoid the problems that might occur if users have set PATH to search their own directories first and have scripts or programs with the same names as the utilities the script calls. You can also include absolute pathnames within a script to achieve this end, although this practice can make a script less portable.
Name of the program
The next line declares a variable named script and initializes it with the simple filename of the script:
script=$(basename $0)
The basename utility sends the simple filename component of its argument to standard output, which is assigned to the script variable, using command substitution. The $0 holds the command the script was called with (page 1022). No matter which of the following commands the user calls the script with, the output of basename is the simple filename safedit:
$ /home/max/bin/safedit memo
$ ./safedit memo
$ safedit memo
After the script variable is set, it replaces the filename of the script in usage and error messages. By using a variable that is derived from the command that invoked the script rather than a filename that is hardcoded into the script, you can create links to the script or rename it, and the usage and error messages will still provide accurate information.
Naming temporary files
Another feature of safedit relates to the use of the $$ parameter in the name of a temporary file. The statement following the esac statement creates and assigns a value to the tempfile variable. This variable contains the name of a temporary file that is stored in the /tmpdirectory, as are many temporary files. The temporary filename begins with the PID number of the shell and ends with the name of the script. Using the PID number ensures that the filename is unique. Thus safedit will not attempt to overwrite an existing file, as might happen if two people were using safedit at the same time. The name of the script is appended so that, should the file be left in /tmp for some reason, you can figure out where it came from.
The PID number is used in front of—rather than after—$script in the filename because of the 14-character limit placed on filenames by some older versions of UNIX. Linux systems do not have this limitation. Because the PID number ensures the uniqueness of the filename, it is placed first so that it cannot be truncated. (If the $script component is truncated, the filename is still unique.) For the same reason, when a backup file is created inside the if control structure a few lines down in the script, the filename consists of the string bak.followed by the name of the file being edited. On an older system, if bak were used as a suffix rather than a prefix and the original filename were 14 characters long, .bak might be lost and the original file would be overwritten. The basename utility extracts the simple filename of $editfile before it is prefixed with bak..
The safedit script uses an unusual test-command in the if structure: vim $editfile. The test-command calls vim to edit $editfile. When you finish editing the file and exit from vim, vim returns an exit code. The if control structure uses that exit code to determine which branch to take. If the editing session completed successfully, vim returns 0 and the statements following the then statement are executed. If vim does not terminate normally (as would occur if the user killed [page 465] the vim process), vim returns a nonzero exit status and the script executes the statements following else.
select
The select control structure is based on the one found in the Korn Shell. It displays a menu, assigns a value to a variable based on the user’s choice of items, and executes a series of commands. The select control structure has the following syntax:
select varname [in arg . . . ]
do
commands
done
The select structure displays a menu of the arg items. If you omit the keyword in and the list of arguments, select uses the positional parameters in place of the arg items. The menu is formatted with numbers before each item. For example, a select structure that begins with
select fruit in apple banana blueberry kiwi orange watermelon STOP
displays the following menu:
1) apple 3) blueberry 5) orange 7) STOP
2) banana 4) kiwi 6) watermelon
The select structure uses the values of the LINES (default is 24) and COLUMNS (default is 80) variables to specify the size of the display. With COLUMNS set to 20, the menu looks like this:
1) apple
2) banana
3) blueberry
4) kiwi
5) orange
6) watermelon
7) STOP
PS3
After displaying the menu, select displays the value of PS3, the select prompt. The default value of PS3 is ?#, but it is typically set to a more meaningful value. When you enter a valid number (one in the menu range) in response to the PS3 prompt, select sets varname to the argument corresponding to the number you entered. An invalid entry causes the shell to set varname to null. Either way, select stores your response in the keyword variable REPLY and then executes the commands between do and done. If you press RETURN without entering a choice, the shell redisplays the menu and the PS3 prompt.
The select structure continues to issue the PS3 prompt and execute the commands until something causes it to exit—typically a break or an exit statement. A break statement exits from the loop and an exit statement exits from the script.
The following script illustrates the use of select:
$ cat fruit2
#!/bin/bash
PS3="Choose your favorite fruit from these possibilities: "
select FRUIT in apple banana blueberry kiwi orange watermelon STOP
do
if [ "$FRUIT" == "" ]; then
echo -e "Invalid entry.\n"
continue
elif [ $FRUIT = STOP ]; then
echo "Thanks for playing!"
break
fi
echo "You chose $FRUIT as your favorite."
echo -e "That is choice number $REPLY.\n"
done
$ ./fruit2
1) apple 3) blueberry 5) orange 7) STOP
2) banana 4) kiwi 6) watermelon
Choose your favorite fruit from these possibilities: 3
You chose blueberry as your favorite.
That is choice number 3.
Choose your favorite fruit from these possibilities: 99
Invalid entry.
Choose your favorite fruit from these possibilities: 7
Thanks for playing!
After setting the PS3 prompt and establishing the menu with the select statement, fruit2 executes the commands between do and done. If the user submits an invalid entry, the shell sets varname ($FRUIT) to a null value. If $FRUIT is null, echo dis-plays an error message; continue then causes the shell to redisplay the PS3 prompt. If the entry is valid, the script tests whether the user wants to stop. If so, echo displays an appropriate message and break exits from the select structure (and from the script). If the user enters a valid response and does not want to stop, the script displays the name and number of the user’s response. (See page 1009 for information about the echo –e option.)
Here Document
A Here document allows you to redirect input to a shell script from within the shell script itself. A Here document is so named because it is here—immediately accessible in the shell script—instead of there, perhaps in another file.
The following script, named birthday, contains a Here document. The two less than symbols (<<) in the first line indicate a Here document follows. One or more characters that delimit the Here document follow the less than symbols—this example uses a plus sign. Whereas the opening delimiter must appear adjacent to the less than symbols, the closing delimiter must be on a line by itself. The shell sends everything between the two delimiters to the process as standard input. In the example it is as though you have redirected standard input to grep from a file, except that the file is embedded in the shell script:
$ cat birthday
grep -i "$1" <<+
Max June 22
Barbara February 3
Darlene May 8
Helen March 13
Zach January 23
Nancy June 26
+
$ ./birthday Zach
Zach January 23
$ ./birthday june
Max June 22
Nancy June 26
When you run birthday, it lists all the Here document lines that contain the argument you called it with. In this case the first time birthday is run, it displays Zach’s birthday because it is called with an argument of Zach. The second run displays all the birthdays in June. The –i argument causes grep’s search not to be case sensitive.
Optional
The next script, named bundle,1 includes a clever use of a Here document. The bundle script is an elegant example of a script that creates a shell archive (shar) file. The script creates a file that is itself a shell script containing several other files as well as the code needed to re-create the original files:
1. Thanks to Brian W. Kernighan and Rob Pike, The Unix Programming Environment (Englewood Cliffs, N.J.: Prentice-Hall, 1984), 98. Reprinted with permission.
$ cat bundle
#!/bin/bash
# bundle: group files into distribution package
echo "# To unbundle, bash this file"
for i
do
echo "echo $i 1>&2"
echo "cat >$i <<'End of $i'"
cat $i
echo "End of $i"
done
Just as the shell does not treat special characters that occur in standard input of a shell script as special, so the shell does not treat the special characters that occur between the delimiters in a Here document as special.
As the following example shows, the output of bundle is a shell script, which is redirected to a file named bothfiles. It contains the contents of each file given as an argument to bundle (file1 and file2 in this case) inside a Here document. To extract the original files frombothfiles, you simply give it as an argument to a bash command. Before each Here document is a cat command that causes the Here document to be written to a new file when bothfiles is run:
$ cat file1
This is a file.
It contains two lines.
$ cat file2
This is another file.
It contains
three lines.
$ ./bundle file1 file2 > bothfiles
$ cat bothfiles
# To unbundle, bash this file
echo file1 1>&2
cat >file1 <<'End of file1'
This is a file.
It contains two lines.
End of file1
echo file2 1>&2
cat >file2 <<'End of file2'
This is another file.
It contains
three lines.
End of file2
In the next example, file1 and file2 are removed before bothfiles is run. The bothfiles script echoes the names of the files it creates as it creates them. The ls command then shows that bothfiles has re-created file1 and file2:
$ rm file1 file2
$ bash bothfiles
file1
file2
$ ls
bothfiles
file1
file2
File Descriptors
As discussed on page 334, before a process can read from or write to a file, it must open that file. When a process opens a file, Linux associates a number (called a file descriptor) with the file. A file descriptor is an index into the process’s table of open files. Each process has its own set of open files and its own file descriptors. After opening a file, a process reads from and writes to that file by referring to its file descriptor. When it no longer needs the file, the process closes the file, freeing the file descriptor.
A typical Linux process starts with three open files: standard input (file descriptor 0), standard output (file descriptor 1), and standard error (file descriptor 2). Often these are the only files the process needs. Recall that you redirect standard output with the symbol > or the symbol 1> and that you redirect standard error with the symbol 2>. Although you can redirect other file descriptors, because file descriptors other than 0, 1, and 2 do not have any special conventional meaning, it is rarely useful to do so. The exception is in programs that you write yourself, in which case you control the meaning of the file descriptors and can take advantage of redirection.
![]() Opening a File Descriptor
Opening a File Descriptor
The Bourne Again Shell opens files using the exec builtin with the following syntax:
exec n> outfile
exec m< infile
The first line opens outfile for output and holds it open, associating it with file descriptor n. The second line opens infile for input and holds it open, associating it with file descriptor m.
![]() Duplicating a File Descriptor
Duplicating a File Descriptor
The <& token duplicates an input file descriptor; >& duplicates an output file descriptor. You can duplicate a file descriptor by making it refer to the same file as another open file descriptor, such as standard input or output. Use the following syntax to open or redirect file descriptor n as a duplicate of file descriptor m:
exec n<&m
Once you have opened a file, you can use it for input and output in two ways. First, you can use I/O redirection on any command line, redirecting standard output to a file descriptor with >&n or redirecting standard input from a file descriptor with <&n. Second, you can use the read (page1041) and echo builtins. If you invoke other commands, including functions (page 396), they inherit these open files and file descriptors. When you have finished using a file, you can close it using the following syntax:
exec n<&–
File Descriptor Examples
When you call the following mycp function with two arguments, it copies the file named by the first argument to the file named by the second argument. If you supply only one argument, the script copies the file named by the argument to standard output. If you invoke mycp with no arguments, it copies standard input to standard output.
Tip: A function is not a shell script
The mycp example is a shell function; it will not work as you expect if you execute it as a shell script. (It will work: The function will be created in a very short-lived subshell, which is of little use.) You can enter this function from the keyboard. If you put the function in a file, you can run it as an argument to the . (dot) builtin (page 332). You can also put the function in a startup file if you want it to be always available (page 397).
function mycp () {
case $# in
0)
# Zero arguments
# File descriptor 3 duplicates standard input
# File descriptor 4 duplicates standard output
exec 3<&0 4<&1
;;
1)
# One argument
# Open the file named by the argument for input
# and associate it with file descriptor 3
# File descriptor 4 duplicates standard output
exec 3< $1 4<&1
;;
2)
# Two arguments
# Open the file named by the first argument for input
# and associate it with file descriptor 3
# Open the file named by the second argument for output
# and associate it with file descriptor 4
exec 3< $1 4> $2
;;
* )
echo "Usage: mycp [source [dest]]"
return 1
;;
esac
# Call cat with input coming from file descriptor 3
# and output going to file descriptor 4
cat <&3 >&4
# Close file descriptors 3 and 4
exec 3<&- 4<&-
}
The real work of this function is done in the line that begins with cat. The rest of the script arranges for file descriptors 3 and 4, which are the input and output of the cat command, respectively, to be associated with the appropriate files.
Optional
The next program takes two filenames on the command line, sorts both, and sends the output to temporary files. The program then merges the sorted files to standard output, preceding each line by a number that indicates which file it came from.
$ cat sortmerg
#!/bin/bash
usage () {
if [ $# -ne 2 ]; then
echo "Usage: $0 file1 file2" 2>&1
exit 1
fi
}
# Default temporary directory
: ${TEMPDIR:=/tmp}
# Check argument count
usage "$@"
# Set up temporary files for sorting
file1=$TEMPDIR/$$.file1
file2=$TEMPDIR/$$.file2
# Sort
sort $1 > $file1
sort $2 > $file2
# Open $file1 and $file2 for reading. Use file descriptors 3 and 4.
exec 3<$file1
exec 4<$file2
# Read the first line from each file to figure out how to start.
read Line1 <&3
status1=$?
read Line2 <&4
status2=$?
# Strategy: while there is still input left in both files:
# Output the line that should come first.
# Read a new line from the file that line came from.
while [ $status1 -eq 0 -a $status2 -eq 0 ]
do
if [[ "$Line2" > "$Line1" ]]; then
echo -e "1.\t$Line1"
read -u3 Line1
status1=$?
else
echo -e "2.\t$Line2"
read -u4 Line2
status2=$?
fi
done
# Now one of the files is at end of file.
# Read from each file until the end.
# First file1:
while [ $status1 -eq 0 ]
do
echo -e "1.\t$Line1"
read Line1 <&3
status1=$?
done
# Next file2:
while [[ $status2 -eq 0 ]]
do
echo -e "2.\t$Line2"
read Line2 <&4
status2=$?
done
# Close and remove both input files
exec 3<&- 4<&-
rm -f $file1 $file2
exit 0
Determining Whether a File Descriptor Is Associated with the Terminal
The test –t criterion takes an argument of a file descriptor and causes test to return a value of 0 (true) or not 0 (false) based on whether the specified file descriptor is associated with the terminal (screen or keyboard). It is typically used to determine whether standard input, standard output, and/or standard error is coming from/going to the terminal.
In the following example, the is.term script uses the test –t criterion ([ ] is a synonym for test; page 1000) to see if file descriptor 1 (initially standard output) of the process running the shell script is associated with the screen. The message the script displays is based on whether test returnstrue (file descriptor 1 is associated with the screen) or false (file descriptor 1 is not associated with the screen).
$ cat is.term
if [ -t 1 ] ; then
echo "FD 1 (stdout) IS going to the screen"
else
echo "FD 1 (stdout) is NOT going to the screen"
fi
When you run is.term without redirecting standard output, the script displays FD 1 (stdout) IS going to the screen because standard output of the is.term script has not been redirected:
$ ./is.term
FD 1 (stdout) IS going to the screen
When you redirect standard output of a program using > on the command line, bash closes file descriptor 1 and then reopens it, associating it with the file specified following the redirect symbol.
The next example redirects standard output of the is.term script: The newly opened file descriptor 1 associates standard output with the file named hold. Now the test command ([ –t 1 ]) fails, returning a value of 1 (false), because standard output is not associated with a terminal. The script writes FD 1 (stdout) is NOT going to the screen to hold:
$ ./is.term > hold
$ cat hold
FD 1 (stdout) is NOT going to the screen
If you redirect standard error from is.term, the script will report FD 1 (stdout) IS going to the screen and will write nothing to the file receiving the redirection; standard output has not been redirected. You can use [ –t 2 ] to test if standard error is going to the screen:
$ ./is.term 2> hold
FD 1 (stdout) IS going to the screen
In a similar manner, if you send standard output of is.term through a pipeline, test reports standard output is not associated with a terminal. In this example, cat copies standard input to standard output:
$ ./is.term | cat
FD 1 (stdout) is NOT going to the screen
Optional
You can also experiment with test on the command line. This technique allows you to make changes to your experimental code quickly by taking advantage of command history and editing (page 378). To better understand the following examples, first verify that test(called as [ ]) returns a value of 0 (true) when file descriptor 1 is associated with the screen and a value other than 0 (false) when file descriptor 1 is not associated with the screen. The $? special parameter (page 1029) holds the exit status of the previous command.
$ [ -t 1 ]
$ echo $?
0
$ [ -t 1 ] > hold
$ echo $?
1
As explained on page 343, the && (AND) control operator first executes the command preceding it. Only if that command returns a value of 0 (true) does && execute the command following it. In the following example, if [ –t 1 ] returns 0, && executes echo "FD 1 to screen". Although the parentheses (page 344) are not required in this example, they are needed in the next one.
$ ( [ -t 1 ] && echo "FD 1 to screen" )
FD 1 to screen
Next, the output from the same command line is sent through a pipeline to cat, so test returns 1 (false) and && does not execute echo.
$ ( [ -t 1 ] && echo "FD 2 to screen" ) | cat
$
The following example is the same as the previous one, except test checks whether file descriptor 2 is associated with the screen. Because the pipeline redirects only standard output, test returns 0 (true) and && executes echo.
$ ( [ -t 2 ] && echo "FD 2 to screen" ) | cat
FD 2 to screen
In this example, test checks whether file descriptor 2 is associated with the screen (it is) and echo sends its output to file descriptor 1 (which goes through the pipeline to cat).
Parameters
Shell parameters were introduced on page 352. This section goes into more detail about positional parameters and special parameters.
Positional Parameters
Positional parameters comprise the command name and command-line arguments. These parameters are called positional because you refer to them by their position on the command line. You cannot use an assignment statement to change the value of a positional parameter. However, the setbuiltin (page 1024) enables you to change the value of any positional parameter except the name of the calling program (the command name).
$0: Name of the Calling Program
The shell expands $0 to the name of the calling program (the command you used to call the program—usually the name of the program you are running). This parameter is numbered zero because it appears before the first argument on the command line:
$ cat abc
echo "This script was called by typing $0"
$ ./abc
This script was called by typing ./abc
$ /home/sam/abc
This script was called by typing /home/sam/abc
The preceding shell script uses echo to verify the way the script you are executing was called. You can use the basename utility and command substitution to extract the simple filename of the script:
$ cat abc2
echo "This script was called by typing $(basename $0)"
$ /home/sam/abc2
This script was called by typing abc2
When you call a script through a link, the shell expands $0 to the value of the link.
$ ln -s abc2 mylink
$ /home/sam/mylink
This script was called by typing mylink
When you display the value of $0 from an interactive shell, the shell displays its name because that is the name of the calling program (the program you are running).
$ echo $0
bash
Tip: bash versus –bash
On some systems, echo $0 displays –bash while on others it displays bash. The former indicates a login shell (page 330); the latter indicates a shell that is not a login shell. In a GUI environment, some terminal emulators launch login shells while others do not.
$1–$n: Positional Parameters
The shell expands $1 to the first argument on the command line, $2 to the second argument, and so on up to $n. These parameters are short for ${1}, ${2}, ${3}, and so on. For values of n less than or equal to 9, the braces are optional. For values of n greater than 9, the number must be enclosed within braces. For example, the twelfth positional parameter is represented by ${12}. The following script displays positional parameters that hold command-line arguments:
$ cat display_5args
echo First 5 arguments are $1 $2 $3 $4 $5
$ ./display_5args zach max helen
First 5 arguments are zach max helen
The display_5args script displays the first five command-line arguments. The shell expands each parameter that represents an argument that is not present on the command line to a null string. Thus the $4 and $5 parameters have null values in this example.
Caution: Always quote positional parameters
You can “lose” positional parameters if you do not quote them. See the following text for an example.
Enclose references to positional parameters between double quotation marks. The quotation marks are particularly important when you are using positional parameters as arguments to commands. Without double quotation marks, a positional parameter that is not set or that has a null value disappears:
$ cat showargs
echo "$0 was called with $# arguments, the first is :$1:."
$ ./showargs a b c
./showargs was called with 3 arguments, the first is :a:.
$ echo $xx
$ ./showargs $xx a b c
./showargs was called with 3 arguments, the first is :a:.
$ ./showargs "$xx" a b c
./showargs was called with 4 arguments, the first is ::.
The showargs script displays the number of arguments it was called with ($#) followed by the value of the first argument between colons. In the preceding example, showargs is initially called with three arguments. Next the echo command shows that the $xx variable, which is not set, has a null value. The $xx variable is the first argument to the second and third showargs commands; it is not quoted in the second command and quoted using double quotation marks in the third command. In the second showargs command, the shell expands the arguments to a b c and passesshowargs three arguments. In the third showargs command, the shell expands the arguments to "" a b c, which results in calling showargs with four arguments. The difference in the two calls to showargs illustrates a subtle potential problem when using positional parameters that might not be set or that might have a null value.
![]() set: Initializes Positional Parameters
set: Initializes Positional Parameters
When you call the set builtin with one or more arguments, it assigns the values of the arguments to the positional parameters, starting with $1. The following script uses set to assign values to the positional parameters $1, $2, and $3:
$ cat set_it
set this is it
echo $3 $2 $1
$ ./set_it
it is this
Optional
A single hyphen (–) on a set command line marks the end of options and the start of values the shell assigns to positional parameters. A – also turns off the xtrace (–x) and verbose (–v) options (Table 9-13 on page 401). The following set command turns on posix mode and sets the first two positional parameters as shown by the echo command:
$ set -o posix - first.param second.param
$ echo $*
first.param second.param
A double hyphen (––) on a set command line without any following arguments unsets the positional parameters; when followed by arguments, –– sets the positional parameters, including those that begin with a hyphen (–).
$ set --
$ echo $*
$
Combining command substitution (page 410) with the set builtin is a convenient way to alter standard output of a command to a form that can be easily manipulated in a shell script. The following script shows how to use date and set to provide the date in a useful format. The first command shows the output of date. Then cat displays the contents of the dateset script. The first command in this script uses command substitution to set the positional parameters to the output of the date utility. The next command, echo $*, displays all positional parameters resulting from the previous set. Subsequent commands display the values of $1, $2, $3, and $6. The final command displays the date in a format you can use in a letter or report.
$ date
Wed Aug 15 17:35:29 PDT 2012
$ cat dateset
set $(date)
echo $*
echo
echo "Argument 1: $1"
echo "Argument 2: $2"
echo "Argument 3: $3"
echo "Argument 6: $6"
echo
echo "$2 $3, $6"
$ ./dateset
Wed Aug 15 17:35:34 PDT 2012
Argument 1: Wed
Argument 2: Aug
Argument 3: 15
Argument 6: 2012
Aug 15, 2012
You can also use the +format argument to date to specify the content and format of its output.
set displays shell variables
When called without arguments, set displays a list of the shell variables that are set, including user-created variables and keyword variables. Under bash, this list is the same as that displayed by declare (page 357) when it is called without any arguments.
$ set
BASH_VERSION='4.2.24(1)-release'
COLORS=/etc/DIR_COLORS
COLUMNS=89
LESSOPEN='||/usr/bin/lesspipe.sh %s'
LINES=53
LOGNAME=sam
MAIL=/var/spool/mail/sam
MAILCHECK=60
...
The set builtin can also perform other tasks. For more information refer to “set: Works with Shell Features, Positional Parameters, and Variables” on page 1036.
shift: Promotes Positional Parameters
The shift builtin promotes each positional parameter. The first argument (which was represented by $1) is discarded. The second argument (which was represented by $2) becomes the first argument (now $1), the third argument becomes the second, and so on. Because no “unshift” command exists, you cannot bring back arguments that have been discarded. An optional argument to shift specifies the number of positions to shift (and the number of arguments to discard); the default is 1.
The following demo_shift script is called with three arguments. Double quotation marks around the arguments to echo preserve the spacing of the output but allow the shell to expand variables. The program displays the arguments and shifts them repeatedly until no arguments are left to shift.
$ cat demo_shift
echo "arg1= $1 arg2= $2 arg3= $3"
shift
echo "arg1= $1 arg2= $2 arg3= $3"
shift
echo "arg1= $1 arg2= $2 arg3= $3"
shift
echo "arg1= $1 arg2= $2 arg3= $3"
shift
$ ./demo_shift alice helen zach
arg1= alice arg2= helen arg3= zach
arg1= helen arg2= zach arg3=
arg1= zach arg2= arg3=
arg1= arg2= arg3=
Repeatedly using shift is a convenient way to loop over all command-line arguments in shell scripts that expect an arbitrary number of arguments. See page 989 for a shell script that uses shift.
$* and $@: Expand to All Positional Parameters
The shell expands the $* parameter to all positional parameters, as the display_all program demonstrates:
$ cat display_all
echo All arguments are $*
$ ./display_all a b c d e f g h i j k l m n o p
All arguments are a b c d e f g h i j k l m n o p
"$*" Versus "$@"
The $* and $@ parameters work the same way except when they are enclosed within double quotation marks. Using "$*" yields a single argument with the first character in IFS (page 363; normally a SPACE) between the positional parameters. Using "$@" produces a list wherein each positional parameter is a separate argument. This difference typically makes "$@" more useful than "$*" in shell scripts.
The following scripts help explain the difference between these two parameters. In the second line of both scripts, the single quotation marks keep the shell from interpreting the enclosed special characters, allowing the shell to pass them to echo so echo can display them. The bb1 script shows that set "$*" assigns multiple arguments to the first command-line parameter.
$ cat bb1
set "$*"
echo $# parameters with '"$*"'
echo 1: $1
echo 2: $2
echo 3: $3
$ ./bb1 a b c
1 parameters with "$*"
1: a b c
2:
3:
The bb2 script shows that set "$@" assigns each argument to a different command-line parameter.
$ cat bb2
set "$@"
echo $# parameters with '"$@"'
echo 1: $1
echo 2: $2
echo 3: $3
$ ./bb2 a b c
3 parameters with "$@"
1: a
2: b
3: c
Special Parameters
Special parameters enable you to access useful values pertaining to positional parameters and the execution of shell commands. As with positional parameters, the shell expands a special parameter when it is preceded by a $. Also as with positional parameters, you cannot modify the value of a special parameter using an assignment statement.
$#: Number of Positional Parameters
The shell expands $# to the decimal number of arguments on the command line (positional parameters), not counting the name of the calling program:
$ cat num_args
echo "This script was called with $# arguments."
$ ./num_args sam max zach
This script was called with 3 arguments.
The next example shows set initializing four positional parameters and echo displaying the number of parameters set initialized:
$ set a b c d; echo $#
4
$$: PID Number
The shell expands the $$ parameter to the PID number of the process that is executing it. In the following interaction, echo displays the value of this parameter and the ps utility confirms its value. Both commands show the shell has a PID number of 5209:
$ echo $$
5209
$ ps
PID TTY TIME CMD
5209 pts/1 00:00:00 bash
6015 pts/1 00:00:00 ps
Because echo is built into the shell, the shell does not create another process when you give an echo command. However, the results are the same whether echo is a builtin or not, because the shell expands $$ before it forks a new process to run a command. Try giving this command using the echo utility (/bin/echo), which is run by another process, and see what happens.
Naming temporary files
In the following example, the shell substitutes the value of $$ and passes that value to cp as a prefix for a filename:
$ echo $$
8232
$ cp memo $$.memo
$ ls
8232.memo memo
Incorporating a PID number in a filename is useful for creating unique filenames when the meanings of the names do not matter; this technique is often used in shell scripts for creating names of temporary files. When two people are running the same shell script, having unique filenames keeps the users from inadvertently sharing the same temporary file.
The following example demonstrates that the shell creates a new shell process when it runs a shell script. The id2 script displays the PID number of the process running it (not the process that called it—the substitution for $$ is performed by the shell that is forked to run id2):
$ cat id2
echo "$0 PID= $$"
$ echo $$
8232
$ ./id2
./id2 PID= 8362
$ echo $$
8232
The first echo displays the PID number of the interactive shell. Then id2 displays its name ($0) and the PID number of the subshell it is running in. The last echo shows that the PID number of the interactive shell has not changed.
$!: PID Number of Most Recent Background Process
The shell expands $! to the value of the PID number of the most recent process that ran in the background. The following example executes sleep as a background task and uses echo to display the value of $!:
$ sleep 60 &
[1] 8376
$ echo $!
8376
![]() $?: Exit Status
$?: Exit Status
When a process stops executing for any reason, it returns an exit status to its parent process. The exit status is also referred to as a condition code or a return code. The shell expands the $? parameter to the exit status of the most recently executed command.
By convention, a nonzero exit status is interpreted as false and means the command failed; a zero is interpreted as true and indicates the command executed successfully. In the following example, the first ls command succeeds and the second fails; the exit status displayed by echo reflects these outcomes:
$ ls es
es
$ echo $?
0
$ ls xxx
ls: xxx: No such file or directory
$ echo $?
1
You can specify the exit status a shell script returns by using the exit builtin, followed by a number, to terminate the script. If you do not use exit with a number to terminate a script, the exit status of the script is that of the last command the script ran.
$ cat es
echo This program returns an exit status of 7.
exit 7
$ es
This program returns an exit status of 7.
$ echo $?
7
$ echo $?
0
The es shell script displays a message and terminates execution with an exit command that returns an exit status of 7, the user-defined exit status in this script. The first echo then displays the exit status of es. The second echo displays the exit status of the first echo: This value is 0, indicating the first echo executed successfully.
$–: Flags of Options That Are Set
The shell expands the $– parameter to a string of one-character bash option flags. These flags are set by the set or shopt builtins, when bash is invoked, or by bash itself (e.g., –i). For more information refer to “Controlling bash: Features and Options” on page 398. The following command displays typical bash option flags for an interactive shell:
$ echo $-
himBH
Table 9-13 on page 401 lists each of these flags (except i) as options to set in the Alternative syntax column. When you start an interactive shell, bash sets the i (interactive) option flag. You can use this flag to determine if a shell is being run interactively. In the following example,display_flags displays the bash option flags. When run as a script in a subshell, it shows the i option flag is not set; when run using source (page 332), which runs a script in the current shell, it shows the i option flag is set.
$ cat display_flags
echo $-
$ ./display_flags
hB
$ source ./display_flags
himBH
$_: Last Argument of Previously Executed Command
When bash starts, as when you run a shell script, it expands the $_ parameter to the pathname of the file it is running. After running a command, it expands this parameter to the last argument of the previously executed command.
$ cat last_arg
echo $_
echo here I am
echo $_
$ ./last_arg
./last_arg
here I am
am
In the next example, the shell never executes the echo command; it expands $_ to the last argument of the ls command (which it executed, albeit unsuccessfully).
$ ls xx && echo hi
ls: cannot access xx: No such file or directory
$ echo $_
xx
![]() Variables
Variables
Variables, introduced on page 352, are shell parameters denoted by a name. Variables can have zero or more attributes (page 356; e.g., export, readonly). You, or a shell program, can create and delete variables, and can assign values and attributes to variables. This section adds to the previous coverage with a discussion of the shell variables, environment variables, inheritance, expanding null and unset variables, array variables, and variables in functions.
Shell Variables
By default, when you create a variable it is available only in the shell you created it in; it is not available in subshells. This type of variable is called a shell variable. In the following example, the first command displays the PID number of the interactive shell the user is working in (2802) and the second command initializes the variable x to 5. Then a bash command spawns a new shell (PID 29572). This new shell is a child of the shell the user was working in (a subprocess; page 373). The ps –l command shows the PID and PPID (parent PID) numbers of each shell: PID 29572 is a child of PID 2802. The final echo command shows the variable x is not set in the spawned (child) shell: It is a shell variable and is local to the shell it was created in.
$ echo $$
2802
$ x=5
$ echo $x
5
$ bash
$ echo $$
29572
$ ps -l
F S UID PID PPID C PRI NI ADDR SZ WCHAN TTY TIME CMD
0 S 1000 2802 2786 0 80 0 - 5374 wait pts/2 00:00:00 bash
0 S 1000 29572 2802 0 80 0 - 5373 wait pts/2 00:00:00 bash
0 R 1000 29648 29572 0 80 0 - 1707 - pts/2 00:00:00 ps
$ echo $x
$
Environment, Environment Variables, and Inheritance
This section explains the concepts of the command execution environment and inheritance.
Environment
When the Linux kernel invokes a program, the kernel passes to the program a list comprising an array of strings. This list, called the command execution environment or simply the environment, holds a series of name-value pairs in the form name=value.
![]() Environment Variables
Environment Variables
When bash is invoked, it scans its environment and creates parameters for each name-value pair, assigning the corresponding value to each name. Each of these parameters is an environment variable; these variables are in the shell’s environment. Environment variables are sometimes referred to as global variables or exported variables.
Inheritance
A child process (a subprocess; see page 373 for more information about the process structure) inherits its environment from its parent. An inherited variable is an environment variable for the child, so its children also inherit the variable: All children and grandchildren, to any level, inherit environment variables from their ancestor. A process can create, remove, and change the value of environment variables, so a child process might not inherit the same environment its parent inherited.
Because of process locality (next), a parent cannot see changes a child makes to an environment variable and a child cannot see changes a parent makes to an environment variable once the child has been spawned (created). Nor can unrelated processes see changes to variables that have the same name in each process, such as commonly inherited environment variables (e.g., PATH).
Process Locality: Shell Variables
Variables are local, which means they are specific to a process: Local means local to a process. For example, when you log in on a terminal or open a terminal emulator, you start a process that runs a shell. Assume in that shell the LANG environment variable (page 368) is set toen_US.UTF-8.
If you then log in on a different terminal or open a second terminal emulator, you start another process that runs a different shell. Assume in that shell the LANG environment variable is also set to en_US.UTF-8. When you change the value of LANG on the second terminal to de_DE.UTF-8, the value of LANG on the first terminal does not change. It does not change because variables (both names and values) are local to a process and each terminal is running a separate process (even though both processes are running shells).
![]() export: Puts Variables in the Environment
export: Puts Variables in the Environment
When you run an export command (a synonym for declare –x; page 357) with variable names as arguments, the shell places the names (and values, if present) of those variables in the environment. Without arguments, export lists environment (exported) variables.
The following extest1 shell script assigns the value of american to the variable named cheese and then displays its name (the shell expands $0 to the name of the calling program) and the value of cheese. The extest1 script then calls subtest, which attempts to display the same information, declares a cheese variable by initializing it, displays the value of the variable, and returns control to the parent process, which is executing extest1. Finally, extest1 again displays the value of the original cheese variable.
$ cat extest1
cheese=american
echo "$0 1: $cheese"
./subtest
echo "$0 2: $cheese"
$ cat subtest
echo "$0 1: $cheese"
cheese=swiss
echo "$0 2: $cheese"
$ ./extest1
./extest1 1: american
./subtest 1:
./subtest 2: swiss
./extest1 2: american
The subtest script never receives the value of cheese from extest1 (and extest1 never loses the value): cheese is a shell variable, not an environment variable (it is not in the environment of the parent process and therefore is not available in the child process). When a process attempts to display the value of a variable that has not been declared and is not in the environment, as is the case with subtest, the process displays nothing; the value of an undeclared variable is that of the null string. The final echo shows the value of cheese in extest1 has not changed: In bash—unlike in the real world—a child can never affect its parent’s attributes.
The extest2 script is the same as extest1 except it uses export to put cheese in the environment of the current process. The result is that cheese appears in the environment of the child process running the subtest script.
$ cat extest2
export cheese=american
echo "$0 1: $cheese"
./subtest
echo "$0 2: $cheese"
$ ./extest2
./extest2 1: american
./subtest 1: american
./subtest 2: swiss
./extest2 2: american
Here the child process inherits the value of cheese as american and, after displaying this value, changes its copy to swiss. When control is returned to the parent, the parent’s copy of cheese retains its original value: american.
Alternately, as the next program shows, you can put a variable in the environment of a child shell without declaring it in the parent shell. See page 148 for more information on this command-line syntax.
$ cheese=cheddar ./subtest
./subtest 1: cheddar
./subtest 2: swiss
$ echo $cheese
$
You can export a variable without/before assigning a value to it. Also, you do not need to export an already-exported variable after you change its value. For example, you do not usually need to export PATH when you assign a value to it in ~/.bash_profile because it is typically exported in a global startup file.
You can place several export declarations (initializations) on a single line:
$ export cheese=swiss coffee=colombian avocados=us
Unexport
An export –n or declare +x command removes the export attribute from the named environment variable (unexports the variable), demoting it to become a shell variable while preserving its value.
Export a function
An export –f command places the named function (page 396) in the environment so it is available to child processes.
printenv: Displays Environment Variable Names and Values
The printenv utility displays environment variable names and values. When called without an argument, it displays all environment variables. When called with the name of an environment variable, it displays the value of that variable. When called with the name of a variable that is not in the environment or has not been declared, it displays nothing. You can also use export (page 1032) and env (next page) to display a list of environment variables.
$ x=5 # not in the environment
$ export y=10 # in the environment
$ printenv x
$ printenv y
10
$ printenv
...
SHELL=/bin/bash
TERM=xterm
USER=sam
PWD=/home/sam
y=10
...
![]() env: Runs a Program in a Modified Environment
env: Runs a Program in a Modified Environment
The env utility runs a program as a child of the current shell, allowing you to modify the environment the current shell exports to the newly created process. See page 148 for an easier way to place a variable in the environment of a child process. The env utility has the following syntax:
env [options] [-] [name=value] ... [command-line]
where options is one of the following options:
––ignore-environment
–i or –
Causes command-line to run in a clean environment; no environment variables are available to the newly created process.
––unset=name –u name
Unsets the environment variable named name so it is not available to the newly created process.
Just as on a bash command line (page 148), zero or more name=value pairs may be used to set or modify environment variables in the newly created process, except you cannot specify a name without a value. The env utility evaluates the name=value pairs from left to right, so if nameappears more than once in this list, the rightmost value takes precedence.
The command-line is the command (including any options and arguments) that env executes. The env utility takes its first argument that does not contain an equal sign as the beginning of the command line and, if you specify a command that does not include a slash (i.e., if you specify a simple filename), uses the value of PATH (page 359) to locate the command. It does not work with builtin commands.
In the following example, env runs display_xx, a script that displays the value of the xx variable. On the command line, env initializes the variable xx in the environment of the script it calls and echo in the script displays the value of xx.
$ cat display_xx
echo "Running $0"
echo $xx
$ env xx=remember ./display_xx
Running ./display_xx
remember
If you want to declare only environment variables for a program, it is simpler to use the following bash syntax (page 148):
$ xx=remember ./display_xx
Running ./display_xx
remember
When called without a command-line, env displays a list of environment variables (it behaves similarly to printenv [page 1034]):
$ env
...
SHELL=/bin/bash
TERM=xterm
USER=sam
PWD=/home/sam
y=10
...
set: Works with Shell Features, Positional Parameters, and Variables
The set builtin can perform the following tasks:
• Set or unset shell features (also called attributes; page 400).
• Assign values to positional parameters (page 1024).
• Display variables that are available to the current shell. These variables comprise shell variables (variables not in the environment) and environment variables. The set builtin displays variables in a format you can use in a shell script or as input to set to declare and initialize variables. Output is sorted based on the current locale (page 368). You cannot reset readonly variables.
$ set
...
BASH=/bin/bash
COLUMNS=70
PWD=/home/sam
SHELL=/bin/bash
x=5
y=10
...
Expanding Null and Unset Variables
The expression ${name} (or just $name if it is not ambiguous) expands to the value of the name variable. If name is null or not set, bash expands ${name} to a null string. The Bourne Again Shell provides the following alternatives to accepting the null string as the value of the variable:
• Use a default value for the variable.
• Use a default value and assign that value to the variable.
• Display an error.
You can choose one of these alternatives by using a modifier with the variable name. In addition, you can use set –o nounset (page 402) to cause bash to display an error message and exit from a script whenever the script references an unset variable.
:– Uses a Default Value
The :– modifier uses a default value in place of a null or unset variable while allowing a nonnull variable to represent itself:
${name:–default}
The shell interprets :– as “If name is null or unset, expand default and use the expanded value in place of name; else use name.”
The following command lists the contents of the directory named by the LIT variable. If LIT is null or unset, it lists the contents of /home/max/literature:
$ ls ${LIT:-/home/max/literature}
The shell expands variables in default:
$ ls ${LIT:-$HOME/literature}
:= Assigns a Default Value
The :– modifier does not change the value of a variable. However, you can change the value of a null or unset variable to the expanded value of default by using the := modifier:
${name:=default}
The shell expands the expression ${name:=default} in the same manner as it expands ${name:–default}, but also sets the value of name to the expanded value of default.
If a script contains a line such as the following and LIT is unset or null at the time this line is executed, the shell assigns LIT the value /home/max/literature:
$ ls ${LIT:=/home/max/literature}
: (null) builtin
Some shell scripts include lines that start with the : (null) builtin followed on the same line by the := expansion modifier. This syntax sets variables that are null or unset. The : builtin evaluates each token in the remainder of the command line but does not execute any commands.
Use the following syntax to set a default for a null or unset variable in a shell script (a SPACE follows the first colon). Without the leading colon (:), the shell would evaluate and attempt to execute the “command” that results from the evaluation.
: ${name:=default}
When a script needs a directory for temporary files and uses the value of TEMPDIR for the name of this directory, the following line assigns to TEMPDIR the value /tmp if TEMPDIR is null:
: ${TEMPDIR:=/tmp}
:? Sends an Error Message to Standard Error
Sometimes a script needs the value of a variable, but you cannot supply a reasonable default at the time you write the script. In this case you want the script to exit if the variable is not set. If the variable is null or unset, the :? modifier causes the script to send an error message to standard error and terminate with an exit status of 1. Interactive shells do not exit when you use :?.
${name:?message}
If you omit message, the shell displays parameter null or not set. In the following command, TESTDIR is not set, so the shell sends to standard error the expanded value of the string following :?. In this case the string includes command substitution for date with the %T syntax, followed by the string error, variable not set.
cd ${TESTDIR:?$(date +%T) error, variable not set.}
bash: TESTDIR: 16:16:14 error, variable not set.
Array Variables
The Bourne Again Shell supports one-dimensional array variables. The subscripts are integers with zero-based indexing (i.e., the first element of the array has the subscript 0). The following syntax declares and assigns values to an array:
name=(element1 element2 ...)
The following example assigns four values to the array NAMES:
$ NAMES=(max helen sam zach)
You reference a single element of an array as follows; the braces are not optional.
$ echo ${NAMES[2]}
sam
The subscripts [*] and [@] both extract the entire array but work differently when used within double quotation marks. An @ produces an array that is a duplicate of the original array; an * produces a single element of an array (or a plain variable) that holds all the elements of the array separated by the first character in IFS (normally a SPACE; page 363). In the following example, the array A is filled with the elements of the NAMES variable using an *, and B is filled using an @. The declare builtin (page 357) with the –a option displays the values of the arrays (and reminds you that bash uses zero-based indexing for arrays):
$ A=("${NAMES[*]}")
$ B=("${NAMES[@]}")
$ declare -a
declare -a A='([0]="max helen sam zach")'
declare -a B='([0]="max" [1]="helen" [2]="sam" [3]="zach")'
...
declare -a NAMES='([0]="max" [1]="helen" [2]="sam" [3]="zach")'
The output of declare shows that NAMES and B have multiple elements. In contrast, A, which was assigned its value with an * within double quotation marks, has only one element: A has all its elements enclosed between double quotation marks.
In the next example, echo attempts to display element 1 of array A. Nothing is displayed because A has only one element and that element has an index of 0. Element 0 of array A holds all four names. Element 1 of B holds the second item in the array and element 0 holds the first item.
$ echo ${A[1]}
$ echo ${A[0]}
max helen sam zach
$ echo ${B[1]}
helen
$ echo ${B[0]}
max
The ${#name[*]} operator returns the number of elements in an array:
$ echo ${#NAMES[*]}
4
The same operator, when given the index of an element of an array in place of *, returns the length of the element:
$ echo ${#NAMES[1]}
5
You can use subscripts on the left side of an assignment statement to replace selected elements of an array:
$ NAMES[1]=max
$ echo ${NAMES[*]}
max max sam zach
![]() Variables in Functions
Variables in Functions
Because functions run in the same environment as the shell that calls them, variables are implicitly shared by a shell and a function it calls.
$ nam () {
> echo $myname
> myname=zach
> }
$ myname=sam
$ nam
sam
$ echo $myname
zach
In the preceding example, the myname variable is set to sam in the interactive shell. The nam function then displays the value of myname (sam) and sets myname to zach. The final echo shows that, in the interactive shell, the value of myname has been changed to zach.
Function local variables
Local variables are helpful in a function written for general use. Because the function is called by many scripts that might be written by different programmers, you need to make sure the names of the variables used within the function do not conflict with (i.e., duplicate) the names of the variables in the programs that call the function. Local variables eliminate this problem. When used within a function, the local builtin declares a variable to be local to the function it is defined in.
The next example shows the use of a local variable in a function. It features two variables named count. The first is declared and initialized to 10 in the interactive shell. Its value never changes, as echo verifies after count_down is run. The other count is declared, using local, to be local to the count_down function. Its value, which is unknown outside the function, ranges from 4 to 1, as the echo command within the function confirms.
The following example shows the function being entered from the keyboard; it is not a shell script. See the tip “A function is not a shell script” on page 1017.
$ count_down () {
> local count
> count=$1
> while [ $count -gt 0 ]
> do
> echo "$count..."
> ((count=count-1))
> sleep 1
> done
> echo "Blast Off."
> }
$ count=10
$ count_down 4
4...
3...
2...
1...
Blast Off.
$ echo $count
10
The count=count–1 assignment is enclosed between double parentheses, which cause the shell to perform an arithmetic evaluation (page 1056). Within the double parentheses you can reference shell variables without the leading dollar sign ($). See page 397 for another example of function local variables.
Builtin Commands
Builtin commands, which were introduced in Chapter 5, do not fork a new process when you execute them. This section discusses the type, read, exec, trap, kill, and getopts builtins. Table 27-6 on page 1055 lists many bash builtin commands.
![]() type: Displays Information About a Command
type: Displays Information About a Command
The type builtin provides information about a command:
$ type cat echo who if lt
cat is hashed (/bin/cat)
echo is a shell builtin
who is /usr/bin/who
if is a shell keyword
lt is aliased to 'ls -ltrh | tail'
The preceding output shows the files that would be executed if you gave cat or who as a command. Because cat has already been called from the current shell, it is in the hash table (page 376) and type reports that cat is hashed. The output also shows that a call to echo runs the echo builtin,if is a keyword, and lt is an alias.
![]() read: Accepts User Input
read: Accepts User Input
A common use for user-created variables is storing information that a user enters in response to a prompt. Using read, scripts can accept input from the user and store that input in variables. The read builtin reads one line from standard input and assigns the words on the line to one or more variables:
$ cat read1
echo -n "Go ahead: "
read firstline
echo "You entered: $firstline"
$ ./read1
Go ahead: This is a line.
You entered: This is a line.
The first line of the read1 script uses echo to prompt for a line of text. The –n option suppresses the following NEWLINE, allowing you to enter a line of text on the same line as the prompt. The second line reads the text into the variable firstline. The third line verifies the action of read by displaying the value of firstline.
The –p (prompt) option causes read to send to standard error the argument that follows it; read does not terminate this prompt with a NEWLINE. This feature allows you to both prompt for and read the input from the user on one line:
$ cat read1a
read -p "Go ahead: " firstline
echo "You entered: $firstline"
$ ./read1a
Go ahead: My line.
You entered: My line.
The variable in the preceding examples is quoted (along with the text string) because you, as the script writer, cannot anticipate which characters the user might enter in response to the prompt. Consider what would happen if the variable were not quoted and the user entered * in response to the prompt:
$ cat read1_no_quote
read -p "Go ahead: " firstline
echo You entered: $firstline
$ ./read1_no_quote
Go ahead: *
You entered: read1 read1_no_quote script.1
$ ls
read1 read1_no_quote script.1
The ls command lists the same words as the script, demonstrating that the shell expands the asterisk into a list of files in the working directory. When the variable $firstline is surrounded by double quotation marks, the shell does not expand the asterisk. Thus the read1 script behaves correctly:
$ ./read1
Go ahead:*
You entered:*
REPLY
When you do not specify a variable to receive read’s input, bash puts the input into the variable named REPLY. The following read1b script performs the same task as read1:
$ cat read1b
read -p "Go ahead: "
echo "You entered: $REPLY"
The read2 script prompts for a command line, reads the user’s response, and assigns it to the variable cmd. The script then attempts to execute the command line that results from the expansion of the cmd variable:
$ cat read2
read -p "Enter a command: " cmd
$cmd
echo "Thanks"
In the following example, read2 reads a command line that calls the echo builtin. The shell executes the command and then displays Thanks. Next read2 reads a command line that executes the who utility:
$ ./read2
Enter a command: echo Please display this message.
Please display this message.
Thanks
$ ./read2
Enter a command: who
max pts/4 2013-06-17 07:50 (:0.0)
sam pts/12 2013-06-17 11:54 (guava)
Thanks
If cmd does not expand into a valid command line, the shell issues an error message:
$ ./read2
Enter a command: xxx
./read2: line 2: xxx: command not found
Thanks
The read3 script reads values into three variables. The read builtin assigns one word (a sequence of nonblank characters) to each variable:
$ cat read3
read -p "Enter something: " word1 word2 word3
echo "Word 1 is: $word1"
echo "Word 2 is: $word2"
echo "Word 3 is: $word3"
$ ./read3
Enter something: this is something
Word 1 is: this
Word 2 is: is
Word 3 is: something
When you enter more words than read has variables, read assigns one word to each variable, assigning all leftover words to the last variable. Both read1 and read2 assigned the first word and all leftover words to the one variable the scripts each had to work with. In the following example,read assigns five words to three variables: It assigns the first word to the first variable, the second word to the second variable, and the third through fifth words to the third variable.
$ ./read3
Enter something: this is something else, really.
Word 1 is: this
Word 2 is: is
Word 3 is: something else, really.
Table 27-4 lists some of the options supported by the read builtin.
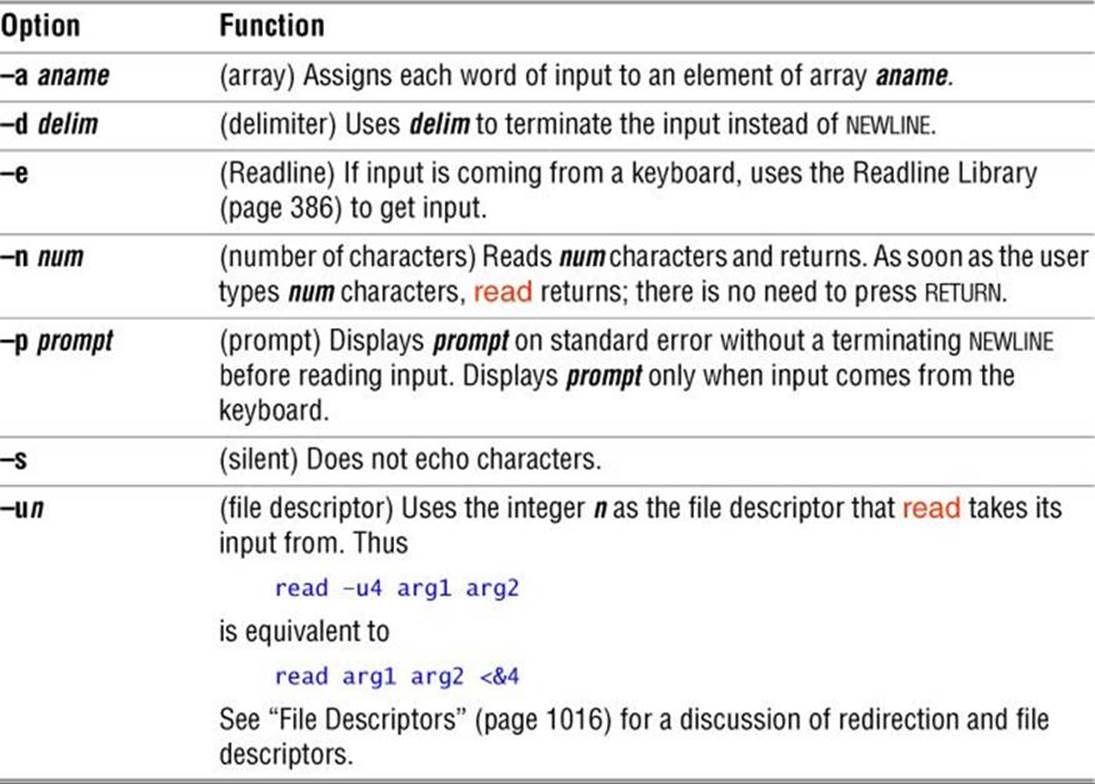
Table 27-4 read options
The read builtin returns an exit status of 0 if it successfully reads any data. It has a nonzero exit status when it reaches the EOF (end of file).
The following example runs a while loop from the command line. It takes its input from the names file and terminates after reading the last line from names.
$ cat names
Alice Jones
Robert Smith
Alice Paulson
John Q. Public
$ while read first rest
> do
> echo $rest, $first
> done < names
Jones, Alice
Smith, Robert
Paulson, Alice
Q. Public, John
$
The placement of the redirection symbol (<) for the while structure is critical. It is important that you place the redirection symbol at the done statement and not at the call to read.
Optional
Each time you redirect input, the shell opens the input file and repositions the read pointer at the start of the file:
$ read line1 < names; echo $line1; read line2 < names; echo $line2
Alice Jones
Alice Jones
Here each read opens names and starts at the beginning of the names file. In the following example, names is opened once, as standard input of the subshell created by the parentheses. Each read then reads successive lines of standard input:
$ (read line1; echo $line1; read line2; echo $line2) < names
Alice Jones
Robert Smith
Another way to get the same effect is to open the input file with exec and hold it open (refer to “File Descriptors” on page 1016):
$ exec 3< names
$ read -u3 line1; echo $line1; read -u3 line2; echo $line2
Alice Jones
Robert Smith
$ exec 3<&-
whiptail
When run in a graphical environment, whiptail can display a dialog box from a shell script. The following command displays What is your name? in a dialog box. When the user types an answer and presses RETURN, whiptail sends the response to standard error, which the command line redirects to the file named answer. See the whiptail man page for more information.
$ whiptail --inputbox "What is your name?" 10 30 2> answer
$ cat answer
Sam the Great$
![]() exec: Executes a Command or Redirects File Descriptors
exec: Executes a Command or Redirects File Descriptors
The exec builtin has two primary purposes: to run a command without creating a new process and to redirect a file descriptor—including standard input, output, or error—of a shell script from within the script (page 1016). When the shell executes a command that is not built into the shell, it typically creates a new process. The new process inherits environment (exported) variables from its parent but does not inherit variables that are not exported by the parent (page 1032). In contrast, exec executes a command in place of (overlays) the current process.
exec: Executes a Command
The exec builtin used for running a command has the following syntax:
exec command arguments
![]() exec versus . (dot)
exec versus . (dot)
Insofar as exec runs a command in the environment of the original process, it is similar to the . (dot) command (page 332). However, unlike the . command, which can run only shell scripts, exec can run both scripts and compiled programs. Also, whereas the . command returns control to the original script when it finishes running, exec does not. Finally the . command gives the new program access to local variables, whereas exec does not.
exec does not return control
Because the shell does not create a new process when you use exec, the command runs more quickly. However, because exec does not return control to the original program, it can be used only as the last command in a script. The following script shows that control is not returned to the script:
$ cat exec_demo
who
exec date
echo "This line is never displayed."
$ ./exec_demo
zach pts/7 May 20 7:05 (guava)
hls pts/1 May 20 6:59 (:0.0)
Fri May 24 11:42:56 PDT 2013
The next example, a modified version of the out script (page 989), uses exec to execute the final command the script runs. Because out runs either cat or less and then terminates, the new version, named out2, uses exec with both cat and less:
$ cat out2
if [ $# -eq 0 ]
then
echo "Usage: out2 [-v] filenames" 1>&2
exit 1
fi
if [ "$1" = "-v" ]
then
shift
exec less "$@"
else
exec cat -- "$@"
fi
exec: Redirects Input and Output
The second major use of exec is to redirect a file descriptor—including standard input, output, or error—from within a script. The next command causes all subsequent input to a script that would have come from standard input to come from the file named infile:
exec < infile
Similarly the following command redirects standard output and standard error to outfile and errfile, respectively:
exec > outfile 2> errfile
When you use exec in this manner, the current process is not replaced with a new process and exec can be followed by other commands in the script.
/dev/tty
When you redirect the output from a script to a file, you must make sure the user sees any prompts the script displays. The /dev/tty device is a pseudonym for the screen the user is working on; you can use this device to refer to the user’s screen without knowing which device it is. (The ttyutility displays the name of the device you are using.) By redirecting the output from a script to /dev/tty, you ensure that prompts and messages go to the user’s terminal, regardless of which terminal the user is logged in on. Messages sent to /dev/tty are also not diverted if standard output and standard error from the script are redirected.
The to_screen1 script sends output to three places: standard output, standard error, and the user’s screen. When run with standard output and standard error redirected, to_screen1 still displays the message sent to /dev/tty on the user’s screen. The out and err files hold the output sent to standard output and standard error, respectively.
$ cat to_screen1
echo "message to standard output"
echo "message to standard error" 1>&2
echo "message to screen" > /dev/tty
$ ./to_screen1 > out 2> err
message to screen
$ cat out
message to standard output
$ cat err
message to standard error
The following command redirects standard output from a script to the user’s screen:
exec > /dev/tty
Putting this command at the beginning of the previous script changes where the output goes. In to_screen2, exec redirects standard output to the user’s screen so the >/dev/tty is superfluous. Following the exec command, all output sent to standard output goes to /dev/tty (the screen). Output to standard error is not affected.
$ cat to_screen2
exec > /dev/tty
echo "message to standard output"
echo "message to standard error" 1>&2
echo "message to screen" > /dev/tty
$ ./to_screen2 > out 2> err
message to standard output
message to screen
One disadvantage of using exec to redirect the output to /dev/tty is that all subsequent output is redirected unless you use exec again in the script.
You can also redirect the input to read (standard input) so that it comes from /dev/tty (the keyboard):
read name < /dev/tty
or
exec < /dev/tty
trap: Catches a Signal
A signal is a report to a process about a condition. Linux uses signals to report interrupts generated by the user (for example, pressing the interrupt key) as well as bad system calls, broken pipelines, illegal instructions, and other conditions. The trap builtin catches (traps) one or more signals, allowing you to direct the actions a script takes when it receives a specified signal.
This discussion covers six signals that are significant when you work with shell scripts. Table 27-5 lists these signals, the signal numbers that systems often ascribe to them, and the conditions that usually generate each signal. Give the command kill –l (lowercase “el”), trap –l (lowercase “el”), or man 7 signal to display a list of all signal names.
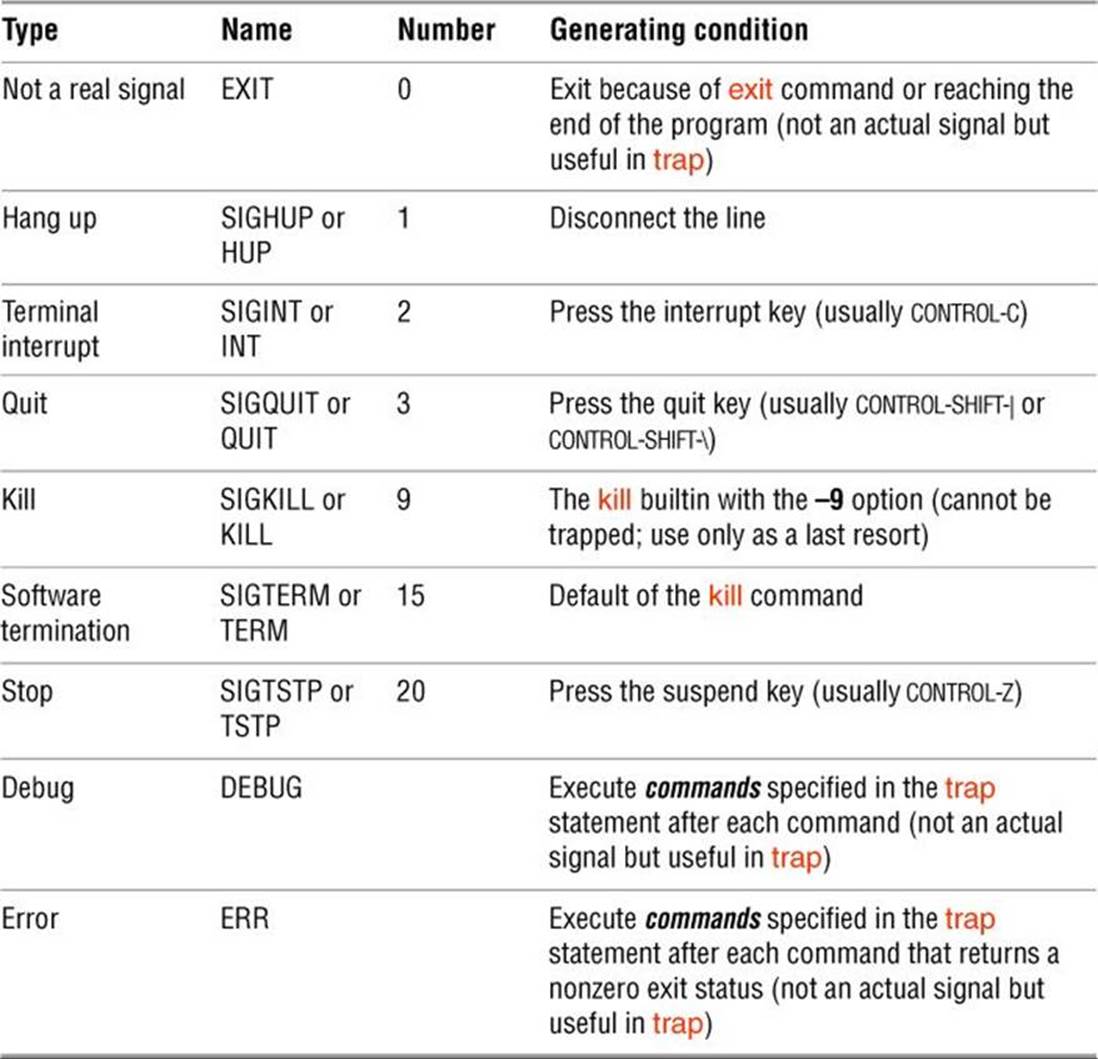
Table 27-5 ![]() Signals
Signals
When it traps a signal, a script takes whatever action you specify: It can remove files or finish other processing as needed, display a message, terminate execution immediately, or ignore the signal. If you do not use trap in a script, any of the six actual signals listed in Table 27-5 (not EXIT, DEBUG, or ERR) will terminate the script. Because a process cannot trap a KILL signal, you can use kill –KILL (or kill –9) as a last resort to terminate a script or other process. (See page 1050 for more information on kill.)
The trap command has the following syntax:
trap ['commands'] [signal]
The optional commands specifies the commands the shell executes when it catches one of the signals specified by signal. The signal can be a signal name or number—for example, INT or 2. If commands is not present, trap resets the trap to its initial condition, which is usually to exit from the script.
Quotation marks
The trap builtin does not require single quotation marks around commands as shown in the preceding syntax but it is a good practice to use them. The single quotation marks cause shell variables within the commands to be expanded when the signal occurs, rather than when the shell evaluates the arguments to trap. Even if you do not use any shell variables in the commands, you need to enclose any command that takes arguments within either single or double quotation marks. Quoting commands causes the shell to pass to trap the entire command as a single argument.
After executing the commands, the shell resumes executing the script where it left off. If you want trap to prevent a script from exiting when it receives a signal but not to run any commands explicitly, you can specify a null (empty) commands string, as shown in the locktty script (page1004). The following command traps signal number 15, after which the script continues:
trap '' 15
The following script demonstrates how the trap builtin can catch the terminal interrupt signal (2). You can use SIGINT, INT, or 2 to specify this signal. The script returns an exit status of 1:
$ cat inter
#!/bin/bash
trap 'echo PROGRAM INTERRUPTED; exit 1' INT
while true
do
echo "Program running."
sleep 1
done
$ ./inter
Program running.
Program running.
Program running.
CONTROL-C
PROGRAM INTERRUPTED
$
: (null) builtin
The second line of inter sets up a trap for the terminal interrupt signal using INT. When trap catches the signal, the shell executes the two commands between the single quotation marks in the trap command. The echo builtin displays the message PROGRAM INTERRUPTED, exitterminates the shell running the script, and the parent shell displays a prompt. If exit were not there, the shell would return control to the while loop after displaying the message. The while loop repeats continuously until the script receives a signal because the true utility always returns a trueexit status. In place of true you can use the : (null) builtin, which is written as a colon and always returns a 0 (true) status.
The trap builtin frequently removes temporary files when a script is terminated prematurely, thereby ensuring the files are not left to clutter the filesystem. The following shell script, named addbanner, uses two traps to remove a temporary file when the script terminates normally or because of a hangup, software interrupt, quit, or software termination signal:
$ cat addbanner
#!/bin/bash
script=$(basename $0)
if [ ! -r "$HOME/banner" ]
then
echo "$script: need readable $HOME/banner file" 1>&2
exit 1
fi
trap 'exit 1' 1 2 3 15
trap 'rm /tmp/$$.$script 2> /dev/null' EXIT
for file
do
if [ -r "$file" -a -w "$file" ]
then
cat $HOME/banner $file > /tmp/$$.$script
cp /tmp/$$.$script $file
echo "$script: banner added to $file" 1>&2
else
echo "$script: need read and write permission for $file" 1>&2
fi
done
When called with one or more filename arguments, addbanner loops through the files, adding a header to the top of each. This script is useful when you use a standard format at the top of your documents, such as a standard layout for memos, or when you want to add a standard header to shell scripts. The header is kept in a file named ~/banner. Because addbanner uses the HOME variable, which contains the pathname of the user’s home directory, the script can be used by several users without modification. If Max had written the script with /home/max in place of$HOME and then given the script to Zach, either Zach would have had to change it or addbanner would have used Max’s banner file when Zach ran it (assuming Zach had read permission for the file).
The first trap in addbanner causes it to exit with a status of 1 when it receives a hangup, software interrupt (terminal interrupt or quit signal), or software termination signal. The second trap uses EXIT in place of signal-number, which causes trap to execute its command argumentwhenever the script exits because it receives an exit command or reaches its end. Together these traps remove a temporary file whether the script terminates normally or prematurely. Standard error of the second trap is sent to /dev/null whenever trap attempts to remove a nonexistent temporary file. In those cases rm sends an error message to standard error; because standard error is redirected, the user does not see the message.
See page 1004 for another example that uses trap.
![]() kill: Aborts a Process
kill: Aborts a Process
The kill builtin sends a signal to a process or job. The kill command has the following syntax:
kill [–signal] PID
where signal is the signal name or number (for example, INT or 2) and PID is the process identification number of the process that is to receive the signal. You can specify a job number (page 163) as %n in place of PID. If you omit signal, kill sends a TERM (software termination, number 15) signal. For more information on signal names and numbers, see Table 27-5 on page 1047.
The following command sends the TERM signal to job number 1, regardless of whether it is running or stopped in the background:
$ kill -TERM %1
Because TERM is the default signal for kill, you can also give this command as kill %1. Give the command kill –l (lowercase “el”) to display a list of signal names.
A program that is interrupted can leave matters in an unpredictable state: Temporary files might be left behind (when they are normally removed), and permissions might be changed. A well-written application traps signals and cleans up before exiting. Most carefully written applications trap the INT, QUIT, and TERM signals.
To terminate a program, first try INT (press CONTROL-C, if the job running is in the foreground). Because an application can be written to ignore this signal, you might need to use the KILL signal, which cannot be trapped or ignored; it is a “sure kill.” For more information refer to “kill: Sends a Signal to a Process” on page 465.
eval: Scans, Evaluates, and Executes a Command Line
The eval builtin scans the command that follows it on the command line. In doing so, eval processes the command line in the same way bash does when it executes a command line (e.g., it expands variables, replacing the name of a variable with its value). For more information refer to “Processing the Command Line” on page 403. After scanning (and expanding) the command line, it passes the resulting command line to bash to execute.
The following example first assigns the value frog to the variable name. Next eval scans the command $name=88 and expands the variable $name to frog, yielding the command frog=88, which it passes to bash to execute. The last command displays the value of frog.
$ name=frog
$ eval $name=88
$ echo $frog
88
Brace expansion with a sequence expression
The next example uses eval to cause brace expansion with a sequence expression (page 406) to accept variables, which it does not normally do. The following command demonstrates brace expansion with a sequence expression:
$ echo {2..5}
2 3 4 5
One of the first things bash does when it processes a command line is to perform brace expansion; later it expands variables (page 403). When you provide an invalid argument in brace expansion, bash does not perform brace expansion; instead, it passes the string to the program being called. In the next example, bash cannot expand {$m..$n} during the brace expansion phase because it contains variables, so it continues processing the command line. When it gets to the variable expansion phase, it expands $m and $n and then passes the string {2..5} to echo.
$ m=2 n=5
$ echo {$m..$n}
{2..5}
When eval scans the same command line, it expands the variables as explained previously and yields the command echo {2..5}. It then passes that command to bash, which can now perform brace expansion:
$ eval echo {$m..$n}
2 3 4 5
getopts: Parses Options
The getopts builtin parses command-line arguments, making it easier to write programs that follow the Linux argument conventions. The syntax for getopts is
getopts optstring varname [arg ...]
where optstring is a list of the valid option letters, varname is the variable that receives the options one at a time, and arg is the optional list of parameters to be processed. If arg is not present, getopts processes the command-line arguments. If optstring starts with a colon (:), the script must take care of generating error messages; otherwise, getopts generates error messages.
The getopts builtin uses the OPTIND (option index) and OPTARG (option argument) variables to track and store option-related values. When a shell script starts, the value of OPTIND is 1. Each time getopts is called and locates an argument, it increments OPTIND to the index of the next option to be processed. If the option takes an argument, bash assigns the value of the argument to OPTARG.
To indicate that an option takes an argument, follow the corresponding letter in optstring with a colon (:). For example, the optstring dxo:lt:r instructs getopts to search for the –d, –x, –o, –l, –t, and –r options and tells it the –o and –t options take arguments.
Using getopts as the test-command in a while control structure allows you to loop over the options one at a time. The getopts builtin checks the option list for options that are in optstring. Each time through the loop, getopts stores the option letter it finds in varname.
As an example, assume you want to write a program that can take three options:
1. A –b option indicates that the program should ignore whitespace at the start of input lines.
2. A –t option followed by the name of a directory indicates that the program should store temporary files in that directory. Otherwise, it should use /tmp.
3. A –u option indicates that the program should translate all output to uppercase.
In addition, the program should ignore all other options and end option processing when it encounters two hyphens (––).
The problem is to write the portion of the program that determines which options the user has supplied. The following solution does not use getopts:
SKIPBLANKS=
TMPDIR=/tmp
CASE=lower
while [[ "$1" = -* ]] # [[ = ]] does pattern match
do
case $1 in
-b) SKIPBLANKS=TRUE ;;
-t) if [ -d "$2" ]
then
TMPDIR=$2
shift
else
echo "$0: -t takes a directory argument." >&2
exit 1
fi ;;
-u) CASE=upper ;;
--) break ;; # Stop processing options
*) echo "$0: Invalid option $1 ignored." >&2 ;;
esac
shift
done
This program fragment uses a loop to check and shift arguments while the argument is not ––. As long as the argument is not two hyphens, the program continues to loop through a case statement that checks for possible options. The –– case label breaks out of the while loop. The * case label recognizes any option; it appears as the last case label to catch any unknown options, displays an error message, and allows processing to continue. On each pass through the loop, the program uses shift so it accesses the next argument on the next pass through the loop. If an option takes an argument, the program uses an extra shift to get past that argument.
The following program fragment processes the same options using getopts:
SKIPBLANKS=
TMPDIR=/tmp
CASE=lower
while getopts :bt:u arg
do
case $arg in
b) SKIPBLANKS=TRUE ;;
t) if [ -d "$OPTARG" ]
then
TMPDIR=$OPTARG
else
echo "$0: $OPTARG is not a directory." >&2
exit 1
fi ;;
u) CASE=upper ;;
:) echo "$0: Must supply an argument to -$OPTARG." >&2
exit 1 ;;
\?) echo "Invalid option -$OPTARG ignored." >&2 ;;
esac
done
In this version of the code, the while structure evaluates the getopts builtin each time control transfers to the top of the loop. The getopts builtin uses the OPTIND variable to keep track of the index of the argument it is to process the next time it is called. There is no need to call shift in this example.
In the getopts version of the script, the case patterns do not start with a hyphen because the value of arg is just the option letter (getopts strips off the hyphen). Also, getopts recognizes –– as the end of the options, so you do not have to specify it explicitly, as in the case statement in the first example.
Because you tell getopts which options are valid and which require arguments, it can detect errors in the command line and handle them in two ways. This example uses a leading colon in optstring to specify that you check for and handle errors in your code; when getopts finds an invalid option, it sets varname to ? and OPTARG to the option letter. When it finds an option that is missing an argument, getopts sets varname to : and OPTARG to the option lacking an argument.
The \? case pattern specifies the action to take when getopts detects an invalid option. The : case pattern specifies the action to take when getopts detects a missing option argument. In both cases getopts does not write any error message but rather leaves that task to you.
If you omit the leading colon from optstring, both an invalid option and a missing option argument cause varname to be assigned the string ?. OPTARG is not set and getopts writes its own diagnostic message to standard error. Generally this method is less desirable because you have less control over what the user sees when an error occurs.
Using getopts will not necessarily make your programs shorter. Its principal advantages are that it provides a uniform programming interface and that it enforces standard option handling.
A Partial List of Builtins
Table 27-6 lists some of the bash builtins. You can use type (page 1041) to see if a command runs a builtin. See “Listing bash builtins” on page 170 for instructions on how to display complete lists of builtins.
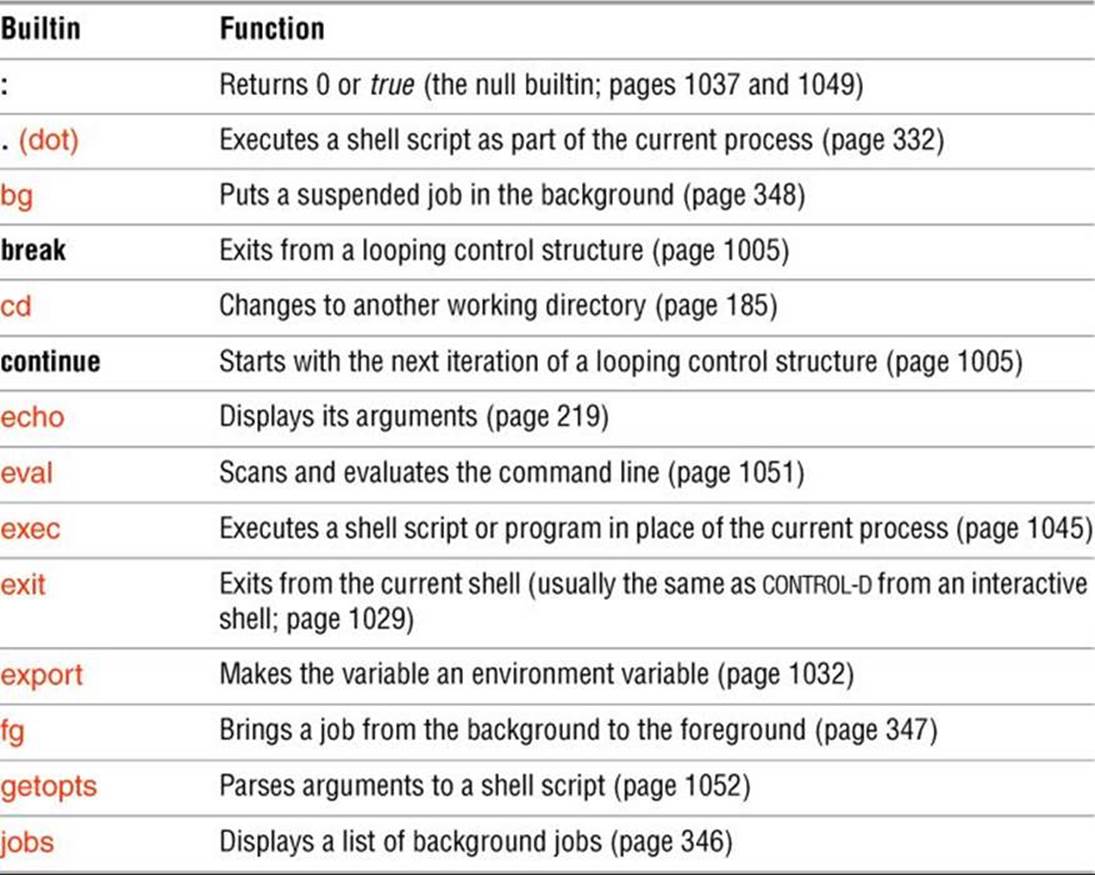
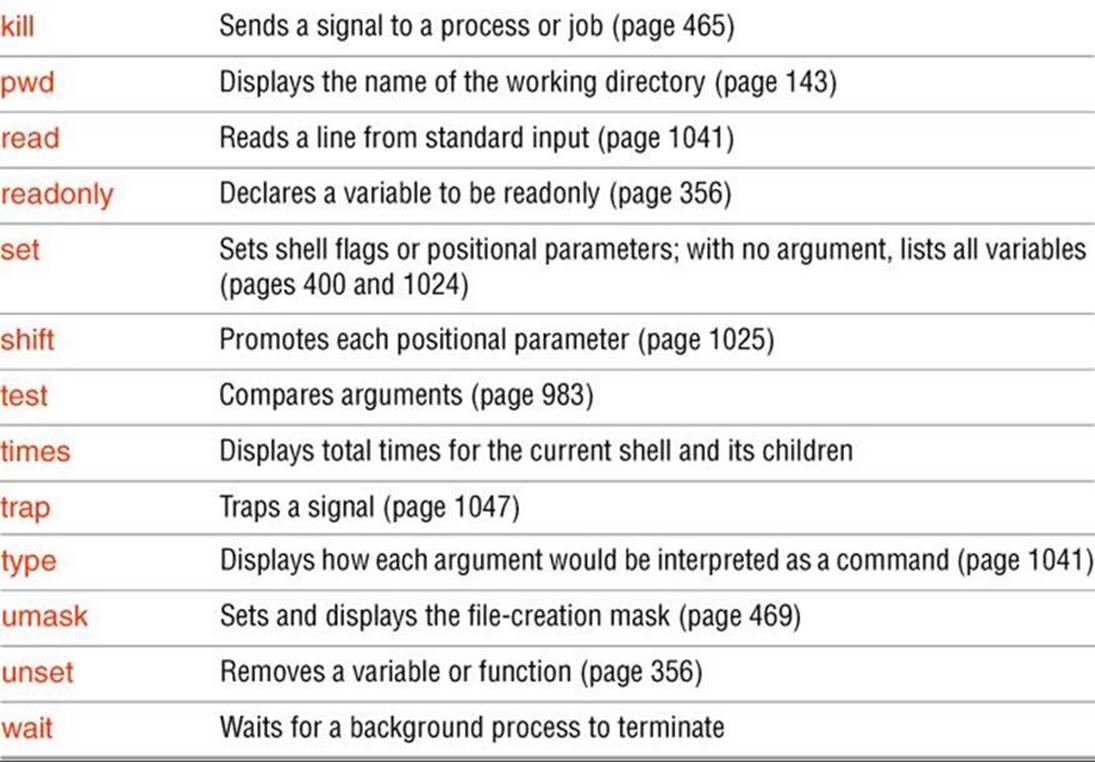
Table 27-6 bash builtins
Expressions
An expression comprises constants, variables, and operators that the shell can process to return a value. This section covers arithmetic, logical, and conditional expressions as well as operators. Table 27-8 on page 1059 lists the bash operators.
Arithmetic Evaluation
The Bourne Again Shell can perform arithmetic assignments and evaluate many different types of arithmetic expressions, all using integers. The shell performs arithmetic assignments in a number of ways. One is with arguments to the let builtin:
$ let "VALUE=VALUE * 10 + NEW"
In the preceding example, the variables VALUE and NEW hold integer values. Within a let statement you do not need to use dollar signs ($) in front of variable names. Double quotation marks must enclose a single argument, or expression, that contains SPACEs. Because most expressions contain SPACEs and need to be quoted, bash accepts ((expression)) as a synonym for let "expression", obviating the need for both quotation marks and dollar signs:
$ ((VALUE=VALUE * 10 + NEW))
You can use either form wherever a command is allowed and can remove the SPACEs. In these examples, the asterisk (*) does not need to be quoted because the shell does not perform pathname expansion on the right side of an assignment (page 354):
$ let VALUE=VALUE*10+NEW
Because each argument to let is evaluated as a separate expression, you can assign values to more than one variable on a single line:
$ let "COUNT = COUNT + 1" VALUE=VALUE*10+NEW
You must use commas to separate multiple assignments within a set of double parentheses:
$ ((COUNT = COUNT + 1, VALUE=VALUE*10+NEW))
Tip: Arithmetic evaluation versus arithmetic expansion
Arithmetic evaluation differs from arithmetic expansion. As explained on page 408, arithmetic expansion uses the syntax $((expression)), evaluates expression, and replaces $((expression)) with the result. You can use arithmetic expansion to display the value of an expression or to assign that value to a variable.
Arithmetic evaluation uses the let expression or ((expression)) syntax, evaluates expression, and returns a status code. You can use arithmetic evaluation to perform a logical comparison or an assignment.
Logical expressions
You can use the ((expression)) syntax for logical expressions, although that task is frequently left to [[expression]] (next). The next example expands the age_check script (page 408) to include logical arithmetic evaluation in addition to arithmetic expansion:
$ cat age2
#!/bin/bash
read -p "How old are you? " age
if ((30 < age && age < 60)); then
echo "Wow, in $((60-age)) years, you'll be 60!"
else
echo "You are too young or too old to play."
fi
$ ./age2
How old are you? 25
You are too young or too old to play.
The test-statement for the if structure evaluates two logical comparisons joined by a Boolean AND and returns 0 (true) if they are both true or 1 (false) otherwise.
Logical Evaluation (Conditional Expressions)
The syntax of a conditional expression is
[[ expression ]]
where expression is a Boolean (logical) expression. You must precede a variable name with a dollar sign ($) within expression. The result of executing this builtin, as with the test builtin, is a return status. The conditions allowed within the brackets are almost a superset of those accepted bytest (page 983). Where the test builtin uses –a as a Boolean AND operator, [[ expression ]] uses &&. Similarly, where test uses –o as a Boolean OR operator, [[ expression ]] uses ||.
To see how conditional expressions work, replace the line that tests age in the age2 script with the following conditional expression. You must surround the [[ and ]] tokens with whitespace or a command terminator, and place dollar signs before the variables:
if [[ 30 < $age && $age < 60 ]]; then
You can also use test’s relational operators –gt, –ge, –lt, –le, –eq, and –ne:
if [[ 30 -lt $age && $age -lt 60 ]]; then
String comparisons
The test builtin tests whether strings are equal. The [[ expression ]] syntax adds comparison tests for strings. The > and < operators compare strings for order (for example, "aa" < "bbb"). The = operator tests for pattern match, not just equality: [[ string = pattern ]] is true if string matchespattern. This operator is not symmetrical; the pattern must appear on the right side of the equal sign. For example, [[ artist = a* ]] is true (= 0), whereas [[ a* = artist ]] is false (= 1):
$ [[ artist = a* ]]
$ echo $?
0
$ [[ a* = artist ]]
$ echo $?
1
The next example uses a command list that starts with a compound condition. The condition tests whether the directory bin and the file src/myscript.bash exist. If the result is true, cp copies src/myscript.bash to bin/myscript. If the copy succeeds, chmod makes myscript executable. If any of these steps fails, echo displays a message. Implicit command-line continuation (page 1063) obviates the need for backslashes at the ends of lines.
$ [[ -d bin && -f src/myscript.bash ]] &&
cp src/myscript.bash bin/myscript &&
chmod +x bin/myscript ||
echo "Cannot make executable version of myscript"
String Pattern Matching
The Bourne Again Shell provides string pattern-matching operators that can manipulate pathnames and other strings. These operators can delete from strings prefixes or suffixes that match patterns. Table 27-7 lists the four operators.

Table 27-7 String operators
The syntax for these operators is
${varname op pattern}
where op is one of the operators listed in Table 27-7 and pattern is a match pattern similar to that used for filename generation. These operators are commonly used to manipulate pathnames to extract or remove components or to change suffixes:
$ SOURCEFILE=/usr/local/src/prog.c
$ echo ${SOURCEFILE#/*/}
local/src/prog.c
$ echo ${SOURCEFILE##/*/}
prog.c
$ echo ${SOURCEFILE%/*}
/usr/local/src
$ echo ${SOURCEFILE%%/*}
$ echo ${SOURCEFILE%.c}
/usr/local/src/prog
$ CHOPFIRST=${SOURCEFILE#/*/}
$ echo $CHOPFIRST
local/src/prog.c
$ NEXT=${CHOPFIRST%%/*}
$ echo $NEXT
local
String length
The shell expands ${#name} to the number of characters in name:
$ echo $SOURCEFILE
/usr/local/src/prog.c
$ echo ${#SOURCEFILE}
21
Arithmetic Operators
Arithmetic expansion and arithmetic evaluation in bash use the same syntax, precedence, and associativity of expressions as the C language. Table 27-8 lists arithmetic operators in order of decreasing precedence (priority of evaluation); each group of operators has equal precedence. Within an expression you can use parentheses to change the order of evaluation.
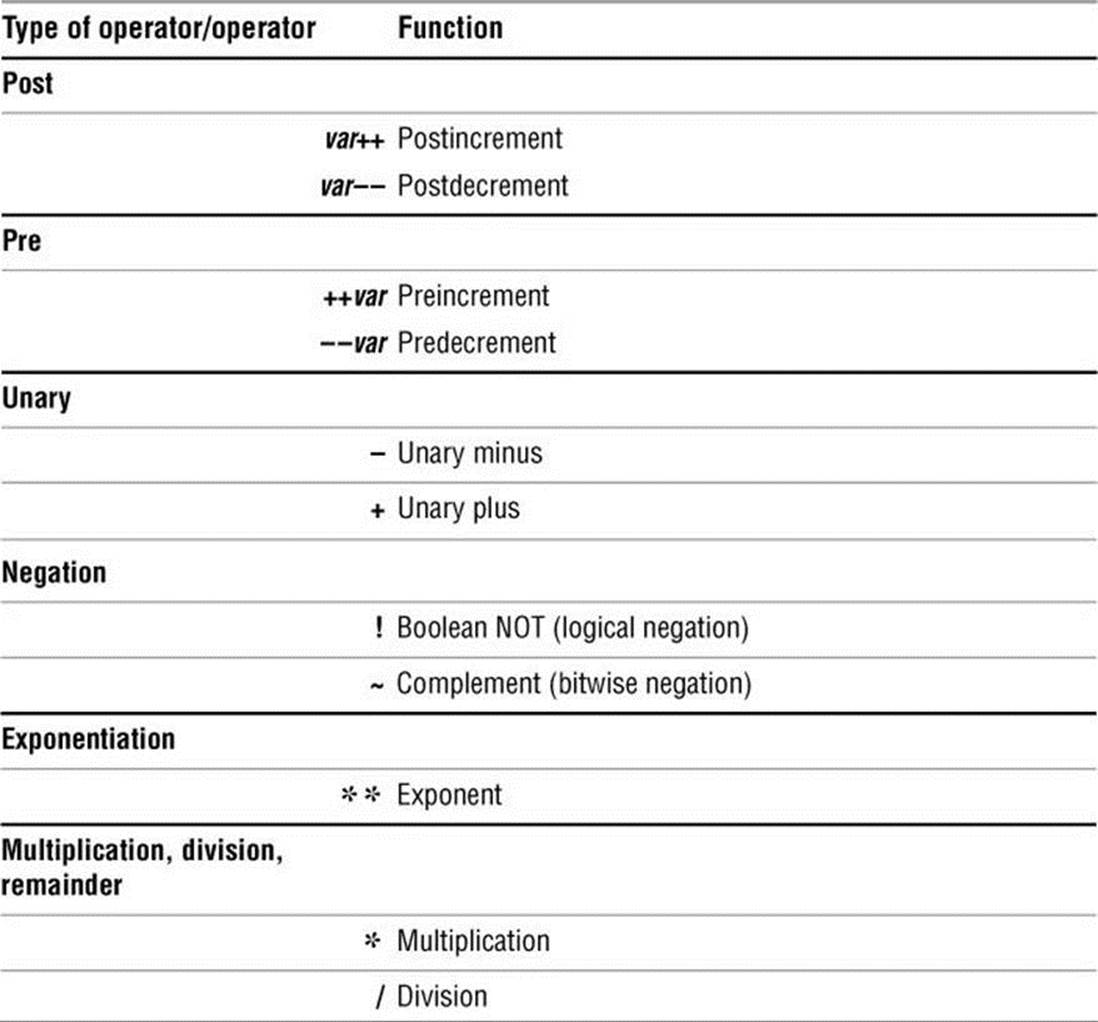


Table 27-8 Arithmetic operators
Pipeline symbol
The | control operator has higher precedence than arithmetic operators. For example, the command line
$ cmd1 | cmd2 || cmd3 | cmd4 && cmd5 | cmd6
is interpreted as if you had typed
$ ((cmd1 | cmd2) || (cmd3 | cmd4)) && (cmd5 | cmd6)
Tip: Do not rely on rules of precedence: use parentheses
Do not rely on the precedence rules when you use command lists (page 162). Instead, use parentheses to explicitly specify the order in which you want the shell to interpret the commands.
Increment and decrement
The postincrement, postdecrement, preincrement, and predecrement operators work with variables. The pre- operators, which appear in front of the variable name (as in ++COUNT and ––VALUE), first change the value of the variable (++ adds 1; –– sub-tracts 1) and then provide the result for use in the expression. The post- operators appear after the variable name (as in COUNT++ and VALUE––); they first provide the unchanged value of the variable for use in the expression and then change the value of the variable.
$ N=10
$ echo $N
10
$ echo $((--N+3))
12
$ echo $N
9
$ echo $((N++ - 3))
6
$ echo $N
10
Remainder
The remainder operator (%) yields the remainder when its first operand is divided by its second. For example, the expression $((15%7)) has the value 1.
Ternary
The ternary operator, ? :, decides which of two expressions should be evaluated, based on the value returned by a third expression. The syntax is
expression1 ? expression2 : expression3
If expression1 produces a false (0) value, expression3 is evaluated; otherwise, expression2 is evaluated. The value of the entire expression is the value of expression2 or expression3, depending on which is evaluated. If expression1 is true, expression3 is not evaluated. If expression1 is false,expression2 is not evaluated.
$ ((N=10,Z=0,COUNT=1))
$ ((T=N>COUNT?++Z:--Z))
$ echo $T
1
$ echo $Z
1
Assignment
The assignment operators, such as +=, are shorthand notations. For example, N+=3 is the same as ((N=N+3)).
Other bases
The following commands use the syntax base#n to assign base 2 (binary) values. First v1 is assigned a value of 0101 (5 decimal) and then v2 is assigned a value of 0110 (6 decimal). The echo utility verifies the decimal values.
$ ((v1=2#0101))
$ ((v2=2#0110))
$ echo "$v1 and $v2"
5 and 6
Next the bitwise AND operator (&) selects the bits that are on in both 5 (0101 binary) and 6 (0110 binary). The result is binary 0100, which is 4 decimal.
$ echo $(( v1 && v2 ))
4
The Boolean AND operator (&&) produces a result of 1 if both of its operands are nonzero and a result of 0 otherwise. The bitwise inclusive OR operator (|) selects the bits that are on in either 0101 or 0110, resulting in 0111, which is 7 decimal. The Boolean OR operator (||) produces a result of 1 if either of its operands is nonzero and a result of 0 otherwise.
$ echo $(( v1 && v2 ))
1
$ echo $(( v1 | v2 ))
7
$ echo $(( v1 || v2 ))
1
Next the bitwise exclusive OR operator (^) selects the bits that are on in either, but not both, of the operands 0101 and 0110, yielding 0011, which is 3 decimal. The Boolean NOT operator (!) produces a result of 1 if its operand is 0 and a result of 0 otherwise. Because the exclamation point in$(( ! v1 )) is enclosed within double parentheses, it does not need to be escaped to prevent the shell from interpreting the exclamation point as a history event. The comparison operators produce a result of 1 if the comparison is true and a result of 0 otherwise.
$ echo $(( v1 ^ v2 ))
3
$ echo $(( ! v1 ))
0
$ echo $(( v1 < v2 ))
1
$ echo $(( v1 > v2 ))
0
Implicit Command-Line Continuation
Each of the following control operators (page 341) implies continuation:
; ;; | & && |& ||
For example, there is no difference between this set of commands:
cd mydir && rm *.o
and this set:
cd mydir &&
rm *.o
Both sets of commands remove all files with a filename extension of .o only if the cd mydir command is successful. If you give the second set of commands in an interactive shell, the shell issues a secondary prompt (>; page 362) after you enter the first line and waits for you to complete the command line.
The following commands create the directory named mydir if mydir does not exist. You can put the commands on one line or two.
[ -d mydir ] ||
mkdir mydir
Pipeline symbol (|) implies continuation
Similarly the pipeline symbol implies continuation:
sort names |
grep -i '^[a-m]' |
sed 's/Street/St/' |
pr --header="Names from A-M" |
lpr
When a command line ends with a pipeline symbol, you do not need backslashes to indicate continuation.
sort names | \
grep -i '^[a-m]' | \
sed 's/Street/St/' | \
pr --header="Names from A-M" | \
lpr
Although it will work, the following example is also a poor way to write code because it is hard to read and understand:
sort names \
| grep -i '^[a-m]' \
| sed 's/Street/St/' \
| pr --header="Names from A-M" \
| lpr
Another way to improve the readability of code you write is to take advantage of implicit command-line continuation to break lines without using backslashes. These commands are easier to read and understand:
$ [ -e /home/sam/memos/helen.personnel/november ] &&
~sam/report_a november alphaphonics totals
than these commands:
$ [ -e /home/sam/memos/helen.personnel/november ] && ~sam/report_a \
november alphaphonics totals
Shell Programs
The Bourne Again Shell has many features that make it a good programming language. The structures that bash provides are not a random assortment, but rather have been chosen to provide most of the structural features found in other procedural languages, such as C and Perl. A procedural language provides the following abilities:
• Declare, assign, and manipulate variables and constant data. The Bourne Again Shell provides both string variables, together with powerful string operators, and integer variables, along with a complete set of arithmetic operators.
• Break large problems into small ones by creating subprograms. The Bourne Again Shell allows you to create functions and call scripts from other scripts. Shell functions can be called recursively; that is, a Bourne Again Shell function can call itself. You might not need to use recursion often, but it might allow you to solve some apparently difficult problems with ease.
• Execute statements conditionally using statements such as if.
• Execute statements iteratively using statements such as while and for.
• Transfer data to and from the program, communicating with both data files and users.
Programming languages implement these capabilities in different ways but with the same ideas in mind. When you want to solve a problem by writing a program, you must first figure out a procedure that leads you to a solution—that is, an algorithm. Typically you can implement the same algorithm in roughly the same way in different programming languages, using the same kinds of constructs in each language.
Chapter 9 and this chapter have introduced numerous bash features, many of which are useful for both interactive use and shell programming. This section develops two complete shell programs, demonstrating how to combine some of these features effectively. The programs are presented as problems for you to solve, with sample solutions provided.
A Recursive Shell Script
A recursive construct is one that is defined in terms of itself. Alternately, you might say that a recursive program is one that can call itself. This concept might seem circular, but it need not be. To avoid circularity, a recursive definition must have a special case that is not self-referential. Recursive ideas occur in everyday life. For example, you can define an ancestor as your mother, your father, or one of their ancestors. This definition is not circular; it specifies unambiguously who your ancestors are: your mother or your father, or your mother’s mother or father or your father’s mother or father, and so on.
A number of Linux system utilities can operate recursively. See the –R option to the chmod, chown, and cp utilities for examples.
Solve the following problem by using a recursive shell function:
Write a shell function named makepath that, given a pathname, creates all components in that pathname as directories. For example, the command makepath a/b/c/d should create directories a, a/b, a/b/c, and a/b/c/d. (The mkdir –p option creates directories in this manner. Solve the problem without using mkdir –p.)
One algorithm for a recursive solution follows:
1. Examine the path argument. If it is a null string or if it names an existing directory, do nothing and return.
2. If the path argument is a simple path component, create it (using mkdir) and return.
3. Otherwise, call makepath using the path prefix of the original argument. This step eventually creates all the directories up to the last component, which you can then create using mkdir.
In general, a recursive function must invoke itself with a simpler version of the problem than it was given until it is finally called with a simple case that does not need to call itself. Following is one possible solution based on this algorithm:
makepath
# This is a function
# Enter it at the keyboard; do not run it as a shell script
#
function makepath()
{
if [[ ${#1} -eq 0 || -d "$1" ]]
then
return 0 # Do nothing
fi
if [[ "${1%/*}" = "$1" ]]
then
mkdir $1
return $?
fi
makepath ${1%/*} || return 1
mkdir $1
return $?
}
In the test for a simple component (the if statement in the middle of the function), the left expression is the argument after the shortest suffix that starts with a / character has been stripped away (page 1058). If there is no such character (for example, if $1 is max), nothing is stripped off and the two sides are equal. If the argument is a simple filename preceded by a slash, such as /usr, the expression ${1%/*} evaluates to a null string. To make the function work in this case, you must take two precautions: Put the left expression within quotation marks and ensure that the recursive function behaves sensibly when it is passed a null string as an argument. In general, good programs are robust: They should be prepared for borderline, invalid, or meaningless input and behave appropriately in such cases.
By giving the following command from the shell you are working in, you turn on debugging tracing so that you can watch the recursion work:
$ set -o xtrace
(Give the same command but replace the hyphen with a plus sign [+] to turn debugging off.) With debugging turned on, the shell displays each line in its expanded form as it executes the line. A + precedes each line of debugging output.
In the following example, the first line that starts with + shows the shell calling makepath. The makepath function is initially called from the command line with arguments of a/b/c. It then calls itself with arguments of a/b and finally a. All the work is done (using mkdir) as each call tomakepath returns.
$ ./makepath a/b/c
+ makepath a/b/c
+ [[ 5 -eq 0 ]]
+ [[ -d a/b/c ]]
+ [[ a/b = \a\/\b\/\c ]]
+ makepath a/b
+ [[ 3 -eq 0 ]]
+ [[ -d a/b ]]
+ [[ a = \a\/\b ]]
+ makepath a
+ [[ 1 -eq 0 ]]
+ [[ -d a ]]
+ [[ a = \a ]]
+ mkdir a
+ return 0
+ mkdir a/b
+ return 0
+ mkdir a/b/c
+ return 0
The function works its way down the recursive path and back up again.
It is instructive to invoke makepath with an invalid path and see what happens. The following example, which is run with debugging turned on, tries to create the path /a/b. Creating this path requires that you create directory a in the root directory. Unless you have permission to write to the root directory, you are not permitted to create this directory.
$ ./makepath /a/b
+ makepath /a/b
+ [[ 4 -eq 0 ]]
+ [[ -d /a/b ]]
+ [[ /a = \/\a\/\b ]]
+ makepath /a
+ [[ 2 -eq 0 ]]
+ [[ -d /a ]]
+ [[ '' = \/\a ]]
+ makepath
+ [[ 0 -eq 0 ]]
+ return 0
+ mkdir /a
mkdir: cannot create directory '/a': Permission denied
+ return 1
+ return 1
The recursion stops when makepath is denied permission to create the /a directory. The error returned is passed all the way back, so the original makepath exits with nonzero status.
Tip: Use local variables with recursive functions
The preceding example glossed over a potential problem that you might encounter when you use a recursive function. During the execution of a recursive function, many separate instances of that function might be active simultaneously. All but one of them are waiting for their child invocation to complete.
Because functions run in the same environment as the shell that calls them, variables are implicitly shared by a shell and a function it calls. As a consequence, all instances of the function share a single copy of each variable. Sharing variables can give rise to side effects that are rarely what you want. As a rule, you should use local to make all variables of a recursive function local. See page 1040 for more information.
The quiz Shell Script
Solve the following problem using a bash script:
Write a generic multiple-choice quiz program. The program should get its questions from data files, present them to the user, and keep track of the number of correct and incorrect answers. The user must be able to exit from the program at any time and receive a summary of results to that point.
The detailed design of this program and even the detailed description of the problem depend on a number of choices: How will the program know which subjects are available for quizzes? How will the user choose a subject? How will the program know when the quiz is over? Should the program present the same questions (for a given subject) in the same order each time, or should it scramble them?
Of course, you can make many perfectly good choices that implement the specification of the problem. The following details narrow the problem specification:
• Each subject will correspond to a subdirectory of a master quiz directory. This directory will be named in the environment variable QUIZDIR, whose default will be ~/quiz. For example, you could have the following directories correspond to the subjects engineering, art, and politics:~/quiz/engineering, ~/quiz/art, and ~/quiz/politics. Put the quiz directory in /usr/games if you want all users to have access to it (requires root privileges).
• Each subject can have several questions. Each question is represented by a file in its subject’s directory.
• The first line of each file that represents a question holds the text of the question. If it takes more than one line, you must escape the NEWLINE with a
backslash. (This setup makes it easy to read a single question with the read builtin.) The second line of the file is an integer that specifies the number of choices. The next lines are the choices themselves. The last line is the correct answer. Following is a sample question file:
Who discovered the principle of the lever?
4
Euclid
Archimedes
Thomas Edison
The Lever Brothers
Archimedes
• The program presents all the questions in a subject directory. At any point the user can interrupt the quiz using CONTROL-C, whereupon the program will summarize the results up to that point and exit. If the user does not interrupt the program, the program summarizes the results and exits when it has asked all questions for the chosen subject.
• The program scrambles the questions related to a subject before presenting them.
Following is a top-level design for this program:
1. Initialize. This involves a number of steps, such as setting the counts of the number of questions asked so far and the number of correct and wrong answers to zero. It also sets up the program to trap CONTROL-C.
2. Present the user with a choice of subjects and get the user’s response.
3. Change to the corresponding subject directory.
4. Determine the questions to be asked (that is, the filenames in that directory). Arrange them in random order.
5. Repeatedly present questions and ask for answers until the quiz is over or is interrupted by the user.
6. Present the results and exit.
Clearly some of these steps (such as step 3) are simple, whereas others (such as step 4) are complex and worthy of analysis on their own. Use shell functions for any complex step, and use the trap builtin to handle a user interrupt.
Here is a skeleton version of the program with empty shell functions:
function initialize
{
# Initializes variables.
}
function choose_subj
{
# Writes choice to standard output.
}
function scramble
{
# Stores names of question files, scrambled,
# in an array variable named questions.
}
function ask
{
# Reads a question file, asks the question, and checks the
# answer. Returns 1 if the answer was correct, 0 otherwise. If it
# encounters an invalid question file, exits with status 2.
}
function summarize
{
# Presents the user's score.
}
# Main program
initialize # Step 1 in top-level design
subject=$(choose_subj) # Step 2
[[ $? -eq 0 ]] || exit 2 # If no valid choice, exit
cd $subject || exit 2 # Step 3
echo # Skip a line
scramble # Step 4
for ques in ${questions[*]}; do # Step 5
ask $ques
result=$?
(( num_ques=num_ques+1 ))
if [[ $result == 1 ]]; then
(( num_correct += 1 ))
fi
echo # Skip a line between questions
sleep ${QUIZDELAY:=1}
done
summarize # Step 6
exit 0
To make reading the results a bit easier for the user, a sleep call appears inside the question loop. It delays $QUIZDELAY seconds (default = 1) between questions.
Now the task is to fill in the missing pieces of the program. In a sense this program is being written backward. The details (the shell functions) come first in the file but come last in the development process. This common programming practice is called top-down design. In top-down design you fill in the broad outline of the program first and supply the details later. In this way you break the problem up into smaller problems, each of which you can work on independently. Shell functions are a great help in using the top-down approach.
One way to write the initialize function follows. The cd command causes QUIZDIR to be the working directory for the rest of the script and defaults to ~/quiz if QUIZDIR is not set.
function initialize ()
{
trap 'summarize ; exit 0' INT # Handle user interrupts
num_ques=0 # Number of questions asked so far
num_correct=0 # Number answered correctly so far
first_time=true # true until first question is asked
cd ${QUIZDIR:=~/quiz} || exit 2
}
Be prepared for the cd command to fail. The directory might not be searchable or conceivably another user might have removed it. The preceding function exits with a status code of 2 if cd fails.
The next function, choose_subj, is a bit more complicated. It displays a menu using a select statement:
function choose_subj ()
{
subjects=($(ls))
PS3="Choose a subject for the quiz from the preceding list: "
select Subject in ${subjects[*]}; do
if [[ -z "$Subject" ]]; then
echo "No subject chosen. Bye." >&2
exit 1
fi
echo $Subject
return 0
done
}
The function first uses an ls command and command substitution to put a list of subject directories in the subjects array. Next the select structure (page 1012) presents the user with a list of subjects (the directories found by ls) and assigns the chosen directory name to the Subject variable. Finally the function writes the name of the subject directory to standard output. The main program uses command substitution to assign this value to the subject variable [subject=$(choose_subj)].
The scramble function presents a number of difficulties. In this solution it uses an array variable (questions) to hold the names of the questions. It scrambles the entries in an array using the RANDOM variable (each time you reference RANDOM, it has the value of a [random] integer between 0 and 32767):
function scramble ()
{
declare -i index quescount
questions=($(ls))
quescount=${#questions[*]} # Number of elements
((index=quescount-1))
while [[ $index > 0 ]]; do
((target=RANDOM % index))
exchange $target $index
((index -= 1))
done
}
This function initializes the array variable questions to the list of filenames (questions) in the working directory. The variable quescount is set to the number of such files. Then the following algorithm is used: Let the variable index count down from quescount – 1 (the index of the last entry in the array variable). For each value of index, the function chooses a random value target between 0 and index, inclusive. The command
((target=RANDOM % index))
produces a random value between 0 and index – 1 by taking the remainder (the % operator) when $RANDOM is divided by index. The function then exchanges the elements of questions at positions target and index. It is convenient to take care of this step in another function namedexchange:
function exchange ()
{
temp_value=${questions[$1]}
questions[$1]=${questions[$2]}
questions[$2]=$temp_value
}
The ask function also uses the select structure. It reads the question file named in its argument and uses the contents of that file to present the question, accept the answer, and determine whether the answer is correct. (See the code that follows.)
The ask function uses file descriptor 3 to read successive lines from the question file, whose name was passed as an argument and is represented by $1 in the function. It reads the question into the ques variable and the number of questions into num_opts. The function constructs the variablechoices by initializing it to a null string and successively appending the next choice. Then it sets PS3 to the value of ques and uses a select structure to prompt the user with ques. The select structure places the user’s answer in answer, and the function then checks that response against the correct answer from the file.
The construction of the choices variable is done with an eye toward avoiding a potential problem. Suppose that one answer has some whitespace in it—then it might appear as two or more arguments in choices. To avoid this problem, make sure that choices is an array variable. The selectstatement does the rest of the work:
quiz
$ cat quiz
#!/bin/bash
# remove the # on the following line to turn on debugging
# set -o xtrace
#==================
function initialize ()
{
trap 'summarize ; exit 0' INT # Handle user interrupts
num_ques=0 # Number of questions asked so far
num_correct=0 # Number answered correctly so far
first_time=true # true until first question is asked
cd ${QUIZDIR:=~/quiz} || exit 2
}
#==================
function choose_subj ()
{
subjects=($(ls))
PS3="Choose a subject for the quiz from the preceding list: "
select Subject in ${subjects[*]}; do
if [[ -z "$Subject" ]]; then
echo "No subject chosen. Bye." >&2
exit 1
fi
echo $Subject
return 0
done
}
#==================
function exchange ()
{
temp_value=${questions[$1]}
questions[$1]=${questions[$2]}
questions[$2]=$temp_value
}
#==================
function scramble ()
{
declare -i index quescount
questions=($(ls))
quescount=${#questions[*]} # Number of elements
((index=quescount-1))
while [[ $index > 0 ]]; do
((target=RANDOM % index))
exchange $target $index
((index -= 1))
done
}
#==================
function ask ()
{
exec 3<$1
read -u3 ques || exit 2
read -u3 num_opts || exit 2
index=0
choices=()
while (( index < num_opts )) ; do
read -u3 next_choice || exit 2
choices=("${choices[@]}" "$next_choice")
((index += 1))
done
read -u3 correct_answer || exit 2
exec 3<&-
if [[ $first_time = true ]]; then
first_time=false
echo -e "You may press the interrupt key at any time to quit.\n"
fi
PS3=$ques" " # Make $ques the prompt for select
# and add some spaces for legibility
select answer in "${choices[@]}"; do
if [[ -z "$answer" ]]; then
echo Not a valid choice. Please choose again.
elif [[ "$answer" = "$correct_answer" ]]; then
echo "Correct!"
return 1
else
echo "No, the answer is $correct_answer."
return 0
fi
done
}
#==================
function summarize ()
{
echo # Skip a line
if (( num_ques == 0 )); then
echo "You did not answer any questions"
exit 0
fi
(( percent=num_correct*100/num_ques ))
echo "You answered $num_correct questions correctly, out of \
$num_ques total questions."
echo "Your score is $percent percent."
}
#==================
# Main program
initialize # Step 1 in top-level design
subject=$(choose_subj) # Step 2
[[ $? -eq 0 ]] || exit 2 # If no valid choice, exit
cd $subject || exit 2 # Step 3
echo # Skip a line
scramble # Step 4
for ques in ${questions[*]}; do # Step 5
ask $ques
result=$?
(( num_ques=num_ques+1 ))
if [[ $result == 1 ]]; then
(( num_correct += 1 ))
fi
echo # Skip a line between questions
sleep ${QUIZDELAY:=1}
done
summarize # Step 6
exit 0
Chapter Summary
The shell is a programming language. Programs written in this language are called shell scripts, or simply scripts. Shell scripts provide the decision and looping control structures present in high-level programming languages while allowing easy access to system utilities and user programs. Shell scripts can use functions to modularize and simplify complex tasks.
Control structures
The control structures that use decisions to select alternatives are if...then, if...then...else, and if...then...elif. The case control structure provides a multiway branch and can be used when you want to express alternatives using a simple pattern-matching syntax.
The looping control structures are for...in, for, until, and while. These structures perform one or more tasks repetitively.
The break and continue control structures alter control within loops: break transfers control out of a loop, and continue transfers control immediately to the top of a loop.
The Here document allows input to a command in a shell script to come from within the script itself.
File descriptors
The Bourne Again Shell provides the ability to manipulate file descriptors. Coupled with the read and echo builtins, file descriptors allow shell scripts to have as much control over input and output as do programs written in lower-level languages.
Variables
By default, variables are local to the process they are declared in; these variables are called shell variables. You can use export to cause variables to be environment variables, which are available to children of the process they are declared in.
The declare builtin assigns attributes, such as readonly, to bash variables. The Bourne Again Shell provides operators to perform pattern matching on variables, provide default values for variables, and evaluate the length of variables. This shell also supports array variables and local variables for functions and provides built-in integer arithmetic, using the let builtin and an expression syntax similar to that found in the C programming language.
Builtins
Bourne Again Shell builtins include type, read, exec, trap, kill, and getopts. The type builtin displays information about a command, including its location; read allows a script to accept user input.
The exec builtin executes a command without creating a new process. The new command overlays the current process, assuming the same environment and PID number of that process. This builtin executes user programs and other Linux commands when it is not necessary to return control to the calling process.
The trap builtin catches a signal sent to the process running the script and allows you to specify actions to be taken upon receipt of one or more signals. You can use this builtin to cause a script to ignore the signal that is sent when the user presses the interrupt key.
The kill builtin terminates a running program. The getopts builtin parses command-line arguments, making it easier to write programs that follow standard Linux conventions for command-line arguments and options.
Utilities in scripts
In addition to using control structures, builtins, and functions, shell scripts generally call Linux utilities. The find utility, for instance, is commonplace in shell scripts that search for files in the system hierarchy and can perform a wide range of tasks.
Expressions
There are two basic types of expressions: arithmetic and logical. Arithmetic expressions allow you to do arithmetic on constants and variables, yielding a numeric result. Logical (Boolean) expressions compare expressions or strings, or test conditions, to yield a true or false result. As with all decisions within shell scripts, a true status is represented by the value 0; false, by any nonzero value.
Good programming practices
A well-written shell script adheres to standard programming practices, such as specifying the shell to execute the script on the first line of the script, verifying the number and type of arguments that the script is called with, displaying a standard usage message to report command-line errors, and redirecting all informational messages to standard error.
Exercises
1. Rewrite the journal script of Chapter 9 (exercise 5, page 416) by adding commands to verify that the user has write permission for a file named journal-file in the user’s home directory, if such a file exists. The script should take appropriate actions if journal-file exists and the user does not have write permission to the file. Verify that the modified script works.
2. The special parameter "$@" is referenced twice in the out script (page 989). Explain what would be different if the parameter "$*" were used in its place.
3. Write a filter that takes a list of files as input and outputs the basename (page 1011) of each file in the list.
4. Write a function that takes a single filename as an argument and adds execute permission to the file for the user.
a. When might such a function be useful?
b. Revise the script so it takes one or more filenames as arguments and adds execute permission for the user for each file argument.
c. What can you do to make the function available every time you log in?
d. Suppose that, in addition to having the function available on subsequent login sessions, you want to make the function available in your current shell. How would you do so?
5. When might it be necessary or advisable to write a shell script instead of a shell function? Give as many reasons as you can think of.
6. Write a shell script that displays the names of all directory files, but no other types of files, in the working directory.
7. Write a script to display the time every 15 seconds. Read the date man page and display the time, using the %r field descriptor. Clear the window (using the clear command) each time before you display the time.
8. Enter the following script named savefiles, and give yourself execute permission to the file:
$ cat savefiles
#! /bin/bash
echo "Saving files in working directory to the file savethem."
exec > savethem
for i in *
do
echo
"==================================================="
echo "File: $i"
echo
"==================================================="
cat "$i"
done
a. Which error message do you receive when you execute this script? Rewrite the script so that the error does not occur, making sure the output still goes to savethem.
b. What might be a problem with running this script twice in the same directory? Discuss a solution to this problem.
9. Read the bash man or info page, try some experiments, and answer the following questions:
a. How do you export a function?
b. What does the hash builtin do?
c. What happens if the argument to exec is not executable?
10. Using the find utility, perform the following tasks:
a. List all files in the working directory and all subdirectories that have been modified within the last day.
b. List all files you have read access to on the system that are larger than 1 megabyte.
c. Remove all files named core from the directory structure rooted at your home directory.
d. List the inode numbers of all files in the working directory whose filenames end in .c.
e. List all files you have read access to on the root filesystem that have been modified in the last 30 days.
11. Write a short script that tells you whether the permissions for two files, whose names are given as arguments to the script, are identical. If the permissions for the two files are identical, output the common permission field. Otherwise, output each filename followed by its permission field. (Hint: Try using the cut utility.)
12. Write a script that takes the name of a directory as an argument and searches the file hierarchy rooted at that directory for zero-length files. Write the names of all zero-length files to standard output. If there is no option on the command line, have the script delete the file after displaying its name, asking the user for confirmation, and receiving positive confirmation. A –f (force) option on the command line indicates that the script should display the filename but not ask for confirmation before deleting the file.
Advanced Exercises
13. Write a script that takes a colon-separated list of items and outputs the items, one per line, to standard output (without the colons).
14. Generalize the script written in exercise 13 so the character separating the list items is given as an argument to the function. If this argument is absent, the separator should default to a colon.
15. Write a function named funload that takes as its single argument the name of a file containing other functions. The purpose of funload is to make all functions in the named file available in the current shell; that is, funload loads the functions from the named file. To locate the file,funload searches the colon-separated list of directories given by the environment variable FUNPATH. Assume the format of FUNPATH is the same as PATH and the search of FUNPATH is similar to the shell’s search of the PATH variable.
16. Rewrite bundle (page 1015) so the script it creates takes an optional list of filenames as arguments. If one or more filenames are given on the command line, only those files should be re-created; otherwise, all files in the shell archive should be re-created. For example, suppose all files with the filename extension .c are bundled into an archive named srcshell, and you want to unbundle just the files test1.c and test2.c. The following command will unbundle just these two files:
$ bash srcshell test1.c test2.c
17. Which kind of links will the lnks script (page 991) not find? Why?
18. In principle, recursion is never necessary. It can always be replaced by an iterative construct, such as while or until. Rewrite makepath (page 1066) as a nonrecursive function. Which version do you prefer? Why?
19. Lists are commonly stored in environment variables by putting a colon (:) between each of the list elements. (The value of the PATH variable is an example.) You can add an element to such a list by catenating the new element to the front of the list, as in
PATH=/opt/bin:$PATH
If the element you add is already in the list, you now have two copies of it in the list. Write a shell function named addenv that takes two arguments: (1) the name of a shell variable and (2) a string to prepend to the list that is the value of the shell variable only if that string is not already an element of the list. For example, the call
addenv PATH /opt/bin
would add /opt/bin to PATH only if that pathname is not already in PATH. Be sure your solution works even if the shell variable starts out empty. Also make sure you check the list elements carefully. If /usr/opt/bin is in PATH but /opt/bin is not, the example just given should still add /opt/bin to PATH. (Hint: You might find this exercise easier to complete if you first write a function locate_field that tells you whether a string is an element in the value of a variable.)
20. Write a function that takes a directory name as an argument and writes to standard output the maximum of the lengths of all filenames in that directory. If the function’s argument is not a directory name, write an error message to standard output and exit with nonzero status.
21. Modify the function you wrote for exercise 20 to descend all subdirectories of the named directory recursively and to find the maximum length of any filename in that hierarchy.
22. Write a function that lists the number of ordinary files, directories, block special files, character special files, FIFOs, and symbolic links in the working directory. Do this in two different ways:
a. Use the first letter of the output of ls –l to determine a file’s type.
b. Use the file type condition tests of the [[ expression ]] syntax to determine a file’s type.
23. Modify the quiz program (page 1072) so that the choices for a question are randomly arranged.
All materials on the site are licensed Creative Commons Attribution-Sharealike 3.0 Unported CC BY-SA 3.0 & GNU Free Documentation License (GFDL)
If you are the copyright holder of any material contained on our site and intend to remove it, please contact our site administrator for approval.
© 2016-2026 All site design rights belong to S.Y.A.