A practical guide to Fedora and Red Hat Enterprise Linux, 7th Edition (2014)
Part I: Installing Fedora and Red Hat Enterprise Linux
Chapter 3. Step-by-Step Installation
In This Chapter
Running a Fedora Live Session
Installing from a Live Session
Installing from an Install Image
The Anaconda Installer
Modifying Boot Parameters (Options)
Advanced Disk Configuration
Manual/Custom Partitioning
Reclaiming Disk Space
gnome-disks: The GNOME Disk Utility
Editing a Kickstart Script
Setting Up a Dual-Boot System
Objectives
After reading this chapter you should be able to:
![]() Run a live session and use gnome-disks to view and change disk partitioning
Run a live session and use gnome-disks to view and change disk partitioning
![]() Install Fedora from a live session
Install Fedora from a live session
![]() Install Fedora/RHEL using an Install Image
Install Fedora/RHEL using an Install Image
![]() Modify system behavior using boot parameters
Modify system behavior using boot parameters
![]() Modify partitions during installation
Modify partitions during installation
![]() Select software during installation
Select software during installation
![]() List the requirement and considerations for a dual-boot configuration
List the requirement and considerations for a dual-boot configuration
Chapter 2 covered planning the installation of Fedora/RHEL: determining the requirements; planning the layout of the hard disk; obtaining the files you need for the installation, including how to download and burn or write Install, Live, and Network Images to installation media; and collecting information about the system. This chapter focuses on installing Fedora/RHEL. Frequently the installation is quite simple, especially if you have done a good job of planning. Sometimes you might run into a problem or have a special circumstance; this chapter gives you tools to use in these cases. Read as much of this chapter as you need to; once you have installed Fedora/RHEL, continue with Chapter 4, which covers getting started using the Fedora/RHEL desktop and command line.
The New Anaconda Installer
The new Anaconda installer, introduced in Fedora 18, has been totally rewritten. The Anaconda user interface changed from a linear (wizard) model to a hub-and-spoke model. Using this model means Anaconda can perform background processing (e.g., you can still be entering information while Anaconda is installing packages) and you can skip screens that are not pertinent to your installation. See fedoraproject.org/wiki/Anaconda/NewInstaller for more information.
Tip: Chapter 17 explains how to set up a virtual system
To install Fedora/RHEL on a virtual system, you build the virtual system and then follow the instructions in this chapter for installing the operating system. See page 663 for instructions on setting up a QEMU/KVM virtual machine and page 671 for setting up a VMware virtual machine.
Tip: Upgrading a Fedora system
The new Anaconda installer will not upgrade a Fedora system from one release to the next. You must use FedUp (FEDora UPgrader), which works on Fedora 17 and later. Visit the Fedora Web page at fedoraproject.org/wiki/FedUp for more information.
Running a Fedora Live Session
As discussed in Chapter 2, a live session is a Linux session you run on a computer without installing Linux on the computer. When you reboot after a live session, the computer is untouched. If you are running Windows, after a live session Windows boots the way it did before the live session. If you choose, you can install Fedora from a live session. RHEL does not offer a live session.
A live session gives you a chance to preview Fedora without installing it. Boot from a Live Image to begin a live session and work with Fedora as explained in Chapter 4. When you are finished, remove the installation medium and reboot the system. The system will boot as it did before you ran the live session.
Preserving files
Because a live session does not write to the hard disk (other than using a swap partition, if one is available), none of the work you save will be available once you reboot. You can use a USB flash drive, email, or another method to transfer files you want to preserve to another system. Theliveusb-creator utility (page 50) can create persistent storage on a USB drive that you can write to from a live session.
Booting the System
Before Fedora can display the desktop of a live session or install itself on a hard disk, the Linux operating system must be read into memory (booted). This process can take a few minutes on older, slower systems and systems with minimal RAM (memory).
In most cases, you can boot Fedora to run a live session that displays a desktop without doing anything after you boot from a Live Image. To begin, insert the installation medium holding a Live Image (the standard GNOME Fedora Desktop Live Media) into the system and turn on or reset the system. Refer to “BIOS setup” on page 31 if the system does not boot from the CD, DVD, or USB drive. Or refer to “Modifying Boot Parameters (Options)” on page 70 if Fedora does not boot or displays an error message.
A few moments after you start the system, Fedora displays a screen that says Starting Fedora Live in 10 seconds. Press any key to interrupt. and counts down from 10 (Figure 3-1). Next the system displays some messages and then a graphical outline of the Fedora logo that gets filled in as the system boots. The screen goes blank and then Fedora displays a Welcome to Fedora window. In this window you can click Try Fedora or Install to Hard Drive.
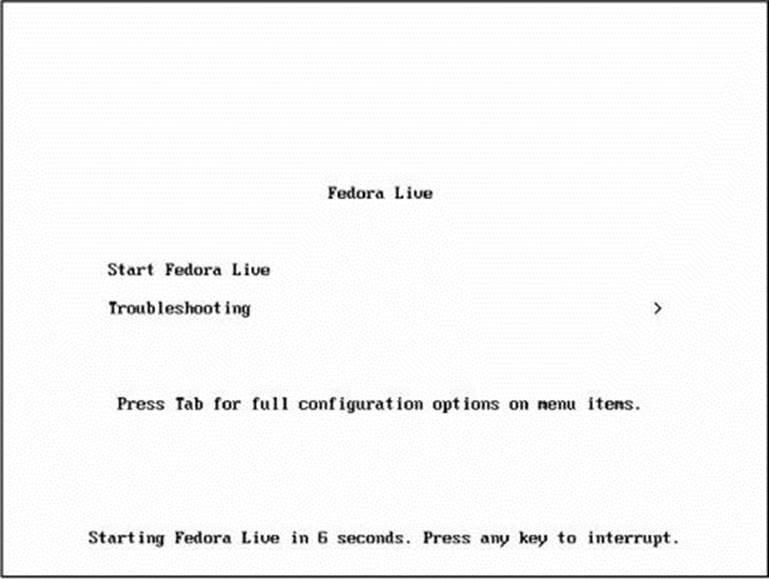
Figure 3-1 The Live Image Boot menu
Checking the installation medium
The first time you use an installation medium, it is a good idea to check it for defects. To do so, interrupt the automatic boot by pressing the SPACE bar while Fedora is counting down. Use the DOWN ARROW key to highlight the Troubleshooting line and press RETURN (the mouse will not work yet). Fedora displays the Troubleshooting menu (Figure 3-2). Use the DOWN ARROW key to highlight Test this media & start Fedora Live; press RETURN.
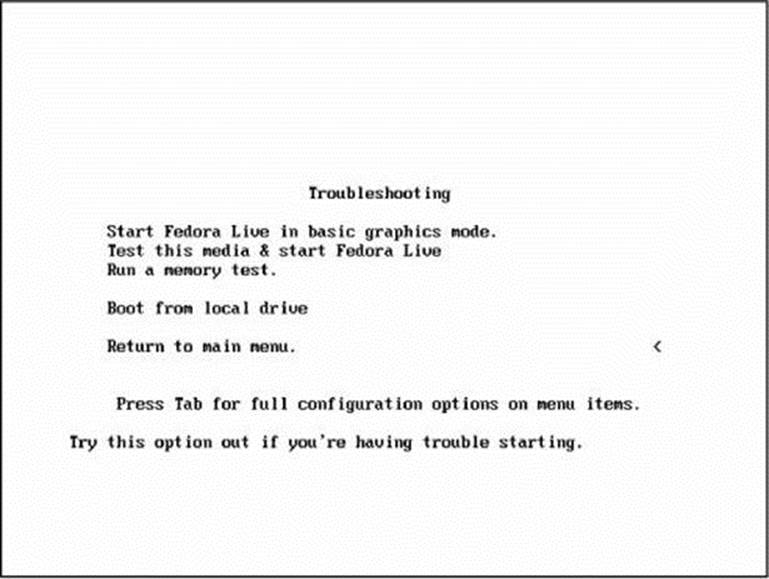
Figure 3-2 The Troubleshooting menu
Anaconda displays a line labeled Checking that shows the percent of the disk it has checked as it verifies the contents of the installation medium. If the installation medium is good, the system boots.
Memory test
Selecting Run a memory test from the Troubleshooting menu runs memtest86+, a GPL-licensed, stand-alone memory test utility for x86-based computers. Press C to configure the test; press ESCAPE to exit and reboot. See www.memtest.org for more information.
Tip: Fedora provides comprehensive installation documentation
Visit docs.fedoraproject.org/en-US/Fedora/19/html/Installation_Quick_Start_Guide to display the Fedora Installation Quick Start Guide. To display the complete Fedora Installation Guide, visit docs.fedoraproject.org/en-US/Fedora/19/html/Installation_Guide.
GNOME
If you are booting from Fedora Desktop Live Media (what this book refers to as a Live Image), the system will run the GNOME desktop manager; Fedora automatically logs in as the user named liveuser and displays the Welcome to Fedora window. This window has two large buttons: Try Fedora and Install to Hard Drive. When you click Try Fedora, GNOME displays a window that explains how to install Fedora to the hard disk. Click Close and Fedora displays the GNOME desktop (Figure 3-3, page 60).
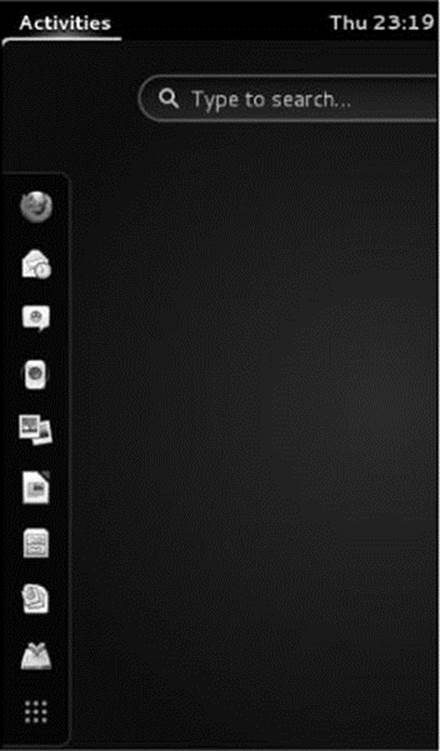
Figure 3-3 The GNOME 3 Live desktop
KDE
If you are booting from a Fedora KDE Live Image, the system will run the KDE desktop manager. When you boot from this disk, Fedora next displays a KDE startup screen and then the KDE desktop—there is no need to log in.
Optional: Seeing What Is Going on
If you are curious and want to see what Fedora is doing as it boots from a Live Image, remove quiet, which controls kernel messages, and rhgb (Red Hat graphical boot), which controls messages from the graphical installer, from the boot parameters. See Figure 3-8 on page70; the list of parameters on the screen will be different from those in the figure. With the Fedora Live Image Boot menu displayed (Figure 3-1) and the Start Fedora Live line highlighted, press TAB to display the boot command-line parameters. Use the LEFT ARROW key to back up over—but not remove—any words to the right of rhgb. Press BACKSPACE or DEL to back up over and erase rhgb and quiet from the boot command line. Press RETURN. Now as Fedora boots, it displays information about what it is doing. Text scrolls on the screen, although sometimes too rapidly to read. When you boot Fedora from an Install Image and when you boot RHEL, this information is displayed by default: You do not have to change the command line.
Installing Fedora/RHEL
You can install Fedora from a live session (preceding) or install Fedora/RHEL from an Install Image. Installing from a live session is simpler but does not give you the flexibility installing from an Install Image does. For example, you cannot select the language Anaconda uses, nor can you choose which software packages you will install when you install from a live session.
Caution: See what is on the hard disk (and back it up) before installing Linux
Unless you are certain the hard disk you are installing Fedora/RHEL on has nothing on it (it is a new disk) or you are sure the disk holds no information of value, it is a good idea to examine the contents of the disk before you start the installation. You can use the gnome-disks disk utility (page 78) from a live session for this purpose. Back up whatever is on the disk, even if it is in a partition the installation will not write to.
An Install Image holds many of the software packages Fedora/RHEL supports. You can install whichever package groups you like from an Install Image without connecting to the Internet. However, without an Internet connection, you will not be able to update the software once the system is installed.
A Live Image holds a limited set of software packages. Once you install from a Live Image, you must connect to the Internet to update the software on the system and to download and install additional packages.
To begin most installations, insert the medium holding a Live or an Install Image into the system and turn on or reset the system. For hard disk and network-based installations, you can use an Install or a Network Image.
Refer to “BIOS setup” on page 31 if the system does not boot from the installation medium.
Installing from a Live Session (Fedora)
Bring up a live GNOME session as explained on page 56. GNOME will display a GNOME 3 desktop that has the word Activities in the upper-left corner of the screen.
Tip: The Anaconda installer does not modify the live environment
The changes you make as you install Fedora from a live session do not affect the live session. For example, when you set up networking for the system you are installing, the network connection for the live environment does not change.
From a GNOME 3 desktop, click Activities; GNOME displays icons along the left side of the screen and a text box with the words Type to search in it (Figure 3-3). Near the bottom of the icons is an icon depicting a hard drive with a green tick on top of it. Left-click this icon when you want to install Fedora. Continue reading at “Using Anaconda” on page 63.
Installing from an Install Image
To install Fedora/RHEL from an Install Image, insert the installation medium and turn on or reset the system. After a few moments, the system displays the Fedora/RHEL Boot menu (Figure 3-4) and a message that says Automatic boot in 60 seconds. Refer to “BIOS setup” on page 31 if the system does not boot from the installation medium. Refer to “Modifying Boot Parameters (Options)” on page 70 if Fedora/RHEL does not boot or displays an error message.
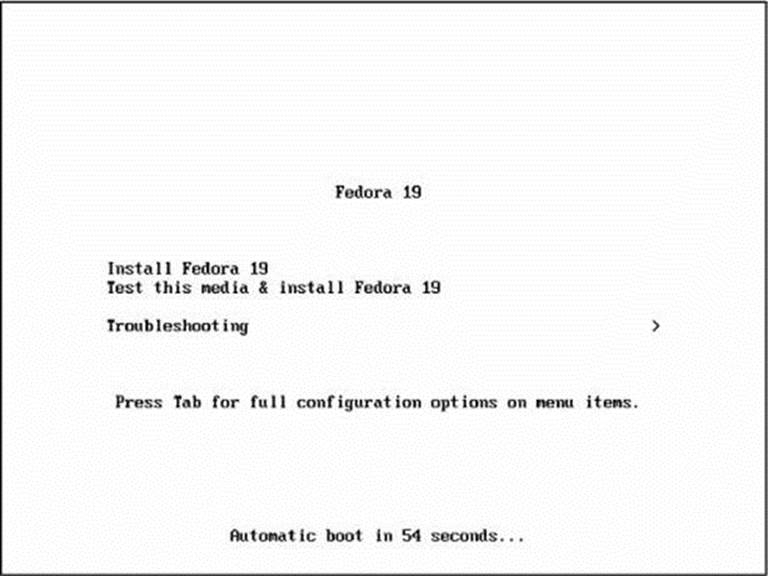
Figure 3-4 The Install Image Boot menu
Press the SPACE bar within 60 seconds to stop the countdown. If you do not press the SPACE bar, after 60 seconds Fedora/RHEL begins a graphical installation.
The Fedora Install Image Boot menu has the following selections:
Install Fedora
Installs a Fedora/RHEL system using the Anaconda graphical installer.
Test this media & install Fedora
Tests the installation medium and installs a Fedora/RHEL system using the Anaconda graphical installer.
Troubleshooting
Displays the Troubleshooting menu (Figure 3-5).
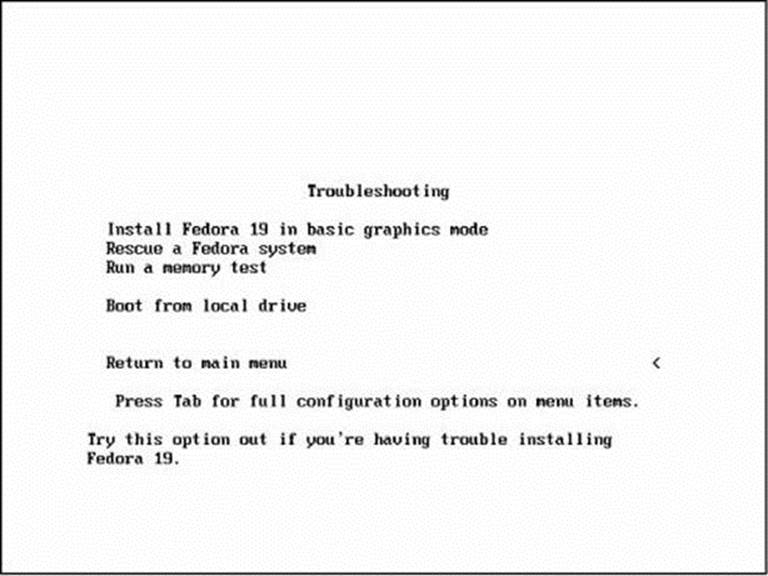
Figure 3-5 The Install Image Troubleshooting menu
The Troubleshooting menu has the following selections.
Install Fedora in basic graphics mode
Installs a graphical Fedora/RHEL system using the graphical installer. Anaconda does not attempt to determine the type of display attached to the system; it uses a basic video driver that works with most displays. Choose this selection if the installation fails before Anaconda displays the Welcome to Fedora screen (page 63).
Rescue a Fedora system
Brings up a minimal Fedora/RHEL system but does not install it. After detecting the system’s disks and partitions, the system enters single-user/rescue mode and allows you to mount an existing Linux filesystem. For more information refer to “Rescue an Installed System” on page 456.
Run a memory test
Runs the memory test described on page 58.
Boot from local drive
Boots the system from the hard disk. This selection frequently has the same effect as booting the system without the installation medium in place (depending on how the BIOS [page 31] is set up).
Return to main menu
Displays the Fedora Install Image Boot menu.
The Anaconda Installer
Anaconda, which is written in Python and C, identifies the hardware, loads drivers, probes for the devices it will use during installation, builds the filesystems, starts the X server, and installs the Fedora/RHEL operating system. Anaconda can run in graphical interactive mode (default), limited textual mode (see the text on page 72), or automated mode (see “Editing a Kickstart Script” on page 83).
Exactly which screens Anaconda displays depends on whether you are installing Fedora from a live session, an Install Image, or a Network Image; whether you are installing RHEL; which paths you pick through the installation process; and which parameters you specify on the boot command line. Unless you tell it not to, Anaconda probes the video card and monitor, and starts a native X server.
While it is running, Anaconda opens the virtual consoles (page 121) shown in Table 3-1. You can display a virtual console by pressing CONTROL-ALT-Fx, where x is the virtual console number and Fx is the function key that corresponds to the virtual console number.
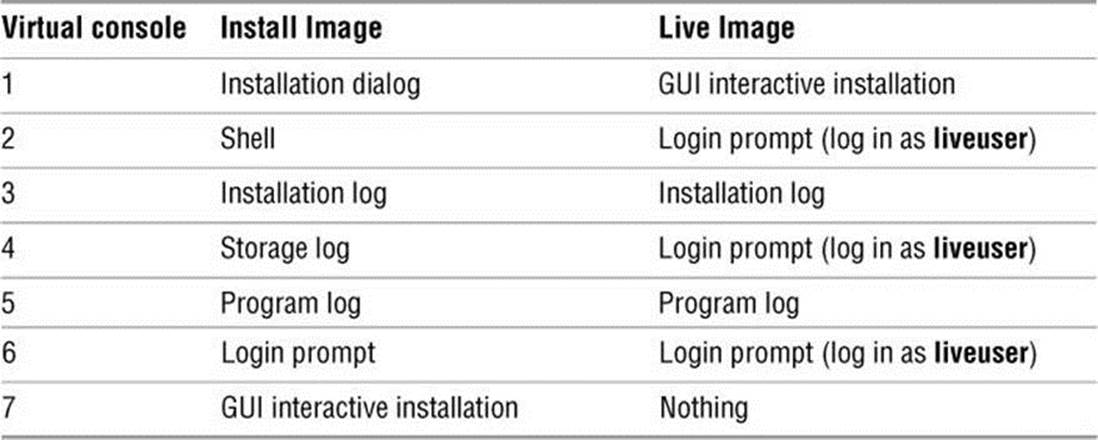
Table 3-1 Virtual console assignments during installation
At any time during the installation, you can switch to virtual console 2 (by pressing CONTROL-ALT-F2) and give commands to see what is going on. Do not give any commands that change any part of the installation process. To switch back to the graphical installation screen, press CONTROL-ALT-F1 (Live Image) or CONTROL-ALT-F7 (Install Image).
Testing the Installation Medium
The first time you use an installation medium, select Test this media & install Fedora from the Boot menu and press RETURN to boot the system. Fedora displays a few lines before displaying a line that starts with Checking. This line shows the percent of the disk Anaconda has checked as it verifies the contents of the installation medium. If the installation medium is good, the system boots. If you use the same medium again, you do not have to test it: Select Install Fedora.
A DVD might fail the media test if the software that was used to burn the disk did not include padding. If a DVD fails the media test, try booting using the nodma parameter. See page 70 for information on adding parameters to the boot command line. If the DVD passes the media test when you boot the system using the nodma parameter, the DVD is good; reboot the system without this parameter before installing Fedora/RHEL. If you install Linux after having booted using this parameter, the kernel will be set up to always use this parameter. As a consequence, the installation and operation of the system can be slow.
Using Anaconda
Welcome to Fedora
Anaconda displays the Welcome to Fedora screen after it obtains enough information to start the X Window System. Scroll and click to highlight the language you want to use for installation. This language is not necessarily the same language the installed system will display. Click Continue. Anaconda displays the Installation Summary screen.
The Installation Summary Screen
Anaconda takes a while to load the information the Installation Summary screen displays (Figure 3-6, next page). While it is loading, some items are grayed out. You must wait until Anaconda finishes loading this information and the items are no longer grayed out before you can select these items. You might need to scroll down to display the Storage item.
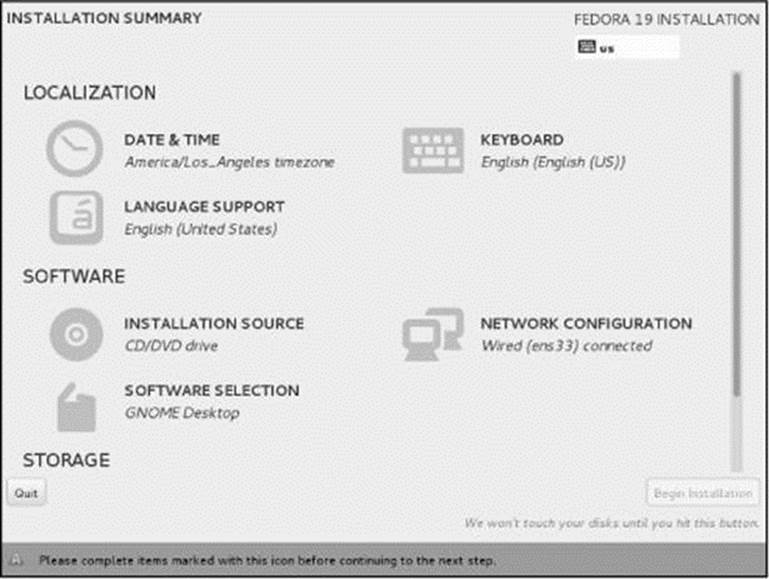
Figure 3-6 The Installation Summary screen (scroll to display the Storage item)
Typically an orange bar that holds an exclamation point in a triangle and the words Please complete items marked with this icon before continuing to the next step appears at the bottom of the window. While this bar is displayed the button labeled Begin Installation is grayed out to indicate it will not work. The only items you must open and modify are those that display this icon. The items displayed when you are installing Fedora from a live session are a subset of those displayed when you install from an Install Image.
Click on an item to display a screen that allows you to work with that item. Click Done to return to the Installation Summary screen. The items that appear in the Installation Summary screen are divided into three groups: Localization, Software (not from a live installation), and Storage.
Tip: You do not need to open most items on the Installation Summary screen
Each item on the Installation Summary screen displays a note about what Anaconda has chosen for that item. You do not need to open an item if it is set properly. For example, if the Date & Time item shows America/Los_Angeles timezone and that is correct, you do not need to open this item. Frequently the only item you need to open is Installation Destination (page 67).
Localization
Date & Time
The Date & Time screen displays a world map that allows you to specify the local time zone. Click a city in the local time zone; Anaconda displays the name of the city in the spin box labeled City. Alternately, you can use the spin boxes labeled Region and City to specify a city.
By default, Anaconda sets up the new system to use NTP (Network Time Protocol) to keep the system clock accurate. If you do not want to use NTP, click the switch labeled Network Time to set it to Off and use the widgets at the bottom of the screen to set the system clock.
Keyboard
The Keyboard Layout screen allows you to specify the type of keyboard that will be attached to the installed system. The box on the left side of this screen displays available keyboard layouts. The entry at the top of the list is the default layout to be used both during installation and for the installed system. Use the buttons at the bottom of this box to add layouts and remove, move, and test the highlighted layout.
You can specify a keyboard for use during installation only, but you can specify only keyboards that are in the list on the Keyboard Layout screen. Use the small keyboard button to make this change. The button is located at the upper-right of all installation screens.
Language Support
Not available with a live installation. In the Language Support screen, put ticks in the check boxes adjacent to the languages you want to install.
Software
Not available with a live installation.
Installation Source
Typically you install Fedora from the medium you booted from. If that is the case you do not need to open the Installation Source screen. This screen allows you to
• Specify as the installation source either the medium you booted from (Auto-detected installation media) or a location (URL) on the network
• Choose to verify the medium you booted from
• Install updates as Anaconda installs the system
• Specify additional repositories (page 533) to use during installation.
The top part of the Installation Source screen is labeled Which installation source would you like to use? and has two radio buttons. By default, Auto-detected installation media is selected and displays the name of the device that holds and the label on the medium. Click the button labeled Verify to test that the image on the installation medium is good.
Caution: Test the installation medium
It is possible for data to become corrupted while fetching an installation image; it is also possible for a transient error to occur while writing an image to a recordable medium. When you boot from an installation medium, the button labeled Verify on the Installation Source screen allows you to verify that the image on the installation medium does not contain any errors. Testing the installation medium takes a few minutes but can save you hours of aggravation if the installation fails due to a bad medium.
The second radio button in this section is labeled On the network and allows you to specify a Web, FTP, or NFS URL. When you select Closest mirror from the drop-down list, Anaconda finds the closest Fedora mirror and downloads packages from that site; after you click Done, Anaconda takes a moment to locate the closest mirror. If you reopen the Installation Source screen after selecting Closest mirror, Anaconda reverts to the installation medium and not installing updates.
By default Anaconda does not install updates while it installs Fedora/RHEL: You update the software after you install the system. Remove the tick from the check box labeled Don’t install the latest available software updates to cause Anaconda to update software as it installs it.
The bottom portion of the screen allows you to specify additional repositories (page 542) that Anaconda can use during installation.
Network Configuration
If the local system is connected to a network that runs a DHCP server (page 491), Anaconda configures the network automatically and you do not have to open the Network Configuration screen. This screen
• Displays information about the network interface and connection Anaconda is using
• Allows you to turn off the network connection
• Allows you to (re)configure the network
• Allows you to specify a hostname for the installed system
When you click the button labeled Configure, Anaconda displays a window that allows you to modify the network connection.
Enter the hostname of the installed system in the text box labeled Hostname at the bottom of the screen.
Software Selection
The Software Selection screen (Figure 3-7) allows you to select which environmental package group and add-on package groups you want to install. An installation from a Network Image allows you to select from more package groups than does installation from an Install Image. By default, Anaconda installs the GNOME desktop and the LibreOffice productivity suite.
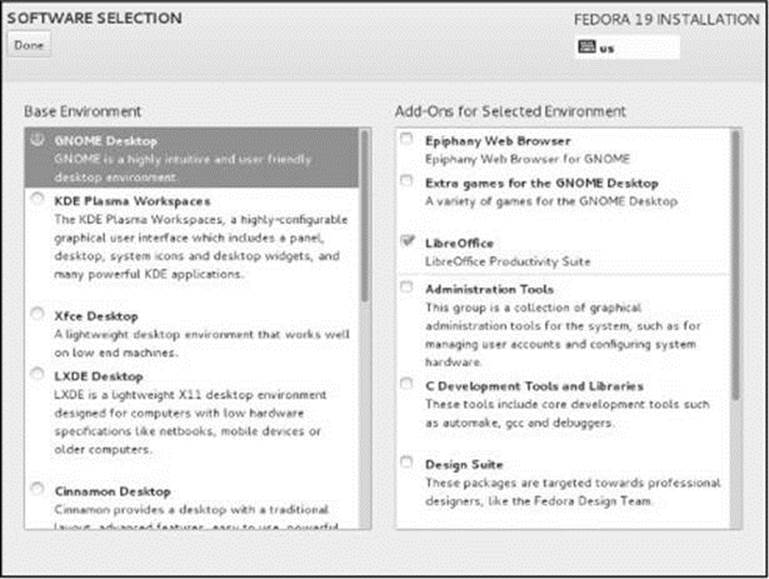
Figure 3-7 The Software Selection screen
The left side of the Software Selection screen is labeled Base Environment and allows you to specify an environmental package group that specifies a desktop environment (e.g., GNOME, KDE, LXDE) or a system function (e.g., Web server, Infrastructure Server). You can make only one selection from this column. All the desktops install appropriate networking software and the Firefox Web browser. The Basic Desktop selection allows you to specify more than one desktop on the right side of the screen. The Minimal Install selection installs as few software packages as possible for a textual system (no GUI). The right side of the screen allows you to select package groups that are typically used with the base environment you selected on the left. (Fedora; RHEL selections differ slightly).
Tip: Use a Minimal Install for older, slower hardware
The last entry in the Base Environment column is Minimal Install. Select this entry for older, slower hardware. This selection installs a system that has no GUI, just a command-line (textual) interface. If the system does not have enough memory to perform a graphical installation, perform a textual installation using the text boot parameter (page 72) and VNC (page 72) or Kickstart (pages 71 and 83).
Tip: You can select only package groups, not individual packages
To streamline the installation process, the new Anaconda allows you to specify which package groups you want to install but not which packages. You must add or remove individual packages after the installation is complete. Visitohjeezlinux.wordpress.com/2013/02/07/anaconda-packaging-retrospective for background information. Use Kickstart (pages 71 and 83) if you require more granular control over package selection.
Storage
Installation Destination
You might need to scroll down to display the Installation Destination selection. At a minimum, Anaconda requires you to confirm where you want to install Fedora/RHEL, although this screen gives you many more choices.
By default, with a single empty disk, Anaconda installs Fedora/RHEL on the whole disk. If the disk is not empty and there is enough free space (page 36) on the disk, Anaconda installs Fedora/RHEL in the free space.
If this default is acceptable, open the Installation Destination screen; a tick will appear over the single disk (similar to Figure 3-9 on page 73). Click Done; Anaconda displays the Installation Options dialog. This dialog allows you to choose whether you want to review and/or modify the default disk setup or whether you want to continue without reviewing it. The bottom of the screen has a check box that allows you to encrypt the data on the disk (page 30). For the simplest installation, do not make any change; click Continue.
If there is not enough free space to install Fedora/RHEL, if the computer has more than one hard disk, if you want to reclaim disk space from an exiting partition, or if you want to customize the disk partitions, see “Advanced Disk Configuration” on page 72.
Begin Copying Files
After making the changes you want (and those that Anaconda requires) to the Installation Summary items, click the button labeled Begin Installation. While it is installing Fedora/RHEL, Anaconda places a Kickstart file (page 83) that corresponds to your selections in /root/anaconda-ks.cfg.
Installing Fedora/RHEL can take a while. The amount of time depends on the hardware you are installing the operating system on and the number of software packages you are installing.
User Settings
While Anaconda installs Linux, it displays the User Settings screen. On this screen you must specify a password for the root user and set up a user.
Root Password
The Root Password screen allows you to enter a password for the root user (Superuser) and confirm that password by entering it a second time. See page 136 for information on selecting a secure password and page 422 for information on root privileges. Although you can specify a weak password, doing so is not recommended. When you specify a weak password, Anaconda tells you why it is weak on the yellow bar at the bottom of the screen. Click Done twice to accept a weak password or once to accept a stronger password.
User Creation
The User Creation screen allows you to add a user to the system by specifying the new user’s full name, username, and password. See “Root Password,” above for information on specifying a password. You can choose to make the user an administrator (see the tip named “Administrator” on page 422) and require a password for the user (see the tip on page 135 for information on why having a password is a good idea). Click the button labeled Advanced to work with the user’s home directory, UID (page 1278), group ID (page 1252), and group membership (see /etc/group on page 506).
Although Anaconda allows you to skip creating a user, you will have to create one before you can log in. The exception is when you install a minimal (command-line) system on which you can log in as root without creating a user.
Rebooting the System
When Anaconda displays the message saying it has successfully installed Fedora/RHEL and asks you to reboot the system, click Reboot and remove the installation medium.
gnome-initial-setup: Setting Up a User
When the system reboots, it is running Linux. The first time each user logs in, Fedora/RHEL runs gnome-initial-setup, which asks a few questions before allowing the user to continue.
Welcome
First, gnome-initial-setup displays the Welcome window. Make sure the language you want to use has a tick next to it before you click Next.
Input Sources
The Input Sources (also input methods) window allows you to specify characters and symbols that are not present on the keyboard attached to the system. For example, some French and Chinese characters do not appear on a en_US keyboard; you have to press combinations of keys to type these characters. These combinations of keys are input sources.
If the language that appears in this window is appropriate, click Next. Otherwise click the plus sign (+) and select additional languages. Click the small picture of a keyboard to display a keyboard on which you can test the highlighted language. When you have selected an appropriate input source, click Next.
Online Accounts
Clicking Add Accounts on the Online Accounts window opens the Add Account window. From this window you can add Google, Facebook, and other accounts to the Fedora/RHEL system. When you add an account you specify your credentials for that account. The online accounts service stores account information in GConf (a system for storing application preferences) and passwords in GNOME Keyring so you have to enter this information only once. Click Next.
Thank You
The Thank You window tells you that you have finished setting up the new system. Click Start Using GNOME 3.
The gnome-initial-setup utility displays an animated presentation that explains how to get started using GNOME. You can press ESCAPE to stop the presentation and then click the X at the upper-right of the GNOME Help window to close it.
Initializing Databases and Updating the System
It is important to update all software on a newly installed system. You can wait for the system to prompt you or you can give the following command from a virtual terminal to update the software; you will need to supply the root password. See page 538 for more information on the yumupdate command. Depending on the network connection and the number of packages that need to be updated, this command can run for a long time.
$ su -c 'yum -y update'
Updating the mandb database ensures the whatis and apropos utilities (both on page 130) will work properly. Similarly, updating the locate database ensures that locate will work properly. (The locate utility indexes and allows you to search for files on the system quickly and securely.) Instead of updating these databases when you install the system, you can wait for crond (page 607) to update them, but be aware that whatis, apropos, and locate will not work for a while. The best way to update these databases is to manually run the cron scripts that normally run daily. Give the following commands:
$ su -c /etc/cron.daily/man-db.cron
$ su -c /etc/cron.daily/mlocate.cron
These utilities run for several minutes and might complain about not being able to find a file or two. When the system displays a prompt, the mandb and locate databases are up-to-date. Continue with Chapter 4.
Installation Tasks
This section details some common tasks you might need to perform during or after installation. It covers modifying the boot parameters, using Anaconda to partition the disk during installation, using gnome-disks to view and modify partitions, using LVs (logical volumes) to facilitate disk partitioning, using Kickstart to automate installation, and setting up a system that will boot two or more operating systems (e.g., Windows and Linux; a dual-boot system).
![]() Modifying Boot Parameters (Options)
Modifying Boot Parameters (Options)
To modify boot parameters, you must interrupt the automatic boot process by pressing the SPACE bar while the system is counting down when you first boot from a Live Image (page 57) or an Install Image (page 60). When you press the SPACE bar, Fedora displays the Fedora Live Image Boot menu (Figure 3-1, page 57) or the Fedora Install Image Boot menu (Figure 3-4, page 61). Use the ARROW keys to highlight the selection you want before proceeding. With the desired selection highlighted, press the TAB key to display the boot command-line parameters (Figure 3-8).
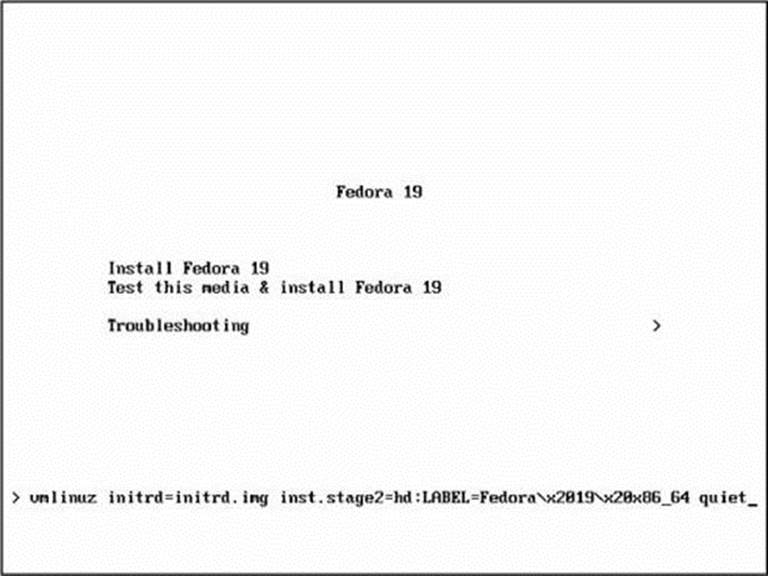
Figure 3-8 The Fedora Install Image Boot menu showing boot parameters (options)
Type a SPACE before you enter any parameters. You can specify multiple parameters separated by SPACEs. Press RETURN to boot the system. For more information on boot parameters, refer to www.kernel.org/doc/Documentation/kernel-parameters.txt or use Google to search for linux boot parameters.
Tip: What to do if the installation does not work
On some hardware, the installation might pause for as long as ten minutes. Before experimenting with other fixes, try waiting for a while. If the installation hangs, try booting with one or more of the boot parameters described in this section.
Following are some of the parameters you can add to the boot command line. If you encounter problems with the display during installation, supply the nofb parameter, which turns off video memory.
Many of these parameters can be combined. For example, to install Linux on a monitor with a resolution of 1024 × 768, without probing for any devices, supply the following parameters.
resolution=1024x768 noprobe
noacpi
Disables ACPI (Advanced Configuration and Power Interface). This parameter is useful for systems that do not support ACPI or that have problems with their ACPI implementation. The default is to enable ACPI. Specifying acpi=off has the same effect.
noapic
Disables APIC (Advanced Programmable Interrupt Controller). The default is to enable APIC.
noapm
Disables APM (Advanced Power Management). The default is to enable APM. Specifying apm=off has the same effect.
nodma
Turns off DMA (direct memory access) for all disk controllers. This parameter might make buggy controllers (or controllers with buggy drivers) more reliable, but also cause them to perform very slowly because the connected devices have to run in PIO mode instead of DMA mode. It can facilitate testing DVDs that were not written correctly.
nofb
(no framebuffer) Turns off the framebuffer (video memory). This option is useful if problems arise when the graphical phase of the installation starts.
irqpoll
Changes the way the kernel handles interrupts.
ks=URI
Specifies the location of a Kickstart file (page 83) to use to control the installation process. The URI is the pathname or network location of the Kickstart file. Use this parameter with the text parameter (next page) to perform an installation without the use of a GUI (a textual installation).
Typically URI points to an NFS or Web server using one of these formats:
ks=nfs:server:/pathname
ks=http://server/pathname
where server is the FQDN or IP address of the server and pathname is the absolute pathname of the Kickstart file. For example, if Max set up an NFS server on the system at 192.168.206.1, put a Kickstart file named ksmax2.cfg in his home directory, and wanted to perform a textual installation, he might add the following parameters to the end of the boot command line.
text ks=192.168.206.1:/home/max/ksmax2.cfg
For a complete list of options visit the Web site at fedoraproject.org/wiki/Anaconda/Kickstart#Chapter_6._Making_the_Kickstart_File_Available.
nolapic
Disables local APIC. The default is to enable local APIC.
lowres
Runs the installation program at a resolution of 640 × 480 pixels. See also resolution (next page).
mem=xxxM
Overrides the detected memory size. Replace xxx with the number of megabytes of RAM in the computer.
repo=URI
Specifies an installation source. For example, you can use the following parameter to start installing from the specified server:
repo=http://dl.fedoraproject.org/pub/fedora/linux/releases/19/Fedora/x86_64/os
noprobe
Disables hardware probing for all devices, including NICs (network interface cards), graphics cards, and the monitor. This option forces you to select devices from a list. You must know exactly which cards or chips the system uses when you use this parameter. Use noprobe when probing causes the installation to hang or otherwise fail. This parameter allows you to supply arguments for each device driver you specify.
rescue
Sets up the system to rescue an installed system; see page 456 for details.
resolution=WxH
Specifies the resolution of the monitor you are using for a graphical installation. For example, resolution=1024x768 specifies a monitor with a resolution of 1024 × 768 pixels.
text
Installs Linux without the use of a graphical interface. See the adjacent tip.
Tip: A textual installation is not usually very useful
A textual installation does not allow you to partition the disk or specify which packages to install and is therefore usually not very useful. If you want to install Linux without using a GUI, you can install it using a VNC connection (next) or a Kickstart file. See page 83 for information on creating a Kickstart file and page 71 for information on the ks boot parameter that allows you to install Linux using a Kickstart file. To perform a textual installation using a Kickstart file you must specify the text parameter in the Kickstart file. If you want to perform a textual installation using a VNC connection, you must specify the text parameter in addition to vnc.
vnc
Installs Linux via a VNC (virtual network computing) remote desktop session. After providing an IP address, you can control the installation remotely using a VNC client from a remote computer. You can download a free VNC client that runs on several platforms from www.realvnc.com. Use yum (page 534) to install the tigervnc software package to run a VNC client on a Fedora/RHEL system.
vncpassword=passwd
Enables a password for a VNC connection. This option requires that you also use the vnc option.
noselinux
Disables SELinux (page 472) on the installed system.
Advanced Disk Configuration
“Installation Destination” on page 67 covered the simplest disk configuration situation: a single hard disk with enough space to hold the new operating system. This section covers selecting disks, installation options, manual/custom partitioning, reclaiming disk space, and working with LVs. See page 36 for a discussion of the setup of the hard disk and partitions.
The Anaconda Installation Destination screen provides a graphical disk-partitioning facility that can add, delete, and modify partitions on a hard disk. This screen is available only during installation; it cannot be run on its own. You can use gnome-disks (page 78), parted (page 614), or fdiskto manipulate partitions after you install Fedora/RHEL. As explained earlier, if you want a basic set of partitions, you can allow Anaconda to partition the hard disk automatically. See page 44 for a discussion of LVM (Logical Volume Manager) including PVs, VGs, and LVs.
Selecting Disks
The Local Standard Disks section of the Installation Destination screen lists the disks attached to the local system. Click Add a disk under Specialized & Network Disks to work with other types of storage devices including SAN (page 1271) devices.
If the local system has one disk only, a tick will appear over that disk indicating that disk is selected and Anaconda will install the new operating system on it (Figure 3-9). If the system has two or more disks, Anaconda does not select any disks so no ticks appear. Select one or more disks for the new operating system by clicking the associated disk icons; Anaconda places a tick over the disk icon. Anaconda does not alter the disks without ticks (the disks you have not selected). Once you have selected the disks you want to use for the installation, click Done. Anaconda displays the Installation Options window.
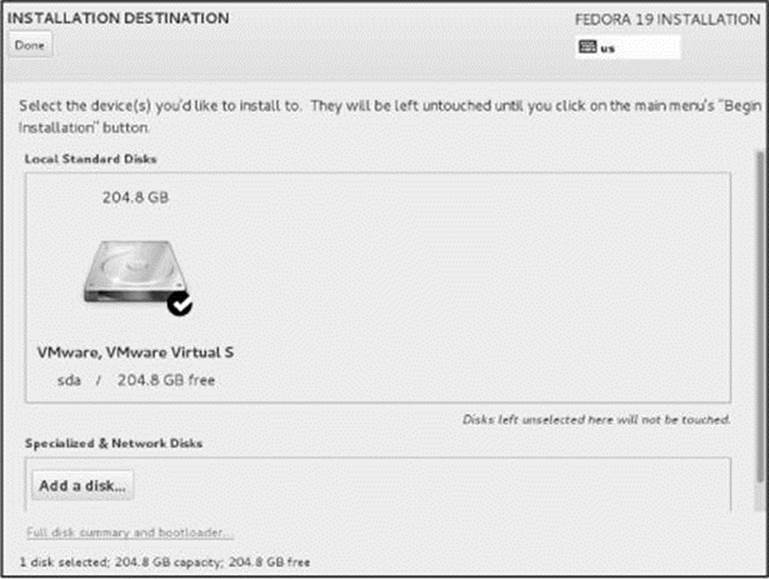
Figure 3-9 The Installation Destination screen showing a single, selected disk
Installation Options
The Installation Options window summarizes the installation disk setup and offers options appropriate to the situation (Figure 3-10, next page). It also allows you to specify a partitioning scheme (standard partitions, LVM [page 44], or BTRFS [B-tree file system]) and encrypt the data on the disks. It always displays a button at the lower-left of the window labeled Cancel & add more disks. This button closes the Installation Options dialog and redisplays the Installation Destination screen.
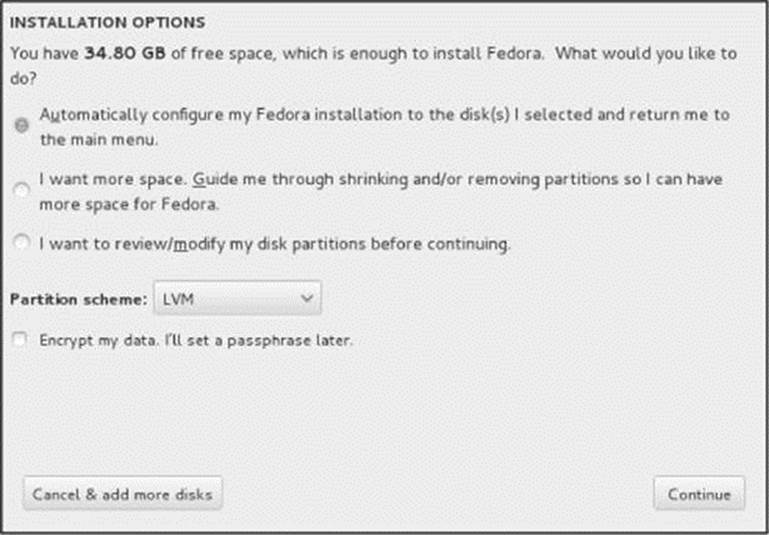
Figure 3-10 The Installation Options window showing several choices
Tip: Here free space includes unpartitioned disk space
The Installation Options window tells you how much free space is on the disk(s) you selected and advises you if that is not enough space to install Fedora/RHEL. This dialog uses the term “free space” to mean both free space and unpartitioned disk space (page 36).
When enough free space exists, the Installation Options window offers you the choice of automatically partitioning the disk(s) or having you review and modify the disk partitions. If there are partitions in use by other operating systems that Anaconda can remove or shrink, it adds the choice of guiding you through the process of reclaiming that space. Select one of these radio buttons and click Continue.
If there is not enough space on the disks, Anaconda tells you how much space the new operating system needs based on your selection of software packages (page 66). It also summarizes how much free space exists and how much space you can reclaim from partitions in use by other operating systems. In this case it presents two buttons: Custom partitioning (next) and Reclaim space (page 77). The first of these buttons displays the Manual Partitioning screen and the second displays the Reclaim Disk Space screen.
![]() Manual/Custom Partitioning
Manual/Custom Partitioning
The box on the left side of the Manual Partitioning screen displays information about the system you are installing (e.g., New Fedora 19 Installation) and other systems Anaconda finds on the disk (e.g., Unknown [a Windows system]; Figure 3-11). At the bottom of the box are buttons you can use to work with partitions and boxes that list the available and total space on the disk(s) you selected in the Installation Destination screen.
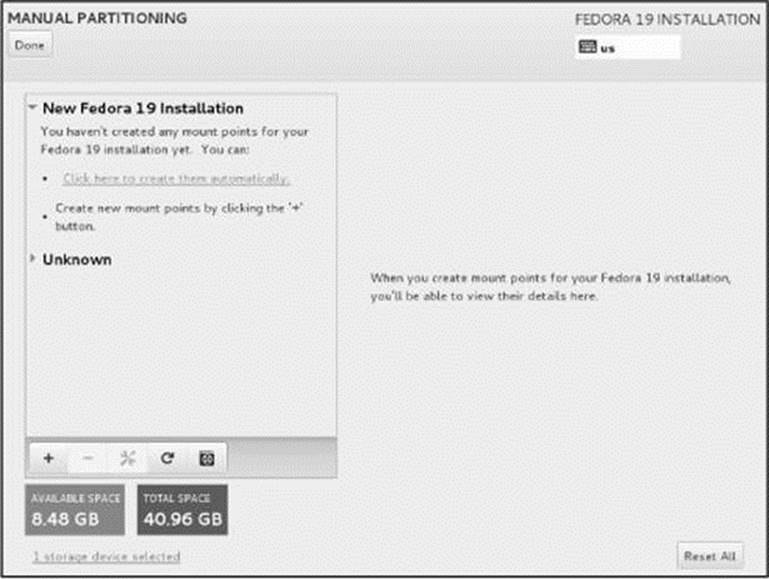
Figure 3-11 The Manual Partitioning screen I
At the left of each system entry is a triangle you can click to expand and collapse that entry. At first the entry for the system you are installing contains only instructions for setting it up and a note on the right side of the screen that says mount points will appear here once you set them up.
Automatic partition creation
To have Anaconda create partitions automatically, click Click here to create them automatically. Anaconda creates swap, /boot, / (root), and (if there is enough space) /home partitions and displays them in the Manual Partitioning screen so you can review and modify them (Figure 3-12).
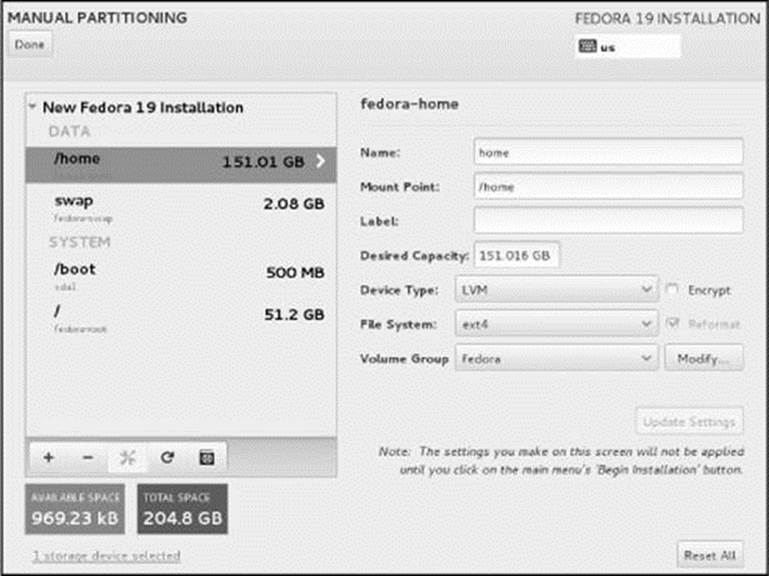
Figure 3-12 The Manual Partitioning screen II
Add partition
To create a new partition on a hard disk, the hard disk must have enough free space to accommodate the partition; see “Reclaiming Disk Space” on the next page.
To set up a new partition and mount point (the name of the directory the partition will be mounted on; page 38), click the plus sign (+) button at the bottom of the box; Anaconda opens the Add a New Mount Point window (Figure 3-13). Specify the mount point and size for the new partition and click Add mount point. Because of block-size constraints, the final partition is not usually exactly the size you specify. Anaconda accepts a suffix of T for terabytes, G for gigabytes, and M for megabytes. If you leave the size blank, Anaconda makes the partition as large as possible. If the disk space you requested is not available, Anaconda allocates as much space as is available.
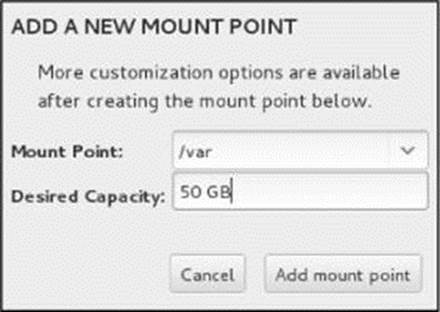
Figure 3-13 The Add a New Mount Point window
Tip: Anaconda does not write to the disk until you click Begin Installation
Making changes on the Manual Partitioning screen does not affect the disks immediately; you can click Reset All at any time to reread configuration information from the disk(s) and restore the screen so it contains the information it originally contained. Only when you click Begin Installation does Anaconda write to the disks.
Modify partition
To modify a mount point/partition, highlight the mount point on the left side of the screen, make changes on the right, and click Update Settings. Using this window, you can change the mount point or size of a partition, or format the partition as another type (e.g., ext3, vfat, swap, etc.). SeeFigure 3-12 on the previous page.
Remove partition
To remove a mount point/partition, highlight the mount point on the left side of the screen and click the minus sign (–) button at the bottom of the box.
Swap partition
If another system on the disk has a swap partition, Anaconda shares it with the system being installed. Otherwise it is a good idea to set up a swap partition for the system being installed. For more information on the swap partition see page 40.
Partition location
When Anaconda creates a partition on a system on which you have selected more than one disk, it decides which disk the partition will reside on. To move a partition to another disk, highlight the partition. If Anaconda can move the highlighted partition to another disk, the tool icon button at the bottom of the box will be active (not grayed out). Click this button to display the Configure Mount Point window. Click to highlight the disk you want the partition to reside on. If appropriate, you can select more than one partition by holding down the SHIFT key as you click the second and subsequent partitions.
Setting Up a RAID Device
To set up a RAID array (page 42), click the mount point/partition you want to change to a RAID device, select RAID from the drop-down list labeled Device Type, and click Update Settings. Anaconda changes the partition to a RAID device. You can then select the type of RAID device you want from the drop-down list labeled RAID Level.
Reclaiming Disk Space
There are several situations in which you might want to reclaim disk space by shrinking or deleting a partition. Assuming you are not installing on a clean disk, any partitions on the disk that are not full are candidates for reclaiming space. A typical example occurs when you are working with a hard disk with a single partition that occupies the entire disk, such as when you are setting up a dual-boot system by adding Fedora/RHEL to a Windows system (page 84). In this case you might be able to reclaim space from the Windows partition to install Fedora/RHEL. According to thentfsresize man page, you do not need to defragment a Windows partition before resizing. The process of resizing a partition is the same regardless of the type of partition: You can use the Reclaim Space window to resize Windows, Linux, and other types of partitions.
To reclaim disk space, click Reclaim space on the Installation Options window; Anaconda displays the Reclaim Disk Space window (Figure 3-14). This window displays a table listing the partitions on each of the disks you selected in the Installation Destination window (page 67). The table shows the mount point, device name, type of filesystem, amount of reclaimable space, and action to be taken for each partition. Below the table are three buttons: Preserve, Delete, and Shrink to. The default action is to preserve a partition.
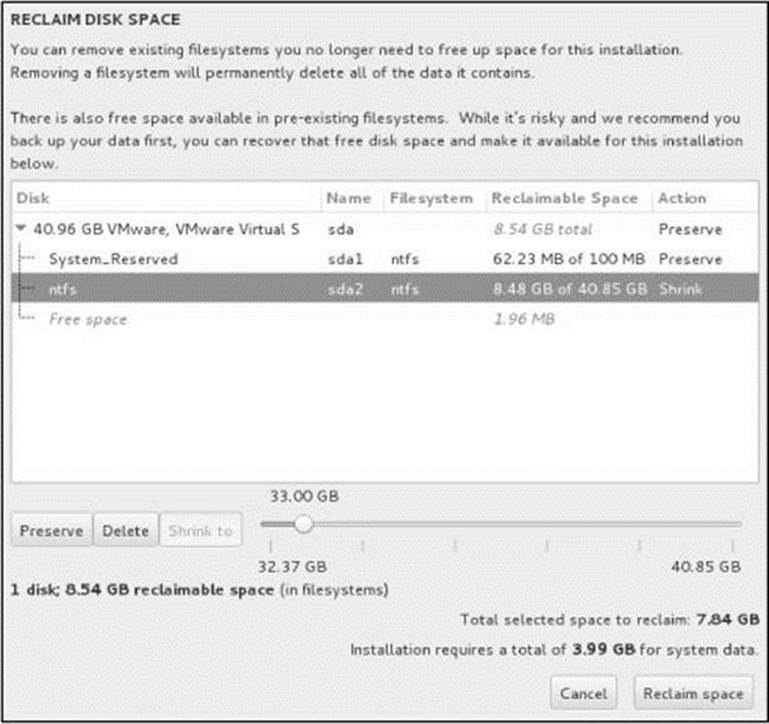
Figure 3-14 The Reclaim Disk Space window showing the slider
As with other instructions that modify disks, Anaconda takes no action until you click Begin Installation in the Installation Summary screen (page 63). Highlight the partition you want to work with and click Delete to delete the partition or Shrink to to reclaim space from the partition. For Anaconda to reclaim space from (shrink) a partition, the partition must not be full of data.
When you highlight a partition and click Shrink to, Anaconda displays a slider below the table (Figure 3-14, previous page). The left end of the slider represents the minimum size the partition can be shrunk to and the right end the maximum (not shrunk at all). Below the slider are labels that show these sizes; above the slider is a label that moves with the slider and shows the selected size of the partition. The smaller you make the partition, the more space there is for the system you are installing. Click and drag the slider until the partition is the size you want. Repeat this procedure for each partition you want to resize or delete and then click Reclaim space. Anaconda will not resize the partition until you click Begin Installation.
Working with LVs
When you instruct Anaconda to partition the hard disk with a default layout, it uses LVM (page 44) to set up most of the hard disk, creating LVs instead of partitions. It places /boot on the first partition on the drive, not under the control of LVM. LVM creates a VG (volume group) namedfedora that occupies the rest of the disk space. Within this VG it creates two or three LVs: root (/, fedora-root), swap (fedora-swap), and if there is room, /home (fedora-home). The swap LV occupies up to a few gigabytes; the root LV takes up to about 50 gigabytes. If there is room for a/home LV, it occupies the rest of fedora. This section explains how to make the /home LV smaller so you can add an additional LV to fedora. If the hard drive on the machine you are working with is small and Anaconda does not create a /home LV, you can follow this example by making the root LV smaller instead.
To make the /home LV smaller and make room for additional LVs, first highlight the /home LV (fedora-home) and then change the value in the text box labeled Desired Capacity to a smaller value. Figure 3-15 shows the size of the fedora-home LV being changed to 100 gigabytes. ClickUpdate Settings.
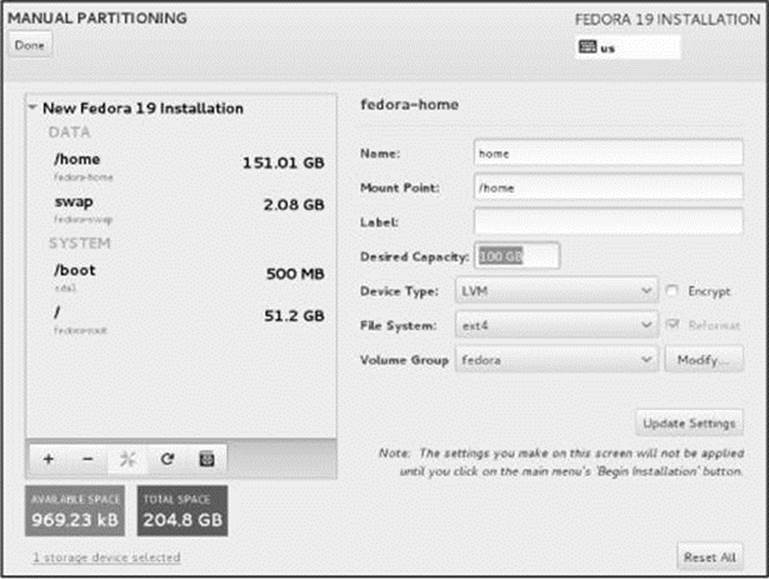
Figure 3-15 The Manual Partitioning screen; changing the size of an LV
Once you decrease the size of the fedora-home LV, the Manual Partitioning screen shows an increase in available space. You can now add another LV to fedora. Click the plus sign (+) to display the Add a New Mount Point window (Figure 3-13, page 76). Select a value from the drop-down list labeled Mount Point (or enter a value) and enter a value in the text box labeled Desired Capacity. Click Add mount point. Anaconda adds the new mount point and partition to the left side of the screen. Click Done when the LVs are set up the way you want.
gnome-disks: The GNOME Disk Utility
The gnome-disks graphical disk utility can create, remove, and modify partitions and filesystems on many types of media, including internal and external hard disks, CD/DVDs, and USB flash drives. It can encrypt partitions and change passwords on already encrypted partitions.
Unless you are certain the hard disk on which you are installing Fedora/RHEL has nothing on it (it is a new disk) or you are sure the disk holds no information of value, it is a good idea to examine the contents of the disk before you start the installation. The gnome-disks disk utility (gnome-disk-utility package) is a good tool for this job. Open the Disks window by giving the command gnome-disks from an Enter a Command window (ALT-F2) or a terminal emulator (page 120).
The Disks window is divided into three sections (Figure 3-16): The left side holds the Devices section, a list of CD/DVD drives, hard disks, and other devices; the top-right section holds information about the device that is highlighted on the left; and the bottom-right displays information about the partition highlighted in the graphical representation of the hard drive in the middle of the right side.
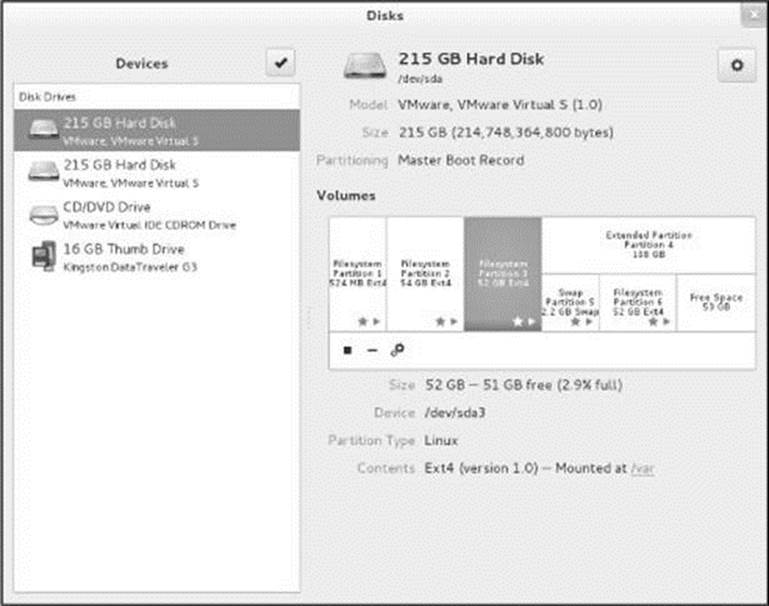
Figure 3-16 The Disks window
When you select a hard disk in the Devices section on the left, gnome-disks displays information about that disk on the right. Click one of the partitions in the graphical representation of a hard disk, and gnome-disks displays information about that partition at the bottom of the right side.
From this window you can view, create, and delete partitions. You can save time if you use gnome-disks to examine a hard disk and Anaconda to set up the partitions you install Fedora/RHEL on.
Displaying the Contents of a Filesystem
To display the contents of a filesystem, select the partition holding the filesystem as described above and click the triangle at the bottom-left of the graphical representation of the disk to mount it. Figure 3-16 on the prvious page shows a square in place of the triangle because the partition is already mounted. When you click the mount point (the link following Contents ... mounted at) at the bottom of the right side of the window, Nautilus displays the filesystem in a Nautilus window (Figure 3-17; more about Nautilus appears on page 102). When you have finished examining the contents of the filesystem, click the square to unmount the filesystem.
Figure 3-17 Browsing a partition using gnome-disks
Writing a Partition Table
A new disk does not have a partition table (page 36) and looks similar to the disk highlighted in Figure 3-18. At the bottom-right of the Disks window, Unknown follows the Contents label and the graphical representation of the disk is marked Unknown. If the disk you are working with already has a partition table, skip to the next section.

Figure 3-18 A disk without a partition table
To partition a hard disk, click the gears icon at the upper-right of the Disks window (not the one below the graphical image of the disk) and select Format from the pop-up menu: gnome-disks opens a Format Volume window. Unless you want to explicitly erase the data on the disk, accept the default of Don’t overwrite existing data from the drop-down list labeled Erase. In the drop-down list labeled Partitioning, accept the default of Compatible with modern systems .... You can enter a name in the text box labeled Name if you like. Click Format; gnome-disks displays another window to confirm you want to format the disk. Click Format again. The gnome-disks utility takes a moment to format the disk, quickly displaying some information while it is working. When it is done, GUID Partition Table follows the Partitioning label, the graphical representation of the disk is marked Free Space (page 36), and Unallocated Space follows the Contents label.
If you want to create a single filesystem that occupies the entire disk drive, instead of following the instructions in the preceding paragraph, click the gears icon in the graphical representation of the disk and select Format from the drop-down menu; gnome-disks opens a Format Volume window. To create a filesystem, make a selection from the Type drop-down menu and click Format.
Creating a Partition and a Filesystem
Once you have created a partition table, you will be able to create a partition that holds a filesystem in the free space. Highlight the area marked Free Space and click the plus sign at the bottom of the graphical image of the disk; gnome-disks opens a Create Partition window (Figure 3-19).
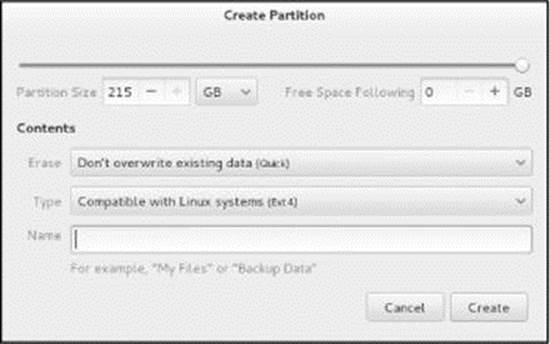
Figure 3-19 The gnome-disks Create Partition window
Use the slider at the top of the window or the spin box labeled Partition Size to specify the size of the new partition. The value in the spin box labeled Free Space Following changes relative to the partition size.
Security: Encrypt to protect data, especially on laptops
Encrypting partitions can prevent theft of sensitive data, especially on laptops, which are prone to theft. If you decide to encrypt a partition, remember the password: You will not get your data back without it.
Unless you want to explicitly erase the data on the disk, accept the default of Don’t overwrite existing data from the drop-down list labeled Erase. In the drop-down list labeled Type, accept the default of Ext4; if you want the filesystem to be encrypted (page 30), select LUKS + Ext4. If you choose to encrypt the filesystem, Anaconda will ask for a passphrase. You will need this passphrase to log in on the system.
You can optionally enter a disk label in the text box labeled Name. This name is not the mount point for the disk. Click Create; gnome-disks creates the filesystem. Now the graphical representation of the disk is divided to represent the division of the hard disk, and Contents corresponds to the highlighted section of the graphical representation (Ext4 or Unallocated Space). If you did not use all the free space, you can create additional partitions and filesystems in the same manner.
Deleting a Partition
Before deleting a partition, make sure it does not contain any data you need. To use the gnome-disks utility to delete a partition, highlight the partition you want to delete in the graphical representation of the hard disk, unmount it if necessary (click the square), and click the minus sign at the bottom of that representation. After checking with you, gnome-disks deletes the partition.
Using SMART to Display Disk Performance Information
SMART (Self-Monitoring, Analysis, and Reporting Technology) monitors hard disks and attempts to predict hard disk failures. To see a SMART report for a disk on the system, click the gears icon at the upper-right of the Disks window (not the one below the graphical image of the disk) and select Smart Data & Self Tests from the pop-up menu; gnome-disks displays a window similar to the one shown in Figure 3-20. From this window you can turn SMART on or off, start a new self test, and scroll through the information about the most recent test.
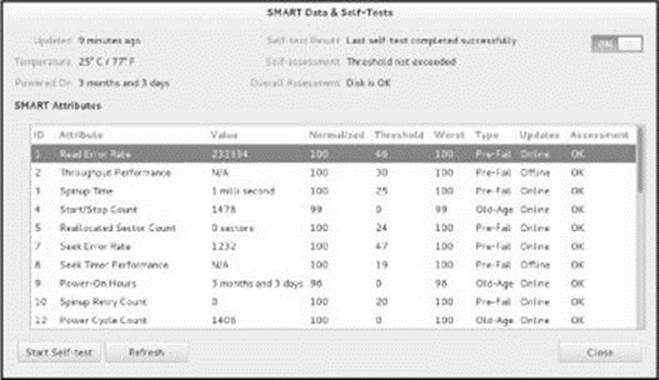
Figure 3-20 SMART data as displayed by gnome-disks
Editing a Kickstart Script
Kickstart is a program that automates the installation and post-installation configuration on one or more machines. To use Kickstart, you create a script (file) that provides the information you normally provide during an installation. Anaconda then refers to this file during installation. Using Kickstart, you can automate language selection, network configuration, keyboard selection, boot loader installation, disk partitioning, and more. See the ks boot parameter on page 71 for instructions on how to install a system using a Kickstart script.
It is easier to modify an existing Kickstart script than to write one from scratch. A good place to start is the Kickstart script Anaconda generates when you install a system (/root/anaconda-ks.cfg). This script holds instructions that can duplicate the system you just installed.
Another good source of sample Kickstart scripts is the packages named fedora-kickstarts and custom-kickstarts. After you install these packages look through the files in the /usr/share/spin-kickstarts directory hierarchy. These files are thoroughly commented; reading the comments can help you learn how to write a Kickstart script.
Textual installation
Although a typical, interactive textual installation is no longer supported, you can perform a textual installation using a Kickstart file. A line with the word text or graphical near the beginning of the Kickstart script specifies the installation environment. Alternately you can use a VNC connection to perform a textual installation. See the tip on page 72.
system-config-kickstart
The system-config-kickstart utility (system-config-kickstart package) is a graphical Kickstart script editor. Although it will create a Kickstart file, you will probably have to edit the resulting file by hand. This utility displays the Kickstart Configurator window (Figure 3-21). Open this window by giving the command system-config-kickstart from an Enter a Command window (ALT-F2) or a terminal emulator.
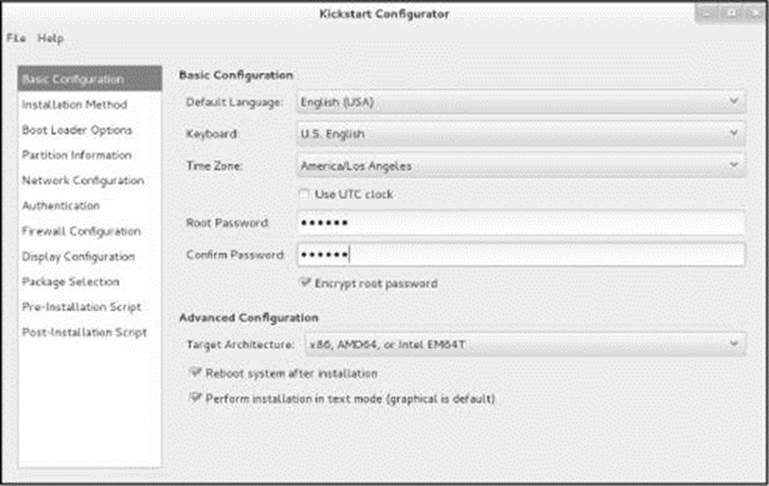
Figure 3-21 The Kickstart Configurator window
Figure 3-21 shows the first window the Kickstart Configurator displays. To generate a Kickstart file (ks.cfg by default), go through each section of this window (the items along the left side), fill in the answers, and put ticks in the appropriate check boxes. It might be helpful to start with the Kickstart installation script that Anaconda generated when you installed the system (/root/anaconda-ks.cfg). Click Help on the menubar for instructions on completing these tasks. When you are finished, click File![]() Save. The Kickstart Configurator gives you a chance to review the generated script before it saves the file.
Save. The Kickstart Configurator gives you a chance to review the generated script before it saves the file.
Setting Up a Dual-Boot System
A dual-boot system is one that can boot one of two (or more) operating systems. This section describes how to add Fedora/RHEL to a system that can boot Windows, thereby creating a system that can boot Windows or Linux. You can use the same technique for adding Fedora/RHEL to a system that runs a different version or distribution of Linux.
Before you set up a dual-boot system, you need to find disk space for the new Fedora/RHEL system. The next section discusses several ways to create the needed space.
Creating Free Space on a Windows System
Typically you install Fedora/RHEL in free space on a hard disk. To add Fedora/RHEL to a Windows system, you must have enough free space on a system that already holds Windows. There are several ways to provide or create this free space. The following paragraphs discuss these options in order from easiest to most difficult.
Add a new hard disk—Add another hard disk to the system and install Linux on the new disk, which contains only free space. This technique is very easy and clean but requires a new hard disk.
Use existing free space—If there is sufficient free space on the Windows disk, you can install Linux there. This technique is the optimal choice, but there is rarely enough free space on an installed hard disk.
Reclaim space from a Windows partition—Windows partitions often occupy the entire disk, which explains why reclaiming space from a Windows partition is the technique most commonly used to free up space. Windows systems typically use NTFS, FAT32, and/or FAT16 filesystems. You can reclaim space from an existing Windows partition when you install Fedora/RHEL (page 77).
Remove a Windows partition—If you can delete a big enough Windows partition, you can install Linux in its place. To delete a Windows partition, you must have multiple partitions under Windows and be willing to lose the data in the partition you delete. In many cases, you can save this data by moving it from the partition you will delete to another Windows partition.
Once you are sure a partition contains no useful information, you can delete it when you install Fedora/RHEL. Alternately, you can use gnome-disks from a live session to delete it (page 82). After deleting the partition, you can install Fedora/RHEL in the free space formerly occupied by the partition you deleted.
Tip: If you install Windows after you install Linux
When you install Windows as the second operating system it overwrites the existing boot loader. In this case you need to reload the boot loader. See “Reinstalling the MBR” on page 456 for instructions.
Installing Fedora/RHEL as the Second Operating System
After you have created enough free space on a Windows system, you can begin installing Fedora/RHEL in the free space you created. When you boot the updated system, you will be able to choose which operating system you want to run (Figure 3-22).
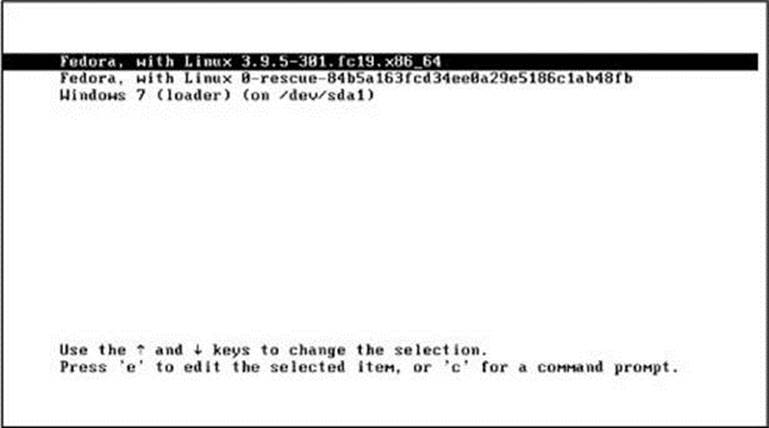
Figure 3-22 Selecting the operating system from a dual-boot system
Chapter Summary
Installing Fedora/RHEL usually begins by booting from a Live or an Install Image. When the system boots, it displays a message saying when it will boot automatically. During the time it displays this message, you can give various commands and then have the system continue booting.
The program that installs Fedora/RHEL is named Anaconda. Anaconda calls tools that identify the hardware, build the necessary filesystems, and install the Fedora/RHEL operating system. Anaconda can run in graphical (default) interactive mode or in automated mode using Kickstart. You can use VNC or Kickstart to perform a textual installation.
Anaconda includes a graphical disk-partitioning facility that can add, delete, and modify partitions and LVs (logical volumes) on a hard disk during installation. The gnome-disks utility reports on and manipulates hard disk partitions before or after installation.
A dual-boot system can boot one of two or more operating systems, frequently Windows and Linux. The biggest task in setting up a dual-boot system, assuming you want to add Linux to a Windows system, is finding enough disk space to hold Linux.
Fedora/RHEL uses the X.org X Window System and the GNOME display manager (gdm) to provide a graphical login.
Exercises
1. What is a live system? What advantages does it have over an installed system?
2. Describe the Anaconda installer.
3. Where can the installation image used by Anaconda be located?
4. Why is it important to test the installation medium? How can you do so?
5. What should you do if the graphical installer does not work?
6. When might you specify an ext2 filesystem instead of ext4?
Advanced Exercises
7. Which utilities can you use to partition a hard disk prior to installation?
8. What do you need to do before you can install Fedora as the second operating system on a Windows machine (to create a dual-boot system)?
9. How does Anaconda set up a hard disk by default?
10. How would you turn off DMA (direct memory access) for all disk controllers when you install a new system?
All materials on the site are licensed Creative Commons Attribution-Sharealike 3.0 Unported CC BY-SA 3.0 & GNU Free Documentation License (GFDL)
If you are the copyright holder of any material contained on our site and intend to remove it, please contact our site administrator for approval.
© 2016-2026 All site design rights belong to S.Y.A.