A practical guide to Fedora and Red Hat Enterprise Linux, 7th Edition (2014)
Part II: Using Fedora and Red Hat Enterprise Linux
Chapter 4 Introduction to Fedora and Red Hat Enterprise Linux
Chapter 5 The Shell
Chapter 6 The Linux Filesystem
Chapter 7 The Linux Utilities
Chapter 8 Networking and the Internet
Chapter 4. Introduction to Fedora and Red Hat Enterprise Linux
In This Chapter
Curbing Your Power (Superuser/root Privileges)
Logging In on the System
The GNOME 3 Standard and Classic Desktops
Working with the Desktop
Using the Nautilus File Manager
The Settings Window
Updating, Installing, and Removing Software Packages
Working from the Command Line
Getting Help from the Command Line
Password Security
What to Do If You Cannot Log In
Objectives
After reading this chapter you should be able to:
![]() Log in on the Fedora desktop
Log in on the Fedora desktop
![]() Understand root privileges
Understand root privileges
![]() Change the desktop background
Change the desktop background
![]() Use the Nautilus File Manager to work with files
Use the Nautilus File Manager to work with files
![]() Correct mistakes on a command line
Correct mistakes on a command line
![]() Explain what you can do using a window titlebar
Explain what you can do using a window titlebar
![]() Update and install software
Update and install software
![]() Find documentation using man, info, and yelp
Find documentation using man, info, and yelp
![]() Open a terminal emulator and run programs from the command line
Open a terminal emulator and run programs from the command line
![]() Create and run a simple shell script
Create and run a simple shell script
One way or another you are sitting in front of a computer that is running Fedora or RHEL (Red Hat Enterprise Linux). After describing the conventions this book uses and root (Superuser) privileges, this chapter takes you on a tour of the system to give you some ideas about what you can do with it. The tour does not go into depth about choices, options, menus, and so on; that is left for you to experiment with and to explore in greater detail throughout later chapters of this book.
The tour covers how to log in on the system, the GNOME 3 Standard and Classic desktops, working with the desktop, the Nautilus File Manager, the Settings window, getting help, and installing software. The final part of the chapter introduces some command-line utilities and describes how to work from the command line, concluding with a section on solving problems logging in and password security.
Be sure to read the warning about the dangers of misusing the powers of root (Superuser) in the next section. While heeding that warning, feel free to experiment with the system: Give commands, create files, click objects, choose items from menus, follow the examples in this book, and have fun.
Curbing Your Power (Superuser/root Privileges)
While you are logged in as the user named root, you are referred to as Superuser or administrator; you are working with root privileges and have extraordinary systemwide powers. Running the su or sudo utility can give you similar privileges. When working with root privileges, you can read from or write to almost any file on the system, execute programs that ordinary users cannot, and more. On a multiuser system you might not be able to run certain programs. Nevertheless, someone—the system administrator—knows the root password or is a member of the administrative group named wheel, and that person maintains the system. When you are running Linux on your own computer, you will assign a password to root when you install Linux. Refer to “Running Commands with root Privileges” on page 422 for more information.
Caution: Do not experiment while you are working with root privileges
Feel free to experiment when you are not working with root privileges. When you are working with root privileges, do only what you have to do and make sure you know exactly what you are doing. After you have completed the task at hand, revert to working as yourself. When working with root privileges, you can damage the system to such an extent that you will need to reinstall Linux to get it working again.
Logging In on the System
When you boot a default Fedora/RHEL system, gdm (GNOME display manager) displays a Login screen (Figure 4-1) on the system console. In the middle of the screen is a list of names of users who can log in on the system. At the upper-right are icons that allow you to restart or shut down the system, adjust the volume, and display the universal access menu that allows you to change accessibility preferences (e.g., make the text larger or display a high-contrast desktop).
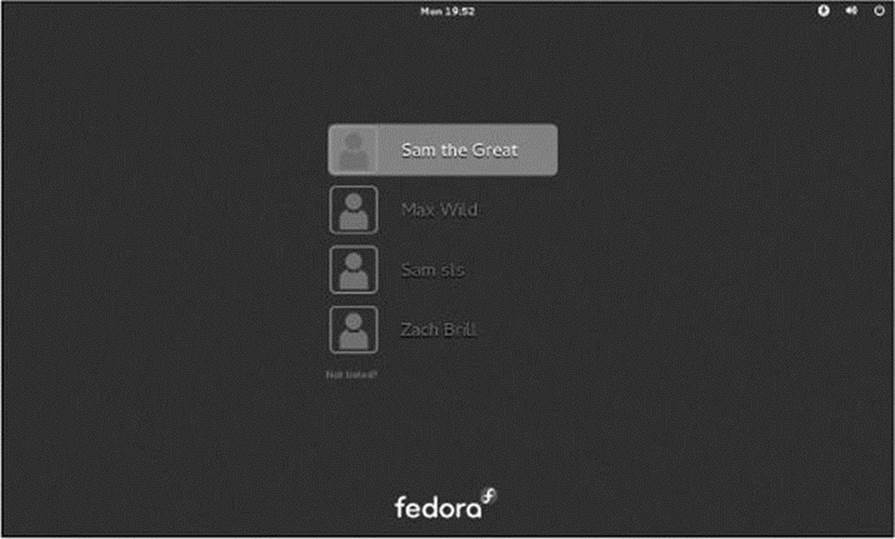
Figure 4-1 The GNOME Login screen
To log in, click your name; gdm displays the Password screen. Enter your password and press RETURN. If gdm displays an error message, try clicking your name and entering your password again. Make sure the CAPS LOCK key is not on (gdm displays a message if it is) because the routine that verifies your entry is case sensitive. See page 135 if you need help with logging in and page 112 if you want to change your password. The system takes a moment to set things up and then displays a workspace.
The GNOME 3 Standard and Classic Desktops
Fedora 15 introduced GNOME 3 and the GNOME shell. GNOME 3 can run in standard mode (Standard desktop) or classic mode (Classic desktop). The GNOME 3 Standard desktop is radically different from the GNOME 2 desktop, following the trend toward simpler, more graphical desktops that have more icons and fewer menus. All versions of Fedora from 15 onward run the GNOME 3 Standard desktop by default. Figure 4-2 on page 93 and Figure 4-3 on page 94 show commonly used screens on a GNOME 3 Standard desktop. See the next section for more information.
By default, RHEL 7 runs the GNOME 3 Classic desktop, a group of GNOME Shell extensions that give GNOME 3 a GNOME 2 look and feel, including the Applications and Places menus. Figure 4-5 on page 97 shows the GNOME Classic desktop. For more information refer to “The GNOME Classic Desktop” on page 96.
This book uses the Linux textual interface (CLI) for most tasks, including setting up servers and programming in bash, SQL, and Python. Where this book describes a GUI utility, it explains how to open the utility/window by pressing ALT-F2 to display the Enter a Command window and typing the name of the utility. Alternately, you can press the SUPER (Windows) key to display the Search text box and enter the name of utility there. These techniques work from both the GNOME 3 Standard desktop (Fedora) and Classic desktop (RHEL). For more information refer to “The Search Text Box and the Enter a Command Window” on page 98.
Tip: You can run the Classic desktop on Fedora
If you like, you can install and run the Classic desktop on Fedora; see “Installing the Classic Desktop on GNOME 3” on page 95.
Optional
gnome-tweak-tool
You can use gnome-tweak-tool (gnome-tweak-tool package) to change many aspects of how GNOME windows look and work. Visit wiki.gnome.org/GnomeTweakTool for more information.
The GNOME 3 Standard Desktop (Fedora)
This section briefly describes how to use the GNOME 3 Standard desktop that Fedora installs by default. For more information visit wiki.gnome.org/GnomeShell/CheatSheet. The extensions.gnome.org Web site lists extensions to GNOME 3. See “The GNOME Classic Desktop” on page 96if you are running RHEL.
When you log in on a system running GNOME 3 the workspace is empty. On the Top panel (the bar at the top of the workspace) are objects: the word Activities, a clock, speaker and networking icons, and your name (or Live System User). You can click one of these objects to work with it. The Top panel remains constant as the information displayed below it changes.
The Activities Overview Screen
Click Activities at the top left of a workspace (or press the SUPER [Windows] key) to display the Activities Overview screen (Figure 4-2). This screen holds the Search text box (near the top), icons of favorite applications (on the left), and a section holding shrunken views of workspaces (on the right); each of these views contain live thumbnails of running applications. When only one workspace exists, you need to move the cursor to the right side of the screen to display this section. Shrunken views of the windows in the active workspace appear in the center of the screen. If the active workspace is empty, the center of the screen is blank.
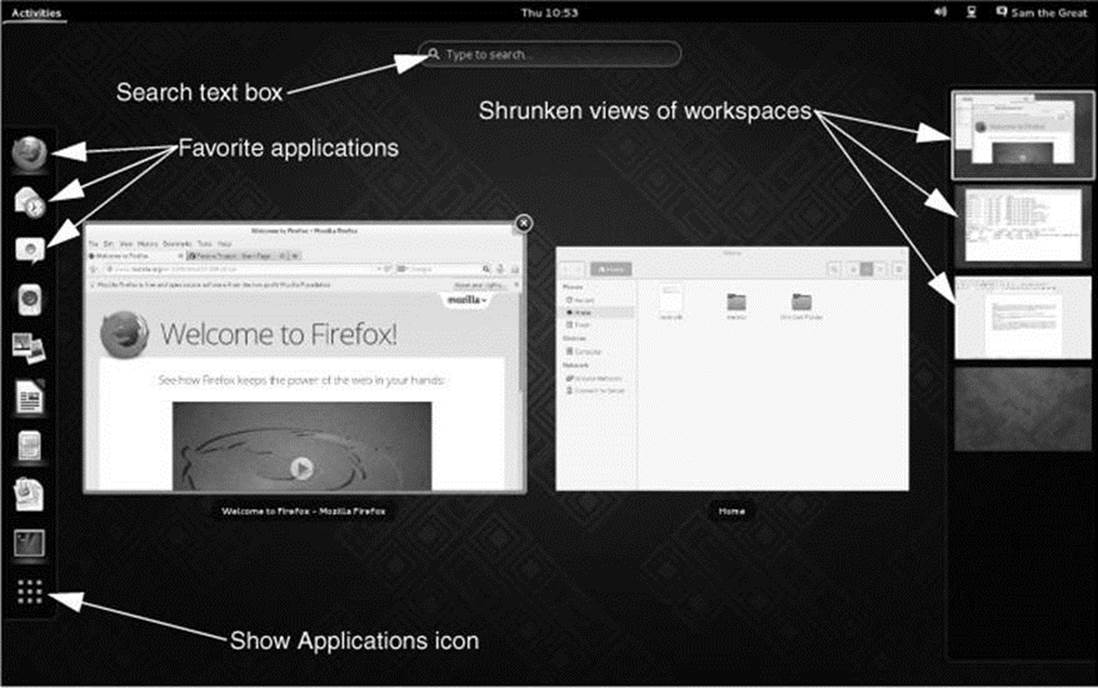
Figure 4-2 GNOME Activities Overview screen
Figure 4-2 shows an Activities Overview screen in which the active workspace holds windows that are running Firefox and Files (Nautilus; page 102). Because the shrunken Firefox window is selected (highlighted), it has an X in a circle at its upper-right corner. Click this X to close the window and terminate Firefox. Click the Firefox or Files window to close the Activities Overview screen and display the active workspace with the window you clicked in the foreground.
Making a workspace active
Still looking at Figure 4-2, you can also click one of the shrunken workspaces along the right side of the screen to make that workspace active. Click the empty workspace at the bottom of the stack to open a new, empty workspace.
Running an application from the Favorites list
There are several ways to start an application. If the icon of the application you want to run is in the Favorites list, click that icon; GNOME closes the Activities Overview screen and opens in the active workspace the application whose icon you clicked.
Running an application from the Search text box (SUPER key)
You can also type the name of the (graphical) application (e.g., gnome-terminal or gnome-disks) or the name of the window the application displays (e.g., Terminal or Disks) in the Search text box, and press RETURN to open that application in the active workspace. If the Search text box is not visible, press the SUPER (Windows) key to display it.
Running an application from the Enter a Command window (ALT-F2 key)
Finally, you can press ALT-F2 to display the Enter a Command window, type the name of the application or utility you want to run, and press RETURN to run an application. You must run a textual application from a terminal emulator such as gnome-terminal (which you can start from an Enter a Command window). See page 98 for more information.
The Applications Overview Screen
At the bottom of the list of favorite application icons on the left of the Activities Overview screen is the Show Applications icon (it holds nine small squares; see Figure 4-2). Click this icon to display the Applications Overview screen (Figure 4-3). This screen displays application icons. Clicking the button labeled Frequent at the bottom of the screen displays only icons of applications you use frequently. Clicking All displays a scrollable list of application icons. Not all applications, or utilities, have icons; use the Enter a Command window (page 98) to run applications that do not have icons.
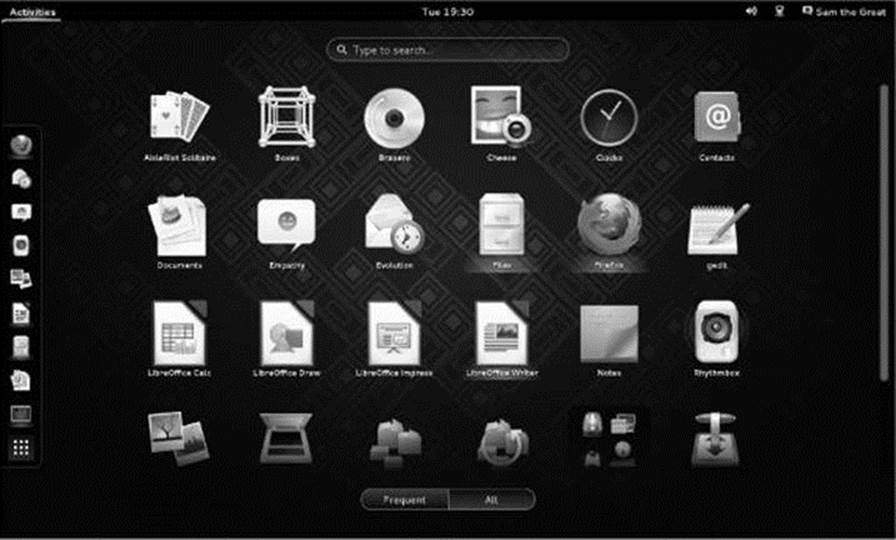
Figure 4-3 The GNOME Applications Overview screen
Left-click an icon to close the Applications Overview screen and open the associated application in the active workspace. Right-click an icon to display a context menu that can include Add to Favorites (if the icon is not in the list of favorites), Remove from Favorites (if it is already in the list of favorites), New Window (closes the Applications Overview screen and opens the application in a new window in the active workspace even if it is already opened), and a line that identifies an already open instance of the application (closes the Applications Overview screen and opens the application in the workspace in which it is already running).
The Application Switcher: Changing the Input Focus
The window with the input focus is the one that receives keyboard characters and commands you type. In addition to using the Activities Overview screen, you can change which window has the input focus using the keyboard; this process is called window cycling.
When you press ALT-TAB when the desktop is displayed, GNOME displays in the center of the workspace the Application Switcher, a box that holds icons representing the programs running in the windows on the desktop. It also shifts the input focus to the window that was active just before the currently active window, making it easy to switch back and forth between two windows. When you hold ALT and press TAB multiple times, the focus moves from window to window. Holding ALT and SHIFT and repeatedly pressing TAB cycles in the other direction.
Installing the Classic Desktop on GNOME 3 (Fedora)
The following instructions explain how to install and run the Classic desktop under Fedora. RHEL 7 runs the Classic desktop by default.
1. With GNOME running the GNOME 3 Standard desktop, click the word Activities at the upper left of the screen. Type terminal and press RETURN; GNOME displays a terminal emulator.
2. With the cursor over the terminal emulator, type the following command; terminate the command using a RETURN.
$ su -c 'yum -y install gnome-classic-session'
Password:
...
Complete!
The su utility will prompt for the root password. Once you enter the root password and press RETURN, yum will display a lot of information as it installs the gnome-classic-session package.When yum displays Complete! and the shell displays its prompt ($), the package is installed. For more information on using yum to install packages see page 534.
3. From a live session only (or if Log Out does not appear in the menu described in the next step), give the following additional commands from the terminal emulator. Substitute your name for sam in the first two commands and supply the root password when you are prompted.
$ su -c 'useradd sam'
$ su -c 'passwd sam'
Changing password for user sam.
New password:
Retype new password:
passwd: all authentication tokens updated successfully.
$ su -c 'systemctl restart gdm'
After a few moments GNOME logs you in as Live System User again (or allows you to log in as yourself).
4. Log off by clicking your name or Live System User at the upper right of the screen, clicking Log Out from the menu GNOME displays, and then clicking the button labeled Log Out from the small window GNOME displays. (If Log Out does not appear in the menu, follow the previous step and then repeat this step.) After a few moments GNOME displays a Login screen (Figure 4-1, page 91).
5. Click your name (not Live System User) on the Login screen; GNOME displays the Password screen (Figure 4-4, next page). Just below the text box labeled Password is a small triangle followed by the word Session. Click the triangle to display the Session menu. Click GNOME Classic; GNOME moves the white dot to the entry you just clicked.
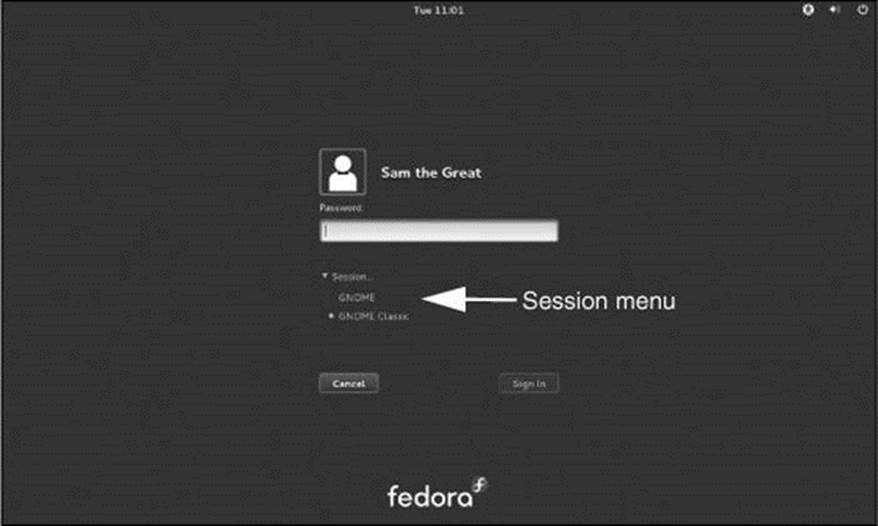
Figure 4-4 The GNOME Password screen showing the Session menu
6. Type your password in the text box labeled Password and click Sign In. After a few moments GNOME displays a Classic desktop (Figure 4-5). If you followed step 3 to add a user, gnome-initial-setup will take you through setting up that user; see page 68.
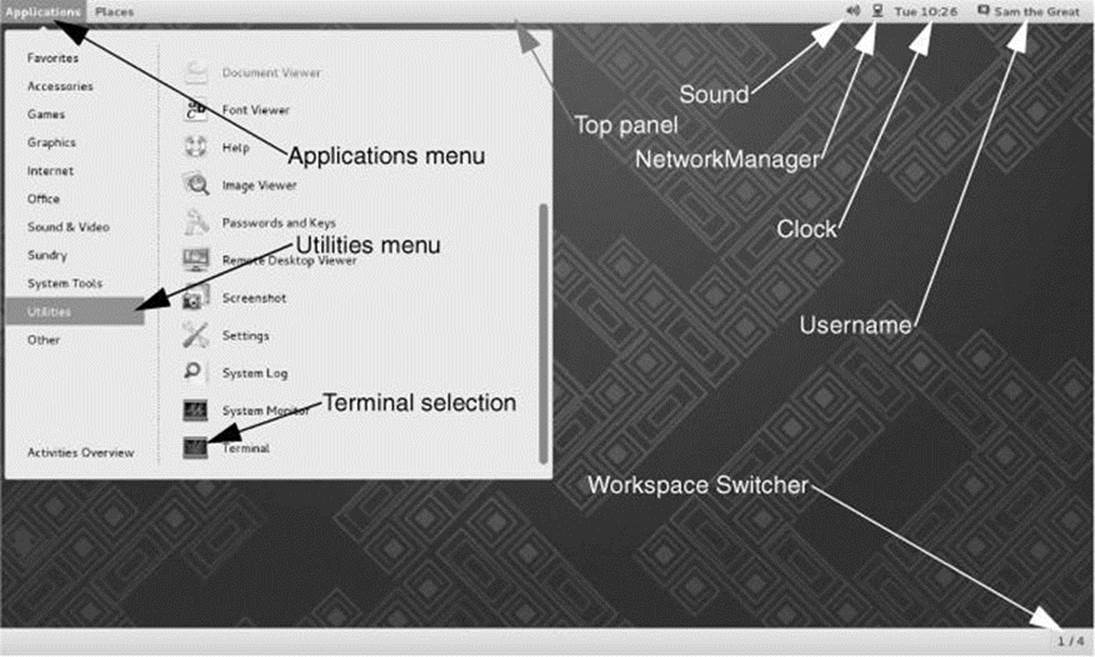
Figure 4-5 The GNOME Classic desktop showing the Applications![]() Utilities menu
Utilities menu
Once you have selected GNOME Classic when you log in, it is your default desktop; you do not have to select it next time you log in.
The GNOME Classic Desktop (RHEL and Optionally Fedora)
This section briefly describes how to use the GNOME Classic desktop that is installed by default on RHEL. Refer to “The GNOME 3 Standard Desktop” on page 92 if you are running Fedora. If you want to install and run a Classic desktop under Fedora refer to “Installing the Classic Desktop on GNOME 3” on the previous page.
Panels and objects
When you log in, the GNOME Classic desktop displays a workspace that includes the Top and Bottom panels (bars) that help you get your work done easily and efficiently (Figure 4-5). Each of the panels can hold several icons and words called objects.
The Applications menu
You can run an application from the Applications menu that appears at the left end of the Top panel (Figure 4-5). Click Applications to display the Applications menu. When you move the mouse pointer over one of the selections in this menu and leave it there for a moment (this action is called hovering), the menu displays a submenu. Move the cursor to and click one of the items in the submenu to select and run it.
The Places menu
The Places menu has no submenus; click an entry in this menu to select it. The Places menu on the GNOME Classic desktop is the same as Places in the Nautilus File Browser Sidebar; see page 103 for more information.
Working with the Desktop
This section discusses several ways you can work with the desktop. It applies to both the GNOME 3 Standard and Classic desktops.
Terminology
In addition to this section, see the Glossary, which defines data entry widgets (page 1281) such as the combo box (page 1243), drop-down list (page 1248), list box (page 1258), and text box (page 1277).
Workspace
A workspace is a screen that holds windows of one or more applications. The Activities Overview screen (page 92) and the Application Switcher (page 94) enable you to display any of the running applications and its workspace.
Active workspace
The active workspace is the workspace that displays the windows you can work with immediately. Only one workspace can be active at a time.
Desktop
The desktop, which is not displayed all at once, is the collection of all workspaces.
Panel
Panels are bars that can appear on the desktop and hold objects. The Top panel appears at the top of the screen and the Bottom panel, if it is present, appears at the bottom of the screen.
Object
An object is a word, icon, or menu that you can select by clicking.
Tip: Click and right-click
This book uses the term click when you need to click the left mouse button. It uses the term right-click when you need to click the right mouse button. See page 110 for instructions on adapting the mouse for left-handed use.
The Search Text Box and the Enter a Command Window
You can start a graphical application (open a window) by pressing the SUPER (Windows) key to display the Search text box (Figure 4-2, page 93) or by pressing ALT-F2 to display the Enter a Command window (Figure 4-6) and typing the name of the application. Try typing firefox and pressingRETURN to start Firefox. The new window opens on the active workspace.
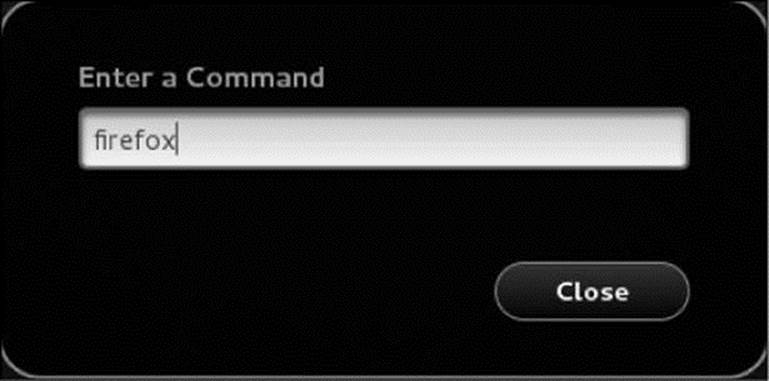
Figure 4-6 The Enter a Command window
Tip: You must run a textual application (utility) from a terminal emulator
A textual application or utility requires a textual environment such as a terminal emulator to run. The Search text box and Enter a Command window do not provide a textual environment and so cannot run a textual application. However, you can run gnome-terminal, a graphical application that provides a textual environment using either of these methods. You can then run the textual application from the terminal emulator that gnome-terminal displays.
Application Menus
Many applications have an Application menu that allows you to set preferences and get help with the application. While the application is active (has the focus), click the object (the name of the window) for the application on the Top panel; GNOME opens the Application menu for the application. Figure 4-7 shows the Application menu for the Software (gpk-application) application. See “Updating, Installing, and Removing Software Packages” on page 116 for more information on this application.
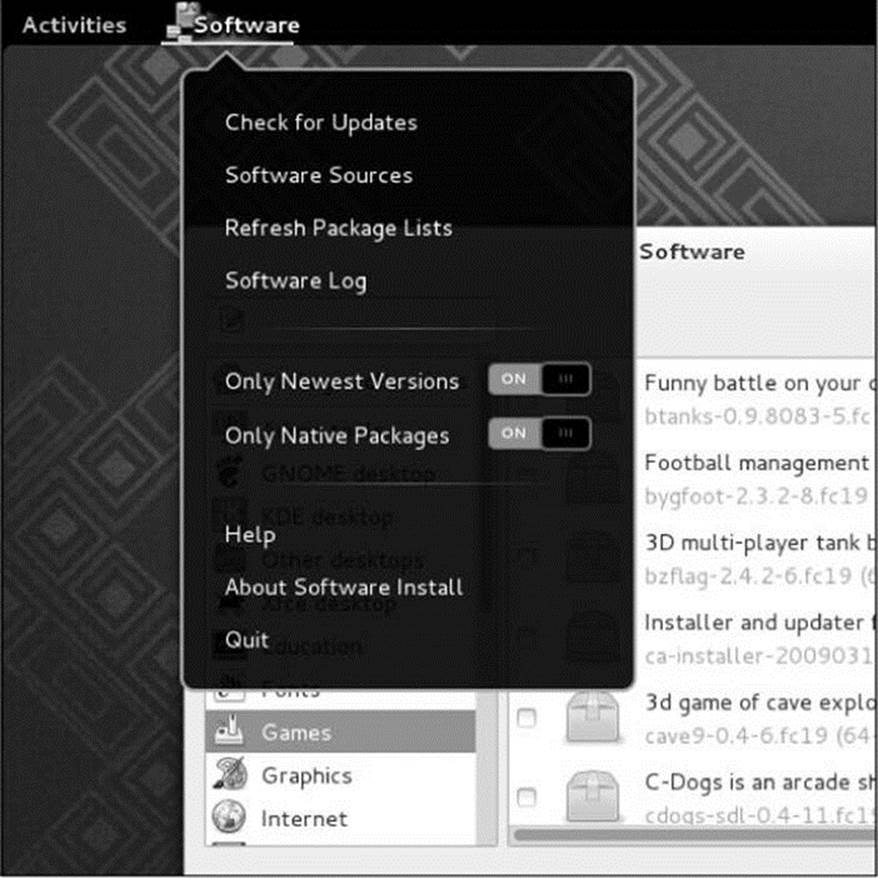
Figure 4-7 The Software (gpk-application) Application menu
Context Menus
A context menu has choices that apply specifically to the window or object you click. The choices differ from window to window and from object to object. Some windows do not have context menus. Frequently a right-click displays a context menu.
Tip: Right-click to display a context menu
Right-click an object to display its context menu. Each object displays its own context menu, although similar objects have similar context menus. Most context menus have either a Preferences or Properties selection.
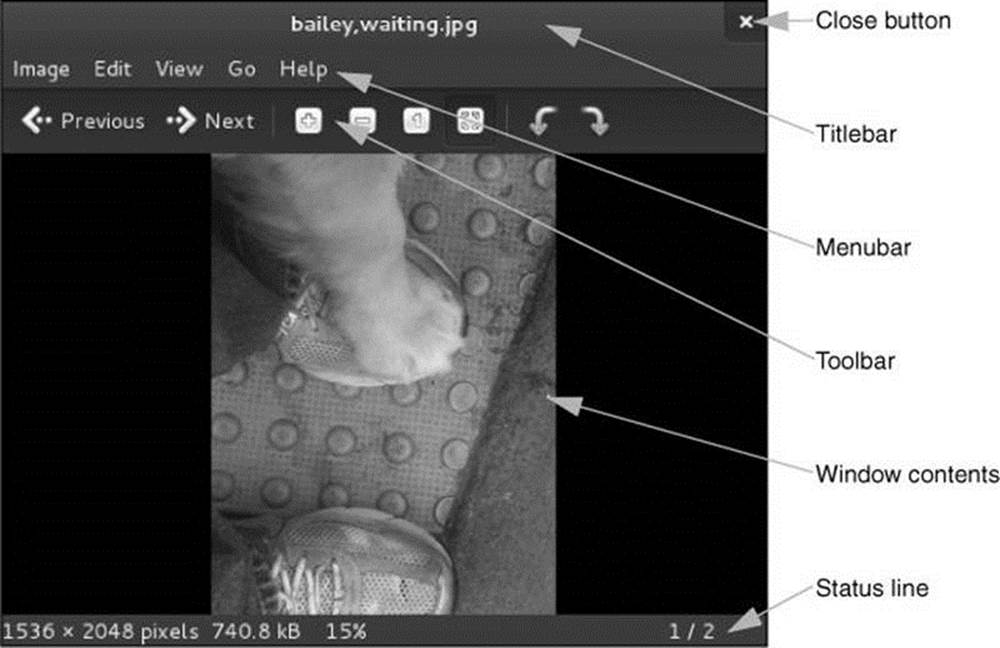
Figure 4-8 A typical window
Windows
Window
In a workspace, a window is a region that runs, or is controlled by, a particular program.
Titlebar
A titlebar (Figure 4-8) appears at the top of most windows and controls the window it is attached to. You can double-click the titlebar to maximize and restore a window. Some windows can be restored only by pressing SUPER-DOWN ARROW (SUPER is the Windows key) or by dragging down from an empty spot on the Top panel. Clicking the close button (X) closes the window and usually terminates the program running in it. To reposition the window, left-click the titlebar and drag the window to the desired location.
Window Operations menu
The Window Operations menu contains operations you can perform on any window. Right-click the titlebar to display this menu. This menu allows you to minimize, maximize, resize, or close a window; move the window within the workspace; move a window to another workspace; keep the window on top of or below other windows; and cause the window to always be visible on the displayed workspace. It also shows the keyboard shortcuts for some of these actions. SUPER refers to the Windows key (e.g., Super+Up means hold the Windows key down and press the UP ARROWkey).
Menubar
The menubar (Figure 4-8) holds icons you can use to work with the window contents.
Toolbar
A toolbar (Figure 4-8) usually appears near the top of a window and contains icons, text, applets, menus, and more. Many kinds of toolbars exist. The titlebar is not a toolbar.
Resizing a window
To resize a window, position the mouse pointer over an edge of the window; the pointer turns into an arrow pointing to a line. When the pointer is an arrow pointing to a line, you can click and drag the side of a window. When you position the mouse pointer over a corner of the window, you can resize both the height and the width of the window simultaneously. Some windows are not resizeable and some windows do not allow you to resize them from all four sides.
Moving a window
To move a window, click and drag the titlebar. Dragging a window to the top of the screen maximizes the window.
Cutting and Pasting Objects Using the Clipboard
There are two similar ways to cut/copy and paste objects and text both within and between windows. In the first method, you use the clipboard, technically called the copy buffer, to copy or move objects or text. To do so, you explicitly copy an object or text to the buffer and then paste it somewhere else. Applications that follow the user interface guidelines use CONTROL-X to cut, CONTROL-C to copy, and CONTROL-V to paste. Application context menus frequently provide these options.
You might not be familiar with the second method to copy and paste text—using the selection or primary buffer, which always contains the text you most recently selected (highlighted). You cannot use this method to copy objects. Clicking the middle mouse button (click the scroll wheel on a mouse that has one) pastes the contents of the selection buffer at the location of the mouse pointer. If you are using a two-button mouse, click both buttons at the same time to simulate clicking the middle button.
With both of these techniques, start by highlighting an object or text to select it. You can drag a box around multiple objects to select them or drag the mouse pointer over text to select it. Double-click to select a word or triple-click to select a line or a paragraph.
Next, to use the clipboard, explicitly copy (CONTROL-C) or cut (CONTROL-X) the objects or text. If you want to use the selection buffer, skip this step.
To paste the selected objects or text, position the mouse pointer where you want to put it and then either press CONTROL-V (clipboard method) or press the middle mouse button (selection buffer method).
Tip: Use SHIFT-CONTROL-C and SHIFT-CONTROL-V within a terminal emulator
The CONTROL-C, CONTROL-X, and CONTROL-V characters do not work in a terminal emulator window because the shell running in the window intercepts them before the terminal emulator can receive them. However, you can use SHIFT-CONTROL-C and SHIFT-CONTROL-V in place of CONTROL-C and CONTROL-V, respectively. There is no keyboard shortcut for CONTROL-X. You can also use the selection buffer in this environment or use copy/paste from the Edit selection on the menubar or from the context (right-click) menu.
When using the clipboard, you can give as many commands as you like between the CONTROL-C or CONTROL-X and CONTROL-V, as long as you do not press CONTROL-C or CONTROL-X again. When using the selection buffer, you can give other commands after selecting text and before pasting it, as long as you do not select (highlight) other text.
Logging Off
Log off by clicking your name or Live System User at the upper-right corner of the screen, click Log Out from the menu GNOME displays, and then click the button labeled Log Out from the small window GNOME displays. Select Power Off to shut down or restart the system, among other options. Alternately, you can give the command gnome-session-quit from an Enter a Command window (ALT-F2) or a terminal emulator.
Using the Nautilus File Manager
Nautilus (the Files program) is the simple, powerful GNOME file manager. You can use it to create, open, view, move, and copy files and folders as well as to execute applications and scripts.
Terms: folder and directory
Nautilus displays the File Browser window, which displays the contents of a folder. The terms folder and directory are synonymous; “folder” is frequently used in graphical contexts, whereas “directory” might be used in textual or command-line contexts. This book uses these terms interchangeably.
Term: File Browser
This book sometimes uses the terms File Browser window and File Browser when referring to the Nautilus File Browser window.
Opening Nautilus
Give the command nautilus from an Enter a Command window (ALT-F2) or a terminal emulator to open a Nautilus File Browser window that shows the files in your home directory (Figure 4-9). From a GNOME 3 desktop you can type nautilus or files in the Search text box in the Activities Overview screen (page 92). Alternately, you can click the filing cabinet icon in the Applications Overview screen (page 93). From a Classic desktop you can select Home from the Places menu.
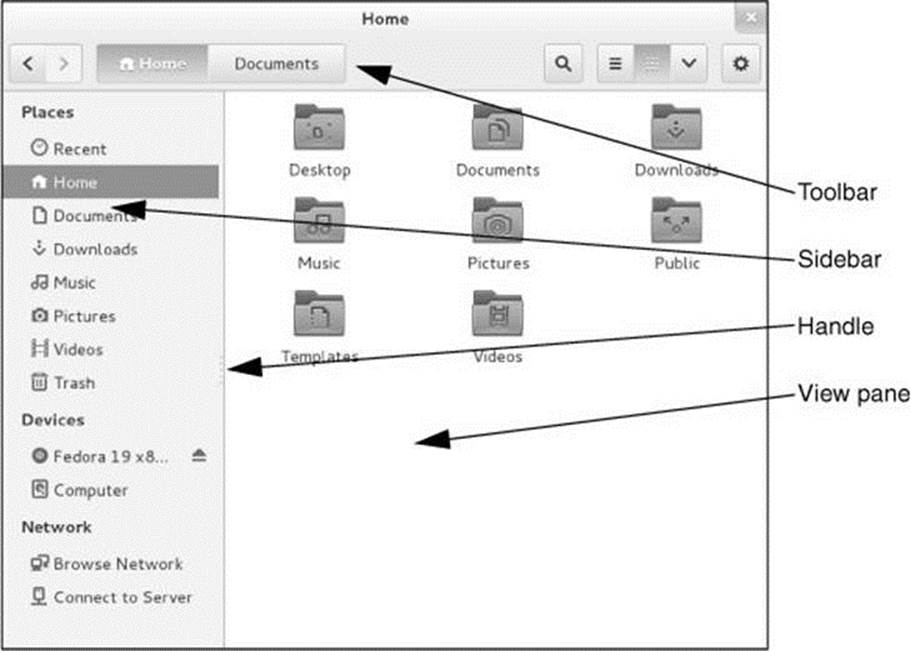
Figure 4-9 A Nautilus File Browser window
The Nautilus File Browser Window
The right side of a File Browser window shows the View pane that holds file objects; the left side shows the Sidebar that holds the Places, Devices, and Network lists.
Application menu
With a File Browser window active, click Files on the Top panel to display the Files Application menu. This menu allows you to set preferences for, open a location bar in, and close the File Browser window.
View pane
The View pane displays file icons or a list of filenames. Select the view you prefer by clicking the dots or lines button near the right end of the toolbar.
Sidebar
The Sidebar allows you to work with Nautilus in different ways. Close or display the Sidebar by pressing F9. To change the horizontal size of the Sidebar, drag the handle (Figure 4-9) on its right side. See “The Sidebar” on the next page for more information.
Toolbar
The left end of the toolbar allows you to display different directories in the View pane. Select Application menu![]() Enter Location to open a location bar in which you can enter a pathname. The right end of the toolbar holds icons that allow you to search for files, control the type of display Nautilus presents in the View pane, and display view options and location options.
Enter Location to open a location bar in which you can enter a pathname. The right end of the toolbar holds icons that allow you to search for files, control the type of display Nautilus presents in the View pane, and display view options and location options.
The Sidebar
The Places section of the Sidebar holds objects that you click to change what Nautilus displays in the View pane. The Home, Documents, and Downloads objects display your directories with corresponding names. The Computer object displays the local filesystem. The Browse Network object displays systems and files on the local network. The Connect to Server object opens a window that allows you to enter a URL to connect to an SSH, FTP, or other type of server.
Trash
Selecting Move to Trash from an object’s context (right-click) menu moves the object to the Trash directory. Because files in the trash take up space on the hard disk (just as all files do), it is a good idea to remove them periodically. To display the Trash directory, double-click the Trash icon in the Sidebar.
Emptying the trash
Select Empty Trash from the Trash icon context (right-click) menu to permanently remove all files from the trash. (This selection is grayed out if there are no files in the trash.) Alternately, you can right-click an object in the Trash File Browser window and select Delete to remove only that object (file), or you can select Restore to move the file back to its original location. You can drag and drop files to and from the trash just as you can with any folder.
Deleting files
You can delete files without first sending them to the trash. Add Delete to the context menu by selecting Preferences from the Files Application menu, then selecting the Behavior tab, and putting a tick in the check box labeled Include a Delete command that bypasses Trash.
Tip: Nautilus can open a terminal emulator
When you install the nautilus-open-terminal package (see page 534 for instructions) and log out and log back in, Nautilus presents an Open in Terminal selection in context menus where appropriate. For example, with this package installed, when you right-click a directory object and select Open in Terminal, Nautilus opens a terminal emulator with that directory as the working directory (page 143).
Opening Files
By default, you double-click a file object in the View pane to open it; alternately, you can right-click the object and select Open from the drop-down list. When you open a file, GNOME figures out the appropriate tool to use by determining the file’s MIME (page 1261) type. GNOME associates each filename extension with a MIME type and each MIME type with a program. Initially GNOME uses the filename extension to try to determine a file’s MIME type. If it does not recognize the filename extension, it examines the file’s magic number (page 1259).
For example, when you open a file with a filename extension of ps, GNOME calls the Evince document viewer, which displays the PostScript file in a readable format. When you open a text file, GNOME uses gedit to display and allow you to edit the file. When you open a directory, GNOME displays its contents in a File Browser window. When you open an executable file such as Firefox, GNOME runs the executable file. When GNOME uses the wrong tool to open a file, the tool generally issues an error message. See “Open With” on page 106 for information on how to use a tool other than the default tool to open a file.
From within a File Browser window, you can open a folder in a new tab. To do so, middle-click the folder or right-click the folder and select Open in New Tab from the drop-down list; Nautilus displays a new tab named for the folder you clicked. Click the tab to display contents of the directory.
Selecting Objects
Within a File Browser window, select an object by clicking it once; GNOME highlights the object. Select additional objects by holding down the CONTROL key while you click each object. To select a group of adjacent objects, highlight the first object and then, while holding down the SHIFTkey, click the last object; GNOME highlights all objects between the two objects you clicked. Alternately, you can use the mouse pointer to drag a box around a group of objects.
The Object Properties Window
The Object Properties window displays information about a file, such as its owner, permissions, size, location, MIME type, ways to work with it, and so on. This window is titled filename Properties, where filename is the name of the file you clicked to open the window. To display this window, right-click an object and select Properties from the drop-down list. The Properties window initially displays some basic information. Click the tabs at the top of the window to display additional information. Different sets of tabs appear for different types of files. You can modify the settings in this window only if you have permission to do so. This section describes the three tabs most commonly found in Object Properties windows.
Basic
The Basic tab displays information about the file, including its MIME (page 1261) type, and enables you to select a custom icon for the file and change its name. To change the name of the file, replace the name in the text box labeled Name. If the filename is not listed in a text box, you do not have permission to change it. An easy way to change the icon is to open a File Browser window at /usr/share/icons (give the command nautilus /usr/share/icons in an Enter a Command window [ALT-F2]). Work your way down through the directories until you find an icon you like (gnome/24x24 has some interesting icons), and then drag and drop it on the icon to the left of Name in the Basic tab.
Permissions
The Permissions tab (Figure 4-10) allows the owner of a file to change the file’s permissions (page 191) and to change the group (see /etc/group on page 506) the file is associated with to any group the owner is associated with. Nautilus grays out items you are not allowed to change.
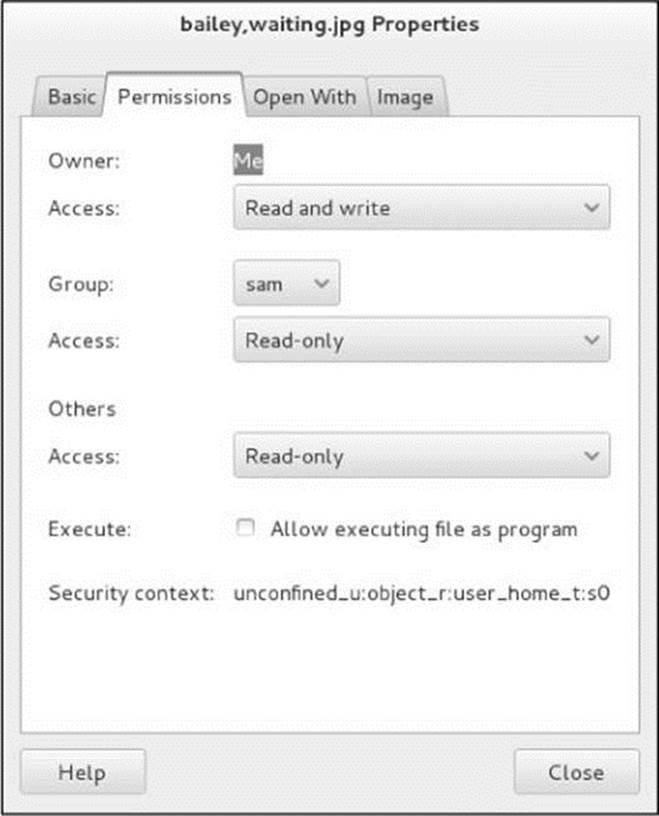
Figure 4-10 The Object Properties window, Permissions tab
Using the drop-down lists, you can give the owner (called user elsewhere; see the tip about chmod on page 194), group, and others read, read-only, or write permission for a file. Alternately, you can prohibit the group and others from accessing the file by specifying permissions as None. Put a tick in the check box labeled Execute to give all users permission to execute the file. This tab does not give you the fine-grained control over assigning permissions that chmod (page 193) does.
Permissions for a directory work as explained on page 197. Owner, group, and others can be allowed to list files in a directory, access (read and—with the proper permissions—execute) files, or create and delete files. Group and others permissions can also be set to None. Click Change Permissions for Enclosed Files to change the permissions of all files in a directory.
Open With
When you ask Nautilus to open a file that is not executable (by double-clicking its icon or right-clicking and selecting the first Open with selection), Nautilus determines which application or utility it will use to open the file. Nautilus uses several techniques to determine the MIME (page1261) type of a file and selects the default application based on that determination.
The Open With tab (Figure 4-11) enables you to change which applications Nautilus can use to open the file and other files of the same MIME type (typically files with the same filename extension). Scroll the list of applications, highlight one, and click the Add button to add to the list of applications. Right-click an application and select Forget association to remove an application from the list. You cannot remove the default application.
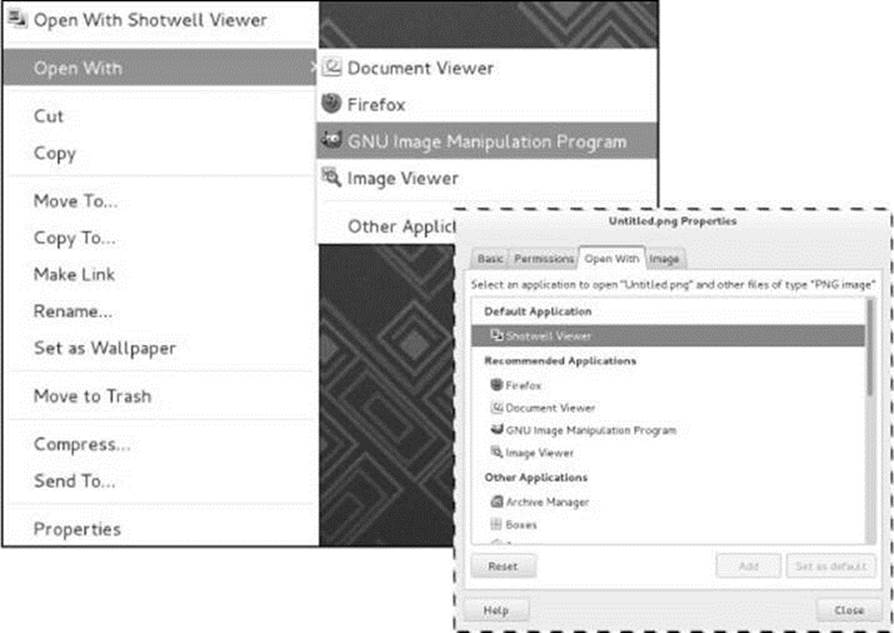
Figure 4-11 The Object Properties window, Open With tab, and the context menu, Open With submenu for the same file
When you add an application, Nautilus adds that application to the Open With list but does not change the default application it uses to open that type of file. Highlight the application and click Set as default to cause that application to become the default application Nautilus uses to open this type of file.
When a file has more than one application in the Open With tab, the context menu displays an Open With submenu (Figure 4-11).
The Settings Window
The Settings window (Figure 4-12) enables you to customize your account so it better meets your needs. Click your name or Live System User at the upper right of the desktop and then click Settings to display this window. Alternately, you can open this window by giving the commandgnome-control-center from an Enter a Command window (ALT-F2) or a terminal emulator. This section discusses the items in this window. Click an item to display its corresponding window.
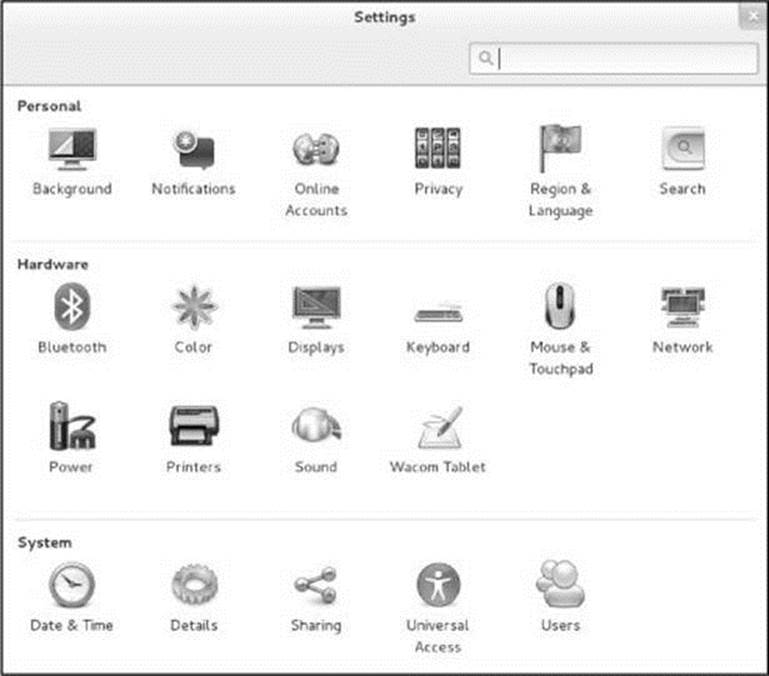
Figure 4-12 The Settings window
Tip: You might need to click Unlock before you can change settings
In the upper right of some windows there is an unlocked lock icon with the word Unlock next to it. See Figure 4-16 on page 111 for an example. When you click this icon, GNOME displays an Authentication Required dialog box. If you are an administrative user, the dialog box will request your password. If not, it will request the password of Administrator, which is the root password.
The Settings window has the following items:
• Background—Sets the desktop background. For more information refer to “Desktop Background” on page 109.
• Notifications—Specifies which applications display notifications and how much information each includes in pop-ups.
• Online Accounts—Adds credentials for Google, Facebook, and other accounts to be stored securely by the system.
• Privacy—Controls automatic screen lock, how you appear on the desktop and network, recent usage and history, and how often trash and temporary files are purged.
• Region & Language—Specifies language, format, and input sources.
• Search—Specifies which applications are consulted when you use the Search text box in the Activities Overview screen (page 92).
• Bluetooth—Controls Bluetooth adapters.
• Color—Specifies a color profile for a monitor.
• Displays—Configures display (monitor) resolution. Refer to “Displays,” next page.
• Keyboard—Controls whether and how keys repeat, cursor blinking, and keyboard shortcuts.
• Mouse & Touchpad—Switches between right- and left-handed mouse, and controls double-click and pointer speed. For more information refer to “Mouse & Touchpad” on page 110.
• Network—Displays the Settings window that controls network connections and operation. See page 638 for information on connecting to a Wi-Fi network and page 639 for general information on this window.
• Power—Controls when GNOME blanks the screen and how long the system must be idle before it is suspended.
• Printers—Adds, removes, and configures printers. See Chapter 13.
• Sound—Controls sound volume, balance, profile, and effects. On systems with more than one sound device, choose which device to use.
• Wacom Tablet—Sets up a tablet.
• Date & Time—Turns NTP (Network Time Protocol; sets/maintains the system clock automatically) on and off, sets the system date, time, and time zone, and causes GNOME to display a 12- or 24-hour clock. For more information refer to “Date & Time” on page 110.
• Details—Displays hardware and software information, specifies default applications, and tells the system what to do when it detects removable media.
• Sharing—Turns remote access via ssh (Chapter 18) on and off, and specifies which content you share.
• Universal Access—Changes settings to help you use the desktop more easily. Tabs allow you to control seeing, hearing, typing, and mouse (pointing and clicking) features.
• Users—Adds, removes, and sets up users. For more information refer to “Users: Changing Your Account Type and Password (GUI)” on page 112.
Desktop Background
The Background window (Figure 4-13) enables you to change the desktop background. To display this window, click Background in the Settings window (Figure 4-12, page 107) or right-click anywhere on an empty space on the desktop and select Change Background. Initially this window displays a picture of the current desktop background. Click that picture to display the Select Background window.
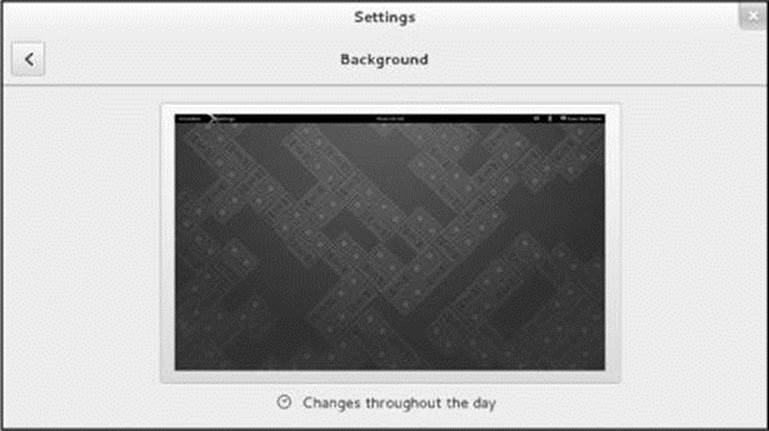
Figure 4-13 The Background window
Three buttons labeled Wallpapers, Pictures, and Colors appear at the top of the Select Background Window. Click one of these buttons, click to highlight a desktop background from those displayed, and click Select to change the desktop background to the highlighted one. The Background window reappears; click X to close the window or click the back arrow to return to the Settings window.
Several utilities and applications allow you to select a picture to use as the desktop background. For example, when you select Set as Wallpaper from an picture’s context (right-click) menu in a Nautilus File Browser window, GNOME sets that picture as the desktop background.
![]() Displays
Displays
Most of the time the monitor attached to the system just works: Fedora/RHEL probes the monitor and autoconfigures X.org to work properly. This section explains how to configure the display in case you need to. The Displays window (Figure 4-14) configures the monitor. Check the specifications for the monitor and select the appropriate resolution value from the drop-down list. With multiple monitors, this window allows you to drag monitors to change their relative positions. Click Apply confirm the changes you have made.
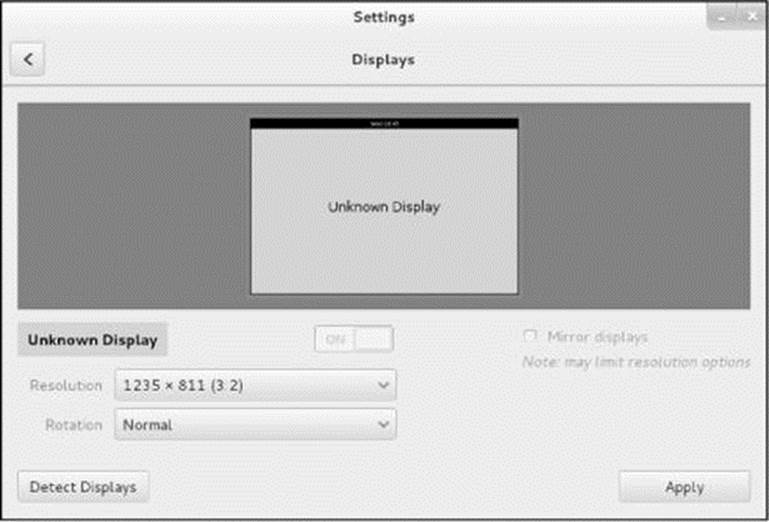
Figure 4-14 The Displays window
Mouse & Touchpad
The Mouse & Touchpad window (Figure 4-15) enables you to change the characteristics of the mouse (and touchpad if there is one). To display this window, click Mouse & Touchpad in the Settings window (Figure 4-12, page 107).
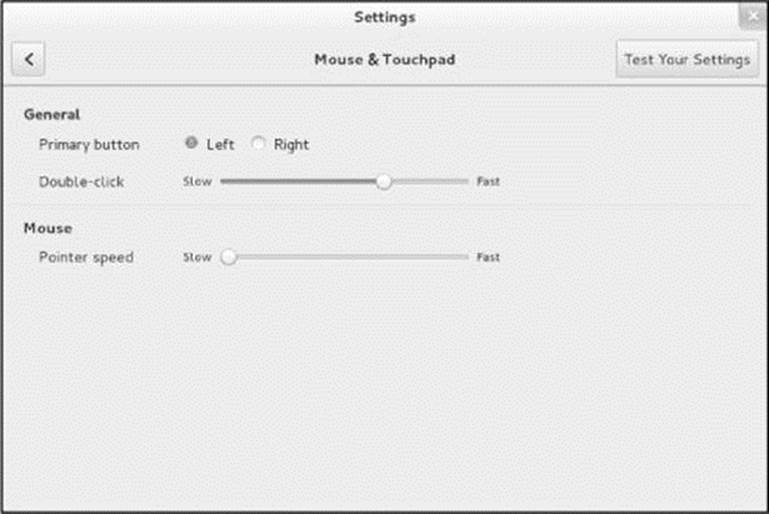
Figure 4-15 The Mouse & Touchpad window
Left-handed mouse
To change the orientation of the mouse buttons for use by a left-handed person, click the radio button labeled Left. If you change the setup of the mouse buttons, remember to reinterpret the descriptions in this book accordingly. That is, when this book asks you to click the left button or does not specify a button to click, click the right button, and vice versa. See page 463 for instructions on remapping mouse buttons from the command line.
Double-click timeout
Use the slider labeled Double-click to change the speed with which you must double-click a mouse button to have the system recognize your action as a double-click rather than as two single clicks. You can control the mouse pointer speed using the slider labeled Pointer speed. Click Test Your Settings to experiment with the mouse settings. Click X to close the window or click the back arrow to return to the Settings window.
Date & Time
The Date & Time window (Figure 4-16) allows you to specify a date format (a 12- or 24-hour clock), specify a time zone (region), and turn NTP (Network Time Protocol) on or off. To display this window, click Date & Time in the Settings window (Figure 4-12, page 107) or click the time at the top of the screen and select Date & Time Settings. You must unlock this window to make changes other than changing the date format; see the tip on page 107.
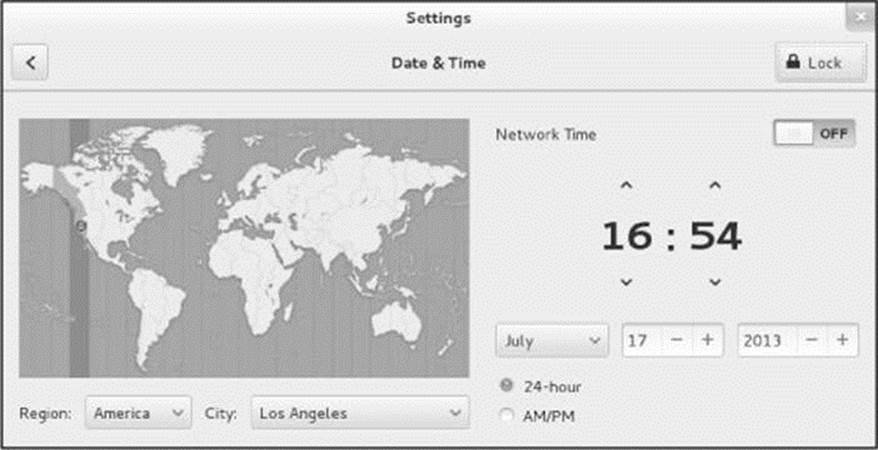
Figure 4-16 The Date & Time window
Turning NTP on causes the system to set and maintain its clock from network time servers. When NTP is off, you can use this window to set the system clock manually. To specify a time zone, click a city in the local time zone; GNOME displays the name of the city in the spin box labeledCity. Alternately, you can use the spin boxes labeled Region and City to specify a city. Click X to close the window or click the back arrow to return to the Settings window.
![]() Users: Changing Your Account Type and Password (GUI)
Users: Changing Your Account Type and Password (GUI)
See “Password Security” on page 136 for help selecting a more secure password for your account. See page 137 for instructions on changing your password from the command line.
The Users window (Figure 4-17) allows you to add and remove users and change the characteristics of a user, including changing the user’s password and making the user an administrator (page 422). To display this window, click Users in the Settings window (Figure 4-12, page 107). You must unlock this window to make changes other than changing your own password or language; see the tip on page 107.
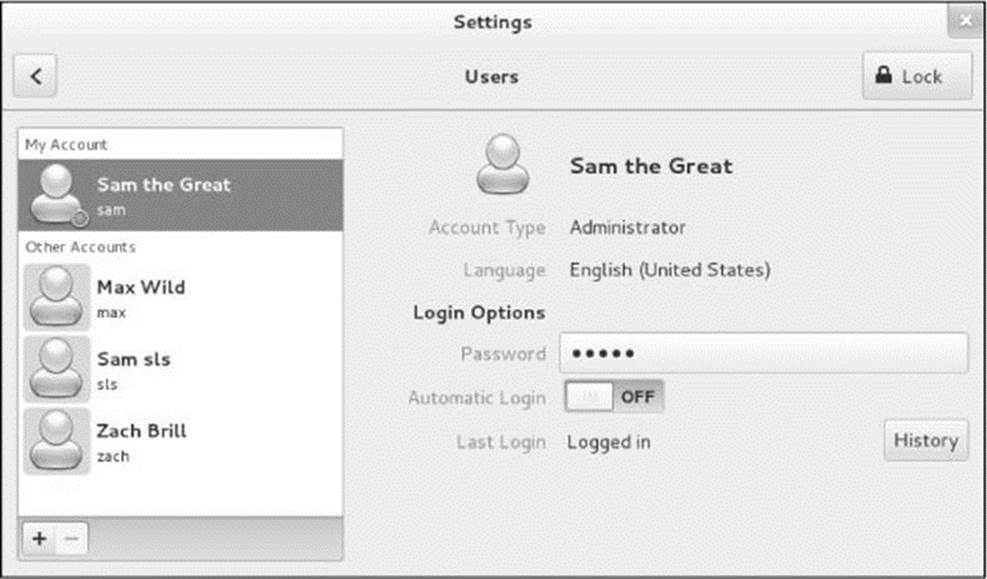
Figure 4-17 The Users window
To change your password click the text box labeled Password; GNOME displays a new window. The first item you must enter in this window is your current (old) password. The system verifies this password to ensure that an unauthorized user is not trying to alter your password. There are also text boxes where you enter and verify the new password. When you have entered a strong enough password the same way two times the system allows you to click Change. When you successfully change your password, you change the way you log in. If you forget your password, a user running with root privileges can change it and tell you the new password. Click X to close the window or click the back arrow to return to the Settings window.
Getting Help
Linux provides help in many forms and formats. This section describes how to get help while using a GUI. See page 128 for resources that are available from the command line.
The GNOME Help Window
The GNOME Help window (Figure 4-18) is displayed by yelp (projects.gnome.org/yelp) and provides information on using Linux in a graphical environment. Open this window by giving the command yelp from a Search text box (SUPER), an Enter a Command window (ALT-F2), or a terminal emulator.
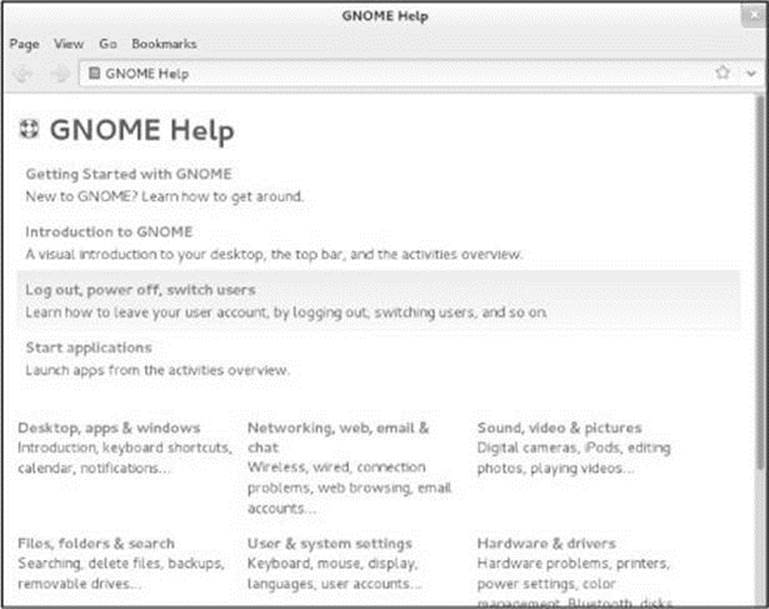
Figure 4-18 The GNOME Help window
Click a topic in this window to display information on that topic. You can also enter text to search for in the text box at the top of the window and then press RETURN. In addition, most Application menus (page 98) provide a Help selection.
Using the Internet to Get Help
The Internet provides many helpful sites related to Linux. Aside from sites that offer various forms of documentation, you can enter an error message from a program you are having a problem with in a search engine such as Google (www.google.com). The search will likely yield a post concerning your problem and suggestions about how to solve it. See Figure 4-19.
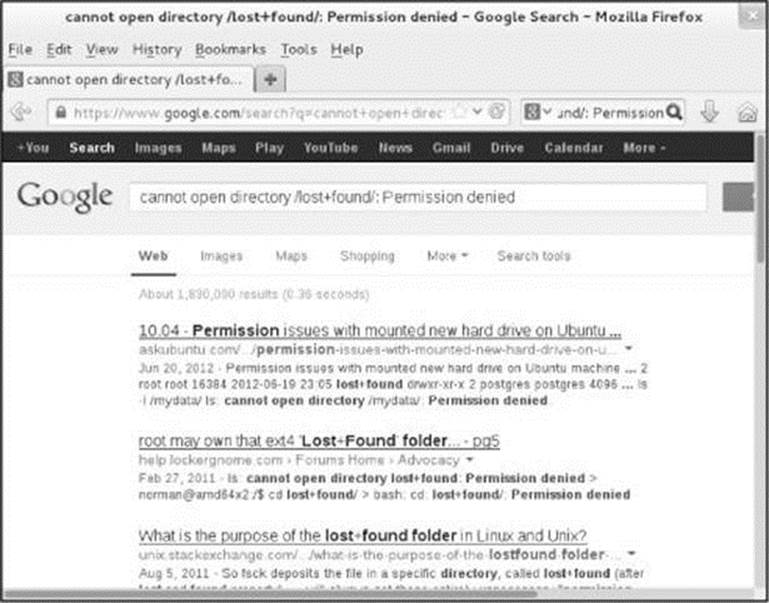
Figure 4-19 Google reporting on an error message
Fedora/Red Hat Web sites
The Red Hat and Fedora Web sites are rich sources of information. The following list identifies locations that may be of interest:
• Fedora documentation is available at docs.fedoraproject.org.
• A list of all methods of getting help using Fedora is available at fedoraproject.org/wiki/Communicating_and_getting_help.
• A useful site that answers questions is ask.fedoraproject.org.
• Manuals and other documentation for RHEL are available at access.redhat.com/site/documentation and access.redhat.com.
• Various types of support documents and support are available at www.redhat.com/support (requires free registration).
• You can query the Red Hat Knowledgebase at access.redhat.com/site (requires free registration).
• The home pages for Fedora (fedoraproject.org) and RHEL (www.redhat.com) have a wealth of information.
• Fedora/RHEL support forums are online discussions about any issues people want to raise. One forum is dedicated to new users; others to Apache, the X Window System, and so on. Visit www.redhat.com/mailman/listinfo and admin.fedoraproject.org/mailman/listinfo to browse the lists.
• The Fedora/RHEL bugs database is available at bugzilla.redhat.com. Anyone can search the database. To submit new bugs or append to existing bugs, you need to sign up for a free account.
• You can find community-sourced solutions to common problems at fedorasolved.org.
• Fedora Magazine is available at fedoramagazine.org.
• RHEL hardware help is available from the Red Hat hardware catalog at hardware.redhat.com. The hardware that Fedora supports is mostly a superset of that supported by RHEL.
GNU
GNU manuals are available at www.gnu.org/manual. In addition, you can visit the GNU home page (www.gnu.org) to obtain other documentation and GNU resources. Many of the GNU pages and resources are available in a variety of languages.
The Linux Documentation Project
The Linux Documentation Project (www.tldp.org; Figure 4-20), which has been around for almost as long as Linux, houses a complete collection of guides, HOWTOs, FAQs, man pages, and Linux magazines. The home page is available in English, Portuguese (Brazilian), Spanish, Italian, Korean, and French. It is easy to use and supports local text searches. This site also provides a complete set of links you can use to find almost anything you want related to Linux (click Links in the Search box or go to www.tldp.org/links). The links page includes sections on general information, events, getting started, user groups, mailing lists, and newsgroups, with each section containing many subsections.
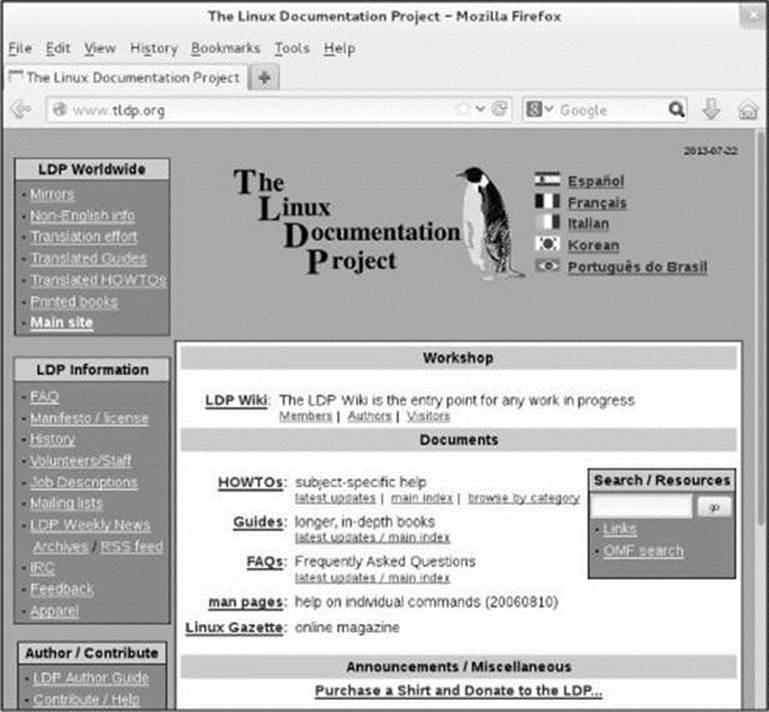
Figure 4-20 The Linux Documentation Project home page
HOWTOs
A HOWTO document explains in detail how to do something related to Linux—from setting up a specialized piece of hardware to performing a system administration task to setting up specific networking software. Mini-HOWTOs offer shorter explanations.
The Linux Documentation Project site houses most HOWTO and mini-HOWTO documents. Use a Web browser to visit www.tldp.org, click HOWTOs, and pick the index you want to use to find a HOWTO or mini-HOWTO. You can also use the LDP search feature on its home page to find HOWTOs and other documents.
Updating, Installing, and Removing Software Packages
Software comes in packages that include all necessary files, instructions so a program can automatically install and remove the software, and a list of other packages the package depends on. There are many ways to search for and install software packages. GNOME notifies you each time updates are available for software on the system. The Software window (Figure 4-22) provides an easy way to install software. Chapter 12 explains how to work with software packages from the command line.
Updating Software
Systems connected to the Internet are set up to search daily for software updates and notify you when updates are available. GNOME displays the message Important software updates are available in a pop-up notification window and places a notification indicator (an envelope icon) toward the right end of the Top panel when updates are available. Clicking Install updates in this window opens the Software Update window (Figure 4-21). You can open this window manually by selecting the Software Update icon from the GNOME 3 desktop Applications Overview screen (page 93) or by giving the command gpk-update-viewer from an Enter a Command window (ALT-F2) or a terminal emulator.
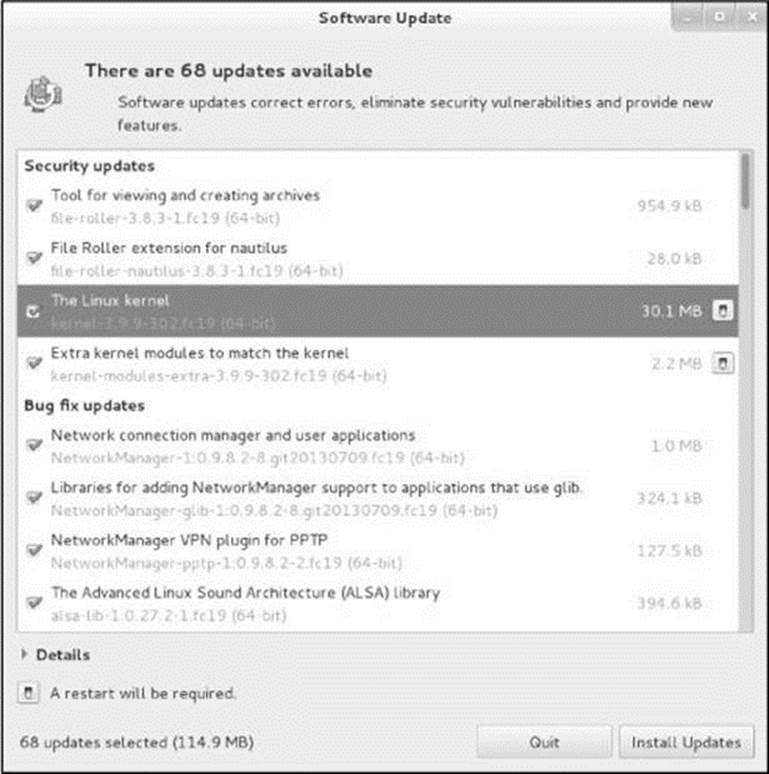
Figure 4-21 The Software Update window
Software Update window
When the Software Update window opens, it displays the message Checking for updates; after it finishes checking it displays the number of available updates. If no updates are available, it displays All software is up to date.
If updates are available, click Install Updates. As it downloads and installs the software packages, the Software Update window displays messages and a progress bar. If the updates require you to reboot the system or log off, the Software Update window prompts you to do so.
Software Update Preferences window
You can control how often the system checks for updates and which sources it checks from the Software Update Preferences window. Open this window by giving the command gpk-prefs from an Enter a Command window (ALT-F2) or a terminal emulator.
Adding and Removing Software
The Software window (Figure 4-22) allows you to add and remove applications from the system. Open this window by giving the command gpk-application from an Enter a Command window (ALT-F2) or a terminal emulator. Maximizing this window might make it easier to use. See page534 for instructions on adding and removing software on the command line.
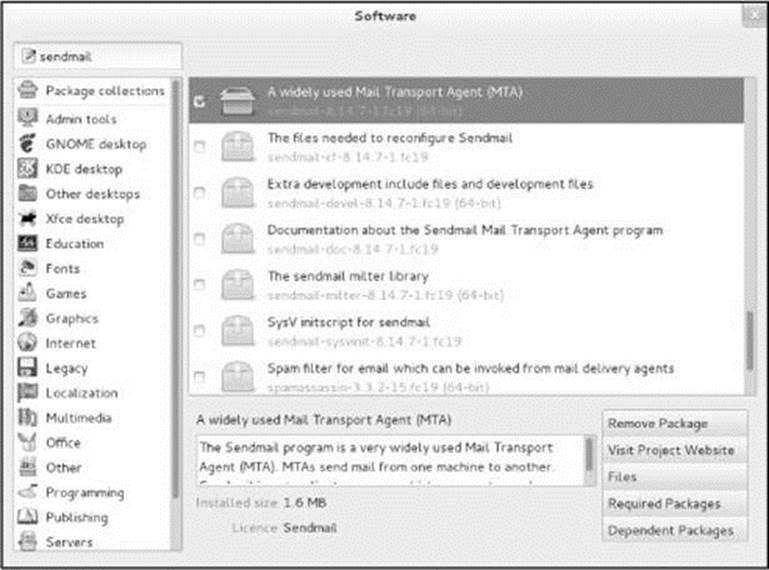
Figure 4-22 The Software window
Enter the name or part of the name of an application in the text box at the upper-left corner of the window and press RETURN to search for that application. The Software window displays a list of matching software packages in the frame on the right side of the window. Alternately, you can select one of the entries from the list on the left side of the window to display a list of related packages.
Scroll through the packages displayed in the frame on the right side of the window. When you click/highlight an application, the window displays a summary of the application in the frame at the lower-right corner of the window. Put a tick in the check box next to each application you want to install. Remove ticks from applications you want to remove. Click Apply Changes to implement the changes you have marked. If a package you want to install depends on other packages that are not installed, gpk-application will ask for permission to install the dependent packages. Because you need to work with root privileges to install and remove software, the utility might ask for the root password. When it is finished, the utility might ask if you want to run the new application. Close the Software window when you are finished.
Installing Different Desktop Environments
If you are installing a new Fedora system you can download a spin to install a system with a desktop environment other than GNOME. See page 35 for a list of popular spins. On a system that is already set up, you can use yum to download and install the packages necessary to run a different desktop. When more than one desktop is installed on a system, the Password screen displays the Sessions menu (Figure 4-4, page 96) so you can choose which desktop you want to run. The following commands, which must be run from a terminal emulator and prompt for the root password, install package groups that include all necessary packages for each desktop.
Xfce
The following command installs the Xfce desktop:
$ su -c 'yum -y group install xfce-desktop'
LXDE
The following command installs the LXDE desktop:
$ su -c 'yum -y group install lxde-desktop'
MATE
The following command installs the MATE desktop:
$ su -c 'yum -y group install mate-desktop'
Security
The following command installs FSL (the Fedora Security Lab):
$ su -c 'yum -y group install "Security Lab"'
KDE
The following command installs the KDE desktop:
$ su -c 'yum -y group install kde-desktop'
![]() Working from the Command Line
Working from the Command Line
Before the introduction of the GUI, UNIX and then Linux provided only a textual (command-line) interface (CLI). Today, a textual interface is available when you log in from a terminal, a terminal emulator, or a textual virtual console, or when you use ssh to log in on a system.
Advantages of the textual interface
Although the concept might seem antiquated, the textual interface has a place in modern computing. In some cases an administrator might use a command-line tool either because a graphical equivalent does not exist or because the graphical tool is not as powerful, flexible, or refined as the textual one. For example, chmod (page 193) provides finer granularity than its GUI counterpart (File Browser Object Properties window, Permissions tab; page 105). On a server system, a graphical interface might not even be installed. The first reason for this omission is that a GUI consumes a lot of system resources; on a server, those resources are better dedicated to the main task of the server. Additionally, security considerations mandate that a server system run as few tasks as possible because each additional task provides an additional attack vector.
You can also write scripts using the textual interface. Using scripts, you can easily reproduce tasks on multiple systems, enabling you to scale the tasks to larger environments. When you are the administrator of only a single system, using a GUI is often the easiest way to configure the system. When you act as administrator for many systems, all of which need the same configuration installed or updated, a script can make the task go more quickly. Writing a script using command-line tools is frequently easy, whereas the same task can be difficult to impossible using graphical tools.
Pseudographical interface
Before the introduction of GUIs, resourceful programmers created textual interfaces that included graphical elements such as boxes, borders outlining rudimentary windows, highlights, and, more recently, color. These textual interfaces, called pseudographical interfaces, bridge the gap between textual and graphical interfaces. The Midnight Commander file management utility (mc; midnight-commander.org) is a good example of a utility with a well-designed pseudographical interface.
Command-line (bash) coverage
This section introduces the Linux CLI. Chapter 5 is the first of three chapters dedicated to the Bourne Again Shell (bash). Chapter 7 describes some of the more important utilities you can use from the command line. Chapter 9 covers advanced bash concepts. Chapter 27 describes shell programming using bash. Most of the examples in Parts III and IV of this book use the CLI, adding examples of graphical tools where available.
Running Commands from the Command Line
This section describes three ways to work from the command line: using a terminal emulator, using a virtual console, and logging in remotely. If the local system does not support a graphical interface, you have no choice: You must work from the command line—skip to “Logging Out” on page 121.
Using a Terminal Emulator/Shell
A terminal emulator is a window that presents a CLI (command-line interface); it functions as a textual (character-based) terminal and is displayed in a graphical environment. To open the GNOME terminal emulator named Terminal (gnome-terminal; Figure 4-23), give the commandgnome-terminal from an Enter a Command window (ALT-F2) or a terminal emulator. Because you are already logged in and are creating a subshell in a desktop environment, you do not need to log in again.
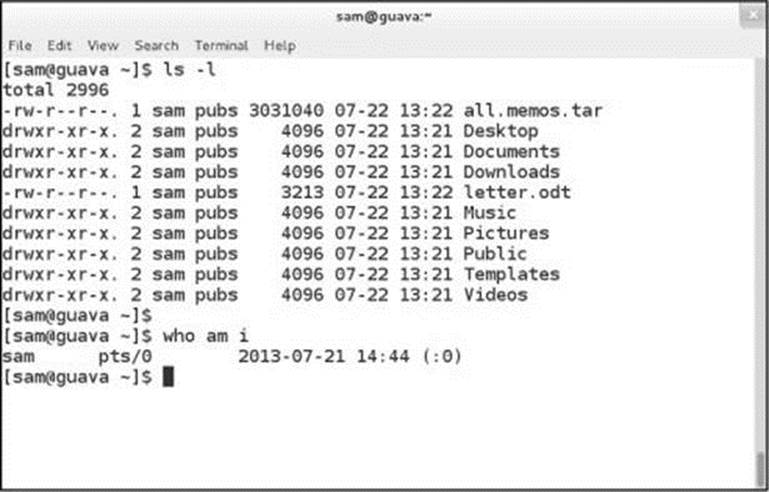
Figure 4-23 A Terminal (emulator) window
Terminal displays your username, the name of the system you are working on, and the name of the directory you are working in (the working directory) on the titlebar. Figure 4-23 shows sam working on the system named guava. He is working in his home directory (page 143), which the shell refers to using a tilde (~; page 182).
You can run character-based (textual) programs that would normally run on a terminal or from the console in a terminal emulator window. You can also start graphical programs, such as gnome-calculator, from this window. A graphical program opens its own window.
To open an additional terminal session within the same Terminal window, right-click the window and select Open Tab from the context menu. A row of tabs appears below the menubar as gnome-terminal opens another terminal session on top of the existing one. Add as many terminal sessions as you like; click the tabs to switch between sessions.
Tip: GNOME Terminal (emulator) shortcuts
While using GNOME Terminal, CONTROL-SHIFT-N opens a new window and CONTROL-SHIFT-T opens a new tab. New windows and tabs open to the working directory. In addition, you can use CONTROL-PAGE UP and CONTROL-PAGE DOWN to switch between tabs; ALT-x switches to tab number x.
A session you add from the context menu uses the same profile as the session you open it from. When you use the menubar to open a session, GNOME gives you a choice of profiles if more than one is available. You can add a profile by selecting Terminal menubar: File![]() New Profile and specifying a name for the new profile.
New Profile and specifying a name for the new profile.
![]() Using a Virtual Console
Using a Virtual Console
When running Linux on a personal computer, you will frequently work with the display and keyboard attached to the computer. Using this physical console, you can access as many as 63 virtual consoles (also called virtual terminals). Some are set up to allow logins; others act as graphical displays. To switch between virtual consoles, hold the CONTROL and ALT keys down and press the function key that corresponds to the console you want to view. For example, CONTROL-ALT-F5 displays the fifth virtual console.
By default, five or six virtual consoles are active and have textual login sessions running. When you want to use both textual and graphical interfaces, you can set up a textual session on one virtual console and a graphical session on another. By default, a graphical session runs on virtual console number 1.
Logging In Remotely: Terminal Emulation, ssh, and Dial-Up Connections
When you are not using a console, terminal, or other device connected directly to the Linux system you are logging in on, you are probably connected using terminal emulation software on another system. Running on the local system, this software connects to the remote Linux system via a network (Ethernet, asynchronous phone line, PPP, or other type) and allows you to log in.
When you log in via a dial-up line, the connection is straightforward: You instruct the local emulator program to contact the remote Linux system, it dials the phone, and the remote system displays a login prompt. When you log in via a directly connected network, you use either ssh (secure; page 685) or telnet (not secure; page 303) to connect to the remote system. The ssh program has been implemented on many operating systems, not just Linux. Many user interfaces to ssh include a terminal emulator. From an Apple, Windows, or UNIX machine, open the program that runsssh and give it the name or IP address of the system you want to log in on.
Logging Out
To log out from a character-based interface, press CONTROL-D in response to the shell prompt. This action sends the shell an EOF (end of file) signal. Alternately, you can give the command exit. Logging out from a shell does not end a graphical session; it just exits from the shell you are working with. For example, exiting from the shell that GNOME Terminal provides closes the Terminal window.
The Shell
Once you open a terminal emulator window, you are communicating with the command interpreter called the shell. The shell plays an important part in much of your command-line communication with Linux. When you enter a command at the keyboard in response to the shell prompt on the screen, the shell interprets the command and initiates the appropriate action—for example, executing a program; calling a compiler, a Linux utility, or another standard program; or displaying an error message indicating you entered a command incorrectly. When you are working on a GUI, you bypass the shell and execute a program by clicking an object or a name. Refer to Chapter 5 for more information on the shell.
Special characters
When you are working on the command line, several characters, including *, ?, |, [, and ], have special meanings. Avoid using these characters until you have read “Special Characters” on page 142.
Tip: Make sure TERM is set correctly
No matter how you connect, make sure the TERM variable is set to the type of terminal your emulator is emulating. For more information refer to “Specifying a Terminal” on page 1153.
Which Shell Are You Running?
This book discusses the Bourne Again Shell (bash). You are probably running bash, but you might be running another shell such as the TC Shell (tcsh) or the Z Shell (zsh). When you give the command echo $0 and press RETURN in response to a shell prompt (usually $ or %), the shell displays the name of the shell you are working with. This command works because the shell expands $0 to the name of the program you are running (page 1022). This command might display output like this:
$ echo $0
-bash
or like this:
$ echo $0
/bin/bash
Either way, this output shows you are running bash. If you are running a different shell, the shell will display appropriate output; if you want to run bash, give the command bash. To permanently change the shell you run when you log in, see the tip on page 329. You may need to installbash (the bash package) as explained on page 534.
Correcting Mistakes
This section explains how to correct typographical and other errors you might make on the command line. Because the shell and most other utilities do not interpret the command line or other text you enter until you press RETURN, you can readily correct a typing mistake before you pressRETURN.
You can correct such mistakes in several ways: Erase one character at a time, back up a word at a time, or back up to the beginning of the line in one step. After you press RETURN, it is too late to correct a mistake: At that point, you must either wait for the command to run to completion or abort execution of the program (next page).
Erasing a Character
While entering characters from the keyboard, you can back up and erase a mistake by pressing the erase key once for each character you want to delete. The erase key backs over as many characters as you wish. It does not, in general, back up past the beginning of the line.
The default erase key is BACKSPACE. If this key does not work, try pressing DEL or CONTROL-H. If these keys do not work, give the following stty1 command to set the erase and line kill (see “Deleting a Line”) keys to their default values:
1. The command stty is an abbreviation for set teletypewriter, the first terminal UNIX ran on. Today stty is commonly thought of as meaning set terminal.
$ stty ek
Alternately, you can give the next command to reset most terminal parameters to a sane value. If the RETURN key does not move the cursor to the next line, press CONTROL-J instead.
$ stty sane
Deleting a Word
You can delete a word you entered by pressing CONTROL-W. A word is any sequence of characters that does not contain a SPACE or TAB. When you press CONTROL-W, the cursor moves left to the beginning of the current word (as you are entering a word) or the previous word (when you have just entered a SPACE or TAB), removing the word.
Tip: CONTROL-Z suspends a program
Although it is not a way of correcting a mistake, you might press the suspend key (typically CONTROL-Z) by mistake and wonder what happened. If you see a message containing the word Stopped, you have just stopped your job using job control (page 164). If you give the command fg to continue your job in the foreground, you return to where you were before you pressed the suspend key. For more information refer to “bg: Sends a Job to the Background” on page 348.
Deleting a Line
Any time before you press RETURN, you can delete the line you are entering by pressing the (line) kill key. When you press this key, the cursor moves to the left, erasing characters as it goes, back to the beginning of the line. The default line kill key is CONTROL-U. If this key does not work, tryCONTROL-X. If these keys do not work, give the stty command described under “Erasing a Character.”
![]() Aborting Execution
Aborting Execution
Sometimes you might want to terminate a running program. For example, you might want to stop a program that is performing a lengthy task such as displaying the contents of a file that is several hundred pages long or copying a large file that is not the one you meant to copy.
To terminate a program that you are running from the command line, press the interrupt key (CONTROL-C or sometimes DELETE or DEL). When you press this key, the Linux kernel sends a TERM (termination) signal to the program you are running and to the shell. Exactly what effect this signal has depends on the program. Some programs stop execution immediately, some ignore the signal, and some take other actions. When the shell receives a TERM signal, it displays a prompt and waits for another command.
If these methods do not terminate the program, try sending the program a QUIT signal (CONTROL-\). If all else fails, try pressing the suspend key (typically CONTROL-Z), giving a jobs command to verify the number of the job running the program, and using kill to abort the job. The job number is the number within the brackets at the left end of the line displayed by jobs ([1]). In the next example, the kill command (pages 164 and 465) uses –TERM to send a TERM signal to the job specified by the job number, which is preceded by a percent sign (%1). You can omit –TERM from the command, because kill sends a TERM signal by default. Table 27-5 on page 1047 lists some signals.
Caution: Use the KILL signal as a last resort
When the termination signal does not work, use the KILL signal (specify –KILL in place of –TERM in the example). A running program cannot ignore a KILL signal; it is sure to abort the program.
Because a program receiving a KILL signal has no chance to clean up its open files before being terminated, using KILL can corrupt application data. Use the KILL signal as a last resort. Before using KILL, give a termination (TERM) or quit (QUIT) signal ten seconds to take effect.
The following example demonstrates the use of the suspend key and the jobs and kill commands.
$ bigjob
^Z
[1]+ Stopped bigjob
$ jobs
[1]+ Stopped bigjob
$ kill -TERM %1
[1]+ Killed bigjob
The kill command returns a prompt; you might need to press RETURN again to see the confirmation message. For more information refer to “Running a Command in the Background” on page 163.
Repeating/Editing Command Lines
To repeat a previous command, press the UP ARROW key. Each time you press this key, the shell displays an earlier command line. Press the DOWN ARROW key to browse through the command lines in the other direction. To execute the displayed command line, press RETURN.
The RIGHT ARROW and LEFT ARROW keys move the cursor back and forth along the displayed command line. At any point along the command line, you can add characters by typing them. Use the erase key (page 123) to remove characters from the command line. Press RETURN to execute the modified command (it does not matter where the cursor is on the command line).
You can also repeat the previous command using !!. This technique is useful if you forgot to use su (page 425) to prefix a command. In this case, if you type su –c "!!", the shell will run the previous command with root privileges. Or, if the local system is set up to use sudo (page 428), you can type sudo !! and the shell will run the previous command with root privileges.
The command ^old^new^ reruns the previous command, substituting the first occurrence of the string old with new. Also, on a command line, the shell replaces the characters !$ with the last token (word) on the previous command line. The following example shows the user correcting the filename meno to memo using ^n^m^ and then printing the file named memo by giving the command lpr !$. The shell replaces !$ with memo, the last token on the previous command line.
$ cat meno
cat: meno: No such file or directory
$ ^n^m^
cat memo
This is the memo file.
$ lpr !$
lpr memo
For information about more complex command-line editing, see page 378.
Running Basic Command-Line Utilities
This section describes a few basic command-line utilities. You can experiment with these utilities from a terminal, a terminal emulator within a GUI (page 120), or a virtual console (page 121). See Chapter 7 for more complete coverage of these and other utilities.
ls: Lists the Names of Files
Using the editor of your choice, create a small file named practice. (See the tutorials on the vim [page 262] and nano [page 270] editors.) After exiting from the editor, you can use the ls (list; page 221) utility to display a list of filenames. Following, ls lists the name of the practice file. (On the system you are using it might also list some files the system or a program created.)
$ ls
practice
By default, ls lists the names of most of the files in the working directory (the directory you are working in). You can list the names of specified files by providing their names as arguments on the command line. Put a SPACE between the name of the utility and any arguments.
$ ls practice
practice
Tip: Arguments
An argument specifies something, such as a filename, the command acts on. An argument typically appears following the name of the utility you are calling and a SPACE. For more information refer to “Arguments” on page 145.
You can list more information about a file by using the –l option to ls. Options must also be preceded by a SPACE.
$ ls -l practice
-rw-r--r--. 1 sam pubs 52 07-24 14:09 practice
From left to right, the –l option causes ls to display file access permissions (page 191), links (page 203), owner and group names, size in bytes, modification date and time, and name.
Tip: Options
An option modifies the way a utility works. Options typically precede arguments and are usually specified as one or more letters that are preceded by one or two hyphens. An option generally appears following the name of the utility you are calling and a SPACE. For more information refer to “Options” on page 145.
cat: Copies a Text File to the Screen
A convenient way to display the contents of a text file on the screen is by giving the command cat with an argument of the name of the file. The following example shows the cat utility (page 216) displaying the contents of practice. Whereas ls displays the name of a file, cat displays thecontents of a file.
$ cat practice
This is a small file I created
using a text editor.
cp: Copies a File
The cp (copy; page 224) utility makes a copy of a file. This utility can copy any file, including text and executable program (binary) files. You can use cp to make a backup copy of a file or a copy to experiment with.
$ cp practice practice.copy
$ ls
practice practice.copy
The preceding example copies the file named practice to practice.copy. The period is part of the filename—just another character. The ls command shows two files in the working directory, practice and practice.copy.
rm: Deletes a File
The rm (remove; page 222) utility deletes a file. The following example shows rm deleting the file named practice. After rm deletes practice, ls and cat show that practice no longer exists. Use rm carefully.
$ rm practice
$ ls practice
ls: cannot access practice: No such file or directory
$ cat practice
cat: practice: No such file or directory
echo: Copies its Arguments to the Screen
The echo utility (page 219) copies its arguments to the screen. The following example shows two echo commands.
$ echo Hi
Hi
$ echo My name is Sam.
My name is Sam.
This book makes extensive use of echo to demonstrate how the shell works.
date: Displays the Time and Date
The date utility (page 218) displays the current date and time:
$ date
Thu Apr 3 10:14:41 PDT 2014
touch: Creates an Empty File
The touch utility (page 243) creates an empty (zero-length) file with the name that you specify as an argument. Following, touch creates myfile and ls shows that the file is zero bytes long.
$ touch myfile
$ ls -l myfile
-rw-r--r--. 1 sam pubs 0 07-24 14:12 myfile
![]() Writing and Executing a Basic Shell Script
Writing and Executing a Basic Shell Script
A shell script, called a batch file under Windows, is a program written using shell commands and utilities. This section explains how to write a basic shell script. See “Writing and Executing a Shell Script” on page 336 for more information on creating and executing shell scripts. Before you can run a shell script you must put commands in a file (the script) and tell Linux that the file is executable. You can use an editor to create the file or you can give the following command, which uses redirection to create the file. See page 154 for information on using cat and redirection to create a file.
$ cat > myprog
echo This is my shell script
date
who
CONTROL-D
This shell script, named myprog, holds three commands (utilities): echo, date, and who. After you type each of the lines and a final RETURN, press CONTROL-D to tell the shell you have finished writing to the file; the shell displays a prompt.
Next you need to tell Linux that myprog is an executable file. Following, the chmod utility (page 193) makes myprog readable and executable.
$ chmod a+rx myprog
Finally, you can execute the myprog script. Because of the way the shell looks for files, you must precede the name of the program with a period and a slash (./). See the discussion of absolute and relative pathnames on page 149 for details. Following, the shell runs the three utilities inmyprog and displays their output.
$ ./myprog
This is my shell script
Mon Jul 22 17:15:50 PDT 2013
sam pts/0 2013-07-21 13:17 (:0)
Getting Help from the Command Line
Distributions of Linux typically do not come with hardcopy reference manuals. However, its online documentation has always been one of Linux’s strengths. The man (or manual) and info pages have been available via the man and info utilities since early releases of the operating system. Not surprisingly, with the ongoing growth of Linux and the Internet, the sources of documentation have expanded as well. This section discusses some of the places you can look for information on Linux while you are working from the command line. If you are working in a graphical environment see “Getting Help” on page 113. See also Appendix B.
![]() man: Displays the System Manual
man: Displays the System Manual
The man (manual) utility displays (man) pages from the system documentation. This documentation is helpful when you know which utility you want to use but have forgotten exactly how to use it. You can also refer to the man pages to get more information about specific topics or to determine which features are available with Linux. Because the descriptions in the system documentation are often terse, they are most helpful if you already understand the basic functions of a utility. You can search for topics covered by man pages using the apropos utility (next page).
To find out more about a utility, give the command man, with the name of the utility as an argument. Figure 4-24 shows man displaying information about itself; the user entered man man on the command line. Within a man page you can search for a term by typing a slash followed by the term and a RETURN. For example, to search for the term function in a man page, type /functionRETURN; man will highlight all occurrences of the string function and move the cursor to the next one.

Figure 4-24 The man utility displaying information about itself
less (pager)
The man utility sends its output through a pager—usually less (page 220), which displays one screen of information at a time. When you display a manual page using man, less displays a prompt [e.g., Manual page man(1) line 1 ...] at the bottom of the screen after it displays each screen of text and waits for you to take one of the following actions:
• Press the SPACE bar to display another screen of text.
• Press PAGE UP, PAGE DOWN, UP ARROW, or DOWN ARROW to navigate through the text.
• Press h (help) to display a list of less commands.
• Press q (quit) to quit man and less and cause the shell to display a prompt.
Manual sections
Based on the FHS (Filesystem Hierarchy Standard; page 189), the Linux system manual and the man pages are divided into ten sections, where each section describes related tools:
1. User Commands
2. System Calls
3. Subroutines
4. Devices
5. File Formats
6. Games
7. Miscellaneous
8. System Administration
9. Kernel
10. New
This layout closely mimics the way the set of UNIX manuals has always been divided. Unless you specify a manual section, man displays the earliest occurrence in the manual of the word you specify as an argument. Most users find the information they need in Sections 1, 6, and 7; programmers and system administrators frequently need to consult the other sections.
In some cases the manual contains entries for different tools with the same name. For example, the following command displays the man page for the crontab utility from Section 1 of the system manual:
$ man crontab
To see the man page for the crontab file from Section 5, enter this command:
$ man 5 crontab
The preceding command instructs man to look only in Section 5 for the man page. In documentation you might see this man page referred to as crontab(5). Use the –a option to view all man pages for a given subject (press qRETURN to display each subsequent man page). For example, give the command man –a crontab to view all man pages for crontab.
![]() apropos: Searches for a Keyword
apropos: Searches for a Keyword
When you do not know the name of the utility required to carry out a particular task, you can use apropos with a keyword as an argument to search for it. This utility searches for the keyword in the short description line of all man pages and displays those lines that contain a match. Theman utility, when called with the –k (keyword) option, provides the same output as apropos.
The database apropos uses, named mandb or makewhatis, is not available when a system is first installed but is built automatically by cron or crond (see page 607 for a discussion of cron/crond and page 69 for instructions on manually building this database).
The following example shows the output of apropos when you call it with the who keyword. The output includes the name of each utility, the section of the manual that contains it, and the short description from the man page. This list includes the utility you need (who) and identifies other, related tools you might find useful.
$ apropos who
at.allow (5) - determine who can submit jobs via at or batch
at.deny (5) - determine who can submit jobs via at or batch
jwhois (1) - client for the whois service
w (1) - Show who is logged on and what they are doing.
who (1) - show who is logged on
who (1p) - display who is on the system
whoami (1) - print effective userid
whois (1) - client for the whois service
whois.jwhois (1) - client for the whois service
![]() whatis
whatis
The whatis utility is similar to apropos but finds only complete word matches for the name of the utility:
$ whatis who
who (1) - show who is logged on
who (1p) - display who is on the system
info: Displays Information About Utilities
The textual info utility (www.gnu.org/software/texinfo/manual/info) is a menu-based hypertext system developed by the GNU Project (page 3) and distributed with Linux. It includes a tutorial on itself (give the command info info) and documentation on many Linux shells, utilities, and programs developed by the GNU Project. Figure 4-25 shows the screen that info displays when you give the command info coreutils (the coreutils software package holds the Linux core utilities).

Figure 4-25 The initial screen displayed by the command info coreutils
Tip: man and info display different information
The info utility displays more complete and up-to-date information on GNU utilities than does man. When a man page displays abbreviated information on a utility that is covered by info, the man page refers to info. The man utility frequently displays the only information available on non-GNU utilities. When info displays information on non-GNU utilities, it is frequently a copy of the man page.
Because the information on this screen is drawn from an editable file, your display might differ from the screens shown in this section. You can press any of the following keys while the initial info screen is displayed:
• h or ? to list info commands
• SPACE to page through the display
• m followed by the name of the menu you want to display or followed by a SPACE to display a list of menus
• q or CONTROL-C to quit
The notation info uses to describe keyboard keys is the same notation emacs uses and might not be familiar to you. For example, the notation C-h is the same as CONTROL-H. Similarly, M-x means hold down the META or ALT key and press x. On some systems you need to press ESCAPE and then x to duplicate the function of META-X.
After giving the command info coreutils, press the SPACE bar a few times to page through the display. Type /sleepRETURN to search for the string sleep. When you type /, info moves the cursor to the bottom line of the window and displays Regexp search [string]:, where string is the last string you searched for. Press RETURN to search for string or enter the string you want to search for. Typing sleep displays sleep on that line, and pressing RETURN displays the next occurrence of sleep in the info text.
Tip: You might find pinfo easier to use than info
The pinfo utility is similar to info but is more intuitive if you are not familiar with emacs editor commands. This utility runs in a textual environment, as does info. When it is available, pinfo uses color to make its interface easier to use. If pinfo is not installed on the system, install the pinfo package as explained on page 534. Run pinfo from a terminal emulator.
Now type /RETURN (or /sleepRETURN) to search for the next occurrence of sleep as shown in Figure 4-26. The asterisk at the left end of the line indicates that this entry is a menu item. Following the asterisk is the name of the menu item and a description of the item.

Figure 4-26 The screen displayed by the command info coreutils after you type /sleepRETURN twice
Each menu item is a link to the info page that describes the item. To jump to that page, search for or use the ARROW keys to move the cursor to the line containing the menu item and press RETURN. With the cursor positioned as it is in Figure 4-26, press RETURN to display information on sleep. Alternately, you can type the name of the menu item in a menu command to view the information: To display information on sleep, for example, give the command m sleep, followed by RETURN. When you type m (for menu), info moves the cursor to the bottom line of the window (as it did when you typed /) and displays Menu item:. Typing sleep displays sleep on that line, and pressing RETURN displays information about the menu item you specified.
Figure 4-27 shows the top node of information on sleep. A node groups a set of information you can page through by pressing the SPACE bar. To display the next node, press n. Press p to display the previous node.
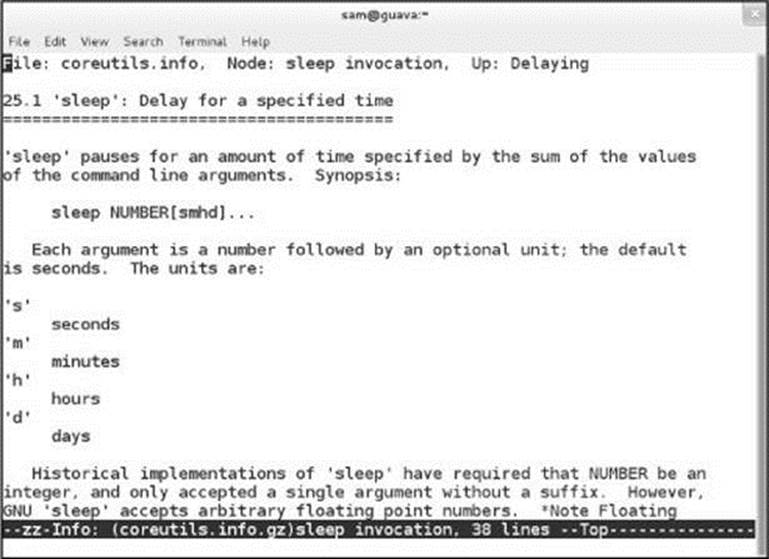
Figure 4-27 The info page on the sleep utility
As you read through this book and learn about new utilities, you can use man or info to find out more about those utilities. If the local system can print PostScript documents, you can print a manual page by using the man utility with the –t option. For example, man –t cat | lpr prints information about the cat utility. You can also use a Web browser to display documentation and then print the desired information from the browser.
The ––help Option
Another tool you can use on the command line is the ––help option. Most GNU utilities provide a ––help option that displays information about the utility. A non-GNU utility might use a –h or –help option to display information about itself.
$ cat --help
Usage: cat [OPTION] [FILE]...
Concatenate FILE(s), or standard input, to standard output.
-A, --show-all equivalent to -vET
-b, --number-nonblank number nonempty output lines, overrides -n
-e equivalent to -vE
-E, --show-ends display $ at end of each line
...
If the information that ––help displays runs off the screen, send the output through the less pager (page 129) using a pipeline (a vertical bar; page 158):
$ ls --help | less
The bash help Command
The bash help command displays information about bash (the Bourne Again Shell) commands, control structures, and other features. From the bash prompt, give the command help followed by the keyword you are interested in. Following are some examples.
$ help help
help: help [-dms] [pattern ...]
Display information about builtin commands.
Displays brief summaries of builtin commands. If PATTERN is
specified, gives detailed help on all commands matching PATTERN,
otherwise the list of help topics is printed.
...
$ help echo
echo: echo [-neE] [arg ...]
Write arguments to the standard output.
Display the ARGs on the standard output followed by a newline.
Options:
-n do not append a newline
...
$ help while
while: while COMMANDS; do COMMANDS; done
Execute commands as long as a test succeeds.
...
![]() /usr/share/doc
/usr/share/doc
The /usr/share/doc directory often contains more detailed and different information about a utility than either man or info provides. Frequently this information is meant for people who will be compiling and modifying the utility, not just using it. These directories hold thousands of files, each containing information on a separate topic. As the following example shows, the names of most directories in /usr/share/doc end in version numbers:
$ ls /usr/share/doc
abattis-cantarell-fonts-0.0.12 iwl1000-firmware-39.31.5.1 ncftp-3.2.5
abrt-2.1.5 iwl100-firmware-39.31.5.1 ncurses-5.9
abrt-dbus-2.1.5 iwl105-firmware-18.168.6.1 ncurses-base-5.9
accountsservice-0.6.34 iwl135-firmware-18.168.6.1 neon-0.29.6
acl-2.2.51 iwl2000-firmware-18.168.6.1 netcf-libs-0.2.3
aic94xx-firmware-30 iwl2030-firmware-18.168.6.1 net-snmp-libs-5.7.2
aisleriot-3.8.0 iwl3945-firmware-15.32.2.9 nettle-2.6
alsa-firmware-1.0.27 iwl4965-firmware-228.61.2.24 net-tools-2.0
...
Most of these directories hold a README file, which is a good place to start reading about the utility or file the directory describes. Use an asterisk (*; page 166) in place of the version number to make it easier to type the filename. The following README file for bzip2 (page 245) explains how to compile the source code.
$ less /usr/share/doc/bzip2*/README
This is the README for bzip2/libzip2.
This version is fully compatible with the previous public releases.
...
Complete documentation is available in Postscript form (manual.ps),
PDF (manual.pdf) or html (manual.html). A plain-text version of the
manual page is available as bzip2.txt.
HOW TO BUILD -- UNIX
Type 'make'. This builds the library libbz2.a and then the programs
bzip2 and bzip2recover. Six self-tests are run. If the self-tests
complete ok, carry on to installation:
To install in /usr/local/bin, /usr/local/lib, /usr/local/man and
/usr/local/include, type
make install
...
More About Logging In and Passwords
Refer to “Logging In on the System” on page 90 for information about logging in. This section covers solutions to common login problems, choosing a password and password security, and changing your password from the command line.
Security: Always use a password
Unless you are the only user of a system, the system is not connected to any other systems or the Internet, and you are the only one with physical access to the system, it is poor practice to maintain a user account without a password.
What to Do If You Cannot Log In
If you enter either your username or your password incorrectly, the system displays an error message after you enter both your username and your password. This message indicates that you have entered either the username or the password incorrectly or that they are not valid. It does not differentiate between an unacceptable username and an unacceptable password—a strategy meant to discourage unauthorized people from guessing names and passwords to gain access to the system.
Following are some common reasons why logins fail:
• The username and password are case sensitive. Make sure the CAPS LOCK key is off and enter your username and password exactly as specified or as you set them up.
• You are not logging in on the right machine. The login/password combination might not be valid if you are trying to log in on the wrong machine. On a larger, networked system, you might have to specify the machine you want to connect to before you can log in.
• Your username is not valid. The login/password combination might not be valid if you have not been set up as a user.
• A filesystem is full. When a filesystem critical to the login process is full, it might appear as though you have logged in successfully, but after a moment the login prompt reappears. In this situation you must boot the system in rescue/recovery mode and delete some files.
• The account is disabled. On some systems, the root account is disabled by default. An administrator might disable other accounts. Often the root account is not allowed to log in over a network: In this case, log in as yourself and then gain root privileges using su/sudo.
![]() Password Security
Password Security
This section contains a practical discussion of password security; see page 625 for a more technical discussion.
If someone else assigned you a password, it is a good idea to give yourself a new one. For security reasons, passwords you enter are not displayed by any utility.
Security: Protect your password
Do not allow someone to find out your password: Do not put your password in a file that is not encrypted, allow someone to watch you type your password, or give your password to someone you do not know (a system administrator never needs to know your password). You can always write your password down and keep it in a safe, private place.
Security: Choose a password that is difficult to guess
Do not use phone numbers, names of pets or kids, birthdays, words from a dictionary (not even a foreign language), and so forth. Do not use permutations of these items or a l33t-speak variation of a word: Modern dictionary crackers try these permutations.
Security: Include nonalphanumeric characters in your password
Automated password cracking tools first try using alphabetic and numeric characters when they try to guess your password. Including at least one character such as @ or # in a password increases the amount of time it takes for one of these tools to crack your password.
Security: Differentiate between important and less important passwords
It is a good idea to differentiate between important and less important passwords. For example, Web site passwords for blogs or download access are not very important; it is acceptable to use the same password for these types of sites. However, your login, mail server, and bank account Web site passwords are critical: Never use these passwords for an unimportant Web site and use a different password for each of these accounts.
Security: Use a password vault
You might want to use a program such as revelation (revelation package) and its command-line counterpart relevation (relevation package) or keepassx (keepassx package) that generates and stores passwords. A password vault makes it easier to maintain different, complex passwords for several important sites. Visit revelation.olasagasti.info or keepass.info for more information.
Secure passwords
To be relatively secure, a password should contain a combination of numbers, uppercase and lowercase letters, and nonalphanumeric characters. It should also meet the following criteria:
• Must be at least eight characters long (or longer if the system administrator sets it up that way). Eight or ten characters is a good compromise between being easy to remember and being secure.
• Should not be a word in a dictionary of any language, no matter how seemingly obscure.
• Should not be the name of a person, place, pet, or other thing that might be discovered easily.
• Should contain at least two letters and one nonalphanumeric character.
• Should not be your username, the reverse of your username, or your username shifted by one or more characters.
Only the first item is mandatory. Avoid using control characters (such as CONTROL-H) because they might have a special meaning to the system, making it impossible for you to log in. If you are changing your password, the new password should differ from the old one by at least three characters. Changing the case of a character does not make it count as a different character.
Security: pwgen helps you pick a password
The pwgen utility (pwgen package) generates a list of almost random passwords. With a little imagination, you can pronounce, and therefore remember, some of these passwords.
![]() passwd: Changing Your Password (CLI)
passwd: Changing Your Password (CLI)
See the previous section for help selecting a secure password. See page 112 if you want to change your password using a GUI. Use the passwd utility to change your password from the command line. The first item passwd asks for is your current (old) password. This password is verified to ensure that an unauthorized user is not trying to alter your password. Then the system requests a new password.
$ passwd
Changing password for user sam.
Changing password for sam.
(current) UNIX password:
New password:
Retype new password:
passwd: all authentication tokens updated successfully.
After you enter your new password, the system asks you to retype it to make sure you did not make a mistake when you entered it the first time. If the new password is the same both times you enter it, passwd changes your password. If the passwords differ, it means that you made an error in one of them, and passwd displays this error message:
Sorry, passwords do not match
If your password is not long enough, passwd displays a messages similar to the following:
BAD PASSWORD: The password is shorter than 8 characters
When it is too simple, passwd displays this message:
BAD PASSWORD: The password fails the dictionary check - it is too
simplistic/systematic
After several failures, passwd displays an error message and exits, allowing the shell to display its prompt. At this point you need to run passwd again.
Working with root privileges you can assign a new password to any user on the system without knowing the user’s old password. As an administrator you can use this technique when a user forgets his password. The following command requests the root password before requesting a new password for Sam.
$ su -c "passwd sam"
Password:
Changing password for user sam.
New password:
...
Chapter Summary
As with many operating systems, your access to a Linux system is authorized when you log in. To do so, you click your username on the Login screen and enter your password on the Password screen. You can change your password at any time while you are logged in. Choose a password that is difficult to guess and that conforms to the criteria imposed by the utility that changes the password.
The system administrator is responsible for maintaining the system. On a single-user system, you are the system administrator. On a small, multiuser system, you or another user might act as the system administrator, or this job might be shared. On a large, multiuser system or a network of systems, there is frequently a full-time system administrator.
When extra (root) privileges are required to perform certain system tasks, a system administrator uses su (or sudo) or logs in as the user named root to obtain these privileges. An administrator working with root privileges is sometimes referred to as Superuser.
Do not work with root privileges as a matter of course. When you have to do something that requires root privileges, work with root privileges for only as long as absolutely necessary; revert to working as yourself as soon as possible.
Understanding the desktop and its components is essential to getting the most out of the GUI. A terminal emulator allows you to use the Linux CLI from a graphical environment. You can use a terminal emulator to launch both textual and graphical programs.
The GNOME environment provides users with a variety of interests and experience levels—the casual user, the office worker, the power user, and the programmer/system designer—with a space to work in and a set of tools to work with. GNOME also provides off-the-shelf productivity and many ways to customize its look, feel, and response. Nautilus is GNOME’s simple, yet powerful file manager. It can create, open, display, move, and copy files and directories as well as execute programs and scripts.
The man utility provides online documentation for system utilities. This utility is helpful both to new Linux users and to experienced users, who must often delve into system documentation for information on the finer points of a utility’s behavior. The info utility also helps the beginner and the expert alike. It provides a tutorial on its use and documentation on many Linux utilities.
The textual interface (CLI) continues to have a place in modern computing. For example, sometimes a graphical tool does not exist or might not be as powerful, flexible, or refined as its textual counterpart. Security concerns on a server system mandate that the system run as few tasks as possible. Because each additional task can make a server more vulnerable to attack, frequently these systems do not have GUIs installed.
Exercises
1. The system displays the following message when you attempt to log in with an incorrect username or an incorrect password:
Login incorrect
a. This message does not indicate whether your username, your password, or both are invalid. Why does it not reveal this information?
b. Why does the system wait for a couple of seconds to respond after you supply an incorrect username or password?
2. Give three examples of poor password choices. What is wrong with each?
3. Is fido an acceptable password? Give several reasons why or why not.
4. What is a context menu? How does a context menu differ from other menus?
5. What is a workspace? What is the relationship between a workspace and the desktop?
6. How would you swap the effects of the right and left buttons on a mouse? What is the double-click speed? How would you change it?
7. What is an Application menu? What does it allow you to do?
8. What is Nautilus? What does it allow you to do?
9. Describe three ways to
a. Change the size of a window.
b. Delete a window.
10. What are the functions of a Window Operations menu? How do you display this menu?
11. How would you set the system time manually?
12. When you are working on the command line, how do you erase (back up over) a character? How do you delete the line you are typing? How do you terminate a program?
Advanced Exercises
13. While working on the command line you get an error that includes the words missing destination file operand. What would be a good way to get help figuring out what the problem is?
14. How does the mouse pointer change when you move it to the edge of a window? What happens when you left-click and drag the mouse pointer when it looks like this? Repeat this experiment with the mouse pointer at the corner of a window.
15. What is the Session menu? When and where does it appear? How do you use it?
16. What happens when you run nano from the Enter a Command window? Where does the output go?
17. The example on page 130 shows that the man pages for crontab appear in Sections 1 and 5 of the system manual. Explain how you can use man to determine which sections of the system manual contain a manual page with a given name.
18. How many man pages are in the Devices subsection of the system manual? (Hint: Devices is a subsection of Special Files.)