A practical guide to Fedora and Red Hat Enterprise Linux, 7th Edition (2014)
Part II: Using Fedora and Red Hat Enterprise Linux
Chapter 7. The Linux Utilities
In This Chapter
Basic Utilities
cat: Joins and Displays Files
less Is more: Display a Text File One Screen at a Time
ls: Displays Information About Files
Working with Files
grep: Searches for a Pattern in Files
lpr: Sends Files to Printers
Compressing and Archiving Files
Displaying User and System Information
script: Records a Shell Session
Tutorial: Using vim to Create and Edit a File
Tutorial: Using nano to Create and Edit a File
Objectives
After reading this chapter you should be able to:
![]() Use basic utilities to list files and display text files
Use basic utilities to list files and display text files
![]() Copy, move, and remove files
Copy, move, and remove files
![]() Display the beginning or end of a file
Display the beginning or end of a file
![]() Search, sort, print, categorize, and compare text files
Search, sort, print, categorize, and compare text files
![]() Compress, decompress, and archive files
Compress, decompress, and archive files
![]() Count the number of letters, words, and lines in a file
Count the number of letters, words, and lines in a file
![]() Locate utilities on the system
Locate utilities on the system
![]() Change the modification time of a file
Change the modification time of a file
![]() Display information about users and the system
Display information about users and the system
![]() Record a session in a file
Record a session in a file
![]() Edit text files
Edit text files
When Linus Torvalds introduced Linux and for a long time thereafter, Linux did not have a GUI (graphical user interface): It ran on character-based terminals only, using a CLI (command-line interface), also referred to as a textual interface. All the tools ran from a command line. Today the Linux GUI is important, but many people—especially system administrators—run many command-line utilities. Command-line utilities are often faster, more powerful, or more complete than their GUI counterparts. Sometimes there is no GUI counterpart to a textual utility; some people just prefer the hands-on feeling of the command line. This chapter describes a number of frequently used utilities and concludes with tutorials on the vim and nano text editors. See “Working from the Command Line” on page 119 for an introduction to the command line.
When you work with a CLI, you are working with a shell (Chapters 5, 9, and 27). When you are working on the command line it is important to quote special characters as explained on page 142.
Tip: More utilities are covered throughout the book
This chapter introduces a few important utilities that are good to know as you start using Linux. More utilities are covered throughout the book. See the inside of the front and back covers for a complete list.
Basic Utilities
One of the advantages of Linux is that it comes with thousands of utilities that perform myriad functions. You will use utilities whenever you work with Linux, whether you use them directly by name from the command line or indirectly from a graphical menu or icon. The following sections discuss some of the most basic and important utilities that are available from a CLI. Some of the more important utilities are also available from a GUI; others are available only from a GUI.
Tip: Run these utilities from a command line
This chapter describes command-line, or textual, utilities. You can experiment with these utilities from a terminal, a terminal emulator within a GUI (page 120), or a virtual console (page 121).
![]() cat: Joins and Displays Files
cat: Joins and Displays Files
The cat utility joins and copies files to standard output. The name of the cat utility is derived from catenate, which means to join together, one after the other. You can also use cat to display virtual system files in the /proc directory hierarchy as explained on page 512.
Arguments
The arguments are the pathnames of one or more files that cat processes. You can use cat to display the contents of one or more text files on the screen. More precisely, cat copies the files to standard output, which by default is attached to the screen.
$ cat practice
This is a small file that I created
using: a text editor!
End.
If you do not specify an argument or if you specify a hyphen (–) in place of a filename, cat reads from standard input. The following example shows cat working without an argument; the < symbol causes the shell to redirect standard input to cat to come from practice. The shell passes no arguments to cat.
$ cat < practice
This is a small file that I created
using: a text editor!
End.
You can use cat to create short, simple files. See “The Keyboard and Screen as Standard Input and Standard Output” on page 152 and “Redirection” on page 153 for more examples of redirecting the standard input and standard output of cat.
Options
Number
The –n (––number) option numbers all lines as they are written to standard output while the –b (––number-nonblank) numbers only non-blank lines.
$ cat -n practice
1 This is a small file that I created
2 using: a text editor!
3
4 End.
Tabs
The –T (––show-tabs) option displays TABs as ^I.
$ cat -T practice
This is a small file that I created
using:^Ia text editor!
End.
You can combine options like this
$ cat -bT practice
Or, using long options, like this
$ cat --number-nonblank --show-tabs practice
Nonprinting
The –v (––show-nonprinting) option displays CONTROL characters using the caret notation (e.g., ^M means CONTROL-M) and displays characters that have the high bit set (META characters) using the M- notation (e.g., M-M means META-M). This option does not convert TABs and LINEFEEDs. Use –T (––show-tabs) if you want to display TABs as ^I. LINEFEEDs cannot be displayed as anything but themselves; otherwise, the line could be too long.
Related Utilities
tac
The tac (cat spelled backwards) utility works the same way as cat works except it reverses the order of the lines in each file.
rev
The rev (reverse) utility works the same way as cat works except it reverses the order of the characters in each line.
![]() date: Displays the System Time and Date
date: Displays the System Time and Date
Without any arguments, the date utility displays the date and time known to the local system. If you set up a locale database (page 368), date uses that database to substitute in its output terms appropriate to the locale for your account. Use timedatectl (page 613) to set the system clock.
$ date
Mon Aug 19 14:39:55 PDT 2013
Tip: The hardware clock and the system clock
The hardware clock is the time kept in the BIOS (page 31). This clock is battery powered and keeps time even when the computer is off. The system clock runs only while the system is running and is what Linux uses when it needs to know the time. On some systems the system clock is adjusted periodically by NTP (Network Time Protocol; page 315) so it stays accurate.
Arguments
The following example formats and specifies the contents of the output of date. See the date man page for a complete list of format sequences.
$ date +"%A %B %d"
Monday August 19
Options
Date
The –d datestring (––date=datestring) option displays the date specified by datestring, not the date known to the system. According to the date man page, “the datestring is a mostly free-format date string” such as 2pm next thursday. See DATE STRING in the date man page for details about the syntax of datestring. This option does not change the system clock.
UTC
The –u (––utc or ––universal) option displays or sets the time and date using UTC (Universal Coordinated Time; page 1279). UTC is also called GMT (Greenwich Mean Time).
$ date -u
Mon Aug 19 21:40:19 UTC 2013
Related Utilities
timedtectl
The timedtectl utility, which is part of systemd (page 438), displays more information about the system clock. You can also use it to set the system clock. See page 613.
cal
The cal utility displays a calendar for the month and year you specify. Without any arguments it displays a calendar for the current month.
![]() echo: Displays Arguments
echo: Displays Arguments
The echo utility copies its arguments, followed by a NEWLINE, to standard output. The Bourne Again Shell has an echo builtin that works similarly to the echo utility.
The echo builtin/utility is a good tool for learning about the shell and other Linux utilities. Some examples on page 166 use echo to illustrate how special characters, such as the asterisk, work. Throughout Chapters 5, 9, and 27, echo helps explain how shell variables work and how you can send messages from shell scripts to the screen. You can even use echo to create a short file by redirecting its output:
$ echo "This is a short file." > short
$ cat short
This is a short file.
Arguments
The arguments can include quoted strings, ambiguous file references, and shell variables. The shell recognizes and expands unquoted special characters in arguments.
The following example shows echo copying its arguments to standard output. The second command includes an unquoted asterisk (*; page 166) that the shell expands into a list of files in the working directory before passing that list as arguments to echo; echo copies this list to standard output.
$ echo This is a sentence.
This is a sentence.
$ echo star: *
star: memo memo.0714 practice
$ ls
memo memo.0714 practice
Option
NEWLINE
The –n option suppresses the NEWLINE that normally terminates the output of echo. This option is useful in shell scripts when you want to prompt a user and have the response appear on the same line as the prompt. See page 1041 for an example of a shell script that uses this feature.
![]() hostname: Displays the System Name
hostname: Displays the System Name
The hostname utility displays the name of the system you are working on. Use this utility if you are not sure that you are logged in on the correct machine. See also /etc/hostname on page 507.
$ hostname
guava
Option
The following option works with hostname.
FQDN
The –f (––fqdn) option displays the FQDN (page 1250) of the local system.
Related Utility
hostnamectl
The hostnamectl utility, which is part of systemd (page 438), displays more information about the local system. You can also use it to change the hostname.
![]() less Is more: Display a Text File One Screen at a Time
less Is more: Display a Text File One Screen at a Time
You can use the less or more utilities, called pagers, to view a long text file one screen at a time. Each of these utilities pauses after displaying a screen of text. You can then press the SPACE bar to display the next screen of text.
Although less and more are very similar, they have subtle differences. The less utility, for example, allows you to move backward while viewing a file in some situations where more does not. Whereas more must read an entire file before displaying anything, less does not have to and so starts more quickly than more when displaying a large file. At the end of the file less displays an END message and waits for you to press q before returning you to the shell. In contrast, more returns you directly to the shell. While using both utilities you can press h to display a Help screen that lists commands you can use while paging through a file. Give the command less /etc/services to experiment with paging through a file.
Arguments
Both less and more take the names of files you want to view as arguments. If you do not specify an argument or if you specify a hyphen (–; less only) in place of a filename, less and more read from standard input.
Options
The following options work with less.
Clear screen
The –c (––clear-screen) option paints each new screen from the top down; by default less scrolls the display.
EOF
The –e (––quit-at-eof) option causes less to exit when it reaches the second EOF (when you press SPACE while less is displaying END at the end of a file) so you do not need to type q to quit.
Truncate
The –S (––chop-long-lines) option truncates lines wider than the screen. By default less wraps long lines.
No initialization
The –X (––no-init) option prevents less from sending terminal initialization and deinitialization strings to the terminal. By default, less clears the screen when it finishes; this option causes the last page of what you were viewing to remain on the screen.
Optional
You can set the LESS environment variable (page 1032) in your ~/.bash_profile file (page 330) to set options for less each time you call it and when it is called from another program such as man. For example, the following line in the .bash_profile file in your home directory will cause less to always run with the –X option.
export LESS='-X'
Related Utility
most
The most utility (part of the most package; see page 534 for installation instructions) is newer and more capable than less and more. See the most man page for details.
![]() ls: Displays Information About Files
ls: Displays Information About Files
The ls utility displays information about one or more files. It lists the information alphabetically by filename unless you use an option to change the order.
When you do not provide an argument, ls displays the names of the visible files (those with filenames that do not begin with a period; page 180) in the working directory.
Arguments
The arguments are one or more pathnames of any ordinary, directory, or device files. The shell expands ambiguous file references (page 165) in the arguments.
When you specify an ordinary file as an argument, ls displays information about that one file. When the argument is a directory, ls displays the contents of the directory. It displays the name of the directory only when needed to avoid ambiguity, such as when the listing includes more than one directory.
$ ls memos.zach/130715.1
memos.zach/130715.1
$ ls memos.zach
130712.1 130714.2 130714.3 130715.1
$ ls memos.*
memos.max:
130619.1 130621.2 130622.1
memos.sam:
130811.2 130811.3 130812.1
memos.zach:
130712.1 130714.2 130714.3 130715.1
![]() Options
Options
Options determine the type of information ls displays, and the manner and order in which it displays the information. When you do not use an option, ls displays a short list that contains just the names of files, in alphabetical order. See page 145 for examples of how options affect ls output.
All
The –a (––all) option includes hidden filenames (those filenames that begin with a period; page 180) in the listing. Without this option ls does not list information about files with hidden filenames unless you specify the name of a hidden file as an argument. The * ambiguous file reference does not match a leading period in a filename, so you must use this option or explicitly specify a filename (ambiguous or not) that begins with a period to display information about files with hidden filenames.
![]() Directory
Directory
The –d (––directory) option displays directories without displaying their contents.
$ ls -ld /
dr-xr-xr-x. 27 root root 4096 07-16 18:37 /
This option is useful when you want to find out, for example, the name of the user who owns a directory in a large directory such as /etc. Instead of scrolling through the output of ls –l /etc looking for a directory, you can give the command ls –ld /etc/filename (e.g., ls –ld /etc/cron.d).
Human readable
The –h (––human-readable) option, when specified with the –l option, displays sizes in K (kilobyte), M (megabyte), and G (gigabyte) blocks, as appropriate. This option works with the –l and –s options only. It displays powers of 1,024. Use ––si to display powers of 1,000.
$ ls -lh /usr/bin
...
-rwxr-xr-x. 1 root root 105K 05-08 00:45 tac
-rwxr-xr-x. 1 root root 68K 05-08 00:45 tail
-rwxr-xr-x. 1 root root 24K 08-01 01:08 tailf
-rwxr-xr-x. 1 root root 29K 05-02 08:55 talk
-rwxr-xr-x. 1 root root 340K 06-04 08:23 tar
...
Long
The –l (lowercase “el”; ––format=long) option lists more information about each file. See page 191 for an explanation of this output. If standard output for a directory listing is sent to the screen, this option displays the number of blocks used by all files in the listing on a line before the listing.
![]() Recursive
Recursive
The –R (––recursive) option recursively lists directory hierarchies.
Reverse
The –r (––reverse) option displays the list of filenames in reverse sorted order.
![]() Size
Size
The –s (––size) option displays the number of 1,024-byte blocks allocated to the file. The size precedes the filename. With the –l option, this option displays the size in column 1 and shifts other items one column to the right. If standard output for a directory listing is sent to the screen, this option displays the number of blocks used by all files in the listing on a line before the listing. You can include the –h option to make the file sizes easier to read. The following example recursively lists the memos directory hierarchy in reverse size order.
$ ls -lRrs memos
memos:
4 drwxrwxr-x. 2 sam sam 4096 04-29 14:11 memos.zach
4 drwxrwxr-x. 2 sam sam 4096 04-29 14:32 memos.sam
4 drwxrwxr-x. 2 sam sam 4096 04-30 14:15 memos.max
memos/memos.zach:
4 -rw-rw-r--. 1 sam sam 4064 04-29 14:11 130715.1
4 -rw-rw-r--. 1 sam sam 3933 04-29 14:11 130714.3
4 -rw-rw-r--. 1 sam sam 3317 04-29 14:11 130714.2
...
![]() rm: Removes a File (Deletes a Link)
rm: Removes a File (Deletes a Link)
The rm utility removes hard and/or symbolic links to one or more files. Frequently this action results in the file being deleted. See page 203 for information on links.
Arguments
The arguments are the pathnames of the files whose links rm will remove. Removing the only (last) hard link to a file deletes the file (page 208). Removing a symbolic link deletes the symbolic link only.
Caution: Be careful when you use rm with ambiguous file references
Because this utility enables you to remove a large number of files with a single command, use rm cautiously, especially when you are working with ambiguous file references. Never use rm with ambiguous file references while you are working with root privileges. If you have any doubts about the effect of an rm command with an ambiguous file reference, first use echo with the same file reference and evaluate the list of files the reference generates. Alternately, you can use the rm –i (––interactive) option.
Options
Force
The –f (––force) option, without asking for your consent, removes files for which you do not have write access permission. This option suppresses informative messages if a file does not exist.
Interactive
The –i (––interactive) option prompts you before removing each file. If you use –r (––recursive) with this option, rm also prompts you before examining each directory.
$ rm -ri memos
rm: descend into directory 'memos'? y
rm: descend into directory 'memos/memos.max'? y
rm: remove regular file 'memos/memos.max/130621.2'? y
rm: remove regular file 'memos/memos.max/130619.1'? n
...
You can create an alias (page 392) for rm –i and put it in a startup file (page 180) so rm always runs in interactive mode. The –i option is set up by default for the root user under Fedora/RHEL.
Recursive
The –r (––recursive) option deletes the contents of the specified directory, including all its subdirectories, and the directory itself. Use this option with caution; do not use it with wildcards (* and ?).
Verbose
The –v (––verbose) option displays the name of each file as it is removed.
Related Utilities
shred
The shred utility overwrites a file to hide its contents and make it very difficult to recover the data that was stored in it. The –u (––remove) option causes shred to delete the file after overwriting it. The following command overwrites the file named myfile three times and then deletes it.
$ shred -u myfile
testdisk
The testdisk utility (testdisk package) scans, repairs, and sometimes can recover disk partitions. In some cases can undelete files. See the testdisk man page for details.
Working with Files
This section describes utilities that copy, move, print, search through, display, sort, compare, and identify files.
Tip: Filename completion
After you enter one or more letters of a filename (as an argument) on a command line, press TAB, and the shell will complete as much of the filename as it can. When only one filename starts with the characters you entered, the shell completes the filename and places a SPACEafter it. You can keep typing or you can press RETURN to execute the command at this point. When the characters you entered do not uniquely identify a filename, the shell completes what it can and waits for more input. If pressing TAB does not change the display, press TABagain to display a list of possible completions. For more information refer to “Pathname Completion” on page 389.
![]() cp: Copies Files
cp: Copies Files
The cp utility copies one or more files. Use scp (page 695) or rsync (page 696) to copy files from one system to another (or to make local copies). See page 237 for a description of the related mv (move) utility.
Arguments
With two arguments that are pathnames, neither of which specifies a directory, cp copies the file named by the first argument to the file named by the second argument.
$ cp memo memo.cp
With two or more arguments that are pathnames, the last of which is an existing directory, cp copies the files named by all but the last argument to the directory named by the last argument.
$ cp memo1 memo2 memo4 memo.dir
Caution: cp can destroy a file
If the destination file exists before you give a cp command, cp overwrites it. Because cp overwrites (and destroys the contents of) an existing destination file without warning, you must take care not to cause cp to overwrite a file that you need. The cp –i (interactive) option prompts you before it overwrites a file.
The following example assumes the file named orange.2 exists before you give the cp command. The user answers y to overwrite the file.
$ cp –i orange orange.2
cp: overwrite 'orange.2'? y
Options
Archive
The –a (––archive) option attempts to preserve the owner, group, permissions, access date, and modification date of source file(s) while copying a directory recursively.
Backup
The –b (––backup) option makes a backup copy of a file that would be removed or overwritten by cp. The backup copy has the same name as the destination file with a tilde (~) appended to it. When you use both –b and –f, cp makes a backup copy when you try to copy a file over itself. For more backup options, search for Backup options in the coreutils info page.
Force
The –f (––force) option causes cp to try to remove the destination file (when it exists but cannot be opened for writing) before copying the source file. This option is useful when the user copying a file does not have write permission to an existing file but does have write permission to the directory containing the file. Use this option with –b to back up a destination file before removing or overwriting it.
Interactive
The –i (––interactive) option prompts you whenever cp would overwrite a file. If you respond with a string that starts with y or Y, cp copies the file. If you enter anything else, cp does not copy the file.
$ cp -i * ../memos.helen
cp: overwrite '../memos.helen/130619.1'? y
cp: overwrite '../memos.helen/130622.1'? n
Preserve
The –p (––preserve[=attr]) option creates a destination file with the same owner, group, permissions, access date, modification date, and ACLs as the source file. The –p option does not take an argument.
Without attr, ––preserve works as described above. The attr is a comma-separated list that can include mode (permissions), ownership (owner and group), timestamps (access and modification dates), links (hard links), and all (all attributes).
Recursive
The –R or –r (––recursive) option recursively copies directory hierarchies including ordinary files. The last argument must be the name of a directory.
Verbose
The –v (––verbose) option displays the name of each file as cp copies it.
$ cp -rv memos memos.bak
'memos' -> 'memos.bak'
'memos/memos.max' -> 'memos.bak/memos.max'
'memos/memos.max/130619.1' -> 'memos.bak/memos.max/130619.1'
'memos/memos.max/130622.1' -> 'memos.bak/memos.max/130622.1'
'memos/memos.sam' -> 'memos.bak/memos.sam'
'memos/memos.sam/130811.3' -> 'memos.bak/memos.sam/130811.3'
'memos/memos.sam/130811.2' -> 'memos.bak/memos.sam/130811.2'
...
![]() cut: Selects Characters or Fields from Input Lines
cut: Selects Characters or Fields from Input Lines
The cut utility selects characters or fields from lines of input and writes them to standard output. Character and field numbering start with 1. Although limited in functionality, cut is easy to learn and use and is a good choice when columns and fields can be specified without using pattern matching.
Arguments
Arguments to cut are pathnames of ordinary files. If you do not specify an argument or if you specify a hyphen (–) in place of a pathname, cut reads from standard input.
Options
Characters
The –c clist (––characters=clist) option selects the characters given by the column numbers in clist. The value of clist is one or more comma-separated column numbers or column ranges. A range is specified by two column numbers separated by a hyphen. A range of –n means columns 1through n; n– means columns n through the end of the line.
The following example displays the permissions of the files in the working directory. The –c2-10 option selects characters 2 through 10 from each input line.
$ ls -l | cut -c2-10
otal 2944
rwxr-xr-x
rw-rw-r--
rw-rw-r--
rw-rw-r--
rw-rw-r--
Input delimiter
The –d dchar (––delimiter=dchar) option specifies dchar as the input field delimiter. This option also specifies dchar as the output field delimiter unless you use the ––output-delimiter option. The default delimiter is a TAB character. Quote dchar as necessary to protect it from shell expansion.
Fields
The –f flist (––fields=flist) option selects the fields specified by flist. The value of flist is one or more comma-separated field numbers or field ranges. A range is specified by two field numbers separated by a hyphen. A range of –n means fields 1 through n; n– means fields n through the last field. The field delimiter is a TAB character unless you use the –d option to change it.
The following example displays a list of full names as stored in the fifth field (–f5) of the /etc/passwd file. The –d option specifies that the colon character is the field delimiter.
$ cut -d: -f5 /etc/passwd
Sam the Great
Sam the Great
Zach Brill
Max Wild
...
The next command outputs the size and name of each file in the working directory. The –f option selects the fifth and ninth fields from the input lines. The –d option tells cut to use SPACEs, not TABs, as delimiters. The tr utility (page 258) with the –s option changes sequences of two or moreSPACE characters to a single SPACE; otherwise, cut counts the extra SPACE characters as separate fields.
$ ls -l | tr -s ' ' ' ' | cut -f5,9 -d' '
259 countout
9453 headers
1474828 memo
1474828 memos_save
7134 tmp1
4770 tmp2
13580 typescript
Output delimiter
The ––output-delimiter=ochar option specifies ochar as the output field delimiter. By default, the output field delimiter is the same as the input field delimiter (the TAB character unless you change it using –d). Quote ochar as necessary to protect it from shell expansion.
diff: Displays the Differences Between Two Text Files
The diff (difference) utility displays line-by-line differences between two text files. By default diff displays the differences as instructions that you can use to edit one of the files to make it the same as the other.
The sdiff utility is similar to diff but its output might be easier to read; its output is the same as that of the diff –y (––side-by-side) option. Use the diff3 utility to compare three files and cmp to compare nontext (binary) files.
Arguments
The diff utility commonly takes the pathnames of two ordinary files it is to compare as arguments.
When you call diff without any options, it produces a series of lines containing Add (a), Delete (d), and Change (c) instructions. Each of these lines is followed by the lines from the file you need to add to, delete from, or change, respectively, to make the files the same. A less than symbol (<) precedes lines from file1. A greater than symbol (>) precedes lines from file2. The diff output appears in the format shown in Table 7-1. A pair of line numbers separated by a comma represents a range of lines; a single line number represents a single line.
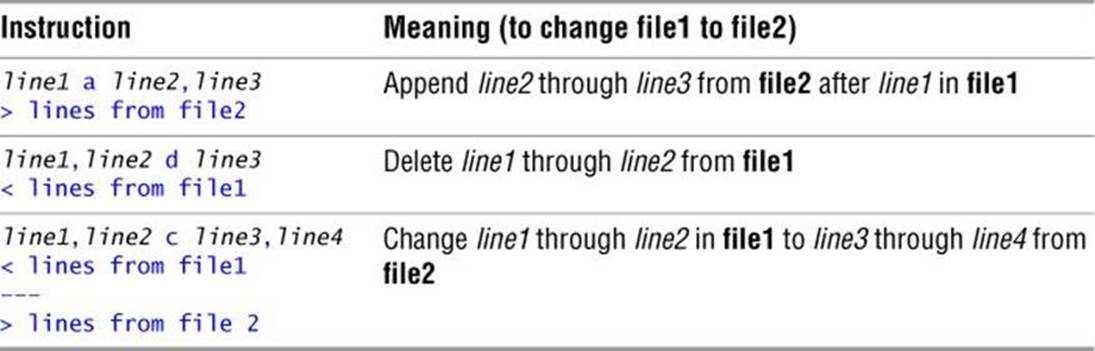
Table 7-1 diff output
The diff utility assumes you will convert the file named by the first argument to the file named by the second argument. The line numbers to the left of each of the a, c, or d instructions always pertain to the first file; the line numbers to the right of the instructions apply to the second file. To display instructions to convert the files in the opposite order, reverse the arguments.
Options
Ignore blank lines
The –B (––ignore-blank-lines) option ignores differences that involve only blank lines. See also “Ignore whitespace at end of lines” (following) and “Ignore whitespace” (next page).
Ignore whitespace at end of lines
The –b (––ignore-space-change) option ignores whitespace (SPACEs and TABs) at the ends of lines and considers other strings of whitespace (such as multiple SPACEs or TABs to be equal. See also “Ignore blank lines” (preceding) and “Ignore whitespace” (next page).
Context
The –C [lines] (––context[=lines]) option displays the sections of the two files that differ, including lines lines (the default is 3) around each line that differs to show the context. Each line in the first file that is missing from the second file is preceded by a hyphen (–); each extra line in the second file is preceded by a plus sign (+); and lines that have different versions in the two files are preceded by an exclamation point (!). When lines that differ are within lines lines of each other, they are grouped together in the output.
Ignore case
The –i (––ignore-case) option ignores differences in case when comparing files.
Unified
The –U lines or –u (––unified[=lines]) option uses the easier-to-read unified output format. The lines argument is the number of lines of context; the default is three. The –u option does not take an argument and provides three lines of context.
This option first displays two lines that indicate which of the files you are comparing will be denoted by a plus sign (+) and which by a minus sign (–). In the following example, a minus sign indicates the colors.1 file; a plus sign indicates the colors.2 file.
$ diff -u colors.1 colors.2
--- colors.1 2014-04-05 10:12:12.322528610 -0700
+++ colors.2 2014-04-05 10:12:18.420531033 -0700
@@ -1,6 +1,5 @@
red
+blue
green
yellow
-pink
-purple
orange
The diff –u command breaks long, multiline text into hunks. Each hunk is preceded by a line starting and ending with two at signs (@@). This hunk identifier indicates the starting line number and the number of lines from each file for this hunk. In the example, the hunk covers the section of the colors.1 file (indicated by a minus sign) from the first line through the sixth line. The +1,5 indicates the hunk covers colors.2 from the first line through the fifth line.
Following these header lines, diff –u displays each line of text with a leading minus sign, a leading plus sign, or a SPACE. A leading minus sign indicates the line occurs only in the file denoted by the minus sign. A leading plus sign indicates the line occurs only in the file denoted by the plus sign. A line that begins with a SPACE (neither a plus sign nor a minus sign) occurs in both files in the same location.
Ignore whitespace
The –w (whitespace; ––ignore-all-space) option ignores whitespace when comparing lines. See also “Ignore blank lines” (previous page) and “Ignore whitespace at end of lines” (previous page).
![]() file: Displays the Classification of a File
file: Displays the Classification of a File
The file utility classifies files according to their contents. You can use the file utility to learn about the contents of any file on a Linux system without having to open and examine the file yourself.
Arguments
The arguments are the pathnames of one or more files that file classifies. You can specify any kind of file, including ordinary, directory, and special files.
In the following example, file reports that letter_e.bz2 contains data that was compressed using the bzip2 utility (page 245):
$ file letter_e.bz2
letter_e.bz2: bzip2 compressed data, block size = 900k
Next file reports on two more files:
$ file memo zach.png
memo: ASCII text
zach.png: PNG image data, 3840 x 1200, 8-bit/color RGB, non-interlaced
Options
Mime
The –i (––mime)
option displays MIME (page 1261) type strings.
$ file -i letter_e.bz2 memo zach.png
letter_e.bz2: application/x-bzip2; charset=binary
memo: text/plain; charset=us-ascii
zach.png: image/png; charset=binary
Zip
The –z (––uncompress) option attempts to classify files within a compressed file.
$ file -z letter_e.bz2
letter_e.bz2: ASCII text (bzip2 compressed data, block size = 900k)
![]() find: Finds Files Based on Criteria
find: Finds Files Based on Criteria
The find utility selects files that meet search criteria and acts on action criteria.
Arguments
The argument(s) specify the directory hierarchies that find searches. Without an argument, find searches the working directory hierarchy.
Expression
The find utility does not take options per se, but rather uses an expression made up of one or more criteria (next page) to specify files. The find utility tests each of the files in each of the specified directory hierarchies to see whether the file meets the criteria described by the expression. The absence of an expression implies –print. Thus, find without an argument or expression displays files in the working directory hierarchy.
$ find
.
./memos.max
./memos.max/130619.1
./memos.max/130622.1
./memos.sam
./memos.sam/130811.3
A SPACE separating two criteria is a Boolean AND operator: The file must meet both criteria to be selected. (You can also explicitly specify –and or –a). A –or or –o separating the criteria is a Boolean OR operator: The file must meet one or the other (or both) of the criteria to be selected. You can negate a criterion by preceding it with an exclamation point (!) or –not. The find utility evaluates criteria from left to right unless you group them using parentheses.
Within the expression you must quote special characters so the shell does not expand them but rather passes them to find. Special characters that are frequently used with find include parentheses, brackets, question marks, and asterisks.
Each element within the expression is a separate argument. You must separate arguments from each other using SPACEs. A SPACE must appear on both sides of each parenthesis, exclamation point, criterion, or other element.
Search Criteria
You can use the following criteria within the expression. As used in this section, ±n is a decimal integer that can be expressed as +n (more than n), –n (fewer than n), or n (exactly n). Action criteria are described on the next page. See the find man page for a complete list of criteria.
Access time
The file being evaluated meets the –atime ±n (access time) criterion if it was last accessed ±n days ago. The following command lists files in the working directory hierarchy that were last accessed more than ten days ago. The period representing the working directory is optional but makes the command more readable.
$ find . -atime +10
Links
The file being evaluated meets the –links ±n criterion if it has ±n links.
Modification time
The file being evaluated meets the –mtime ±n (modify time) criterion if it was last modified ±n days ago.
Filename
The file being evaluated meets the –name filename criterion if the pattern filename matches its name. The filename can include wildcard characters (*, ?, and []) but these characters must be quoted. The following command lists files in the /etc directory that have a filename extension of.xml.
$ find /etc -name "*.xml"
Size
The file being evaluated meets the –size ±n[c|k|M|G] criterion if it is the size specified by ±n, measured in 512-byte blocks. Follow n with the letter c to measure files in characters, k to measure files in kilobytes, M to measure files in megabytes, or G to measure files in gigabytes. The following command finds files in the /etc directory that have a filename extension of xml and are bigger than 100 kilobytes. It then uses the –exec action criterion (below) to display information about each of these files using an ls –lh command. Error messages are redirected to /dev/null so they are not displayed (page 158).
$ find /etc -name "*.xml" -size +100k -exec ls -lh {} \; 2> /dev/null
Type
The file being evaluated meets the –type filetype criterion if its file type is specified by filetype. Select a filetype from the following list:
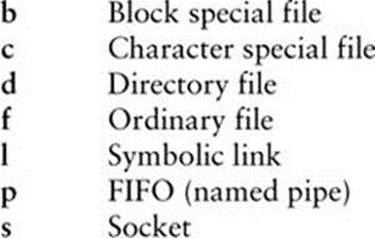
The following command lists the directories in the /etc directory hierarchy.
$ find /etc -type d
Username
The file being evaluated meets the –user name criterion if it belongs to the user with the username name. You can use a numeric user ID in place of name. The following example lists files in Max’s home directory hierarchy that are not (!) owned by max.
$ find ~max ! -user max
You can use the –nouser and –nogroup criteria for finding files whose numeric user ID and group ID, respectively, do not exist on the system.
Action Criteria
The file being evaluated always meets the –print action criterion. When evaluation of the expression reaches this criterion, find displays the pathname of the file it is evaluating. If –print is the only criterion in the expression, find displays the names of all files in the directory hierarchy specified on the command line. If this criterion appears with other criteria, find displays the name only if the preceding criteria are met. The following example finds files in the working directory hierarchy that are named core and were modified more than 30 days ago. It displays the names of these files and removes them.
$ find . -name core -mtime +30 -print -exec rm {} \;
Execute
The file being evaluated meets the –exec command \; action criterion if the command returns a 0 (zero [true]) exit status. You must terminate the command with a quoted semicolon (\;) . The find utility replaces a pair of braces ({}) within the command with the name of the file being evaluated. You can use the –exec action criterion at the end of a group of other criteria to execute the command if the preceding criteria are met. See the section on xargs on page 260 for a more efficient way of doing what this option does. The following command finds files in the working directory hierarchy that were last accessed more than ten days ago and lists each file using an ls –l command. See page 458 for another example of the –exec criterion.
$ find . -atime +10 -exec ls -l {} \;
Filesystem
The file being evaluated always meets the –xdev action criterion. It prevents find from searching directories in filesystems other than the one specified on the command line. Also –mount.
![]() grep: Searches for a Pattern in Files
grep: Searches for a Pattern in Files
The grep1 utility searches one or more text files for a pattern, which can be a simple string or another form of a regular expression. The grep utility takes various actions, specified by options, each time it finds a line that contains a match for the pattern. This utility takes its input either from files specified on the command line or from standard input.
1. Originally the name grep was a play on an ed—an original UNIX editor, available on Fedora/RHEL—command: g/re/p. In this command g stands for global, re is a regular expression delimited by slashes, and p means print.
Arguments
The first argument on a grep command line is the pattern grep is to search for. The pattern is a regular expression, as defined in Appendix A. You must quote regular expressions that contain special characters, SPACEs, or TABs. An easy way to quote these characters is to enclose the entire expression within single quotation marks.
The pattern is followed by a list of the pathnames of text files grep is to search through. With the –r option, this list can contain directories; grep searches the files in the specified directory hierarchies.
Without any options grep sends lines that contain a match for pattern to standard output. The following command displays all lines from the memo1 file that contain the string Sam (with an uppercase S).
$ grep Sam memo1
Dear Samuel --
I hope this finds you and Sammy Jr. well and
When you specify more than one file on the command line, grep precedes each line it displays with the name of the file it came from, followed by a colon. The next command displays all lines from all files in the working directory that contain the string sam. The second command uses \< in the regular expression to force the match to the beginning of a word. The last command uses a caret (^) in a regular expression to anchor the string to the beginning of the line: It lists all lines that begin with the string sam. See Appendix A for information on regular expressions.
$ grep sam *
memo1:This is a letter to sam:
memo1:not eating too much samak.
memo2:subsample by the end of the day.
memo5:sam, what is going on?
$ grep '\<sam' *
memo1:This is a letter to sam:
memo1:not eating too much samak.
memo5:sam, what is going on?
$ grep '^sam' *
memo5:sam, what is going on?
Options
Count
The –c (––count) option displays only the number of lines that contain a match in each file. The following example lists all files in the working directory, each followed by the number of times the regular expression (a simple string in this example) occurs in each file.
$ grep -c sam *
memo1:2
memo2:1
memo3:0
memo4:0
memo5:1
Color
The ––color option causes grep to display the match in color on a terminal.
![]() Extended regular expression
Extended regular expression
The –E (––extended-regexp) option causes grep to accept extended regular expressions (page 1145). The following example uses an extended regular expression to display in color lines that contain a match for either vmx or svm in the /proc/cpuinfo virtual file, indicating whether the system supports hardware virtualization.
$ grep --color -E 'vmx|svm' /proc/cpuinfo
See page 664 for a slightly different version of this command. Calling grep with the –E option is the same as calling egrep.
Ignore case
The –i (––ignore-case) option causes lowercase letters in the pattern to match uppercase letters in the file, and vice versa. This example lists all lines that contain the string sam with any combination of upper- and lowercase letters.
$ grep -i sam *
memo1:This is a letter to sam:
memo1:Dear Samuel --
memo1:I hope this finds you and Sammy Jr. well and
memo1:not eating too much samak.
memo2:subsample by the end of the day.
memo3:How is Sam doing?
memo5:sam, what is going on?
List filenames
The –l (lowercase “el”; ––files-with-matches) option displays only the name of each file that contains one or more matches. A filename is displayed only once, even if the file contains more than one match.
$ grep -li sam *
memo1
memo2
memo3
memo5
Quiet
The –q (––quiet or ––silent) option does not write anything to standard output, it only sets the exit code. The following grep command returns an exit code of 0 (true) as displayed by the $? special parameter (page 1029). This exit code indicates that grep found the string sam in the memo5file.
$ grep -q sam memo5
$ echo $?
0
Recursive
The –r or –R (––recursive) option recursively descends directories specified in the list of files to be searched and processes files within these directories.
Invert match
The –v (––invert-match) option causes lines not containing a match to satisfy the search. When you use this option by itself, grep displays all lines that do not contain a match for the pattern. The following example lists all lines that do not contain the string sam (regardless of case).
$ grep -vi Sam *
memo1:
memo1:
memo1:Good day.
memo2:This is a letter to Max
memo2:
memo2:Hi Max --
memo2:
memo2:How are you?
memo2:I hope you are able to get me a
memo3:Better I hope!
memo4:Only Max here, no one else.
memo5:I have not seen you in days!
Match word
–w (––word-regexp) With this option, the pattern must match a whole word. This option is helpful if you are searching for a specific word that might also appear as a substring of another word in the file. The following examples show grep searching for a word, first using the –w option and then using a regular expression.
$ grep -w sam *
memo1:This is a letter to sam:
memo5:sam, what is going on?
$ grep '\<sam\>' *
memo1:This is a letter to sam:
memo5:sam, what is going on?
![]() head: Displays the Beginning of a File
head: Displays the Beginning of a File
The head utility displays the beginning of a file. This utility takes its input either from one or more files specified on the command line or from standard input. See page 241 for a description of the related tail utility.
Arguments
The arguments are the pathnames of the text files that head displays. When you specify more than one file, head displays the filename before displaying the first few lines of each file. When you do not specify a file, head takes its input from standard input.
Without any options, head displays the first ten lines of a file. For example, if the file named months lists the 12 months of the year in calendar order, one to a line, then head displays January through October.
$ head months
January
February
March
April
May
June
July
August
September
October
Options
Bytes
The –c n (––bytes=n) option displays the first n bytes (characters) of a file.
$ head -c 60 /etc/passwd
root:x:0:0:root:/root:/bin/bash
bin:x:1:1:bin:/bin:/sbin/nol
Lines
The –n n (––lines=n) option displays the first n lines of a file. You can use –n to specify n lines without using the ––lines or –n option. If you specify a negative value for n, head displays all but the last n lines of the file.
$ head -2 /etc/passwd
root:x:0:0:root:/root:/bin/bash
bin:x:1:1:bin:/bin:/sbin/nologin
lpr: Sends Files to Printers
The lpr (line printer) utility places one or more files in a print queue for printing. Linux provides print queues so only one job is printed on a given printer at a time. A queue allows several people or jobs to send output simultaneously to a single printer with the expected results. This utility can work with local and remote printers. Refer to Chapter 13 for information on setting up a printer and defining the default printer.
The lpr utility takes input either from files specified on the command line or from standard input; it adds these files to the print queue as print jobs. The utility assigns a unique identification number to each print job.
Arguments
The arguments are the pathnames of one or more files that lpr prints. Often these files are text files, but many systems are configured so lpr can accept and properly print a variety of file types, including PostScript and PDF files. Without arguments, lpr accepts input from standard input. The following command prints the file named report:
$ lpr report
Because this command does not specify a printer, the output goes to the default printer, which is the printer when you have only one printer. You can send more than one file to the printer with a single command. The following command prints three files on the default printer:
$ lpr 05.txt 108.txt 12.txt
Options
Some of the following options depend on which type of file is being printed as well as on how the system is configured for printing.
No header
The –h (no header) option suppresses printing of the header (burst) page. This page is useful for identifying the owner of the output in a multiuser setup, but it is a waste of paper when this identification is not needed.
No filter
The –l (lowercase “el”) option specifies that lpr should not preprocess (filter) the file being printed. Use this option when the file is already formatted for the printer.
Printer
The –P printer option routes a print job to the queue for the printer named printer. If you do not use this option, print jobs are routed to the default printer for the local system. The acceptable values for printer are stored in the /etc/printcap file and can be displayed using an lpstat –tcommand. These values vary from system to system. The following command prints report on the printer named mailroom:
$ lpr -P mailroom report
The next example uses a pipeline to send the output of ls to the printer named deskjet:
$ ls | lpr -Pdeskjet
Tip: Setting your personal default printer
If you normally use a printer other than the system default printer, you can set up lpr to use another printer as your personal default by assigning the name of this printer to the environment variable PRINTER. For example, if you use bash, you can add the following line to~/.bash_profile to set your default printer to the printer named ps:
export PRINTER=ps
Remove
The –r (remove) option deletes the files being printed after calling lpr.
Copies
The –# n option prints n copies of each file. Depending on which shell you are using, you might need to escape the # by preceding it with a backslash to keep the shell from interpreting it as a special character. The following command prints two copies of memo on the printer named laser.
$ lpr -Plaser -#2 memo
Related Utilities
lpq
The lpq utility displays information about jobs in a print queue. When called without arguments, lpq lists all print jobs queued for the default printer. Use the –P printer option with lpq to look at other print queues—even those for printers connected to remote systems. With the –l (lowercase “el”) option, lpq displays more information about each job. If you specify a username as an argument, lpq displays only the print jobs belonging to that user.
The next example shows a number of print jobs queued for the default printer. Max owns all the jobs, and the first one is being printed (it is active). Jobs 635 and 639 were created by sending input to lpr’s standard input; job 638 was created by giving ncut.icn as an argument to the lprcommand. The last column gives the size of each print job.
$ lpq
deskjet is ready and printing
Rank Owner Job Files Total Size
active max 635 (stdin) 38128 bytes
1st max 638 ncut.icn 3587 bytes
2nd max 639 (stdin) 3960 bytes
lprm
One item displayed by lpq is the job number for each print job in the queue. To remove a job from the print queue, give the job number as an argument to lprm.
Unless you are working with root privileges, you can remove only your own jobs. Even a user working with root privileges might not be able to remove a job from a queue for a remote printer. Without an argument, lprm removes the active printer job (i.e., the job that is now printing) from the queue, if you own that job. The next command removes job 638 from the default print queue:
$ lprm 638
![]() mv: Renames or Moves a File
mv: Renames or Moves a File
The mv (move) utility, which renames or moves one or more files, has three forms. The first renames a single file with a new filename that you supply. The second renames one or more files so that they appear in a specified directory. The third renames a directory. The mv utility physically moves (copies and deletes) the original file if it is not possible to rename it (that is, if you move the file from one filesystem to another). See page 224 for a description of the related cp (copy) utility.
Caution: mv can destroy a file
Just as cp can destroy a file, so can mv. Also like cp, mv has a –i (interactive) option. See the caution box on page 224.
Arguments
The first form of mv takes two arguments: the pathname of the ordinary file you want to rename and/or move and the new pathname of the file. The first of the following commands renames memo in the working directory to memo.copy. The second command moves memo from the working directory to the copies directory and renames it memo.130808.
$ mv memo memo.copy
$ mv memo copies/memo.130808
The second form of mv takes two or more arguments; all but the last are the pathnames of ordinary files you want to move and the last specifies the new parent directory for the files. The files you move will have the same simple filenames as each of the original files but new absolute pathnames. The following command moves memo1, memo2, and memo3 from the working directory and memoX from the /tmp directory to the (existing) memo.copy subdirectory of the working directory.
$ mv memo1 memo2 memo3 /tmp/memoX memo.copy
The third form of mv takes two arguments: the pathname of an existing directory that you want to move and/or rename, and the new pathname for the directory, which does not exist. (If the directory exists, the command is the second form of mv and moves the file to the directory without changing the file’s name.) The first of the following commands renames the memo.copy directory in the working directory memo.old. The second moves the feb subdirectory of memos to the directory named archive and renames it 1302.
$ mv memo.copy memo.old
$ mv memos/feb archive/1302
Options
Force
The –f (––force) option causes mv not to prompt you if a move would overwrite an existing file that you do not have write permission for. You must have write permission for the directory holding the existing file.
Interactive
The –i (––interactive) option prompts for confirmation if mv would overwrite a file. If your response begins with a y or Y, mv overwrites the file; otherwise, mv does not move the file. The following example copies all files named memo followed by a single character to the memo.copydirectory, prompting you if it would overwrite a file.
$ mv -i memo? memo.copy
mv: overwrite 'memo.copy/memo3'? y
If mv would not overwrite a file, it does not prompt even with this option.
Verbose
The –v (––verbose) option lists files as they are moved.
$ mv -v memo? memo.copy
'memo1' -> 'memo.copy/memo1'
'memo2' -> 'memo.copy/memo2'
'memo3' -> 'memo.copy/memo3'
'memo4' -> 'memo.copy/memo4'
'memo5' -> 'memo.copy/memo5'
![]() sort: Sorts and/or Merges Files
sort: Sorts and/or Merges Files
The sort utility sorts and/or merges one or more text files. It orders the output using the collating sequence specified by the LC_COLLATE locale variable (page 368). This section explains how to use sort to order a file by lines. See the sort man page for information on sorting on fields.
Without the –o option, sort sends its output to standard output. This utility sorts and merges files unless you use the –m (merge only) or –c (check only) option.
Arguments
The arguments are the pathnames of one or more ordinary files that contain the text to be sorted. Without arguments, sort takes its input from standard input. The following example shows sort processing a file named days that holds the days of the week, one per line, in calendar order. Thesort utility outputs the contents of the file in alphabetical order.
$ sort days
Friday
Monday
Saturday
Sunday
Thursday
Tuesday
Wednesday
The next example merges and sorts the days and months files.
$ sort days months
April
August
December
February
Friday
...
Options
Check
The –c (––check) option checks whether the file is properly sorted. The sort utility does not display anything if everything is in order. It displays a message if the file is not in sorted order and returns an exit status of 1. The following example shows that the fourth line of days, which containsThursday, is the first line of the file that is not in alphabetical order.
$ sort -c days
sort: days:4: disorder: Thursday
Dictionary
The –d (––dictionary-order) option ignores all characters that are not alphanumeric characters or blanks. For example, sort does not consider punctuation with this option. The LC_CTYPE locale variable (page 368) affects the outcome when you specify this option.
Ignore case (fold)
The –f (––ignore-case) option considers all lowercase letters to be uppercase letters.
Ignore nonprinting
The –i (––ignore-nonprinting) option ignores nonprinting characters. This option is overridden by the –d option. The LC_CTYPE locale variable (page 368) affects the outcome when you specify this option.
Merge
The –m (––merge) option assumes that each of the multiple input files is in sorted order and merges them without verifying they are sorted.
Numeric
The –n (––numeric-sort) option orders in arithmetic sequence, it does not order lines in the machine collating sequence. With this option, minus signs and decimal points take on their arithmetic meaning. The following example shows the difference between sorting a numeric file without using the –n option and with it.
$ sort num
09.0
10.5
1.24
-5
9
$ sort -n num
-5
1.24
09.0
9
10.5
Output
The –o filename (––output=filename) option sends output to filename instead of standard output; filename can be the same as one of the names of the files that sort is sorting. The following command sends the output to the days.sort file.
$ sort -o days.sort days
Reverse
The –r (––reverse) option reverses the sense of the sort (e.g., z precedes a). The following examples order days in reverse alphabetic order and num in reverse arithmetic order.
$ sort -r days
Wednesday
Tuesday
Thursday
Sunday
Saturday
Monday
Friday
$ sort -rn num
10.5
9
09.0
1.24
-5
Unique
The –u (––unique) option outputs repeated lines only once. When you use this option with –c, sort displays a message if the same line appears more than once in the input file, even if the file is in sorted order. The following example sorts (and merges) two copies of days. Without any options, the first command displays two copies of each day in alphabetic order. The second command uses the –u option and displays one copy of each day.
$ sort days days | head -5
Friday
Friday
Monday
Monday
Saturday
$ sort -u days days | head -5
Friday
Monday
Saturday
Sunday
Thursday
The next example works with the fol file, which holds the names of three months, each listed twice. One of each pair begins with an uppercase letter, the other with a lowercase letter. With just the –u option, the first command displays all six lines. The second command adds the –f option, which causes sort to consider upper- and lowercase letters to be equivalent. Now the –u option considers each pair of months to be equivalent and sort displays only one of each pair of months.
$ sort -u fol
april
April
february
February
january
January
$ sort -uf fol
April
February
January
![]() tail: Displays the Last Part of a File
tail: Displays the Last Part of a File
The tail utility displays the last part, or end, of a file. See page 235 for a description of the related head utility.
Arguments
The arguments are the pathnames of the files that tail displays. When you specify more than one file, tail displays the filename of each file before displaying lines from that file. If you do not specify an argument or if you specify a hyphen (–) instead of a filename, tail reads from standard input. By default tail displays the last ten lines of its input. The following example shows tail displaying the last ten lines of the months file.
$ tail months
March
April
May
June
July
August
September
October
November
December
Options
Bytes
The –c [+]n (––bytes=[+]n) option counts by bytes (characters) instead of lines. The n argument is an integer that specifies the number of bytes. The following example displays the last 16 bytes, including 2 NEWLINEs, of the months file.
$ tail -c 16 months
vember
December
If you put a plus sign (+) in front of n, tail counts from the start of the file instead of the end. The tail utility still displays characters through the end of the file, even though it starts counting from the beginning. This example shows that tail –c +16 causes tail to display from the 16th character through the end of the file.
$ tail -c +16 months
y
March
April
...
Follow
The –f (––follow) option causes tail to enter an endless loop after copying the last line of the file, waiting for and copying additional lines from the file as the file grows. If you specify multiple files in the arguments with this option, tail includes a new header each time it displays output from a different file so you know which file is being added to. This option is useful for tracking the progress of a process that is running in the background and sending its output to a file. The tail utility continues to wait indefinitely, so you must use the interrupt key to terminate it.
Lines
The –n [+]n (––lines=[+]n) option counts by lines (the default). The n argument is an integer that specifies the number of lines. Although it is not documented, you can use ±n to specify a number of lines without using this option. The next example displays the last five lines of the monthsfile.
$ tail -5 months
August
September
October
November
December
If you put a plus sign (+) in front of n, tail counts from the start of the file instead of the end. The tail utility still displays lines through the end of the file, even though it starts counting from the beginning. Thus tail –n +5 causes tail to display from the fifth line through the last line of the file.
![]() touch: Changes File Modification and Access Times
touch: Changes File Modification and Access Times
The touch utility changes the modification and access times of a file to the system time or a time you specify. You can also use touch to create a file.
Arguments
The arguments are the pathnames of the files that touch creates or updates. Without options, touch changes the access and modification times to the system time. When you do not specify the –c (––no-create) option, touch creates files if they do not exist.
The following example shows that f1 exists in the working directory with a modification date of July 24, 2014, and that f2 does not exist. The date utility shows the system time. When touch is given these two filenames as arguments, it updates the modification time of f1 and creates f2. Use the ls –lu options to display access times.
$ ls -l
-rwxr-xr-x. 1 max pubs 898028 2014-07-24 f1
$ date
Wed May 8 15:20:36 PDT 2013
$ touch f1 f2
$ ls -l
-rwxr-xr-x. 1 max pubs 898028 05-08 15:20 f1
-rw-r--r--. 1 max pubs 0 05-08 15:20 f2
Options
No create
The –c (––no-create) option does not create files, it only modifies times on existing files.
Date
The –d datestring (––date=datestring) option changes times using the date specified by datestring. Most familiar formats are permitted for datestring. Components of the date and time not included in datestring are assumed to be the current date and time. This option may not be used with –t. This example changes the date on f1 to May 15, 2020.
$ touch -d 'may 15 2020' f1
$ ls -l f1
-rw-rw-r--. 1 max max 978160 2020-05-15 f1
Time
The –t [[cc]yy]nnddhhmm[.ss] option changes times to the date specified by the argument. The nn argument is the number of the month (01–12), dd is the day of the month (01–31), hh is the hour based on a 24-hour clock (00–23), and mm is the minutes (00–59). You must specify at least these fields. You can specify the number of seconds past the start of the minute using .ss.
The optional cc specifies the first two digits of the year (the value of the century minus 1), and yy specifies the last two digits of the year. When you do not specify a year, touch assumes the current year. When you do not specify cc, touch assumes 20 for yy in the range 0–68 and 19 for yy in the range 69–99. This option may not be used with –d.
The following example creates a file with a modification and access time of August (08) 2 (02) at 2:30 PM (1420). The command assumes the year known to the system and zero seconds.
$ touch -t 08021420 xx
$ ls -l xx
-rw-r--r--. 1 sam pubs 0 08-02 14:20 xx
![]() wc: Displays the Number of Lines, Words, and Bytes in Files
wc: Displays the Number of Lines, Words, and Bytes in Files
The wc (word count) utility displays the number of lines, words, and bytes in one or more files. When you specify more than one filename on the command line, wc displays totals for each file as well as combined totals for all files.
Arguments
The arguments are the pathnames of one or more files that wc analyzes. The columns wc displays show the number of lines, words, and bytes, in that order. (A word is a sequence of characters bounded by SPACEs, TABs, NEWLINEs, or a combination of these characters.) Without any arguments,wc takes its input from standard input. The following commands show wc analyzing the days and months files. When you redirect its input, wc does not display the name of the file.
$ wc days months
7 7 57 days
12 12 86 months
19 19 143 total
$ cat days months | wc
19 19 143
Options
Lines
The –l (lowercase “el”; ––lines) option displays only the number of lines (i.e., NEWLINE characters) in the input. The following example shows that there are seven lines in the days file.
$ wc -l days
7 days
Bytes
The –m (––chars) option displays only the number of bytes in the input. The next example shows that there are 57 bytes, including NEWLINEs, in the days file.
$ wc -m days
57 days
Words
The –w (––words) option displays only the number of words in the input. The final example shows that there are seven words (each line holds one word) in the days file.
$ wc -w days
7 days
![]() Compressing and Archiving Files
Compressing and Archiving Files
Large files use more disk space and take longer to transfer over a network than smaller files. To reduce these factors you can compress a file without losing any of the information it holds (lossless data compression). Similarly, a single archive of several files packed into a larger file is easier to manipulate, upload, download, and email than multiple files. You might frequently download compressed, archived files from the Internet. The utilities described in this section compress and decompress files and pack and unpack archives.
Tip: dtrx: extracts and decompresses files intelligently
The dtrx utility (Do the Right Extraction; dtrx package) extracts and decompresses many types of files intelligently. It decompresses xz, bzip2, and gzip files and it extracts and decompresses compressed tar archives. This utility (it is a Python script) determines which utility was used to compress a file and calls that utility to decompress it.
The dtrx utility will
• Not overwrite a file, but will instead rename the decompressed/extracted file and tell you what it named it
• Extract an archive into a new directory so the extracted files do not clutter and mingle with those in the working directory; see the tips on page 251
• Perform recursive extraction: it will extract archives from within archives
• Set the permissions of extracted files to sane values
The dtrx utility does not have a man page. For more information use the ––help option or visit brettcsmith.org/2007/dtrx.
![]() xz, bzip2, and gzip: Compress and Decompress Files
xz, bzip2, and gzip: Compress and Decompress Files
This section discusses three compression utilities: xz, bzip2, and gzip (GNU zip). Because these utilities work similarly and take many of the same options, this one section covers all three utilities. Because xz is the newest and most effective tool, all examples in this section use xz. Differences between the utilities are noted.
Tip: xz, bzip2, and gzip
The bzip2 utility is block based, provides good compression, and is CPU intensive. The older alternative, gzip, is stream based and does not compress as well as bzip2. However, gzip can compress on-the-fly (e.g., while downloading a file) whereas bzip2 cannot begin compression until it has read a complete block. Also, bzip2 is a Linux utility whereas gzip is a cross-platform utility that is recognized natively by Windows, Linux, and other *nix systems. The xz utility is newer than bzip2 and gzip and can do a better job of compressing files than either.
The xz, bzip2, and gzip utilities compress a file by analyzing it and recoding it more efficiently. The new version of the file looks completely different from the original file. In fact, because the new file contains many nonprinting characters, you cannot view it directly. These utilities work particularly well on files that contain a lot of repeated information, such as text and image data, although most image data is already in a compressed format. The xz utility can yield a smaller compressed file than bzip2 and bzip2 can yield a smaller compressed file than gzip.
Normally these utilities do not overwrite a file; you must use ––force to overwrite a file during compression or decompression.
Tip: gzip versus zip
Do not confuse gzip and gunzip with the zip and unzip utilities. The zip and unzip utilities pack and unpack an archive that might contain several files compressed into a single file. That compressed file is typically imported from or exported to a Windows system.
In contrast, when given multiple filenames as arguments, gzip compresses each file individually and gunzip decompresses individual files. It does not create an archive.
The zip and unzip utilities are compatible with WinZip, a Windows program that compresses and archives files.
Arguments
The arguments are the pathnames of one or more ordinary files (no directories except when you call gzip with the –r option) that are to be compressed or decompressed. Without arguments, or if the special option – is present, these utilities read from standard input. By default, when these utilities compress a file, they create a new, compressed version of the file with a filename extension of .xz (xz), .bz2 (bzip2), or .gz (gzip) and delete the original file. They reverse the process when they decompress a file. In the following example, xz compresses the myprog file, reducing its size, deleting the original file, and creating a new file named myprog.xz.
$ ls -l
-rwxr-xr-x. 1 sam sam 982296 06-07 13:50 myprog
$ xz myprog
$ ls -l
-rwxr-xr-x. 1 sam sam 387536 06-07 13:50 myprog.xz
Options
Standard output
The –c (––stdout) option writes the results of compression or decompression to standard output. This option implies the –k option.
Decompress
The –d (––decompress) option decompresses a file that was compressed using xz. This option with xz is equivalent to the unxz utility (unxz is a link to xz). With bzip2 it is equivalent to bunzip2, and with gzip it is equivalent to gunzip.
$ xz -d myprog.xz
$ ls -l
-rwxr-xr-x. 1 sam sam 982296 06-07 13:50 myprog
Quality
The –n option sets the compression level when compressing a file. Under xz, the n is a digit from 0 to 9; under bzip2 and gzip it is from 1 to 9. Level 0 or 1 compression yields the largest file but runs quickly and uses the least memory. Level 9 compression yields the smallest file but runs slowly and uses the most memory. The default level is 6. The next example shows that with xz the –9 option yields about a 9 percent smaller compressed file than does –0. This option has more impact on file size and speed with xz than with bzip2 or gzip.
$ xz -0 myprog
$ ls -l
-rwxr-xr-x. 1 sam sam 423704 06-07 13:50 myprog.xz
$ unxz myprog.xz
$ xz -9 myprog
$ ls -l
-rwxr-xr-x. 1 sam sam 387536 06-07 13:50 myprog.xz
Optional
The time utility displays execution times for the command you specify as its argument. The line labeled real reports the elapsed clock time, user is the time the execution spent in userspace (page 1279), and sys is the time it spent in kernelspace (page 1257). The following example shows that it took about one-tenth of a second of clock time to compress myprog using level 0 compression and about seven-tenths of a second using level 9. The difference in the system time is even more dramatic.
$ time xz -0 myprog
real 0m0.115s
user 0m0.043s
sys 0m0.071s
$ unxz myprog.xz
$ time xz -9 myprog
real 0m0.705s
user 0m0.078s
sys 0m0.599s
Force
The –f (––force) option forces compression even if a file already exists, is a symbolic link to a regular file, or has multiple hard links. The following example shows that, by default, xz will not compress a file that has a hard link (page 204). With the –f option, xz compresses the file, creating a new, compressed file and deleting the old, linked file.
$ ls -l
-rwxr-xr-x. 2 sam sam 982296 06-07 13:50 myprog
-rwxr-xr-x. 2 sam sam 982296 06-07 13:50 myprog.lnk
$ xz myprog
xz: myprog: Input file has more than one hard link, skipping
$ xz -f myprog
$ ls -l
-rwxr-xr-x. 1 sam sam 982296 06-07 13:50 myprog.lnk
-rwxr-xr-x. 1 sam sam 387536 06-07 13:50 myprog.xz
Keep
The –k (––keep) option does not delete input files after compressing or decompressing them. The following command uses the –k option so that after compressing myprog, the original file remains along with the compressed version.
$ xz -k myprog
$ ls -l
-rwxr-xr-x. 1 sam sam 982296 06-07 13:50 myprog
-rwxr-xr-x. 1 sam sam 387536 06-07 13:50 myprog.xz
Tip: Keep the original file by using the –k option
The xz, bzip2, and gzip utilities and their counterparts, unxz, bunzip2, and gunzip, remove the original file when they compress or decompress a file. Use the –k (keep) option to keep the original file.
Recursive
The –r (––recursive) option recursively descends directories listed in the arguments and compresses or decompresses each file within these directories. This option does not create an archive; see the tip on page 246. Works with gzip only.
Verbose
The –v (––verbose) option displays the name of the file, the percent of compression completed, the sizes of the compressed and original files, and the compression ratio. The output of the following xz command shows that the compressed file is almost 40 percent smaller than the original file.
$ xz -v myprog
myprog (1/1)
100 % 378.5 KiB / 959.3 KiB = 0.395
Related Utilities
xzcat bzcat zcat
The xzcat, bzcat, and zcat utilities display files that have been compressed using xz, bzip2, and gzip, respectively. The equivalent of cat for compressed files, these utilities decompress the compressed data and display the decompressed data. Like cat, they do not change the source file. The following command decompresses and displays memo.xz on the fly.
$ xzcat memo.xz
After xzcat is run, the content of memo.xz is unchanged; the file is still stored on the disk in compressed form.
xzless bzless zless
Use xzless/bzless/zless in place of xzcat/bzcat/zcat when you decompress and view a large text file. These utilities send the decompressed output through a pipeline to less so you can view it one screen at a time.
xzgrep bzgrep zgrep
Use xzgrep/bzgrep/zgrep to search for a pattern in a compressed file without changing the file. Because these utilities invoke grep, they accept the same arguments as grep.
![]() unxz bunzip2 gunzip
unxz bunzip2 gunzip
The unxz/bunzip2/gunzip utilities restore a compressed file just as running xz/bzip2/gzip with the –d option does:
$ unxz myprog.xz
$ ls -l
-rwxr-xr-x. 1 sam sam 982296 06-07 13:50 myprog
compress
The compress utility compresses files, albeit not as well as gzip. This utility marks a file it has compressed by adding a .Z filename extension to its name.
![]() unzip
unzip
The unzip utility restores a file that has been compressed using zip.
![]() zip
zip
The zip utility compresses and archives files; the –r option processes files in a directory hierarchy. This utility marks a file it has compressed by adding a .zip filename extension to its name. The zip and unzip utilities are compatible with WinZip, a Windows program that compresses and archives files. Give the command zip without any arguments or see the zip man page for more information including a list of options.
$ zip -r allmemos memos
adding: memos/ (stored 0%)
adding: memos/typescript (deflated 33%)
adding: memos/memos.sam/ (stored 0%)
adding: memos/memos.sam/130811.2 (deflated 77%)
adding: memos/memos.sam/130811.3 (deflated 73%)
![]() tar: Stores or Extracts Files to/from an Archive File
tar: Stores or Extracts Files to/from an Archive File
The tar (tape archive) utility, also discussed on page 603, creates, adds to, lists, and retrieves files from an archive file. Its name is short for tape archive, as its original function was to create and read archive and backup tapes. Today it is used to create a single file (called a tar file, archive, ortarball) from multiple files or directory hierarchies and to extract files from a tar file. See page 603 for more information and examples that use tar to back up files; see page 605 for information on cpio, a similar utility.
You can use xz, bzip2, gzip, or compress to compress tar files, making them easier to store and handle. Many files you download from the Internet will already be in one of these formats.
Files that have been processed by tar and compressed by xz frequently have a filename extension of .txz. Those processed by tar and compressed by bzip2 use .tar.bz2 or .tbz, those processed by tar and gzip use .tar.gz or .tgz, and files processed by tar and compress use .tar.Z as the filename extension.
Arguments
The arguments are pathnames of the files that tar archives or extracts. If you do not specify an argument, tar reads from standard input or writes to standard output.
Options
You must use one and only one of the following options to indicate which action you want tar to take. You can alter the action of the option by following it with one or more modifiers (page 251).2
2. Although the original UNIX tar did not use a leading hyphen to indicate an option on the command line, the GNU/Linux version accepts hyphens but works as well without them. This book precedes tar options with a hyphen for consistency with most other utilities.
Create
The –c (––create) option creates an archive. This option stores the files named as arguments in a new archive. If the archive already exists, tar destroys it before creating the new archive. If an argument is a directory, tar copies the directory hierarchy into the archive. Without the ––filemodifier, tar writes the archive to standard output.
In the following example, the first ls shows the sizes of the files g, b, and d. Next tar uses the –c (create) option along with the –v (verbose; page 252) and –f (write to or read from a file; next page) modifiers to create an archive named all.tar from these files. Each line of output displays the name of the file tar is appending to the archive it is creating.
The tar utility adds overhead when it creates an archive. The next command shows that the archive file all.tar occupies more than 9,700 bytes, whereas the sum of the sizes of the three files is about 6,000 bytes. This overhead is more appreciable on smaller files, such as the ones in this example:
$ ls -l g b d
-rw-r--r--. 1 zach other 1178 08-20 14:16 b
-rw-r--r--. 1 zach zach 3783 08-20 14:17 d
-rw-r--r--. 1 zach zach 1302 08-20 14:16 g
$ tar -cvf all.tar g b d
g
b
d
$ ls -l all.tar
-rw-r--r--. 1 zach zach 9728 08-20 14:17 all.tar
TOC
Without arguments, the –t (––list) option produces a table of contents listing all files in an archive. With arguments, it displays the name of each file in the arguments each time it occurs in the archive. You can use this option with the –v option to display detailed information about files in an archive. The next example calls tar with the –t and –v options to display a table of contents for the archive created in the previous example.
$ tar -tvf all.tar
-rw-r--r-- zach /zach 1302 2013-08-20 14:16 g
-rw-r--r-- zach /other 1178 2013-08-20 14:16 b
-rw-r--r-- zach /zach 3783 2013-08-20 14:17 d
![]() Extract
Extract
The –x (––extract) option extracts files listed in the arguments from the archive and writes them to the disk, overwriting existing files with the same names. Without arguments, this option extracts all files from the archive. If the arguments include a directory, tar extracts the directory hierarchy. The tar utility attempts to keep the owner, modification time, and access privileges the same as those of the original file. If tar reads the same file more than once, the last version read will appear on the disk when tar is finished.
Caution: tar: the –x option can overwrite files
The –x option to tar overwrites a file that has the same filename as a file you are extracting. Follow the suggestion in the following caution box to avoid overwriting files.
Caution: tar: the –x option might extract a lot of files
Some tar archives contain many files. To list the files in the archive without unpacking them, run tar with the –tf options followed by the name of the tar file. In some cases you might want to create a new directory (mkdir [page 184]), cd to that directory, and expand the tarfile from there (i.e., tar –xf ../filename). That way the unpacked files will not mingle with existing files, and no confusion will occur. This strategy also makes it easier to delete the extracted files. Depending on how they were created, some tar files automatically create a new directory and put the files into it; the –t option shows where tar will place the files you extract. See also the tip on dtrx (page 245).
The next example extracts a single file from a tar archive file. The –x option tells tar to extract files and the –f modifier takes an argument of the name of the archive file. The –v option causes tar to list the files as it extracts each one. The argument to tar, b, tells tar the name of the file to extract from the archive file.
$ tar -xvf all.tar b
-rw-r--r-- zach /other 1178 2013-08-20 14:16 b
Omit the argument (b) to extract all files from the archive file.
Modifiers
Preserve ACLs
The ––acls modifier preserves ACL permissions (page 198).
Filename
The –f filename (––file filename) modifier uses filename as the name of the file the archive is created in or extracted from. The filename can be the name of an ordinary file or a device (e.g., a DVD or USB flash drive). You can use a hyphen (–) instead of filename to refer to standard input when creating an archive and standard output when extracting files from an archive.
xz
The –J (––xz) modifier uses xz (page 245) to compress/decompress files when creating an archive and extracting files from an archive. This modifier is optional when you decompress files because tar recognizes a compressed file and decompresses it automatically.
The first command in the following example uses the –c option to create an archive, the –J modifier to use xz to compress the files going into the archive, the –f modifier with an argument of mfiles.txz to specify the name of the archive file, and an asterisk, which the shell expands into a list of all files in the working directory, to specify the names of the files that tar is to archive. The second command extracts (–x option) the files from the archive named mfiles.tbz (–f mfiles.tbz) specifying the –v (verbose) modifier two times to create a long listing of the extracted files and the optional –J (xz) modifier to decompress the files as tar extracts them. It extracts the files named by the arguments.
$ tar -cJf mfiles.txz *
$ tar -xvvJf mfiles.txz mkdir more
-rwxr-xr-x max/pubs 128899 2013-05-06 13:23 mkdir
-rwxr-xr-x max/pubs 36176 2013-05-06 13:22 more
bzip2
The –j (––bzip2) modifier uses bzip2 (page 245) to compress/decompress files when creating an archive and extracting files from an archive. This modifier is optional when you decompress files because tar recognizes a compressed file and decompresses it automatically.
Verbose
The –v (––verbose) modifier lists each file as tar reads or writes it. When combined with the –t option, –v causes tar to display a more detailed listing of the files in the archive, showing their ownership, permissions, size, and other information. Similarly, two –v options cause tar to display a more detailed listing while extracting files.
Interactive
The –w (––interactive) modifier asks you for confirmation before reading or writing each file. Respond with a string that begins with Y or y if you want tar to take the action. Any other response causes tar not to take the action.
$ tar -xwf mfiles.tbz
extract 'mkdir'?y
extract 'mknod'?n
...
gzip
The –z (––gzip or ––gunzip) modifier uses gzip when creating an archive and gunzip when extracting files from an archive. This modifier also works to extract files from archives that have been compressed using the compress utility. This modifier is optional when you decompress files because tar recognizes a compressed file and decompresses it automatically.
The following two commands are equivalent ways of creating a compressed archive of the files in the /home directory hierarchy on the device mounted at /dev/sde1:
$ tar -zcf /dev/sde1 /home
$ tar -cf - /home | gzip > /dev/sde1
Displaying User and System Information
This section covers utilities that provide information about who is using the system, what those users are doing, and how the system is running. In addition to the utilities covered in this section, see
• df—displays a list of the directory hierarchies available on the system, along with the amount of disk space, free and used, on each (page 804)
• dmesg—displays kernel messages (page 595)
• du—displays disk usage information (page 523)
• lsblk—lists block device information (page 635)
• lshw—lists hardware information (page 636)
• lspci—lists PCI device information (page 635)
• lsusb—lists USB bus and USB device information (page 636)
• top—lists processes using the most resources (page 612)
• uname—displays information about the system (page 470)
![]() free: Displays Memory Usage Information
free: Displays Memory Usage Information
The free utility displays the amount of physical (RAM) and swap space (page 1276) memory in the local system. It displays columns for total, used, and free memory as well as for kernel buffers. The column labeled shared is obsolete.
Options
Human
The –h option displays memory in easy-to-read units.
Total
The –t option adds a line labeled Total to the end of the output.
In the following example, the –h option causes free to display memory sizes in human readable format (gigabytes in this case) and the –t option displays a total line.
$ free -mth
total used free shared buffers cached
Mem: 988M 781M 207M 0B 25M 279M
-/+ buffers/cache: 476M 512M
Swap: 2.0G 0B 2.0G
Total: 3.0G 781M 2.2G
One of the ways Linux takes advantage of free memory is to allocate memory it is not otherwise using to buffers (page 1240) and cache (page 1241). Thus the value on the Mem line in the free column will be small and is not representative of the total available memory when the kernel is working properly. As the kernel needs more memory, it reallocates memory it had allocated to buffers and cache.
The –/+ buffers/cache line gives values assuming memory used for buffers and cache is free memory. The value in the used column on this line assumes buffers and cache (25M + 279M = 304M on the Mem line) are freed; thus the value in the used column is 476M (~781M – 304M) while the value in the free column value increases to 512M (~207M + 304M). Unlike the value in the free column on the Mem line, as the value in the free column on the –/+ buffers/cache line approaches zero, the system is truly running out of memory.
The Swap line displays the total, used, and free amounts of swap space.
![]() uptime: Displays System Load and Duration Information
uptime: Displays System Load and Duration Information
The uptime utility displays a single line that includes the time of day, the period of time the computer has been running (in days, hours, and minutes), the number of users logged in, and the load average (how busy the system is). The three load average numbers represent the number of jobs waiting to run, averaged over the past 1, 5, and 15 minutes.
$ uptime
09:49:14 up 2 days, 23:13, 3 users, load average: 0.00, 0.01, 0.05
![]() w: Lists Users on the System
w: Lists Users on the System
The first line the w utility displays is the same as the output of uptime (previous page). Following that line, w displays a list of the users who are logged in.
The first column in the following example shows that Max, Zach, and Sam are logged in (Max is logged in twice). The second column shows the name of the device file each user’s terminal, workstation, or terminal emulator is connected to. The third column shows the system that a remote user is logged in from. The fourth column shows the time each user logged in. The fifth column indicates how long each user has been idle (how much time has elapsed since the user pressed a key on the keyboard). The next two columns identify how much computer processor time each user has used during this login session and on the task that user is running. The last column shows the command each user is running.
$ w
17:47:35 up 1 day, 8:10, 6 users, load average: 0.34, 0.23, 0.26
USER TTY FROM LOGIN@ IDLE JCPU PCPU WHAT
sam tty4 - 17:18 29:14m 0.20s 0.00s vi memo
max tty2 - 16:42 0.00s 0.20s 0.07s w
zach tty1 - 16:39 1:07 0.05s 0.00s run_bdgt
max pts/4 guava 17:27 3:10m 0.24s 0.24s -bash
![]() who: Lists Users on the System
who: Lists Users on the System
The who utility displays information about the local system. Without options it displays a list of users who are logged in. In the following example, the first column who displays shows that Sam, Max, and Zach are logged in. (Max is logged in from two locations.) The second column shows the name of the device that each user’s terminal, workstation, or terminal emulator is connected to. The third column shows the date and time the user logged in. An optional fourth column shows (in parentheses) the name of the system a remote user logged in from.
$ who
sam tty4 2013-07-25 17:18
max tty2 2013-07-25 16:42
zach tty1 2013-07-25 16:39
max pts/4 2013-07-25 17:27 (guava)
Arguments
Boot
The –b option displays the time the system was last booted.
$ who -b
system boot 2013-04-30 17:48
Run level
The –r option displays the system runlevel (page 449) and the time the system entered that runlevel.
$ who -r
run-level 5 2013-04-30 17:51
Me
The –m option displays the standard information for the user issuing the command.
$ who -m
max pts/4 2013-07-25 17:27 (guava)
In place of –m you can supply any two arguments; am i or mom likes are classic.
$ who am i
max pts/4 2013-07-25 17:27 (guava)
Related Utilities
whoami
While the who utility (e.g., who am i) displays the real UID of a user, whoami displays the effective UID of a user. For more information refer to “Real UID Versus Effective UID” on page 425.
Miscellaneous Utilities
This section covers which and whereis (determine the location of a utility), locate (searches for a file), script (records a shell session), tr (replaces specified characters), unix2dos (converts Linux files to Windows format), dos2unix (converts Windows files to Linux format), and xargs(converts standard input to command lines).
which and whereis: Locate a Utility
When you give Linux a command, the shell searches a list of directories for a program with that name. This list of directories is called a search path. For information on how to change the search path, refer to “PATH: Where the Shell Looks for Programs” on page 359. If you do not change the search path, the shell searches only a standard set of directories and then stops searching. However, other directories on the system might also contain useful utilities.
![]() which
which
The which utility locates utilities by displaying the full pathname of the file for the utility. The local system might include several utilities that have the same name. When you type the name of a utility, the shell searches for the utility in your search path and runs the first one it finds. You can find out which copy of the utility the shell will run by using which. In the following example, which reports the location of the tar utility:
$ which tar
/usr/bin/tar
The which utility can be helpful when a utility is working in unexpected ways. By running which, you might discover that you are running a nonstandard version of a tool or a different one from the one you expected. (“Important Standard Directories and Files” on page 189 provides a list of standard locations for executable files.) For example, if tar is not working properly and you find that you are running /usr/local/bin/tar instead of /bin/tar, you might suspect the local version is broken.
![]() whereis
whereis
The whereis utility searches for files related to a utility by looking in standard locations instead of using your search path. For example, you can find the locations for files related to tar:
$ whereis tar
tar: /usr/bin/tar /usr/share/man/man1/tar.1.gz /usr/share/man/man5/tar.5.gz
In this example whereis finds three references to tar: the tar utility file and two (compressed) tar man pages.
Tip: which versus whereis
Given the name of a utility, which looks through the directories in your search path (page 359) in order and locates the utility. If your search path includes more than one utility with the specified name, which displays the name of only the first one (the one you would run).
The whereis utility looks through a list of standard directories and works independently of your search path. Use whereis to locate a binary (executable) file, any manual pages, and source code for a program you specify; whereis displays all the files it finds.
Caution: which, whereis, and builtin commands
Both the which and whereis utilities report only the names for utilities as they exist on the disk; they do not report shell builtins (utilities that are built into a shell; page 170). When you use whereis to try to find where the echo command (which exists as both a utility program and a shell builtin) is kept, it displays the following information:
$ whereis echo
echo: /usr/bin/echo /usr/share/man/man1/echo.1.gz
/usr/share/man/man1p/echo.1p.gz
The whereis utility does not display the echo builtin. Even the which utility reports the wrong information:
$ which echo
/usr/bin/echo
Under bash you can use the type builtin (page 1041) to determine whether a command is a builtin:
$ type echo
echo is a shell builtin
![]() locate: Searches for a File
locate: Searches for a File
The locate utility (locate package) searches for files on the local system.
$ locate logrotate
/etc/logrotate.conf
/etc/logrotate.d
/etc/cron.daily/logrotate
/etc/logrotate.d/chrony
/etc/logrotate.d/cups
...
![]() updatedb
updatedb
Before you can use locate, the updatedb utility must build or update the locate database. Typically the database is updated once a day by a cron script (page 607).
Tip: locate does not return real-time results the way find does
Because locate relies on the locate database, which is typically updated once a day, results may not be accurate. The locate utility will display the names of files that have been deleted since the database was last updated. Similarly, it will not display the names of files that have been created since the last update. For accurate, real-time results, search for filenames using find (page 229).
The locate utility searches for the string you provide as its argument anywhere in the absolute pathname of a file. Thus, the command locate sam returns the names of all files that have the string sam anywhere in their absolute pathname, including all files in the hierarchy of a directory named sample. Use find if you want a more refined search. The command find / –name "sam" returns only files named sam and find / –name "*sam*" returns only files that have the string sam in their simple filename.
By default locate searches for simple strings; use the –r option to cause it to search for regular expressions.
script: Records a Shell Session
The script utility records part of a login session, including your input and the system’s responses. This utility is useful only from character-based devices, such as a terminal or a terminal emulator. It does capture a session with vim; however, because vim uses control characters to position the cursor and display different typefaces, such as bold, the output will be difficult to read and might not be useful. When you cat a file that has captured a vim session, the session quickly passes before your eyes.
By default script captures the session in a file named typescript, overwriting a file with the same name. Following is a session being recorded by script:
$ script
Script started, file is typescript
$ ls -l /bin | head -5
-rwxr-xr-x. 1 root root 123 02-07 17:32 alsaunmute
-rwxr-xr-x. 1 root root 25948 02-08 03:46 arch
lrwxrwxrwx. 1 root root 4 02-25 16:52 awk -> gawk
-rwxr-xr-x. 1 root root 25088 02-08 03:46 basename
$ exit
exit
Script done, file is typescript
Use the exit command to terminate a script session. You can then view the file you created using cat, less, more, or an editor. Following is the file created by the preceding script command:
$ cat typescript
Script started on Tue 08 Apr 2014 10:16:36 AM PDT
$ ls -l /bin | head -5
-rwxr-xr-x. 1 root root 123 02-07 17:32 alsaunmute
-rwxr-xr-x. 1 root root 25948 02-08 03:46 arch
lrwxrwxrwx. 1 root root 4 02-25 16:52 awk -> gawk
-rwxr-xr-x. 1 root root 25088 02-08 03:46 basename
$ exit
exit
Script done on Tue 08 Apr 2014 10:16:50 AM PDT
If you will be editing the file, you can use dos2unix (page 260) to eliminate from the typescript file the ^M (carriage return) characters that appear at the ends of the lines. Refer to the script man page for more information.
Arguments
The argument is the pathname of the file that script writes to. If you do not specify an argument, script writes to typescript, overwriting this file if it exists.
Options
Append
The –a (––append) option appends to the output file. Without this option script overwrites an existing file.
Command
The –c cmd (––command cmd) option runs cmd instead of an interactive shell. Useful when a program produces different output when standard output is not connected to the screen. For example, the ls utility displays its output in a column when it is redirected and in rows when it is not.
$ ls
memos.max memos.sam memos.zach old
$ ls | cat
memos.max
memos.sam
memos.zach
old
The –c option enables you to capture the output of ls without redirecting its output.
$ script -c ls
Script started, file is typescript
memos.max memos.sam memos.zach old typescript
Script done, file is typescript
![]() tr: Replaces Specified Characters
tr: Replaces Specified Characters
The tr utility reads standard input and, for each input character, maps it to an alternate character, deletes the character, or leaves the character unchanged. This utility reads from standard input and writes to standard output.
Arguments
The tr utility is typically used with two arguments, string1 and string2. The position of each character in the two strings is important: Each time tr finds a character from string1 in its input, it replaces that character with the corresponding character from string2.
When string1 is longer than string2, the initial portion of string1 (equal in length to string2) is used in the translation. When string1 is shorter than string2, tr repeats the last character of string1 to extend string1 to the length of string2. In this case tr departs from the POSIX standard, which does not define a result.
You can use a hyphen to represent a range of characters in string1 or string2. The two command lines in the following example produce the same result:
$ echo abcdef | tr 'abcdef' 'xyzabc'
xyzabc
$ echo abcdef | tr 'a-f' 'x-za-c'
xyzabc
The next example demonstrates a popular method for disguising text, often called ROT13 (rotate 13) because it replaces the first letter of the alphabet with the thirteenth, the second with the fourteenth, and so forth. The first line ends with a pipeline symbol that implicitly continues the line (see the optional section on page 161) and causes bash to start the next line with a secondary prompt (page 362).
$ echo The punchline of the joke is ... |
> tr 'A-M N-Z a-m n-z' 'N-Z A-M n-z a-m'
Gur chapuyvar bs gur wbxr vf ...
To make the text intelligible again, reverse the order of the arguments to tr:
$ echo Gur chapuyvar bs gur wbxr vf ... |
> tr 'N-Z A-M n-z a-m' 'A-M N-Z a-m n-z'
The punchline of the joke is ...
Options
Complement
The –c (––complement) option complements string1, causing tr to match all characters except those in string1.
Delete
The –d (––delete) option deletes characters that match those specified in string1. If you use this option with the –s (––squeeze-repeats) option, you must specify both string1 and string2.
$ echo If you can read this, you can spot the missing vowels! |
> tr --delete 'aeiou'
If y cn rd ths, y cn spt th mssng vwls!
Help
The ––help option summarizes how to use tr, including the special symbols you can use in string1 and string2.
Squeeze
The –s (––squeeze-repeats) option replaces multiple sequential occurrences of a character in string1 with a single occurrence of the character when you call tr with only one string argument. If you use both string1 and string2, the tr utility first translates the characters in string1 to those instring2; it then replaces multiple sequential occurrences of a character in string2 with a single occurrence of the character.
If you use the –d (––delete) and –s (––squeeze-repeats) options at the same time, tr first deletes the characters in string1 and then replaces multiple sequential occurrences of a character in string2 with a single occurrence of the character.
In the following example, tr replaces characters and reduces pairs of identical characters to single characters:
$ echo tennessee | tr -s 'tnse' 'srne'
serene
The next example replaces each sequence of nonalphabetic characters (the complement of all the alphabetic characters as specified by the character ranges A-Za-z) in the file draft1 with a single NEWLINE character. The output is a list of words, one per line.
$ tr -c -s 'A-Za-z' '\n' < draft1
unix2dos: Converts Linux Files to Windows and Macintosh Format
unix2dos, unix2mac
If you want to share a text file you created on a Linux system with someone on a Windows or Macintosh OS X system, you need to convert the file for the person on the other system to read it easily. The unix2dos utility converts a Linux text file so it can be read on a Windows machine; useunix2mac to convert a Linux file so it can be read on a Macintosh system. These utilities are part of the dos2unix software package. Enter the following command to convert a Linux-format file named memo.txt to a Windows-format file (use unix2mac to convert to a Macintosh-format file):
$ unix2dos memo.txt
You can now email the file as an attachment to someone on a Windows or an OS X system. This utility overwrites the original file.
dos2unix, mac2unix
The dos2unix utility converts Windows-format files so they can be read on a Linux system (use mac2unix to convert from Macintosh format):
$ dos2unix memo.txt
tr
You can also use tr (translate; page 258) to change a Widows or an OS X text file into a Linux text file. In the following example, the –d (delete) option causes tr to remove RETURNs (represented by \r) as it makes a copy of the file:
$ cat memo | tr -d '\r' > memo.txt
The greater than (>) symbol (page 154) redirects the standard output of tr to the file named memo.txt. Converting a file the other way without using unix2dos is not as easy.
![]() xargs: Converts Standard Input to Command Lines
xargs: Converts Standard Input to Command Lines
The xargs utility is a convenient, efficient way to convert standard output of one command into arguments for another command. The format of an xargs command line is
xargs [options] [command]
The xargs utility reads arguments to command from standard input, interpreting each whitespace-delimited string as a separate argument. It then constructs a command line from command and a series of arguments. When the maximum command-line length would be exceeded by adding another argument, xargs runs the command line it has built. If there is more input, xargs repeats the process of building a command line and running it. This process continues until all input has been read.
Arguments
The command argument is the command line you want xargs to use as a base for the command it constructs. Without an argument, command defaults to echo. The xargs utility appends to command the arguments it receives from standard input. If any arguments need to precede the arguments from standard input, you must include them as part of command.
The xargs utility is often used as an efficient alternative to the –exec option of find (page 231). If you call find with the –exec option to run a command, it runs the command once for each file it processes. Each execution of the command creates a new process, which can drain system resources when you are processing many files. By accumulating as many arguments as possible, xargs can greatly reduce the number of processes needed.
To locate and remove all files with names ending in .o from the working directory and its subdirectories, you can use the find –exec option:
$ find . -name \*.o -exec rm --force {} \;
This approach calls the rm utility once for each .o file that find locates. Each invocation of rm requires a new process. If a lot of .o files exist, the system must spend a significant amount of time creating, starting, and then cleaning up these processes. You can reduce the number of processes by allowing xargs to accumulate as many filenames as possible before calling rm:
$ find . -name \*.o -print | xargs rm --force
In the next example, the content of all *.txt files located by find is searched for lines containing the word login. The names of all files that contain login are displayed by grep.
$ find . -name \*.txt -print | xargs grep -w -l login
Options
Replace
The –I [marker] option allows you to place arguments from standard input anywhere within command. All occurrences of marker in command are replaced by the arguments generated from standard input of xargs. The –l option is ignored when you use this option.
The next example shows how to use the –I option to cause xargs to embed standard input within command instead of appending it to command. This option causes xargs to execute command each time a NEWLINE character is encountered in standard input.
$ cat names
Tom,
Dick,
and Harry
$ xargs echo "Hello," < names
Hello, Tom, Dick, and Harry
$ xargs -I xxx echo "Hello xxx. Join me for lunch?" < names
Hello Tom,. Join me for lunch?
Hello Dick,. Join me for lunch?
Hello and Harry. Join me for lunch?
Max lines
The –l [num] (lowercase “el”; ––max-lines[=num]) option executes command once for every num lines of input. When you include this option and do not specify num, xargs sets num to 1.
Max arguments
The –n num (––max-args=num) option executes command once for every num arguments in the input line. The next example uses the same input file as the previous examples and includes the –n and –l options:
$ xargs -n 1 echo "Hi there" < names
Hi there Tom,
Hi there Dick,
Hi there and
Hi there Harry
$ xargs -l 2 echo "Hi there" < names
Hi there Tom, Dick,
Hi there and Harry
Max processes
The –P num (––max-procs=num) option allows xargs to run up to num instances of command simultaneously. (The default is 1, which runs commands sequentially.) This option might improve the throughput if xargs is running on a multiprocessor system.
Interactive
The –p (––interactive) option prompts prior to each execution of command.
Empty
The –r (––no-run-if-empty) option causes xargs not to execute command if standard input is empty. Ordinarily xargs executes command at least once, even if standard input includes only blanks (SPACEs and TABs).
Editing Files
This section presents tutorials on two editors: vim and nano. The nano editor is less powerful than vim but takes less time to learn and is powerful enough for writing simple programs and notes.
![]() Tutorial: Using vim to Create and Edit a File
Tutorial: Using vim to Create and Edit a File
This section explains how to start vim, enter text, move the cursor, correct text, save the file to the disk, and exit from vim. The tutorial discusses three of the modes of operation of vim and explains how to switch from one mode to another.
vimtutor
In addition to working with this tutorial, you might want to try vim’s instructional program, vimtutor. Enter its name as a command to run it.
Specifying a terminal
Because vim takes advantage of features that are specific to various kinds of terminals, you must tell it what type of terminal or terminal emulator you are using. On many systems, and usually when you work on a terminal emulator, your terminal type is set automatically. If you need to specify your terminal type explicitly, refer to “Specifying a Terminal” on page 1024.
Tip: vimtutor and vim help files are not installed by default
To run vimtutor and to get help as described on page 266, you must install the vim-enhanced package. See page 534 for instructions on installing software.
Starting vim
Start vim with the following command to create and edit a file named practice (use vi in place of vim if you have not installed the vim-enhanced package):
$ vim practice
When you press RETURN, the command line disappears, and the screen looks similar to the one shown in Figure 7-1.

Figure 7-1 Starting vim
Tip: vim is not installed by default: use vi
The full version of the vim editor is not installed by default. Instead, a small version of vim, named vi, is installed. You can either replace each vim command in this section with vi, or you can install the full vim editor by installing the vim-enhanced package and then using the vim command as shown in this section. See page 534 for instructions on installing software.
The tildes (~) at the left of the screen indicate the file is empty. They disappear as you add lines of text to the file. If the screen looks like a distorted version of the one shown in Figure 7-1, the terminal type is probably not set correctly (see “Problem,” next).
The practice file is new so it contains no text. The vim editor displays a message similar to the one shown in Figure 7-1 on the status (bottom) line of the terminal to indicate you are creating and editing a new file. When you edit an existing file, vim displays the first few lines of the file and gives status information about the file on the status line.
Problem
If you start vim with a terminal type that is not in the terminfo database, vim displays an error message and waits for you to press RETURN or sets the terminal type to ansi, which works on many terminals.
Emergency exit
To reset the terminal type, press ESCAPE and then give the following command to exit from vim and display the shell prompt:
:q!
When you enter the colon (:), vim moves the cursor to the bottom line of the screen. The characters q! tell vim to quit without saving your work. (You will not ordinarily exit from vim this way because you typically want to save your work.) You must press RETURN after you give this command. When the shell displays its prompt, refer to “Specifying a Terminal” on page 1024 and start vim again.
If you start vim without a filename, it displays information about itself (Figure 7-2).
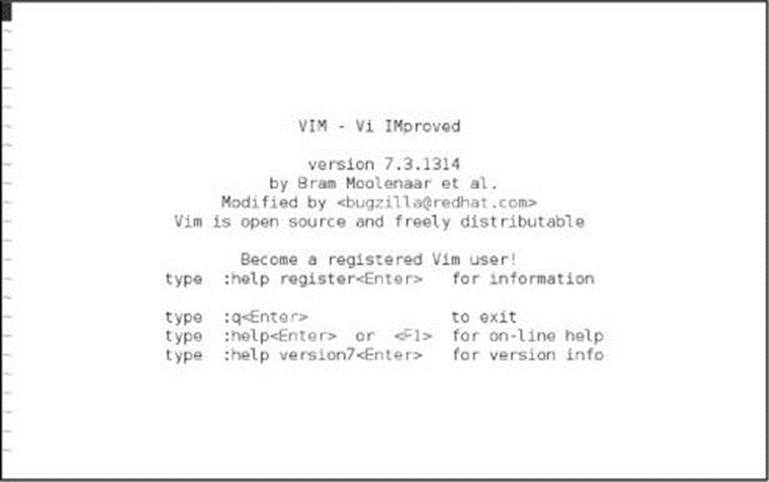
Figure 7-2 Starting vim without a filename
![]() Command and Input Modes
Command and Input Modes
Two of vim’s modes of operation are Command mode (also called Normal mode) and Input mode (Figure 7-3). While vim is in Command mode, you can give vim commands. For example, you can delete text or exit from vim. You can also command vim to enter Input mode. In Input mode,vim accepts anything you enter as text and displays it on the screen. Press ESCAPE to return vim to Command mode. By default the vim editor keeps you informed about which mode it is in: It displays INSERT at the lower-left corner of the screen while it is in Insert mode.
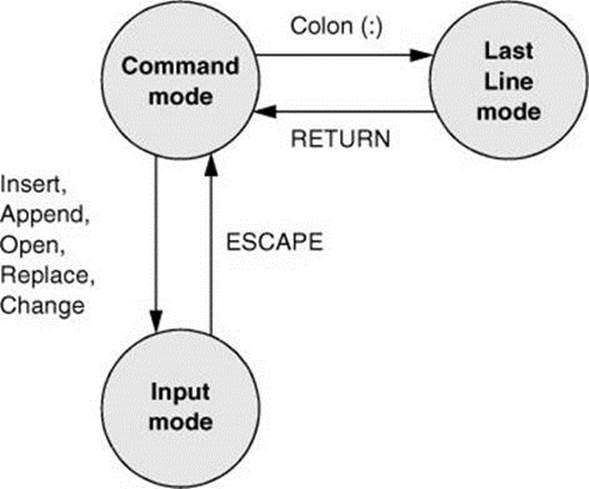
Figure 7-3 Modes in vim
The following command causes vim to display line numbers next to the text you are editing:
:set number RETURN
Last Line mode
The colon (:) in the preceding command puts vim into another mode, Last Line mode. While in this mode, vim keeps the cursor on the bottom line of the screen. When you finish entering the command by pressing RETURN, vim restores the cursor to its place in the text. Give the command :set nonumber RETURN to turn off line numbering.
vim is case sensitive
When you give vim a command, remember that the editor is case sensitive. In other words, vim interprets the same letter as two different commands, depending on whether you enter an uppercase or lowercase character. Beware of the CAPS LOCK (SHIFTLOCK) key. If you set this key to enter uppercase text while you are in Input mode and then exit to Command mode, vim interprets your commands as uppercase letters. It can be confusing when this happens because vim does not appear to be executing the commands you are entering.
![]() Entering Text
Entering Text
i/a (Input mode)
When you start vim, you must put it in Input mode before you can enter text. To put vim in Input mode, press the i (insert before cursor) key or the a (append after cursor) key.
If you are not sure whether vim is in Input mode, press the ESCAPE key; vim returns to Command mode if it is in Input mode or beeps, flashes, or does nothing if it is already in Command mode. You can put vim back in Input mode by pressing the i or a key again.
While vim is in Input mode, you can enter text by typing on the keyboard. If the text does not appear on the screen as you type, vim is not in Input mode.
To continue with this tutorial, enter the sample paragraph shown in Figure 7-4, pressing the RETURN key at the end of each line. If you do not press RETURN before the cursor reaches the right side of the screen or window, vim wraps the text so that it appears to start a new line. Physical lines will not correspond to programmatic (logical) lines in this situation, so editing will be more difficult. While you are using vim, you can correct typing mistakes. If you notice a mistake on the line you are entering, you can correct it before you continue (page 267). You can correct other mistakes later. When you finish entering the paragraph, press ESCAPE to return vim to Command mode.

Figure 7-4 Entering text with vim
Getting Help
You must have the vim-runtime package installed to use vim’s help system; see page 534.
To get help while you are using vim, enter the command :help [feature] followed by RETURN. The editor must be in Command mode when you enter this command. The colon moves the cursor to the last line of the screen. If you type :help, vim displays an introduction to vim Help (Figure 7-5). Each dark band near the bottom of the screen names the file that is displayed above it. (Each area of the screen that displays a file, such as the two areas shown in Figure 7-5, is a vim “window.”) The help.txt file occupies most of the screen (the upper window) in Figure 7-5. The file that is being edited (practice) occupies a few lines in the lower portion of the screen (the lower window).
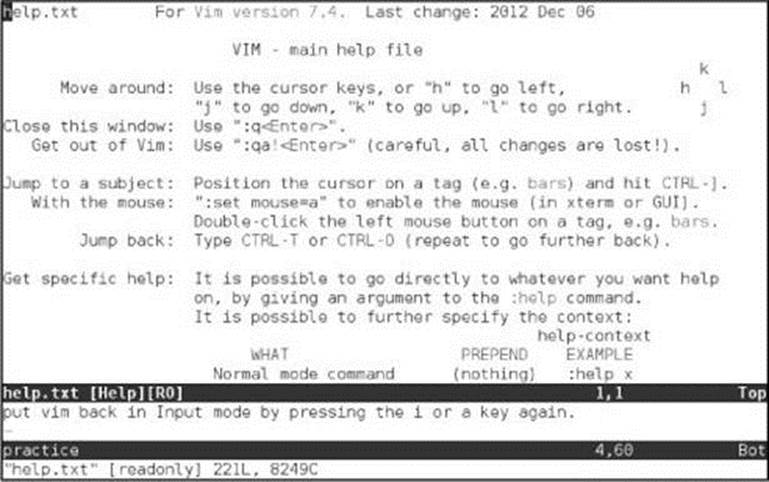
Figure 7-5 The main vim Help screen
Read through the introduction to Help by scrolling the text as you read. Press j or the DOWN ARROW key to move the cursor down one line at a time; press CONTROL-D or CONTROL-U to scroll the cursor down or up half a window at a time. Give the command :q to close the Help window.
You can display information about the insert commands by giving the command :help insert while vim is in Command mode (Figure 7-6).
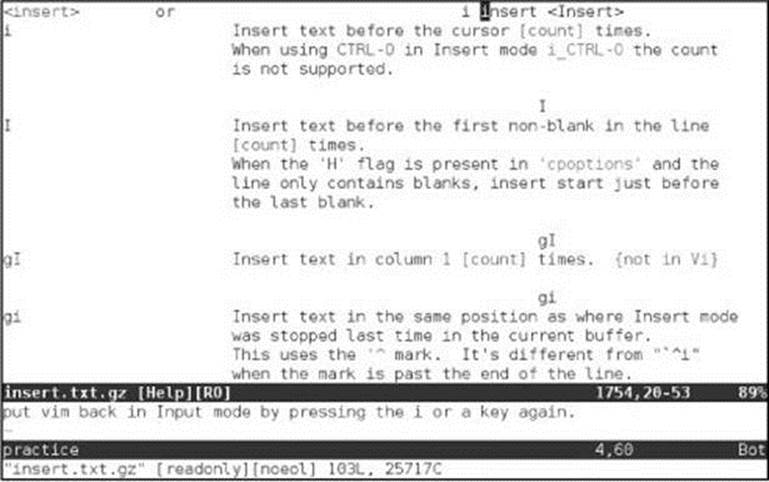
Figure 7-6 Help with insert commands
A Few vim Commands
This section describes a few useful vim commands.
Correcting Text as You Insert It
The keys that back up and correct a shell command line serve the same functions when vim is in Input mode. These keys include the erase, line kill, and word kill keys (usually CONTROL-H, CONTROL-U, and CONTROL-W, respectively). Although vim might not remove deleted text from the screen as you back up over it using one of these keys, the editor does remove it when you type over the text or press RETURN.
![]() Moving the Cursor
Moving the Cursor
You need to be able to move the cursor on the screen so you can delete, insert, and correct text. While vim is in Command mode, the RETURN key, the SPACE bar, and the ARROW keys move the cursor. If you prefer to keep your hand closer to the center of the keyboard, if your terminal does not have ARROW keys, or if the emulator you are using does not support them, you can use the h, j, k, and l (lowercase “el”) keys to move the cursor left, down, up, and right, respectively.
![]() Deleting Text
Deleting Text
x (Delete character) dw (Delete word) dd (Delete line)
You can delete a single character by moving the cursor until it is over the character you want to delete and then giving the command x. You can delete a word by positioning the cursor on the first letter of the word and then giving the command dw (Delete word). You can delete a line of text by moving the cursor until it is anywhere on the line and then giving the command dd.
Undoing Mistakes
u (Undo)
If you delete a character, line, or word by mistake or give any command you want to reverse, give the command u (Undo) immediately after the command you want to undo. The vim editor will restore the text to the way it was before you gave the last command. If you give the u command again, vim will undo the command you gave before the one it just undid. You can use this technique to back up over many of your actions. With the compatible parameter (page 269) set, however, vim can undo only the most recent change.
:redo (Redo)
If you undo a command you did not mean to undo, give a Redo command: CONTROL-R or :redo (followed by a RETURN). The vim editor will redo the undone command. As with the Undo command, you can give the Redo command many times in a row.
![]() Entering Additional Text
Entering Additional Text
i (Insert) a (Append)
When you want to insert new text within existing text, move the cursor so it is on the character that follows the new text you plan to enter. Then give the i (Insert) command to put vim in Input mode, enter the new text, and press ESCAPE to return vim to Command mode. Alternately, you can position the cursor on the character that precedes the new text and use the a (Append) command.
o/O (Open)
To enter one or more lines, position the cursor on the line above where you want the new text to go. Give the command o (Open). The vim editor opens a blank line below the line the cursor was on; puts the cursor on the new, empty line; and goes into Input mode. Enter the new text, ending each line with a RETURN. When you are finished entering text, press ESCAPE to return vim to Command mode. The O command works in the same way o works, except it opens a blank line above the line the cursor is on.
![]() Correcting Text
Correcting Text
To correct text, use dd, dw, or x to remove the incorrect text. Then use i, a, o, or O to insert the correct text.
For example, to change the word pressing to hitting in Figure 7-4 on page 266, you might use the ARROW keys to move the cursor until it is on top of the p in pressing. Then give the command dw to delete the word pressing. Put vim in Input mode by giving an i command, enter the wordhitting followed by a SPACE, and press ESCAPE. The word is changed, and vim is in Command mode, waiting for another command. A shorthand for the two commands dw followed by the i command is cw (Change word). The command cw puts vim into Input mode.
Tip: Page breaks for the printer
CONTROL-L tells the printer to skip to the top of the next page. You can enter this character anywhere in a document by pressing CONTROL-L while you are in Input mode. If ^L does not appear, press CONTROL-V before CONTROL-L.
![]() Ending the Editing Session
Ending the Editing Session
While you are editing, vim keeps the edited text in an area named the Work buffer. When you finish editing, you must write out the contents of the Work buffer to a disk file so the edited text is saved and available when you next want it.
Make sure vim is in Command mode and use the ZZ command (you must use uppercase Zs) to write the newly entered text to the disk and end the editing session. After you give the ZZ command, vim returns control to the shell. You can exit with :q! if you do not want to save your work.
Caution: Do not confuse ZZ with CONTROL-Z
When you exit from vim with ZZ, make sure that you type ZZ and not CONTROL-Z (typically the suspend key). When you press CONTROL-Z, vim disappears from your screen, almost as though you had exited from it. In fact, vim will continue running in the background with your work unsaved. Refer to “Job Control” on page 294. If you try to start editing the same file with a new vim command, vim displays a message about a swap file.
The compatible Parameter
The compatible parameter makes vim more compatible with vi. By default this parameter is not set. To get started with vim, you can ignore this parameter.
Setting the compatible parameter changes many aspects of how vim works. For example, when the compatible parameter is set, the Undo command (page 268) can undo only the most recent change; in contrast, with the compatible parameter unset, you can call Undo repeatedly to undo many changes. To obtain more details on the compatible parameter, give the command :help compatible RETURN. To display a complete list of vim’s differences from the original vi, use :help vi-diff RETURN. See page 266 for a discussion of the help command.
![]() Tutorial: Using nano to Create and Edit a File
Tutorial: Using nano to Create and Edit a File
The nano text editor (www.nano-editor.org) is a user-friendly, pseudographical text editor, written by Chris Allegretta. It is based on the pico text editor that was distributed with the now defunct Pine mail client (www.washington.edu/pine) developed at the University of Washington. Although not as comprehensive as vim (page 262) and emacs (www.gnu.org/software/emacs), nano has a much gentler learning curve and is adequate for writing and maintaining system files, shell scripts, and Python programs. The nano editor is distributed with Fedora and RHEL as thenano package.
Tip: nano might not be available on a rescue system
The nano editor might not be available when you try to rescue a system (page 450). It is a good idea to know how to perform basic editing using vim for those occasions.
Specifying a terminal
Because nano takes advantage of features that are specific to various kinds of terminals, you must tell it what type of terminal or terminal emulator you are using. On many systems, and usually when you work on a terminal emulator, the terminal type is set automatically. If you need to specify a terminal type explicitly, refer to “Specifying a Terminal” on page 1024.
Starting nano
Start nano using the following command to (create and) edit a file named practice:
$ nano practice
When you press RETURN, the command line disappears, and the screen looks similar to the one shown in Figure 7-7.
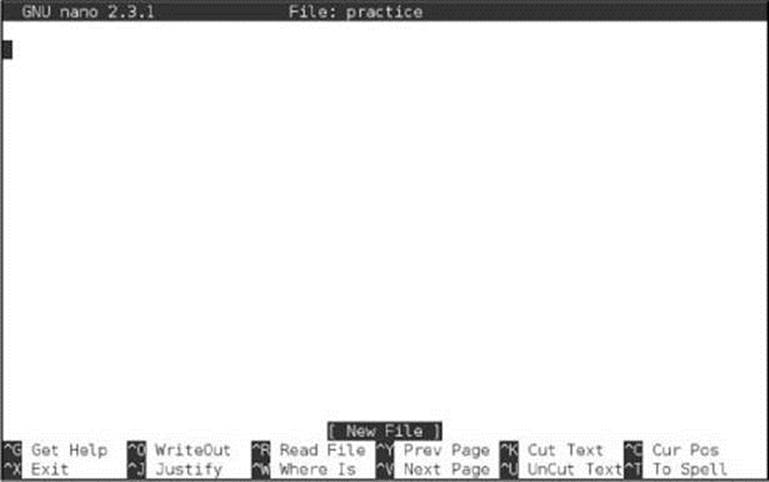
Figure 7-7 Starting nano
If nano displays an Error opening terminal message, see Specifying a terminal, above.
The nano Screen
The top line of the screen has three fields and is called the Title bar (Figure 7-7). The left field displays the name (nano) and version of the program you are running. The center field displays the name of the file you are editing; if you do not specify a filename when you start nano, the wordsNew Buffer appear in place of the filename. The right field displays the word Modified if the buffer (what nano displays on the screen) differs from what is in the file you are editing. When you save the file, nano removes Modified from the screen because the buffer and the file contain the same information.
The third line from the bottom of the screen is the Status bar. This line displays status, informational, and error messages. It also displays prompts and your response to prompts, such as the characters you enter in response to a prompt for a search string.
The bottom two lines hold the Shortcut list. This list displays the most frequently used commands in a given context along with the keys you need to press to execute each command. Figure 7-7 shows that you can press CONTROL-G to display nano help information (^G Get Help), CONTROL-Oto write out the modified buffer (the changes you have made; ^O WriteOut), CONTROL-X to exit from nano (nano will prompt you to write out the buffer if you have modified it; ^X Exit), etc.
Entering Text and Exiting from nano
Wrapping lines
By default, nano does not wrap long lines: It just keeps going, placing a dollar sign at the beginning (and end) of the part of the line that appears on the screen to show that some text is not displayed. If you want to break a long line into shorter lines so you can see all the text at one time on the screen, press CONTROL-J (justify). Alternately, you can cause nano to wrap lines as you type them by calling nano with the –r cols (––fill=cols) option. Set cols to the desired width of the text or, more frequently, to a negative value that specifies the width of the right margin. Using nano –r –8 (or ––fill=–8) works well.
Entering text
To create a new file, start typing. To edit text you have entered, use the ARROW keys to move the cursor, type text to enter new text, and use the keys you use to correct mistakes on the command line (page 122) to remove text from the screen. The nano editor keeps the text you are working on in a buffer until you tell it to write the buffer to disk or to exit.
Exiting from nano
When you are finished creating or modifying a document and want to write the buffer to disk and exit from nano, press CONTROL-X (Exit). If you have modified the buffer since the last time you wrote it out, nano asks whether you want to save the modified buffer; type y to save it (Figure 7-8). The nano editor then confirms the name of the file you are writing the buffer to by prompting with Filename to Write: filename (Figure 7-9). Press RETURN to write to that filename or enter a different filename before you press RETURN. The nano editor terminates execution and returns control to the shell.
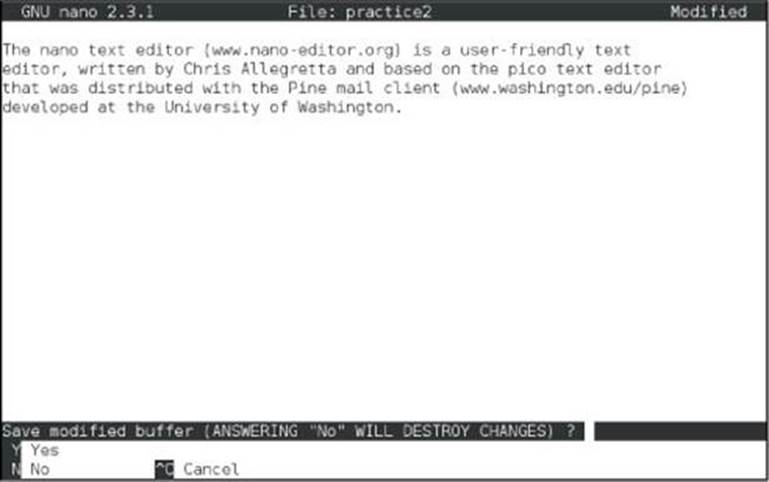
Figure 7-8 Saving the modified buffer
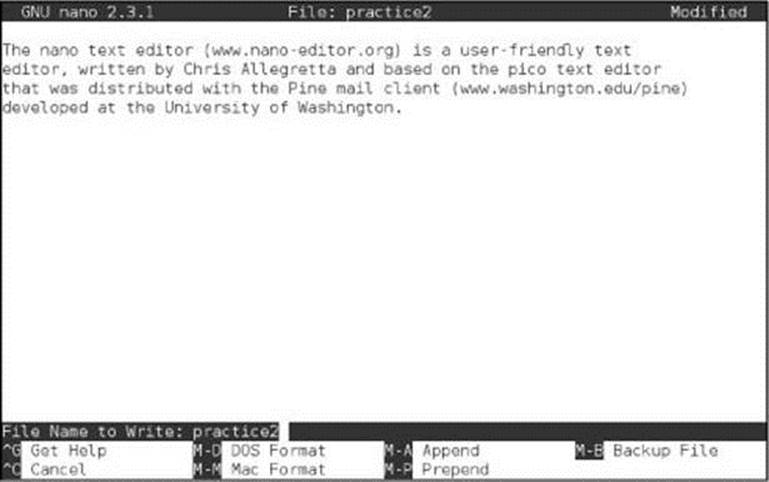
Figure 7-9 Confirming the name of the file you are writing to
Saving the buffer
While you are editing a document, you can use CONTROL-O (WriteOut) to save the buffer without exiting from nano; nano confirms the name of the file you want to write to.
The nano Command Keys
Get Help (CONTROL-G)
Press CONTROL-G (Get Help) to view more nano commands including commands that move the cursor and delete text. In the help text some keys are preceded by a caret (^) and some by an M-.
The CONTROL key
To enter a command specified by a caret followed by a key, press the CONTROL key and the specified key at the same time (e.g., CONTROL-W for Where, which searches for text or moves the cursor). Alternately, you can press the ESCAPE key twice and then press the specified key.
The META key
To enter a command specified by M- followed by a key, press the META or ALT key and the specified key at the same time (e.g., ALT-\ to move the cursor to the first line of the file). Alternately, you can press the ESCAPE key one time and then press the specified key.
Chapter Summary
The utilities introduced in this chapter are a powerful subset of the many utilities available on Linux. Because you will use them frequently and because they are integral to the following chapters, it is important that you become comfortable using them. The utilities listed in Table 7-2manipulate, display, locate, compare, and print files.
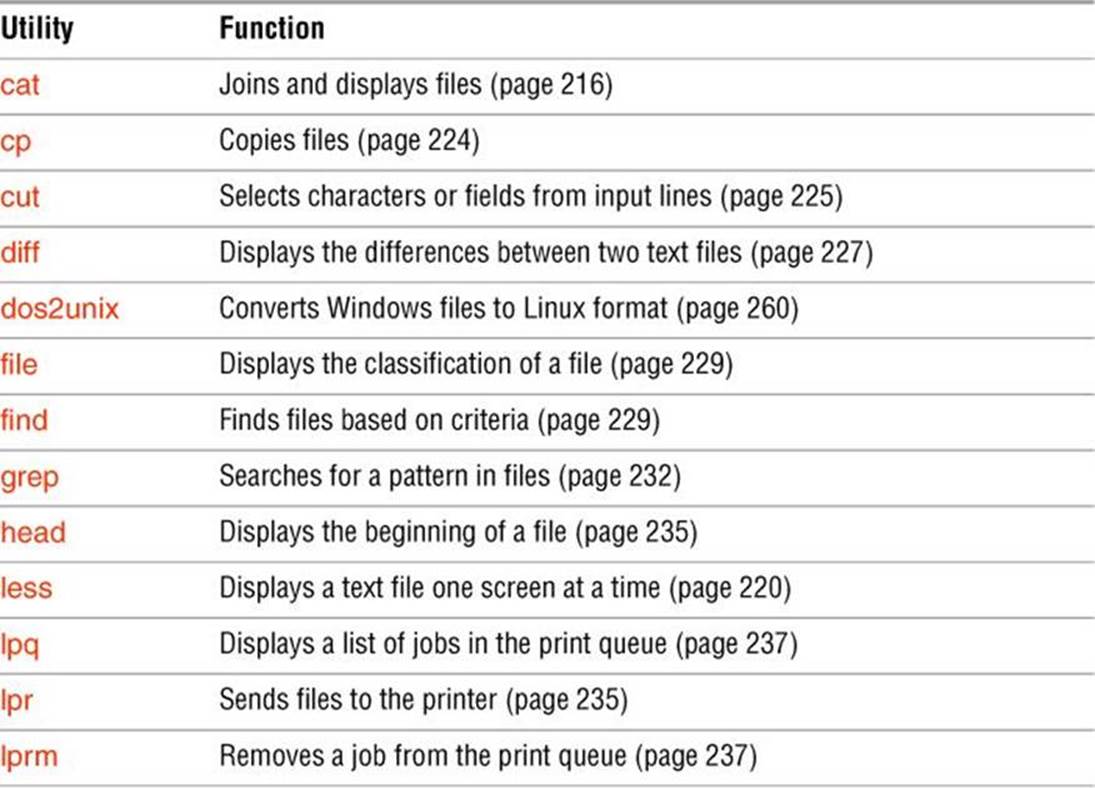
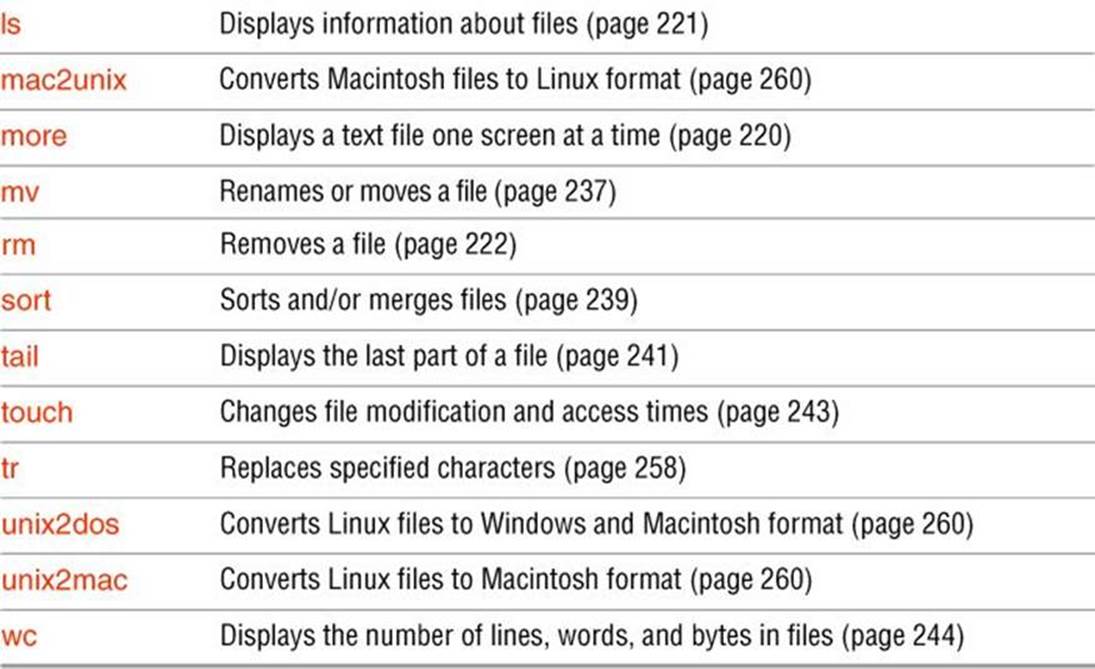
Table 7-2 File utilities
To reduce the amount of disk space a file occupies, you can compress it. Compression works especially well on files that contain patterns, as do most text files, but it reduces the size of almost all files. The inverse of bzip2—bunzip2—restores a file to its original, decompressed form. Thebzip2 utility is the most efficient of these. An archive is a file, frequently compressed, that contains a group of files. The tar utility packs and unpacks archives. The filename extensions .tar.bz2, .tar.gz, and .tgz identify compressed tar archive files and are often seen on software packages obtained over the Internet. Table 7-3 lists utilities that compress, decompress, and archive files.
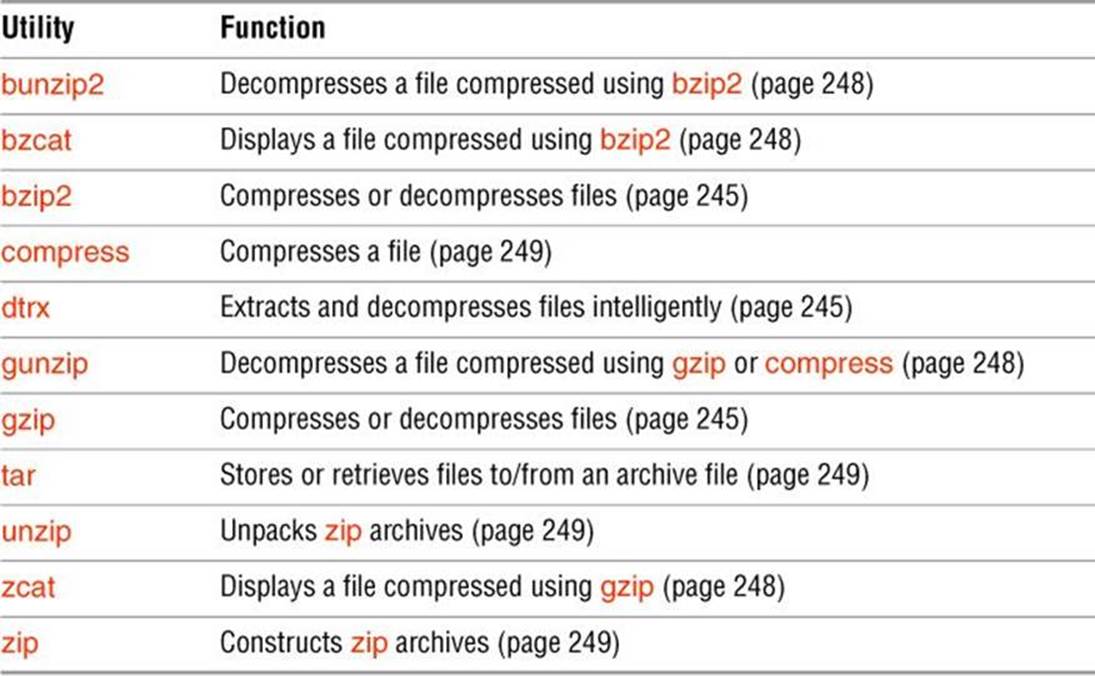
Table 7-3 (De)compression and archive utilities
Table 7-4 lists utilities that display information about the local system and users.
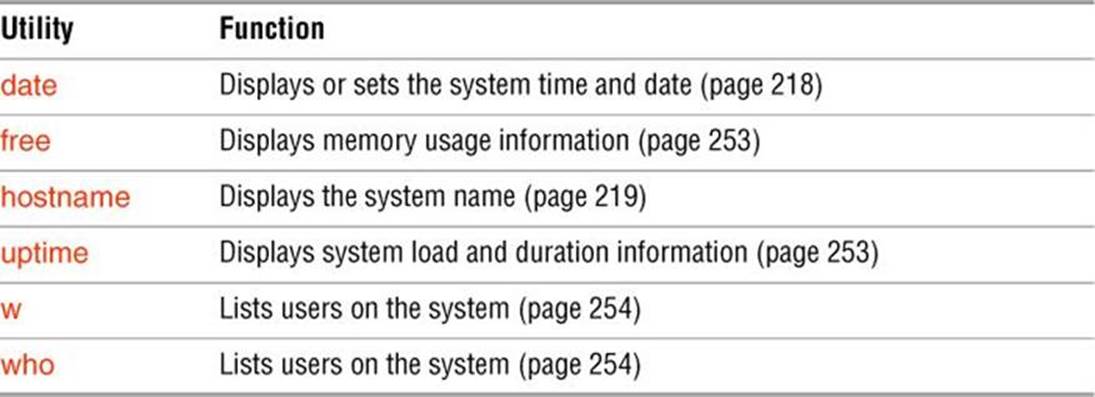
Table 7-4 User and system information utilities
Table 7-5 lists miscellaneous utilities.
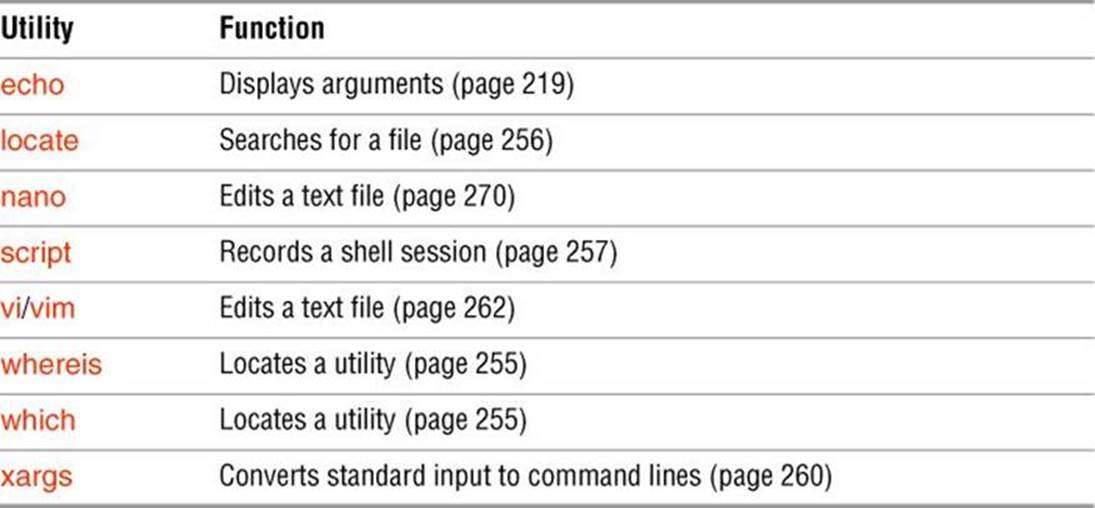
Table 7-5 Miscellaneous utilities
Exercises
1. Which commands can you use to determine who is logged in on a specific terminal? Which command shows you which terminal you are giving the command from?
2. Give a command that displays a long listing of the files in /bin in reverse chronological order. Give the command again but this time display the output one screen at a time.
3. What happens when you give the following commands if the file named done already exists?
$ cp to_do done
$ mv to_do done
4. List the first 20 lines in /etc/services that describe TCP ports.
5. How can you find the phone number for Ace Electronics in a file named phone that contains a list of names and phone numbers? Which command can you use to display the entire file in alphabetical order? How can you display the file without any adjacent duplicate lines? How can you display the file without any duplicate lines?
6. What happens when you use diff to compare two binary files that are not identical? (You can use gzip to create the binary files.) Explain why the diff output for binary files is different from the diff output for ASCII files.
7. What is the result of giving the which utility the name of a command that resides in a directory that is not in your search path?
8. Are any of the utilities discussed in this chapter located in more than one directory on the local system? If so, which ones?
9. Experiment by calling the file utility with the names of files in /usr/bin. How many different types of files are there?
10. Which command can you use to look at the first few lines of a file named status.report? Which command can you use to look at the end of the file?
Advanced Exercises
11. Display only the names of the last ten services listed in /etc/services. (Hint: the services are listed in the first column.)
12. Display a long listing of the files in the /etc/pam.d directory hierarchy that are links.
13. Display a count of the number of words in the /etc/passwd file.
14. Display the /etc/passwd file, replacing all colons (:) with TABs. Display the /etc/services file, substituting one SPACE for each occurrence of multiple SPACEs.
15. Change the modification time of /bin/bash to the system time. What happens? Why? Copy /bin/bash to the working directory, display its modification time, and then change its modification time to the system time. Display the modification time of your copy of bash and the system time. Change its modification time to January 5, 2018 at 2:34 PM and display its modification time.
16. Copy /bin/bash to the working directory and make two copies so you have three identical files: bash1, bash2, and bash3. Compress bash1 using gzip and bash2 using bzip2. Do not change bash3. Which utility does the best job of compressing the file? Which does the worst? How big is bash2.bz2 compared to bash3?
17. Re-create the colors.1 and colors.2 files used in the example on page 228. Test your files by running diff –u on them. Does diff display the same results as in the figure?
18. Try giving these two commands:
$ echo cat
$ cat echo
Explain the differences between the output of each command.
19. Repeat exercise 5 using the file phone.gz, a compressed version of the list of names and phone numbers. Consider more than one approach to answer each question and explain how you made your choices.
20. Find or create files that
a. gzip compresses by more than 80 percent.
b. gzip compresses by less than 10 percent.
c. Get larger when compressed with gzip.
d. Use ls –l to determine the sizes of the files in question. Can you characterize the files in a, b, and c?