RHCSA & RHCE Red Hat Enterprise Linux 7: Training and Exam Preparation Guide (EX200 and EX300), Third Edition (2015)
Part I. RHCSA Section
Chapter 13. Securing Access with SSH and TCP Wrappers
This chapter describes the following major topics:
· Understand the OpenSSH service, versions, and algorithms
· Overview of encryption techniques and authentication methods
· Overview of OpenSSH administration commands and configuration files
· Configure private/public key-based authentication
· Use OpenSSH client commands: ssh, scp, and sftp
· Access OpenSSH server from Windows
· Understand the use and syntax of TCP Wrappers
RHCSA/RHCE Objectives:
04. Access remote systems using ssh
20. Securely transfer files between systems
49. Configure key-based authentication for SSH
80. Configure key-based authentication (an RHCE objective)
81. Configure additional options described in documentation (an RHCE objective)
Secure Shell is a network protocol that delivers a secure mechanism for data transmission between source and destination systems over insecure network channels. The secure shell includes a set of utilities that provides remote users the ability to log in, transfer files, and execute commands securely using encryption and authentication. These tools have widely replaced their insecure counterparts in the corporate world.
TCP Wrappers is a host-based service that is used to control access to network services running on the system. It may be configured to permit (or prevent) specific users, hosts, networks, and domains to access one or more network services on the system.
The OpenSSH Service
Secure Shell (SSH) provides a secure mechanism for data transmission between source and destination systems over IP networks. It was designed to replace the old remote login programs that transmitted user passwords in clear text and data unencrypted. SSH uses encryption techniques to secure a communication channel and employs digital signatures for user authentication, making it extremely hard for people to gain unauthorized access to passwords or the data in transit. It also performs checks on the data being transferred throughout a session to ensure integrity. SSH includes a set of utilities, providing remote users with the ability to log in, transfer files, and execute commands securely using strong encryption and authentication mechanisms. Due to their powerful security features, SSH utilities have widely replaced their conventional unsecured login and file transfer counterparts in computing environments.
OpenSSH is a free, open source implementation of proprietary SSH. Once applied successfully on the system, the telnetd, rlogind, rshd, rexec, and ftpd services can be disabled after a careful examination to eliminate potential impact. The secure command that has replaced telnetd, rlogin, rsh, andrexec is called ssh and those that have replaced rcp and ftp are referred to as scp and sftp, respectively.
OpenSSH supports additional features such as tunneling, arbitrary TCP port forwarding, and X11 forwarding. A discussion of these topics is beyond the scope of this book.
OpenSSH uses TCP Wrappers for access control.
OpenSSH Versions and Algorithms
OpenSSH has evolved over the years. It currently supports two versions: v1 and v2, and both are available in RHEL7. However, we should be using the newer version as it integrates many enhancements and improvements over the older version, and includes numerous advanced configuration options. The default in RHEL7 is v2 as defined in the /etc/ssh/sshd_config file. Both versions support various algorithms for data encryption and user authentication (digital signatures). OpenSSH v1 supports the RSA algorithm only whereas the other version supports three algorithms: RSA, DSA, and ECDSA (a new variant of DSA). RSA includes the support for both encryption and authentication. In contrast, the use of DSA and ECDSA is restricted to providing digital signatures only.
RSA stands for Rivest-Shamir-Adleman, who first published this algorithm, DSA for Digital Signature Algorithm, and ECDSA is an acronym for Elliptic Curve Digital Signature Algorithm. RSA is more common and is widely used in the industry partly because it supports both encryption and digital signatures.
Encryption Techniques
Encryption is a way of transforming information into a scrambled form to conceal the real information from unauthorized access. Encryption is done at the client end and the reverse process, called de-encryption, happens on the server. OpenSSH employs various encryption techniques during an end-to-end communication session. These techniques include symmetric and asymmetric encryption.
Symmetric Encryption Technique: This type of encryption uses a single secret key (or a pair of keys) to protect authentication traffic as well as the entire subsequent communication session. This key is generated as a result of a negotiation process between the client and server.
Asymmetric Encryption Technique: This technique uses a private/public key combination for encryption. These keys are randomly-generated lengthy strings of alphanumeric characters attached to messages during a communication session. The client transmutes the information using a publickey and the server decrypts it using the paired private key. The private key must be kept secure since it is private to that one system only. The public key is distributed to clients. This technique is used for channel encryption as well as for user authentication.
Authentication Methods
Once an encrypted channel is established between the client and server, additional negotiations take place between the two to authenticate the user trying to gain access to the server. OpenSSH offers several methods for this purpose, and they are listed below in the order in which they are attempted during the authentication process:
· GSSAPI-based (Generic Security Service Application Program Interface) authentication
· Host-based authentication
· Public key-based authentication
· Challenge-response authentication
· Password-based authentication
GSSAPI-Based Authentication: GSSAPI provides a standard interface that allows security mechanisms such as Kerberos to be plugged in. OpenSSH uses this interface and the underlying Kerberos for authentication. With this method, an exchange of tokens take place between the client and server to validate user identity. This authentication method is only supported in OpenSSH version 2.
Host-Based Authentication: This type of authentication allows a single user, a group of users, or all users on the client to be authenticated on the server. A user may be configured to log in with a matching username on the server or as a different user that exists on the server. For each user that requires an automatic entry on the server, a .shosts file is set up in that user’s home directory on the server containing the client name or IP, and, optionally, a different username (this user must exist on the server). The same rule applies to a group of users or all users on the client; however, the setup is done in the /etc/ssh/shosts.equiv file.
Private/Public Key-Based Authentication: This method uses a private/public key combination for user authentication. The user on the client has a public key and the server stores the corresponding private key. At the login attempt, the server prompts the user to enter the key and logs the user in if the key is validated.
Challenge-Response Authentication: This method is based on the response(s) to one or more arbitrary challenge questions that the user has to answer correctly in order to gain login access to the server.
Password-Based Authentication: This is the last fall back option. The server prompts the user to enter their password. It checks the password against the stored entry in the shadow (or passwd) file and allows the user in if the password is confirmed.
Of the five authentication methods described above, the password-based method is common and requires no further explanation. The first two and the challenge-response methods are beyond the scope of this book. We will be using public/private authentication and encryption methods in our exercises to follow.
OpenSSH Packages
OpenSSH has three packages that are of interest. These are openssh, openssh-clients, and openssh-server. The openssh package provides the ssh-keygen command and some supported library routines; the openssh-clients package includes commands, such as scp, sftp, slogin, ssh, and ssh-copy-id, and a client configuration file /etc/ssh/ssh_config; and the openssh-server package contains the sshd daemon, a server configuration file /etc/ssh/sshd_config, and library routines. By default, the openssh-server package is installed during OS installation, allowing users to log in to the system using the ssh command.
Commands and Daemon
As indicated, OpenSSH packages install several commands on the system. Moreover, the server package also loads the sshd daemon that must run on the system to allow users to be able to connect to the system over the ssh channel. This daemon listens on the well-known TCP port 22 by default. Table 13-1 lists and explains some of the key commands.
|
Command |
Description |
|
scp |
Secure alternative to the rcp command. |
|
sftp |
Secure alternative to the ftp command. |
|
slogin |
Secure alternative to the rlogin command. |
|
ssh |
Secure alternative to the telnet and rlogin commands. |
|
ssh-add |
Adds RSA/DSA/ECDSA characteristics to ssh-agent. |
|
ssh-agent |
Authentication Agent. Holds private keys used for the RSA/DSA/ECDSA authentication. |
|
ssh-copy-id |
Copies RSA/DSA/ECDSA keys to remote systems. |
|
ssh-keygen |
Generates private and public keys. |
Table 13-1 OpenSSH Commands
We will be using most of these commands later in this chapter.
System-Wide Server and Client Configuration Files
OpenSSH has configuration files that define default global settings for both server and client to control how they should operate. These files are located in the /etc/ssh directory, and are called sshd_config and ssh_config, respectively. The server has an additional configuration file called sshd and it is located in the /etc/sysconfig directory. In addition, the /var/log/secure log file is used to capture authentication messages.
A few directives from the sshd_config file are displayed below:
|
# cat /etc/ssh/sshd_config |
|
|
#Port |
22 |
|
#Protocol |
2 |
|
HostKey |
/etc/ssh/ssh_host_rsa_key |
|
HostKey |
/etc/ssh/ssh_host_ecdsa_key |
|
SyslogFacility |
AUTHPRIV |
|
AuthorizedKeysFile |
.ssh/authorized_keys |
|
PasswordAuthentication |
yes |
|
ChallengeResponseAuthentication |
no |
|
GSSAPIAuthentication |
yes |
|
UsePAM |
yes |
|
X11Forwarding |
yes |
The above shows just a few directives from the file; there are many more that we may change if required. Some of these are explained in Table 13-2.
|
Directive |
Description |
|
Port |
Default is 22. Specifies the port to listen on. |
|
ListenAddress |
Specifies the IP to be used for incoming ssh requests. |
|
Protocol |
Default is 2. Specifies the ssh protocol version to be used. |
|
SyslogFacility |
Default is AUTHPRIV. Defines the facility code to be used when logging messages to the /var/log/secure file. This is based on the configuration in the /etc/rsyslog.conf file. |
|
LogLevel |
Default is INFO. Defines the level of criticality for the messages to be logged. |
|
LoginGraceTime |
Default is 2 minutes. Defines the period after which the server disconnects the user if the user did not successfully log in. |
|
PermitRootLogin |
Default is yes. Allows the root user to be able to log in directly on the system. |
|
MaxAuthTries |
Default is 6. Specifies the number of authentication attempts per connection. |
|
MaxSessions |
Default is 10. Allows to open up to this many ssh sessions. |
|
RSAAuthentication |
Default is yes. Specifies whether to allow the RSA authentication. |
|
PubKeyAuthentication |
Default is yes. Specifies whether to enable public key-based authentication. |
|
AuthorizedKeysFile |
Default is ∼/.ssh/authorized_keys. Specifies the name and location of the file containing the authorized keys for a user. |
|
PasswordAuthentication |
Default is yes. Specifies whether to enable local password authentication. |
|
PermitEmptyPasswords |
Default is no. Specifies whether to allow null passwords. |
|
ChallengeResponseAuthentication |
Default is yes. Specifies whether to allow challenge-response authentication. |
|
UsePAM |
Default is yes. Enables or disables user authentication via PAM. If enabled, only root will be able to run the daemon. |
|
AllowAgentForwarding |
Default is yes. Enables or disables the ssh-agent command to forward private keys to remote systems. |
|
AllowTCPForwarding |
Default is yes. Specifies whether to allow forwarding TCP communication over an ssh channel. |
|
X11Forwarding |
Default is yes. Allows or disallows remote access to GUI applications. |
|
TCPKeepAlive |
Default is yes. Specifies whether to send TCP keepalive signals to the ssh server to check its accessibility. |
|
UseLogin |
Default is no. Allows or disallows the use of the login command for interactive login sessions. |
|
Compression |
Default is delayed. Specifies whether to allow or delay compression until the user has authenticated successfully. |
|
ClientAliveInterval |
Default is 0. Defines a timeout interval in seconds for the server to send a message to the client seeking a response. |
|
ClientAliveCountMax |
Default is 3. If the ClientAliveInterval directive is set to a non-zero value, this directive specifies the maximum number of messages to be sent to the client. |
|
AllowUsers |
Allows only the listed users access to the server. Syntax is: |
|
AllowGroups |
Allows only the listed group members access to the server. Syntax is: |
|
DenyUsers |
Do not allow the listed users access to the system. Syntax is: |
|
DenyGroups |
Do not allow the listed group members access to the system. Syntax is: |
Table 13-2 OpenSSH Server Configuration File
Besides using the AllowUsers, DenyUsers, AllowGroups, and DenyGroups directives in the sshd_config file for setting user-based security, we can instead define these restrictions in the TCP Wrappers files hosts.allow and hosts.deny as appropriate. Furthermore, we can restrict system access from specific systems, domains, or networks via port 22 using the iptables firewall.
Now, let’s look at a few directives from the beginning of the system-wide client configuration file ssh_config:
# cat /etc/ssh/ssh_config
…… . .
# Host *
# ForwardAgent no
# ForwardX11 no
# RhostsRSAAuthentication no
# RSAAuthentication yes
# PasswordAuthentication yes
# HostbasedAuthentication no
# GSSAPIAuthentication no
…… . .
We can define client-specific configuration in this file. For each client or a group of clients, we can add a separate section beginning with the keyword Host and listing the directives specific to that client or group only. Many of the directives are the same as for the server. See Table 13-2 earlier for details.
Per-User Client Files
OpenSSH allows us to store default values for our ssh communication sessions in a separate file. These per-user settings override the system-wide defaults and they are saved in a file called config in the ∼/.ssh directory. The format of this file is the same as that of the ssh_config file. ∼/.ssh does not exist by default; it is created when we attempt to connect to the server the first time and it accepts the presented key.
The ∼/.ssh directory has a file called known_hosts. This file stores the hostname, IP address, and a copy of the public key of the remote system that we have accessed. A sample entry from this file on server1 is shown below:
server2,192.168.0.120 ecdsa-sha2-nistp256 AAAAE2VjZHNhLXNoYTItbmlzdHAyNTYAAAAIbmlzdHAyNTYAAABBBCP4LK2GHWIDv+a/QX/gp0ggl8Q1H85SLExeyeS4ph6o8Nl/ArWWeBUWSl1PLDUIczGGsLjeUBtUgXdVDhwO/CQ=
There are three additional files in ∼/.ssh that we may be interested in looking at. These files do not exist by default. Two of them hold private (id_rsa, id_dsa, or id_ecdsa) and public (id_rsa.pub, id_dsa.pub, or id_ecdsa.pub) keys, and the third one (authorized_keys) is used when we set up a trust relationship between two systems. I will show the contents of these files in one of the exercises below to give you an idea of how they look like.
Exercise 13-1: Configure Private/Public Key-Based Authentication
This exercise should be done on server1 and server2.
For this exercise, assume that user1 exists on both server1 and server2.
In this exercise, you will generate RSA private/public key combination for user1 on server1 and use it to allow this user access to server2 using the ssh command. You will show the private and public file contents and the log file messages related to the login attempt.
1. Log on to server1 as user1.
2. Generate RSA keys and save them in ∼/.ssh in default files. Enter passphrase redhat123 when prompted.
$ ssh–keygen
Generating public/private rsa key pair.
Enter file in which to save the key (/home/user1/.ssh/id_rsa):
Created directory '/home/user1/.ssh'.
Enter passphrase (empty for no passphrase):
Enter same passphrase again:
Your identification has been saved in /home/user1/.ssh/id_rsa.
Your public key has been saved in /home/user1/.ssh/id_rsa.pub.
The key fingerprint is:
9c:09:ec:b9:ab:67:f7:77:aa:9a:c6:38:ca:3d:e8:af user1@server1.example.com
The key's randomart image is:
+--[ RSA 2048]----+
…… . .
The contents of id_rsa (private key) and id_rsa.pub (public key) files are shown below:
$ cat ∼/.ssh/id_rsa
-----BEGIN RSA PRIVATE KEY-----
Proc-Type: 4,ENCRYPTED
DEK-Info: AES-128-CBC,1B940AE24240F15CBF5CB82B756655AF
YoeDYpyExsC7YFNvfNXB8zDmw3A6xvaXyum5DhN3Qr1Hvn5g6uz8dG+MbM1AGDi4
uymHfLPuXd/KP4ju1p3MxcEXcX6a0YynwUgtPGkURcF9MywF/sGYoueVDev2VP00
ViAJPJyn9vet14p0Lp16skGgU0Eiwx+cvixEaemOfFA9vYDxqJKoGYpd8cAUissK
ZXPVH0Zf0XuYTNAI038fMxkcANdKlXg1CrAp+3hp69+A7cqrAZH4oYlQY3Q5wMsY
YAB2OsGj52cZsMBPcGKL4JYcFmQbhq/NJPRJOhUXxOxLpyojkMIvm7KDqD7X6oW7
8CTXLWeeR2wTxmY0niHcbzMEA/ByIxcXwJvu/yDksYEboxAYmqjzRv3tXHkrCAQ2
RXsedTjBFeRAqZ1TAg1CfccrZK/cz0JRLvG04aIZ+10eUs/cEnrwTtYGzJZ9gLjg
mPQdQngdKJvZdFSTjXO8CXEQ5JdVhb+CgIRy+D2mMsJgGtmy8nUWVZupgU479wbm
Eld4PNTiBsw8DoLYdj6gzJM66/D0q+6S3uA73+AatEJcWx2j7fHLW1ZwbUd3eWMW
FMXqljFm0pma9mFtqi+i5033YG3uikV5lpsMOd+Vn66sNpEN/bvwdVwTlX0uFYhD
KFK1dT4VQt7/NYYNFp1A61rykwxD9GyOB7yAo012lBCsjD80uaiauo7Ut9U3Kdf9
8nZHrsOt98N5Fdt5aef1htLs2xaGmKp5SPrdHwLLmFt8IKklLaPXkG+5+fxFLclO
t/G0nEYjLFapdKAtut6r+NAFGVF1zko7FOG5Nce2H0TYHyQgToOw1oNsd7qCuaec
LF4oQKL5esqOJxx7g0exGuhgVV7x1Y0+Dg1rSKBLouLt2fwPxvDubURfD3lc3WRX
OMYgL9GFMGw6mDn8J0Lqm1Rmq8rG08/XRJS+UsezNDDibBqFGvqebdUGhh0qdSWM
LmLWRr262AgBAxtRtDGevTZ+8i2PP30T9Cgd6ZZaDgLf9R5DQeAp2o+2/qZUtjzA
B/sTV3EJm9H+nZVseoJYU5Eiat6kgeiZqTXJMoBiv8czGY3u2sPLLtYv/xGnKizn
Uos+qOwt2XRlGhnkI4EsTB6p/sHpGW3U9D86LsbZa+aAMYfMXRBd+3uKknOnLPR/
72wUAyVhmHfAssPayeHz0XbupVKQzc6+xNCOmTJhL639xQqLGav1fCrp0EFLL0SZ
jZlpW7nuuDakKRisLbEErkLJ2XgKMZcWDTJ8Oc26gl1ofrJnAVZOAq0TBbGEbuC0
w+zxmEwVcUQ7RBet/4+l+zJQo3tlXZFgl8qYDVKK7X7M8QLC3gvSy35PNYYbv9JI
7WkjSUEl+cCWfk4jTzhPETqRKYg7cCPM8Vu29vq1u3LrmIT58WeqQclu5J8XMrX+
SdIrz2Ppy1GqFtN9JnldkIns+zoeieEYZuKXjQei7BEi6rFUjaD1609zenBVjqr8
AlmnaZFbhoeeuIJDNvYANmO0R9poWmoZfylCWRS9TlLwuKz7rQPm4wx2kNQSAGnL
Fi8DNzg/VV0Pjhp5xkwnLR8rHirdLrUB+Eveqb9qNoX2Vw/Cps86UchAUu8CYPeU
-----END RSA PRIVATE KEY-----
$ cat ∼/.ssh/id_rsa.pub
ssh-rsa AAAAB3NzaC1yc2EAAAADAQABAAABAQDTypuZx+D+soDxXgi8aAy/+Kg30xO2AtQF0HDPCt+xwTH7QYHyTM9CXS7NL0wvZsuCN6It1aVXnNnOk3D0nOQZonOxTGlJpdrpBYXp09nuAdCMfO+78toXEDJQTL/FoZG+efsoi1dIlCsKP2wKv4LUmz+JQwrttag0FjHE4m7H7hlZftTclfeZyHg339VkDu7ue+tqA2AuxfrEkFcImPwxW0f0goLWWwY20ToDv94Adl9JWADr1cOs8UWgXiO4gfUIRIbwr/wnKKQwJLP2bsp8ONp844W9VHL29imysRTboSI5eiuIVta1sZYyWhDbLJEmZ2bD8MAlI7q799ARJisz user1@server1.example.com
3. Copy the public key file to server2 under /home/user1/.ssh. Accept the fingerprints for server2 when prompted. Then enter the password for user1 set on server2 to continue with the file copy. This file will be copied as authorized_keys.
$ ssh-copy-id –i ∼/.ssh/id_rsa.pub server2
The authenticity of host 'server2 (192.168.0.120)' can't be established.
ECDSA key fingerprint is e8:b1:ce:8b:71:92:b2:8a:50:ed:d4:15:a3:e3:63:ec.
Are you sure you want to continue connecting (yes/no)? yes
/bin/ssh-copy-id: INFO: attempting to log in with the new key(s), to filter out any that are already installed
/bin/ssh-copy-id: INFO: 1 key(s) remain to be installed -- if you are prompted now it is to install the new keys
user1@server2's password:
Number of key(s) added: 1
Now try logging into the machine, with: "ssh 'server2'"
and check to make sure that only the key(s) you wanted were added.
At the same time, this command also creates or updates the known_hosts file on server1 and stores the fingerprints for server2 in it:
$ cat ∼/.ssh/known_hosts
server2,192.168.0.120 ecdsa-sha2-nistp256 AAAAE2VjZHNhLXNoYTItbmlzdHAyNTYAAAAIbmlzdHAyNTYAAABBBCP4LK2GHWIDv+a/QX/gp0ggl8Q1H85SLExeyeS4ph6o8Nl/ArWWeBUWSl1PLDUIczGGsLjeUBtUgXdVDhwO/CQ=
4. On server1, run the ssh command as user1 to connect to server2. Answer yes when prompted to accept the server’s fingerprints. Supply the passphrase for user1.
$ ssh server2
Enter passphrase for key '/home/user1/.ssh/id_rsa':
Last login: Sat Nov 22 08:54:33 2014 from server1.example.com
We can view this login attempt in the /var/log/secure file on server2. You need to be root to view this log file.
# tail /var/log/secure
Nov 22 09:02:07 server2 sshd[27133]: Accepted publickey for user1 from 192.168.0.110 port 46996 ssh2: RSA 9c:09:ec:b9:ab:67:f7:77:aa:9a:c6:38:ca:3d:e8:af
Nov 22 09:02:07 server2 sshd[27133]: pam_unix(sshd:session): session opened for user user1 by (uid=0)
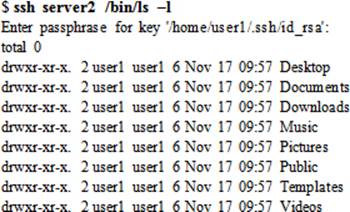
Executing a Command Remotely Using ssh
The ssh command is a secure replacement for telnet, rlogin, and rsh. It allows us to securely sign in to a remote system or execute a command without actually logging on to it. The previous exercise demonstrated how a user can log in using this command. The following shows how to use this command to execute the specified command on a remote system.
Issue ssh on server1 to view the listing of user1’s home directory on server2. Enter the passphrase when prompted.
Copying Files Using scp
Similarly, user1 can execute the scp command to transfer files from server1 to server2, and vice versa. To copy server1:/home/user1/file1 to server2:/home/user2, use the scp command as follows. Enter the passphrase for user1 when prompted.
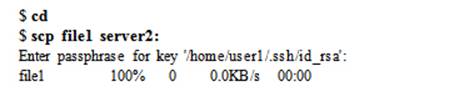
Now let’s copy the server2:/usr/bin/zip file to server1:/home/user1:

As long as user1 has the required read and write permissions, they can transfer any file between source and destination systems into any directory.
Transferring Files Using sftp
In the same manner, we can execute the sftp command on server1 to connect to server2 and download or upload files between the two systems:
$ sftp server2
Enter passphrase for key '/home/user1/.ssh/id_rsa':
Connected to server2.
sftp>
Type ? at the prompt to view available commands. A short description of what each command does is also displayed.
|
sftp> ? |
|
|
Available commands: |
|
|
bye |
Quit sftp |
|
cd path |
Change remote directory to 'path' |
|
chgrp grp path |
Change group of file 'path' to 'grp' |
|
chmod mode path |
Change permissions of file 'path' to 'mode' |
|
chown own path |
Change owner of file 'path' to 'own' |
|
df [-hi] [path] |
Display statistics for current directory or filesystem containing 'path' |
|
exit |
Quit sftp |
|
get [-Ppr] remote [local] |
Download file |
|
reget remote [local] |
Resume download file |
|
help |
Display this help text |
|
lcd path |
Change local directory to 'path' |
|
lls [ls-options [path]] |
Display local directory listing |
|
lmkdir path |
Create local directory |
|
ln [-s] oldpath newpath |
Link remote file (-s for symlink) |
|
lpwd |
Print local working directory |
|
ls [-1afhlnrSt] [path] |
Display remote directory listing |
|
lumask umask |
Set local umask to 'umask' |
|
mkdir path |
Create remote directory |
|
progress |
Toggle display of progress meter |
|
put [-Ppr] local [remote] |
Upload file |
|
pwd |
Display remote working directory |
|
quit |
Quit sftp |
|
rename oldpath newpath |
Rename remote file |
|
rm path |
Delete remote file |
|
rmdir path |
Remove remote directory |
|
symlink oldpath newpath |
Symlink remote file |
|
version |
Show SFTP version |
|
!command |
Execute 'command' in local shell |
|
! |
Escape to local shell |
|
? |
Synonym for help |
Some of the common commands at the sftp> prompt are cd/lcd, get/put, ls/lls, pwd/lpwd, mkdir/rmdir, quit/exit, rename, and rm.
Accessing OpenSSH Server from Windows
On the Windows side, several freeware ssh client programs are available. One such program is puTTY, which can be downloaded free of cost from the Internet. Figure 13-1 shows its interface.
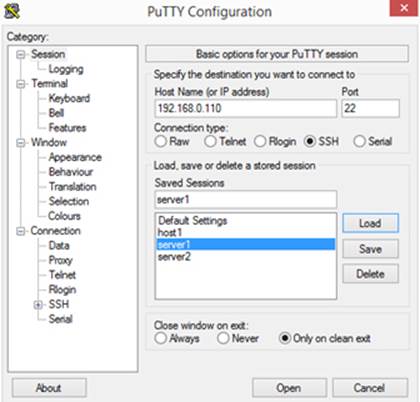
Figure 13-1 puTTY Interface
puTTY is a straightforward program to use. We simply enter the hostname or IP address of the remote system and click Open to establish a connection. We need to ensure that port 22 is entered and SSH protocol is selected. We can assign a name for this connection and click Save to save it for future use.
TCP Wrappers
TCP Wrappers is a host-based mechanism that is used to limit access to wrappers-aware TCP services on the system by inbound clients. The access can be controlled by specifying which services are allowed or denied access by which users and from which sources (host, network, or domain). The services that wrappers can control include ftp, ssh, telnet, tftp, finger, rsh, and talk. The software package associated with the wrappers is loaded by default as part of the OS installation, and it is called tcp_wrappers. We can produce details for this package using the yum command:
|
# yum info tcp_wrappers |
|
|
Name |
: tcp_wrappers |
|
Arch |
: x86_64 |
|
Version |
: 7.6 |
|
Release |
: 77.el7 |
|
Size |
: 202888 |
|
Repo |
: installed |
|
From repo |
: anaconda |
|
Summary |
: A security tool which acts as a wrapper for TCP daemons |
|
URL |
: ftp://ftp.porcupine.org/pub/security/index.html |
|
License |
: BSD |
|
Description |
: The tcp_wrappers package provides small daemon programs which can |
|
: monitor and filter incoming requests for systat, finger, FTP, |
|
|
: telnet, rlogin, rsh, exec, tftp, talk and other network services. |
|
|
: Install the tcp_wrappers program if you need a security tool for |
|
|
: filtering incoming network services requests. |
|
|
: This version also supports IPv6. |
|
Two files – hosts.allow and hosts.deny – located in the /etc directory are critical to the functionality of TCP Wrappers. The default files contain no access restrictions. The .allow file is referenced before the .deny file is. If these files do not contain an entry for the requesting user or the source, wrappers grants access to the inbound request.
Here is how it works: when a TCP client request comes in, the wrappers daemon tcpd scans the .allow file and requests the start of the respective service process for the client if it finds a match in that file. If .allow does not have a match, wrappers consults the .deny file and denies access to the service if it discovers a match there. If no match is detected in the .deny file either, tcpd requests the start of the respective server daemon to establish a link with the client. Wrappers entertains only the first matching entry as it scans the files and it discontinues the search as soon as it finds the first match. Any changes made to either file take effect right away.
The format of both files is identical and it is based on “service : user@source” as shown below:
<name of service process> : <user@source>
The first column lists the name of a service daemon such as telnetd, sshd, and ftpd, and the second column specifies who (username) from where (hostname, network address, or a domain name) is or is not permitted. If a username is missing, the rule applies to all users. Similarly, a missing source represents all sources.
Wrappers supports some wildcards to match sets of services or sources. These include ALL, LOCAL, KNOWN, and UNKNOWN. The ALL wildcard may be used in either field to represent “open to all”; the LOCAL wildcard matches any hostnames that do not contain a leading dot; the KNOWN wildcard matches resolveable hostnames; and the UNKNOWN wildcard is the opposite of KNOWN. In addition, wrappers allows us to use an operator called EXCEPT to define an exception within a rule.
EXAM TIP: A thorough understanding of the syntax of entries placed in these files is important.
Several service:user@source combinations can be defined in the wrappers access control files. Table 13-3 provides some examples.
|
service : user@source |
/etc/hosts.allow |
/etc/hosts.deny |
|
ALL:ALL |
Allows all services from all sources. |
Denies all services from all sources. |
|
ALL:user1 |
Allows all services to user1. |
Denies all services to user1. |
|
ALL:user1@server1 |
Allows all services to user1@server1. |
Denies all services to user1@server1. |
|
ALL:.example.com |
Allows all services from example.com domain. |
Denies all services from example.com domain. |
|
ALL:192.168.0. |
Allows all services from 192.168.0 network. |
Denies all services from 192.168.0 network. |
|
sshd:ALL |
Allows ssh access from all sources. |
Denies ssh access from all sources. |
|
sshd:LOCAL |
Allows ssh access from local network. |
Denies ssh access from local network. |
|
vsftpd:192.168.0. |
Allows ftp access from 192.168.0 network. |
Denies ftp access from 192.168.0 network. |
|
vsftpd:192.168.0.0/24 |
Allows ftp access from 192.168.0.0/24 network. |
Denies ftp access from 192.168.0.0/24 network. |
|
vsftpd:192.168.0. EXCEPT 192.168.0.25 |
Allows ftp access from 192.168.0 network except for system with IP 192.168.0.25. |
Denies ftp access from 192.168.0 network, except for system with IP 192.168.0.25. |
|
vsftpd:192.168.0. EXCEPT 192.168.0.25, 192.168.0.26 |
Allows ftp access from 192.168.0 network except for systems with IPs 192.168.0.25 and .26. |
Denies ftp access from 192.168.0 network, except for systems with IPs 192.168.0.25 and .26. |
|
vsftpd,sshd:user1@192.168.0. |
Allows ftp and ssh access to user1 from 192.168.0 network. |
Denies ftp and ssh access to user1 from 192.168.0 network. |
|
vsftpd,sshd@192.168.0.110: |
Allows ftp and ssh access from 192.168.1 network via interface configured with IP 192.168.0.110. |
Denies ftp and ssh access from 192.168.1 network via interface configured with IP 192.168.0.110. |
|
ALL EXCEPT sshd:192.168.0. |
Allows all services except for ssh from 192.168.0 network. |
Denies all services, except for ssh from 192.168.0 network. |
Table 13-3 TCP Wrappers Access Control Files
We need to keep these rules in mind when dealing with TCP Wrappers. All messages related to TCP Wrappers are logged to the /var/log/secure file.
Chapter Summary
This chapter discussed the secure shell server and TCP Wrappers. It started with an introduction of the secure shell service: what it is, how it works, available versions, and algorithms used. It continued with describing encryption techniques and authentication methods. It described software packages to support the service, commands, daemon, and configuration files. It demonstrated the setup for user authentication using private/public keys, and the use of this service for remote logging and transferring files. It also shows how to access the ssh service from a Window system.
The next and the last topic discussed TCP Wrappers in detail. TCP Wrappers is a simple service that controls access to various system services through entries placed in access control files.
Chapter Review Questions
1. What is the secure equivalent for the rcp command?
2. Name the two files for TCP wrapper through which it controls access to system services.
3. The secure shell may be defined to use TCP Wrappers for access control. True or False?
4. The primary secure shell server configuration file is ssh_config. True or False?
5. What are the encryption and/or authentication algorithms used in ssh version 2?
6. What is the secure shell equivalent for the telnet command?
7. Provide the names of four directives that may be used to set user-level access control for the secure shell server.
8. List any five network services that can be access-controlled by TCP Wrappers.
9. Where are the user ssh keys stored?
10. What would the command ssh-copy-id do?
11. What is the use of the ssh-keygen command?
12. List the two encryption techniques described in this chapter.
13. What is the default port used by the secure shell service?
14. Which log file stores the authentication messages?
15. What would the entry ALL EXCEPT telnetd:user100@192.168.0. in /etc/hosts.deny file do?
Answers to Chapter Review Questions
1. The scp command is the secure equivalent for the rcp command.
2. TCP wrappers uses the hosts.allow and hosts.deny files located in the /etc directory to control access to system services.
3. True.
4. False. The primary secure shell configuration file is sshd_config.
5. The ssh version 2 uses RSA, DSA, and ECDSA algorithms.
6. The secure equivalent for telnet is the ssh command.
7. The four directives that can be used to set user-level access control for the ssh server are AllowUsers, DenyUsers, AllowGroups, and DenyGroups.
8. Some of the services that may be controlled via TCP wrappers include ssh, telnet, ftp, and rsh.
9. In the .ssh sub-directory under the user’s home directory.
10. The ssh-copy-id command is used to install public keys on remote systems.
11. The ssh-keygen command is used to generate authentication keys for the ssh use.
12. The two encryption techniques are symmetric and asymmetric.
13. The default port used by the secure shell service is 22.
14. The /var/log/secure file stores authentication messages.
15. This entry would allow user100 from 192.168.0 network access to the telnet service.
DIY Challenge Labs
The following labs are useful to strengthen most of the concepts and topics learned in this chapter. It is expected that you perform these labs without any additional help. A step-by-step guide is not provided, as the implementation of these labs requires the knowledge that has been presented in this chapter. Use defaults or your own thinking for missing information.
Lab 13-1: Establish Key-Based Authentication
Establish a private/public key combination for user3 on server1 so that this user is prompted for a passphrase (and not password) upon login to host1.
Lab 13-2: Configure TCP Wrappers to Secure Services
Edit TCP Wrappers access control files as appropriate and allow user1 and user3 from 192.168.1 and example.net to access sshd and vsftpd services, but disallow their access for user2new and user4 from 192.168.2.120 and example.org. Log in as user1 and user3 from RHEL systems (one with IP 192.168.1.120 and the other with IP 192.168.2.120) and test access. Observe messages as they are logged to the /var/log/messages and /var/log/secure files.
All materials on the site are licensed Creative Commons Attribution-Sharealike 3.0 Unported CC BY-SA 3.0 & GNU Free Documentation License (GFDL)
If you are the copyright holder of any material contained on our site and intend to remove it, please contact our site administrator for approval.
© 2016-2026 All site design rights belong to S.Y.A.