RHCSA & RHCE Red Hat Enterprise Linux 7: Training and Exam Preparation Guide (EX200 and EX300), Third Edition (2015)
Part II. RHCE Section
Chapter 24. Configuring DNS
This chapter describes the following major topics:
· Understand domain name system and name resolution
· Overview of BIND
· Recognize DNS components: name space, domains, root servers, roles, types, zones, and software packages
· Analyze configuration and zone files
· Review SELinux requirements
· Configure a caching-only nameserver
· Describe DNS client configuration files and lookup tools
· Configure DNS client and test server configuration
· Troubleshoot DNS client issues
RHCE Objectives:
71. Configure a caching-only name server
72. Troubleshoot DNS client issues
Domain Name System is an OS- and hardware-independent network service used for determining the IP address of a system by providing its hostname and vice versa. This mechanism is employed to map human-friendly hostnames to their assigned numerical IP addresses by consulting one or more servers offering this popular service. This service has been used on the Internet and corporate networks as the de facto standard for this purpose. It works based on the client/server architecture where one central server provides name resolution service to many remote clients. Configuration of domain name system setup requires a good comprehension of the concepts, components, configuration files, and tools involved. Moreover, this knowledge helps troubleshoot issues should they arise.
Domain Name System and Name Resolution
Domain Name System (DNS) is a tree-like distributed structure that is employed on the Internet and corporate networks as the de facto standard for resolving hostnames to their numerical IP addresses for computer systems, mobile devices, networking gear, storage arrays, imaging equipment, and any other device with a unique IP address. Name resolution is the technique that employs DNS for this purpose. Determining the IP address of a hostname is referred to as forward name resolution (or simply name resolution) and determining the hostname associated with an IP address is referred to as reverse name resolution. DNS is platform-independent and it is supported on virtually every operating system, including UNIX, Linux, Windows, and MAC.
What is BIND?
BIND, Berkeley Internet Name Domain, is an open source implementation of DNS on UNIX and Linux operating system platforms. BIND was developed at the University of California, Berkeley, a little over three decades ago, and it has since been the most popular DNS application in use on the Internet and private networks. RHEL7, like its precursor versions, supports BIND and offers it as the standard DNS software.
DNS Name Space and Domains
The DNS name space is a hierarchical organization of all the domains on the Internet. The root of the name space is represented by a dot. The hierarchy right below the root represents top-level domains (TLDs) that are either generic, such as .com, .net, .edu, .org, and .gov, and referred to asgTLDs, or specific to two-letter country-code, such as .ca and .uk, and referred to as ccTLDs. A DNS domain is a collection of one or more systems. Sub-domains fall under domains and are separated by a dot. For example, the .com domain consists of second-level domains, such as .redhat and .ibm, with further division into multiple, smaller third-level domains, such as .bugzilla.redhat.com under .redhat.com.
Figure 24-1 exhibits a sample hierarchy of the name space, showing the top three domain levels.
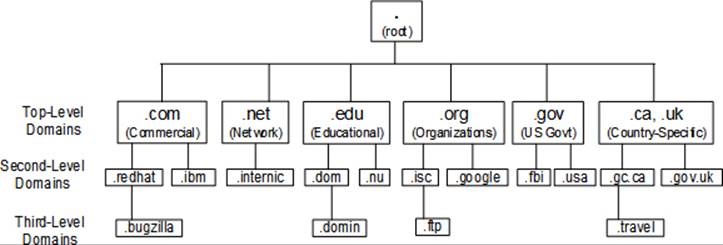
Figure 24-1 DNS Hierarchy
At the deepest level of the hierarchy are the leaves (systems, nodes, or any device with an IP address) of the name space. For example, a network switch net01 in .travel.gc.ca sub-domain will be known as net01.travel.gc.ca. If a dot is added to the end of this name to look like net01.travel.gc.ca., it will be referred to as the Fully Qualified Domain Name (FQDN) for net01.
The division of a domain into multiple sub-domains allows the delegation of management responsibility for each sub-domain to different groups of administrators by adding a dedicated DNS server to each sub-domain with full authority on the information that the sub-domain possesses. This distributed management approach simplifies the overall DNS administration in large and complex environments, as well as make it fault tolerant.
In order to run an Internet-facing server, a unique domain name needs to be chosen and registered. There are accredited domain registrars in every region of the world that are licensed by the Internet Corporation for Assigned Names and Numbers (ICANN). A list of all authorized registrars is available at www.internic.net. You may, alternatively, search the Internet for a registrar in your region, or simply contact your Internet Service Provider (ISP).
DNS Root Servers
The root servers sit at the top of the DNS hierarchy in the root zone (See Figure 24-1) and are managed and maintained by different organizations authorized by ICANN. At present, there are thirteen operational root servers, with a number of mirrors for each one and are placed across the globe to offload the main servers. Information about the root servers is supplied as part of bind software, and it is stored in the named.ca file in the /var/named directory. A list of these servers with their IP addresses is provided below:
a.root-servers.net. 198.41.0.4
b.root-servers.net. 192.228.79.201
c.root-servers.net. 192.33.4.12
d.root-servers.net. 199.7.91.13
e.root-servers.net. 192.203.230.10
f.root-servers.net. 192.5.5.241
g.root-servers.net. 192.112.36.4
h.root-servers.net. 128.63.2.53
i.root-servers.net. 192.36.148.17
j.root-servers.net. 192.58.128.30
k.root-servers.net. 193.0.14.129
l.root-servers.net. 199.7.83.42
m.root-servers.net. 202.12.27.33
The root servers handle queries for TLDs only and provide the client with the IP address of the name server that is responsible for the requested TLD.
DNS Roles
A role is a function that a system performs from a DNS standpoint. A system is typically configured to operate as one of the three types of DNS server or as a client. A DNS server, also referred to as a nameserver, stores the DNS records for a domain and responds to client queries for name resolution.
Primary DNS Server: A primary (a.k.a. master) DNS server has the authority over its domain (or sub-domain) and maintains that domain’s original (or master) data. Each domain must have one primary server with one or more other optional DNS servers, referred to as secondary and caching servers. Zone data files are maintained on the primary server and they can be propagated to secondary servers.
Secondary DNS Server: A secondary (a.k.a. slave) DNS server also has the authority for its domain and stores that domain’s zone data files; however, these files are copied over from the primary server. When updates are made to the zone files on the primary server, the secondary server gets a copy of the updated files automatically. This type of DNS server is set up for redundancy or offloading the primary. It is recommended to have at least one secondary server per domain to supplement the primary.
Caching DNS Server: A caching DNS server has no authority for any domains. It gets data from a primary or secondary server and caches it locally in the memory. Like a secondary server, a caching server is used for redundancy and load sharing, but its more common use is due to its ability to provide faster responses to queries as it stores data in the memory rather than on the disk. This type of DNS server is typically employed at ISP locations to respond to hundreds of thousands of queries every minute.
Forwarding DNS Server: A forwarding DNS server has no authority for any domains. It simply forwards an incoming query to a specified DNS server.
DNS Client: A DNS client is used for initiating and sequencing hostname queries by referencing nameserver information defined in resolver configuration files.
Types of Nameserver Configurations
There are two fundamental types of DNS server configurations referred to as authoritative and recursive. An authoritative DNS server is usually a primary or secondary server that provides authoritative responses to name resolution queries from its own zone data files. In contrast, a recursive DNS server, which is usually a caching server, is able to query the next available DNS server in order to get a response if it does not have one. This type of server configuration does not store authoritative records; rather the server polls other authoritative servers for that information. Upon receiving a reply, the caching server caches it locally for a preset time period.
DNS Zones and Zone Files
Every DNS server maintains complete information about the portion of the DNS name space it is responsible for. This information includes a complete set of authoritative data files. The portion of the name space for which a DNS server has a complete set of authoritative data files is known as the server’s zone, and the set of authoritative data files is known as zone files or zone databases. The zone files contain directives and resource records. Directives control the behavior of a DNS server and instruct how to undertake tasks or apply special settings to the zone; resource records describe zone limits and assign each individual host an identity. In order to provide the name resolution service to a zone, resource records must be defined; directives are optional. Directives in a zone file are prepended by the $ sign. Some of the common directives are $INCLUDE, $ORIGIN, and $TTL that let you include additional zone files, append the domain name to simple hostnames, and define the default validity (time to live) setting, in seconds, for the zone, respectively. Common resource records are A, CNAME, MX, NS, PTR, and SOA, and are described in Table 24-1.
|
Record |
Description |
|
A or AAAA |
Address record. Specifies an IPv4 or IPv6 address to be mapped to a hostname. |
|
CNAME |
Canonical Name record. Maps an alias to a real name. |
|
MX |
Mail Exchanger record. Points to a weighted list of mail servers configured to receive mail for a domain. |
|
NS |
Nameserver record. Specifies the name of an authoritative nameserver. |
|
PTR |
Pointer record. Points to a different location in the namespace. It is usually used for reverse lookups. |
|
SOA |
Start Of Authority record. Defines key authoritative data for a namespace that includes primary DNS server, email address of the administrator, and the following: |
Table 24-1 Resource Records
A sample zone file is presented below, along with explanation in brackets:
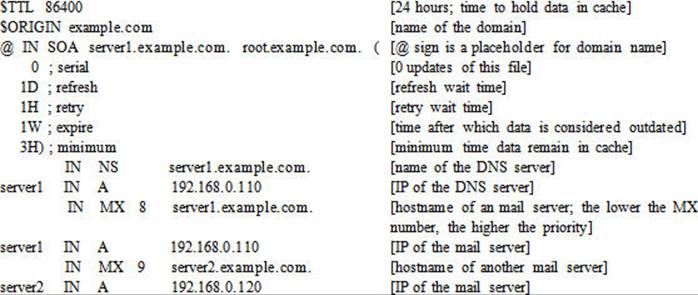
All zone database files are maintained on the primary DNS server.
BIND Software Packages and Service Daemon
In order to provide the BIND service, several software packages need to be installed on the system. These packages add necessary support to the operating system, and bring the tools and configuration and zone files that are used for setting up and testing a DNS server. Table 24-2 describes these packages.
|
Package |
Description |
|
bind |
Provides software to configure a DNS server. |
|
bind-libs |
Contains library files for bind and bind-utils packages. |
|
bind-utils |
Comprises of resolver tools, such as dig, host, and nslookup. |
Table 24-2 BIND Software Packages
We may use the yum command as shown below to check the install status of these packages:
# yum list installed | grep ^bind
|
bind.x86_64 |
32:9.9.4-14.el7 |
@ftprepo |
|
bind-libs.x86_64 |
32:9.9.4-14.el7 |
@ftprepo |
|
bind-libs-lite.x86_64 |
32:9.9.4-14.el7 |
@ftprepo |
|
bind-license.noarch |
32:9.9.4-14.el7 |
@ftprepo |
|
bind-utils.x86_64 |
32:9.9.4-14.el7 |
@ftprepo |
The above output indicates two additional packages, bind-libs-lite and bind-license, that deliver additional library routines and copyright information, respectively.
The BIND server package also loads the named daemon binary file in addition to commands and configuration files. This daemon process listens on well-known port 53 and supports both TCP and UDP protocols for operation. It must run on the system to provide DNS services.
Analysis of the Default Nameserver Configuration File
The /etc/named.conf is the main DNS configuration file and it is read each time the DNS server daemon is started or restarted. It provides the DNS server with the names and locations of zone databases for all the domains the server is responsible for. This file typically contains options, zone, and include statements. Each statement begins with a { and ends in };. The default version of this file is pre-configured for use as a caching-only name server. A sample named.conf file is shown below:

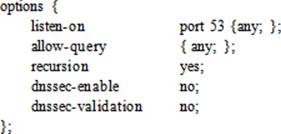
In this file, comments begin with the // characters or can be enclosed within /* and */ tags. Options can be defined at the global level within the options statement or at an individual level within a zone statement, as required. Individual options override the global options. The listen-on directive defines port 53, which the DNS server uses to listen to queries on the localhost interface and the interface configured with the 192.168.0.111 address. The systems (or networks or domains), defined within curly brackets and separated by the semicolon character, are called match-list. The directory directive identifies the working directory location for the named service. The dump-file and statistics-file directives specify the location for the DNS dump and statistics files. The memstatistics-file specifies the location for the memory usage statistics file. The pid-file directive provides the file name and location to store the named daemon’s PID. The allow-query directive defines a match-list, which enables the specified systems to query the DNS server. You can restrict queries to one or more networks by specifying IP addresses of the networks. The recursion directive instructs the DNS server to act as a recursive server. The next three directives—dnssec-enable, dnssec-validation, and dnssec-lookaside—are related to DNS security. The logging function instructs the DNS server to log debug messages of dynamic severity to the /var/named/data/named.run file.
There is one zone statement defined in this file. The . zone defines the root servers to query as defined in the named.ca file whose location is with respect to the directory directive setting. The type hint for this zone implies that one of the root servers will point hostname queries to a nameserver that will fulfill them.
The include directive at the bottom of the file instructs named to process the specified file. The default entry is for the named.rfc1912.zones file.
The named.conf file must have named as the owning group and read permission at the group level.
Analysis of the Default Zone Configuration File
The /etc/named.rfc1912.zones is the default DNS zone configuration file that points to the zone databases located in the /var/named directory. This file is defined with the include directive in the named.conf file, and is processed each time the DNS server daemon is started or restarted. The default version of this file provides the DNS server with zone information for localhost only. For each zone statement, it specifies a zone name, its type (master for primary, slave for secondary, or forward for forwarding DNS server), its file name that stores zone data, and the hostnames that are allowed to submit dynamic updates to the zone with the allow-update directive. Each statement begins with a { and ends in };. There are many other directives that can be defined in this file to customize the behavior. The default version of this file is ready for use as a localhost caching nameserver. The following shows a few statements from this file:
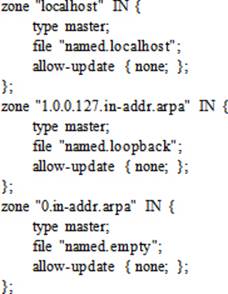
Each statement in this file points to a relevant zone file in the /var/named directory. You can use the ll command to view a list. Here are the named.empty, named.localhost, and named.loopback files that correspond to zone entries above:

The default contents of the named.localhost zone file are shown below:
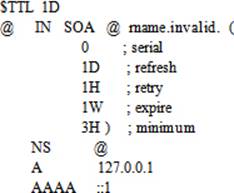
For an explanation of zone data, see the sub-section “DNS Zones and Zone Files” earlier in this chapter.
DNS Message Logging
All DNS messages and alerts are logged to the /var/log/messages log file and are related to starting and stopping the named process, zone loading and unloading, general information, warning messages, and so on. This information may be viewed with any file viewing utility, such as head, tail, cat,more, or view. The following shows a grep on named PID 26989:
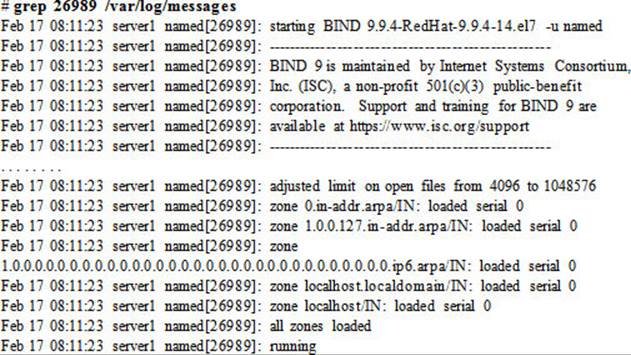
EXAM TIP: You can open another terminal session on the system to run ‘tail –f’ on this log file.
This log file grows over time depending on how busy the system is. The syslog service rotates this file once a week to prevent it from getting too large, and saves previous four weeks of backup in the same directory.
Configuring BIND Server
Managing BIND involves several configuration and administration tasks, including setting up a primary, secondary, or caching name server, and client. These tasks are covered in exercises presented in this section.
SELinux Requirements for BIND Operation
SELinux protects systems by setting appropriate controls using contexts and booleans. Before you proceed with implementing the exercises, let’s look at the BIND-specific SELinux contexts on processes, files, and port, and also see the booleans that may require a toggle for BIND to function properly. By default, the named daemon runs confined in its own domain, and it is labeled appropriately with domain type named_t. This can be confirmed with the ps command as follows:
# ps –eZ | grep named
system_u:system_r:named_t:s0 26989 ? 00:00:00 named
The SELinux file type associated with the /etc/named.conf and /etc/named.rfc1912.zones files is named_conf_t and that for the zone directory /var/named is named_zone_t. Here is an ll command output that verifies this information:

The SELinux type associated with the DNS port is dns_port_t, and it is in place by default. Here is the semanage command output that validates this information:
# semanage port –l | grep dns_
dns_port_t tcp 53
dns_port_t udp 53
From a SELinux boolean standpoint, there are two booleans that are associated with BIND, and we can see this with the getsebool command:
# getsebool –a | grep ^named
named_tcp_bind_http_port --> off
named_write_master_zones --> off
These booleans determine whether the BIND service can bind a TCP socket to HTTP ports and write to master zone files, respectively. Both booleans are turned off by default and do not need to be toggled for our exercises in this chapter.
By looking at the above SELinux settings for BIND, we can establish that there are no changes required to make it function smoothly in the SELinux enforcing mode.
Exercise 24-1: Configure a Caching-Only DNS Server
This exercise should be done on server1.
In this exercise, you will configure server1 as a primary DNS server. You will install the BIND software, modify the named.conf file, set the BIND service to autostart at system reboots, start the BIND service, and open port 53 in the firewall.
1. Install the BIND software packages:
# yum –y install bind bind-utils
…… . .
Installed:
bind.x86_64 32:9.9.4-14.el7
bind-utils.x86_64 32:9.9.4-14.el7
Dependency Installed:
bind-libs.x86_64 32:9.9.4-14.el7
Complete!
2. Open the named.conf file in a text editor and set or modify the following directives. Leave other settings intact.
3. Check the configuration file using the named-checkconf command:
# named-checkconf
4. Set named to autostart at system reboots:
# systemctl enable named
ln -s '/usr/lib/systemd/system/named.service' '/etc/systemd/system/multi-user.target.wants/named.service'
5. Start the BIND service and check its operational status:
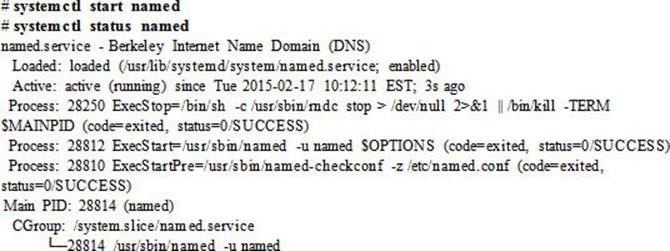
6. Add the named service to firewalld persistently and reload the rules to allow traffic on DNS port 53:
# firewall-cmd --permanent --add-service dns; firewall-cmd --reload
This completes the configuration of a caching-only DNS server. At this point, if you wish to view log entries for this instance of the BIND daemon, execute the pidof named command, and grep for the PID in the /var/log/messages file, as explained in the previous section.
Understanding, Configuring, and Troubleshooting DNS Client
Now that a DNS server is in place and ready for use, we need to look at the client-side configuration files that are consulted when hostname queries are made. Moreover, there are several tools available in RHEL that we need to look at to see how they can be used to query hostnames via the DNS server we configured in the previous exercise. We can use the same tools and a few others to troubleshoot DNS client issues. This section discusses the files and tools, and then presents a simple exercise to configure a DNS client and test the DNS server. Finally, it provides some information on how to troubleshoot a non-functioning client.
Overview of DNS Client Configuration Files
Primarily, there are two files of interest, a resolver configuration file called resolv.conf and a name service switch configuration file called nsswitch.conf. Both files are located in the /etc directory and are installed at the time of OS installation.
The Resolver Configuration File
The resolv.conf file is the DNS resolver configuration file where we define information to support hostname lookups. This file may be updated manually using a text editor. It is referenced by resolver utilities, such as dig, host, and nslookup, to obtain necessary information for query purposes. There are three key directives set in this file: domain, nameserver, and search. Table 24-3 describes these directives.
|
Directive |
Description |
|
domain |
Specifies the default domain name to be searched for queries. In the absence of this directive, the domain associated with the hostname is assumed, and if the hostname is without a domain name, then the root domain is considered. This directive is useful in a multi-domain environment. |
|
nameserver |
Specifies up to three DNS server IP addresses to be queried one at a time in the order in which they are listed for name resolution. If none specified, the DNS server on the localhost is assumed. |
|
search |
Specifies up to six domain names, of which the first must be the local domain. The resolver appends these names one at a time in the order in which they are listed to the hostname being looked up. In the absence of this directive, the local domain is assumed. |
Table 24-3 The Resolver Configuration File
A sample entry is provided below, depicting the syntax of the three directives:
domain example.com
search example.com
nameserver 191.11.11.22
On a system with this file absent, the resolver utilities only query the name server configured on the localhost, determine domain name from the hostname of the system, and construct the search path from the domain name.
The Name Service Switch Configuration File
The nsswitch.conf file is referenced by many system and network tools to determine the source, such as NIS, NIS+, LDAP, DNS, or local files, for obtaining information about users, user aging, groups, mail aliases, hostnames, networks, protocols, and so on. In the presence of multiple sources, this file also identifies the order in which to consult them and what to do next based on the status result we receive from the preceding source. There are four keywords—success, notfound, unavail, and tryagain—that affect this behavior. The keywords are described in Table 24-4.
|
Keyword |
Meaning |
Default Action |
|
success |
Information found in the source and returned to the requester. |
return (do not try the next source). |
|
notfound |
Information not found in the source. |
continue (try the next source). |
|
unavail |
Source down, not responding, or service is disabled or not configured. |
continue (try the next source). |
|
tryagain |
Source or service is busy temporarily. Try again later. |
continue (try the next source). |
Table 24-4 Name Service Source Status
The following example entry shows the syntax for defining entries in the nsswitch.conf file. It shows two sources for name resolution: DNS (the /etc/resolv.conf file) and the /etc/hosts file:
hosts: dns files
Based on the default behavior, the search will terminate if the requested information is found in DNS. However, we can alter this behavior and instruct the lookup program to return if the requested information is not found in DNS. The modified entry will look like:
hosts: dns [NOTFOUND=return] files
This altered entry will ignore the hosts file.
Overview of DNS Lookup Utilities
Once a DNS server is set up and available, we can use one of the client tools provided by the bind-utils package to perform queries for hostname lookups. These tools include dig, host, and nslookup, and are elaborated below.
The dig Utility
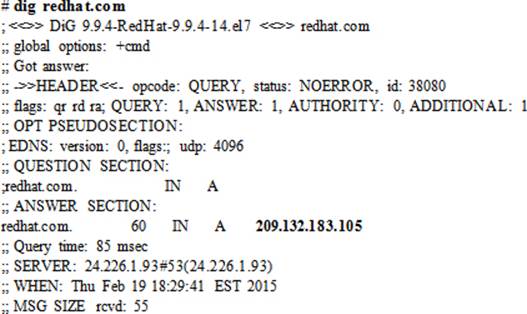
dig (domain information groper) is a DNS lookup utility. It queries the nameserver specified at the command line or consults the resolv.conf file to determine the nameservers to be used for lookups if no nameserver is supplied with the command. In case the nameservers are unable to fulfill the query, the dig command contacts one of the root DNS servers listed in the /etc/named.ca file for directions. This tool may be used for DNS troubleshooting because of its flexibility and verbosity. The following shows a few examples on the usage.
To perform a lookup to get the IP address of redhat.com using the nameservers listed in the resolv.conf file:
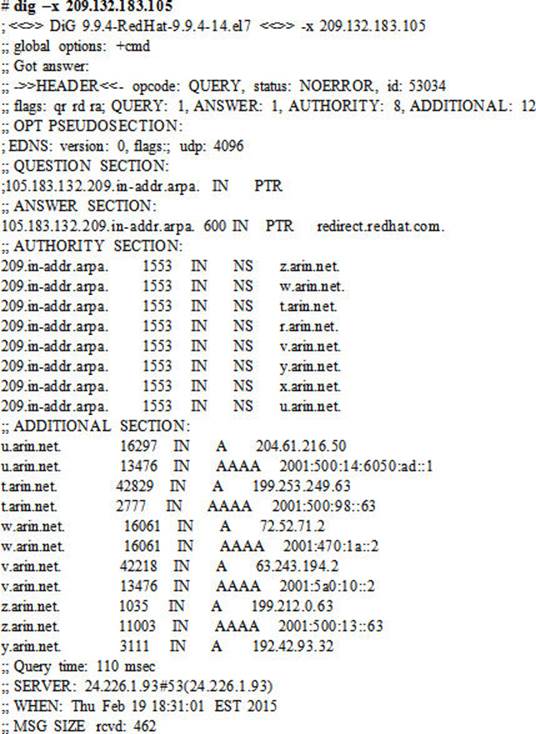
To perform a reverse lookup on the IP address of redhat.com using the nameservers listed in the resolv.conf file, use the –x option and specify the IP address:
The host Utility
host is a simple DNS lookup utility that works on the same principles as the dig command in terms of nameserver determination. This tool produces much less data in the output. Here are a few examples on its usage.
To perform a lookup to get the IP address of redhat.com using the nameservers listed in the resolv.conf file:
# host redhat.com
redhat.com has address 209.132.183.105
redhat.com mail is handled by 10 mx2.redhat.com.
redhat.com mail is handled by 5 mx1.redhat.com.
To perform a reverse lookup on the IP address of redhat.com using the nameservers listed in the resolv.conf file:
# host 209.132.183.105
105.183.132.209.in-addr.arpa domain name pointer redirect.redhat.com.
You can use the –a option for detailed output.
The nslookup Utility
nslookup is another DNS lookup utility. It queries the nameservers listed in the resolv.conf file or specified at the command line. The following shows a few examples of its usage.
To perform a lookup to get the IP address of redhat.com using the nameservers listed in the resolv.conf file:
# nslookup redhat.com
Server: 24.226.1.93
Address: 24.226.1.93#53
Non-authoritative answer:
Name: redhat.com
Address: 209.132.183.105
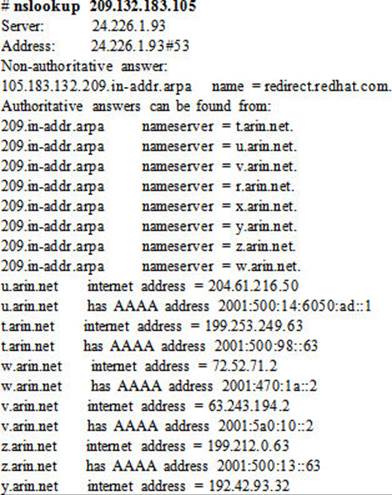
To perform a reverse lookup on the IP address of redhat.com using the nameservers listed in the resolv.conf file:
The nslookup utility can be invoked in interactive mode without supplying an argument to it:
# nslookup
>
At the prompt, you can specify a nameserver to use for queries. For instance typing “server server1” at the nslookup prompt will instruct it to use server1 as the nameserver for queries.
> server server1
Default server: server1
Address: 192.168.0.110#53
Now you can perform a simple query by typing a hostname, such as:
> ibm.com
Server: server1
Address: 192.168.0.110#53
Non-authoritative answer:
Name: ibm.com
Address: 129.42.38.1
> exit
Type exit at the nslookup prompt to quit.
Exercise 24-2: Configure DNS Client and Test Server Configuration
This exercise should be done on server2.
In this exercise, you will install the bind-utils package and test the caching-only nameserver you set up in the previous exercise. You will then modify the resolver configuration file and add an entry for the new nameserver. You will ensure that the name service switch file contains proper hosts entry. You will test the nameserver again.
1. Install the DNS client software package bind-utils:
# yum –y install bind-utils
Package 32:bind-utils-9.9.4-14.el7.x86_64 already installed and latest version
Nothing to do
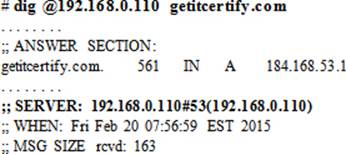
2. Test the functionality of the caching-only nameserver with the dig and host commands:
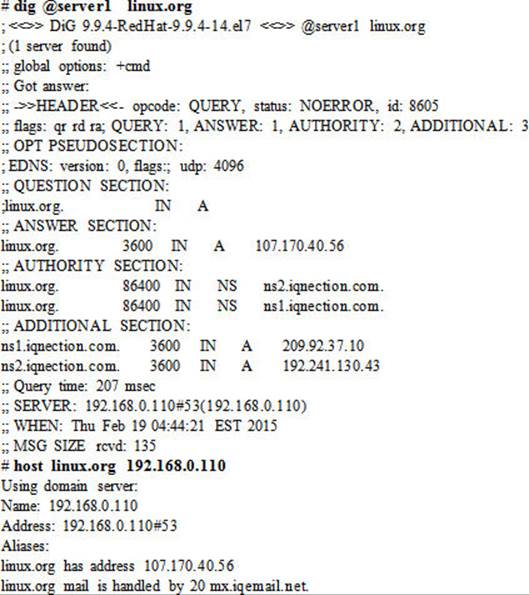
The above demonstrated the use of hostname and IP address of the caching-only nameserver at the command line.
3. Open the resolver configuration file and add the following entry:
nameserver 192.168.0.110
4. Open the name service switch configuration file and ensure the hosts entry looks like the following:
hosts: files dns
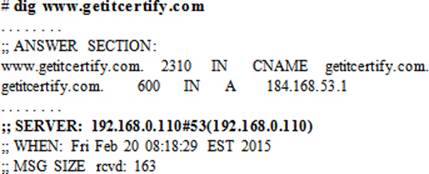
5. Test the functionality of the caching-only nameserver again with the dig and nslookup commands without specifying the nameserver at the command line:
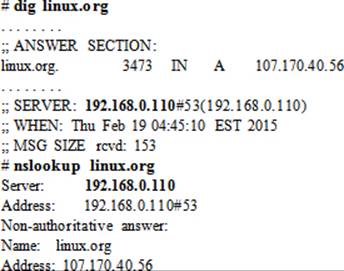
The above outputs indicate that both commands now use the caching nameserver for lookups without being explicitly supplied at the command line.
If the client is configured to receive IP assignments from a DHCP server, edit the associated network interface file in the /etc/sysconfig/network-scripts directory and set the PEERDNS directive to no to prevent the client from receiving nameserver information.
Troubleshooting DNS Client Issues
Once a nameserver is configured properly on a system and tested locally, the next step is to test it from a remote client. If the testing works out satisfactory, proceed with making persistent changes to client configuration files and mirror the changes across all clients that are intended to use this nameserver for name resolution. During the testing, knowledge of simple tools, such as ping, ip, dig, nslookup, and host, is essential to help resolve problems quickly if encountered. Since DNS is a network service, a stable and robust network infrastructure is key for its successful operation.
The first step toward setting up DNS client or troubleshooting is to verify the persistent addition and loading of the dns service to firewalld on the nameserver. To do this, log on to server1 (nameserver) and run the following:
# firewall-cmd --list-services
dhcpv6-client dns ftp http https kerberos nfs ntp samba smtp ssh tftp
In case of its absence, run the following to add and load it:
# firewall-cmd --permanent --add-service dns ; firewall-cmd --reload
On a configured and functional local nameserver, the above is the only step to verify from a remote client.
Now, on server2 (client), verify connectivity with the nameserver using the ping command. Send just two packets to its hostname or IP address.
# ping 192.168.0.110 –c2
PING 192.168.0.110 (192.168.0.110) 56(84) bytes of data.
64 bytes from 192.168.0.110: icmp_seq=1 ttl=64 time=0.299 ms
64 bytes from 192.168.0.110: icmp_seq=2 ttl=64 time=0.389 ms
--- 192.168.0.110 ping statistics ---
2 packets transmitted, 2 received, 0% packet loss, time 1000ms
rtt min/avg/max/mdev = 0.299/0.344/0.389/0.045 ms
The connectivity is fully operational as indicated by the above output. Based on the successful outcome, proceed to the next step.
If, however, ping reports errors, you need to check whether the physical or virtual network interface on the 192.168.0 network is configured properly and is active:
# ip addr show eth0
2: eth0: <BROADCAST,MULTICAST,UP,LOWER_UP> mtu 1500 qdisc pfifo_fast state UP qlen 1000
link/ether 52:54:00:81:ca:82 brd ff:ff:ff:ff:ff:ff
inet 192.168.0.120/24 brd 192.168.0.255 scope global eth0
valid_lft forever preferred_lft forever
inet6 fe80::5054:ff:fe81:ca82/64 scope link
valid_lft forever preferred_lft forever
The above report shows that eth0 is up and it has the IP address on the correct subnet. You may want to re-run the ping test if it reported an issue. It is possible that the server was over-busy at that time.
Assuming the network connectivity is okay, the next step is to use one of the lookup tools, such as dig, to see whether you are able to resolve a hostname. Specify the IP of the nameserver with the command.
Based on the successful outcome of this command, proceed to the next step.
If, however, dig reports an error, you will need to re-visit the nameserver configuration.
Assuming dig reported as expected, you will then open the resolv.conf and nsswitch.conf files and add or modify the following entries to look like:
![]()
The above changes are persistently stored.
Re-run dig but do not specify the nameserver at the command line. Let it refer to the resolv.conf file for the nameserver. The output will report the nameserver (highlighted) used for the query.
Now you can go ahead and update the nsswitch.conf and resolv.conf files on other clients.
Chapter Summary
This chapter described DNS concepts and strengthened their study with implementation of exercises. The chapter introduced the domain name system and name resolution, and continued with the presentation of various terms, concepts, and components involved. It expounded what BIND was and described the name space, domains, root servers, kinds of nameservers, types of nameserver configurations, zones, software packages, service daemon, and log file. It presented an examination of default configuration and zone files.
The next part of the chapter demonstrated the configuration of a nameserver and client, and showed how to troubleshoot client-side issues using the knowledge gained in the first part of the chapter.
Chapter Review Questions
1. What is the main advantage of using a caching-only nameserver over the other types?
2. An MX record in the nameserver configuration file represents a mail server. True or False?
3. Name three utilities for hostname lookup.
4. What is the difference between DNS and BIND?
5. Given a hostname ca.redhat.com, what is the second level domain name?
6. Which two types of nameservers do not have authority for any domains?
7. Name the two types of nameserver configuration.
8. What would the entry “host: dns [TRYAGAIN=return] files” mean in the nsswitch.conf file?
9. What is the default location for storing zone files?
10. What would the command host 10.22.112.22 do?
11. Provide the name of the software package that contains lookup utilities.
12. What type of nameserver is considered the most authoritative?
13. What is the name of the resolver configuration file?
14. Define reverse name resolution.
15. Name the four DNS server roles.
16. Which file lists details for the root name servers?
17. Which is the main configuration file for a DNS server?
18. Define name resolution in one sentence.
19. What is the term that represents the hierarchy of all domains on the Internet?
20. Provide a difference between zone file and zone database.
21. What is the name of the client file where you list DNS servers for query?
22. Is the DNS name space hierarchical or flat?
23. What is a fully qualified domain name?
24. What is the well-known port number used for DNS service?
Answers to Chapter Review Questions
1. The main advantage of using a caching nameserver than the other types is its ability to respond faster to queries.
2. True.
3. Three lookup utilities are dig, host, and nslookup.
4. DNS is a name resolution mechanism whereas BIND is a software that provides name resolution on UNIX and Linux platforms while conforming to DNS standards.
5. The second level of domain name in this construction is .redhat.
6. The forwarding and caching-only nameservers do not have authority for any domains.
7. The two types of nameserver configurations are referred to as authoritative and recursive.
8. This entry in the nsswitch.conf file would terminate a name lookup attempt if a nameserver were busy.
9. The zone files are located in the /var/named directory by default.
10. This command would lookup for the host with the specified IP address.
11. The bind-utils package contains the lookup utilities.
12. The primary nameserver is considered the most authoritative.
13. The name of the resolver configuration file is resolv.conf.
14. Reverse name resolution is the ability to map the specified IP address with its hostname.
15. The four DNS server roles are master, secondary, caching, and forwarding.
16. The named.ca file contains root server information.
17. The main configuration file for DNS server is named.conf.
18. Name resolution resolves hostname to IP address and IP address to hostname.
19. The term used to represent the DNS hierarchy is called name space.
20. There is no difference between the two.
21. The /etc/resolv.conf file.
22. The DNS name space is hierarchical.
23. A fully qualified domain name is a hostname with its domain name appended.
24. The DNS service uses the well-known port 53 for its operation.
DIY Challenge Labs
The following labs are useful to strengthen the concepts and topics learned in this chapter. It is expected that you perform these labs without any additional help. A step-by-step guide is not provided, as the implementation of these labs requires the knowledge that has been presented in this chapter. Use defaults or your own thinking for missing information.
Lab 24-1: Configure a Caching-Only Nameserver
Set up caching-only name service on host1 and allow only server1 to use this service as a client.
All materials on the site are licensed Creative Commons Attribution-Sharealike 3.0 Unported CC BY-SA 3.0 & GNU Free Documentation License (GFDL)
If you are the copyright holder of any material contained on our site and intend to remove it, please contact our site administrator for approval.
© 2016-2026 All site design rights belong to S.Y.A.