RHCSA & RHCE Red Hat Enterprise Linux 7: Training and Exam Preparation Guide (EX200 and EX300), Third Edition (2015)
Part II. RHCE Section
Chapter 23. Sending and Receiving Electronic Mail
This chapter describes the following major topics:
· Introduction to SMTP and electronic mail
· Overview of common terms and protocols
· How the mail system works
· Understand Postfix, its daemons, commands, configuration files, and log files
· Describe the use of various Postfix configuration files
· Review of SELinux requirements for Postfix operation
· Configure Postfix as a central mail server and test operation
· Set up Postfix as a relay host for local users and network users
RHCE Objectives:
79. Configure a system to forward all email to a central mail server
Email is the most widely used service on the Internet, and it is an effective, convenient, and easy-to-use communication tool that allows people to stay in touch with one another and share their thoughts and files electronically. Moreover, it is a productive messaging tool that every business relies on for instant, simultaneous communication with several people. The email system works similar to the way the traditional postal service operates. The primary protocol on which the entire email system stands is SMTP. There are numerous email server and client programs available, and several of them are supported in RHEL7 that can be configured on corporate networks for email exchange.
SMTP and the Email System
Simple Mail Transport Protocol (SMTP) is a networking protocol that is responsible for transporting email messages from one email server to another. It establishes a reliable connection between the source and the destination email server for message handover. This protocol runs on top of the IP protocol and uses well-known TCP port 25 for its operation. Using a combination of these protocols, a message is transported on the network or the Internet, passing through one or several routing devices to reach its ultimate identified destination.
An email message (just like an addressed envelope) typically has four parts: the sender’s ID and domain name, the receiver’s email address, a subject line, and a message body. The SMTP protocol uses the first two items to determine the sender and receiver’s domains, based on which it decides whether the message is destined for the local network. If the message is destined for the local network, the SMTP protocol delivers the message to the receiving user’s mailbox. If not, it sends the message across the Internet to the correct target system.
Common Terms
An operational email system typically performs four key functions: Mail User Agent (MUA), Mail Submission Agent (MUA), Mail Transport Agent (MTA), and Mail Delivery Agent (MDA). Some programs are designed to perform one of these functions only; however, most programs have the ability to do more than one. These four functions and other key components of the email system are described below.
Mail User Agent (MUA)
A Mail User Agent is an email client program used to compose messages, and to submit them to an outgoing MTA. On the receiving side, an MUA pulls the message into the inbox of the user and allows them to read. An MUA uses either the POP or IMAP protocol for mail retrieval. Some common MUAs are mail, mailx, mutt, evolution, pine, elm, thunderbird, and Outlook.
Mail Submission Agent (MSA)
A Mail Submission Agent is responsible for accepting new mail messages from an MUA. The MSA function may be integrated within an MUA or MTA, or it may be a separate program. It uses TCP port 587; however, it normally works on the SMTP port.
Mail Transport Agent (MTA)
A Mail Transport Agent is responsible for transporting a message from a sending mail server, and another MTA is responsible for accepting the message at a receiving mail server, and they both use SMTP. There may be more than one MTA involved before the message actually gets to the finaldestination. The most widely used MTA is sendmail; however, Postfix is a more popular alternative due to its simplicity and better performance. In RHEL7, sendmail is deprecated in favor of Postfix.
Mail Delivery Agent (MDA)
A Mail Delivery Agent is responsible for delivering an incoming message to a local mail spool location for storage. The MDA may be a separate program or its functionality may be integrated within an MTA. Examples of MDA are procmail and maildrop.
Post Office Protocol (POP)
The Post Office Protocol is used by an MUA and it is responsible for downloading user mail messages from the mail server to their local inboxes, and optionally, delete them on the server to free up space. This protocol proves to be more useful for users who use a single system to check their mail, or for those with intermittent Internet connections. The latest POP version is referred to as POP3, and it uses TCP port 110 for its operation. A secure cousin of POP3 is referred to as POP3s, which works on top of the SSL layer to provide secure authentication and data privacy. POP3s listens on TCP port 995.
Internet Message Access Protocol (IMAP)
The Internet Message Access Protocol is used by an MUA and it is responsible for downloading user mail messages from the mail server to their local inboxes. Unlike POP3, IMAP is more useful for users who use multiple systems to access their mail, and for those with slow Internet connections. The latest IMAP version is referred to as IMAP4, and it uses TCP port 143 for its operation. A secure cousin of IMAP4 is referred to as IMAPs, which works on top of the SSL layer to provide secure authentication and data privacy. IMAPs listens on TCP port 993.
Smart Host (Relay)
A smart host is an MTA that is configured with the intent to deliver email messages on behalf of other systems. The other systems may have non-persistent connection to the Internet or lack the capacity to perform this function efficiently.
Mail Queue
A mail queue is a directory location where submitted email messages are stored temporarily for further processing. The default mail queue for Postfix is located in the /var/spool/postfix directory.
Mailbox
A mailbox is a location for storing user email messages. By default, a mailbox file is created under the /var/spool/mail directory for each user account created on the system with a matching name.
How the Email System Works
A fully functional email system from a sender standpoint requires an email client (MUA) to compose an email message with all the relevant information, a program (MSA) that takes this email message and submits it to a temporary location (mail queue) for further processing, and another program (MTA) for transporting that email message over the network or the Internet to the destination system (another MTA) using the SMTP protocol. On the receiving side, the MTA receives that message and invokes an MDA, which forwards the message to a temporary mail spool location and holds it there until an MUA picks it up and saves it in the mailbox of the user via either POP3 or IMAP protocol. The mail server authenticates the user before allowing the MUA to access their email. See Figure 23-1 for a high-level process flow.
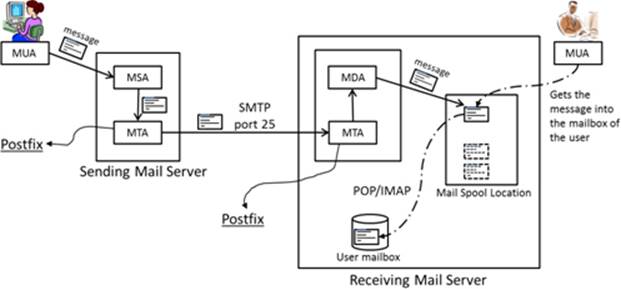
Figure 23-1 Email – From Sender to Receiver
The flow of the email system from a sender to a receiver can be summarized as depicted in Figure 23-2.
MUA → MSA → MTA → Network / Internet → MTA → MDA → MUA
Figure 23-2 Email System Process
We can analogize the entire process of an email system to the traditional postal system for delivery of a letter (email message). From a sender perspective, a person (MUA) writes a letter and puts it in an envelope with a receiver’s name, destination address, and appropriate postage, and drops it at a mail facility. A postal worker (MSA) picks up the letter and takes it to a postal facility (mail queue) for culling, postmarking, scanning, barcoding, sorting, etc. After the processing is complete, the letter is transported (MTA) via a carrier (SMTP) to the delivery post office (another MTA) close to the destination address. A postal worker (MDA) gets the letter and delivers it to the mailbox of the receiver. The receiver (MUA) uses their mailbox key (authentication) to access the letter.
Depending on the location of the sending and receiving MUAs, the message may be transported across a large corporate network or over the Internet using several routing devices. In either case, DNS is employed for name resolution. For local delivery, the MTA simply places the message into the mailbox of the user for pickup by an MUA.
The remainder of this chapter covers Postfix at length; other tools mentioned earlier are beyond the scope.
Understanding Postfix
Postfix is sendmail compatible; however, it is easier to configure and administer, and it is more modular, more secure, and offers better performance. It includes features such as pattern matching for filtering unwanted mail, and support for setting up several virtual mail domains on a single system. Postfix is the default MTA used in RHEL7. It uses the SMTP protocol over port 25 for mail transfers. By default, Postfix, out of the box, is ready to accept mail from local system users.
Postfix Daemons
The primary service daemon for Postfix is the master daemon located in the /usr/libexec/postfix directory. This daemon process starts several agent processes, such as nqmgr, pickup, and smtpd, on demand to carry out tasks on its behalf. Each agent has a small, well-defined function and operates with the minimal privilege required for a successful execution of that function. The network queue manager agent, nqmgr, is responsible for mail transmission, relay, and local delivery, and the pickup agent transfers mail messages from the /var/spool/postfix directory to the /var/spool/mail directory in collaboration with the smtpd agent. These agent processes terminate after servicing clients or being inactive for a pre-determined period of time. The master and all agent processes work collaboratively to manage the entire Postfix email system.
Postfix Commands
Postfix offers several commands to administer the email system. These commands include Postfix-specific utilities, as well as general operating system tools, that are described in Table 23-1.
|
Command |
Description |
|
alternatives |
Displays and sets the default MTA. |
|
mail/mailx |
Sends and receives email. |
|
postalias/newaliases |
Processes the aliases database, which is /etc/aliases by default. |
|
postconf |
Displays and modifies the Postfix configuration stored in the main.cf file. |
|
postfix |
Controls the operation of the Postfix service, including starting, stopping, health checking, and reloading the configuration. |
|
postmap |
Processes and converts some configuration files into Postfix-compatible databases. |
|
postqueue/mailq |
Lists and controls Postfix queue. |
Table 23-1 Postfix and Other Mail Commands
Some of these commands are used later in this chapter. View the man pages for the rest for details and usage.
Postfix Configuration Files
Postfix configuration files are located in the /etc/postfix directory, with the exception of the aliases file, which is stored in /etc. A list of the configuration files can be viewed with the ll command:
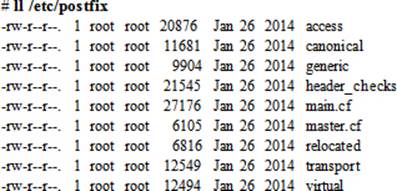
Some essential configuration files are explained below.
The access File
The access file may be used to establish access control based on email addresses, or hosts, domains, or network addresses for Postfix use. The controls are placed in the form “pattern action”. Each pattern has an associated action, such as OK or REJECT. The following shows some examples.
To allow access to the specified IP address:
192.168.122.20 OK
To allow access to systems in the example.org domain:
example.com OK
To reject access to systems on the 192.168.3 network:
192.168.3 REJECT
The contents of this file are converted into an indexed database called access.db for Postfix use. After making changes to the access file, run the postmap command on the file to create or update the database:
# postmap /etc/postfix/access
# ll /etc/postfix/access*
-rw-r--r--. 1 root root 20876 Jan 26 2014 /etc/postfix/access
-rw-r--r--. 1 root root 12288 Feb 12 07:47 /etc/postfix/access.db
You can use firewalld as an alternative to using this database for host, domain, or network access control.
The canonical File
This optional file is used to establish mapping for local and non-local mail addresses. The mapping can be done on incoming mail from other users, domains, and networks, and it is configured in the form “pattern result”. The following shows some examples.
To forward mail sent to a local user user1 to user1@yahoo.com:
user1 user1@yahoo.com
To forward all mail destined for example.org domain to another domain example.com:
@example.org @example.com
The contents of this file are converted into an indexed database called canonical.db for Postfix use. After making changes to the canonical file, run the postmap command on the file to create or update the database:

The generic File
This optional file is used to establish mapping for local and non-local mail addresses throught outgoing mail. The syntax of this file is identical to that of the canonical file.
The contents of this file are converted into an indexed database called generic.db for Postfix use. After making changes to the generic file, run the postmap command on the file to create or update the database:

The main.cf File
The main.cf file is the primary Postfix configuration file, which defines global settings for its operation. These settings include the identification of the host, domain, origin, and destination to be served, the mail owner, the network interfaces to listen on, the name and location of the aliases database, the queue and user mailbox directory locations, and so on. Some key directives from this file are shown below in the order in which they appear in the main.cf file, and this order is important.
|
queue_directory |
= /var/spool/postfix |
|
command_directory |
= /usr/sbin |
|
daemon_directory |
= /usr/libexec/postfix |
|
mail_owner |
= postfix |
|
myhostname |
= host2.example.com |
|
mydomain |
= example.com |
|
myorigin |
= $myhostname |
|
inet_interfaces |
= localhost |
|
mydestination |
= $myhostname, localhost.$mydomain, localhost |
|
mynetworks |
= 192.168.2.0/24, 127.0.0.0/8 |
|
relayhost |
= $mydomain |
|
alias_maps |
= hash:/etc/aliases |
|
alias_database |
= hash:/etc/aliases |
|
mail_spool_directory |
= /var/spool/mail |
These directives are explained in Table 23-2.
|
Directive |
Description |
|
queue_directory |
Location of Postfix queue. |
|
command_directory |
Location of the Postfix commands. |
|
daemon_directory |
Location of the Postfix daemons. |
|
mail_owner |
Owner name for Postfix queue and daemons. |
|
myhostname |
FQDN of the Postfix server. |
|
mydomain |
Domain name of the Postfix server. |
|
myorigin |
Host or domain name the outgoing mail appears to have originated from. |
|
inet_interfaces |
Network interfaces to be used for incoming mail. |
|
mydestination |
Domains the Postfix server accepts mail from. |
|
mynetworks |
IP addresses of trusted networks. |
|
relayhost |
Hostname of another mail server (smart host) to forward mail to. This mail server will act as an outgoing mail gateway. |
|
alias_maps |
Aliases database used by local delivery agent. |
|
aliases_database |
Aliases database generated with the newaliases command. |
|
mail_spool_directory |
Location for storing user mailboxes. |
Table 23-2 main.cf Directives
You can use the postconf command to display the default (–d) settings that are not defined in the file:
# postconf –d
bounce_notice_recipient = postmaster
access_map_defer_code = 450
access_map_reject_code = 554
address_verify_cache_cleanup_interval = 12h
address_verify_default_transport = $default_transport
address_verify_local_transport = $local_transport
address_verify_map = btree:$data_directory/verify_cache
address_verify_negative_cache = yes
…… . .
You can view the settings that are defined explicitly in the file using the postconf command with the –n switch:
# postconf –n
alias_database = hash:/etc/aliases
alias_maps = hash:/etc/aliases
command_directory = /usr/sbin
config_directory = /etc/postfix
daemon_directory = /usr/libexec/postfix
data_directory = /var/lib/postfix
debug_peer_level = 2
debugger_command = PATH=/bin:/usr/bin:/usr/local/bin:/usr/X11R6/bin ddd $daemon_directory/$process_name $process_id & sleep 5
html_directory = no
inet_interfaces = localhost
inet_protocols = all
mail_owner = postfix
mailq_path = /usr/bin/mailq.postfix
manpage_directory = /usr/share/man
mydestination = $myhostname, localhost.$mydomain, localhost
newaliases_path = /usr/bin/newaliases.postfix
queue_directory = /var/spool/postfix
readme_directory = /usr/share/doc/postfix-2.10.1/README_FILES
sample_directory = /usr/share/doc/postfix-2.10.1/samples
sendmail_path = /usr/sbin/sendmail.postfix
setgid_group = postdrop
unknown_local_recipient_reject_code = 550
Rather than editing the main.cf file manually for modifications, you can alter a directive value directly from the command prompt using the postconf command. For instance, the following sets the inet_interfaces directive to all:
# postconf –e inet_interfaces=all
Verify the change by greping for this directive in the file:
# grep ^inet_interfaces /etc/postfix/main.cf
Inet_interfaces = all
There is no need for the conversion of this file into a database as you did for the files discussed previously. Postfix reads this configuration file to obtain settings.
EXAM TIP: Understanding and use of mydomain, mydestination, myhostname, mynetworks, myorigin, inet_interfaces, and relayhost directives is important.
The master.cf File
The master.cf file defines configuration settings for the master daemon and the way it should interact with other service agents to achieve mail delivery. An excerpt from the file is provided below:
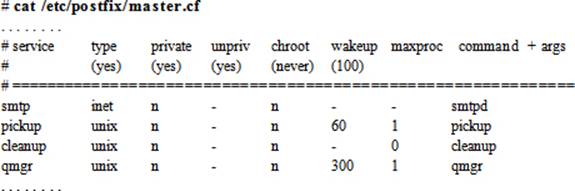
For each service listed in the first column, there are seven columns that define how the service is to be used. These columns are explained in Table 23-3.
|
Column |
Description |
|
service |
Name of the service. |
|
type |
Transport mechanism to be used. |
|
private |
Whether the service is for Postfix use only. |
|
unpriv |
Whether the service is to be run by non-root users. |
|
chroot |
Whether the service is to be chrooted for the mail queue. |
|
wakeup |
Wake up interval for the service. |
|
maxproc |
Maximum number of threads the service can spawn. |
|
command + args |
Command associated with the service plus any arguments. |
Table 23-3 master.cf File Description
There is no need to convert this file into a database. Postfix references this file for service agent settings.
The relocated File
This optional file contains information of users that have moved. This file is syntactically identical to the canonical and generic files. The following shows an example.
Assuming user1 has moved from example.com domain to example.net, you can forward all email received on their old address to a new one by adding the following line to the relocated file:
user1@example.com user1@example.net
The contents of this file are converted into an indexed database called relocated.db for Postfix use. After making changes to the relocated file, run the postmap command on the file to create or update the database:

The transport File
This optional file is used to establish mappings between email addresses and message delivery transports and next-hop destinations in the transport:nexthop format. An example of transport is local or smtp and that for nexthop a hostname or a domain name. For instance, the following entry sets up a mapping between a user email address and a host:
user1@example.com smtp:host1.example.com
The contents of this file are converted into an indexed database called transport.db for Postfix use. After making changes to the transport file, run the postmap command on the file to create or update the database:

The virtual File
This optional file may be used to redirect mail intended for one user to one or more other email addresses, or to implement a virtual alias domain with all email addresses aliased to addresses in other domains. The first example below redirects email for user1 to users root and user3, and the second example redirects email for user1 in the example.com domain to user root:
user1 root, user3
user1@example.com root
The contents of this file are converted into an indexed database called virtual.db for Postfix use. After making changes to the virtual file, run the postmap command on the file to create or update the database:

The /etc/aliases File
The /etc/aliases file delivers a mechanism to forward mail destined for local recipients to other local or remote addresses. Postfix references this file to determine alias settings. Some default contents from this file are displayed below:
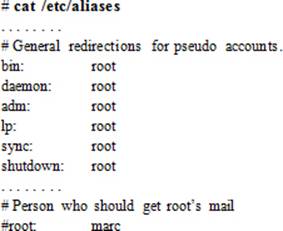
The preceding output indicates that the root user receives messages generated by system users. You can set up something similar for other users too. For instance, if you wish to forward email for a deleted user account, user50, to a local user, user1, and a remote user, user2@host1.example.com, open the aliases file and add the following entry:
user50: user1, user2@host1.example.com
This file also allows you to create a mailing group with all members receiving the mail sent to the group. Here is how you would define a mailing group lnxadmteam with members user1, user2, and user3. Add the following line to the aliases file:
lnxadmteam: user1, user2, user3
After any modifications have been made to the aliases file, the Postfix service needs to be apprised. To this end, the contents of this file are converted into an indexed database called aliases.db by executing the newaliases command:

Postfix Logging
All mail messages and alerts are logged to the /var/log/maillog file, and are related to starting and stopping the Postfix service, successful and unsuccessful user connection attempts, mail sent and disallowed, warning messages, and so on. The maillog is a plain text file and may be viewed with any file viewing utility, such as head, tail, cat, more, or view. The following shows an excerpt from the file:

This log file grows over time depending on how busy the mail system is. The syslog service rotates this file once a week to prevent it from getting too large, and it saves previous four weeks of backup in the same directory.
EXAM TIP: You can open another terminal session on the system to run ‘tail –f’ on a log file.
Managing Postfix
Managing Postfix involves several configuration and administration tasks, including setting up Postfix as a network mail server and as a smart host, applying appropriate access controls, mapping email addresses, and creating aliases. These tasks are covered in exercises presented in this section.
SELinux Requirements for Postfix Operation
SELinux protects systems by setting appropriate controls using contexts and booleans. Before you proceed with the exercises, let’s look at the Postfix-specific SELinux contexts on processes, files, and port, and discuss the booleans that may need to be modified for Postfix to function properly. By default, all Postfix daemons, including master, pickup, and qmgr, run confined in their own domains and are labeled appropriately. For instance, the domain type associated with the master process is postfix_master_t, and that for pickup and qmgr are postfix_pickup_t and postfix_qmgr_t, respectively. This can be confirmed with the ps command as follows:

The SELinux file types associated with Postfix are postfix_exec_t on the /etc/postfix configuration directory, postfix_data_t on the /var/lib/postfix data directory, and postfix_spool_t on the /var/spool/postfix incoming and outgoing mail directory. Here is an ll command output that verifies this information:

The SELinux type associated with the SMTP port is smtp_port_t, and it is in place by default. Here is the semanage command output that validates this information:
# semanage port –l | grep smtp
smtp_port_t tcp 25, 465, 587
From a SELinux boolean perspective, there is a solo boolean that is associated with Postfix, and we can see this with the getsebool command:
# getsebool –a | grep postfix
postfix_local_write_mail_spool --> on
This boolean allows or disallows Postfix to write to the local mail spool on the system, and, by default, it is turned on.
By looking at the above SELinux settings for Postfix, we can establish that there are no changes required to make Postfix function smoothly in the SELinux enforcing mode.
Exercise 23-1: Configure a Central Mail Server
This exercise should be done on server1.
In this exercise, you will configure Postfix to serve systems on the local network (192.168.0.0/24). You will add server1 as the MTA in the example.com domain, listening on all network interfaces with DNS lookups disabled (disable_dns_lookups directive). You will check the Postfix configuration for any syntax errors, configure appropriate host-based access rules in firewalld, set Postfix to autostart at system reboots, start the Postfix service, and ensure that it is set as the default MTA. You will send an email to a local user user3 to ensure that the mail service is working for local users.
1. Install the Postfix software package:
# yum –y install postfix
Package 2:postfix-2.10.1-6.el7.x86_64 already installed and latest version
Nothing to do
2. Open the main.cf file in a text editor and set or modify the following directives. Leave other settings intact.
|
myhostname |
= server1.example.com |
|
mydomain |
= example.com |
|
myorigin |
= $myhostname |
|
inet_interfaces |
= all |
|
mydestination |
= $myhostname, localhost.$mydomain, localhost, $mydomain |
|
mynetworks |
= 192.168.0.0/24, 127.0.0.0/8 |
|
disable_dns_lookups |
= yes |
![]() The default method for the mail system to resolve hostnames is DNS; however, in the absence of DNS service, you can instruct the mail system to use the hosts file instead by defining the disable_dns_lookups directive in the main.cf file and setting its value to yes.
The default method for the mail system to resolve hostnames is DNS; however, in the absence of DNS service, you can instruct the mail system to use the hosts file instead by defining the disable_dns_lookups directive in the main.cf file and setting its value to yes.
3. Check for any syntax errors in the main.cf file using the postfix command:
# postfix check
4. Review the changes made in the main.cf file with the postconf command:
|
# postconf –n |
|
|
alias_database |
= hash:/etc/aliases |
|
alias_maps |
= hash:/etc/aliases |
|
command_directory |
= /usr/sbin |
|
config_directory |
= /etc/postfix |
|
daemon_directory |
= /usr/libexec/postfix |
|
data_directory |
= /var/lib/postfix |
|
disable_dns_lookups |
= yes |
|
inet_interfaces |
= all |
|
inet_protocols |
= all |
|
mail_owner |
= postfix |
|
mail_spool_directory |
= /var/spool/mail |
|
mydestination |
= $myhostname, localhost.$mydomain, localhost, $mydomain |
|
mydomain |
= example.com |
|
myhostname |
= server1.example.com |
|
mynetworks |
= 192.168.0.0/24, 127.0.0.0/8 |
|
myorigin |
= $myhostname |
|
queue_directory |
= /var/spool/postfix |
You may get additional lines in the output based on what was modified in the file.
5. Add the smtp service to firewalld persistently and reload the rules to allow traffic on SMTP port 25:
# firewall-cmd --permanent --add-service smtp; firewall-cmd --reload
6. Set Postfix to autostart at system reboots:
# systemctl enable postfix
ln -s '/usr/lib/systemd/system/postfix.service' '/etc/systemd/system/multi-user.target.wants/postfix.service'
7. Start the Postfix service and check its operational status:
# systemctl start postfix
# systemctl status postfix
postfix.service - Postfix Mail Transport Agent
Loaded: loaded (/usr/lib/systemd/system/postfix.service; enabled)
Active: active (running) since Thu 2015-02-12 17:44:13 EST; 3s ago
Process: 14879 ExecStop=/usr/sbin/postfix stop (code=exited, status=0/SUCCESS)
Process: 14893 ExecStart=/usr/sbin/postfix start (code=exited, status=0/SUCCESS)
Process: 14891 ExecStartPre=/usr/libexec/postfix/chroot-update (code=exited, status=0/SUCCESS)
Process: 14888 ExecStartPre=/usr/libexec/postfix/aliasesdb (code=exited, status=0/SUCCESS)
Main PID: 14965 (master)
CGroup: /system.slice/postfix.service
├─14965 /usr/libexec/postfix/master -w
├─14966 pickup -l -t unix -u
└─14967 qmgr -l -t unix -u
8. Configure Postfix as the default MTA using the alternatives command and verify:
# alternatives --set mta /usr/sbin/sendmail.postfix
# alternatives --display mta | grep current
link currently points to /usr/sbin/sendmail.postfix
9. Mail a message to user3 with the subject (–s) “Local Delivery Test” to test local mail delivery (the mail command is part of the mailx package, which needs to be installed if it is not already there):
# date | mail –s “Local Delivery Test” user3
10. Switch to user3 account and run the mail command to check whether this user has received the email. Press Enter at the & prompt to view the message and type q at the next & prompt to quit.
# su – user3
Heirloom Mail version 12.5 7/5/10. Type ? for help.
"/var/spool/mail/user3": 1 message 1 new
>N 1 root Fri Feb 13 11:42 18/626 "Local Delivery Test"
&
Message 1:
From root@server1.example.com Fri Feb 13 11:42:50 2015
Return-Path: <root@server1.example.com>
X-Original-To: user3
Delivered-To: user3@server1.example.com
Date: Fri, 13 Feb 2015 11:42:50 -0500
To: user3@server1.example.com
Subject: Local Deliver Test
User-Agent: Heirloom mailx 12.5 7/5/10
Content-Type: text/plain; charset=us-ascii
From: root@server1.example.com (root)
Status: R
Fri Feb 13 11:42:50 EST 2015
& q
Held 1 message in /var/spool/mail/user3
You can tail the /var/log/maillog file to view messages generated during the implementation of this exercise.
This completes the procedure to set up a central mail server with Postfix.
EXAM TIP: By default, your email appears to have originated from server1.example.com. However, if you would like to change it to your domain name example.com, for instance, open main.cf and set myorigin directive to $mydomain. Save and quit the file, and restart Postfix. Try sending another test email and check the “From” line in the email.
Exercise 23-2: Test Central Mail Server from Remote Client
This exercise should be done on server2 (mail client) and server1 (mail server).
In this exercise, you will install the Postfix software package, modify it to avoid DNS lookups, enable Postfix, and start it. You will send an email to root on the mail server for verification. You will log on to server1 as user root and verify the receipt.
On server2 (mail client):
1. Install the Postfix software package:
# yum –y install postfix
2. Open the main.cf file in a text editor and add the following directive at the beginning of the file:
disable_dns_lookups = yes
3. Set Postfix to autostart at system reboots:
# systemctl enable postfix
4. Start the Postfix service:
# systemctl start postfix
5. Mail a message to root@server1.example.com with the subject “Remote Delivery Test” to test network mail delivery:
# date | mail –s “Remote Delivery Test” root@server1.example.com
On server1 (mail server):
6. Run the mail command to check whether the email has been received. Press Enter at the & prompt to view the message and type q at the next & prompt to quit. Install the mailx package to access the mail command if it is not already there.
Heirloom Mail version 12.5 7/5/10. Type ? for help.
"/var/spool/mail/root": 1 message 1 new
>N 1 root Fri Feb 13 11:46 21/854 "Remote Delivery Test"
&
Message 1:
From root@server2.example.com Fri Feb 13 11:46:00 2015
Return-Path: <root@server2.example.com>
X-Original-To: root@server1.example.com
Delivered-To: root@server1.example.com
Date: Sat, 14 Feb 2015 03:46:00 +1100
To: root@server1.example.com
Subject: Remote Delivery Test
User-Agent: Heirloom mailx 12.5 7/5/10
Content-Type: text/plain; charset=us-ascii
From: root@server2.example.com (root)
Status: R
Sat Feb 14 03:46:00 MIST 2015
& q
Held 1 message in /var/spool/mail/root
You can tail the /var/log/maillog file on both servers to view messages generated during the implementation of this exercise. Also, you can find the incoming mail for each user in the /var/spool/mail directory.
This completes the procedure for sending email from a remote system and receiving it on the mail server.
EXAM TIP: By default, your email appears to have originated from server2.example.com. However, if you would like to change it to your domain name example.com, for instance, open main.cf and set mydomain directive to example.com and myorigin directive to $mydomain. Save and quit the file, and restart Postfix. Try sending another test email and check the “From” line in the email.
Exercise 23-3: Configure Postfix to Forward Local Mail to a Central Mail Server and Reject Incoming Mail
This exercise should be done on host1 (mail client) and server1 (mail server).
In this exercise, you will install and configure Postfix on host1 to deny all incoming email (access control) and forward (relayhost) localhost mail to the central mail server (server1). You will disable the use of DNS for lookups. You will ensure that any mail received on the central mail server appears to have originated from example.com and not host1.example.com. You will check the Postfix configuration for any syntax errors, configure appropriate host-based access rules in firewalld, set Postfix to autostart at system reboots, start the Postfix service, and ensure that it is set as the default MTA. You will send an email to a local user user1 on host1 and confirm its receipt on the mail server.
On host1 (mail client):
1. Install the postfix software package:
# yum –y install postfix
Package 2:postfix-2.10.1-6.el7.x86_64 already installed and latest version
Nothing to do
2. Open the main.cf file in a text editor and set or modify the following directives. Leave other settings intact.
|
myhostname |
= host1.example.com |
|
mydomain |
= example.com |
|
myorigin |
= $mydomain |
|
inet_interfaces |
= localhost |
|
mydestination |
= localhost |
|
relayhost |
= server1.example.com |
|
disable_dns_lookups |
= yes |
3. Check for any syntax errors in the main.cf file using the postfix command:
# postfix check
4. Review the changes made in the main.cf file with the postconf command:
|
# postconf –n |
|
|
command_directory |
= /usr/sbin |
|
config_directory |
= /etc/postfix |
|
daemon_directory |
= /usr/libexec/postfix |
|
data_directory |
= /var/lib/postfix |
|
disable_dns_lookups |
= yes |
|
inet_interfaces |
= localhost |
|
mail_owner |
= postfix |
|
mydestination |
= localhost |
|
mydomain |
= example.com |
|
myhostname |
= host1.example.com |
|
myorigin |
= $mydomain |
|
queue_directory |
= /var/spool/postfix |
|
relayhost |
= server1.example.com |
You may get additional lines in the output based on what was modified in the file.
5. Add the smtp service to firewalld persistently and reload the rules to allow traffic on SMTP port 25:
# firewall-cmd --permanent --add-service smtp; firewall-cmd --reload
6. Set Postfix to autostart at system reboots:
# systemctl enable postfix
ln -s '/usr/lib/systemd/system/postfix.service' '/etc/systemd/system/multi-user.target.wants/postfix.service'
7. Start the Postfix service and check its operational status:
# systemctl start postfix
8. Configure Postfix as the default MTA using the alternatives command, and verify:
# alternatives --set mta /usr/sbin/sendmail.postfix
# alternatives --display mta | grep current
link currently points to /usr/sbin/sendmail.postfix
9. Mail a message to user1 (this account should exist on both host1 and server1) with the subject (–s) “Relay Host Delivery Test” to test the relay host functionality:
# date | mail –s “Relay Host Delivery Test” user1
On server1 (mail server):
10. Log on to server1 as user user1, and run the mail command to check whether this user has received the email. Press Enter at the & prompt to view the message and type q at the next & prompt to quit.
Heirloom Mail version 12.5 7/5/10. Type ? for help.
"/var/spool/mail/user1": 1 message 1 new
>N 1 root Thu Feb 12 19:11 20/781 "Relay Host Delivery Test"
&
Message 1:
From root@example.com Thu Feb 12 19:11:12 2015
Return-Path: <root@example.com>
X-Original-To: user1
Delivered-To: user1@server1.example.com
Date: Thu, 12 Feb 2015 19:11:12 -0500
To: user1@server1.example.com
Subject: Relay Host Delivery Test
User-Agent: Heirloom mailx 12.5 7/5/10
Content-Type: text/plain; charset=us-ascii
From: root@example.com (root)
Status: R
Thu Feb 12 19:11:12 EST 2015
& q
Held 1 message in /var/spool/mail/user1
You can tail the /var/log/maillog file on both servers to view messages generated during the implementation of this exercise. In addition, you can find the incoming mail for each user in the /var/spool/mail directory.
This completes the procedure to set up and test a relay host for localhost only.
Exercise 23-4: Configure Postfix to Receive Local Network Mail and Forward All Mail to a Central Mail Server
This exercise involves host1 (relay host), server1 (mail server), and server2 (mail client).
In this exercise, you will extend the ability of the mail client configured on host1 to accept all incoming email and forward both local and incoming mail to the central mail server (server1). The rest of the configuration will stay the same. You will submit an email on server2 touser1@host1.example.com and it should be received by user1 on the mail server.
On host1 (relay host):
1. Open the main.cf file in a text editor and set or modify the following directives. Leave other settings intact.
|
myhostname |
= host1.example.com |
|
mydomain |
= example.com |
|
myorigin |
= $mydomain |
|
inet_interfaces |
= all |
|
mydestination |
= $myhostname, localhost.$mydomain, localhost, $mydomain |
|
mynetworks |
= 192.168.0.0/24, 127.0.0.0/8 |
|
relayhost |
= server1.example.com |
|
disable_dns_lookups |
= yes |
2. Restart the Postfix service:
# systemctl restart postfix
On server2 (mail client):
3. Mail a message to user1@host1.example.com with the subject (–s) “Relay Host Delivery Test Exercise 23-4” to test the relay host functionality from a network system:
# date | mail –s “Relay Host Delivery Test Exercise 23-4” user1@host1.example.com
On server1 (mail server):
4. Log on to server1 as user1 and run the mail command to check whether this user has received the email. Press Enter at the & prompt to view the message and type q at the next & prompt to quit.
"/var/spool/mail/user1": 1 message 1 new
>N 1 root Thu Feb 13 20:23 23/878 "Relay Host Delivery Test Exercise 23-4"
& q
Held 1 message in /var/spool/mail/user1
You can tail the /var/log/maillog file on host1 and server1 to view messages generated during the testing.
This completes the procedure to set up and test a relay host for network systems.
Chapter Summary
This chapter presented an introduction to email service and provided several exercises to practice the implementation. The chapter examined the SMTP protocol and described common terms and protocols that are part of the email system. It described how the email system works and analogized it to the traditional postal system. It discussed Postfix daemons and commands, analyzed various required and optional configuration files, and discussed SELinux file, process, and port contexts, as well as booleans. The chapter demonstrated the configuration of a central mail server for the network, relayhosts for local and network use, and how to test them.
Chapter Review Questions
1. What is the use of the mydestination directive?
2. What is the name of the Postfix access control file?
3. Evolution is an example of an MTA. True or False?
4. What functionality does an MTA provide?
5. What is the default myorigin directive setting?
6. The mail command may be used to verify the functionality of a mail server. True or False?
7. Directives in the main.cf file can be modified directly from the command line. What command is used for this purpose?
8. Which file does Postfix use to log mail alerts?
9. Which Postfix command is used to convert text configuration files into indexed databases?
10. Which file controls the behavior of Postfix daemons and agents?
11. Where are the Postfix configuration files located?
12. An MUA is responsible to transport email messages over the network. True or False?
13. What is the equivalent Postfix command for mailq?
14. What command would you use to display or alter the current MTA?
15. Why do we use the disable_dns_lookups directive?
16. What protocol and port does the mail system use?
17. What would the command postconf –n do?
18. What is the purpose of the relayhost directive?
19. What two protocols are used to pull user mail in to their inboxes?
20. What would the entry “example.com REJECT” in the access file imply?
21. How do you notify Postfix service of a change in the /etc/aliases file?
22. When should you run the postfix check command?
23. Which file defines mapping for email addresses?
24. The access file can be used to allow or disallow a host, domain, or network from accessing the Postfix service. True or False?
25. Which command would you run to update the aliases database?
26. What would the command postconf –e setgid_group=postdrop do?
27. What is the name of the main daemon for the Postfix service?
28. By default, all Postfix daemons and agents run in their own SELinux domains. True or False?
Answers to Chapter Review Questions
1. The mydestination directive defines the hosts and domains that the mail server is configured to serve.
2. The name of the Postfix access control file is access.
3. False. Evolution is an MUA program.
4. An MTA is responsible for transporting email messages between mail servers.
5. The default myorigin directive is set to $myhostname.
6. False. The mail command is used to read and compose email messages.
7. The postconf command can be used to modify directives in the main.cf file directly from the command prompt.
8. Postfix uses the /var/log/maillog file for logging.
9. The postmap command is used to convert configuration files into indexed databases.
10. The master.cf file controls the behavior of Postfix daemons and agents.
11. The Postfix configuration files are located in the /etc/postfix directory.
12. False. An MUA is used to read and compose email messages.
13. The equivalent command is postqueue with the –p switch.
14. The alternatives command is used to display and alter the current MTA setting.
15. The disable_dns_lookups is used to enable or disable the use of DNS lookups.
16. The mail system uses the SMTP protocol on well-known port 25.
17. This command displays non-default Postfix settings.
18. The relayhost directive specifies the mail server to forward mail to.
19. POP3 and IMAP protocols are used to pull user mail messages into their inboxes.
20. This entry would reject incoming mail from systems in the example.com domain.
21. By executing the newaliases command.
22. After making changes to the main.cf file for syntax errors.
23. In the /etc/aliases file.
24. True.
25. The newaliases command is run after making edits in the aliases file.
26. This command will modify the directive’s value in the main.cf file without having to open the file in a text editor.
27. The main daemon for the Postfix service is called master.
28. True.
DIY Challenge Labs
The following labs are useful to strengthen the concepts and topics learned in this chapter. It is expected that you perform these labs without any additional help. A step-by-step guide is not provided, as the implementation of these labs requires the knowledge that has been presented in this chapter. Use defaults or your own thinking for missing information.
Lab 23-1: Establish a Network Mail Server and Test It
Establish a RHEL7 system as a network mail server for network 192.168.1.0/24. This server should reject inbound mail from 192.168.0.0/24 and example.org. Create a mapping in the appropriate file to forward mail destined for user1 and group dba to user3. On the client, ensure that outbound mail appears to originate from example.com domain.
Lab 23-2: Establish a Forwarding Mail Server and Test It
Configure a RHEL7 system to relay localhost as well as all inbound mail to the central mail server set up in the previous lab. On the client, ensure that outbound mail appears to originate from example.net domain.
All materials on the site are licensed Creative Commons Attribution-Sharealike 3.0 Unported CC BY-SA 3.0 & GNU Free Documentation License (GFDL)
If you are the copyright holder of any material contained on our site and intend to remove it, please contact our site administrator for approval.
© 2016-2026 All site design rights belong to S.Y.A.