RHCSA & RHCE Red Hat Enterprise Linux 7: Training and Exam Preparation Guide (EX200 and EX300), Third Edition (2015)
Part I. RHCSA Section
Chapter 4. Dealing with the Bash Shell, Processes, and Scheduling
This chapter describes the following major topics:
· The bash shell and its features – local and environment variables; command and variable substitution; input, output, and error redirection; tab completion; command line editing; command history; tilde substitution; regular expressions; and metacharacters
· Understand and display system and user executed processes
· View process states and priorities
· Process niceness and reniceness
· Signals and their use
· Overview of job scheduling and access control
· Schedule and manage jobs using at and cron
RHCSA Objectives:
02. Use input-output redirection (>, >>, |, 2>, etc.)
03. Use grep and regular expressions to analyze text
15. Identify CPU/memory intensive processes, adjust process priority with renice, and kill processes
32. Schedule tasks using at and cron
Shells interface users with the kernel by enabling them to submit their requests for processing. RHEL supports several shells of which the bash shell is the most popular. It is also the default shell in RHEL7. The bash shell offers a variety of features that help administrators perform their job with great ease and flexibility.
A process is a program or command running on the system. Every process has a unique numeric identifier and it is managed by the kernel. It may be viewed, listed, niced, and reniced. A process is in one of several states at any given time during its lifecycle. There are several signals that may be passed to a process to kill or terminate it, among other actions. A program or command may be run in a way that precludes termination by a hangup signal (such as the disconnection of the terminal session in which the program or command is running).
Job scheduling allows a user to schedule a command for a one-time or recurring execution in future. A job may be submitted and managed by any authorized user. All executed jobs are logged.
Introducing the BASH Shell
The shell is referred to as the command interpreter, and it is an interface between a user and the kernel. The shell accepts instructions from users (or scripts), interprets them, and passes them on to the kernel for processing. The kernel utilizes all hardware and software components required for successfully processing the instructions. When finished, it returns the results to the shell and displays them on the screen. The shell also shows appropriate error messages, if generated.
A widely used shell by Linux users and administrators is the bash (bourne again shell) shell. bash is a replacement for the older Bourne shell, and has undergone a number of enhancements. It is the default shell in RHEL7 and offers several features such as variable manipulation, command substitution, variable substitution, input and output redirection, command history, command line editing, tab completion, tilde substitution, pattern matching, metacharacters, command aliasing, quoting, conditional execution, flow control, and shell scripting. Some of these features are discussed in this section.
The bash shell is identified by the $ sign for regular users and the # sign for the root user. This shell is resident in the /bin/bash file.
Variables
A variable is a temporary storage of data in memory. It stores information that is used for customizing the shell environment and by many system and application processes to function properly. The shell allows us to store a value in a variable. This value may include a string of alphanumeric characters, white spaces, and some special characters. A variable value that contains one or more white space characters must be enclosed within quotes.
There are two types of variables: local and environment.
A local variable is private to the shell in which it is created and its value cannot be used by processes that are not started in that shell. This introduces the concept of current shell and sub-shell (or child shell). The current shell is where we execute a program, whereas a sub-shell is created by a running program. The value of a local variable is available only in the current shell, and not in the sub-shell.
The value of an environment variable, however, is passed from the current shell to the sub-shell during the execution of a script. In other words, the value stored in an environment variable is passed from the parent process to the child process. Any environment variable set in a sub-shell loses its value when the sub-shell terminates.
Some environment variables are defined automatically through system and user startup files at log in, and are described in Table 4-1.
|
Variable |
Description |
|
DISPLAY |
Stores the hostname or IP address for X terminal sessions. |
|
HISTFILE |
Defines the file for storing the history of executed commands. |
|
HISTSIZE |
Defines the maximum size for the HISTFILE. |
|
HOME |
Sets the home directory path. |
|
LOGNAME |
Stores the login name. |
|
|
Contains the path to the user mail directory. |
|
PATH |
Defines a colon-separated list of directories to be searched when executing a command. |
|
PS1 |
Defines the primary command prompt. |
|
PS2 |
Defines the secondary command prompt. |
|
PWD |
Stores the current directory location. |
|
SHELL |
Holds the absolute path to the primary shell file. |
|
TERM |
Holds the terminal type value. |
Table 4-1 Pre-Defined Environment Variables
We may also set custom environment variables at the command prompt or in scripts as required.
Setting and Unsetting Variables, and Viewing their Values
Local and environment variables may be set or unset at the command prompt or via programs, and their values may be viewed and used as necessary. It is recommended that you employ uppercase letters for naming variables so as to avoid any possible conflicts with existing command, program, file, or directory names. To understand how variables are defined, viewed, and undefined, a few examples are presented below. These examples are run as user100 on host1.
To define a local variable called VR1:
$ VR1=rhel7
To view the value stored in VR1:
$ echo $VR1
rhel7
To make this variable an environment variable, use the export command as follows:
$ export VR1
To undefine this variable:
$ unset VR1
You can define a local variable that contains a value with one or more white spaces as follows:
$ VR1=“I love RHEL7”
The above may also be defined as an environment variable using the export command as follows:
$ export VR1=“I love RHEL7”
In addition to the echo command to view variable values, the set, env, and export commands may also be used for this purpose. The set command lists current values for all shell variables, including local and environment variables, while the env and export commands list only the environment variables.
Command and Variable Substitution
The primary command prompt for the root user is the # sign and that for regular users is $. Customizing the primary command prompt to display useful information such as who you are, the system you are logged on to, and your current location in the directory tree is a good practice. The examples below illustrate how to modify the primary prompt for user100 using either of the following:
$ export PS1=“< $LOGNAME@`hostname`:\$PWD > ”
$ export PS1=“< $LOGNAME@$(hostname):\$PWD > ”
The command prompt for user100 will now look like:
< user100@host1.example.com:/home/user100 >
The value of the PWD variable will reflect the directory location in the prompt as user100 navigates the tree. This is called variable substitution. For instance, if user100 moves to /usr/bin, the prompt will change to:
< user100@host1.example.com:/usr/bin >
Also, the value of LOGNAME will display the user’s login name.
Running the command hostname and assigning its output to a variable is an example of a shell feature called command substitution. Note that the command whose output we want to assign to a variable must be enclosed within either single forward quotes or parentheses preceded by the $ sign.
Input, Output, and Error Redirection
Many programs read input from the keyboard and write output to the terminal window where they are initiated. Any errors, if encountered, are printed on the terminal window too. This is the default behavior. What if we do not want input to come from the keyboard or output to go to the terminal screen? The bash shell gives us the flexibility to redirect input, output, and error messages to allow programs and commands to read input from a non-default source and forward output and errors to a non-default destination.
EXAM TIP: You may be asked to run a command or report and redirect its output and/or error messages to a file.
The default (or the standard) locations for input, output, and error are referred to as standard input (or stdin), standard output (or stdout), and standard error (or stderr), respectively. These locations may also be epitomized using the < operator for stdin and > for both stdout and stderr, or using the file descriptors 0, 1, and 2 for stdin, stdout, and stderr, respectively.
Redirecting Standard Input
Input redirection instructs a command to read the required information from an alternative source, such as a file, instead of the keyboard. The < character is used for input redirection. For example, run the following to have the cat command read the /etc/cron.allow file and display its contents on the standard output (terminal screen):
$ cat < /etc/cron.allow
Redirecting Standard Output
Output redirection sends the output generated by a command to an alternative destination, such as a file, instead of to the terminal window. The > sign is used for this purpose. For instance, execute the following to direct the ll command to send the output to a file called ll.out. This will overwrite the existing ll.out file if there is one. If ll.out does not exist, it will be created.
$ ll > ll.out
To direct the ll command to append the output to the ll.out file instead, use the >> characters:
$ ll >> ll.out
Redirecting Standard Error
Error redirection forwards any error messages generated to an alternative destination such as a file, rather than to the terminal window. For example, the following directs the find command to search for all occurrences of files by the name core in the entire root directory tree and sends any error messages produced to /dev/null (/dev/null is a special file that is used to discard data).
$ find / –name core –print 2> /dev/null
Redirecting both Standard Output and Error
Both output and error can be redirected to alternative locations as well. For instance, issue the following to forward them both to a file called outerr.out:
$ ls /usr /cdr &> outerr.out
This example will produce a listing of the /usr directory and save the result in outerr.out. At the same time, it will generate an error message complaining about the non-existence of the /cdr directory, and will send it to the same file as well. You may use >> signs in the above example to append to an existing file.
Command History
Command history keeps a log of all commands that you run at the command prompt. This feature is enabled by default. The bash shell stores command history in a file located in the user’s home directory. You may retrieve these commands, modify them at the command line, and re-run them.
There are two variables that enable the command history feature, and their values may be viewed with the echo command:
$ echo $HISTFILE
/home/user100/.bash_history
$ echo $HISTSIZE
1000
The HISTFILE variable tells the bash shell to store all commands run by a user in the .bash_history file in that user’s home directory. This file is created automatically if it does not already exist. Each command, along with options and arguments, is stored on a separate line.
The HISTSIZE variable controls the maximum number of command entries that can be stored in HISTFILE.
In addition to these variables, you also need to ensure that a text editor such as emacs or vi is set. This allows you the ability to use the command history feature, as well as some other features that are discussed in later sub-sections. The default editor is set to emacs. If not, you can issue the following to activate it:
$ set –o emacs (or $ set –o vi)
The HISTSIZE variable is pre-defined in the /etc/profile startup file and may be increased or decreased if desired. The set command above may be defined in the user or system startup file. Refer to Chapter 08 “Managing Users and Groups” on how to define variables and commands in startup files to customize the shell behavior.
RHEL provides the history command to display or use previously executed commands. It gets the information from the ∼/.bash_history file. By default, the last 500 entries are displayed if it is executed without any options.
$ history | more
1 cd /sdata
2 touch file1
3 ll
4 ll -d /sdata
…… . .
Let’s use some of the history command options and observe the impact on the output.
To display this command and the ten entries preceding it:
$ history 11
To re-execute a command by its line number (line 38 for example) in the history file:
$ !38
To re-execute the most recent occurrence of a command that started with a particular letter or series of letters (ch for example):
$ !ch
To repeat the last command executed:
$ !!
Command Line Editing
Command line editing allows us to edit a line of text right at the command prompt. Depending on which editor is set, we can scroll backward (reverse chronological order) or forward (chronological order) through the command history. This feature is enabled by setting either the emacs or vi command line text editor (or some other editor of your choice). By default, emacs is set; however, we can also set vi as follows:
$ set –o vi
One of the differences between the two is the key combinations used for scrolling through the history file, ∼/.bash_history. Pressing the up arrow key (or Ctrl+k for vi) brings the last command we executed at the prompt, and pressing it (or the j key for vi) repeatedly scrolls backward through the command history. Pressing the down arrow key (or the j key for vi) repeatedly scrolls forward through the command history. When we get the desired command at the prompt, we may edit it right there using the emacs or vi editor commands. If we do not wish to edit the command or are done with editing, we can simply press Enter to execute it.
Tab Completion
Tab completion (a.k.a. command line completion) is a bash shell feature whereby typing one or more initial characters of a file, directory, or command name at the command line and then hitting the Tab key twice automatically completes the entire name. In case of multiple possibilities matching the entered characters, it completes up to the point they have in common and prints all the remaining possibilities on the screen. We can then type one or more following characters and press Enter again to further narrow down the possibilities. When the desired name appears on the command line, we press Enter to accept it and perform the action. One of the major benefits of using this feature is the time that we save on typing long file, directory, or command names.
Tab completion works if a text editor is set as explained in the previous two sub-sections.
Tilde Substitution
Tilde substitution (or tilde expansion) is performed on words that begin with the tilde ∼ character. The rules to keep in mind when using the ∼ sign are:
1. If ∼ is used as a standalone character, the shell refers to the $HOME directory of the user running the command. The following example displays the $HOME directory of user100:
$ echo ∼
/home/user100
2. If the plus sign follows the ∼, the shell refers to the current directory. For example, if user100 is in the /etc/systemd directory and does ∼+, the output displays the user’s current directory location:
$ echo ∼+
/etc/systemd
3. If the dash sign follows the ∼, the shell refers to the previous working directory. For example, if user100 switches into the /usr/share/man directory from /etc/systemd and does ∼–, the output displays the user’s last working directory location:
$ echo ∼–
/etc/systemd
4. If a username has the ∼ character prepended to it, the shell refers to the $HOME directory of that user:
$ echo ∼user200
/home/user200
We can use tilde substitution with any commands such as cd, ls, and echo that refer to a location in the directory structure. Additional examples of tilde substitution were provided in Chapter 02 “Using Basic Linux Tools”.
Regular Expression
A regular expression, also referred to as pattern matching, regex, or regexp, is a pattern that is matched against a string of characters in a file or supplied input. The pattern can be a single character, series of characters, word, or sentence. Any pattern with one or more white spaces must be enclosed within quotes.
Linux provides a powerful tool called grep (global regular expression print) for pattern matching. This tool searches the contents of one or more text files or supplied input for a regular expression. If the expression is matched, grep prints every line containing that expression on the screen without changing the source contents. Consider the following examples.
EXAM TIP: The grep command is a handy tool to extract needed information from a file or command output. The extracted information can then be redirected to a file. The sequence of the grepped data remains unchanged.
To search for the pattern user100 in the /etc/passwd file:
$ grep user100 /etc/passwd
user100:x:1001:1001::/home/user100:/bin/bash
To search for the pattern nologin in /etc/passwd and exclude the lines in the output that contain this pattern. Use –v for pattern exclusion and –n for line numbers associated with the lines that do not contain the pattern.
$ grep –nv nologin /etc/passwd
1:root:x:0:0:root:/root:/bin/bash
6:sync:x:5:0:sync:/sbin:/bin/sync
7:shutdown:x:6:0:shutdown:/sbin:/sbin/shutdown
8:halt:x:7:0:halt:/sbin:/sbin/halt
38:user1:x:1000:1000:user1:/home/user1:/bin/bash
41:user100:x:1001:1001::/home/user100:/bin/bash
42:user200:x:1002:1002::/home/user200:/bin/bash
To search for all lines in the /etc/passwd file that begin with the pattern root. The bash shell treats the caret ^ sign as a special character which marks the beginning of a line or word. This is useful, for instance, if we wish to know whether there are more than one users with that name.
$ grep ^root /etc/passwd
root:x:0:0:root:/root:/bin/bash
To list all lines from the /etc/passwd file that end with the pattern bash. The bash shell treats the $ sign as a special character which marks the end of a line or word. This is useful, for example, to determine which users have their shells set to the bash shell.
$ grep bash$ /etc/passwd
root:x:0:0:root:/root:/bin/bash
user1:x:1000:1000:user1:/home/user1:/bin/bash
user100:x:1001:1001::/home/user100:/bin/bash
user200:x:1002:1002::/home/user200:/bin/bash
To search for all empty lines in the /etc/passwd file:
$ grep ^$ /etc/passwd
To search for all lines in the /etc/passwd file that contain the pattern root. The –i option instructs the command to perform a case-insensitive search. This is useful to determine if there are any root user accounts with a combination of lowercase and uppercase letters.
$ grep –i root /etc/passwd
root:x:0:0:root:/root:/bin/bash
operator:x:11:0:operator:/root:/sbin/nologin
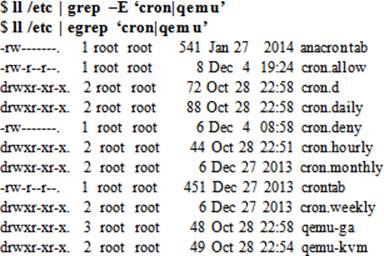
To print all lines from the output of the ll command that contain either the cron or qemu pattern. The pipe character is used as an OR operator in this example. This is referred to as alternation. We can have more than two alternative matches added to this set. The grep command with the –E option and the egrep command as demonstrated below function identically.
To print all lines from the output of the ll command that contain an exact match for a word (–w). We can use one or more period characters to match that many positions in the search string. The following example searches for any word in the /etc/lvm/lvm.conf file that begin with letters “acce” followed by any two characters:
$ grep –w acce.. /etc/lvm/lvm.conf
# prefixed with either an 'a' (for accept) or 'r' (for reject).
# By default we accept every block device:
# Whenever there are competing read-only and read-write access requests for
# serviced. Without this setting, write access may be stalled by a high
# I/O errors on access. You can instead use a device p ath, in which
In addition to the ^, $, and . signs, the asterisk and question mark symbols are also used for matching regular expressions. These two symbols are explained in the next sub-section.
Metacharacters
Metacharacters are special characters that possess special meaning to the shell. They include input and output redirection < >, caret ^, dollar $, period ., asterisk *, question mark ?, square brackets [], pipe |, curly brackets {}, parentheses (), plus +, and backslash \. Some of these characters are used in pattern matching, and as wildcard and escape characters. We covered < > ^ $ . earlier. This sub-section discusses * ? [] and |.
The * Character
The * matches zero to an unlimited number of characters (except for the leading period in a hidden file). See the following examples for usage.
To list names of all files in the /etc directory that begin with letters ali followed by any characters:
$ ls /etc/ali*
/etc/aliases /etc/aliases.db
To list names of all files in the /var/log directory that end in .log:
$ ls /var/log/*.log
/var/log/boot.log /var/log/Xorg.9.log
/var/log/pm-powersave.log /var/log/yum.log
/var/log/Xorg.0.log
The ? Character
The ? character matches exactly one character, except for the leading period in a hidden file. See the following example to understand its usage.
To list all directories under /var/log with exactly three characters in their names:
$ ls –d /var/log/???
/var/log/gdm /var/log/ppp
The [] Characters
The [] can be used to match either a set of characters or a range of characters for a single character position.
For a set of characters specified in this enclosure, the order in which they are listed has no importance. This means [xyz], [yxz], [xzy], and [zyx] are treated alike. In the following example, two characters are enclosed within the square brackets. The output will include all files and directories that begin with either of the two characters followed by any number of characters.
$ ls /usr/sbin/[yw]*
/usr/sbin/weak-modules
/usr/sbin/wipefs
/usr/sbin/wpa_cli
/usr/sbin/wpa_passphrase
/usr/sbin/wpa_supplicant
/usr/sbin/yum-complete-transaction
/usr/sbin/yumdb
A range of characters must be specified in a proper sequence such as [a-z] or [0-9]. The following example matches all directory names that begin with any letter between m and p:
$ ls –d /etc/systemd/system/[m–p]*
/etc/systemd/system/multi-user.target.wants
/etc/systemd/system/nfs.target.wants
/etc/systemd/system/printer.target.wants
The | Character
The pipe, represented by the vertical bar | and residing with the \ on the keyboard, is a special character that is used to send the output of one command as input to the next. This character is also used to define alternations in regular expressions.
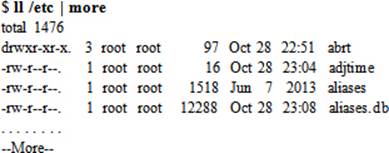
The following example runs the ll command on /etc and sends the output to the more command for displaying the directory listing one screenful at a time:
In another example, the who command is run and its output is piped to the nl command to number each line:

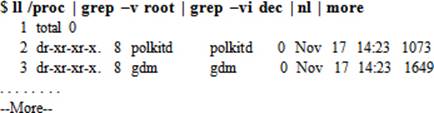
The following example forms a pipeline by piping the output of ll to grep for the lines that do not contain the pattern root. The new output is further piped for a case-insensitive selection of all lines that exclude the pattern dec. The filtered output is numbered and the final result is printed on the screen one screenful at a time.
A construct like the above with multiple pipes is referred to as a pipeline.
Quoting Mechanisms
As we know, metacharacters have special meaning to the shell. In order to use them as regular characters, the bash shell offers three quoting mechanisms that disable their special meaning and allow the shell to treat them as regular characters. These mechanisms are provided by the backslash, single quote, and double quote characters, and work by prepending a special character to a backslash, or enclosing it within single or double quotation marks.
Prefixing with a Backslash
The backslash character, also referred to as the escape character in shell terminology, instructs the shell to mask the meaning of any special character that follows it. For example, if a file exists by the name * and we want to remove it with the rm command, we will have to escape the * so that it is treated as a regular character (and not as a wildcard character).
$ rm \*
In the above example, if we forget to escape the *, the rm command will remove all files in the directory.
Enclosing within Single Quotes
The single quote character instructs the shell to mask the meaning of all enclosed special characters. For example, LOGNAME is a variable and its value can be viewed with the echo command:
$ echo $LOGNAME
user100
If we enclose $LOGNAME within single quotes, the echo command will display what is enclosed instead of the value of the variable:
$ echo ‘$LOGNAME’
$LOGNAME
Similarly, the backslash character is echoed when it is enclosed within single quotes:
$ echo ‘\’
\
Enclosing within Double Quotes
The double quote character instructs the shell to mask the meaning of all but backslash, dollar sign, and single quote characters. These three special characters retain their special meaning when they are enclosed within double quotes. Look at the following examples to understand the usage of double quotes.
$ echo “$SHELL”
/bin/bash
$ echo “\$PWD”
$PWD
$ echo “‘\’”
‘\’
Understanding Processes
A process is a unit for provisioning system resources. It is any program, application, or command that runs on the system. A process is created in memory in its own address space when a program, application, or command is initiated. Processes are organized in a hierarchical fashion. Each process has a parent process (a.k.a. a calling process) that spawns it. A single parent process may have one or many child processes and passes many of its attributes to them at the time of their creation. Each process is assigned a unique identification number, known as the process identifier (PID), which is used by the kernel to manage and control the process through its lifecycle. When a process completes its lifecycle or is terminated, this event is reported back to its parent process, and all the resources provisioned to it are then freed and the PID is removed.
Several processes are spawned at system boot, many of which sit in the memory and wait for an event to trigger a request to use their services. These background system processes are called daemons and are critical to system operability.
Viewing and Monitoring Processes
An operational system may have hundreds or thousands of processes running concurrently, depending on the purpose of the system. These processes may be viewed and monitored using various native tools such as ps (process status) and top. The ps command offers several switches that influence its output, whereas top is used for real-time viewing and monitoring of processes and system resources.
The ps command, without any options or arguments, lists processes specific to the terminal where this command is run:
The above output shows basic process information in four columns. It shows the PID in the first column, the terminal the process belongs to in the second column, the cumulative time the system CPU has given to this process in the third column, and the name of the actual command or program being executed in the last column.
Some common options that we may use with the ps command to generate desired reports include –a (all), –e (every), –f (full-format), –F (extra full-format), and –l (long format). A combination of eaFl options can produce a very detailed process report. However, it may or may not be useful in normal circumstances. There are a number of additional options available with this. Check the man pages for details and usage.
Here is what is produced when the command is executed with eaf options:
$ ps –eaf
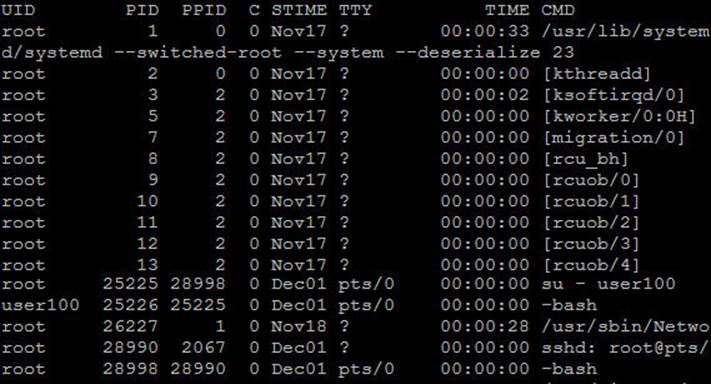
This output is spread across eight columns that show details about every process running on the system. Table 4-2 describes the content type of each column.
|
Column |
Description |
|
UID |
User ID or name of the process owner. |
|
PID |
Process ID of the process. |
|
PPID |
Process ID of the parent process. |
|
C |
Shows processor utilization for the process. |
|
STIME |
Process start date or time. |
|
TTY |
The terminal on which the process was started. Console represents the system console and ? represents a background process. |
|
TIME |
Aggregated execution time for the process, including time spent in both userland and kernel space. |
|
CMD |
The name of the command or the program. |
Table 4-2 ps Command Output
The ps output above indicates the presence of several daemon processes running in the background. These processes have no association with any terminal devices and that is why they show a ? in the TTY column. Notice the PID and PPID numbers. The smaller the number, the earlier it is started. The process with PID 0 is started first at system boot, followed by the process with PID 1, and so on. Each PID has an associated PPID in the third column. The owner of each process is shown in the UID column, along with the name of the command or program under CMD.
Information for each running process is kept and maintained in the /proc file system, which ps and other commands reference to obtain desired data for our viewing.
The other popular tool for viewing process information is the top command. This command displays the statistics in real-time and may be helpful in identifying possible performance issues on the system. A sample output from a running top session is shown below:
$ top
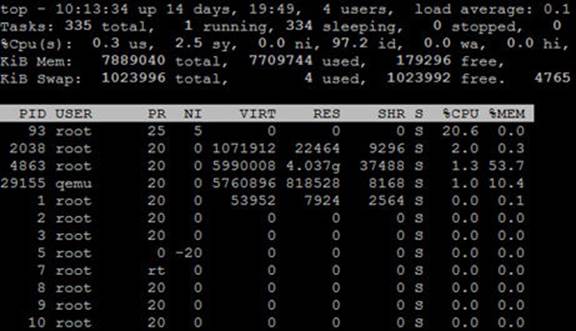
Press q or Ctrl+c to quit top.
top also shows the CPU, memory, and swap utilization. In the top row, it displays the system uptime, the number of logged-in users, the system load average, and the total number of processes on the system along with their current operating state.
Viewing and Monitoring Processes Graphically
Another tool that is loaded as part of the gnome-system-monitor software package is called system monitor. This tool provides us the ability to view, monitor, and terminate processes in a graphical setting, as well as view CPU, memory, swap, network, and file system utilization. Execute thegnome-system-monitor command in an X terminal window or select Applications | System Tools | System Monitor in the GNOME desktop to start this tool. See Figure 4-1.
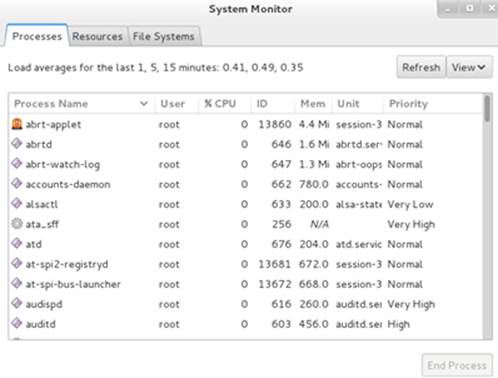
Figure 4-1 GNOME System Monitor – Process View
There are three tabs across the top that we can switch for viewing specific information. The Process tab shows details for all the processes running on the system. We can click the drop-down View button in the top right to list desired processes only. It also gives us the ability to highlight a process and terminate it by clicking the End Process button in the bottom right corner.
The Resources tab shows current and historic views of CPU, memory, swap, and network interface utilization. This data may be supportive when troubleshooting to determine the root cause of a potential bottleneck in the system. See Figure 4-2.
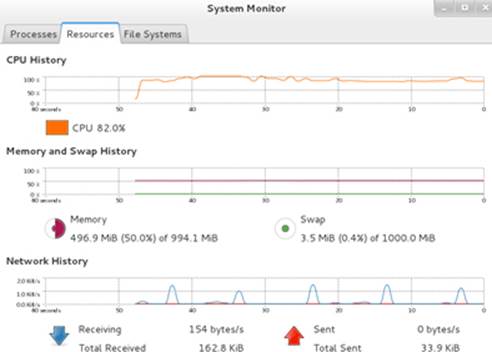
Figure 4-2 GNOME System Monitor – Resource Utilization View
The last tab, File Systems, lists all configured and mounted file systems, and shows their usage and other details.
Listing a Specific Process
Though the tools we have discussed in the previous sub-sections provide us with a lot of information about processes including their PIDs, RHEL offers the pidof and pgrep commands that only list the PID of a specific process. These commands have a few switches available to them; however, their simplest use is to pass a process name as an argument to view its PID. For instance, to list the PID of the crond daemon, use either of the following:
# pidof crond
# pgrep crond
998
Listing Processes by User and Group Ownership
A process can be listed by its ownership or owning group. We can use the ps command for this purpose. For example, to list all processes owned by root, specify the –U option with the command and then the username:
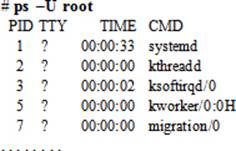
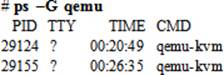
The command lists the PID, TTY, Time, and process name for all processes owned by the root user. We can specify the –G option instead and the name of an owning group to print processes associated with that group only:
The graphical system monitor tool can also be used to view the process list sorted by a user or group name.
Process States
A process changes its operating state multiple times during its lifecycle. Factors such as processor load, memory availability, process priority, and response from other applications affect how often a process jumps from one operating state to another. It may be in a non-running condition for a while or waiting for some other process to feed it information so that it can continue to run. There are five basic process states, as illustrated in Figure 4-3.
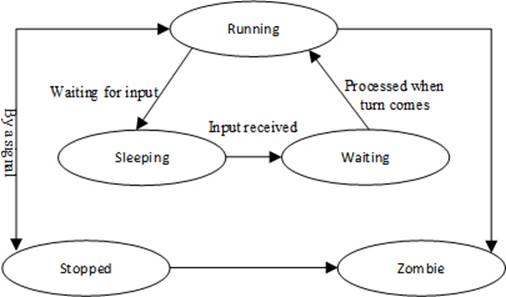
Figure 4-3 Process State Transition
Each process is in one state at any given time. These states are running, sleeping, waiting, stopped, and zombie, and are explained below:
Running: the process is being executed by the system CPU.
Sleeping: the process is waiting for input from a user or another process.
Waiting: the process has received the input it was waiting for and is now ready to run as soon as its turn arrives.
Stopped: the process is currently halted and will not run even when its turn comes, unless a signal is sent to it to change its behavior.
Zombie: the process is dead. A zombie process exists in the process table alongside other process entries, but it takes up no resources. Its entry is retained until the parent process permits it to die. A zombie process is also called a defunct process.
Understanding Process Niceness
A process is spawned at a certain priority, which is established at initiation based on a numeric value called niceness (or a nice value). There are 40 niceness values, with –20 being the highest and +19 the lowest. Most system-started processes use the default niceness of 0. A higher niceness lowers the execution priority of a process and a lower niceness increases it. In other words, a process running at a higher priority gets more CPU attention. A child process inherits the niceness of its calling process in calculating its priority. Though we normally run programs at the default niceness, we may choose to initiate them at a different niceness to adjust their priority based on urgency and system load.
Viewing and Changing Process Niceness
We can view current process priorities and niceness values with the ps command, the top command, and the system monitor GUI. With ps, specify the –l option and look for the priority (PRI, column seven) that is calculated based on the niceness value (NI, column eight):
# ps –efl

The above output indicates the use of the default niceness for the first three processes and the highest niceness of –20 for the fourth one. These values are used by the process scheduler to adjust their execution time on the CPU.
We can check the default niceness using the nice command:
# nice
0
A different niceness may be assigned to a program or command at its startup. For example, to run the top command at a lower priority with a nice value of +2, we use the nice command as follows:
# nice –2 top
Open another terminal window and run the ps command to validate. Look for the priority and nice values in columns 7 and 8.
![]()
To run the same program at a higher priority with a niceness of –10, specify the value with a pair of dashes:
# nice --10 top
Validate in the other window:
![]()
As we can see, the process is running at a higher priority (70) with a nice value of –10.
Renicing a Running Process
The niceness of a running process may be altered using the renice command. This adjustment will affect the priority at which the process is currently running. For example, to change the nice value of the running top session from –10 to +5, specify the PID (9191 from above) with the renicecommand:
![]()
We can validate the above change with ps or top, or using the GNOME system monitor.
The renice command also allows us to alter the nice values of all the processes owned by a specific user or members of a particular group by specifying the –u or –g option, respectively, with it.
Controlling Processes with Signals
As you know, a system may have hundreds or even thousands of processes running simultaneously on it. Sometimes it becomes necessary to alert a process of an event. We do that by sending a control signal to the process. Processes may use signals to alert each other as well. The receiving process halts its execution as soon as it gets the signal and takes an appropriate action as per instructions enclosed in the signal. The instructions may include terminating the process gracefully, killing it abruptly, or forcing it to re-read its configuration.
There are a number of signals available for use but we mostly deal with only a few of them. Each signal is associated with a unique numeric identifier, a name, and an action. A list of available signals can be displayed with the kill command using the –l option:
# kill –l
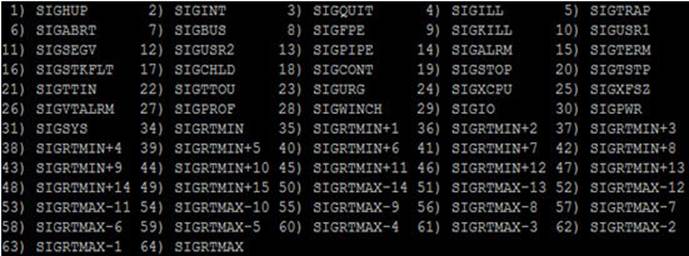
The output shows the availability of 64 signals for process-to-process and user-to-process communication. Table 4-3 describes the signals that are most often used.
|
Signal Number |
Signal Name |
Action |
|
1 |
SIGHUP |
Hang up signal causes a process to disconnect itself from a closed terminal that it was tied to. Also used to instruct a running daemon to re-read its configuration. |
|
2 |
SIGINT |
The ^c signal issued on the controlling terminal to interrupt the execution of a process. |
|
9 |
SIGKILL |
Kills a process abruptly. |
|
15 |
SIGTERM |
Sends a soft termination signal to stop a process in an orderly fashion. This signal may be ignored by a process. This is the default signal. |
Table 4-3 Control Signals
The commands used to pass a signal to a process are kill and pkill. These commands are usually used to terminate a process. Ordinary users can kill processes that they own, while the root user can kill any process running on the system.
The kill command requires one or more PIDs and the pkill command requires one or more process names to send a signal to. We may specify a non-default single name or number with either utility.
Let’s look at a few examples to understand the usage of these tools.
To pass the soft termination signal to the crond daemon, use either of the following:
# pkill crond
# kill `pidof crond`
The pidof command in the above example was used to determine the PID of the crond process and was enclosed with its argument in forward quotes (you may alternatively use the pgrep command to determine the PID of a process, as demonstrated in the next example). You may use the pscommand to check whether the crond process has terminated.
Using the pkill or kill command without specifying a signal name or number sends the default signal of 15 to the process. This signal may or not terminate the process.
Some processes ignore signal 15 as they might be waiting for an input to continue processing. Such processes may be terminated forcefully using signal 9:
# pkill –9 crond
# kill –9 `pgrep crond`
You may wish to run the killall command to terminate all processes that match a specified criteria. Here is how you can use this command to kill all crond processes (assuming there are more than one running):
# killall crond
Understanding Job Scheduling
Job scheduling is a feature that allows a user to submit a command or program for execution at a specified time in the future. The execution of the command or program could be one time or periodically based on a pre-determined time schedule. A one-time execution is normally scheduled for an activity that needs to be performed at times of low system usage. One example of such an activity would be the execution of a lengthy shell program. In contrast, recurring activities could include performing backups, trimming log files, monitoring the system, running custom scripts, and removing unwanted files from the system.
Job scheduling and execution is taken care of by two daemons: atd and crond. While atd manages the jobs scheduled to run one time in the future, crond is responsible for running jobs repetitively at pre-specified times. At startup, this daemon reads schedules in files located in the /var/spool/cronand /etc/cron.d directories, and loads them in the memory for later execution. It scans these files at short intervals and updates the in-memory schedules to reflect any modifications made. This daemon runs a job at its scheduled time only and does not entertain missed jobs. In contrast, the atddaemon retries a missed job at the same time next day. For any additions or changes, neither daemon needs a restart.
Controlling User Access
By default, all users are allowed to schedule jobs using the at and cron services. However, this access can be controlled and restricted to specific users only. This can be done by listing users in the allow or deny file located in the /etc directory. For either service, a pair of allow/deny files can be used. For at, at.allow and at.deny files are used, and for cron, cron.allow and cron.deny files are used.
The syntax of all four files is identical. We only need to list usernames that require allow or deny access to these scheduling tools. Each file takes one username per line. The root user is always permitted; it is neither affected by the existence or non-existence of these files nor by the presence or absence of its entry in these files.
Table 4-4 shows various combinations and their impact on user access.
|
at.allow / cron.allow |
at.deny / cron.deny |
Impact |
|
Exists, and contains user entries |
Existence does not matter |
All users listed in allow files are permitted. |
|
Exists, but is empty |
Existence does not matter |
No users are permitted. |
|
Does not exist |
Exists, and contains user entries |
All users, other than those listed in deny files, are permitted. |
|
Does not exist |
Exists, but is empty |
All users are permitted. |
|
Does not exist |
Does not exist |
No users are permitted. |
Table 4-4 User Access Restrictions to Scheduling Tools
By default, the deny files exist and are empty, and the allow files do not exist. This opens up full access to using both tools for all users.
EXAM TIP: A simple username is entered in an appropriate allow or deny file.
The following message appears if an unauthorized user attempts to execute at:
You do not have permission to use at.
And the following message appears for unauthorized access attempt to the cron service:
You (user1) are not allowed to use this program (crontab)
See crontab(1) for more information
In both examples above, we have entries for user1 in the deny files.
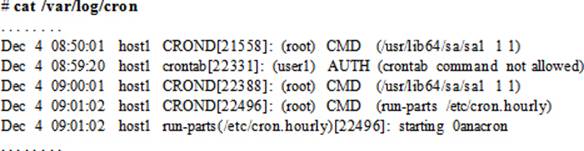
Scheduler Log File
All activities involving atd and crond are logged to the /var/log/cron file. Information such as the time of activity, hostname, owner, PID, and a message for each invocation is captured. The file also keeps track of other activities for the crond service such as the service start time and any delays. A few sample entries from the log file are shown below:
Using at
The at command is used to schedule a one-time execution of a program in the future. All submitted jobs are spooled in the /var/spool/at directory and executed by the atd daemon at the specified time. Each submitted job will have a file created that contains all variable settings for establishing the user’s shell environment to ensure a successful execution. This file also includes the name of the command or script to be run. There is no need to restart the atd daemon after a job submission.
There are multiple ways for expressing a time with the at command. Some examples are:
|
at 1:15am |
(executes the task at the next 1:15am) |
|
at noon |
(executes the task at 12pm) |
|
at 23:45 |
(executes the task at 11:45pm) |
|
at midnight |
(executes the task at 12am) |
|
at 17:05 tomorrow |
(executes the task at 5:05pm on the next day) |
|
at now + 5 hours |
(executes the task 5 hours from now. We can specify minutes, days, or weeks instead) |
|
at 3:00 5/15/15 |
(executes the task at 3am on May 15, 2015) |
![]() at assumes the current year if no year is mentioned. Similarly, it assumes today’s date if no date is mentioned.
at assumes the current year if no year is mentioned. Similarly, it assumes today’s date if no date is mentioned.
You may supply a filename with the at command using the –f option. The command will execute that file at the specified time. For instance, the following will run script1.sh (create this file, add the ls command to it, and ensure it is executable by the user) for user100 from their home directory two hours from now:
$ at –f ∼/script1.sh now + 2 hours
job 1 at Thu Dec 4 11:40:00 2014
By default, at is already installed on the system as part of the RHEL7 installation. You can confirm with the yum command as follows:
# yum list installed at
at.x86_64 3.1.13-17.el7 @anaconda/7.0
If this package does not exist, you can run the yum command to install it. See Chapter 05 “Managing Software Packages” for details on package management.
# yum –y install at
Exercise 4-1: Submit, View, List, and Remove an at Job
This exercise should be done on host1.
In this exercise, you will submit an at job as the root user to run the find command at 11:30pm on June 30, 2015 to search for all core files in the entire directory structure and remove them as they are found. You will have the output and any error messages generated redirected to the /tmp/core.outfile. You will list the submitted job and show its contents for verification then finally you will remove the job.
1. Run the at command and specify the correct time and date for the job execution. Press Ctrl+d at the at> prompt when done.
# at 11:30pm 6/30/15
at> find / –name core –exec rm {} \; & /tmp/core.out
at> <EOT>
job 5 at Tue Jun 30 23:30:00 2015
The system has assigned ID 5 to this at job.
2. List the job file created in the /var/spool/at directory:
# ll /var/spool/at
-rwx------. 1 root root 2862 Dec 4 13:49 a00005016d1f72
3. Display the contents of this file with the cat or at command. Specify the job ID with at.
# cat /var/spool/at/a00005016d1f72
# at –c 5
#!/bin/sh
# atrun uid=0 gid=0
# mail root 0
umask 22
XDG_SESSION_ID=2383; export XDG_SESSION_ID
HOSTNAME=host1.example.com; export HOSTNAME
SELINUX_ROLE_REQUESTED=; export SELINUX_ROLE_REQUESTED
SHELL=/bin/bash; export SHELL
HISTSIZE=1000; export HISTSIZE
SSH_CLIENT=192.168.0.13\ 64816\ 22; export SSH_CLIENT
SELINUX_USE_CURRENT_RANGE=; export SELINUX_USE_CURRENT_RANGE
SSH_TTY=/dev/pts/4; export SSH_TTY
USER=root; export USER
…… . .
find / -name core -exec rm {} \; & /tmp/core.out
marcinDELIMITER0c40a7df
4. List the spooled job with the at or atq command:
# at –l
# atq
5 Tue Jun 30 23:30:00 2015 a root
5. Finally, remove the spooled job with the at or atrm command:
# at –d 5
# atrm 5
This should remove the job file from the /var/spool/at directory. You can confirm the deletion with the atq command as well.
Using crontab
Using the crontab command is the other method for scheduling tasks for execution in the future. Unlike atd, crond executes cron jobs on a regular basis if they comply with the format defined in the /etc/crontab file. Crontables for users are located in the /var/spool/cron directory. Each authorized user with a scheduled job has a file matching their login name in this directory. For example, the crontab file for user100 would be /var/spool/cron/user100. The other location where system crontables are stored is the /etc/cron.d directory; however, only the root user is allowed to create, modify, or delete them. The crond daemon scans entries in the files at the two locations to determine a job execution schedule. The daemon runs the commands or scripts at the specified time and adds a log entry to the /var/log/cron file. There is no need to restart the daemon after submitting or modifying a job.
By default, cron and crontable files are installed on the system as part of the RHEL7 installation. You can confirm that with the yum command as follows:
# yum list installed | grep cron
|
cronie.x86_64 |
1.4.11-11.el7 |
@anaconda/7.0 |
|
cronie-anacron.x86_64 |
1.4.11-11.el7 |
@anaconda/7.0 |
|
crontabs.noarch |
1.11-6.20121102git.el7 |
@anaconda/7.0 |
If these packages do not exist, you can run the yum command to install them. See Chapter 05 “Managing Software Packages” for details on package management.
# yum –y install cronie crontabs
The crontab command is used to edit (–e), list (–l), and remove (–r) crontables. The –u option is available for users who wish to modify a different user’s crontable, provided they are allowed to do so and that user is listed in the cron.allow file. The root user can also use the –u option to alter other users’ crontables, even if the users are not listed in the allow file. By default, crontab files are opened in the vi editor when the crontab command is used to edit them.
Syntax of User Crontab Files
The /etc/crontab file specifies the syntax that each user cron job must comply with in order for crond to interpret and execute it successfully. Each line in a user crontable with an entry for a scheduled job is comprised of six fields. See Figure 4-4 for the syntax.
![]() Compared to user crontables, the system crontab files have seven fields. The first five and the last fields are identical; however, the sixth field specifies the user name of who will be executing the specified command or script.
Compared to user crontables, the system crontab files have seven fields. The first five and the last fields are identical; however, the sixth field specifies the user name of who will be executing the specified command or script.

Figure 4-4 Syntax of Crontables
A description of each field is given in Table 4-5.
|
Field |
Field Content |
Description |
|
1 |
Minute of hour |
Valid values are 0 (the exact hour) to 59. This field can have one specific value (see #1), multiple comma-separated values (see #2), a range of values (see #3), a mix of #2 and #3 (1-5,6-19), or an * representing every minute of hour (see #4 and #5). |
|
2 |
Hour of day |
Valid values are 0 (midnight) to 23. Same usage applies as in the minute of hour field. |
|
3 |
Day of month |
Valid values are 1 to 31. Same usage applies as in the minute of hour field. |
|
4 |
Month of year |
Valid values are 1 to 12 or jan to dec. Same usage applies as in the minute of hour field. |
|
5 |
Day of week |
Valid values are 0 to 6 or sun to sat, with 0 representing Sunday, 1 representing Monday, and so on. Same usage applies as in the minute of hour field. |
|
6 |
Command or script to execute |
Specifies the full path name of the command or script to be executed, along with any arguments that it requires. |
Table 4-5 Description of Crontable Syntax
Moreover, step values may be used with * and ranges in the crontab files using the forward slash (/) character. Step values allow the number of skips for a given value. For example, */2 in the minute field would mean every 2nd minute, */3 would mean every 3rd minute, 0-59/4 would mean every 4th minute, and so on. Step values are also supported in the same manner in the hour, day of month, month of year, and day of week fields.
EXAM TIP: Make sure you understand the order of the fields in user crontab files.
Exercise 4-2: Add, List, and Remove a Cron Job
This exercise should be done on host1.
For this exercise, assume that all users are currently denied access to cron.
In this exercise, you will submit a cron job for user100 to run script100.sh (create this file, add “echo Hello, this is a test” to it, and ensure the script is executable by user100) located in this user’s home directory. You will schedule this script to execute at every 5th minute past the hour from 1am to 5am on the 1st and the 15th of alternate months. You will have the output redirected to the /tmp/script100.out file, list the cron entry, and then remove it.
1. As user100, open the crontable and append the following schedule to it. Save the file when done and exit out of the editor.
$ crontab –e
*/5 1-5 1,15 */2 * /home/user100/script100.sh &> /tmp/script100.out
2. As root, check for the presence of a new file by the name user100 in the /var/spool/cron directory:
# ll /var/spool/cron/user100
-rw-------. 1 user100 user100 68 Dec 4 19:26 user100
3. As root, edit the /etc/cron.allow file and add user100 to it:
# vi /etc/cron.allow
user100
4. As user100, list the contents of the crontable:
$ crontab –l
*/5 1-5 1,15 */2 * /home/user100/script100.sh &> /tmp/script100.out
5. As user100, remove the crontable and confirm the deletion:
$ crontab –r
$ crontab –l
no crontab for user100
Chapter Summary
This chapter started with a discussion of the bash shell. The bash shell has numerous features but we touched upon only a few that are used more commonly. These features included variable settings, command prompt customization, redirection, command line editing, command history, tab completion, tilde substitution, regular expressions, and metacharacters.
We then studied processes. A good understanding of what user and system processes are running, what resources they are consuming, who is running them, what their execution priorities are, etc. is vital for overall system performance and health, as well as for you, the system administrator. We learned how to list processes in different ways. We looked at the five process states, niceness and reniceness for increasing and decreasing a process priority, and signals and how they are passed to running processes.
The last topic covered submitting and managing tasks to run in the future one time or on a recurring basis. We looked at the daemons that control the task execution and the control files where we list users who can or cannot submit jobs. We looked at the log file that stores information about all executed jobs. We reviewed the syntax of the crontab file and looked at a variety of date/time formats for use with both at and cron job submission. Finally, we performed two exercises to get a grasp on their usage.
Chapter Review Questions
1. Which is the default command line editor called?
2. When would the cron daemon execute a job that is submitted as */10 * 2-6 */6 * /home/user1/script1.sh
3. What is the other command besides ps to view processes running on the system?
4. Name two usages of the pipe symbol.
5. What are the two commands we learned to list the PID of a specific process?
6. What are the background processes normally referred to in Linux?
7. What is the default nice value?
8. The parent process gets the nice value of its child process. True or False?
9. What would the nice command display without any options or arguments?
10. Every process that runs on the system has a unique identifier called UID. True or False?
11. Why would we use the renice command?
12. Which user does not have to be explicitly defined in either *.allow or *.deny file to run the at and cron jobs?
13. When would the at command execute a job that is submitted as at 01:00 12/12/15?
14. What are the two commands that we can use to kill a process if the PID is known?
15. What is the directory location where user crontab files are stored?
16. By default the *.allow files exist. True or False?
17. Name the three quoting mechanisms?
18. Where does the scheduling daemons store log information of executed jobs?
19. Which command can we use to edit a crontable?
20. The default location to send application error messages is the system log file. True or False?
21. We have to restart crond after modifying the /etc/crontab file. True or False?
22. What are the five process states?
23. Signal 9 is used for a soft termination of a process. True or False?
Answers to Chapter Review Questions
1. The default command line editor is Emacs.
2. The cron daemon will run the script every tenth minute past the hour on the 2nd, 3rd, 4th, 5th, and 6th day of every 6th month.
3. The top command.
4. The pipe can be used as an OR operator and to send the output of one command as input to the next.
5. The pidof and pgrep commands.
6. The background processes are referred to as daemons.
7. The default nice value is zero.
8. False. The child process inherits its parent’s niceness.
9. The nice command displays the default nice value when executed without any options.
10. False. It is called the PID.
11. The renice command is used to change the niceness of a running process.
12. The root user.
13. The at command will run it at 1am on December 12, 2015.
14. The kill and pkill commands.
15. The user crontab files are stored in the /var/spool/cron directory.
16. False. By default, the *.deny files exist.
17. The three quoting mechanisms are backslash, single quotes, and double quotes.
18. The scheduling daemons store log information of executed jobs in the /var/log/cron file.
19. We can use the crontab command with the –e option to edit crontables.
20. False. The default location is the user screen where the program is initiated.
21. False. The crond daemon does not need a restart after a crontable is modified.
22. The five process states are running, sleeping, waiting, stopped, and zombie.
23. True. Singal 9 kills a process by force.
DIY Challenge Labs
The following labs are useful to strengthen most of the concepts and topics learned in this chapter. It is expected that you perform these labs without any additional help. A step-by-step guide is not provided, as the implementation of these labs requires the knowledge that has been presented in this chapter. Use defaults or your own thinking for missing information.
Lab 4-1: Customize the Shell Prompt
Log on to host1 as user1 and customize the primary shell prompt to display the information enclosed within the quotes “<username@hostname in directory_location >: ”.
Lab 4-2: Redirect the Standard Input, Output, and Error
Log on to host1 as user1 and run the ll command on the /etc, /dvd, and the /var dirctories. Have the output printed on the screen as well as redirected to the /tmp/ioutput file and the errors forwarded to the /tmp/ioerror file. Check both files after the execution of the command to validate.
Lab 4-3: Nice and Renice a Process
Open two terminal sessions on host1 as root. Run the system-config-users command on one of the terminals. Run a command on the other terminal to determine the PID and the nice value of the system-config-users command. Stop system-config-users on the first terminal and re-run it at a lower priority of +8. Confirm the new nice value of the process by running the appropriate command on the second terminal. Execute the renice command on the second terminal and increase the priority of the system-config-users process to –10, and validate.
Lab 4-4: Configure a User Crontab File
Log on to host1 as user1 and create a cron entry to run the find command to search for the core files in the entire directory structure and delete them as they are found. Schedule this command in cron in such a way that it runs every other day of every other month at 15 minutes past 6am. As root, create an entry for user1 if not already authorized to schedule cron jobs.
All materials on the site are licensed Creative Commons Attribution-Sharealike 3.0 Unported CC BY-SA 3.0 & GNU Free Documentation License (GFDL)
If you are the copyright holder of any material contained on our site and intend to remove it, please contact our site administrator for approval.
© 2016-2026 All site design rights belong to S.Y.A.