RHCSA & RHCE Red Hat Enterprise Linux 7: Training and Exam Preparation Guide (EX200 and EX300), Third Edition (2015)
Part I. RHCSA Section
Chapter 6. Configuring Server Virtualization and Network Installing RHEL7
This chapter describes the following major topics:
· Understand server virtualization and its benefits
· Virtual network switches and interfaces
· Virtual storage pools and volumes
· Manage hypervisor with GUI and commands
· Create virtual networks with GUI and commands
· Create virtual storage with GUI and commands
· Configure FTP installation server
· Set up two-way communication between host and virtual machines
· Network install RHEL using GUI and remote installation server
· Benefits of using kickstart
· Create kickstart configuration file
· Network install RHEL using commands and kickstart configuration file
· Download files non-interactively from FTP and HTTP/HTTPS sources
RHCSA Objectives:
17. Access a virtual machine’s console
18. Start and stop virtual machines
35. Install Red Hat Enterprise Linux automatically using Kickstart
36. Configure a physical machine to host virtual guests
37. Install Red Hat Enterprise Linux systems as virtual guests
38. Configure systems to launch virtual machines at boot
Server virtualization is a feature that allows a physical computer to host several virtual machines, each of which acts as a standalone computer running a unique instance of RHEL, Solaris, Windows, or other Linux distribution. All virtual machines, and the operating systems they run, operate alongside one another in complete isolation.
RHEL may be installed over the network using a configured FTP, HTTP, or NFS server hosting the installation files. Installing over the network is much faster than a local DVD-based installation. A client system, where RHEL needs to be installed, can be booted locally and then redirected to one of these network installation servers for loading the operating system software. The client system can be configured during the installation or supplied with a file that contains all the configuration information, including disk partitioning. This way there is no need to go through the configuration process during installation, which makes the installation faster and fully unattended.
The wget utility is used to download files or entire directory trees non-interactively from FTP or HTTP/HTTPS sites. This tool can be scheduled to run during off-peak hours for large file retrievals.
Server Virtualization Technology
Server virtualization refers to the act of building and running multiple independent virtual computers on top of a single physical computer. In the process of virtualizing the physical computer, hardware components such as processors, memory, disk storage, optical storage, network interfaces, and ports, are shared among the virtual computers. An operating system such as RHEL, other Linux, Solaris, or Windows is deployed in each virtual computer, and run to support a database, web, DNS, or some other service or application. All virtual computers, along with the operating systems and services they host, run concurrently and in complete isolation from one another.
From a server virtualization standpoint, a physical computer that is configured to host virtual computers is referred to as a host machine; a virtual computer that is created to run on the host machine is referred to as a virtual machine; and an operating system instance that is deployed to run in a virtual machine is referred to as a guest.
For the purpose of virtualizing a host machine, there are many different software available. These software form a virtual layer on top of the physical hardware to create a virtualization infrastructure that enables the creation and hosting of virtual machines, giving the guest operating systems the notion that they are running on real, standalone, independent computers. Virtualization software deployed directly on bare-metal host machines is referred to as the hypervisor software. Kernel-based Virtual Machine (KVM) is an example of such software; it is part of the Linux kernel and comes as a native hypervisor software with RHEL7. It enables the mapping between physical CPUs on the host machine and virtual CPUs allotted to virtual machines, thereby providing hardware acceleration for virtual machines which results in performance increase. Once the virtualization infrastructure is set up with KVM, another software called Quick Emulator (QEMU) comes into action and plays an important role by making use of the physical-to-virtual CPU mappings provided by KVM. QEMU intercepts guest OS instructions destined for virtual CPUs and gets them executed on the physical CPUs using this mapping. It works with KVM to provide full virtualization capabilities on the host machine, and together they are able to attain the same level of performance for applications on virtual machines that the applications would normally get when they run on the physical hardware. See Figure 6-1.
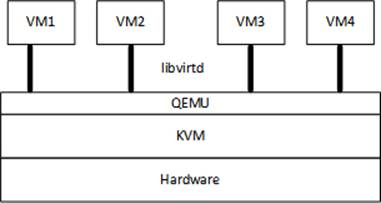
Figure 6-1 Virtualization Stack
With virtualization infrastructure in place, some software is needed to manage the hypervisor and virtual machines. The standard toolset available with RHEL7 is called libvirt. libvirt is a virtualization management library that includes necessary support and tools to manage the hypervisor and virtual machines. It consists of a daemon called libvirtd, a set of command line and graphical utilities, and an API library. Together, KVM, QEMU, and libvirt provide an end-to-end virtualization solution on RHEL7.
Virtualization Benefits
Virtualization technology brings a lot of benefits with it. Some of the key values that we may realize with its implementation are:
· Allows the creation of multiple virtual machines on a single host.
· Supports running instances of a variety of operating systems as guests.
· Each virtual machine and its guest is completely isolated and independent of other virtual machines and their guests.
· Provides the ability to consolidate older systems onto newer hardware platforms.
· Decreases the overall cost associated with computer hardware, and network and storage switches.
· Allows live migration of active virtual machines between physical hosts with a shared storage configuration.
· Supports the addition of virtual CPUs to active virtual machines.
· Supports overcommitting processor and memory, and thin provisioning of storage.
· Reduces the overall cost associated with power and cooling, floor and rack space, and network and fiber cabling.
· Supports quick virtual server deployments.
· Allows better utilization of computer hardware resources.
· Allows the addition of capacity to active virtual machines.
Verifying Host Virtualization Support
In order for the host machine to be able to support the virtualization infrastructure via KVM, its processors must have integrated support for hardware virtualization. This support is referred to as VT-x for Intel processors and AMD-V for AMD processors. We can run the lscpu command on the host machine to check whether the processors support this feature:
# lscpu | grep Virtualization
Virtualization: VT-x
The above output indicates that the processors on this host support hardware virtualization.
Alternatively, we can grep for the vmx (for Intel processors) or svm (for AMD processors) attribute in the /proc/cpuinfo file. The presence of this flag confirms that the processors on this host support hardware virtualization. The following command is issued on host1 that has Intel i7 processor, and the output is from one of the processors:
# grep vmx /proc/cpuinfo
flags : fpu vme de pse tsc msr pae mce cx8 apic sep mtrr pge mca cmov pat pse36 clflush dts acpi mmx fxsr sse sse2 ss ht tm pbe syscall nx rdtscp lm constant_tsc arch_perfmon pebs bts rep_good nopl xtopology nonstop_tsc aperfmperf eagerfpu pni pclmulqdq dtes64 monitor ds_cpl vmx smx est tm2 ssse3 cx16 xtpr pdcm pcid sse4_1 sse4_2 x2apic popcnt tsc_deadline_timer aes xsave avx lahf_lm ida arat epb xsaveopt pln pts dtherm tpr_shadow vnmi flexpriority ept vpid
Virtualization Packages
In order for a physical computer to be able to host virtual machines, RHEL must be directly installed on it. During RHEL7 installation, we have the opportunity to select the virtualization environment group and the subgroups available within it. There are four virtualization subgroups, but not all of them are required on the host for full virtualization capabilities. Table 6-1 lists and describes them.
|
Package Group |
Description |
|
Virtualization Hypervisor |
Provides the foundation to host virtual machines. Includes the libvirt and qemu-kvm packages. |
|
Virtualization Client |
Provides the support to install and manage virtual machines. Includes virsh, virt-install, virt-manager, virt-top, and virt-viewer packages. |
|
Virtualization Tools |
Provides tools for offline management of virtual machines. Includes the libguestfs package. |
|
Virtualization Platform |
Provides an interface to access and control virtual machines. Includes the libvirt, libvirt-client, and virt-who packages. |
Table 6-1 Virtualization Package Groups
We can run the yum group info command on each of these groups to view details. For instance, the following shows the details when the command is executed on the virtualization hypervisor group:
# yum group info “virtualization hypervisor“
…… . .
Group: Virtualization Hypervisor
Group-Id: virtualization-hypervisor
Description: Smallest possible virtualization host installation.
Mandatory Packages:
libvirt
qemu-kvm
Optional Packages:
qemu-kvm-tools
If these package groups are not already installed, we can run the following to install all of them at once from an enabled repository:
# yum –y group install “virtualization hypervisor“ “virtualization client“ “virtualization platform“ “virtualization tools“
Virtual Network Switch and Virtual Network Interface
A virtual network switch is a libvirt-constructed software switch to allow the virtual machines to be able to communicate with the host and amongst one another. The host and the virtual machines see this switch as a virtual network interface. There is one virtual switch created on the host when thelibvirtd daemon is first started, and it is represented as virbr0. The default IP assigned to this switch is 192.168.122.1. We can use the ip command to view its characteristics:
# ip addr show virbr0
4: virbr0: <BROADCAST,MULTICAST,UP> mtu 1500 qdisc state UP
link/ether f2:71:d7:37:6b:8b brd ff:ff:ff:ff:ff:ff
inet 192.168.122.1/24 brd 192.168.122.255 scope global virbr0
valid_lft forever preferred_lft forever
The default mode of operation for virbr0 is NAT (Network Address Translation) with IP masquerading. NAT allows the network traffic of guest operating systems to access external networks via the IP address of the host machine, thereby hiding their own IP addresses from the outside world.
Furthermore, libvirt uses the dnsmasq program to enable DHCP and DNS on the virtual switch. It makes the IP range from 192.168.122.2 to .254 available for allocation to virtual machines. The DNS settings also become automatically available to virtual machines when the interface becomes active on them.
Libvirt supports two additional types of virtual network switch configurations; they are referred to as isolated and routed. Isolated switches restrict the ability of virtual machines to communicate to the outside world, whereas routed switches allow the virtual machines to talk to external networks directly.
Storage Pool and Storage Volume
A storage pool is a storage area that is used for the provision of storage to virtual machines. It is created and managed with libvirt tools and can be accessed by multiple virtual machines simultaneously as a shared storage space. A storage pool can be local to the host and configured as a file in a directory or as a file system in a partition, logical volume, or on an entire disk. Moreover, a storage pool can be set up on a remote system and accessed via iSCSI or NFS protocol.
Once a storage pool is set up, it can be carved up into one or more storage volumes, which can then be assigned to virtual machines as block storage devices.
Virtualization Management Tools
RHEL7 offers libvirt as the default hypervisor and virtual machine management software. This software is part of both virtualization hypervisor and virtualization platform package groups. Libvirt includes a powerful graphical administration tool called the Virtual Machine Manager or virt-manager, which is easy to understand and convenient to use. It also includes the virt-install command, which provides equivalent power at the command line. The virt-install command is used to create virtual machines and install RHEL in it. Libvirt includes a few additional tools also, but their coverage is beyond the scope of this book.
The Virtual Machine Manager (virt-manager)
The Virtual Machine Manager (virt-manager) is the graphical equivalent for both virt-install and virsh commands, and is used for the provision of virtual machines, installation of guest operating systems in both attended and unattended modes from a local or remote source, and management and monitoring of the hypervisor and virtual machines. It allows us to access the graphical console of the virtual machines, view performance statistics, and control their lifecycle. This desktop program includes wizards that make it easy for us to supply information as we set up a new virtual machine, virtual network, virtual network interface, storage pool, or storage volume. This tool gives us the ability to list, modify, and delete these objects as well.
To bring this tool up, run the virt-manager command in an X terminal or choose Applications | System Tools | Virtual Machine Manager. A screen similar to the one shown in Figure 6-2 appears.
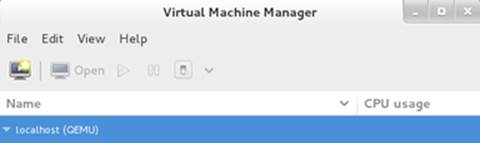
Figure 6-2 Virtual Machine Manager Interface
To view the details of the hypervisor, right click it and select Details. You will see four tabs in the details window, as shown in Figure 6-3. These tabs are Overview, Virtual Networks, Storage, and Network Interfaces.
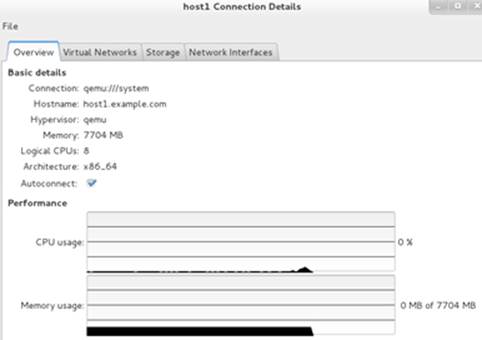
Figure 6-3 Hypervisor Basic Information
The Overview tab shows the basic information about the hypervisor, including its URI, hostname of the server it is running on, name of the hypervisor, memory and number of CPUs available, CPU architecture, and CPU/memory utilization information under Performance. There is also a checkmark whether to connect to the hypervisor each time the host machine is started.
The Virtual Networks tab displays the default virtual network configuration (see Figure 6-4).
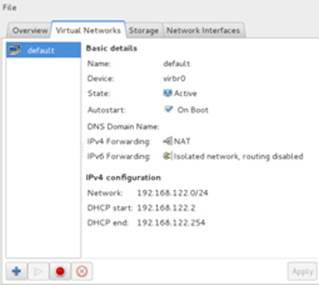
Figure 6-4 Hypervisor Virtual Networks Tab
This tab provides basic details and displays IP configuration. It shows the virtual network name, the device associated with it, the state of the device, and whether to autostart it when a virtual machine using this virtual network is started. It does not show a DNS domain name, which implies that there is none currently set. IPv4 Forwarding indicates that NATting is enabled on the physical network interface. The IP configuration includes the subnet IP, the netmask, and a range of IP addresses that it may be able to supply to virtual machines if they are configured to use DHCP. The four little square buttons in the bottom left may be used to add, start, stop, or delete a virtual network.
The Storage tab displays the default virtual storage configuration (see Figure 6-5).
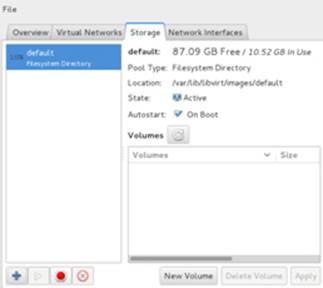
Figure 6-5 Hypervisor Storage Tab
This tab provides basic information about the configured storage. It indicates that the default location for storing virtual machine images is the /var/lib/libvirt/images directory. It also tells us the current usage of the selected storage pool. Creation of a separate partition or logical volume large enough to hold the image files for all additional virtual machines that you plan on adding to this host is recommended. The New Volume button allows you to create volumes, which may be used to store virtual machine images. The Delete Volume button allows the removal of an existing volume. The State and Autostart buttons in the middle of the window as well as the four square buttons in the bottom left are self-explanatory.
The Network Interfaces tab displays the virtual network interfaces that are available for virtual machines to connect to (see Figure 6-6).
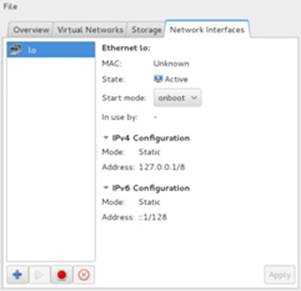
Figure 6-6 Hypervisor Network Interfaces Tab
This tab provides a list of all currently configured network interfaces. Highlighting one of them in the left window pane shows details on the right side of the window. By default, it shows only the loopback interface; however, you can add other network interfaces here too. Each interface shows the MAC address, state, autostart mode, and IP information, if available.
The virsh Command
The virsh command is used for the management and monitoring of the hypervisor and virtual machines. These management tasks include the ability of the tool to create, manage, and monitor virtual machines, virtual networks, virtual interfaces, storage pools, storage volumes, snapshots, and so on. There are a number of subcommands available. Table 6-2 lists and describes some of the more common ones.
|
Misc Subcommands |
Description |
|
cd |
Changes into a different directory. |
|
pwd |
Displays the current directory location. |
|
connect |
Connects to the hypervisor in the form qemu:///system. |
|
hostname |
Displays the hypervisor name. |
|
sysinfo |
Prints the hypervisor information in XML format. |
|
nodeinfo |
Shows the host processor and memory information. |
|
list |
Lists domains and their state. |
|
Domain Subcommands |
|
|
autostart |
Sets a domain to autostart when the hypervisor is rebooted. |
|
create |
Creates a domain from an XML file. |
|
define |
Defines a domain from an XML file. |
|
desc |
Assigns a short description to a domain. |
|
destroy |
Terminates a running domain immediately. Emulates unplugging the power to a computer. |
|
domdisplay |
Shows the URI to be used to connect to the graphical display of the domain. |
|
domhostname |
Displays the hostname of a domain. |
|
dominfo |
Shows basic information of a domain. |
|
domstate |
Shows the current state of a domain. |
|
dumpxml |
Displays configuration of an existing domain. |
|
edit |
Edits the XML configuration file of a domain. |
|
reboot / shutdown |
Reboots a domain / shuts down a domain gracefully. |
|
start |
Starts up an inactive domain. |
|
suspend / resume |
Suspends a running domain / resumes a suspended domain. |
|
vcpuinfo |
Returns basic information about virtual processors assigned to a domain. |
|
Device Subcommands |
|
|
attach-disk / detach-disk |
Attaches / detaches a disk to / from a domain. |
|
attach-interface / detach-interface |
Attaches / detaches a network interface to / from a domain. |
|
Virtual Network Subcommands |
|
|
net-autostart |
Sets a virtual network to autostart at system reboot. |
|
net-create |
Creates a temporary virtual network. |
|
net-define / net-undefine |
Defines / removes a persistent virtual network. |
|
net-destroy |
Stops a temporary or persistent virtual network. |
|
net-dumpxml |
Displays configuration of an existing virtual network. |
|
net-edit |
Edits the XML configuration of a virtual network. Files located in the /etc/libvirt/qemu/networks directory. |
|
net-info |
Returns basic information about a virtual network. |
|
net-list |
Displays the list of active virtual networks. |
|
net-start |
Starts an inactive virtual network. |
|
Virtual Network Interface Subcommands |
|
|
iface-bridge |
Creates a bridge device and attaches an existing network interface to it. |
|
iface-define |
Defines a host interface from an XML file. |
|
iface-destroy |
Stops a host interface. |
|
iface-dumpxml |
Obtains configuration of an existing interface and dumps it to a file. |
|
iface-edit |
Edits the XML configuration of an interface. Files located in the /etc/libvirt/qemu/networks directory. |
|
iface-list |
Displays the list of active interfaces. |
|
iface-start |
Starts an inactive interface. |
|
Storage Pool Subcommands |
|
|
pool-build |
Builds a pool. |
|
pool-create / pool-delete |
Creates and starts a pool from an XML file / Deletes a pool. |
|
pool-define |
Creates a pool from an XML file. Files located in the /etc/libvirt/storage directory. |
|
pool-destroy |
Stops a pool. |
|
pool-dumpxml |
Displays configuration of an existing pool. |
|
pool-edit |
Edits the XML configuration of a pool. |
|
pool-info |
Returns basic information about a pool. |
|
pool-list |
Displays the list of active pools. |
|
pool-start |
Starts an inactive pool. |
|
Storage Volume Subcommands |
|
|
vol-create / vol-delete |
Creates a volume from an XML file / Deletes a volume. |
|
vol-dumpxml |
Displays configuration of an existing volume. |
|
vol-info |
Returns basic information about a volume. |
|
vol-list |
Displays the list of active volumes. |
|
vol-pool |
Shows the pool name of a volume. |
|
vol-path |
Returns the path of a volume. |
|
vol-name |
Shows the name of a volume. |
Table 6-2 virsh Subcommands
The virt-install Command
The virt-install command is used for the provision of virtual machines. It supports both text and graphical installations of guest operating systems using an installation source located locally, or remotely via the NFS, HTTP, or FTP protocol. The virt-install command supports unattended kickstart installations also. There are a number of options available with this command. Table 6-3 lists and describes some common options.
|
Option |
Description |
|
--autostart |
Sets the virtual machine to autostart when the host machine reboots. |
|
--cdrom |
Specifies the location of the installation image. |
|
--connect |
Specifies the non-default hypervisor in the form qemu:///system. |
|
--description |
A short description for the virtual machine. |
|
--disk path/name |
Specifies the path to store the virtual machine image. Also accepts a storage pool or storage volume name. |
|
--graphics |
Specifies the graphics type to be used, such as vnc or spice. |
|
--location |
Specifies the local or remote path for the installation image. |
|
--name |
Name of the virtual machine. |
|
--network network |
Specifies the name of a virtual network or bridge. |
|
--os-type |
Specifies the type of OS desired. Valid values include Linux and Windows. |
|
--os-variant |
Specifies the OS variant for the OS type. Valid values include rhel7, rhel6, sles11, sles10, fedora19, win7, and win2k8. |
|
--ram |
Memory for the virtual machine. |
|
--vcpus |
Number of virtual CPUs for the virtual machine. |
|
-v |
Specifies to use full virtualization. |
|
-x |
Additional arguments to pass to Anaconda during a guest installation. For instance, specify the location of the kickstart file if kickstart installation is desired. |
Table 6-3 virt-install Command Options
Managing Hypervisor
This section discusses adding a virtual network, storage pool, and storage volume using both virt-manager and virsh. The procedures outlined below using the virsh command are not the only ways to configure these objects; this command is versatile and can be used differently to achieve the same results. There are several other management tasks such as destroying, deleting, and undefining these objects that these tools can perform; however, I leave it up to you to try them out on your own.
Exercise 6-1: Create a NAT Virtual Network Using virt-manager
This exercise should be done on host1.
In this exercise, you will use the virt-manager GUI to define a persistent NAT virtual network called rhnet_virt with subnet 192.168.1.0/24, gateway 192.168.1.1, and DHCP range 192.168.1.128 to .254. This virtual network will activate and set to autostart automatically.
1. Run the virt-manager command or choose Applications | System Tools | Virtual Machine Manager to start it.
2. Highlight “localhost (QEMU)”, right-click, and select Details.
3. Go to the Virtual Networks tab.
4. Click the + sign to start the “Creating a new virtual network” wizard. Click Forward.
5. Enter rhnet_virt as the virtual network name and click Forward.

Figure 6-7 Create a Virtual Network – Select a name
6. Enter 192.168.1.0/24 as the IPv4 address space and select Enable DHCPv4. The default DHCP IP range for this network will be 192.168.1.128 to .254 and the range 192.168.1.2 to .127 will be available if you need to assign static addresses. Click Forward.
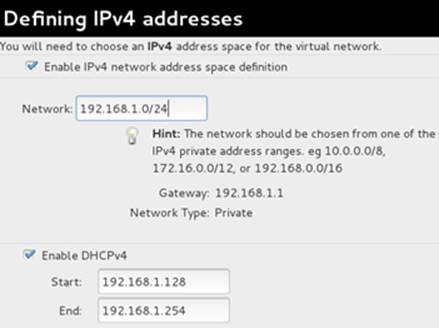
Figure 6-8 Create a Virtual Network – Choose Network IP and DHCP
7. Do not enable IPv6 addresses on the following screen. Click Forward to continue.
8. Next, select “Forwarding to physical network”, destination “Any physical device”, and mode “NAT”. Do not assign a domain name. Click Forward.
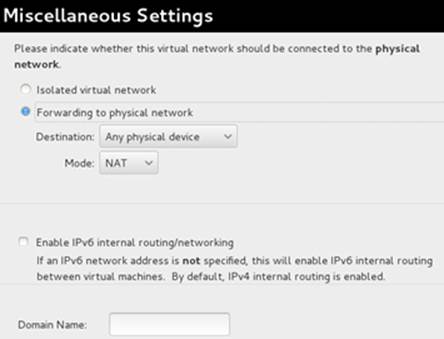
Figure 6-9 Create a Virtual Network – Connection to Physical Network
9. View the summary of your selections and click Finish to create the virtual network.

Figure 6-10 Create a Virtual Network – Summary
10. The Virtual Networks tab now shows the new virtual network.
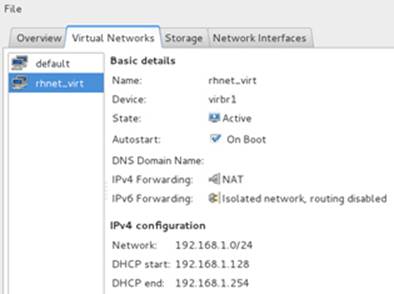
Figure 6-11 Create a Virtual Network – New Virtual Network Created
This virtual network is now ready. You can go to the Virtual Networks tab to view its details. You should now be able to attach this virtual network to virtual machines.
Exercise 6-2: Define a NAT Virtual Network Using virsh
This exercise should be done on host1.
In this exercise, you will use the virsh command to define a persistent NAT virtual network called rhnet_virsh with subnet 192.168.2.0/24, gateway 192.168.2.1, and DHCP range 192.168.2.2 to .254. You will use virbr2 as the bridge name and a range of ports between 1024 and 65535. You will activate this virtual network and set it to autostart at each system reboot.
1. View available virtual networks:
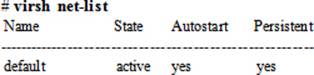
2. Create an XML file called rhnet_virsh.xml in the /root directory with the following information:

3. Define rhnet_virsh as a persistent virtual network based on the configuration provided in the /root/rhnet_virsh.xml file:
# virsh net-define /root/rhnet_virsh.xml
Network rhnet_virsh defined from /root/rhnet_virsh.xml
4. Set automatic start up of the new virtual network at system reboots:
# virsh net-autostart rhnet_virsh
Network rhnet_virsh marked as autostarted
5. Start the new virtual network:
# virsh net-start rhnet_virsh
Network rhnet_virsh started
6. List all virtual networks, including the new one:
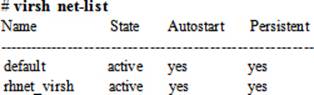
7. View details for the new virtual network:
# virsh net-info rhnet_virsh
Name rhnet_virsh
UUID eed2e055-4817-4d04-bc84-6c2fe04732cf
Active: yes
Persistent: yes
Autostart: yes
Bridge: virbr2
This virtual network is now ready and you should be able to attach it to virtual machines.
Exercise 6-3: Create a Storage Pool and Volume Using virt-manager
This exercise should be done on host1.
In this exercise, you will use the virt-manager GUI to create a file-based storage pool called rhpol_virt and add a 10GB volume called rhvol_virt to it. You will use file system directory as the pool type and /var/lib/libvirt/rhpol_virt as its location. You will ensure that the permissions on the pool directory are 0755 with ownership and group belonging to the root user. You will activate this storage pool and set it to autostart at each system reboot.
1. Run the virt-manager command or choose Applications | System Tools | Virtual Machine Manager to start it.
2. Highlight “localhost (QEMU)”, right-click, and select Details.
3. Click Storage to go to the storage details tab. The information on this tab shows the existing pools, their sizes, location, current state, autostart setting, and list of volumes they have.
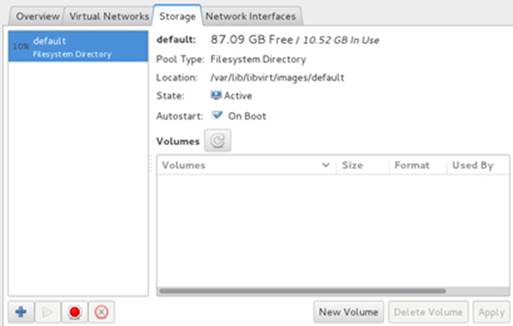
Figure 6-12 Add a Storage Pool – Existing Pools and Volumes
4. Click the + sign at the bottom of the screen to start the “Add Storage Pool” wizard.
5. Enter rhpol_virt as the name of the storage pool and filesystem directory as the type. Click Forward to continue.
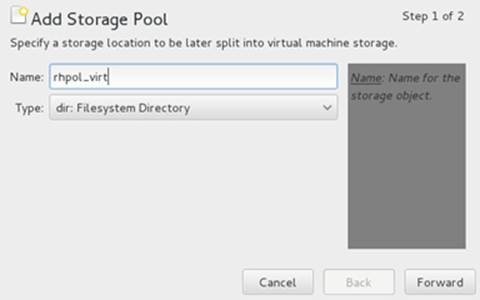
Figure 6-13 Add a Storage Pool – Assign a Name and Type
6. Specify /var/lib/libvirt/rhpol_virt as the target path and click Finish to complete adding a storage pool and go back to the Storage tab.
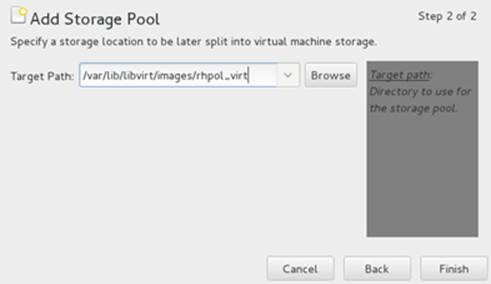
Figure 6-14 Add a Storage Pool – Specify a Target Path
7. The storage tab now shows the rhpol_virt pool in addition to the other two pools.
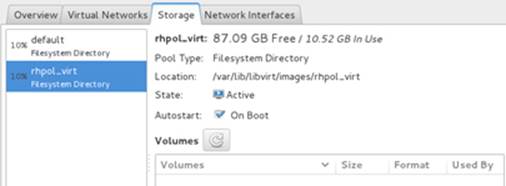
Figure 6-15 Add a Storage Pool – List of Storage Pools
8. Click New Volume to add rhvol_virt volume of size 10GB to rhpol_virt storage pool. Click Finish to create the volume and go back to the Storage tab.
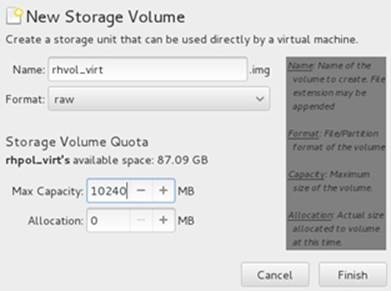
Figure 6-16 Add a Storage Volume – Add a Volume
9. The Storage tab now shows the new pool and the volume within it.

Figure 6-17 Add a Storage Volume – New Pool and Volume Created
This storage pool with a storage volume is now ready. You can go to the Storage tab to view their details. You should now be able to attach this volume to virtual machines.
Exercise 6-4: Create a Storage Pool and Volume Using virsh
This exercise should be done on host1.
In this exercise, you will use the virsh command to create a file-based storage pool called rhpol_virsh and add a 10GB volume called rhvol_virsh to it. You will use file system directory as the pool type and /var/lib/libvirt/rhpol_virsh as its location. You will ensure that the permissions on the pool directory are 0755, with ownership and group belonging to the root user. You will activate this storage pool and set it to autostart at each system reboot.
1. View available storage pools:
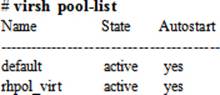
2. Create the pool directory:
# mkdir /var/lib/libvirt/rhpol_virsh
3. Define the storage pool as type “dir” with source path “- - - -” and target /var/lib/libvirt/rhpol_virsh directory:
# virsh pool-define-as rhpol_virsh dir - - - - /var/lib/libvirt/rhpol_virsh
Pool rhpol_virsh defined
4. Set automatic start up of the new storage pool at system reboots:
# virsh pool-autostart rhpol_virsh
Pool rhpol_virsh marked as autostarted
5. Start the new storage pool:
# virsh pool-start rhpol_virsh
Pool rhpol_virsh started
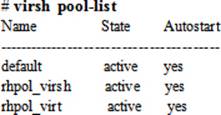
6. List all storage pools including the new one:
7. View details of the new pool:
# virsh pool-info rhpol_virsh
Name: rhpol_virsh
UUID: 94f2975f-7544-4ef0-b9c6-bf71e8dd07cf
State: running
Persistent: yes
Autostart: yes
Capacity: 49.98 GiB
Allocation: 6.69 GiB
Available: 43.29 GiB
8. Create volume rhvol_virsh of size 10GB in the rhpol_virsh pool:
# virsh vol-create-as rhpol_virsh rhvol_virsh 10G
Vol rhvol_virsh created
9. List the available volumes in the rhpol_virsh pool:
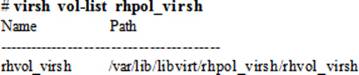
This storage volume is now ready and you should be able to attach it to virtual machines.
Configuring FTP Installation Server
File Transfer Protocol (FTP) is the standard networking protocol for transferring files between systems, and has been used on Linux, UNIX, Windows, and other operating system platforms for decades. In RHEL, an enhanced implementation of FTP called very secure File Transfer Protocol(vsFTP) is available and is used as the default file transfer service. This enhanced version is faster, more stable, and more powerful than the standard FTP and at the same time allows us to enable, disable, and set security controls on incoming service requests. The vsFTP daemon called vsftpdcommunicates on port 21.
This section discusses setting up an FTP installation server in preparation for over-the-network RHEL7 installation in virtual machines that we are going to deploy in later exercises. The following exercise provides a step-by-step procedure on how to configure an FTP server to provide access to RHEL7 installation files.
Exercise 6-5: Configure an FTP Installation Server
This exercise should be done on host1.
In this exercise, you will configure an FTP installation server on host1 using the vsFTP program. You will install the necessary packages associated with vsFTP from the DVD yum repository that was set up in Chapter 05 “Managing Software Packages”, copy the files from the installation DVD to the /var/ftp/pub/rhel7 directory, set proper SELinux context, enable FTP traffic to pass through the firewall, and start the FTP service. Finally, you will open a browser window and test access to the files.
1. Install the vsftpd software:
# yum –y install vsftpd
2. Create the directory /var/ftp/pub/rhel7 for storing the RHEL7 installation files. Ensure that there is at least 4GB of free space available in the /var file system.
# mkdir /var/ftp/pub/rhel7
3. Change the directory into /mnt where the RHEL7 installation DVD is mounted and copy the entire directory structure from /mnt to /var/ftp/pub/rhel7:
# cd /mnt && find . | cpio –pmd /var/ftp/pub/rhel7
4. Add a permanent rule to the firewall for the FTP traffic to pass through and reload it:
# firewall-cmd --permanent --add-service=ftp ; firewall-cmd --reload
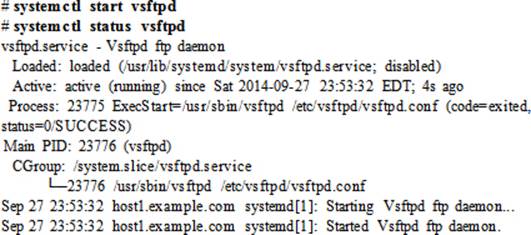
5. Start the vsFTP service and check the running status:
6. Set the vsFTP service to autostart at each system reboot:
# systemctl enable vsftpd
ln -s '/usr/lib/systemd/system/vsftpd.service' '/etc/systemd/system/multi-user.target.wants/vsftpd.service'
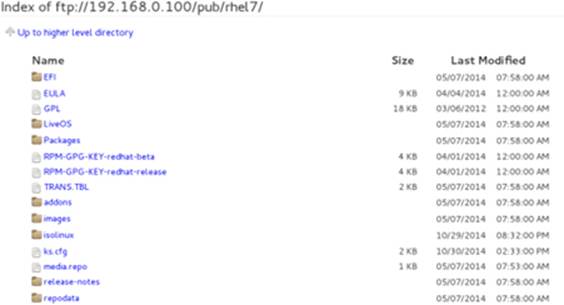
7. Open a browser window on host1 and type the following URL to test access:
ftp://192.168.0.100/pub/rhel7
Exercise 6-6: Replace DVD Yum Repository with FTP Yum Repository
This exercise should be done on host1.
In this exercise, you will unconfigure the DVD yum repository that was created in Chapter 05 and set up a new FTP yum repository pointing to the FTP location /var/ftp/pub/rhel7. You will create a definition file for this new repository and test it to ensure it is available on the system.
1. Remove the dvd.repo file from the /etc/yum.repos.d directory:
# rm /etc/yum.repos.d/dvd.repo
2. Unmount and eject the RHEL7 installation DVD from the drive:
# eject /mnt
3. Create a definition file /etc/yum.repos.d/ftp.repo for the repository. Enter the information as shown:
# vi /etc/yum.repos.d/ftp.repo
[ftprepo]
name=ftp repo
baseurl=ftp://192.168.0.100/pub/rhel7
enabled=1
gpgcheck=0
4. Clean up the yum cache directory:
# yum clean all
5. Confirm that the repository is created and is available for use:
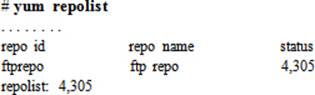
EXAM TIP: Configuring a network yum repository is a critical task. You will not be able to load missing or required packages if you are unable to set up a repository successfully.
Exercise 6-7: Set Up Bi-directional Communication Between Host and Virtual Machines
This exercise should be done on host1.
In this exercise, you will create a virtual interface on host1 that will allow this host and server1 and server2, virtual guests that you will build in this chapter, to communicate directly with each other on the same 192.168.0 subnet using a bridge. This interface will also be used by server1 and server2during their build to access the RHEL7 installation files on the FTP server that you configured in Exercise 6-5 on host1. This interface will be named br0 and will use the IP assignments from em1 physical interface. These assignments are 192.168.0.100 IP address, 255.255.255.0 subnet mask, and 192.168.0.1 gateway.
1. Change to /etc/sysconfig/network-scripts directory and create a file called ifcfg-br0 in vi. Add the directives as indicated below:
# cd /etc/sysconfig/network-scripts; vi ifcfg-br0
DEVICE=br0
BOOTPROTO=static
ONBOOT=yes
IPADDR=192.168.0.100
NETMASK=255.255.255.0
GATEWAY=192.168.0.1
TYPE=Bridge
NM_CONTROLLED=no
2. Edit the ifcfg-em1 file and set the following directives:
# vi ifcfg-em1
DEVICE=em1
TYPE=Ethernet
BRIDGE=br0
ONBOOT=yes
NM_CONTROLLED=no
HWADDR=D4:BE:D9:2E:2E:D9
3. Confirm the setup of the new bridge using the brctl command:

4. Restart the network service:
# systemctl restart network
5. Confirm that the new bridge interface has taken over the IP assignments from em1. Also ensure that these assignments are no longer assigned to em1.
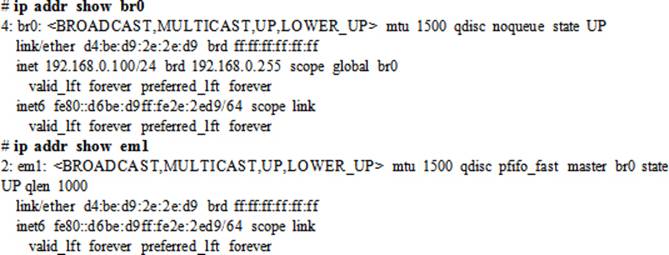
The new virtual bridge br0 is now ready for use. It will allow the virtual machines in the next section to be able to access the FTP services on host1.
Network Installing RHEL Using virt-manager
This section discusses creating a virtual machine using the virt-manager GUI and then installing RHEL7 in it using the installation files located on an FTP server.
Exercise 6-8: Network Install RHEL7 Using virt-manager
This exercise should be done on host1.
In this exercise, you will create a virtual machine on the hypervisor using the Virtual Machine Manager program. The name of the virtual machine will be server1.example.com and it will use the FTP server configured in the previous exercise as the installation source. It will have 1024MB of memory, one vcpu, and will use space in the rhpol_virt/rhvol_virt storage volume for the OS. You will use the OS type and variant as Linux / rhel7 and ensure that the installation runs in the graphical environment. You will create /boot of size 500MB, swap 500MB, /home 300MB, and the rest of the space for the root partition in the 10GB space provided by the rhpol_virt/rhvol_virt volume. You will ensure that root, home, and swap partitions are logical volumes in vg00 volume group. You will assign source device “Host device em1 (Bridge ‘br0’)” as the network interface. During RHEL7 installation, You will assign IP 192.168.0.110, netmask 255.255.255.0, and gateway 192.168.0.1, use the default file system layout, and select “Server with GUI” software environment group.
1. Run the virt-manager command or choose Applications | System Tools | Virtual Machine Manager to start it.
2. Right click “localhost (QEMU)”, and select New to start the Create a new virtual machine wizard.
3. Enter server1.example.com for the virtual machine name and select Network Install as the installation source. Click Forward to continue.

Figure 6-18 Create a Virtual Machine – Step 1 of 6
4. Specify the URL for the network install. Type ftp://192.168.0.100/pub/rhel7. Uncheck the “Automatically detect operating system based on install media” option and select OS type Linux and Version Red Hat Enterprise Linux 7. Click Forward to continue.
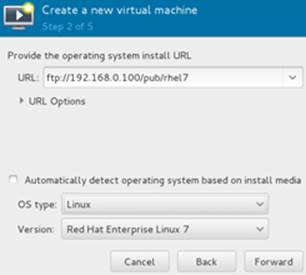
Figure 6-19 Create a Virtual Machine – Step 2 of 6
5. Enter 1024MB for memory and 1 for CPU. Click Forward to continue.
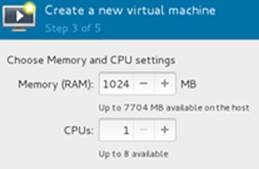
Figure 6-20 Create a Virtual Machine – Step 3 of 6
6. Check the “Enable storage for this virtual machine” box. Select “Select managed or other existing storage” and browse for available storage pools and volumes. Choose rhpol_virt storage pool and rhvol_virt volume, and click Choose Volume.
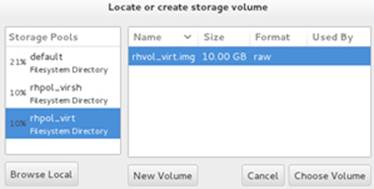
Figure 6-21 Create a Virtual Machine – Step 4 of 6
7. The storage volume is now selected. Click Forward to continue.
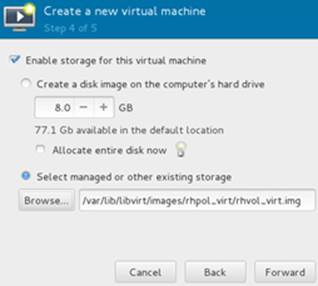
Figure 6-22 Create a Virtual Machine – Step 5 of 6
8. A summary of your selections is displayed. Expand “Advanced options” to view the settings, but do not alter them. Review all configuration items and click Finish to proceed with the installation.
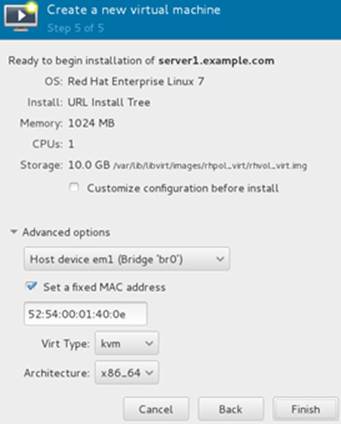
Figure 6-23 Create a Virtual Machine – Step 6 of 6
9. Customize the OS as directed in the exercise objective and follow the procedure from Chapter 01 to finish the installation.
Kickstart Installation Method
The Red Hat Kickstart installation method is used to perform fully-automated, fully-customized, and unattended installation of RHEL on any number of servers concurrently. This method requires a single file supplied to the installation program, which uses the configuration defined in the file to accomplish an identical custom installation on the target system. This method eliminates the lengthy question and answer session that we otherwise have to go through.
This section discusses installing RHEL7 in a virtual machine using the virt-install command, with installation files located on an FTP server using Kickstart automated procedure.
Creating a Kickstart Configuration File
A configuration file must be created and supplied to the installation program in order to perform a kickstart installation. We need to capture all required and desired configuration for use by the kickstart process to install the system and configure it accordingly. We can create this file by making a copy of the /root/anaconda-ks.cfg file and customizing it. Red Hat also offers a graphical tool called Kickstart Configurator system-config-kickstart that is available in RHEL7 to build a kickstart configuration file; however, the use of this tool is not recommended.
During the initial portion of RHEL installation, several pieces of configuration information are entered. The installation program creates a file called anaconda-ks.cfg in the /root directory and stores this information in it. We can customize this file as per requirements and use it for new client deployments.
The following displays the modified contents of a copy of the anaconda-ks.cfg file called ks.cfg, located in the /var/ftp/pub/rhel7 directory. We will use this file for your automated installation on server2. Each directive in the file is on a separate line, which is numbered below with the nl command.
# cp /root/anaconda-ks.cfg /var/ftp/pub/rhel7/ks.cfg
# cd /var/ftp/pub/rhel7 ; nl ks.cfg
1 url --url="ftp://192.168.0.100/pub/rhel7"
2 lang en_US
3 keyboard --vckeymap=us --xlayouts='us'
4 network --bootproto=static --device=eth0 --ip=192.168.0.120 --netmask=255.255.255.0
--gateway=192.168.0.1 --ipv6=auto --activate --hostname=server2.example.com
5 rootpw --iscrypted $6$ah1lE4adlnmNP7Bg$FwfTfXfDUyoN.QONQNU0gN8vukCCvdbSlX5Du3IzeZXhF7KDR7vXlRWXsGwGOnE407V/2Aq7/7a78H.D601w..
6 auth --enableshadow --passalgo=sha512
7 reboot
8 timezone America/Toronto --isUtc
9 firstboot --disable
10 eula --agreed
11 ignoredisk --only-use=vda
12 zerombr
13 clearpart --all --initlabel --drives=vda
14 bootloader --location=mbr --boot-drive=vda
15 part /boot --fstype="xfs" --ondisk=vda --size=500
16 part pv.16 --fstype="lvmpv" --ondisk=vda --size=9739
17 volgroup vg00 --pesize=4096 pv.16
18 logvol swap --fstype="swap" --size=500 --name=swap --vgname=vg00
19 logvol /home --fstype="xfs" --size=300 --name=home --vgname=vg00
20 logvol / --fstype="xfs" --size=9230 --name=root --vgname=vg00
21 user --groups=wheel --name=user1 --password=$6$uHOiMAtuLcsyfCUB$R9vvAxTXYs3Vh0axmsVp/cEGdvylgBZc327kmmgV.JuLefz/BFnE1ODiypG6d9SyHb9INRUUTZYhsVorfmhqC0 --iscrypted --gecos="user1"
22 xconfig --startxonboot
23 %packages
24 @base
25 @core
26 @desktop-debugging
27 @dial-up
28 @fonts
29 @gnome-desktop
30 @guest-agents
31 @guest-desktop-agents
32 @input-methods
33 @internet-browser
34 @multimedia
35 @print-client
36 @x11
37 %end
Let’s analyze the file contents line by line so that we have a good understanding of each entry. Comments and empty lines have been omitted.
Line #1: uses the specified URL as the source for installation files.
Line #2: uses the US English language.
Line #3: uses the US keyboard layout.
Line #4: names the first network interface eth0, assigns it static IP address 192.168.0.120, netmask 255.255.255.0, gateway 192.168.0.1, sets it to auto-activate at system reboots, assigns this system hostname server2.example.com, and sets IPv6 support to automatic. If we wish to obtain networking information from a configured DHCP server, use “network --device eth0 --bootproto dhcp” instead.
Line #5: assigns the specified password to the root account. We can copy and paste the root password from the /etc/shadow file on an existing RHEL system.
Line #6: enables password shadowing for user authentication and uses sha512 algorithm password encryption.
Line #7: reboots the system after the installation has finished.
Line #8: sets the time zone to America/Toronto based on the assumption that the hardware clock of the system is set to UTC time.
Line #9: disables the execution of the firstboot program after the first reboot following the installation.
Line #10: accepts the end-user license agreement.
Line #11: strictly uses the vda disk as the target disk for installation.
Line #12: wipes off all information from the MBR.
Line #13: removes all partitions from the target disk and initializes the disk label.
Line #14: installs the GRUB bootloader program in the MBR on the target disk.
Line #15: creates /boot partition of size 500MB on the target disk and formats it to the xfs file system type.
Line #16: constructs an LVM physical volume called lvmpv on the target disk and allocates 9739MB to it.
Line #17: creates vg00 LVM volume group with PE size 4MB using the lvmpv physical volume.
Line #18: builds a swap logical volume of size 500MB in vg00 volume group.
Line #19: builds a home logical volume of size 300MB in vg00 volume group and formats it to the xfs file system type.
Line #20: creates a root partition of size 9230MB in vg00 volume group and formats it to the xfs file system type.
Line #21: creates a user account called user1 with membership to the administrative group called wheel, assigns the supplied encrypted password, and adds “user1” as the comments for this user.
Line #22: configures to start X Window on system reboots.
Line #23: marks the beginning of software selection.
Lines #24 to #36: installs these package groups during the installation process.
Line #37: marks the end of software selection.
There are several other directives and options available that you may want to use in the kickstart file, but not all of them are mandatory. If you do not define a compulsory directive, Anaconda prompts you to enter that particular piece of information during the installation process, which defeats the purpose of this automated process. Also make certain that the sequence of sections in the file remain unchanged; however, directives within a section can be in any order. As well, there are many settings such as selinux --enforcing and firewall --enabled that are defaults and need not be included in the file.
At the end of the configuration file, you may specify any pre-installation and/or post-installation commands or scripts that you wish Anaconda to execute.
Execute the ksvalidator command on the file after you are done with the editing to validate the directives, their values, and the file syntax. This tool is part of the pykickstart package and should be installed if you wish to use it.
# ksvalidator /var/ftp/pub/rhel7/ks.cfg
If you see any errors in the output, you need to fix them before continuing.
You also need to set the appropriate SELinux context on the ks.cfg file with the chcon command, to ensure SELinux allows access to this file:
# chcon –t public_content_t /var/ftp/pub/rhel7/ks.cfg
Exercise 6-9: Network Install RHEL7 Using virt-install with Kickstart Configuration
This exercise should be done on host1.
In this exercise, you will create a virtual machine on host1 using the virt-install command. The name of the virtual machine will be server2.example.com and it will use the configuration stored in the ks.cfg file configured in the previous sub-section. It will have 1024MB of memory, one vcpu, and 10GB of disk space in volume rhpol_virsh/rhvol_virsh.img. You will use the OS type and variant as Linux / rhel7, assign br0 as the network interface, and mark the virtual machine to start automatically upon host1 reboot.
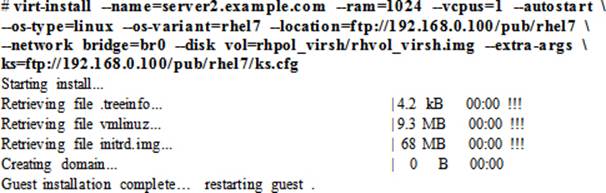
The new server will be rebooted automatically after the installation is complete.
![]() The backslash character used in the virt-install command above marks the continuation of the line.
The backslash character used in the virt-install command above marks the continuation of the line.
The wget Utility
wget is a non-interactive file download utility that allows you to retrieve a single file, multiple files, or an entire directory structure from an FTP, HTTP, or HTTPS source. This tool has the ability to retrieve files from both IPv4 and IPv6 addresses. There are several options available with wget;however, some of them are used more often than the others. Table 6-4 lists a few common options in both short and long notations, and describes them. For additional options and details, refer to the command’s man pages.
|
Option |
Description |
|
–d (--debug) |
Turns the debug mode on. |
|
–i (--input-file) |
Downloads files from URLs listed in the specified file. |
|
–N (--timestamping) |
Retrieves files newer than the source files. |
|
–nv (--no-verbose) |
Hides the verbose output except for error messages and basic information. |
|
–o (--output-file) |
Redirects messages to the specified output file. |
|
–P (--directory-prefix) |
Specifies the directory location in which to download the files. |
|
–q (--quiet) |
Hides the output and any errors. |
|
–r (--recursive) |
Turns the recursive retrieval on. |
|
–T (--timeout) |
Specifies the number of seconds before the command times out. |
|
–t (--tries) |
Specifies the number of retries. |
|
--ignore-case |
Treats lowercase and uppercase letters alike. |
|
--user |
Specifies a username for FTP or HTTP access. |
|
--password |
Specifies a password for the --user option. |
Table 6-4 wget Command Options
You can run the wget command with --help to list available options in both short and long forms, along with a short description of each:
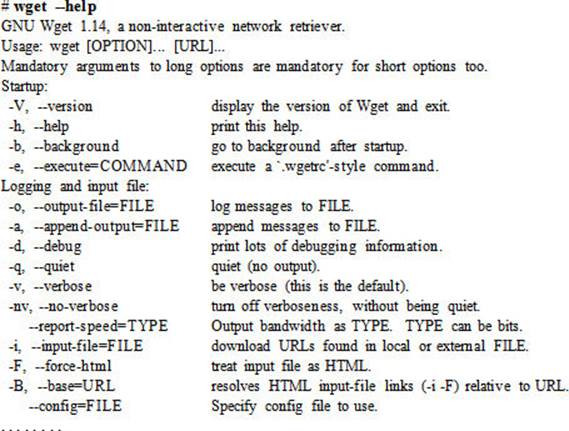
Let’s look at a few examples to understand the usage of wget.
To download the kernel file linux-3.9.9.tar.gz in the current directory from ftp.kernel.org:
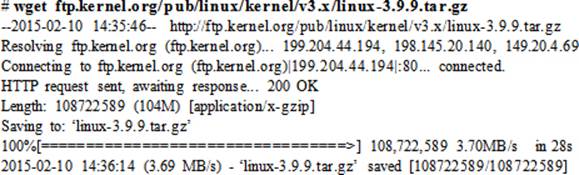
To download the kernel file linux-3.9.8.tar.gz in /var/tmp directory and without displaying output:
# wget ftp.kernel.org/pub/linux/kernel/v3.x/linux-3.9.8.tar.gz –P /var/tmp –q
To download the kernel file linux-3.9.7.tar.gz in the current directory with output redirected to /tmp/wget.out:
# wget ftp.kernel.org/pub/linux/kernel/v3.x/linux-3.9.7.tar.gz –o /tmp/wget.out
To download the index.html file from www.redhat.com with debug mode on:
# wget –d www.redhat.com
DEBUG output created by Wget 1.14 on linux-gnu.
URI encoding = ‘UTF-8’
--2015-02-10 14:45:18-- http://www.redhat.com/
Resolving www.redhat.com (www.redhat.com)… 96.7.207.214
Caching www.redhat.com => 96.7.207.214
Connecting to www.redhat.com (www.redhat.com)|96.7.207.214|:80… connected.
Created socket 3.
Releasing 0x0000000001dff930 (new refcount 1).
---request begin---
GET / HTTP/1.1
User-Agent: Wget/1.14 (linux-gnu)
Accept: */*
Host: www.redhat.com
Connection: Keep-Alive
---request end---
…… . .
2015-02-10 14:45:19 (1.22 MB/s) - ‘index.html’ saved [56072]
You can verify the download with the ll command:
# ll index.html
-rw-r--r--. 1 root root 56072 Feb 10 14:45 index.html
To download the ks.cfg file from the FTP site you set up in the previous exercise:
# wget ftp://192.168.0.100/pub/rhel7/ks.cfg
--2015-02-10 14:46:10-- ftp://host1/pub/rhel7/ks.cfg
=> ‘ks.cfg’
Resolving host1 (host1)… 192.168.0.100
Connecting to host1 (host1)|192.168.0.100|:21… connected.
Logging in as anonymous … Logged in!
…… . .
EXAM TIP: Use the wget command to download files from an FTP or HTTP source as instructed in the exam.
Chapter Summary
In this chapter, we learned the concepts surrounding server virtualization, and learned the terms host machine, virtual machine, guest operating system, hypervisor, KVM, QEMU, and libvirt. We reviewed the benefits associated with using server virtualization. We looked at various package groups that support virtualization on bare-metal servers then moved on and learned additional concepts around virtual network switches, virtual network interfaces, virtual storage pools, and virtual storage volumes. We studied various virtualization management tools, including the GUI and commands. We reviewed the GUI Virtual Machine Manager program and saw how to interact with it to perform various management functions pertaining to virtual machines. We then performed several exercises and set up virtual networking and virtual storage using both GUI and commands.
We set up network installation services using the FTP protocol and configured bi-directional communication between the hypervisor and guests. We then performed a network installation using the GUI.
We studied the features and benefits associated with the kickstart method of hands-off installation. We customized a kickstart file and then used it to install RHEL7 in a virtual machine.
Finally, we learned about the wget utility and saw how to use this tool to download files from the specified network source.
Chapter Review Questions
1. What is the name of the package group that contains the qemu-kvm package?
2. What three protocols are supported for configuring over the network installation servers?
3. Which command can be used to start the virtual machine manager program?
4. What is the default location where the virtual machine files are stored?
5. The computer must be 64-bit and must have built-in support for hardware virtualization. True or False?
6. Kickstart supports fully unattended installations. True or False?
7. What is the name of the file that is created during the RHEL installation and it captures all configuration information entered?
8. The wget utility can be used to download an entire directory tree. True or False?
9. What is the name of the program that allows us to generate a kickstart file?
10. KVM is the default virtualization hypervisor software in RHEL7. True or False?
11. Which daemon must be running in order to connect to the hypervisor?
12. Which package group includes the graphical virtual machine manager program?
13. What is the command line tool to set up a virtual machine and optionally install an OS in it?
14. By default, SELinux is set to enforcing during installation. True or False?
15. What would happen if we set the onboot option to no in the ks.cfg file?
16. What are the three software components that are needed to provide full virtualization functionality on a RHEL7 server?
17. Which of these is not true about server virtualization: support for multiple guests, support for multiple virtual storage pools, availability of at least two fully functional physical servers, and support for multiple virtual networks.
18. Where do we create virtual volumes?
Answers to Chapter Review Questions
1. The Virtualization package group contains the qemu-kvm package.
2. The three protocols supported for accessing over the network installation server are FTP, HTTP, and NFS.
3. The virt-manager command.
4. The /var/lib/libvirt/images directory.
5. True.
6. True.
7. The anaconda-ks.cfg file.
8. True.
9. The name of the program is Kickstart Configurator.
10. True.
11. The libvirtd daemon.
12. The Virtualization Client package group contains the graphical virtual machine manager program.
13. The virt-install tool.
14. True.
15. The network interface will not be activated automatically at system reboots.
16. The three software components are KVM, QEMU, and libvirt.
17. It requires only one physical system to operate.
18. We create virtual volumes in virtual pools.
DIY Challenge Labs
The following labs are useful to strengthen most of the concepts and topics learned in this chapter. It is expected that you perform these labs without any additional help. A step-by-step guide is not provided, as the implementation of these labs requires the knowledge that has been presented in this chapter. Use defaults or your own thinking for missing information.
Lab 6-1: Create a Virtual Network
Set up a virtual network called rhcsanet. Enable DHCP to provide IP addresses from 192.168.100.51 to 192.168.100.100 on subnet 255.255.255.0. Ensure that this virtual network uses NATting on all physical interfaces.
Lab 6-2: Create a Virtual Storage Pool
Set up a new storage pool called rhcsastr of 14GB in size. Use the directory filesystem as the storage type and store it in the /var/lib/libvirt/vstorage directory. Create a virtual volume called rhcsavol that uses the entire pool space.
Lab 6-3: Perform a Network Installation of RHEL7
Create a virtual machine and install RHEL7 in it. Use IP 192.168.0.220, netmask 255.255.255.0, gateway 192.168.0.1, and hostname server220.example.com. Use standard partitioning to create /boot 200MB, lvol1 for / 4GB, lvol2 for swap 1GB, lvol3 for /usr 4GB, lvol4 for /var 2GB, lvol5 for/opt 1GB, lvol6 for /tmp 500MB, and lvol7 for /home 500MB in that order. You can use the virtual storage volume created in the previous lab. Select packages to support X Window, GNOME desktop, and graphical administration tools. Create a local user account called user220 with all the defaults. Use configuration of your own for any missing information.
Lab 6-4: Perform a Kickstart Installation of RHEL7
Create a virtual machine and install RHEL7 in it, using kickstart as explained in this chapter. Use IP 192.168.0.230 and hostname server230.example.com. Select necessary packages to support X Window and a graphical desktop. Use partitioning and other missing configuration at will.
Lab 6-5: Add Virtual Disks to Virtual Machines
Set up a new storage volume and allocate one 2GB disk to server3.example.com and one 2GB disk to server4.example.com from this volume. Use storage settings as you wish.