RHCSA & RHCE Red Hat Enterprise Linux 7: Training and Exam Preparation Guide (EX200 and EX300), Third Edition (2015)
Part I. RHCSA Section
Chapter 7. Booting RHEL7, Updating Kernel, and Logging Messages
This chapter describes the following major topics:
· Linux boot process: firmware, GRUB, kernel, and systemd
· Understand and interact with GRUB to boot into different targets
· Linux kernel, its version and directory structure
· Install and update the kernel
· Manage kernel modules
· Init and Upstart
· Understand systemd, units, targets, and control groups
· Administer units and control groups
· Understand and interpret system log files
· Understand and manage systemd journal
RHCSA Objectives:
12. Boot, reboot, and shut down a system normally
13. Boot systems into different runlevels manually
14. Interrupt the boot process in order to gain access to a system
16. Locate and interpret system log files and journals
19. Start, stop, and check the status of network services
33. Start and stop services and configure services to start automatically at boot
34. Configure systems to boot into a specific target automatically
39. Configure network services to start automatically at boot
42. Update the kernel package appropriately to ensure a bootable system
43. Modify the system bootloader
RHEL goes through multiple phases during startup. It starts selective services during its transition from one phase into another, and provides the administrator with an opportunity to interact with the bootloader to boot the system into non-default targets. RHEL starts a number of services during its transition to the default or specified target.
The kernel controls everything on the Linux system. It controls the system hardware, enforces security and access controls, and runs, schedules, and manages processes and service daemons. The kernel is comprised of several modules. A new kernel must be installed or an existing kernel must be upgraded when the need arises from an application or functionality standpoint.
systemd is the new default system initialization scheme in RHEL7, replacing both init and Upstart. It has brought a number of enhancements, capabilities, and new tools to the operating system. It allows the system to boot into one of several pre-defined targets. The shutdown, halt, poweroff, and reboot commands are still around, and can be used for system power management.
RHEL7 logs all system activities by default in appropriate log files. These log files grow over a period of time and need to be rotated on a regular basis to ensure availability of enough space in the file system. systemd has introduced a new service for viewing and managing system logs in addition to the traditional syslog.
Linux Boot Process
RHEL goes through the boot process when the system is powered up or reset, with the boot process lasting until all enabled services are started and a login prompt appears on the screen. The boot process on an x86 computer may be split into four major phases: the firmware phase, the boot loader phase, the kernel phase, and the initialization phase. The system accomplishes these phases one after the other while performing and attempting to complete the tasks identified in each phase. The following sub-sections briefly explain each phase, and the subsequent sections provide more details on the last three phases.
The Firmware Phase
The firmware is the BIOS or the UEFI code that is stored in flash memory on the x86 system board. The first thing that it does is run the power-on-self-test (POST) to detect, test, and initialize the system hardware components. While doing this, it installs appropriate drivers for the video hardware and begins displaying system messages on the screen. The firmware scans the available storage devices in an effort to locate a boot device, starting with a 512-byte image containing 446 bytes of the boot loader program called GRUB2, 64 bytes for the partition table, and the last two bytes with the boot signature. As soon as it discovers a usable boot device, it loads GRUB2 into memory and passes control over to it.
The GRUB Phase
In RHEL7, a new, enhanced version of GRUB, called GRUB2, has been introduced, replacing the legacy GRUB. GRUB2 supports both BIOS/MBR and UEFI/GPT combinations.
After GRUB2 is loaded into memory and takes control, it searches for the kernel in the /boot file system. It extracts the kernel code from /boot into memory, decompresses it, and loads it based on the configuration defined in the /boot/grub2/grub.cfg file. For UEFI-based systems, GRUB2 looks for the EFI system partition /boot/efi instead, and runs the kernel based on the configuration defined in the /boot/efi/EFI/redhat/grub.efi file. Once the kernel is loaded, GRUB2 transfers the control over to it for furthering the boot process.
The Kernel Phase
After getting control from GRUB2, the kernel loads the initial RAM disk (initrd) image from the /boot file system into memory after decompressing and extracting it. The kernel then mounts this image as read-only to serve as a temporary root file system. This allows the kernel to bypass mounting the actual physical root file system in order to be fully functional. The kernel loads necessary modules from the initrd image to allow access to the physical disks and the partitions and file systems therein. It also loads any required drivers to support the boot process. Later, the kernel unmounts the initrd image and mounts the actual root file system in read/write mode. At this point, the necessary foundation is built for the boot process to carry on and start loading the enabled services.
The Initialization Phase
This is the last phase that takes over control from the kernel and continues the boot process. In RHEL7, systemd has replaced both SysVinit and Upstart as the default system initialization scheme. systemd starts all enabled userspace system and network services, and brings the system up to the preset boot target. The system boot process is considered complete when all enabled services are operational for the boot target and users are able to log in to the system.
Managing GRUB
After the firmware phase has finished, the boot loader presents a menu with a list of bootable kernels available on the system. The menu waits for a pre-defined amount of time before it times out and starts booting the default kernel. You may want to interact with GRUB at this time if you wish to boot with a non-default kernel, boot to a different target, or edit a kernel boot string before booting it.
Pressing a key before the timeout expires allows you to interrupt the autoboot process and interact with GRUB. If you wish to boot the system using the default boot device with all the configured default settings, do not press any key, as shown in Figure 7-1, and let the system go through the autoboot process.
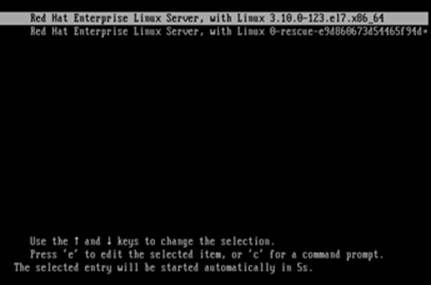
Figure 7-1 GRUB Menu
The line at the very bottom in Figure 7-1 above shows the autoboot countdown in seconds. The default setting is 5 seconds. If you press no keys within the 5 seconds, the highlighted kernel will be booted automatically.
Understanding the GRUB Menu
The GRUB menu shows a list of bootable kernels at the top. You can change the selection using the up or down arrow key. You can also edit a selected kernel menu entry by pressing e or go to the grub> command prompt by pressing c. In the edit mode, GRUB loads the selected entry from the/boot/grub2/grub.cfg file in an editor, which you are allowed to modify before booting. You can press Ctrl+x to boot after making the change, Ctrl+c to switch into the grub> command prompt, or press ESC to discard the changes made and go back to the main menu. Figure 7-2 displays one of the entries and the action keys.
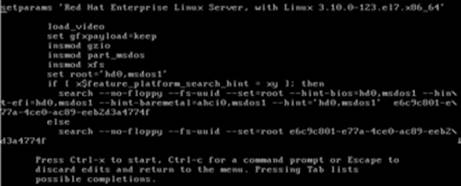
Figure 7-2 Edit Kernel String
The grub> prompt appears when you type c. While at the prompt, you can press the TAB key to view a list of all available commands that you can run to perform a desired action. See Figure 7-3.
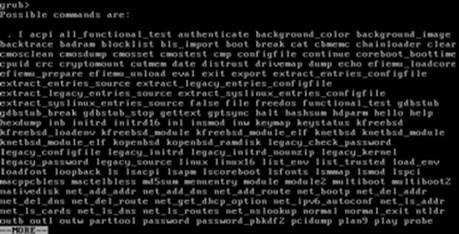
Figure 7-3 GRUB Command Prompt
The /etc/default/grub File
The /etc/default/grub configuration file defines directives that govern how GRUB behaves at boot time. Values defined in this file are used to regenerate the /boot/grub2/grub.cfg file, which controls the behavior of GRUB at boot time. Any changes made to the grub file will only take effect after the grub2-mkconfig utility has been executed.
Here are the default settings from the /etc/default/grub file, with an explanation in Table 7-1:
GRUB_TIMEOUT=5
GRUB_DISTRIBUTOR="$(sed 's, release .*$,,g' /etc/system-release)"
GRUB_DEFAULT=saved
GRUB_DISABLE_SUBMENU=true
GRUB_TERMINAL_OUTPUT="console"
GRUB_CMDLINE_LINUX="rd.lvm.lv=vg00/swap vconsole.font=latarcyrheb-sun16 crashker
nel=auto vconsole.keymap=us rd.lvm.lv=vg00/root rhgb quiet"
GRUB_DISABLE_RECOVERY="true"
|
Directive |
Description |
|
GRUB_TIMEOUT |
Sets the wait time, in seconds, before booting off the default kernel. Default value is 5. |
|
GRUB_DISTRIBUTOR |
Defines the name of the Linux distribution. |
|
GRUB_DEFAULT |
Boots the selected option from the previous system boot. |
|
GRUB_DISABLE_SUBMENU |
Enables/disables the appearance of GRUB submenu. |
|
GRUB_TERMINAL_OUTPUT |
Sets the default terminal. |
|
GRUB_CMDLINE_LINUX |
Specifies the command line options to pass to the kernel at boot time. |
|
GRUB_DISABLE_RECOVERY |
Disables showing system recovery entries in the GRUB menu. |
Table 7-1 GRUB Default Configuration File
Generally, you do not need to make any changes to this file, as the default settings are good enough for normal system operation.
The /boot/grub2/grub.cfg File
This is the main configuration file that controls the behavior of GRUB at boot time. This file is located in the /boot/grub2 directory on BIOS-based systems and in the /boot/efi/EFI/redhat directory on UEFI-based systems. This file can be regenerated manually with the grub2-mkconfig utility, or it is automatically regenerated when a new kernel is installed. During this process, any manual changes made to this file are lost.
Here is how you would run this utility to reproduce the grub.cfg file on BIOS and UEFI systems, respectively:
# grub2-mkconfig –o /boot/grub2/grub.cfg
# grub2-mkconfig –o /boot/efi/EFI/redhat/grub.cfg
When this utility runs, it uses the settings defined in the /etc/default/grub file and in the helper scripts located in the /etc/grub.d/ directory to regenerate this file for kernels located in the /boot directory. Here is the list of default helper scripts located in the /etc/grub.d/ directory:
# ll /etc/grub.d
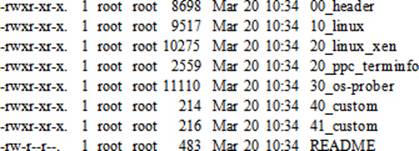
The first script, 00_header, sets the GRUB environment; the 10_linux script searches for all installed kernels on the same disk partition; the 30_os-prober searches for the presence of other operating systems; and the 40_custom and 41_custom scripts are for us to add any customization to the new GRUB configuration file. An example would be to add custom entries to the boot menu.
The grub.cfg file contains menuentry blocks for each installed kernel. Each block begins with a title and includes the names of the kernel and RAM disk image files, their location with respect to /boot, and several options and modules to be loaded. These menu entry titles are displayed at the time of system boot and you can choose one of them to boot. A sample menuentry block is shown below for the kernel 3.10.0-123.el7.x86_64 installed on server1:
menuentry 'Red Hat Enterprise Linux Server, with Linux 3.10.0-123.el7.x86_64 ' --class red --class gnu-linux --class gnu --class os --unrestricted $menuentry_id_option 'gnulinux-3.10.0-123.el7.x86_64-advanced-964201bb-1e32-4794-a2f2-7a33e2fb591a' {
load_video
set gfxpayload=keep
insmod gzio
insmod part_msdos
insmod xfs
set root='hd0,msdos1'
if [ x$feature_platform_search_hint = xy ]; then
search --no-floppy --fs-uuid --set=root --hint-bios=hd0,msdos1 --hint-efi=hd0,msdos1 --hint-baremetal=ahci0,msdos1 --hint='hd0,msdos1' e6c9c801-e77a-4ce0-ac89-eeb2d3a4774f
else
search --no-floppy --fs-uuid --set=root e6c9c801-e77a-4ce0-ac89-eeb2d3a4774f
fi
linux16 /vmlinuz-3.10.0-123.el7.x86_64 root=UUID=964201bb-1e32-4794-a2f2-7a33e2fb591a ro rd.lvm.lv=vg00/swap vconsole.font=latarcyrheb-sun16 crashkernel=auto vconsole.keymap=us rd.lvm.lv=vg00/root rhgb quiet LANG=en_US.UTF-8
initrd16 /initramfs-3.10.0-123.el7.x86_64.img
}
If a new kernel is added to the system, existing kernel entries will remain in this file and can be chosen in the GRUB menu at startup to boot.
Booting into Specific Targets
RHEL is booted into graphical target state by default. It can also be booted into other non-default, but less capable, operating targets from the GRUB menu. Additionally, in situations when it becomes mandatory to boot the system into an administrative state for carrying out a function that cannot be otherwise performed in other target states or for system recovery, RHEL offers emergency and rescue targets. These special targets can be entered by interacting with the GRUB interface, selecting a boot menu entry, pressing e to enter the edit mode, and supplying the desired target with the systemd.unit directive.
EXAM TIP: You need to know how to boot a RHEL7 system into a specific target from the GRUB menu to modify the fstab file or reset an unknown root user password.
For instance, to boot into the emergency target, append systemd.unit=emergency.target (or simply ‘emergency’) to the default linux kernel line entry, as shown below:

Press Ctrl+x after making the modification to boot the system into the supplied target. You will be required to enter the root user password to log on. Run systemctl reboot after you are done to reboot the system.

![]() The SysVinit parameters—s, S, single, 1, 2, 3, or 5—can still be supplied to the kernel to boot into one of these targets. systemd maps them to the associated runlevelX.target files.
The SysVinit parameters—s, S, single, 1, 2, 3, or 5—can still be supplied to the kernel to boot into one of these targets. systemd maps them to the associated runlevelX.target files.
Similarly, you can enter systemd.unit=rescue.target (or simply 1, s, or single) with the linux kernel line entry and press Ctrl+x to boot into the rescue target, which is also referred to as the single-user mode.
Exercise 7-1: Resetting the Root User Password
This exercise should be done on server1.
For this exercise, assume that the root user password has been lost or forgotten, and it needs to be reset.
In this exercise, you will boot the system into a special shell in order to reset the root password.
1. Reboot or reset server1, and interact with GRUB by pressing a key before the autoboot timer runs out. Highlight the default kernel entry in the GRUB menu and press e to enter the edit mode. Scroll down and you will find a boot string similar to the following:

2. Modify this kernel string and append “init=/sysroot/bin/sh” to the end of the line to look like:

3. Press Ctrl+x when done to boot to the special shell. The system mounts the root file system read-only on the /sysroot directory. Make /sysroot appear as mounted on / using the chroot command:
# chroot /sysroot
4. Remount the root file system in read/write mode with the mount command:
# mount –o remount,rw /
5. Enter a new password for root by invoking the passwd command:
# passwd
6. Create an empty, hidden file called .autorelabel at the root of the directory tree to instruct the system to perform SELinux relabeling upon next reboot:
# touch /.autorelabel
7. Exit out of the special shell:
# exit
8. Reboot the system:
# reboot
The system will perform SELinux relabeling during the first reboot, and it will reboot again to the default boot target after the relabeling is finished. This is how you can reset the password for root.
Modifying the Default Kernel to Boot
If you wish to change the default boot menuentry persistently to something other than the default, specify its number with the grub2-set-default command. For instance, the default grub.cfg file includes two menuentry blocks, with 0 representing the first kernel that boots RHEL normally and 1 identifying the second kernel that boots RHEL into the rescue target. For each additional menuentry block, a subsequent number is assigned. The default entry is set to the last successfully loaded kernel, as identified by the GRUB_DEFAULT=saved directive in the /etc/default/grub file. Let’s run the grub2-set-default command as follows and change the default to the second kernel entry:
# grub2-set-default 1
Reboot the system after the above change and you will notice that it boots into the rescue target. To reinstate, run the command again with 0 as the argument followed by a system reboot.
The Linux Kernel
RHEL7.0 comes with Linux kernel 3.10 as the default. It provides a 64-bit operating environment and provides libraries to support both 32-bit and 64-bit applications. The Linux kernel is a set of software components called modules that work together as a single entity to allow programs, services, and applications to run smoothly and efficiently on the system. Modules are device drivers that are used for controlling hardware devices, such as controller cards and peripheral devices, as well as software components, such as LVM, file systems, networking, and RAID. Some of these modules are static to the kernel and are integral to system functionality, while others are loaded dynamically as needed.
A Linux kernel that comprises both static and dynamic modules is referred to as the modular kernel. It is made up of critical and vital components, and loads dynamic modules automatically on demand, making it faster and more efficient in terms of overall performance, and less vulnerable to crashes. Another benefit of a modular kernel is that software driver updates only require the associated dynamic module to be recompiled and reloaded; it does not need an entire kernel recompile or a system reboot.
RHEL7 is available with the kernel that is designed to support diverse processor architectures, such as 64-bit Intel/AMD/PowerPC in single, multicore, and multiprocessor configurations. RHEL7 is also available for IBM System z mainframes. On the x86 system, the uname command with the –m option lists the architecture of the system. In addition to the main kernel package, RHEL7 includes additional kernel packages that are described in Table 7-2. These kernel packages may be installed if necessary.
|
Kernel Package |
Description |
|
kernel |
The main kernel package that contains the Linux kernel called vmlinuz. This package is installed as part of the OS installation. |
|
kernel-devel |
Includes support to build modules against the kernel package. |
|
kernel-tools |
Includes tools to manipulate the kernel. |
|
kernel-tools-libs |
Includes the libraries to support the kernel tools. |
|
kernel-firmware |
Includes firmware files that are required by various devices to operate. |
|
kernel-headers |
Includes C header files that specify the interface between the kernel and userspace libraries and programs. |
|
kernel-debug |
Includes debugging support. |
|
kernel-debug-devel |
Includes support to build modules against the debug kernel. |
Table 7-2 Kernel Packages
Moreover, the source code for RHEL7 is also available for those who wish to customize and recompile the code for their precise needs.
Currently, the following kernel packages are installed on server1:
# yum list installed kernel-*
|
Installed Packages |
||
|
kernel.x86_64 |
3.10.0-123.el7 |
@anaconda/7.0 |
|
kernel-devel.x86_64 |
3.10.0-123.el7 |
@ftprepo |
|
kernel-headers.x86_64 |
3.10.0-123.el7 |
@ftprepo |
|
kernel-tools.x86_64 |
3.10.0-123.el7 |
@anaconda/7.0 |
|
kernel-tools-libs.x86_64 |
3.10.0-123.el7 |
@anaconda/7.0 |
The default kernel installed during the installation is usually adequate for most system needs; however, it requires a rebuild when a new functionality is added or removed. The new functionality may be introduced by installing a new kernel, upgrading the existing one, installing a new hardware device, or changing a critical system component. Likewise, an existing functionality that is no longer required may be removed to make the kernel smaller, resulting in improved performance and reduced memory utilization.
To control the behavior of the modules, and the kernel in general, several tunable parameters are set that define a baseline for kernel functionality. Some of these parameters must be tuned to allow certain applications and database software to be installed smoothly and operate properly.
RHEL allows us to generate and store several custom kernels with varied configuration and required modules, but only one of them is active at a time. Other kernels may be loaded via GRUB.
Determining Kernel Version
To determine the version of the running kernel on the system, run the uname command:
# uname –r
3.10.0-123.el7.x86_64
The output indicates the kernel version currently in use is 3.10.0-123.el7.x86_64. An anatomy of the version information is displayed in Figure 7-4 and explained below.
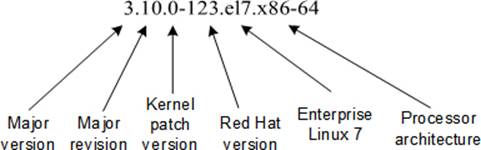
Figure 7-4 Anatomy of a Kernel Version
From left to right:
· (3) indicates the major version of the Linux kernel. The major number changes when significant alterations, enhancements, and updates to the previous major version are made.
· (10) indicates the major revision of the third major version.
· (0) indicates no patches were applied to this kernel. If we see a number n, it will represent the nth patched version of this kernel with minor bug and security hole fixes, minor enhancements, and so on.
· (123) indicates the custom kernel version from Red Hat.
· (el7) indicates the Enterprise Linux version this kernel is for.
· (x86_64) indicates the architecture for which this kernel is built.
A further analysis designates that 3.10.0 holds the general Linux kernel version information and the subsequent numbers and letters represent the Red Hat specific information.
Understanding Kernel Directory Structure
Kernel and its support files are stored at different locations in the directory hierarchy, of which three locations—/boot, /proc, and /lib/modules—are of significance and are explained below.
The /boot File System
The /boot file system is created at system installation and its purpose is to store kernel and associated files. This file system also stores any updated or modified kernel data. An ll on /boot produces the following information:
# ll /boot
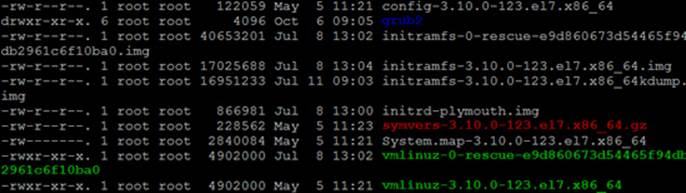
The output indicates that the current kernel is vmlinuz-3.10.0-123.el7.x86_64, its boot image is stored in the initramfs-3.10.0-123.el7.x86_64.img file, and configuration in the config-3.10.0-123.el7.x86_64 file.
A sub-directory /boot/grub2 contains GRUB information as shown below:
# ll /boot/grub2
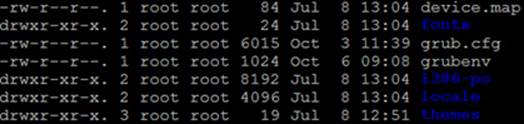
The key file in /boot/grub2 is grub.cfg, which maintains a list of available kernels and defines the default kernel to boot, along with other information.
The /proc File System
/proc is a virtual file system and its contents are created in memory at system boot and destroyed when the system goes down. Underneath this file system lie current hardware configuration and status information. A directory listing of /proc is provided below:
# ll /proc

This file system contains several files and sub-directories. Some sub-directory names are numerical and contain information about a specific process, with process ID matching the sub-directory name. Within each sub-directory, there are files and further sub-directories that include information, such as memory segment specific to that particular process. Other files and sub-directories contain configuration data for system components. If you wish to view configuration for a particular item, such as the CPU or memory, cat the contents of cpuinfo and meminfo files as shown below:
# cat /proc/cpuinfo
|
processor |
: 0 |
|
vendor_id |
: GenuineIntel |
|
cpu family |
: 6 |
|
model |
: 42 |
|
model name |
: Intel(R) Core(TM) i7-2760QM CPU @ 2.40GHz |
|
stepping |
: 7 |
|
microcode |
: 0x29 |
|
cpu MHz |
: 881.906 |
|
cache size |
: 6144 KB |
|
…… . . |
|
|
# cat /proc/meminfo |
|
|
MemTotal: |
7889040 kB |
|
MemFree: |
5550788 kB |
|
MemAvailable: |
6061284 kB |
|
…… . . |
|
The data stored under /proc is referenced by a number of system utilities, including top, ps, uname, and vmstat, to display information.
The /lib/modules Directory
This directory holds information about kernel modules. Underneath it are located sub-directories specific to the kernels installed on the system. For example, the ll output on /lib/modules below shows that there is only one kernel on this system:
# ll /lib/modules
drwxr-xr-x. 6 root root 4096 Sep 24 06:32 3.10.0-123.el7.x86_64
Now issue the ll command on the kernel sub-directory:
# ll /lib/modules/3.10.0-123.el7.x86_64

There are several files and a few sub-directories here. These files and sub-directories hold module-specific information.
One of the key sub-directories is /lib/modules/3.10.0-123.el7.x86_64/kernel/drivers, which stores modules categorized in groups in various sub-directories as shown in the listing below:
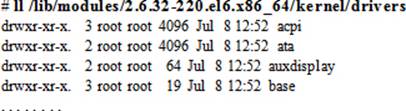
Several module categories exist, such as ata, bluetooth, cdrom, firewire, input, net, pci, scsi, usb, and video. These categories contain modules to control the hardware components associated with them.
Managing the Kernel
Managing the kernel involves performing several tasks, such as installing and updating the kernel, and listing, displaying, loading, unloading, and installing modules. It also includes the task of adding and removing modules to the initial ram disk; however, this is not usually done manually. This task is accomplished automatically when a new kernel is rebuilt. The tools that are used to install and update the kernel are the yum and rpm commands, while those for managing modules are lsmod, modinfo, modprobe, and depmod. The module management tools are part of the kmod package, and they automatically take into account any dependent modules during their execution.
Installing and Updating the Kernel
Unlike handling other package installs and upgrades, installing and updating kernel packages require extra care as you might end up leaving your system in an unbootable state. It is recommended that you have a bootable media handy prior to starting either process. With the yum command, the install and update function identically; they both add a new kernel to the system, leaving the existing kernel(s) intact. Neither of them replaces or overwrites the existing kernel files.
EXAM TIP: Always install a higher version of the kernel instead of updating the existing one. This will add the new kernel to the system without affecting the current kernel. The existing kernel must still be intact and available for boot.
An upgraded kernel is typically required when deficiencies or bugs are identified in the existing kernel, hampering the kernel’s smooth operation, or a new version of an application needs to be installed on the system that requires a different version of the kernel to operate. In either case, the new kernel addresses existing issues as well as adds bug fixes, security updates, new features, and support for additional hardware devices.
The process for installing and updating the kernel is the same. The rpm command may be used if you wish to perform these tasks manually, otherwise the yum command and the PackageKit graphical tools are available to carry out these tasks hassle-free.
![]() When using the rpm command, always install (–i) the new kernel even though you want to upgrade (–U) the existing kernel. This will ensure that you can revert to the previous kernel if needed.
When using the rpm command, always install (–i) the new kernel even though you want to upgrade (–U) the existing kernel. This will ensure that you can revert to the previous kernel if needed.
Exercise 7-2: Install a New Kernel
This exercise should be done on server1.
In this exercise, you will install the latest available kernel using the yum command with the assumption that your system is subscribed to the Red Hat Subscription Management service, and the service is accessible from your system. You will need to ensure that the existing kernel and its configuration remains intact.
1. Run the uname command and check the version of the running kernel:
# uname –r
3.10.0-123.el7.x86_64
2. Run the yum command to install the latest available kernel from the subscription management service using either the update or the install subcommand:
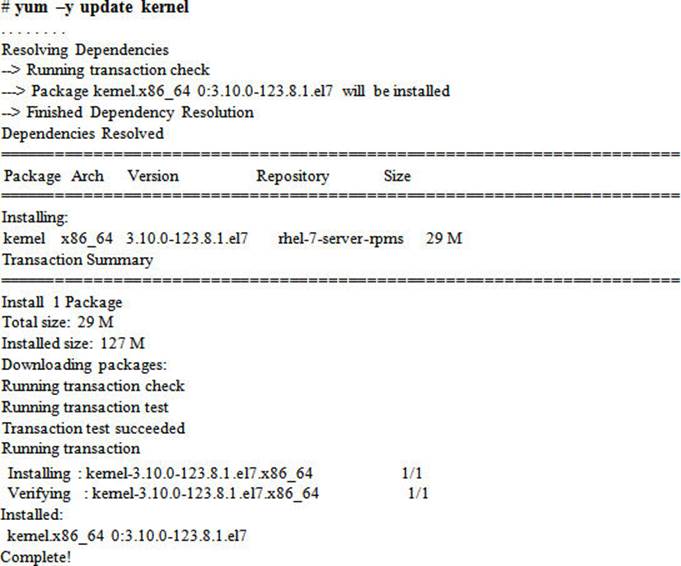
3. Confirm that the kernel package has been updated:

The output indicates that a higher kernel version 3.10.0-123.8.1.el7 has been installed. It also shows the presence of the previous kernel.
4. The /boot/grub2/grub.cfg file gets the newest kernel menuentry added to it as well:
# cat /boot/grub/grub.conf
### BEGIN /etc/grub.d/10_linux ###
menuentry 'Red Hat Enterprise Linux Server (3.10.0-123.8.1.el7.x86_64)
7.0 (Maipo)' --class red --class gnu-linux --class gnu --class os –u nrestricted $menuentry_id_option 'gnulinux-3.10.0-123.el7.x86_64-advanced-964201bb-1e32-4794-a2f2-7a33e2fb591a' {
load_video
set gfxpayload=keep
insmod gzio
insmod part_msdos
insmod xfs
set root='hd0,msdos1'
if [ x$feature_platform_search_hint = xy ]; then
search --no-floppy --fs-uuid --set=root --hint-bios=hd0,msdo
s1 --hint-efi=hd0,msdos1 --hint-baremetal=ahci0,msdos1 --hint='hd0,msdos1' e6c9c801-e77a-4ce0-ac89-eeb2d3a4774f
else
search --no-floppy --fs-uuid --set=root e6c9c801-e77a-4ce0-ac89-eeb2d3a4774f
fi
linux16 /vmlinuz-3.10.0-123.8.1.el7.x86_64 root=/dev/mapper/vg00-root ro rd.lvm.lv=vg00/swap vconsole.font=latarcyrheb-sun16 crashkernel=auto vconsole.keymap=us rd.lvm.lv=vg00/root rhgb quiet LANG=en_US.UTF-8
initrd16 /initramfs-3.10.0-123.8.1.el7.x86_64.img
}
5. Reboot the system and you will see the new kernel menu entry shows up in the GRUB boot list. The system will boot with this kernel as the install process has marked it as the default kernel.
6. Run the uname command again after the reboot to confirm the loading of the new kernel:
# uname –r
3.10.0-123.8.1.el7.x86_64
7. You can also view the contents of either of the following files to verify the new kernel:
# cat /proc/version
Linux version 3.10.0-123.8.1.el7.x86_64 (mockbuild@x86-025.build.eng.bos.redhat.com) (gcc version 4.8.2 20140120 (Red Hat 4.8.2-16) (GCC) ) #1 SMP Mon Aug 11 13:37:49 EDT 2014
# cat /proc/cmdline
BOOT_IMAGE=/vmlinuz-3.10.0-123.8.1.el7.x86_64 root=/dev/mapper/vg00-root ro rd.lvm.lv=vg00/swap vconsole.font=latarcyrheb-sun16 crashkernel=auto vconsole.keymap=us rd.lvm.lv=vg00/root rhgb quiet LANG=en_US.UTF-8
![]() For those with CentOS or Scientific Linux, can access their repositories for kernel version update. Alternatively, you can download the required kernel version from ftp.kernel.org and install it. See Chapter 06 “Configuring Server Virtualization and Network Installing RHEL7” on how to do it with the wget command.
For those with CentOS or Scientific Linux, can access their repositories for kernel version update. Alternatively, you can download the required kernel version from ftp.kernel.org and install it. See Chapter 06 “Configuring Server Virtualization and Network Installing RHEL7” on how to do it with the wget command.
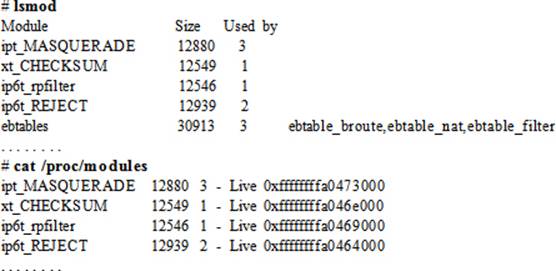
Listing Loaded Modules
RHEL provides the lsmod command to view currently loaded modules. Alternatively, you can view them by displaying the contents of the /proc/modules file. Both show module names, memory they are consuming, the number of processes using this and any dependent modules, and a list of dependent modules (if any).
Displaying Module Information
The modinfo command can be used to display details about a module. For instance, the following example shows information about a disk mirroring module called dm_mirror:
# modinfo dm_mirror
|
filename: |
/lib/modules/3.10.0-123.8.1.el7.x86_64/kernel/drivers/md/dm-mirror.ko |
|
license: |
GPL |
|
author: |
Joe Thornber |
|
description: |
device-mapper mirror target |
|
srcversion: |
80B7705018D32620F6E86B0 |
|
depends: |
dm-region-hash,dm-mod,dm-log |
|
intree: |
Y |
|
vermagic: |
3.10.0-123.8.1.el7.x86_64 SMP mod_unload modversions |
|
signer: |
Red Hat Enterprise Linux kernel signing key |
|
sig_key: |
D8:AC:C6:83:77:76:03:AC:49:21:21:97:4D:8A:77:F9:5D:F3:38:74 |
|
sig_hashalgo: |
sha256 |
|
parm: |
raid1_resync_throttle:A percentage of time allocated for raid resynchronization (uint) |
The output shows the module file name, license type, author name, a short description, dependent module names, and other information.
Loading and Unloading Modules
Execute the modprobe command to load a module dynamically into memory. This command ensures that any dependent modules are also loaded prior to the specified module. The following example loads the dm_mirror module:
# modprobe –v dm_mirror
insmod /lib/modules/3.10.0-123.8.1.el7.x86_64/kernel/drivers/md/dm-log.ko
insmod /lib/modules/3.10.0-123.8.1.el7.x86_64/kernel/drivers/md/dm-region-hash.ko
insmod /lib/modules/3.10.0-123.8.1.el7.x86_64/kernel/drivers/md/dm-mirror.ko
To unload the dm_mirror module along with all unused dependent modules, run the modprobe command with the –r option:
# modprobe –vr dm_mirror
rmmod dm_mirror
rmmod dm_region_hash
rmmod dm_log
Installing New Modules
RHEL detects hardware devices and loads appropriate modules automatically; however, there may be instances when a device is left undetected or added online (as in the case of SAN disk allocation). In such a situation, execute the depmod command to force the system to scan the hardware, find appropriate modules for the new devices, create required module dependencies, and update the /lib/modules/3.10.0-123.8.1.el7.x86_64/modules.dep file, in addition to creating and updating several corresponding map files in the /lib/modules/3.10.0-123.8.1.el7.x86_64 directory.
# depmod –v
/lib/modules/3.10.0-123.8.1.el7.x86_64/kernel/arch/x86/crypto/ablk_helper.ko needs "cryptd_alloc_ablkcipher": /lib/modules/3.10.0-123.8.1.el7.x86_64/kernel/crypto/cryptd.ko
/lib/modules/3.10.0-123.8.1.el7.x86_64/kernel/arch/x86/crypto/camellia-x86_64.ko needs "glue_cbc_encrypt_128bit": /lib/modules/3.10.0123.8.1.el7.x86_64/kernel/arch/x86/crypto/glue_helper.ko
…… . .
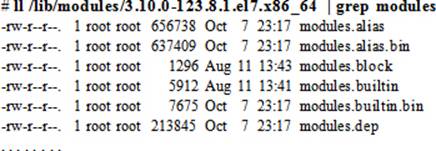
Here is a listing of the module files in the /lib/modules/3.10.0-123.8.1.el7.x86_64 directory:
init and Upstart
The init program (short for initialization) is the first process that spawns in the userland at system boot. It serves as the root process for all the processes that start on the system thereafter. It is a daemon process that is assigned PID 1. The init process debuted as a single main shell script in BSD UNIX that would call additional shell scripts one after the other in a pre-determined sequence to initialize the system. If a script had to wait for something during the execution, init had no other choice but to pause until what was required either became available to the script or the script timed out. The init process then continued to the next script in the sequence. This unexpected wait resulted in delays in the overall boot process. In order to support the system initialization, there was one configuration file listing names of enabled services and one optional script for handling miscellaneous tasks. During the initialization, the system had to start all enabled services.
init was enhanced in UNIX System V (SysVinit) with the introduction of numbered run levels. This enhanced approach modularized the entire initialization process by permitting the system to boot and run into one of several pre-configured operating states, such as system maintenance, and multi-user states with or without graphical support. Each operating state defined a set of services and numbered them to be started serially to get to that state of system operation. Though the services were numbered, it was the system administrator’s responsibility to ensure that each script was sequenced in an appropriate order of dependency to lessen the chances of service failures and delays. This dependency adjustment was a manual process. Additionally, there was still the issue of slower processing of shell scripts. In SysVinit, the inittab file was referenced to determine the default run level to boot the system to. Based on this default run level, the rc script (part of the init program) called numbered start/stop scripts corresponding to the default run level and executed them. On a running system, these same scripts were used to transition from one operating state to another by only stopping or starting the services associated with the desired target run level. Red Hat had had this boot model in their Linux distribution for roughly a decade before they switched over to a more competent system boot model in RHEL6 called Upstart.
Upstart was introduced as a replacement for the SysVinit model. It offered three major benefits over its predecessor: asynchronous service startup; automatic restart of crashed services; and event-based service start and stop triggered by a process on the system, a change in hardware, or by the start or stop of another service. This enhanced boot model was presented in RHEL6 as the default initialization scheme. Upstart, like its predecessor, also referenced the inittab file, but only to determine the default run level to boot to. Upstart used a set of configuration files located in the /etc/initdirectory and processed scripts from the /etc/rc.d directory for bringing the system up to the default run level and for state transitioning. It used the initctl command for service control. Due to some shortcomings in the Upstart design, Red Hat decided not to continue with this init system in RHEL7 and they switched to an even better solution called systemd.
Overview of systemd
systemd (short for system daemon) is another alternative for the SysVinit model. It is a system and service management mechanism that has superseded its precursors in terms of rapidity and capability. It has fast-tracked system initialization and state transitioning by introducing parallel processing of startup scripts, improved handling of service dependencies, and an on-demand activation of service daemons using sockets and D-Bus. Moreover, it supports snapshotting of system states, tracks processes using control groups, and maintains automatic mount and automount points. systemd is the default system initialization mechanism in RHEL7, replacing both SysVinit and Upstart. It is backwards compatible with SysVinit scripts as described in the Linux Standard Base (LSB) specification. systemd is the first process that starts at boot and it is the last process that terminates at shutdown.
In order to benefit from parallelism, systemd initiates distinct services concurrently, taking advantage of multiple CPU cores and other computing resources. To achieve this, systemd creates sockets for all enabled services that support socket-based activation instantaneously at the very beginning of the initialization process, and passes them to daemon processes as they attempt to start in parallel. This approach lets systemd handle inter-service order dependencies and allows services to start without any delays. With systemd, dependent daemons need not be running, they only need the correct socket to be available. systemd creates all sockets first, all the daemons next, and any client requests to daemons not yet running are cached in the socket buffer and filled when the daemons come online. During the operational state, systemd maintains the sockets and uses them to reconnect other daemons and services that were interacting with an old daemon before it was terminated or restarted. Likewise, services that use activation based on D-Bus are started when a client application attempts to communicate with them the first time. Additional methods used by systemd for activation are device-based and path-based, with the former starting services when a specific hardware type such as USB is plugged in, and the latter starting services when a particular file or directory alters its state.
With the on-demand activation, systemd defers the startup of services such as Bluetooth and printing until they are actually needed during the boot process or during runtime. Together, parallelization and on-demand activation save time and computing resources, and contribute to speeding up the boot process considerably.
![]() Socket is a communication method that allows a single process running on a system to talk to another process on the same or remote system.
Socket is a communication method that allows a single process running on a system to talk to another process on the same or remote system.
![]() D-Bus is another communication method that allows multiple services running in parallel on a system to talk to one another on the same or remote system.
D-Bus is another communication method that allows multiple services running in parallel on a system to talk to one another on the same or remote system.
Another major benefit of parallelism witnessed at system boot time is when systemd uses the autofs service to temporarily mount the file systems listed in the /etc/fstab file. During the boot process, the file systems are checked that may result in unnecessary delays. With autofs, the file systems are temporarily mounted on their normal mount points and as soon as the checks on the file systems are finished, systemd remounts them using their standard devices. Parallelism in file system mounts does not affect the root and virtual file systems.
Some service shell scripts have been converted into the C programming language, resulting in their faster startup.
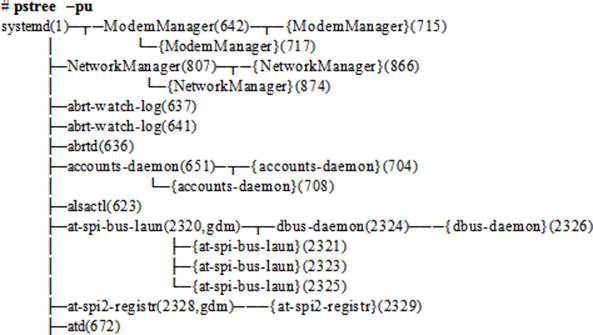
Parallelism in systemd also results in a flatter process tree, and this can be confirmed with the pstree command. With the –p and –u options, this command shows the PID and UID transitions.
Units
Units are systemd objects that are used for organizing boot and maintenance tasks, such as hardware initialization, socket creation, file system mounts, and service startups. Unit configuration is stored in their respective configuration files, which are auto-generated from other configurations, created dynamically from the system state, produced at runtime, or user-developed. Units are in one of several operational states, including active, inactive, in the process of being activated or deactivated, and failed. Units can be enabled or disabled. An enabled unit can be started to an active state; a disabled unit cannot be started.
Units have a name and a type, and they are encoded in files with names in the form unitname.type. Some examples are tmp.mount, sshd.service, syslog.socket, and umount.target. There are two types of unit configuration files: system unit files that are distributed with installed packages and located in the /usr/lib/systemd/system directory, and user unit files that are generated by users and stored in the /etc/systemd/user directory. This information can be vetted with the pkg-config command:
# pkg-config systemd --variable=systemdsystemunitdir
/usr/lib/systemd/system
# pkg-config systemd --variable=systemduserconfdir
/etc/systemd/user
Furthermore, there are additional system units that are created at runtime and destroyed when they are no longer needed. They are located in the /run/systemd/system directory. These runtime unit files take precedence over the system unit files, and the user unit files take priority over the runtime files. The unit configuration files are a direct replacement of the initialization scripts found in the /etc/rc.d/init.d directory in the older RHEL releases. systemd currently includes 12 unit types, which are described in Table 7-3.
|
Unit Type |
Description |
|
Automount |
Offers automount capabilities for on-demand mounting of file systems. |
|
Device |
Exposes kernel devices in systemd and may be used to implement device-based activation. |
|
Mount |
Controls when and how to mount or unmount file systems. |
|
Path |
Starts a service when monitored files or directories are accessed. |
|
Scope |
Manages foreign processes instead of starting them. |
|
Service |
Starts, stops, restarts, or reloads service daemons and the processes they are made up of. Handles services controlled by scripts in the /etc/rc.d/init.d directory in previous RHEL releases. |
|
Slice |
May be used to group units, which manage system processes in a hierarchical tree for resource management. |
|
Snapshot |
Saves the current state of all units dynamically. This state may be restored later to go back to that state. |
|
Socket |
Encapsulates local IPC or network sockets for use by matching service units. |
|
Swap |
Encapsulates swap partitions. |
|
Target |
Defines logical grouping of units. Equivalent to run levels in SysV. |
|
Timer |
Useful for triggering activation of other units based on timers. |
Table 7-3 systemd Unit Types
Unit files contain common and specific configuration elements. Common elements fall under the [Unit] and [Install] sections, and comprise description, documentation location, dependency information, conflict information, and other options that are independent of the type of unit. The unit specific configuration data is located under the unit type section: [Service] for the service unit type, [Socket] for the socket unit type, and so forth.
Units can have dependency relationship amongst themselves based on a sequence or a requirement. A sequence outlines one or more actions that need to be taken before or after the activation of a unit (options Before and After), and a requirement specifies what must already be running (option Requires) or not running (option Conflicts) in order for the successful launch of a unit. For instance, the graphical.target unit file tells us that the system must already be operating in the multi-user mode and must not be running in rescue mode in order for it to boot successfully into the graphical mode. Another option, Wants, may be used instead of Requires in the Unit or Install section so the unit is not forced to fail activation if a required unit fails to start.
There are a few other types of dependencies that you may see in unit configuration files. systemd generally sets and maintains inter-service dependencies automatically; however, this can be implemented manually as well.
You can use the systemctl command as follows to list all active units on the system:
# systemctl
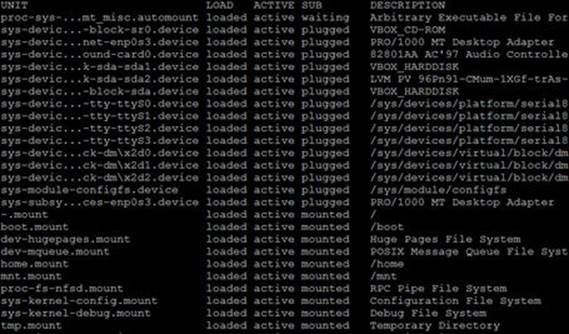
The UNIT column above shows the name of the unit and its location in the cgroup tree, LOAD reflects whether the unit configuration file was loaded properly, ACTIVE shows the high-level activation state, SUB depicts the low-level unit activation state, and DESCRIPTION illustrates the unit’s content and functionality. By default, the systemctl command lists only the active units. You can use the --all option to see inactive units also. If you want to list a specific type of unit, use the –t switch and specify a type. For instance, the following shows the list of all active and inactive units of type socket:
# systemctl –t mount --all
Targets
Targets are simply logical collections of units. They are a special systemd unit type with the .target file extension. Some targets are equivalent to SysVinit run levels; however, they are named rather than numbered. Targets are used to execute a series of units. This is typically true for booting the system to a specific operational level (similar to a numbered run level) with all the required services up and running at that level. Some targets inherit all services from other targets and add their own to them. systemd includes several pre-defined targets that are described in Table 7-4, along with the comparable run level associated with each one of them.
|
Target |
SysVinit Run Level |
Description |
|
halt |
0 |
Shuts down and halts the system. |
|
poweroff or runlevel0 |
0 |
Shuts down and powers off the system. |
|
shutdown |
0 |
Shuts down the system. |
|
rescue or runlevel1 |
1, s, or single |
Single-user target for administrative and recovery functions. All local file systems are mounted. Some essential services are started, but networking remains disabled. |
|
multi-user or runlevel2|3|4 |
3 |
Multi-user target with full network support, but without GUI. |
|
graphical or runlevel5 |
5 |
Multi-user target with full network support and GUI. |
|
reboot or runlevel6 |
6 |
Shuts down and reboots the system. |
|
default |
Typically set to 3 or 5 |
Default system boot target symlinked to either multi-user.target or graphical.target. |
|
emergency |
N/A |
Runs an emergency shell. The root file system is mounted in read-only mode; other file systems are not mounted. Networking and all other services remain disabled. |
|
hibernate |
N/A |
Puts the system into hibernation by saving the running state of the system on the hard disk and powering it off. When powered up, the system restores from its saved state rather than booting up. |
|
suspend |
N/A |
Same as hibernation except that the system running state is saved in memory and the power to the memory and supporting modules is not turned off. |
|
hybrid-sleep |
N/A |
Puts the system into hibernation and then suspend its operation. |
Table 7-4 systemd Targets
Table 7-4 indicates one-to-one correspondence between most systemd targets and the old SysVinit run levels. The default target is graphical.target, which is executed to boot the system with full networking and graphical support.
You can use the systemctl command as follows to view a list of all loaded and active targets:
# systemctl –t target
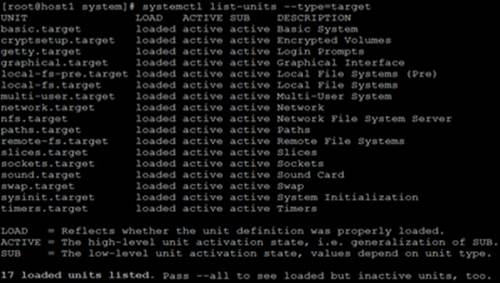
For each target unit, the above output shows the target unit’s full name, load state, high-level and low-level activation states, and a short description. Add the --all option to the above command to see all loaded targets in either an active or inactive state.
Control Groups
systemd spawns several processes during a service startup. It places the processes in a private hierarchy composed of control groups (or cgroups for short), and uses them for monitoring and controlling system resources such as processor, memory, network bandwidth, and disk I/O. This includes limiting, isolating, and prioritizing their usage of resources. This way resources can be distributed among users, databases, and applications based on their needs and priorities, resulting in overall improved system performance. The ps command below can be used to view a PID-sorted list of processes within cgroups:
# ps –eafxo pid,user,cgroup,args | sort –nk1
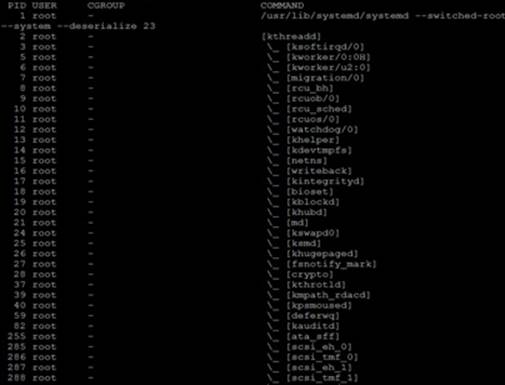
The output shows PIDs in the first column, owner name in the second column, and cgroup names and processes within them in the third and fourth columns.
Managing Units and Control Groups
systemd comes with a set of management tools for querying and controlling its operations. The primary tool in this command suite is systemctl, which supports a number of administrative functions. This command also includes the combined functionality that the chkconfig and service commands provided in RHEL6 to display service startup settings, set service start and stop at appropriate run levels, and start, stop, check the operational status of, and restart a service. Red Hat recommends avoiding the use of these two commands in RHEL7.
As we know, each systemd unit is named as unitname.type. When working with the systemctl command, we do not need to specify the unit type; the command automatically picks that information up.
This section covers general operations performed on units, specifically the service and target units, using the systemctl command. It also provides some instances of viewing cgroup contents with two new commands: systemd-cgls and systemd-cgtop.
The systemctl Command
systemctl is the primary command for interaction with systemd. It can be used to display unit information and manage it. This command is versatile and supports a variety of subcommands and flags. Table 7-5 lists and describes some common subcommands.
|
Subcommand/Option |
Description |
|
daemon-reload |
Re-reads and reloads all unit configuration files and recreates the entire user dependency tree. |
|
enable / disable |
Activates (deactivates) a unit for autostart at system boot. |
|
get-default (set-default) |
Shows (sets) the default boot target unit. |
|
get-property (set-property) |
Returns (sets) the value of a property. |
|
is-active |
Checks whether a unit is running. |
|
is-enabled |
Displays whether a unit is set to autostart at system boot. |
|
is-failed |
Checks whether a unit is in the failed state. |
|
isolate |
Changes the running state of a system (similar to changing runlevels in SysVinit). |
|
kill |
Terminates all processes for a unit. |
|
list-dependencies |
Lists dependency tree for a unit. |
|
list-sockets |
Lists socket units. |
|
list-unit-files |
Lists installed unit files. |
|
list-units |
Lists known units. This is the default subcommand when systemctl is executed without any arguments. |
|
mask / unmask |
Prohibits (permits) auto and manual activation of a unit. |
|
reload |
Forces a running unit to re-read its configuration file. This action does not change the PID of the running unit. |
|
restart |
Stops a running unit and restarts it. |
|
show |
Shows unit properties. |
|
start / stop |
Starts (stops) a unit. |
|
status |
Presents the unit status information. |
Table 7-5 systemctl Subcommands
We will use most of these options with the systemctl command in this book.
Managing Units
The systemctl command is used to view and manage all types of units. The following examples demonstrate some common operations related to viewing units and their information.
To list all known units and their status:
# systemctl

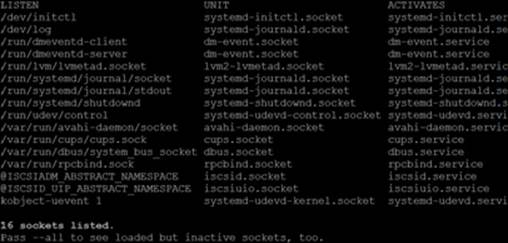
To list all units of type socket sorted by the listening address:
# systemctl list-sockets
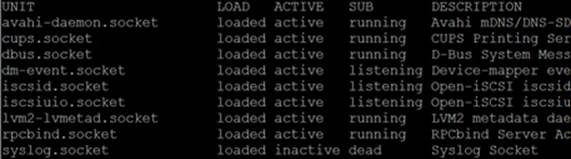
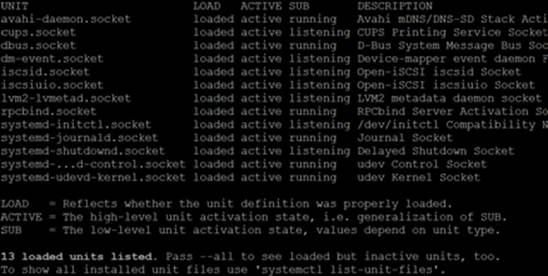
To list all socket units and their status:
# systemctl --type=socket
To list all unit files installed on the system and their state:
# systemctl list-unit-files

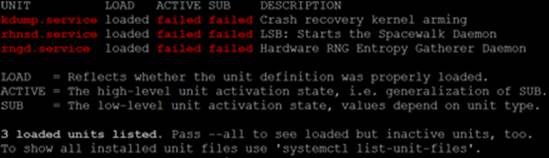
To list all units that failed to start at the last system boot:
# systemctl --failed
Managing Service Units
The following examples demonstrate the use of the systemctl command on a service unit called atd.
To check the current operational status of the atd service and its location in the cgroup subtree:
# systemctl status atd
atd.service - Job spooling tools
Loaded: loaded (/usr/lib/systemd/system/atd.service; enabled)
Active: active (running) since Fri 2014-08-08 11:48:05 EDT; 6 days ago
Main PID: 672 (atd)
CGroup: /system.slice/atd.service
└─672 /usr/sbin/atd -f
Aug 08 11:48:05 server1.example.com systemd[1]: Started Job spooling tools.
To disable the atd service from autostarting at the next system reboot:
# systemctl disable atd
rm '/etc/systemd/system/multi-user.target.wants/atd.service'
To enable the atd service to autostart at the next system reboot:
# systemctl enable atd
ln -s '/usr/lib/systemd/system/atd.service' '/etc/systemd/system/multi-user.target.wants/atd.service'
To check whether the atd service is set to autostart at the next system reboot:
# systemctl is-enabled atd
enabled
To check whether the atd service is running:
# systemctl is-active atd
active
To stop and start the atd service:
# systemctl stop atd
# systemctl start atd
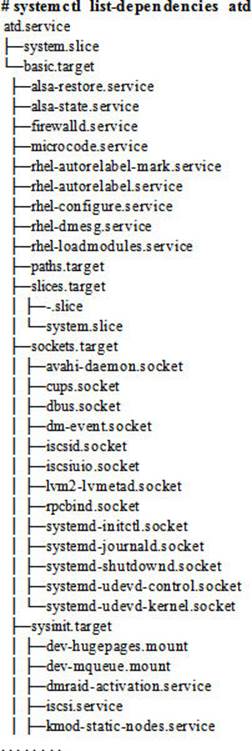
To list all dependencies for the atd service:
To show details for the atd service:
# systemctl show atd
Id=atd.service
Names=atd.service
Requires=basic.target
Wants=system.slice
WantedBy=multi-user.target
Conflicts=shutdown.target
Before=shutdown.target multi-user.target
After=syslog.target systemd-user-sessions.service systemd-journald.socket basic.
Description=Job spooling tools
LoadState=loaded
ActiveState=active
SubState=running
…… . .
Managing Target Units
The systemctl command is used to manage the target units as well. It can be used to switch from one running target into another at the command line. Examples of some common operations are provided below.
Viewing and Setting Default Boot Target
We can use the systemctl command to view and change the default boot target.
To check the current default boot target:
# systemctl get-default
graphical.target
EXAM TIP: You may have to modify the default boot target persistenly.
To change the current default boot target to multi-user.target:
# systemctl set-default multi-user.target
rm '/etc/systemd/system/default.target'
ln -s '/usr/lib/systemd/system/multi-user.target' '/etc/systemd/system/default.target'
Switching into Specific Targets
The systemctl command can be used to transition the system from one target into another. There are a number of targets available to switch the system operating state into, and these are captured in Table 7-2. The following shows a few examples of switching targets from the command prompt.
To switch into the multi-user target (equivalent to legacy run level 3):
# systemctl isolate multi-user.target
To transition into the graphical target (equivalent to legacy run level 5):
# systemctl isolate graphical.target
To shut down the system to the halt state:
# systemctl halt
To shut down the system to the poweroff state:
# systemctl poweroff
To shut down the system and then reboot it:
# systemctl reboot
To transition the system into hibernation and then suspend its activities:
# systemctl hybrid-sleep
To switch into the legacy run level 3 target:
# systemctl isolate runlevel3.target
Using the shutdown Command
The shutdown command is used to halt, power off, or reboot the system gracefully. This command broadcasts a warning message to all logged-in users, disables further user logins, waits for the specified amount of time for users to log off, and then goes ahead with stopping the services and shutting the system down to the specified target state.
The following examples show a few different ways for using this command:
|
# shutdown –r now |
(begins shutting down the system immediately, and reboots to the default target). |
|
# shutdown –h 5 |
(begins shutting down the system to the halt or power off state after a 5-minute wait). |
|
# shutdown –H 10 |
(begins shutting down the system to the halt state after a 10-minute wait). |
|
# shutdown –P 20 |
(begins shutting down the system to the power off state after a 20-minute wait). |
Using the halt, poweroff, and reboot Commands
The halt, poweroff, and reboot commands are available in RHEL7 for compatibility reasons only. It is recommended to use the systemctl command instead when switching system states.
The three commands, without any arguments, perform the same action that the shutdown command would do with the “–H now”, “–P now”, and “–r now” arguments, respectively. We may specify the –f option with any of these commands to halt, power off, or reboot the system forcefully; however, this may introduce the risk of damaging application files and file system structures and, therefore, it is not advisable to use this option from any multi-user target.
Viewing System Boot Performance Statistics
systemd provides the systemd-analyze command that can be used to obtain and analyze statistics about system boot performance. This command produces reports that show the time the last system startup took in the kernel and user space programs. A couple of examples are provided below on the usage and the kind of data the command produces.
To view the total amount of time the last boot process took in kernel, initrd, and userspace:
# systemd-analyze
Startup finished in 578ms (kernel) + 3.283s (initrd) + 38.091s (userspace) = 41.953s
To view the time spent by each task during the boot process:
# systemd-analyze blame
13.402s firewalld.service
12.118s plymouth-quit-wait.service
11.786s tuned.service
6.803s accounts-daemon.service
5.776s ModemManager.service
5.513s postfix.service
…… . .
Managing Control Groups
systemd uses control groups to organize processes for the purposes of monitoring and controlling system resources. It uses the service, scope, and slice unit types in this organization to achieve that. As we know, a service is a collection of processes that are treated as a single entity, a scope is a group of processes that are started and stopped by processes external to them, and a slice is essentially a structured assembly of service and scope units for managing processes encapsulated within them.
systemd offers the systemd-cgls and systemd-cgtop commands for the management of cgroups in addition to the systemctl command. The systemd-cgls command shows the cgroup hierarchy of actual processes and the systemd-cgtop command shows top cgroups by their CPU, memory, and disk I/O usage. The output of systemd-cgtop is refreshed every second. Some examples presented below use them.
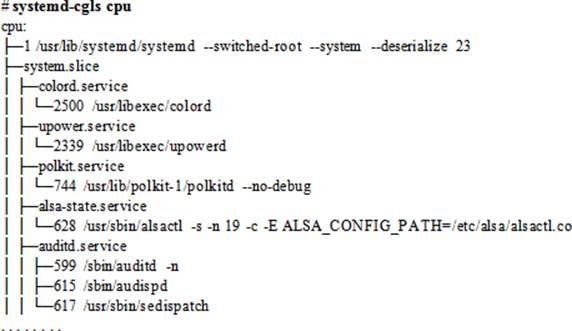
To list the cgroup hierarchy:

The highest level of cgroup tree is formed by slices (user.slice, system.slice, and so on) as depicted in the above output. These slices are shown containing service and scope units. The above output also indicates that PID 1 is located within a special slice called systemd.slice.
To limit the output to a specific resource such as CPU, issue the systemd-cgls command as follows:
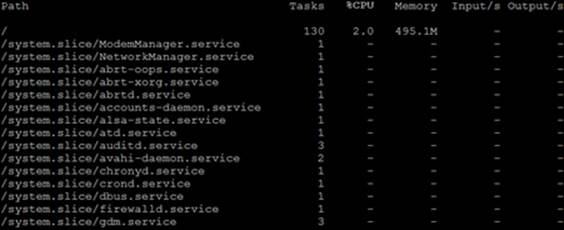
To monitor cgroup resource consumption ordered by CPU, memory, and disk I/O:
# systemd-cgtop
To view the current values of BlockIOWeight and CPUShares properties for a service such as atd, execute the systemctl command as follows:
# systemctl show –p BlockIOWeight –p CPUShares atd
CPUShares=1024
BlockIOWeight=1000
To change the property values, use the set-property subcommand with systemctl. For instance, to set the BlockIOWeight value to 200 and that of CPUShares to 256, run the command as demonstrated below:
# systemctl set-property atd BlockIOWeight=200 CPUShares=256
Run the systemctl show again to confirm the new values.
System Logging
System logging (syslog for short) is an essential and one of the most basic elements of an operating system. In RHEL, it is performed to capture messages generated by the kernel, daemons, commands, user activities, applications, and other events. These messages are forwarded to various log files, which store them for security auditing, service malfunctioning, system troubleshooting, or informational purposes.
The daemon that is responsible for system logging is called rsyslogd. This daemon is multi-threaded, with support for enhanced filtering, encryption protected message relaying, and a variety of configuration options. The rsyslogd daemon reads its configuration file /etc/rsyslog.conf and the files located in the /etc/rsyslog.d directory at startup. The default port this daemon uses is 514, which may be configured to use either UDP or TCP protocol. The default repository for most system log files is the /var/log directory, as defined in /etc/rsyslog.conf. Other services such as audit, libvirt, Samba, Apache, and GNOME desktop manager also have sub-directories under /var/log/ for storing their respective log files.
The syslog service is modular, allowing the modules listed in its configuration file to be dynamically loaded in the kernel as and when needed. Each module brings a new functionality to the system upon loading.
The rsyslogd daemon can be stopped or started manually with the systemctl command as follows:
# systemctl stop rsyslog
# systemctl start rsyslog
A PID is assigned to the daemon at startup and a file by the name syslogd.pid is created in the /var/run/ directory to store the PID. The reason for creating this file is to prevent the initiation of multiple instances of rsyslog.
The System Log Configuration File
The primary syslog configuration file is located in the /etc directory and it is called rsyslog.conf. The default uncommented line entries from the file are shown below and explained subsequently. The section headings have been added to separate the directives in each section.
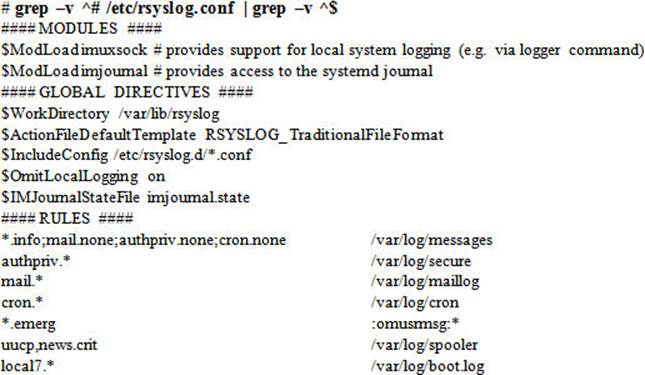
As shown above, the syslog configuration file contains three sections: Modules, Global Directives, and Rules. The Modules section includes two modules: imuxsock and imjournal. These modules are specified with the ModLoad directive and are loaded on demand. The imuxsock module provides support for local system logging via the logger command, and the imjournal module allows access to the systemd journal.
The Global Directives section contains five active directives. The definitions in this section influence the rsyslogd daemon as a whole. The first of the five directives specifies the location for the storage of auxiliary files, the second directive instructs the daemon to save captured messages in the traditional way, the third directive directs the daemon to read additional configuration files from /etc/rsyslogd.d/ and loads them, the fourth directive orders the daemon to retrieve local messages via imjournal rather than the old local log socket, and the last directive defines the file name to store the position in the journal.
Under the Rules section, each line entry consists of two fields. The left field is called selector and the right field is referred to as action. The selector field is further divided into two dot-separated sub-fields called facility (left) and priority (right), with the former representing one or more system process categories that generate messages and the latter identifying the severity associated with the messages. The semicolon is used as a distinction if multiple facility.priority groups are present. The action field determines the destination to send the messages to.
The supported facilities are auth, authpriv, cron, daemon, kern, lpr, mail, news, syslog, user, uucp, and local0 through local7, while the asterisk character represents all of them.
Similarly, the supported priorities are emerg, alert, crit, error, warning, notice, info, debug, and none. This sequence is in the descending criticality order. The asterisk character represents all of them. If a lower priority is selected, the daemon logs all messages of the service at that and higher levels. We may use the = sign to capture messages at a specific priority or the ! sign to ignore messages at a particular priority.
The first line entry under the Rules section instructs the rsyslogd daemon to catch and store informational messages from all services to the /var/log/messages file and ignore all messages generated by mail, authentication, and cron services.
The second, third, and fourth line entries command the daemon to collect and log all messages generated by authentication, mail, and cron to the secure, maillog, and cron files, respectively, located in /var/log.
The fifth line orders the daemon to display emergency messages on the terminals of all logged-in users.
The sixth line shows two comma-separated facilities that are set at the same priority. These facilities tell the daemon to gather critical messages from uucp and news facilities, and log them to the /var/log/spooler file.
And the last line entry is for logging the boot messages to the /var/log/boot.log file.
If you have made any modifications to the rsyslog.conf file, run the rsyslogd command with the –N switch and specify a numeric verbosity level to check whether the file has any errors:
# rsyslogd –N 1
rsyslogd: version 7.4.7, config validation run (level 1), master config /etc/rsyslog.conf
rsyslogd: End of config validation run. Bye.
Maintaining and Managing Log Files
In RHEL, the /var/log directory is the central location for storing the log files. An ll on this directory reveals the log files it contains along with sub-directories that may have multiple service-specific logs:

The output indicates the presence of log files for different services. Depending on the usage and the number of messages generated and captured, log files may quickly fill up the file system they are located in. Also, if a log file grows to a very large size, it becomes troublesome to load and read it.
In RHEL, a script called logrotate in the /etc/cron.daily directory invokes the logrotate command once every day to rotate log files by sourcing the /etc/logrotate.conf file and the configuration files located in the /etc/logrotate.d directory. These files may be modified to include additional tasks such as removing, compressing, and emailing identified log files.
Here is what the /etc/cron.daily/logrotate script contains:
# cat /etc/cron.daily/logrotate
#!/bin/sh
/usr/sbin/logrotate /etc/logrotate.conf
EXITVALUE=$?
if [ $EXITVALUE != 0 ]; then
/usr/bin/logger -t logrotate "ALERT exited abnormally with [$EXITVALUE]"
fi
exit 0
The following shows an excerpt from the /etc/logrotate.conf file:
# cat /etc/logrotate.conf
# rotate log files weekly
weekly
# keep 4 weeks worth of backlogs
rotate 4
# create new (empty) log files after rotating old ones
create
# use date as a suffix of the rotated file
dateext
# uncomment this if you want your log files compressed
#compress
# RPM packages drop log rotation information into this directory
include /etc/logrotate.d
# no packages own wtmp and btmp -- we'll rotate them here
/var/log/wtmp {
monthly
create 0664 root utmp
minsize 1M
rotate 1
}
/var/log/btmp {
missingok
monthly
create 0600 root utmp
rotate 1
}
# system-specific logs may be also be configured here.
The file content shows the default log rotation frequency (weekly). It indicates the period of time (4 weeks) to retain the rotated logs before deleting them. Each time a log file is rotated, a replacement file is created with the date as a suffix to its name, and the rsyslogd daemon is restarted. The script presents the option of compressing the rotated files using the gzip utility. During the script execution, the logrotate command checks for the presence of additional log configuration files in the /etc/logrotate.d directory and includes them as necessary. For the wtmp and btmp files, separate rules are in place elaborating the frequency, permissions and ownership, the number of times to be rotated, etc. The directives defined in the logrotate.conf file have a global effect on all log files.
We may define custom settings for a specific log file in logrotate.conf, or create a separate file for it in the /etc/logrotate.d directory. Any settings defined in user-defined files overrides the global settings. For instance, yum has a configuration file of its own in this directory that controls the rotation of the /var/log/yum.log file:
/var/log/yum.log {
missingok
notifempty
size 30k
yearly
create 0600 root root
}
The /etc/logrotate.d directory includes additional configuration files for other service logs as well. Some of them are listed below:
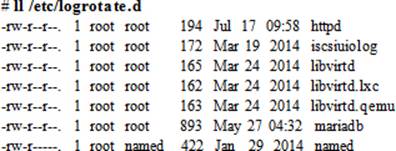
Here we see that logs for services—httpd, iscsi, libvirt, mariadb, and DNS—all have their rules in place in their own configuration files.
The Boot Log File
Logs generated during a system startup show the service startup sequence with a status stating whether the service was started successfully. This information may help in post-boot troubleshooting if required. Boot logs are stored in the boot.log file in /var/log. Here is an excerpt from this file:
# cat /var/log/boot.log
…… . .
[ OK ] Started Avahi mDNS/DNS-SD Stack.
[ OK ] Started Login Service.
[ OK ] Started GNOME Display Manager.
[ OK ] Started Modem Manager.
Starting Authorization Manager…
The System Log File
The default location for storing most system activities is the /var/log/messages file. This file saves log information in plain text and may be viewed with any file display utility, such as cat, more, pg, less, head, or tail. This file may be observed in real time using the tail command with the –f switch.The messages file captures the date and time of the activity, hostname of the system, name of the service, PID of the service, and a short description of the activity being logged.
EXAM TIP: It is a good practice to “tail” the contents of the messages file after starting or restarting a system service or during testing it to identify and address any issues encountered.
The following displays some sample entries from this file:
# tail /var/log/messages
…… . .
Oct 12 23:10:53 server1 dbus-daemon: dbus[660]: [system] Successfully activated service 'org.freedesktop.locale1'
Oct 12 23:10:53 server1 dbus[660]: [system] Successfully activated service 'org.freedesktop.locale1'
Oct 12 23:10:53 server1 systemd: Started Locale Service.
Oct 12 23:10:55 server1 systemd: Started The Apache HTTP Server.
Oct 12 23:10:55 server1 NetworkManager[834]: <info> (virbr0): carrier is OFF (but ignored)
Oct 12 23:10:55 server1 NetworkManager[834]: <info> (virbr0): new Bridge device (driver: 'bridge' ifindex: 3)
Oct 12 23:10:55 server1 NetworkManager[834]: <info> (virbr0): exported as /org/freedesktop/NetworkManager/Devices/2
Oct 12 23:10:55 server1 NetworkManager[834]: ifcfg-rh: read connection 'virbr0'
Oct 12 23:10:55 server1 NetworkManager[834]: <info> (virbr0): device state change: unmanaged -> unavailable (reason 'connection-assumed') [10 20 41]
…… . .
Understanding the Journal
In addition to syslog, RHEL7 offers a new service for viewing and managing log files. This service is implemented via the journald daemon, which is an element of systemd. The function of journald is to collect and manage log messages from both kernel and daemon processes. It also captures syslog and initial RAM disk messages, and any alerts generated during the early boot stage. It stores these messages in the binary format in files called journals that are located in the /var/run/journal directory. These files are structured and indexed for faster and easier searches, and may be viewed and managed using the journalctl command. As we know, /var/run is a virtual file system that is created automatically in memory at system boot, and its contents are destroyed when the system is shut down. Therefore the log data stored therein is non-persistent; however, we can enable persistent storage for the logs.
RHEL7 allows the concurrent execution and use of both rsyslogd and journald. In fact, the data gathered by journald may be forwarded to rsyslogd for further processing and storage in text format.
Viewing the Journal
systemd offers the journalctl command to view the journals. For instance, if we wish to read all messages generated on the system since the last reboot, run the journalctl command without any options. The following output shows only the first two entries from the journal:
# journalctl
-- Logs begin at Thu 2014-09-04 20:49:36 EDT, end at Thu 2014-09-11 15:40:01 EDT. --
Sep 04 20:49:36 server1.example.com systemd-journal[81]: Runtime journal is using 6.2M (max 49.7M, leaving 74.5M of free 490.9M, current limit 49.7M).
Sep 04 20:49:36 server1.example.com systemd-journal[81]: Runtime journal is using 6.2M (max 49.7M, leaving 74.5M of free 490.9M, current limit 49.7M).
The above output is similar in format to that of the messages logged to the /var/log/messages file. Each line begins with a timestamp followed by the hostname of the system and then the process name with its PID in square brackets, followed by the actual message.
With the –o option, we can specify the verbose option to view the output in a structured form:
# journalctl –o verbose
-- Logs begin at Fri 2014-10-10 10:03:40 EDT, end at Mon 2014-10-13 20:11:26 EDT. --
Fri 2014-10-10 10:03:40.935148 EDT [s=dcff053888a44a66bce6e8ce208e54ed;i=2079;b=df4de941517e4d15b55242d06e39591d;m=
bea148b82;t=5051204298bec;x=5cb6d3b71626ab8f]
_TRANSPORT=stdout
PRIORITY=6
SYSLOG_IDENTIFIER=gnome-session
…… . .
Run the journalctl command with the –b option to view all messages since the last system reboot:
# journalctl –b
-- Logs begin at Thu 2014-09-04 20:49:36 EDT, end at Thu 2014-09-11 15:40:01 EDT. --
Sep 04 20:49:36 server1.example.com systemd-journal[81]: Runtime journal is using 6.2M (max
Sep 04 20:49:36 server1.example.com systemd-journal[81]: Runtime journal is using 6.2M (max
Sep 04 20:49:36 server1.example.com kernel: Initializing cgroup subsys cpuset
We may specify –0, –1, –2, and so on to view messages from previous system reboots.
Run the journalctl command with the –k and –b options to view only kernel-generated messages since the last system reboot:
# journalctl –k –b –0
-- Logs begin at Thu 2014-09-04 20:49:36 EDT, end at Thu 2014-09-11 15:40:01 EDT. --
We can pass a number, such as 3, with the –n option to view that many previous entries only:
# journalctl –n 3
To show all messages generated by a specific executable, such as the crond daemon:
# journalctl /sbin/crond
To show all messages for a specific process, such as PID 1374:
# journalctl _PID=1374
-- Logs begin at Thu 2014-09-04 20:49:36 EDT, end at Thu 2014-09-11 16:20:33 ED
Sep 04 20:50:28 server1.example.com kdumpctl[1374]: No memory reserved for crash
Sep 04 20:50:28 server1.example.com kdumpctl[1374]: Starting kdump: [FAILED]
To display all messages for a specific system unit, such as sshd:
# journalctl _SYSTEM_UNIT=sshd
To view all error messages for a specific date range, such as all error messages logged on September 4 and 5:
# journalctl --since 2014-09-04 --until 2014-09-05 –p err
To get all warning messages that have appeared today:
# journalctl --since=today –p warning
We can specify a time range in hh:mm:ss format, or yesterday, today, or tomorrow instead.
To view the messages pertaining to a specific systemd unit, specify its name with the –u option:
# journalctl -u httpd –b –0
Similar to the –f option that we use with the tail command for real-time viewing of a log file, we can use the same switch with journalctl as well:
# journalctl –f
Storing Journal Information Persistently
By default, journals are stored temporarily in the /run/log/journal directory, which is a memory-based virtual file system. The contents of this file system do not survive across reboots. The journalctl command examples demonstrated in the previous sub-section read journal information from that temporary location. The rsyslogd daemon, by default, reads the temporary journals and stores the messages in the /var/log directory; however, if we enable persistent logging, journal files will be stored on disk in the /var/log/journal directory, and will be available for future reference. Here is what we need to do in order to enable persistent logging:
# mkdir –p /var/log/journal
# systemctl restart systemd-journald
# ll /var/log/journal
drwxr-sr-x. 2 root systemd-journal 49 Sep 11 20:12 e9d860673d54465f94db2961c6f10ba0
As soon as we restart the journald daemon, a directory matching the unique 128-bit machine ID created during the installation and stored in the /etc/machine-id file is created in /var/log/journal/. Here are the contents of the /etc/machine-id file, which are exactly the same as the directory we have just created:
# cat /etc/machine-id
e9d860673d54465f94db2961c6f10ba0
Chapter Summary
This chapter started with a discussion of Linux boot process. We reviewed BIOS/firmware and looked at the pre-boot administration tasks, and kernel and system startup phases. Pre-boot administration included interacting with GRUB2, booting into specific targets, and an analysis of the bootloader configuration file; kernel initialization covered viewing messages generated during the system startup; and system startup included a detailed look at the new system initialization method called systemd. We examined how to enable services and configure them to autostart.
The next major topic talked about Linux kernel, its key components, and its management. We learned about modules that form the kernel. We performed an analysis on a kernel version and looked at key directories that hold kernel-specific information. We installed a new kernel using various common tools, and used commands to manage kernel modules.
We then discussed the new system initialization scheme called systemd. We compared it with the older sysVinit and Upstart initialization schemes. We looked at the key components of systemd, its key directories, and unit configuration files. We used various tools to view and manage units, targets, and control groups.
Finally, we studied system logging and systemd journaling, which are used to capture and store system alerts. We looked at key log files and saw how to rotate log files.
Chapter Review Questions
1. Both BIOS and UEFI are used in newer computers. True or False?
2. The systemd command may be used to rebuild a new kernel. True or False?
3. By default, GRUB is stored in the master boot record. True or False?
4. What is the location of the grub.efi file in the UEFI-based systems?
5. Which file stores the location information of the boot partition on the BIOS systems?
6. Which command is used to manage system services?
7. Name the two directory paths where systemd unit files are stored.
8. What is the name for the boot log file?
9. Which two files would we want to view to obtain processor and memory information?
10. What would the command systemctl restart rsyslog do?
11. In which target does the X window and the graphical desktop interface become available?
12. Which command can we use to determine the kernel release information?
13. The lsmod command is used to rebuild modules. True or False?
14. Which command can we use to unload a module?
15. We cannot use the yum command to upgrade a Linux kernel. True or False?
16. What is the difference between the –U and the –i options with the rpm command?
17. What is the new system initialization scheme introduced in RHEL7?
Answers to Chapter Review Questions
1. True.
2. False.
3. True.
4. The grub.efi file is located in the /boot/efi/EFI/redhat directory.
5. The grub.conf file stores the location information of the boot partition.
6. The systemctl command.
7. The directory location are /etc/systemd/system and /usr/lib/systemd/system.
8. The /var/log/boot.log file.
9. The cpuinfo and meminfo files in the /proc file system.
10. The command provided will restart the rsyslog service.
11. The X window and the graphical desktop interface become available in the graphical target.
12. The uname command.
13. False.
14. The modprobe command.
15. False.
16. The –U option would instruct the rpm command to upgrade the specified package or install it if it does not already installed. The –i option, on the other hand, would instruct the command to install the package and fail if the package does not already exist.
17. It is called systemd.
DIY Challenge Labs
The following labs are useful to strengthen most of the concepts and topics learned in this chapter. It is expected that you perform these labs without any additional help. A step-by-step guide is not provided, as the implementation of these labs requires the knowledge that has been presented in this chapter. Use defaults or your own thinking for missing information.
Lab 7-1: Modify the Default Boot Target
Modify the default boot target from graphical to multi-user and reboot the system to test it. Run appropriate commands after the reboot to validate the change. Restore the default boot target back to graphical and reboot to test.
Lab 7-2: Install a New Kernel
Check the current version of the kernel on the system. Download a higher version and install it. Reboot the system and ensure it is booted with the new kernel. Configure the system to boot with the old kernel and reboot it to validate.
All materials on the site are licensed Creative Commons Attribution-Sharealike 3.0 Unported CC BY-SA 3.0 & GNU Free Documentation License (GFDL)
If you are the copyright holder of any material contained on our site and intend to remove it, please contact our site administrator for approval.
© 2016-2026 All site design rights belong to S.Y.A.