Running Linux, 5th Edition (2009)
Part IV. Network Services
Chapter 28. Heterogeneous Networking and Running Windows Programs
Linux is a remarkably effective operating system, which in many cases can completely replace MS-DOS/Windows. However, there are always those of us who want to continue to use other operating systems as well as Linux. Enterprises considering Linux as an alternative desktop to Microsoft Windows often believe they have some essential Win32 applications or tools that prevent them from changing over. CIOs often eliminate the Linux option because someone advising them failed to mention that Linux can run Win32 applications.
Linux satisfies such yearnings with internal enhancements that allow it to access foreign filesystems and act on their files. It can mount DOS/Windows partitions on the system's hard disk, or access files and printers shared by Windows servers on the network, as we explored in "Sharing Files with Windows Systems (Samba)" in Chapter 15. Linux can also run DOS and Windows applications, using compatibility utilities that allow it to invoke MS-DOS or Windows. It can also access remote systems and run programs on them, using the local keyboard, mouse, and screen for interaction.
We use the term Windows somewhat generically in this chapter to refer to any of the operating systems coming from Microsoft, or those compatible with them. Although Windows NT, Windows 2000, and Windows XP are fundamentally different from the old DOS-based systems (up to and including Windows ME), most of the tools in this chapter can accommodate them all.
One of the most common reasons for needing to run Windows is that it often has better support for new hardware products. If you have installed Windows because you need to use a piece of hardware that is supported by Windows but for which there is no Linux driver, do not despair. Although you may have to wait a while for it, most mainstream hardware devices that are supported by Windows will eventually be supported by Linux, too. For example, Linux drivers for USB devices used to be rare and flaky, but now many common USB devices work just fine on Linux. You can get updated information about which USB devices work on Linux at http://www.linux-usb.org.
You may also need to run Windows in order to use "standard" applications, such as Photoshop or Microsoft Office. In both of these cases, there are free, open source applications (namely, the GIMP, KOffice, and OpenOffice.org) that can match or even outdo their proprietary, closed-source equivalents. However, it is still sometimes necessary to run Windows to obtain access to software products that have no Linux equivalent, or for which the Linux counterpart is not fully compatible.
There are essentially four ways in which Linux and Windows can cooperate:
§ Sharing removable media such as USB keys, CDs, and floppy disks ("sneakernet")
§ Sharing a computer by being installed on separate partitions
§ Sharing data over a network
§ Running concurrently on the same computer using an emulator or virtual machine
When Windows and Linux are running on separate hardware, and the systems are not networked, a floppy disk or CD (either CD-R or CD-RW) can be written on one system and read on the other. Both Windows and Linux have the capability to read and write CDs in industry-standard, ISO 9660 format. The cdrecord program, which runs on Linux and other Unix flavors, can create CDs using Microsoft's Joliet extensions to the ISO 9660 standard, making Windows feel right at home with the disk format.
A more cost-effective approach is to install both Windows and Linux on the same computer, each in its own disk partition. At boot time, the user is given the choice of which operating system to run. "Booting the System," in Chapter 17, tells you how to configure a multiboot system. You can then mount your Windows partition directly onto the Linux filesystem and access the Windows files in a manner similar to regular Unix files.
For networked computers, the most outstanding tool for getting Linux and Windows to cooperate is Samba, an open source software suite that lets you access Unix files and printers from Windows. Linux servers running Samba can—depending on the circumstances—serve Windows computers even faster than Windows servers can! In addition, Samba has proven to be very stable and reliable.
The Samba package also includes programs that work with the smbfs filesystem supported by Linux, which allows directories shared by Windows to be mounted onto the Linux filesystem. We discuss the smbfs filesystem and Samba in enough depth to help you mount shared directories and get a basic, functional server running.
Emulators or virtual computers are forms of software that let you run Windows applications directly under Linux, or even run Windows itself. Wine is an open source project with the goal of directly supporting Windows applications without needing to install Windows. Another approach is used by the commercial VMware application, which is able to concurrently run a number of installations of Windows, Linux, FreeBSD, or some other operating systems. When running Windows under VMware, data is shared with the Linux host using the Samba tools.
Finally, remote desktop applications let users on one system log in to other systems and run applications there, or even control the remote systems.
You should be a little skeptical of some claims of compatibility. You might find, for example, that you need twice the disk storage in order to support two operating systems and their associated files and applications programs, plus file conversion and graphic-format conversion tools, and so on. You may find that hardware tuned for one OS won't be tuned for the other, or that even when you've installed and correctly configured all the necessary software, small compatibility issues remain.
Sharing Partitions
As we've explained in the section "Mounting Filesystems" in Chapter 10, partitions on local hard disks are accessed by mounting them onto a directory in the Linux filesystem. To be able to read and write to a specific filesystem, the Linux kernel needs to have support for it.
Filesystems and Mounting
Linux has filesystem drivers that can read and write files on the traditional FAT filesystem and the newer VFAT filesystem, which was introduced with Windows 95 and supports long filenames. It also can read and (with some caveats) write to the NTFS filesystem of Windows NT/2000/XP.
In "Building a New Kernel" in Chapter 18, you learned how to build your own kernel. In order to be able to access DOS (used by MS-DOS and Windows 3.x) and VFAT (used by Windows 95/98/ME) partitions, you need to enable DOS FAT fs support in the File systems section during kernel configuration. After you say yes to that option, you can choose MSDOS fs support and VFAT (Windows-95) fs support. The first lets you mount FAT partitions, and the second lets you mount FAT32 partitions.
If you want to access files on a Windows NT partition that carries an NTFS filesystem, you need another driver. Activate the option NTFS filesystem support during the kernel configuration. This lets you mount NTFS partitions by specifying the file system type ntfs. Note, however, that the current NTFS driver supports just read-only access. There is a version of this driver available that supports writing as well, but at the time of this writing, it was still under development, and not guaranteed to work reliably when writing to the NTFS partition. Read the documentation carefully before installing and using it!
While Linux is running, you can mount a Windows partition like any other type of partition. For example, if the third partition on your first IDE hard disk contains your Windows 98 installation, you can make the files in it accessible with the following command, which must be executed asroot:
# mount -t vfat /dev/hda3 /mnt/windows98
The /dev/hda3 argument specifies the disk drive corresponding to the Windows 98 disk, and the /mnt/windows98 argument can be changed to any directory you've created for the purpose of accessing the files. But how do you know that you need (in this case) /dev/hda3? If you're familiar with the naming conventions for Linux filesystems, you'll know that hda3 is the third partition on the hard disk that is the master on the primary IDE port. You'll find life easier if you write down the partitions while you are creating them with fdisk, but if you neglected to do that, you can runfdisk again to view the partition table.
The filesystem drivers support a number of options that can be specified with the -o option of the mount command. The mount(8) manual page documents the options that can be used, with sections that explain options specific to the fat and ntfs filesystem types. The section for fat applies to both the msdos and vfat filesystems, and there are two options listed there that are of special interest.
The check option determines whether the kernel should accept filenames that are not permissible on MS-DOS and what it should do with them. This applies only to creating and renaming files. You can specify three values for check. relaxed lets you do just about everything with the filename. If it doesn't fit into the 8.3 convention of MS-DOS files, the filename will be truncated accordingly. normal, the default, will also truncate the filenames as needed, and also removes special characters such as * and ? that are not allowed in MS-DOS filenames. Finally, strictforbids both long filenames and the special characters. To make Linux more restrictive with respect to filenames on the partition mounted in our example, the mount command could be used as follows:
# mount -o check=strict -t msdos /dev/sda5 /mnt/dos
This option is used with msdos filesystems only; the restrictions on filename length do not apply to vfat filesystems.
The conv option can be useful, but not as commonly as you might at first think. Windows and Unix systems have different conventions for how a line ending is marked in text files. Windows uses both a carriage return and a linefeed character, whereas Unix only uses a linefeed. Although this does not make the files completely illegible on the other system, it can still be a bother. To tell the kernel to perform the conversion between Windows and Unix text-file styles automatically, pass the mount command the option conv, which has three possible values: binary, the default, does not perform any conversion; text converts every file; and auto tries to guess whether the file in question is a text file or a binary file. auto does this by looking at the filename extension. If this extension is included in the list of "known binary extensions," it is not converted; otherwise, it will be converted.
It is not generally advisable to use text, because this will invariably damage any binary files , including graphics files and files written by word processors, spreadsheets, and other programs. Likewise, auto can be dangerous, because the extension-based detection mechanism is not very sophisticated. So we suggest you don't use the conv option unless you are sure the partition contains only text files. Stick with binary (the default) and convert your files manually on an as-needed basis. See "File Translation Utilities," later in this chapter, for directions on how to do this.
As with other filesystem types, you can mount MS-DOS and NTFS filesystems automatically at system bootup by placing an entry in your /etc/fstab file. For example, the following line in /etc/fstab mounts a Windows 98 partition onto /win:
/dev/hda1 /win vfat defaults,umask=002,uid=500,gid=500 0 0
When accessing any of the msdos, vfat, or ntfs filesystems from Linux, the system must somehow assign Unix permissions and ownerships to the files. By default, ownerships and permissions are determined using the user ID and group ID, and umasking of the calling process. This works acceptably well when using the mount command from the shell, but when run from the boot scripts, it will assign file ownerships to root, which may not be desired. In the previous example, we use the umask option to specify the file and directory creation mask the system will use when creating files and directories in the filesystem. The uid option specifies the owner (as a numeric user ID, rather than a text name), and the gid option specifies the group (as a numeric group ID). All files in the filesystem will appear on the Linux system as having this owner and group. Since dual-boot systems are generally used as workstations by a single user, you will probably want to set the uid and gid options to the user ID and group ID of that user's account.
File Translation Utilities
One of the most prominent problems when it comes to sharing files between Linux and Windows is that the two systems have different conventions for the line endings in text files. Luckily, there are a few ways to solve this problem:
§ If you access files on a mounted partition on the same machine, let the kernel convert the files automatically, as described in "Filesystems and Mounting" earlier in this chapter. Use this with care!
§ When creating or modifying files on Linux, common editors such as Emacs and vi can handle the conversion automatically for you.
§ There are a number of tools that convert files from one line-ending convention to the other. Some of these tools can also handle other conversion tasks as well.
§ Use your favorite programming language to write your own conversion utility.
If all you are interested in is converting newline characters, writing programs to perform the conversions is surprisingly simple. To convert from DOS format to Unix format, replace every occurrence of <CR><LF> (\r\f or \r\n) in the file to a newline (\n). To go the other way, convert every newline to a <CR><LF>. For example, we show you two Perl programs that do the job. The first, which we call d2u, converts from DOS format to Unix format:
#!/usr/bin/perl
while (<STDIN>) { s/\r$//; print }
And the following program (which we call u2d) converts from Unix format to DOS format:
#!/usr/bin/perl
while (<STDIN>) { s/$/\r/; print }
Both commands read the input file from the standard input, and write the output file to standard output. You can easily modify our examples to accept the input and output filenames on the command line. If you are too lazy to write the utilities yourself, you can see if your Linux installation contains the programs dos2unix and unix2dos, which work similarly to our simple d2u and u2d utilities, and also accept filenames on the command line. Another similar pair of utilities is fromdos and todos. If you cannot find any of these, then try the flip command, which is able to translate in both directions.
If you find these simple utilities underpowered, you may want to try recode, a program that can convert just about any text-file standard to any other.
The most simple way to use recode is to specify both the old and the new character sets (encodings of text-file conventions) and the file to convert. recode will overwrite the old file with the converted one; it will have the same filename. For example, to convert a text file from Windows to Unix, you would enter:
recode ibmpc:latin1 textfile
textfile is then replaced by the converted version. You can probably guess that to convert the same file back to Windows conventions, you would use:
recode latin1:ibmpc textfile
In addition to ibmpc (as used on Windows) and latin1 (as used on Unix), there are other possibilities available, such as latex for the LATEX style of encoding diacritics and texte for encoding French email messages. You can get the full list by issuing:
recode -l
If you do not like recode's habit of overwriting your old file with the new one, you can make use of the fact that recode can also read from standard input and write to standard output. To convert dostextfile to unixtextfile without deleting dostextfile, you could use:
recode ibmpc:latin1 < dostextfile > unixtextfile
With the tools just described, you can handle text files quite comfortably, but this is only the beginning. For example, pixel graphics on Windows are usually saved as bmp files. Fortunately, there are a number of tools available that can convert bmp files to graphics file formats, such as png orxpm, that are more common on Unix. Among these are the GIMP, which is probably included with your distribution.
Things are less easy when it comes to other file formats, such as those saved by office productivity programs. Although the various incarnations of the .doc file format used by Microsoft Word have become a de facto lingua franca for word processor files on Windows, it was until recently almost impossible to read those files on Linux. Fortunately, a number of software packages have appeared that can read (and sometimes even write) .doc files. Among them are the office productivity suite KOffice, the freely available OpenOffice.org, and the commercial StarOffice 6.0, a close relative to OpenOffice.org. Be aware, though, that these conversions will never be perfect; it is very likely that you will have to manually edit the files afterward. Even on Windows, conversions can never be 100% correct; if you try importing a Microsoft Word file into WordPerfect (or vice versa), you will see what we mean.
In general, the more common a file format is on Windows, the more likely it is that Linux developers will provide a means to read or even write it. Another approach might be to switch to open file formats, such as Rich Text Format (RTF) or Extensible Markup Language (XML), when creating documents on Windows. In the age of the Internet, where information is supposed to float freely, closed, undocumented file formats are an anachronism.
Emulation and Virtual Operating Systems
The next step up from using Windows files within Linux shells and applications is to make Linux act like Windows so it can run Windows applications . In this section we discuss the two most popular ways to do this: Wine (along with CrossOver Office) and VMware.
Wine
Wine can get you out of a number of high-pressure situations, whether it's your friends bugging you to play the latest Half-Life 2 mod, or finding out after you converted your entire corporation to Linux that the CEO can't function without his favorite Access database.
Wine is a free software project that lets you run your favorite Windows programs on Linux. It does this by implementing Microsoft's Win32 application programming interface (only on Intel x86 systems).
The acronym Wine expands to "Wine Is Not an Emulator." Rather than emulating a Windows system, Wine translates between the Windows program and the underlying Linux system. You can think of Wine and its libraries as a piece of middleware that sits between your application and Linux (not unlike those other APIs we mentioned). However, no one will get angry if you call it an emulator because it sort of works like one.
Wine's roots can be traced back to 1993 and the earliest days of Linux. A group of developers thought it might be interesting to get Windows programs to run on Linux. At the time, Microsoft used the Win16 API in Windows 3.1. A newer operating system, Windows NT, was under intense development and was intended to usher in a wide range of new technologies, including the Win32 API. The Wine developers underestimated the amount of work involved with getting Win16 applications to run, and the subsequent Win32 programs that arrived in the next few years added an entirely new complication. Over time it became clearer how to design the architecture to allow Windows programs to run on Linux. Much of the core design was completed by 2000, but the sheer expanse of the Win32 API meant that several more years would be required just to implement its functionality. The latest versions of Wine support advanced APIs such as DirectX, the Microsoft Installer, and COM. A running joke within the Wine community is that it's been six to twelve months from completion for over a decade. However, things have progressed rapidly in the past few years and it's likely that by the time you read this a stable version of Wine exists.
Let's be realistic about what Wine can and can't do for you. A huge number of programs have been written for Windows over the years, and there's a sweet spot where programs tend to work well with Wine.
Anything before Windows 95 tends to run into problems. There are a lot of reasons for this, but the main reason is that the Win16 and DOS parts of Wine don't get used much, so bugs remain.
Similarly, the applications written for the latest and greatest version of Windows sometimes use features not yet implemented in Wine.
Everything in between, which generally means applications written for Windows 98, 2000, and XP, has a decent shot at running. Common applications that people use Wine with include the following:
|
Microsoft Office |
|
Internet Explorer |
|
Adobe Photoshop |
|
Quicken |
You may find some aspects of your application that won't work with Wine, in which case you'll need to evaluate whether they're necessary or whether perhaps a commercially supported version of Wine (described in a later section) can fix it.
Purists may argue that Wine simply degrades Linux and free software. Practically speaking, however, it's undeniable that more software exists for Windows operating systems than for any other. It's also undeniable that a huge amount of Windows software has turned into abandonware over the years as companies have gone out of business. Wine can expand the library of software you have access to and help you solve integration problems. Wine developers would be the first to point out you should always try to use a native Linux solution. If you can't, then maybe Wine can help you.
If you're a software developer, you may be interested in Winelib, which is the Wine version of the Win32 interfaces, exported for applications to link against. Thanks to Winelib, you can take the source code of a Windows program and recompile it on Linux with Wine. There are several advantages to this, such as being able to run a program on versions of Linux other than x86. Creating a Winelib app also means your program will have access to any native Linux library. For example, if you'd like to integrate an application with a native Linux sound system, you could rewrite parts of the application to work with ALSA. Winelib apps still require Wine to facilitate the management of system activities such as Windows threading. Winelib can be found at http://www.winehq.org/site/winelib.
Wine can help you solve a wide range of integration problems, though some work may be required on your part to make it function smoothly. Don't give up on Wine if your favorite application doesn't start up the first time you try it. Study the resources we point you to here, to get a feel for what you may need to do. Spend some time with the configuration tools to alter the default settings. If that doesn't work, you may want to download the trial version of CrossOver Office to evaluate whether it will work for you.
Getting and installing Wine
Like most free software, the decision you'll need to make concerning Wine is whether to compile from source code or download a binary version. Both offer advantages, but you should weigh the decision carefully. It's recommended you download a binary version if you can. The source code does utilize standard build tools, so if you're comfortable doing a standard configure/make build, you may find it to be a reasonable option. Regardless of which option you choose, you'll want to make sure certain pieces of software have been loaded and configured on your system.
Both the Wine source code and binary packages can be found on the WineHQ web site at http://www.winehq.org/download. For some distributions, such as Debian or Ubuntu, you can find additional information for installing packages. All of the individual package selections will redirect you to a download mirror. Wine development moves rapidly, and if your system came preinstalled with it, you should strongly consider upgrading to the latest version on WineHQ.
The Wine project maintains binary packages for the most common Linux distributions, including Red Hat, Mandriva, Fedora, SUSE, Debian, and Slackware. Chances are you can find a package to work with your distribution. Each package has been built specifically for its associated Linux distribution and may even offer some integration you wouldn't ordinarily find from the source distribution. In addition, each binary package has been compiled to work specifically with the set of libraries that come with your distribution. If you're not sure you have all the software installed on your system to compile Wine, download the binary version. Use your Linux distribution's package tool, such as rpm or apt, to install Wine.
If you choose to download Wine's source code, you'll need a standard build environment. Wine utilizes libraries that are standard on almost every Linux distribution, but you'll need to make sure you have the headers available for things such as X. Building consists of running just a few common commands from within the source code directory:
$ ./configure
$ make depend
$make
Be sure to monitor the output from configure to make sure everything was found. To actually install the packages, you'll need root access. As root, run make install from within the source directory. The default installation directories are in /usr/local, such as /usr/local/bin and/usr/local/lib/wine.
If you would like to access the latest development source code of Wine, you can download it from the CVS server. Wine's CVS tree remains relatively stable from day to day, and it's uncommon to run into a build problem. But, as with any software under development, you'll need to carefully evaluate whether it's worth being on the bleeding edge. To access the CVS server, you'll need to let CVS know where the repository is, log in, and then check out the actual source code:
$ export CVSROOT=:pserver:cvs@cvs.winehq.org:/home/wine
$ cvs login
$cvs -z 0 checkout wine
For future updates, enter the newly created wine directory and simply run cvs update -PAd.
A simple example of using Wine
To get started with an application that uses Wine, let's walk through running a simple example. Afterward, we can examine the settings that get automatically configured by Wine. The defaults are sufficient for running simple programs, but you'll want to tweak them later for many applications.
To dive right in, run the Wine task manager application taskmgr . If your installation worked, you can enter:
$ wine taskmgr
Wine's task manager allows you to start, stop, and debug Wine processes.
After running taskmgr, you'll notice that a couple of things have been automatically set up in your account. Wine stores its settings in a special directory named ~/.wine and in subdirectories below that. Within ~/.wine you'll find that a system registry has been created and stored within three files named system.reg, user.reg, and userdef.reg. In addition, two important directories have been created: dosdevices and drive_c. The former contains all of the mappings necessary to configure your virtual Windows drives. The latter contains an entire virtual Windows drive with all of the directories you'd expect to find on Windows, such as c:\windows and c:\Program Files. We discuss each of these in more detail as we go on.
Warning
Never run Wine as root. Programs run with Wine have access only to parts of the underlying operating system that the user running it has. Running as root can lead to security problems and even corrupt your Linux installation. The default configuration maps a virtual Windows drive to the root of the Linux filesystem, so running a Windows application as root would give it the access possible to modify or delete any file on your system.
Configuring Wine
Wine configuration generally involves a couple of graphical tools, but you can also use a regular text editor if you prefer. At the core of Wine's configuration lies the Wine registry. Because Windows applications require a registry to store settings, Wine was forced to implement a completely compatible system. For many years Wine also maintained a separate configuration file (the venerable config file.) Having two different configuration mechanisms made no sense, so Wine abandoned its custom mechanism to move its settings directly into the registry. Now you can configure both applications and Wine with one set of tools.
Wine comes with two different tools for configuration: winecfg and regedit. The first lets you easily control common settings. The second will let you control more obscure settings as well as the settings for your applications. Both tools access the registry files stored in ~/.wine. Unlike Windows, these registry files are stored in a plain-text format. You can always fire up your favorite text editor and change the keys manually.
Run winecfg from the command line to start the program. The first thing you'll notice along the top are a series of tabs to configure applications, libraries, graphics, appearance, drives, and audio. The Applications, Libraries, and Graphics tabs are linked together to allow you to control settings for an individual program. For instance, on the Applications tab you'll notice you can change the Windows version that Wine reports to the program. The default attempts to emulate Windows 2000. You may find that a program responds differently if the Windows version is, say, Windows 98 versus Windows XP. If you happen to know the program explicitly requires Windows 2000, you can use the Add application button to locate your program's executable. Then you can change the Windows Version setting just for that program while leaving the Default Settings as they are. Likewise, all of the settings within the Libraries and Graphics tabs affect the application (or Default Settings) selected within the Applications tab.
The Libraries tab allows you to change the behavior of individual libraries. Wine can optionally use native Windows libraries if you have them available. For instance, if you have a Windows partition on your computer, you can copy the DLLs from C:\WINDOWS\SYSTEM to the corresponding directory within your virtual Windows drive.
To utilize one of those libraries, type the name of the library in the text box under "New override for library." For instance, if you copied FOO.DLL from Windows, enter foo in the text box and click on the Add button. By default, Wine tries to load the native Windows version followed by the built-in Wine version. You can change that load order to native only, built-in only, or either search combination using the Edit button. Using native Windows libraries can often work around deficiencies within Wine. But keep in mind that you can never replace the core Wine DLLskernel32, ntdll, user32, or gdi32.
Games are the most common reason for changing settings within the Graphics tab. You may find that changing the color depth will enable a game to run better. If you have the XRandR extension available within your X server (and most systems do these days), Wine will attempt to resize your screen if requested by an application. That behavior may not be desirable, though. Therefore, Wine can "Emulate a virtual desktop" of a size of your choosing. The virtual desktop will run an application within an enclosed X window.
The Appearance tab does not affect the running of applications, but just allows you to customize Wine's look. It loads Windows XP themes based on .msstyles files.
Windows programs are sandboxed within a contained filesystem environment. The settings within the Drives tab allow you to adjust how much of the underlying Linux filesystem can be seen by an application. This can prevent misbehaving Windows programs from affecting anything else on your system. Wine can modify only files that the Linux user running it can modify. By default, Wine sets up a special virtual Windows drive in ~/.wine/drive_c and installs Windows applications there. If you look at the drive mappings for your virtual C: drive, you'll see that they point to that location. If you would like to add another drive, click on the Add button and locate the Linux directory you'd like to access. For instance, if you have some removable media, you can add that mount point as a drive.
The final tab that controls audio settings is pretty self-explanatory. If you use the Autodetect button, it attempts to automatically figure out which one of Wine's audio drivers should be used. You can also set this manually using the drop-down box. If you have difficulty getting sound output, be sure to check the mixer settings within your distribution to make sure the volume on your audio device is turned up. Problems with audio are handled in Chapter 9.
In general, winecfg operates like Windows' control panels. It simply serves as a graphical interface to the underlying registry settings. And just as on Windows, you can configure these settings directly using the regedit tool. Just run regedit from the command line to open it. You'll find most of the settings we've discussed stored within the HKEY_CURRENT_USER\Software\Wine branch of the registry. For example, if you drill down through the hierachy using regedit, you'll see that the Windows version is stored directly in the key HKEY_CURRENT_USER\Software\Wine with a value of Version containing the data of the version, such as win98. regedit can also be useful for examining application settings. Usually these keys follow a naming convention like HKEY_LOCAL_MACHINE\Software\vendor\application.
The only configuration settings not stored in the registry are drives and ports. The changes made using the Drives tab are stored directly in the filesystem using a series of symbolic links. If you look in the ~/.wine/dosdevices directory, you'll see that each link points to the location within the filesystem to be accessed by the virtual drive. The default configuration will look something like this:
lrwxrwxrwx 1 wineuser wineuser 10 May 6 21:37 c: -> ../drive_c
lrwxrwxrwx 1 wineuser wineuser 1 May 6 21:37 z: -> /
Therefore, the virtual Windows drive c: points to ~/.wine/drive_c. The z: points to the root of your filesystem. Accessing ports is done in a similar manner, and you may find you need to add a symbolic link for com1 to something like /dev/ttyS0 in order to access the serial port. Of course, Wine will be able to access only the parts of your root filesystem that the user has access to.
Running Wine
To actually run applications, just invoke wine. First, locate the actual file you need to run. Most likely this means locating an installation program first. Generally the name will be something like SETUP.EXE or INSTALL.EXE. To run it, enter:
$ wine SETUP.EXE
The installation program should then execute and copy all of the files the program requires into your virtual Windows drive. It will also make any necessary registry changes. On Windows, this may mean setting up some special RunOnce registry keys that get executed when Windows reboots. The RunOnce keys will execute just that one time, but they typically perform actions necessary to set up a program for use. To simulate a reboot and execute these keys, run the wineboot command. Running that command really can't hurt anything, so you should always plan on running it after installing a program.
Once the program is installed, you need to locate the executable and run it. There's a chance Wine was able to modify your desktop's configuration and create an entry for this new program, so you may see an icon right on your desktop for the new program. You may also see menu entries in GNOME's Panel or KDE's Kicker toolbar. Wine will attempt to set up a special Wine menu containing all of the installed applications.
If that doesn't work, or if you prefer to run your application from the command line, navigate into the directory where you installed the application. Typically this will be something like ~/.wine/drive_c/Program\ Files/application. Many Windows applications like to be executed from the working directory where the application is installed. From that directory simply enter:
$ wine program.EXE
At this point, you may find you need to tweak the configuration options using winecfg to adjust the Windows version or DLL overrides for the program. If you compiled Wine from source, you'll see FIXME messages printed out informing you of unimplemented Windows functions. Often theFIXME messages can lead you to the library experiencing the problem. Replacing that library with a native one may solve your problem. Installing third-party software may help as well. Internet Explorer and the libraries it comes with can often solve Internet-related issues.
Warning
Be sure you have a validly licensed copy of any software or libraries you install.
If you have a text-based application, you can run that with Wine as well. You may want to change the graphics driver to be winetty.drv rather than winex11.drv so it can run without requiring X Windows. However, some text-based programs misbehave and attempt to use graphical features for backend processing, so you may not be able to run it without X Windows support. To execute a text-based program, run it with the wineconsole command:
$ wineconsole program.EXE
Other programs you can run through wine include Wine versions of Notepad, REGEDIT, and many other common programs provided by Windows. The Wine versions of these programs access Winelib, and all of the graphical elements you see on the screen have been drawn by Wine.
Further help
If you run into problems, check out Wine's web site at http://www.winehq.org for more information. It has extensive user documentation. The FAQ might contain the answer to your question. If not, the Wine User Guide contains more in-depth coverage of the topics discussed here as well as other tips and tricks. Finally, several helpful documents have been put together to debunk popular myths, explain in more detail how Wine works, and highlight specific features.
Wine also hosts several resources to help resolve problems. If you look in the Application Database, http://appdb.winehq.org, you may find that someone has already solved the same problem you're chasing. If you would like to report a bug, check out Wine's Bugzilla database athttp://bugs.winehq.org. You may find the mailing lists hosted on WineHQ helpful to solve problems, as well.
Lastly, a wiki has been set up to collect information from the community. If you would like to contribute, or you would like explore more documentation, you can find it at http://wiki.winehq.org.
CrossOver Office
If you're struggling with Wine, you may find that a commercial version works better. CodeWeavers' CrossOver Office, available from http://www.codeweavers.com, supports a small set of Windows applications. You can download a 30-day trial version for free to get a feel for whether it will work for you.
CodeWeavers actively tests Windows programs with its product, and its supported applications work really well. The current list includes over 30 different popular applications, including Microsoft Word, Excel, PowerPoint, Visio, Access, Quicken, iTunes, FrameMaker, and Lotus Notes. You can also use CrossOver Office to run popular web browser plug-ins, such as QuickTime, Shockwave Director, and Windows Media Player, and have them interoperate with a native Mozilla web browser. CrossOver Office provides a stable and tested version of Wine you can rely on. CodeWeavers also provides consulting services to help you run Windows programs on Linux. If you're looking for a company to provide the warm, fuzzy feeling of commercially supported Wine, CodeWeavers fits the bill.
CrossOver Office can be ordered and downloaded directly from CodeWeavers' web site. You have the option of downloading an RPM installer for Red Hat, SUSE, and other RPM-based distributions, a custom Debian installer, or a Loki-based installer. The Loki-based installer is the preferred method because it can be run entirely in user space.
After downloading the Loki-based installer, be sure to set the execute bit (chmod +x) on the installer script. Then you just need to run the following script:
$ ./install-crossover-standard-5.0.sh
The script will first unpack CrossOver Office and walk you through the installation. At the end it gives you the option to install Windows software. This launches the cxoffice/bin/cxsetup configuration tool and gives you a list of supported software you can install. This wizard-like tool will walk you through the process of installing the software and perform any additional steps necessary, such as restarting Wine to simulate a Windows reboot. You can also choose to install unsupported software. CrossOver Office runs many other applications besides the officially supported ones, and you may find your favorite Windows application works better with CrossOver Office than regular old Wine.
Regardless of whether you choose to install supported or unsupported software, you'll be prompted next for the location of the installation file. You can choose from either your vendor CD-ROM or a setup program on your hard drive. Some of the supported software will install automatically, but other software may require the installation program to run. When installation is complete, a simulated reboot of Wine is performed and menu entries are made for your desktop. Your desktop panel—KDE's Kicker or GNOME's Panel--will contain a new entry called Windows Applications that leads to the programs installed by CrossOver Office.
To configure CrossOver Office, navigate to the CrossOver menu in your desktop's panel and choose Configuration. You'll then be presented with the tab-based cxsetup dialog giving you options to Add/Remove programs or Manage Bottles. The first option allows you to manage applications, including the use of the Install button to launch the installation wizard described earlier.
The second option, Manage Bottles, allows you to customize aspects of CrossOver Office. Bottles are self-contained directories for sets of installed applications, each holding a complete Wine configuration. After selecting a bottle from the list available, you click on the Configure button to edit things such as menus, set file associations, configure plug-ins, add fonts, open control panel apps, and change bottle settings. Each tab contains a Help button in case you get stuck.
VMware Workstation
VMware (now owned by EMC) distributes proprietary products that permit the running of virtual operating systems on servers and workstations.[*] The workstation product has achieved a certain popularity by aiding people who want to run different operating systems on their computer desktop; among other things, they can run licensed versions of many different Windows operating systems on Linux. VMware Workstation also sees much use in development and testing. Many claim that it accelerates application deployment.
So what does it actually do?
VMware Workstation 5 allows multiple operating systems and applications to run at the same time on a single physical computer. If you have enough RAM, a decent hard drive, and a modern CPU, VMware performs well.
Figure 28-1 provides a look at VMware Workstation running on Novell Linux Desktop 9 with Windows XP Home Edition installed. This should give you an idea of what you can expect to see if you use this product. Notice on the top of the toolbar that an icon lets you select a full-screen mode. This option makes the screen look just like the guest operating system is running natively.
According to VMware, Workstation Version 5 runs on the following:
32-bit systems
SUSE LINUX Pro 9.2, SUSE LINUX Enterprise Server 9.0, Mandrake Linux 10, Red Hat Enterprise Linux 4.0, and Windows Server 2003 SP1 beta (experimental support).
64-bit systems
Red Hat Enterprise Linux 4.0, Red Hat Enterprise Linux 3.0, SUSE LINUX Enterprise Server 9, SUSE LINUX Enterprise Server 9 SP1, SUSE LINUX Enterprise Server 8, Windows Server 2003 SP1 (experimental support), and Windows XP (experimental support).
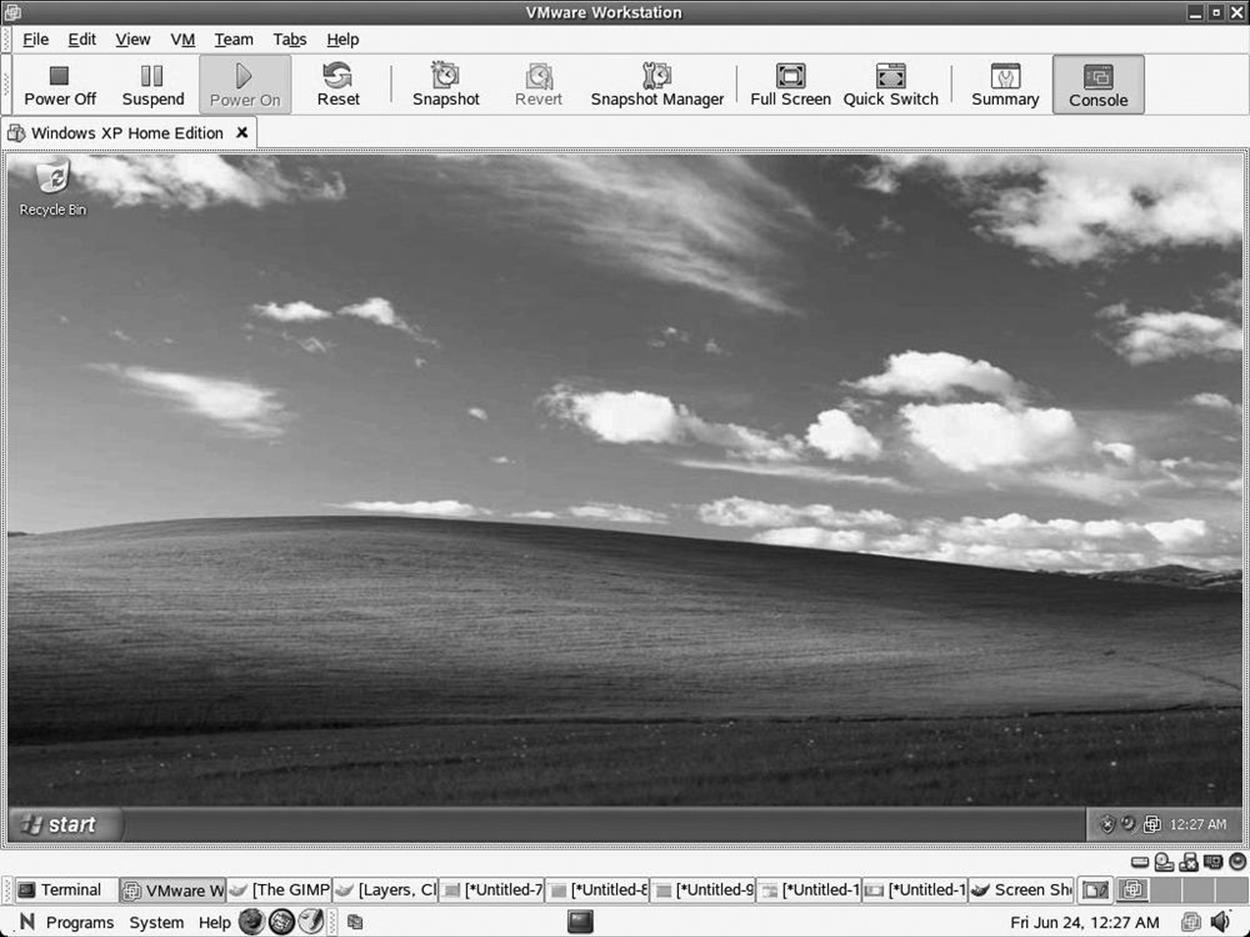
Figure 28-1. VMware Workstation 5 on Novell Linux Desktop 9
Users of Fedora Core 3, Gentoo, Red Hat, and Debian have reported that VMware 5 also runs on their systems without difficulty, although the company does not claim to support them. As shown in Figure 28-1, the author found VMware completely functional on NLD 9.
Each guest operating system runs in an isolated virtualized machine. VMware maps a host's computer hardware resources to the virtual machine's resources, so each virtual machine has its own CPU, memory, disks, and I/O devices, so to speak. At least it looks that way to the guest operating system. The virtual machine appears to the guest operating systems as a standard x86 computer.
Once VMware Workstation installs on its host, you can install and run unmodified versions of Windows, Linux, Novell NetWare, and Sun Solaris x86, as well as applications written for those platforms, on one machine. The promise of VMware is for users to derive the benefit of using multiple PCs without the expense, physical setup, and maintenance of various hardware platforms. VMware Workstation makes it easy for Linux users to run Windows applications.
VMware Workstation as a product may turn out to have a limited lifetime. It could be seen as a way to allow Linux users to run their favorite Windows applications while they move toward replacing them with versions that run natively in GNOME, KDE, and other desktop environments. It's worth remembering that the workstation product is just one product among VMware's offerings, and that the future for VMware, the company, probably lies in the server area, where it has given Linux a leg up in the data center.
Still, VMware has an important place in the history and evolution of Linux. Many people still love it and are glad it's around. Hopefully, the company will continue to innovate and make using Windows applications simpler for Linux users while it grows its server business.
Installing VMware Workstation 5
We had some difficulty installing VMware on SUSE Professional 9.2, even though the company listed it as a supported platform. The installation seems simple. One downloads VMware as either a gunzipped tarball or as an RPM. Once the package installs, simply run vmware-config.pl. But SUSE 9.2 kept giving this error message:
None of the pre-built vmmon modules for VMware Workstation is suitable
for your running kernel. Do you want this program to try to build the
vmmon module for your system (you need to have a C compiler installed
on your system)?
CC [M] /tmp/vmware-config1/vmmon-only/linux/driver.o
/bin/sh: scripts/basic/fixdep: No such file or directory
make[2]: *** [/tmp/vmware-config1/vmmon-only/linux/driver.o] Error 1
make[1]: *** [_module_/tmp/vmware-config1/vmmon-only] Error 2
make[1]: Leaving directory `/usr/src/linux-2.6.11.4-21.7'
make: *** [vmmon.ko] Error 2
make: Leaving directory `/tmp/vmware-config1/vmmon-only'
Unable to build the vmmon module.
When we decided to switch and try Novell Linux Desktop, installing it without any updates, VMware installed as well. Afterward, we updated NDL 9 and tested VMware Workstation 5; it continued to work.
We later discovered that SUSE's 9.x kernels have patches that do not come with a stock Linux kernel. Many packages relying on prebuilt modules fail. You can recompile the modules as a workaround. To recompile the modules, use:
# cd /usr/src/linux
# make cloneconfig
# make prepare
#vmware-config.pl
vmware-config.pl will then find all the necessary files as if a fresh kernel had been compiled.
You also may find some confusion on the VMware site regarding which Linux distributions can operate as "guest" systems and which operate as hosts. Think of this like inviting a guest to your home. You escort them into the living room, where you sit and talk. In VMware terms, when you install VMware, you create a living room for a guest operating system.
In this case, you are running Linux as the host system and install Microsoft Windows as a guest. If you are interested in installing other Linux distributions as guests, make sure you check with the VMware web site for supported guests (as opposed to hosts). Officially supported guest operating systems include the following:
|
Mandrake Linux 8.2, 9.0, 9.2, 10 |
|
Novell Linux Desktop 9 |
|
Red Hat Linux 7.0, 7.1, 7.2, 7.3, 8.0, 9.0 |
|
Red Hat Enterprise Linux AS/ES/WS 4.0 (32-bit) |
|
Red Hat Enterprise Linux AS/ES/WS 2.1, 3.0 |
|
Red Hat Enterprise Linux Advanced Server 2.1 |
|
SUSE Linux 7.3, 8.0, 8.1, 8.2, 9.0, 9.1, 9.2 |
|
SUSE Linux Enterprise Server 7, 7 patch 2, 8, 9, 9 SP1 |
|
Turbolinux 7.0, Enterprise Server 8, Workstation 8 |
|
Sun Java Desktop System (JDS) 2 |
The virtual hardware of VMware 5 runs better than previous versions. With a single Pentium IV or an equivalent AMD processor and 512 MB of RAM, one should be able to run two virtual machines simultaneously. The previous versions would grind to a halt in such a scenario.
VMWare Workstation 5 features
Once you get used to the novelty of seeing another familiar operating system running on your Linux system, you can start to consider the advanced capabilities of VMWare Workstation 5 that turn it into an excellent platform for system testing and group development work.
Operating system snapshots . Version 5 of VMware provides for multiple snapshots so that a user can preserve the state of a guest and revert to an older state after powering down and starting up again. You can configure a virtual machine to take a snapshot and preserve an audit trail. If you need to examine a virus, for example, you can take a snapshot before you introduce the malware. If the virus does damage, you can restore the virtual machine to the state preserved in that snapshot. The same capability can prove valuable when you're testing new code or a patch.
Previous versions of VMware allowed for the taking of snapshots. However, each snapshot would overwrite the previous one. So, for testing purposes, Version 5 provides a significant upgrade.
Virtual networks. Workstation teams allow users to set up a virtual network or lab on a host computer. You can power up multiple virtual machines, as mentioned earlier. You then can configure networking the way you would on any local area network, however, this network would run on a single computer.
Users can work together in what VMware calls a LAN segment. They are invisible to the host computer's network, which creates a virtual safe house for development.
Cloning. VMware Workstation 5 provides interesting deployment capabilities with what the company calls clones. In VMware workstation terms, two types of clones exist. One is called a full clone, which we might consider to be similar to a ghosted image used to provision another computer. The second type of clone is called a linked clone. It remains dependent on the original image.
VMware's full clone functions as an independent copy of a virtual machine. Once a user makes the clone, it runs separate from the parent. It then can go off and become a unique instance that you can use to make changes or deploy for whatever purpose you see fit.
VMware's linked clone shares virtual disks with the original or parent, conserving disk space. This permits multiple virtual machines to use the same software installation. Also, linked clones take less time to create than a full clone.
Labs might want to create linked clones to provide identical environments to developers, quality assurance engineers, testers, or maintenance programmers. If you store a linked virtual machine on your local network, other users can make a linked clone quickly. A support team can reproduce a bug in a virtual machine, and an engineer quickly can make a linked clone of that virtual machine to work on the bug.
The files on the parent of a linked clone continue to exist at the time one creates a snapshot, and continue to remain available to the linked clone. Changes to the parent don't affect the linked clone, and changes to the disk of the linked clone don't affect the parent.
Other Programs for Running MS-DOS and Windows Applications on Linux
A number of other attempts have been made by different groups of developers, both open source and commercial, to bring DOS and Windows programs to Linux. The simplest is Dosemu (http://www.dosemu.org), which emulates PC hardware well enough for MS-DOS (or compatible systems such as PC-DOS or DR-DOS) to run. It is still necessary to install DOS in the emulator, but since DOS is actually running inside the emulator, good application compatibility is assured. To a limited extent, it is even possible to run Windows 3.1.
Another open source project is Bochs (http://bochs.sf.net), which emulates PC hardware well enough for it to run Windows and other operating systems. However, because every 386 instruction is emulated in software, performance is reduced to a small percentage of what it would be if the operating system were running directly on the same hardware.
The plex86 project (http://savannah.nongnu.org/projects/plex86) takes yet another approach, and implements a virtualized environment in which Windows or other operating systems (and their applications) can run. Software running in the virtual machine runs at full speed, except for when it attempts to access the hardware. It is very much like Dosemu, except the implementation is much more robust, and not limited to running just DOS.
At the time this book was written, all of the projects discussed so far in this section were fairly immature, and significantly limited. To put it bluntly, the sayings, "Your mileage may vary" and "You get what you pay for" go a long way here.
You may have better luck with a commercial product, such as VMware (http://www.vmware.com) or Win4Lin (http://www.win4lin.com). Both of these work by implementing a virtual machine environment (in the same manner as plex86), so you will need to install a copy of Windows before you can run Windows applications. The good news is that with VMware, at least, the degree of compatibility is very high. VMware supports versions of DOS/Windows ranging from MS-DOS to .NET, including every version in between. You can even install some of the more popular Linux distributions, to run more than one copy of Linux on the same computer. To varying extents, other operating systems, including FreeBSD, NetWare, and Solaris, can also be run. Although there is some overhead involved, modern multi-gigahertz CPUs are able to yield acceptable performance levels for most common applications, such as office automation software.
Win4Lin is a more recent release than VMware. At the time of this writing, it ran Windows and applications faster than VMware, but was able to support only Windows 95/98/ME, and not Windows NT/2000/XP. As with other projects described in this section, we suggest keeping up-to-date with the product's development, and check once in a while to see if it is mature enough to meet your needs.
[*] Xen, which is free software, is another, increasingly popular virtualization tool that allows a large computer server to host multiple versions of Linux and some other operating systems.
Remote Desktop Access to Windows Programs
In this section of the chapter, we switch gears and look at Linux as a thin client for a Microsoft Windows terminal server. Under this scenario, a site's system administrator runs the applications desired by the users on a central Windows system (making sure there are enough licenses to support all the users), and the users access the application transparently through Linux systems. Performance is often better than when users run the same programs locally on Windows PCs!
If you did not know Microsoft offered Terminal Services, the material in this section may come as a pleasant surprise. These services are offered through a feature called Remote Desktop Protocol or Remote Display Protocol (RDP), which can interact with an open source project calledrdesktop . Thus, rdesktop provides the tools Linux needs to run Microsoft Windows software applications natively from NT 4.0, Windows 2000 Server, XP Pro, and Windows Server 2003.
Few people think of a Microsoft Windows server as an application host. When Microsoft released its first viable Network Operating System (NOS ) , Windows NT Version 3.51 and later 4.0, they did not have such facilities. Windows NOS servers traditionally ran back-office applications such as email, various databases, and web servers. A third-party provider, Citrix , offered Terminal Services through its WinFrame product, a multiuser technology originally used in NT 3.51 that opened up the NT kernel for multiple sessions per system.
Now Microsoft packages terminal server clients for Windows and Apple desktops. It has allowed Citrix to create terminal extensions and offer solutions to Unix and eventually Linux. But through the directions in this section, Linux can utilize rdesktop and Samba to directly access Windows terminal servers without the use of Citrix extensions.
rdesktop and TSCLient
As we stated, rdesktop lets a Linux system run Windows applications that reside on a remote Windows system. It also lets Linux participate in the remote Windows administration available with Terminal Services. That allows you the use of both operating systems simultaneously.
Matthew Chapman, a graduate student from the University of New South Wales, Australia, wrote rdesktop as an open source client for Windows NT Terminal Server, Windows 2000, Windows XP Professional, and Microsoft Server 2003 Terminal Services. You don't need a license from Microsoft to use rdesktop itself (only to use the Microsoft applications). Think of rdesktop as you would a Internet browser, or an FTP, Telnet, or SSH client.
A Case Study in Using Linux with RDP
As an example of the benefits of using Linux as a remote desktop, this author set up Microsoft Terminal Services for a workgroup needing access to Exchange Server. We utilized Windows 2003 with Outlook 2000 as the primary application. This allowed our engineers to reply to meeting requests and use the enterprise scheduling system. It also allowed a secretary to manage department personnel's calendars.
Previously, the IT department had purchased laptops for each engineer for the sole purpose of accessing Outlook for meeting management and scheduling. Each laptop cost the department approximately $4,000. Eventually, therefore, the IT department decided to reprovision the laptops to the sales department while setting up a workgroup server for the engineers.
In the new configuration, the workgroup server ran Terminal Services, licensing services, and WINS. Each Linux computer ran Samba and enabled WINS client in its Samba configuration file. The workgroup server utilized local accounts for the department personnel.
Once we could resolve NetBIOS names to IP addresses at the server and workstation level, we added local users to the Remote Desktop Users group. This allowed the Windows server to recognize the Linux hosts and vice versa. The users could then log on and use the multiuser-aware applications.
To use your Linux desktop to run Windows applications, you'll need to configure Windows Terminal Services for applications and remote administration, add the open source rdesktop and its popular frontend, TSClient, and configure them for use. Additionally, you can add another component called Virtual Network Computing (VNC) and access Windows, Macintosh OS X, and other Linux desktops remotely using a slightly different approach from Terminal Services.
Tip
You need Microsoft licenses to access and use the company's applications. Microsoft requires a Client Access License (CAL) to access a Microsoft Windows server. You also need a legitimate application product license if you plan to run standard software such as Microsoft Office.
To interoperate with Microsoft's RDP, rdesktop uses industry-standard protocols: the Internet Engineering Task Force standards discussed in RFCs 905 and 2126. Those documents implement the Telecommunication Standardization Sector ITU-T.128 application sharing protocol. Matthew released rdesktop under the GNU Public License (GPL) as free, open source software.
TSClient is the most popular and easy-to-use graphical interface to rdesktop. Most Linux distributions provide rdesktop and TSClient in their default configurations. Occasionally, you might have to specify the RDP components as options when installing Linux or download them from a repository.
Setting up Windows Terminal Services
Unless you have configured a Windows server, you may find it difficult to visualize the kinds of tasks required to enable Linux to use Win32 applications from NT Version 4 or 5. Initially, you will need a Microsoft NOS and the ability to install Terminal Services. You will also need to configure a way for the terminal server to resolve your Linux workstations to a TCP/IP address.
Figure 28-2 provides a look at how a Windows 2000 server sets up Terminal Services. Notice the large screen with the heading Windows 2000 Configure Your Server. On the left side of that window under the heading Application Server, you can see the subheading Terminal Services.
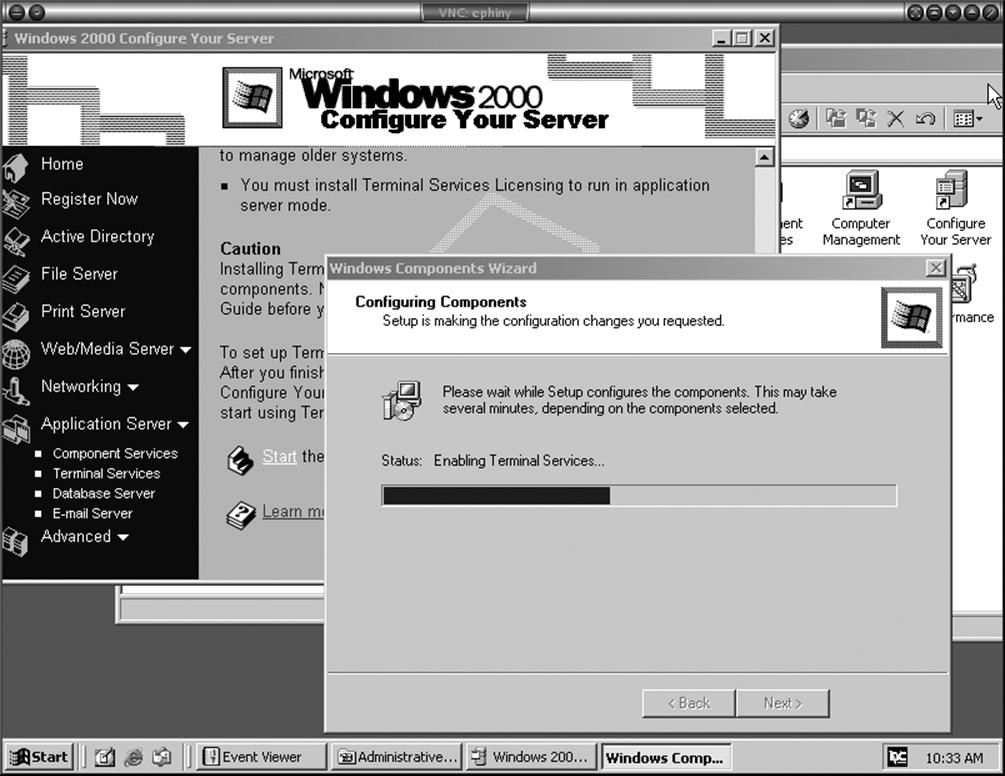
Figure 28-2. Configuring Terminal Services in Windows 2000 and Windows Server 2003
The small window in the foreground of Figure 28-2 shows the progress of installation while the operating system installs the terminal server components in the background. Prior to the release of Windows 2000 Server, you had to order a separate component to run applications from NT. Now, Terminal Services come as an integral part of the NOS.
Figure 28-3 shows the same process for Windows Server 2003. The configuration wizard still displays a dialog screen, but you see a more verbose set of instructions on the wizard screen.
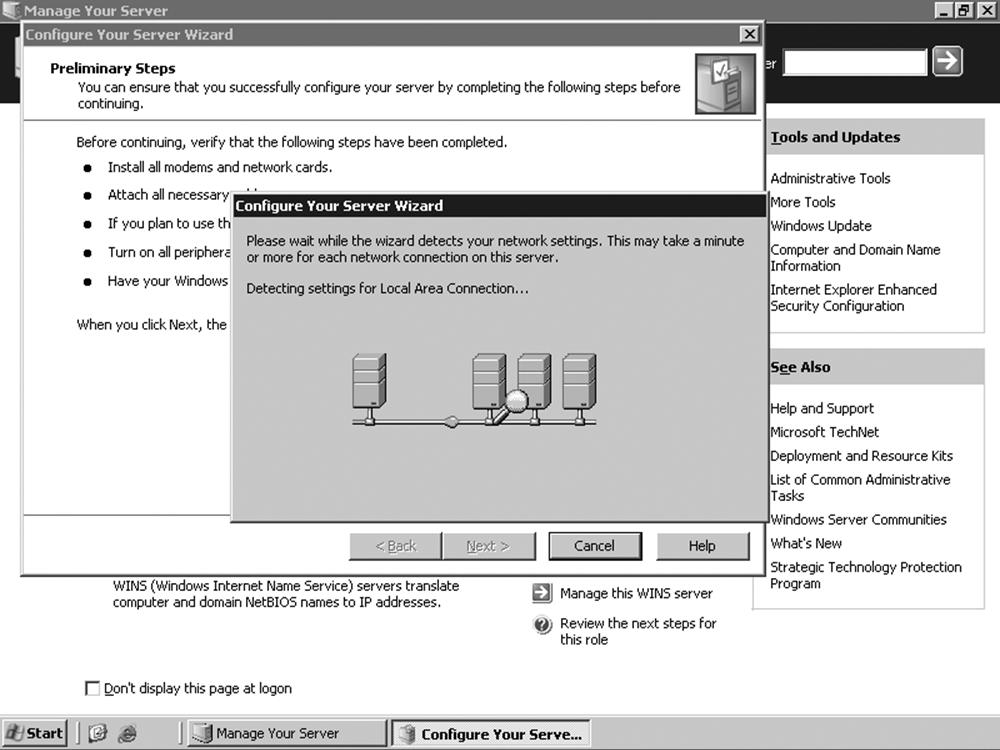
Figure 28-3. The configuration wizard in Windows Server 2003
One of the major differences in the 2003 version of the NOS deals with license management. Microsoft requires activation of Client Access Licenses for its latest server. So, in addition to installing Terminal Services, users must install a license server and activate it over the Internet or by phone.
If you have fewer than 25 users requiring Terminal Services, license services can reside on the same computer. If you have more than 100 users accessing the terminal server, you will want a second computer just to manage the Client Access Licenses.
Figure 28-4 shows how to configure a Windows 2003 server in the role of a terminal server. Select the role and double-click it. You can see, in the highlighted section of this screen, a "Yes" under the column entitled "configured."
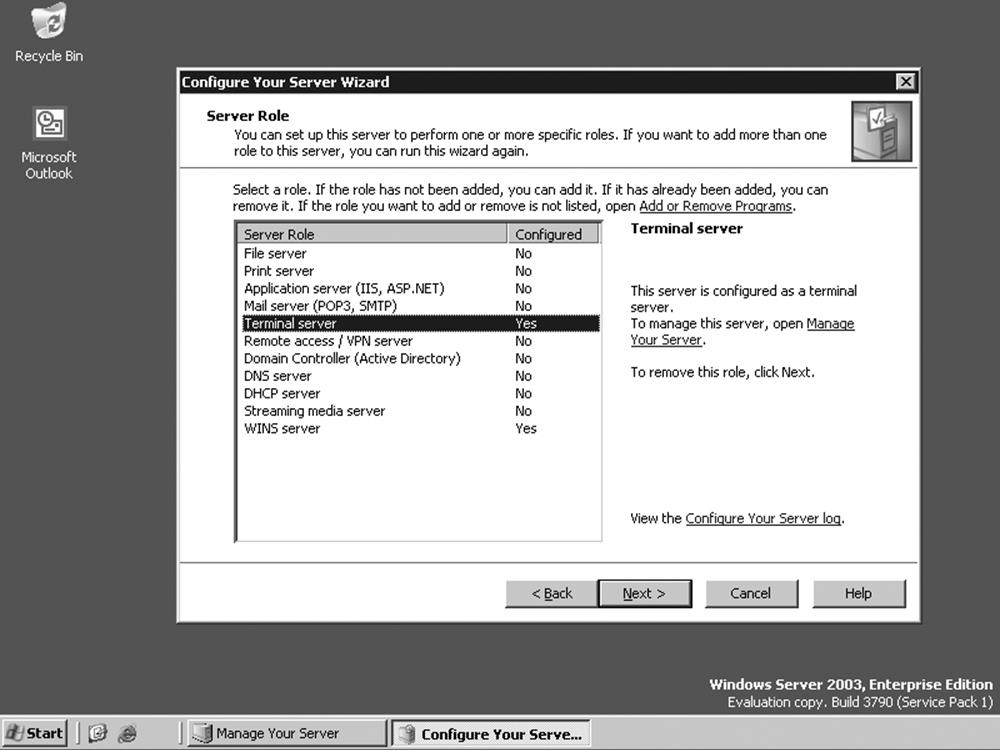
Figure 28-4. Service Options in Windows Server 2003
To summarize what we just covered, remember the following:
1. You must set up Terminal Services on Microsoft servers explicitly by adding it as a Windows component.
2. Terminal Services require Client Access Licenses, and the current Microsoft servers require you to activate the licenses with Microsoft or the server will refuse connection requests.
3. Microsoft applications running in terminal service mode require licenses for each user and require explicit activation.
Connecting to the terminal server
Before you can run a Windows application on your Linux desktop from the terminal server, you need to install and set up rdesktop. The best way to run rdesktop involves using TSClient. TSClient is simply a graphical interface to rdesktop. You can execute the rdesktop commands from a console, but the TSClient GUI makes connecting easier for some people. It also allows you to save a configuration file for one or more terminal servers to which you might connect. Figure 28-5 shows TSClient running Microsoft Outlook on a Linux desktop. TSClient provides a Terminal Services configuration dialog box similar to what you see on Windows.
Figure 28-5. Microsoft Outlook displayed by TSClient on a Linux desktop
Making Windows applications multiuser aware
The most common applications used on terminal servers are those in the Microsoft Office suite. Other applications, including custom-written ones, require modifications to run in multiuser mode. The examples here give you an idea of how you might install Microsoft Office.
When installing Office 2000 on a terminal server, you need to install the Office 2000 Resource Kit and specify a transform file, which ends with a .mst extension. Some people think of such a file as a mini-specification file. The file tells Terminal Services that the installation of the Office 2000 component is for multiuser mode.
At the beginning of the Office installation procedure, you need to specify the path to the transform file in the Office 2000 Resource Kit. For example, the setup command might look like this:
E:/Set.exe G:\Program Files\ORKTools\ToolBox\Tools\Terminal Server Tools\TERMSRVR.MST
The default Microsoft SDK transform file comes with the Resource Kit. You can also make your own transform file. Some applications, such as Internet Explorer, run from the Windows menu and do not require modifications, unless you wish to change the security settings. But if you use Microsoft Office products including Microsoft Project, Visio, or media tools, most administrators will want to restrict access to those features depending on the needs of the users. Some users don't need templates for doing drafting, so loading the drafting templates is a waste of memory, disk space, and bandwidth. Eliminating features can improve performance.
Office XP on a Terminal Services server gives you the option of using the Office XP Custom Installation Wizard to create a transform file to hold customized settings. You then install Office on the Terminal Services server by using that transform. All Office XP users who log on to the Terminal Services server receive the customized settings you defined in the transform.
On Windows Server 2003, the only version of Office 2003 that supports Terminal Services is Office 2003 Enterprise Edition. It makes installation easier than Office 2000. Setup detects the use of Terminal Services automatically. By default, Microsoft makes some features unavailable. Office 2003 users who log on to the Terminal Services server receive the settings defined by Microsoft and the administrator who installs the Office suite.
Using Windows applications from the Linux desktop
To launch TSClient from Fedora Core 3, simply select Launch → Internet → Terminal Server → Client. Once you have launched TSClient, you need to configure it for use with Windows Terminal Server in order to run applications. Figure 28-6 shows the first set of parameters required to start your client session.
Notice we use the Windows NetBIOS or host alias name of the server in the first line. Other parameters specify the RDP protocol and the Windows domain the system is in, which is known by the system administrator who set up the Windows server. Include your login name and your password on the Windows domain.
If you want to save configuration options for a session so you don't have to retype them next time, you can create a protocol file from the fields you've typed in. Use the Save As button to preserve the information for later use. In this example, we saved a file called gateway.tsc. By clicking Open, a user can load that file and it will populate the Terminal Server client with the saved settings.
Figure 28-6. Terminal Server client on a Linux desktop
Notice in Figure 28-6 that five tabs exist toward the top of the screen. Each of these tabs has parameters you can use to configure the look and feel of your session as well as the application that opens when you connect to the server. In Figure 28-7, you can see the options available in the Display tab; among its useful options are altering the size of the display and the color depth. Lowering the color depth can reduce the bandwidth you take up when using Terminal Services. In this display, we used a 16-bit color depth.
The remaining tabs provide additional options. For example, Local Resources allows you to stream sound to your terminal and specify key combinations as well as language options for your keyboard. You can also select a program to start immediately by specifying it in the next tab to the right, entitled Programs. This saves time logging
Figure 28-7. Display tab window of Terminal Server client
in to the server and selecting icons to launch a program if you use only one application, such as Microsoft Outlook.
The Performance tab allows you to enable bitmap caching, motion events, and a window manager's key bindings and its decorations. You may want to hide the window manager's decorations so that you can immediately tell that you have opened a terminal session.
Once you have pressed the Connect button on the bottom of the Terminal Server client screen, you will see a logon screen for the server. For instance, Figure 28-8 shows the log-on box for a Windows Server 2003 Enterprise Edition.
The remote application screen also appears as a Linux application on the desktop. On the task bar at the bottom of Figure 28-8, you can see that the open application named Gateway Terminal Service Client appears as the second application from the
Figure 28-8. Logging in to a Windows Terminal Server
left. Once you enter your username and password, you can log on to the remote desktop and see an application window such as the one in Figure 28-9, which shows a live calendar view of Outlook 2000 SR-1 running on a Windows desktop.
Virtual Network Connection
In this section our emphasis switches to a widely used remote technology called Virtual Network Connection (VNC ). We discuss how VNC works and its value in heterogeneous networks. We also discuss installing it on different hosts and how to use it.
More people use VNC than any other remote desktop tool; several open source VNC projects exist. Servers exist for Linux, Windows, Macintosh, and Unix operating systems. Clients exist for Linux, Windows, Macintosh, Unix, MS-DOS, Palm, and Java. Still, not all Linux users understand how valuable VNC can be.
Perhaps VNC's most powerful feature is to let you control a number of different computers from one keyboard, mouse, and monitor. In a sense, VNC can function as a virtual KVM switch.

Figure 28-9. Microsoft Office running on the Linux desktop using Terminal Server
Tip
A KVM switch is a hardware device that allows a user to control multiple computers from a single keyboard, video monitor, and mouse. KVM is an acronym for keyboard, video, mouse.
In Figure 28-10, you can see a remote session of VNC running on a Fedora Core 3 GNOME desktop. If you look closely, you can see the GNOME panels at the bottom of the screen. In this figure, we have opened a session of a popular VNC implementation called TightVNC. In the window, you will notice that we have accessed a Microsoft Windows XP desktop and opened the native Remote Desktop client application, which we could use to start a Terminal Services session. VNC displays the entire remote desktop, not just a single application.
VNC requires a client and server to create a session. In the previous example, the server runs on the remote desktop and we used the vncviewer command to start the session. It put up the small dialog box shown in Figure 28-11.
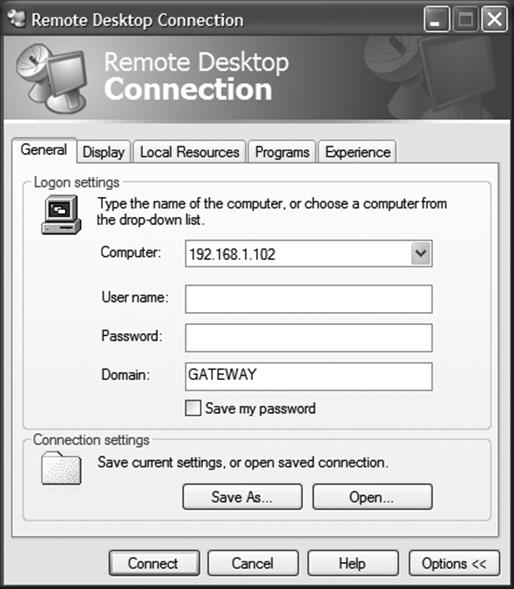
Figure 28-10. Opening a remote VNC session in GNOME on Fedora Core 3
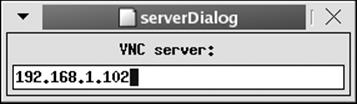
Figure 28-11. Logging on to a remote VNC desktop
Figure 28-11 shows the simplicity of starting a remote session:
§ Start vncviewer from the command line.
§ Enter the TCI/IP address of the remote server in the dialog box and press Enter.
§ At the resulting password prompt, enter your password on the remote system.
At that point, you should see a window containing the remote desktop, similar to the one in Figure 28-12.
Figure 28-12 shows some typical activity on a remote Windows XP desktop as viewed from a Fedora Core 3 GNOME desktop. Two events are taking place on the
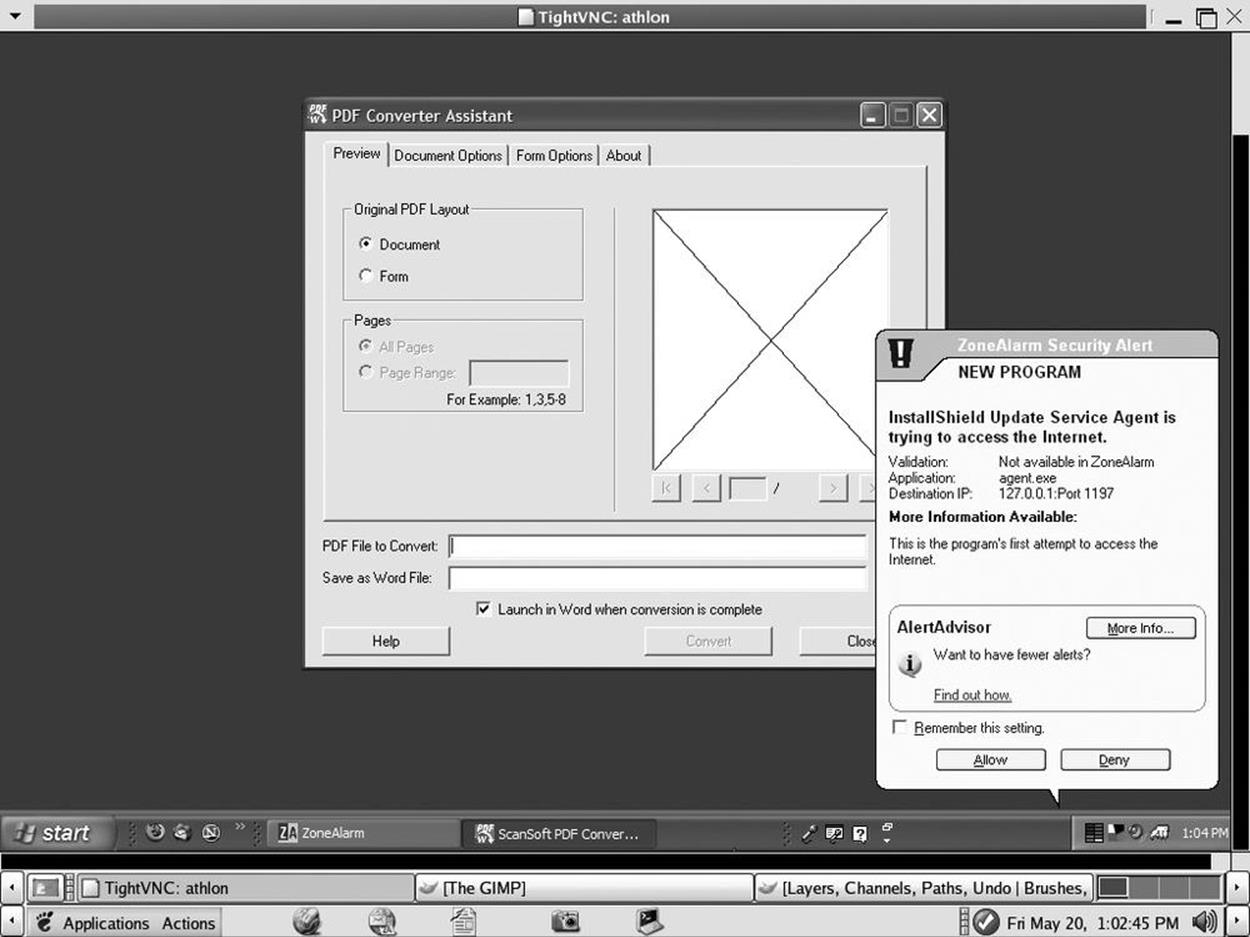
Figure 28-12. Activity on a remote desktop
remote desktop: the Linux user has started a program to convert a PFD file to a Word file, and in response, a security product called ZoneAlarm is informing the user that the application is attempting to access the Internet to check for updates.
VNC allows the user to take control of the remote computer. It is not a remote terminal session, like that provided by Windows Terminal Server, because you do not log in to a server. You do not require a Client Access License. Instead, anything you do on the VNC session will be under the auspices of the user who logged on to the remote desktop.
Let's see how this works.
VNC establishes remote access to a computer over a local area network or over the Internet using TCP/IP. VNC uses Remote Frame Buffer protocol (RFB). The RFB service grabs the screen image and sends it to the client in response to the client's requests. Once the server moves the screen image data, that data becomes compatible with any client ported to supported operating systems. The VNC client takes what the server sends and paints the image of the remote screen in a window on the client desktop. The client transmits mouse and keyboard data back to the server, giving a user control over a remote desktop.
VNC transmits screen data from the server to the client. It compresses the screen data to conform to the bandwidth and CPU power on each end of the connection. Once the client establishes the initial frames and pixels in the viewer window, the server transmits only those areas of the screen that have changed. The frame itself remains the same.
VNC creates stateless sessions. The user can disconnect from a session and then reconnect from a totally different machine to resume work where she left off. Some people use this feature to provide mobility.
Either a server or a client may initiate a VNC connection. Usually, it is the client that connects to the server for remote access operations, but in a tech-support environment it is often useful to have the server connect to a waiting client. The tech support personnel can then lead the user through the resolution of his problem as if in person, even if the two are many miles apart.
Further strengths of VNC include the following:
§ It allows a client to connect to any VNC server regardless of the operating system on each side.
§ It provides a secure, encrypted connection between client and server.
§ It's free, GPL-compliant software.
Current VNC endpoints (clients and servers) are largely based on TCP/IP, enabling them to be used on a very wide range of networks. It is entirely sensible and practical to implement VNC using some other kind of reliable, bidirectional protocol, but such systems are at present almost nonexistent.
Setting up VNC
You can obtain VNC from several sources. Most users prefer either RealVNC or TightVNC, which you can find at http://www.realvnc.com and http://www.tightvnc.com, respectively. Using either of these web sites, download and install the software on the platforms you want to use. To begin using VNC, you need to run a VNC server and then connect to it from the system running the VNC client through a viewer.
Installing the Windows server, WinVNC, should create a RealVNC group in a Windows Start menu. Then, by running the VNC server as shown in Figure 28-13, you can start the service. With the service running, you can use vncviewer to initiate a session from a remote client.
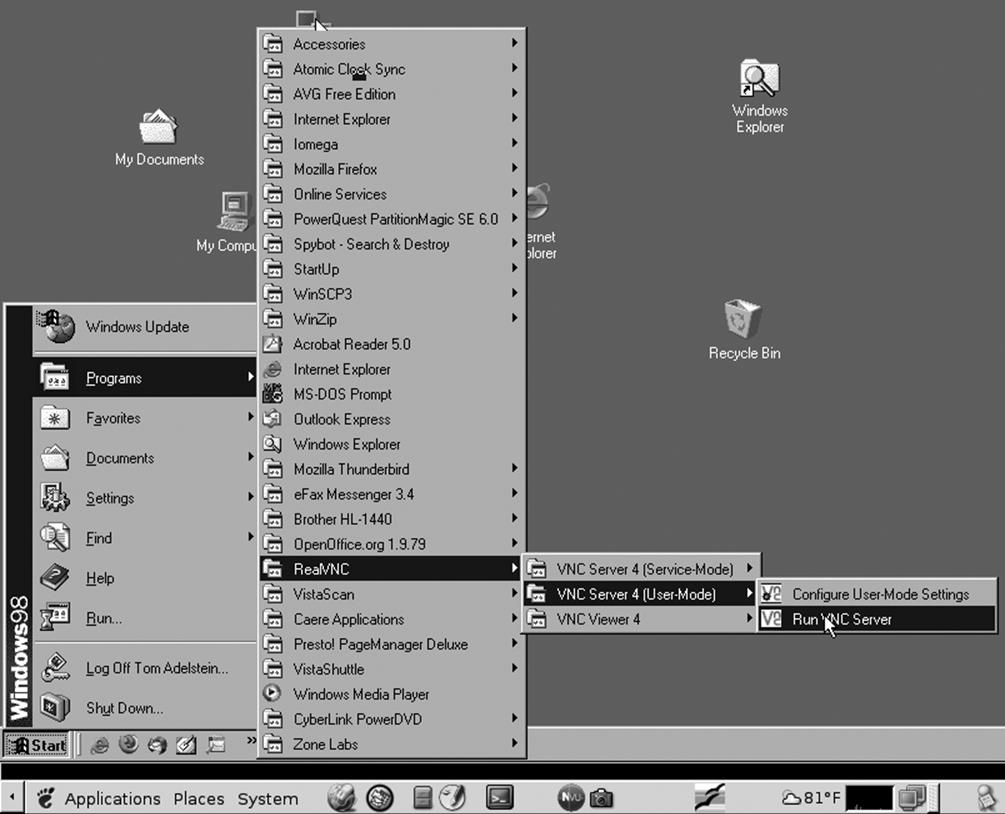
Figure 28-13. Launching WinVNC Server from the RealVNC group in the Start menu
The first time you use a VNC server on a machine, the applications prompt you to set a password. In Windows, a small icon appears in the system tray; by right-clicking on this icon, you can control most aspects of the server. Connecting to the machine from a remote location also requires the password. The initial security uses a challenge/response protocol, which is reasonably secure. From that point on, you will need to find a third-party solution to provide a secure connection between a client and server.
Tip
The RFB protocol does not travel over a normal connection in an encrypted mode. For that reason, many people use OpenSSH or some variation on it, and use VNC through an encrypted tunnel. Using VNC with OpenSSH is beyond the scope of this book. However, many articles exist on the Internet that can help you create an encrypted VNC tunnel. When looking, be sure to specify the type of operating systems you will use.
Running a Linux VNC server
With Linux applications, a VNC server appears like an X display. Applications continue running on the remote system whether or not you are connected to it. Start the VNC server on a Linux desktop with the command:
$ vncserver
You'll probably want to run it in the background because it doesn't exit until you finish your session.
The first time you run the VNC server, the system will prompt you for a system password. This is the password people will use to connect to the machine with an active VNC server. All servers on the same Linux machine will use the same password by default. If you wish to change the password at a later time, you can do so by using the command:
$ vncpasswd
Once you issue the command, you will be prompted for the current password and the one you wish to use in the future.
With a normal X system, the X display of a workstation uses its hostname and display, in a format such as hostname:0.
On Linux, you can run many VNC servers . They will appear as hostname:1, hostname:2, and so forth, as if each were an additional display. vncserver chooses the first available display number and tells you what it is. In some situations, you have pre-existing sessions that you want people to use. You can cause applications to use a pre-existing VNC server rather than the normal X display by setting the DISPLAY environment variable to the VNC server you want, or by starting the application with the -display option. For example:
$ xterm -display hostname:2 &
You can kill a Unix VNC server by using, for example:
$ vncserver -kill :2
FreeNX: Linux as a Remote Desktop Server
Imagine X server technology with compression so tight that GNOME and KDE sessions run over modems with SSH encryption with impressive response time. FreeNX is an addition to the remote desktop line with stunning performance. Thin clients use small amounts of bandwidth while handling audio and video, printing, and other heavy applications, and permit the use of session suspension instead of termination. As long as you wish to primarily use Linux, FreeNX provides real virtual KVM switches without hardware.
FreeNX differs from both Windows RDP and VNC because it makes Linux the source of the applications people use. So if you want to set up a Linux server and provide OpenOffice.org or Firefox web browsers to remote users with minimal hardware, FreeNX would work for you. Also, if you have clients such as Windows 98 or Mac OS X, you can obtain free clients from http://nomachine.com to allow those platforms to connect and run those applications from the Linux server.
Using FreeNX server on Linux creates a secure environment for remote computing. Clients can run on Linux, of course, but FreeNX can also create X client sessions on various operating systems such as Windows and Macintosh without the need to install X. Clients also exist at the time of this writing for PlayStation2, iPAQ, and Zaurus 5XXX.
System administrators like FreeNX because they can control the features and content available to their users. They can also see and operate every Linux server in their data centers with a single keyboard, video console, and mouse. They can do this without a hardwire switch or keyboard, mouse, and video cables. They can also display multiple windows on a single desktop and monitor many servers at once, which they can't do with a KVM switch beccause it is limited to one server at a time.
Gian Filippo Pinzari invented NX by taking the fat and insecure X client/server protocol and utilizing inventive compression to make it very thin. His company, NoMachine.com, released the code under the GPL license in 2003.
Let's see how to set up and use FreeNX. We use an example that utilizes two free Linux distributions, Fedora and Ubuntu. First, we install FreeNX on Ubuntu, after obtaining it from the Ubuntu backports community at http://backports.ubuntuforums.org. Follow the directions on the site and add the recommended mirrors to your /etc/apt/sources.list file. Then run apt-get install FreeNX to add FreeNX to your server.
Once installed, add a user, as shown in Figure 28-14.
Following the setup, if you log out and log back in, you will see FreeNX added to the Applications menu under Internet. See Figure 28-15.
Next, obtain and install the RPMs for Fedora from http://fedoranews.org/contributors/rick_stout/freenx. Be sure to install both the client and the server. Again, add yourself as a user.
Client configuration involves running a wizard. As the wizard says, "The most important part of the initial connection is the key file. This file, client.id_dsa.key, must be copied from the server to your client machine." Following these directions, I executed the following commands:
bash-3.00# scp /var/lib/nxserver/home/.ssh/client.id_dsa.key
username@192.168.1.109:~/
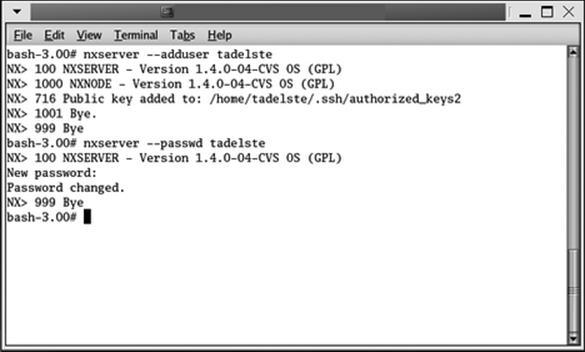
Figure 28-14. Adding users to the FreeNX server
Figure 28-15. FreeNX on the menu
The authenticity of host '192.168.1.109 (192.168.1.109)' can't be
established.
RSA key fingerprint is 40:54:e3:c9:5e:81:39:2d:ac:70:b9:bf:44:a9:ec:a8.
Are you sure you want to continue connecting (yes/no)? yes
Warning: Permanently added '192.168.1.109' (RSA) to the list of known
hosts.
Password: password entered here
client.id_dsa.key 100% 672 0.7KB/s
00:00
bash-3.00#
Once you accomplish these tasks, you should be able to use the FreeNX server to connect as a remote client and see a complete Linux session. If you run into any problems, many support sites exist on the Internet to assist you. You can also find answers on the FreeNX mailing lists or in its archives at http://developer.berlios.de/projects/freenx.
FreeNX opens sessions quickly. You will also notice that FreeNX can suspend sessions rather than close them. When you resume a suspended session, the client revalidates but still resumes midsession, at the point where you left off. Although this is not a stateless session in the purest terms, it does save bandwidth; see Figures 28-16 and 28-17.
Figure 28-16. Resuming a session from Fedora to Ubuntu
FreeNX has many advantages for Linux uers. It provides an excellent and free thin client environment. It's fast, and it uses a proven encryption methodology (OpenSSH) that has made it through major FIPS 140 criteria tests in source code form. FreeNX also is available for most commercial Linux distributions. Free distributions of Linux such as the Fedora Project and Ubuntu have extensive community support.
Figure 28-17. Running a FreeNX session on Ubuntu with the server on Fedora Core 3
Finally, FreeNX can use a Linux server as a proxy to VNC and RDP servers. Run either vcnviewer or rdesktop on the Linux server and use those remote applications to start a Windows session. By using FreeNX, you speed up the VNC sessions, encrypt them, and provide broader access to Windows applications through RDP.
All materials on the site are licensed Creative Commons Attribution-Sharealike 3.0 Unported CC BY-SA 3.0 & GNU Free Documentation License (GFDL)
If you are the copyright holder of any material contained on our site and intend to remove it, please contact our site administrator for approval.
© 2016-2026 All site design rights belong to S.Y.A.