How Linux Works: What Every Superuser Should Know (2015)
Chapter 12. Moving Files Across the Network
This chapter surveys options for moving and sharing files between machines on a network. We’ll start by looking at some ways to copy files other than the scp and sftp utilities that you’ve already seen. Then we’ll briefly look at true file sharing, where you attach a directory on one machine to another machine.
This chapter describes some alternative ways to transfer files because not every file transfer problem is the same. Sometimes you need to provide quick, temporary access to machines that you don’t know much about, sometimes you need to efficiently maintain copies of large directory structures, and sometimes you need more constant access.
12.1 Quick Copy
Let’s say you want to copy a file (or files) from your machine to another one on your network, and you don’t care about copying it back or need to do anything fancy. You just want to do it quickly. There’s a convenient way to do this with Python. Just go to the directory containing the file(s) and run
$ python -m SimpleHTTPServer
This starts a basic web server that makes the directory available to any browser on the network. It usually runs on port 8000, so if the machine you run this on is at 10.1.2.4, go to http://10.1.2.4:8000 on the destination and you’ll be able to grab what you need.
12.2 rsync
If you want to move an entire directory structure around, you can do so with scp -r—or if you need a little more performance, tar in a pipeline:
$ tar cBvf - directory | ssh remote_host tar xBvpf -
These methods get the job done but are not very flexible. In particular, after the transfer completes, the remote host may not have an exact copy of the directory. If directory already exists on the remote machine and contains some extraneous files, those files persist after the transfer.
If you need to do this sort of thing regularly (and especially if you plan to automate the process), use a dedicated synchronizer system. On Linux, rsync is the standard synchronizer, offering good performance and many useful ways to perform transfers. We’ll cover some of the essentialrsync operation modes and look at some of its peculiarities.
12.2.1 rsync Basics
To get rsync working between two hosts, the rsync program must be installed on both the source and destination, and you’ll need a way to access one machine from the other. The easiest way to transfer files is to use a remote shell account, and we’ll assume that you want to transfer files using SSH access. However, remember that rsync can be handy even for copying files and directories between locations on a single machine, such as from one filesystem to another.
On the surface, the rsync command is not much different from scp. In fact, you can run rsync with the same arguments. For example, to copy a group of files to your home directory on host, enter
$ rsync file1 file2 ... host:
On any modern system, rsync assumes that you’re using SSH to connect to the remote host.
Beware of this error message:
rsync not found
rsync: connection unexpectedly closed (0 bytes read so far)
rsync error: error in rsync protocol data stream (code 12) at io.c(165)
This notice says that your remote shell can’t find rsync on its system. If rsync isn’t in the remote path but is on the system, use --rsync-path=path to manually specify its location.
If your username is different on the remote host, add user@ to the hostname, where user is your username on host:
$ rsync file1 file2 ... user@host:
Unless you supply extra options, rsync copies only files. In fact, if you specify just the options described so far and you supply a directory dir as an argument, you’ll see this message:
skipping directory dir
To transfer entire directory hierarchies—complete with symbolic links, permissions, modes, and devices—use the -a option. Furthermore, if you want to copy to some place other than your home directory on the remote host, place this destination after the remote host, like this:
$ rsync -a dir host:destination_dir
Copying directories can be tricky, so if you’re not exactly sure what will happen when you transfer the files, use the -nv option combination. The -n option tells rsync to operate in “dry run” mode—that is, to run a trial without actually copying any files. The -v option is for verbose mode, which shows details about the transfer and the files involved:
$ rsync -nva dir host:destination_dir
The output looks like this:
building file list ... done
ml/nftrans/nftrans.html
[more files]
wrote 2183 bytes read 24 bytes 401.27 bytes/sec
12.2.2 Making Exact Copies of a Directory Structure
By default, rsync copies files and directories without considering the previous contents of the destination directory. For example, if you transferred the directory d containing the files a and b to a machine that already had a file named d/c, the destination would contain d/a, d/b, and d/c after the rsync.
To make an exact replica of the source directory, you must delete files in the destination directory that do not exist in the source directory, such as d/c in this example. Use the --delete option to do that:
$ rsync -a --delete dir host:destination_dir
WARNING
This can be dangerous, because you should typically inspect the destination directory to see if there’s anything that you’ll inadvertently delete. Remember, if you’re not certain about your transfer, use the -n option to perform a dry run so that you’ll know exactly when rsync wants to delete a file.
12.2.3 Using the Trailing Slash
Be particularly careful when specifying a directory as the source in an rsync command line. Consider the basic command that we’ve been working with so far:
$ rsync -a dir host:dest_dir
Upon completion, you’ll have a directory dir inside dest_dir on host. Figure 12-1 shows an example of how rsync normally handles a directory with files named a and b. However, adding a slash (/) significantly changes the 'margin-top:0cm;margin-right:0cm;margin-bottom:0cm; margin-left:20.0pt;margin-bottom:.0001pt;line-height:normal;vertical-align: baseline'>$ rsync -a dir/ host:dest_dir
Here, rsync copies everything inside dir to dest_dir on host without actually creating dir on the destination host. Therefore, you can think of a transfer of dir/ as an operation similar to cp dir/* dest_dir on the local filesystem.
For example, say you have a directory dir containing the files a and b (dir/a and dir/b). You run the trailing-slash version of the command to transfer them to the dest_dir directory on host:
$ rsync -a dir/ host:dest_dir
When the transfer completes, dest_dir contains copies of a and b but not dir. If, however, you had omitted the trailing / on dir, dest_dir would have gotten a copy of dir with a and b inside. Then, as a result of the transfer, you’d have files and directories named dest_dir/dir/a anddest_dir/dir/b on the remote host. Figure 12-2 illustrates how rsync handles the directory structure from Figure 12-1 when using a trailing slash.
When transferring files and directories to a remote host, accidentally adding a / after a path would normally be nothing more than a nuisance; you could go to the remote host, add the dir directory, and put all of the transferred items back in dir. Unfortunately, you must be careful to avoid disaster when combining the trailing / with the --delete option, because you can easily remove unrelated files this way.
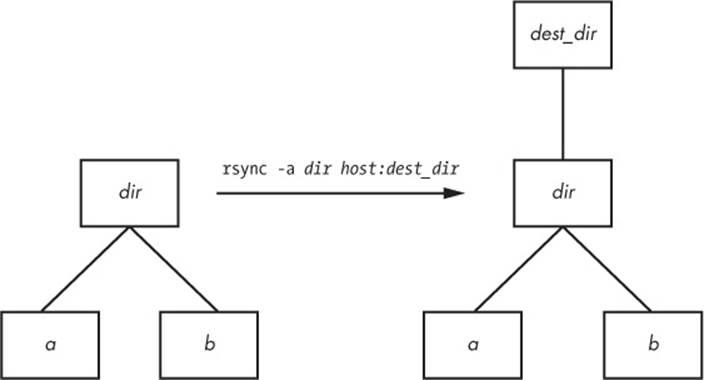
Figure 12-1. Normal rsync copy

Figure 12-2. Effect of trailing slash in rsync
NOTE
Be wary of your shell’s automatic filename completion feature. GNU readline and many other completion libraries tack trailing slashes onto completed directory names.
12.2.4 Excluding Files and Directories
One very important feature of rsync is its ability to exclude files and directories from a transfer operation. For example, say you’d like to transfer a local directory called src to host, but you want to exclude anything named .git. You can do it like this:
$ rsync -a --exclude=.git src host:
Note that this command excludes all files and directories named .git because --exclude takes a pattern, not an absolute filename. To exclude one specific item, specify an absolute path that starts with /, as shown here:
$ rsync -a --exclude=/src/.git src host:
NOTE
The first / in /src/.git in this command is not the root directory of your system but rather the base directory of the transfer.
Here are a few more tips on how to exclude patterns:
§ You can have as many --exclude parameters as you like.
§ If you use the same patterns repeatedly, place them in a plaintext file (one pattern per line) and use --exclude-from=file.
§ To exclude directories named item but include files with this name, use a trailing slash: --exclude=item/.
§ The exclude pattern is based on a full file or directory name component and may contain simple globs (wildcards). For example, t*s matches this, but it does not match ethers.
§ If you exclude a directory or filename but find that your pattern is too restrictive, use --include to specifically include another file or directory.
12.2.5 Transfer Integrity, Safeguards, and Verbose Modes
To speed operation, rsync uses a quick check to determine whether any files on the transfer source are already on the destination. The quick check uses a combination of the file size and its last-modified date. The first time you transfer an entire directory hierarchy to a remote host, rsyncsees that none of the files already exist at the destination, and it transfers everything. Testing your transfer with rsync -n verifies this for you.
After running rsync once, run it again using rsync -v. This time you should see that no files show up in the transfer list because the file set exists on both ends, with the same modification dates.
When the files on the source side are not identical to the files on the destination side, rsync transfers the source files and overwrites any files that exist on the remote side. The default behavior may be inadequate, though, because you may need additional reassurance that files are indeed the same before skipping over them in transfers, or you may want to put in some extra safeguards. Here are some options that come in handy:
§ --checksum(abbreviation:-c) Compute checksums (mostly unique signatures) of the files to see if they’re the same. This consumes additional I/O and CPU resources during transfers, but if you’re dealing with sensitive data or files that often have uniform sizes, this option is a must.
§ --ignore-existing Doesn’t clobber files already on the target side.
§ --backup(abbreviation:-b) Doesn’t clobber files already on the target but rather renames these existing files by adding a ~ suffix to their names before transferring the new files.
§ --suffix=s Changes the suffix used with --backup from ~ to s.
§ --update(abbreviation:-u) Doesn’t clobber any file on the target that has a later date than the corresponding file on the source.
With no special options, rsync operates quietly, only producing output when there is a problem. However, you can use rsync -v for verbose mode or rsync -vv for even more details. (You can tack on as many v options as you like, but two is probably more than you need.) For a comprehensive summary after the transfer, use rsync --stats.
12.2.6 Compression
Many users like the -z option in conjunction with -a to compress the data before transmission:
$ rsync -az dir host:destination_dir
Compression can improve performance in certain situations, such as when uploading a large amount of data across a slow connection (like the slow upstream link on many DSL connections) or when the latency between the two hosts is high. However, across a fast local area network, the two endpoint machines can be constrained by the CPU time that it takes to compress and decompress data, so uncompressed transfer may be faster.
12.2.7 Limiting Bandwidth
It’s easy to clog the uplink of Internet connections when uploading a large amount of data to a remote host. Even though you won’t be using your (normally large) downlink capacity during such a transfer, your connection will still seem quite slow if you let rsync go as fast as it can, because outgoing TCP packets such as HTTP requests will have to compete with your transfers for bandwidth on your uplink.
To get around this, use --bwlimit to give your uplink a little breathing room. For example, to limit the bandwidth to 10,000 Kpbs you might do something like this:
$ rsync --bwlimit=10000 -a dir host:destination_dir
12.2.8 Transferring Files to Your Computer
The rsync command isn’t just for copying files from your local machine to a remote host. You can also transfer files from a remote machine to your local host by placing the remote host and remote source path as the first argument on the command line. Therefore, to transfer src_dir on the host to dest_dir on the local host, run this command:
$ rsync -a host:src_dir dest_dir
NOTE
As mentioned before, you can use rsync to duplicate directories on your local machines if you omit host: entirely.
12.2.9 Further rsync Topics
Whenever you need to copy numerous files, rsync should be one of the first utilities that comes to mind. Running rsync in batch mode is particularly useful, and you’ll find a number of options to employ auxiliary files related to command options, logging, and transfer state. In particular, the state files make long transfers faster and easier to resume when interrupted.
You’ll also find rsync useful for making backups. For example, you can attach Internet storage, such as Amazon’s S3, to your Linux system and then use rsync --delete to periodically synchronize a filesystem with the network storage to create a very effective backup system.
There are many more command-line options than those described here. For a rough overview, run rsync --help. You’ll find more detailed information in the rsync(1) manual page as well as at the rsync home page: http://rsync.samba.org/.
12.3 Introduction to File Sharing
Your Linux machine probably doesn’t live alone on your network, and when you have multiple machines on a network, there’s nearly always a reason to share files between them. For the remainder of this chapter, we’ll primarily be concerned with file sharing between Windows and Mac OS X machines, because it’s interesting to see how Linux adapts to completely foreign environments. For the purpose of sharing files between Linux machines, or for accessing files from a Network Area Storage (NAS) device, we’ll briefly talk about using Network File System (NFS) as a client.
12.4 Sharing Files with Samba
If you have machines running Windows, you’ll probably want to permit access to your Linux system’s files and printers from those Windows machines using the standard Windows network protocol, Server Message Block (SMB). Mac OS X also supports SMB file sharing.
The standard file-sharing software suite for Unix is called Samba. Not only does Samba allow your network’s Windows computers to get to your Linux system, but it works the other way around: You can print and access files on Windows servers from your Linux machine with the Samba client software.
To set up a Samba server, perform these steps:
1. Create an smb.conf file.
2. Add file-sharing sections to smb.conf.
3. Add printer-sharing sections to smb.conf.
4. Start the Samba daemons nmbd and smbd.
When you install Samba from a distribution package, your system should perform the steps listed above using some reasonable defaults for the server. However, it probably won’t be able to determine which particular shares (resources) on your Linux machine you offer to clients.
NOTE
The discussion of Samba in this chapter is brief and limited to getting Windows machines on a single subnet to see a standalone Linux machine through the Windows Network Places browser. There are countless ways to configure Samba, because there are many possibilities for access control and network topology. For the gory details on how to configure a large-scale server, see Using Samba, 3rd edition (O’Reilly, 2007), a much more extensive guide, and visit the Samba website, http://www.samba.org/.
12.4.1 Configuring the Server
The central Samba configuration file is smb.conf, which most distributions place in an etc directory such as /etc/samba. However, you may have to hunt around to find this file, as it may also be in a lib directory such as /usr/local/ samba/lib.
The smb.conf file is similar to the XDG style that you’ve seen elsewhere (such as the systemd configuration format) and breaks down into several sections denoted with square brackets (such as [global] and [printers]). The [global] section in smb.conf contains general options that apply to the entire server and all shares. These options primarily pertain to network configuration and access control. The sample [global] section below shows how to set the server name, description, and workgroup:
[global]
# server name
netbios name = name
# server description
server string = My server via Samba
# workgroup
workgroup = MYNETWORK
These parameters work like this:
§ netbios name The server name. If you omit this parameter, Samba uses the Unix hostname.
§ server string A short description of the server. The default is the Samba version number.
§ workgroup The SMB workgroup name. If you’re on a Windows domain, set this parameter to the name of your domain.
12.4.2 Server Access Control
You can add options to your smb.conf file to limit the machines and users that can access your Samba server. The following list includes many options that you can set in your [global] section and in the sections that control individual shares (as described later in the chapter):
§ interfaces Set this to have Samba listen on the given networks or interfaces. For example:
§ interfaces = 10.23.2.0/255.255.255.0
interfaces = eth0
§ bind interfaces only Set this to yes when using the interfaces parameter in order to limit access to machines that you can reach on those interfaces.
§ valid users Set this to allow the given users access. For example:
valid users = jruser, bill
§ guest ok Set this parameter to true to make a share available to anonymous users on the network.
§ guest only Set this parameter to true to allow anonymous access only.
§ browseable Set this to make shares viewable by network browsers. If you set this parameter to no for any shares, you’ll still be able to access the shares on the Samba server, but you’ll need to know their exact names in order to be able to access them.
12.4.3 Passwords
In general, you should only allow access to your Samba server with password authentication. Unfortunately, the basic password system on Unix is different than that on Windows, so unless you specify clear-text network passwords or authenticate passwords with a Windows server, you must set up an alternative password system. This section shows you how to set up an alternative password system using Samba’s Trivial Database (TDB) backend, which is appropriate for small networks.
First, use these entries in your smb.conf [global] section to define the Samba password database characteristics:
# use the tdb for Samba to enable encrypted passwords
security = user
passdb backend = tdbsam
obey pam restrictions = yes
smb passwd file = /etc/samba/passwd_smb
These lines allow you to manipulate the Samba password database with the smbpasswd command. The obey pam restrictions parameter ensures that any user changing their password with the smbpasswd command must obey any rules that PAM enforces for normal password changes. For the passdb backend parameter, you can add an optional pathname for the TDB file after a colon; for example, tdbsam:/etc/samba/private/passwd.tdb.
NOTE
If you have access to a Windows domain, you can set security = domain to make Samba use the domain’s usernames and eliminate the need for a password database. However, in order for domain users to access the machine running Samba, each domain user must have a local account with the same username on the machine running Samba.
Adding and Deleting Users
The first thing you need to do in order to give a Windows user access to your Samba server is to add the user to the password database with the smbpasswd -a command:
# smbpasswd -a username
The username parameter to the smbpasswd command must be a valid username on your Linux system.
Like the regular system’s passwd program, smbpasswd asks you to enter the new user’s password twice. If the password passes any necessary security checks, smbpasswd confirms that it has created the new user.
To remove a user, use the -x option to smbpasswd:
# smbpasswd -x username
To temporarily deactivate a user instead, use the -d option; the -e option will reenable the user:
# smbpasswd -d username
# smbpasswd -e username
Changing Passwords
You can change a Samba password as the superuser by using smbpasswd with no options or keywords other than the username:
# smbpasswd username
However, if the Samba server is running, any user can change their own Samba password by entering smbpasswd by itself on the command line.
Finally, here’s one place in your configuration to beware of. If you see a line like this in your smb.conf file, be careful:
unix password sync = yes
This line causes smbpasswd to change a user’s normal password in addition to the Samba password. The result can be very confusing, especially when a user changes their Samba password to something that’s not their Linux password and discovers that they can no longer log in. Some distributions set this parameter by default in their Samba server packages!
12.4.4 Starting the Server
You may need to start your server if you didn’t install Samba from a distribution package. To do so, run nmbd and smbd with the following arguments, where smb_config_file is the full path of your smb.conf file:
# nmbd -D -s smb_config_file
# smbd -D -s smb_config_file
The nmbd daemon is a NetBIOS name server, and smbd does the actual work of handling share requests. The -D option specifies daemon mode. If you alter the smb.conf file while smbd is running, you can notify the daemon of the changes with a HUP signal or use your distribution’s service restart command (such as systemctl or initctl).
12.4.5 Diagnostics and Log Files
If something goes wrong when starting one of the Samba servers, an error message appears on the command line. However, runtime diagnostic messages go to the log.nmbd and log.smbd log files, which are usually in a /var/log directory, such as /var/log/samba. You’ll also find other log files there, such as individual logs for each individual client.
12.4.6 Configuring a File Share
To export a directory to SMB clients (that is, to share a directory with a client), add a section like this to your smb.conf file, where label is what you would like to call the share and path is the full directory path:
[label]
path = path
comment = share description
guest ok = no
writable = yes
printable = no
These parameters are useful in directory shares:
§ guest ok Allows guest access to the share. The public parameter is a synonym.
§ writable A yes or true setting here marks the share as read-write. Do not allow guest access to a read-write share.
§ printable Specifies a printing share. This parameter must be set to no or false for a directory share.
§ veto files Prevents the export of any files that match the given patterns. You must enclose each pattern between forward slashes (so that it looks like /pattern/). This example bars object files, as well as any file or directory named bin:
veto files = /*.o/bin/
12.4.7 Home Directories
You can add a section called [homes] to your smb.conf file if you want to export home directories to users. The section should look like this:
[homes]
comment = home directories
browseable = no
writable = yes
By default, Samba reads the logged-in user’s /etc/passwd entry to determine their home directory for [homes]. However, if you don’t want Samba to follow this behavior (that is, you want to keep the Windows home directories in a different place than the regular Linux home directories), you can use the %S substitution in a path parameter. For example, here’s how you would switch a user’s [homes] directory to /u/user :
path = /u/%S
Samba substitutes the current username for the %S .
12.4.8 Sharing Printers
You can export all of your printers to Windows clients by adding a [printers] section to your smb.conf file. Here’s how the section looks when you’re using CUPS, the standard Unix printing system:
[printers]
comment = Printers
browseable = yes
printing = CUPS
path = cups
printable = yes
writable = no
To use the printing = CUPS parameter, your Samba installation must be configured and linked against the CUPS library.
NOTE
Depending on your configuration, you may also want to allow guest access to your printers with the guest ok = yes option rather than give a Samba password or account to everyone who needs to access the printers. For example, it’s easy to limit printer access to a single subnet with firewall rules.
12.4.9 Using the Samba Client
The Samba client program smbclient can print to and access remote Windows shares. This program comes in handy when you are in an environment where you must interact with Windows servers that don’t offer a Unix-friendly means of communication.
To get started with smbclient use the -L option to get a list of shares from a remote server named SERVER:
$ smbclient -L -U username SERVER
You do not need -U username if your Linux username is the same as your username on SERVER .
After running this command, smbclient asks for a password. To try to access a share as a guest, press ENTER; otherwise, enter your password on SERVER. Upon success, you should get a share list like this:
Sharename Type Comment
--------- ---- -------
Software Disk Software distribution
Scratch Disk Scratch space
IPC$ IPC IPC Service
ADMIN$ IPC IPC Service
Printer1 Printer Printer in room 231A
Printer2 Printer Printer in basement
Use the Type field to help you make sense of each share and pay attention only to the Disk and Printer shares (the IPC shares are for remote management). This list has two disk shares and two printer shares. Use the name in the Sharename column to access each share.
12.4.10 Accessing Files as a Client
If you need only casual access to files in a disk share, use the following command. (Again, you can omit the -U username if your Linux username matches your username on the server.)
$ smbclient -U username '\\SERVER\sharename'
Upon success, you will get a prompt like this, indicating that you can now transfer files:
smb: \>
In this file transfer mode, smbclient is similar to the Unix ftp, and you can run these commands:
§ getfile Copies file from the remote server to the current local directory.
§ putfile Copies file from the local machine to the remote server.
§ cddir Changes the directory on the remote server to dir .
§ lcdlocaldir Changes the current local directory to localdir .
§ pwd Prints the current directory on the remote server, including the server and share names.
§ !command Runs command on the local host. Two particularly handy commands are !pwd and !ls to determine directory and file status on the local side.
§ help Shows a full list of commands.
Using the CIFS Filesystem
If you need frequent, regular access to files on a Windows server, you can attach a share directly to your system with mount. The command syntax is shown below. Notice the use of SERVER:sharename rather than the normal \\SERVER\sharename format.
# mount -t cifs SERVER:sharename mountpoint -o user=username,pass=password
In order to use mount like this, you must have the Common Internet File System (CIFS) utilities available for Samba. Most distributions offer these as a separate package.
12.5 NFS Clients
The standard system for file sharing among Unix systems is NFS; there are many different versions of NFS for different scenarios. You can serve NFS over TCP and UDP, with a large number of authentication and encryption techniques. Because there are so many options, NFS can be a big topic, so we’ll just stick to the basics of NFS clients.
To mount a remote directory on a server with NFS, use the same basic syntax as for mounting a CIFS directory:
# mount -t nfs server:directory mountpoint
Technically, you don’t need the -t nfs option because mount should figure this out for you, but you may want to investigate the options in the nfs(5) manual page. (You’ll find several different options for security using the sec option. Many administrators on small, closed networks use host-based access control. However, more sophisticated methods, such as Kerberos-based authentication, require additional configuration on other parts of your system.)
When you find that you’re making greater use of filesystems over a network, set up the automounter so that your system will mount the filesystems only when you actually try to use them in order to prevent problems with dependencies on boot. The traditional automounting tool is calledautomount, with a newer version called amd, but much of this is now being supplanted by the automount unit type in systemd.
12.6 Further Network File Service Options and Limitations
Setting up an NFS server to share files to other Linux machines is more complicated than using a simple NFS client. You need to run the server daemons (mountd and nfsd) and set up the /etc/exports file to reflect the directories that you’re sharing. However, we won’t cover NFS servers primarily because shared storage over a network is often made much more convenient by simply purchasing an NAS device to handle it for you. Many of these devices are Linux based, so they’ll naturally have NFS server support. Vendors add value to their NAS devices by offering their own administration tools to take the pain out of tedious tasks such as setting up RAID configurations and cloud backups.
Speaking of cloud backups, another network file service option is cloud storage. This can be handy when you need the extra storage that comes with automatic backups and you don’t mind an extra hit on performance. It’s especially useful when you don’t need the service for a long time or don’t need to access it very much. You can usually mount Internet storage much as you would NFS.
Although NFS and other file-sharing systems work well for casual use, don’t expect great performance. Read-only access to larger files should work well, such as when you’re streaming audio or video, because you’re reading data in large, predictable chunks that don’t require much back-and-forth communication between the file server and its client. As long as the network is fast enough and the client has enough memory, a server can supply data as needed.
Local storage is much faster for tasks involving many small files, such as compiling software packages and starting desktop environments. The picture becomes more complicated when you have a larger network with many users accessing many different machines, because there are tradeoffs between convenience, performance, and ease of administration.
All materials on the site are licensed Creative Commons Attribution-Sharealike 3.0 Unported CC BY-SA 3.0 & GNU Free Documentation License (GFDL)
If you are the copyright holder of any material contained on our site and intend to remove it, please contact our site administrator for approval.
© 2016-2026 All site design rights belong to S.Y.A.