Ubuntu 15.04 Server with systemd: Administration and Reference (2015)
Part IV. Network Support
Chapter 15. Domain Name System
The Domain Name System (DNS) is an Internet service that locates and translates domain names into their corresponding Internet Protocol (IP) addresses. All computers connected to the Internet are addressed using an IP address. Since an average user on a network might have to access many different hosts, keeping track of the IP addresses needed quickly became a problem. It was much easier to label hosts with names and use the names to access them. Names were associated with IP addresses. When a user used a name to access a host, the corresponding IP address was looked up first and then used to provide access.
With the changeover from IPv4 to IPv6 address, DNS servers will have some configuration differences. Both are covered here, though some topics will use IPv4 addressing for better clarity, as they are easier to represent.
Check the Ubuntu Server Guide | Domain Name Service (DNS) for basic configuration.
https://help.ubuntu.com/stable/serverguide/dns.html
DNS Address Translations
The process of translating IP addresses into associated names is fairly straightforward. Small networks can be set up easily, with just the basic configuration. The task becomes much more complex when you deal with larger networks and with the Internet. The sheer size of the task can make DNS configuration a complex operation.
Fully Qualified Domain Names
IP addresses were associated with corresponding names, called fully qualified domain names. A fully qualified domain name is composed of three or more segments. The first segment is the name that identifies the host, and the remaining segments are for the network in which the host is located. The network segments of a fully qualified domain name are usually referred to simply as the domain name, while the host part is referred to as the hostname (though this is also used to refer to the complete fully qualified domain name). In effect, subnets are referred to as domains. The fully qualified domain name www.linux.org could have an IPv4 address 198.182.196.56, where 198.182.196 is the network address and 56 is the host ID. Computers can be accessed only with an IP address, so a fully qualified domain name must first be translated into its corresponding IP address to be of any use. The parts of the IP address that make up the domain name and the hosts can vary.
IPv4 Addresses
The IP address may be implemented in either the newer IPv6 (Internet Protocol Version 6) format, or the older and more common IPv4 (Internet Protocol Version 4) format. Since the IPv4 addressing is much easier to read, that format will be used in these examples. In the older IPv4 format, the IP address consists of a number composed of four segments, separated by periods. Depending on the type of network, several of the first segments are used for the network address and one or more of the last segments are used for the host address. In a standard class C network used in smaller networks, the first three segments are the computer’s network address and the last segment is the computer’s host ID (as used in these examples). For example, in the address 192.168.0.2, 192.168.0 is the network address and 2 is the computer’s host ID within that network. Together, they make up an IP address by which the computer can be addressed from anywhere on the Internet. IP addresses, though, are difficult to remember and easy to get wrong.
IPv6 Addressing
IPv6 addressing uses a very different approach designed to provide more flexibility and support for very large address spaces. There are three different types of IPv6 addresses, unicast, multicast, and anycast, of which unicast is the most commonly used. A unicast address is directed to a particular interface. There are several kinds of unicast addresses, depending on how the address is used. For example, you can have a global unicast address for access through the Internet or a unique-level unicast address for private networks.
Though consisting of 128 bits in eight segments (16 bits, 2 bytes, per segment), an IPv6 address is made up of several fields that conform roughly to the segments and capabilities of an IPv4 address: networking information, subnet information, and the interface identifier (host ID). The network information includes a format prefix indicating the type of network connection. In addition, a subnet identifier can be used to specify a local subnet. The network information takes up the first several segments; the remainder is used for the interface ID. The interface ID is a 64-bit (four-segment) Extended Unique Identifier (EUI-64) generated from a network device's Media Access Control (MAC) address. IP addresses are written in hexadecimal numbers, making them difficult to use. Each segment is separated from the next by a colon, and a set of consecutive segments with zero values can be left empty.
Manual Translations: /etc/hosts
Any computer on the Internet can maintain a file that manually associates IP addresses with domain names. On Linux and UNIX systems, this file is called the /etc/hosts file. Here, you can enter the IP addresses and domain names of computers you commonly access. Using this method, however, each computer needs a complete listing of all other computers on the Internet, and that listing must be updated constantly. Early on, this became clearly impractical for the Internet, though it is still feasible for small, isolated networks, as well as simple home networks.
DNS Servers
The Domain Name System has been implemented to deal with the task of translating the domain name of any computer on the Internet to its IP address. The task is carried out by interconnecting servers that manage the Domain Name System (also referred to as DNS servers or name servers). These DNS servers keep lists of fully qualified domain names and their IP addresses, matching one up with the other. This service that they provide to a network is referred to as the Domain Name System. The Internet is composed of many connected subnets called domains, each with its own Domain Name System (DNS) servers that keep track of all the fully qualified domain names and IP addresses for all the computers on its network. DNS servers are hierarchically linked to root servers, which, in turn, connect to other root servers and the DNS servers on their subnets throughout the Internet. The section of a network for which a given DNS server is responsible is called a zone. Although a zone may correspond to a domain, many zones may, in fact, be within a domain, each with its own name server. This is true for large domains where too many systems exist for one name server to manage.
DNS Operation
When a user enters a fully qualified domain name to access a remote host, a resolver program queries the local network’s DNS server requesting the corresponding IP address for that remote host. With the IP address, the user can then access the remote host. In Figure 15-1 , the user atrabbit.mytrek.com wants to connect to the remote host lizard.mytrek.com. The host rabbit.mytrek.com first sends a request to the network’s DNS server, in this case turtle.mytrek.com, to look up the name lizard.mytrek.com and find its IP address. The DNS server atturtle.mytrek.com then returns the IP address for lizard.mytrek.com, 192.168.0.3, to the requesting host, rabbit.mytrek.com. With the IP address, the user at rabbit.mytrek.com can then connect to lizard.mytrek.com.
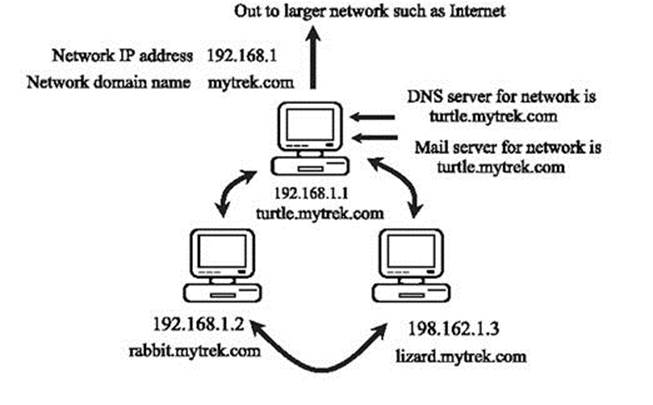
Figure 15-1: DNS server operation
DNS Clients: Resolvers
The names of the DNS servers that service a host’s network are kept in the host’s /etc/resolv.conf file. When setting up an Internet connection, the DNS servers, also referred to as name servers, provided by your Internet service provider (ISP) were placed in this file. These name servers resolve any fully qualified domain names that you use when you access different Internet sites. For example, when you enter a Web site name in your browser, the name is looked up by the name servers and the name’s associated IP address is then used to access the site. In this file, the termnameserver references the IP address of a DNS server.
/etc/resolv.conf
search mytrek.com mytrain.com
nameserver 192.168.0.1
nameserver 192.168.0.3
Local Area Network Addressing
If you are setting up a DNS server for a local area network (LAN) that is not connected to the Internet, you should use a special set of IP numbers reserved for such local networks (also known as private networks or intranets). This is especially true if you are implementing IP masquerading, where only a gateway machine has an Internet address, and the others make use of that one address to connect to the Internet. The IPv4 and IPv6 protocols use different addressing formats for local addresses. Many local and home networks still use the IPv4 format, and this is the format used in the following local addressing example.
|
Address |
Networks |
|
10.0.0.0 |
Class A network |
|
172.16.0.0–172.31.255.255 |
Class B network |
|
192.168.0.0 |
Class C network |
|
127.0.0.0 |
Loopback network (for system self-communication) |
Table 15-1: Non-Internet Private Network IP Addresses
IPv4 Private Networks
IPv4 provides a range of private addresses for the three classes supported by IPv4. The class C IPv4 network numbers use the special network number 192.168. Numbers are also reserved for class A and class B non-Internet local networks. Table 15-1 lists these addresses. The possible addresses available span from 0 to 255 in the host segment of the address. For example, class B network addresses range from 172.16.0.0 to 172.16.255.255, giving you a total of 65,534 possible hosts. The class C network ranges from 192.168.0.0 to 192.168.255.255, giving you 254 possible subnetworks, each with 254 possible hosts. The number 127.0.0.0 is reserved for a system’s loopback interface, which allows it to communicate with itself, as it enables users on the same system to send messages to each other.
These numbers were originally designed for class-based addressing. However, they can just as easily be used for Classless Interdomain Routing (CIDR) addressing, where you can create subnetworks with a smaller number of hosts. For example, the 254 hosts addressed in a class C network could be split into two subnetworks, each with 125 hosts.
IPv6 Private Networks
IPv6 supports private networks with unique-local addresses that provide the same functionality of IPv4 private addresses. The unique-local addresses have no public routing information. They cannot access the Internet. They are restricted to the site they are used on. The unique-local addresses use only three fields: a format prefix, subnet identifier, and interface identifier. A site-level address has the format prefix fc00. If you have no subnets, it will be set to 0. This will give you a network prefix of fc00:0:0:0. You can drop the set of empty zeros to give you fc00::. The interface ID field will hold the interface identification information, similar to the host ID information in IPv4.
fc00:: IPv6 unique-local prefix
The loopback device will have special address of ::1, also known as localhost.
::1 IPv6 loopback network
Rather than using a special set of reserved addresses as IPv4 does, with IPv6 you only use the unique-local prefix, fc00, and the special loopback address, ::1.
Tip: Once your network is set up, you can use ping6 or ping to see if it is working. The ping6 tool is designed for IPv6 addresses, whereas ping is used for IPv4.
Local Network Address Example Using IPv4
If you are setting up a LAN, such as a small business or home network, you are free to use class C IPv4 network (254 hosts or less), that have the special network number 192.168, as used in these examples. These are numbers for your local machines. You can set up a private network, such as an intranet, using network cards, such as Ethernet cards and Ethernet hubs, and then configure your machines with IP addresses starting from 192.168.0.1. The host segment can range from 1 to 254, where 255 is used for the broadcast address. If you have three machines on your home network, you can give them the addresses 192.168.0.1, 192.168.0.2, and 192.168.0.3. You can then set up domain name system services for your network by running a DNS server on one of the machines. This machine becomes your network’s DNS server. You can then give your machines fully qualified domain names and configure your DNS server to translate the names to their corresponding IP addresses. As shown in Figure 15-1 , for example, you could give the machine 192.168.0.1 the name turtle.mytrek.com and the machine 192.168.0.2 the namerabbit.mytrek.com. You can also implement Internet services on your network such as FTP, Web, and mail services by setting up servers for them on your machines. Then you can configure your DNS server to let users access those services using fully qualified domain names. For example, for the mytrek.com network, the Web server could be accessed using the name www.mytrek.com. Instead of a Domain Name System, you could have the /etc/hosts files in each machine contain the entire list of IP addresses and domain names for all the machines in your network. But in this case, for any changes, you would have to update each machine’s /etc/hosts file.
BIND
The DNS server software currently in use on Linux systems is Berkeley Internet Name Domain (BIND). BIND was originally developed at the University of California, Berkeley, and is currently maintained and supported by the Internet Software Consortium (ISC). You can obtain BIND information and current software releases from its Web site at www.isc.org. Web page documentation and manuals are included with the software package. At that site you can also access the BIND Administration Manual for detailed configuration information. The BIND documentation directory, bind9-doc, in /usr/share/doc contains extensive documentation, including Web page manuals and examples. The Linux HOW-TO for the Domain Name System, DNS-HOWTO, provides detailed examples. Documentation, news, and DNS tools can be obtained from the DNS Resource Directory (DNSRD) at www.dns.net/dnsrd. The site includes extensive links and online documentation, including the BIND Operations Guide (BOG).
The DNS server packages on Ubuntu are:
bind9
bind9-doc
Note: The djbdns server, written by D.J. Bernstein, is designed specifically with security in mind, providing a set of small server daemons, each performing specialized tasks. djbdns separates the name server, caching server, and zone transfer tasks into separate programs: tinydns (tinydns.org) implements the authoritative name server for a network, whereas dnscache implements a caching server that will resolve requests from DNS clients such as Web browsers.
BIND Servers and Tools
The BIND DNS server software consists of a name server daemon, several sample configuration files, and resolver libraries. As of 1998, a new version of BIND, beginning with the series number 8.x, implemented a new configuration file using a new syntax. Version 9.0 adds new security features and support for IPv6. Older versions, which begin with the number 4.x, use a different configuration file with an older syntax. Most distributions, including Ubuntu, currently install the newer 9.x version of BIND.
|
Tool |
Description |
|
dig domain |
Domain Information Groper, tool to obtain information on a DNS server. Preferred over nslookup |
|
host hostname |
Simple lookup of hosts |
|
nslookup domain |
Tool to query DNS servers for information about domains and hosts |
|
named-checkconf |
BIND tool to check the syntax of your DNS configuration file, /etc/named.conf |
|
named-checkzone |
BIND tool to check the syntax of your DNS zone files |
|
nslint |
Tool to check the syntax of your DNS configuration and zone files |
|
rndc command |
Remote Name Daemon Controller, an administrative tool for managing a DNS server (version 9.x) |
|
ndc |
Name Daemon Controller (version 8.x) |
|
bind9 |
Use the /etc/init.d/bind9 script to start, stop, and restart the named server with the service command |
Table 15-2: BIND Diagnostic and Administrative Tools
The name of the BIND name server daemon is named. To operate your machine as a name server, simply run the named daemon with the appropriate configuration. The named daemon listens for resolution requests and provides the correct IP address for the requested hostname. On Ubuntu, named runs as a stand-alone daemon, starting up when the system boots and constantly running. You can start, stop, and restart the daemon manually using the service command and the bind9 script.
sudo service bind9 restart
You can also use the Remote Name Daemon Controller utility, rndc, provided with BIND (bind9utils package) to start, stop, restart, and check the status of the server as you test its configuration. rndc with the stop command stops named and, with the start command, starts it again, reading your named.conf file. rndc with the help command provides a list of all rndc commands. Configuration is set in the /etc/rndc.conf file. Once your name server is running, you can test it using the dig or nslookup utility, which queries a name server, providing information about hosts and domains. If you start dig with no arguments, it enters an interactive mode where you can issue different dig commands to refine your queries.
To check the syntax of your DNS server configuration and zone files, BIND provides the named-checkconfig and named-checkzone tools: named-checkconfig will check the syntax of DNS configuration file, named.conf, and named-checkzone will check a zone file's syntax. Other syntax checking tools are also available, such as nslint, which operates like the programming tool lint. Table 15-2 lists several DNS administrative tools.
The named daemon is managed by systemd using the bind9.service unit file. It is started for the multi-user.target (runlevels 2, 3, 4, and 5) (WantedBy). Runtime configuration is read from /etc/default/bind9. Though the /usr/sbin/named command starts the server (ExecStart), the rndccommand is used to restart or stop the server (ExecReload and ExecStop).
bind9.service
[Unit]
Description=BIND Domain Name Server
Documentation=man:named(8)
After=network.target
[Service]
ExecStart=/usr/sbin/named -f -u bind
ExecReload=/usr/sbin/rndc reload
ExecStop=/usr/sbin/rndc stop
[Install]
WantedBy=multi-user.target
Note: The GADMIN-BIND configuration tool uses a different set of files that it sets up in the /var/named directory.
Domain Name System Configuration
You configure a DNS server using a configuration file, several zone files, and a cache file. The part of a network for which the name server is responsible is called a zone. A zone is not the same as a domain, because in a large domain you could have several zones, each with its own name server. You could also have one name server servicing several zones. In this case, each zone has its own zone file.
DNS Zones
The zone files hold resource records that provide hostname and IP address associations for computers on the network for which the DNS server is responsible. Zone files exist for the server’s network and the local machine. Zone entries are defined in the named.conf file. Here, you place zone entries for your master, slave, and forward DNS servers. The most commonly used zone types are described here:
Master zone This is the primary zone file for the network supported by the DNS server. It holds the mappings from domain names to IP addresses for all the hosts on that network.
Slave zone These are references to other DNS servers for your network. Your network can have a master DNS server and several slave DNS servers to help carry the workload. A slave DNS server automatically copies its configuration files, including all zone files, from the master DNS server. Any changes to the master configuration files trigger an automatic download of these files to the slave servers. In effect, you only have to manage the configuration files for the master DNS server, since they are automatically copied to the slave servers.
Forward zone The forward zone lists name servers outside your network that should be searched if your network’s name server fails to resolve an address.
IN-ADDR.ARPA zone DNS can also provide reverse resolutions, where an IP address is used to determine the associated domain name address. Such lookups are provided by IN-ADDR.ARPA zone files. Each master zone file usually has a corresponding IN-ADDR.ARPA zone file to provide reverse resolution for that zone. For each master zone entry, a corresponding reverse mapping zone entry named IN-ADDR.ARPA also exists, as well as one for the localhost. This entry performs reverse mapping from an IP address to its domain name. The name of the zone entry uses the domain IP address, which is the IP address with segments listed starting from the host, instead of the network. So for the IP address 192.168.0.4, where 4 is the host address, the corresponding domain IP address is 4.0.168.192, listing the segments in reverse order. The reverse mapping for the localhost is 1.0.0.127.
IP6.ARPA zone This is the IPv6 equivalent of the IN-ADDR.ARPA zone, providing reverse resolution for that zone. The IP6.ARPA zone uses bit labels that provide a bit-level format that is easier to write, requiring no reverse calculation on the part of the DNS administrator.
IP6.INT zone This is the older form of the IPv6 IP6.ARPA zone, which is the equivalent of the IPv4 IN-ADDR.ARPA zone, providing reverse resolution for a zone. IP6.INT uses a nibble format to specify a reverse zone. In this format, a hexadecimal IPv6 address is segmented into each of its 32 hexadecimal numbers and listed in reverse order, each segment separated by a period.
Hint zone A hint zone specifies the root name servers and is denoted by a period (.). A DNS server is normally connected to a larger network, such as the Internet, which has its own DNS servers. DNS servers are connected this way hierarchically, with each server having its root servers to which it can send resolution queries. The root servers are designated in the hint zone.
DNS Servers Types
There are several kinds of DNS servers, each designed to perform a different type of task under the Domain Name System. The basic kind of DNS server is the master server. Each network must have at least one master server that is responsible for resolving names on the network. Large networks may need several DNS servers. Some of these can be slave servers that can be updated directly from a master server. Others may be alternative master servers that hosts in a network can use. Both are commonly referred to as secondary servers. For DNS requests a DNS server cannot resolve, the request can be forwarded to specific DNS servers outside the network, such as on the Internet. DNS servers in a network can be set up to perform this task, and are referred to as forwarder servers. To help bear the workload, local DNS servers can be set up within a network that operate as caching servers. Such a server merely collects DNS lookups from previous requests it sent to the main DNS server. Any repeated requests can then be answered by the caching server.
A server that can answer DNS queries for a given zone with authority is known as an authoritative server. An authoritative server holds the DNS configuration records for hosts in a zone that will associate each host’s DNS name with an IP address. For example, a master server is an authoritative server. So are slave and stealth servers (see the list that follows). A caching server is not authoritative. It only holds whatever associations it picked up from other servers and cannot guarantee that the associations are valid.
Master server This is the primary DNS server for a zone.
Slave server A DNS server that receives zone information from the master server.
Forwarder server A server that forwards unresolved DNS requests to outside DNS servers. Can be used to keep other servers on a local network hidden from the Internet.
Caching only server Caches DNS information it receives from DNS servers and uses it to resolve local requests.
Stealth server A DNS server for a zone not listed as a name server by the master DNS server.
Location of Bind Server Files: /etc/bind/
Both the configuration and zone files used by BIND are placed in the /etc/bind directory. Zone files begin with the prefix db, as in db.127 for the localhost zone file.
/etc/bind/named.conf BIND configuration file
/etc/bind/db.* BIND zone files
named.conf
The configuration file for the named daemon is /etc/bind/named.conf. It uses a flexible syntax similar to C programs. The format enables easy configuration of selected zones, enabling features such as access control lists and categorized logging. The named.conf file consists of BIND configuration statements with attached blocks within which specific options are listed. A configuration statement is followed by arguments and a block that is delimited with braces. Within the block are lines of option and feature entries. Each entry is terminated with a semicolon. Comments can use the C, C++, or Shell/Perl syntax: enclosing /* */, preceding //, or preceding #. The following example shows a zone statement followed by the zone name and a block of options that begin with an opening brace ({). Each option entry ends with a semicolon. The entire block ends with a closing brace, also followed by a semicolon. The format for a named.conf entry is show here, along with the different kinds of comments allowed. Tables 35-5, 35-6, and 35-7 list several commonly used statements and options.
// comments
/* comments */
# comments
statements {
options and features; //comments
};
The following example shows a simple caching server entry:
// a caching only nameserver config
//
zone "." {
type hint;
file "named.ca";
};
Once you have created your configuration file, you should check its syntax with the named-checkconfig tool. Enter the command on a shell command line. If you do not specify a configuration file, it will default to /etc/bind/named.conf.
named-checkconfig
The zone Statement
The zone statement is used to specify the domains that the name server will service. To create a zone statement, enter the keyword zone, followed by the name of the domain placed within double quotes. Do not place a period at the end of the domain name. In the following example, a period is within the domain name, but not at the end, “mytrek.com”; this differs from the zone file, which requires a period at the end of a complete domain name.
|
Type |
Description |
|
master |
Primary DNS zone |
|
slave |
Slave DNS server; controlled by a master DNS server |
|
hint |
Set of root DNS Internet servers |
|
forward |
Forwards any queries in it to other servers |
|
stub |
Like a slave zone, but holds only names of DNS servers |
Table 15-3: DNS BIND Zone Types
After the zone name, you can specify the class in, which stands for Internet. You can also leave it out, in which case in is assumed (there are only a few other esoteric classes that are rarely used). Within the zone block, you can place several options (see Table 15-3 ). Two essential options are type and file. The type option is used to specify the zone’s type. The file option is used to specify the name of the zone file to be used for this zone. You can choose from several types of zones: master, slave, stub, forward, and hint. A master zone specifies that the zone holds master information and is authorized to act on it. A master server was called a primary server in the older 4.x BIND configuration. A slave zone indicates that the zone needs to update its data periodically from a specified master name server. Use this entry if your name server is operating as a secondary server for another primary (master) DNS server. A stub zone copies only other name server entries, instead of the entire zone. A forward zone directs all queries to name servers specified in a forwarders statement. A hint zone specifies the set of root name servers used by all Internet DNS servers. You can also specify several options that can override any global options set with the options statement. Table 15-3 lists the BIND zone types. The following example shows a simple zone statement for the mytrek.com domain. Its class is Internet (in), and its type is master. The name of its zone file is usually the same as the zone name, in this case, “mytrek.com.”
zone "mytrek.com" in {
type master;
file "mytrek.com";
};
|
Statement |
Description |
|
/* comment */ |
BIND comment in C syntax. |
|
// comment |
BIND comment in C++ syntax. |
|
# comment |
BIND comment in Unix shell and Perl syntax. |
|
acl |
Defines a named IP address matching list. |
|
include |
Includes a file, interpreting it as part of the named.conf file. |
|
key |
Specifies key information for use in authentication and authorization. |
|
logging |
Specifies what the server logs and where the log messages are sent. |
|
options |
Global server configuration options and defaults for other statements. |
|
controls |
Declares control channels to be used by the ndc utility. |
|
server |
Sets certain configuration options for the specified server basis. |
|
sortlists |
Gives preference to specified networks according to a queries source. |
|
trusted-keys |
Defines DNSSEC keys pre configured into the server and implicitly trusted. |
|
zone |
Defines a zone. |
|
view |
Defines a view. |
Table 15-4: BIND Configuration Statements
Configuration Statements
Other statements, such as acl, server, options, and logging, enable you to configure different features for your name server (see Table 15-4 ). The server statement defines the characteristics to be associated with a remote name server, such as the transfer method and key ID for transaction security. The control statement defines special control channels. The key statement defines a key ID to be used in a server statement that associates an authentication method with a particular name server (see “DNSSEC” later in this chapter). The logging statement is used to configure logging options for the name server, such as the maximum size of the log file and a severity level for messages. Table 15-5 lists the BIND statements.
The sortlists statement lets you specify preferences to be used when a query returns multiple responses. For example, you could give preference to your localhost network or to a private local network such a 192.168.0.0.
The options Statement
The options statement defines global options and can be used only once in the configuration file. An extensive number of options cover such components as forwarding, name checking, directory path names, access control, and zone transfers, among others (see Table 15-6 ). A complete listing can be found in the BIND documentation. The options statement is listed in the /etc/bind/named.conf.options file. It is included in the named.conf file with an include statement.
include "/etc/bind/named.conf.options"
|
Option |
Description |
|
type |
Specifies a zone type. |
|
file |
Specifies the zone file for the zone. |
|
directory |
Specifies a directory for zone files. |
|
forwarders |
Lists hosts for DNS servers where requests are to be forwarded. |
|
masters |
Lists hosts for DNS master servers for a slave server. |
|
notify |
Allows master servers to notify their slave servers when the master zone data changes and updates are needed. |
|
allow-transfer |
Specifies which hosts are allowed to receive zone transfers. |
|
allow-query |
Specifies hosts that are allowed to make queries. |
|
allow-recursion |
Specifies hosts that are allowed to perform recursive queries on the server. |
Table 15-5: Zone Options
The directory Option
An important option found in most configuration files is the directory option, which holds the location of links for the name server’s zone and cache files on your system. The following example is taken from the /etc/bind/named.conf.options file, with sample entries added for forward servers. The example uses IPv4 addresses.
options {
directory "/var/cache/bind";
forwarders { 192.168.0.34;
192.168.0.47;
};
};
The forwarders Option
Another commonly used global option is the forwarders option. With the forwarders option, you can list several DNS servers to which queries can be forwarded if they cannot be resolved by the local DNS server. This is helpful for local networks that may need to use a DNS server connected to the Internet. The forwarders option can also be placed in forward zone entries.
The notify Option
With the notify option turned on, the master zone DNS servers send messages to any slave DNS servers whenever their configuration has changed. The slave servers can then perform zone transfers in which they download the changed configuration files. Slave servers always use the DNS configuration files copied from their master DNS servers. The notify option takes one argument, yes or no, where yes is the default. With the no argument, you can have the master server not send out any messages to the slave servers, in effect preventing any zone transfers.
|
Option |
Description |
|
sortlist |
Gives preference to specified networks according to a queries source. |
|
directory |
Specifies a directory for zone files. |
|
forwarders |
Lists hosts for DNS servers where requests are to be forwarded. |
|
allow-transfer |
Specifies which hosts are allowed to receive zone transfers. |
|
allow-query |
Specifies hosts that are allowed to make queries. |
|
allow-recursion |
Specifies hosts that are allowed to perform recursive queries on the server. |
|
notify |
Allows master servers to notify their slave servers when the master zone data changes and updates are needed. |
|
blackhole |
Option to eliminate denial response by allow-query. |
Table 15-6: Bind Options for the options Statement
The named configuration files
BIND configuration uses three named configuration files for your zones and server options. These files are located in the /etc/bind directory.
named.conf The primary BIND configuration file. This file will read in the named.conf.local, the named.conf.options, and the named.conf.default-zones files. The DNS server actually only looks for the named.conf file.
named.conf.options This file includes global options for your DNS server.
named.conf.local Here you add your own zone configuration entries.
named.conf.default-zones This file lists the entries for the localhost and broadcast zones, used by a DNS server to access its own host.
The named.conf configuration file
The named.conf configuration file consist of three include statements for reading in the contents of the named.conf.local, the named.conf.options, and the named.conf.default-zones files. You should make any changes to these files, not to the named.conf file, though you can add changes to the named.conf file if you want. First the named.conf.options file is read to set global options, then the named.conf.local file which holds your DNS server zone statements, and then the named.conf.default-zones file which holds the standard zone definitions for root level access, the localhost, and broadcast. The named.conf file installed by the BIND server package to the /etc/bind directory is shown here. The file begins with comments using C++ syntax, //.
/etc/bind/named.conf
// This is the primary configuration file for the BIND DNS server named.
//
// Please read /usr/share/doc/bind9/README.Debian.gz for information on the
// structure of BIND configuration files in Debian, *BEFORE* you customize
// this configuration file.
//
// If you are just adding zones, please do that in /etc/bind/named.conf.local
include "/etc/bind/named.conf.options";
include "/etc/bind/named.conf.local";
include "/etc/bind/named.conf.default-zones";
The named.conf.options configuration file
The named.conf.options file contains an options statement with global options listed. The directory option sets the directory for the zone and cache files to /var/cache/bind. In this directory, you will find links to your zone files and reverse mapping files, along with the cache file,named.ca. The original files will be located in /etc/bind. The forwarders option can be used for your ISP DNS servers. The dnssec-validation option enables DNSSEC support.
/etc/bind/named.conf.options
options {
directory "/var/cache/bind";
// If there is a firewall between you and nameservers you want
// to talk to, you may need to fix the firewall to allow multiple
// ports to talk. See http://www.kb.cert.org/vuls/id/800113
// If your ISP provided one or more IP addresses for stable
// nameservers, you probably want to use them as forwarders.
// Uncomment the following block, and insert the addresses
// replacing the all-0's placeholder.
// forwarders {
// 0.0.0.0;
// };
========================================================================
// If BIND logs error messages about the root key being expired,
// you will need to update your keys. See https://www.isc.org/bind-keys
//
========================================================================
dnssec-validation auto;
auth-nxdomain no; # conform to RFC1035
listen-on-v6 { any; };
};
The named.conf.local configuration file
In the named.conf.local file you add the zone statements for your particular DNS server. Initially this file will be empty, except for a few comments.
A sample named.conf.local file follows.
//
// A simple BIND configuration
//
zone "mytrek.com" {
type master;
file "/etc/bind/db.mytrek.com";
};
zone "1.168.192.IN-ADDR.ARPA" {
type master;
file "/etc/bind/db.192.168.0";
};
The first zone statement defines a zone for the mytrek.com domain. Its type is master, and its zone file is named “mytrek.com.” The next zone is used for reverse IP mapping of the previous zone. Its name is made up of a reverse listing of the mytrek.com domain’s IP address with the term IN-ADDR.ARPA appended. The domain address for mytrek.com is 192.168.0, so the reverse is 1.168.192. The IN-ADDR.ARPA domain is a special domain that supports gateway location and Internet address–to–host mapping.
The named.local.local file is also where you would include the local address zone definitions for private non-Internet local addresses (those beginning with 192, 10, and 172.16 through 172.31) (see Chapter 18). If you are not using them, you should include the dummy definitions for them located in the zones.rfc1918 file.
include "/etc/bind/zones.rfc1918";
The named.conf.default-zones configuration file
The named.conf configuration file will read in any default zones from the named.conf.default-zones file, using the include directive. The zone statements in the named.conf.default-zones file will configure the localhost, broadcast, and root level zones.
You should not have to modify the named.conf.default-zones file. The named.conf.default-zones file installed by the BIND server package to the /etc/bind directory is shown here.
/etc/bind/named.conf.default-zones
// prime the server with knowledge of the root servers
zone "." {
type hint;
file "/etc/bind/db.root";
};
// be authoritative for the localhost forward and reverse zones, and for
// broadcast zones as per RFC 1912
zone "localhost" {
type master;
file "/etc/bind/db.local";
};
zone "127.in-addr.arpa" {
type master;
file "/etc/bind/db.127";
};
zone "0.in-addr.arpa" {
type master;
file "/etc/bind/db.0";
};
zone "255.in-addr.arpa" {
type master;
file "/etc/bind/db.255";
};
The "." zone is set up for accessing the root DNS servers, the db.root zone file.
The localhost zone statement configures the localhost network addresses. The 127 statement defines a reverse mapping zone for the loopback interface (localhost), the method used by the system to address itself and enable communication between local users on the system. The zone file for local host is db.local, and its reverse lookup file is db.127.
Two reverse lookup zones are then set up for the broadcast zone, 0 and 255, in the db.0 and db.255 zone files.
An IPv6 named.conf.local Example
The IPv6 version for the preceding named.conf.local file appears much the same, except that the IN-ADDR.ARPA domain is replaced by the IP6.ARPA domain in the reverse zone entries. IP6.ARPA uses bit labels providing bit-level specification for the address. This is simply the full hexadecimal address, including zeros, without intervening colons. You need to use IP6.ARPA format of the IPv6 address for both the mytrek.com domain and the localhost domain.
named.conf.local
//
// A simple BIND 9 configuration
//
zone "mytrek.com" {
type master;
file "/etc/bind/db.mytrek.com";
};
zone "\[xFC00000000000000/64].IP6.ARPA" {
type master;
file "/etc/bind/db.fc0";
};
Resource Records for Zone Files
Your name server holds domain name information about the hosts on your network in resource records placed in zone and reverse mapping files. Resource records are used to associate IP addresses with fully qualified domain names. You need a record for every computer in the zone that the name server services. A record takes up one line, though you can use parentheses to use several lines for a record, as is usually the case with SOA records. A resource record uses the Standard Resource Record Format as shown here:
name [<ttl>] [<class>] <type> <rdata> [<comment>]
|
Type |
Description |
|
A |
An IPv4 host address, maps hostname to IPv4 address |
|
AAAA |
An IPv6 host address |
|
A6 |
An IPv6 host address supporting chained addresses |
|
NS |
Authoritative name server for this zone |
|
CNAME |
Canonical name, used to define an alias for a hostname |
|
SOA |
Start of Authority, starts DNS entries in zone file, specifies name server for domain, and other features such as server contact and serial number |
|
WKS |
Well-known service description |
|
PTR |
Pointer record, for performing reverse domain name lookups, maps IP address to hostname |
|
RP |
Text string that contains contact information about a host |
|
HINFO |
Host information |
|
MINFO |
Mailbox or mail list information |
|
MX |
Mail exchanger, informs remote site of your zone’s mail server |
|
TXT |
|
|
Text strings, usually information about a host |
|
|
KEY |
Domain private key |
|
SIG |
Resource record signature |
|
NXT |
Next resource record |
Table 15-7: Domain Name System Resource Record Types
Here, name is the name for this record. It can be a domain name or a hostname (fully qualified domain name). If you specify only the hostname, the default domain is appended. If no name entry exists, the last specific name is used. If the @ symbol is used, the name server’s domain name is used. ttl (time to live) is an optional entry that specifies how long the record is to be cached (the $TTL directive sets default). class is the class of the record. The class used in most resource record entries is IN, for Internet. By default, it is the same as that specified for the domain in the named.conf file. type is the type of the record. rdata is the resource record data. The following is an example of a resource record entry. The name is rabbit.mytrek.com, the class is Internet (IN), the type is a host address record (A), and the data is the IP address 192.168.0.2.
rabbit.mytrek.com. IN A 192.168.0.2
Resource Record Types
Different types of resource records exist for different kinds of hosts and name server operations (see Table 15-7 for a listing of resource record types). A, NS, MX, PTR, and CNAME are the types commonly used. A is used for host address records that match domain names with IP addresses. NS is used to reference a name server. MX specifies the host address of the mail server that services this zone. The name server has mail messages sent to that host. The PTR type is used for records that point to other resource records and is used for reverse mapping. CNAME is used to identify an alias for a host on your system.
Time To Live Directive and Field: $TTL
All zone files begin with a Time To Live directive, which specifies the time that a client should keep the provided DNS information before refreshing the information again from the DNS server. Realistically this should be at least a day, though if changes in the server are scheduled sooner, you can temporarily shorten the time, later restoring it. Each record, in fact, has a Time To Live value that can be explicitly indicated with the TTL field. This is the second field in a resource record. If no TTL field is specified in the record, then the default, as defined by the $TLL directive, can be used. The $TTL directive is placed at the beginning of each zone file. By default it will list the time in seconds, usually 86400, 24 hours.
$TTL 86400
You can also specify the time in days (d), hours (h), or minutes (m), as in
$TTL 2d3h
When used as a field, the TTL will be a time specified as the second field. In the following example, the turtle resource record can be cached for three days. This will override the default time in the TTL time directive:
turtle 3d IN A 192.168.0.1
Start of Authority: SOA
A zone or reverse mapping file always begins with a special resource record called the Start of Authority (SOA) record. This record specifies that all the following records are authoritative for this domain. It also holds information about the name server’s domain, which is to be given to other name servers. An SOA record has the same format as other resource records, though its data segment is arranged differently. The format for an SOA record follows:
name {ttl} class SOA Origin Person-in-charge (
Serial number
Refresh
Retry
Expire
Minimum )
Each zone has its own SOA record. The SOA begins with the zone name specified in the named.conf zone entry. This is usually a domain name. An @ symbol is usually used for the name, and acts like a macro expanding to the domain name. The class is usually the Internet class, IN.SOA is the type. Origin is the machine that is the origin of the records, usually the machine running your name server daemon. The person-in-charge is the e-mail address for the person managing the name server (use dots, not @, for the e-mail address, as this symbol is used for the domain name). Several configuration entries are placed in a block delimited with braces. The first is the serial number. You change the serial number when you add or change records, so that it is updated by other servers. The serial number can be any number, as long as it is incremented each time a change is made to any record in the zone. A common practice is to use the year-month-day-number for the serial number, where number is the number of changes in that day. For example, 2009120403 would be the year 2009, December 4, for the third change. Be sure to update it when making changes.
Refresh specifies the time interval for refreshing SOA information. Retry is the frequency for trying to contact an authoritative server. Expire is the length of time a secondary name server keeps information about a zone without updating it. Minimum is the length of time records in a zone live. The times are specified in the number of seconds.
The following example shows an SOA record. The machine running the name server is turtle.mytrek.com, and the e-mail address of the person responsible for the server is hostmaster.turtle.mytrek.com. Notice the periods at the ends of these names. For names with no periods, the domain name is appended. turtle would be the same as turtle.mytrek.com. When entering full hostnames, be sure to add the period so that the domain is not appended.
@ IN SOA turtle.mytrek.com. hostmaster.turtle.mytrek.com. (
1997022700 ; Serial
28800 ; Refresh
14400 ; Retry
3600000 ; Expire
86400 ) ; Minimum
Name Server: NS
The name server record specifies the name of the name server for this zone. These have a resource record type of NS. If you have more than one name server, list them in NS records. These records usually follow the SOA record. As they usually apply to the same domain as the SOA record, their name field is often left blank to inherit the server’s domain name specified by the @ symbol in the previous SOA record.
IN NS turtle.mytrek.com.
You can, if you wish, enter the domain name explicitly as shown here:
mytrek.com. IN NS turtle.mytrek.com.
Address Record: A, AAAA, and A6
Resource records of type A are address records that associate a fully qualified domain name with an IP address. Often, only their hostname is specified. Any domain names without a terminating period automatically have the domain appended to them. Given the domain mytrek.com, the turtle name in the following example is expanded to turtle.mytrek.com:
rabbit.mytrek.com. IN A 192.168.0.2
turtle IN A 192.168.0.1
BIND supports IPv6 addresses. IPv6 IP addresses have a very different format from that of the IPv4 addresses commonly used. Instead of the numerals arranged in four segments, IPv6 uses hexadecimal numbers arranged in seven segments. In the following example, turtle.mytrek.comis associated with a unique-local IPv6 address: fc00::. There are only three fields in a unique-local address: format prefix, subnet identifier, and interface identifier. The empty segments of the subnet identifier can be represented by an empty colon pair (::). The interface identifier follows,8:800:200C:417A.
turtle.mytrek.com. IN AAAA FC00::8:800:200C:417A
IPv6 also supports the use of IPv4 addresses as an interface identifier, instead of the MAC-derived identifier. The network information part of the IPv6 address would use IPv6 notation, and the remaining interface (host) identifier would use the full IPv4 address. These are known as mixed addresses. In the next example, lizard.mytrek.com is given a mixed address using IPv6 network information and IPv4 interface information. The IPv6 network information is for an IPv6 unique-local address.
lizard.mytrek.com. IN AAAA fc00::192.168.0.3
The AAAA record is used in most networks for an IPv6 record. An AAAA record operates much like a standard A address record, requiring a full IPv6 address. An A6 record is an experimental version of the IPv6 record. It can be more flexible, in that it does not require a full address. Instead you chain A6 records together, specifying just part of the address in each. For example, you could specify just an interface identifier for a host, letting the network information be provided by another IPv6 record (you can implement an A6 record with a full address, just like an AAAA record). In the next example, the first A6 record lists only the address for the interface identifier for the host divit. Following the address is the domain name, mytrek.com, whose address is to be used to complete divit's address, providing network information. The next A6 record provides the network address information for mytrek.com.
divit.mygolf.com. IN A6 0:0:0:0:1234:5678:3466:af1f mytrek.com.
mytrek.com. IN A6 3ffe:8050:201:1860::
Mail Exchanger: MX
The Mail Exchanger record, MX, specifies the mail server that is used for this zone or for a particular host. The mail exchanger is the server to which mail for the host is sent. In the following example, the mail server is specified as turtle.mytrek.com. Any mail sent to the address for any machines in that zone will be sent to the mail server, which in turn will send it to the specific machines. For example, mail sent to a user on rabbit.mytrek.com will first be sent to turtle.mytrek.com, which will then send it on to rabbit.mytrek.com. In the following example, the host 192.168.0.1 (turtle.mytrek.com) is defined as the mail server for the mytrek.com domain:
mytrek.com. IN MX 10 turtle.mytrek.com.
You could also inherit the domain name from the SOA record, leaving the domain name entry blank.
IN MX turtle.mytrek.com.
You could use the IP address instead, but in larger networks, the domain name may be needed to search for and resolve the IP address of a particular machine, which could change.
mytrek.com. IN MX 10 192.168.0.1
An MX record recognizes an additional field that specifies the ranking for a mail exchanger. If your zone has several mail servers, you can assign them different rankings in their MX records. The smaller number has a higher ranking. This way, if mail cannot reach the first mail server, it can be routed to an alternate server to reach the host. In the following example, mail for hosts on the mytrek.com domain is first routed to the mail server at 192.168.0.1 (turtle.mytrek.com), and if that fails, it is routed to the mail server at 192.168.0.2 (rabbit.mytrek.com).
mytrek.com. IN MX 10 turtle.mytrek.com.
IN MX 20 rabbit.mytrek.com.
You can also specify a mail server for a particular host. In the following example, the mail server for lizard.mytrek.com is specified as rabbit.mytrek.com:
lizard.mytrek.com. IN A 192.168.0.3
IN MX 10 rabbit.mytrek.com.
Aliases: CNAME
Resource records of type CNAME are used to specify alias names for a host in the zone. Aliases are often used for machines running several different types of servers, such as both Web and FTP servers. They are also used to locate a host when it changes its name. In this case, the old name becomes an alias for the new name. In the following example, ftp.mytrek.com is an alias for a machine actually called turtle.mytrek.com:
ftp.mytrek.com. IN CNAME turtle.mytrek.com.
The term CNAME stands for canonical name. The canonical name is the actual name of the host. In the preceding example, the canonical name is turtle.mytrek.com. The alias, also known as the CNAME, is ftp.mytrek.com. In a CNAME entry, the alias points to the canonical name. Aliases cannot be used for NS (name server) or MX (mail server) entries. For those records, you need to use the original domain name or IP address.
A more stable way to implement aliases is simply to create another address record for a host or domain. You can have as many hostnames for the same IP address as you want, provided they are certified. For example, to make www.mytrek.com an alias for turtle.mytrek.com, you only have to add another address record for it, giving it the same IP address as turtle.mytrek.com.
turtle.mytrek.com. IN A 192.168.0.1
www.mytrek.com. IN A 192.168.0.1
Pointer Record: PTR
A PTR record is used to perform reverse mapping from an IP address to a host. PTR records are used in the reverse mapping files. The name entry holds a reversed IP address, and the data entry holds the name of the host. The following example maps the IP address 192.168.0.1 toturtle.mytrek.com:
1.1.168.192 IN PTR turtle.mytrek.com.
In a PTR record, you can specify just that last number segment of the address (the host address) and let DNS fill in the domain part of the address. In the next example, 1 has the domain address, 1.168.192, automatically added to give 1.1.168.192:
1 IN PTR turtle.mytrek.com.
Host Information: HINFO, RP, MINFO, and TXT
The HINFO, RP, MINFO, and TXT records are used to provide information about the host. The RP record enables you to specify the person responsible for a certain host. The HINFO record provides basic hardware and operating system identification. The TXT record is used to enter any text you want. MINFO provides a host’s mail and mailbox information. These are used sparingly, as they may give too much information out about the server.
Zone Files
A DNS server uses several zone files covering different components of the DNS. Each zone uses two zone files: the principal zone file and a reverse mapping zone file. The zone file contains the resource records for hosts in the zone. A reverse mapping file contains records that provide reverse mapping of your domain name entries, enabling you to map from IP addresses to domain names. The name of the file used for the zone file can technically be any name, but on the Ubuntu server zone files, use the prefix db, as in db.local for the localhost zone. The name of the file is specified in the zone statement’s file entry in the named.conf and named.conf.local files. If your server supports several zones, you may want to use a name that denotes the specific zone. The domain name is used as the name of the zone file. For example, the zone mytrek.com would have a zone file with the same name and the prefix db, as in db.mytrek.com. The zone file used in the following example is called db.mytrek.com. The reverse mapping file can also be any name, though it is usually the reverse IP address domain specified in its corresponding zone file. For example, in the case of mytrek.com.zone zone file, the reverse mapping file would be called db.192.168.0, the IP address of the mytrek.com domain defined in the db.mytrek.com zone file. This file would contain reverse mapping of all the host addresses in the domain, allowing their hostname addresses to be mapped to their corresponding IP addresses. In addition, BIND sets up a cache file and a reverse mapping file for the localhost. The cache file holds the resource records for the root name servers to which your name server connects. The cache file is called db.root. The localhost reverse mapping file, db.local, holds reverse IP resource records for the local loopback interface, localhost.
Once you have created your zone files, you should check their syntax with the named-checkzone tool. This tool requires that you specify both a zone and a zone file. In the following example, in the /etc/bind directory, the zone mytrek.com in the zone file db.mytrek.com is checked:
named-checkzone mytrek.com db.mytrek.com
Zone Files for Internet Zones
A zone file holds resource records that follow a certain format. The file begins with general directives to define default domains or to include other resource record files. These are followed by a single SOA record, name server and domain resource records, and then resource records for the different hosts. Comments begin with a semicolon and can be placed throughout the file. The @ symbol operates like a special macro, representing the domain name of the zone to which the records apply. The @ symbol is used in the first field of a resource or SOA record as the zone’s domain name. Multiple names can be specified using the * matching character. The first field in a resource record is the name of the domain to which it applies. If the name is left blank, the previous explicit name entry in another resource record is used automatically. This way, you can list several entries that apply to the same host without having to repeat the hostname. Any host or domain name used throughout this file that is not terminated with a period has the zone’s domain appended to it. For example, if the zone’s domain is mytrek.com and a resource record has only the name rabbit with no trailing period, the zone’s domain is automatically appended to it, giving you rabbit.mytrek.com.. Be sure to include the trailing period whenever you enter the complete fully qualified domain name, turtle.mytrek.com., for example.
Directives
You can also use several directives to set global attributes. $ORIGIN sets a default domain name to append to address names that do not end in a period. $INCLUDE includes a file. $GENERATE can generate records whose domain or IP addresses differ only by an iterated number. The $ORIGIN directive is often used to specify the root domain to use in address records. Be sure to include the trailing period. The following example sets the domain origin to mytrek.com and will be automatically appended to the lizard host name that follows:
$ORIGIN mytrek.com.
lizard IN A 192.168.0.2
SOA Record
A zone file begins with an SOA record specifying the machine the name server is running on, among other specifications. The @ symbol is used for the name of the SOA record, denoting the zone’s domain name. After the SOA, the name server resource records (NS) are listed. Just below the name server records are resource records for the domain itself. Resource records for host addresses (A), aliases (CNAME), and mail exchangers (MX) follow. The following example shows a sample zone file, which begins with an SOA record and is followed by an NS record, resource records for the domain, and then resource records for individual hosts:
db.turtle.mytrek.com
; Authoritative data for turle.mytrek.com
;
$TTL 86400
@ IN SOA turtle.mytrek.com. hostmaster.turtle.mytrek.com.(
93071200 ; Serial number
10800 ; Refresh 3 hours
3600 ; Retry 1 hour
3600000 ; Expire 1000 hours
86400 ) ; Minimum 24 hours
IN NS turtle.mytrek.com.
IN A 192.168.0.1
IN MX 10 turtle.mytrek.com.
IN MX 15 rabbit.mytrek.com.
turtle IN A 192.168.0.1
IN HINFO PC-686 LINUX
ftp IN CNAME turtle.mytrek.com.
www IN A 192.168.0.1
rabbit IN A 192.168.0.2
lizard IN A 192.168.0.3
IN HINFO MAC MACOS
The first two lines are comments about the server for which this zone file is used. Notice that the first two lines begin with a semicolon. The class for each of the resource records in this file is IN, indicating these are Internet records. The SOA record begins with an @ symbol that stands for the zone’s domain. In this example, it is mytrek.com. Any host or domain name used throughout this file that is not terminated with a period has this domain appended to it. For example, in the following resource record, turtle has no period, so it automatically expands toturtle.mytrek.com. The same happens for rabbit and lizard. These are read as rabbit.mytrek.com and lizard.mytrek.com. Also, in the SOA, notice that the e-mail address for hostmaster uses a period instead of an @ symbol; @ is a special symbol in zone files and cannot be used for any other purpose.
Nameserver Record
The next resource record specifies the name server for this zone. Here, it is mytrek.com.. Notice the name for this resource record is blank. If the name is blank, a resource record inherits the name from the previous record. In this case, the NS record inherits the value of @ in the SOA record, its previous record. This is the zone’s domain, and the NS record specifies turtle.mytrek.com as the name server for this zone.
IN NS turtle.mytrek.com.
Here the domain name is inherited. The entry can be read as the following. Notice the trailing period at the end of the domain name:
mytrek.com. IN NS turtle.mytrek.com.
Address Record
The following address records set up an address for the domain itself. This is often the same as the name server, in this case 192.168.0.1 (the IP address of turtle.mytrek.com). This enables users to reference the domain itself, rather than a particular host in it. A mail exchanger record follows that routes mail for the domain to the name server. Users can send mail to the mytrek.com domain and it will be routed to turtle.mytrek.com.
IN A 192.168.0.1
Here the domain name is inherited. The entry can be read as the following:
mytrek.com. IN A 192.168.0.1
Mail Exchanger Record
The next records are mail exchanger (MX) records listing turtle.mytrek.com and fast.mytrek.com as holding the mail servers for this zone. You can have more than one mail exchanger record for a host. More than one host may exist through which mail can be routed. These can be listed in mail exchanger records for which you can set priority rankings (a smaller number ranks higher). In this example, if turtle.mytrek.com cannot be reached, its mail is routed through rabbit.mytrek.com, which has been set up also to handle mail for the mytrek.com domain:
IN MX 100 turtle.mytrek.com.
IN MX 150 rabbit.mytrek.com.
Again the domain name is inherited. The entries can be read as the following:
mytrek.com. IN MX 100 turtle.mytrek.com.
mytrek.com. IN MX 150 rabbit.mytrek.com.
Address Record with Host Name
The following resource record is an address record (A) that associates an IP address with the fully qualified domain name turtle.mytrek.com. The resource record name holds only turtle with no trailing period, so it is automatically expanded to turtle.mytrek.com. This record provides the IP address to which turtle.mytrek.com can be mapped.
turtle IN A 192.168.0.1
Inherited Names
Several resource records immediately follow that have blank names. These inherit their names from the preceding full record—in this case, turtle.mytrek.com. In effect, these records also apply to that host. Using blank names is an easy way to list additional resource records for the same host (notice that an apparent indent occurs). The first record is an information record, providing the hardware and operating system for the machine.
IN HINFO PC-686 LINUX
Alias Records
If you are using the same machine to run several different servers, such as Web and FTP servers, you may want to assign aliases to these servers to make accessing them easier for users. Instead of using the actual domain name, such as turtle.mytrek.com, to access the Web server running on it, users may find that using the following is easier: for the Web server, www.mytrek.com; and for the FTP server, ftp.mytrek.com. You can implement such a feature using alias records. In the example zone file, one CNAME alias records exist for the turtle.mytrek.commachine: FTP. The next record implements an alias for www, using another address record for the same machine. None of the name entries ends in a period, so they are appended automatically with the domain name mytrek.com. www.mytrek.com and ftp.mytrek.com are aliases forturtle.mytrek.com. Users entering those URLs automatically access the respective servers on the turtle.mytrek.com machine.
Loopback Record
Address and mail exchanger records are then listed for the two other machines in this zone: rabbit.mytrek.com and lizard.mytrek.com. You could add HINFO, TXT, MINFO, or alias records for these entries.
IPv6 Zone File Example
This is the same zone file using IPv6 addresses. The addresses are unique-local (FC00), instead of global (3), providing private network addressing. The AAAA IPv6 address records are used.
Note: On Ubuntu, if your network does not use zones for private address space, you can redirect those addresses to an empty configuration file, db.empty. Load the RFC 1912 configuration file, zones.rfc1912, into the named.conf.local file using an include statement.
; Authoritative data for turle.mytrek.com, IPv6 version
;
$TTL 1d
@ IN SOA turtle.mytrek.com. hostmaster.turtle.mytrek.com.(
93071200 ; Serial number
10800 ; Refresh 3 hours
3600 ; Retry 1 hour
3600000 ; Expire 1000 hours
86400 ) ; Minimum 24 hours
IN NS turtle.mytrek.com.
IN AAAA FC00::8:800:200C:417A
IN MX 10 turtle.mytrek.com.
IN MX 15 rabbit.mytrek.com.
turtle IN AAAA FC00::8:800:200C:417A
IN HINFO PC-686 LINUX
ftp IN CNAME turtle.mytrek.com.
www IN AAAA FC00::8:800:200C:417A
rabbit IN AAAA FC00::FEDC:BA98:7654:3210
lizard IN AAAA FC00::E0:18F7:3466:7D
IN HINFO MAC MACOS
Localhost zone file: named.localhost
The db.local zone file implements mapping for the local loopback interface known as localhost. This file includes support for both for IPv4 and for IPv6 addressing. The IPv4 address for localhost is 127.0.0.1, and the IPv6 address is ::1. These are special addresses that functions as the local address for your machine. It allows a machine to address itself. The IPv4 address has the type A and the address 127.0.0.1, whereas the IPv6 address has the type AAAA and the address ::1.
A 127.0.0.1
AAAA ::1
The db.local zone file is shown here.
db.local
$TTL 604000
@ IN SOA @ localhost root.localhost. (
2 ; Serial
604800 ; Refresh
86400 ; Retry
2419200 ; Expire
; 604800) ; Negative Cache TTL
@ IN NS localhost.
@ IN A 127.0.0.1
@ IN AAAA ::1
Reverse Mapping File
Reverse name lookups are enabled using a reverse mapping file. Reverse mapping files map fully qualified domain names to IP addresses. This reverse lookup capability is unnecessary, but it is convenient to have. With reverse mapping, when users access remote hosts, their domain name addresses can be used to identify their own host, instead of only the IP address. The name of the file can be anything you want. On Ubuntu, it is usually the first part of the zone’s domain address (the network part of a zone’s IP address). For example, the reverse mapping file for a zone with the IP address of 192.168.0 is db.192. Its full pathname would be something like /etc/bind/db.192. For the localhost which has address 127.0.0.1, the reverse zone file is db.127. Two reverse lookup zones are setup for the broadcast zone, 0 and 255, in the db.0 and db.255 files.
IPv4 IN-ADDR.ARPA Reverse Mapping Format
In IPv4, the zone entry for a reverse mapping in the named configuration files use a special domain name consisting of the IP address in reverse, with an in-addr.arpa extension. This reverse IP address becomes the zone domain referenced by the @ symbol in the reverse mapping file. For example, the reverse mapping zone name for a domain with the IP address of 192.168.43 would be 43.168.192.in-addr.arpa. In the following example, the reverse domain name for the domain address 192.168.0 is 168.192.in-addr.arpa:
zone "168.192.in-addr.arpa" in {
type master;
file "db.192";
};
A reverse mapping file begins with an SOA record, which is the same as that used in a forward mapping file. Resource records for each machine defined in the forward mapping file then follow. These resource records are PTR records that point to hosts in the zone. These must be actual hosts, not aliases defined with CNAME records. Records for reverse mapping begin with a reversed IP address. Each segment in the IP address is sequentially reversed. Each segment begins with the host ID, followed by reversed network numbers.
If you list only the host ID with no trailing period, the zone domain is automatically attached. In the case of a reverse mapping file, the zone domain as specified in the zone statement is the domain IP address backward. The 1 expands to 1.1.168.192. In the following example, turtle andlizard inherit the domain IP address, whereas rabbit has its address explicitly entered:
; reverse mapping of domain names 1.168.192.IN-ADDR.ARPA
;
$TTL 86400
@ IN SOA turtle.mytrek.com. hostmaster.turtle.mytrek.com.(
92050300 ; Serial (yymmddxx format)
10800 ; Refresh 3hHours
3600 ; Retry 1 hour
3600000 ; Expire 1000 hours
86400 ) ; Minimum 24 hours
@ IN NS turtle.mytrek.com.
1 IN PTR turtle.mytrek.com.
2.1.168.192 IN PTR rabbit.mytrek.com.
3 IN PTR lizard.mytrek.com.
IPv6 IP6.ARPA Reverse Mapping Format
In IPv6, reverse mapping can be handled either with the current IP6.ARPA domain format, or with the older IP6.INT format. With IP6.ARPA, the address is represented by a bit-level representation that places the hexadecimal address within brackets. The first bracket is preceded by a backslash. The address must be preceded by an x indicating that it is a hexadecimal address. Following the address is a number indicating the number of bits referenced. In a 128-bit address, usually the first 64 bits reference the network address and the last 64 bits are for the interface address. The following example shows the network and interface addresses for lizard.
FC00:0000:0000:0000:00E0:18F7:3466:007D lizard IPv6 address
\[xFC00000000000000/64] lizard network address
\[x00E018F73466007D/64] lizard interface address
The zone entry for a reverse mapping in a named configuration file with an IP6.ARPA extension would use the bit-level representation for the network address.
zone "\[xfc00000000000000/64].IP6.ARPA" in {
type master;
file "fec.ip6.arpa";
};
A reverse mapping file then uses the same bit-level format for the interface addresses.
$TTL 1d
@ IN SOA turtle.mytrek.com. hostmaster.turtle.mytrek.com.(
92050300 ; Serial (yymmddxx format)
10800 ; Refresh 3hHours
3600 ; Retry 1 hour
3600000 ; Expire 1000 hours
86400 ) ; Minimum 24 hours
@ IN NS turtle.mytrek.com.
\[x00080800200C417A/64] IN PTR turtle.mytrek.com.
\[xFEDCBA9876543210/64] IN PTR rabbit.mytrek.com.
\[x00E018F73466007D/64] IN PTR lizard.mytrek.com.
Localhost Reverse Mapping
A localhost reverse mapping file implements reverse mapping for the local loopback interface known as localhost, whose network address is 127.0.0.1. The localhost reverse mapping file name is uses the network part of the IP address, 127.0.0, and is named db.127. The address 127.0.0.1 is a special address that functions as the local address for your machine.
In the zone statement for this file in the named.conf.default-zones file, the name of the zone is 127.in-addr.arpa. The zone entry is shown here:
zone "127.in-addr.arpa" {
type master;
file " /etc/bind/db.127";
};
The name of the file used for the localhost reverse mapping file is db.127, though it can be any name. The zone file supports both IPv4 and IPv6 addresses.
;
; BIND reverse data file for local loopback interface
;
$TTL 604800
@ IN SOA localhost. root.localhost. (
1 ; Serial
604800 ; Refresh
86400 ; Retry
2419200 ; Expire
604800 ) ; Negative Cache TTL
;
@ IN NS localhost.
1.0.0 IN PTR localhost.
The NS record specifies the name server localhost should use. This file has a PTR record that maps the IP address to the localhost. The 1.0.0 used as the name expands to append the zone domain—in this case, giving you 1.0.0.127, a reverse IP address. The contents of the db.127 file are shown here. Notice the trailing periods for localhost.
Subdomains and Slaves
Adding a subdomain to a DNS server is a simple matter of creating an additional master entry in the named configuration file, and then placing name server and authority entries for that subdomain in your primary DNS server’s zone file. The subdomain, in turn, has its own zone file with its SOA record and entries listing hosts, which are part of its subdomain, including any of its own mail and news servers.
Subdomain Zones
The name for the subdomain could be a different name altogether or a name with the same suffix as the primary domain. In the following example, the subdomain is called beach.mytrek.com. It could just as easily be called mybeach.com. The name server to that domain is on the hostcrab.beach.mytrek.com, in this example. Its IP address is 192.168.0.33, and its zone file is db.beach.mytrek.com. The beach.mytrek.com zone file holds DNS entries for all the hosts being serviced by this name server. The following example shows zone entries:
zone "beach.mytrek.com" {
type master;
file "db.beach.mytrek.com";
};
zone "1.168.192.IN-ADDR.ARPA" {
type master;
file "192.168.0";
};
Subdomain Records
On the primary DNS server, in the example turtle.mytrek.com, you would place entries in the master zone file to identify the subdomain server’s host and designate it as a name server. Such entries are also known as glue records. In this example, you would place the following entries in the mytrek.com zone file on turtle.mytrek.com:
beach.mytrek.com. IN NS beach.mytrek.com.
beach.mytrek.com. IN A 192.168.0.33.
URL references to hosts serviced by beach.mytrek.com can now be reached from any host serviced by mytrek.com, which does not need to maintain any information about the beach.mytrek.com hosts. It simply refers such URL references to the beach.mytrek.com name server.
Slave Servers
A slave DNS server is tied directly to a master DNS server and periodically receives DNS information from it. You use a master DNS server to configure its slave DNS servers automatically. Any changes you make to the master server are automatically transferred to its slave servers. This transfer of information is called a zone transfer. Zone transfers are initiated automatically whenever the slave zone’s refresh time is reached or the slave server receives a notify message from the master. The refresh time is the second argument in the zone’s SOA entry. A notify message is sent automatically by the master whenever changes are made to the master zone’s configuration files and the named daemon is restarted. In effect, slave zones are configured automatically by the master zone, receiving the master zone’s zone files and making them their own.
Slave Zones
Using the previous examples, suppose you want to set up a slave server on rabbit.mytrek.com. Zone entries, as shown in the following example, are set up in the named configuration file for the slave DNS server on rabbit.mytrek.com. The slave server is operating in the same domain as the master, and so it has the same zone name, mytrek.com. Its SOA file is named slave.mytrek.com. The term “slave” in the filename is merely a convention that helps identify it as a slave server configuration file. The masters statement lists its master DNS server—in this case, 192.168.0.1. Whenever the slave needs to make a zone transfer, it transfers data from that master DNS server. The entry for the reverse mapping file for this slave server lists its reverse mapping file as slave.192.168.0.
zone "mytrek.com" {
type slave;
file "slave.mytrek.com";
masters { 192.168.0.1;
};
zone "1.168.192.IN-ADDR.ARPA" {
type slave;
file "slave.192.168.0";
masters { 192.168.0.1;
};
Slave Records
On the master DNS server, the master SOA zone file has entries in it to identify the host that holds the slave DNS server and to designate it as a DNS server. In this example, you would place the following in the mytrek.com zone file:
IN NS 192.168.0.2
You would also place an entry for this name server in the mytrek.com reverse mapping file:
IN NS 192.168.0.2
Controlling Transfers
The master DNS server can control which slave servers can transfer zone information from it using the allow-transfer statement. Place the statement with the list of IP addresses for the slave servers to which you want to allow access. Also, the master DNS server should be sure its notify option is not disabled. The notify option is disabled by a “notify no” statement in the options or zone named configuration entries. Simply erase the “no” argument to enable notify.
Incremental Zone Transfers
BIND supports incremental zone transfers (IXFR). Previously, all the zone data would be replaced in an update, rather than changes such as the addition of a few resource records simply being edited in. With incremental zone transfers, a database of changes is maintained by the master zone. Then only the changes are transferred to the slave zone, which uses this information to update its own zone files. To implement incremental zone transfers, you have to turn on the maintain-ixfr-base option in the options section.
maintain-ixfr-base yes;
You can then use the ixfr-base option in a zone section to specify a particular database file to hold changes.
ixfr-base “db.mytrek.com.ixfr”;
IP Virtual Domains
IP-based virtual hosting allows more than one IP address to be used for a single machine. If a machine has two registered IP addresses, either one can be used to address the machine. If you want to treat the extra IP address as another host in your domain, you need only create an address record for it in your domain’s zone file. The domain name for the host would be the same as your domain name. If you want to use a different domain name for the extra IP, however, you have to set up a virtual domain for it. This entails creating a new zone statement for it with its own zone file. For example, if the extra IP address is 192.168.0.42 and you want to give it the domain name sail.com, you must create a new zone statement for it in a named configuration file with a new zone file. The zone statement would look something like this. The zone file is called sail.com:
zone "sail.com" in {
type master;
file "sail.com";
};
In the db.sail.com file, the name server name is turtle.mytrek.com and the e-mail address is hostmaster@turtle.mytrek.com. In the name server (NS) record, the name server is turtle.mytrek.com.
; Authoritative data for sail.com
;
$TTL 1d
@ IN SOA turtle.mytrek.com. hostmaster.turtle.mytrek.com. (
93071200 ; Serial (yymmddxx)
10800 ; Refresh 3 hours
3600 ; Retry 1 hour
3600000 ; Expire 1000 hours
86400 ) ; Minimum 24 hours
IN NS turtle.mytrek.com.
IN MX 10 turtle.mytrek.com.
IN A 192.168.0.42 ;address of the sail.com domain
jib IN A 192.168.0.42
www IN A jib.sail.com.
ftp IN CNAME jib.sail.com.
This is the same machine using the original address that the name server is running as. turtle.mytrek.com is also the host that handles mail addressed to sail.com (MX). An address record then associates the extra IP address 192.168.0.42 with the sail.com domain name. A virtual host on this domain is then defined as jib.sail.com. Also, www and ftp aliases are created for that host, creating www.sail.com and ftp.sail.com virtual hosts.
In your reverse mapping file (/var/named/1.168.192), add PTR records for any virtual domains.
42.1.168.192 IN PTR sail.com.
42.1.168.192 IN PTR jib.sail.com.
You also have to configure your network connection to listen for both IP addresses on your machine.
Cache File
The cache file is used to connect the DNS server to root servers on the Internet. The file can be any name. On Ubuntu, the cache file is called db.root. The cache file is usually a standard file installed by your BIND software, which lists resource records for designated root servers for the Internet. The following example shows sample entries taken from the db.root file:
; formerly NS.INTERNIC.NET
;
. 3600000 IN NS A.ROOT-SERVERS.NET.
A.ROOT-SERVERS.NET. 3600000 A 198.41.0.4
;
; formerly NS1.ISI.EDU
;
. 3600000 NS B.ROOT-SERVERS.NET.
B.ROOT-SERVERS.NET. 3600000 A 128.9.0.107
If you are creating an isolated intranet, you need to create your own root DNS server until you connect to the Internet. In effect, you are creating a fake root server. This can be another server on your system pretending to be the root or the same name server.
Dynamic Update: DHCP and Journal Files
There are situations wherein you will need to have zones updated dynamically. Instead of manually editing a zone file to make changes in a zone, an outside process updates the zone, making changes and saving the file automatically. Dynamic updates are carried out both by master zones updating slave zones, and by DHCP servers providing IP addresses they generated for hosts to the DNS server.
A journal file is maintained recording all the changes made to a zone, having a .jnl extension. Should a system crash occur, this file is read to implement the most current changes. Should you manually want to update a dynamically updated zone, you will need to erase its journal file first; otherwise, your changes would be overwritten by the journal file entries.
You allow a zone to be automatically updated by specifying the allow-update option. This option indicates the host that can perform the update.
allow-update {turtle.mytrek.com;};
Alternatively, for master zones, you can create a more refined set of access rules using the update-policy statement. With the update-policy statement, you can list several grant and deny rules for different hosts and types of hosts.
TSIG Signatures and Updates
With BIND 9.x, TSIG signature names can be used instead of host names or IP addresses for both allow-update and update-policy statements (see the following sections on TSIG). Use of TSIG signatures implements an authentication of a host performing a dynamic update, providing a much greater level of security. For example, to allow a DHCP server to update a zone file, you would place an allow-update entry in the zone statement listed in a named configuration file.
The TSIG key is defined in a key statement, naming the key previously created by the dnssec-keygen command. The algorithm is HMAC-MD5, and the secret is the encryption key listed in the .private file generated by dnssec-keygen.
key mydhcpserver {
algorithm HMAC-MD5;
secret "ONQAfbBLnvWU9H8hRqq/WA==";
};
The key name can then be used in an allow-update or allow-policy statement to specify a TSIG key.
allow-update { key mydhcpserver;};
Manual Updates: nsupdate
You can use the update procedure to perform any kind of update you want. You can perform updates manually or automatically using a script. For DHCP updates, the DHCP server is designed to perform dynamic updates of the DNS server. You will need to configure the DHCP server appropriately, specifying the TSIG key to use and the zones to update.
You can manually perform an update using the nsupdate command, specifying the file holding the key with the -k option.
nsupdate -k myserver.private
At the prompt, you can use nsupdate commands to implement changes. You match on a record using its full or partial entry. To update a record, you would first delete the old one and then add the changed version, as shown here:
update delete rabbit.mytrek.com. A 192.168.0.2
update add rabbit.mytrek.com. A 192.168.0.44
DNS Security: Access Control Lists, TSIG, and DNSSEC
DNS security currently allows you to control specific access by hosts to the DNS server, as well as providing encrypted communications between servers and authentication of DNS servers. With access control lists, you can determine who will have access to your DNS server. The DNS Security Extensions (DNSSEC), included with BIND 9.x, provide private/public key–encrypted authentication and transmissions. TSIGs (transaction signatures) use shared private keys to provide authentication of servers to secure actions such as dynamic updates between a DNS server and a DHCP server.
Once you have configured DNSSEC you can enable it by placing the dnssec-enable option in the /etc/bind/named.conf.options file.
dnssec-enable yes;
Access Control Lists
To control access by other hosts, you use access control lists, implemented with the acl statement. Using allow and deny options with access control host lists enables you to deny or allow access by specified hosts to the name server. With allow-query, you can restrict queries to specified hosts or networks. Normally, this will result in a response saying that access is denied. You can further eliminate this response by using the blackhole option in the options statement.
You define an ACL with the acl statement followed by the label you want to give the list and then the list of addresses. Addresses can be IP addresses, network addresses, or a range of addresses based on CNDR notation. You can also use an ACL as defined earlier. The following example defines an ACL called mynet:
acl mynet { 192.168.0.1; 192.168.0.2; };
If you are specifying a range, such as a network, you also add exceptions to the list by preceding such addresses with an exclamation point (!). In the following example, the myexceptions ACL lists all those hosts in the 192.168.0.0 network, except for 192.168.0.3:
acl myexceptions {192.168.0.0; !192.168.0.3; };
Four default ACLs are already defined for you. You can use them wherever an option uses a list of addresses as an argument. These are any for all hosts, none for no hosts, localhost for all local IP addresses, and localnet for all hosts on local networks served by the DNS server.
In the next example, an ACL of mynet is created. Then in the mytrek.com zone, only these hosts are allowed to query the server. As the server has no slave DNS serves, zone transfers are disabled entirely. The blackhole option denies access from the myrejects list, without sending any rejection notice.
acl mynet { 192.168.0.0; };
acl myrejects { 10.0.0.44; 10.0.0.93; };
zone "mytrek.com" {
type master;
file "mytrek.com";
allow-query { mynet; };
allow-recursion { mynet; };
allow-transfer { none; };
blackhole {myrejects};
};
Once a list is defined, you can use it with the allow-query, allow-transfer, allow-recursion, and blackhole options in a zone statement to control access to a zone. allow-query specifies hosts that can query the DNS server. allow-transfer is used for master/slave zones, designating whether update transfers are allowed. allow-recursion specifies those hosts that can perform recursive queries on the server. The blackhole option will deny contact from any hosts in its list, without sending a denial response.
Secret Keys
Different security measures will use encryption keys generated with the dnssec-keygen command. You can use dnssec-keygen to create different types of keys, including zone (ZONE), host (HOST), and user (USER) keys. You specify the type of key with the -n option. A zone key will require the name ZONE and the name of the zone’s domain name. A zone key is used in DNSSEC operations. The following example creates a zone key for the mytrek.com zone:
dnssec-keygen -n ZONE mytrek.com.
To create a host key, you would use the HOST type. HOST keys are often used in TSIG operations.
dnssec-keygen -n HOST turtle.mytrek.com.
You can further designate an encryption algorithm (-a) and key size (-b). Use the -h option to obtain a listing of the dnssec-keygen options. Currently you can choose from RSA, DSA, HMAC-MD5, and DH algorithms. The bit range will vary according to the algorithm. RSA ranges from 512 to 4096, and HMAC-MD5 ranges from 1 to 512. The following example creates a zone key using a 768-bit key and the DSA encryption algorithm:
dnssec-keygen -a DSA -b 768 -n ZONE mytrek.com.
The dnssec-keygen command will create public and private keys, each in corresponding files with the suffixes .private and .key. The .key file is a KEY resource record holding the public key. For DNSSEC, the private key is used to generate signatures for the zone, and the public key is used to verify the signatures. For TSIG, a shared private key generated by the HMAC-MD5 algorithm is used instead of a public/private key pair.
DNSSEC
DNSSEC provides encrypted authentication to DNS. With DNSSEC, you can create a signed zone that is securely identified with an encrypted signature. This form of security is used primarily to secure the connections between master and slave DNS servers, so that a master server transfers update records only to authorized slave servers, and does so with a secure encrypted communication. Two servers that establish such a secure connection do so using a pair of public and private keys. In effect, you have a parent zone that can securely authenticate child zones, using encrypted transmissions. This involves creating zone keys for each child, and having those keys used by the parent zone to authenticate the child zones.
Zone Keys
You generate a zone key using the dnssec-keygen command and specifying the zone type, ZONE, with the -n option. For the key name, you use the zone’s domain name. The following example creates a zone key for the mytrek.com zone:
dnssec-keygen -n ZONE mytrek.com.
You can further designate an encryption algorithm (-a) and a key size (-b). Use the -h option to obtain a listing of the dnssec-keygen options. Since you are setting up a public/private key pair, you should choose either the RSA or DSA algorithm. The bit range will vary according to the algorithm. RSA ranges from 512 to 4096, and DSA ranges from 512 to 1024. The following example creates a zone key using a 768-bit key and the DSA encryption algorithm:
dnssec-keygen -a DSA -b 768 -n ZONE mytrek.com.
The dnssec-keygen command will create public and private keys, each in corresponding files with the suffixes .private and .key. The private key is used to generate signatures for the zone, and the public key is used to verify the signatures. The .key file is a KEY resource record holding the public key. This is used to decrypt signatures generated by the corresponding private key. You add the public key to a DNS named configuration file using the $INCLUDE statement to include the .key file.
DNSSEC Resource Records
In the zone file, you then use three DNSSEC DNS resource records to implement secure communications for a given zone: KEY, SIG, and NXT. In these records, you use the signed keys for the zones you have already generated. The KEY record holds public keys associated with zones, hosts, or users. The SIG record stores digital signatures and expiration dates for a set of resource records. The NXT record is used to determine that a resource record for a domain does not exist. In addition, several utilities let you manage DNS encryption. With the dnskeygen utility, you generated the public and private keys used for encryption. dnssigner signs a zone using the zone’s private key, setting up authentication.
To secure a DNS zone with DNSSEC, you first use dnskeygen to create public and private keys for the DNS zone. Then use dnssigner to create an authentication key. In the DNS zone file, you enter a KEY resource record in which you include the public key. The public key will appear as a lengthy string of random characters. For the KEY record, you enter in the domain name followed by the KEY and then the public key.
mytrek.com. KEY 0x4101 3 3 (
AvqyXgKk/uguxkJF/hbRpYzxZFG3x8EfNX389l7GX6w7rlLy
BJ14TqvrDvXr84XsShg+OFcUJafNr84U4ER2dg6NrlRAmZA1
jFfV0UpWDWcHBR2jJnvgV9zJB2ULMGJheDHeyztM1KGd2oGk
Aensm74NlfUqKzy/3KZ9KnQmEpj/EEBr48vAsgAT9kMjN+V3
NgAwfoqgS0dwj5OiRJoIR4+cdRt+s32OUKsclAODFZTdtxRn
vXF3qYV0S8oewMbEwh3trXi1c7nDMQC3RmoY8RVGt5U6LMAQ
KITDyHU3VmRJ36vn77QqSzbeUPz8zEnbpik8kHPykJZFkcyj
jZoHT1xkJ1tk )
For authentication, you can sign particular resource records for a given domain or host. Enter the domain or host followed by the term SIG and then the resource record’s signature.
mytrek.com. SIG KEY 3 86400 19990321010705 19990218010705 4932 com. (
Am3tWJzEDzfU1xwg7hzkiJ0+8UQaPtlJhUpQx1snKpDUqZxm
igMZEVk= )
The NXT record lets you negatively answer queries.
mytrek.com. NXT ftp.mytrek.com. A NS SOA MX SIG KEY NXT
Signing Keys
To set up secure communications between a parent (master) DNS server and a child (slave) DNS server, the public key then needs to be sent to the parent zone. There, the key can be signed by the parent. As you may have more than zone key, you create a keyset using the dnssec-makekeyset command. This generates a file with the extension .keyset that is then sent to the parent. The parent zone then uses the dnssec-signkey command to sign a child’s keyset. This generates a file with the prefix signedkey-. This is sent back to the child and now contains both the child’s keyset and the parent’s signatures. Once the child has the signedkey- files, the dnssec-signedzone command can be used to sign the zone. The dnssec-signedzone command will generate a file with the extension .signed. This file is then included in a named configuration file with the INCLUDE operation. The trusted-keys statement needs to list the public key for the parent zone.
TSIG Keys
TSIG (transaction signatures) also provide secure DNS communications, but they share the private key instead of a private/public key pair. They are usually used for communications between two local DNS servers, and to provide authentication for dynamic updates such as those between a DNS server and a DHCP server.
Generating TSIG keys
To create a TSIG key for your DNS server, you use the dnssec-keygen command as described earlier. Instead of using the same keys you use for DNSSEC, you create a new set to use for transaction signatures. For TSIG, a shared private key is used instead of a public/private key pair. For a TSIG key you would use an HMAC-MD5 algorithm that generates the same key in the both the .key and .private files. Use the -a option to specify the HMAC-MD5 algorithm to use and the -b option for the bit size. (HMAC-MD5 ranges from 1 to 512.) Use the -n option to specify the key type, in this case HOST for the host name. The bit range will vary according to the algorithm. The following example creates a host key using a 128-bit key and the HMAC-MD5 encryption algorithm:
dnssec-keygen -a HMAC-MD5 -b 128 -n HOST turtle.mytrek.com
This creates a private key and a public key, located in the .key and .private files. In a TSIG scheme, both hosts would use the same private key for authentication. For example, to enable a DHCP server to update a DNS server, both would need the private (secret) key for a TSIG authentication. The HMAC-MD5 key is used as a shared private key, generating both the same private and public keys in the .key and .private files.
The Key Statement
You then specify a key in the named configuration file with the key statement. For the algorithm option, you list the HMAC-MD5 algorithm, and for the secret option, you list the private key. This key will be listed in both the .private and .key files. The preceding example would generate key and private files called Kturtle.mytrek.com.+157.43080.key and Kturtle.mytrek.com.+157.43080.private. The contents of the .key file consist of a resource record shown here:
turtle.mytrek.com. IN KEY 512 3 157 ONQAfbBLnvWU9H8hRqq/WA==
The contents of the private file show the same key along with the algorithm:
Private-key-format: v1.2
Algorithm: 157 (HMAC_MD5)
Key: ONQAfbBLnvWU9H8hRqq/WA==
Within the named configuration file, you then name the key using a key statement:
key myserver {
algorithm HMAC-MD5;
secret "ONQAfbBLnvWU9H8hRqq/WA==";
};
The key’s name can then be used to reference the key in other named statements, such as allow-update statements:
allow-update myserver;
The DNS server or DHCP server with which you are setting up communication will also have to have the same key. See the earlier section “Dynamic Update: DHCP and Journal Files”. For communication between two DNS servers, each would have to have a server statement specifying the shared key. In the following example, the named.conf file for the DNS server on 192.168.0.1 would have to have the following server statement to communicate with the DNS server on 10.0.0.1, using the shared myserver key. The named.conf file on the 10.0.0.1 DNS server would have to have a corresponding server statement for the 192.168.0.1 server.
server 10.0.0.1 { keys (myserver;}; };
Split DNS: Views
BIND 9.x allows you to divide DNS space into internal and external views. This organization into separate views is referred to as split DNS. Such a configuration is helpful to manage a local network that is connected to a larger network, such as the Internet. Your internal view would include DNS information on hosts in the local network, whereas an external view would show only the part of the DNS space that is accessible to other networks. DNS views are often used when you have a local network that you want to protect from a larger network such as the Internet. In effect, you protect DNS information for hosts on a local network from a larger external network such as the Internet.
Internal and External Views
To implement a split DNS space, you need to set up different DNS servers for the internal and external views. The internal DNS servers will hold DNS information about local hosts. The external DNS server maintains connections to the Internet through a gateway, as well as manages DNS information about any local hosts that allow external access, such as FTP or Web sites. The gateways and Internet-accessible sites make up the external view of hosts on the network. The internal servers handle all queries to the local hosts or subdomains. Queries to external hosts, such as Internet sites are sent to the external servers, which then forward them on to the Internet. Queries sent to those local hosts that operate external servers such as Internet FTP and Web sites are sent to the external DNS servers for processing. Mail sent to local hosts from the Internet is handled first by the external servers, which then forward messages on to the internal servers. With a split DNS configuration, local hosts can access other local hosts, Internet sites, and local hosts maintaining Internet servers. Internet users, on the other hand, can access only those hosts open to the Internet (served by external servers) such as those with Internet servers like FTP and HTTP. Internet users can, however, send mail messages to any of the local hosts, internal and external.
You can also use DNS views to manage connections for a private network that may use only one Internet address to connect its hosts to the Internet. In this case, the internal view holds the private addresses (192.168.), and the external view connects a gateway host with an Internet address to the Internet. This adds another level of security, providing a result similar to IP masquerading.
Configuring Views
DNS views are configured with the allow statements such as allow-query and allow-transfer. With these statements, you can specify the hosts that a zone can send and receive queries and transfers to and from. For example, the internal zone could accept queries from other local hosts, but not from local hosts with external access such as Internet servers. The local Internet servers, though, can accept queries from the local hosts. All Internet queries are forwarded to the gateway. In the external configuration, the local Internet servers can accept queries from anywhere. The gateways receive queries from both the local hosts and the local Internet servers.
In the following example, a network of three internal hosts and one external host is set up into a split view. There are two DNS servers: one for the internal network and one for external access, based on the external host. In reality these make up one network but they are split into two views. The internal view is known as mygolf.com, and the external as greatgolf.com. In each configuration, the internal hosts are designated in ACL-labeled internals, and the external host is designated in ACL-labeled externals. Should you want to designate an entire IP address range as internal, you could simply use the network address, as in 192.168.0.0/24. In the options section, allow-query, allow-recursion, and allow-transfers restrict access within the network.
Split View Example
The following example shows only the configuration entries needed to implement an internal view (see next page). In the mygolf.com zone, queries and transfers are allowed only among internal hosts. The global allow-recursion option allows recursion among internals.
Internal DNS server
acl internals { 192.168.0.1; 192.168.0.2; 192.168.0.3; };
acl externals {10.0.0.1;};
options {
forward only;
forwarders {10.0.0.1;}; // forward to external servers
allow-transfer { none; }; // allow-transfer to no one by default
allow-query { internals; externals; };// restrict query access
allow-recursion { internals; }; // restrict recursion to internals
}
zone "mygolf.com" {
type master;
file "mygolf";
forwarders { };
allow-query { internals; };
allow-transfer { internals; }
};
In the configuration for the external DNS server, the same ACLs are set up for internals and externals. In the options statement, recursion is now allowed for both externals and internals. In the mygolf.com zone, queries are allowed from anywhere, and recursion is allowed for externals and internals. Transfers are not allowed at all.
External DNS server
acl internals { 192.168.0.1; 192.168.0.2; 192.168.0.3; };
acl externals {10.0.0.1;};
options {
allow-transfer { none; }; // allow-transfer to no one
allow-query { internals; externals; };// restrict query access
allow-recursion { internals; externals }; // restrict recursion
};
zone "greatgolf.com" {
type master;
file "greatgolf";
allow-query { any; };
allow-transfer { internals; externals; };
};