Ubuntu 15.04 Server with systemd: Administration and Reference (2015)
Part IV. Network Support
Chapter 17. Firewalls
Most systems currently connected to the Internet are open to attempts by outside users to gain unauthorized access. Outside users can try to gain access directly by setting up an illegal connection, by intercepting valid communications from users remotely connected to the system, or by pretending to be valid users. Firewalls, encryption, and authentication procedures are ways of protecting against such attacks. A firewall prevents any direct unauthorized attempts at access, encryption protects transmissions from authorized remote users, and authentication verifies that a user requesting access has the right to do so. The current Linux kernel incorporates support for firewalls using the Netfilter (IPtables) packet filtering package. To implement a firewall, you simply provide a series of rules to govern what kind of access you want to allow on your system. If that system is also a gateway for a private network, the system’s firewall capability can effectively help protect the network from outside attacks.
|
Web Site |
Security Application |
|
www.netfilter.org |
Netfilter project, Iptables, and NAT |
|
www.openssh.org |
Secure Shell encryption |
|
www.squid-cache.org |
Squid Web Proxy server |
|
web.mit.edu/Kerberos |
Kerberos network authentication |
Table 17-1: Network Security Applications
To provide protection for remote communications, transmission can be simply encrypted. For Linux systems, you can use the Secure Shell (SSH) suite of programs to encrypt any transmissions, preventing them from being read by anyone else. Kerberos authentication provides another level of security whereby individual services can be protected, allowing use of a service only to users who are cleared for access. Outside users may also try to gain unauthorized access through any Internet services you may be hosting, such as a Web site. In such a case, you can set up a proxy to protect your site from attack. For Linux systems, use Squid proxy software to set up a proxy to protect your Web server. Table 17-1 lists several network security applications commonly used on Linux.
Firewall management tools
You can choose from several different popular firewall management tools (see Table 17-2 ). Ubuntu now provides its own firewall configuration tool called the Uncomplicated Firewall (ufw). IPtables and ufw are on the Ubuntu main repository, and other firewall tools are in the Universe repository. You can also choose to use other popular management tools such as Fwbuilder. Gufw provides a desktop interface. Gufw is covered in this chapter, along with the underlying IPTables firewall application. Search Synaptic Package Manager for firewall to see a more complete listing. In addition you can use the FirewallD dynamic firewall, which uses a daemon instead of generating iptables commands.
Setting up a firewall with the Uncomplicated Firewall: ufw
The Uncomplicated Firewall, ufw, is now the official firewall application for Ubuntu. It provides a simple firewall that can be managed with a few command-line operations. Like all firewall applications, ufw uses IPTables to define rules and run the firewall. The ufw application is just a management interface for IPtables. Default IPtables rules are kept in before and after files, with added rules in user files. The IPtables rule files are held in the /etc/ufw directory. Firewall configuration for certain packages will be placed in the /usr/share/ufw directory. You can find out more about ufw at the Ubuntu Firewall site at https://wiki.ubuntu.com/UncomplicatedFirewall and at the Ubuntu firewall section in the Ubuntu Server Guide at https://help.ubuntu.com/stable/serverguide/firewall.html. The Server Guide also shows information on how to implement IP Masquerading on ufw.
|
Firewall |
Description |
|
IPTables |
IPTables: netfilter, NAT, and mangle. http://netfilter.org (Main repository) |
|
ufw |
Uncomplicated Firewall, ufw. |
|
Gufw |
GNOME interface for Uncomplicated Firewall, ufw. |
|
Fwbuilder |
Firewall configuration tool, allow for more complex configuration http://www.fwbuilder.org (Universe repository) |
|
Shorewall |
Shoreline firewall (Universe repository) |
|
FirewallD |
Dynamic Firewall daemon, https://fedorahosted.org/firewalld/ (Universe repository) |
Table 17-2: Ubuntu Firewall configuration tools
You can now manage the ufw firewall with either the ufw command or using the Gufw desktop tool.
The ufw systemd unit files manage static IPtables rules, much like System V scripts did in previous releases. The iptables command keeps firewall rules in /etc/ufw/. The ufw operation runs an ufw-init script to start and stop the firewall. Runtime configuration is read from/etc/default/ufw.
ufw.service
[Unit]
Description=Uncomplicated firewall
DefaultDependencies=no
Before=network.target
[Service]
Type=oneshot
RemainAfterExit=yes
ExecStart=/lib/ufw/ufw-init start quiet
ExecStop=/lib/ufw/ufw-init stop
[Install]
WantedBy=multi-user.target
ufw commands
IPtables firewall rules can be set up using ufw commands entered on the command line and in a Terminal window. Most users may only need to use ufw commands to allow or deny access by services like the Web server or Samba server. To check the current firewall status, listing those services allowed or blocked, use the status command.
sudo ufw status
|
Commands |
Description |
|
enable | disable |
Turn the firewall on or off |
|
status |
Display status along with services allowed or denied. |
|
logging on | off |
Turn logging on or off |
|
default allow | deny |
Set the default policy, allow is open, whereas deny is restrictive |
|
allow service |
Allow access by a service. Services are defined in /etc/services which specify the ports for that service. |
|
allow port-number/protocol |
Allow access on a particular port using specified protocol. The protocol is optional. |
|
deny service |
Deny access by a service |
|
delete rule |
Delete an installed rule, use allow, deny, or limit and include rule specifics. |
|
proto protocol |
Specify protocol in allow, deny, or limit rule |
|
from address |
Specify source address in allow, deny, or limit rule |
|
to address |
Specify destination address in allow, deny, or limit rule |
|
port port |
Specify port in allow, deny, or limit rule for from and to address operations |
Table 17-3: UFW firewall operations
If the firewall is not enabled, you will first have to enable it with the enable command.
sudo ufw enable
You can restart the firewall, reloading your rules, using the service command and the ufw option.
sudo service ufw restart
You can then add rules using allow and deny commands and their options as listed in Table 17-3 . To allow a service, use the allow command and the service name. This is the name for the service listed in the /etc/services file. The following command allows the ftp service.
sudo ufw allow ftp
If the service you want is not listed in /etc/services, and you know the port and protocol it uses, you can specify the port and protocol directly. For example, the Microsoft Discovery Service, used by Samba, uses port 445 and protocol TCP.
sudo ufw allow 445/tcp
The status operation will then show what services are allowed.
sudo ufw status
To Action From
21:tcp ALLOW Anywhere
21:udp ALLOW Anywhere
445:tcp ALLOW Anywhere
To remove a rule, prefix it with the delete command.
sudo ufw delete allow 445/tcp
A range of ports can be specified using the colon. Samba also uses the 137 and 138 ports with the UDP protocol.
sudo ufw allow 137:138/udp
Provided ports use the same protocol, you can list several in the same rule separated by commas. The Samba service uses both ports 445 and 135 with the TCP protocol.
sudo ufw allow 135,445/tcp
More detailed rules can be specified using address, port, and protocol commands. These are similar to the actual IPtables commands. Packets to and from particular networks, hosts, and ports can be controlled. The following denies SSH access (port 22) from host 192.168.03.
sudo ufw deny proto tcp from 192.168.03 to any port 22
UFW also supports connection rate limiting. Use the limit option in place of allow. With limit, connections are limited to 6 per 30 seconds on the specified port. It is meant to protect against brute force attacks.
The rules you add are placed in the /lib/ufw/user.rules file as IPTables rules (corresponding IPv6 rules are placed in the user6.rules file). ufw is just a front-end for iptables-restore which will read this file and set up the firewall using iptables commands. ufw will also have iptables-restore read the before.rules and after.rules files in the /etc/ufw directory. These files are considered administrative files that include needed supporting rules for your IPtables firewall. Administrators can add their own Iptables rules to these files for system specific features like IP Masquerading.
Note: The Ubuntu Server Guide shows information on how to implement IP masquerading on ufw (https://help.ubuntu.com/stable/serverguide/firewall.html).
The before.rules file will specify a table with the * symbol, as in *filter for the netfilter table (the corresponding IPv6 before rules are in the before6.rules file). For the NAT table you would use *nat. At the end of each table segment, a COMMIT command is needed to instruct ufw to apply the rules. Rules use -A for allow and -D for deny, assuming the iptables command. The following would implement IP Forwarding when placed at the end of the before.rules file (see Ubuntu firewall server documentation). This particular rule works on the first Ethernet device (eth0) for a local network (192.168.0.0/24).
# nat Table rules
*nat
:POSTROUTING ACCEPT [0:0]
# Forward traffic from eth1 through eth0.
-A POSTROUTING -s 192.168.0.0/24 -o eth0 -j MASQUERADE
# don't delete the 'COMMIT' line or these nat table rules won't be processed
COMMIT
Default settings for ufw are placed in /etc/default/ufw. Here you will find the default INPUT, OUTPUT, and FORWARD policies specified by setting associated variables, like DEFAULT_INPUT_POLICY for INPUT and DEFAULT_OUTPUT_POLICY for OUTPUT. The DEFAULT_INPUT_POLICY variable is set to DROP, making DROP the default policy for the INPUT rule. The DEFAULT_OUTPUT_POLICY variable is set to ACCEPT, and the DEFAULT_FORWARD_POLICY variable is set to DROP. To allow IP Masquerading, DEFAULT_FORWARD_POLICY would have to be set to ACCEPT. These entries set default policies only. Any user rules you have set up would take precedence.
Gufw
Gufw will initially open with the firewall disabled, with no ports configured. The application is locked initially. Click the unlock button in the lower right corner of the window. The Status button is set to off, and the shield image will be gray. To enable the firewall, just click the left side of the Status button, setting the status to on. The shield image will be colored and the firewall rules will be listed. Figure 17-1 shows the firewall enabled and several rules listed Samba ports. Rules for both IPv4 and IPv6 (v6) network protocols are listed.
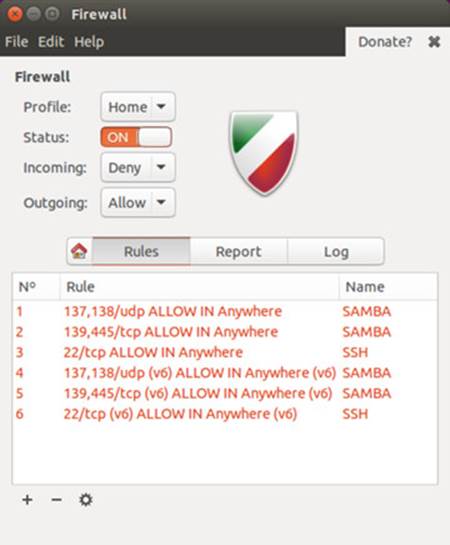

Figure 17-1: Gufw
The Gufw dialog has a Firewall section and four tabs, Home, Rules, Report, and Log. The Firewall section has a Status button for turning the firewall on or off. There is a Profile menu for Home, Office, and Public configurations. The Incoming and Outgoing drop down menus for setting the default firewall rules. Options are Deny, Reject, or Allow, and are applied to incoming and outgoing traffic respectively. By default, incoming traffic is denied (Deny), and outgoing traffic is allowed (Allow). Rules you specified in the Rules tab will make exceptions, allowing only certain traffic in or out. Should you select the Allow option, the firewall accepts all incoming traffic. In this case you should set up rules to deny access to some traffic, otherwise the firewall becomes ineffective, allowing access to all traffic. The Report tab lists active services and ports such as the Samba server (smbd) on port 139. The Log tab list firewall notices. You can copy notices, as well as delete a log. The Home tab provides basic help on how to use Gufw.
To add a rule, click the plus button (+) on the lower left corner of the Rules tab to open the "Add rule" dialog, which has three tabs for managing rules: Preconfigured, Simple, and Advanced. The Preconfigured tab provides five menus: the first for the policy (Allow, Deny, Reject, and Limit), the second for the traffic direction (In or Out), the third for the category of the application and the fourth for a subcategory, and the fifth for the particular application or service for the rule. The main categories are Audio video, Games, Network, Office, and System. The Network category lists most network services like SSH, Samba, and FTP. Should there be a security issue with the rule, a warning is displayed.
Should you need modify the default rule for an application, you can click on the arrow button to open the Advanced tab for that rule.
Click the Add button to add the rule. Once added a port entry for the rule appears in the Rules section. In Figure 17-2 the Samba service has been selected and then added, showing up in the Rules section as "137,138/udp ALLOW IN Anywhere."
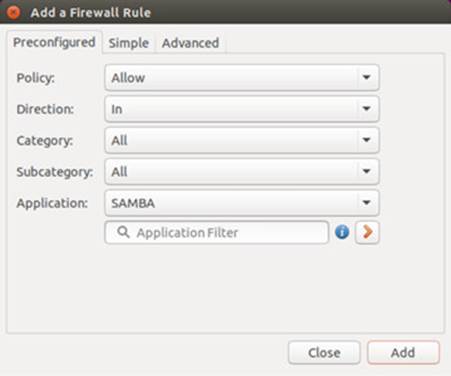
Figure 17-2: Gufw Preconfigured rules
Applications and services can also be blocked. To prevent access by the FTP service, you would first select Deny, then Service, and then the FTP entry.
Besides Allow and Deny, you can also choose a Limit option. The Limit option will enable connection rate limiting, restricting connections to no more than 6 every 30 seconds for a given port. This is meant to protect against brute force attacks.
Should there be no preconfigured entry, you can use the Simple tab to allow access to a port (see Figure 17-3 ). The first menu is for the rule (Allow, Deny, Reject, and Limit), and the second for the protocol (TCP, UDP, or both). In the Port text box you enter the port number.
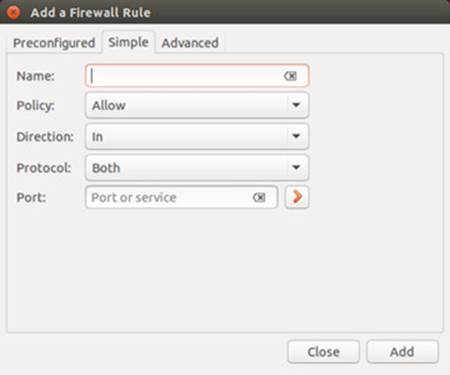
Figure 17-3: Gufw Simple rules
On the Advanced tab you can enter more complex rules. You can set up allow or deny rules for tcp or udp protocols, and specify the incoming and outgoing host (ip) and port (see Figure 17-4 ).
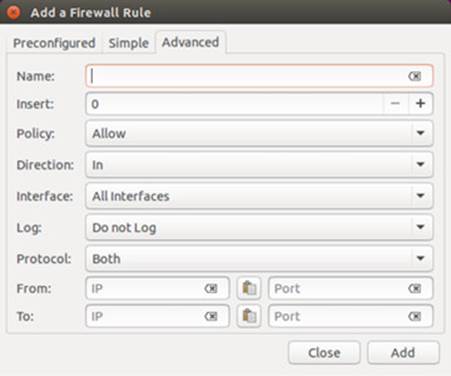
Figure 17-4: Gufw Advanced rules
If you decide to remove a rule, select it in the Rules section and then click the minus button on the lower left corner (-). To remove several rules, click and press Shift-click or use Ctrl-click to select a collection of rules, and then click the minus button.
You can edit any rule by selecting it and clicking the edit button (gear image) to open an "Update a Firewall Rule" dialog (see Figure 17-5 ). For a default or simple rule, you can only change a few options, but you can turn on logging.
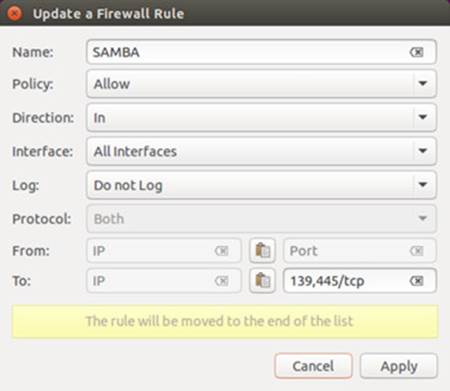
Figure 17-5: Gufw edit a rule
You can also create rules for detected active ports. Click on a port in the Listening Report section, and then click on the plus button at the bottom of that section. An "Add a Firewall Rule" dialog opens to the Advanced tab with the name of the service active on that port and the port number (see figure 17-6). You can change any of the options. The port number is already entered.
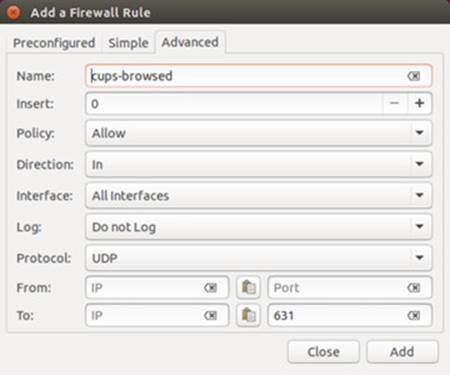
Figure 17-6: Gufw create a rule for an active port
IPtables, NAT, Mangle, and ip6tables
A good foundation for your network’s security is to set up a Linux system to operate as a firewall for your network, protecting it from unauthorized access. You can use a firewall to implement either packet filtering or proxies. Packet filtering is the process of deciding whether a packet received by the firewall host should be passed on into the local network. The packet-filtering software checks the source and destination addresses of the packet and sends the packet on, if it’s allowed. Even if your system is not part of a network but connects directly to the Internet, you can still use the firewall feature to control access to your system. Of course, this also provides you with much more security.
With proxies, you can control access to specific services, such as Web or FTP servers. You need a proxy for each service you want to control. The Web server has its own Web proxy, while an FTP server has an FTP proxy. Proxies can also be used to cache commonly used data, such as Web pages, so that users needn’t constantly access the originating site. The proxy software commonly used on Linux systems is Squid.
An additional task performed by firewalls is network address translation (NAT). Network address translation redirects packets to appropriate destinations. It performs tasks such as redirecting packets to certain hosts, forwarding packets to other networks, and changing the host source of packets to implement IP masquerading.
Firewalls also can perform packet mangling, which modifies packet information to control operations like routing, connection size, and priority.
Note: The IP Chains package is the precursor to IPtables that was used on Linux systems running the 2.2 kernel. It is still in use on some Linux systems. The Linux Web site for IP Chains, which is the successor to ipfwadm used on older versions of Linux, is currentlywww.netfilter.org/ipchains. IP Chains is no longer included with many Linux distributions.
The Netfilter software package implements both packet filtering and NAT tasks for the Linux 2.4 kernel and above. The Netfilter software is developed by the Netfilter Project, which you can find out more about at http://www.netfilter.org.
Iptables
The command used to execute packet filtering and NAT tasks is iptables, and the software is commonly referred to as simply Iptables. Netfilter implements packet filtering and NAT tasks separately using different tables of rules. This approach streamlines the packet-filtering task, letting IPtables perform packet-filtering checks without the overhead of also having to do address translations. NAT operations are also freed from being mixed in with packet-filtering checks. You use the iptables command for packet filtering, NAT tasks, and packet mangling. Each operation has its own table of rules: filter for packet filtering, nat for NAT tasks, and mangle for packet mangling. For NAT you specify the NAT table with the -t nat option. For the mangle table you use the -t mangle option. The packet filtering is the default. It can be specified with the -t filter option, but it’s usually left out, assuming that if a table is not specified it is a filter operation. In addition, netfilter also handles certain exemptions to connection tracking operations in a raw table.
On Ubuntu, firewall applications, such as ufw,will set up their own iptables files containing iptables commands. When these are run, they will set up the tables and rules used to filter, translate, and mangle packets. The iptables files are located at /etc/ufw. If you want to set up rules manually and start them automatically you can use the iptables-persistent service (iptables-persistent package). The iptables-persistent service will run IPtables rules using rules you have set up in the /etc/iptables/rules file. Use the iptables-persistent script to run iptables-restore to load rules from the rules file.
sudo service iptables-persistent start
ip6tables
The ip6tables command provides support for IPv6 addressing. It is identical to IPtables, except that it allows the use of IPv6 addresses instead of IPv4 addresses. Both filter and mangle tables are supported in ip6tables, but not NAT tables. The filter tables support the same options and commands as supported in IPtables. The mangle tables will allow specialized packet changes like those for IPtables, using PREROUTING, INPUT, OUTPUT, FORWARD, and POSTROUTING rules. Some extensions have ipv6 labels for their names, such as ipv6-icmp, which correspond to the IPtables icmp extension. The ipv6headers extension is used to select IPv6 headers.
arptables
The arptables tool allows you to manage rules for the IPv4 Address Resolution Protocol (ARP). The ARP is used on IPv4 local networks to discover the hardware address (MAC address) associated with an IP address. Once the association is made, connections can be made to that address. In this way, a host on a local network can detect and connect to another host. arptables sets up IPtables rules for controlling access between these hosts. The filter, mangle, and nat tables are supported. Install the arptables package. arptables has its own commands for saving and loading ARP rules, arptables-restore and arptables-save. It is used for managing transmissions on local networks.
ebtables
The ebtables tool manages rules for Ethernet bridges. Install the ebtables packages. Configuration files are /etc/sysconfig/ebtables-config. ebtables has its own startup script, /etc/init.d/ebtables, and uses ebtables-save and ebtables-restore to save and load ebtables rules.
xtables
xtables is an underlying framework that combines the code for iptables, ip6tables, and arptables. Firewall modules hook into this framework. Modules that connect directly to this framework begin the xt prefix.
Modules
Netfilter is designed to be modularized and extensible. Capabilities can be added in the form of modules such as the state module, which adds connection tracking. Most modules are loaded as part of the IPtables service. Others are optional; you can elect to load them before installing rules. The IPtables modules are located at /lib/modules/kernel-version/kernel/net/ipv4/netfilter, where kernel-version is your kernel number. For IPv6 modules, check the ipv6/netfilter directory. Modules that load automatically will have an ipt_ prefix, and optional modules have just anip_ prefix. If you are writing you own iptables script, you would have to add modprobe commands to load optional modules directly.
The optional IPtables modules, also known as helper modules, are located in the /lib/modules/kernel-version/kernel/net/netfilter directory. Modules that apply to the netfilter table begin with the prefix nf, and those that apply to all tables begin with the prefix ipt. An example of a helper module is a connection tracking module that tracks packets that belong to an established connection, like an FTP download connection tracker module. The conntrack helper modules have the name conntrack, such as nf_conntrack_ipv4.ko.
Packet Filtering
Netfilter is essentially a framework for packet management that can check packets for particular network protocols and notify parts of the kernel listening for them. Built on the Netfilter framework is the packet selection system implemented by IPtables. With IPtables, different tables of rules can be set up to select packets according to differing criteria. Netfilter currently supports three tables: filter, nat, and mangle. Packet filtering is implemented using a filter table that holds rules for dropping or accepting packets. Network address translation operations such as IP masquerading are implemented using the NAT table that holds IP masquerading rules. The mangle table is used for specialized packet changes. Changes can be made to packets before they are sent out, when they are received, or as they are being forwarded. This structure is extensible in that new modules can define their own tables with their own rules. This also greatly improves efficiency. Instead of all packets checking one large table, they access only the table of rules they need.
IP table rules are managed using the iptables command. For this command, you will need to specify the table you want to manage. The default is the filter table, which does not need to be specified. You can list the rules you have added at any time with the -L and -n options, as shown next. The -n option says to use only numeric output for both IP addresses and ports, avoiding a DNS lookup for hostnames. You could, however, just use the -L option to see the port labels and hostnames:
iptables -L -n
Chains
Rules are combined into different chains. The kernel uses chains to manage packets it receives and sends out. A chain is simply a checklist of rules. These rules specify what action to take for packets containing certain headers. The rules operate with an if-then-else structure. If a packet does not match the first rule, the next rule is then checked, and so on. If the packet does not match any rules, the kernel consults chain policy. Usually, at this point the packet is rejected. If the packet does match a rule, it is passed to its target, which determines what to do with the packet. The standard targets are listed in Table 17-4 . If a packet does not match any of the rules, it is passed to the chain’s default target.
Targets
A target could, in turn, be another chain of rules, or even a chain of user-defined rules. A packet could be passed through several chains before finally reaching a target. In the case of user-defined chains, the default target is always the next rule in the chains from which it was called. This sets up a procedure or function-call-like flow of control found in programming languages. When a rule has a user-defined chain as its target, when activated, that user-defined chain is executed. If no rules are matched, execution returns to the next rule in the originating chain.
Tip: Specialized targets and options can be added by means of kernel patches provided by the Netfilter site. For example, the SAME patch returns the same address for all connections. A patch-o-matic option for the Netfilter make file will patch your kernel source code, adding support for the new target and options. You can then rebuild and install your kernel.
|
Target |
Function |
|
ACCEPT |
Allow packet to pass through the firewall. |
|
DROP |
Deny access by the packet. |
|
REJECT |
Deny access and notify the sender. |
|
QUEUE |
Send packets to user space. |
|
RETURN |
Jump to the end of the chain and let the default target process it. |
Table 17-4: IPtables Targets
Firewall and NAT Chains
The kernel uses three firewall chains: INPUT, OUTPUT, and FORWARD. When a packet is received through an interface, the INPUT chain is used to determine what to do with it. The kernel then uses its routing information to decide where to send it. If the kernel sends the packet to another host, the FORWARD chain is checked. Before the packet is actually sent, the OUTPUT chain is also checked. In addition, two NAT table chains, POSTROUTING and PREROUTING, are implemented to handle masquerading and packet address modifications. The built-in Netfilter chains are listed in Table 17-5 .
|
Chain |
Description |
|
INPUT |
Rules for incoming packets |
|
OUTPUT |
Rules for outgoing packets |
|
FORWARD |
Rules for forwarded packets |
|
PREROUTING |
Rules for redirecting or modifying incoming packets, NAT table only |
|
POSTROUTING |
Rules for redirecting or modifying outgoing packets, NAT table only |
Table 17-5: Netfilter Built-in Chains
Adding and Changing Rules
You add and modify chain rules using the iptables commands. An iptables command consists of the command iptables, followed by an argument denoting the command to execute (see Table 17-6 ). For example, iptables -A is the command to add a new rule, whereas iptables -D is the command to delete a rule. The iptables commands are listed in Table 17-4 .
|
Option |
Function |
|
-A chain |
Appends a rule to a chain. |
|
-D chain [ rulenum] |
Deletes matching rules from a chain. Deletes rule rulenum (1 = first) from chain. |
|
-I chain [rulenum] |
Inserts in chain as rulenum (default 1 = first). |
|
-R chain rulenum |
Replaces rule rulenum (1 = first) in chain. |
|
-L [chain] |
Lists the rules in chain or all chains. |
|
-E [chain] |
Renames a chain. |
|
-F [chain] |
Deletes (flushes) all rules in chain or all chains. |
|
-R chain |
Replaces a rule; rules are numbered from 1. |
|
-Z [chain] |
Zero counters in chain or all chains. |
|
-N chain |
Creates a new user-defined chain. |
|
-X chain |
Deletes a user-defined chain. |
|
-P chain target |
Changes policy on chain to target. |
Table 17-6: IPtables Commands
The following command simply lists the chains along with their rules currently defined for your system. The output shows the default values created by iptables commands.
iptables-L -n
Chain input (policy ACCEPT):
Chain forward (policy ACCEPT):
Chain output (policy ACCEPT):
To add a new rule to a chain, you use -A. Use -D to remove it, and -R to replace it. Following the command, list the chain to which the rule applies, such as the INPUT, OUTPUT, or FORWARD chain, or a user-defined chain. Next, you list different options that specify the actions you want taken (most are the same as those used for IP Chains, with a few exceptions). The -s option specifies the source address attached to the packet, -d specifies the destination address, and the -j option specifies the target of the rule. The ACCEPT target will allow a packet to pass. The -i option indicates the input device and can be used only with the INPUT and FORWARD chains. The -o option indicates the output device and can be used only for OUTPUT and FORWARD chains. Table 17-6 lists several basic options.
IPtables Options
The IPtables package is designed to be extensible, and a number of options with selection criteria can be included with IPtables (see Table 17-7 ). For example, the TCP extension includes the --syn option that checks for SYN packets. The ICMP extension provides the --icmp-type option for specifying ICMP packets as those used in ping operations. The limit extension includes the --limit option, with which you can limit the maximum number of matching packets in a specified time period, such as a second.
Note: In IPtables commands, chain names have to be entered in uppercase, as with the chain names INPUT, OUTPUT, and FORWARD.
|
Option |
Function |
|
-p [!] proto |
Specifies a protocol, such as TCP, UDP, ICMP, or ALL. |
|
-s [!] address[/mask] [!] [port[:port]] |
Source address to match. With the port argument, you can specify the port. |
|
--sport [!] [port[:port]] |
Source port specification. You can specify a range of ports using the colon, port:port. |
|
-d [!] address[/mask] [!] [port[:port]] |
Destination address to match. With the port argument, you can specify the port. |
|
--dport [!][port[:port]] |
Destination port specification. |
|
--icmp-type [!] typename |
Specifies ICMP type. |
|
-i [!] name[+] |
Specifies an input network interface using its name (for example, eth0). The + symbol functions as a wildcard. The + attached to the end of the name matches all interfaces with that prefix (eth+ matches all Ethernet interfaces). Can be used only with the INPUT chain. |
|
-j target [port] |
Specifies the target for a rule (specify [port] for REDIRECT target). |
|
--to-source < ipaddr>[-< ipaddr>][: port- port] |
Used with the SNAT target, rewrites packets with new source IP address. |
|
--to-destination < ipaddr>[-< ipaddr>][: port- port] |
Used with the DNAT target, rewrites packets with new destination IP address. |
|
-n |
Numeric output of addresses and ports, used with -L. |
|
-o [!] name[+] |
Specifies an output network interface using its name (for example, eth0). Can be used only with FORWARD and OUTPUT chains. |
|
-t table |
Specifies a table to use, as in -t nat for the NAT table. |
|
-v |
Verbose mode, shows rule details, used with -L. |
|
-x |
Expands numbers (displays exact values), used with -L. |
|
[!] -f |
Matches second through last fragments of a fragmented packet. |
|
[!] -V |
Prints package version. |
|
! |
Negates an option or address. |
|
-m |
Specifies a module to use, such as state. |
|
--state |
Specifies options for the state module such as NEW, INVALID, RELATED, and ESTABLISHED. Used to detect packet’s state. NEW references SYN packets (new connections). |
|
--syn |
SYN packets, new connections. |
|
--tcp-flags |
TCP flags: SYN, ACK, FIN, RST, URG, PS, and ALL for all flags. |
|
--limit |
Option for the limit module (-m limit). Used to control the rate of matches, matching a given number of times per second. |
|
--limit-burst |
Option for the limit module (-m limit). Specifies maximum burst before the limit kicks in. Used to control denial-of-service attacks. |
Table 17-7: IPtables Options
In the following example, the user adds a rule to the INPUT chain to accept all packets originating from the address 192.168.0.55. Any packets that are received (INPUT) whose source address (-s) matches 192.168.0.55 are accepted and passed through (-j ACCEPT):
iptables -A INPUT -s 192.168.0.55 -j ACCEPT
Accepting and Denying Packets: DROP and ACCEPT
There are two built-in targets: DROP and ACCEPT. Other targets can be either user-defined chains or extensions added on, such as REJECT. Two special targets are used to manage chains, RETURN and QUEUE. RETURN indicates the end of a chain and returns to the chain it started from. QUEUE is used to send packets to user space. The following example will drop all incoming packets from the www.myjunk.com site:
iptables -A INPUT -s www.myjunk.com -j DROP
You can turn a rule into its inverse with an ! symbol. For example, to accept all incoming packets except those from a specific address, place an ! symbol before the -s option and that address. The following example will accept all packets except those from the IP address 192.168.0.45:
iptables -A INPUT -j ACCEPT ! -s 192.168.0.45
You can specify an individual address using its domain name or its IP number. For a range of addresses, you can use the IP number of their network and the network IP mask. The IP mask can be an IP number or simply the number of bits making up the mask. For example, all of the addresses in network 192.168.0 can be represented by 192.168.0.0/225.255.255.0 or by 192.168.0.0/24. To specify any address, you can use 0.0.0.0/0.0.0.0 or simply 0/0. By default, rules reference any address if no -s or -d specification exists. The following example accepts messages coming in that are from (source) any host in the 192.168.0.0 network and that are going (destination) anywhere at all (the -d option is left out or could be written as -d 0/0):
iptables -A INPUT -s 192.168.0.0/24 -j ACCEPT
The IPtables rules are usually applied to a specific network interface such as the Ethernet interface used to connect to the Internet. For a single system connected to the Internet, you will have two interfaces, one that is your Internet connection, and a loopback interface (lo) for internal connections between users on your system. The network interface for the Internet is referenced using the device name for the interface. For example, the first Ethernet card with the device name would be referenced by the device name eth0. A modem using PPP protocols with the device name ppp0 would have the name ppp0. In IPtables rules, you use the -i option to indicate the input device; it can be used only with the INPUT and FORWARD chains. The -o option indicates the output device and can be used only for OUTPUT and FORWARD chains. Rules can then be applied to packets arriving and leaving on particular network devices. In the following examples, the first rule references the Ethernet device eth0, and the second, the localhost:
iptables -A INPUT -j DROP -i eth0 -s 192.168.0.45
iptables -A INPUT -j ACCEPT -i lo
User-Defined Chains
With IPtables, the FORWARD and INPUT chains are evaluated separately. One does not feed into the other. This means that if you want to completely block certain addresses from passing through your system, you will need to add both a FORWARD rule and an INPUT rule for them.
iptables -A INPUT -j DROP -i eth0 -s 192.168.0.45
iptables -A FORWARD -j DROP -i eth0 -s 192.168.0.45
A common method for reducing repeated INPUT and FORWARD rules is to create a user chain into which both the INPUT and FORWARD feed. You define a user chain with the -N option. The next example shows the basic format for this arrangement. A new chain is created called incoming (it can be any name you choose). The rules you would define for your FORWARD and INPUT chains are now defined for the incoming chain. The INPUT and FORWARD chains then use the incoming chain as a target, jumping directly to it and using its rules to process any packets they receive.
iptables -N incoming
iptables -A incoming -j DROP -i eth0 -s 192.168.0.45
iptables -A incoming -j ACCEPT -i lo
iptables -A FORWARD -j incoming
iptables -A INPUT -j incoming
ICMP Packets
Firewalls often block certain Internet Control Message Protocol (ICMP) messages. ICMP redirect messages, in particular, can take control of your routing tasks. You need to enable some ICMP messages, however, such as those needed for ping, traceroute, and particularly destination-unreachable operations. In most cases, you always need to make sure destination-unreachable packets are allowed; otherwise, domain name queries could hang. Some of the more common ICMP packet types are listed in Table 17-8 . You can enable an ICMP type of packet with the --icmp-type option, which takes as its argument a number or a name representing the message. The following examples enable the use of echo-reply, echo-request, and destination-unreachable messages, which have the numbers 0, 8, and 3:
|
Number |
Name |
Required By |
|
0 |
echo-reply |
ping |
|
3 |
destination-unreachable |
Any TCP/UDP traffic |
|
5 |
redirect |
Routing if not running routing daemon |
|
8 |
echo-request |
ping |
|
11 |
time-exceeded |
traceroute |
Table 17-8: Common ICMP Packets
iptables -A INPUT -j ACCEPT -p icmp -i eth0 --icmp -type echo-reply -d 10.0.0.1
iptables -A INPUT -j ACCEPT -p icmp -i eth0 --icmp-type echo-request -d 10.0.0.1
iptables -A INPUT -j ACCEPT -p icmp -i eth0 --icmp-type destination-unreachable -d 10.0.0.1
Their rule listing will look like this:
ACCEPT icmp -- 0.0.0.0/0 10.0.0.1 icmp type 0
ACCEPT icmp -- 0.0.0.0/0 10.0.0.1 icmp type 8
ACCEPT icmp -- 0.0.0.0/0 10.0.0.1 icmp type 3
Ping operations need to be further controlled to avoid the ping-of-death security threat. You can do this several ways. One way is to deny any ping fragments. Ping packets are normally very small. You can block ping-of-death attacks by denying any ICMP packet that is a fragment. Use the -f option to indicate fragments.
iptables -A INPUT -p icmp -j DROP -f
Another way is to limit the number of matches received for ping packets. You use the limit module to control the number of matches on the ICMP ping operation. Use -m limit to use the limit module, and --limit to specify the number of allowed matches. 1/s will allow one match per second.
iptables -A FORWARD -p icmp --icmp-type echo-request -m limit --limit 1/s -j ACCEPT
Controlling Port Access
If your system is hosting an Internet service, such as a Web or FTP server, you can use IPtables to control access to it. You can specify a particular service by using the source port (--sport) or destination port (--dport) options with the port that the service uses. IPtables lets you use names for ports such as www for the Web server port. The names of services and the ports they use are listed in the /etc/services file, which maps ports to particular services. For a domain name server, the port would be domain. You can also use the port number if you want, preceding the number with a colon. The following example accepts all messages to the Web server located at 192.168.0.43:
iptables -A INPUT -d 192.168.0.43 --dport www -j ACCEPT
Common ports checked and their labels are shown here:
|
Service |
Port Number |
Port Label |
|
Auth |
113 |
auth |
|
Finger |
79 |
finger |
|
FTP |
21 |
ftp |
|
NTP |
123 |
ntp |
|
Portmapper |
111 |
sunrpc |
|
Telnet |
23 |
telnet |
|
Web server |
80 |
www |
You can also use port references to protect certain services and deny others. This approach is often used if you are designing a firewall that is much more open to the Internet, letting users make freer use of Internet connections. Certain services you know can be harmful, such as Telnet and NTP, can be denied selectively. For example, to deny any kind of Telnet operation on your firewall, you can drop all packets coming in on the Telnet port, 23. To protect NFS operations, you can deny access to the port used for the portmapper, 111. You can use either the port number or the port name.
# deny outside access to portmapper port on firewall.
iptables -A arriving -j DROP -p tcp -i eth0 --dport 111
# deny outside access to telnet port on firewall.
iptables -A arriving -j DROP -p tcp -i eth0 --dport telnet
The rule listing will look like this:
DROP tcp -- 0.0.0.0/0 0.0.0.0/0 tcp dpt:111
DROP tcp -- 0.0.0.0/0 0.0.0.0/0 tcp dpt:23
One port-related security problem is access to your X server ports that range from 6000 to 6009. On a relatively open firewall, these ports could be used to illegally access your system through your X server. A range of ports can be specified with a colon, as in 6000:6009. You can also use x11 for the first port, x11:6009. Sessions on the X server can be secured by using SSH, which normally accesses the X server on port 6010.
iptables -A arriving -j DROP -p tcp -i eth0 --dport 6000:6009
Packet States: Connection Tracking
One of the more useful extensions is the state extension, which can easily detect tracking information for a packet. Connection tracking maintains information about a connection such as its source, destination, and port. It provides an effective means for determining which packets belong to an established or related connection. To use connection tracking, you specify the state module first with -m state. Then you can use the --state option. Here you can specify any of the following states:
|
State |
Description |
|
NEW |
A packet that creates a new connection |
|
ESTABLISHED |
A packet that belongs to an existing connection |
|
RELATED |
A packet that is related to, but not part of, an existing connection, such as an ICMP error or a packet establishing an FTP data connection |
|
INVALID |
A packet that could not be identified for some reason |
|
RELATED+REPLY |
A packet that is related to an established connection, but not part of one directly |
If you are designing a firewall that is meant to protect your local network from any attempts to penetrate it from an outside network, you may want to restrict packets coming in. Simply denying access by all packets is unfeasible, because users connected to outside servers—say, on the Internet—must receive information from them. You can, instead, deny access by a particular kind of packet used to initiate a connection. The idea is that an attacker must initiate a connection from the outside. The headers of these kinds of packets have their SYN bit set on and their FIN and ACK bits empty. The state module’s NEW state matches on any such SYN packet. By specifying a DROP target for such packets, you deny access by any packet that is part of an attempt to make a connection with your system. Anyone trying to connect to your system from the outside is unable to do so. Users on your local system who have initiated connections with outside hosts can still communicate with them. The following example will drop any packets trying to create a new connection on the eth0 interface, though they will be accepted on any other interface:
iptables -A INPUT -m state --state NEW -i eth0 -j DROP
You can use the ! operator on the eth0 device combined with an ACCEPT target to compose a rule that will accept any new packets except those on the eth0 device. If the eth0 device is the only one that connects to the Internet, this still effectively blocks outside access. At the same time, input operation for other devices such as your localhost are free to make new connections. This kind of conditional INPUT rule is used to allow access overall with exceptions. It usually assumes that a later rule, such as a chain policy, will drop remaining packets.
iptables -A INPUT -m state --state NEW ! -i eth0 -j ACCEPT
The next example will accept any packets that are part of an established connection or related to such a connection on the eth0 interface:
iptables -A INPUT -m state --state ESTABLISHED,RELATED -j ACCEPT
Specialized Connection Tracking: ftp, irc, Amanda, tftp.
To track certain kinds of packets, IPtables uses specialized connection tracking modules. These are optional modules that you need to have loaded manually. To track passive FTP connections, you would have to load the ip_conntrack_ftp module. To add NAT table support, you would also load the ip_nat_ftp module. For IRC connections, you use ip_conntrack_irc and ip_nat_irc. There are corresponding modules for Amanda (the backup server) and TFTP (Trivial FTP).
If you are writing your own iptables script, you would have to add modprobe commands to load the modules.
modprobe ip_conntrack ip_conntrack_ftp ip_nat_ftp
modprobe ip_conntrack_amanda ip_nat_amanda
Network Address Translation (NAT)
Network address translation (NAT) is the process whereby a system will change the destination or source of packets as they pass through the system. A packet will traverse several linked systems on a network before it reaches its final destination. Normally, they will simply pass the packet on. However, if one of these systems performs a NAT operation on a packet, it can change the source or destination. A packet sent to a particular destination could have its destination address changed. To make this work, the system also needs to remember such changes so that the source and destination for any reply packets are altered back to the original addresses of the packet being replied to.
NAT is often used to provide access to systems that may be connected to the Internet through only one IP address. Such is the case with networking features such as IP masquerading, support for multiple servers, and transparent proxying. With IP masquerading, NAT operations will change the destination and source of a packet moving through a firewall/gateway linking the Internet to computers on a local network. The gateway has a single IP address that the other local computers can use through NAT operations. If you have multiple servers but only one IP address, you can use NAT operations to send packets to the alternate servers. You can also use NAT operations to have your IP address reference a particular server application such as a Web server (transparent proxy). NAT tables are not implemented for ip6tables.
Adding NAT Rules
Packet selection rules for NAT operations are added to the NAT table managed by the iptables command. To add a rule to the NAT table, you would have to specify the NAT table with the -t nat option as shown here:
iptables -t nat
With the -L option, you can list the rules you have added to the NAT table:
iptables -t nat -L -n
Adding the -n option will list IP addresses and ports in numeric form. This will speed up the listing, as iptables will not attempt to do a DNS lookup to determine the hostname for the IP address.
Nat Targets and Chains
In addition, there are two types of NAT operations: source NAT, specified as SNAT target, and destination NAT, specified as DNAT target. The SNAT target is used for rules that alter source addresses, and DNAT target, for those that alter destination addresses.
Three chains in the NAT table are used by the kernel for NAT operations. These are PREROUTING, POSTROUTING, and OUTPUT. PREROUTING is used for destination NAT (DNAT) rules. These are packets that are arriving. POSTROUTING is used for source NAT (SNAT) rules. These are for packets leaving. OUTPUT is used for destination NAT rules for locally generated packets.
The targets valid only for the NAT table are shown here:
|
SNAT |
Modify source address, use --to-source option to specify new source address. |
|
DNAT |
Modify destination address, use --to-destination option to specify new destination address. |
|
REDIRECT |
Redirect a packet. |
|
MASQUERADE |
IP masquerading. |
|
MIRROR |
Reverse source and destination and send back to sender. |
|
MARK |
Modify the Mark field to control message routing. |
As with packet filtering, you can specify source (-s) and destination (-d) addresses, as well as the input (-i) and output (-o) devices. The -j option will specify a target such as MASQUERADE. You would implement IP masquerading by adding a MASQUERADE rule to the POSTROUTING chain:
iptables -t nat -A POSTROUTING -o eth0 -j MASQUERADE
To change the source address of a packet leaving your system, you would use the POSTROUTING rule with the SNAT target. For the SNAT target, you use the --to-source option to specify the source address:
iptables -t nat -A POSTROUTING -o eth0 -j SNAT --to-source 192.168.0.4
To change the destination address of packets arriving on your system, you would use the PREROUTING rule with the DNAT target and the --to-destination option:
iptables -t nat -A PRETROUTING -i eth0 -j DNAT --to-destination 192.168.0.3
Specifying a port lets you change destinations for packets arriving on a particular port. In effect, this lets you implement port forwarding. In the next example, every packet arriving on port 80 (the Web service port) is redirected to 10.0.0.3, which in this case would be a system running a Web server.
iptables -t nat -A PRETROUTING -i eth0 -dport 80 -j DNAT --to-destination 10.0.0.3
With the TOS and MARK targets, you can mangle the packet to control its routing or priority. A TOS target sets the type of service for a packet, which can set the priority using criteria such as normal-service, minimize-cost, or maximize-throughput, among others.
Nat Redirection: Transparent Proxies
NAT tables can be used to implement any kind of packet redirection, a process transparent to the user. Redirection is commonly used to implement a transparent proxy. Redirection of packets is carried out with the REDIRECT target. With transparent proxies, packets received can be automatically redirected to a proxy server. For example, packets arriving on the Web service port, 80, can be redirected to the Squid Proxy service port, usually 3128. This involves a command to redirect a packet, using the REDIRECT target on the PREROUTING chain:
# iptables -t nat -A PREROUTING -i eth1 --dport 80 -j REDIRECT --to-port 3128
Packet Mangling: the Mangle Table
The packet mangling table is used to actually modify packet information. Rules applied specifically to this table are often designed to control the mundane behavior of packets, like routing, connection size, and priority. Rules that actually modify a packet, rather than simply redirecting or stopping it, can be used only in the mangle table. For example, the TOS target can be used directly in the mangle table to change the Type of Service field to modifying a packet’s priority. A TCPMSS target could be set to control the size of a connection. The ECN target lets you work around ECN black holes, and the DSCP target will let you change DSCP bits. Several extensions such as the ROUTE extension will change a packet, in this case, rewriting its destination, rather than just redirecting it.
The mangle table is indicated with the -t mangle option. Use the following command to see what chains are listed in your mangle table:
iptables -t mangle -L
Several mangle table targets are shown here:
|
TOS |
Modify the Type of Service field to manage the priority of the packet. |
|
TCPMSS |
Modify the allowed size of packets for a connection, enabling larger transmissions. |
|
ECN |
Remove ECN black hole information. |
|
DSCP |
Change DSCP bits. |
|
ROUTE |
Extension TARGET to modify destination information in the packet. |
Note: The IPtables package is designed to be extensible, allowing customized targets to be added easily. This involves applying patches to the kernel and rebuilding it. See www.netfilter.org for more details, along with a listing of extended targets.
IPtables Scripts
Though you can enter IPtables rules from the shell command line, when you shut down your system, these commands will be lost. You will most likely need to place your IPtables rules in a script that can then be executed directly. This way you can edit and manage a complex set of rules, adding comments and maintaining their ordering.
To load the rules, use the iptables-restore script to read the IPtables commands from that file.
sudo iptables-restore < myfilter
The iptables-save command will save currently loaded firewall rules to a file of your choosing using the redirection operator, >. You could use this command to save a copy of rules set up by another firewall application like ufw, and then use that file as a basis for customizing firewall rules manually. You could then use iptables-restore to load your customized rules. The iptables-save command will save whatever rules are loaded currently, even those you may have entered directly using the iptables command.
sudo iptables-save > mycurrentfirewall
An IPtables Script Example: IPv4
You now have enough information to create a simple IPtables script that will provide basic protection for a single system connected to the Internet. The following script, myfilter, provides an IPtables filtering process to protect a local network and a Web site from outside attacks. This example uses IPtables and IPv4 addressing. For IPv6 addressing you would use ip6tables, which has corresponding commands, except for the NAT rules, which would be implemented as mangle rules.
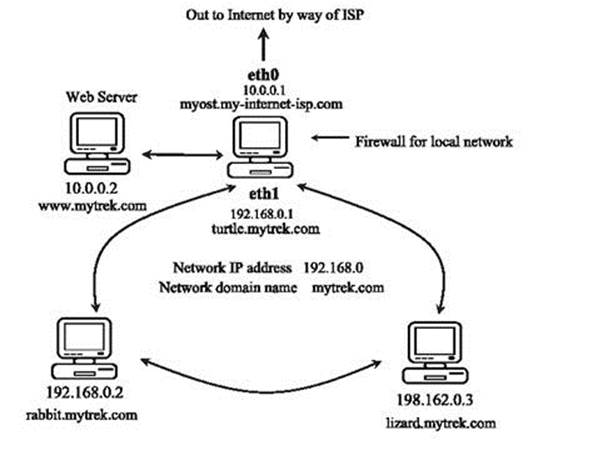
Figure 17-7 A network with a firewall
myfilter
# Firewall Gateway system IP address is 10.0.0.1 using Ethernet device eth0
# Private network address is 192.168.0.0 using Ethernet device eth1
# Web site address is 10.0.0.2
# turn off IP forwarding
echo 0 > /proc/sys/net/ipv4/ip_forward
# Flush chain rules
iptables -F INPUT
iptables -F OUTPUT
iptables -F FORWARD
# set default (policy) rules
iptables -P INPUT DROP
iptables -P OUTPUT ACCEPT
iptables -P FORWARD ACCEPT
# IP spoofing, deny any packets on the internal network that have an external source address
iptables -A INPUT -j LOG -i eth1 \! -s 192.168.0.0/24
iptables -A INPUT -j DROP -i eth1 \! -s 192.168.0.0/24
iptables -A FORWARD -j DROP -i eth1 \! -s 192.168.0.0/24
# IP spoofing, deny any outside packets (any not on eth1) that have the
# source address of the internal network
iptables -A INPUT -j DROP \! -i eth1 -s 192.168.0.0/24
iptables -A FORWARD -j DROP \! -i eth1 -s 192.168.0.0/24
# IP spoofing, deny any outside packets with localhost address
# (packets not on the lo interface (any on eth0 or eth1) that have source address localhost)
iptables -A INPUT -j DROP -i \! lo -s 127.0.0.0/255.0.0.0
iptables -A FORWARD -j DROP -i \! lo -s 127.0.0.0/255.0.0.0
# allow all incoming messages for users on your firewall system
iptables -A INPUT -j ACCEPT -i lo
# allow communication to the Web server (address 10.0.0.2), port www
iptables -A INPUT -j ACCEPT -p tcp -i eth0 --dport www -s 10.0.0.2
# Allow established connections from Web servers to internal network
iptables -A INPUT -m state --state ESTABLISHED,RELATED -i eth0 -p tcp --sport www -s 10.0.0.2 -d 192.168.0.0/24 -j ACCEPT
# Prevent new connections from Web servers to internal network
iptables -A OUTPUT -m state --state NEW -o eth0 -p tcp --sport www -d 192.168.0.0/24 -j DROP
# allow established and related outside communication to your system
# allow outside communication to the firewall, except for ICMP packets
iptables -A INPUT -m state --state ESTABLISHED,RELATED -i eth0 -p \! icmp -j ACCEPT
# prevent outside initiated connections
iptables -A INPUT -m state --state NEW -i eth0 -j DROP
iptables -A FORWARD -m state --state NEW -i eth0 -j DROP
# allow all local communication to and from the firewall on eth1 from the local network
iptables -A INPUT -j ACCEPT -p all -i eth1 -s 192.168.0.0/24
# Set up masquerading to allow internal machines access to outside network
iptables -t nat -A POSTROUTING -o eth0 -j MASQUERADE
# Accept ICMP Ping and Destination unreachable messages
# Others will be rejected by INPUT and OUTPUT DROP policy
iptables -A INPUT -j ACCEPT -p icmp -i eth0 --icmp-type echo-reply -d 10.0.0.1
iptables -A INPUT -j ACCEPT -p icmp -i eth0 --icmp-type echo-request -d 10.0.0.1
iptables -A INPUT -j ACCEPT -p icmp -i eth0 --icmp-type destination-unreachable -d 10.0.0.1
# Turn on IP Forwarding
echo 1 > /proc/sys/net/ipv4/ip_forward
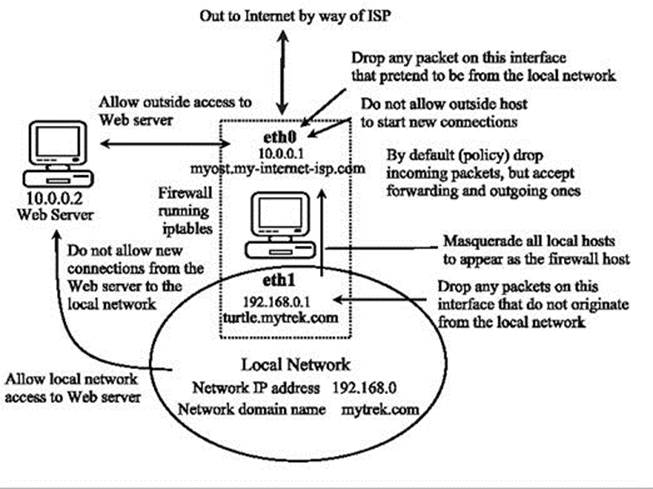
Figure 17-8: Firewall rules applied to a local network example
The script configures a simple firewall for a private network. In this configuration, all remote access initiated from the outside is blocked, but two-way communication is allowed for connections that users in the network make with outside systems. In this example, the firewall system functions as a gateway for a private network whose network address is 192.168.0.0 (see ). The Internet address is, for the sake of this example, 10.0.0.1. The system has two Ethernet devices: one for the private network (eth1) and one for the Internet (eth0). The gateway firewall system also supports a Web server at address 10.0.0.2. Entries in this example that are too large to fit on one line are continued on a second line, with the newline quoted with a backslash. The basic rules as they apply to different parts of the network are illustrated in Figure 17-8 .
Initially, in the script you would clear your current IPtables with the flush option (-F), and then set the policies (default targets) for the non-user-defined rules. IP forwarding should also be turned off while the chain rules are being set:
echo 0 > /proc/sys/net/ipv4/ip_forward
Drop Policy
First, a DROP policy is set up for INPUT and FORWARD built-in IP chains. This means that if a packet does not meet a criterion in any of the rules to let it pass, it will be dropped. Then both IP spoofing attacks and any attempts from the outside to initiate connections (SYN packets) are rejected.
Outside connection attempts are also logged. This is a very basic configuration that can easily be refined to your own needs by adding IPtables rules.
iptables -P INPUT DROP
iptables -P OUTPUT ACCEPT
iptables -P FORWARD ACCEPT
IP Spoofing
One way to protect the private network from the IP spoofing of any packets is to check for any outside addresses on the Ethernet device dedicated to the private network. In this example, any packet on device eth1 (dedicated to the private network) whose source address is not that of the private network (! -s 192.168.0.0) is denied. Also, check to see if any packets coming from the outside are designating the private network as their source. In this example, any packets with the source address of the private network on any Ethernet device other than for the private network (eth1) are denied. The same strategy can be applied to the local host.
# IP spoofing, deny any packets on the internal network
# that has an external source address.
iptables -A INPUT -j LOG -i eth1 \! -s 192.168.0.0/24
iptables -A INPUT -j DROP -i eth1 \! -s 192.168.0.0/24
iptables -A FORWARD -j DROP -i eth1 \! -s 192.168.0.0/24
# IP spoofing, deny any outside packets (any not on eth1)
# that have the source address of the internal network
iptables -A INPUT -j DROP \! -i eth1 -s 192.168.0.0/24
iptables -A FORWARD -j DROP \! -i eth1 -s 192.168.0.0/24
# IP spoofing, deny any outside packets with localhost address
# (packets not on the lo interface (any on eth0 or eth1)
# that have the source address of localhost)
iptables -A INPUT -j DROP -i \! lo -s 127.0.0.0/255.0.0.0
iptables -A FORWARD -j DROP -i \! lo -s 127.0.0.0/255.0.0.0
Then, you would set up rules to allow all packets sent and received within your system (localhost) to pass.
iptables -A INPUT -j ACCEPT -i lo
Server Access
For the Web server, you want to allow access by outside users but block access by anyone attempting to initiate a connection from the Web server into the private network. In the next example, all messages are accepted to the Web server, but the Web server cannot initiate contact with the private network. This prevents anyone from breaking into the local network through the Web server, which is open to outside access. Established connections are allowed, permitting the private network to use the Web server.
# allow communication to the Web server (address 10.0.0.2), port www
iptables -A INPUT -j ACCEPT -p tcp -i eth0 --dport www -s 10.0.0.2
# Allow established connections from Web servers to internal network
iptables -A INPUT -m state --state ESTABLISHED,RELATED -i eth0 \
-p tcp --sport www -s 10.0.0.2 -d 192.168.0.0/24 -j ACCEPT
# Prevent new connections from Web servers to internal network
iptables -A OUTPUT -m state --state NEW -o eth0 -p tcp \
--sport www -d 192.168.0.1.0/24 -j DROP
Firewall Outside Access
To allow access by the firewall to outside networks, you allow input by all packets except for ICMP packets. These are handled later. The firewall is specified by the firewall device, eth0. First, your firewall should allow established and related connections to proceed, as shown here. Then you would block outside access as described later.
# allow outside communication to the firewall,
# except for ICMP packets
iptables -A INPUT -m state --state ESTABLISHED,RELATED \
-i eth0 -p \! icmp -j ACCEPT
Blocking Outside Initiated Access
To prevent outsiders from initiating any access to your system, create a rule to block access by SYN packets from the outside using the state option with NEW. Drop any new connections on the eth0 connection (assumes only eth0 is connected to the Internet or outside network).
# prevent outside initiated connections
iptables -A INPUT -m state --state NEW -i eth0 -j DROP
iptables -A FORWARD -m state --state NEW -i eth0 -j DROP
Local Network Access
To allow interaction by the internal network with the firewall, you allow input by all packets on the internal Ethernet connection, eth1. The valid internal network addresses are designated as the input source.
iptables -A INPUT -j ACCEPT -p all -i eth1 -s 192.168.0.0/24
Listing Rules
A listing of these iptables options shows the different rules for each option, as shown here:
$ iptables -L
Chain INPUT (policy DROP)
target prot opt source destination
LOG all -- !192.168.0.0/24 anywhere LOG level warning
DROP all -- !192.168.0.0/24 anywhere
DROP all -- 192.168.0.0/24 anywhere
DROP all -- 127.0.0.0/8 anywhere
ACCEPT all -- anywhere anywhere
ACCEPT tcp -- 10.0.0.2 anywhere tcp dpt:http
ACCEPT tcp -- 10.0.0.2 192.168.0.0/24 state RELATED,ESTABLISHED tcp spt:http
ACCEPT !icmp -- anywhere anywhere state RELATED,ESTABLISHED
DROP all -- anywhere anywhere state NEW
ACCEPT all -- 192.168.0.0/24 anywhere
ACCEPT icmp -- anywhere 10.0.0.1 icmp echo-reply
ACCEPT icmp -- anywhere 10.0.0.1 icmp echo-request
ACCEPT icmp -- anywhere 10.0.0.1 icmp destination-unreachable
Chain FORWARD (policy ACCEPT)
target prot opt source destination
DROP all -- !192.168.0.0/24 anywhere
DROP all -- 192.168.0.0/24 anywhere
DROP all -- 127.0.0.0/8 anywhere
DROP all -- anywhere anywhere state NEW
Chain OUTPUT (policy ACCEPT)
target prot opt source destination
DROP tcp -- anywhere 192.168.0.0/24 state NEW tcp spt:http
$ iptables -t nat -L
Chain PREROUTING (policy ACCEPT)
target prot opt source destination
Chain POSTROUTING (policy ACCEPT)
target prot opt source destination
MASQUERADE all -- anywhere anywhere
Chain OUTPUT (policy ACCEPT)
target prot opt source destination
User-Defined Rules
For more complex rules, you may want to create your own chain to reduce repetition. A common method is to define a user chain for both INPUT and FORWARD chains, so that you do not have to repeat DROP operations for each. Instead, you would have only one user chain that both FORWARD and INPUT chains would feed into for DROP operations. Keep in mind that both FORWARD and INPUT operations may have separate rules in addition to the ones they share. In the next example, a user-defined chain called arriving is created. The chain is defined with the -N option at the top of the script:
iptables -N arriving
A user chain has to be defined before it can be used as a target in other rules. So, you have to first define and add all the rules for that chain, and then use it as a target. The arriving chain is first defined and its rules added. Then, at the end of the file, it is used as a target for both the INPUT and FORWARD chains. The INPUT chain lists rules for accepting packets, whereas the FORWARD chain has an ACCEPT policy that will accept them by default.
iptables -N arriving
iptables -F arriving
# IP spoofing, deny any packets on the internal network
# that has an external source address.
iptables -A arriving -j LOG -i eth1 \! -s 192.168.0.0/24
iptables -A arriving -j DROP -i eth1 \! -s 192.168.0.0/24
iptables -A arriving -j DROP \! -i eth1 -s 192.168.0.0/24
…………………………
# entries at end of script
iptables -A INPUT -j arriving
iptables -A FORWARD -j arriving
A listing of the corresponding rules is shown here:
Chain INPUT (policy DROP)
target prot opt source destination
arriving all -- 0.0.0.0/0 0.0.0.0/0
Chain FORWARD (policy ACCEPT)
target prot opt source destination
arriving all -- 0.0.0.0/0 0.0.0.0/0
Chain arriving (2 references)
target prot opt source destination
LOG all -- !192.168.0.0/24 0.0.0.0/0 LOG flags 0 level 4
DROP all -- !192.168.0.0/24 0.0.0.0/0
DROP all -- 192.168.0.0/24 0.0.0.0/0
For rules where chains may differ, you will still need to enter separate rules. In the myfilter script, the FORWARD chain has an ACCEPT policy, allowing all forwarded packets to the local network to pass through the firewall. If the FORWARD chain had a DROP policy, like the INPUT chain, then you may need to define separate rules under which the FORWARD chain could accept packets. In this example, the FORWARD and INPUT chains have different rules for accepting packets on the eth1 device. The INPUT rule is more restrictive. To enable the local network to receive forwarded packets through the firewall, you could enable forwarding on its device using a separate FORWARD rule, as shown here:
iptables -A FORWARD -j ACCEPT -p all -i eth1
The INPUT chain would accept packets only from the local network.
iptables -A INPUT -j ACCEPT -p all -i eth1 -s 192.168.0.0/24
Masquerading Local Networks
To implement masquerading, where systems on the private network can use the gateway’s Internet address to connect to Internet hosts, you create a NAT table (-t nat) POSTROUTING rule with a MASQUERADE target.
iptables -t nat -A POSTROUTING -o eth0 -j MASQUERADE
Controlling ICMP Packets
In addition, to allow ping and destination-reachable ICMP packets, you enter INPUT rules with the firewall as the destination. To enable ping operations, you use both echo-reply and echo-request ICMP types, and for destination unreachable, you use the destination-unreachable type.
iptables -A INPUT -j ACCEPT -p icmp -i eth0 --icmp-type echo-reply -d 10.0.0.1
iptables -A INPUT -j ACCEPT -p icmp -i eth0 --icmp-type echo-request -d 10.0.0.1
iptables -A INPUT -j ACCEPT -p icmp -i eth0 --icmp-type destination-unreachable -d 10.0.0.1
At the end, IP forwarding is turned on again.
echo 1 > /proc/sys/net/ipv4/ip_forward
Simple LAN Configuration
To create a script to support a simple LAN without any Internet services like Web servers, you would not include rules for supporting those services. You would still need FORWARD and POSTROUTING rules for connecting your local hosts to the Internet, as well as rules governing interaction between the hosts and the firewall. To modify the example script to support a simple LAN without the Web server, remove the three rules governing the Web server. Leave everything else the same.
LAN Configuration with Internet Services on the Firewall System
Often, the same system that runs a firewall is also used to run Internet servers, like Web and FTP servers. In this case the firewall rules are applied to the ports used for those services. The example script dealt with a Web server running on a separate host system. If the Web server were, instead, running on the firewall system, you would apply the Web server firewall rules to the port that the Web server uses. Normally the port used for a Web server is 80. In the following example, the IPtables rules for the Web server have been applied to port www, port 80, on the firewall system. The modification simply requires removing the old Web server host address references, 10.0.0.2.
# allow communication to the Web server, port www (port 80)
iptables -A INPUT -j ACCEPT -p tcp -i eth0 --dport www
# Allow established connections from Web servers to internal network
iptables -A INPUT -m state --state ESTABLISHED,RELATED -i eth0 \
-p tcp --sport www -d 192.168.0.0/24 -j ACCEPT
# Prevent new connections from Web servers to internal network
iptables -A OUTPUT -m state --state NEW -o eth0 -p tcp \
--sport www -d 192.168.0.1.0/24 -j DROP
Similar entries could be set up for an FTP server. Should you run several Internet services, you could use a user-defined rule to run the same rules on each service, rather than repeating three separate rules per service. Working from the example script, you would use two defined rules, one for INPUT and one for OUTPUT, controlling incoming and outgoing packets for the services.
iptables -N inputservice
iptables -N outputservice
iptables -F inputservice
iptables -F outputservice
# allow communication to the service
iptables -A inputservice -j ACCEPT -p tcp -i eth0
# Allow established connections from the service to internal network
iptables -A inputservice -m state --state ESTABLISHED,RELATED -i eth0 \
-p tcp -d 192.168.0.0/24 -j ACCEPT
# Prevent new connections from service to internal network
iptables -A outputservice -m state --state NEW -o eth0 -p tcp \
-d 192.168.0.1.0/24 -j DROP
…………………………
# Run rules for the Web server, port www (port 80)
iptables -A INPUT --dport www -j inputservice
iptables -A INPUT --dport www -j outputservice
# Run rules for the FTP server, port ftp (port 21)
iptables -A OUTPUT --dport ftp -j inputservice
iptables -A OUTPUT --dport ftp -j outputservice
IP Masquerading
On Linux systems, you can set up a network in which you can have one connection to the Internet that several systems on your network can use. This way, using only one IP address, several different systems can connect to the Internet. This method is called IP masquerading, where a system masquerades as another system, using that system’s IP address. In such a network, one system is connected to the Internet with its own IP address, while the other systems are connected on a local area network (LAN) to this system. When a local system wants to access the network, it masquerades as the Internet-connected system, borrowing its IP address.
IP masquerading is implemented on Linux using the IPtables firewall tool. In effect, you set up a firewall, which you then configure to do IP masquerading. Currently, IP masquerading supports all the common network services—as does IPtables firewall—such as Web browsing, Telnet, and ping. Other services, such as IRC, FTP, and RealAudio, require the use of certain modules. Any services you want local systems to access must also be on the firewall system because request and response actually are handled by services on that system.
With IP masquerading, as implemented on Linux systems, the machine with the Internet address is also the firewall and gateway for the LAN of machines that use the firewall’s Internet address to connect to the Internet. Firewalls that also implement IP masquerading are sometimes referred to as MASQ gates. With IP masquerading, the Internet-connected system (the firewall) listens for Internet requests from hosts on its LAN. When it receives one, it replaces the requesting local host’s IP address with the Internet IP address of the firewall and then passes the request out to the Internet, as if the request were its own. Replies from the Internet are then sent to the firewall system. The replies the firewall receives are addressed to the firewall using its Internet address. The firewall then determines the local system to whose request the reply is responding. It then strips off its IP address and sends the response on to the local host across the LAN. The connection is transparent from the perspective of the local machines. They appear to be connected directly to the Internet.
Masquerading Local Networks
IP masquerading is often used to allow machines on a private network to access the Internet. These could be machines in a home network or a small LAN, such as for a small business. Such a network might have only one machine with Internet access, and as such, only the one Internet address. The local private network would have IP addresses chosen from the private network allocations (10., 172.16., or 192.168.). Ideally, the firewall has two Ethernet cards: one for an interface to the LAN (for example, eth1) and one for an interface to the Internet, such as eth0. The card for the Internet connection (eth0) would be assigned the Internet IP address. The Ethernet interface for the local network (eth1, in this example) is the firewall Ethernet interface. Your private LAN would have a network address like 192.168.0. Its Ethernet firewall interface (eth1) would be assigned the IP address 192.168.0.1. In effect, the firewall interface lets the firewall operate as the local network’s gateway. The firewall is then configured to masquerade any packets coming from the private network. Your LAN needs to have its own domain name server, identifying the machines on your network, including your firewall. Each local machine needs to have the firewall specified as its gateway. Use separate interfaces for them, such as two Ethernet cards.
Masquerading NAT Rules
In Netfilter, IP masquerading is a NAT operation and is not integrated with packet filtering as in IP Chains. IP masquerading commands are placed on the NAT table and treated separately from the packet-filtering commands. Use IPtables to place a masquerade rule on the NAT table. First reference the NAT table with the -t nat option. Then add a rule to the POSTROUTING chain with the -o option specifying the output device and the -j option with the MASQUERADE command.
iptables -t nat -A POSTROUTING -o eth0 -j MASQUERADE
IP Forwarding
The next step is to turn on IP forwarding, either manually or by setting the net.ipv4.ip_forward variable in the /etc/sysctl.conf file and running sysctl with the -p option. IP forwarding will be turned off by default. For IPv6, use net.ipv6.conf.all.forwarding. The /etc/sysctl.conf entries are shown here:
net.ipv4.ip_forward = 1
net.ipv6.conf.all.forwarding = 1
You then run sysctl with the -p option.
sysctl -p
You can directly change the respective forwarding files with an echo command as shown here:
echo 1 > /proc/sys/net/ipv4/ip_forward
For IPv6, you would to use the forwarding file in the corresponding /proc/sys/net/ipv6 directory, conf/all/forwarding.
echo 1 > /proc/sys/net/ipv6/conf/all/forwarding
Masquerading Selected Hosts
Instead of masquerading all local hosts as the single IP address of the firewall/gateway host, you could use the NAT table to rewrite addresses for a few selected hosts. Such an approach is often applied to setups where you want several local hosts to appear as Internet servers. Using the DNAT and SNAT targets, you can direct packets to specific local hosts. You would use rules on the PREROUTING and POSTROUTING chains to direct input and output packets.
For example, the Web server described in the previous example could have been configured as a local host to which a DNAT target could redirect any packets originally received for 10.0.0.2. Say the Web server was set up on 192.168.0.5. It could appear as having the address 10.0.0.2 on the Internet. Packets sent to 10.0.0.2 would be rewritten and directed to 192.168.0.5 by the NAT table. You would use the PREROUTING chain with the -d option to handle incoming packets and POSTROUTING with the -s option for outgoing packets.
iptables -t nat -A PREROUTING -d 10.0.0.2 --to-destination 192.168.0.5 -j DNAT
iptables -t nat -A POSTROUTING -s 192.168.0.5 --to-source 10.0.0.2 -j SNAT
Tip: Masquerading is not combined with the FORWARD chain. If you specify a DROP policy for the FORWARD chain, you will also have to specifically enable FORWARD operation for the network that is being masqueraded. You will need both a POSTROUTING rule and a FORWARD rule.
Dynamic Firewall with FirewallD
FirewallD runs as a daemon implementing a dynamic firewall. Instead of loading rules offline from file, you add them directly to the FirewallD daemon. FirewallD is no supported by Ubuntu, but is available on the Ubuntu repository. It is the default firewall for Fedora and Suse Linux. For documentation see:
http://fedoraproject.org/wiki/FirewallD
FirewallD Zones
FirewallD sets up network zones to define the level of trust for different kinds of network connections (see Table 17-9 ). Each zone can have several connections, but a connection can belong only to one zone. FirewallD defines several zones, most of which you can change (mutable). The drop and block zones are immutable and designed to stop all incoming packets. The public, external, and dmz zones are designed for untrusted networks, exposing only part of your system. The work, home, and internal zone are used for trusted networks. The trusted zone (also immutable) allows all network connections.
|
Zone |
Description |
|
drop (immutable) |
Deny all incoming connections, outgoing ones are accepted. |
|
block (immutable) |
Deny all incoming connections, with ICMP host prohibited messages issued. |
|
trusted (immutable) |
Allow all network connections |
|
public |
Public areas, do not trust other computers |
|
external |
For computers with masquerading enabled, protecting a local network |
|
dmz |
For computers publicly accessible with restricted access. |
|
work |
For trusted work areas |
|
home |
For trusted home network connections |
|
internal |
For internal network, restrict incoming connections |
Table 17-9: FirewallD zones
Zone configurations are located in /etc/firewalld/zones. You can use firewall-config or firewall-cmd to manage your zones and add new ones. The default zone is set in the /etc/firewalld.conf configuration files by the DefaultZone variable. Initially it is set to public. The default and fallback zones are saved in /lib/firewalld/zones.
Zone files are saved a XML files which list the zone name and the services and ports allowed. Also any masquerade, ICMP, and port forwarding options.
Dynamic and Static Firewalls: FirewallD and the iptables command
Traditionally firewalls were static. You modified firewall rules and then restarted your firewall to load the rules. A dynamic firewall, such as FirewallD, can apply modified rules without restarting the firewall. Rules, however, have to be managed directly by the FirewallD daemon. You cannot use the iptables command to add firewall rules for the firewalld daemon. In fact, FirewallD does not user netfilter rules in the traditional sense. You do not list a set of rules that the firewall then reads, as you do with static firewalls like iptables. Instead, you use to firewall-config andfirewall-cmd tools to directly configure your firewall.
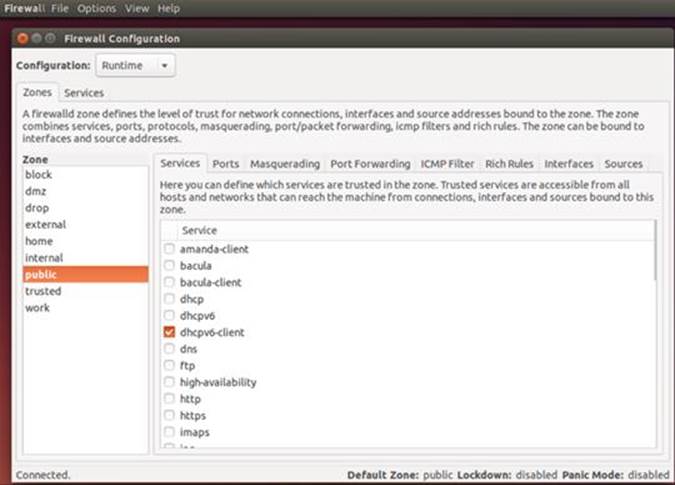

Figure 17-9: firewall-config: Runtime Configuration
Though not supported by Ubuntu directly, you can use the FirewallD dynamic firewall daemon to set up a firewall. You can disable and enable FirewallD manually using the systemctl command.
sudo systemctl enable firewalld
sudo systemctl disable firewalld
On Ubuntu, FirewallD is managed by the firewalld service script. You can start and stop it using the service command. You will have to start the FirewallD daemon in a terminal window with the following command.
sudo service firewalld start
You can stop it with a stop command.
sudo service firewalld stop
firewall-config
On the desktop, you can use the firewalld-config to configure Firewalld. You can also use firewalld-cmd command from the command line. To set up your firewall, run firewall-config (System | Firewall) (see Figure 17-9 ). The top button bar has a button to Reload your saved firewall.
With firewall-config you can configure either a Runtime or Permanent Configuration. Select one from the Configuration menu. The Runtime Configuration shows your current runtime set up, whereas a Permanent configuration does not take effect until you reload or restart. If you wish to edit your zones and services you need to choose the Permanent Configuration (see ). This view displays a zone toolbar for editing zone at the bottom of the zone scroll box, and an Edit button on the Services tab for editing service protocols, ports, and destination addresses.
Additional tabs can be displayed from the View menu for configuring ICMP types, and for adding firewall rules directly (Direct Configuration).
From the Options menu you can reload your saved firewall.
A firewall configuration is set up for a given zone, such as a home, work, internal, external, or public zone. Each zone can have its own configuration. Zones are listed in the Zone scroll box on the left side of the firewall-config window (see Figure 17-10 ). Select the one you want to configure. The firewall-config window opens to the default, Public. You can choose the default zone from the System Default Zone dialog (see Figure 17-11 ), which you open from the Options menu as "Change Default Zone."

Figure 17-10: firewall-config: Permanent Configuration
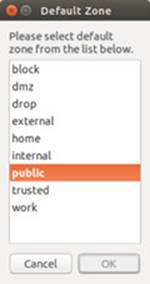
Figure 17-11: Default Zone
If you choose Permanent Configuration from the Current View Menu, a tool bar for zones is displayed below the Zone scroll box, as shown here. The plus button lets you add a zone, minus removes a zone. The pencil button lets you edit a zone. The add and edit buttons open the Base Zone Settings dialog, where you enter or edit the zone name, version, description, and the target (see Figure 17-12 ). The default target is ACCEPT. Other options are REJECT and DROP. The Load Zone Defaults button (yellow arrow) loads default settings, removing any you have made.
![]()
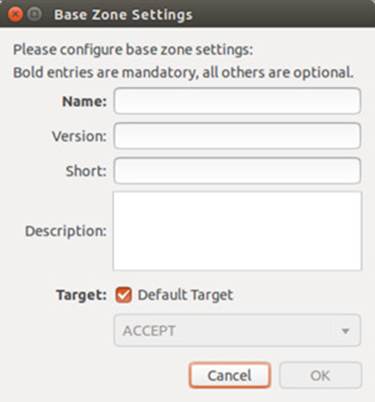
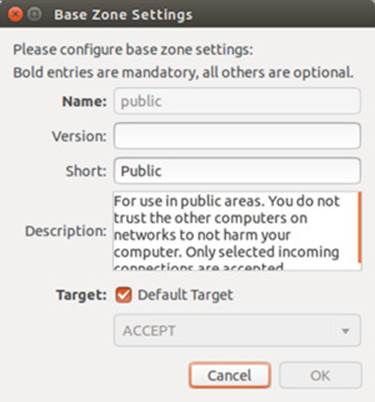
Figure 17-12: Base Zone Settings
Each zone, in turn, can have one or more network connections. From the Options menu choose "Change Zones of Connections" to open the Network Connections dialog where you can add a network connection.
For a given zone you can configure services, ports, masquerading, port forwarding, and ICMP filter (see Figure 17-8 ). A Linux system is often used to run servers for a network. If you are creating a strong firewall but still want to run a service such as a Web server, an FTP server, Samba desktop browsing, or SSH encrypted connections, you must specify them in the Services tab. Samba desktop browsing lets you access your Samba shares, like remote Windows file systems, from your GNOME or KDE desktops.
For a selected service, you can specify service settings such as ports and protocols it uses, any modules, and specific network addresses. Default settings are already set up for you such as port 139 for Samba, using the TCP protocol. To modify the settings for service, click the Services tab to open the Service Settings window (see Figure 17-13 ). Choose the service you want to edit from the Service scroll box at the left. For a given service you can then use the Ports and Protocols, Modules, and Destination tabs to specify ports, protocols, modules, and addresses. On the Ports and Protocols tab click the Add button to open the Port and/or Protocol dialog where you can add a port or port range, and choose a protocol from the Protocol menu (see Figure 17-14 ). On the Destination tab you can enter an IPv4 or IPv6 destination address for the service.
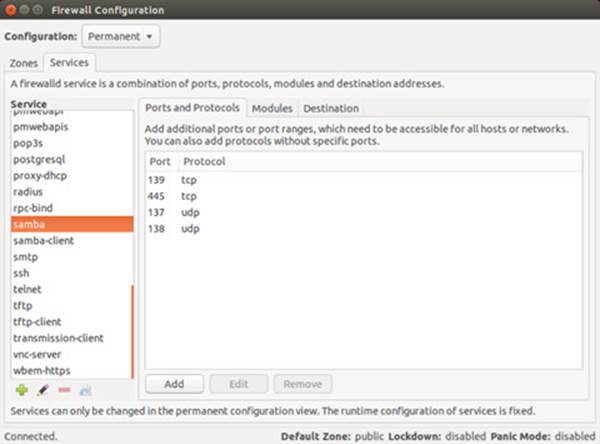
Figure 17-13: Service Settings
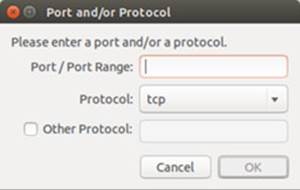
Figure 17-14: Service Protocols and Ports
The Ports tab lets you specify ports that you may want opened for certain services, like BitTorrent. Click the Add button to open a dialog where you can select the port number along with the protocol to control (tcp or udp), or enter a specific port number or range.
If your system is being used as gateway to the Internet for your local network, you can implement masquerading to hide your local hosts from outside access from the Internet. This, though, also requires IP forwarding which is automatically enabled when you choose masquerading. Local hosts will still be able to access the Internet, but they will masquerade as your gateway system. You would select for masquerading the interface that is connected to the Internet. Masquerading is available only for IPv4 networks, not IPv6 networks.
The Port Forwarding tab lets you set up port forwarding, channeling transmissions from one port to another, or to a different port on another system. Click the Add button to add a port, specifying its protocol and destination (see Figure 17-15 ).
v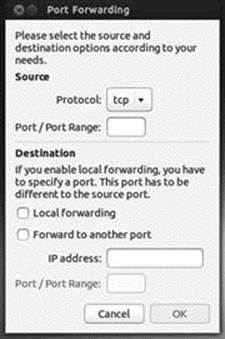
Figure 17-15: Port Forwarding
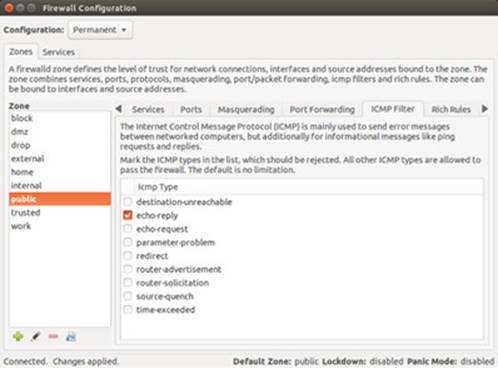
Figure 17-16: ICMP Filters
The ICMP Filters tab allows you to block ICMP messages. By default all ICMP messages are allowed. Blocking ICMP messages makes for a more secure system. Certain types of ICMP messages are often blocked as they can be used to infiltrate or overload a system, such as the ping and pong ICMP messages (see Figure 17-16 ).
If you have specific firewall rules to add, use the Direct Configuration tab (displayed from the View | Direct Configuration menu).
firewall-cmd
The firewall-cmd command works on a command line interface, using options to set features for different zone. Zone modification options such as --add-service, can be either runtime or permanent. Runtime changes are gone after a restart or reload. To make the changes permanent you add the --permanent option, making changes for a persistent configuration, instead of a runtime one.
Use the get options to display information about the firewall. The --get-zones option lists your zones, the --get-services option list services supported by the current zone, and the --get-icmptypes lists the ICMP types.
firewall-cmd --get-zones
firewall-cmd --get-services
firewall-cmd --get-icmptypes
The --get-default-zone option lists the default zone, and --set-default-zone sets up a new default zone.
firewall-cmd --set-default-zone home
To find out what features have been enabled for a zone, use the --list-all option with a --zone= option to specify the zone.
firewall-cmd home --zone=home --list-all
Zone are assigned network interfaces. There are interface options to add, remove, or change an interface. Use the query option to check if an interface belongs to a zone.
firewall-cmd --zone=home --query-interface=eth0
The service, port, masquerade, icmp, and forwarding options can be either runtime or persistent (permanent). The --service options can add and remove services to a zone.
firewall-cmd -add-service=vsftp
To make the change permanent (persistent mode), add the --permanent option.
firewall-cmd --permanent -add-service=vsftp
The --query-service option checks to see if a service is enabled for a zone.
firewall-cmd --zone=home -query-service=http
The --port options are used to add, remove, or query ports.
firwall-cmd --zone=home --add-port=22
Add the --permanent option to make it permanent.
firwall-cmd --permanent --zone=home --add-port=22
The --masquerade option add, removes, and queries zones for masquerading.
firwall-cmd --zone=work --add-masquerade
The --icmp-block options add, remove, and query ICMP types.
firewall-cmd --zone=work --add-icmp-block=echo-reply
Should your firewall needs to use custom firewall rules, you can add, remove, and list them using the --direct option. These are rules written in the IPtables syntax. You have to specify the protocol, table, chain, and arguments. The following lists the rules you added to the netfilter table. The rules are not saved, and have to be added again each time you restart or reload. You could have a script of firewall-cmd rules to do this.
firewall-cmd --direct --get-rules ipv4 netfilter
The following adds a simple netfilter rule.
Firewall-cmd --direct -add-rule ipv4 netfilter INPUT Deny