Ubuntu Hacks: Tips & Tools for Exploring, Using, and Tuning Linux (2009)
Chapter 3. Multimedia
A modern computer can be a nifty little entertainment center; it has fast video, stereo speakers, probably plenty of disk space for movies and videos. So, how come Ubuntu doesn't know what to do when you insert a DVD or double-click on a video or audio file?
The fundamental problem is that there are some critical pieces to the multimedia puzzle that Ubuntu can't distribute in all jurisdictions, so you need to go out and get those pieces yourself. Fortunately, Ubuntu makes it easy for you to install those bits once you do obtain them. In this chapter, you'll learn how to get Ubuntu to support more multimedia formats, play DVDs, and even let you buy music online.
For care and feeding of your multimedia collection, you'll need to eventually work with optical discs. Whether you want to take a CD you purchased and rip it down into MP3 files, create a personalized remix CD, or burn a movie to DVD, the hacks in this chapter have you covered.
Hack 28. Install Multimedia Plug-ins
![]()
![]()
Music and video files come in a wide variety of exotic formats. Learn how to locate and install the plug-ins you need to view or listen to them.
On some Linux distributions, getting all of your multimedia files to play seems like it requires all sorts of command-line voodoo. One thing that sets Ubuntu apart is just how easy it is to grab all of the packages you need to play multimedia content. In this hack, we will walk you through the necessary steps so that once you are finished, Ubuntu will happily play just about any media file you throw at it.
Tweak Your Repository List
Many of the multimedia packages you need to install do not reside in the default Ubuntu repository. To get these packages, you will need to add the universe and multiverserepositories to Ubuntu. If you haven't done so yet, check out "Modify the List of Package Repositories" [Hack #60] for information about these repositories and how to add them. Once you have added the repositories, be sure to update your list of packages within your package-management tool before proceeding.
Install General-Purpose Libraries and Tools
There are a number of basic libraries and multimedia tools you need to install to get the best support for your multimedia files. These include libraries for MP3 and Ogg Vorbis playback, as well as media players and other tools. If you use Synaptic, select totem-xine from the GNOME Desktop Environment (universe) category, vorbis-tools from the Multimedia category, sox from the Multimedia (universe) category, faad and lame from the Multimedia (multiverse) category, imagemagick from the Graphics category, and finally ffmpeg and mjpegtools from the Graphics (universe) category. Or, if you use apt-get, type:
$ sudo apt-get install totem-xine vorbis-tools sox faad lame \\
imagemagick ffmpeg mjpegtools
Install Gstreamer Libraries
Gstreamer is a new plug-in-based approach to multimedia playback. GNOME uses Gstreamer for much of its own multimedia playback, and, while it is still under heavy development, you will still want to install a number of Gstreamer libraries for GNOME. If you use Synaptic as your package management tool, select the gstreamer0.8-plugins-multiverse package from the Libraries (multiverse) category; gstreamer0.8-ffmpeg, gstreamer0.8-mad, and gstreamer0.8-plugins from the Libraries (universe) category; and gstreamer0.8-lame from the Multimedia (multiverse) category, and apply your changes. Alternatively, if you use apt-get, type:
$ sudo apt-get install gstreamer0.8-plugins-multiverse \\
gstreamer0.8-ffmpeg gstreamer0.8-mad gstreamer0.8-plugins \\
gstreamer0.8-lame
|

Once you have installed all the Gstreamer libraries, open a terminal and type:
$ gst-register-0.8
to register all of the Gstreamer plug-ins on your system.
Install Codecs of Ambiguous Legality
There are a number of multimedia formats that are encumbered by special licenses that require the user to leverage Windows codec libraries on their Linux system to play back the file. Some of these include QuickTime and Windows Media formats. In certain countries, it may be illegal to play files via these codecs, so open up your checkbook, call up your lawyer, and have a chat before proceeding. Then, open a terminal window and grab a copy of the w32codecs .deb file from ftp://ftp.nerim.net/debian-marillat/pool/main/w/w32codecs/ and install the .deb:
$ wget ftp://ftp.nerim.net/debian-marillat/pool/main/w/w32codecs/w32codecs_
![]()
20050412-0.0_i386.deb
$ sudo dpkg -i w32codecs_20050412-0.0_i386.deb
If for some reason that site isn't available, you can also track down the w32codecs packages from the official MPlayer page at http://mplayerhq.hu.
|
Hack 29. Watch Videos
![]()
![]()
While the default Totem video player in Ubuntu is great, it's hard to beat MPlayer in terms of flexibility, configurability, and features.
Every once in a while, a tool comes along in Linux that impresses you in almost every respect with its flexibility. MPlayer is one of those tools. When it comes to video and audio playback, think of MPlayer as your universal translator. It can play basically any audio or video format you throw at it (provided it has the libraries available), in just about any container you throw at it. For instance, it can play DVDs from the disc, an image of the disc, or even just the VOBs from the disc. Of course, depending on your taste, there is one downside: by default, MPlayer is a command-line program. There is a graphical frontend for MPlayer for those interested, called gmplayer, or you can just use the default Ubuntu video player, Totem. This hack discusses the basics of how to play multimedia files with MPlayer from the command line.
Install MPlayer
The first step to using MPlayer is to install it and the codecs it needs. If you haven't already followed the steps in "Install Multimedia Plug-ins" [Hack #28], do that first to get all of the codecs you'll need. Next, use your preferred packaging tool and install the mplayer package that matches your CPU architecture. If you use apt-get, type:
$ sudo apt-get install mplayer-
686
Replace 686 with 386, 586, k6, k7, g4, g5, etc., depending on your processor. To see a list of the different processor options, type:
$ apt-cache search mplayer
Use MPlayer
With MPlayer installed, basic file playback is as simple as opening a terminal and typing:
$ mplayer
file.avi
The console will immediately fill with a lot of different output. This can be useful because MPlayer is telling you what information it can figure out about the file you passed to it, along with information about how it will try to play it. MPlayer should also display the video in a new window and immediately start playback. Back in the console, you will see output scroll by as MPlayer updates you on which frame is playing and how far along MPlayer is in the video.
MPlayer provides an extensive list of key bindings so that you can control playback. The manpage lists all of these options; Table 3-1 lists some of the more commonly used ones.
|
Table Mplayer keybindings |
|
|
Keys |
Function |
|
Left and right arrows |
Seek backward/forward 10 seconds |
|
Up and down arrows |
Seek backward/forward 1 minute |
|
Page Up and Page Down |
Seek backward/forward 10 minutes |
|
< and > |
Move backward/forward in playlist |
|
p, Space |
Pause movie (pressing again unpauses) |
|
q, Esc |
Stop playing and quit |
|
+ and - |
Adjust audio delay by +/- 0.1 seconds |
|
/,9 and *,0 |
Decrease/increase volume |
|
m |
Mute sound |
|
f |
Toggle full-screen |
|
t |
Toggle stay-on-top |
Most of these key bindings are pretty self-explanatory, but the + and - options to adjust the audio delay are worth further discussion. Sometimes when you create your own videos or convert videos between formats, the audio and video fall out of sync. This can be very frustrating when you are watching a movie, but with MPlayer, you can tweak the audio with the + and - keys. Just hit one of the keys a few times and see whether you have improved or worsened the sync problems, and then adjust until the video and audio is completely in sync.
The full-screen key binding (f) won't necessarily scale the video to fill up the entire screen. Whether the video scales depends on the video output option you select for MPlayer.
MPlayer is truly a universal multimedia playback tool, and the next sections list some examples for playing back specific video types. For most video files, it is sufficient to simply pass the filename as an argument to mplayer, but for special videos such as DVDs, VCDs, and filestreams, things are done slightly differently.
DVD playback
MPlayer has good support for DVD playback; however, one thing it does not support is DVD menus. When you play a DVD with MPlayer, it skips the menu system and everything else up-front and goes right to the movie, which can actually be a good thing if you don't want to sit through the numerous ads and FBI warnings some DVDs have. Most DVDs have a main featurethe movie you purchasedplus several lesser features, such as behind-the-scenes footage or scenes that were cut. In the case of episodic discs like TV box sets, each episode is a different feature. Each of these features is a title, and you can select which title to play when you run mplayer. To start playback of the first title on a DVD, type:
$ mplayer dvd://
1
To play other titles, replace 1 with the number of the title you want to play. If you want to play a range of titles, you can specify the range on the command line. For instance, to play titles three through six, type:
$ mplayer dvd://3-6
You can also specify individual chapters (scenes) or a range of chapters with the -chapter argument. To play chapters four through eight on title one, type:
$ mplayer dvd://1 -chapter 4-8
MPlayer will attempt to play from /dev/dvd, but if that device doesn't exist, or you want to point it to a different device, use the -dvd-device argument. The following command will play back from /dev/hdc:
$ mplayer dvd://1 -dvd-device /dev/hdc
You can even use the -dvd-device argument to play back directly from a DVD image somewhere on your filesystem:
$ mplayer dvd://1 -dvd-device
/path/to/dvd.iso
It is even possible to use a directory full of VOB files:
$ mplayer dvd://1 -dvd-device
/path/to/directory/
You may also specify language and subtitle options directly from the command line. The -alang option controls the audio language option and can accept multiple languages separated by commas. In that case, MPlayer will try the first language and fall back on the next language if the first isn't available. For instance, to play a movie in Japanese and fall back to English if Japanese isn't available, type:
$ mplayer dvd://1 -alang ja,en
The -slang option controls which language's subtitles are shown. To show the English subtitles on the above example, type:
$ mplayer dvd://1 -alang ja,en -slang en
(S)VCD playback
(S)VCD playback in MPlayer is much like DVD playback. Just use vcd:// instead of dvd:// in the command line, with the track to play as an argument. So, to play track one of a VCD, type:
$ mplayer vcd://1
MPlayer can even play the .bin files from (S)VCDs. You don't even need to pass any special options; just point mplayer to the .bin file to start playback.
Streaming playback
MPlayer supports playback from a number of different audio and video streams. Just pass the URL on the command line:
$ mplayer
http://example.com/stream.avi
$ mplayer
rtsp://example.com/stream
Troubleshooting
There are a number of reasons MPlayer may not output your video correctly. If MPlayer has trouble identifying your video, all the video codecs mplayer requires may not be installed on your system. "Install Multimedia Plug-ins" [Hack #28] explains how to find and install the various video and audio codecs you need under Linux.
If MPlayer plays the video, but the video output looks strange, you can't see it at all, or playback is very jerky, it's possible that MPlayer is configured to use the wrong video output option for your system. Try passing -vo x11 as an argument to mplayer on the command line and see if that lets you at least view the video.
Another reason for jerky video is simply that a system is too slow to play the video well. In this case, MPlayer will warn you in its output that your system is too slow to play the video and will recommend that you add the -framedrop option. This option tells MPlayer to drop video frames if the video can't keep up with the audio on the system.
![]()
Hack 30. Play DVDs
![]()
![]()
Install libraries that allow you to play encrypted DVDs under Ubuntu.
Out of the box, Ubuntu will probably not be able to play most of the DVDs that you own. This isn't because of an oversight on the part of the Ubuntu developers; it's simply because most DVDs you might buy are encrypted with a system called CSS (Content Scrambling System). While video-player packages such as totem-gstreamer, totem-xine, xine, mplayer, and vlc can all play unencrypted DVDs, to play CSS-encrypted DVDs, you will have to actually circumvent the encryption scheme. (Note that in certain countries circumventing CSS is not legal, so here is a good place to stop reading and phone up your attorney before proceeding.)
Ubuntu actually makes this process very simple. The first step is to install one of the aforementioned video-player packages along with the libdvdread3 package, if they aren't installed, so use your preferred package-installation tool to do so (see Chapter 6 for different ways to install packages).
|
After you install libdvdread3, you must run the script it provides to download and install the libdvdcss2 libraries you need. Open a terminal and run the following script:
$ sudo /usr/share/doc/libdvdread3/examples/install-css.sh
Password:
--20:19:23-- http://www.dtek.chalmers.se/groups/dvd/deb/libdvdcss2_1.2.5-1_i386.deb
=> \Q/tmp/libdvdcss.deb'
Resolving www.dtek.chalmers.se... 129.16.30.198
Connecting to www.dtek.chalmers.se|129.16.30.198|:80... connected.
HTTP request sent, awaiting response... 200 OK
Length: 25,178 (25K) [text/plain]
100%[====================================>] 25,178 55.66K/s
20:19:25 (55.54 KB/s) - \Q/tmp/libdvdcss.deb' saved [25178/25178]
(Reading database ... 59605 files and directories currently installed.)
Preparing to replace libdvdcss2 1.2.5-1 (using /tmp/libdvdcss.deb) ...
Unpacking replacement libdvdcss2 ...
Setting up libdvdcss2 (1.2.5-1) ...
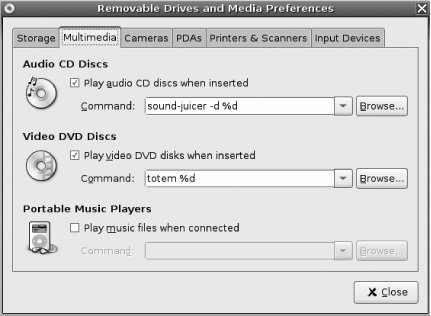
That's all. Now to play a DVD, just insert it into your computer's DVD player. Ubuntu is configured by default to automatically open DVD video with the Totem media player. If you want to toggle that setting, click System![]() Preferences
Preferences![]() Removable Drives and Media, click the Multimedia tab in the window that appears, and check or uncheck the checkbox next to "Play video DVD disks when inserted" (see Figure 3-1). From this window, you can also change the default program used to open DVDs. Just change the default video player from totem to your program of choice.
Removable Drives and Media, click the Multimedia tab in the window that appears, and check or uncheck the checkbox next to "Play video DVD disks when inserted" (see Figure 3-1). From this window, you can also change the default program used to open DVDs. Just change the default video player from totem to your program of choice.
Figure 3-1. The Removable Drives and Media Preferences window
To start Totem manually, click Applications![]() Sound & Video
Sound & Video![]() Movie Player, then click Movie
Movie Player, then click Movie![]() Play Disc to open your movie. Totem provides a simple interface to navigate through a moviewith standard Play/Pause, previous track, and next track buttons on the main window, along with a sliding bar you can use to quickly skip through a movie. When you are finished watching the movie, click Movie
Play Disc to open your movie. Totem provides a simple interface to navigate through a moviewith standard Play/Pause, previous track, and next track buttons on the main window, along with a sliding bar you can use to quickly skip through a movie. When you are finished watching the movie, click Movie![]() Eject or hit Ctrl-E from within Totem.
Eject or hit Ctrl-E from within Totem.
Hack 31. Buy Songs at the iTunes Music Store
![]()
![]()
Yes, it's possible to access, buy, and download music from iTMS on Linux.
If you're not averse to spending a little money for a fantastically useful app and to running a proprietary, nonfree program (but then again, if you were, why are you using the DRM-laden iTunes Music Store?), CrossOver Office from CodeWeavers is a great way to get your iTMS fix. As a bonus, you'll also be able to run other Windows-based, proprietary programs, such as Microsoft Word, Excel, PowerPoint, and Internet Explorer, as well as multimedia apps like QuickTime and Shockwave. The advantage of CrossOver is that it makes it really easy to run these Windows programs in Linux, and you won't be skirting the terms of their software licenses. The disadvantage is that CrossOver costs $40, which is, IMHO, a pittance for all that it offers you. If you're not sure if you want to buy the program, you can try it for free for 30 days, which should be plenty of time for you to kick the tires and discover how useful this program really is.
To start with CrossOver, head over to http://www.codeweavers.com. CrossOver Office is featured prominently on the home page, with a big red Try Now button that you should press. Follow the instructions on the page and download the software via FTP, BitTorrent, or HTTP.
After downloading the CrossOver shell script, you need to make it executable and then install it. Both actions are performed as a normal user, without sudo:
$ chmod 744 install-crossover-standard-demo-5.0.1.sh
$ ./install-crossover-standard-demo-5.0.1.sh
A GUI installer will open. Click OK to accept the quite reasonable licensing terms (basically that you won't copy the software and let everyone in the world use it), and then you'll be asked where you wish to install the software. By default, CrossOver will install at /home/<user>/cxoffice, but I don't like cluttering up my home directory, so I always change that to /home/scott/.cxoffice. (There's a dot in front of cxoffice, which makes it a hidden directory.) Once that's in place, click Begin Install.
The program installs, and immediately the Introduction Wizard opens so that you can tell CrossOver about your Internet connectivity. Click Next, and you'll be asked if you use an HTTP proxy. Most likely you don't, so click Finish; if you do, enter the correct information and then click Finish.
You're back at the main Setup screen, but now there's a new button: Install Windows Software. Click it, and the Installation Wizard opens, displaying a list of supported Windows software, including various Microsoft, Adobe, Intuit, and other companies' apps. Scroll down until you see iTunes, and then click Next.
|
The first screen of the install tells you that CrossOver is going to download and use iTunes 4.9.0, and that you should avoid upgrading. Listen to the folks at CodeWeavers! They test this stuff, and they know what they're talking about.
You're given a choice between the Express and Advanced install; go with the Express unless you absolutely know what you're doing and need the Advanced option. Click Next. CrossOver will download and install iTunes for you, and the whole time Apple's program will think it's running on Windows instead of Linux. I'm not going to walk you through an installation of iTunes, since presumably you're already familiar with how to install (and use) it. It's mostly just Next, Next, Next, anyway.
When CrossOver finishes, you'll reach the end of the Installation Wizard. If you're ready to quit CrossOver, click Finish. Before doing so, you ought to check the box next to "Remove installer files" so you can keep your hard drive tidy. If you had a problem with the installation and you want to help CodeWeavers diagnose the issue, check the box next to "Package log for CodeWeavers support," which saves a logfile detailing the process, so that tech support has some useful info. If you want to place more software on your system, check the box next to "Install more Windows software," which starts the wizard over again. Finally, "View installed associations" shows you what file types are now linked to the program you just installed. It may be handy to see, so feel free to check it.
Now that iTunes is installed on your Ubuntu machine, you'll find a shortcut for it on your desktop, as well as on your K menu (if you're using KDE) or Applications menu (if you're using GNOME). Start up the program, and you can buy as much DRM-laden music as you'd like.
|
If you ever want to uninstall iTunes, go to your K menu or Applications menu, and then to CrossOver![]() Configuration. Select iTunes, and simply press Repair/Remove.
Configuration. Select iTunes, and simply press Repair/Remove.
I've used CrossOver to run a wide variety of software; in fact, I've written several books using the VBA-laden Microsoft Word templates that publishers love so much, and they've run beautifully under CrossOver. You'll find that CrossOver is an incredibly invaluable tool that can already run a lot of important Windows apps, including iTunes, with the list growing all the time. Try it out for 30 days and see what you think.
Scott Granneman
Hack 32. Get a Grip on CD Ripping
![]()
![]()
Use the Grip program to automate ripping audio CDs into music files.
The command line is definitely a powerful tool, particularly for automation, but it can also make doing a task like ripping a CD more trouble than it's worth, especially if you plan on tagging the resulting audio with metadata such as ID3 tags. While there are several frontends for command-line tools, Grip, in our opinion, is an excellent example of a GUI frontend that balances the power and configurability of the command line with the ease of use of a GUI interface. After you get to the end of this hack, your CD-ripping process will be so automated that once you start, you won't even have to pick up a mouse.
Install Grip
It is simple to install Grip: just install the grip package using your preferred package manager. Grip is a frontend in that, for the most part, it uses other command-line utilities behind the scenes to do all of the work and simply provides an easy-to-use interface to configure the commands it passes down to those tools. Because it is a frontend, Grip can make use of many different command-line CD-ripping and audio-encoding programs, and, as such, it supports ripping to a number of popular formats including MP3, Ogg Vorbis, FLAC, or even a custom encoder of your choosing. This also means that to take advantage of those tools, you will need to already have them installed, but Ubuntu's package manager will take care of the major dependencies.
Configure Ubuntu to Default to Grip
By default, Ubuntu uses a program called Sound Juicer to play audio CDs. This program is fine but lacks a lot of the configurability and power of Grip.
You could manually launch Grip each time you want to use it, but you can make Ubuntu launch it for you whenever it detects that an audio CD has been inserted. To do so, click System![]() Preferences
Preferences![]() Removable Drives and Media to open the "Removable Drives and Media Preferences" window. Then, where it says Command under Audio CD Discs (on the Multimedia tab), replace sound-juicer (and its arguments, if any) with grip.
Removable Drives and Media to open the "Removable Drives and Media Preferences" window. Then, where it says Command under Audio CD Discs (on the Multimedia tab), replace sound-juicer (and its arguments, if any) with grip.
You may have to log out of and back in to GNOME for this change to take effect.
Configure Grip
Before you rip your first CD, you need to configure Grip. First, launch Grip from Applications![]() Sound & Video
Sound & Video![]() Grip. Grip's main interface is broken into a number of tabs:
Grip. Grip's main interface is broken into a number of tabs:
Tracks
This tab displays the current list of tracks for a CD that has been inserted into the CD player and allows you to check which of the tracks you want to rip. Grip also functions as a CD player, so you can select a particular track from this tab and click the play button at the bottom of the window to play the track.
Rip
Here, you can see the current progress of any ripping and encoding you have scheduled and start or abort the ripping process.
Config
Under Config, you will find a number of subtabs that configure how Grip rips and encodes a CD.
Status
Look here for constantly updated text output for any jobs that have been done. You can look here to see any error messages or other output.
Help
This tab provides buttons to launch help for different categories, including how to play CDs, rip CDs, and configure Grip.
About
Here, you'll find information about Grip itself, including the version and a link to the official web site.
To configure Grip, click the Config tab to reveal a number of subtabs that configure different Grip settings. The tabs you are interested in are CD, Rip, Encode, ID3, and DiscDB.
Configure CD options
The first tab, CD, lets you configure your CD device. For the most part, the default settings will work, but for the purposes of automated ripping, make sure that the "Auto-play on disc insert" option is off. To test whether Grip has the correct CD-ROM device, insert an audio CD and see whether Grip sees and can play it. If not, make sure /dev/cdrom is pointing to your correct CD-ROM device, often /dev/hdc or /dev/scd0.
Configure ripping options
The Rip configuration tab is where things start to get interesting. Because so many people are used to automated programs that turn their CDs into MP3s, they often don't realize that ripping is a two-stage process: first ripping the tracks from the CD into WAV files, and then encoding the tracks to MP3, Ogg, or whatever other format you wish. This tab controls the ripping stage of the process, and most of the options are pretty self-explanatory.
The first subtab, Ripper, lets you configure which CD-ripping program to use. Grip now includes its own version of cdparanoia by default, and we recommend that you use it unless you have a good reason not to. cdparanoia by default rips more slowly than most other ripping programs (on most of our CD-ROM drives, it rips at 2x), but what it loses in speed, it more than makes up for in accuracy. cdparanoia is slow because it is particularly thorough about getting every bit it can from the CD. If you rip with faster but less thorough ripping programs, you may notice pops or gaps in your tracks. Even on many of our scratched-up CDs, cdparanoia has been able to recover the track.
Once you choose your CD-ripping program, you can configure it further in the Ripper tab. In the case of cdparanoia, you can disable a number of its default options, including what it calls "paranoia" and "extra paranoia"how thorough it is about reading the CD. We recommend you leave these and the scratch-detection and repair options alone. The primary option in this subtab you should be interested in configuring is the "Rip file format" option. Here, you can tell Grip where to put and how to name the WAV files it rips. Grip uses a number of variables that correspond to metadata from the CD. Table 3-2 lists a number of the common variables and what they represent.
|
Table Grip naming variables |
|
|
Variable |
What it represents |
|
%A |
The artist name for the disc |
|
%a |
The artist name for the track (useful for multiartist CDs) |
|
%y |
The year of the disc |
|
%d |
The name of the disc |
|
%t |
The track number, zero-filled so that 3 would be shown as 03 |
|
%n |
The name of the track |
|
%x |
The encoded file extension (mp3 for MP3 files, ogg for OGG files, and wav for WAV files) |
For example, if you stored your MP3s in a directory called mp3 in your home directory, you might put in the "Rip file format" field:
~/mp3/%A/%y-%d/%t-%n.%x
Decoded, that line would turn Track 10 of the London Calling CD by The Clash, called "The Guns of Brixton," into the file ~/mp3/the_clash/1979-london_calling/10-the_guns_of_brixton.wav.
|
With this subtab configured, click the Options subtab to get to other ripping options. There are a few options here that we like to enable, particularly "Auto-rip on insert" and "Auto-eject after rip." With these options enabled, when Grip is running it will automatically start ripping a CD for you when you insert it and then eject it when it's done. This means that once the rest of Grip is configured, you can set up a stack of CDs at your desk, start Grip, insert the first CD, and then minimize it and do something else. When you see that the CD has ejected, you can just replace it with another CD to rip and go on with what you were doing. Grip will handle the rest. It doesn't get much more automated than that!
Configure encoding options
The next main configuration tab is Encode. This tab lets you configure what kind of audio files Grip will encode the WAV files into. The first option, Encoder, lets you choose what encoding program to use. What you choose here depends heavily on what encoding programs you have installed and what kind of audio files you want. For instance, if you want to make MP3s, you will likely choose LAME, mp3encode, or your favorite MP3 encoder. We usually stick with LAME because it is fast and produces decent-quality MP3s. If you want to create Ogg Vorbis files, choose "oggenc." If you want to create FLAC files (a lossless audio codec so there is no degradation in quality), choose "flac." After you have chosen the encoder to use, make sure the encoder executable path points to the location of your encoder (the default should be fine here). The defaults for the next two options, the encoder command line and file extension, should be fine unless you choose to use a special encoder not directly supported by Grip. The next field, "Encode file format," takes the same type of information as the "Rip file format" field in the Rip tab. In fact, if you make sure to use %x as the file extension, you can likely just directly copy and paste from this.
In the Options subtab for Encode, you can configure some specific options for your encoder. Probably the most important option here is the "Encoding bitrate" option, which determines the bitrate at which to encode your audio file if you use a lossy encoding such as MP3 or Ogg. What you put here is largely a matter of taste, although the higher the number, the larger your resulting file will be. In the case of MP3s, some people can't tell the difference between 128 and 256 kilobits per second. For other people, the distinction is great. We usually use 192 or 256 kilobits per second here, but you may want to experiment with the output for your audio files and determine what bitrate is best for you; your choice may vary depending on the type of music you are encoding. In this tab, you also have the option to create an .m3u playlist file for each CD you rip and choose where to put it. Generally, the only other option we enable in this subtab is "Delete .wav after encoding." (.wav files are quite large, and once Grip has encoded them to MP3 or another format, there's no reason to keep the .wav around.)
Configure ID3 options
The next major configuration tab, ID3, lets you control whether Grip inserts ID3 tags into your audio files. Generally, this is a good thing, and you will want all these options enabled unless you want to go back later and manually set ID3 tagsan often tedious process.
Configure DiscDB options
The final configuration tab you might want to configure is the DiscDB tab. This tab lets you configure the primary and secondary CD database servers that Grip will query when you insert a CD. These servers contain information on many CDs, based on CD signatures. When you insert a CD, Grip will query this database and retrieve artist, disc, and track information for the CD so that it can automatically fill out the ID3 tags and name the files appropriately. We would recommend sticking with the default servers listed here unless you know what you are doing. Make sure that the "Perform disc lookups automatically" option is enabled here.
Rip a CD
Once you have configured Grip, the process to rip a CD is rather simple: just insert the CD into the CD-ROM drive. Grip will automatically scan the CD, retrieve the track information from your CD database servers, select all tracks for ripping, and start the ripping and encoding process. You can click on the Rip tab to monitor the progress of both the ripping and encoding to see how far along in the process you are. If for some reason you want to stop the ripping process, click the "Abort Rip and Encode" button.
|
As mentioned before, the nice thing about configuring Grip in this way is that you can let it run virtually unattended and just feed it new CDs until all your CDs are rippedwhich certainly beats typing long commands and editing ID3 tags by hand!
![]()
Hack 33. Burn CDs and DVDs
![]()
![]()
A few click-and-drag operations are all that separates your data from a CD or DVD.
While USB drives seem to be all the rage for transporting data, it's still hard to beat the price of blank CDs or DVDs. Whether you want to create an archive of some files "just in case," or you want to take some larger files with you to another computer, under Ubuntu the process to make a data CD or DVD only takes a couple of clicks.
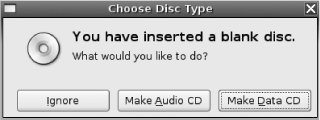
To copy data to a CD or DVD, first you need a blank CD or DVD. Insert your blank media into your CD/DVD burner and wait a moment as Ubuntu detects that you have inserted blank media into the drive. Figure 3-2 shows you the default prompt that Ubuntu will present you, where you will be given the choice to make an audio CD [Hack #34]">Figure 3-2 shows you the default prompt that Ubuntu will present you, where you will be given the choice to make an audio CD [Hack #34], make a data CD, or just ignore the CD. Choose Make Data CD. Ubuntu will now open a special Nautilus window devoted to Data CD and DVD creation.
Figure 3-2. The prompt that greets you when you insert a blank CD or DVD
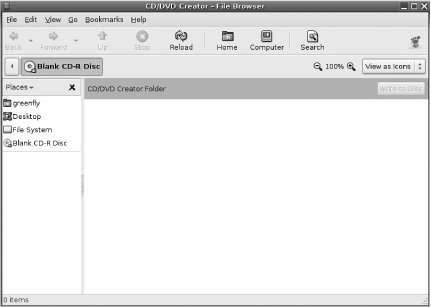
The CD/DVD Creator Folder is pretty basic, as Figure 3-3 illustrates. Essentially, you have an empty directory into which you can drag and drop files you would like to burn. Probably the easiest thing to do is to click the File menu at the top of the screen and open a new Nautilus window, and then drag files or directories from it into the CD/DVD Creator Folder.
Figure 3-3. The default Nautilus CD/DVD-burning window
Once you have collected all of the files you wish to burn into the folder, click the "Write to Disc" button at the top of the window. A new window will appear that lists some basic CD-burning options in a number of drop-down menus. From here, you can choose between multiple CD burners if your computer has them, assign a name to the disc, view the current size of the disc, and pick the write speed to use.
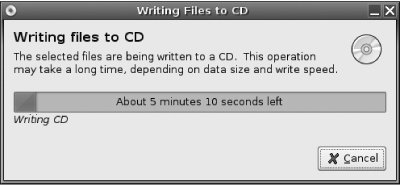
When you are ready to burn the CD, click the Write button and the CD-burning process will begin. A simple status bar will appear so you can keep track of your disc's progress (see Figure 3-4).
Figure 3-4. The Nautilus Writing Files to CD dialog
|
Hack 34. Automate Audio CD Burning
![]()
![]()
Use Serpentine and K3b to burn your own custom audio CD in just a few clicks.
Even with the advent of high-tech hard drives, flash-memory-based media players, and sophisticated peer-to-peer file-sharing software, sometimes the simplest way to take your music with you is on a good old-fashioned CD. After all, many home and car stereos still don't support the playback of MP3s or other audio formats, so if you mix your favorite tracks and burn them to a CD, you can play them just about anywhere. Plus, if your CD breaks, it's quick, easy, and cheap to replace with another burned copy.
Creating a CD used to be a bit of a dark science under Linux and required you to use a number of command-line tools to convert audio files into WAVs if they weren't already WAVs. Then you had to execute another script to burn them onto a CD and, of course, hope that you calculated the song length correctly so your music would all fit on the CD. With Ubuntu, those days are over. Ubuntu offers a number of options for burning audio CDs, but this hack will cover the built-in option Serpentine, and K3b, a very powerful and very user-friendly graphical CD- and DVD-burning tool. Both tools accomplish all of the steps that you would normally have to do on the command line, all within a nice simple interface.
Serpentine is installed by default on your Ubuntu system, so you will only need to get K3b (and its MP3 decoding library, if you want to burn MP3s to disc). To do so, just install the k3band libk3b2-mp3 packages using your preferred package manager (for example, the command sudo apt-get install k3b libk3b2-mp3 will do the trick). Ubuntu will also need to pull down a number of supporting libraries for K3b, so be patient as everything downloads and installs.
Use Serpentine
To use Serpentine, just insert a blank CD into your CD burner. Ubuntu will pop up a dialog window asking you whether you'd like to burn a data CD, burn an audio CD, or just ignore the CD (see Figure 3-2 in "Burn CDs and DVDs" [Hack #33]">Figure 3-2 in "Burn CDs and DVDs" [Hack #33]). Choose Make Audio CD.
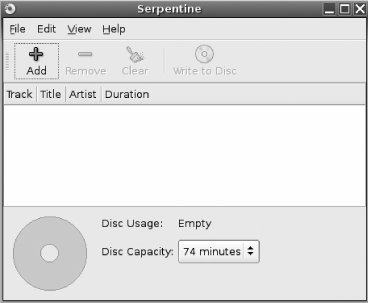
As Figure 3-5 shows, Serpentine's interface is very basic. To add tracks to the CD, either click the Add button to locate audio files on your filesystem or just drag and drop the tracks from your file manager. Serpentine will calculate the remaining time and display it on the main window. Once you are ready to burn the CD, click "Write to Disc," and Serpentine will start the process of converting and burning your tracks to the CD.
Figure 3-5. The default Serpentine window
Use K3b
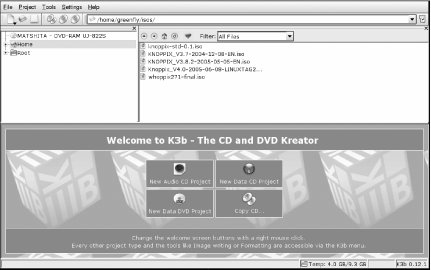
To use K3b, either launch it from your application menu or type k3b in a terminal. The screen that initially appears offers some quick links to start common CD-burning projects (Figure 3-6), so click New Audio Project or select File![]() New
New![]() New Project
New Project![]() New Audio CD Project. The split-screen interface shows you a view of your filesystem at the top of the window and a view of your CD project at the bottom. To add tracks to your CD, browse through the top interface to the WAV, MP3, and Ogg Vorbis audio files you want to add. You can also drag tracks from a CD you have inserted.
New Audio CD Project. The split-screen interface shows you a view of your filesystem at the top of the window and a view of your CD project at the bottom. To add tracks to your CD, browse through the top interface to the WAV, MP3, and Ogg Vorbis audio files you want to add. You can also drag tracks from a CD you have inserted.
Figure 3-6. Main K3b window
As you add tracks, K3b automatically figures out how much space you have left on the CD and displays it in a progress bar at the bottom of the window. K3b will also read any ID3 tags your music files may have and use the information to label the tracks on the CD, so that the artist and title will show up on CD players that support CD-Text. Right-click on a track and choose Properties to edit any of the text fields, control what portion of the track to burn to CD, and change the gap length between tracks. If you want to save the project so you can burn another CD with the same settings at a future date, click File![]() Save As to store the project information to your disk.
Save As to store the project information to your disk.
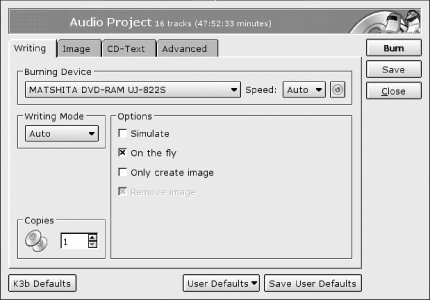
Once you have arranged your new CD how you want it, click the Burn button at the bottom-righthand corner of the screen. The dialog that appears allows you to tweak any last-minute settings for your CD burner, including write speed, write mode, and which CD burner to use (see Figure 3-7). Unless you have specific needs, the default settings should work just fine. Once you have inserted the CD and are ready to burn, click the final Burn button in this dialog to start the burning process, or the Simulate button to simulate the process without actually writing to the CD. A new status window will appear and give you information on the progress of your burning session, including elapsed time, current track being burned, and other status information.
Figure 3-7. K3b Burn dialog
|

Hack 35. Rip and Encode DVDs
![]()
![]()
The acidrip utility gives you access to many of the common mencoder functions so you can use a GUI to rip and encode a DVD to a file.
As with many things under Linux, there are a number of ways to rip and encode a DVD. For instance, some people use the mencoder tool (part of the mplayer suite) with two-pass encoding to turn VOB files they have extracted from a DVD into an MPEG4 .avi file. This method works great; however, some people are turned off by the thought of doing encoding entirely from the command line. If you want to use mencoder to encode a DVD but would rather have a GUI, the acidrip utility provides you with a GUI interface for most of the major mencoder options you might want.
Before you install acidrip, follow the instructions in "Install Multimedia Plug-ins" [Hack #28] and "Play DVDs" [Hack #30] to make sure that you have all of the multimedia plug-ins you'll need. After that, use your preferred package manager to install the acidrip package (it's in the Multiverse subcategory); if you use apt-get, type:
$ sudo apt-get install acidrip
With acidrip installed, click Applications![]() Sound and Video
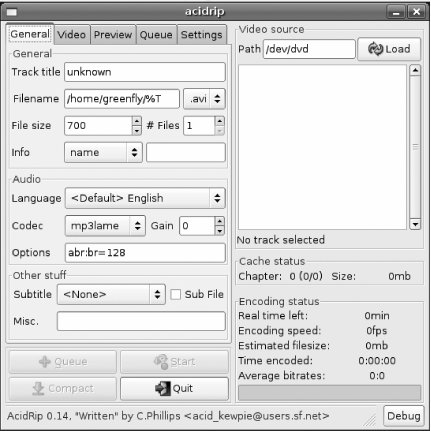
Sound and Video![]() Acidrip, or type acidrip from the command line to start the program. The default screen that greets you (see Figure 3-8) can be a bit intimidating at first, because it has so many options. For basic ripping, however, there are only a few options you need to worry about, and the nice thing is that acidripwill remember your settings for next time. That means that after you have it set up, you can rip multiple DVDs with minimal effort.
Acidrip, or type acidrip from the command line to start the program. The default screen that greets you (see Figure 3-8) can be a bit intimidating at first, because it has so many options. For basic ripping, however, there are only a few options you need to worry about, and the nice thing is that acidripwill remember your settings for next time. That means that after you have it set up, you can rip multiple DVDs with minimal effort.
Figure 3-8. The default acidrip window
Load Your DVD
To rip a DVD, first locate the section on the right side of the window labeled "Video source" and type the path to your DVD in the Path field. If you are ripping directly from a DVD, insert the DVD and type the path to your DVD device (such as /dev/dvd). If you have already ripped the DVD to the hard drive, type in the path to the directory that contains the DVD's VIDEO_TS directory. Click Load, and acidrip scans the DVD and displays each title with its playback time. Use the playback time to identify the main title you want to encode (generally the title with the longest playback time, and often the first title on the DVD) and select it.
|
Configure Settings
Now click on the General tab on the left side of the window and fill in the "Track title" if acidrip didn't automatically detect it for you. By default, acidrip uses this field for the final filename. In the Filename field, type in the path where you want acidrip to put the final encoded video. The %T in this field is a variable that gets replaced with the contents of the "Track title" field. In the drop-down menu next to the Filename, you can choose whether to give the final video an .avi or .mpg extension. Underneath that field, you can configure the final file size for the video and whether to split it across multiple files. For instance, if you wanted to fit the video across two CDs, you would set "File size" to 700 and "# Files" to 2.
Those settings should be fine for typical DVD rippings, but acidrip provides plenty of other options so that you can configure mencoder for special cases. The General tab also lets you configure what codec to use for the audio track, along with whether to include a subtitle in the final video.
The Video tab gives the experienced mencoder user access to more advanced options. Here, you can configure which codec to use for the output file and can set the bitrate for the final file by hand. You can also crop the final video or scale it to a different width and height. If you want to add any special pre- or post-filters to mencoder, you can also configure those here.
|
The Settings tab lets you configure general acidrip options, including what program to use for mencoder, mplayer, and lsdvd (useful if there is more than one instance of these programs in your path) and what directory to use to cache a DVD (if you have that option enabled). From this tab, you can also tell acidrip to automatically shut down the computer after it is finished ripping.
Queue and Rip
After you have configured your settings the way you want them, click the Queue button at the bottom of the window to add the job to the queue. The Queue tab displays any queued jobs you have set. This tab can be handy if you want to learn more about the mencoder processes acidrip uses, because it displays the full commands mencoder will run. This can also be good for debugging purposes if acidrip fails to start ripping. Copy and paste the mencoder lines from the queue to the command line and make note of any errors mencoder outputs. You can also queue more than one job, so you can line up a bunch of jobs and leave them running overnight.
Once you finish configuring your job and queue it, click the Start button to start the encoding process. acidrip shrinks down to a smaller window and displays its progress, including time left in the current process, encoding speed, and estimated file size. Click the Full View button to go back to the full-sized window. When acidrip finishes, it goes back to full view, and you will be able to check out your new video files in the directory you specified.
As mentioned earlier, the nice thing about using acidrip over mencoder is that you can tweak acidrip with your favorite mencoder settings a single time and then just concentrate on adding encoding jobs. This helps to eliminate the problem of trying to remember which options to use each time; plus it makes it easier to queue up multiple jobs, one after another.
![]()
Hack 36. Create a Video DVD
![]()
![]()
Use the tovid scripts to automate the conversion of many video formats to DVD.
Before DVD burners and media were relatively inexpensive, creating your own video DVDs was a daunting prospect. Even today, depending on which tools you use, it can still be a daunting prospect under Linux. However, with the tovid set of scripts (http://tovid.org), you can easily convert just about any video into a DVD-compatible format.
So you have a video (or a number of videos) that you want to convert into a DVD. The first step is to convert that video into a format compatible with the DVD standard. Although you could use mencoder or transcode directly to perform this conversion, the number of options involved can quickly get complicated and confusing. Luckily, a great tool, tovid, has been created to solve this problem. The tovid suite is a series of scripts that automate the process of converting a video into a VCD. The scripts involved have basic, easy-to-understand arguments and, because the output shows you the commands that are being executed, you can also use them to learn more about the underlying process.
Install tovid
To install tovid, download the latest release from the official project page at http://tovid.org. The main tool in the suite is also called tovid and uses the mplayer, mjpegtools, ffmpeg, mkisofs, dvdauthor, transcode, vcdimager, and normalize-audio packages to perform the video conversion, so you will need to have these packages installed beforehand (you'll need the universe and multiverse repositories enabled [Hack #60]). For example:
$ sudo apt-get install mplayer mjpegtools ffmpeg mkisofs \\
dvdauthor normalize-audio transcode vcdimager
Once these requirements are met, download the latest release and untar it:
$ tar -xzvf tovid-0.25.tar.gz
Now enter the tovid source directory that tar created and then run the configure script inside. This script automates the process of installing tovid on your system, and once it completes, you are ready to start:
greenfly@ubuntu:~$ cd tovid-0.25
greenfly@ubuntu:~tovid-0.25$ ./configure
The configure script will confirm that you have all the required dependencies installed. If you are missing a dependency, check out "Search for Packages from the Command Line" [Hack #58] for information on how to track down the exact package name you need. Once configure has detected all the dependencies it needs, run the setup.sh script:
greenfly@ubuntu:~tovid-0.25$ sudo ./setup.sh
Convert the Video
With tovid installed, now it's time to convert the video. The tovid arguments are pretty basic. The only wrinkle is that you need to decide whether to use NTSC or PAL formats and which aspect ratio to use for the video so tovid knows how to properly resize the video. Whether to use NTSC or PAL formats depends on where you live (or, more specifically, what your TV uses). If you live in the United States, use NTSC. If you live in Europe or Japan, use PAL.
tovid supports full-screen (4:3), wide-screen (16:9), and theatrical widescreen (2.35:1) aspect ratios through the -full, -wide, and -panavision options, respectively. Generally speaking, if you are creating a DVD of a home video or TV show, you will probably use -full (which is what tovid uses by default if you don't specify the option). If the video source is from a movie, you will use -wide or -panavision, depending on how wide the video is. If you are unsure, run the idvid utility that comes with the tovid suite on the video file to output the width and height of the video, and then divide the width by the height:
$ idvid sample.avi
-----------------------------------
idvid video identification script
Version 0.25
Written in 2004 by Eric Pierce
http://tovid.sourceforge.net/
----------------------------------
Gathering video information. This may take several minutes,
so please be patient...
=====================================================
File: sample.avi
Width: 512 pixels
Height: 384 pixels
...
$
In this example, the video aspect ratio is 512/384, or 4:3.
With the aspect ratio chosen, run tovid with the -dvd option to create the new DVD-compatible MPEG2 file. tovid also takes as arguments -in followed by the input file, and -out followed by the name to give the output file (without any file extensions):
$ tovid -dvd -ntsc -full -in sample.avi -out output
Probing video for information. This may take several minutes...
Input file is 512 x 384 at 23.976 fps.
Reported running time is 1267 seconds.
Source is not 29.970 fps. Adjusting to 29.970 fps.
Scaling and/or padding with letterbox bars
Scaling 512 x 384 directly to 720 x 480
The encoding process is estimated to require 886 MB of disk space.
You currently have 21396 MB available in this directory.
=========================================================
Testing mplayer stability with -vc dummy option:
Test succeeded!
Creating WAV of audio stream with the following command:
mplayer -quiet -vo null -ao pcm "sample.avi" -vc dummy -ao pcm:file=stream.
wav
=========================================================
=========================================================
Encoding WAV to ac3 format with the following command:
ffmpeg -i stream.wav -ab 224 -ar 48000 -ac 2 -acodec ac3 -y "output.ac3"
Audio encoding finished successfully
=========================================================
Creating and encoding video stream using the following commands:
nice -n 0 mplayer -benchmark -nosound -noframedrop -noautosub -vo yuv4mpeg -
vf-add pp=hb/vb/dr/al:f -vf-add hqdn3d -vf-add scale=720:480 "sample.avi"
cat stream.yuv | yuvfps -r 30000:1001 -n -v 0 | nice -n 0 mpeg2enc -M 2 -a 2
-f 8 -b 8000 -g 4 -G 11 -D 10 -F 4 -v 0 -n n -4 2 -2 1 -q 5 --keep-hf -o
"output.m2v"
If you have more than one video you would like to convert, you can use the tovid-batch command instead. tovid-batch takes the same arguments as tovid, except that you use -infilesinstead of -in and you don't specify an output filename; tovid-batch will determine the output filename based on the input filename. So if you had a directory of full-screen .avi files you wanted to convert to DVD, run this:
$ tovid-batch -dvd -full -ntsc -infiles *.avi
Create the XML File
The next step is to create a proper .xml file to describe the DVD structure. You can use the makexml tool that is included with tovid to create an XML file that is compatible with the dvdauthor tool. makexml supports more options when used for DVDs.
Section 28 Table 3-3 lists the DVD-specific options.
|
Table makexml arguments |
|
|
Argument |
Function |
|
-group videofile1 videofile2 ... -endgroup |
List of video files to include as one single title. This is useful if you have split a movie into several video files. |
|
-titlesets |
Forces the creation of a separate titleset per title. This is useful if the titles of a DVD have different video formatse.g., PAL + NTSC or 4:3 + 16:9. If used with menus, there must be a -topmenuoption that specifies a menu file with an entry for each of the titlesets. |
|
-chapters n |
Creates a chapter every n minutes within the video. This option can be put at any position in a file list and is valid for all subsequent titles until a new -chapters option is encountered. Using this option may increase burn time, since the duration of the video is calculated. |
These options are generally for special cases, apart from the last option. By default, makexml won't define chapters in your DVD, which means you won't be able to easily skip through it. To add chapters, use the -chapters option and specify an interval, such as 5 or 10 minutes. That way, you can more quickly skip through the DVD. To create an XML file for the sample video with a chapter every five minutes, type:
$ makexml -dvd -chapters 5 output.mpg output
---------------------------------------------
makexml
A script to generate XML for authoring a VCD, SVCD, or DVD.
Part of the tovid suite, version 0.18b
Written in 2004 by Eric Pierce
http://tovid.sourceforge.net/
--------------------------------------------
Adding title: output.mpg as title number 1 of titleset 1
Calculating the duration of the video using the following command:
idvid -terse "output.mpg"
This may take a few minutes, so please be patient...
The duration of the video is 00:21:07
Closing titleset 1 with 1 title(s).
==========================================
Done. The resulting XML was written to output.xml.
You can create the DVD filesystem by running the command:
dvdauthor -x output.xml
Thanks for using makexml!
where output.mpg is the name of the movie to work on and output is the name of the XML file to create (the .xml is appended automatically).
Create the DVD Filesystem Structure
With the XML file created, the next step is to use dvdauthor to create the DVD filesystem. dvdauthor has a number of options you can use to create special DVD filesystems, but since makexml has already done the work for you, you can just pass your XML file to dvdauthor as an argument. makexml also listed the appropriate command to use near the end of its output, so to create a DVD filesystem for this example, type:
$ dvdauthor -x output.xml
DVDAuthor::dvdauthor, version 0.6.11.
Build options: gnugetopt magick iconv freetype fribidi
Send bugs to
INFO: Locale=en_US
INFO: Converting filenames to ISO-8859-1
INFO: dvdauthor creating VTS
STAT: Picking VTS 01
STAT: Processing output.mpg...
STAT: VOBU 3184 at 529MB, 1 PGCS
INFO: Video pts = 0.178 .. 1268.077
INFO: Audio[0] pts = 0.178 .. 1267.506
STAT: VOBU 3194 at 530MB, 1 PGCS
INFO: Generating VTS with the following video attributes:
INFO: MPEG version: mpeg2
INFO: TV standard: ntsc
INFO: Aspect ratio: 4:3
INFO: Resolution: 720x480
INFO: Audio ch 0 format: ac3/2ch, 48khz drc
STAT: fixed 3194 VOBUS
INFO: dvdauthor creating table of contents
INFO: Scanning output/VIDEO_TS/VTS_01_0.IFO
dvdauthor will create a directory named output and store the AUDIO_TS and VIDEO_TS DVD filesystem there. If you want to test the DVD before you burn it, you can use mplayer to play from this filesystem with the -dvd-device option:
$ mplayer dvd://1 -dvd-device output/
This command plays the first title from the DVD filesystem under the output directory. If you want to play a different title, specify it on the command line.
Burn the DVD
Now it's time to burn the file structure to DVD. With K3b [Hack #34], click File![]() New Project
New Project![]() New Video DVD Project. Find your DVD filesystem in the top pane and then drag and drop the files inside the AUDIO_TS (if any) and VIDEO_TS directories into their respective directories in the bottom pane. Then click the Burn button to set the DVD-burning options and, finally, to burn the filesystem to DVD.
New Video DVD Project. Find your DVD filesystem in the top pane and then drag and drop the files inside the AUDIO_TS (if any) and VIDEO_TS directories into their respective directories in the bottom pane. Then click the Burn button to set the DVD-burning options and, finally, to burn the filesystem to DVD.
If you want to burn the DVD from the command line, you need to install dvdrtools, which is a fork of the cdrecord utility that is designed to support recordable DVD drives. dvdrtools is already packaged for Ubuntu, so install it with your preferred package manager.
Once dvdrtools is installed, the first step is to use the included mkisofs utility to create a DVD image out of your file structure:
$ mkisofs -dvd-video -udf -o dvd.iso output/
With the dvd.iso file created, you can locate the dvd.iso file in your file browser, right-click it, and select "Burn to DVD." Otherwise, if you prefer the command line, use the dvdrecordutility to burn it:
$ dvdrecord -dao speed=2
dev=/dev/dvdrw
dvd.iso
Replace the dev=/dev/dvdrw option with the correct values for your DVD burner.
With the DVD created, pop it in your DVD player and test your results.
Hack 37. Connect to a Digital Camera
![]()
![]()
Under Ubuntu, connecting to your digital camera is just about as easy as plugging it in.
We've used digital cameras under Linux in the past, and while it hasn't been too difficult to get pictures off of them, when we wanted to automate the process, we had to do a considerable amount of hacking. Not so under Ubuntu, where importing images from a camera, whether it's a USB storage device or not, is just a matter of plugging it in and clicking a few buttons. In this hack, we'll describe the general process to connect to a digital camera under Ubuntu.
Before we go into the individual steps in the process, we should mention that not all digital cameras are created equal. You can categorize digital cameras under Linux into two categories: cameras that have USB-storage-device support and cameras that don't. Cameras that have USB-storage-device support appear as standard USB hard drives when you plug them into a computer. For instance, if you plug such a device into a Windows or Mac machine, you can browse through the camera just as if it were a USB thumb drive. Under Ubuntu, this isn't too different; these devices will show up as a hard drive, and you can browse through them as such. There are also a number of cameras that don't tout USB storage device support. For these cameras, you will have to rely on Ubuntu's libgphoto libraries to communicate with the cameras over their specific protocols.
For the most part, under Ubuntu, we've had pretty good success importing photos, even on relatively new digital cameras that required libgphoto, but the best way to find out about your particular camera's support is simply to plug it in.
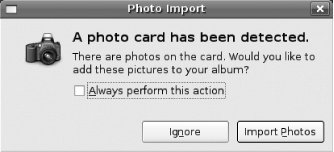
To import photos from your digital camera on Ubuntu, just plug in the USB connector and power on the camera. If Ubuntu recognizes the device, it will present you with a dialog similar to the one in Figure 3-9. If you have already imported your photos, then you can click Ignore; otherwise, click Import Photos. The window that appears next will vary depending on which type of camera you have. These are different enough that we'll go into each of them.
Figure 3-9. The dialog Ubuntu presents when you plug in a digital camera
Import from a Non-USB-Storage-Device Camera
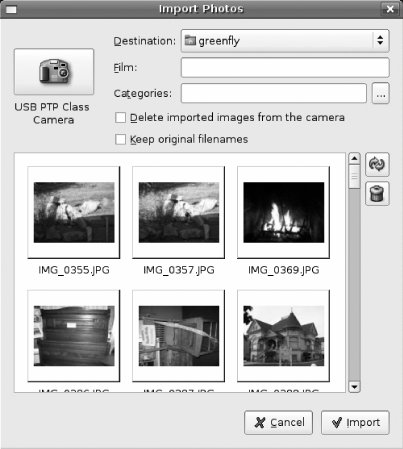
If your camera does not have USB-storage-device support, Ubuntu will need to perform an intermediary step to import the photos from your drive. After you select Import Photos, Ubuntu will present you with a window like the one in Figure 3-10. This program uses libgphoto to pull the photos off of the camera. (While this program will allow you to rotate photos, we recommend you wait until the next step and rotate them in the gThumb program.) Select where you would like to import these photos from the Destination drop-down menu and click Import. Ubuntu will then import each photo from the camera into a new directory in the destination that is conveniently timestamped so that you can keep track of when the photos were imported.
Figure 3-10. Import photos using libgphoto from this window
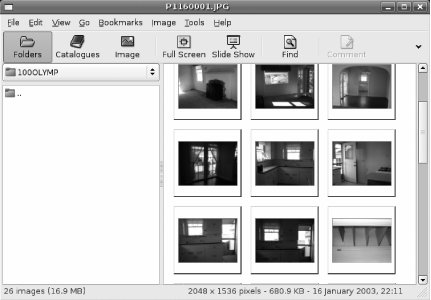
Once Ubuntu finishes importing the photos, it will open the gThumb program with that directory selected. Figure 3-11 shows how gThumb presents your photos in thumbnail format. From here, you click the Rotate button (or click Tools![]() Rotate), display a slideshow of every photo, or double-click on a particular photo to take a closer look. Since the import program already copied all of the photos off of your camera, you can now disconnect it whenever you please.
Rotate), display a slideshow of every photo, or double-click on a particular photo to take a closer look. Since the import program already copied all of the photos off of your camera, you can now disconnect it whenever you please.
Figure 3-11. gThumb displaying the imported photos
Import from a USB-Storage-Device Camera
If your camera has USB-storage-device support, Ubuntu will bypass the intermediary step of importing the photos and instead take you directly to a gThumb display of your image directory, as shown in Figure 3-11. From here, you can rotate images, view slideshows, and examine your images; however, note that any changes you make are made on the camera itself. If you want to copy the files to your computer, you will need to create a directory to store the photos; then you can drag and drop the photos from gThumb into your new directory.
|
Automatically Rotate Your Photos with gThumb
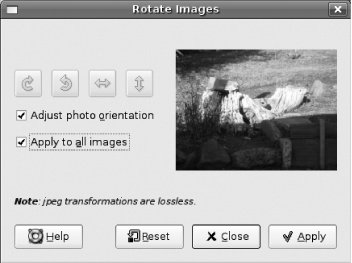
One nice feature of some newer digital cameras is the ability to store the orientation of the camera when a picture is taken. The image will then have stored within its metadata information that says not only when the picture was taken, but whether you took the picture in portrait or landscape mode. If your camera supports this feature, you can save a lot of effort rotating images within gThumb. Type Ctrl-A to select all of the images in the directory, then click Tools![]() Rotate to open the Rotate Images dialog. Then check the "Adjust photo orientation" and "Apply to all images" checkboxes in that window, as shown in Figure 3-12. Click Apply, and gThumb will go through each photo and rotate it according to the orientation stored in the metadata. This can be quite a time-saver when you have a lot of images.
Rotate to open the Rotate Images dialog. Then check the "Adjust photo orientation" and "Apply to all images" checkboxes in that window, as shown in Figure 3-12. Click Apply, and gThumb will go through each photo and rotate it according to the orientation stored in the metadata. This can be quite a time-saver when you have a lot of images.
Figure 3-12. Check these checkboxes to automatically rotate images
All materials on the site are licensed Creative Commons Attribution-Sharealike 3.0 Unported CC BY-SA 3.0 & GNU Free Documentation License (GFDL)
If you are the copyright holder of any material contained on our site and intend to remove it, please contact our site administrator for approval.
© 2016-2026 All site design rights belong to S.Y.A.