Ubuntu Hacks: Tips & Tools for Exploring, Using, and Tuning Linux (2009)
Chapter 7. Security
When you hear stories about how much more secure Linux is than other operating systems, it can be tempting to rest easy. However, the truth is that any given Linux system is more likely to be secure only when it's in good hands. This chapter collects a number of hacks that will make you a better steward of your Ubuntu systems.
In this chapter, you'll learn about how Ubuntu relies on sudo to keep root privileges at the minimum needed to keep the system running smoothly. You'll also learn how to configure your system to download and install security updates, so you can take advantage of the Linux community's famously quick responses to security flaws. But even with these practices under your belt, there's more you can do.
You can protect your network with a firewall to make it even harder for intruders to gain access. And if that's not enough, you can use industrial-grade encryption to protect sensitive information on your system (so if your system is stolen or otherwise compromised, the attackers won't be able to use what they findunless you used a lousy passphrase or wrote it down on a piece of paper). You'll find hacks showing how to do all this and more in this chapter.
![]()
Hack 67. Limit Permissions with sudo
![]()
![]()
Leverage Ubuntu's default sudo installation to allow fine-grained control over privileged access.
If you have used a number of different Linux distributions in the past, one surprising thing you'll notice the first time you use Ubuntu is that it disables the root account. For most other distributions, the installer prompts you for root's password, and when you need to get work done as root, you log in or use the su command to become root, and type in root's password. Since Ubuntu's root user has no password by default, you must use the sudo command to run commands as root. sudo sets up a way to allow access to root or other user accounts with fine-grained controls over what a person can do as that user. Plus the way sudo works is that it prompts you for your password, not that of the other user you want to switch to. This allows an administrator the ability to grant particular types of root access to users on the system without them all knowing the root password.
The default sudo configuration in Ubuntu is pretty basic and can be found in the /etc/sudoers file. Note that you must never edit this file using a standard text editor. You must use the visudo tool. visudo is required because it will perform extra validation on the sudoers file before you close it to make sure there aren't any syntax errors. This is crucial because a syntax error in a sudoers file could lock out all of the users on your system. Here are the roles defined in the default Ubuntu /etc/sudoers file:
# User privilege specification
root ALL=(ALL) ALL
# Members of the admin group may gain root privileges
%admin ALL=(ALL) ALL
The first rule allows root to use sudo to become any other user on the system, and the second rule allows anyone who is a member of the admin group to run any command as root. So when you want to run a command as root on a default Ubuntu system, type sudo followed by the command to run. For instance if you wanted to run apt-get update as root, you would type:
$ sudo apt-get update
/etc/sudoers Syntax
To fully explain the syntax of /etc/sudoers, we will use a sample rule and break down each column:
jorge ALL=(root) /usr/bin/find, /bin/rm
The first column defines what user or group this sudo rule applies to. In this case, it is the user jorge. If the word in this column is preceded by a % symbol, it designates this value as a group instead of a user, since a system can have users and groups with the same name.
The second value (ALL) defines what hosts this sudo rule applies to. This column is most useful when you deploy a sudo environment across multiple systems. For a desktop Ubuntu system, or a system where you don't plan on deploying the sudo roles to multiple systems, you can feel free to leave this value set to ALL, which is a wildcard that matches all hosts.
The third value is set in parentheses and defines what user or users the user in the first column can execute a command as. This value is set to root, which means that jorge will be allowed to execute the commands specified in the last column as the root user. This value can also be set to the ALL wildcard, which would allow jorge to run the commands as any user on the system.
The last value (/usr/bin/find, /bin/rm) is a comma-separated list of commands the user in the first column can run as the user(s) in the third column. In this case, we're allowing jorge to run find and rm as root. This value can also be set to the ALL wildcard, which would allow jorge to run all commands on the system as root.
Show It's Working
To take advantage of his sudo role, jorge would use the sudo command on the command line followed by the program to execute:
jorge@ubuntu:~$ sudo find . ! -name '*.mp3' -exec rm -f \\{\\} \\;
If jorge tried to run a command other than find or rm, sudo would fail with a warning that he is not allowed to run that command as root.
You can use sudo to run commands as users other than root. If you don't specify a user, sudo defaults to the root user, but you can use the -u flag to designate a particular user to run as:
$ sudo -u fred ls /home/fred
As you can see, these rules allow you to create specific roles on a system. For instance, you might want to designate a group of administrators as account administrators. You don't want these users to have full root access, but you do want them to be able to add and remove users from the system. You could create a group on the system called accounts and add these users to that group (see "Manage Users and Groups" [Hack #75] for more information on user and group management under Ubuntu). Then you could use visudo to add the following line to /etc/sudoers:
%accounts ALL=(root) /usr/sbin/useradd, /usr/sbin/userdel, /usr/sbin/usermod
Now any member of the accounts group can run useradd, userdel, and usermod. If you found there were other tools this role needed to access, you could simply add them to the end of the list.
|

Another handy feature of sudo is the ability to specify commands that don't require a password to run. This is useful if you need to run certain commands as root within a script noninteractively. For instance, you may want a user to be able to run the kill command as root without requiring a password (so the user can quickly kill a runaway process, for instance). To enable this privilege, add the NOPASSWD: attribute before the command list. To grant this ability to our jorge user, we would add the following line to /etc/sudoers:
jorge ALL=(root) NOPASSWD: /bin/kill, /usr/bin/killall
Then jorge could run:
jorge@ubuntu:~$ sudo killall rm
to quickly kill a runaway rm process as root.
Enable the root Account
So sudo is all well and good, but what if you just want to go back to an enabled root account that you access with su? Essentially, all you need to do is set the root password:
$ sudo passwd root
Now you should be able to log in directly as root, as well as use su.
sudo is an incredibly powerful tool, and this hack covers only some of the configurations that might be useful to a desktop user. If you want to deploy sudo across an enterprise, check out the sudoers manpage (man 5 sudoers) to see examples of how to configure a number of aliases to define user groups, groups of users to run commands as, host aliases, and command aliases. This modular approach to defining roles really comes in handy when deploying across a large number of computers.
Hack 68. Manage Security Updates
![]()
![]()
Stay up-to-date with the latest security fixes.
There is an old saying that the only safe computer is one that's disconnected from the network, turned off, and locked in an underground bunkerand even then you can't be sure! Keeping your computer up-to-date with the latest security patches is essential if you want to keep yourself safe from the latest threats and exploits.
Ubuntu Update Policy
When each version of Ubuntu is released, all packages within it are considered "frozen." No new versions of software contained in that release are added to it, so when you install Ubuntu Dapper Drake, the versions of all the software available within that release will remain the same indefinitely. New versions of individual packages are not added because that would make the release a moving target rather than a predictable environmentand might even introduce new bugs and security vulnerabilities.
Of course, software itself doesn't stand still; new versions are always coming out, and sometimes an existing vulnerability is found and fixed by a new release. That means older versions of the software may still be vulnerable, but Ubuntu policy dictates that new versions of software are not shoe-horned into an already released distribution.
This impasse is resolved by back-porting security fixes to the version of the software that was included with the distribution at the time of release and then releasing a "security update" package for just that particular piece of software. System administrators can then install the security update, safe in the knowledge that they are fixing only a specific security problem and not changing the fundamental way the system operates.
Obtain Security Updates
Security updates are distributed from special package repositories, so check your /etc/apt/sources.list to make sure you have entries that match your main package sources, like this:
deb http://archive.ubuntu.com/ubuntu dapper main restricted universe
![]()
multiverse
deb http://security.ubuntu.com/ubuntu dapper-security main restricted
If not, see "Modify the List of Package Repositories" [Hack #60] to learn how to enable security sources, but note that there are no security updates available for the universe and multiverse sources because they are not officially supported by the Ubuntu security team.
Automate Update Notifications
The Ubuntu desktop comes with a panel applet called update-notifier that pops up an alert if any new packages have been released since your machine was last updated, but if you are running a headless server, you can set up a trivial script to notify you via email directly from the server.
Place the following in /etc/cron.daily/notify-updates:
#!/bin/sh
apt-get -qq update
apt-get -qq --simulate dist-upgrade
Then make it executible:
$ sudo chmod +x /etc/cron.daily/notify-updates
The -qq flags tell apt-get to run in "really quiet" mode so it produces no output unless it really needs to, so apt-get -qq update causes it to silently fetch the latest list of packages from the package servers. The --simulate flag causes the dist-upgrade to be done in a dry-run mode that pretends to upgrade all available packages without really doing it, and if there are no packages available for upgrade, it will also complete silently.
Because this script is being called by cron, it will be triggered every day, and if it produces no output, cron will just silently move on. However, if there are packages available for upgrade, the dist-upgrade command will generate output listing all packages that can be upgraded, and cron will email the output to the system administrator, who can then decide whether to apply the updates manually.
If cron does not send email to the right person, you may need to edit /etc/crontab and put in an entry near the top similar to:
MAILTO=user@example.com
Package Signatures
Packages distributed through the official Ubuntu archives are cryptographically signed so that you can verify that the packages haven't been tampered with or forged using a man-in-the-middle attack. The official archive keys are included in the ubuntu-keyring package and installed in /etc/apt/trusted.gpg by default as part of Dapper. You can use the apt-keys tool to verify and manage the keys that are trusted by your system when new packages are installed:
jon@jbook:~$ sudo apt-key list
/etc/apt/trusted.gpg
--------------------
pub 1024D/437D05B5 2004-09-12
uid Ubuntu Archive Automatic Signing Key <ftpmaster@ubuntu.com>
sub 2048g/79164387 2004-09-12
pub 1024D/FBB75451 2004-12-30
uid Ubuntu CD Image Automatic Signing Key <cdimage@ubuntu.com>
If you attempt to install any packages that originated in archives that aren't verified by one of those trusted keys, apt will complain but allow you to proceed anyway if you choose:
WARNING: The following packages cannot be authenticated!
myprogram lib-blah lib-foo
Install these packages without verification [y/N]?
Monitor Security Advisories
One of the most important sources of up-to-the-minute information on threats and vulnerabilities is CERT, the Computer Emergency Response Team, run by the Carnegie Mellon University's Software Engineering Institute. The CERT Coordination Center (CERT/CC) acts as a global clearing-house for advisories relating to computer security, and even makes its advisories available as RSS and Atom news feeds so you can stay on top of the latest problems as they come to light.
However, the CERT advisory listing can be overwhelming because it includes notifications for all operating systems and software packages. A much more concise list of advisories that relate directly to Ubuntu is available online at http://www.ubuntu.com/usn, along with links to the Ubuntu Security Announcements mailing list and list archives.
If you believe you have found an unreported vulnerability in an Ubuntu package, you can contact the Ubuntu security team via email at security@ubuntu.com.
Hack 69. Protect Your Network with a Firewall
![]()
![]()
Protect your network with a firewall managed from your Ubuntu desktop.
Linux has an excellent kernel-based network packet-management system called iptables that can be configured either directly from the command line or through a variety of GUI administration interfaces. One of the most powerful firewall-management interfaces is called Firewall Builder, a system designed to separate policy from implementation and allow you to concentrate on what you want your firewall to do, rather than how you want it to do it.
The Firewall Builder interface presents hosts, routers, firewalls, networks, and protocols as objects, and allows you to drag and drop those objects to define your firewall policy. Firewall Builder then compiles your policy into the actual rules needed to enforce it, with multiple policy compilers available to suit different types of firewall. You can define your policy using Firewall Builder running on an Ubuntu desktop and then have it compiled for a firewall running iptables on Linux, ipfilter on BSD, or any of about half a dozen other firewall technologies. The policy can be defined exactly the same way, regardless of the technology deployed on the target firewall. And because Firewall Builder can support multiple firewalls simultaneously, you can use it as a central management console to configure a variety of firewalls and individual hosts throughout your network, all from a single, unified interface.
You can run Firewall Builder directly on your firewall if you choose, but as a general policy, it's a good idea to have your firewall running the absolute minimum system possible, so a better approach is to have a dedicated machine as your firewall and run Firewall Builder on a desktop or laptop management machine. Then whenever you want to update your firewall policy, you can run Firewall Builder on your management machine to generate new rules and push them out to the firewall.
Initial Firewall Setup
Start by setting up your firewall machine with a minimal Ubuntu installation: run the installer in server mode [Hack #93] so that it installs only basic packages, and preferably install at least one extra Ethernet card so that you can keep untrusted Internet traffic away from your internal network. A standard approach is to run three network interfaces on a firewall: one for your internal network (downstream), one to connect to the Internet (upstream), and one to a separate local network called the De-Militarized Zone (DMZ), where you can put servers that you want to expose to the Internet. Configure the network interfaces to suit the networks they are connecting to and make sure that your firewall can connect to each one of them individually by using ping to check whether you can see hosts on each network.
Your firewall machine is now sitting at the crossroads between the Internet, your internal network, and any servers that you want to run, but it doesn't yet know how to pass data from one to another so everything will be effectively isolated. To enable your firewall to pass packets from one network interface to another and perform packet filtering and network/port address translation, you will need to install iptables, and to allow the firewall to be managed remotely, you will need to install an SSH server:
$ sudo apt-get install iptables ssh
Initial Management-Machine Setup
Install Firewall Builder on your management machine along with RCS and the Firewall Builder documentation package:
$ sudo apt-get install fwbuilder rcs fwbuilder-doc
Now you're ready to perform the rest of the steps.
Create a firewall project
First, launch Firewall Builder:
$ fwbuilder
Select Create New Project File and specify a location to save it. Ideally, you should create a special directory to hold the project file because Firewall Builder will also generate other files in the same directory, and having them all in one place makes it easier to back up your firewall configuration.
You are then given the option of activating revision control for the project as well as setting it to be opened automatically when Firewall Builder starts up. Turn on both options.
The revision-control option tells Firewall Builder to store the configuration file in RCS, allowing you to see the entire history of the file, including all changes that have ever been made to it. This feature can be extremely handy if you manage to break your firewall and need to roll back to a known-good working configuration.
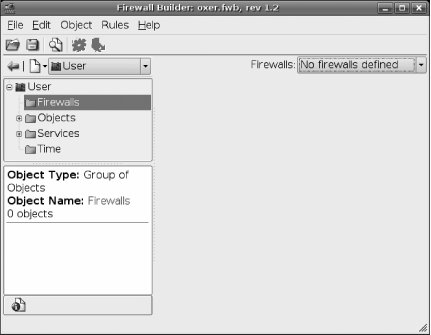
Firewall Builder will initially start with an empty configuration containing only a number of predefined services in two libraries (see Figure 7-1). The libraries are called User and Standard, and you can switch between them using the drop-down menu near the upper left. The Standard library is a read-only library that ships with Firewall Builder and contains predefined services for almost every TCP and UDP service in common use, along with predefined network ranges and time ranges. The User library is where objects you define will be stored, including firewalls, custom TCP and UDP services, and custom network ranges.
Figure 7-1. Firewall Builder policy management
Define a new firewall
Make sure the User library is selected, right-click on the Firewalls folder, and select New Firewall. The New Firewall dialog appears, as shown in Figure 7-2. Give your firewall a name, select the firewall software (typically "iptables" if you run Linux on your firewall), and select the firewall operating system (Linux 2.4/2.6). This is where you start to see the flexibility of Firewall Builder and its support for multiple firewall types.
You also have the option of using preconfigured template firewall objects, which is a good idea if you're just getting started with Firewall Builder. The templates make it very easy to get started with a typical firewall scenario, rather than starting from scratch with a totally blank configuration. After you've made your selection, click Next.
Figure 7-2. New firewall
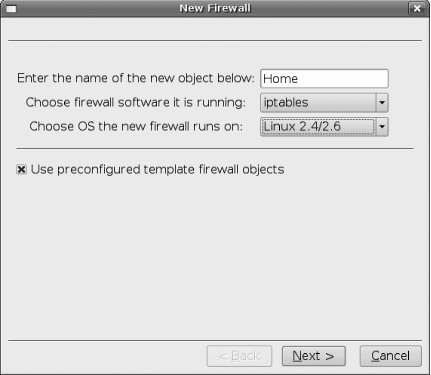
Click on each of the firewall template names to see a diagram and a brief explanation of how it works. For most small networks, "fw template 1" is a good choice, giving you a typical firewall with a dynamic external address, static internal addresses on the 192.168.1.0/24 network, unrestricted outbound access from the network, and access to the firewall itself only via SSH from inside the network. "fw template 2" is similar but also allows the firewall to operate as a DHCP and DNS server for the internal network.
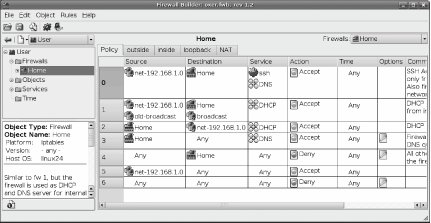
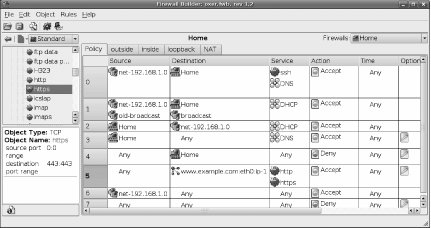
Once you have selected a template, you will be returned to the main Firewall Builder policy-management screen, but you will now have a default policy defined for your new firewall. Firewall Builder displays policy rules in a list, with the rules applied in order, starting at the top and working down until a match is found, as shown in Figure 7-3.
Figure 7-3. Policy management
There are multiple rules lists that can be accessed using tabs across the top of the list. The primary list is Policy, which are the rules that control allowed and disallowed activity throughout the firewall. Then there is an individual rule list for each interface on the firewall, and finally a NAT list that allows you to configure Network Address Translation rules. You don't usually need to worry about the individual interfaces; most changes will be to Policy and NAT.
Add a host-specific policy
To understand how Policy and NAT are managed, try applying a specific scenario, such as providing external access to an internal web server.
Start by adding a Host object for the server. Go through the User object tree to User![]() Objects
Objects![]() Hosts, right-click on Hosts, and select New Host. Enter a name such as www.example.comfor your host, select the checkbox labeled Use Preconfigured Template Host Objects, and then click Next.
Hosts, right-click on Hosts, and select New Host. Enter a name such as www.example.comfor your host, select the checkbox labeled Use Preconfigured Template Host Objects, and then click Next.
Select the "PC with 1 interface" template and click Finish. An object will be added to your Hosts list with an interface predefined, so click through to User![]() Objects
Objects![]() Hosts
Hosts![]() <www.example.com>
<www.example.com>![]() eth0
eth0![]() <www.example.com>, then double-click on it to edit the interface values. Change the IP address to match the actual internal address of your server, apply the changes, and close the dialog.
<www.example.com>, then double-click on it to edit the interface values. Change the IP address to match the actual internal address of your server, apply the changes, and close the dialog.
Assuming you have a range of public, static IP addresses assigned to the external interface of your network, right-click on "eth0" and select Add IP Address. Enter the public IP address and network mask, apply changes, and close.
Your server now has two IP addresses defined: the real address assigned to its interface and the public address that you want people to use to access it.
Now click the NAT tab at the top of the rules list. Add a new, blank NAT rule by either right-clicking on the number of an existing rule or selecting Rules![]() Add Rule Below from the menu.
Add Rule Below from the menu.
You can now build your NAT rule by dragging and dropping object icons into appropriate places. The columns are:
Original Src
The original source address of packets before translation
Original Dst
The original destination of packets before translation
Original Srv
The original service (port) the packets arrived on
Translated Src
The new source address to report that packets came from
Translated Dst
The new destination address to apply to packets
Translated Srv
The new port to direct packets to
The first rule to set up is the translation to apply to packets directed toward the server from outside the firewall. Click the icon representing the external IP address of the server and drag it into the Original Dst box, and then click the internal IP address icon and drag it into the Translated Dst box.
Now add another blank rule and set it to translate packets directed from the server to the outside world. Click the internal IP address icon and drag it into the Original Src box, and the external IP address icon and drag it into the Translated Src box.
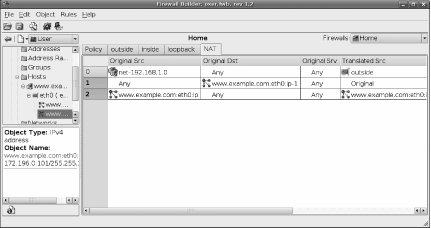
You now have rules that will cause packets traveling to and from the server to be modified as they pass through the firewall, with external machines seeing only the external IP address (see Figure 7-4).
Figure 7-4. NAT rules
In these examples, only the IP addresses were translated. However, you can also apply translations to services. For example, you may have a reverse-proxy cache running as a web-server accelerator internally on port 8080, and you want external users to be able to access it using the standard HTTP port, port 80. By dragging and dropping services into the Original Srv and Translated Srv boxes from the Standard library (and creating services in the User library as necessary), you can apply port translation in the same way as address translation. Firewall Builder gives you the flexibility to convert the source and destination addresses and port of packets at will, so adjust the NAT rules until they represent the transformations you want to apply to network traffic.
However, NAT rules alone are not enough. Without a matching policy rule, no packets will be allowed through the firewall, even if they match NAT rules. While the NAT rules define what can happen, policy rules define what is allowed to happen. Policy rules have the final say.
Click the Policy tab and go down through the list of existing rules to find an appropriate place to add rules for your host, most likely right near the end, before the general network rule and the fall-through Deny All rule. Right-click in the rule-number column and add a rule. Drag the external IP address icon of your web server into the Destination box, and then right-click the Deny icon in the Action column and change it to Allow.
If you want to allow full access to every port on your web server from outside your network, that's all you need to do. However, it's safest to make the rule more specific and allow only certain services through, so click the User/Standard drop-down near the top left and switch to the Standard library. Browse down through the library to Standard![]() Services
Services![]() TCP
TCP![]() "http" and drag its icon into the Service box of your new rule. If you want to allow SSL connections, you can also drag the "https" icon into the same box. You now have a rule that explicitly allows connections from any host to your web server but only on ports 80 and 443 (see rule 5 in Figure 7-5).
"http" and drag its icon into the Service box of your new rule. If you want to allow SSL connections, you can also drag the "https" icon into the same box. You now have a rule that explicitly allows connections from any host to your web server but only on ports 80 and 443 (see rule 5 in Figure 7-5).
Figure 7-5. Policy rules
Compile and Install the Policy
Once you are happy with the policy you have created, you need to apply it to the firewall. Firewall Builder does this in two steps. First, the policy is compiled into a script to suit the software on your firewall; then, it's pushed out to the firewall and loaded.
Select Rules![]() Compile or click the gear icon to have Firewall Builder compile your rules. You will see a dialog reporting progress, and when it finishes, you will have a new script placed in Firewall Builder's working directory alongside the project file. You can now copy the script to the target firewall by SSH and execute it to have the rules applied. To keep everything neat, it's a good idea to create a directory on the firewall to store the script:
Compile or click the gear icon to have Firewall Builder compile your rules. You will see a dialog reporting progress, and when it finishes, you will have a new script placed in Firewall Builder's working directory alongside the project file. You can now copy the script to the target firewall by SSH and execute it to have the rules applied. To keep everything neat, it's a good idea to create a directory on the firewall to store the script:
$ sudo mkdir /etc/firewall
Then copy your script into that directory and execute it manually to test it. Even though it will have a .fw extension, the file is actually just a shell script that you can run in the normal way:
$ sudo /etc/firewall/
firewallname.fw
Firewall Builder provides a large number of configuration options to control the way the script is generated for each firewall, so if the script didn't work properly on your firewall, you may need to right-click the firewall icon in the object tree, select Edit, and then click the Firewall Settings button. The tabs at the top give you access to a lot of options, so go through them carefully and change any settings that may apply to your particular firewall; then compile the rules and test them again.
Automatic Policy Startup
The firewall script needs to be run each time your firewall boots up, so use your favorite editor to open /etc/rc.local and add the path to the script just before the exit 0 line. The end of /etc/rc.local should look something like this:
/etc/firewall/firewallname.fw
exit 0
The rc.local file is executed after all the other startup scripts whenever Ubuntu switches to a new multiuser runlevel. Referencing your script in there ensures it will be executed after other services such as networking have started up, and that it won't be started if you boot up in single-user mode. This is handy if you need to fix configuration problems by booting into single-user mode.
Automatic Policy Installation
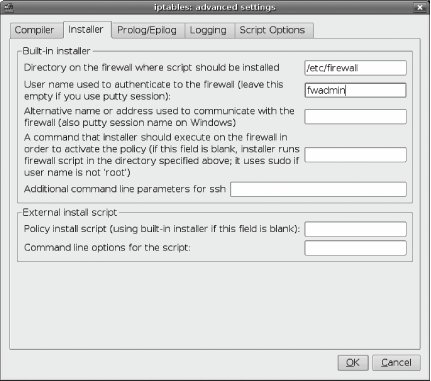
Once you are happy that the rules are being generated correctly for your firewall, you can save yourself some effort on subsequent updates by configuring Firewall Builder to manage installing and activating the script on your behalf. Select the firewall icon (located in User![]() Firewalls), right-click, select Edit, and the Firewall dialog will appear. Click Firewall Settings to re-enter the firewall options dialog. Click the Installer tab to be presented with options to execute a script to install and activate the firewall rules. The lower section of the dialog provides two text-entry fields that you can use to invoke any external script or command you like; so, for example, you can write a script that copies the script to the firewall by SCP and then executes it using SSH. Firewall Builder even comes with a sample script to do exactly what you will find installed in /usr/bin/fwb_install. Full information on how to use fwb_install is available in its manpage:
Firewalls), right-click, select Edit, and the Firewall dialog will appear. Click Firewall Settings to re-enter the firewall options dialog. Click the Installer tab to be presented with options to execute a script to install and activate the firewall rules. The lower section of the dialog provides two text-entry fields that you can use to invoke any external script or command you like; so, for example, you can write a script that copies the script to the firewall by SCP and then executes it using SSH. Firewall Builder even comes with a sample script to do exactly what you will find installed in /usr/bin/fwb_install. Full information on how to use fwb_install is available in its manpage:
$ man fwb_install
Firewall Builder also has an internal policy-installation mechanism, which is perfectly adequate for most environments.
To set up automatic policy installation, first create a group such as fwadmin on the firewall, and then create a user and make it a member of the group:
$ sudo addgroup fwadmin
$ sudo adduser fwadmin -G fwadmin
Set up a directory on the firewall to store the firewall configuration:
$ sudo mkdir -m 0770 /etc/firewall
$ sudo chown fwadmin:fwadmin /etc/firewall
Configure sudo to allow this user to execute the firewall script without entering a password by running:
$ sudo visudo
and adding a line similar to the following to the end of the /etc/sudoers file:
%fwadmin = NOPASSWD:/etc/firewall/firewallname.fw
The firewallname.fw string should be replaced by the actual name of the script generated by Firewall Builder for this firewall.
You can optionally set up public-key encryption for access to the fwadmin account on the firewall.
In the Installer tab of the Firewall Settings dialog, put in the path to the directory you created on the firewall and the username you created, as shown in Figure 7-6.
Figure 7-6. Policy installation options
You may not need to specify an alternate name or address for the firewall: Firewall Builder will try to automatically determine the IP address to use to communicate with the firewall, but it will use an address if you put one in.
Save and close the Firewall Settings dialog, and you should now be able to install and activate your policy simply by clicking the Install icon or by selecting Rules![]() Install from the menu. From now on, any updates you make can be applied simply by clicking Compile and then Install.
Install from the menu. From now on, any updates you make can be applied simply by clicking Compile and then Install.
Extensive documentation and tutorials are available on the official Firewall Builder site at http://www.fwbuilder.org if you want to learn more.
![]()
Hack 70. Use an Encrypted Filesystem to Protect Your Data
![]()
![]()
An encrypted filesystem keeps your data safe even if someone steals your computer and tries to mount the disk.
There are a number of techniques for creating encrypted filesystems, typically based on using some kind of loopback device with an encryption layer spliced in the middle. Popular systems include cryptloop and loop-aes, but a more recent development called dm-crypt has some interesting advantages, so that's what we use for this hack. It's faster than cryptloop, easier to implement than loop-aes, and able to operate on a wide range of block devices even when using RAID or LVM because it's built on a new feature in the 2.6 kernel called device-mapper. device-mapper is designed to provide a generic and flexible way to add extra virtual layers on top of real block devices, allowing developers to implement special handlers for mirroring, snapshotting, concatenation, and encryption. As far as filesystem tools are concerned, they are dealing with a real block device, and any special functionality is hidden away by device-mapper.
dm-crypt is a device-mapper target that uses the kernel crypto API to provide transparent encryption, and it's even backward-compatible with the on-disk format used by cryptloop.
Kernel Setup
dm-crypt uses the kernel's crypto API to perform the actual encryption. The standard Dapper kernel loads crypto ciphers as modules, and this hack uses 256-bit AES encryption, so make sure that your kernel has AES support loaded:
$ cat /proc/crypto
|

If AES support is loaded, you will see output like:
name : aes
module : aes
type : cipher
blocksize : 16
min keysize : 16
max keysize : 32
If it's not loaded, you can force it to load manually using modprobe:
$ sudo modprobe aes
Cryptsetup should load this module automatically when required, but it's useful to know how to check for it and load the module manually if necessary.
Install the dmsetup package, which will provide the tools you need to configure the device-mapper target:
$ sudo apt-get install dmsetup cryptsetup
Check that the dmsetup package has created the device mapper:
$ ls -l /dev/mapper/control
Load the dm-crypt kernel module:
$ sudo modprobe dm-crypt
The dm-crypt module registers itself automatically with device-mapper when it's loaded, so next check that device-mapper has recognized it and added crypt as an available target:
$ sudo dmsetup targets
If everything has gone according to plan, you'll see crypt in the output:
crypt v1.1.0
striped v1.0.2
linear v1.0.1
error v1.0.1
Your system is now ready to mount encrypted devices. First, though, you need to create one!
Create an Encrypted Device
There are two options for creating a filesystem to mount as an encrypted device: create a disk image as a file and mount it as a loopback device, or use an actual block device (for example, /dev/hda3). In both cases, the procedure is almost identical, with the exception of some extra preparation required to create and bind the loopback device.
Create a loopback disk image
If you don't have a real device, such as a memory stick or extra disk partition, that you can encrypt, you can instead use dd to create an empty disk image and mount it as a loopback device. In this example, you'll call it secret.img and make it 100 MB in size. Just alter the count value if you want to make it a different size:
$ dd if=/dev/zero of=~/secret.img bs=1M count=
100
Use losetup to associate the image with a loopback device:
$ sudo losetup /dev/loop/0 ~/secret.img
You will now have a virtual block device at /dev/loop/0 that you can reference just like any other block device.
Set up the block device
Now you can set up either a real block device (for example, /dev/sda1) or a virtual block device, such as the loopback image created in the previous step, and mount it as an encrypted logical volume using device-mapper. Start by using cryptsetup to create a logical volume (called mysecrets) and bind the block device to it:
$ sudo cryptsetup -y create mysecrets
/dev/DEVICENAME
The last argument must be the block device that will be used as an encrypted volume, so if you're using the loopback image created in the previous step as a virtual block device, you would instead run something like:
$ sudo cryptsetup -y create mysecrets /dev/loop/0
In either case, you will be asked for a passphrase for the logical volume, and the -y flag indicates that cryptsetup should confirm the passphrase by asking you for it twice. It's critical that you get it right, because otherwise you'll find yourself locked out of your own data!
You can then confirm that the logical volume has been created:
$ sudo dmsetup ls
You should see the logical volume listed, although the major and minor device numbers may vary:
mysecrets (254, 0)
device-mapper mounts its virtual devices under /dev/mapper, so you should now have a virtual block device at /dev/mapper/mysecrets that behaves just like any other block device but is transparently encrypted.
Just like a real block device, you can create a filesystem on it:
$ sudo mkfs.ext3 /dev/mapper/mysecrets
Create a mount point for the new virtual block device and mount it:
$ sudo mkdir /mnt/mysecrets
$ sudo mount /dev/mapper/mysecrets /mnt/mysecrets
You should now be able to see it mounted just like any other device:
$ df -h /mnt/mysecrets
Filesystem Size Used Avail Use% Mounted on
/dev/mapper/mysecrets 97M 4.1M 88M 5% /mnt/mysecrets
Voil\x88 ! You now have a mounted filesystem that behaves just like any other filesystem, but any data you write to /mnt/mysecrets/ will be transparently encrypted before being written to disk, and anything you read from it will be decrypted on the fly.
Unmounting
Unmount the encrypted filesystem as usual:
$ sudo umount /mnt/mysecrets
Even after you have unmounted the block device, it's still configured in dm-crypt as a virtual device. You can confirm this by running sudo dmsetup ls again and seeing that the device is still listed. Because dm-crypt caches the passphrase, any other user on the computer can now remount the device without needing to know the passphrase. To prevent this, you need to explicitly remove the device from dm-crypt after unmounting it:
$ sudo cryptsetup remove mysecrets
After that, it will be truly gone, and remounting it will require the passphrase again.
You can simplify the process by creating a tiny script to unmount and remove the device:
#!/bin/sh
umount /mnt/mysecrets
cryptsetup remove mysecrets
Remounting
Since you'll probably want to mount the encrypted device as your normal user, it will make things easier if you add something like this to your /etc/fstab:
/dev/mapper/mysecrets /mnt/mysecrets ext3 noauto,noatime 0 0
You can also create a script that will take care of creating the dm-crypt device and mounting the volume for you (replace /dev/DEVICENAME with the actual device name or path to the file):
#!/bin/sh
cryptsetup create mysecrets /dev/DEVICENAME
mount /dev/mapper/mysecrets /mnt/mysecrets
If you're using a loopback device, you can also have the script bind the device for you:
#!/bin/sh
losetup /dev/loop/0 ~/secret.img
cryptsetup create mysecrets /dev/loop/0
mount /dev/mapper/mysecrets /mnt/mysecrets
|
Hacking the Hack
You can even have your entire home directory encrypted if you configure the PAM (Pluggable Authentication Modules) subsystem to mount it for you when you log in. The libpam-mount module allows PAM to mount arbitrary devices automatically when a user logs in, so install it along with openssl:
$ sudo apt-get install libpam-mount openssl
Edit /etc/pam.d/common-auth and add this line to the end:
auth optional pam_mount.so use_first_pass
Then edit /etc/pam.d/common-session and add this line to the end:
session optional pam_mount.so
You need to configure PAM to know what volume to mount and where. In this example, the username is jon and you're using the device /dev/sda1, so substitute your username and device and add a line like this to /etc/security/pam_mount.conf:
volume jon crypt - /dev/sda1 /home/jon cipher=aes aes-256-ecb /home/jon.key
|
Because the volume is encrypted, PAM needs access to the key to mount it. The last argument tells PAM to look in /home/jon.key for the key, so create the key file by encrypting your passphrase using OpenSSL:
$ sudo sh -c "echo
'
YOUR PASSPHRASE
'
| openssl aes-256-ecb >
/home/jon.key"
You will then be asked for a password, and you must enter the same password you use to log in as that user. The reason is that when you log in, PAM will take the password you provide, use it to decrypt the key file, and then use the passphrase contained in the key file to mount your home directory using dm-crypt.
Note, however, that the step above will leave your passphrase in plain text in your .history file, so clear your history (with history -c) or at least edit it to remove the command before proceeding.
Another approach that avoids storing your passphrase in an encrypted key file is to create your encrypted filesystem with the exact same password you use to log in. Then PAM can simply pass your password through to dm-crypt when you authenticate rather than extract it from the key file. In that situation, you can use a line like this in /etc/security/pam_mount.conf instead:
volume jon crypt - /dev/sda1 /home/jon cipher=aes - -
Finally, to make sure your encrypted home directory is unmounted automatically when you log out, edit /etc/login.defs and make sure the CLOSE_SESSIONS option is set:
CLOSE_SESSIONS yes
![]()
Hack 71. Encrypt Your Email and Important Files
![]()
![]()
It's good to be paranoid, and the best way to protect your thoughts and data is with powerful encryption.
Encryption is a vital tool with which all Ubuntu users should familiarize themselves. One of the best ways to encrypt emails and files is with GPG, the GNU Privacy Guard. Like its inspiration PGP, GPG utilizes public-key cryptography. In essence, each user owns two keys: a private key used to decrypt messages sent to the user and a public key others use to encrypt messages they send to that user. In order for this system to work, therefore, folks who want to send encrypted messages to each other must exchange publicnever private!keys.
Once you have GPG up and running, there are several things you can do with it:
· Encrypt and decrypt email messages and attachments
· Encrypt and decrypt files
· Sign a file with your electronic signature or verify the authenticity of a file by checking its digital signature
· Verify or sign other users' public keys
As I said in the first paragraph, you need two keys, but where do they come from? If you've been using GPG for a while, you can move your keys from machine to machine, as needed, or you can create a new key pair from scratch.
|
Generate a GPG Key Pair
It's a simple matter to create your own GPG key pair (if you already have a key pair on another computer, skip to the next section):
$ gpg --gen-key
You'll be asked to choose the kind of key to use, so choose from the following items...and no, I don't know why the third and fourth options are left out:
1. DSA and ElGamal (default)
2. DSA (sign only)
5. RSA (sign only)
Press Enter to choose the default of 1, and next you're asked about your key size. The default of 2048 is excellent, so just press Enter to accept it. Now you're asked about how long you want this key to be valid. The default is 0, meaning that it will never expire, and normally this is just fine, as long as you plan to keep this key and use it going forward. If you instead want it only for a limited time, change it to the number of days, weeks, months, or years you want, and press Enter. After verifying that length of time, type y and press Enter again.
Now you need to create a user ID that is linked to the keys. First, you're asked your real name, so type it in and press Enter. Following that, you're asked for an email address, and finally a comment. The comment can be anything at all, such as a URL, a company name, a location, or even nothing at all, but it's a good idea to include this data point to help distinguish between keys. Type in your info, pressing Enter after each item. You'll be asked to confirm or change your user ID when you've answered the three questionsname, email, commentso respond accordingly and press Enter.
Now for the biggie: your secret key's passphrase. As you can probably guess, you need something really good here, not just password or scooter or 123456. Notice that you're able to use a passphrase, not just a password, so pick something long with spaces that is still memorable to you. Stuck? Check out an article I wrote for SecurityFocus that contains tips for picking good passwords and passphrases: "Pass the Chocolate," at http://www.securityfocus.com/columnists/245. Enter your passphrase, then verify it, and then, boom! GPG begins generating your keys. You can tell because random characters will appear on your screen, and GPG will ask you to move your mouse, type on your keyboard, and generate disk activity to help improve the key by providing random data it can use. Finally, GPG will finish creating your new keys, which you can verify with this command:
$ gpg --list-keys
/home/scott/.gnupg/pubring.gpg
---------------------------------
pub 1024D/73CA5DE6 2006-03-20
uid Scott Granneman (St. Louis, MO) <scott@granneman.com>
sub 2048g/675B19A0 2006-03-20
You've created your keys; now it's time to use them. Skip ahead to "Signing a GPG Key," or read the next section if you want to learn how to import GPG keys from another computer.
Importing GPG Keys
If you want to use the exact same public and private keys from another computer, just copy them over from the other machine to your new box. Realize that you'll overwrite anything already on the new computer if you've created any keys at all, but this may be just fine. I've used the same keys for years, simply copying them from machine to machine, and it's worked fine. Here's how to copy keys from an old box named eliot using scp.
$ mkdir ~/.gnupg
$ scp
eliot
:~/.gnupg/* ~/.gnupg
You can also import keys, which will append them onto a computer's currently existing keyring (rather than overwriting existing keys, as in the previous method). To do so, you obviously need access to them. This can be accomplished by copying the keys from another machine to yours or by grabbing the keys from a public keyserver on the Net. If the keys are on another computer, copy them to your Ubuntu box, put them on the Desktop for the time being, and then run this command:
$ gpg --import /home/
username
/Desktop/pubring.gpg
You'll see the list of keys that are imported, along with totals, indicating success. Don't forget to delete the pubring.gpg file on your Desktop, since you no longer need it.
If the keys aren't directly available to you, but you know that the users whose keys you wish to import have uploaded them to a public keyserver, you can always import them from there. For instance, say you want to import my key. First, you need to find my key's ID. Using your web browser, go to the MIT PGP Public Key Server at http://pgp.mit.edu and search for scott granneman. You'll get back three results, but pay attention only to the one dated 2004/08/08, which looks like this:
Type bits /keyID Date User ID
pub 1024D/6503F88C 2004/08/08 Scott Granneman <scott@granneman.com>
Scott Granneman (www.granneman.com) <scott@granneman.com>
Take note of the key ID, which is 6503F88C. With it, you can import that specific key using the following command:
$ gpg --keyserver pgp.mit.edu --recv-keys 6503F88C
gpg: requesting key 6503F88C from hkp server pgp.mit.edu
gpg: key 6503F88C: public key "Scott Granneman <scott@granneman.com>" imported
gpg: Total number processed: 1
gpg: imported: 1
Was that easy or what?
Signing a GPG Key
Before you can send someone a file or message encrypted with GPG, you have to sign the key you're going to use. By signing the key, you verify that it belongs to the correct person. In the best situation, you received it directly from the individual, perhaps face to face or perhaps through email. If you know that the key you just imported belongs to Scott Granneman, you can run this command:
$ gpg --sign-key www.granneman.com
In actuality, you can use any data that uniquely identifies a key after the --sign-key option. I used www.granneman.com because it was unique to the key you imported previously. To see the data points you can use, just run gpg --list-keys. For instance, the key ID6503F88Cwould have been a great choice, since it's obviously unique to that exact key.
When you sign a key, you're asked if you want to sign all user IDs associated with it. Type in y and press Enter. Verify your answer by entering y again and press Enter. Now you're asked for your secret passphrasethe one protecting your secret keyso that you can prove it's really you who's signing this person's public key. Enter your passphrase, press Enter, and you're finished. You've signed the key, and you can now start using it for encryption.
Encrypting Files Using GPG
You've signed my key, so now it's time to send me an encrypted file. Open your favorite text editor and enter a message like "Can't sleep...clowns will eat me." Save the file on the desktop as test_encryption and close it. In your terminal, enter this command:
$ gpg -r "Scott Granneman" --encrypt test_encryption
|
Now there's a new file on your desktop: text_encryption.gpg. This is a binary file that you could attach to an email and send. You don't have to create binary files that you attach, however; you can instead generate ASCII text messages suitable for pasting into an email. To do so, run this command:
$ gpg -r "Scott Granneman" --armor --encrypt test_encryption
Now your desktop contains a file named test_encryption.asc. If you open the file, you'll see something like this:
-----BEGIN PGP MESSAGE-----
Version: GnuPG v1.4.2.2 (GNU/Linux)
hQIOAwcs+U2/zd/NEAf+IR5zIX/ggNxemqkoa4HhCDeEm5hiu1rJivzd7fi504Di
MfeE11Do7p6WMWBi+fzH5FtowwMXi/+OFt6erO65Cb3sVsBDyH01W1NrDLRNPTgN
HC88OJOiWpB16/w65rQXQC9Lgczc8kNsqMCMWUo3tHLBxFNg7d+SW62zgicX2qza
fqHq1Y5ekRPWhmmqkItbYhsXMwz8YE7jq38TP17RBcStiNEKlSAyRrFKMC2L5OI9
VCj2GV6gaKK8nDKFD87hw3V8TN29JHAcPZ5R11wJJNVRv+muDgX+bY8z/9RpTsMs
ALn3ET5J8kzquJg5tctrpXvSN4vBKpvjCH1Y30gDDQgAxRHuNLRo8muBh63N7twc
Gx5VJZlx9AfBYTTWqXPC0VA7O2DSbfgwUdDQS9mL+8ckR1XI921q9ih05IqHG40x
cibPCyg8kXRSK1PUxk4IXiOjbUs62OxMtqMvZtfSzbuOxoNRezrWXO79Q5N2KZVs
HtexYLKm9Wf4RhCQylSwosMojeg4eoTsz+R3MArG8XR/MbI/sLZKGhi3nuwpO3oK
YqaWUhob+U0ZLfCf1l3WPhO7nkJ+6xgcVKIXiycTBYeH6xfN5Gq+WHx546XKJbkB
fTutzRsqUdAr3TED77Pr6zPi8PBZL0f76KXE5KX05zClkwd97vCkIVaQkm4etsGc
4dJwAQ5fhUGqRlmMScO3UbtS3Hh43ZQ8Ndnn+Jpid7D4thZEub9lcpkGw3PLeOco
jRu9smNJHUd8J5ODapAOunqGt0whmpcePbrxEkbL1upigAxqFc9DV7g7pDgJsSLr
i+Bm7tUbhQq2vLpINDeVnzchNQ==
=yBG6
-----END PGP MESSAGE-----
You can attach the ASCII file to an email message, or you can copy and paste the entire text directly into a message.
For added security, you can digitally sign it so that the recipient knows that the file was in fact from you and you only. To sign and encrypt a file at the same time, use this command:
$ gpg -r "Scott Granneman" --armor --sign --encrypt test_encryption
You'll be asked for your passphrase, so go ahead and enter it. You'll still end up with test_encryption.asc, but it will be slightly larger, since it now contains your digital signature as well as your original message.
|
Decrypting Files Using GPG
Let's say my buddy Jans sends me an encrypted file, and I need to decrypt it. Before proceeding, I must import Jans' public key into my keyring and verify his key. Once that's done, I can decrypt the file. If he sent me a binary file, I'd use this command:
$ gpg --output
business_plans.odt
--decrypt
business_plans.odt.gpg
If he instead sent me an ASCII file, I'd use this:
$ gpg --output
business_plans.odt
--decrypt
business_plans.odt.asc
In either instance, I'd be prompted to enter my secret key's passphrase. Upon doing so, GPG would decrypt the file, leaving me with the filename I'd specified with the --output option. Without that option, GPG instead sends output to STDOUT, which wouldn't work very well with an OpenOffice.org document.
Of course, most good Linux email programs have integrated GPG encryption directly into their interfaces. KMail, the default for Kubuntu, makes it simple to work with encrypted emails and attachments, and while Evolution, the default for Ubuntu, isn't quite as easy, it's certainly doable. Really, there's no excuse for you not to use GPG to encrypt your emails and files. With absolutely no downsides and lots of good reasonsprivacy and security come immediately to mindyou should set up your own keyring and start using GPG today.
|
Scott Granneman
![]()
Hack 72. Surf the Web Anonymously
![]()
![]()
Firefox + the Tor Project = you accessing web sites without anyone knowing who you are.
It's still possible to use the Web with some degree of privacy and even anonymity, but you have to jump through a few hoops to do so. Even so, these hoops aren't that arduous, and, better yet, you'll get to learn about a cool program named Tor that makes all of it possible.
In answer to the question, "Why would I want to surf the Web anonymously?", here are a few reasons you might want to use Tor:
· You just don't want to be tracked as you browse the Web.
· Your ISP or network blocks your access to certain web sites or services.
· You want to access and participate in communications that you'd prefer were kept private, such as those for survivors of rape and abuse.
· You live in a country with an oppressive government that monitors or limits its citizens' Net usage.
· You want to connect to some of the cool hidden servers that anonymously publish materials available only to Tor users.
Of course, there are also some good reasons not to use Tor:
· You're a speed demon and can't stand the fact that connections using Tor will always be slower than nonproxied connections.
· You don't want to deal with the hassle that because some e-commerce sites track your browsing session using your IP address, they will fail miserably since Tor keeps changing it.
· You want to share BitTorrent or other P2P filesseriously, that slows down the entire Tor network, so please don't do it at this time.
With your choices laid out before you, let's look at how Tor does its job.
How Onion Routing Works
Tor works by utilizing a technology known as onion routing. You can find great explanations of onion routing at the Electronic Frontier Foundation (http://tor.eff.org/overview.html.enand http://tor.eff.org/documentation.html.en) or at Wikipedia (http://en.wikipedia.org/wiki/Onion_routing). Here's a quick-and-dirty analogy for onion routing. Imagine that Alice wants to send a message to Bob, who's on the other side of a building. Alice encodes her message and hands the first few characters of it to Carol, who decrypts it, re-encrypts it with a new key, and then hands it off to David. David decrypts it, re-encrypts it with a new key, and then hands if off to Ernest. Ernest repeats the process, handing the message off to Frank. Finally, Frank decrypts the message and hands it to Bob, the intended recipient of the message.
Remember, though, that this entire process was just for the first few characters of the message. The second set of characters don't go from Alice to Carol; instead, they go from Alice to Gus, and then from Gus to Ernest, Ernest to Paul, Paul to Scott, and from Scott to Bob. The third set of characters goes through a different route as well, as do all the other sets, until the message is completed. Some of the same people may be reused, but the progress is random.
Think about the security benefits of this process: Ernest knows that he got his chunk from Gus and that he sent his chunk along to Paul, but that's it. Ernest has no idea that the originator of the message was Alice and that the ultimate recipient is Bob. The encryption performed between each hop further protects the message. While the system isn't perfect (and the creators of Tor are the first to admit this), it's still a smart, powerful technology that goes a long way toward providing anonymity to web users.
Installing and Using Tor
To use Tor, you actually need to install two programs on your box: Tor itself and Privoxy, an open source, powerful proxy that's needed to further protect your anonymity (for more on why this is necessary, see http://wiki.noreply.org/noreply/TheOnionRouter/TorFAQ#SOCKSAndDNS). In addition, there's a Firefox extension, SwitchProxy, that will come in very handy, so you'll need to put that in place as well. Once you've completed these tasks, you'll be able to use the Web in near-complete anonymity.
To begin, use apt to install Tor and Privoxy.
$ sudo apt-get install tor privoxy
You may find that apt wants to install some needed dependences, such as libevent1 and tsocks. Go ahead and approve those packages, and a few moments later your new software will be installed. Ubuntu will start both Tor and Privoxy automatically as services, but you still need to configure them.
First, set up Privoxy to use Tor. Using sudo, open your favorite text editor and point it to /etc/privoxy/config. If you want to be precise, find section 5.2. forward-socks4 and forward-socks4aand add the following line (be sure to include the dot at the end!):
forward-socks4a / localhost:9050 .
If you're in a hurry, or you're proudly sloppy, just add that line at the very top of the file.
Before saving and leaving config, you need to take care of one more detail. By default, Privoxy stores some items not conducive to total privacy. The program logs everywhere it goes, so if you want to disable this behavior, find section 1.5. logfile and comment out the line for this setting, as follows:
# logfile logfile
In addition, Privoxy stores all intercepted cookies, so look for section 1.6. jarfile and comment out the line for that setting, like this:
# jarfile jarfile
Save /etc/privoxy/config and then restart Privoxy:
$ sudo /etc/init.d/privoxy restart
Now you need to set up Firefox to use the SwitchProxy extension. Open Firefox and head over to https://addons.mozilla.org/extensions/moreinfo.php?id=125&application=firefox (if that page is missing for some reason, search http://addons.mozilla.org for SwitchProxy). Click on the Install Now link on the web page, and when the Software Installation window opens, click the Install Now button that appears. Close the Extensions window and then restart Firefox. When you do, a new toolbar will appear, as shown in Figure 7-7.
Figure 7-7. After SwitchProxy is installed, it appears as a Firefox toolbar
![]()
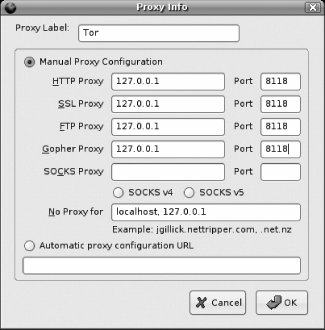
On the Proxy toolbar, click the Add button. In the Select Proxy Type window, leave Standard chosen and click Next. In the Proxy Info window, enter Tor as the Proxy Label. Then, for the first four proxies (HTTP, SSL, FTP, and Gopher) enter 127.0.0.1 as the host and 8118 as the port. Your final results are pictured in Figure 7-8.
Figure 7-8. Configure SwitchProxy to use Tor
Click OK to close the Proxy Info window. Back in Firefox, choose Tor from the drop-down menu on the Proxy toolbar and click Apply. The Status on the toolbar should change from Using No Proxy to Using Tor. To make sure that Tor is working correctly, point Firefox to http://serifos.eecs.harvard.edu/cgi-bin/ipaddr.pl?tor=1, which will present a large text message about whether Firefox is using Tor.
Other Apps
You can use Tor as your proxy with other programs. If a program supports using an HTTP proxy, just enter 127.0.0.1:8118, the address for Privoxy. Other programs use SOCKS directlylike IM and IRCand for those you use 127.0.0.1:9050, the direct address of Tor.
In particular, you may find this implementation handy for FTP. In actuality, Privoxy works with only HTTP and HTTPS. You told Firefox to use Privoxy (and therefore Tor) for FTP and Gopher to prevent any hidden images served via FTP from giving away your IP address. Now FTP and Gopher will failsince Privoxy doesn't work with thembut your privacy will be maintained. Find an FTP app that uses SOCKS, and you can use FTP with Tor.
For a short set of instructions that explain how to use Tor with Gaim, the excellent cross-platform IM client, see http://gentoo-wiki.com/HOWTO_Anonymity_with_Tor_and_Privoxy#How_to_use_Gaim_with_tor. On the same page are instructions for configuring wget, curl, and other terminal-based apps to use Tor; see http://gentoo-wiki.com/HOWTO_Anonymity_with_Tor_and_Privoxy#Autoconfigure_Some_Applications.
If you need to connect to a site without Tor, you can always temporarily set the SwitchProxy extension to None. Better still, with Tor acting as a proxy, click the Edit button on the SwitchProxy toolbar. When the Proxy Info window opens, add the troublesome web site to the list in the No Proxy For text box. Click OK, and you can browse that site proxy-free.
Tor is great software, and we should all thank the EFF for developing it. Unfortunately, the EFF doesn't have the money to pay developers to continue full-time on the project, so please consider donating a few dollars to the EFF to help fund further work. If you're able to do so, check out http://tor.eff.org/donate.
Scott Granneman
Hack 73. Keep Windows Malware off Your System
![]()
![]()
Linux users can help protect their Windows-using brethren from the myriad virus infestations out in the wild with some free anti-virus tools.
It's well known among Linux users that ours is an operating system that doesn't have to worry about viruses, unlike that other OS made in Washington state that appears to be completely overrun by them. Even so, there are still very good open source anti-virus tools available to run on Linux, principally among them ClamAV. But why do people running Ubuntu need anti-virus software?
If you receive infected materials that may be sent along to Windows users, it sure would be good to prevent the transfer of virus-laden files. If you share files via Samba with people on Windows, you probably want to know if some of those are infected, just as a point of pride if nothing else. And, finally, a huge plague of Linux viruses could be unleashed upon the world sometime in the future, so it's good to be prepared (sure, it's about as likely as the dead rising from their graves to eat the brains of the living, but you never know).
And besides, it doesn't really hurt to run ClamAV on your system. The resources it takes up are miniscule, and the vast majority of the time, you'll never even know it's there. So why not?
To install ClamAV, run the following command (you'll need the universe repository enabled [Hack #60]):
$ sudo apt-get install clamav
This will prompt apt to download some dependencies required by clamav, including clamav-base and clamav-freshclam. Go ahead and accept them, and let apt download and install the software. You may find that configuration problems occur due to one of the packages needing to be configured before another can be configured, so you may have to run the following command to straighten things out:
$ sudo apt-get -f install
You should see the various clamav packages successfully set up, and then apt will start freshclam for you automatically.
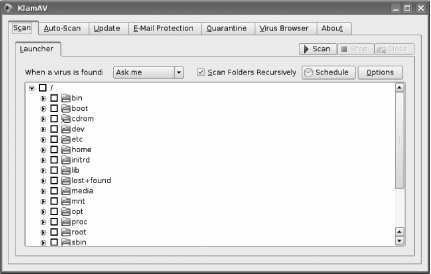
You've installed the base packages, but you haven't installed a GUI yet. ClamAV doesn't need a GUIthe whole thing can be run from the command line, and, in fact, that's best for scriptingbut if you want a GUI, you have a choice. If you use Kubuntu, you can install klamav, a KDE-based frontend for ClamAV; if you use Ubuntu, avscan, a GTK-based frontend is what you want. Or you can install both, as it really doesn't hurt anything. I'll install both, even though I'm basically a Kubuntu user:
$ sudo apt-get install avscan klamav
A lot of dependencies are required for these two packages, so go ahead and accept them. I'm going to focus the rest of this hack on the command line, but here's a quick glimpse of the frontends. Ubuntu's GUI, AntiVirus Scanner, is shown in Figure 7-10.
Figure 7-9. Ubuntu's virus scanner
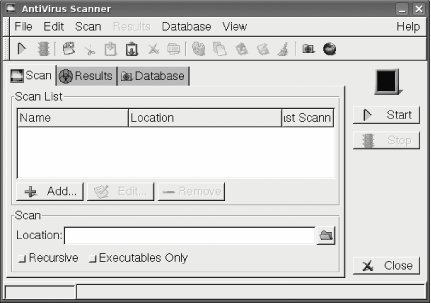
Figure 7-10. Kubuntu's virus scanner
By the way, even if you're using Ubuntu, you can still run KlamAV if you have the KDE libraries installed. I recommend using KlamAV over AntiVirus Scanner if at all possible, since it's a much nicer program.
Now, back to the command line. To check for regular virus-definition updatesone of the key features of an anti-virus programClamAV uses freshclam. The config file that handles update checking is /etc/clamav/freshclam.conf, but you really don't need to do anything to it, since it automatically checks for new virus definitions once an hour, every day. Now that's timeliness!
To actually scan your system for nasties, ClamAV uses clamscan. If you look at man clamscan, you'll see the full list of options available to you. Two that you'll want to use most of the time are -r, which orders ClamAV to scan recursively through the directory you specify as well as all its subdirectories, and -i, which has ClamAV print only the names of infected files, as opposed to every single file that ClamAV scans.
In addition, you probably want to quarantine infected files. To do so, you'll want to use an option like --move=/tmp/virus, but /tmp/virus must exist before clamscan runs.
Putting everything together, run the following command if you want to scan your home directory on demand:
$ mkdir /tmp/virus
$ clamscan -ri --move=/tmp/virus
/home/yourusername
It's a better idea to set up a cron job that automatically scans your entire hard drive in the middle of the night. To do so, add the following line to /etc/crontab as root:
11 3 * * * root mkdir /tmp/virus ; clamscan -ri --log=/var/log/clamscan.log
![]()
--move=/tmp/virus /
At 3:11 A.M. every morning, a directory in /tmp/virus will be created, and then clamscan will run. Any infected objects will be quarantined, and a log of activity will be created as well.
ClamAV probably integrates with your email program as well. KMail and Sylpheed Claws (http://claws.sylpheed.org/), for instance, allow you to select ClamAV directly as your anti-virus program of choice. Evolution and many others adopt a much less user-friendly method by forcing users to manually create a filter that pipes mail through ClamAV. That's pretty bad, and I hope that Evolution and other apps like it come to their senses and allow users to specify ClamAVor other anti-virus programsdirectly. It's the only reasonable thing to do.
Who says you have to pay $50 for expensive, bloated anti-virus software? ClamAV does the job, efficiently and easily...and for free!
|
Scott Granneman