Ubuntu Unleashed 2017 Edition (2017)
Part IV: Ubuntu as a Server
Chapter 34. Virtualization on Ubuntu
In This Chapter
![]() KVM
KVM
![]() VirtualBox
VirtualBox
![]() VMware
VMware
![]() Xen
Xen
![]() References
References
Virtualization is an important topic today, but it isn’t a difficult one to understand, at least conceptually. We cover two distinct use cases in this chapter: server virtualization and virtualization on the desktop. Most of the options covered in this chapter work for either use case. In the sections that follow, this chapter points out specific moments that are focused solely on one use case. There are several scenarios, both large and small, that are helpful to illustrate the potential of virtualization and to give the idea some definition.
For starters, imagine a large corporation or business that processes huge amounts of data. That corporation has many dedicated computers to assist with the task. In the past, they might have used mainframes, single computers capable of performing multiple tasks concurrently while dealing with large data sets and multiple, concurrent users. Today, the same company might use a server farm, a network of smaller computers that is extensible and which can have specific servers in the network dedicated to precise tasks.
The problem is that some of these servers do not get used to their capacity. Take, for example, a payroll server that might get extensive use at certain times, but which might sit nearly idle at other times. That seems like a waste of resources.
What if a systems administrator could pool the resources of all these machines and then dole those resources out as they are needed? She can by using virtualization.
At other times, there is a need for servers that do not exist and which will not be needed in the long term. A statistics department might have a one-time need for extra processing power for a big project. It would take a long time to set up a dedicated server, and it is hard to justify the effort for a one-time task.
What if a system administrator could easily create and destroy servers for a specific task, making them appear, completely configured, as needed and then making them disappear when the need no longer exists, freeing up the physical resources for other uses? He can by using virtualization.
Networks of physical servers can be created using virtualization where the physical resources of each server are pooled together and then passed out as designated by an administrator. It is as if, instead of having 10 servers, each with 4 processors, 8GB of RAM, and 100GB of physical disk storage, you now have one huge resource pool with 40 processors, 80GB of RAM, and 1TB of disk space. Virtual machines can then use these resources.
A virtual machine (VM) is a computer that operates on top of a virtualization layer, often called a hypervisor. It isn’t real in the sense that it runs on defined, discrete physical resources, but it does all of the same tasks as a “real” computer. The virtualization layer on which the VM runs defines a set of virtual interfaces for the VM, which appear to VM’s operating system as if they were real network cards, memory, hard drives, and so on. In a sense, virtualization fools the guest operating system in the VM into thinking it is running on specific physical equipment that is emulated by the virtualization software while the virtualization software takes care of the details of interacting with the actual hardware, which may even change without affecting the VM. This is called hardware emulation, sometimes abbreviated to emulation.
Virtual machines are flexible; their allocated resources may be changed, in some cases without any downtime. A VM can be created quickly, as needed, and then removed when it is no longer needed, to make the resources it was using once again available to the pool. Servers that are vital but generally use few resources that can be created using far fewer resources than one of the physical servers in the pool. Others that are needed for larger tasks might be able to take advantage of the resources of many physical servers in the pool.
It is possible for VMs to be created and then have their image saved, so that instead of starting with operating system installation each time a VM is created, the VM starts up with a full operating system and installed programs all configured to work together for a desired task. One neat trick is to run a set of servers locally and then add compute resources from a cloud computing pool such as Amazon’s EC2, Ubuntu Enterprise Cloud (using Eucalyptus), Ubuntu Cloud Infrastructure (using OpenStack), or OpenStack to start up VMs on their network as needed, using them while paying for the time they are running and then deleting them (see Chapter 35, “Ubuntu in the Cloud”). This saves a lot of time and money.
Some readers might think, “That sounds great, but I run only one machine, and it is my desktop (or laptop).” Virtualization might be useful to you, as well. Have you ever wanted to test out a different operating system than the one you are using? Perhaps you found that you have a need to run a specific program that only runs on Windows, but you have Ubuntu installed on your system. Maybe you want to run the latest development version of Ubuntu to help with testing, but you don’t want to use it as your main system operating system. You might want to try out another distribution of Linux or even BSD. In the past, doing these things might involve partitioning your hard drive and installing both operating systems side by side. That worked, but you couldn’t easily move data from one to the other, and you couldn’t run both operating systems at the same time. Wouldn’t it be great if you could run another operating system as a guest on your same machine? You can with virtualization.
There is a trade-off with virtualization, depending on the software used. Some virtualization software runs as an additional layer on top of another operating system. This is great if you want to test something while running on your local desktop machine, but it can add some unwanted and sometimes unacceptable delays when creating a new server. Other virtualization software runs on or near “bare metal,” meaning that the virtualization software is either a part of the operating system kernel or runs as the operating system and there are no other software layers between it and the physical resources being used/managed. This method is faster but not as convenient on the desktop, at least for users who are not as technically advanced.
Virtualization is not new. For example, IBM had useful virtualization running on its mainframes in the 1960s. What has created the recent buzz is that the technology became available to perform the task on much less-expensive x86 hardware.
In November 2005, Intel released its first processors that supported an extension called VT-x, which allows virtualization software access to the processor and other hardware. Before this, virtualization on any x86 platform was slow because it required difficult software workarounds and massaging to get it working. VT-x is available on many of Intel’s processors, but not necessarily all of them as it is one of the ways that Intel differentiates the processors to segment their marketing across various price points. Also, with some motherboards, the extension is not enabled by default but must be enabled in the BIOS before it becomes available.
Following closely behind is AMD, who in May 2006 released virtualization extensions for their processors. Called AMD-V, these extensions are available on many of AMD’s processors, but not on all AMD processors, as this is a higher-end feature.
A related topic deserves a quick mention here. In the cloud, the idea of “containers” has become quite popular. If you are interested in virtualization for use in cloud computing, read the coverage of containers in Chapter 35, “Ubuntu in the Cloud,” before you make any decisions.
KVM
The Kernel-based Virtual Machine (KVM) is a part of the Linux kernel. KVM does not perform hardware emulation, but only provides the lower-level tasks. It needs a second layer to run in user space. This is much faster than running the entire virtualization process in user space, on top of another operating system. KVM is designed for use on processors that have either the VT-x or AMD-V extension enabled. Managing VMs with KVM in Ubuntu is accomplished using libvirt and QEMU. You can check whether a system has the extensions enabled by installing and running the kvm-ok package. It is a simple command-line tool that exits with output 0 if the system is suitable or non-0 if not.
Start by installing the following packages from the Ubuntu software repositories: qemu-kvm, libvirt-bin, virtinst, and bridge-utils:
![]() qemu-kvm is the necessary user-space component of KVM.
qemu-kvm is the necessary user-space component of KVM.
![]() libvirt-bin is a binary of a C toolkit to interact with the virtualization capabilities of Linux and currently supports not only KVM, but also XEN, VirtualBox, and more.
libvirt-bin is a binary of a C toolkit to interact with the virtualization capabilities of Linux and currently supports not only KVM, but also XEN, VirtualBox, and more.
![]() virtinst is a set of command-line tools for creating VMs.
virtinst is a set of command-line tools for creating VMs.
![]() bridge-utils is a set of utilities for configuring Ethernet connections in Linux.
bridge-utils is a set of utilities for configuring Ethernet connections in Linux.
You might want to add virt-viewer, which provides a nice GUI and VNC interface to VMs, and virt-manager, which provides a nice GUI for managing VMs. If installed, you can find both in the Dash listing of applications.
Log out and back in so that the automatic addition of your user to the libvirtd group is certain to be made effective.
By default, any operating system you install as a guest using KVM has access to network services but is not visible to other machines on the network. It is able to download software updates and browse the Web, for example, but it cannot run as a server accessible by other systems. By default, VMs receive an IP address in the 10.0.2.0/24 range and hosts are reachable from within a VM using 10.0.2.2. This should be adequate for simple uses such as testing other operating systems, copying files back and forth using scp, or making virtual private network (VPN) connections from a host to a guest.
Bridged Networking
If you want to change the network settings to enable the use of a VM as an outside-accessible server, you need bridged networking. This enables VMs to use a physical interface to connect to the outside network, making them appear to the rest of the network as any other typical server. Note that to do this you must not use the default Network Manager to control the hardware being bridged. Also this works only with wired, not wireless hardware. See Chapter 18, “Networking,” if you need help understanding the concepts used here.
To start, install libcap2-bin. Next, you need to grant QEMU the ability to administer networking by setting cap_net_admin. If you have a 64-bit system, use the following:
Click here to view code image
matthew@seymour:~$ sudo setcap cap_net_admin=ei /usr/bin/qemu-system-x86_64
And if you have a 32-bit system, use this:
Click here to view code image
matthew@seymour:~$ sudo setcap cap_net_admin=ei /usr/bin/qemu
Then create a bridge interface called br0 in /etc/network/interfaces by adding these lines to use DHCP or your network settings if you want to configure it yourself:
Click here to view code image
auto br0
iface br0 inet dhcp
bridge_ports eth0
bridge_stp off
bridge_fd 0
bridge_maxwait 0
Restart networking by entering this:
Click here to view code image
matthew@seymour:~$ sudo /etc/init.d/networking restart
Finally, you need to create guest VMs that use this bridged network. Manually define your guest OS to use the new br0 interface, as you usually would in that operating system.
There are several ways to create VMs for use with KVM. One way is vmbuilder. This is a Python script that is best for servers on which you intend to run Ubuntu JeOS, a specialized, very light Ubuntu server variant that includes a tuned kernel with only the base elements necessary to run as a virtual server, especially under KVM and VMware. Install python-vm-builder to get the package. You run vmbuilder from the command line with two necessary parameters: the virtualization software and the distribution you will run. However, there are literally tons of useful options and customizations available. Here is an example that builds a VM for KVM from the 15.10 (WilyWerewolf) release of Ubuntu using the virtual flavor (for example, JeOS) in an i386 architecture while overwriting any previous edition of the VM, instructing libvirt to inform the local virtualization environment to add the resulting VM to the list of available virtual machines, give the new VM a specific IP address, the hostname lovelace, and to use the br0 bridge interface. Phew! That’s a lot in one command.
Click here to view code image
matthew@seymour:~$ sudo vmbuilder kvm ubuntu --suite wily --flavour virtual --arch i386 -o --libvirt qemu:///system --ip 192.168.0.100 --hostname lov elace --bridge br0
You can learn more from the help file:
Click here to view code image
matthew@seymour:~$ vmbuilder kvm ubuntu --help
Because vmbuilder is so specialized, here we focus on using the tools from virtinst as they are more likely to appeal to a general audience. However, if you are looking to create server VMs to run on a KVM or VMware installation, you definitely want to explore vmbuilder more fully. However, you might not need to do so. A set of official, prebuilt and Ubuntu-supported VM images are available for download at http://cloud-images.ubuntu.com. These are the exact images that Ubuntu uses in EC2.
Note
One of the Ubuntu Server developers, Dustin Kirkland, has a blog post outlining a method for preseeding Ubuntu Server installations, making the process even faster. You can read it at http://blog.dustinkirkland.com/2011/03/ubuntu-server-quick-install-no.html
virtinst consists of several tools. Here we focus on two: virt-install, to provision new virtual machines; and virt-clone, to clone existing virtual machines.
You can do similar things with virt-install as was done earlier with vmbuilder. The major difference are the options available and that virt-install can also make desktop images that include a GUI, accessible using VNC. See Chapter 19, “Remote Access with SSH, Telnet, and VNC,” for a discussion of VNC.
Here is an example:
Click here to view code image
matthew@seymour:~$ sudo virt-install -n hopper -r 512 --disk path=/var/lib/libvirt/images/hopper.img,size=20 -c /dev/cdrom --accelerate -- connect=qemu:///system --vnc --noautoconsole -v
The preceding example includes the following options:
![]() -n hopper defines the name of the new VM.
-n hopper defines the name of the new VM.
![]() -r 512 specifies the amount of memory the virtual machine will be allotted, in megabytes.
-r 512 specifies the amount of memory the virtual machine will be allotted, in megabytes.
![]() --disk path=... is the path to the virtual disk. It can be a file, a partition, or a logical volume. Here we create a 20GB file named hopper.img in /var/lib/libvirt/images.
--disk path=... is the path to the virtual disk. It can be a file, a partition, or a logical volume. Here we create a 20GB file named hopper.img in /var/lib/libvirt/images.
![]() -c /dev/cdrom is the path to the host’s CD-ROM device. You can also use an ISO file.
-c /dev/cdrom is the path to the host’s CD-ROM device. You can also use an ISO file.
![]() --accelerate enables use of the kernel’s acceleration.
--accelerate enables use of the kernel’s acceleration.
![]() --connect defines the hypervisor to use.
--connect defines the hypervisor to use.
![]() --vnc exports the guest using a VNC virtual console.
--vnc exports the guest using a VNC virtual console.
![]() --noautoconsole prevents automatic connecting to the virtual machine’s console.
--noautoconsole prevents automatic connecting to the virtual machine’s console.
![]() -v creates a fully virtualized guest.
-v creates a fully virtualized guest.
To copy a virtual machine, use virt-clone:
Click here to view code image
matthew@seymour:~$ sudo virt-clone -o hopper -n knuth -f /var/lib/libvirt/images/ knuth.img -connect=qemu:///system
The preceding example includes the following options:
![]() -o hopper defines the name of the origin or source VM.
-o hopper defines the name of the origin or source VM.
![]() -n knuth defines the name of the new VM.
-n knuth defines the name of the new VM.
![]() -f defines the path to the file, partition, or logical volume that the new VM will use.
-f defines the path to the file, partition, or logical volume that the new VM will use.
![]() --connect defines the hypervisor to use.
--connect defines the hypervisor to use.
To start a virtual machine, use the following:
Click here to view code image
matthew@seymour:~$ virsh -c qemu:///system start hopper
To stop a virtual machine, use this:
Click here to view code image
matthew@seymour:~$ virsh -c qemu:///system shutdown hopper
After a VM is installed and running, you can connect to it using the configured IP address and a utility like ssh. You can also use a GUI with the following:
Click here to view code image
matthew@seymour:~$ virt-viewer -c qemu:///system hopper
You may use a GUI to manage your VMs by connecting to the following:
Click here to view code image
matthew@seymour:~$ virt-manager -c qemu:///system
If you are interested in an easy way to use KVM to test Ubuntu development versions, see Chapter 41, “Helping with Ubuntu Testing and QA,” and the discussion of Test Drive, which automates this entire process, including the downloading of specific Ubuntu ISO files.
VirtualBox
VirtualBox is much easier to use than KVM, especially if all you want to do is run a second operating system on top of Ubuntu. It was created by innotek GmbH, purchased by Sun Microsystems, and is now owned and developed by Oracle after their purchase of Sun. VirtualBox is installed on top of another operating system, so it isn’t ideal for processing intensive activity where every processor cycle counts. However, for testing or for running another operating system because you need specific applications, it is great. VirtualBox runs on top of most UNIX-type operating systems such as Linux, BSD, and Mac OS X (as well as on Windows).
There is a version of VirtualBox in the Ubuntu software repositories, but in general downloading the one from the VirtualBox website is a better idea. Go to www.virtualbox.org/wiki/Downloads. From there, you can download a version for any operating system you are likely to use, including on the Linux page an Ubuntu DEB file that installs using the Advanced Packing Tool (APT), so package management isn’t a problem. However, this also gives you easy access to download the extension pack, which isn’t available in the Ubuntu repositories, so you can get it installed quickly and easily. The extension pack adds a few nice, but proprietary, features that cannot be made available under the GPL used for the main program, such the ability to connect to the USB port of a host computer from a guest VM in VirtualBox. After you’ve installed it, start VirtualBox at the command line using the following:
matthew@seymour:~$ virtualbox
If you want to be able to close your terminal and keep VirtualBox running, run VirtualBox in the background by putting an ampersand (&) after the command, like this:
matthew@seymour:~$ virtualbox &
Either way, when you are done, just close the GUI program and VirtualBox shuts down. When you run either, the GUI appears (Figure 34.1).
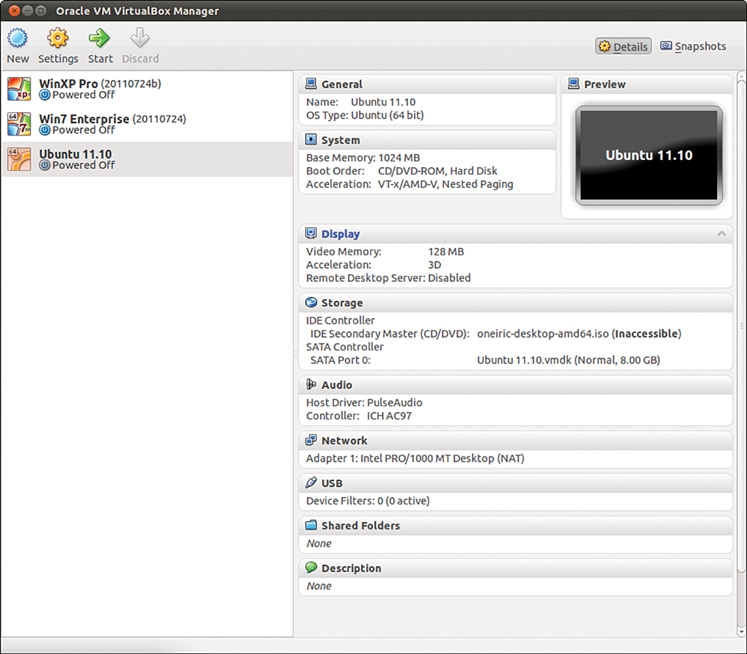
FIGURE 34.1 Oracle VM VirtualBox Manager.
From here you can create a new VM by selecting New at the top left. Change the settings on any currently installed VM by selecting Settings. Start any installed VM by selecting Start. Delete any VM by selecting Discard. You can see details of the currently selected VM using Details at the upper right or your saved snapshots of existing VMs using Snapshots. Everything is configurable from the GUI. VirtualBox is easy and intuitive to use, even for a complete novice.
From the GUI, you can clone a machine, export it, and import it on another machine running VirtualBox. A command-line interface is available for scripting, focused on VM management activities. You can run VirtualBox headless and access it using Remote Display Protocol (RDP). These activities are beyond the scope of this book but can make VirtualBox a little more interesting to someone who wants to run VMs remotely (although most who are going to go through the trouble would probably go ahead and use KVM and connect to a VM using VNC).
VMware
VMware is an enterprise-focused virtualization platform. The company offers a limited-feature version that runs on the desktop for free and also sells a full-featured version. It runs well, is easy to use, and has better features than VirtualBox. It also requires buying a new license each year, and the license isn’t cheap. Their enterprise server offerings are considered by many to be the most powerful and well-featured in the business. The VMware software runs on bare metal; it is the operating system that gets installed on all the servers in a VMware installation. Then, all the resources are controlled from one central location. VMs can be moved while running from one physical machine to another in the system with no loss of usability and no downtime. This can even be done automatically based on administrator-set criteria, such as bandwidth, available memory, or processor load. It is also quite expensive to license. VMware is primarily designed for use by large corporations in enterprise environments. It deserves a mention here but is not really targeted toward the same audience as this book.
Xen
Xen is a well-known open-source virtualization platform. It is in widespread use by researchers, hobbyists, developers, and others. Web hosting companies that offer virtual servers often use Xen. Generally, Xen installs on bare metal, like VMware. It can be installed on top of another operating system in a host/guest arrangement. However, in 2008, Ubuntu made a decision not to support Xen. Instead, the Ubuntu community has focused its efforts on KVM. This is not a value statement that one is better than the other, but only that KVM seemed to be a better fit for the needs of an Ubuntu developer community that did not have the resources to give quality support to two similar virtualization platforms. It does appear possible to run Xen on Ubuntu, but there are no guarantees. For this reason, many choose to use one of the Linux distributions that use Xen as their primary virtualization platform, such as SUSE, Red Hat, or CentOS, if Xen is preferred. At the time this book was being written, rumors began to surface that Ubuntu will once again support Xen in the near future, but no solid news was yet available.
References
![]() www.linux-kvm.org—The main page for KVM.
www.linux-kvm.org—The main page for KVM.
![]() www.virtualbox.org—The main page for VirtualBox.
www.virtualbox.org—The main page for VirtualBox.
![]() www.vmware.com—The main page for VMware.
www.vmware.com—The main page for VMware.
![]() http://www.xenproject.org/—The main page for Xen.
http://www.xenproject.org/—The main page for Xen.
All materials on the site are licensed Creative Commons Attribution-Sharealike 3.0 Unported CC BY-SA 3.0 & GNU Free Documentation License (GFDL)
If you are the copyright holder of any material contained on our site and intend to remove it, please contact our site administrator for approval.
© 2016-2026 All site design rights belong to S.Y.A.