Ubuntu Unleashed 2017 Edition (2017)
Part IV: Ubuntu as a Server
Chapter 33. Linux Terminal Server Project (LTSP)
In This Chapter
![]() Requirements
Requirements
![]() Installation
Installation
![]() Using LSTP
Using LSTP
![]() References
References
The Linux Terminal Server Project (LTSP) is an add-on package for Linux that enables you to run multiple thin clients, low-powered terminals, from one main server. A thin client is a small, energy-efficient, and generally lower-powered system designed to be used in conjunction with a more powerful server. The thin client has limited processing power and speed and limited storage, making it very inexpensive. All it is used for is receiving input from a device such as a keyboard or mouse, communicating with a server, and displaying output to a screen.
Processing of information and the actual running of programs are offloaded to the server, meaning the server does all the hard work and is the only system in the network that has strong requirements for processor power and speed, memory, storage, and so on. Thin clients are also generally smaller in size and quieter, which also make them more convenient to use when space and noise are potential issues. Those of us who have been around longer or who have worked in enterprise environments will see an immediate relationship to big metal servers and dumb client terminals, and it is reasonable to think of an LTSP setup this way. In our case, the server isn’t as big or as powerful, and the thin clients aren’t as dumb and weak, but the idea is the same.
Thin clients are great in places such as classrooms and computer labs where strict control and strong security are desirable, where money for a room of full-powered systems might not be available, and where installing and maintaining core software on one server is preferable to doing so on many systems. For this reason, Edubuntu, a community-led official subproject of Ubuntu, is designed for easy LTSP installation and configuration. We focus on using LTSP with standard Ubuntu, but if you want to use LTSP in an education-specific context, or if you just want an additional perspective and more information about LTSP, Edubuntu is worth a closer look. Other common places you are likely to find thin clients in use are libraries for catalog access and searches and in some airports that make courtesy terminals for checking email available for travelers.
Links to several thin client hardware sources are included in the “References” section of this chapter, although they are included to inform and should not be taken as endorsements. (We don’t own and have not used equipment from every company listed and can’t make any honest recommendations about them.) In addition to those mentioned, you are sure to find others. In fact, computers that often make excellent thin clients are not advertised as such. You can look for compact format systems that use an ARM, VIA, or maybe an Intel Atom processor, for example, and are likely to find they make wonderful thin clients. You can even recycle older hardware that would otherwise be bound for the trashcan and make it useful again as a thin client.
Now that you have a sense of why you might use LTSP and how the network is created, it is a good time to fill you in on some of the details of what LTSP is, what it is not, and how it is designed to work. Armed with this knowledge, you will be able to find documentation to help you decide what you can afford to buy, how you want to configure it, and even whether this is a configuration that is applicable and useful to your situation.
LTSP is add-on software for Linux that creates a server that can be used to boot client computers over a network. It allows client computers to access and run applications on the server while the client remains responsible for input and display and the server handles processing data and storage. This allows many inexpensive hardware clients to be used to do things that would normally be beyond the capability of the hardware and streamlines administration by placing all the configuration and software on one server. The biggest limitations result from server and networking hardware (for example, switch or hub, 1GB versus 100MB ports, high-end server and storage or less-expensive just-adequate equipment).
Requirements
Our minimum recommended specifications for thin clients are a processor running at 400MHz with 128MB RAM and the ability to boot via PXE (a common network boot protocol). Nearly any system sold today and advertised as a thin client exceeds these requirements by a wide margin. We list them here in case you want to try to reuse old hardware that is otherwise obsolete. Server and other hardware recommendations are listed in the “Installation” section.
Let’s start by looking at several wiring schemes to show appropriate methods of using LTSP. The first one, shown in Figure 33.1, is the default install without an Internet connection and is the simplest way to use LTSP.
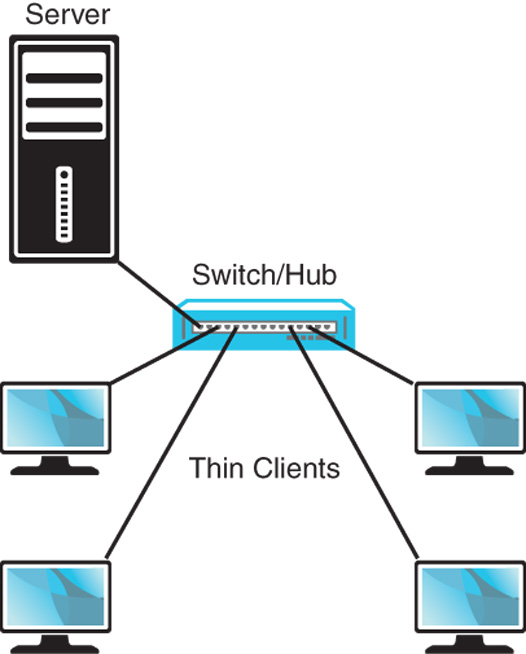
FIGURE 33.1 A default LTSP install without an Internet connection.
From the diagram alone, you can see the main pieces of hardware needed: a server, a switch/hub, and a number of thin clients. The switch/hub is the first piece of hardware we discuss.
For simplicity, we only show four thin clients in each example, but this is not an actual limit. The number of thin clients is limited by your switch/hub and even an inexpensive hub supports four connections, although it is common for quality enterprise-grade switches to have 48 or more ports. A switch is generally faster and more expensive than a hub and is often preferable for reasons beyond the scope of this chapter, but they both serve the same basic purpose, and either can work in an LTSP setting. They are used to control traffic on a network and make sure that communication happens between computers as it is intended.
Ideally, you want a piece of hardware here that supports a GB connection between the server and a switch, with at least 100MB connections between the thin clients and the switch, and enough unused communication ports to make future expansion easy without requiring the addition of another switch or hub and layer of complexity. If money is an issue and ideal performance isn’t vital, an inexpensive hub that only had 100MB ports all around and just enough ports to connect everything will certainly work. If you are connecting more than 10 clients to the server, a gigabyte connection to the server is strongly recommended. Life is full of trade-offs, and money supplies are not limitless, so use your best judgment and buy the best you can afford.
For the server, recommended specifications depend greatly on the intended use. If everyone will be using the same program on each client, you do not need as much memory and processor speed as you would if everyone is doing different things at the same time. You can easily run LTSP server on a repurposed old machine you have sitting around with 512MB RAM, a 1GHz Celeron processor, and a decent, working hard drive, and it will work, but we don’t really recommend that if you are going to have more than a couple of clients doing anything beyond simple and identical tasks.
Our minimum recommendation is the same as the current recommendation for a minimum Ubuntu desktop installation: a 1GHz x 86 processor, 1GB RAM, and a 15GB hard drive. At least a 100MB Ethernet card is vital. Ideally, you would bump each category up to the highest level you can afford and expect better performance as a result. Our minimum-if-you-want-a-great-experience recommendation is a current-issue fast-as-you-can-afford multicore 64-bit processor, 4GB RAM, at least two fast hard drives in a RAID array for performance and data backup, and at least one and perhaps two gigabyte Ethernet cards.
Most of the time you use LTSP you will want the network to be connected to the Internet. There are two main ways to do this. Figure 33.2 shows the network with an Internet connection via an Internet router connected to the switch/hub. This is a common method and works well.
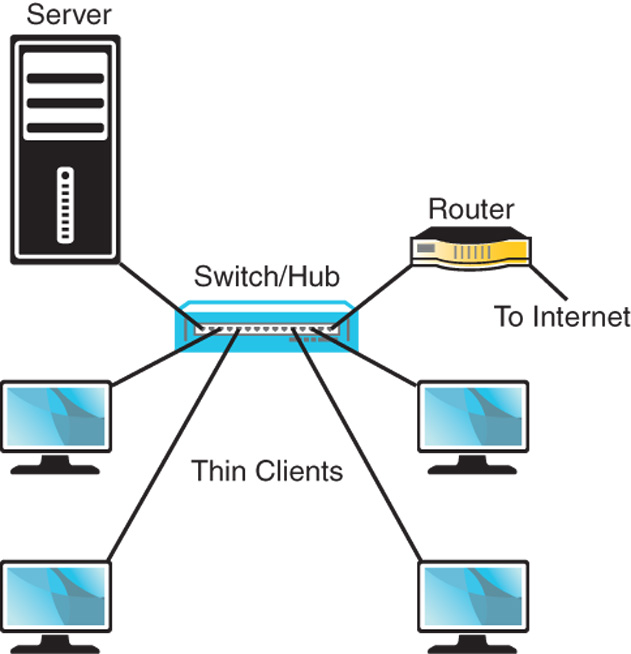
FIGURE 33.2 A typical LTSP install with an Internet connection via an Internet router.
Another common method is to connect the server directly to the Internet router as in Figure 33.3. This has the benefit of enabling you to easily configure and use the server as a gateway to control thin client access to the Internet. To do this, the server must have two network cards, and we again recommend that the one used to connect to the switch is a 1GB card; all the thin client traffic has to travel between the switch and server over that one connection, so a 1GB card will cause fewer bottlenecks than if you have multiple clients connecting to a switch at 100MB trying to share a single 100MB connection to a server. The card from the server to the Internet router should be adequate for the Internet connection available, but there is no reason to put anything faster in there. If you have only a 100MB connection with your Internet service provider, using a 1GB card will not give any particular benefit.
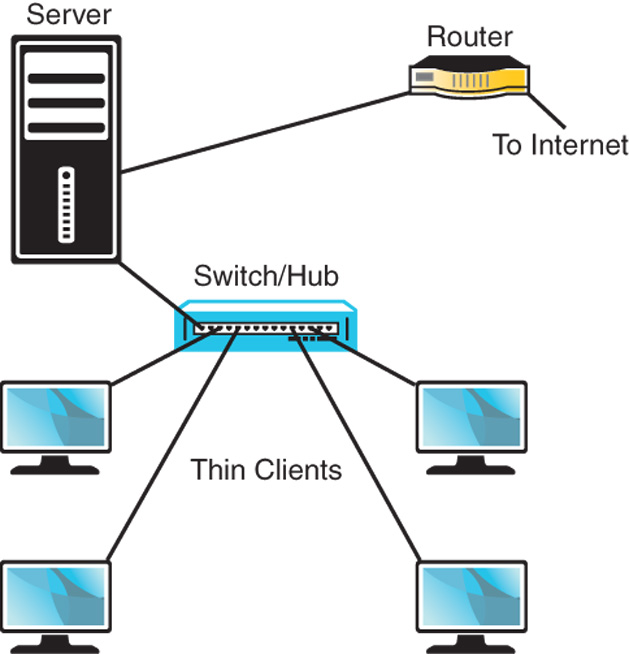
FIGURE 33.3 Using a server with two Ethernet cards as a portal to the Internet.
Installation
After you decide how you want to set up your network and connect all the hardware, you can get to the task of installing the software. In Ubuntu, the LTSP software is available for installation in two ways. If you are repurposing a server that already has a current release of Ubuntu installed on it, you install the ltsp-server-standalone and openssh-server packages from the Ubuntu repositories and run the following to set up the environment:
Click here to view code image
matthew@seymour:~$ sudo ltsp-build-client
If your server is a 64-bit system and your thin clients use a different processor architecture, you want to run that command with the --arch option, as follows:
Click here to view code image
matthew@seymour:~$ sudo ltsp-build-client --arch i386
Most people will be installing from scratch and not reusing a system with Ubuntu already installed. This is still quite easy. You must download the alternative install CD from the Ubuntu website at http://releases.ubuntu.com/. From here, find the release version of Ubuntu you want to use for the server. Some of you will want the current release (at this writing, 15.10), and others will want to use an LTS release like 14.04 LTS. Click the release version you want to use and then find the link for the alternative install CD for your server’s processor architecture, either 32-bit or the 64-bit. Download it and burn the image to a CD as discussed in Chapter 1, “Installing Ubuntu and Post-Installation Configuration.”
Make sure all your thin clients are connected and set to boot from network using PXE but turned off. Then boot the server using the alternative CD, press F4 for the Modes menu, and choose Install an LTSP Server. A regular Ubuntu installation begins. Near the end of the installation a message appears that lets you know the thin client system is being built on the server. You are notified that it is being compressed into an image, and when the process is complete you reboot your server, removing the CD at the appropriate moment in the process.
After the server has rebooted and is running, you may turn on your thin clients and they boot from the network using the image on the server. Thin clients can run any programs installed on the server.
Using LTSP
When you boot a thin client in an LTSP network, it retrieves the boot image from the LTSP server and uses it to create the environment to be displayed to the user. The process includes using Dynamic Host Control Protocol (DHCP)to request from and assign to the client an IP address on the network. The process then downloads the kernel and initial RAM disk from the server and then downloads the LTSP configuration and mounts the server-hosted file system. It uses chroot to use this file system as the client’s own root file system and then finishes the boot using the instructions in that file system. This is a highly configurable process. By default, the client boots to a login screen using the LTSP Display Manager (LDM) in place of GDM that is used by Ubuntu, KDM that is used by Kubuntu, or others. User accounts are used to limit or control access, and the LDM initializes the details for communication between the server and client, including launching the desktop, mounting storage devices and /home directories, and creating menu items. The entire desktop is run on the server and displayed on the client.
By default, LTSP uses inherent abilities in Linux but has configured them to work together smoothly. You may modify details to suit your needs. For example, communication between an application server and a client is done by tunneling an X11 session over ssh, making the sharing of a graphical desktop easy and using a standard method while also being a secure method of communicating user credentials.
One really useful feature in LTSP is that you are not limited to using only one server in a network. If your network of thin clients grows to a point where your current server is being taxed, there is an easy way to configure and add a second or multiple servers to the network to share the load. In this case, the server that a thin client uses to boot is not necessarily the same server that a user will log in to. When you add servers, one server is chosen to be the primary server and controls thin client boots, data storage, and runs additional services. Additional, secondary servers can be much simpler because all they do is host desktop sessions and will be configured to use the central services from the primary server for everything else. In a multiple-server network, authentication of users is something that you need to think through and configure because it becomes a little more complex. There are many ways to do this, including the obvious choice: LDAP.
Creating and maintaining an LTSP network is very useful in specific situations and can be a cost-effective way of using administrator time while providing useful functionality to end users. Although the foundation sounds simple in this introductory chapter, it can be a complex task worthy of an entire book. Our intent with this chapter is to give enough information for you to determine whether LTSP is a technology that suits your needs and is deserving of a closer look. To that end, we offer several useful links in the following section and suggest them as your next step.
References
![]() www.ltsp.org/—The official upstream LTSP website.
www.ltsp.org/—The official upstream LTSP website.
![]() https://help.ubuntu.com/community/UbuntuLTSP—The Ubuntu community documentation page, which is easily the best resource for LTSP because it includes an organized and up-to-date set of links to information on any aspect you should need.
https://help.ubuntu.com/community/UbuntuLTSP—The Ubuntu community documentation page, which is easily the best resource for LTSP because it includes an organized and up-to-date set of links to information on any aspect you should need.
![]() https://help.ubuntu.com/community/UbuntuLTSP/Tour—This gives an overview of the differences between a traditional LTSP installation and the Ubuntu community modifications to the process for ease of installation, software updates, and security.
https://help.ubuntu.com/community/UbuntuLTSP/Tour—This gives an overview of the differences between a traditional LTSP installation and the Ubuntu community modifications to the process for ease of installation, software updates, and security.
![]() https://help.ubuntu.com/community/UbuntuLTSP/ThinClientHowtoNAT/—If you use the network design in Figure 33.3, this tells you how to configure your server so that your thin clients have access to the Internet.
https://help.ubuntu.com/community/UbuntuLTSP/ThinClientHowtoNAT/—If you use the network design in Figure 33.3, this tells you how to configure your server so that your thin clients have access to the Internet.
A sampling of companies advertising thin clients:
![]() www.artecgroup.com/thincan
www.artecgroup.com/thincan
![]() http://www.chippc.com/products/
http://www.chippc.com/products/
![]() http://www.devonit.com/thin-client-solutions
http://www.devonit.com/thin-client-solutions
![]() www.disklessworkstations.com/
www.disklessworkstations.com/
![]() www.lucidatech.com/
www.lucidatech.com/
![]() http://www.dell.com/us/business/p/cloud-client-computing?~ck=bt#!tabId=8886AFAC
http://www.dell.com/us/business/p/cloud-client-computing?~ck=bt#!tabId=8886AFAC
All materials on the site are licensed Creative Commons Attribution-Sharealike 3.0 Unported CC BY-SA 3.0 & GNU Free Documentation License (GFDL)
If you are the copyright holder of any material contained on our site and intend to remove it, please contact our site administrator for approval.
© 2016-2026 All site design rights belong to S.Y.A.