Hacking Ubuntu (2007)
Part I: Optimizing Your System
Chapter 3: Configuring Devices
Linux is a powerful operating system, and much of that power comes from its ability to support different hardware configurations and peripheral devices. Everything from multiple CPUs and video cards to printers and scanners require device drivers and kernel modifications. In this chapter, we'll look at getting some common devices configured properly.
Working with Device Drivers
Under Linux, there are a couple of required elements for working with devices. First, you need a kernel driver that can recognize the device. These are usually low-level drivers, such as support a parallel port (for example, for use with a parallel printer) or provide USB support (regardless of the USB device).
The second element depends on the type of hardware-some devices need software support for managing the device. The kernel driver only knows how to address the device; the software driver actually speaks the right language. This means that different versions of the same device may speak different languages but communicate over the same kernel driver. Printers are one such example. A printer may use PostScript, HP PCL, oki182, or some other format to communicate data. The kernel driver knows how to send data to the printer, but the software driver knows what data to send. The same is true for most scanners, cameras, pointer devices, and even keyboards.
The final element is the user-level application that accesses the device. This is the program that says "print" or the audio system that says "play."
There are four steps needed before using any device:
1. Install a device driver, if one is not already installed.
2. Create a device handle if one is not created automatically.
3. Load any required software drivers and configuration parameters.
4. Configure applications as necessary for using the device.
In some cases, some or all of these steps are automated. In other cases, devices will need manual configuration.
Useful Programs
Many computer peripherals and add-ons are either pointer or video devices. There are two very useful programs when trying to test these devices. The first is the GNU Image Manipulation Program or gimp (http://www.gimp.org/), an open source version of Adobe Illustrator. This is a very powerful drawing tool that supports most types of pointer devices and can also capture input from video devices such as cameras, scanners, and TV cards.
The second useful program is the Scanner Access Now Easy or sane (http://www.sane-project.org/) program. This is strictly used for capturing images from a video device such as a scanner, digital still camera, digital video camera, or TV card. The xsane program provides an X-Windows front end for sane. As with gimp, xsane can capture images from a variety of input devices.
The sane, xsane, and gimp programs are installed by the default Ubuntu desktop configuration.
Loading Modules
Very early versions of Linux had all the necessary kernel drivers compiled into the kernel. This meant that the kernel knew exactly what was supported. If you needed to add a new device, you would need to compile a new kernel.
Unfortunately, including every driver in the kernel led to a big problem: the kernel became too large. Back in the days of floppy disks, it would take two 1.44 MB disks to boot Linux-one for the kernel and the other for the rest of the operating system. The kernel developers introduced compressed kernels, but even those became too large for floppy disks.
Fortunately, the barbaric days of compiling all desired modules into the kernel are long gone. Today Linux uses loadable kernel modules (LKMs). Each LKM can be placed in the kernel as needed. This keeps the kernel small and fast. Some LKMs can even perform a check and see if they are required. If you don't have a SCSI card on your computer, then the SCSI LKM driver won't bother to load and won't consume kernel resources. Usually hardware is found through device identifiers, but sometimes you need to tell the operating system to enable the device.
Ubuntu includes a healthy selection of common and uncommon kernel modules. If the device has any type of stable Linux support, then it is very likely that Ubuntu has the LKM on the system.
Viewing Modules
The basic command to see what modules are currently loaded is lsmod. Running lsmod displays the LKM's common name, size of the LKM, and any other LKMs that depend on it. For example:
$ lsmod | head
Module Size Used by
floppy 64676 0
rfcomm 43604 0
l2cap 28192 5 rfcomm
bluetooth 54084 4 rfcomm,l2cap
ppdev 9668 0
speedstep_lib 4580 0
cpufreq_userspace 6496 0
cpufreq_stats 6688 0
freq_table 4928 1 cpufreq_stats
This shows that the bluetooth module is loaded and is in use by the rfcomm and l2cap modules. A second command, modprobe, can be used to show the actual LKM files.
$ modprobe -l bluetooth
/lib/modules/2.6.15-26-686/kernel/net/bluetooth/bluetooth.ko
The modprobe command can also list available modules-not just ones that are loaded. For example, to see all the asynchronous transfer mode (ATM) network drivers, you can use:
$ modprobe -l -t atm
/lib/modules/2.6.15-26-686/kernel/net/atm/pppoatm.ko
/lib/modules/2.6.15-26-686/kernel/net/atm/mpoa.ko
/lib/modules/2.6.15-26-686/kernel/net/atm/lec.ko
/lib/modules/2.6.15-26-686/kernel/net/atm/br2684.ko
/lib/modules/2.6.15-26-686/kernel/drivers/usb/atm/xusbatm.ko
/lib/modules/2.6.15-26-686/kernel/drivers/usb/atm/usbatm.ko
/lib/modules/2.6.15-26-686/kernel/drivers/usb/atm/speedtch.ko
/lib/modules/2.6.15-26-686/kernel/drivers/usb/atm/cxacru.ko
/lib/modules/2.6.15-26-686/kernel/drivers/atm/zatm.ko
/lib/modules/2.6.15-26-686/kernel/drivers/atm/uPD98402.ko
/lib/modules/2.6.15-26-686/kernel/drivers/atm/suni.ko
...
The -t atm parameter shows all modules with the ATM tag. LKMs are stored in an organized directory, so the tag indicates the directory name. This is different than using modprobe -l ‘*atm*‘ since that will only show modules containing "atm" in the LKM file name.
Installing and Removing Modules
Modules are relatively easy to install. The insmod command loads modules, and rmmod removes modules. The modprobe command actually uses insmod and rmmod, but adds a little more intelligence. The modprobe command can resolve dependencies and search for modules.
As an example, let's look at the suni.ko ATM driver (you probably do not have it installed and you probably don't need it). Listing 3-1 shows different queries for the driver, installing the driver, and removing it.
|
Note |
Asynchronous Transfer Mode (ATM) network cards are uncommon on home PCs, so this is a good type of device driver to play with when learning how to load and unload LKMs. If we used a common driver for this example, then you could end up disabling your floppy drive, printer, or other device. If you do happen to have a Saturn User Network Interface (SUNI) ATM card, then consider using a different driver for this example, such as pppoatm. |
Listing 3-1: Sample LKM Queries and Management
$ lsmod | grep suni
[none found]
$ modprobe -l -t atm # show all ATM modules
/lib/modules/2.6.15-26-686/kernel/net/atm/pppoatm.ko
/lib/modules/2.6.15-26-686/kernel/net/atm/mpoa.ko
/lib/modules/2.6.15-26-686/kernel/net/atm/lec.ko
/lib/modules/2.6.15-26-686/kernel/net/atm/br2684.ko
/lib/modules/2.6.15-26-686/kernel/drivers/usb/atm/xusbatm.ko
/lib/modules/2.6.15-26-686/kernel/drivers/usb/atm/usbatm.ko
/lib/modules/2.6.15-26-686/kernel/drivers/usb/atm/speedtch.ko
/lib/modules/2.6.15-26-686/kernel/drivers/usb/atm/cxacru.ko
/lib/modules/2.6.15-26-686/kernel/drivers/atm/zatm.ko
/lib/modules/2.6.15-26-686/kernel/drivers/atm/uPD98402.ko
/lib/modules/2.6.15-26-686/kernel/drivers/atm/suni.ko
...
$ modprobe -l '*suni*' # Show only the suni.ko module
/lib/modules/2.6.15-26-686/kernel/drivers/atm/suni.ko
$ modprobe -l -a 'suni' # Show all suni modules
/lib/modules/2.6.15-26-686/kernel/drivers/atm/suni.ko
$ sudo modprobe -a suni # install all suni modules
$ lsmod | grep suni # show it is installed
suni 7580 0
$ sudo modprobe -r suni # remove it
$ lsmod | grep suni # show it is removed
[none found]
|
Note |
Using modprobe -l without any other parameters will list every module on the system. |
|
The installation step could also be accomplished using
sudo insmod /lib/modules/2.6.15-26-686/kernel/drivers/atm/suni.ko
Similarly removal could also use any of the following commands:
sudo rmmod /lib/modules/2.6.15-26-686/kernel/drivers/atm/suni.ko
sudo rmmod suni.ko
sudo rmmod suni
To make the installation permanent, you can either add the module name to /etc/modules or /etc/modprobe.d/. (See the man pages for modules and modprobe.conf.) In general, /etc/modulesis simpler for adding a new module, but the /etc/modprobe.d/ configuration files provide more control.
Optimizing Modules
If you're trying to streamline your system, you may not want to have all of the various modules installed or accessible. Although unused modules take virtually no resources (even if they are loaded into memory), systems with limited capacity or that are hardened for security may not want unnecessary LKMs. Between the lsmod and modprobe -l commands, you can identify which modules are unnecessary and either remove them from the system or just not load them.
For example, if you do not have a printer on your parallel port, then you probably do not need the lp module loaded. Similarly, if you want to disable the floppy disk, you can remove that driver, too.
sudo modprobe -r lp
sudo modprobe -r floppy
You can make these changes permanent by removing lp from /etc/modules and adding both lp and floppy to /etc/modprobe.d/blacklist, or if you need the disk space then you can just delete the drivers from the system (use modprobe -l lp and modprobe -l floppy to find the files).
Starting Software Devices
After the device driver is loaded into the kernel, it usually needs to be configured. Each device driver has it's own set of tools for doing the configuration. For example, the network uses ifconfig to configure addresses, and PCMCIA support uses cardmgr to notify the operating system when a new card is added or removed. Each driver is different. Some software drivers are only needed once to configure the system (for example, network, audio, and system clock), others are needed continually while the device is in use (for example, high resolution graphics and mouse). A few KLM drivers require no additional assistance-keyboard, hard drives, and USB fall into this category.
In addition to configuring and managing kernel drivers, some software drivers are software- only (no KLM needed). These services include virtual file systems, schedulers, and network services like SSH and the Web.
Using Init.d
As the system boots, kernel drivers are loaded into memory and the init process begins setting the run level. At each run level, different software drivers and services are started. Which ones are started and the order that they are started in is determined by /etc/init.d/ and the rc script. There are eight rc directories: /etc/rc0.d, /etc/rc1.d, … /etc/rc6.d, and /etc/rcS.d. These correspond with the different run levels (0 through 6, and S for single user mode). In each of these directories are symbolic links to files in /etc/init.d. The name of the symbolic link determines whether the script is called when starting (S) or leaving (K for kill) the run level (see Listing 3-2). Each name also has a number, used to order when the service is started. This way, dependent processes can be started in the right order. For example, S13gdm is started before S99rmnologin since the Gnome Display Manager (gdm) should be started before the user login prompt.
The directory /etc/init.d/ contains the actual control scripts (without the S/K and number). Each script has a start, stop, and restart option. So, for example, if you want to restart the network and stop the cron server, you can run:
sudo /etc/init.d/networking restart
sudo /etc/init.d/cron stop
To make system changes happen after the next reboot, add the appropriate S or K script to the appropriate run-level directory.
Listing 3-2: Directory Contents of /etc/rc6.d
$ ls /etc/rc6.d
K01gdm K20NVidia-kernel K88pcmciautils
K01usplash K20postfix K89klogd
K11anacron K20powernowd K90sysklogd
K11atd K20rsync K99timidity
K11cron K20ssh S01linux-restricted-modules-common
K15fetchmail K20tor S20sendsigs
K19cupsys K20vsftpd S30urandom
K20acpi-support K21acpid S31umountnfs.sh
K20apmd K21hplip S35networking
K20bittorrent K25hwclock.sh S40umountfs
K20dbus K25mdadm S49evms
K20festival K50alsa-utils S50lvm
K20hotkey-setup K74bluez-utils S50mdadm-raid
K20laptop-mode K86ppp S60umountroot
K20makedev K88pcmcia S90reboot
Running Ragged
Ubuntu includes seven different run levels: 0-6 and S. Many of the run levels provide very specific services. For example, level 0 is a system halt, 6 reboots the system, and S provides the single-user mode. Under Ubuntu, level 1 provides an alternate single-user mode environment.
The remaining run levels provide different types of multi-user support. Usually the system uses level 2. This provides a graphical user interface (when available) and network support. The default level 3 provides support for accessibility devices, such as a Braille TTY display. Finally, levels 4 and 5 usually look like level 2, however, you can modify them if you need customized run-time environments.
Configuring Boot Options with services-admin
Managing services by hand can be time consuming. Ubuntu offers an easy applet for enabling and disabling some system services: services-admin. You can run this from the command line, or select it from System ![]() Administration
Administration ![]() Services (see Figure 3-1). Enabling or disabling services only requires changing a check box.
Services (see Figure 3-1). Enabling or disabling services only requires changing a check box.
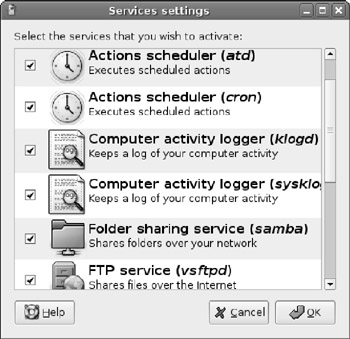
Figure 3-1: The Services settings applet
|
Tip |
Checking or unchecking a service will immediately change the service's current running status. It will also alter the service's boot status. This way, if you uncheck a service, you don't need to manually stop any running processes and it will not start at the next boot. Checking a service makes it start immediately and it will start with the next boot. |
Although this tool does identify some of the better-known services, it does not list custom services and does not identify different run levels. Since Ubuntu normally runs at run-level 2, you are only modifying whether services will start during run level 2. In order to control more of the boot options, you either need to modify the files in the /etc/init.d and /etc/rc*.d directories, or you need a better tool, like sysv-rc-conf.
Configuring Boot Options with sysv-rc-conf
The services-admin applet does not list all services but is more convenient than manually editing services. The sysv-rc-conf tool offers a middle ground by allowing easy access to the boot services without requiring manual modification of the different startup files found in /etc/init.d and /etc/rc*.d/.
sudo apt-get install sysv-rc-conf
Running this tool (sudo sysv-rc-conf) brings up a text list of all services and run-levels (see Figure 3-2). Using this tool, you can immediately start or stop services by pressing + or -, and spacebar enables or disables the service in specific run levels. The tool also supports the mouse; clicking a check box enables or disables the service.
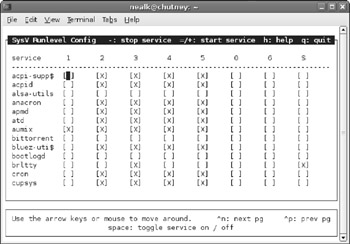
Figure 3-2: The sysv-rc-conf tool
|
Tip |
As with the services-admin application, selecting or clearing a service will immediately change the service's running status and alter the service's boot-up configuration. |
The sysv-rc-conf tool has one other huge benefit over the services-admin program: it is text based. Although usually graphical applications are easier to use, most system services only need modification when the system is not working properly, and that means using the command line. Furthermore, if you installed the Ubuntu server instead of the desktop (see Chapter 1), then there is no graphical display available. The sysv-rc-conf tool works without needing the entire overhead and installation of a graphical interface.
Enabling Multiple CPUs (SMP)
Many of today's computers have multiple CPUs. Some are physically distinct, and others are virtual, such as hyper-threading and dual-core. In any case, these processors support symmetric multiprocessing (SMP) and can dramatically speed up Linux.
|
Note |
The kernel supports multiple CPUs and hyper-threading. If your computer has two CPUs that both support hyper-threading, then the system will appear to have a total of four CPUs. |
Older versions of Ubuntu, such as Hoary and Breezy, had different kernels available for SMP. To take advantage of multiple processors, you would need to install the appropriate kernel.
sudo apt-get install kernel-image-2.4.27-2-686-smp
Without installing an SMP kernel, you would only use one CPU on an SMP system.
Dapper changed this requirement. Under Dapper, all of the default kernels have SMP support enabled. The developers found that there was no significant speed impact from using an SMP kernel on a non-SMP system, and this simplified the number of kernels they needed to maintain.
There are a couple of ways to tell if your SMP processors are enabled in both the system hardware and kernel.
§ /proc/cpuinfo-This file contains a list of all CPUs on the system.
§ top-The top command shows what processes are running. If you run top and press 1, the header provides a list of all CPUs individually and their individual CPU loads. (This is really fun when running on a system with 32 CPUs. Make sure the terminal window is tall enough to prevent scrolling!)
§ System Monitor-The System Monitor applet can be added to the Gnome panels. When you click it, it shows the different CPU loads (see Figure 3-3).
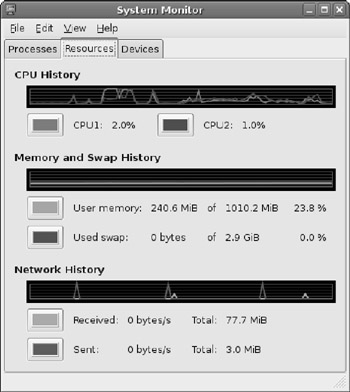
Figure 3-3: The System Monitor applet showing multiple CPUs
In each of these cases, if only one CPU is listed, then you are not running SMP. Multiple CPUs in the listings indicate SMP mode.
Disabling SMP
In some situations, such as application benchmarking or hardware debugging, you may want to disable SMP support. This can be done with the kernel parameters nosmp or maxcpus=1.If this is a temporary need, you can just boot the system, catch Grub at the menu by pressing ESC, and typing boot nosmp maxcpus=1 at the prompt. If you have multiple boot options, then you may need to edit the kernel line and add nosmp maxcpus=1 to the kernel boot line.
|
Warning |
Some kernels do not work with nosmp, but in my experience maxcpus=1 always works. |
|
Note |
The default Grub boot loader gives you three (3) seconds to press the escape key before it boots the operating system. |
For a longer-term solution, consider adding these boot parameters to the Grub configuration.
1. As root, edit /boot/grub/menu.lst.
2. Scroll down to your kernel.
3. Add a kernel option for disabling SMP. For example:
4. kernel /boot/vmlinuz-2.6.15-26-686 root=/dev/hda1 ro splash maxcpus=1
5. Save your changes.
The next reboot will use your new changes.
|
Warning |
If you modify /boot/grub/menu.lst, be aware that the contents could be overwritten the next time you upgrade the kernel or run update-grub. |
Missing SMP?
If you find that you only have one active CPU on a multiple CPU system, try installing the explicit SMP kernel: sudo apt-get install linux-686-smp. Beyond that, there are few generic debugging options and the problem is unlikely related to Ubuntu-it is probably a general Linux kernel problem.
§ Check with the motherboard manufacturer and see if Linux supports their chipset. For example, I have an old dual-CPU motherboard that is not supported by Linux.
§ Check the Linux Hardware FAQ for the motherboard or chipset. This will tell you if other people managed to get it to work. Web sites such as https://wiki.ubuntu.com/HardwareSupportand/http://www.faqs.org/docs/Linux-HOWTO/SMP-HOWTO.html are good places to start.
§ If all else fails, post a query to any of the Linux or Ubuntu hardware forums. Maybe someone else knows a workaround. Some good forums include http://www.ubuntuforums.org/, http://www.linuxhardware.org/, and http://www.linuxforums.org/forum/. Be sure to include details such as the make and model of the motherboard, Ubuntu version, and other peripherals. It is generally better to provide too much information when asking for help, rather than providing too little.
Unfortunately, if SMP is not enabled after installing the linux-686-smp kernel, then it probably will not work. But you might get lucky-if someone has a patch then you will probably need to recompile the kernel.
|
Warning |
Compiling the kernel is not for the weak-of-heart. Many aspects of Linux have become automated or given easy-to-use graphical interfaces, but compiling the kernel is not one of them. There are plenty of help pages and FAQs for people daring enough to compile their own kernel. |
Adding Printers
Printers are one of the most common types of external device. Today, many computer manufactures bundle printers with new computers-it's hard not to have a printer. Printers used to come with one of two types of connectors: serial or parallel. Today, USB printers are very common. In corporate and small-office/home-office (SOHO) environments, networked printers are common. Ubuntu supports an amazing number of printers; making Ubuntu work with most printers is relatively easy.
Changing Paper Size
Before you install your first printer, be sure to set the system's default paper size. This is found in the file /etc/papersize. The default paper size probably says A4 or letter-this depends on the geographical location you selected during the installation. If the default paper size is not set right, then every printer you add to the system will be configured with the wrong default paper size. Changing /etc/papersize after you create a printer will not alter any already existing printers.
To change the default paper size, edit the /etc/papersize file and change the value. Common values are A4, letter, and legal. A4 is a commonly used standard paper in Europe. Letter and legal refer to the 8.5" × 11" and 8.5" × 14" paper sizes common in the United States. Less common paper sizes that I have come across include A5, B2, C2, ledger, and 10 × 14.
|
Tip |
If you have multiple printers that take different paper sizes, set the value in /etc/papersize before adding each printer. |
Papers Please
Paper sizes, such as A0, A1, A2, B3, C4, and D4, refer to ratios from a larger piece of paper. For example, A0 has a total area of one square meter. The A0 dimensions are 841 × 1189 mm. A1 is half of A0's longest direction: 594 × 841mm. A2 is half of A1 (420 × 594), and so on. As a result, 16 sheets of A4 cover a surface area of 1m2. Other paper types follow the same ratios-four sheets of B2 can fit in one B0 sheet. B0 is 1000 × 1414 mm and C0 is 917 × 1297 mm.
Specific fields use different paper sizes. For example, A is common in publishing and C is used in construction for building plans. If you have a large printer or plotter, be sure to set up /etc/papersizewith the right default before adding the printer.
Adding a Printer
Adding a printer under Ubuntu is straightforward. Go to System ![]() Administration
Administration ![]() Printing to open the printer applet. From there, you can double-click New Printer to configure the device.
Printing to open the printer applet. From there, you can double-click New Printer to configure the device.
The first step in adding a printer requires specifying which kernel device communicates with the printer (see Figure 3-4). The default choices are a local printer using a USB or parallel port, or a network printer. Although the local printer configuration is easy (simply select the detected USB printer or parallel port), networked printers require additional information.
§ CUPS Printer (IPP)-The Common Unix Printing System allows the sharing of printers between different Unix computers. You will need to provide a URL for the printer, such as ipp://server/printer_name.
§ Windows Printer (SMB)-More common than CUPS are Windows printers. In small offices, a user with a printer directly connected to their Windows host can share the printer with the network. You will need to provide the Windows host name, printer name, and any user name and password needed to access the device.
§ Unix Printer (LPD)-The Line Printer Daemon protocol is one of the oldest and most reliable network printing options. Most stand-alone network printers support LPD. For this option, you will need to provide the host name and the name of the LPD print queue.
§ HP JetDirect-This is another common protocol for stand-alone printers. You only need to provide the host name (and port number if it's not the default 9100).
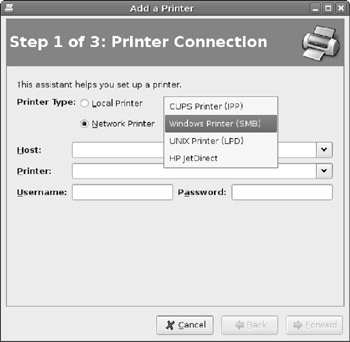
Figure 3-4: The applet for adding a new printer
The second step for adding a printer enables you to specify the type of printer. If your exact printer model is not listed, chances are good that there is a model that is close enough. In the worst case, you can always select one of the generic printer options.
Finally, you should name the printer. Give it something descriptive so you can recognize it later.
Sharing Your Printer
After you have added your printer, you can share it with other people on the network. Sharing the printer requires knowing who will use it: other system using CUPS, other devices using LPD, or other computers running Windows.
Sharing With CUPS
To share the printer with CUPS, you will need to configure both the printer server and the client.
On the print server:
1. Edit /etc/cups/cups.d/ports.conf and change the line that reads Listen localhost:631 to Port 631. This tells CUPS to allow printing from any remote system.
2. (Optional) Edit /etc/cups/cups.d/browse.conf and change Browsing off to Browsing on. This allows the server to announce the printer's availability to other hosts on the network. The default is an announcement every 30 seconds.
3. Restart the CUPS subsystem on the print server.
4. sudo /etc/init.d/cupsys restart
On the print client:
1. Go to System ![]() Administration
Administration ![]() Printing to open the printer applet.
Printing to open the printer applet.
2. Double-click New Printer to configure the device.
3. Select a Network Printer and the CUPS Printer (IPP) protocol.
4. Enter the printer host name and printer name as a URL. For example, if the server is named printer.example.com and the printer is called Okidata127, then you would use ipp://printer.example.com/printers/Okidata127.
5. Click the Forward button and select the printer model.
6. Create a description for the printer
7. Click on the Apply button to create the printer.
|
Tip |
If you enabled browsing in Step 2 of the server configuration, then Ubuntu clients can use the Global Settings |
CUPS Runneth Over
CUPS provides many configuration options, but it has a long history of being a security risk. The CUPS installation includes a web-based administration interface. By default, it is not accessible remotely. (But if you followed the steps under Sharing With CUPS, then it is remotely accessible.) The URL for this interface is http://localhost:631/.
Although you can use the CUPS web interface to view and manage the print queue, the default administration interface does not permit adding new printers or changing configurations. This functionality is disabled in Ubuntu primarily due to security risks. Enabling this interface is not recommended. Instead, if you need to modify printer configurations, use the System ![]() Preferences
Preferences ![]() Printing applet.
Printing applet.
Sharing With LPD
Enabling LPD support is a little more complex since Ubuntu does not normally include servers.
On the print server:
1. Install xinetd on the print server. This is the extended Internet daemon for running processes.
2. sudo apt-get install xinetd
3. Create a configuration file for the printer service. This requires creating a file called /etc/xinetd.d/printer. The contents should look like this:
4. service printer
5. {
6. socket_type = stream
7. protocol = tcp
8. wait = no
9. user = lp
10. group = sys
11. server = /usr/lib/cups/daemon/cups-lpd
12. server_args = -o document-format=application/octet/stream
13. }
14. Restart the xinetd server.
15. sudo /etc/init.d/xinetd restart
On the printer client:
1. Go to System ![]() Administration
Administration ![]() Printing to open the printer applet.
Printing to open the printer applet.
2. Double-click New Printer to configure the device.
3. Select a Network Printer and the Unix Printer (lpd) protocol.
4. Enter the print server host name (or IP address) in the Host field and the CUPS printer name under the Queue field.
5. Continue through the remaining screens to select the printer type and configuration. On the final screen, click the Apply button to create the printer.
Sharing with Windows
It is usually best to use a native printing protocol. For Ubuntu, LPD and CUPS are native. Most versions of Windows support network printing to LPD servers, so sharing with LPD should be enough, but it requires user to configure their printers.
Native Windows environments can share printers using the Server Message Block (SMB) protocol. This allows Windows users to browse the Network Neighborhood and add any shared printers-very little manual configuration is required. For Ubuntu to share a printer with Windows users requires installing SAMBA, an open source SMB server.
On the print server:
1. Install SAMBA on the print server. This provides Windows SMB support.
2. sudo apt-get install samba
3. Create a directory for the print spool.
4. sudo mkdir /var/spool/smbprint
5. Edit the SAMBA configuration file: /etc/samba/smb.conf.
6. Change workgroup = to match your Windows Workgroup.
7. Under the [global] section is an area for printer configuration. Uncomment (remove the leading ;) the load printers = yes and CUPS printing lines.
8. Set the [printers] section to look like this:
9. [printers]
10. comment = All Printers
11. browseable = no
12. security = share
13. use client driver = yes
14. guest ok = yes
15. path = /var/spool/smbprint
16. printable = yes
17. public = yes
18. writable = yes
19. create mode = 0700
This setting allows any Windows client to access the printers without a password.
20. (Optional) Under the [printers] section, set browseable = yes. This allows Windows systems to see the printers through the Network Neighborhood.
21. Restart the SAMBA server.
22. sudo /etc/init.d/samba restart
On the Windows client, you can add the printer as if it were a Windows printer. For example, if the server's name is printer.example.com and the printer is Okidata127, then the shared printer resource would be \\printer.example.com\Okidata127. Windows clients will need to install their own print drivers.
Adding Drives
Back in the good old days, people would buy computer components separately. After gathering the necessary components, such as a motherboard, case, memory, video card, and monitor, they would slap together a working computer. Today it is usually cheaper to get a pre-built system. Few people (except power users like yourself) upgrade the video card or memory after buying the computer; most people will just upgrade the entire system. Even though most of the hardware stays the same, there is one thing that is usually upgraded: the hard drive. This could be because you need more disk space, or maybe you want a second drive for backups or additional storage.
Upgrading Drives
When you upgrade your hard drive, you want to make sure you transfer over all of your personal files. This could be as simple as transferring the contents of /home from one system to another. But if you have installed any custom applications (very likely) or tuned any configurations, then you will probably need to transfer system files too. Here's an easy way for doing it.
1. Shut down the system, remove the old drive, and install the new drive. Do not leave the old drive in the system since you do not want to accidentally reformat the wrong drive.
2. Install Ubuntu on the system (see Chapter 1). Be sure to use the same base install. Don't bother customizing this new install-it is only needed for making the drive bootable.
3. Shut down the system and install the old hard drive as the second drive. Do not boot from the old hard drive.
4. Start up the computer and boot from the new drive.
5. Log in when the computer has rebooted, then run the System ![]() Administration
Administration ![]() Disks. This brings up the Disks Manager applet. All of the drives on the system are listed, including their disk size. The new drive should be listed first, and the old one listed second. (See Figure 3-5.)
Disks. This brings up the Disks Manager applet. All of the drives on the system are listed, including their disk size. The new drive should be listed first, and the old one listed second. (See Figure 3-5.)
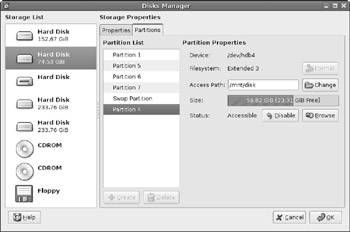
Figure 3-5: The Disk Manager applet
6. Select the old drive and click on the Partitions tab.
7. Mount the old drive partition(s).
o If you only have one partition, then select the partition name, enter a temporary mount point, such as /mnt/disk, and click the Enable button. You may need to make the mount point first (for example, sudo mkdir -p /mnt/disk).
o If you have multiple partitions, such as /usr and /home, mount the root partition first, and then mount the other partitions in place. For example, the old / would be mounted at /mnt/disk and /usr would be at /mnt/disk/usr.
|
Tip |
If you don't know what is on a particular partition then mount it to a temporary location and click on the Browse button. This allows you to see the partition's contents. |
8. As root, copy over all of the files to the new system.
9. $ cd /mnt/disk
10. $ ls
11. bin dev initrd lib mnt root sys var
12. boot etc initrd.img lost+found opt sbin tmp vmlinuz
13. cdrom home initrd.img.old media proc srv usr vmlinuz.old
14. $ sudo tar -cf - * | ( cd / ; tar -xvf - )
|
Note |
You may want to remove temporary and device directories first, such as /mnt/disk/mnt, cdrom, tmp, dev, and proc. Alternately, you could only list the directories to keep in the tar -cf command. |
15. Since the copy may have brought over a newer kernel, you will want to reset the boot loader.
16. sudo update-grub
17. Now that everything is copied over, you can reboot the system immediately. You don't want to use the shutdown applet since that can save desktop settings over your new settings. To force an immediate reboot, use the -f parameter.
18. sudo reboot -f
When the system comes back up, you should have all of your old files right where you left them, and a minimal amount of residue (undesirable files) that you did not originally want. This method is great for switching partition layouts since it only copies files, but it should not be used when upgrading operating systems.
Mounting Systems
In Chapter 1, we covered how to partition and format a drive. Now, since you have a second drive in the system, you can make it mount each time you boot the system.
1. Unmount the drive, partition, and format it. For this example, we will assume you have configured it with one partition: /dev/hb1.
2. Create a place to mount the drive. For example: sudo mkdir /mnt/backup.
3. Add the drive (/dev/hdb1) to the /etc/fstab file so it is mounted automatically.
4. # /etc/fstab: static file system information.
5. #
6. # <file system> <mount point> <type> <options> <dump>
7. <pass>
8. proc /proc proc defaults 0 0
9. /dev/hda1 / ext3 defaults,errors=remount-ro 0
10. 1
11. /dev/hda5 none swap sw 0 0
12. /dev/hdc /media/cdrom0 udf,iso9660 user,noauto 0 0
13. /dev/hdb1 /mnt/backup ext3 defaults 0 0
14. Mount the new file system using either sudo mount -a or sudo mount /mnt/backup.
With these changes in place, the new drive will be mounted every time you boot.
Using Simple Backups
Back in the old days, I would make backups using floppy disks. As drives increased in size, I switched over to magnetic tapes. Today, home systems can be cheaply backed up using a second hard drive. Listing 3-3 is a simple script that I use to backup my Ubuntu system onto a second hard drive.
Listing 3-3: Very Simple Backup Script: /usr/local/bin/backup2disk-full
#!/bin/sh
# backup files to disk
# (Be sure to make this executable! chmod a+rx backup2disk)
for i in bin boot etc home lib opt root sbin sys usr var ; do
tar --one-file-system -cf - "/$i" 2>/dev/null | \
gzip -9 > /mnt/backup/backup-$i-full.tgz
done
This simple script creates a bunch of compressed TAR files containing all of my data. For example, /mnt/backup/backup-home-full.tgz contains the contents of my /home partition. You can also create a version that does incremental backup by replacing the tar command in Listing 3-3 with:
tar --newer /mnt/backup/backup-$i-full.tgz \
--one-file-system -cf - "/$i" 2>/dev/null | \
gzip -9 > /mnt/backup/backup-$i-inc.tgz
For my system, I added the full backup script to my root crontab and configured it to run once a week. The incremental runs nightly.
1. Edit the root crontab. This allows files to run at specific times.
2. sudo crontab -e
3. Add a line to make the full backup run weekly and the incremental run daily. (See Chapter 7 for details on Cron.)
4. # minute hour day-of-month month day-of-week command
5. 5 0 * * 0 /usr/local/bin/backup2disk-full
6. 5 0 * * 1-6 /usr/local/bin/backup2disk-inc
Using this script, I can restore any file or directory using tar. For example, to restore the /home/nealk/book2 directory, I can use:
cd /
sudo tar -xzvf /mnt/backup/backup-home-full.tgz home/nealk/book2
sudo tar -xzvf /mnt/backup/backup-home-inc.tgz home/nealk/book2
|
Warning |
This backup script is very simple and can still lead to data loss. It does not keep historical backups and can lose everything if a crash happens during the backup. Although this script is a hack that is better than having no backups, it should not be depended on for critical backup needs. For long-term or critical data recovery, consider using a professional backup system. |
Configuring a RAID
A Redundant Array of Inexpensive Disks (RAID) is a simple solution to surviving a disk crash. Ubuntu supports hardware RAIDs as well as software RAIDs. A hardware RAID needs no extra configuration for use with Ubuntu. The entire RAID just appears as a single disk. On the other hand, software RAIDs require some configuration.
A software RAID requires multiple hard drives. The simplest RAID uses two identical hard drives. I recommend buying the same make and model at the same time because they are certain to be identical. Other people recommend buying similar-but not identical-drives in case the drives have an unknown common problem. The choice really depends on your level of paranoia. I have had identical drives die within months of each other, but never both at the same time.
After installing the drives (for example, sda and sdb), partition them with the same size partitions (sda1 and sdb1). Now comes the fun part, turning them into a RAID.
|
Note |
This example assumes that you have added two additional hard drives to your systems and they are already partitioned. The software RAID works by combining multiple real partitions into one virtual partition. Usually the partitions are on different hard drives, since having a RAID hosted on a single hard drive does not protect against hardware failure. |
|
Warning |
Creating a RAID requires modifying disk partitions and format. If you accidentally specify the wrong partition, you may end up destroying some or all of your system. |
1. Use the mdadm tool to create the RAID. The man page for mdadm contains many additional options for striping, setting the RAID level, and so on. In this example, we will create a simple RAID1, or mirrored disks, configuration using the two partitions. The result is one RAID drive called /dev/md0.
2. sudo mdadm --create /dev/md0 --level=1 \
3. --raid-devices=2 /dev/sda1 /dev/sdb1
4. Creating the RAID happens in the background and can take hours to complete. Do not continue until it finishes. To watch the progress, use:
5. nice watch cat /proc/mdstat
6. Now you can create the file system for the RAID. You can use any file system on the RAID. For example, to create an Ext2 file system, you can use:
7. sudo mkfs /dev/md0
When you're done, you can view the RAID details using sudo mdadm -Q –detail /dev/md0. You can also mount the partition (sudo mount /dev/md0 /mnt/disk) and add it to your /etc/fstab.
|
Note |
Under earlier versions of Ubuntu, such as Hoary, you could not easily add a RAID to /etc/fstab since the drivers started up in the wrong order. Dapper has fixed that problem and you can now boot the system with a RAID listed in /etc/fstab. |
Between a Rock and a Hard Disk
In 2004 I had a hard disk crash that hurt. Years worth of research was on that drive and it had a head crash. Although I did have simple backups, that's not the same thing as having the entire working system. Although 98 percent of the data was recovered (thank you Reynolds Data Recovery in Longmont, Colorado!) and the lost 2 percent was easily recreated, I quickly learned my lesson: don't store critical data on one hard drive.
Today, my main research computer has four hard drives. One is the main operating system, one is configured as a removable backup, and two are identical drives used in a software RAID for storing all research. A single drive failure will not cause me any data loss, and a massive electrical surge should only cost me a day of work and some hardware. I also use daily backups and off-site, out-of-state storage. A massive file system corruption might take a day or two to recover and result in a few hours of lost work, but the majority of my data is safe.
Although this type of configuration may sound like overkill for most home and SOHO environments, you need to ask yourself: which costs less? Configuring a software RAID and a simple backup script, or rebuilding everything after a total loss? Even the hourly costs for recovery time are less when maintaining a minimal backup system.
Adding Other Devices
Printers, keyboards, and hard drives are just the start of the list of device that people use with their computers. Mice, touch pads, and video capture devices are also common. Unfortunately, hardware support within the open source community is hit-and-miss. Some devices have plenty of support, some have drivers that almost work, and some have no support at all. Adding to this problem, Ubuntu natively supports a much smaller set of hardware options than Linux in general. As a result, some drivers may need to be downloaded and compiled from scratch.
There is a basic rule of thumb when looking for Linux and Ubuntu support. If the device is standard and has been around for a while then it is likely to have support. Proprietary devices and closed technologies are unlikely to have drivers. Similarly, most peripherals that are new and cool either lack support or are supported by standard drivers.
Almost Compatible
Some vendors provide drivers for Linux in binary format only. Although these will work for a specific platform, they may not work with all platforms.
When choosing new hardware that requires Linux drivers, make sure that they support your version of Linux. A kernel driver for RedHat Enterprise Linux 4.2 may not work with Ubuntu's Dapper Drake, and a device driver for Dapper Drake may not work with Edgy Eft.
In general, the best hardware vendors use standard protocols and do not require specialized kernel drivers. This means that drivers will be around for a long time. Your second choice should be vendors that provide source code. This enables you to recompile the code for use with other kernels and operating system versions. In the worst case, you may need to tweak the driver to work, but at least you will have the source code for tweaking. Finally, if you have no other option, then choose a vendor that has a long track record of Linux support. Hardware that does not support Linux today should not be expected to support Linux tomorrow.
For example, Timex offers a set of watches with USB ports. This enables you to synchronize the alarms with your computer's calendar program. (This is a huge cool factor in geek terms.) Unfortunately, the watches use a non-standard USB protocol. As of August 2006, drivers are only available for Windows. Even though a few open source groups are trying to create drivers for other operating systems, Mac OSX and Linux users are currently out of luck.
NVIDIA is another example of a vendor with proprietary protocols. But instead of USB watches, NVIDIA manufacturers video cards. In contrast to the Timex non- existent drivers, NVIDIA supports Linux by providing proprietary video drivers, including versions that work with Ubuntu (see Chapters 4 and 9). Although source code is not available, NVIDIA has a long history of providing drivers for Linux.
Under Linux, it is generally easier to find drivers for legacy hardware. Few devices have ever been completely dropped. (The notable exceptions are the original 80386 and older CPU architectures due to their lack of a math coprocessor.) Although Windows XP may not have drivers for the Colorado Memory Systems' QIC-80 tape backup system, the Linux ftape driver's source code should be available for decades (although you may need to download, compile, and install them manually).
Using a Serial Mouse
One of the first problems I encountered when installing Ubuntu was the mouse. By default, Ubuntu only supports a USB mouse, but my mouse uses the serial port. This problem can be quickly resolved by editing the /etc/X11/xorg.conf file, which describes the displays and input devices that should be used with the graphical display.
1. As root, make a backup of /etc/X11/xorg.conf.
2. $ sudo cp /etc/X11/xorg.conf /etc/X11/xorg.conf.original
3. Edit the file. You may want to make the window wide enough so lines do not wrap.
4. $ sudo gedit /etc/X11/xorg.conf
5. Search for the sections titled "InputDevice". One will refer to the keyboard with the title "Generic Keyboard" and the other refers to the mouse ("Configured Mouse").
6. Add a new section after "Configured Mouse" for the serial mouse. In this example, the mouse is on /dev/ttyS0 (first serial port). Other port options include /dev/psaux (for a PS/2 mouse) and /dev/ttyS1 for the second serial port. The sample configuration also supports three-button emulation, where pressing the left and right mouse buttons acts the same as pressing the middle mouse button. If you have a three-button mouse, then you can choose to leave this line out of the configuration. Other options include specifying the mouse protocol, such as "Microsoft" or "Logitech" for most serial mice, and "PS/2" for a PS/2 mouse.
7. Section "InputDevice"
8. Identifier "Serial Mouse"
9. Driver "mouse"
10. Option "CorePointer"
11. Option "Device" "/dev/ttyS0"
12. Option "Emulate3Buttons" "true"
13. # Option "Protocol" "Microsoft"
14. # Option "Protocol" "Logitech"
15. # Option "Protocol" "PS/2"EndSection
16. Go down to the "ServerLayout" section. You should comment out the Configured Mouse line (for a USB mouse) and add a line for the serial mouse.
17. Section "ServerLayout"
18. Identifier "Default Layout"
19. Screen "Default Screen"
20. InputDevice "Generic Keyboard"
21. InputDevice "Configured Mouse"
22. InputDevice "Serial Mouse" "SendCoreEvents"
23. InputDevice "stylus" "SendCoreEvents"
24. InputDevice "cursor" "SendCoreEvents"
25. InputDevice "eraser" "SendCoreEvents"
26. EndSection
27. Save your changes.
Now you can restart the X-server by pressing Ctrl+Alt+Backspace. This immediately logs you out and closes all running processes. When the system comes back (after a few seconds) you will be at the login screen. Moving the serial mouse should work.
Debugging Xorg.conf
There are a few things that could go wrong here. First, you could have entered the wrong information for your mouse (for example, specifying /dev/ttyS0 instead of /dev/ttyS1) or the wrong protocol (for example, Microsoft instead of Logitech). This appears as a mouse pointer that does not move. You can press Ctrl+Alt+F1 to get to a command prompt and re-edit your /etc/X11/xorg.conf file. Pressing Alt+F7 returns you to the graphical window and you can reset the server again using Ctrl+Alt+Backspace.
|
Note |
At the text command prompt, you will need to use a text editor such as vi or emacs. For example, sudo vi /etc/X11/xorg.conf. |
The other bad result is a black screen (maybe with a cursor blinking). This means that you did something wrong and the server failed to start. Use Alt+F1 (or Ctrl+Alt+F1-both key combinations work) to get to a command prompt where you can edit the /etc/X11/xorg.conf file. Look in the /var/log/Xorg.0.log file for error messages. Common things that can go wrong include:
§ Typo-A mistake when entering the configuration file can stop the server from booting.
§ Driver conflict-If you forgot to disable the USB mouse, then there is a driver conflict with the serial mouse. That will block the server.
Unfortunately, if the server crashed, you will be unable to restart it with Ctrl+Alt+Backspace. Instead, run startx to bring up the X server. If the server fails, it will display a lot of debugging information that you can use to resolve the problem. In the worst case, copy the backup back (sudo cp /etc/X11/xorg.conf.backup /etc/X11/xorg.conf) and try again. When you finally have a working X-server, you can reboot the system to restart the login screen.
Supporting a Touch Pad
The other type of pointer device that you will likely come across is a touch pad. Touch pads are very common with laptops. Normally, these are identified by the mouse driver and used without any additional configuration.
The default mouse driver does not support special features such as double tapping the pad in place of double clicking, or hot corners in place of shortcuts. These features can be added through the Synaptics mouse driver.
sudo apt-get install xserver-xorg-input-synaptics
The full list of configuration options and requirements can be found at http://web.telia.com/˜u89404340/touchpad/index.html. As with other devices, you will need to install the devices driver, configure /etc/X11/xorg.conf, and restart the X-server. The basic "InputDevice" section will look something like this:
Section "InputDevice"
Identifier "Synaptics Touchpad"
Driver "synaptics"
Option "SendCoreEvents" "true"
Option "Device" "/dev/psaux"
Option "Protocol" "auto-dev"
Option "HorizScrollDelta" "0"
Option "SHMConfig" "on"
EndSection
You will also need to add InputDevice "Synaptics Touchpad" to the "ServerLayout" section of /etc/X11/xorg.conf and restart the X-server.
After installing the device, you can install qsynaptic. This application enables you to graphically configure the touch pad.
sudo apt-get install qsynaptics
qsynaptics
Configuring USB Devices
Ubuntu supports many types of USB devices. Some devices are recognized instantly and are very usable, but others need additional drivers and some configuration. The first step for configuring a USB device is simple enough: plug it in. The core USB kernel driver should immediately recognize that a USB device has been connected. You can check this with the lsusb command.
$ lsusb
Bus 005 Device 003: ID 0781:5406 SanDisk Corp.
Bus 005 Device 001: ID 0000:0000
Bus 003 Device 001: ID 0000:0000
Bus 001 Device 001: ID 0000:0000
Bus 004 Device 003: ID 056a:0014 Wacom Co., Ltd
Bus 004 Device 001: ID 0000:0000
Bus 002 Device 002: ID 05ac:0301 Apple Computer, Inc. iMac Mouse
Bus 002 Device 001: ID 0000:0000
You should also see the device listed at the end of /var/log/messages.
$ dmesg | grep usb
[17183135.308000] usb-storage: device found at 3
[17183135.308000] usb-storage: waiting for device to settle before scanning
[17183135.308000] usbcore: registered new driver usb-storage
[17183140.348000] usb-storage: device scan complete
[17183277.088000] usb 4-1: USB disconnect, address 2
[17183279.400000] usb 4-1: new low speed USB device using uhci_hcd and
address 3
[17183279.644000] usbcore: registered new driver wacom
[17183279.644000] drivers/usb/input/wacom.c: v1.44:USB Wacom Graphire and
Wacom Intuos tablet driver
Making Static USB Devices
USB supports hot-plug devices. This means that USB devices can be disconnected and reconnected without advanced notice for the operating system. The operating system will not crash or become unstable just because a USB device is suddenly unplugged.
|
Warning |
Although the core USB subsystem permits disconnects at any time, other systems can have problems. Disconnecting a USB thumb drive while it is being written to can corrupt the thumb drive's partition, and disconnecting an X-Windows input device can crash the computer. |
Every device on the system needs a device handle in the /dev directory. This can lead to problems with hot-plug devices: each time a device is connected, it may be assigned a different device handle. One time the tablet may be on /dev/input/event0 and the next time it could be /dev/input/event3. The maintenance of these devices is handled by udev, the dynamic device management system. The udev daemon (udevd) is actually a process started by init. You can configure udev to assign a static name to a device. For example, if you have a Wacom USB drawing tablet, you can have it automatically assigned to /dev/wacom rather than using the dynamic device driver handle.
|
Tip |
The same approach for assigning the tablet to /dev/wacom can be used for assigning a mouse, scanner, or other USB device. |
|
Note |
The Wacom graphic tablet is used throughout this example because it requires each of the configuration steps. Other USB devices may need some or all of these items. |
1. Determine the event driver(s) assigned to the device by looking in /proc/bus/ input/devices. In this example, the device is a Wacom Graphire3 6x8 tablet and it uses the device handlers /dev/input/mouse0, /dev/input/event2, and /dev/input/ts0 for the mouse, stylus, and touch screen, respectively.
2. $ more /proc/bus/input/devices
3. ...
4. I: Bus=0003 Vendor=056a Product=0014 Version=0314
5. N: Name="Wacom Graphire3 6x8"
6. P: Phys=
7. S: Sysfs=/class/input/input3
8. H: Handlers=mouse0 event2 ts0
9. B: EV=f
10. B: KEY=1c43 0 70000 0 0 0 0 0 0 0 0
11. B: REL=100
12. B: ABS=3000003
13. ...
14. Determine the driver attributes using the event driver (event2 in this example) identified in /proc/bus/input/devices. The udevinfo command will traverse the chain of USB device drivers, printing information about each element. (There will be similar entries for /dev/input/mouse0 and /dev/input/ts0.)
15. $ sudo udevinfo -a -p 'udevinfo -q path -n /dev/input/event2'
16. ...
17. device '/sys/class/input/input3/event2' has
18. looking at class device '/sys/class/input/input3/event2':
19. KERNEL=="event2"
20. SUBSYSTEM=="input"
21. SYSFS{dev}=="13:66"
22.
23. follow the "device"-link to the physical device: looking at the
24. device chain at '/sys/devices/pci0000:00/0000:00:1d.3/usb4/4-1/
25. 4-1:1.0':
26. BUS=="usb"
27. ID=="4-1:1.0"
28. DRIVER=="wacom"
29. SYSFS{bAlternateSetting}==" 0"
30. SYSFS{bInterfaceClass}=="03"
31. SYSFS{bInterfaceNumber}=="00"
32. SYSFS{bInterfaceProtocol}=="02"
33. SYSFS{bInterfaceSubClass}=="01"
34. SYSFS{bNumEndpoints}=="01"
35. SYSFS{modalias}=="usb:v056Ap0014d0314dc00dsc00dp00ic03isc01ip02"
36. ...
37. As root, create (or edit) the /etc/udev/rules.d/10-local.rules file. This is where udev will look when determining how to handle the device. Rules can consist of comparisons (for example, == or !=) and assignments. Rules can use any of the fields displayed by udevinfo. There are other rules files in the same directory if you need additional examples. The manual for udev (man udev) is also very informative.
38. Add the following line to the /etc/udev/rules.d/10-local.rules file. Be sure to use the name found in /proc/bus/input/devices and the driver name and fields found from the udevinfocommand.
39. BUS=="usb", DRIVER=="wacom", KERNEL=="event[0-9]*", SYMLINK="wacom"
This says to match any device where the bus is usb, the driver is wacom, and the kernel is the string event followed by some digits. Any match will be assigned to the link /dev/wacom.
|
Note |
Try to make the rule as specific as possible, but be aware that fields like ID and SYSFS{dev} can change each time the device is plugged in. For example, if we don't specify the KERNEL, pattern, then the mouse0 and ts0 devices will also match the rule. But, if we add in SYSFS{dev}=="13:66", then it may not match if we plug the device into a different USB port. |
40. Restart the udev system.
41. sudo /etc/init.d/udev restart
If your tablet is already plugged in, you may also need to unplug the tabled from the USB socket and then plug it in again; otherwise, its device driver may not be recognized.
42. Check to see if the device appears.
43. $ ls -l /dev/wacom
44. lrwxrwxrwx 1 root root 12 2006-08-16 21:45 /dev/wacom -> input/event2
With these changes, every time the tablet is plugged in, it may still be assigned a dynamic device handle, but the well-known symbolic link will always point to the correct place. When the tablet is disconnected the symbolic link will be removed.
Associating Applications with USB
By default, all new device handles created by udev are only accessible by root. You can change the default ownership and permissions by including an OWNER, GROUP, or MODE assignment in your udev rule. For example:
SYSFS{idVendor}=="e2e3", SYSFS{idProduct}=="0222", MODE="664", GROUP="floppy"
The udev rules can also run commands. For example, /etc/udev/rules.d/85-hal.rules contains a command to unmount any mounted USB drives when they are disconnected.
SUBSYSTEM=="block",ACTION="remove", RUN+="/usr/lib/hal/hal-unmount.sh"
A similar rule could be added to start a specific program when a specific USB device is connected. For example, when you connect a scanner, you may want the drawing program gimp to start automatically. This way, you can immediately use Gimp to scan in images.
All commands executed by udev are run as root. This can be a security risk for multi-user systems and a problem for interactive applications. For example, if you start the gimp drawing program whenever a scanner is connected, then it will try to run as root; it will also try to connect to the X display and fail. To resolve both of these problems, we can create a /usr/bin/ run_gimp command to always run the program as the user who owns the display (see Listing 3-4). We can then add this script to the scanner's run line in /etc/udev/rules.d/45-libsane.rules. For example, to run Gimp when an HP ScanJet 4100C scanner (USB vendor 03f0, product 0101) is plugged in, you can use:
SYSFS{idVendor}=="03f0", SYSFS{idProduct}=="0101", MODE="664", \
GROUP="scanner", RUN="/usr/bin/run_gimp"
|
Note |
Don't forget to make the script executable by using chmod a+x /usr/bin/run_gimp. |
Now, every time the scanner with the USB identifier 03f0:0101 (as seen by lsusb) is connected, the driver will be added to group "scanner" and gimp will be started with the right permissions.
Listing 3-4: /usr/bin/run_gimp
#!/bin/sh
# Get the username of the person running the X-window on tty :0
NAME='/usr/bin/who | /bin/grep " :0 " | /usr/bin/awk '{print $1}''
# Udev runs as root but this needs to run as the user
# Run as the user and set the display
/bin/su - "$NAME" "/usr/bin/gimp --display :0"
When Programs Run…
There are many different places where a program can be told to run automatically. Some are easy to find, but others can be more difficult to hunt down. More importantly, there is no single right place to install a program. For example, if you want to start a program when a scanner is plugged in, you can either modify /etc/udev/rules.d/45-libsane.rules, or you can run gnome-volume-properties (System ![]() Preferences
Preferences ![]() Removable Drives and Media) and change the program that Gnome runs when a scanner is detected.
Removable Drives and Media) and change the program that Gnome runs when a scanner is detected.
The main difference between these different options is flexibility. Although Gnome knows about scanners and cameras, only udev knows about other types of devices. In contrast, Gnome is generally easier to configure since udev has no graphical interface. Chapter 7 covers other ways for programs to start automatically.
Enabling Drawing Tablets
Ubuntu supports the many types of drawing pads, but the Wacom drawing pad has drivers installed by default. Even though the drivers are installed, they are not completely configured. To complete the configuration, you will need to follow a few steps.
1. Follow the steps mentioned in the "Making Static USB Devices" section to create the /dev/wacom driver handle.
2. By default, the /etc/X11/xorg.conf contains three "InputDevice" sections for the Wacom driver. It also has these input devices listed in the "ServerLayout" section.
3. Plug the Wacom drawing pad into the USB port and restart the X-server by pressing Control-Alt-Backspace.
The mouse cursor on the screen should now be controllable by the mouse or drawing pad.
|
Note |
Tablets and drawing pads may not be common, but installing them requires all of the device configuration steps. This is a fairly long example, but if you have troubles with any new device then you can use this example to help debug the problem. |
Debugging the Wacom Tablet
If the tablet does not work, start with the xorg.conf debugging instructions for configuring a serial mouse. This will resolve any problems with the graphical display not starting.
You can also install the wacom-tools. These are a set of diagnostic applications.
sudo apt-get install wacom-tools
After installing these tools, you can see the list of supported tablets as well as run the diagnostics program (see Figure 3-6). As you move the tablet's mouse or stylus, the diagnostics program should register movement and any tablet button presses.
$ wacdump -l
art wacom serial "ArtPad"
art2 wacom serial "ArtPadII"
dig wacom serial "Digitizer"
dig2 wacom serial "Digitizer II"
pp wacom serial "PenPartner"
gr wacom serial "Graphire"
pl wacom serial "Cintiq (PL)"
int wacom serial "Intuos"
int2 wacom serial "Intuos2"
c100 acer serial "C100"
pp wacom usb "PenPartner"
gr wacom usb "Graphire"
gr2 wacom usb "Graphire2"
gr3 wacom usb "Graphire3"
gr4 wacom usb "Graphire4"
int wacom usb "Intuos"
int2 wacom usb "Intuos2"
int3 wacom usb "Intuos3"
ctq wacom usb "Cintiq (V5)"
pl wacom usb "Cintiq (PL)"
ptu wacom usb "Cintiq Partner (PTU)"
vol wacom usb "Volito"
vol2 wacom usb "Volito2"
$ sudo wacdump -c usb /dev/wacom
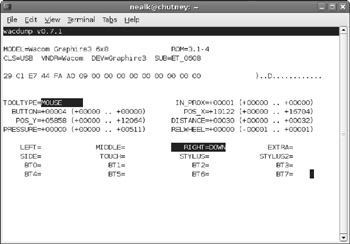
Figure 3-6: The text-based wacdump diagnostics program
|
Warning |
Disconnecting a USB device that is used by the X-server can crash the computer. |
Not all removable devices can be removed safely. Removing a USB device that is in use by the X-server can only create problems. In the best case, the device will not function until you restart the X-server. In the worst case, the X-server can hang or the entire computer may crash. If you want to disconnect the Wacom graphics tablet, first log out, then disconnect it, and then immediately restart the X-server by pressing Ctrl+ Alt+Backspace.
Tuning the Tablet
Depending on the tablet model, the coordinates on the tablet may not match your screen resolution. You can resolve this by adding the following options to each of the Wacom "InputDevice" sections in the xorg.conf file.
To automatically set the coordinates on your tablet to match your screen resolution, you can use:
Option "KeepShape" "on"
The KeepShape option scales the active area of the tablet so it matches the screen. For example, the tablet likely has a 4:3 aspect ratio. If your screen is 16:9, then the active area on your tablet will start at the top left corner and scale to match a 16:9 region. The bottom of the active area on the tablet will not be usable since it is outside of the 16:9 ratio.
To manually set the coordinates on your tablet, you can use:
Option "TopX" "0"
Option "TopY" "0"
Option "BottomX" "16704" # match wacdump resolution
Option "BottomY" "12064" # set to match wacdump resolution
The Wacom tablets have very high resolutions. For example, the Wacom Graphire3 (6 × 8) has a maximum resolution of 16,704 × 12,064. The Wacom driver scales the tablet's range to match the screen resolution. If you set the bottom coordinates to something small, like 1024 × 768, then only a very tiny area of the tablet will be active.
Using Other Tablets
Although support for the Wacom tablet is included by default, other tablets have available drivers. Use apt-cache search tablet to display the list of available drivers. In addition, some tablets may be compatible with other drivers or have drivers available for download from other sources. Your best bet is to research the tablet first and select one that has Linux, and preferably Ubuntu, support.
Each different tablet model will likely have different configuration requirements. Some of the requirements may be automated, while others may require manual modifications. Regardless of the specific requirements, they will all have the same basic steps:
1. Install a device driver, if one is not already installed.
2. Create device handle if one is not created automatically.
3. Load any required software drivers and configuration parameters.
4. Configure /etc/X11/xorg.conf.
5. Restart the X-server using Ctrl+ Alt+Backspace.
Tuning TV Cards
TV capture cards are a must-have for any power user. These add-on cards allow you to watch TV through your computer and configure a video recorder such as MythTV (an open source version of the TiVo™video recorder system). The driver for video devices is called video4linux (v4l). The v4l driver supports bt848 and bt878 TV cards.
|
Note |
Most TV cards use the bt848 or bt878. If you look at the card, you should see a quarter-sized chip with "848" or "878" printed on it. |
Configuring TV cards is relatively easy.
1. Install the video card and hook up the TV cable to it. Most TV cards support both broadcast and cable TV signals.
2. Install the v4l driver.
3. sudo apt-get install xserver-xorg-driver-v4l
4. Edit /etc/X11/xorg.conf and add v4l to the "Modules" section so X-Windows knows about the video driver.
5. Section "Module"
6. Load "i2c"
7. Load "bitmap"
8. Load "ddc"
9. Load "dri"
10. Load "extmod"
11. Load "freetype"
12. Load "glx"
13. Load "int10"
14. Load "type1"
15. Load "vbe"
16. Load "v4l"
17. EndSection
18. Restart the X-server using Ctrl+ Alt+Backspace.
19. Test the video configuration. The xsane program has a scan option and menu for selecting the TV as input (Figure 3-7). If you see a picture (or static) then the v4l driver is working properly.
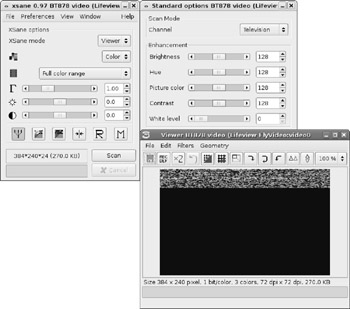
Figure 3-7: Using xsane to test the v4l driver. Since the channels are not configured, only static is captured.
Now that the v4l driver is working, you can install capture, recording, and viewing programs that can configure and use the video card. My favorite is xawtv. This is a simple program for tuning the TV, watching channels, capturing images, and recording shows.
sudo apt-get install xawtv xawtv-plugin-qt tv-fonts xawtv-tools
When you first start xawtv it will display the TV screen but may need a little configuration. Right-clicking the TV window will bring up the configuration menu. Be sure to set the norm (PAL, NTSC, and so on), type of signal (for example, us-cable), and the input source (Television). Use the up and down arrows to change channels. When you find a configuration that works for you, save it using E. This option is actually used to set channel names, but saves the entire configuration in $HOME/.xawtv. Listing 3-5 shows a sample configuration. At this point, xawtv should be working for you and the TV card is fully configured (see Figure 3-8).
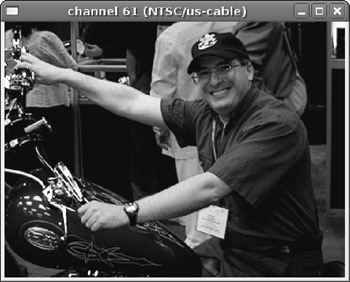
Figure 3-8: The xawtv program showing the TV in a window
With a working TV card you can also configure your screen saver to grab pictures from the TV.
|
Tip |
If you change the screensaver from the default gnome-screensaver to xscreensaver (see Chapter 9), then you can configure some of the screensavers to use the TV card. You will find this option in xscreensaver's preferences as Grab Video Frames under the Advanced tab settings. Screensavers such as Distort and Flipscreen3D will manipulate TV captures. |
Using Digital Cameras, Scanners, and Web Cameras
Although TV cards are cool, they are not as common as digital cameras, scanners, and web- cams. Unfortunately, this is where hardware support really becomes hit-and-miss. My eight- year-old SCSI scanner is supported, whereas my newer USB scanner is not. And although both of my digital cameras can work as webcams under Windows, neither can work as webcams under Linux.
|
Note |
Not every camera provides the same compatibility. If your camera does not support a capture mode, then you cannot use the computer to take pictures with it and you cannot use it as a high- resolution webcam. |
A tool that you may want to consider installing is gphoto2. This program provides support for over 700 different camera models. It enables you to scan for compatibility with the camera and query supported functionality.
1. Install gphoto2 as well as the graphical front end (gtkam) and the gimp plug-in to allow captures from cameras.
2. sudo apt-get install gphoto2 gtkam gtkam-gimp
3. Plug your camera into the USB port. There is no need to restart the X-server in order to load the drivers. If any windows, such as the camera import applet, pop up with prompts to import images or show the camera's contents, just close them.
4. Determine if the camera is supported. If the gphoto2 command does not auto-detect your camera, then the camera is not supported. You may need to use a different driver if one is available. If the camera is mounted as a disk, then it will not be listed as a camera device.
5. $ gphoto2 --auto-detect
6. Model Port
7. ----------------------------------------------------------
8. HP PhotoSmart 618 usb:
|
Note |
Depending on your camera model and capabilities, you may see multiple lines of output from the gphoto2 –auto-detect command. |
9. List the camera's capabilities. Most digital cameras have two PC-connect modes. The first mode is usually called something like digital device and makes the camera appear as an actual USB camera. The second mode makes the camera appear as a USB drive. The different camera modes provide different attributes. For example, here are the attributes for the HP PhotoSmart 618 in digital device mode.
|
Note |
The ability to switch PC-connect modes depends on the camera. You will need to hunt through the camera's configuration menu to see if mode selection is supported and to change modes. |
$ gphoto2 --abilities
Abilities for camera : HP PhotoSmart 618
Serial port support : yes
USB support : yes
Transfer speeds supported :
: 9600
: 19200
: 38400
: 57600
: 115200
Capture choices :
: Capture not supported by
the driver
Configuration support : no
Delete files on camera support : yes
File preview (thumbnail) support : yes
File upload support : no
For a comparison, here are the attributes for the same camera in USB disk drive mode.
$ gphoto2 --abilities
Abilities for camera : USB PTP Class Camera
Serial port support : no
USB support : yes
Capture choices :
: Capture not supported by
the driver
Configuration support : yes
Delete files on camera support : yes
File preview (thumbnail) support : yes
File upload support : yes
Depending on your supported capture modes, you may be able to use the camera with scanner software such as Gimp and xsane, or with VoIP and teleconference software like WengoPhone (see Chapter 5). Even if the camera does not support captures or webcam mode, you can still access the device as a USB drive and copy (or move) off images. In USB disk drive mode, the camera appears no different than a USB thumb drive. You can transfer files by opening the drive via Nautilus and copying off the files. In digital device mode, use gtkam to view the photos and copy them to the desktop.
Summary
Hardware support for Linux, and Ubuntu in particular, varies greatly. Although printers, hard drives, and TV cards have excellent support, other devices have more spotty support options. In many cases, installing the driver is not the last step; you will also need to configure the driver and dependent applications. Fortunately, once Linux supports a device, it is effectively supported for life. You can still find drivers for ancient MFM hard drives and ten-year-old scanners.
The best resources for hardware support are the Linux and Ubuntu forums, and sites that specialize in specific hardware types.
§ https://wiki.ubuntu.com/HardwareSupport lists hardware that is supported by Ubuntu, as well as any particular quirks and issues.
§ http://www.linux.org/hardware provides a very complete list of hardware that has known support for the Linux kernel.
§ http://www.gphoto.org/ lists more than 700 supported digital camera models.
Loading the device and making it work is one thing, but making it work well can be something entirely different. In Chapter 4, you'll see how to get the most out of video and audio devices by installing different codecs. Chapter 6 covers hardware emulation. In Chapter 9 you will start playing with screen resolutions and multiple monitors, and in Chapter 12 you will dive into advanced networking.