Linux Web Server Development (2015)
Chapter 13 A Database-driven Web Site
In this chapter, you will create a PHP-enabled virtual server that connects via PHP to a MySQL database. This will allow the client to query the database through a form on a Web page. You start by installing the MySQL database server on the server, then you create and test the database from the command line, and finally you will create a PHP page that connects to the MySQL database and a PHP page that will be used to display the form to the remote user. The form is embedded in the first PHP page. After the user submits the requested information on this first PHP page, the data from the form is sent to the second PHP page, which queries the database and returns the result to the user. Finally you test the site and query the database from both your LAN and remotely using online network tools.
MySQL Installation
Open the Linux terminal and enter the following command:
$ sudo apt-get install mysql-server mysql-client php5-mysql
During the installation process, a simple blue-colored window will ask for the password of the MySQL root user. Enter the password and press Enter on your keyboard.
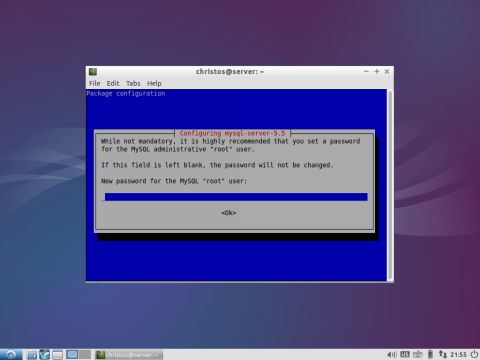
Another window appears; retype your password.
When the installation process is complete, enter the following command in the Linux terminal to login to mysql as the mysql user root (not to be confused with the Linux user root). Use the –p argument to provide the required password and –u to specify the user:
$ sudo mysql -u root -p
Type your user password for the sudo command and then type the MySQL password that you created during the installation. MySQL is ready for you to input your commands when you see the mysql prompt:
[sudo] password for christos:
Enter password:
Welcome to the MySQL monitor. Commands end with ; or \g.
Your MySQL connection id is 39
Server version: 5.5.41-0ubuntu0.14.10.1 (Ubuntu)
Copyright (c) 2000, 2014, Oracle and/or its affiliates. All rights reserved.
Oracle is a registered trademark of Oracle Corporation and/or its
affiliates. Other names may be trademarks of their respective
owners.
Type 'help;' or '\h' for help. Type '\c' to clear the current input statement.
mysql>

Creating a MySQL Database and Table from the Command Line
Use the create database command to create a database called bookstore:
mysql> create database bookstore;
Note that MySQL commands can also be uppercase (e.g., CREATE DATABASE) and all commands should end with a semicolon (;).
Enter the use command to use a specific database (in this case, the database just created):
mysql> use bookstore;
Let’s add a table to the bookstore database named books. Table books is created with the create table command:
mysql> create table books(book_id int auto_increment primary key, title varchar(255) not null, author varchar(255) not null);
or
mysql> create table books(book_id int auto_increment, title varchar(255) not null, author varchar(255) not null, primary key(book_id));
Table books includes a field named book_id, which is an integer (int) number. The keyword auto_increment indicates that book_id increments automatically by one in each record you add to the table, starting (by default) from 1. The primary key constraint indicates that this field uniquely identifies each record in this table.
The table will include two more fields, one called title and author. Both are of type varchar, which holds a variable length string with a maximum size specified in parenthesis. Fields title and author can hold up to 255 characters. The not null directive enforces a field to not accept null values.
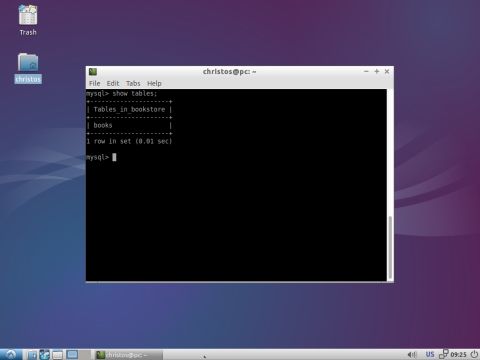
Use the show tables command to display the tables that the bookstore database contains. You have created just one table named books:
mysql> show tables;
The command’s output is shown below:
mysql> show tables;
+---------------------+
| Tables_in_bookstore |
+---------------------+
| books |
+---------------------+
1 row in set (0.01 sec)
mysql>
Use the describe command to display the table’s structure:
mysql> describe books;
The command’s output is shown below:
mysql> describe books;
+---------+--------------+------+-----+---------+----------------+
| Field | Type | Null | Key | Default | Extra |
+---------+--------------+------+-----+---------+----------------+
| book_id | int(11) | NO | PRI | NULL | auto_increment |
| title | varchar(255) | NO | | NULL | |
| author | varchar(255) | NO | | NULL | |
+---------+--------------+------+-----+---------+----------------+
3 rows in set (0.05 sec)
mysql>

Inserting Data to the Database from the Command Line
Use the insert into command to insert three records into the books table. Recall that the field book_id is auto incremented and you don’t have to enter book_id values.
mysql> insert into books (title, author) values ('Waving The Web', 'Tim Berners Lee');
mysql> insert into books (title, author) values ('Just for Fun', 'Linus Torvalds');
mysql> insert into books (title, author) values ('How the Web was Born', 'Gillies & Cailliau');
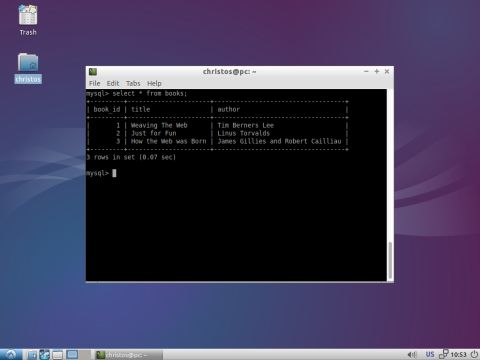
To view the three records, use the select command. You can specify the records to view or you can select any record by using the star ‘*’ wildcard:
mysql> select * from books;
The output is shown below:
mysql> select * from books;
+---------+----------------------+-----------------------------------+
| book_id | title | author |
+---------+----------------------+-----------------------------------+
| 1 | Weaving The Web | Tim Berners Lee |
| 2 | Just for Fun | Linus Torvalds |
| 3 | How the Web was Born | James Gillies and Robert Cailliau |
+---------+----------------------+-----------------------------------+
3 rows in set (0.07 sec)
Querying the Database from the Command Line
You can use the select command to query the database. Perform a specific query that you will repeat also from the online network tool that will query remotely the database in your site. For example, view the title and author of the books that include the keyword Web.
mysql> select title, author from books where title like "%Web%";
The SQL like operator is used in the where clause to search for a specific pattern in a field. In the previous example, like is used with the ‘%’ wildcard character, which matches any sequence of characters or none. Another wildcard character, the underscore ‘_’ matches exactly one character. The query result is therefore any pair of title and author, where the title includes the Web keyword.
As expected, two titles of the database include the Web keyword:
mysql> select title, author from books where title like "%Web%";
+----------------------+-----------------------------------+
| title | author |
+----------------------+-----------------------------------+
| Weaving The Web | Tim Berners Lee |
| How the Web was Born | James Gillies and Robert Cailliau |
+----------------------+-----------------------------------+
2 rows in set (0.02 sec)
mysql>

To exit MySQL enter:
mysql> \c
and then:
mysql> exit
Creating the PHP-enabled Virtual Server
In a Linux terminal, start cherokee-admin:
$ sudo cherokee-admin -b
Open your browser from any computer of your LAN and enter in the address bar:
http://192.168.1.101:9090
where 192.168.1.101 is the private IP address of the Web server.
At the dialogue window that appears provide admin as Username and the one-time password returned by the cherokee-admin output at the Password field to enter the Cherokee administration panel.
In the vServers section, click the Add New Virtual Server button (the blue plus sign button) to create a new virtual server. In the Add New Virtual Server dialogue window, enter a nickname for the server (e.g., Bookstore) and provide the document root (e.g., /var/www6),which was previously created with the following command:
$ sudo mkdir /var/www6
Click the Add button.
In the Basics tab, enter index.php in the Directory Indexes textbox. In the Host Match tab, select the Server IP option of the Method drop-down menu. Click the Add new IP/Subnet button that appears and in the dialogue window, enter the private IP address of the Web server (e.g., 192.168.1.101). Click the Add button.
In the Behavior tab, click the Rule Management button to view the new set of tabs (Rule, Handler, etc.). Click the Add Behavior Rule button (the blue plus sign button in the upper-left area of the panel). In the new dialogue window, click Languages to the left and select PHP to the right.
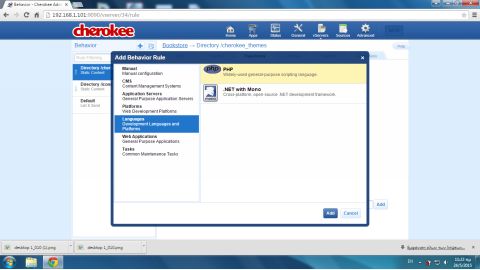
Click the Add button in the window and in the new window with the caption Configuration Assistant that appears, click on the Create button. In the newly created rule, Extensions PHP, that appears in the list on the left, click on the NON-FINAL button. The FastCGI option now appears in the Handler drop-down menu in the Handler tab. Click the SAVE button and click Graceful restart in the next dialogue window.
The new PHP-enabled virtual server that can make connections to the MySQL server is now ready. The PHP pages you create next will be placed in the directory /var/www6.
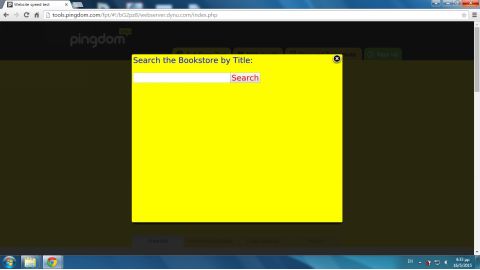
Creating a PHP page with a Form
To allow the client to query your database, you must provide her a web page with a form, where she can type the keywords and send them to the database. One can easily establish a connection to MySQL with PHP. This simplicity makes PHP an attractive option.
Create a PHP enabled Cherokee virtual server following the steps described in the previous paragraph. Move this virtual server to the top of the Virtual Servers list in the vServers section using the double arrow button. Next create a directory index for this virtual server (e.g., index.php). This file will implement an HTML form that includes a text box for entering the keyword and the Submit button to send the data from the client’s computer to your PHP virtual server and eventually to the database.

The action parameter in the <form> tag specifies the program on the server side that will receive the client’s data and will return the result back to the client. Set this to database.php. This is another php file that you will create in the same directory as index.php. database.php will connect to the MySQL server and perform the query on the string passed by the client and generate the results. The database.php output is what the client receives back after pressing the Search button.
Set the second parameter in the <form>, named method, to get. There are two methods for submitting the data in a form: GET and POST. PHP programs can handle both and retrieve the data sent with automatic global variables.
To create the file index.php, enter the following command in a Linux terminal:
$ sudo gedit /var/www6/index.php
The source code of index.php is the following:
<html>
<head><title>Search the Bookstore</title></head>
<body bgcolor="yellow">
<p style="color:red; font-size:48px">
Search the Bookstore by Title:
</p>
<form action="database.php" method="get">
<input type="text" name="title" style="color:red;
font-size:48px">
<input type="submit" value="Search" style="color:red;
font-size:48px">
</form>
</body>
</html>
The same code could be replaced with the following code that uses the PHP notation instead the HTML notation:
<?php
echo "<html>";
echo "<head><title>Search the Bookstore</title></head>";
echo "<body bgcolor=/"yellow/">";
echo "<p style=\"color:blue; font-size:48px\">";
echo "Search the Bookstore by Title:";
echo "</p>";
echo "<form action=\"database.php\" method=\"get\">";
echo "<input type=\"text\" name=\"title\"
style=\"color:red; font-size:48px\">";
echo "<input type=\"submit\" value=\"Search\"
style=\"color:red; font-size:48px\">";
echo "</form>";
echo "</body>";
echo "</html>";
?>
In the directory where index.php is placed create another file called database.php. Enter the following code:
<?php
$user_name = 'root';
$password = 'my_PaSsWoRd';
$database = 'bookstore';
$server = 'localhost:3306';
$db = 'bookstore';
$title = $_GET['title'];
$conn = mysql_connect($server, $user_name, $password);
mysql_select_db($db);
$query = "SELECT title, author FROM books WHERE title LIKE
'%$title%'";
$result = mysql_query($query);
echo "<p style=\"font-size: 36px; color:blue\">";
while ($row = mysql_fetch_array($result))
{
echo "$row[title], $row[author]<br />";
}
echo"</p>";
mysql_close($conn);
?>
Array $_GET[] is a global variable that is used to collect form data after submitting data from an HTML form with the get method. In the previous code, it retrieves the value sent from the form object called title. This is the form’s text box.
Function mysql_connect() makes a connection to the MySQL server, which listens at port 3306 of the web server computer. The mysql_connect() arguments are the MySQL server domain, port pair, the username used in MySQL and the MySQL password.
Function mysql_select_db() specifies the database that will be used. Function mysql_query() performs the query and returns the query result. Inside the while loop, the function mysql_fetch_array() is called to fetch each row of the result and print it with the echo command. The echo command is also used to enclose the results to a <p></p> pair of HTML tags that format the text. Finally, mysql_close() closes the connection with the MySQL server.
Testing the Database Site Locally
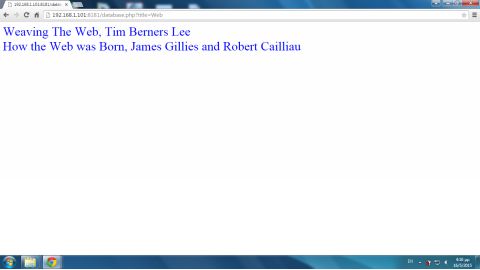
From a computer at the server’s LAN, test the database site. At web browser’s address bar enter the following URL:
http://192.168.1.101
Or if you run the server to a different port to 80, for instance port 8181 use the following URL:
http://192.168.1.101:8181
The virtual server dispatches the directory index, which you set previously to index.php.

At the text box of the form, enter a word to make a keyword search. You can use the same word used previously from the command line (e.g., Web) to compare the results. Press the Search button in the form. The form definesdatabase.php as the program that handles the data at the server. The PHP parser runs the code and the output is received by the client:
Testing the Database Site Remotely
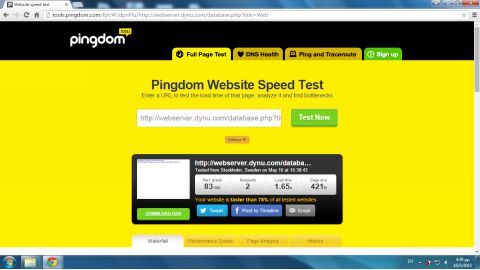
Use an online network tool like http://tools.pingdom.com/ or http://www.webpagetest.org/ to test the database site. You can view the Home page, which includes the form, by entering in the text box the site’s address:
http://webserver.dynu.com/
Click the Test Now button and the page index.php appears in the virtual browser of the online network tool:

Click on the image at the left to zoom into the web page:
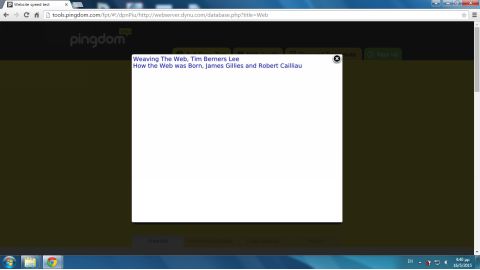
Testing the home page of the database site is certainly required, but it would be more helpful to query the database using the online network tool. Certainly, you cannot control the remote browser to type the keyword in the textbox and press the Search button. However you can request the query by sending the data appended on the URL. In the online network tool, enter at the text box the following URL:
http://webserver.dynu.com/database.php?title=Web
Using the previous URL, you provide the data directly to database.php, by attaching them in the URL, instead of requiring a user typing them at the form provided by index.php.
In this example the keyword Web is the one sent, as it would be sent by the text box named title.
The result is shown below:
By clicking on the browser’s icon at the left, you can enlarge the icon (by zooming in) and inspect the web page and view the results:
The question mark (?) used in the URL for the remote queries separates the query string from the directory path to the resource that will handle the data (database.php).
A query string is the portion of the URL submitted to the Web server that includes the database fields and their values. In the previous example, there is only one field submitted to the server, namely title with a value of Web. If our site used two or more fields, the ampersand (&) would be used to separate the field/value pairs. For example, if the query also included the author field:
http://webserver.dynu.com/database.php?title=Web&author=Tim Berners Lee
Next, use the following URL in the text box of tools.pingdom.com:
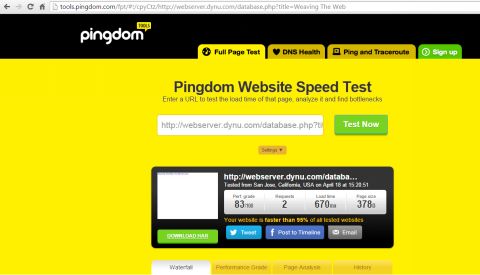
http://webserver.dynu.com/database.php?title=Weaving The Web
Running the test again has the following result:
Weaving The Web, Tim Berners Lee
Note that in order to submit the query in a way that was accepted by all browsers, you could replace any space with the special URL encoding character %20 or the plus sign. The previous query could be submitted as:
http://webserver.dynu.com/database.php?title=Weaving%20The%20Web
or
http://webserver.dynu.com/database.php?title=Weaving+The+Web
All materials on the site are licensed Creative Commons Attribution-Sharealike 3.0 Unported CC BY-SA 3.0 & GNU Free Documentation License (GFDL)
If you are the copyright holder of any material contained on our site and intend to remove it, please contact our site administrator for approval.
© 2016-2026 All site design rights belong to S.Y.A.