Linux Web Server Development (2015)
Chapter 5 Being Visible from the Entire Internet
At this point, your Cherokee server is running but it is only visible from your LAN. In this chapter, you make the big step to allow your server to be available from the whole Internet. You achieve this by configuring the gateway (i.e., the router) for your LAN.
It is assumed that your router currently uses the NAT (Network Address Translation) protocol to allow each computer on our LAN to masquerade as the router’s public IP address. With the configuration you apply now, you use the Virtual Server service of the router to redirect HTTP request packets from the router to your Web server. Note that the Virtual Server service of the router is unrelated to the Virtual Server Cherokee feature.
The Virtual Server Router Option
After your Cherokee server is up and running, a Web client should be able to connect to the server by entering a URL – for example, http://webserver.dynu.com. A DNS server will first be queried for the URL’s corresponding IP address so that this client can reach the Web server. This IP address is not the Web server’s static private IP address but instead the router’s public IP address. With the NAT protocol, the router manages to represent your server and all other computers on the LAN with its own public IP address. The public IP address of the router can be either static or dynamic. For a static IP, you have the option of registering a domain name that corresponds to this IP via the DNS system. For a dynamic IP, which is more common and less expensive, you can use a domain name (typically for free) allocated from a DDNS (Dynamic DNS) provider. DDNS is explained in the next chapter.
With the Virtual Server router option, the router administrator can register a port number on which a given computer will be responsible for listening. For example, if you wish to use a computer on our LAN with IP address 192.168.1.200 as your Web server that uses port 80 and a second computer 192.168.1.110 as a second Web server that uses port 8080, you assign in the router Virtual Server settings port 80 to the IP address 192.168.1.200 and you assign port 8080 to the IP address 192.168.1.110. After making this configuration change, when the client connects to webserver.dynu.com:80 (or simply webserver.dynu.com since port 80 is the default port for the HTTP protocol), the request is sent to the router’s public IP address (e.g., 94.69.235.77) since this is the corresponding IP address of webserver.dynu.com, according to the DNS servers. The router then passes the request on to the server with IP address 192.168.1.200, according to the Virtual Server tables. Similarly, a connection to webserver.dynu.com:8080 will be passed on to the server with IP address 192.168.1.110.
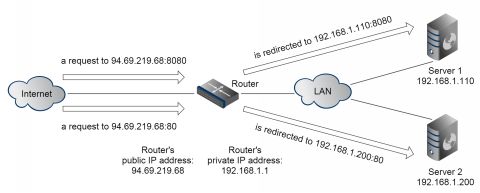
Using therefore the Virtual Server router option, multiple computers on the LAN can be used as servers on different ports, all using the router’s public IP address. (In contrast, with the Cherokee’s Virtual Servers configuration, your Cherokee server can virtualize multiple Web servers.)
Router Configuration
To configure your router so that your server can be reached from any client computer with an Internet connection, you can use the Web-based interface of the router. Many routers also support a command line interface which is invoked by the telnet service. However, we will not describe the command line interface because the graphical environment is usually easier to use.) It will be the second time you will use a Web interface in this book. The first time was the Cherokee Administration Panel.
As our case study, a Level One FBR-1161 ADSL2+ router will be used. Web interfaces for different routers vary. The menus and the options are usually different for each model. Sometimes their capabilities also vary. The basic features that are common to most modern routers will be described next. The private IP Address of the router in the example is 192.168.1.1. Enter this address on the address bar of the browser, from any computer of the router’s LAN. A dialogue window will prompt you for the username and password. The values you enter are either the default username/password (as found in the router manual) or the new values that you have previously chosen to replace the default. The Status page appears:
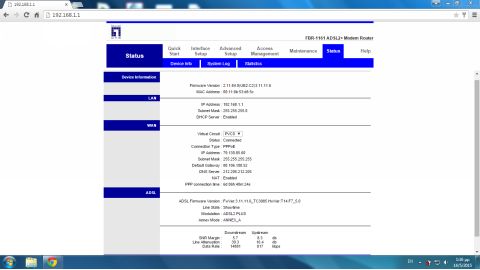
On the WAN (Wide Area Network) section of this page, you can find the router’s public IP address (sometimes referred to as its external IP address). If your Internet Service Provider has assigned you a dynamic IP address, as is most often the case, the router’s public IP address changes after a set amount of time, or each time you turn off and then restart the router. In the previous example, the router’s public IP address is 79.130.85.60. There are other ways to learn your IP. For example, several Internet sites will report your IP address:
http://www.whatssmyipaddress.com
Click on the Advanced Setup link and the following page appears:
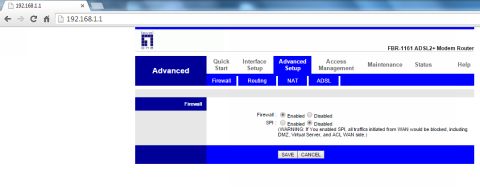
Click on the link NAT to configure the Network Address Translation options. The following page appears:
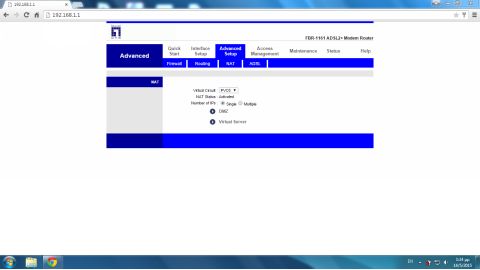
As can be seen, NAT is active. (You must click on Interface Setup and then the Internet link and select Enable at the NAT drop-down menu and click on the SAVE button if NAT is not active on the router). With NAT activated, click on the Virtual Server link to configure the Virtual Servers option. Select in the Application drop-down menu HTTP_Server (this varies according to the router model). In the Start Port Number and End Port Number fields, enter the port number (e.g., port 8080). In the Local IP Address field, enter the private IP address of the Web server (e.g., 192.168.1.101). Click the SAVE button. Repeat the same process for other ports.
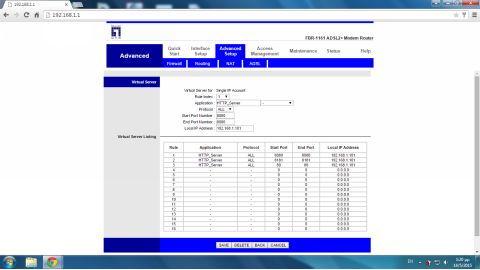
In this example, the computer with the private IP address 192.168.1.101 has been assigned the task to handle traffic to ports 8080 and 8181. Port 8080 is a popular alternative to port 80 for offering web services and port 8181 is a random port number. If your ISP permits incoming connections to port 80, you can also add the official HTTP port. You can try to include port 80 and test it using an online network tool (as described next in this chapter). If you do use a non-standard port, for example port 8080, the URL changes from the usual:
http://some_site.com
to the following:
http://some_site.com:8080
This poses no problem since most DDNS service will handle this, using port redirection (DDNS is discussed in chapter 6). For now you can access the Web site using URLs with the IP address instead of a domain name.
Testing Your Site from the Internet
So far, you have viewed the Cherokee test page from the Web server or other computers on our LAN, using the private IP for our Cherokee Web server:
http://192.168.1.101
(Port 80 is still valid in our LAN in the case the Internet Service Provider forbids it)
or
http://192.168.1.101:8181
or
http://192.168.1.101:8080
After configuring the router, you can test your site from a computer outside of our LAN on the Internet. So what is the public IP address of the router and (therefore) the IP address for your site? The following image displays the results from www.howtofindmyipaddress.com:
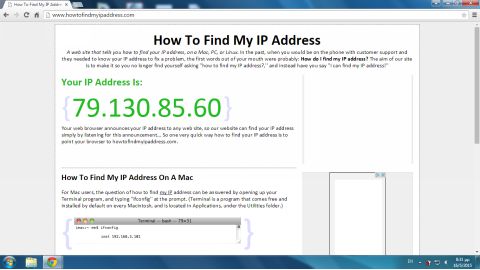
So why can’t you use your router’s external IP address from a browser on a computer on your internal LAN? Unfortunately, this won’t work for most cases. Many routers prevent loopback connections as a security feature. This means that a machine on your LAN (i.e., behind your router) cannot connect to the external IP address of a machine that is also on your LAN. You cannot even connect to the internal IP of the router at port 80 because this is targeted to the Web-based router configuration interface. You also cannot access ports 8080 and 8181 from the internal (private) address of the router because the router’s Virtual Server service is not supported from the private address interface.
Just like a person needs a mirror to view her image, you need an external computer to see how your site looks from outside your LAN. Even if the site looks fine from a computer internal to your LAN, that does not ensure that your site can be viewed without problems from the Internet. Using online network tools, you can also determine download speeds from various countries and determine which ports are closed.
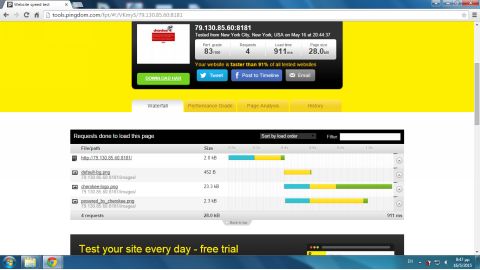
One of these sites is tools.pingdom.com.
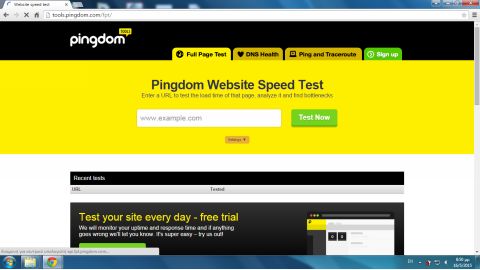
If the public IP address for the router is 79.130.85.60 and the port we use is 8181, enter the following URL in the text field:
http://79.130.85.60:8181
Don’t worry – this awkward IP address/port address URL will never be used by a normal user. In the following chapter, you implement a DDNS (Dynamic DNS) domain name. Press the Test Now button to remotely view the Cherokee test page
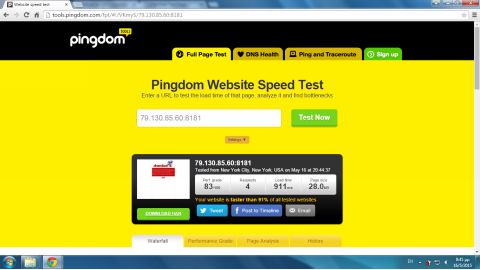
On the same page, you can also get details about the download speed of the test Cherokee page:
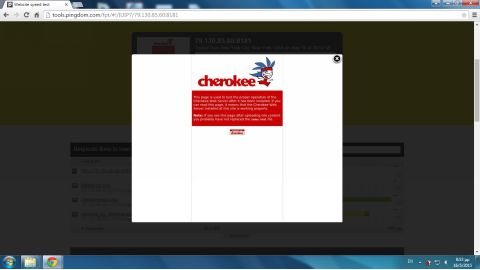
Click on the browser icon on the page to zoom in the Cherokee test page:
From the Settings drop-down menu at pingdom.com you can also select a specific country to run the test from.
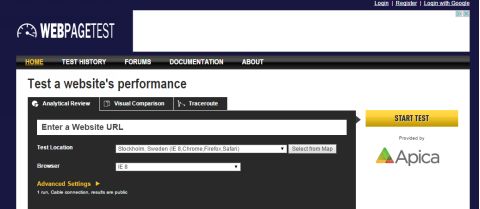
Another online network tool (http://www.webpagetest.org/) allows you to select servers (that simulate web clients) from many different countries and also different browsers for each server.
A helpful category of diagnostic tools, especially useful if anything went wrong at this stage, is the Port Forwarding Testers. We can use the online port tester www.yougetsignal.com to determine if a specific port on the server is open. In the home page of www.yougetsignal.com, click the Port forwarding Tester link.
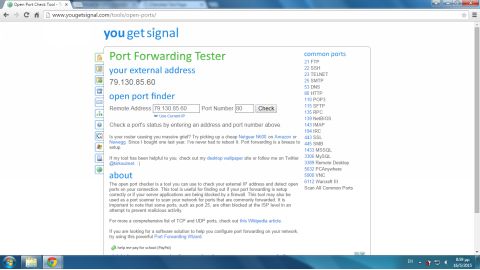
The port tester detects and displays your router’s public IP address – you must simply enter the port numbers you wish to test. Here is the result for port 80 for the case that the Internet Service Provider blocks incoming port 80 packets:
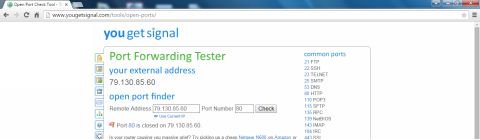
The result after you click on the Check button is:
Port 80 is closed on 79.130.85.60
The specific Cherokee Web server uses port 8181 instead. Port 8181 should be listed as open.
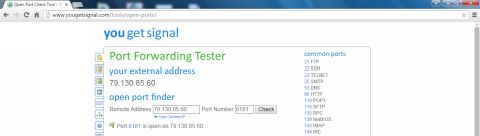
The result after you click on the Check button is:
Port 8181 is open on 79.130.85.60
Sometimes when experimenting with the Cherokee server, it’s easy to forget to start the service. If port 8181 is closed, first verify that the Web server is running. Click the Start Server button in the Home section of the Administration Panel if the Cherokee server has not been started.
All materials on the site are licensed Creative Commons Attribution-Sharealike 3.0 Unported CC BY-SA 3.0 & GNU Free Documentation License (GFDL)
If you are the copyright holder of any material contained on our site and intend to remove it, please contact our site administrator for approval.
© 2016-2026 All site design rights belong to S.Y.A.