Linux Web Server Development (2015)
Chapter 9 Creating a PHP Virtual Server Using a Wizard
So far, you have used the default virtual server and you have also created another server with HTML static content called HTML Server. Next you will create another virtual server that will use the PHP language for dynamic Web content. This time, you will use a Wizard, a program that simplifies the process by guiding you through the required steps.
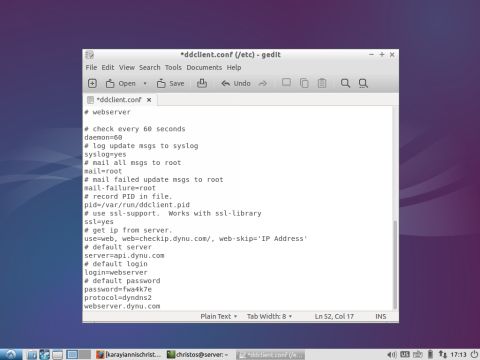
In the following configurations, another domain name is required as well as another registration with dynu.com. Recall that earlier the domain name christos.dynu.com was used on port number 8181 and port forwarding was used. The second domain name will be webserver.dynu.com and will use port 8080 and will also use the port forwarding service. In the configuration file of the DDNS client, /etc/ddclient.conf, another entry is required with the new values for the webserver.dynu.com. Add the following lines at the end of /etc/ddclient.conf:
# check every 60 seconds
daemon=60
# log update msgs to syslog
syslog=yes
# mail all msgs to root
mail=root
# mail failed update msgs to root
mail-failure=root
# record PID in file.
pid=/var/run/ddclient.pid
# use ssl-support. Works with ssl-library
ssl=yes
# get ip from server.
use=web, web=checkip.dynu.com/, web-skip='IP Address'
# default server
server=api.dynu.com
# default login
login=webserver
# default password
password=fwa4k7e
protocol=dyndns2
webserver.dynu.com
Starting the new Virtual Server
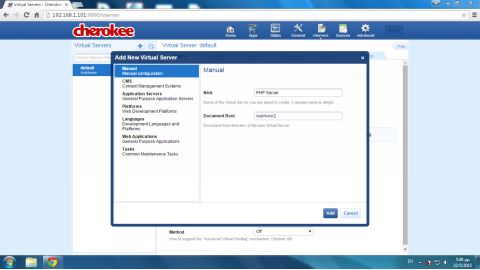
Click on the vServers section of Cherokee Administration Panel and then click the Add New Virtual Server button. This is the button with the blue plus sign in the upper-left area of the Cherokee Administration Panel.
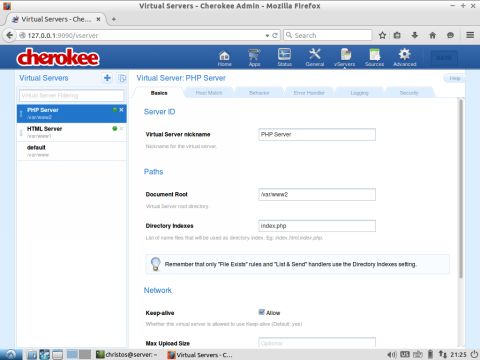
In the dialogue window that appears, enter a nickname for the server in the Nick textbox. This nickname can be the domain name that corresponds to the new virtual server. In our example, this is a simple name like PHP Server. You must also enter the Document Root. The default Document Root for Ubuntu is:
/var/www
or
/usr/local/var/www
For your new virtual server, create the directory /var/www2. This new directory will be our Document Root. In a Linux terminal window enter:
$ sudo mkdir /var/www2
Return to the Cherokee Administration Panel and enter the newly created directory name at the Document Root text field and click the Add button.
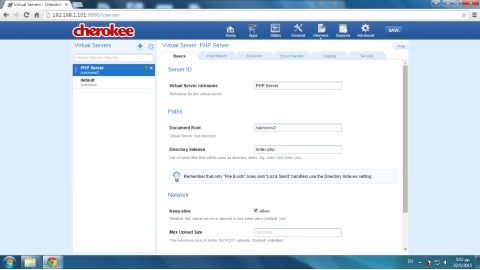
The new virtual server appears in the Virtual Servers list at the left side of the Administration Panel.
After the new virtual server has been added, you must be careful to select the server from the list in the left area of the vServers section when you wish to configure this server. Otherwise you may accidentally change the settings of a different virtual server. The current server name appears immediately above the tabs.
In the Basics tab, enter index.php as the directory index in the Directory Indexes textbox. Later you will create a PHP file named index.php.
In the next section, you will install and enable the PHP language for Cherokee.
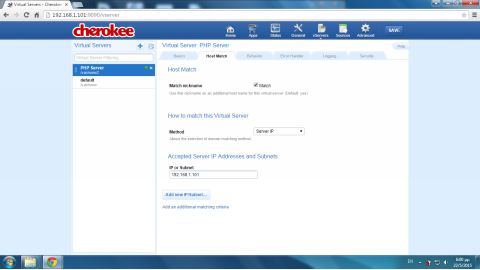
For this virtual server, we have selected a nickname that does not correspond to the domain name of the Web server since we will use the Server IP option for the Host Match method. Click on the Host Match tab and from the Method drop-down menu, choose the Server IP method. Click next at the Add new IP/Subnet button and at the Add new entry window that appears, enter the private IP address of the Web server (e.g. 192.168.1.101). Click the Addbutton.
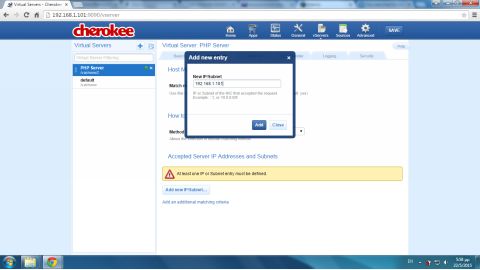
The IP or Subnet textbox is updated with the private IP address of the server.
PHP Installation and Configuration
To install PHP on Ubuntu, enter the following command at the terminal:
$ sudo apt-get install php5 php5-cgi
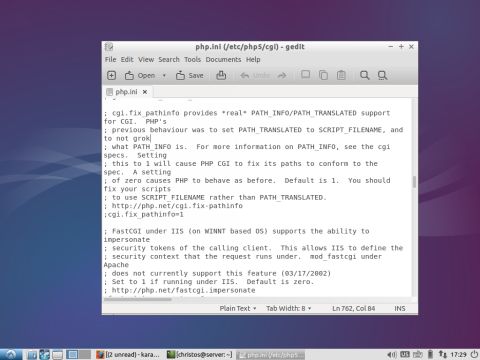
To configure PHP, edit the php.ini file using the gedit command. According to the version of PHP, this file can be found in different directories. Try:
$ sudo gedit /etc/php5/cgi/php.ini
or
$ sudo gedit /etc/php.ini
Uncomment the following configuration option by deleting the semicolon (;)
;cgi.fix_pathinfo=1
A .php file must also be created that we will use as an index to our Web site. Use the gedit Linux editor to create the index.php file in the Document Root directory. At the Linux terminal, enter:
$ sudo gedit /var/www2/index.php
In the gedit window that appears, type and save the following PHP program. This simple program outputs some information about the PHP version that we currently run:
<?php
phpinfo();
?>
Enabling the PHP Interpreter in Cherokee
Click on the Behavior tab of the vServers Cherokee section. Next click on the Rule Management button.
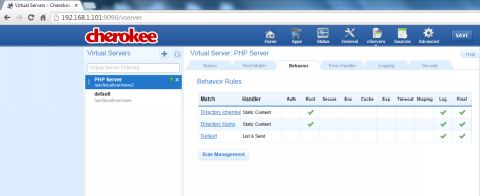
A set of new tabs appears.

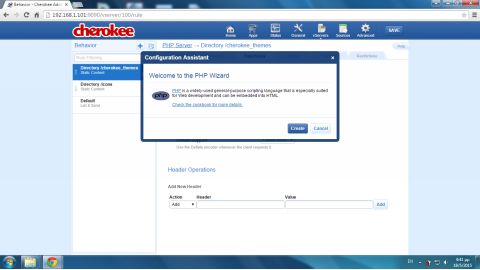
Click on the Add Behavior Rule button, which is the button with the blue plus sign in the upper-right area of the Cherokee window. In the dialogue window that appears, select Languages at the list on the left and then click on the PHP option at the right. Click on the Add button.
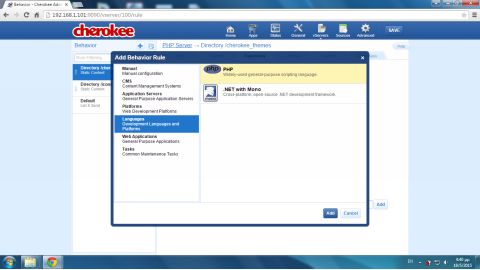
In the following PHP Wizard dialogue window that appears, click on the Create button.
A new rule, called Extensions php, appears in the list on the left area of the Administration Panel.
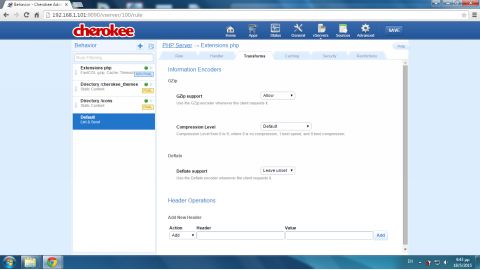
Notice that the button NON FINAL appears next to the rule’s name in the rule list. Click this button to toggle it to FINAL. When a rule is marked as FINAL, no other rules will be applied afterwards.
Note that Cherokee automatically creates some rules that apply in certain directories (e.g., /cherokee-themes and /cherokee_icons). Click on the ‘x’ button next to the rule names to delete these rules.
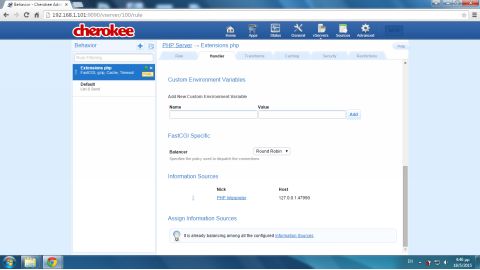
Click on the Handler tab. Note that the Handler menu was set by the wizard to FastCGI. FastCGI is a programming interface for connecting interactive programs with a Web server.
FastCGI uses an information source nicknamed PHP Interpreter. PHP Interpreter is a FastCGI server located in localhost in port 47990.
To save the setting, click on the SAVE button in the upper-right area of the Administration Panel. Restart the Cherokee server using the Graceful restart button.
Testing the PHP Server
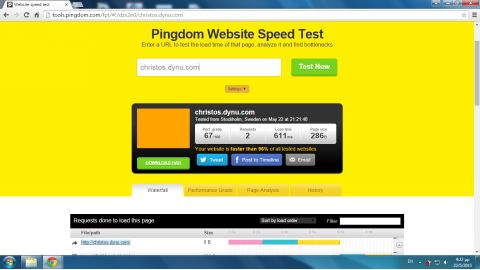
Let’s test your PHP Server by using tools.pingdom.com. In the text field, enter the second domain name, registered for this site, webserver.dynu.com. Click on the Test Now button and wait for the result.
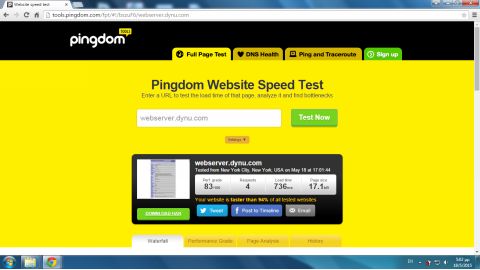
The image in the results page shows our web page as it would appear from a remote browser. You can click on the image to zoom in, or you can test it locally from your LAN to view the page in its full size:
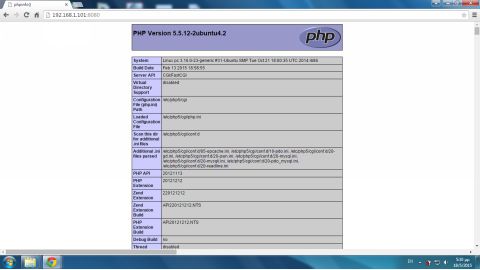
Recall that this is the output of the PHP program that called the function phpinfo(), implemented in index.php, which returns information about the OS version, server API, PHP configuration, etc.
With PHP enabled in Cherokee server, you can test the online network service you created in chapter 7 that provides the IP address of the visitor. Rename the current index.php (e.g., index_old.php) and copy at the Document Root of this server the index.php file you created in chapter 7. Use tools.pingdom.com to test your online network service.
Using both Virtual Servers
We will now attempt to run the two virtual servers HTML Server and PHP Server simultaneously. In the vServers section, verify that both are active. This is indicated by the circular button in the right of each server name, which by clicking toggles from activated (green color) to deactivated (gray color). When the Cherokee server receives a request for a URL from a client browser, the virtual servers are checked from the top to the bottom of the list in the left area of the Administration Panel. The first virtual server that matches will handle the client’s request. The order of the list is therefore significant, especially in cases when a client request matches more than one virtual server.
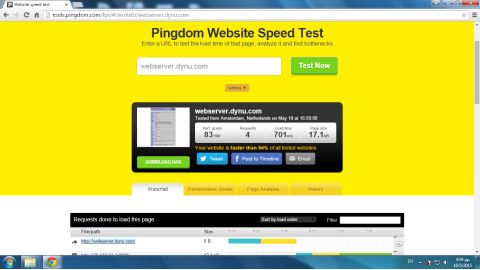
To test this in our example, we can use an online network tool (e.g., tools.pingdom.com) to view the page dispatched by the server. A URL that can be dispatched by both servers is simply the domain name of the server:
http://webserver.dynu.com
or when no port forwarding is used at the DDNS service:
http://webserver.dynu.com:8080
or just the public IP address of the router, at the specific time:
http://79.130.85.80:8080
You can also use the christos domain name. In this example, the two domain names are valid for both virtual servers:
http://christos.dynu.com
or when no port forwarding is used at the DDNS service:
http://christos.dynu.com:8181
When the PHP Server is on top of the server list the server dispatches the directory index, which is currently index.php:
Use the double-arrow buttons at the left of the server name in the list to move the HTML Server to the top of the list.

Click on the SAVE button in the upper-right area of the window to confirm the reorder of the server list. Click the Graceful restart button in the dialogue window that appears.
Run the test a second time at tools.pingdom.com. Again, no web page file is indicated by the URLs and the directory index is dispatched. For HTML Server the directory index is index.html, a simple colored page.
All materials on the site are licensed Creative Commons Attribution-Sharealike 3.0 Unported CC BY-SA 3.0 & GNU Free Documentation License (GFDL)
If you are the copyright holder of any material contained on our site and intend to remove it, please contact our site administrator for approval.
© 2016-2026 All site design rights belong to S.Y.A.