Linux Web Server Development (2015)
Chapter 8 Manually Creating a Virtual Server
The focus in this chapter is on the process of creating a virtual server and setting its behavior manually. In the next chapter, you will use a Wizard to help you develop a PHP server. Wizards are configuration assistants that help the system administrator configure a new virtual server.
Matching the Virtual Server
When creating a new virtual server, the first three tabs of the vServers section of the Administration Panel contain the settings for the basic attributes of the server, the settings that determine when the server will be chosen to handle the request, and the settings for how the server dispatches the client’s requests.
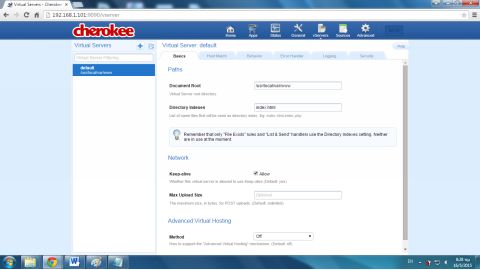
In the first tab named Basics, you set the basic characteristics of the virtual server (e.g., the name, the directory index and the document root).
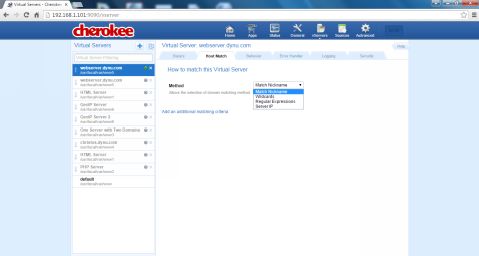
When we include multiple virtual servers, the Cherokee Web server must determine which virtual server will process the request. The virtual server values that will be evaluated in this phase are set in the Host Match page in the vServers section of the Administration Panel. In the Method drop-down menu, one of the following four methods for matching a server can be selected:
● Match Nickname
● WildCards
● Regular Expressions
● Server IP
Each virtual server that you create is added to the Virtual Servers list found at the left of the vServers section of the Cherokee Administration Panel. This list is evaluated from top to bottom. As soon as a virtual server matches, the evaluation stops. If the request does not match one of the non-default virtual servers, the default server will handle the client’s request.
As an example, consider that two virtual servers already exist in the Cherokee server (later you will create several virtual servers), with the nicknames:
● webserver.dynu.com
● myWebserver
The following image shows the two virtual servers on the server list:
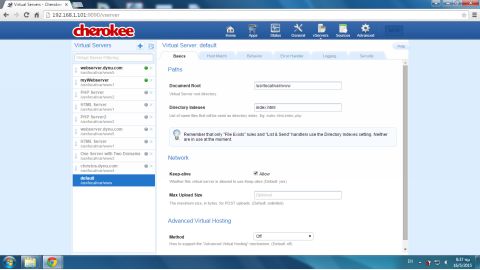
You can change the order of the virtual servers in the list by clicking on the double arrow next to the server name and dragging the server name up or down. You can also disable and enable the server by clicking on the circular button to the right of the server name. There is also an ‘x’ button that deletes the server.
The nickname of the first server corresponds to a valid domain name used by the site, while the nickname of the second server does not. For the first server, the Match Nickname method is selected at the Host Match tab, which requires a valid domain name as the virtual server’s name, and for the second, the Server IP is selected, which requires a specified IP address (e.g. 192.168.1.101) and corresponds to the Web server. In this example, if a user typed the following in the address field of his browser:
http://webserver.dynu.com/page.html
the first server matches. Because webserver.dynu.com is first in the list, the evaluation stops. On the other hand, if the client types the following in the address field of the browser:
http://christos.dynu.com/page.html
and christos.dynu.com is a valid domain name that corresponds to the router’s public IP and eventually (with the router’s virtual server service) at the Web server’s IP address 192.168.1.101, the first server does not match (i.e., the first server has a different domain name) but the second matches (i.e., the second server uses the Host Match method that resolves to the server’s IP address).
Server Rules Lookup and Handling
Once the virtual server has been chosen from the Virtual Servers list to handle the request, the request is evaluated against the list of the rules that you have created for the specific virtual server. For example, consider a rule for requesting files with .html extensions or a rule for a connection to port 8080. Therefore, the number of lists that must be searched is two lists. Again, the evaluation is performed in the order from the top of the list to the bottom. If no rule applies to the specific client’s request, the Default rule wins.
The virtual server rules define the condition on which the server will act and also how the request will be handled. You can set the rules in the Behavior tab of the vServers section. This section includes a table with the rules that you have currently set and also the Default rule that is predefined for each virtual server.
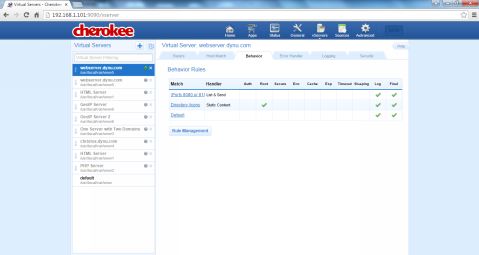
You can create new rules, set a handler for any rule you create, and also set a handler for the default rule. The rules are managed by clicking the Rule Management button, which swaps to a new set of tabs relating to rules. The first two, called Rule and Handler, are the most important.
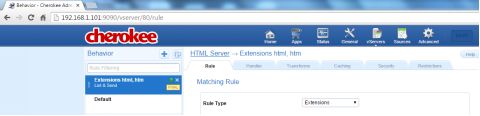
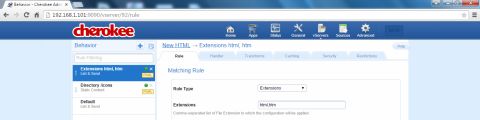
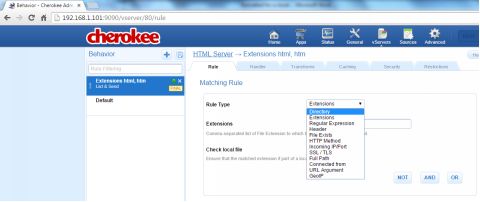
In the Rule tab, you set the rule type for the rule currently selected from the list. The types are
● Directory
● Extensions
● Regular Expressions
● Header
● File Exists
● HTTP method
● Incoming IP/Port
● SSL / TLS
● Full Path
● Connected from
● URL Argument
● GeoIP
The URL:
http://cherokee-project.com/doc/config_virtual_servers_rule_types.html
describes the rule types.
In the Handler tab, you set the handler for the rule that is currently selected from the list. You can select one of the following rule handlers:
● None
● List & Send
● Static Content
● Only listing
● Redirection
● CGI Execution
● FastCGI Server Support
● SCGI Server Support
● uWSGI Server Support
● HTTP Reverse Proxy
● Audio/Video streaming
● Server Side Includes
● Hidden Downloads
● MySQL Bridge
● HTTP Error
● 1x1 Transparent GIF
● Server Info
● Remote Administration

The URL:
http://cherokee-project.com/doc/config_virtual_servers_rule.html
describes the rule handlers.
To continue with the example of the current section, the virtual server with the name webserver.dynu.com was selected. This includes two rules and the Default. For the two rules, rule type Extensions were selected; html was used for the first and htm was used for the second. Furthermore, handler List & Send was selected for the first and Only Listing for the second. The Default rule cannot be assigned any rule type but the rule handler can be set. We assume this is set to None and the Default rule of the default server is also set to None.
By entering the following URL at the browser’s address field:
http://webserver.dynu.com/info.html
the virtual server dispatches the web page info.html to the client’s browser. The rule that applies in this case is List & Send, therefore the web page can be submitted.
By entering the following URL:
http://webserver.dynu.com/info.htm
the result is an HTTP error message 404. This is the Not Found error message and is caused by the fact that Only Listing was selected as the handler that applies here.
If index.htm is set as the directory index then the request:
http://webserver.dynu.com
lists the document root directory (the directory where index.htm is found).
If index.html is set as the directory index, the request:
http://webserver.dynu.com
sends the page index.html to the client browser.
By entering the following URL:
http://webserver.dynu.com/about.pdf
the result is the HTTP error message 405 (Method Not Allowed).
Basic Steps to Create a Virtual Server
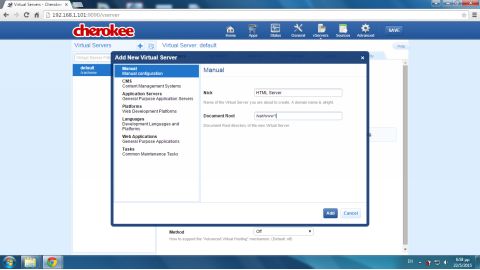
You create next a virtual server that dispatches static (HTML) content. At the vServers section of the Administration Panel, click on the Add New Virtual Server button, the button with the blue plus sign at the upper-left area of the Cherokee window.

At the dialogue window that appears, enter the nickname HTML Server at the Nick text field and the directory /var/www1 at the Document Root field. Cherokee will serve files from this directory, for this virtual server.
Before clicking the Add button, open a terminal window and enter the following command to create directory /var/www1:
$ sudo mkdir /var/www1
Using gedit or any other text editor, edit index.html:
$ sudo gedit index.html
The HTML source code of index.html is the following:
<!DOCTYPE html>
<html lang="en">
<head>
<meta http-equiv="Content-Type" content="text/html;
charset=utf-8"/>
<title>Cherokee Server</title>
</head>
<body bgcolor="orange">
</body>
</html>
Return to the Administration Panel window and click Add.
The new server is added in the Virtual Server list in the left area of the vServers section. To be certain that the correct server is being configured, verify the virtual server’s name directly above the tags. If this is not the case, click on the server name in the servers’ list.
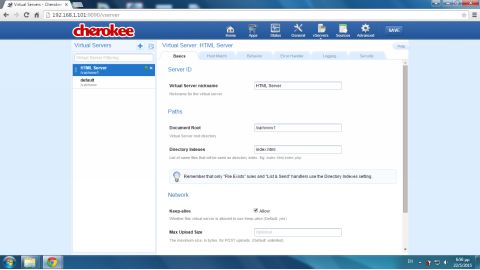
Configuring the Basics Tab
In the Basics tab, enter the filename index.html in the Directory Indexes text field. The Directory Indexes text field sets the list of file names to search for when the client requests an index of the directory by specifying a forward-slash (/) at the end of the directory name. We click on the SAVE button in the upper-right area of the panel. The Administration Panel asks whether a computer restart is desired. A restart is necessary at this point to apply the new changes. Click the Graceful restart button in the dialogue window that appears.
Configuring the Host Match tab
Next, click on the Host Match tab, where there are four available methods. From the Method drop-down menu, select the Server IP option. Click the Add new IP/Subnet button and in the dialogue window that appears enter the Web server’s private IP address in the text field. In the following example, the address 192.168.1.101 is used. Click the Add button. The IP or subnet textbox reflects now the server’s private IP address.
With the previous configuration any client request that receives to the server on a packet with destination address 192.168.1.101 will be accepted.

Configuring the Behavior Tag
Click the Behavior tab of the vServers section to apply the rules for the virtual server. Click on the Rule Management button and a new set of tabs (Rule, Handler, etc.) appears. If you must later return to the previous tabs, click on the vServers link at the top.
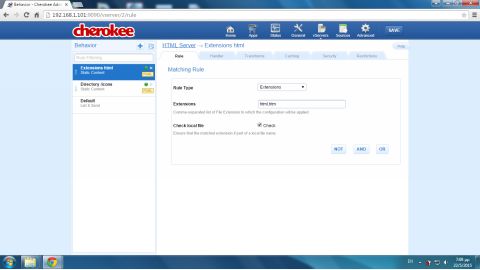
Configuring the Rule Tag
In the Rule tab, select Extensions in the Rule Type drop-down menu and enter html, htm in the Extensions text box. Click next on the Check local file checkbox. Delete any other predefined rules for instance Directory /icons by clicking in the ‘x’ box to the right of the rule’s name.
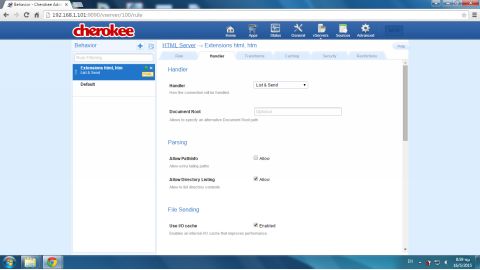
Configuring the Handler Tag
In the Handler drop-down menu, select List & Send and at the Document Root textbox, clear any entry. This specifies an alternate document root directory.
Click on the SAVE button and select Graceful restart in the Save Configuration dialogue window that appears.

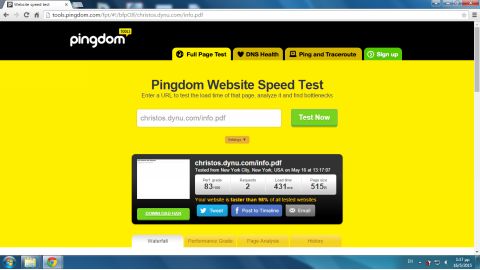
Testing the New Virtual Server
An online network tool is needed to the new virtual server. We will use tools.pingdom.com. In the text field, enter christos.dynu.com and press the Test Now button. The directory index (index.html) is dispatched. The result is shown below:

A request for a file with the .htm extension (e.g., info.htm) is also dispatched according to the rule you previously set. However, a request for a file with another extension (e.g., http://christos.dynu.com/info.pdf) is also dispatched although the .pdf extension is not included in the rule. This request is not fulfilled by the rule you just set but from the Default rule. To disable the Default rule in the Handler tab, select Default in the rule list and select None in the Handler drop-down menu.
Also be sure to deactivate the default virtual server. In the Virtual Servers list in the vServers section, click the default virtual server and in the Behavior tab, click the Rule Management button. In the Handler tab, select None in the drop-down menu.
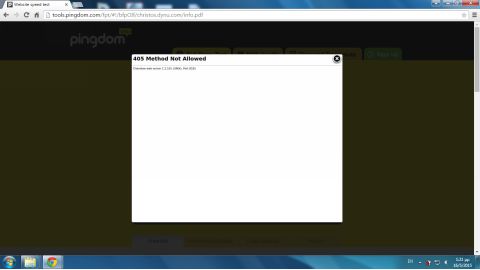
Click again on the SAVE button and restart Cherokee. Test the server by requesting info.pdf. The HTTP error message 405 should be sent:
Click on the web page image of the online network tool to zoom in:
Note that the domain name christos.dynu.com uses port forwarding to port 8181, which along with port 8080 are two port numbers used in the example server. This domain name is then resolved to the public IP address of the router and then through the virtual server router service to the private IP of the server (192.168.1.101 in this example). Since the server matching method is the Server IP, which contrary to Match nickname is independent of the server’s domain names, the second domain used in this book examples, webserver.dynu.com, could also be used.