Professional ASP.NET MVC 5 (2014)
Chapter 10
NuGet
—by Phil Haack and Jon Galloway
What's In This Chapter?
· NuGet Basics
· How to add a library as a package
· How to create packages
· How to publish packages
WROX.COM CODE DOWNLOADS FOR THIS CHAPTER
You can find the wrox.com code downloads for this chapter at http://www.wrox.com/go/proaspnetmvc5 on the Download Code tab. The code for this chapter is contained in the following file: Wrox.ProMvc5.C10.zip
NuGet is a package-management system for .NET and Visual Studio that makes it easy to add, update, and remove external libraries and their dependencies in your application. NuGet also makes creating packages that you can share with the world easy. This chapter covers the basics of how to use NuGet in your application development workflow, and looks at some more advanced uses of NuGet.
INTRODUCTION TO NUGET
Try as it might, Microsoft cannot provide every possible piece of code a developer could need. Millions of developers are on the .NET platform, each with unique problems to solve. Waiting on Microsoft to solve every problem isn't efficient and doesn't make sense.
The good news is that many developers don't wait around to “scratch their own itch.” They solve their own problems (and those of their peers) with useful libraries that they write and then distribute on the Web.
Three big challenges with all these libraries out there in the wild are discovery, installation, and maintenance. How do developers find a library in the first place? After they find it, how do they make use of it in their projects? After they've installed it, how do they track project updates?
This section walks through a quick example of the steps necessary to install ELMAH without the benefit of NuGet. ELMAH, which stands for Error Logging Module and Handler, is used to log and display unhandled exception information within a web application. The steps are especially familiar to the NuGet team because we use ELMAH in the NuGet.org site, which is discussed in Chapter 17.
These are the steps needed to make use of the library:
1. Find ELMAH. Due to its unique name, this is easy with any search engine.
2. Download the correct zip package. Multiple zip files are presented and, as I personally learned, choosing the correct one isn't always trivial.
3. “Unblock” the package. Files downloaded from the Web are marked with metadata that specifies they came from the “web zone” and are potentially unsafe. This mark is sometimes referred to as the Mark of the Web (MOTW). Unblocking the zip file before you expand it is important; otherwise, every file within has the bit set and your code won't work in certain cases. If you're curious about how this mark is set, read up on the Attachment Manager in Windows, which is responsible for protecting the OS from potentially unsafe attachments (http://support.microsoft.com/kb/883260).
4. Verify its hash against the one provided by the hosting environment. You do verify the hash of the file with the one listed in the download page to ensure that it hasn't been altered, don't you? Don't you?!
5. Unzip the package contents into a known location, such as in a lib folder so you can reference the assembly. Developers usually don't want to add assemblies directly to the bin directory because they don't want to add the bin directory to source control.
6. Add an assembly reference. Add a reference to the assembly in the Visual Studio Project.
7. Update web.config. ELMAH requires a bit of configuration. Typically, you would search the documentation to find the correct settings.
All these steps for a library, ELMAH, that doesn't even have any dependencies! If the library does have dependencies, then every time you update the library, you must find the correct version of each dependency and repeat each of the previous steps for each dependency. This is a painful set of tasks to undertake every time you are ready to deploy a new version of your application, which is why many teams just stick with old versions of their dependencies for a long time.
This is the pain that NuGet solves. NuGet automates all these common and tedious tasks for a package as well as its dependencies. It removes most of the challenges of incorporating a third-party open source library into a project's source tree. Of course, using that library properly is still up to the developer.
ADDING A LIBRARY AS A PACKAGE
NuGet is included with Visual Studio 2012 and 2013; it previously required a separate install with Visual Studio 2010. You install NuGet via a Visual Studio extension, and updates are available roughly every few months.
You have two ways to interact with NuGet in Visual Studio: the Manage NuGet Packages dialog and the Package Manager Console. I'll cover the dialog first and the console later. You can launch the dialog from within a project by right-clicking the References node in the Solution Explorer, as shown in Figure 10.1. You can also launch it by right-clicking the project name or from the Tools / Library Package Manager menu.

Figure 10.1
The Manage NuGet Packages dialog looks similar to the Extension Manager dialog, which leads to confusion for some people. The distinction between the two is very clear. The Visual Studio Extension Manager installs extensions that extend and enhance Visual Studio. These extensions are not deployed as part of your application. In contrast, the purpose of NuGet is to install packages that are included in and extend your project. In most cases, the contents of these packages are deployed as part of your application.
Unlike the Extension Manager, the Manage NuGet Packages dialog defaults to the section it was on the last time it was run. Be sure to click the Online node in the left pane to see packages available in the NuGet feed, as shown in Figure 10.2.

Figure 10.2
Finding Packages
If you're a glutton for punishment, you can use the paging links at the bottom of the Manage NuGet Packages dialog to page through the list of packages until you find the one you want, but the quickest way is to use the search bar in the top right.
When you find a package, the pane on the right displays information about the package. Figure 10.3 shows the information pane for the SignalR package.
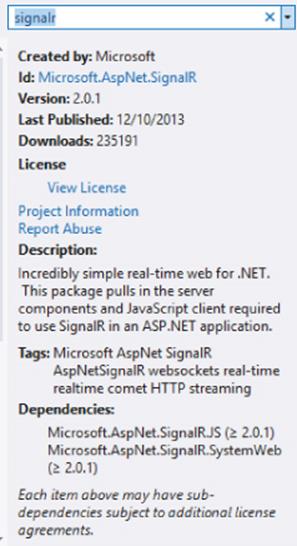
Figure 10.3
This pane provides the following information:
· Created By: A list of authors of the original library. This listing does not show the owners of the package, just the authors. In some cases, the owners are different from the library authors. For example, the Bootstrap package is owned (maintained) by the Outercurve Foundation, but distributes code written by Mark Otto and Jacob Thornton, so Mark and Jacob are listed in the Created By section.
· Id: The identifier for the package. This is the id used when installing the package using the Package Manager Console.
· Version: The version number of the package. Typically, this matches the version of the contained library, but it isn't necessarily the case.
· Last Published: This indicates the date this version of the package was last published to the feed.
· Downloads: Download count for the current package.
· View License: Click this link to view the license terms for the package.
· Project Information: This link takes you to the package's project page.
· Report Abuse: Use this link to report broken or malicious packages.
· Description: This is a good place for the package author to display brief release notes for a package.
· Tags: The tags indicate a list of topics or features for the package. This assists in package discovery by allowing potential users to search by topic rather than name. For instance, a developer interested in websockets may not know that the solution they're looking for is named SignalR.
· Dependencies: A list of other packages that this package depends on.
As you can see in the screenshot, the SignalR package depends on two other packages: Microsoft.AspNet.SignalR.JS and Microsoft.AspNet.SignalR.SystemWeb. The information displayed is controlled by the package's NuSpec file, which is covered in more detail later.
Installing a Package
To install a package, perform the following steps:
1. Type ELMAH in the search box to find it. In this case, there are several ELMAH related packages, but the top result is the main ELMAH package, as indicated by both the Description and Download count.
2. After you've found the package, click the Install button to install it. This downloads the package, as well as all the packages it depends on, before it installs the package to your project.
Note
In some cases, you're prompted to accept the license terms for the package, as well as any dependencies that also require license acceptance. Figure 10.4 shows what happens when you install the Microsoft.AspNet.SignalR package. Requiring license acceptance is a setting in the package set by the package author. If you decline the license terms, the packages are not installed.
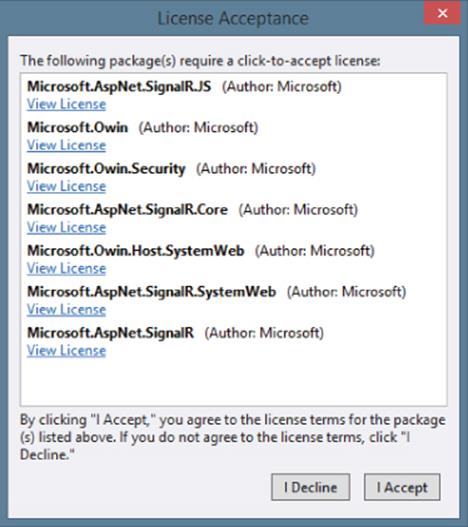
Figure 10.4
When NuGet installs the ELMAH package, it makes a few changes to your project. The first time any package is installed into a project, a new file named packages.config is added to the project, as shown in Figure 10.5. This file will already exist in an ASP.NET MVC 5 project because the project template itself includes several NuGet packages. This file keeps a list of packages installed in the project.
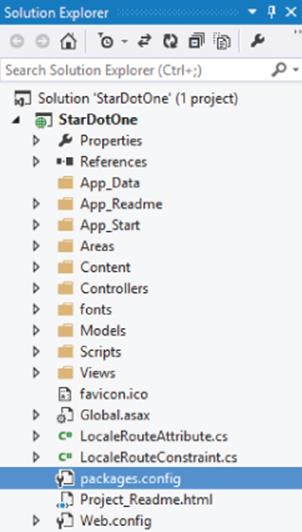
Figure 10.5
The format for this file is simple. Here's an example showing that version 1.2.2 of the ELMAH package is installed (omitting all the other standard libraries included in an ASP.NET MVC application):
<?xml version="1.0" encoding="utf-8"?>
<packages>
<package id="elmah" version="1.2.2" targetFramework="net451" />
<package id="elmah.corelibrary" version="1.2.2" targetFramework="net451" />
</packages>
Also notice that you now have an assembly reference to the Elmah.dll assembly, as shown in Figure 10.6.
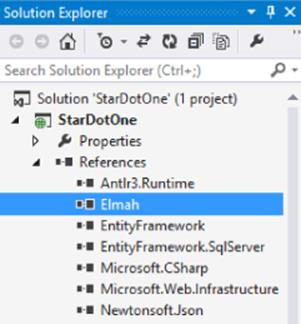
Figure 10.6
Where is that assembly referenced from? To answer that, you need to look at what files are added to your solution when a package is installed. When the first package is installed into a project, a packages folder is created in the same directory as the solution file, as shown in Figure 10.7.
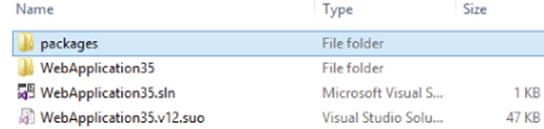
Figure 10.7
The packages folder contains a subfolder for each installed package. Figure 10.8 shows a packages folder with multiple installed packages.
Note
Note that the name of each package folder includes a version number because this folder stores all the packages installed for a given solution. The possibility exists for two projects in the same solution to each have a different version of the same package installed.
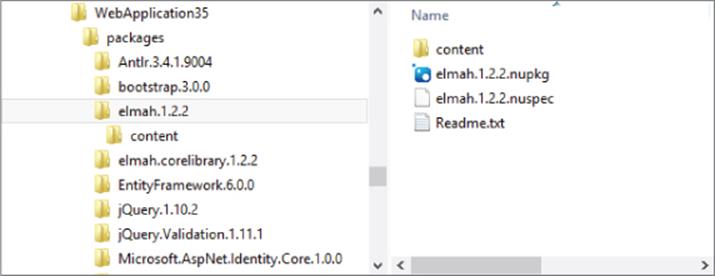
Figure 10.8
Figure 10.8 also shows the contents of the ELMAH package folder, which contains the contents of the package along with the original package itself in the form of the .nupkg file.
The lib folder contains the ELMAH assembly, and this is the location from which the assembly is referenced. Although some teams opt to commit the packages folder into version control, doing so is generally not recommended, especially with distributed version control systems such as Git and Mercurial. The “Package Restore” section later in this chapter explains how NuGet will automatically download any missing packages referenced in your packages.config file as part of the project build process.
The content folder contains files that are copied directly into the project root. The directory structure of the content folder is maintained when it is copied into the project. This folder may also contain source code and configuration file transformations, which are covered in more depth later. In the case of ELMAH, there's a web.config.transform file, which updates the web.config with settings required by ELMAH, as shown in the following code:
<?xml version="1.0" encoding="utf-8"?>
<configuration>
<configSections>
<sectionGroup name="elmah">
<section name="security" requirePermission="false"
type="Elmah.SecuritySectionHandler, Elmah" />
<section name="errorLog" requirePermission="false"
type="Elmah.ErrorLogSectionHandler, Elmah" />
<section name="errorMail" requirePermission="false"
type="Elmah.ErrorMailSectionHandler, Elmah" />
<section name="errorFilter" requirePermission="false"
type="Elmah.ErrorFilterSectionHandler, Elmah" />
</sectionGroup>
</configSections>
…
</configuration>
Some packages contain a tools folder, which may contain PowerShell scripts and other executables. We cover that in more detail later in this chapter.
With all these settings in place, you are now free to make use of the library in your project, with the benefits of full IntelliSense and programmatic access to it. In the case of ELMAH, you have no additional code to write in order to try it out. To see ELMAH in action, run the application and visit /elmah.axd (see Figure 10.9).
Note
What you just saw is that after you have NuGet installed, adding ELMAH to your project is as easy as finding it in the NuGet dialog and clicking the Install button. NuGet automates all the boring rote steps normally needed to add a library to your project in a way that you're immediately ready to take advantage of it.
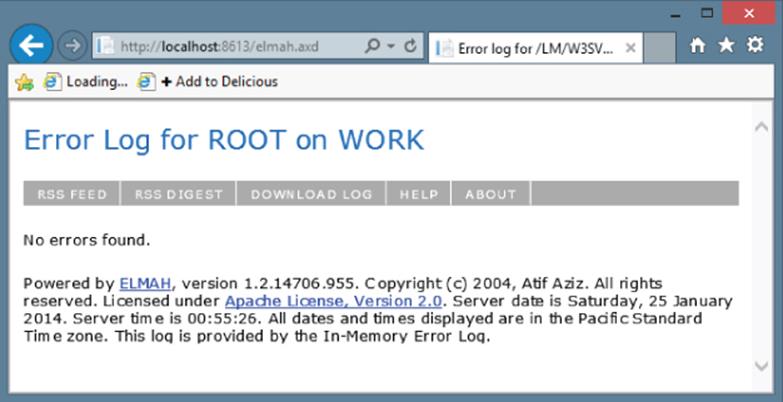
Figure 10.9
Updating a Package
NuGet doesn't just help you install packages, it also helps you maintain them after installation. For example, let's assume you've installed 10 or so packages in your project. At some point, you're going to want to update some (or all) of your packages to the latest version of each. Before NuGet, this was a time-consuming process of searching for and visiting the homepage of each library and checking the latest version against the one you have.
With NuGet, updating is as easy as clicking the Updates node in the left pane. This displays a list of packages in the current project that have newer versions available. Click the Update button next to each package to upgrade the package to the latest version. This also updates all the dependencies of the packages, ensuring that only compatible versions of the dependencies are installed.
Package Restore
As mentioned earlier, the one possible NuGet workflow assumes developers will commit the Packages folder into version control. One benefit of this approach is that retrieving the solution from version control ensures that everything needed to build the solution is available. The packages do not need to be retrieved from another location.
However, this approach has a couple of downsides to it. The Packages folder is not part of the Visual Studio solution, so developers who administer version control via Visual Studio integration must take an additional step to ensure the Packages folder is committed. If you happen to use TFS (Team Foundation System) for source control, NuGet automatically commits the Packages folder.
Developers who use a distributed version control system (DVCS), such as Git or Mercurial, face another downside. Typically, DVSs are not efficient in handling binary files. If a project contains a large number of packages that change a lot, the DVCS repository can grow quite large. In this case, not committing the Packages folder to version control makes sense.
NuGet 1.6 introduced the package restore feature to address these downsides and support a workflow that doesn't require developers to commit packages to source control. This process used to require a few manual steps: Each project required a separate step to enable package restore, and for a time (NuGet versions 2.0 through 2.6) each developer needed to configure Visual Studio to allow package restore.
Note
NuGet Package Restore is now enabled by default, but users can opt out using two options in the Package Manager settings in Visual Studio:
· Allow NuGet to download missing packages
· Automatically check for missing packages during build in Visual Studio
For more information on these settings, see the NuGet Package Restore documentation: http://docs.nuget.org/docs/reference/package-restore.
NuGet 2.7 simplified things significantly with the introduction of Automatic Package Restore. No manual steps are required either in your projects or in Visual Studio; MSBuild automatically performs a package restore step prior to building the application. NuGet looks at each package entry in every Packages.config file, then downloads and unpacks the package. Note that it doesn't “install” the package. The assumption is that the package is already installed and all the changes it made to your solution are already committed. The only things missing are the files in the Packages folder, such as assemblies and tools.
If you have existing applications, which were configured using the previous package restore configuration, you must make a few simple changes to migrate to the Automatic Package Restore workflow. The NuGet documentation explains this process:http://docs.nuget.org/docs/workflows/migrating-to-automatic-package-restore.
Using the Package Manager Console
Earlier I mentioned that you could interact with NuGet in two ways. In this section I cover the second way, the Package Manager Console. This is a PowerShell-based console within Visual Studio that provides a powerful way to find and install packages and supports a few additional scenarios that the Manage NuGet Packages dialog doesn't.
To launch and use the console, follow these steps:
1. Launch the console by selecting Tools ![]() Library Package Manager
Library Package Manager ![]() Package Manager Console, as shown in Figure 10.10. The Package Manager Console opens, which enables you to perform all the actions available to you from the NuGet Packages dialog.
Package Manager Console, as shown in Figure 10.10. The Package Manager Console opens, which enables you to perform all the actions available to you from the NuGet Packages dialog.
Figure 10.10
2. Perform an action. This is done with commands such as Get-Package, which lists available packages online. This command supports search filters, as shown in Figure 10.11.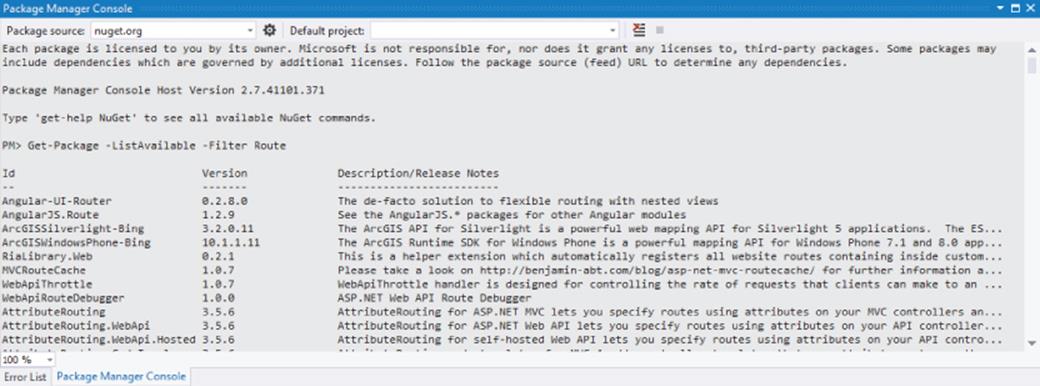
Figure 10.11
3. Use tab expansions. Figure 10.12 shows an example of tab expansion at work with the Install-Package command. As you might guess, this command enables you to install a package. The tab expansion shows a list of packages from the feed, starting with the characters you've typed in so far.
Figure 10.12
4. One nice thing about PowerShell commands is that they support tab expansions, which means you can type the first few letters of a command and press the Tab key to see a range of options.
5. Compose commands. PowerShell also enables composing commands together by piping one command into another. For example, if you want to install a package into every project in your solution, you can run the following command:
Get-Project -All | Install-Package log4net
The first command retrieves every project in your solution and pipes the output to the second command, which installs the specified package into each project.
6. Dynamically add new commands. One powerful aspect of the PowerShell interface is that some packages add new commands to the shell you can use. For example, the EntityFramework package (included by default in a new ASP.NET MVC application) installs new commands to configure and manage Entity Framework Migrations.
Figure 10.13 shows an example of the Enable-Migrations command.
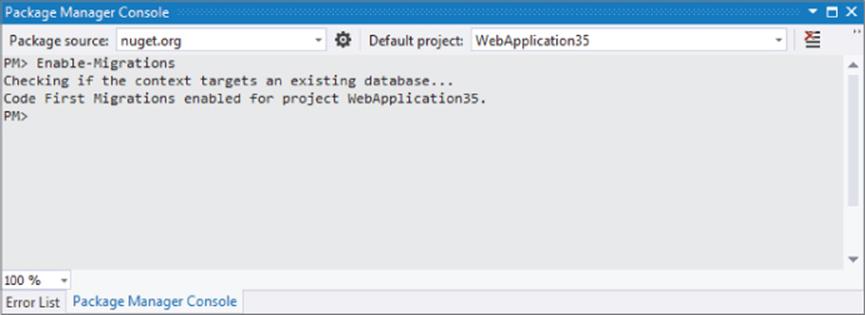
Figure 10.13
By default, the Package Manager Console commands work against the “All” package source. This package source is an aggregate of all the configured package sources. To change the current package source, use the Package source drop-down at the top left of the console to select a different package source or use the -Source flag to specify a different package source when running a command. The flag changes the package source for the duration of that command. To change the set of configured package sources, click the button that looks like a gear to the right of the Package source drop-down. This brings up the Configure Package Sources dialog.
Likewise, the Package Manager Console applies its commands to the default project. The default project is displayed in a drop-down at the top right of the console. When you run a command to install a package, it only applies to the default project. Use the –Projectflag followed by the project name to apply the command to a different project.
For more details about the Package Manager Console and a reference list of the available commands, visit the NuGet Docs website: http://docs.nuget.org/docs/reference/package-manager-console-powershell-reference.
Note
Generally the decision whether to use the Manage NuGet Packages dialog versus the Package Manager Console comes down to a matter of preference: Do you like clicking or typing? However, the Package Manager Console supports a few scenarios that are not available via the dialog:
1. Install a specific version using the -Version flag (for example, Install-Package EntityFramework -Version 4.3.1).
2. Reinstall a package that has already been installed using the -Reinstall flag (for example, Install-Package JQueryUI -Reinstall). This is useful if you've removed files that were installed by the package or in certain build scenarios.
3. Ignore dependencies using the -ignoreDependencies flag (Install-Package jQuery.Validation –ignoreDependencies). This is often useful if you've already installed dependencies outside of NuGet.
4. Force the uninstallation of a package despite dependencies (Uninstall-Package jQuery -force). Again, this is helpful if you want to manage a dependency outside of NuGet.
CREATING PACKAGES
Although consuming packages with NuGet is easy, there wouldn't be any packages to consume if people didn't also create them. This is why the NuGet team made package creation as simple as possible.
Before you create a package, make sure to download the NuGet.exe command-line utility from the NuGet CodePlex website at http://nuget.codeplex.com/. Copy NuGet.exe to a more central location on your hard drive and add that location to your PATH environment variable.
NuGet.exe is self-updatable via the Update command. For example, you can run
NuGet.exe update -self
or use the short form:
Nuget u -self
This backs up the current version of NuGet.exe by appending the .old extension to its filename, and then replaces it with the latest version of NuGet.exe.
After you have NuGet.exe installed, you have three main steps to follow to create a package:
1. Organize the package contents into a convention-based folder structure.
2. Specify the metadata for the package in a .nuspec file.
3. Run the NuGet.exe Pack command against the .nuspec file:
Nuget Pack MyPackage.nuspec
Packaging a Project
In many cases, a package contains a single assembly that maps nicely to a Visual Studio project (a .csproj or .vbproj). In this case, creating a NuGet package is trivially easy. From a command prompt, navigate to the directory containing your project file and run the following command:
NuGet.exe pack MyProject.csproj -Build
If the directory contains only a single project file, you can omit the project filename. This compiles the project and uses the project's assembly metadata to fill in the NuGet metadata.
Typically, though, you want to customize the package's metadata. You can do this via the following command:
NuGet.exe spec MyProject.csproj
This creates a .nuspec file (covered later in this section) with special replacement tokens for information that will be retrieved from the assembly. The NuGet docs go into much more detail about this: http://docs.nuget.org/docs/creating-packages/creating-and-publishing-a-package.
Note
NuGet also supports packaging symbol packages using the NuGet Pack MyPackage.nuspec - Symbols command. You can then publish them, either to the community SymbolSource.org server (the default) or an internal corporate symbol server. This allows developers to debug into the code in your NuGet package from within Visual Studio. For more information on creating and publishing symbol packages, see the NuGet documentation: http://docs.nuget.org/docs/creating-packages/creating-and-publishing-a-symbol-package.
Packaging a Folder
NuGet also supports creating a package based on a folder structure. This makes sense when you don't have a simple mapping from a project to a package — for example, your package contains versions of your assembly for multiple versions of the .NET Framework.
By default, the NuGet Pack command recursively includes all the files in the folder where the specified .nuspec file is located. Overriding this default is possible by specifying the set of files to include within the .nuspec file.
A package consists of three types of files, as outlined in Table 10.1.
Table 10.1 Package File Types
|
Folder |
Description |
|
Lib |
Each assembly (.dll file) in this folder gets referenced as an assembly reference in the target project. |
|
Content |
Files within the content folder are copied to the application root when the package is installed. If the file ends with the .pp, .xdt or .transform extension, a transformation is applied before copying it, as explained in the following section, “Configuration File and Source Code Transformations.” |
|
Tools |
Contains PowerShell scripts that may be run during installation or initialization of the solution, as well as any programs that should be accessible from the Package Manager Console. |
Typically, when creating a package, you set up one or more of these default folders with the files needed for your package. Most packages add an assembly into a project, so going into more detail about the structure of the lib folder is worth it.
If your package requires extra details for the developer who uses it, include a readme.txt file in the root of the package. When the package is installed, NuGet opens the readme.txt file when installation completes. However, to avoid overwhelming users with a bunch of opened readme files, the readme is opened only when the developer installs that package directly, not when it is installed as a dependency to another package.
Configuration File and Source Code Transformations
While you can copy some content files directly into the target project, others require modification or transformation. For example, if you have configuration information to add to the project, you need to merge with the existing web.config rather than overwrite it. NuGet provides three methods for transforming content during installation. You can use:
· A configuration file transform to insert configuration into a web.config or app.config file. You do this by adding a .transform to your source file, so web.config.transform modifies the target web.config, while app.config.transform modifies the targetapp.config. Your .transform file uses the standard configuration file syntax, but only includes the sections to be inserted during installation.
· XML Document Transform (XDT) syntax to modify XML files (including web.config and app.config) using a .install.xdt suffix. Similarly, you can use .uninstall.xdt to remove changes during package uninstallation. Whereas simple configuration file transforms are automatic and out of your control, the XDT Locator and Transform attributes provide you with complete control over how the target XML file is modified.
· Source code transformations to insert Visual Studio project properties into the target source code. You do this with a .pp file extension (short for project properties). You most commonly use this to apply the project namespace to application code using the $rootnamespace$ property.
All three transformation methods are described in detail here: http://docs.nuget.org/docs/creating-packages/configuration-file-and-source-code-transformations.
NuSpec File
When you create a package, you want to specify information about the package, such as the package ID, a description, the authors, and so on. All this metadata is specified in an XML format in a .nuspec file. This file is also used to drive package creation and is included within the package after creation.
A quick way to write a NuSpec file is to use the NuGet Spec command to generate a boilerplate spec file. Use the AssemblyPath flag to generate a NuSpec file from the metadata stored in an assembly. For example, if you have an assembly named MusicCategorizer.dll, the following would be the command to generate a NuSpec file from the assembly's metadata:
nuget spec –AssemblyPath MusicCategorizer.dll
This command generates the following NuSpec file:
<?xml version="1.0"?>
<package>
<metadata>
<id>MusicCategorizer</id>
<version>1.0.0.0</version>
<title>MusicCategorizer</title>
<authors>Haackbeat Enterprises</authors>
<owners>Owner here</owners>
<licenseUrl>http://LICENSE_URL_HERE_OR_DELETE_THIS_LINE</licenseUrl>
<projectUrl>http://PROJECT_URL_HERE_OR_DELETE_THIS_LINE</projectUrl>
<iconUrl>http://ICON_URL_HERE_OR_DELETE_THIS_LINE</iconUrl>
<requireLicenseAcceptance>false</requireLicenseAcceptance>
<description>
Categorizes music into genres and determines beats
per minute (BPM) of a song.
</description>
<releaseNotes>Summary of changes made in this release
of the package.
</releaseNotes>
<copyright>Copyright 2014</copyright>
<tags>Tag1 Tag2</tags>
<dependencies>
<dependency id="SampleDependency" version="1.0" />
</dependencies>
</metadata>
</package>
All NuSpec files start with the outer <packages> element. This element must contain a child <metadata> element and optionally may contain a <files> element, which I cover later. If you follow the folder structure convention mentioned earlier, the <files> element is not needed.
Metadata
Table 10.2 outlines the elements contained within the <metadata> section of a NuSpec file.
Table 10.2 Metadata Elements
|
Element |
Description |
|
id |
Required. The unique identifier for the package. |
|
version |
Required. The version of the package using the standard version format of up to four version segments (for example, 1.1 or 1.1.2 or 1.1.2.5). |
|
title |
The human-friendly title of the package. If omitted, the ID is displayed instead. |
|
authors |
Required. A comma-separated list of authors of the package code. |
|
owners |
A comma-separated list of the package creators. This is often, though not necessarily, the same list as in authors. Note that when you upload your package to the gallery, the account on the gallery supersedes this field. |
|
licenseUrl |
A link to the package's license. |
|
projectUrl |
A URL for the homepage of the package where people can find more information about the package. |
|
iconUrl |
A URL for the image to use as the icon for the package in the dialog. This should be a 32x32-pixel .png file that has a transparent background. |
|
requireLicenseAcceptance |
A Boolean value that specifies whether the client needs to ensure that the package license (described by licenseUrl) is accepted before the package is installed. |
|
description |
Required. A long description of the package. This shows up in the right pane of the Package Manager dialog. |
|
releaseNotes |
A description of changes made in this version of the package. The release notes are shown instead of the description when looking at package updates. |
|
tags |
A space-delimited list of tags and keywords that describe the package. |
|
frameworkAssemblies |
List of .NET Framework assembly references that will be added to the target project. |
|
references |
Names of assemblies within the lib folder that are added to the project as assembly references. Leave this blank if you want all assemblies in the lib folder to be added (the default behavior). If you specify any references, only those assemblies are added. |
|
dependencies |
The list of dependencies for the package specified via child <dependency> elements. |
|
language |
The Microsoft Locale ID string (or LCID string) for the package, such as en-us. |
|
copyright |
Copyright details for the package. |
|
summary |
A short description of the package. This shows up in the middle pane of the Package Manager dialog. |
Choosing an ID for a package carefully is important because it must be unique. This value is used to identify a package when running commands to install and update packages.
The format for a package ID follows the same basic rules as a .NET namespace. So MusicCategorizer and MusicCategorizer.Mvc are valid package IDs, but MusicCategorizer!!!Web is not.
The Metadata section may also contain one attribute, minClientVersion, which defines the minimum version of NuGet required to install the package. If specified, both NuGet and Visual Studio will enforce the restriction. For example, users cannot install a package with the following minClientVersion setting using either NuGet.exe or Visual Studio without at least NuGet version 2.7:
<metadata minClientVersion="2.7">
Dependencies
Many packages are not developed in isolation, but themselves depend on other libraries. You could include those dependencies in your package, but if they are available as NuGet packages, an even better approach is to specify those packages as dependencies in your package's metadata. If those libraries don't exist as packages, contact the owners of the library and offer to help them package it up!
Each <dependency> contains two key pieces of information, as shown in Table 10.3.
Table 10.3 Dependency Elements
|
Attribute |
Description |
|
id |
The package ID that this package depends on |
|
version |
The range of versions of the dependency package that this package may depend on |
As mentioned in Table 10.3, the version attribute specifies a range of versions. By default, just entering a version number, for example, <dependency id="MusicCategorizer" version="1.0" />, indicates a minimum version for the dependency. This example shows a dependency that allows your package to take a dependency on version 1.0 and above of the MusicCategorizer package.
If more control over the dependencies is required, you can use interval notation to specify a range. Table 10.4 shows the various ways to specify a version range.
Table 10.4 Version Ranges
|
Range |
Meaning |
|
1.0 |
Version is greater than or equal to 1.0. This is the most common and recommended usage. |
|
[1.0, 2.0) |
Version is between 1.0 and 2.0 including 1.0, but excluding 2.0. |
|
(,1.0] |
Version is less than or equal to 1.0. |
|
(,1.0) |
Version is strictly less than 1.0. |
|
[1.0] |
Version is exactly 1.0. |
|
(1.0,) |
Version is strictly greater than 1.0. |
|
(1.0,2.0) |
Version is between 1.0 and 2.0, excluding those versions. |
|
[1.0,2.0] |
Version is between 1.0 and 2.0 including those versions. |
|
(1.0, 2.0] |
Version is between 1.0 and 2.0 excluding 1.0, but including 2.0. |
|
(1.0) |
Invalid. |
|
Empty |
All versions. |
In general, the recommended approach is to specify only a lower bound. This gives the person who installs the package a fighting chance to make it work with a newer version of the dependency. If you specify an upper bound, it blocks users from even trying to make it work with a higher version of the dependency prematurely. In the case of strongly named assemblies, NuGet automatically adds the appropriate assembly binding redirects to the target project's configuration file.
For an in-depth discussion of the versioning strategy employed by NuGet, read the blog series by David Ebbo at http://blog.davidebbo.com/2011/01/nuget-versioning-part-1-taking-on-dll.html.
Specifying Files to Include
If you follow the folder structure conventions described earlier, you do not have to specify a list of files in the .nuspec file. But in some cases you may choose to be explicit about which files to include. For example, you might have a build process where you would rather choose the files to include rather than copy them into the convention-based structure first. You can use the <files> element to choose which files to include.
Note that if you specify any files, the conventions are ignored and only the files listed in the .nuspec file are included in the package.
The <files> element is an optional child element of the <package> element and contains a set of <file> elements. Each <file> element specifies the source and destination of a file to include in the package. Table 10.5 describes these attributes.
Table 10.5 Version Ranges
|
Attribute |
Description |
|
src |
The location of the file or files to include. The path is relative to the NuSpec file unless an absolute path is specified. The wildcard character, *, is allowed. Using a double wildcard, **, implies a recursive directory search. |
|
target |
Optional. The destination path for the file or set of files. This is a relative path within the package, such as target="lib" or target="lib\net40". Other typical values include target="content" or target="tools". |
The following example shows a typical files element:
<files>
<file src="bin\Release\*.dll" target="lib" />
<file src="bin\Release\*.pdb" target="lib" />
<file src="tools\**\*.*" target="tools" />
</files>
All paths are resolved relative to the .nuspec file unless an absolute path is specified. For more details on how this element works, check out the specifications on the NuGet Documentation website: http://docs.nuget.org/docs/reference/nuspec-reference.
Tools
A package can include PowerShell scripts that automatically run when the package is installed or removed. Some scripts can add new commands to the console, such as the EntityFramework package.
Let's walk through building a simple package that adds a new command to the Package Manager Console. In this particular case, the package won't be particularly useful, but it will illustrate some useful concepts.
I've always been a fan of the novelty toy called the Magic 8-Ball. If you're not familiar with this toy, it's very simple. It's an oversized plastic 8-ball (the kind you use when playing pool or pocket billiards). First, you ask the 8-ball any yes or no question that pops in your head. You then shake it and peer into a small clear window that allows you to see one face of an icosahedral (20-sided) die with the answer to the question.
You'll build your own version of the Magic 8-Ball as a package that adds a new PowerShell command to the console. You start by writing a script named init.ps1. By convention, scripts with this name placed in the tools folder of the package are executed every time the solution is opened, allowing the script to add this command to the console.
Table 10.6 shows a list of all the special PowerShell scripts that can be included in the tools folder of a package and when NuGet executes them.
Table 10.6 Special PowerShell Scripts
|
Name |
Description |
|
Init.ps1 |
Runs the first time a package is installed into any project within a solution. If the same package is installed into additional projects in the solution, the script is not run during those installations. The script also runs every time the solution is opened in Visual Studio. This is useful for adding new commands into the Package Manager Console. |
|
Install.ps1 |
Runs when a package is installed into a project. If the same package is installed in multiple projects in a solution, the script runs each time the package is installed into the project. This is useful for taking additional installation steps beyond what NuGet normally can do. |
|
Uninstall.ps1 |
Runs every time a package is uninstalled from a project. This is useful for any cleanup your package may need to do beyond what NuGet does normally. |
When calling these scripts, NuGet passes in a set of parameters, as shown in Table 10.7.
Table 10.7 NuGet PowerShell Script Parameters
|
Name |
Description |
|
$installPath |
Path to the installed package. |
|
$toolsPath |
Path to the tools directory within the installed package directory. |
|
$package |
An instance of the package. |
|
$project |
The project you are installing the package into. This is null in the case of init.ps1 because init.ps1 runs at the solution level. |
Your init.ps1 script is very simple. It imports a PowerShell module that contains your real logic:
param($installPath, $toolsPath, $package, $project)
Import-Module (Join-Path $toolsPath MagicEightBall.psm1)
The first line declares the parameters to the script that NuGet will pass into the script when NuGet calls the script.
The second line imports a module named MagicEightBall.psm1. This PowerShell module script contains the logic for this new command you plan to write. This module is located in the same directory as the init.ps1 script, which, as described earlier, must go in thetools directory. That's why you need to join the $toolsPath (path to the tools directory) with the name of your module to get the full path to your module script file.
The following is the source for MagicEightBall.psm1:
$answers = "As I see it, yes",
"Reply hazy, try again",
"Outlook not so good"
function Get-Answer($question) {
$rand = New-Object System.Random
return $answers[$rand.Next(0, $answers.Length)]
}
Register-TabExpansion "Get-Answer' @{
"question' = {
"Is this my lucky day?",
"Will it rain tonight?",
"Do I watch too much TV?"
}
}
Export-ModuleMember Get-Answer
Let's break it down:
· The first line declares an array of possible answers. Although the real Magic 8-Ball has 20 possible answers, you'll start off simply with only three.
· The next block of code declares your function named Get-Answer. This is the new command that this package adds to the Package Manager Console. It generates a random integer number between 0 (inclusive) and 3 (exclusive). You then use this random number as an index into your array to return a random answer.
· The next block of code registers a tab expansion for your new command via the Register-TabExpansion method. This is a neat way to provide IntelliSense-like tab completion to any function. The first parameter is the name of the function for which you will provide tab expansion. The second parameter is a dictionary used to supply the possible tab expansion values for each parameter to the function. Each entry in the dictionary has a key corresponding to the parameter name. In this example, you only have one parameter,question. The value of each entry is an array of possible values. This code sample provides three possible questions you can ask the 8-ball, but of course, the user of the function is free to ask any question.
· The last line of code exports the Get-Answer function. This makes it available to the console as a publicly callable command.
Now all you need to do is package these files and install your package. For these scripts to run, you must add them to the tools folder of a package. If you drag these files into the Contents pane of Package Explorer (a useful tool I cover later in this chapter in the section “Using the Package Explorer”), it'll automatically prompt you to place them in the tools folder. If you're using NuGet.exe to create the package, place these files in a folder named tools.
After you finish creating the package, you can test it by installing it locally. Simply place the package in a folder and add that folder as a package source. After you install the package, the new command becomes available in the Package Manager, complete with tab expansion, as shown in Figure 10.14.
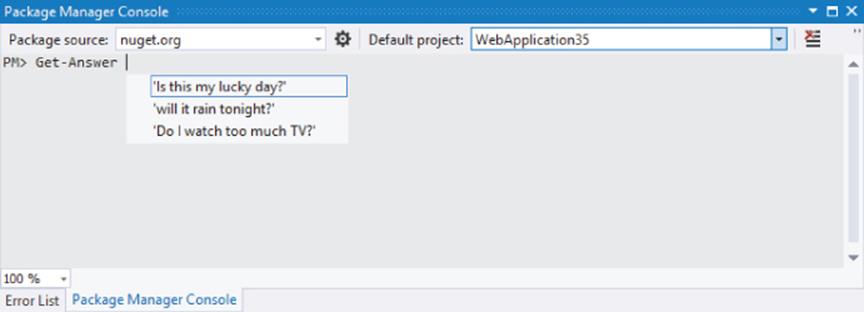
Figure 10.14
Building packages that can add powerful new commands to the Package Manager Console is relatively quick and easy, after you get the hang of PowerShell. We've only begun to scratch the surface of the types of things you can do with it.
Framework and Profile Targeting
Many assemblies target a specific version of the .NET Framework. For example, you might have one version of your library that's specific to .NET 2.0 and another version of the same library that takes advantage of .NET 4 features. You do not need to create separate packages for each of these versions. NuGet supports putting multiple versions of the same library in a single package, keeping them in separate folders within the package.
When NuGet installs an assembly from a package, it checks the target .NET Framework version of the project you are adding the package to. NuGet then selects the correct version of the assembly in the package by selecting the correct subfolder within the lib folder.Figure 10.15 shows an example of the layout for a package that targets both .NET 4 and .NET 4.5.
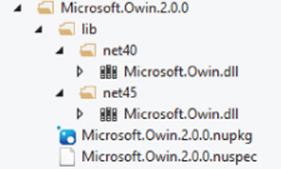
Figure 10.15
To include assemblies for multiple framework versions, use the following naming convention to indicate which assemblies go with which framework versions:
lib\{framework name}{version}
The only two choices for the framework name are .NET Framework and Silverlight. Using the abbreviations for these frameworks, in this case, net and sl, respectively, is a customary practice.
The version is the version of the framework. For brevity, you can omit the dot character. Thus:
· net20 targets .NET 2.0.
· net35 targets .NET 3.5.
· net40 targets .NET 4.
· net45 targets .NET 4.5.
· sl4 targets Silverlight 4.0.
Assemblies that have no associated framework name or version are stored directly in the lib folder.
When NuGet installs a package that has multiple assembly versions, it tries to match the framework name and version of the assembly with the target framework of the project.
If an exact match is not found, NuGet looks at each of the folders within the lib folder of the package and finds the folder with a matching framework version and the highest version number that's less than or equal to the project's target framework.
For example, if you install a package that has a lib folder structure containing net20 and net40 into a project that targets the .NET Framework 3.5, the assembly in the net20 folder (for .NET Framework 2.0) is selected because that's the highest version that's still less than or equal to 3.5.
NuGet also supports targeting a specific framework profile by appending a dash and the profile name (or names, delimited by +) to the end of the folder:
lib\{framework name}{version}
For example, to target a Portable class library on .NET 4.5 for Windows Store apps, Silverlight 5, and Windows Phone 8, place your assembly in a folder named portable-net45+sl5+wp8+win8.
Profiles supported by NuGet include:
· CF: Compact Framework
· Client: Client Profile
· Full: Full Profile
· WP: Windows Phone
Figure 10.16 shows a relatively complex example used by the Portable.MvvmLightLibs package to support a variety of platforms.
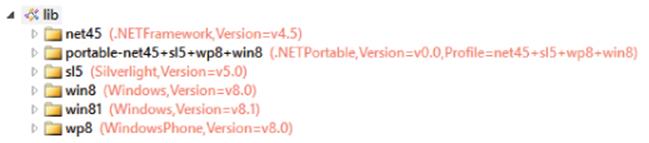
Figure 10.16
Prerelease Packages
By default, NuGet displays only “stable” packages. However, you might want to create a beta version of your next big release and have it available via NuGet.
NuGet supports the concept of prerelease packages. To create a prerelease version, specify a prerelease version number according to the Semantic Versioning (SemVer) specification. For example, to create a beta for your 1.0 package, you might set the version as 1.0.0-beta. You can set this either in the NuSpec's version field or via the AssemblyInformationalVersion, if you are creating a package via a project:
[assembly: AssemblyInformationalVersion("1.0.1-alpha")]
For more details about the version string and SemVer, check out the NuGet versioning docs at http://docs.nuget.org/docs/Reference/Versioning.
Prerelease packages can depend on stable packages, but stable packages cannot depend on prerelease packages. The reason for this is that when someone installs a stable package, he or she might not want to take on the added risk of a prerelease package. NuGet requires people to opt into prerelease packages and the inherent risks that entails.
To install a pre-release package from the Manage NuGet Packages dialog, make sure Include Prerelease is selected in the drop-down in the middle pane, not Stable Only. In the Package Manager Console, use the –IncludePrerelease flag with the Install-Packagecommand.
PUBLISHING PACKAGES
The previous section looked at how to create packages. Creating packages is useful, but at some point, you might to want to share them with the world. This section explains how to publish your packages to the NuGet Gallery.
Using Private NuGet Feeds
If you don't want to—or can't—share your package publicly, you can still make use of NuGet with private feeds. There are three good options. You can:
1. Create a local feed just by copying the packages into a folder either on your development computer or on a team fileshare.
2. Run your own NuGet server by installing the NuGet.Server package into a new Web Application created using the Empty template.
3. Use a private feed hosting service, such as MyGet (http://myget.org). These service offer access control and other advanced features, some free and some paid.
In all three cases, accessing the private feed is accomplished by adding a new package source via the Tools ![]() Options
Options ![]() NuGet
NuGet ![]() Package Sources dialog.
Package Sources dialog.
More information about private NuGet feeds is available in the NuGet documentation: http://docs.nuget.org/docs/creating-packages/hosting-your-own-nuget-feeds.
Publishing to NuGet.org
By default, NuGet points to a feed located at https://nuget.org/api/v2/.
To publish your package to this feed, you do the following:
1. Set up a NuGet Gallery account at http://nuget.org/. You can create an account using either a Microsoft Account (formerly called Windows Live ID) or using a username and password. Figure 10.17 shows the NuGet gallery.
Figure 10.17
2. Log into the site, and then click your username. A page with options to manage your account and your packages appears, as shown in Figure 10.18.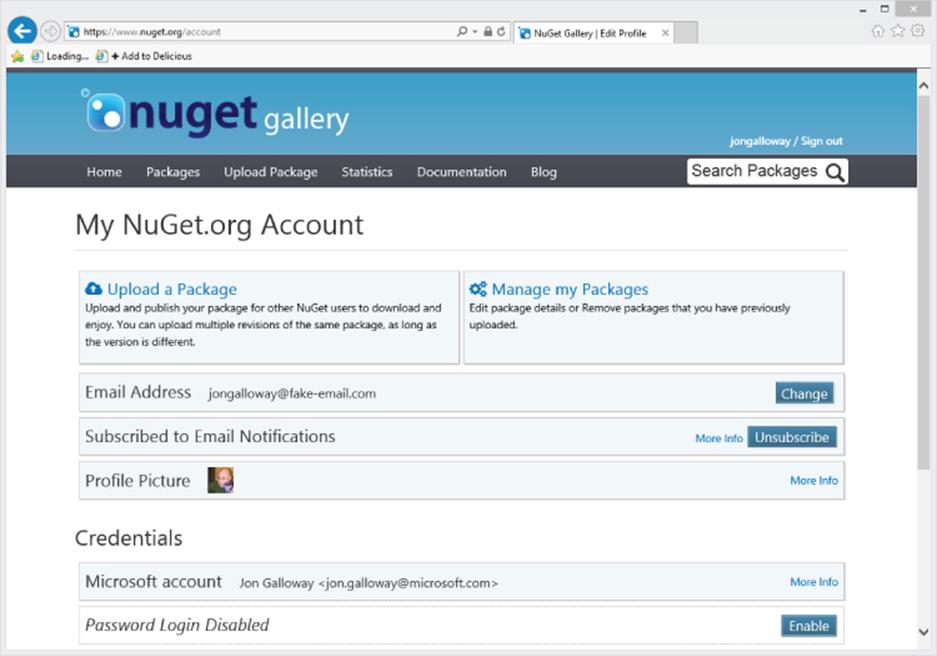
Figure 10.18
3. Click the Upload a Package link to navigate to the upload page, as shown in Figure 10.19.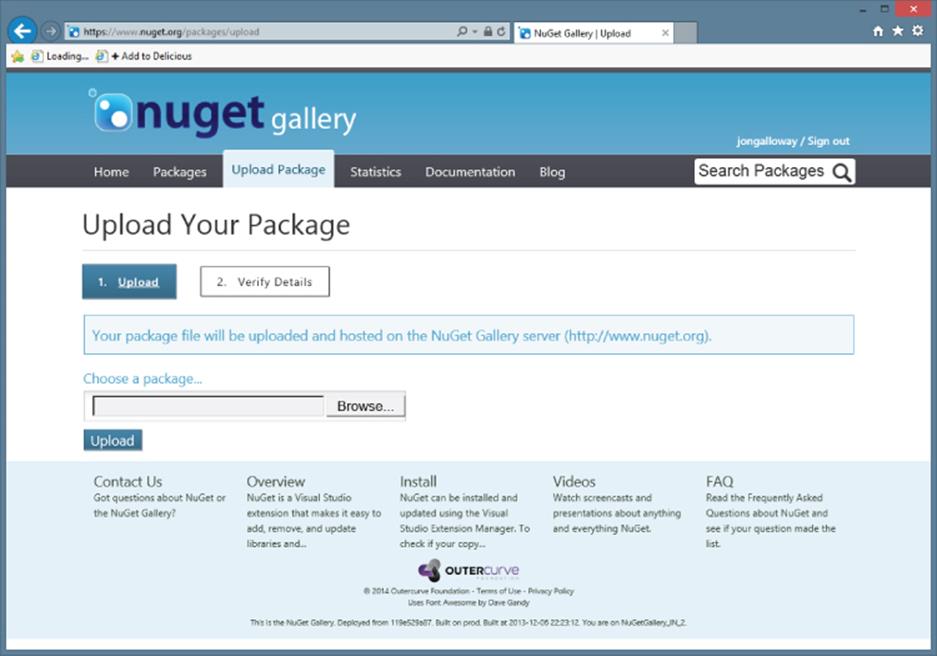
Figure 10.19
4. Uploading a package takes you to a screen that enables you to verify the metadata for the package, as shown in Figure 10.20. If you want to upload the package but keep it hidden from search results, change the Listed in Search Results option.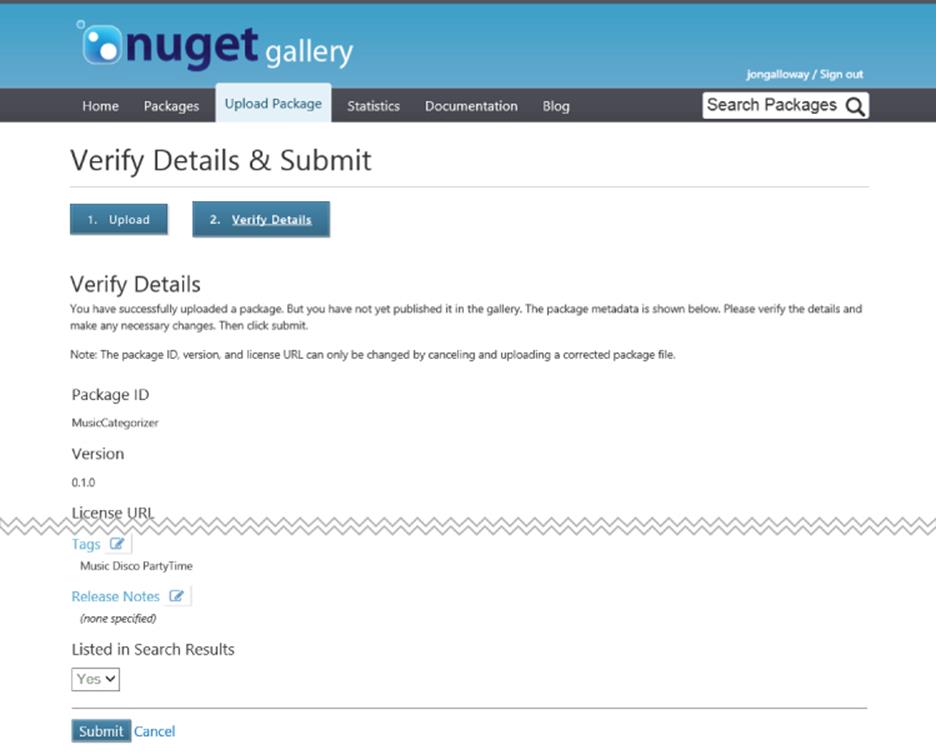
Figure 10.20
Note
The package can still be installed if you know the ID and version. This is useful if you want to test the package before you list it publicly.
5. After you've verified the metadata, click Submit. This uploads the package and redirects you to the package details page.
Using NuGet.exe
Given that you can use NuGet.exe to create a package, wouldn't it be nice if you could also use it to publish a package? The good news is you can do that with the NuGet push command. But before you run the command, you'll need to make note of your API key.
On the NuGet website, click your username to navigate to the account page. This page enables you to manage your account, but more importantly, it displays your access key, which is required when publishing packages using NuGet.exe. Simply scroll down a bit to see the API key section, as shown in Figure 10.21.
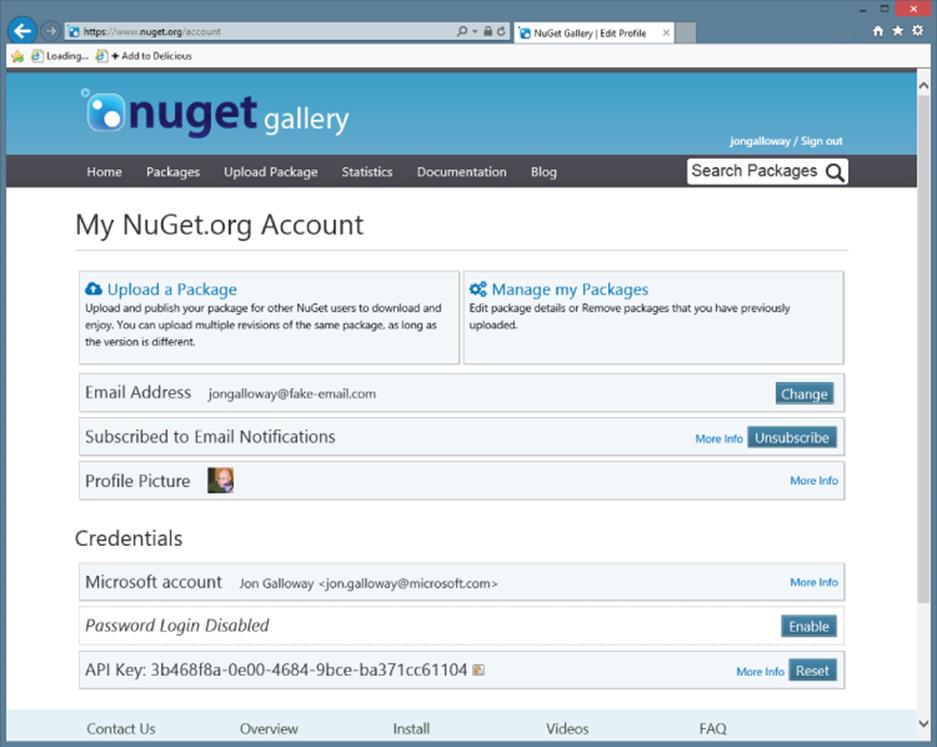
Figure 10.21
Conveniently, there's also a Reset button in case you accidentally leak your key, much like I just did by posting this screenshot.
When you use the NuGet push command, it requires that you specify your API key. However, you can use the setApiKey command to have NuGet remember your API key by securely storing it so that you don't need to specify it every time you run the push command.Figure 10.22 shows an example of using the setApiKey command.
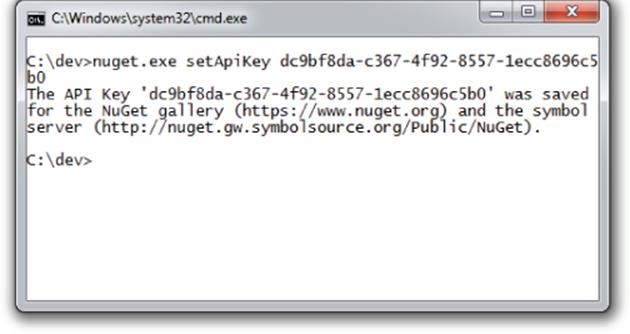
Figure 10.22
The API key is saved to a NuGet.config file in your Roaming profile, found at \%APPDATA%\NuGet\NuGet.config.
With the API key saved, publishing a command is as easy as running the push command and specifying the .nupkg file you want to publish, as shown in Figure 10.23.
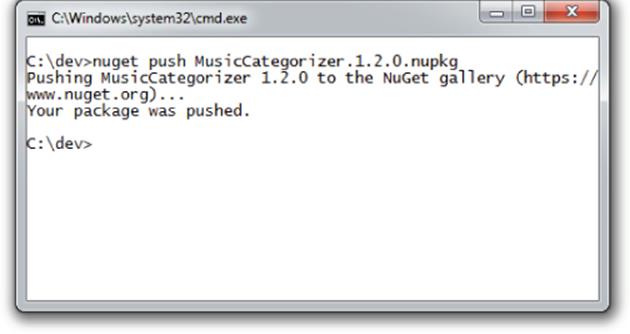
Figure 10.23
This makes the package immediately available in the feed and thus available for installation via the dialog or console. Note that it might take a few minutes before this change is reflected in the nuget.org website.
Using the Package Explorer
After building your package, you might want to examine the package to ensure that it has been packaged up properly. All NuGet packages are, at their core, simply zip files. You can rename the file to have a .zip file extension and then unzip the contents to take a look.
That's good to know, but an easier way to look inside a package is by using the Package Explorer. This is a ClickOnce application, which is available at http://npe.codeplex.com.
After installing the Package Explorer, you can double-click any .nupkg file to view its contents or even open directly from the NuGet feed. Figure 10.24 shows the MVC 5 NuGet package open in NuGet Package Explorer.
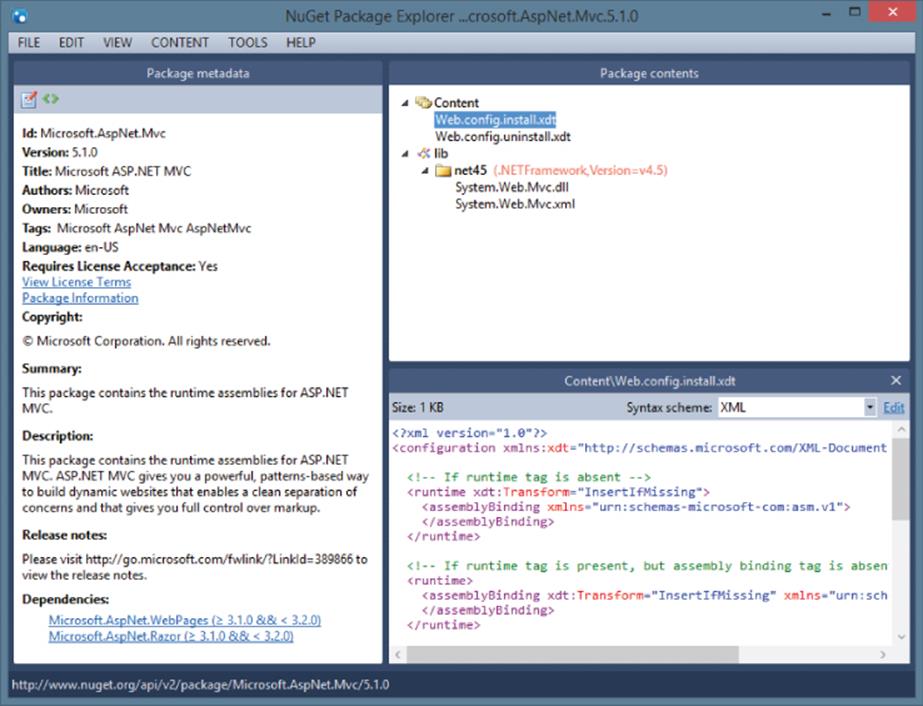
Figure 10.24
You can also use the Package Explorer to make quick edits to a package file or even to create a brand-new package. For example, clicking the Edit menu and selecting Edit Package Metadata makes the metadata editable, as shown in Figure 10.25.
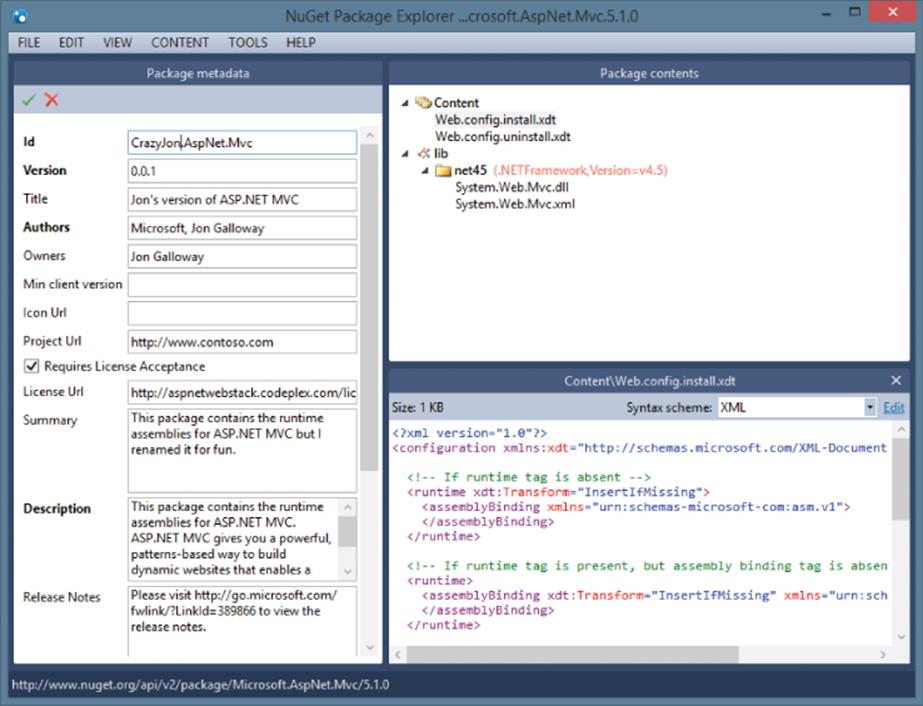
Figure 10.25
You can drag files into the appropriate folder within the Package Contents pane. When you drop a file into the Package Contents pane but not on any particular folder, Package Explorer prompts you with a suggested folder depending on the content. For example, it suggests putting assemblies in the lib folder and PowerShell scripts in the Tools folder.
When you are done editing the package, you can save the .nupkg file by going to the File ![]() Save menu option or by using the Ctrl+S key combination.
Save menu option or by using the Ctrl+S key combination.
Package Explorer also provides a convenient means to publish the package via the File ![]() Publish menu. This opens a publish dialog, as shown in Figure 10.26. Just enter your API key and click Publish, and the package will show up in the feed immediately.
Publish menu. This opens a publish dialog, as shown in Figure 10.26. Just enter your API key and click Publish, and the package will show up in the feed immediately.
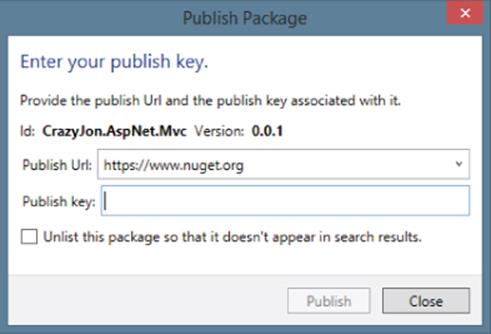
Figure 10.26
SUMMARY
Although NuGet ships with ASP.NET MVC 5 and complements it nicely, NuGet is not restricted to ASP.NET MVC by any means. NuGet can install packages for nearly any type of project within Visual Studio. Are you building a Windows Phone application? There's a set of NuGet packages for it.
However, when you are building an ASP.NET MVC 5 application, NuGet is a great companion. Many packages are available that take advantage of specific features built into ASP.NET MVC.
For example, you can install the Autofac.Mvc5 package to automatically wire up the Autofac dependency injection library as the dependency resolver. Install the Glimpse.Mvc5 package to add end-to-end debugging and diagnostics for your ASP.NET MVC applications from a browser console. One site tracks some community favorite NuGet packages for ASP.NET MVC development here: http://nugetmusthaves.com/Category/MVC. Because NuGet packages can be quickly installed and uninstalled, discovering and trying them out is pretty painless.
When you are ready to share your own useful libraries with the world, don't just place them in a zip file and pop them on the Web. Turn them into a NuGet package and make it easy for others to discover the great work you've created.
All materials on the site are licensed Creative Commons Attribution-Sharealike 3.0 Unported CC BY-SA 3.0 & GNU Free Documentation License (GFDL)
If you are the copyright holder of any material contained on our site and intend to remove it, please contact our site administrator for approval.
© 2016-2026 All site design rights belong to S.Y.A.