Professional ASP.NET MVC 5 (2014)
Chapter 14
Unit Testing
—by Brad Wilson
What's In This Chapter?
· Understanding unit testing and test-driven development
· Building a unit test project
· Advice for unit testing your ASP.NET MVC and ASP.NET Web API applications
Unit testing and developing testable software have become recognized as essential elements in the software quality process. Most professional developers practice some form of unit testing in their daily jobs. Test-driven development (TDD) is a style of writing unit tests where the developer writes a test before writing any production code. TDD allows the developer to evolve the design in an organic way, while still gaining the quality and regression testing benefits of unit tests. ASP.NET MVC was written with unit testing in mind. This chapter focuses on how unit testing (and TDD in particular) applies to ASP.NET MVC.
For users who have never practiced unit testing or TDD, the first half of this chapter offers a brief introduction to both subjects to encourage readers to seek out more in-depth information on the practices. Unit testing is a very large subject. This introduction should serve as a guide to whether unit testing and TDD are something you want to research further.
The second half of this chapter includes real-world advice for unit testing your ASP.NET MVC and Web API applications. Those who are already practicing unit testing and want to get the most out of their craft might want to skip directly to the second half of the chapter.
UNDERSTANDING UNIT TESTING AND TEST-DRIVEN DEVELOPMENT
When we talk about software testing, we are referring to a whole host of different activities, including unit testing, acceptance testing, exploratory testing, performance testing, and scalability testing. To set the stage for this chapter, starting with a shared understanding of what is meant by unit testing—the subject of this section—is helpful.
Defining Unit Testing
Most developers have some exposure to unit testing and some opinion on what works best. In our experience, the following attributes tend to be present in most long-term successful unit testing:
· Testing small pieces of production code (“units”)
· Testing in isolation from the rest of the production code
· Testing only public endpoints
· Running the tests gets an automated pass/fail result
The following sections examine each of these rules and how they impact the way you write unit tests.
Testing Small Pieces of Code
When writing a unit test, you're often looking for the smallest piece of functionality that you can reasonably test. In an object-oriented language such as C#, this usually means nothing larger than a class, and in most cases, you're testing a single method of a class. The reason to test small pieces of code is that it allows you to write simple tests. These tests should be easy to understand so that you can verify that you're accurately testing what you intended.
Source code is read far more often than it is written; this is especially important in unit tests, which attempt to codify the expected rules and behaviors of the software. When a unit test fails, the developer should be able to quickly read the test to understand what has failed and why, so he or she can better understand how to fix what's broken. Testing small pieces of code with small tests greatly enhances this critical comprehensibility.
Testing in Isolation
Another important aspect of a unit test is that it should very accurately pinpoint where problems are when they arise. Writing code against small pieces of functionality is an important aspect of this, but it's not enough. You need to isolate your code from any other complex code with which it might interact so that you can be fairly sure a test failure is due to bugs in the code you're testing rather than bugs in collaborating code. It is the job of the unit tests of the collaborating code to test whether it has bugs.
Testing in isolation has an additional benefit because the code with which you will eventually interact might not yet exist. This is particularly true when you're working on larger teams with several active developers; several teams might handle interacting pieces of functionality and develop them in parallel. Testing your components in isolation not only allows you to make progress before other components are available, but it also works to help you better understand how components interact with one another and to catch design mistakes before integrating those components together.
Testing Only Public Endpoints
Many developers who first start unit testing often feel the most pain when the time comes to change internal implementations of a class. A few changes to code can cause multiple unit tests to fail, and developers can become frustrated trying to maintain the unit tests while making those production changes. A common source of this frustration comes from unit tests that know too much about how the class they're testing works.
When writing unit tests, if you limit yourself to the public endpoints of the product (the integration points of a component), you can isolate the unit tests from many of the internal implementation details of the component. This means that changing the implementation details will break your unit tests far less often.
If you find yourself having a hard time testing a class without looking into its internals, that's often a sign that the class might be doing too much. Making your class testable might require that you turn a single large class into several smaller classes so that each one does a single, easily tested behavior. This practice of ensuring you have small, focused, single-behavior classes is called the Single Responsibility Pattern (SRP).
Automated Results
Given that you'll write tests against small pieces of code, it's pretty clear that you'll eventually have a large number of unit tests. To gain the benefits of unit tests, you want to run them frequently as you develop them to ensure that you're not breaking existing functionality while you do your work. If this process is not automated, it can result in a big productivity drain on the developer (or worse, it becomes an activity that the developer actively avoids). Ensuring that the result of unit tests is a simple pass or fail judgment is also important; unit test results should not be open to interpretation.
To help the automation process, developers usually resort to using a unit-testing framework. Such frameworks generally allow the developer to write tests in their preferred programming language and development environment, and then create a set of pass/fail rules that the framework can evaluate to determine whether or not the test was successful. Unit-testing frameworks generally come with a piece of software called a runner, which discovers and executes unit tests in your projects. Generally a large variety of such runners exist; some integrate into Visual Studio, some run from a command line, and others come with a GUI, or even integrate with automated build tools (such as build scripts and automated build servers).
Unit Testing as a Quality Activity
Most developers choose to write unit tests because it increases the quality of their software. In this situation, unit testing acts primarily as a quality assurance mechanism, so writing the production code first, and then writing the unit tests afterward, is fairly common for developers. Developers use their knowledge of the production code and the desired end-user behavior to create the list of tests that help assure them that the code behaves as intended.
Unfortunately, weaknesses exist with this ordering of tests after production code. Developers can easily overlook some piece of the production code that they've written, especially if the unit tests are written long after the production code was written. Writing production code for days or weeks before getting around to the final part of unit testing is not uncommon for developers, and it requires an extremely detail-oriented person to ensure that every avenue of the production code is covered with an appropriate unit test. What's worse, after several weeks of coding, developers are more likely to want to write more production code than to stop and write unit tests. TDD works to solve some of those shortcomings.
Defining Test-Driven Development
Test-driven development is the process of using unit tests to drive the design of your production code by writing the tests first, and then writing just enough production code to make the tests pass. On its surface, the end result of traditional unit testing and TDD is the same: production code along with unit tests that describe the expected behavior of that code, which you can use to prevent behavior regression. If both are done correctly, being able to tell by looking at the unit tests whether the tests came first or the production code came first can often be impossible.
When we talk about unit testing being a quality activity, we are speaking primarily of the quality activity of reducing bugs in the software. Practicing TDD achieves this goal, but it is a secondary goal; the primary purpose of TDD is to increase the quality of thedesign. By writing the unit tests first, you describe the way you want components to behave before you've written any of the production code. You cannot accidentally tie yourself to any specific implementation details of the production code because those implementation details don't yet exist. Rather than peeking inside the innards of the code under test, the unit tests become consumers of the production code in much the same way that any eventual collaborator components will consume it. These tests help to shape the API of components by becoming the first users of the APIs.
The Red/Green Cycle
You still follow all the same guidelines for unit tests set out earlier: Write small, focused tests against components in isolation, and run them in an automated fashion. Because you write the tests first, you often get into a rhythm when practicing TDD:
1. Write a unit test.
2. Run it and watch it fail (because the production code is not yet written).
3. Write just enough production code to make the test pass.
4. Re-run the test and watch it pass.
You repeat this cycle over and over again until the production code is completed. This cycle is often called the red/green cycle because most unit-testing frameworks represent failed tests with red text/UI elements and passed tests with green. Being diligent in this process is important. Don't write any new production code unless you have a failing unit test that tells you what you're doing. After the test passes, stop writing new production code (until you have a new test that is failing). When practiced regularly, this process teaches you when to stop writing new code. Just do enough to make a test pass, and then stop; if you're tempted to keep going, describe the new behavior you want to implement in another test. This not only gives you the bug quality benefits of having no undescribed functionality, but it also gives you a moment to pause and consider whether you really need the new functionality and are willing to commit to supporting it long term.
You can also use the same rhythm when fixing bugs. You might need to debug around in the code to discover the exact nature of the bug, but after you've discovered it, you write a unit test that describes the behavior you want, watch it fail, and then modify the production code to correct the mistake. You'll have the benefit of the existing unit tests to help you ensure that you don't break any existing expected behavior with your change.
Refactoring
Following the pattern described here, you'll often find yourself with messy code as a result of these very small incremental code changes. You've been told to stop when the light goes green, so how do you clean up the mess you've made by piling small change on top of small change? The answer is refactoring.
The word refactoring can be overloaded, so we should be very clear that when we talk about refactoring, we mean the process of changing the implementation details of production code without changing its externally observable behavior. What this means in practical terms is that refactoring is a process you undertake only when all unit tests are passing. As you refactor and update your production code, the unit tests should continue to pass. Don't change any unit tests when refactoring; if what you're doing requires unit test changes, then you're adding, deleting, or changing functionality, and that should first be done with the rhythm of writing tests discussed earlier in the section “The Red/Green Cycle.” Resist the temptation to change tests and production code all at the same time. Refactoring should be a mechanical, almost mathematical process of structured code changes that do not break unit tests.
Structuring Tests with Arrange, Act, Assert
Many of the unit testing examples in this book follow a structure called “Arrange, Act, Assert” (sometimes abbreviated as 3A). This phrase (coined by William C. Wake in http://weblogs.java.net/blog/wwake/archive/2003/12/tools_especiall.html) describes a structure for your unit tests that reads a bit like three paragraphs:
· Arrange: Get the environment ready.
· Act: Call the method under test.
· Assert: Ensure that what you expected to happen, happened.
A unit test written in 3A style looks something like this:
[TestMethod]
public void PoppingReturnsLastPushedItemFromStack()
{
// Arrange
var stack = new Stack<string>();
var value = "Hello, World!";
stack.Push(value);
// Act
string result = stack.Pop();
// Assert
Assert.AreEqual(value, result);
}
I've added the Arrange, Act, and Assert comments here to illustrate the structure of the test. The arrange in this case creates an empty stack and pushes a value onto it. These are the pre-conditions in order for the test to function. The act, popping the value off the stack, is the single line under test. Finally, the assert tests one logical blank lines are sufficient to separate the sections from one another.
The Single Assertion Rule
When you look at the 3A stack example, you'll see only a single assert to ensure that you got back the expected value. Aren't there a lot of other behaviors you could assert there, as well? For example, you know that after you pop off the value, the stack is empty—shouldn't you make sure it's empty? And if you try to pop another value, it should throw an exception—shouldn't you test that as well?
Resist the temptation to test more than one behavior in a single test. A good unit test is about testing a very small bit of functionality, usually a single behavior. The behavior you're testing here isn't the large behavior of “all properties of a recently emptied stack”; rather, it's the small behavior of popping a known value from a non-empty stack. To test the other properties of an empty stack, you should write more unit tests, one per small behavior you want to verify.
Keeping your tests svelte and single-focused means that when you break something in your production code, you're more likely to break only a single test. This, in turn, makes understanding what broke and how to fix it much easier. If you mix several behaviors into a single unit test (or across several unit tests), a single behavior break might cause dozens of tests to fail and you'll have to sift through several behaviors in each one to figure out exactly what's broken.
Some people call this the single assertion rule. Don't confuse this with thinking that your tests should have only a single call to Assert. Calling Assert several times to verify one logical piece of behavior is often necessary; that's perfectly fine, as long as you remember to test just one behavior at a time.
BUILDING A UNIT TEST PROJECT
The MS Test unit-testing framework is included with all editions of Visual Studio 2013 (even the free editions) and contains a much-improved unit test runner. Although you can create unit test projects directly inside of Visual Studio, getting started with unit testing your MVC application can be a lot of work. The ASP.NET MVC team included unit-testing capability in the New Project dialog for MVC applications, as shown in Figure 14.1.
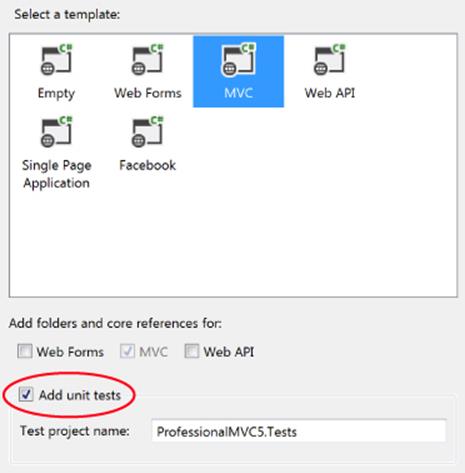
Figure 14.1
By selecting the Add Unit Tests checkbox, you're telling the ASP.NET New Project Wizard not only to create an associated unit test project, but also to populate it with a set of default unit tests. These default unit tests can help new users understand how to write tests against an MVC application.
Examining the Default Unit Tests
The default application templates give you just enough functionality to get you started with your first application. When you create the new project, it automatically opens HomeController.cs for you. HomeController.cs contains three action methods (Index, About, andContact). This is the source for the Index action:
public ActionResult Index()
{
return View();
}
MVC action methods don't get much simpler than this: A view result is returned. If you expected the unit test to be relatively simple, you would be right. The default unit test project has exactly one test for the Index action:
[TestMethod]
public void Index()
{
// Arrange
HomeController controller = new HomeController();
// Act
ViewResult result = controller.Index() as ViewResult;
// Assert
Assert.IsNotNull(result);
}
This is a pretty good unit test: It's written in 3A form, and at three lines of code, it's quite simple to understand. However, even this unit test has room for improvement. Our action method is only one line of code, but it's actually doing two things:
· It returns a view result.
· The view result uses the default view.
This unit test is only testing one of these two behaviors. You could argue that you need to at least add a second assert (to ensure that the view name is null); if you wanted to write a second separate test, we wouldn't fault you for it.
Did you notice the use of the as keyword to cast the result into the ViewResult type? The cast is an interesting code smell — that is, something you look at and wonder whether it's really the right thing. Is the cast really necessary? Obviously, the unit test needs to have an instance of the ViewResult class so that it can get access to the ViewBag property; that part isn't in question. But can you make a small change to the action code so that the cast is unnecessary? You can, and should:
public ViewResult Index()
{
return View();
}
By changing the return value of the action method from the general ActionResult to the specific ViewResult, you've more clearly expressed the intention of your code: This action method always returns a view. Now you're down from four things to test to three with just a simple change of the production code. If you ever need to return anything else besides ViewResult from this action (for example, sometimes you'll return a view and sometimes you'll do a redirect), then you're forced to move back to the ActionResult return type. If you do that, it's very obvious that you must test the actual return type as well, because it won't always be the same return type.
Let's rewrite the test now to verify both behaviors:
[TestMethod]
public void IndexShouldAskForDefaultView()
{
var controller = new HomeController();
ViewResult result = controller.Index();
Assert.IsNotNull(result);
Assert.IsNull(result.ViewName);
}
You should feel better about this test now. It's still simple, but it should be free of any subtle bugs that could have affected the original test. It's also worth noting that we gave the test a much longer and more descriptive name. We've found that longer names mean you're more likely to understand the reason a test fails without even needing to look at the code inside the test. You might have no idea why a test named Index might fail, but you have a pretty good idea why a test named IndexShouldAskForDefaultView would fail.
Test Only the Code You Write
One of the more common mistakes that people new to unit testing and TDD make is to test code they didn't write, even if inadvertently. Your tests should be focused on the code that you wrote, and not the code or logic that it depends upon.
For a concrete example, let's revisit the test from the last section:
[TestMethod]
public void IndexShouldAskForDefaultView()
{
var controller = new HomeController();
ViewResult result = controller.Index();
Assert.IsNotNull(result);
Assert.IsNull(result.ViewName);
}
When a controller action is invoked and a view is rendered by the MVC pipeline, a whole lot of stuff happens: Action methods are located by MVC, they are called with model binders invoked for any action parameters, the result is taken from the method and executed, and the resulting output is sent back to the browser. In addition, because you asked for the default view, that means the system attempts to find a view named Index (to match your action name), and it will look in the ∼/Views/Home and∼/Views/Shared folders to find it.
This unit test doesn't concern itself with any of that code. You focus on the code under test and none of its collaborators. Tests that test more than one thing at a time are called integration tests. If you look, there are no tests anywhere for that because all the rest of that behavior is provided by the MVC framework itself, and not any code you wrote. From a unit test perspective, you must trust that the MVC framework is capable of doing all those things. Testing everything running together is also a valuable exercise, but it's outside the scope of unit testing.
Let's focus for a moment on the ViewResult class. That is a direct result of calling the Index action. Shouldn't you at least test its ability to look for the Index view by default? You can say no, because it is code you didn't write (the MVC framework provided it), but even that argument isn't necessary. You can say no, even if it was your own custom action result class, because that's not the code you're testing right now. You are currently focused on the Index action. The fact that it uses a specific action result type is all you need to know; exactly what it does is the concern of the unit test for that piece of code. You can safely assume, whether the action result is written by you or by the ASP.NET team, that the action result code is sufficiently tested on its own.
ADVICE FOR UNIT TESTING YOUR ASP.NET MVC AND ASP.NET WEB API APPLICATIONS
Now that you have the necessary tools in your belt, let's take a closer look at some of the more common unit-testing tasks in ASP.NET MVC applications.
Testing Controllers
The default unit test project already includes some controller tests (which you modified earlier in this chapter). A surprising number of subtleties are involved with testing controllers, and as with all things, the subtleties between decent and great code can often be found in small differences.
Keeping Business Logic Out of Your Controllers
The primary purpose of a controller in a Model-View-Controller architecture is to be the coordinator between the model (where your business logic lives) and the view (where your user interface lives). The controller is the dispatcher that wires everybody together and gets everybody running. Although, strictly speaking, Web API doesn't have “views,” you can think of the rendering of your model objects into the requested format (XML, JSON, and so on) as a form of view. When discussing the best attributes of MVC controllers, most of that advice also applies to Web API controllers.
When we talk about business logic, it could be something as simple as data or input validation, or something as complex as applying long-running processes such as core business workflow. As an example, controllers shouldn't try to validate that models are correct; that is the purpose of the business model layer. A controller should, however, concern itself with what actions to take when it has been told that the model isn't valid (perhaps redisplaying a particular view when it's invalid, or sending the user off to another page when the model is valid). Web API controllers have well-defined behavior, too, when encountering invalid input data: the HTTP 400 (“Bad Request”) response code.
Because your controller action methods will be relatively simple, the unit tests for your action methods should be correspondingly simple. You also want to try to keep business knowledge out of the unit test, just as you could out of the controllers.
To make this advice concrete, consider the case of models and validation. The differences between a good unit test and a bad one can be fairly subtle. A good unit test would provide a fake business logic layer that tells the controller that the model is valid (or not) based on the needs of the test; a bad unit test would cobble together good or bad data and let the existing business logic layer tell the controller whether it's good or bad. The bad unit test is testing two components at once (the controller action and the business layer). A less obvious problem with the bad unit test, though, is that it has baked into it the knowledge of what bad data actually is; if the definition of bad data changes over time, then the test becomes broken, perhaps causing a false negative (or worse, a false positive) when running the test.
Writing the good unit test requires a little more discipline in the design of the controller, which leads directly to our second piece of advice.
Passing Service Dependencies via Constructor
To write the good unit test just discussed, you need to substitute in a fake business layer. If the controller has a direct tie into the business layer, this can be quite challenging. If, on the other hand, it takes the business layer as a service parameter via the constructor, providing the fake becomes trivial for you.
This is where the advice provided in Chapter 13 can really shine. ASP.NET MVC and Web API both include the ability to enable dependency injection in your application, making it not only possible but also trivial to support the idea of getting services via constructor parameters. Both frameworks can support most any dependency injection framework through third-party libraries available on NuGet. You can now leverage that work very easily in your unit tests to help test in isolation (one of our three critical aspects of unit testing).
To test these service dependencies, the services need to be replaceable. Usually that means you need to express your services in terms of interfaces or abstract base classes. The fake substitutes that you write for your unit tests can be handwritten implementations, or you can use a mocking framework to simplify the implementation for you. Special kinds of dependency injection containers even exist called auto-mocking containers that automatically create the implementations as needed.
A common practice for handwriting a fake service is called a spy, which simply records the values that it is passed so that it can later be inspected by the unit test. For example, assume that you have a math service (a trivial example, I know) with the following interface:
public interface IMathService
{
int Add(int left, int right);
}
The method in question takes two values and returns one. The real implementation of math service is obviously going to add the two values together. The spy implementation might look something like this:
public class SpyMathService : IMathService
{
public int Add_Left;
public int Add_Right;
public int Add_Result;
public int Add(int left, int right)
{
Add_Left = left;
Add_Right = right;
return Add_Result;
}
}
Now your unit test can create an instance of this spy, set Add_Result with the value that it wants passed back when Add is called, and after the test is complete, it can make assertions on the Add_Left and Add_Right values, to ensure that correct interaction happened. Notice that the spy doesn't add the values together; you're only concerned with the values going into and out of the math service:
[TestMethod]
public void ControllerUsesMathService()
{
var service = new SpyMathService { Add_Result = 42; }
var controller = new AdditionController(service);
var result = controller.Calculate(4, 12);
Assert.AreEqual(service.Add_Result, result.ViewBag.TotalCount);
Assert.AreEqual(4, service.Add_Left);
Assert.AreEqual(12, service.Add_Right);
}
Favoring Action Results over HttpContext Manipulation
You can think of the ASP.NET core infrastructure as the IHttpModule and IHttpHandler interfaces, plus the HttpContext hierarchy of classes (HttpRequest, HttpResponse, and so on). These are the fundamental underlying classes that all ASP.NET is built upon, whether that means Web Forms, MVC, or Web Pages.
Unfortunately, these classes aren't very test-friendly. There is no way to replace their functionality, which makes testing any interactions with them very difficult (although not impossible). .NET 3.5 SP1 introduced an assembly named System.Web.Abstractions.dll, which created abstract class versions of these classes (HttpContextBase is the abstract version of HttpContext). Everything in MVC is written against these abstract classes instead of their original counterparts, and it makes testing code that interacts with these classes much easier. It's not perfect, though. These classes still have very deep hierarchies, and most of them have dozens of properties and methods. Providing spy versions of these classes can be very tedious and error-prone, so most developers resort to mocking frameworks to make the work easier. Even so, setting up the mocking frameworks can be tedious and repetitive work. Controller tests are going to be numerous, so you want to minimize the pain involved in writing them.
Consider the RedirectResult class in MVC. The implementation of this class is fairly straightforward: It just calls HttpContextBase.Response.Redirect on your behalf. Why did the team go through all the trouble to create this class, when you're trading one line of code for another (slightly simpler) line of code? The answer is: to make unit testing easier.
To illustrate, write a hypothetical action method that does nothing but redirect you to another part of the site:
public void SendMeSomewhereElse()
{
Response.Redirect("∼/Some/Other/Place");
}
This action is fairly straightforward to understand, but the test is a lot less straightforward than we would like. Using the Moq mocking framework your unit test might look like this:
[TestMethod]
public void SendMeSomewhereElseIssuesRedirect()
{
var mockContext = new Mock<ControllerContext>();
mockContext.Setup(c =>
c.HttpContext.Response.Redirect("∼/Some/Other/Place"));
var controller = new HomeController();
controller.ControllerContext = mockContext.Object;
controller.SendMeSomewhereElse();
mockContext.Verify();
}
Note
The Moq mocking framework is available at GitHub https://github.com/Moq/moq4 as well as a NuGet packages.
That's a couple of extra ugly lines of code, even after you figure out how to write them! Redirect is probably one of the simplest things you can do, too. Imagine that you had to write code like this every time you wanted to write a test for an action. Believe us when we say that the source listing for the necessary spy classes would take several pages, so Moq is actually pretty close to the ideal situation for the test. However, with a small change, the controller reads roughly the same, but the unit test becomes much more readable:
public RedirectResult SendMeSomewhereElse()
{
return Redirect("∼/Some/Other/Place");
}
[TestMethod]
public void SendMeSomewhereElseIssuesRedirect()
{
var controller = new HomeController();
var result = controller.SendMeSomewhereElse();
Assert.AreEqual("∼/Some/Other/Place", result.Url);
}
When you encapsulate your interactions with HttpContext (and friends) inside of an action result, you're moving the testing burden to a single isolated place. All your controllers can reap the benefit of much more readable tests for themselves. Just as important, if you need to change the logic, you have a single place to change it (and only a handful of tests to change, instead of needing to change dozens or hundreds of controller tests).
ASP.NET Web API also supports action results with a system that resembles MVC. Although Web API's dependence on the new abstractions in System.Net.Http.dll means you can effortlessly write easy-to-test controllers, correctly creating the request and response objects is still difficult. Action results in Web API (that is, anything that implements System.Web.Http.IHttpActionResult) isolate the manipulation of request and response objects, and leave developers to write much simpler unit tests for their controllers. Web API'sApiController base class has dozens of methods to create action result classes written by the ASP.NET team.
Favoring Action Parameters over UpdateModel
The model binding system in ASP.NET MVC is what is responsible for translating incoming request data into values that your actions can use. That request data might come from form posts, from query string values, and even from parts of the path of the URL. No matter where that data comes from, though, you have two common ways to get it in your controller: as an action parameter, and by calling UpdateModel (or its slightly wordier sibling TryUpdateModel).
Here is an example of an action method using both techniques:
[HttpPost]
public ActionResult Edit(int id)
{
Person person = new Person();
UpdateModel(person);
[...other code left out for clarity...]
}
The id parameter and the person variable are using the two aforementioned techniques. The unit testing benefit to using the action parameter should be obvious: It's trivial for the unit test to provide an instance of whatever type your action method needs, and no need exists to change any of the infrastructure to make it happen. UpdateModel, on the other hand, is a non-virtual method on the Controller base class, which means that you cannot easily override its behavior.
If you truly need to call UpdateModel, you have several strategies to feed your own data to the model binding system. The most obvious is overriding ControllerContext (as shown in the previous section “Favoring Action Results over HttpContext Manipulation”), and providing fake form data for the model binders to consume. The Controller class also has ways to provide model binders and/or value providers that can be used to provide the fake data. It should be clear from our exploration of mocking, though, that these options are a last resort.
Using Action Filters for Orthogonal Activities
This piece of advice is similar to the one about action results. The core recommendation is to isolate code that might be harder to test into a reusable unit, so the difficult testing becomes tied up with that reusable unit, and not spread all throughout your controller tests.
That doesn't mean you have no unit-testing burden, though. Unlike the action result situation, you don't have any input or output that you can directly inspect. An action filter is usually applied to an action method or a controller class. In order to unit test this, you merely need to ensure that the attribute is present, and leave testing the actual functionality to someone else. Your unit test can use some simple reflection to find and verify the existence of the attribute (and any important parameters you want to check).
An important aspect of action filters, though, is that they don't run when your unit tests invoke the actions. The reason action filters do their work in a normal MVC or Web API application is because the framework itself is responsible for finding them and running them at the right time. There is no “magic” in these attributes that makes them run just because the method they're attached to is running.
When you're running actions in your unit tests, remember that you cannot rely on the action filters executing. This might slightly complicate the logic in the action method, depending on what the action filter does. If the filter adds data to the ViewBag property, for example, that data is not present when the action runs under the unit test. You need to be conscious of that fact both in the unit tests and in the controller itself.
The advice in this section's title recommends action filters should be limited to orthogonal activities precisely because the action filter doesn't run in the unit test environment. If the action filter is doing something that's critical for the execution of the action, your code probably belongs somewhere else (like a helper class or service instead of a filter attribute).
Testing Routes
Testing routes tends to be a fairly straightforward process after you've figured out all the bits of infrastructure that need to be in place. Because routing uses the core ASP.NET infrastructure, you'll rely on Moq to write the replacements.
The default MVC project template registers two routes inside of your global.asax file:
public static void RegisterRoutes(RouteCollection routes)
{
routes.IgnoreRoute("{resource}.axd/{*pathInfo}");
routes.MapRoute(
"Default",
"{controller}/{action}/{id}",
new { controller = "Home", action = "Index", id = UrlParameter.Optional
}
);
}
It's very convenient that the MVC tooling created this function as a public static function. This means you can very easily call this from your unit test with an instance of RouteCollection and get it to map all your routes into the collection for easy inspection and execution.
Before you can test this code, you need to understand a little bit about the routing system. Some of this was covered in Chapter 9, but the part that's important for you to understand now is how the underlying route registration system works. If you examine the Addmethod on RouteCollection, you'll see that it takes a name and an instance of the RouteBase type:
public void Add(string name, RouteBase item)
The RouteBase class is abstract, and its primary purpose is to map incoming request data into route data:
public abstract RouteData GetRouteData(HttpContextBase httpContext)
MVC applications don't generally use the Add method directly; instead, they call the MapRoute method (an extension method provided by the MVC framework). Inside the body of MapRoute, the MVC framework itself does the work of calling Add with an appropriateRouteBase object. For your purposes, you really only care about the RouteData result; specifically, you want to know which handler is invoked, and what the resulting route data values are.
The guidance here applies equally to Web API applications. Route registration is typically done with MapHttpRoute (or with the new attribute-based routing system), so call WebApiConfig.RegisterRoutes to get the routes registered for your unit tests.
When you're using MVC or Web API, if you follow the previous advice about preferring action results in your controllers, very few of your unit tests should require access to the real routes in the system.
Testing Calls to IgnoreRoute
Start with the call to IgnoreRoute, and write a test that shows it in action:
[TestMethod]
public void RouteForEmbeddedResource()
{
// Arrange
var mockContext = new Mock<HttpContextBase>();
mockContext.Setup(c => c.Request.AppRelativeCurrentExecutionFilePath)
.Returns("∼/handler.axd");
var routes = new RouteCollection();
MvcApplication.RegisterRoutes(routes);
// Act
RouteData routeData = routes.GetRouteData(mockContext.Object);
// Assert
Assert.IsNotNull(routeData);
Assert.IsInstanceOfType(routeData.RouteHandler,
typeof(StopRoutingHandler));
}
The arrange section creates a mock of the HttpContextBase type. Routing only needs to know what the request URL is, and to do that, it calls Request.AppRelativeCurrentExecutionFilePath. All you need to do is tell Moq to return whatever URL you want to test whenever routing calls that method. The rest of the arrange section creates an empty route collection, and asks the application to register its routes into the collection.
The act line then asks the routes to act on the request and tell you what the resulting RouteData is. If there were no matching routes, the RouteData instance would be null, so your first test is to ensure that you did match some route. For this test, you don't care about any of the route data values; the only thing that's important is for you to know that you hit an ignore route, and you know that because the route handler will be an instance of System.Web.Routing.StopRoutingHandler.
Testing Calls to MapRoute
Testing calls to MapRoute is probably more interesting because these are the routes that actually match up with your application functionality. Although you only have one route by default, you have several incoming URLs that might match this route.
Your first test ensures that incoming requests for the homepage map to your default controller and action:
[TestMethod]
public void RouteToHomePage()
{
var mockContext = new Mock<HttpContextBase>();
mockContext.Setup(c => c.Request.AppRelativeCurrentExecutionFilePath)
.Returns("∼/");
var routes = new RouteCollection();
MvcApplication.RegisterRoutes(routes);
RouteData routeData = routes.GetRouteData(mockContext.Object);
Assert.IsNotNull(routeData);
Assert.AreEqual("Home", routeData.Values["controller"]);
Assert.AreEqual("Index", routeData.Values["action"]);
Assert.AreEqual(UrlParameter.Optional, routeData.Values["id"]);
}
Unlike the ignore route tests, in this test you want to know what values are going inside of your route data. The values for controller, action, and id are filled in by the routing system. Because you have three replaceable parts to this route, you'll end up with four tests that probably have data and results like those shown in Table 14.1. If your unit-testing framework supports data-driven tests, routes are an excellent place to take advantage of such features.
Table 14.1 Default Route Mapping Examples
|
URL |
Controller |
Action |
ID |
|
∼/ |
Home |
Index |
UrlParameter.Optional |
|
∼/Help |
Help |
Index |
UrlParameter.Optional |
|
∼/Help/List |
Help |
List |
UrlParameter.Optional |
|
∼/Help/Topic/2 |
Help |
Topic |
2 |
Testing Unmatched Routes
Don't. Seriously, just don't. The tests you've written up until now were tests of code that we wrote—namely, calls to IgnoreRoute or MapRoute. If you write a test for unmatched routes, you're just testing the routing system at that point. You can assume that just works.
Testing Validators
The validation systems in ASP.NET MVC and Web API take advantage of the Data Annotations library in .NET, including support for self-validating objects that implement the IValidatableObject interface and context-based validation that allows validators to have access to the “container” object where the property being validated resides. MVC extends this validation system with an interface named IClientValidatable, designed to make it easier for validation attributes to participate in client-side validation. In addition to the built-in DataAnnotations validation attributes, MVC adds two new validators: CompareAttribute and RemoteAttribute.
On the client side, the changes are more dramatic. The MVC team added support for unobtrusive validation, which renders the validation rules as HTML elements instead of inline JavaScript code. MVC was the first framework from ASP.NET that delivered on the team's commitment to fully embrace the jQuery family of JavaScript frameworks. The unobtrusive validation feature is implemented in a framework-independent manner; the default implementation shipped with MVC is based on jQuery and jQuery Validate.
It is common for developers to want to write new validation rules, and most will quickly outgrow the four built-in validation rules (Required, Range, RegularExpression, and StringLength). At a minimum, writing a validation rule means writing the server-side validation code, which you can test with server-side unit-testing frameworks. Additionally, you can use server-side unit-testing frameworks to test the client-side metadata API in IClientValidatable to ensure that the rule is emitting the correct client-side rule. Writing tests for both these pieces should be relatively straightforward, after you're familiar with how the Data Annotations validation system works.
A validation attribute derives from the ValidationAttribute base class, from System.ComponentModel.DataAnnotations. Implementing validation logic means overriding one of the two IsValid methods. You might recall the maximum words validator from Chapter 6, which started out like this:
public class MaxWordsAttribute : ValidationAttribute
{
protected override ValidationResult IsValid(
object value, ValidationContext validationContext)
{
return ValidationResult.Success;
}
}
Client-Side (JavaScript) Unit Testing
If no corresponding client-side rule exists that's a reasonable match for the validation rule, the developer might also choose to write a small piece of JavaScript, which can be unit tested using a client-side unit-testing framework (like QUnit, the unit-testing framework developed by the jQuery team). Writing unit tests for client-side JavaScript is beyond the scope of this chapter. I strongly encourage developers to invest time in finding a good client-side unit testing system for their JavaScript code.
This validator attribute has the validation context passed to it as a parameter. This is the new overload available in the Data Annotations library in .NET 4. You could also override the version of IsValid from the original .NET 3.5 data annotations validation API:
public class MaxWordsAttribute : ValidationAttribute
{
public override bool IsValid(object value)
{
return true;
}
}
Which API you choose to override really depends on whether you need access to the validation context. The validation context gives you the ability to interact with the container object that contains your value. This is an issue when you consider unit testing because any validator that uses information inside of the validation context is going to need to get a validation context provided to it. If your validator overrides the version of IsValid, which does not take a validation context, then you can call the version of Validate on it, which only requires the model value and the parameter name.
On the other hand, if you implement the version of IsValid, which includes the validation context (and you need values from that validation context), then you must call the version of Validate, which includes the validation context; otherwise, the validation context will be null inside of IsValid. Theoretically, any implementation of IsValid must be resilient when being called without a validation context because it might be called by code that was written against the .NET 3.5 data annotations API; in practice, though, any validator that is used only in MVC 3 or later can safely assume that it will always be getting a validation context.
This means when you write your unit tests, you need to provide a validation context to your validators (at the very least when you know those validators will be using one, but in practice, you might as well always do the right thing and provide the validation context).
Correctly creating the ValidationContext object can be tricky. It has several members you need to set correctly so that it can be consumed properly by the validator. The ValidationContext takes three arguments to its constructor: the model instance that is being validated, the service container, and the items collection. Of these three parameters, only the model instance is required; the others should be null because they are unused in ASP.NET MVC or Web API applications.
MVC and Web API do two different types of validation: model-level validation and property-level validation. Model-level validation is performed when the model object as a whole is being validated (that is, the validation attribute is placed on the class itself); property-level validation is performed when validating a single property of the model (that is, the validation attribute is placed on a property inside the model class). The ValidationContext object is set up differently in each scenario.
When performing model-level validation, the unit test sets up the ValidationContext object as shown in Table 14.2; when performing property-level validation, the unit test uses the rules shown in Table 14.3.
Table 14.2 Validation Context for Model Validation
|
Property |
What It Should Contain |
|
DisplayName |
This property is used in error messages, replacing the {0} replacement token. For model validation, it is usually the simple name of the type (that is, the class name without the namespace prefix). |
|
Items |
This property isn't used in ASP.NET MVC or Web API applications. |
|
MemberName |
This property isn't used in model validation. |
|
ObjectInstance |
This property is the value passed to the constructor, and should be the instance of the model that is being validated. Note that this is the same value you will be passing to Validate. |
|
ObjectType |
This is the type of the model being validated. This is automatically set for you to match the type of the object passed into the ValidationContext constructor. |
|
ServiceContainer |
This value isn't used in ASP.NET MVC or Web API applications. |
Table 14.3 Validation Context for Property Validation
|
Property |
What It Should Contain |
|
DisplayName |
This property is used in error messages, replacing the {0} replacement token. For property validation, it is usually the name of the property, although that name might be influenced by attributes such as [Display] or [DisplayName]. |
|
Items |
This property isn't used in ASP.NET MVC or Web API applications. |
|
MemberName |
This property should contain the actual property name of the property being validated. Unlike DisplayName, which is used for display purposes, this should be the exact property name as it appears in the model class. |
|
ObjectInstance |
This property is the value passed to the constructor, and should be in the instance of the model that contains the property being validated. Unlike in the case of model validation, this value is not the same value that you will be passing to Validate(that will be the value of property). |
|
ObjectType |
This is the type of the model being validated (not the type of the property). This is automatically set for you to match the type of the object passed into the ValidationContext constructor. |
|
ServiceContainer |
This property isn't used in ASP.NET MVC or Web API applications. |
Let's take a look at some sample code for each scenario. The following code shows how you would initialize the validation context to unit test model-level validation (assuming you were testing an instance of a hypothetical class named ModelClass):
var model = new ModelClass { /* initialize properties here */ };
var context = new ValidationContext(model, null, null) {
DisplayName = model.GetType().Name
};
var validator = new ValidationAttributeUnderTest();
validator.Validate(model, context);
Inside the test, the call to Validate will throw an instance of the ValidationException class if there were any validation errors. When you're expecting the validation to fail, surround the call to Validate with a try/catch block, or use your test framework's preferred method for testing for exceptions.
Now let's show what the code might look like to test property-level validation. If you were testing a property named FirstName on your ModelClass model, the test code might look something like this:
var model = new ModelClass { FirstName = "Brad" };
var context = new ValidationContext(model, null, null) {
DisplayName = "The First Name",
MemberName = "FirstName"
};
var validator = new ValidationAttributeUnderTest();
validator.Validate(model.FirstName, context);
Comparing this code to the previous example, you can see two key differences:
· The code sets the value of MemberName to match the property name, whereas the model-level validation sample didn't set any value for MemberName.
· You pass the value of the property you're testing when you call Validate, whereas in the model-level validation sample you passed the value of the model itself to Validate.
Of course, all this code is necessary only if you know that your validation attribute requires access to the validation context. If you know that the attribute doesn't need validation context information, then you can use the simpler Validate method, which takes only the object value and the display name. These two values match the value you're passing to the ValidationContext constructor and the value you're setting into the DisplayName property of the validation context, respectively.
SUMMARY
The first half of this chapter briefly introduced unit testing and TDD so that you could be on the same page with the mechanics of effective unit testing. The second half of this chapter leveraged and enhanced that knowledge by providing real-world guidance on the best things to do (and to avoid) when writing unit tests for your MVC and Web API applications.
All materials on the site are licensed Creative Commons Attribution-Sharealike 3.0 Unported CC BY-SA 3.0 & GNU Free Documentation License (GFDL)
If you are the copyright holder of any material contained on our site and intend to remove it, please contact our site administrator for approval.
© 2016-2026 All site design rights belong to S.Y.A.