Professional ASP.NET MVC 5 (2014)
Chapter 5
Forms and HTML Helpers
—by K. Scott Allen
What's In This Chapter?
· Understanding forms
· Making HTML helpers work for you
· Editing and inputting helpers
· Displaying and rendering helpers
WROX.COM CODE DOWNLOADS FOR THIS CHAPTER
You can find the wrox.com code downloads for this chapter at http://www.wrox.com/go/proaspnetmvc5 on the Download Code tab. The code for this chapter is contained in the following file: Wrox.ProMvc5.C05.zip.
As their name implies, HTML helpers help you work with HTML. Because it seems like a simple task to type HTML elements into a text editor, you might wonder why you need any help with your HTML. Tag names are the easy part, however. The hard part of working with HTML is making sure the URLs inside of links point to the correct locations, form elements have the proper names and values for model binding, and other elements display the appropriate errors when model binding fails.
Tying all these pieces together requires more than just HTML markup. It also requires some coordination between a view and the runtime. In this chapter, you see how easy it is to establish this coordination. Before you begin working with helpers, however, you first learn about forms. Forms are where most of the hard work happens inside an application, and are where you need to use HTML helpers the most.
USING FORMS
You might wonder why a book targeted at professional web developers covers the HTML form tag. Isn't it easy to understand?
There are two reasons:
· The form tag is powerful. Without the form tag, the Internet would be a read-only repository of boring documentation. You wouldn't be able to search the web or buy anything (even this book) over the Internet. If an evil genius stole all the form tags from every website tonight, civilization would crumble by lunchtime tomorrow.
· Many developers coming to the MVC framework have been using ASP.NET Web Forms. Web Forms don't expose the full power of the form tag (you could say Web Forms manage and exploit the form tag for their own purposes). It's easy to excuse the Web Forms developer who forgets what the form tag is capable of—such as creating an HTTP GET request.
The Action and the Method
A form is a container for input elements: buttons, checkboxes, text inputs, and more. The input elements in a form enable a user to enter information into a page and submit information to a server—but which server? And how does the information get to the server? The answers to these questions are in the two most important attributes of a form tag: the action and the method attributes.
The action attribute tells a web browser where to send the information, so naturally the action contains a URL. The URL can be relative, or in cases where you want to send information to a different application or a different server, the action URL can also be an absolute URL. The following form tag sends a search term (the input named q) to the Bing search page from any application:
<form action="http://www.bing.com/search">
<input name="q" type="text" />
<input type="submit" value="Search!" />
</form>
The form tag in the preceding code snippet does not include a method attribute. The method attribute tells the browser whether to use an HTTP POST or HTTP GET when sending the information. You might think the default method for a form is HTTP POST. After all, you regularly POST forms to update your profile, submit a credit card purchase, and leave comments on the funny animal videos on YouTube. However, the default method value is “get,” so by default a form sends an HTTP GET request:
<form action="http://www.bing.com/search" method="get">
<input name="q" type="text" />
<input type="submit" value="Search!" />
</form>
When a user submits a form using an HTTP GET request, the browser takes the input names and values inside the form and puts them in the query string. In other words, the preceding form would send the browser to the following URL (assuming the user is searching for love): http://www.bing.com/search?q=love.
To GET or to POST?
You can also give the method attribute the value post, in which case the browser does not place the input values into the query string, but places them inside the body of the HTTP request instead. Although you can successfully send a POST request to a search engine and see the search results, an HTTP GET is preferable. Unlike the POST request, you can bookmark the GET request because all the parameters are in the URL. You can use the URLs as hyperlinks in an e-mail or a web page and preserve all the form input values.
Even more importantly, the GET verb is the right tool for the job because GET represents an idempotent, read-only operation. You can send a GET request to a server repeatedly with no ill effects, because a GET does not (or should not) change state on the server.
A POST, on the other hand, is the type of request you use to submit a credit card transaction, add an album to a shopping cart, or change a password. A POST request generally modifies state on the server, and repeating the request might produce undesirable effects (such as double billing). Many browsers help a user avoid repeating a POST request. Figure 5.1 shows what happens when trying to refresh a POST request in Chrome.
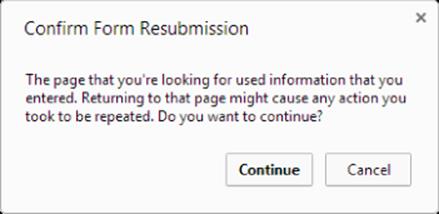
Figure 5.1
Note
Because there's a new Chrome release approximately every fifteen minutes, you may see something slightly different by the time you read this. Or, possibly each time you refresh the page.
Web applications generally use GET requests for reads and POST requests for writes (which typically include updates, creates, and deletes). A request to pay for music uses POST. A request to search for music, a scenario you look at next, uses GET.
Searching for Music with a Search Form
Imagine you want to let your Music Store shoppers search for music from the homepage of the Music Store application. Just like the search engine example from earlier, you'll need a form with an action and a method. The HTML shown in Listing 5.1 shows an example that would add a simple search form.
Listing 5.1: Search Form
<form action="/Home/Search" method="get">
<input type="text" name="q" />
<input type="submit" value="Search" />
</form>
Note
In this section, we're using some examples based on a completed Music Store to illustrate the use of a form with a GET method instead of a POST method. Don't worry about typing this code in.
The next step is to implement a Search method on the HomeController. The code block shown in Listing 5.2 makes the simplifying assumption that a user is always searching for music by album name:
Listing 5.2: Search Controller Action
public ActionResult Search(string q)
{
var albums = storeDB.Albums
.Include("Artist")
.Where(a => a.Title.Contains(q))
.Take(10);
return View(albums);
}
Notice how the Search action expects to receive a string parameter named q. The MVC framework automatically finds this value in the query string, when the name q is present, and also finds the value in posted form values if you made your search form issue a POST instead of a GET.
The controller tells the MVC framework to render a view. Code for an example view, which would render the results of the search, appears in Listing 5.3. We've just added a few Bootstrap classes to the table tag to make it look more presentable.
Listing 5.3: Search Results View
@model IEnumerable<MvcMusicStore.Models.Album>
@{ ViewBag.Title = "Search"; }
<h2>Results</h2>
<table class="table table-condensed table-striped">
<tr>
<th>Artist</th>
<th>Title</th>
<th>Price</th>
</tr>
@foreach (var item in Model) {
<tr>
<td>@item.Artist.Name</td>
<td>@item.Title</td>
<td>@String.Format("{0:c}", item.Price)</td>
</tr>
}
</table>
The result lets customers search for terms such as “work,” which produces the output shown in Figure 5.2.
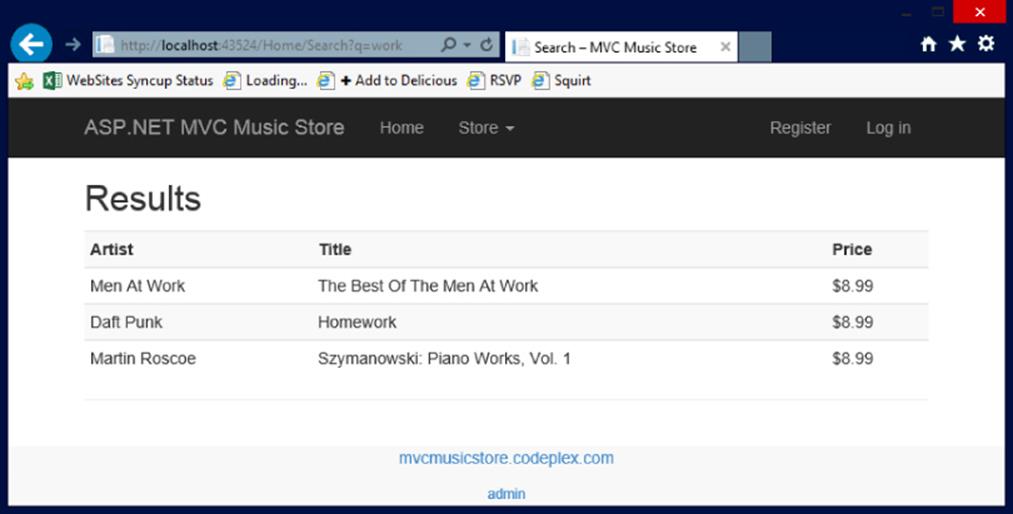
Figure 5.2
The simple search scenario demonstrates how easy it is to use HTML forms with ASP.NET MVC. The web browser collects the user input from the form and sends a request to an MVC application, where the MVC runtime can automatically pass the inputs into parameters for your action methods to respond to.
Of course, not all scenarios are as easy as the search form. In fact, you've simplified the search form to the point where it is brittle. If you deploy the application to a directory that is not the root of a website, or if your route definitions change, the hard-coded action value might lead the user's browser to a resource that does not exist. Remember, we've hard-coded Home/Search into the form's action attribute.
<form action="/Home/Search" method="get">
<input type="text" name="q" />
<input type="submit" value="Search" />
</form>
Searching for Music by Calculating the Action Attribute Value
Rather than hard-coding the form behavior, a better approach is to calculate the value of the action attribute, and fortunately, there is an HTML helper to do the calculation for you.
@using (Html.BeginForm("Search", "Home", FormMethod.Get)) {
<input type="text" name="q" />
<input type="submit" value="Search" />
}
The BeginForm HTML helper asks the routing engine how to reach the Search action of the HomeController. Behind the scenes it uses the method named GetVirtualPath on the Routes property exposed by RouteTable— that's where your web application registered all its routes in global.asax. If you did all this without an HTML helper, you would have to write all the following code:
@{
var context = this.ViewContext.RequestContext;
var values = new RouteValueDictionary{
{ "controller", "home" }, { "action", "index" }
};
var path = RouteTable.Routes.GetVirtualPath(context, values);
}
<form action="@path.VirtualPath" method="get">
<input type="text" name="q" />
<input type="submit" value="Search2" />
</form>
The last example demonstrates the essence of HTML helpers. They don't take away your control, but they do save you from writing lots of code.
HTML HELPERS
HTML helpers are methods you can invoke on the Html property of a view. You also have access to URL helpers (via the Url property), and Ajax helpers (via the Ajax property). All these helpers have the same goal: to make views easy to author. The URL helper is also available from within the controller.
Most of the helpers, particularly the HTML helpers, output HTML markup. For example, the BeginForm helper you saw earlier is a helper you can use to build a robust form tag for your search form, but without using lines and lines of code:
@using (Html.BeginForm("Search", "Home", FormMethod.Get)) {
<input type="text" name="q" />
<input type="submit" value="Search" />
}
Chances are the BeginForm helper will output the same markup you had previously when you first implemented the search form. However, behind the scenes the helper is coordinating with the routing engine to generate a proper URL, so the code is more resilient to changes in the application deployment location.
Note the BeginForm helper outputs both the opening <form> and the closing </form>. The helper emits the opening tag during the call to BeginForm, and the call returns an object implementing IDisposable. When execution reaches the closing curly brace of the usingstatement in the view, the helper emits the closing tag, thanks to the implicit call to Dispose. The using trick makes the code simpler and elegant. For those who find it completely distasteful, you can also use the following approach, which provides a bit of symmetry:
@{Html.BeginForm("Search", "Home", FormMethod.Get);}
<input type="text" name="q" />
<input type="submit" value="Search" />
@{Html.EndForm();}
At first glance it might seem the helpers like BeginForm are taking the developer away from the metal—the low-level HTML many developers want to control. After you start working with the helpers, you'll realize they keep you close to metal while remaining productive. You still have complete control over the HTML without writing lines and lines of code to worry about small details. Helpers do more than just churn out angle brackets. Helpers also correctly encode attributes, build proper URLs to the right resources, and set the names of input elements to simplify model binding. Helpers are your friends!
Automatic Encoding
Like any good friend, an HTML helper can keep you out of trouble. Many of the HTML helpers you will see in this chapter are helpers you use to output model values. All the helpers that output model values will HTML encode the values before rendering. For example, later you'll see the TextArea helper, which you can use to output an HTML textarea element.
@Html.TextArea("text", "hello <br/> world")
The second parameter to the TextArea helper is the value to render. The previous example embeds some HTML into the value, but the TextArea helper produces the following markup:
<textarea cols="20" id="text" name="text" rows="2">
hello <br /> world
</textarea>
Notice how the output value is HTML encoded. Encoding by default helps you to avoid cross-site scripting attacks (XSS). You'll learn more details about XSS in Chapter 7.
Making Helpers Do Your Bidding
While protecting you, helpers can also give you the level of control you need. As an example of what you can achieve with helpers, look at another overloaded version of the BeginForm helper:
@using (Html.BeginForm("Search", "Home", FormMethod.Get,
new { target = "_blank" }))
{
<input type="text" name="q" />
<input type="submit" value="Search" />
}
In this code, you are passing an anonymously typed object to the htmlAttributes parameter of BeginForm. Nearly every HTML helper in the MVC framework includes an htmlAttributes parameter in one of its overloaded methods. You'll also find an htmlAttributesparameter of type IDictionary<string, object> in a different overload. The helpers take the dictionary entries (or, in the case of the object parameter, the property names and property values of an object) and use them to create attributes on the element the helper produces. For example, the preceding code produces the following opening form tag:
<form action="/Home/Search" method="get" target="_blank">
You can see you've set target=”_blank” using the htmlAttributes parameter. You can set as many attribute values using the htmlAttributes parameter as necessary. You might find a few attributes problematic at first. For example, setting the class attribute of an element requires you to have a property named class on the anonymously typed object, or as a key in the dictionary of values. Having a key value of “class” in the dictionary is not a problem, but it is problematic for an object, because class is a reserved keyword in C# and is not available to use as a property name or identifier, so you must prefix the word with an @ sign:
@using (Html.BeginForm("Search", "Home", FormMethod.Get,
new { target = "_blank", @class="editForm" }))
Another problem is setting attributes with a dash in the name (like data-val). You'll see dashed attribute names in Chapter 8 when you look at Ajax features of the framework. Dashes are not valid in C# property names, but all HTML helpers convert an underscore in a property name to a dash when rendering the HTML. The following view code:
@using (Html.BeginForm("Search", "Home", FormMethod.Get,
new { target = "_blank", @class="editForm", data_validatable=true }))
produces the following HTML:
<form action="/Home/Search" class="editForm" data-validatable="true"
method="get" target="_blank">
In the next section, you take a look at how the helpers work and see some of the other built-in helpers.
Inside HTML Helpers
Every Razor view inherits an Html property from its base class. The Html property is of type System.Web.Mvc.HtmlHelper<T>, where T is a generic type parameter representing the type of the model for the view (dynamic by default). The class provides a few instance methods you can invoke in a view, such as EnableClientValidation (to selectively turn client validation on or off on a view-by-view basis). However, the BeginForm method you used in the previous section is not one of the methods you'll find defined on the class. Instead, the framework defines the majority of the helpers as extension methods.
You know you are working with an extension method when the IntelliSense window shows the method name with a down arrow to the left (see Figure 5.3). AntiForgeryToken is an instance method, whereas BeginForm is an extension method.
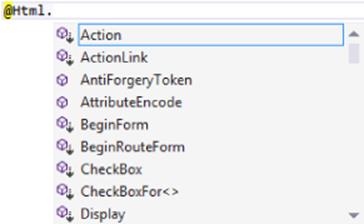
Figure 5.3
Extension methods are a wonderful approach to building HTML helpers for two reasons. First, extension methods in C# are available only when the namespace of the extension method is in scope. All MVC's extension methods for HtmlHelper live in theSystem.Web.Mvc.Html namespace (which is in scope by default thanks to a namespace entry in the Views/web.config file). If you don't like the built-in extension methods, you can remove this namespace and build your own.
The phrase “build your own” brings us to the second benefit of having helpers as extension methods. You can build your own extension methods to replace or augment the built-in helpers. You can learn how to build a custom helper in Chapter 14. For now, you'll look at the helpers provided out of the box.
Setting Up the Album Edit Form
If you need to build a view that lets a user edit album information, you might start with the following view code:
@using (Html.BeginForm()) {
@Html.ValidationSummary(excludePropertyErrors: true)
<fieldset>
<legend>Edit Album</legend>
<p>
<input type="submit" value="Save" />
</p>
</fieldset>
}
The two helpers in this code have some additional descriptions in the following sections.
Html.BeginForm
You've used the BeginForm helper previously. The version of BeginForm in the preceding code, with no parameters, sends an HTTP POST to the current URL, so if the view is a response to /StoreManager/Edit/52, the opening form tag will look like the following:
<form action="/StoreManager/Edit/52" method="post">
POST is the ideal verb for this scenario because you are modifying album information on the server.
Html.ValidationSummary
The ValidationSummary helper displays an unordered list of all validation errors in the ModelState dictionary. The Boolean parameter you are using (with a value of true) is telling the helper to exclude property-level errors. In other words, you are telling the summary to display only the errors in ModelState associated with the model itself, and exclude any errors associated with a specific model property. You will be displaying property-level errors separately.
Assume you have the following code somewhere in the controller action rendering the edit view:
ModelState.AddModelError("", "This is all wrong!");
ModelState.AddModelError("Title", "What a terrible name!");
The first error is a model-level error, because you didn't provide a key (or provided an empty key) to associate the error with a specific property. The second error you associated with the Title property, so in your view it will not display in the validation summary area (unless you remove the parameter to the helper method, or change the value to false). In this scenario, the helper renders the following HTML:
<div class="validation-summary-errors">
<ul>
<li>This is all wrong!</li>
</ul>
</div>
Other overloads of the ValidationSummary helper enable you to provide header text and set specific HTML attributes.
Note
By convention, the ValidationSummary helper renders the CSS class validation-summary-errors along with any specific CSS classes you provide. The default MVC project template includes some styling to display these items in red, which you can change in styles.css.
Adding Inputs
After you have the form and validation summary in place, you can add some inputs for the user to enter album information into the view. One approach would use the scaffolded Edit view in Chapter 4 (see the section titled “Building a Resource to Edit an Album”). The form section of the StoreManager Edit.cshtml view code is shown in Listing 5.4, with input helpers highlighted.
Listing 5.4: StoreManager Edit.cshtml
@using (Html.BeginForm())
{
@Html.AntiForgeryToken()
<div class="form-horizontal">
<h4>Album</h4>
<hr />
@Html.ValidationSummary(true)
@Html.HiddenFor(model => model.AlbumId)
<div class="form-group">
@Html.LabelFor(model => model.GenreId,
"GenreId",
new { @class = "control-label col-md-2" })
<div class="col-md-10">
@Html.DropDownList("GenreId", String.Empty)
@Html.ValidationMessageFor(model => model.GenreId)
</div>
</div>
<div class="form-group">
@Html.LabelFor(model => model.ArtistId,
"ArtistId",
new { @class = "control-label col-md-2" })
<div class="col-md-10">
@Html.DropDownList("ArtistId", String.Empty)
@Html.ValidationMessageFor(model => model.ArtistId)
</div>
</div>
<div class="form-group">
@Html.LabelFor(model =>
model.Title,
new { @class = "control-label col-md-2" })
<div class="col-md-10">
@Html.EditorFor(model => model.Title)
@Html.ValidationMessageFor(model => model.Title)
</div>
</div>
<div class="form-group">
@Html.LabelFor(model => model.Price,
new { @class = "control-label col-md-2" })
<div class="col-md-10">
@Html.EditorFor(model => model.Price)
@Html.ValidationMessageFor(model => model.Price)
</div>
</div>
<div class="form-group">
@Html.LabelFor(model => model.AlbumArtUrl,
new { @class = "control-label col-md-2" })
<div class="col-md-10">
@Html.EditorFor(model => model.AlbumArtUrl)
@Html.ValidationMessageFor(model => model.AlbumArtUrl)
</div>
</div>
<div class="form-group">
<div class="col-md-offset-2 col-md-10">
<input type="submit" value="Save" class="btn btn-default" />
</div>
</div>
</div>
}
As a reminder, these helpers give the user the display shown in Figure 5.4.
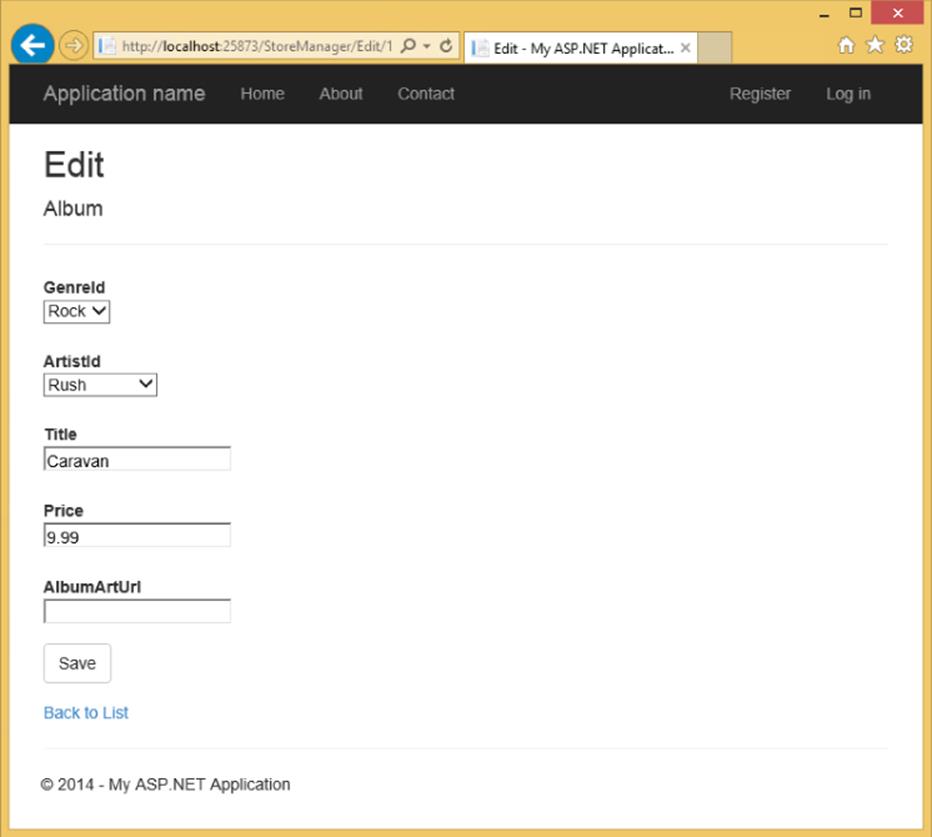
Figure 5.4
The following new helpers are in the view:
· LabelFor
· DropDownList
· ValidationMessageFor
· ValidationSummary
· HiddenFor
We talk about all of these—and more—in this section. To begin with, though, you'll start with the simplest input HTML helper: the TextBox helper.
Html.TextBox and Html.TextArea
The TextBox helper renders an input tag with the type attribute set to text. You commonly use the TextBox helper to accept free-form input from a user. For example, the call to
@Html.TextBox("Title", Model.Title)
results in
<input id="Title" name="Title" type="text"
value="For Those About To Rock We Salute You" />
Just like nearly every other HTML helper, the TextBox helper provides overloads to let you set individual HTML attributes (as demonstrated earlier in the chapter). A close cousin to the TextBox helper is the TextArea helper. Use TextArea to render a <textarea> element for multi-line text entry. The following code:
@Html.TextArea("text", "hello <br/> world")
produces
<textarea cols="20" id="text" name="text" rows="2">hello <br /> world
</textarea>
Notice again how the helper encodes the value into the output (all helpers encode the model values and attribute values). Other overloads of the TextArea helper enable you to specify the number of columns and rows to display in order to control the size of the text area.
@Html.TextArea("text", "hello <br /> world", 10, 80, null)
The preceding code produces the following output:
<textarea cols="80" id="text" name="text" rows="10">hello <br /> world
</textarea>
Html.Label
The Label helper returns a <label/> element using the string parameter to determine the rendered text and for attribute value. A different overload of the helper enables you to independently set the for attribute and the text. In the preceding code, the call toHtml.Label(“GenreId”) produces the following HTML:
<label for="GenreId">Genre</label>
If you haven't used the label element before, then you are probably wondering whether the element has any value. The purpose of a label is to attach information to other input elements, such as text inputs, and boost the accessibility of your application. The forattribute of the label should contain the ID of the associated input element (in this example, the drop-down list of genres that follows in the HTML). Screen readers can use the text of the label to provide a better description of the input for a user. Also, if a user clicks the label, the browser transfers focus to the associated input control. This is especially useful with checkboxes and radio buttons in order to provide the user with a larger area to click (instead of clicking only on the checkbox or radio button itself).
The attentive reader will also notice that the text of the label does not appear as “GenreId” (the string you passed to the helper), but as “Genre”. When possible, helpers use any available model metadata in building a display. We'll return to this topic after you've looked at the rest of the helpers in the form.
Html.DropDownList and Html.ListBox
Both the DropDownList and ListBox helpers return a <select /> element. DropDownList allows single item selection, whereas ListBox allows for multiple item selection (by setting the multiple attribute to multiple in the rendered markup).
Typically, a select element serves two purposes:
· To show a list of possible options
· To show the current value for a field
In the Music Store, you have an Album class with a GenreId property. You are using the select element to display the value of the GenreId property, as well as all other possible categories.
You have a bit of setup work to do in the controller when using these helpers because they require some specific information. A list needs a collection of SelectListItem instances representing all the possible entries for the list. A SelectListItem object has Text, Value, and Selected properties. You can build the collection of SelectListItem objects yourself, or rely on the SelectList or MultiSelectList helper classes in the framework. These classes can look at an IEnumerable of any type and transform the sequence into a sequence ofSelectListItem objects. Take, for example, the Edit action of the StoreManager controller:
public ActionResult Edit(int id)
{
var album = storeDB.Albums.Single(a => a.AlbumId == id);
ViewBag.Genres = new SelectList(storeDB.Genres.OrderBy(g => g.Name),
"GenreId", "Name", album.GenreId);
return View(album);
}
You can think of the controller action as building not only the primary model (the album for editing), but also the presentation model required by the drop-down list helper. The parameters to the SelectList constructor specify the original collection (Genres from the database), the name of the property to use as a value (GenreId), the name of the property to use as the text (Name), and the value of the currently selected item (to determine which item to mark as selected).
If you want to avoid some reflection overhead and generate the SelectListItem collection yourself, you can use the LINQ Select method to project Genres into SelectListItem objects:
public ActionResult Edit(int id)
{
var album = storeDB.Albums.Single(a => a.AlbumId == id);
ViewBag.Genres =
storeDB.Genres
.OrderBy(g => g.Name)
.AsEnumerable()
.Select(g => new SelectListItem
{
Text = g.Name,
Value = g.GenreId.ToString(),
Selected = album.GenreId == g.GenreId
});
return View(album);
}
Html.ValidationMessage
When an error exists for a particular field in the ModelState dictionary, you can use the ValidationMessage helper to display that message. For example, in the following controller action, you purposely add an error to model state for the Title property:
[HttpPost]
public ActionResult Edit(int id, FormCollection collection)
{ var album = storeDB.Albums.Find(id);
ModelState.AddModelError("Title", "What a terrible name!");
return View(album);
}
In the view, you can display the error message (if any) with the following code:
@Html.ValidationMessage("Title")
which results in
<span class="field-validation-error" data-valmsg-for="Title"
data-valmsg-replace="true">
What a terrible name!
</span>
This message appears only if there is an error in the model state for the key Title. You can also call an override that allows you to override the error message from within the view:
@Html.ValidationMessage("Title", "Something is wrong with your title")
which results in
<span class="field-validation-error" data-valmsg-for="Title"
data-valmsg-replace="false">Something is wrong with your title
Note
By convention, this helper renders the CSS class field-validation-error (when an error exists), along with any specific CSS classes you provide. The default MVC project template includes some styling to display these items in red, which you can change in style.css.
In addition to the common features described so far, such as HTML encoding and the ability to set HTML attributes, all the form input features share some common behavior in regards to working with model values and model state.
Helpers, Models, and View Data
Helpers give you the fine-grained control you need over your HTML while taking away the grunge work of building a UI to show the proper controls, labels, error messages, and values. Helpers such as Html.TextBox and Html.DropDownList (as well as all the other form helpers) check the ViewData object to obtain the current value for display (all values in the ViewBag object are also available through ViewData).
Let's take a break from the edit form you are building and look at a simple example. If you want to set the price of an album in a form, you could use the following controller code:
public ActionResult Edit(int id)
{
ViewBag.Price = 10.0;
return View();
}
In the view, you can render a textbox to display the price by giving the TextBox helper the same name as the value in the ViewBag:
@Html.TextBox("Price")
The TextBox helper will then produce the following HTML:
<input id="Price" name="Price" type="text" value="10" />
When the helpers look inside ViewData, they can also view properties of objects inside ViewData. Change the previous controller action to look like the following:
public ActionResult Edit(int id)
{
ViewBag.Album = new Album {Price = 11};
return View();
}
You can use the following code to display a textbox with the album's price:
@Html.TextBox("Album.Price")
Now the resulting HTML looks like the following code:
<input id="Album_Price" name="Album.Price" type="text" value="11" />
If no values match Album.Price in ViewData, the helper attempts to look up a value for the portion of the name before the first dot, (Album), and in this case finds an object of type Album. The helper then evaluates the remaining portion of the name (Price) against theAlbum object, and finds the value to use.
Notice that the id attribute of the resulting input element uses an underscore instead of a dot (whereas the name attribute uses the dot). Dots are not legal inside an id attribute, so the runtime replaces dots with the value of the staticHtmlHelper.IdAttributeDotReplacement property. Without valid id attributes, performing client-side scripting with JavaScript libraries such as jQuery is not possible.
The TextBox helper also works well against strongly typed view data. For example, change the controller action to look like the following code:
public ActionResult Edit(int id)
{
var album = new Album {Price = 12.0m};
return View(album);
}
Now you can return to supplying the TextBox helper with the name of the property for display:
@Html.TextBox("Price");
For the preceding code, the helper now renders the following HTML:
<input id="Price" name="Price" type="text" value="12.0" />
Form helpers also enable you to supply an explicit value to avoid the automatic data lookup, if you want. Sometimes the explicit approach is necessary. Return to the form you are building to edit album information. Remember, the controller action looks like the following:
public ActionResult Edit(int id)
{
var album = storeDB.Albums.Single(a => a.AlbumId == id);
ViewBag.Genres = new SelectList(storeDB.Genres.OrderBy(g => g.Name),
"GenreId", "Name", album.GenreId);
return View(album);
}
Inside the edit view, which is strongly typed to an Album, you have the following code to render an input for the album title:
@Html.TextBox("Title", Model.Title)
The second parameter provides the data value explicitly. Why? Well, in this case, Title is a value already in ViewData, because the Music Store's album edit view, like many views, places the page title into the ViewBag.Title property. You can see this happen at the top of the Edit view:
@{
ViewBag.Title = "Edit - " + Model.Title;
}
The _Layout.cshtml view for the application can retrieve ViewBag.Title to set the title of the rendered page. If you invoked the TextBox helper passing only the string Title, it would first look in the ViewBag and pull out the Title value inside (the helpers look inside theViewBag before they check the strongly typed model). To display the proper title, you need to provide the explicit value in this case. This is an important yet subtle lesson. In a large application, you could consider adding a prefix to some of the view data entries to be clear where they are used. For example, instead of ViewBag.Title for the main page title, a name such as ViewBag.Page_Title would be less likely to conflict with page-specific data.
Strongly Typed Helpers
If you are uncomfortable using string literals to pull values from view data, ASP.NET MVC also provides an assortment of strongly typed helpers. With the strongly typed helpers you pass a lambda expression to specify a model property for rendering. The model type for the expression will be the same as the model specified for the view (with the @model directive). To strongly type a view against the album model, you would need the following line of code at the top of the view:
@model MvcMusicStore.Models.Album
After the model directive is in place, you can rewrite the album edit form you've been working on so far with the following code:
@using (Html.BeginForm())
{
@Html.ValidationSummary(excludePropertyErrors: true)
<fieldset>
<legend>Edit Album</legend>
<p>
@Html.LabelFor(m => m.GenreId)
@Html.DropDownListFor(m => m.GenreId, ViewBag.Genres as SelectList)
</p>
<p>
@Html.TextBoxFor(m => m.Title)
@Html.ValidationMessageFor(m => m.Title)
</p>
<input type="submit" value="Save" />
</fieldset>
}
Notice that the strongly typed helpers have the same names as the previous helpers you've been using, but with a For suffix. The preceding code produces the same HTML you saw previously; however, replacing strings with lambda expressions provides a number of additional benefits. The benefits include IntelliSense, compile-time error checking, and easier refactoring (if you change the name of a property in your model, Visual Studio can automatically change the code in the view).
You can generally find a strongly typed counterpart for every helper that works with model data; the built-in scaffolding you saw in Chapter 4 uses the strongly typed helpers wherever possible.
Notice also how you didn't explicitly set a value for the Title textbox. The lambda expression gives the helper enough information to go directly to the Title property of the model to fetch the required value.
Helpers and Model Metadata
Helpers do more than just look up data inside ViewData; they also take advantage of available model metadata. For example, the album edit form uses the Label helper to display a label element for the genre selection list:
@Html.Label("GenreId")
The helper produces the following output:
<label for="GenreId">Genre</label>
Where did the Genre text come from? The helper asks the runtime whether any model metadata is available for GenreId, and the runtime provides information from the DisplayName attribute decorating the Album model:
[DisplayName("Genre")]
public int GenreId { get; set; }
The data annotations you'll see in Chapter 6 can have a dramatic influence on many of the helpers, because the annotations provide metadata the helpers use when constructing HTML. Templated helpers can take the metadata one step further.
Templated Helpers
The templated helpers in ASP.NET MVC build HTML using metadata and a template. The metadata includes information about a model value (its name and type), as well as model metadata (added through data annotations or a custom provider). The templated helpers are Html.Display and Html.Editor, their strongly typed counterparts, Html.DisplayFor and Html.EditorFor, and their whole-model counterparts, Html.DisplayForModel and Html.EditorForModel.
As an example, the Html.TextBoxFor helper renders the following HTML for an album's Title property:
<input id="Title" name="Title" type="text"
value="For Those About To Rock We Salute You" />
Instead of using Html.TextBoxFor, you can switch to using the following code:
@Html.EditorFor(m => m.Title
The EditorFor helper will render the same HTML as TextBoxFor; however, you can change the HTML using data annotations. If you think about the name of the helper (Editor), the name is more generic than the TextBox helper (which implies a specific type of input element). When using the templated helpers, you are asking the runtime to produce whatever “editor” it sees fit. Let's see what happens if you add a DataType annotation to the Title property:
[Required(ErrorMessage = "An Album Title is required")]
[StringLength(160)]
[DataType(DataType.MultilineText)]
public string Title { get; set; }
Now the EditorFor helper renders the following HTML:
<textarea class="text-box multi-line" id="Title" name="Title">
Let There Be Rock
</textarea>
Because you asked for an editor in the generic sense, the EditorFor helper looked at the metadata and determined that the best HTML element to use was the textarea element (because the metadata indicates the Title property can hold multiple lines of text). Of course, most album titles won't need multiple lines of input, although some artists do like to push the limit with their titles.
The DisplayForModel and EditorForModel helpers build the HTML for an entire model object. Using these helpers, you can add new properties to a model object and instantly see changes in the UI without making any changes to the views.
You can control the rendered output of a template helper by writing custom display or editor templates (see Chapter 15).
Helpers and ModelState
All the helpers you use to display form values also interact with ModelState. Remember, ModelState is a byproduct of model binding and holds all validation errors detected during model binding. Model state also holds the raw values the user submits to update a model.
Helpers used to render form fields automatically look up their current value in the ModelState dictionary. The helpers use the name expression as a key into the ModelState dictionary. If an attempted value exists in ModelState, the helper uses the value from ModelStateinstead of a value in view data.
The ModelState lookup allows bad values to preserve themselves after model binding fails. For example, if the user enters the value abc into the editor for a DateTime property, model binding will fail and the value abc will go into model state for the associated property. When you re-render the view for the user to fix validation errors, the value abc will still appear in the DateTime editor, allowing the users to see the text they tried as a problem and allowing them to correct the error.
When ModelState contains an error for a given property, the form helper associated with the error renders a CSS class of input-validation-error in addition to any explicitly specified CSS classes. The default style sheet, style.css, included in the project template contains styling for this class.
OTHER INPUT HELPERS
In addition to the input helpers you've looked at so far, such as TextBox and DropDownList, the MVC framework contains a number of other helpers to cover the full range of input controls.
Html.Hidden
The Html.Hidden helper renders a hidden input. For example, the following code:
@Html.Hidden("wizardStep", "1")
results in
<input id="wizardStep" name="wizardStep" type="hidden" value="1" />
The strongly typed version of this helper is Html.HiddenFor. Assuming your model had a WizardStep property, you would use it as follows:
@Html.HiddenFor(m => m.WizardStep)
Html.Password
The Html.Password helper renders a password field. It's much like the TextBox helper, except that it does not retain the posted value, and it uses a password mask. The following code:
@Html.Password("UserPassword")
results in
<input id="UserPassword" name="UserPassword" type="password" value="" />
The strongly typed syntax for Html.Password, as you would expect, is Html.PasswordFor. Here's how to use it to display the UserPassword property:
@Html.PasswordFor(m => m.UserPassword)
Html.RadioButton
Radio buttons are generally grouped together to provide a range of possible options for a single value. For example, if you want the user to select a color from a specific list of colors, you can use multiple radio buttons to present the choices. To group the radio buttons, you give each button the same name. Only the selected radio button is posted back to the server when the form is submitted.
The Html.RadioButton helper renders a simple radio button:
@Html.RadioButton("color", "red")
@Html.RadioButton("color", "blue", true)
@Html.RadioButton("color", "green")
and results in
<input id="color" name="color" type="radio" value="red" />
<input checked="checked" id="color" name="color" type="radio" value="blue" />
<input id="color" name="color" type="radio" value="green" />
Html.RadioButton has a strongly typed counterpart, Html.RadioButtonFor. Rather than a name and a value, the strongly typed version takes an expression that identifies the object that contains the property to render, followed by a value to submit when the user selects the radio button.
@Html.RadioButtonFor(m => m.GenreId, "1") Rock
@Html.RadioButtonFor(m => m.GenreId, "2") Jazz
@Html.RadioButtonFor(m => m.GenreId, "3") Pop
Html.CheckBox
The CheckBox helper is unique because it renders two input elements. Take the following code, for example:
@Html.CheckBox("IsDiscounted")
This code produces the following HTML:
<input id="IsDiscounted" name="IsDiscounted" type="checkbox" value="true" />
<input name="IsDiscounted" type="hidden" value="false" />
You are probably wondering why the helper renders a hidden input in addition to the checkbox input. The helper renders two inputs because the HTML specification indicates that a browser will submit a value for a checkbox only when the checkbox is on (selected). In this example, the second input guarantees a value will appear for IsDiscounted even when the user does not check the checkbox input.
Although many of the helpers dedicate themselves to building forms and form inputs, helpers are available that you can use in general rendering scenarios.
RENDERING HELPERS
Rendering helpers produce links to other resources inside an application, and can also enable you to build those reusable pieces of UI known as partial views.
Html.ActionLink and Html.RouteLink
The ActionLink method renders a hyperlink (anchor tag) to another controller action. Like the BeginForm helper you looked at earlier, the ActionLink helper uses the routing API under the hood to generate the URL. For example, when linking to an action in the same controller used to render the current view, you can simply specify the action name:
@Html.ActionLink("Link Text", "AnotherAction")
This produces the following markup, assuming the default routes:
<a href="/Home/AnotherAction">LinkText</a>
When you need a link pointing to an action of a different controller, you can specify the controller name as a third argument to ActionLink. For example, to link to the Index action of the ShoppingCartController, use the following code:
@Html.ActionLink("Link Text", "Index", "ShoppingCart")
Notice that you specify the controller name without the Controller suffix. You never specify the controller's type name. The ActionLink methods have specific knowledge about ASP.NET MVC controllers and actions, and you've just seen how these helpers provide overloads enabling you to specify just the action name, or both the controller name and action name.
In many cases you'll have more route parameters than the various overloads of ActionLink can handle. For example, you might need to pass an ID value in a route, or some other route parameter specific to your application. Obviously, the built-in ActionLink helper cannot provide overloads for these types of scenarios out of the box.
Fortunately, you can provide the helper with all the necessary route values using other overloads of ActionLink. One overload enables you to pass an object of type RouteValueDictionary. Another overload enables you to pass an object parameter (typically an anonymous type) for the routeValues parameter. The runtime reflects over the properties of the object and uses them to construct route values (the property names are the names of the route parameters, and the property values represent the values of the route parameters). For example, to build a link to edit an album with an ID of 10720, you can use the following code:
@Html.ActionLink("Edit link text", "Edit", "StoreManager", new {id=10720}, null)
The last parameter in the preceding overload is the htmlAttributes argument. You saw earlier in the chapter how you can use this parameter to set any attribute value on an HTML element. The preceding code passes a null (effectively not setting any additional attributes in the HTML). Even though the code isn't setting attributes, you have to pass the parameter to invoke the correct overload of ActionLink.
The RouteLink helper follows the same pattern as the ActionLink helper, but also accepts a route name and does not have arguments for controller name and action name. For example, the first example ActionLink shown previously is equivalent to the following:
@Html.RouteLink("Link Text", new {action="AnotherAction"})
URL Helpers
The URL helpers are similar to the HTML ActionLink and RouteLink helpers, but instead of returning HTML they build URLs and return the URLs as strings. There are three helpers:
· Action
· Content
· RouteUrl
The Action URL helper is exactly like ActionLink, but does not return an anchor tag. For example, the following code displays the URL (not a link) to browse all jazz albums in the store:
<span>
@Url.Action("Browse", "Store", new { genre = "Jazz" }, null)
</span>
The result is the following HTML:
<span>
/Store/Browse?genre=Jazz
</span>
When you reach the Ajax chapter (Chapter 8), you'll see another use for the Action helper.
The RouteUrl helper follows the same pattern as the Action helper, but like RouteLink it accepts a route name and does not have arguments for controller name and action name.
The Content helper is particularly helpful because it can convert a relative application path to an absolute application path. You'll see the Content helper at work in the Music Store's _Layout view.
<script src="@Url.Content("∼/Scripts/jquery-1.10.2.min.js")"
type="text/javascript"></script>
Using a tilde as the first character in the parameter you pass to the Content helper lets the helper generate the proper URL no matter where your application is deployed (think of the tilde as representing the application root directory). Without the tilde, the URL could break if you moved the application up or down the virtual directory tree.
In ASP.NET MVC 5, which uses Razor version 3, the tilde character is resolved automatically when it appears in the src attribute for script, style, and img elements. The code in the previous example could also be written as follows and work just fine:
<script src="∼/Scripts/jquery-1.5.1.min.js" type="text/javascript"></script>
Html.Partial and Html.RenderPartial
The Partial helper renders a partial view into a string. Typically, a partial view contains reusable markup you want to render from inside multiple different views. Partial has four overloads:
public void Partial(string partialViewName);
public void Partial(string partialViewName, object model);
public void Partial(string partialViewName, ViewDataDictionary viewData);
public void Partial(string partialViewName, object model,
ViewDataDictionary viewData);
Notice that you do not have to specify the path or file extension for a view because the logic the runtime uses to locate a partial view is the same logic the runtime uses to locate a normal view. For example, the following code renders a partial view named AlbumDisplay. The runtime looks for the view using all the available view engines.
@Html.Partial("AlbumDisplay")
The RenderPartial helper is similar to Partial, but RenderPartial writes directly to the response output stream instead of returning a string. For this reason, you must place RenderPartial inside a code block instead of a code expression. To illustrate, the following two lines of code render the same output to the output stream:
@{Html.RenderPartial("AlbumDisplay "); }
@Html.Partial("AlbumDisplay ")
So, which should you use, Partial or RenderPartial? In general, you should prefer Partial to RenderPartial because Partial is more convenient (you don't have to wrap the call in a code block with curly braces). However, RenderPartial might result in better performance because it writes directly to the response stream, although it would require a lot of use (either high site traffic or repeated calls in a loop) before the difference would be noticeable.
Html.Action and Html.RenderAction
Action and RenderAction are similar to the Partial and RenderPartial helpers. The Partial helper typically helps a view render a portion of a view's model using view markup in a separate file. Action, on the other hand, executes a separate controller action and displays the results. Action offers more flexibility and reuse because the controller action can build a different model and make use of a separate controller context.
Once again, the only difference between Action and RenderAction is that RenderAction writes directly to the response (which can bring a slight efficiency gain). Here's a quick look at how you might use this method. Imagine you are using the following controller:
public class MyController : Controller {
public ActionResult Index() {
return View();
}
[ChildActionOnly]
public ActionResult Menu() {
var menu = GetMenuFromSomewhere();
return PartialView(menu);
}
}
The Menu action builds a menu model and returns a partial view with just the menu:
@model Menu
<ul>
@foreach (var item in Model.MenuItem) {
<li>@item.Text</li>
}
</ul>
In your Index.cshtml view, you can now call into the Menu action to display the menu:
<html>
<head><title>Index with Menu</title></head>
<body>
@Html.Action("Menu")
<h1>Welcome to the Index View</h1>
</body>
</html>
Notice that the Menu action is marked with a ChildActionOnlyAttribute. The attribute prevents the runtime from invoking the action directly via a URL. Instead, only a call to Action or RenderAction can invoke a child action. The ChildActionOnlyAttribute isn't required, but is generally recommended for child actions.
Since MVC 3, there is also a new property on the ControllerContext named IsChildAction. IsChildAction is true when someone calls an action via Action or RenderAction (but false when invoked through a URL). Some of the action filters of the MVC runtime behave differently with child actions (such as the AuthorizeAttribute and OutputCacheAttribute).
Passing Values to RenderAction
Because these action helpers invoke action methods, specifying additional values to the target action as parameters is possible. For example, suppose you want to supply the menu with options.
1. You can define a new class, MenuOptions, as follows:
2. public class MenuOptions {
3. public int Width { get; set; }
4. public int Height { get; set; }
}
5. Change the Menu action method to accept this as a parameter:
6. [ChildActionOnly]
7. public ActionResult Menu(MenuOptions options) {
8. return PartialView(options);
}
9. You can pass in menu options from your action call in the view:
10. @Html.Action("Menu", new {
options = new MenuOptions { Width=400, Height=500 } })
Cooperating with the ActionName Attribute
Another thing to note is that RenderAction honors the ActionName attribute when calling an action name. If you annotate the action as follows, you'll need to make sure to use CoolMenu as the action name and not Menu when calling RenderAction:
[ChildActionOnly]
[ActionName("CoolMenu")]
public ActionResult Menu(MenuOptions options) {
return PartialView(options);
}
SUMMARY
In this chapter, you've seen how to build forms for the Web, and also how to use all the form- and rendering-related HTML helpers in the MVC framework. Helpers are not trying to take away control over your application's markup. Instead, helpers are about achieving productivity while retaining complete control over the angle brackets your application produces.
All materials on the site are licensed Creative Commons Attribution-Sharealike 3.0 Unported CC BY-SA 3.0 & GNU Free Documentation License (GFDL)
If you are the copyright holder of any material contained on our site and intend to remove it, please contact our site administrator for approval.
© 2016-2026 All site design rights belong to S.Y.A.