Automating Microsoft Azure Infrastructure Services
Chapter 6. Virtual Networks
Microsoft Azure Virtual Networks are a critical feature for many scenarios. Deploying a virtual machine into a virtual network allows several key features that may be required with more-advanced virtual machine workloads. The ability to specify static IP addresses, Domain Name System (DNS) servers, and internal load balancing; and to enable hybrid connectivity to an on-premises data center, or even secure access from an individual client machine, are all possible with virtual networks.
Virtual networks also provide the ability to connect virtual machines in other cloud services and even other virtual networks to create a larger isolated network. This private network can potentially span multiple Microsoft Azure regions globally and even multiple on-premises sites.
Virtual networks allow you to control name resolution as well. You can define one or more DNS servers to assign to the virtual machines that are deployed into the virtual network. This allows workloads such as Active Directory or any other scenario where you need automatic DNS server assignment.
Now that you know a little about why virtual networks are so useful and powerful, let’s dive in and see how we can use PowerShell to manage them.
Understanding Virtual Network Configuration
The support for creating and updating virtual networks directly from PowerShell is relatively primitive. There are two key cmdlets that can assist: Get-AzureVNetConfig and Set-AzureVNetConfig. Each cmdlet works by either returning an XML file or by passing an XML file.
Unfortunately, there are no convenience cmdlets for abstracting away the XML (like Add-AzureVirtualNetwork or Add-AzureSubnet). During the initial development, these cmdlets were in scope; but like all projects, features had to be cut to ship on time and those additional cmdlets just have not been added back since.
So now that you know that there are no convenience cmdlets to create and update virtual networks, how can you accomplish the task via PowerShell? The answer is to use PowerShell’s native support for XML to add or remove settings in your subscription’s virtual network configuration in combination with the Get-AzureVNetConfig and Set-AzureVNetConfig cmdlets to specify your subscription’s current network configuration.
For example, to retrieve the XML configuration for your current subscription, you can use the Get-AzureVNetConfig cmdlet. There are two methods for retrieving the network configuration with Get-AzureVNetConfig. The first is to simply save it to a local path for viewing or manipulation. This is equivalent to using the management portal to export your network configuration to disk (see Example 6-1).
Example 6-1. Exporting network configuration
Get-AzureVNetConfig -ExportToFile "C:\Users\Michael\NetworkConfiguration.xml"
The second method can be used to store the XML configuration within a variable. This is useful if you need to manipulate or read the configuration from your script (see Example 6-2).
Example 6-2. Storing the returned data in an XML variable
$networkConfiguration = [xml] (Get-AzureVNetConfig).XMLConfiguration
If there is no configuration at all, the data returned will be $null. If the return value is $null, you can set the configuration to whatever valid network configuration you think the subscription should have by using the Set-AzureVNetConfig cmdlet. This is equivalent to using the management portal to import an existing network configuration XML file (see Example 6-3).
Example 6-3. Importing a network configuration
Set-AzureVNetConfig -ConfigurationPath "C:\Users\Michael\NewNetworkConfiguration.xml"
It is important to understand how virtual networks are created, updated, or deleted in order to do this correctly. The underlying API to modify your virtual network configuration requires that the network configuration for your entire subscription is passed with each update.
What this means to you as someone designing automation is that you first need to retrieve the current virtual network configuration (XML), if it is not $null, then modify the XML by adding, updating, or deleting whatever configuration needs to be changed. When the XML has been modified, send the changed configuration back by using the Set-AzureVnetConfig cmdlet.
Dynamically Adding a Virtual Network
In this section of the chapter we will walk through a simplified but realistic example of using PowerShell to dynamically add a virtual network to a Microsoft Azure subscription. The example will take an existing network configuration file (XML) that contains a very simple virtual network and add it to the networking configuration of a Microsoft Azure subscription.
To build this script on your own, I would recommend creating a new PowerShell file and saving it with a name such as chapter6addvnet.ps1.
In the same directory as your script, create a new text file and change the name to NewVNETConfig.xml. Once created, add the contents shown in Example 6-4 to the file and save it.
Example 6-4. Network configuration (NewVNETConfig.xml)
<?xml version="1.0" encoding="utf-8"?>
<NetworkConfiguration xmlns:xsd="http://www.w3.org/2001/XMLSchema"
xmlns:xsi="http://www.w3.org/2001/XMLSchema-instance"
xmlns="http://schemas.microsoft.com/ServiceHosting/2011/07/NetworkConfiguration">
<VirtualNetworkConfiguration>
<VirtualNetworkSites>
<VirtualNetworkSite name="PSBookVNET" Location="[region name]">
<AddressSpace>
<AddressPrefix>10.20.0.0/16</AddressPrefix>
</AddressSpace>
<Subnets>
<Subnet name="AppSubnet">
<AddressPrefix>10.20.1.0/24</AddressPrefix>
</Subnet>
<Subnet name="DCSubnet">
<AddressPrefix>10.20.2.0/24</AddressPrefix>
</Subnet>
</Subnets>
</VirtualNetworkSite>
</VirtualNetworkSites>
</VirtualNetworkConfiguration>
</NetworkConfiguration>
Replace the [region name] placeholder with the region in which you want to create the virtual network. Remember, you can identify all of the regions available for your subscription with the Get-AzureLocation cmdlet.
The NewVNETConfig.xml file contains a complete network configuration for a Microsoft Azure subscription. However, if an existing configuration is already in place, you will need to merge the contents of the XML file with the existing configuration.
In this specific example, the only element we are interested in merging is the <VirtualNetworkSite>. This element describes a very simple but functionally complete virtual network with two subnets. In more-realistic scenarios you will deal with many other configuration elements such as DNS, LocalNetworkSites, and Gateways. For a complete review of the Microsoft Azure Virtual Network schema, consult the authoritative source at MSDN.
The first set of code to add to the chapter6addvnet.ps1 script is to define the variables for the script. These are the Microsoft Azure subscription name and the path to the XML file that contains the new virtual network to import (see Example 6-5).
Example 6-5. Creating the parameters (Script pane)
[CmdletBinding()]
param(
[parameter(Mandatory)]
[string]$subscription,
[parameter(Mandatory)]
[string]$newVNetConfigPath
)
The next step is to call the Select-AzureSubscription cmdlet to specify the subscription in which the virtual network will be created. The script then loads the XML file containing the new virtual network and extracts the virtual network name by using PowerShell’s native XML handing capabilities (see Example 6-6).
Example 6-6. Loading the virtual network configuration (Script pane)
Select-AzureSubscription $subscription
[xml] $nxml = Get-Content $newVNetConfigPath
[Xml.XmlElement]$nVNet = $nxml.NetworkConfiguration.VirtualNetworkConfiguration
# New VNET name
$nvname = $nVNet.VirtualNetworkSites.VirtualNetworkSite.name
The next step is to return the existing virtual network configuration from the Microsoft Azure subscription. This step is performed using the Get-AzureVNetConfig cmdlet.
The return value of this cmdlet contains the XMLConfiguration property, which can be cast using the [xml] qualifier and stored in a variable for manipulation (see Example 6-7). The return value can also be $null, which means that the subscription has no current network configuration. In the event that the subscription does not have a network configuation, the script simply calls the Set-AzureVNetConfig cmdlet and specifies the XML configuration file. If this branch of the script is followed, the contents of this file will become the network configuration for the subscription.
Example 6-7. Retrieving and verifying the existing network configuration (Script pane)
# Retrieve the current subscription network configuration
$exml = [xml] (Get-AzureVNetConfig).XMLConfiguration
if($exml -eq $null)
{
Write-Output "Existing network configuration not found."
Write-Output "Applying entire configuration."
Set-AzureVNetConfig -ConfigurationPath $newVNetConfigPath
return
}
The next portion of the script assumes there is an existing network configuration to deal with. In this case the script will perform some basic validation to ensure that there are no existing virtual networks with the same name; if there is, the script will exit (see Example 6-8). A more advanced automation script could attempt to merge any updated properties such as DNS, Subnets, and so on that differ between the virtual networks.
Example 6-8. Testing for an existing virtual network with the same name (Script pane)
# Existing virtual networks
[Xml.XmlElement]$eVNet = $exml.NetworkConfiguration.VirtualNetworkConfiguration
$esite = $eVNet.VirtualNetworkSites.VirtualNetworkSite
if($esite -ne $null)
{
foreach($vnet in $esite)
{
if($vnet.Name -eq $nvname)
{
Write-Output "$nvname already exists - exiting."
return
}
}
}
The final portion of the script uses PowerShell’s XML processing capabilities of merging the new VirtualNetworkSite element from the passed-in XML configuration retrieved from the Microsoft Azure subscription. When the XML is merged, a new XML file is created in a temporary location on the filesystem and is then passed to the Set-AzureVNetConfig cmdlet. The final step is to remove the newly created temporary XML file by using the Remove-Item cmdlet (see Examples 6-9 and 6-10).
Example 6-9. Merging the new virtual network with the existing configuration (Script pane)
$newSite = $nVNet.VirtualNetworkSites.VirtualNetworkSite
$importedVnet = $exml.ImportNode($newSite, $true)
$eVNet.VirtualNetworkSites.AppendChild($importedVnet)
$tmpFile = Join-Path $env:TEMP "NewNetConfig.xml"
$exml.Save($tmpFile)
Write-Output "Importing new virtual network to existing network configuration"
Set-AzureVNetConfig -ConfigurationPath $tmpFile
# Delete the temporary file
Remove-Item $tmpFile
Example 6-10. Complete example
[CmdletBinding()]
param(
[parameter(Mandatory)]
[string]$subscription,
[parameter(Mandatory)]
[string]$newVNetConfigPath
)
Select-AzureSubscription $subscription
[xml] $nxml = Get-Content $newVNetConfigPath
[Xml.XmlElement]$nVNet = $nxml.NetworkConfiguration.VirtualNetworkConfiguration
# New VNET name
$nvname = $nVNet.VirtualNetworkSites.VirtualNetworkSite.name
# Retrieve the current subscription network configuration
$exml = [xml] (Get-AzureVNetConfig).XMLConfiguration
if($econfig -eq $null)
{
Write-Output "Existing network configuration not found."
Write-Output "Applying entire configuration."
Set-AzureVNetConfig -ConfigurationPath $newVNetConfigPath
return
}
# Existing virtual networks
[Xml.XmlElement]$eVNet = $exml.NetworkConfiguration.VirtualNetworkConfiguration
$esite = $eVNet.VirtualNetworkSites.VirtualNetworkSite
if($esite -ne $null)
{
foreach($vnet in $esite)
{
if($vnet.Name -eq $nvname)
{
Write-Output "$nvname already exists - exiting."
return
}
}
}
$newSite = $nVNet.VirtualNetworkSites.VirtualNetworkSite
$importedVnet = $exml.ImportNode($newSite, $true)
$eVNet.VirtualNetworkSites.AppendChild($importedVnet)
$tmpFile = Join-Path $env:TEMP "NewNetConfig.xml"
$exml.Save($tmpFile)
Write-Output "Importing new virtual network to existing network configuration"
Set-AzureVNetConfig -ConfigurationPath $tmpFile
# Delete the temporary file
Remove-Item $tmpFile
When you have completed writing the script, the last step is to execute it by pressing F5, or by highlighting the script and pressing F8. You will be prompted for the variables defined at the beginning of the script (see Figure 6-1). Enter the subscription name and the path to theNewVNETConfig.xml file (quotes around the values are not needed even if there are spaces in the subscription name or path to the XML file).
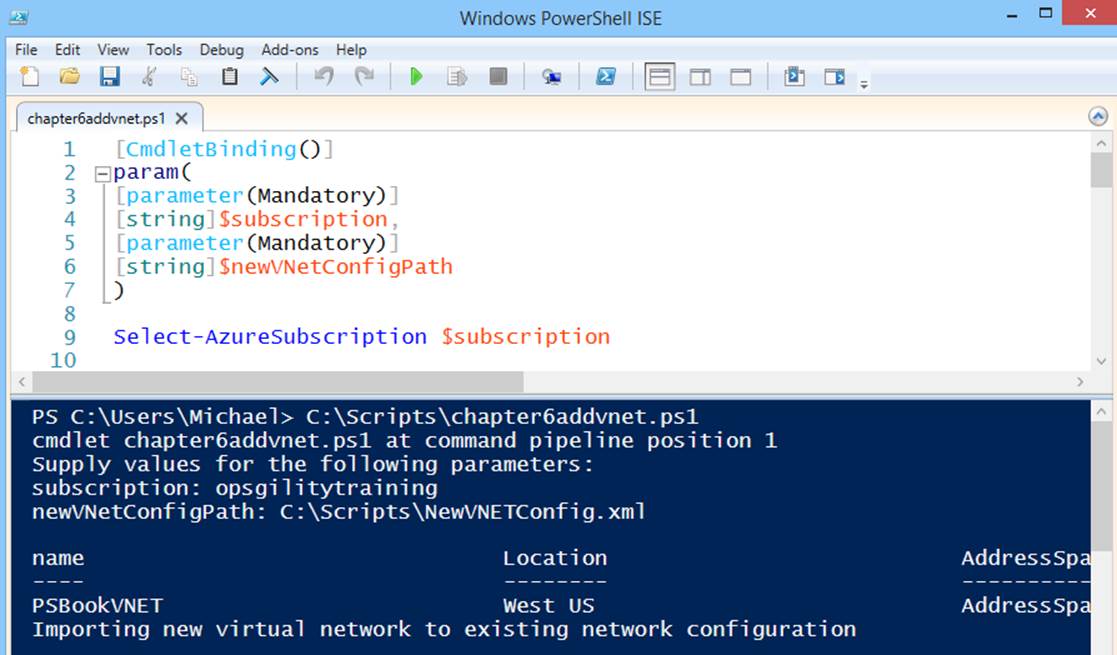
Figure 6-1. Add virtual network by using Set-AzureVNetConfig
REAL-WORLD VALIDATION
Like most examples in this book, this example does not validate for all failure cases. In the previous example, if you wish to validate the configuration before executing, there are several items to check. First, you could validate the incoming XML file against the virtual network schema. Second, you could validate the subscription quotas to ensure that you can actually allocate another virtual network in the subscription. Finally, you could also check that the region specified in the virtual network is valid within the subscription you are using by comparing it against the available names returned from the Get-AzureLocation cmdlet.
Updating a Virtual Network Configuration
The experience of updating an existing virtual network is almost identical to creating a new one. You first retrieve the configuration by using Get-AzureVNetConfig, modify the XML, and send the modified changes back to the subscription with a call to Set-AzureVNetConfig.
Deleting a virtual network
Deleting a virtual network consists of removing it from the network configuration XML file and sending the new configuration (minus the virtual network) back with Set-AzureVNetConfig. One thing to remember is you cannot delete a virtual network that has a gateway, virtual machines, or cloud service instances provisioned into the virtual network. When these compute resources are deleted, you can delete the virtual network.
Adding or removing DNS
You can add DNS servers to your virtual network configuration by modifying the XML configuration to match the schema outlined in MSDN. Similar to deleting a virtual network, you cannot remove a DNS server from a virtual network if any compute resources are provisioned into the virtual network that is referencing the DNS server. You can add new DNS servers to the virtual network, but existing virtual machines must be rebooted to see the new DNS server.
Adding or removing subnets and local network sites
Similar to DNS, you can add or remove subnets or a local network site configuration by modifying the XML configuration. You must first remove any virtual machines or cloud service instances assigned to a subnet before deleting it.
Removing the Network Configuration
I also want to mention the Remove-AzureVnetConfig cmdlet. This cmdlet is very handy for clearing all of your virtual network settings from a subscription. The only time you can execute this cmdlet is when you have no virtual machine or cloud service instances provisioned in any virtual network in your subscription.
The syntax for executing the cmdlet is straightforward; see Example 6-11.
Example 6-11. Removing an existing virtual network configuration
Remove-AzureVNetConfig
Now that you know the basics of constructing or updating the virtual network schema, let’s discuss how to provision a virtual machine into the virtual network we just created.
Provisioning into a Virtual Network
The New-AzureVM and New-AzureQuickVM cmdlets support specifying a VNetName as a parameter to deploy a virtual machine into a virtual network. In the following pages we will write examples to show how with each cmdlet.
To get started, you will need the details of your current network configuration. To accomplish this, Get-AzureVNetConfig can be used along with the select command and -ExpandProperty parameter to expand the XMLConfiguration element of the returned configuration (seeExample 6-12 and Figure 6-2).
Example 6-12. Using Get-AzureVNETConfig to display the virtual network configuration (Console pane)
Get-AzureVNetConfig | select -ExpandProperty XMLConfiguration
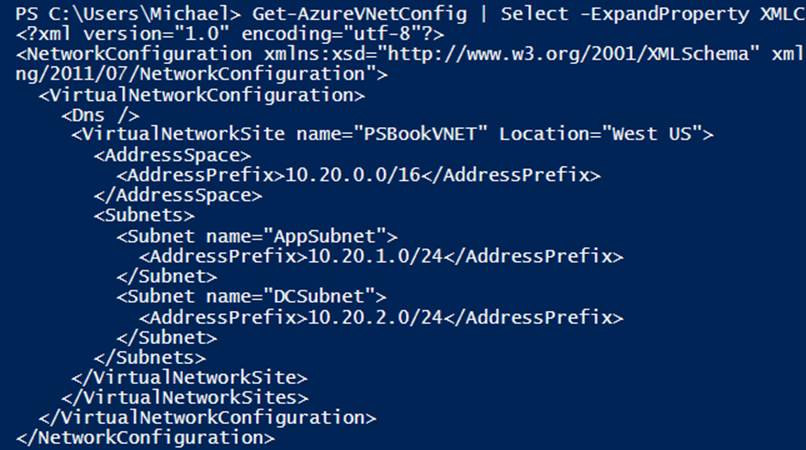
Figure 6-2. Get-AzureVNETConfig output
The first example we will write is to use New-AzureQuickVM to provision into a virtual network. Using the PowerShell ISE, create a new file called chapter6quickvmvnet.ps1 and add the source shown in Example 6-13, ensuring that you replace the placeholder values with real values. For this example you should use a new cloud service name.
Example 6-13. Using the New-AzureQuickVM cmdlet to join a virtual network and specify a subnet (Script pane)
# Specify the admin credentials
$adminUser = "[admin username]"
$password = "[admin password]"
$serviceName = "[cloud service name]"
$VNET = "PSBookVNET"
$Location = "West US"
$Subnet = "AppSubnet"
$vmName = "vnetjoinedvm1"
$vmSize = "Small"
$imageFamily = "Windows Server 2012 R2 Datacenter"
$imageName = Get-AzureVMImage |
where { $_.ImageFamily -eq $imageFamily } |
sort PublishedDate -Descending |
select -ExpandProperty ImageName -First 1
New-AzureQuickVM -Windows `
-ServiceName $serviceName `
-Name $vmName `
-InstanceSize $vmSize `
-ImageName $imageName `
-Location $location `
-AdminUsername $adminUser `
-Password $password `
-VNetName $VNET `
-SubnetNames $Subnet
The -SubnetNames parameter accepts an array of subnets, but it is actually not doing what you may think. Currently, virtual machines in Microsoft Azure support only a single network interface, so your virtual machine will be deployed on only a single subnet. So why have more than one? Simple: if the address space on the first subnet is full (no more available IP addresses), Microsoft Azure will allocate an IP from one of the additional subnets if they are specified.
Execute the script by pressing F5, or by highlighting the script and pressing F8, to create the first virtual machine in your virtual network.
The second example shows how to provision a virtual machine by using the composition model with the New-AzureVMConfig and New-AzureVM cmdlets. Using the PowerShell ISE, create a new PowerShell file called chapter6createvmvnet.ps1 and add the source shown in Example 6-14. As always, ensure that you replace the placeholder values with real values. For this example you should also use a new cloud service name.
Example 6-14. Joining a virtual network by using the virtual machine composition model (Script pane)
# Specify the admin credentials
$adminUser = "[admin username]"
$password = "[admin password]"
$serviceName = "[cloud service name]"
$VNET = "PSBookVNET"
$Location = "West US"
$Subnet = "AppSubnet"
$vmName = "vnetjoinedvm2"
$vmSize = "Small"
$imageFamily = "Windows Server 2012 R2 Datacenter"
$imageName = Get-AzureVMImage |
where { $_.ImageFamily -eq $imageFamily } |
sort PublishedDate -Descending |
select -ExpandProperty ImageName -First 1
$vmConfig = New-AzureVMConfig -Name $vmName `
-InstanceSize $vmSize `
-ImageName $imageName
$vmConfig | Add-AzureProvisioningConfig -Windows -AdminUsername $adminUser `
-Password $password
$vmConfig | Set-AzureSubnet -SubnetNames $Subnet
$vmConfig | New-AzureVM -ServiceName $serviceName -Location $location -VNetName $VNET
Only minor changes were made to the previous composition example to demonstrate how to join a virtual network. The first change is the introduction of a new cmdlet, Set-AzureSubnet. This cmdlet takes the virtual machine configuration and modifies it by setting the SubnetNamesproperty. The second change is the addition of the VNetName parameter on the New-AzureVM cmdlet call.
Execute the script by pressing F5, or by highlighting the script and pressing F8, to create the second virtual machine in your virtual network.
CROSS-SERVICE CONNECTIVITY
If you have executed the previous two examples, you should have two virtual machines in separate cloud services on the same virtual network. To demonstrate that the virtual machines can communicate directly even though they are in separate cloud services, log in to vnetjoinedvm1 using remote desktop and from within that virtual machine log in to vnetjoinedvm2 using its internal IP address.
Understanding IP Address Assignment
When a virtual machine is deployed into a virtual network, its internal IP address is assigned from the subnet specified in Set-AzureSubnet and is dependent on the order in which it was provisioned (unless a static IP is specified, which will be discussed soon).
For example, the AppSubnet subnet created in the previous example uses the address prefix of 10.20.1.0/24. The first four IP addresses of each subnet are reserved. With this knowledge in hand, it is easy to deduce that the first IP address available in this subnet will be 10.20.1.4. Unless otherwise specified, a virtual machine will be assigned the next available IP address from the subnet to which it was assigned at provisioning time.
The IP address assigned to each virtual machine will not change unless the virtual machine is deallocated. How do you deallocate a virtual machine? Simply use the Stop-AzureVM cmdlet (without using the -StayProvisioned parameter) or shut down from within the management portal. If the status of your virtual machine is StoppedDeallocated, then the virtual machine is no longer allocated and you are not being billed for the compute time. You should remember that shutting down your virtual machine from within the virtual machine itself does not deallocate the virtual machine and it will retain its IP address (and bill you while shut down).
To further illustrate the IP addressing scheme that Microsoft Azure uses, let’s walk through the IP address assignments for four virtual machines in the same subnet range of 10.20.1.0/24, shown in Example 6-15.
If you would like to try this experiment out on your own, you should first delete any virtual machines you may have created in the PSBookVNET virtual network. Then, using your PowerShell ISE, create a new PowerShell script named chapter6createvmsvnet.ps1.
Example 6-15. Creating multiple virtual machines (Script pane)
# Replace with your own subscription name
Select-AzureSubscription "[subscription name]"
# Specify the admin credentials
$adminUser = "[admin username]"
$password = "[admin password]"
# Replace with your cloud service name
$serviceName = "[cloud service name]"
$VNET = "PSBookVNET"
$Location = "West US"
$Subnet = "AppSubnet"
$vmSize = "Small"
$imageFamily = "Windows Server 2012 R2 Datacenter"
$imageName = Get-AzureVMImage |
where { $_.ImageFamily -eq $imageFamily } |
sort PublishedDate -Descending |
select -ExpandProperty ImageName -First 1
$vmConfigs = @()
for($i=1; $i -le 4; $i++)
{
# Change the VM name to match the instance number
$vmName = "vnetjoinedvm$i"
$vmConfig = New-AzureVMConfig -Name $vmName `
-InstanceSize $vmSize `
-ImageName $imageName
$vmConfig | Add-AzureProvisioningConfig -Windows `
-AdminUsername $adminUser `
-Password $password
$vmConfig | Set-AzureSubnet -SubnetNames $Subnet
$vmConfigs += $vmConfig
}
# Create the virtual machines by passing an array of configurations
# New-AzureVM will create them on your behalf in the same cloud service
New-AzureVM -ServiceName $serviceName `
-Location $Location `
-VNetName $VNET `
-VMs $vmConfigs
To view the internal IP addresses assigned to each virtual machine, you can use the Get-AzureVM cmdlet and select the virtual machine name and the IP address (see Example 6-16 and Figure 6-3).
Example 6-16. Viewing internal IP addresses for your virtual machines (Console pane)
Get-AzureVM -ServiceName $serviceName | select Name, IpAddress
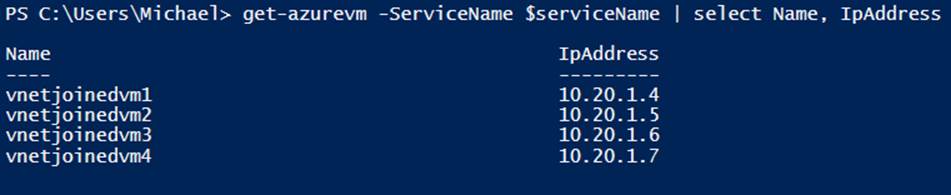
Figure 6-3. Name and IP address assignment at creation
If all of the virtual machines are shut down using Stop-AzureVM and then started in a different order, the IP addresses will be assigned in the order they were started (see Example 6-17 and the resulting assignments in Figure 6-4).
Example 6-17. Shut down and started out of order (Console pane)
# Replace with your cloud service name
$serviceName = "[cloud service name]"
# Stop all virtual machines in the cloud service
Get-AzureVM -ServiceName $serviceName | Stop-AzureVM -Force
Start-AzureVM -ServiceName $serviceName -Name "vnetjoinedvm4"
Start-AzureVM -ServiceName $serviceName -Name "vnetjoinedvm1"
Start-AzureVM -ServiceName $serviceName -Name "vnetjoinedvm2"
Start-AzureVM -ServiceName $serviceName -Name "vnetjoinedvm3"

Figure 6-4. Name and IP address assignment with modified start order
Specifying Static IP Addresses
Having the IP addresses of your virtual machines depend on the start order may or may not be acceptable in your situation. In some workloads, such as DNS servers, if the IP address changes, the result could be catastrophic to your deployment.
The first solution you might think of is to just not shut down those virtual machines. However, that removes one of the key benefits of the cloud in the first place: pay-as-you-go computing. If you do not need your servers running for whatever reason, you should not be required to. It is also risky because with multiple administrators (or sometimes even just one) accidents will happen.
A better solution is to use static IP addresses. Static IP addresses allow you to request a specific IP address be assigned to a virtual machine when it starts. One thing to note is this is a request and not a reservation. If another virtual machine already has the static IP address assigned to it (and yes, it is available for automatic assignment), when your virtual machine is started, it will fail to boot. You can mitigate this risk by deploying all virtual machines with static IP addresses into a separate subnet.
Example 6-18 first shuts down all of the existing virtual machines so their IP addresses are free for assignment. It then updates the virtual machines by retrieving their current configuration with Get-AzureVM, modifies that configuration by using Set-AzureStaticVNetIP, and sends the updated configuration to Azure with Update-AzureVM.
When the virtual machines have static IP addresses assigned, Start-AzureVM is called for each of them in the same order as before, and, as Figure 6-5 shows, the virtual machines have the expected IP addresses.
To try this on your own, create a new PowerShell script named chapter6setstatic.ps1 and add the code in Example 6-18.
Example 6-18. Specifying static IP addresses (Script pane)
# Replace with your own subscription name
$subscription = "[subscription name]"
Select-AzureSubscription $subscription
# Replace with your cloud service name
$serviceName = "[cloud service name]"
# Stop all virtual machines in the cloud service
Get-AzureVM -ServiceName $serviceName | Stop-AzureVM -Force
Get-AzureVM -ServiceName $serviceName -Name vnetjoinedvm1 |
Set-AzureStaticVNetIP -IPAddress "10.20.1.4" |
Update-AzureVM
Get-AzureVM -ServiceName $serviceName -Name vnetjoinedvm2 |
Set-AzureStaticVNetIP -IPAddress "10.20.1.5" |
Update-AzureVM
Get-AzureVM -ServiceName $serviceName -Name vnetjoinedvm3 |
Set-AzureStaticVNetIP -IPAddress "10.20.1.6" |
Update-AzureVM
Get-AzureVM -ServiceName $serviceName -Name vnetjoinedvm4 |
Set-AzureStaticVNetIP -IPAddress "10.20.1.7" |
Update-AzureVM
# Regardless of the start order, the virtual machines will have
# the correct IP addresses
Start-AzureVM -ServiceName $serviceName -Name "vnetjoinedvm4"
Start-AzureVM -ServiceName $serviceName -Name "vnetjoinedvm1"
Start-AzureVM -ServiceName $serviceName -Name "vnetjoinedvm2"
Start-AzureVM -ServiceName $serviceName -Name "vnetjoinedvm3"

Figure 6-5. Name and IP address assignment with modified start order and static IPs
It is easy to see the static IP address assigned to a virtual machine. Run the Get-AzureVM cmdlet and pipe the output to the Get-AzureStaticVNetIP cmdlet (see Example 6-19 and Figure 6-6).
Example 6-19. Viewing the static IP address of a virtual machine (Console pane)
Get-AzureVM -ServiceName $serviceName -Name "vnetjoinedvm1" | Get-AzureStaticVNetIP

Figure 6-6. Get-AzureStaticVNetIP output
Removing a static IP address follows the same process as setting one. You must return the virtual machine configuration by using the Get-AzureVM cmdlet, modify it through the PowerShell pipeline by using Remove-AzureStaticVNetIP, and then send the modified configuration back by using the Update-AzureVM cmdlet (see Example 6-20 and Figure 6-7).
Example 6-20. Removing a static IP address (Console pane)
Get-AzureVM -ServiceName $serviceName -Name "vnetjoinedvm4" |
Remove-AzureStaticVNetIP |
Update-AzureVM

Figure 6-7. Removing a static IP address
Moving Virtual Machines to Different Subnets
Another common network task you will perform with PowerShell is subnet migration. For example, if I wanted to use one of the previously created virtual machines as a domain controller on its own subnet, I could use the code shown in Example 6-21 to move it from the AppSubnet to the DCSubnet (see Figure 6-8).
Example 6-21. Moving a virtual machine between subnets (Console pane)
Get-AzureVM -ServiceName $serviceName -Name "vnetjoinedvm4" |
Set-AzureSubnet -SubnetNames "DCSubnet" |
Update-AzureVM
REBOOT WARNING
Changing the subnet of a virtual machine will cause a reboot!

Figure 6-8. Changing the subnet of a virtual machine
STATIC IPS AND MOVING SUBNETS
If a virtual machine already has a static IP address assigned to it from one subnet, it must be removed before it can be moved to another subnet.
Hybrid Network Connectivity
For hybrid network connectivity, there are three options for connecting your Microsoft Azure Virtual Network to non-cloud-based networks such as your on-premises data center or even your laptop at home (or the coffee shop). These hybrid options are site-to-site, point-to-site, and ExpressRoute. Going into depth for each connectivity option is beyond the scope of this book. However, discussing how to automate each option through PowerShell is not.
Gateway Management
NOT COMPREHENSIVE
This section will touch on many virtual network-related topics such as supported devices, gateway types, and virtual network schema. The focus is on using PowerShell to automate these features, not necessarily about the features themselves.
Here are two references that should help with a more thorough understanding:
§ Gateways and devices: http://bit.ly/about_VPN_for_VMs
§ Virtual network schema: http://bit.ly/VN_config_schema
Each of the three hybrid connectivity options requires the creation of a gateway. A gateway is a software-based device running within your Microsoft Azure subscription that provides connectivity through one of the previously mentioned hybrid options. When you provision a gateway, two worker roles are created under the covers, and they are in active/passive mode for high availability. Unlike virtual networks, gateways do include a separate charge that starts the moment the gateway is provisioned.
Gateways come in two flavors: static and dynamic. Static gateways support the only site-to-site connectivity model, while dynamic gateways can support both site-to-site and point-to-site.
Before creating a gateway using PowerShell, you must create a virtual network that has the gateway described in the network configuration XML. If you are automating this portion of the task, you will have to create the Gateway element as part of the VirtualNetworkSite, similar to how the virtual network was dynamically added at the beginning of the chapter.
Let’s examine a complete virtual network configuration using the network configuration XML. Unlike previous examples, I’m not going to treat this as a sample to walk through but more as a reference for how to build your own.
In Example 6-22, two virtual networks are defined in the network configuration: PSBookVNETS2S and PSBookVNETP2S.
Example 6-22. Creating virtual networks with site-to-site and point-to-site
<?xml version="1.0" encoding="utf-8"?>
<NetworkConfiguration xmlns:xsd="http://www.w3.org/2001/XMLSchema"
xmlns:xsi="http://www.w3.org/2001/XMLSchema-instance"
xmlns="http://schemas.microsoft.com/ServiceHosting/2011/07/NetworkConfiguration">
<VirtualNetworkConfiguration>
<Dns>
<DnsServers>
<DnsServer name="AD-DC" IPAddress="192.168.1.60" />
</DnsServers>
</Dns>
<LocalNetworkSites>
<LocalNetworkSite name="ONPREMVPN">
<AddressSpace>
<AddressPrefix>192.168.0.0/16</AddressPrefix>
</AddressSpace>
<VPNGatewayAddress>96.226.226.148</VPNGatewayAddress>
</LocalNetworkSite>
</LocalNetworkSites>
<VirtualNetworkSites>
<VirtualNetworkSite name="PSBookVNETS2S" AffinityGroup="PSBookAG">
<AddressSpace>
<AddressPrefix>172.16.0.0/16</AddressPrefix>
</AddressSpace>
<Subnets>
<Subnet name="App">
<AddressPrefix>172.16.0.0/24</AddressPrefix>
</Subnet>
<Subnet name="Data">
<AddressPrefix>172.16.1.0/24</AddressPrefix>
</Subnet>
<Subnet name="DNS">
<AddressPrefix>172.16.2.0/24</AddressPrefix>
</Subnet>
<Subnet name="GatewaySubnet">
<AddressPrefix>172.16.3.0/29</AddressPrefix>
</Subnet>
</Subnets>
<DnsServersRef>
<DnsServerRef name="AD-DC" />
</DnsServersRef>
<Gateway>
<ConnectionsToLocalNetwork>
<LocalNetworkSiteRef name="ONPREMVPN">
<Connection type="IPsec" />
</LocalNetworkSiteRef>
</ConnectionsToLocalNetwork>
</Gateway>
</VirtualNetworkSite>
<VirtualNetworkSite name="PSBookVNETP2S" AffinityGroup="PSBookAG">
<AddressSpace>
<AddressPrefix>172.16.0.0/16</AddressPrefix>
</AddressSpace>
<Subnets>
<Subnet name="App">
<AddressPrefix>172.16.0.0/24</AddressPrefix>
</Subnet>
<Subnet name="Data">
<AddressPrefix>172.16.1.0/24</AddressPrefix>
</Subnet>
<Subnet name="DNS">
<AddressPrefix>172.16.2.0/24</AddressPrefix>
</Subnet>
<Subnet name="GatewaySubnet">
<AddressPrefix>172.16.3.0/29</AddressPrefix>
</Subnet>
</Subnets>
<Gateway>
<VPNClientAddressPool>
<AddressPrefix>10.0.0.0/24</AddressPrefix>
</VPNClientAddressPool>
<ConnectionsToLocalNetwork />
</Gateway>
</VirtualNetworkSite>
</VirtualNetworkConfiguration>
</NetworkConfiguration>
The first virtual network, PSBookVNETS2S, contains a DnsServersRef element. This element refers to a DNS server that is defined outside of the virtual network itself; this means it could be referenced by multiple virtual networks. The DNS server referenced could point to an on-premises server reachable through a VPN tunnel, or it could point to a server in a virtual network. All virtual machines provisioned into this virtual network will be assigned the IP address of this DNS server at boot time. For availability, you can specify more than one DNS server per virtual network.
In the PSBookVNETS2S virtual network, the Gateway element contains a ConnectionsToLocalNetwork element that references a separate local network configuration. This configuration describes the IP prefixes for a local network and the IP address for the VPN device to reach it. If you are creating a virtual network that has site-to-site connectivity enabled, at least one local network is required.
In the PSBookVNETP2S virtual network, the gateway element contains a VPNClientAddressPool element. This is the IP prefix that point-to-site client machines will be allocating IP addresses from when they connect and are authenticated. If you are creating a virtual network that has point-to-site connectivity enabled, this element is required.
SITE-TO-SITE AND POINT-TO-SITE CAN COEXIST
It is possible to create a virtual network that has both ConnectionsToLocalNetwork and VPNClientAddressPool elements. The gateway for this type of configuration has to be dynamic, but in this configuration connectivity, in both modes is fully supported.
Now that you have a basic understanding of the gateway configurations, you next need to know how to provision the gateways.
Creating and Automating Gateways
Creating a gateway is straightforward. Use the New-AzureVNetGateway cmdlet and specify the gateway type (StaticRouting or DynamicRouting) and the virtual network name with which you want to associate the gateway (see Example 6-23).
Example 6-23. Creating a gateway
New-AzureVNetGateway -VNetName "PSBookVNETS2S" -GatewayType DynamicRouting
Before you proceed to configuring the device to accept the VPN connection, you must wait until the gateway has been provisioned. The simplest way to validate that the gateway is provisioned is by retrieving its current state using the Get-AzureVNetGateway cmdlet and polling the status until the gateway state is set to Provisioned (see Example 6-24). This operation may take 20 to 30 minutes to complete.
Example 6-24. Determining when the gateway is provisioned
while($true)
{
Write-Output "Checking Gateway Status"
$gatewayStatus = Get-AzureVNetGateway $vnetName
if($gatewayStatus.State -eq "Provisioning")
{
Write-Output "Gateway is still provisioning.. "
Start-Sleep 30
}
elseif($gatewayStatus.State -eq "Provisioned")
{
Write-Output "Gateway is provisioned.. "
break
}
else
{
Write-Error "Gateway is in an unknown state. Cannot Continue."
Write-Error "GW State:" $gatewayStatus.State
return
}
}
If you are configuring a site-to-site connection, you can optionally download the configuration script for your device using a direct call to the Microft Azure API. There currently is no native cmdlet for this call, which is why a direct API call is required.
The API to download the VPN device configuration script requires passing the vendor name, platform, and operating system family as parameters to the URI to identify the correct script. Example 6-25 downloads the configuration script for Microsoft’s Routing and Remote Access Service (RRAS).
Example 6-25. Downloading a device script
$vnetName = "PSBookVNETS2S"
$vendor = "Microsoft Corporation"
$platform = "RRAS"
$osfamily = "Windows Server 2012"
# Calls and downloads the script
$sURI = "https://management.core.windows.net/$subscriptionID/services/networking/"
$sURI += "$vnetName/gateway/vpndeviceconfigscript?vendor=$vendor&platform=$platform"
$sURI += "&osfamily=$osfamily"
$task = $httpClient.GetStringAsync($sURI)
$task.Wait()
if ($task.IsCompleted)
{
$vpnScript = $task.Result | Out-String
$vpnScript | Out-File "$PSScriptRoot\VPNDevice.ps1"
}
else
{
Write-Error "An Error Occurred Downloading VPN Script" + $task.Exception.Message
}
When the script is downloaded, it has to be executed on the remote server. If you were downloading a script for a non-Windows platform, this would likely involve executing the script using SSH. However, since this example is downloading for a Windows server using the Routing and Remote Access Service, the script could be executed using remote PowerShell, as Example 6-26 indicates.
Example 6-26. Executing the device script
$RRASServer = "myrrassvr"
Write-Output "Configuring RRAS for Site-to-Site tunnel on Server $RRASServer"
Invoke-Command -ComputerName $RRASServer -FilePath "$PSScriptRoot\VPNDevice.ps1"
When the gateway is created, it will automatically attempt to connect to the VPN device specified in the network configuration. You can use the Get-AzureVNetConnection cmdlet to monitor the status (see Example 6-27 and Figure 6-9).
Example 6-27. Detecting gateway connection state
Get-AzureVNetConnection -VNetName $vnetName
At some point you may need to disconnect or reconnect the gateway. The cmdlet to perform these operations is Set-AzureVNetGateway. The cmdlet accepts a -Disconnect parameter to tell it to disconnect, as well as a -Connect parameter to do the opposite (see Example 6-28 andExample 6-29). This cmdlet also requires the virtual network name and the specific local network site (VPN connection) to disconnect or connect.
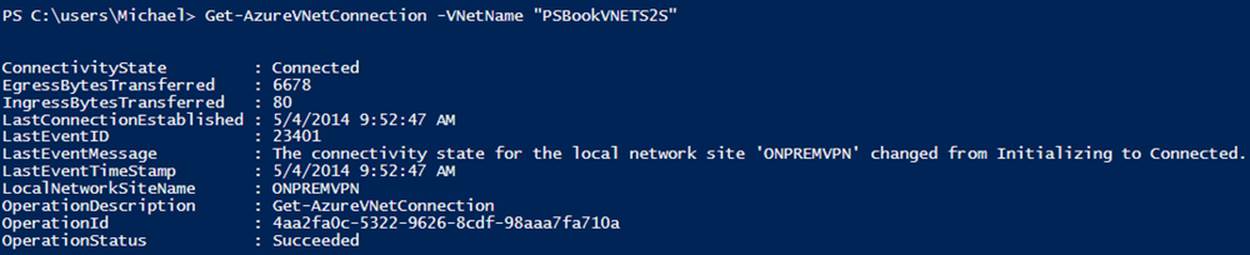
Figure 6-9. Gateway connection status
Example 6-28. Disconnecting a gateway
$siteName = "ONPREMVPN"
Set-AzureVNetGateway -Disconnect -VNetName $vnetName -LocalNetworkSiteName $siteName
Example 6-29. Reconnecting a gateway
$siteName = "ONPREMVPN"
Set-AzureVNetGateway -Connect -VNetName $vnetName -LocalNetworkSiteName $siteName
GATEWAY CHARGES
As long as the VPN gateway is provisioned, you are being charged (connected or not). The only way to stop being charged for the gateway time is to delete it.
The final gateway cmdlet to mention is, of course, the Remove-AzureVNetGateway cmdlet. This cmdlet requires the virtual network name as a parameter and will delete the underlying gateway worker roles upon a successfully completed call (see Example 6-30).
Example 6-30. Deleting a gateway
Remove-AzureVNetGateway -VNetName $vnetName
Using the Internal Load Balancer
A feature that works hand-in-hand with hybrid connectivity is the internal load balancer. This feature enables two key workloads that are relatively difficult to simulate without a native load balancer.
Intranet workloads
The first workload is the intranet workload. Using the internal load balancer, it is possible to deploy an intranet workload into virtual machines and access those virtual machines from an internal IP address without browsing from the public VIP. These workloads can be accessed over ExpressRoute, site-to-site; or for development, test, and administration over point-to-site (see Figure 6-10).
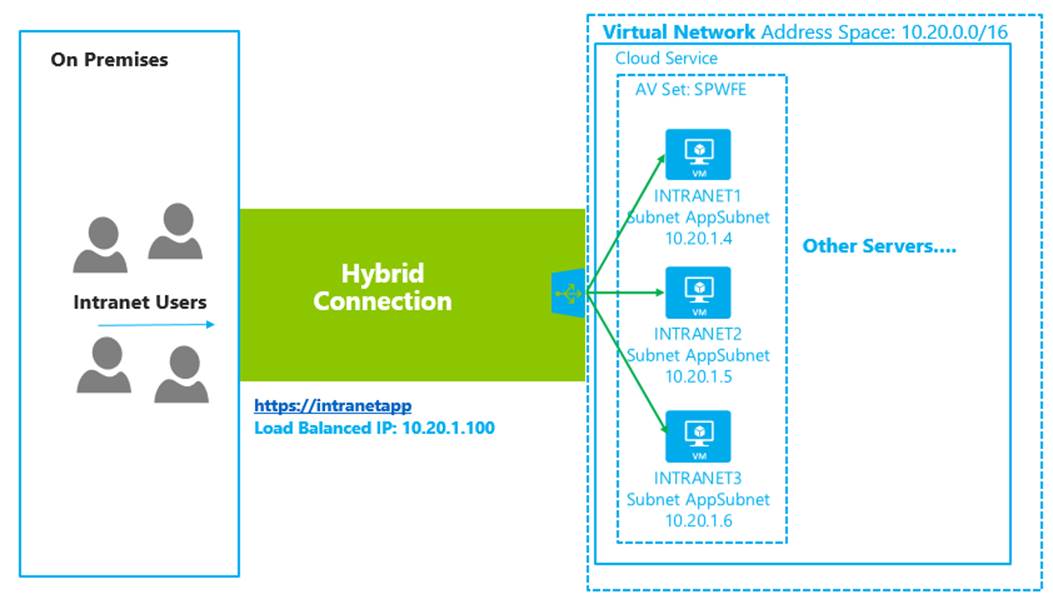
Figure 6-10. Intranet workload using the internal load balancer
N-tier workloads
The second workload that is now enabled is the classic n-tier design pattern, where a middle-tier application server is load-balanced from requests from a frontend web or application tier. This architecture is possible without the internal load balancer by using the external load balancer and access control lists (ACLs), but it fundamentally makes more sense to use the internal IP and not worry about the additional complexities of applying ACLs to your endpoints (see Figure 6-11).
To set up the internal load balancer at virtual machine creation time, you must create an internal load-balancer configuration object that specifies an IP address from a subnet in your virtual network to use as the internal virtual IP address (VIP) and the name of the load balancer.
When specifying the load-balanced endpoints at creation time, the configuration object must be specified when you create the first virtual machine in the deployment as part of the call to New-AzureVM. Virtual machines created in the same cloud service can have load-balanced endpoints that reference the load balancer. These load-balanced endpoints are accessible only from the virtual network itself or from a connected on-premises network.
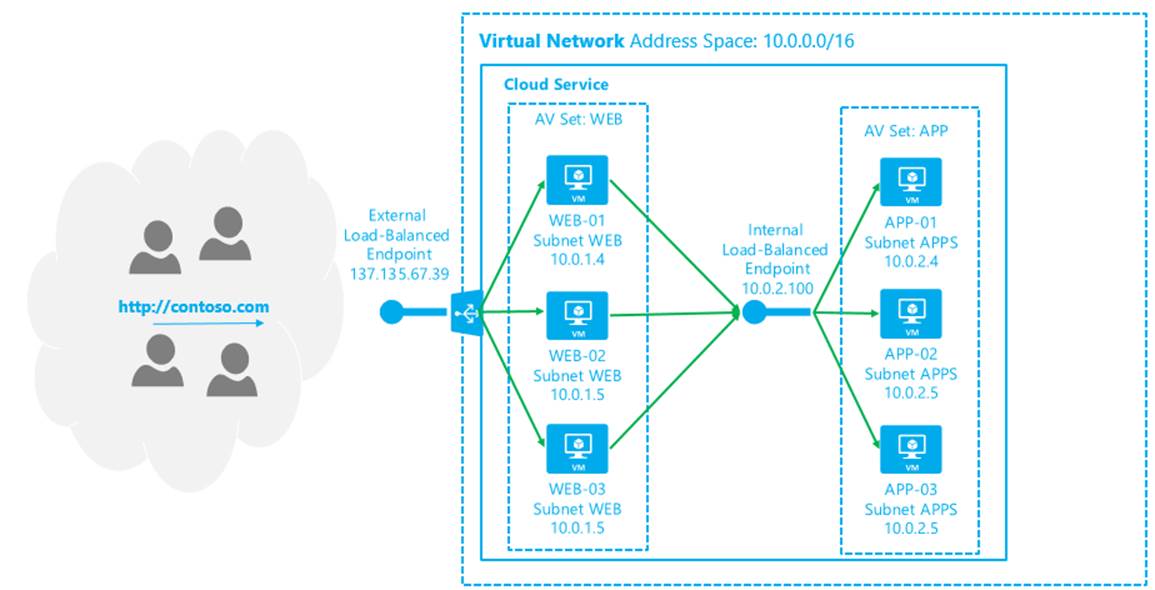
Figure 6-11. N-tier workload using the internal load balancer
Example 6-31 creates a new internal load-balancer configuration object named MyILB. This object points to an IP address in the AppSubnet subnet from the previously referenced virtual network.
If you would like to try this experiment out on your own, you should first delete any virtual machines you may have created in the PSBookVNET virtual network. Then, using your PowerShell ISE, create a new PowerShell script named chapter6ilb.ps1 and add the following code.
Example 6-31. Creating an internal load-balancer configuration object (Script pane)
$ilb = New-AzureInternalLoadBalancerConfig -InternalLoadBalancerName "MyILB" `
-StaticVNetIPAddress "10.20.1.100" `
-SubnetName "AppSubnet"
The next step after creating the internal load-balancer configuration object is to create a set of virtual machines with load-balanced endpoints. These endpoints will be bound to the IP address specified in the configuration for load balancing. Replace the placeholder values with your own values and ensure that you use a new unique cloud service name (see Example 6-32).
Example 6-32. Creating a set of virtual machines using the internal load balancer (Script pane)
# Specify the cloud service
$serviceName = "[cloud service name]"
# Specify the admin credentials
$adminUser = "[admin username]"
$password = "[admin password]"
# Specify the region (must match the same region as your virtual network)
$location = "[region name]"
# Specify the virtual machine names
$vmName1 = "intranet1"
$vmName2 = "intranet2"
$vmSize = "Small"
$vnetName = "PSBookVNET"
$imageFamily = "Windows Server 2012 R2 Datacenter"
$imageName = Get-AzureVMImage |
where { $_.ImageFamily -eq $imageFamily } |
sort PublishedDate -Descending |
select -ExpandProperty ImageName -First 1
# Create a virtual machine configuration object
$vm1 = New-AzureVMConfig -Name $vmName1 -InstanceSize $vmSize -ImageName $imageName
$vm1 | Add-AzureProvisioningConfig -Windows `
-AdminUsername $adminUser `
-Password $password
$vm1 | Set-AzureSubnet -SubnetNames "AppSubnet"
$vm1 | Add-AzureEndpoint -Name "intranet" -Protocol tcp `
-LocalPort 80 -PublicPort 80 `
-LBSetName "lbintranet" `
-InternalLoadBalancerName "MyILB" `
-DefaultProbe
# Create a virtual machine configuration object
$vm2 = New-AzureVMConfig -Name $vmName2 -InstanceSize $vmSize -ImageName $imageName
$vm2 | Add-AzureProvisioningConfig -Windows `
-AdminUsername $adminUser `
-Password $password
$vm2 | Set-AzureSubnet -SubnetNames "AppSubnet"
$vm2 | Add-AzureEndpoint -Name "intranet" -Protocol tcp `
-LocalPort 80 -PublicPort 80 `
-LBSetName "lbintranet" `
-InternalLoadBalancerName "MyILB" `
-DefaultProbe
# Specify the internal load balancer configuration and the virtual network
New-AzureVM -ServiceName $serviceName `
-Location $location `
-VNetName $vnetName `
-InternalLoadBalancerConfig $ilb `
-VMs $vm1, $vm2
SUBNETS AND THE INTERNAL LOAD BALANCER
The internal load balancer’s static IP address must be on the same subnet as the virtual machines to which you are adding load-balanced endpoints.
Validating the internal load balancer
An easy way to validate that the internal load balancer is indeed working is to log in to each virtual machine and install IIS. Modify the default HTML file in C:\inetpub\wwwroot\iisstart.htm to contain the server name (intranet1 or intranet2). Create a third virtual machine in the virtual network by using the portal or PowerShell. From that virtual machine, you can modify the hosts file to contain a mapping to the internal VIP. An example host file entry is 10.20.1.100 myintranet.
Updating internal load-balanced endpoints
Updating endpoints using the internal load balancer is exactly the same as you learned about in Chapter 4 with regular load-balanced endpoints. The Set-AzureLoadBalancedEndpoint cmdlet works against endpoints that are internally load-balanced the same way that it does against external load-balanced endpoints.
There can be only one
There can be only one internal load-balancer configuration with each virtual machine deployment (cloud service). If you need multiple configurations, simply create a new cloud service in the same virtual network with a new configuration.
Adding an internal load balancer to an existing deployment
You can add an internal load balancer to an existing virtual machine deployment (assuming one does not already exist) by using the Add-AzureInternalLoadBalancer cmdlet. This cmdlet accepts the same parameters that New-AzureInternalLoadBalancerConfig does with the addition of the -ServiceName parameter to specify the existing cloud service to which to add the configuration. When the configuration is added, you can use the Add-AzureEndpoint cmdlet to add the internal load-balanced endpoints.
Removing an internal load balancer from an existing deployment
You can also remove the internal load balancer from an existing virtual machine deployment by using the Remove-AzureInternalLoadBalancer cmdlet. Specify the cloud service by using the -ServiceName parameter, and it will be removed. You do need to first remove any endpoints that reference the internal load balancer.
Viewing the internal load-balancer configuration on an existing deployment
Since you can add and remove, it only makes sense that you can view the configuration as well. Use the Get-AzureInternalLoadBalancer cmdlet and pass the cloud service name to the -ServiceName parameter to view the current configuration.
ExpressRoute
I have saved the best for last (at least from a capabilities perspective). Microsoft Azure ExpressRoute is a hybrid connectivity technology that allows you to have a private, low-latency direct connection from your data center (or colocated data center) directly to Microsoft Azure. The cmdlets to configure ExpressRoute are relatively straightforward.
Before you can execute Azure ExpressRoute cmdlets, you need to load the ExpressRoute module directly by using the Import-Module cmdlet (see Example 6-33).
Example 6-33. Loading the ExpressRoute PowerShell module (path split for readability)
$m = "C:\Program Files (x86)\Microsoft SDKs\Azure\PowerShell\ServiceManagement\"
$m += "Azure\ExpressRoute\ExpressRoute.psd1"
Import-Module $m
The first cmdlet you should know about with ExpressRoute is Get-AzureDedicatedCircuitServiceProvider. This cmdlet enumerates the available providers, locations, and bandwidth capabilities (see Example 6-34 and Figure 6-12).
Example 6-34. Identifying ExpressRoute providers
Get-AzureDedicatedCircuitServiceProvider
At this point, if you do not have a relationship with one of these providers already, you need to reach out to them to set up an agreement. Either you will need your own cage with servers in place at an exchange provider or you will need to work with a network service provider for services through an MPLS VPN.
Assuming that the contracts and technical setup for your partner connection are in place, the next task you need to complete is to create an ExpressRoute circuit. A circuit defines the connectivity parameters between your network and Microsoft Azure.
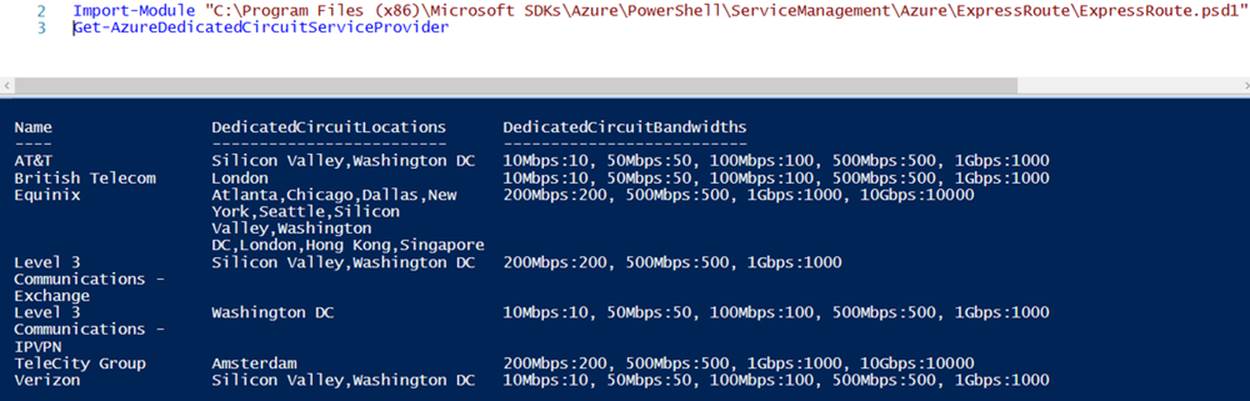
Figure 6-12. Enumerating ExpressRoute providers
Once you know the available bandwidth, provider name, and location, you have everything you need to create an ExpressRoute circuit (see Example 6-35 and Figure 6-13).
Example 6-35. Creating an ExpressRoute circuit
New-AzureDedicatedCircuit -CircuitName "1GbpsCircuit" `
-Bandwidth 1024 `
-Location "Silicon Valley" `
-ServiceProviderName "Equinix"

Figure 6-13. Creating a new circuit
BILLING STARTS NOW!
The moment you execute the New-AzureDedicatedCircuit cmdlet successfully, Microsoft Azure will start billing your subscription. Be prepared to engage your provider immediately after to avoid being charged for a circuit that is not in use.
When the ExpressRoute circuit has been created, your next step is to contact your service provider. If this provider is a network service provider, they will perform configuration for routing and configure ExpressRoute to be available to your network.
If your provider is an exchange provider, it is up to you to configure routing. This configuration needs to take place with your routers hosted in your cage, and you also need to tell Microsoft Azure how your router is configured. Registering your router configuration with Microsoft Azure is possible through PowerShell.
Configuring BGP routing in full detail is beyond the scope of this book, and I would refer you back to the Microsoft Azure ExpressRoute documentation for more details.
The New-AzureBGPPeering cmdlet tells Microsoft Azure what the IP addresses for your routers are by passing them via the -PrimaryPeerSubnet and -SecondaryPeerSubnet parameters. Each subnet represents the IP addresses that one of your routers is configured on and it also tells Microsoft Azure the IP address that you want the routers in Azure to use.
In Example 6-36, the primary subnet 172.16.1.0/30 tells Microsoft Azure that your primary router will be listening on 172.16.1.1 and that you would like the Microsoft Azure router to listen on 172.16.1.2 (the remaining IP addresses on the subnet are reserved).
The secondary subnet is for your secondary router. You should have two physical routers for high availability and to be in compliance for the ExpressRoute service-level agreement (SLA).
The New-AzureBGPPeering cmdlet also can accept the -AccessType parameter, which represents either private or public peering (the default is private). Configuring private peering tells Microsoft Azure to publish any virtual network IP addresses that are later linked to the circuit to your router. This allows traffic between your on-premises network and your virtual network to be routed over your ExpressRoute circuit. Specifying Public for this value tells Microsoft Azure to publish routes for all Microsoft Azure public services to your routers. This has the effect of providing connectivity between your on-premises network and Microsoft Azure public services—such as storage and SQL Database—using your private ExpressRoute circuit instead of going across the public Internet.
You will need several other parameters as well that you should know from when you configured your routers. For instance, you should specify a password to ensure that only your routers can participate in exchanging routes. You must also specify an autonomous system number (ASN) that represents the network for which your routers can exchange routes. Finally, you must specify separate VLAN IDs for private and public peering.
Example 6-36 shows how you could potentially configure BGP routing between your exchange provider network and Microsoft Azure.
Example 6-36. Configuring BGP routing for an exchange provider
# Service key from your previously created and provisioned circuit
$ServiceKey = "[your service key goes here]"
# MD5 hash to authenticate BGP sessions
$MD5Hash = "[your MD5 hash password]"
# Subnets used for configuring private peering
$private_Subnet_Primary = "172.16.1.0/30"
$private_Subnet_Secondary = "172.16.2.0/30"
# Subnets used for configuring public peering
$public_Subnet_Primary = "172.16.1.4/30"
$public_Subnet_Secondary = "172.16.2.4/30"
# Autonomous System Number
$ASN = "65520"
# VLAN ID for private peering
$VLANPrivate = "555"
# VLAN ID for public peering
$VLANPublic = "556"
# Create the private peering configuration
New-AzureBGPPeering -ServiceKey $ServiceKey `
-PrimaryPeerSubnet $private_Subnet_Primary `
-SecondaryPeerSubnet $private_Subnet_Secondary `
-PeerAsn $ASN `
-VlanId $VLANPrivate `
–AccessType Private `
-SharedKey $MD5Hash
# Create the public peering configuration
New-AzureBGPPeering -ServiceKey $ServiceKey `
-PrimaryPeerSubnet $public_Subnet_Primary `
-SecondaryPeerSubnet $public_Subnet_Secondary `
-PeerAsn $ASN `
-VlanId $VLANPublic `
-AccessType Public `
-SharedKey $MD5Hash
To view the existing BGP configuration, you can use the Get-AzureBGPPeering cmdlet (see Example 6-37 and Figure 6-14). This cmdlet accepts a -ServiceKey and, optionally, the -AccessType (the default is private).
Example 6-37. Viewing BGP peering configuration for an ExpressRoute circuit
# Show private peering configuration
Get-AzureBGPPeering -ServiceKey $serviceKey
# Shows public peering configuration
Get-AzureBGPPeering -ServiceKey $serviceKey -AccessType Public
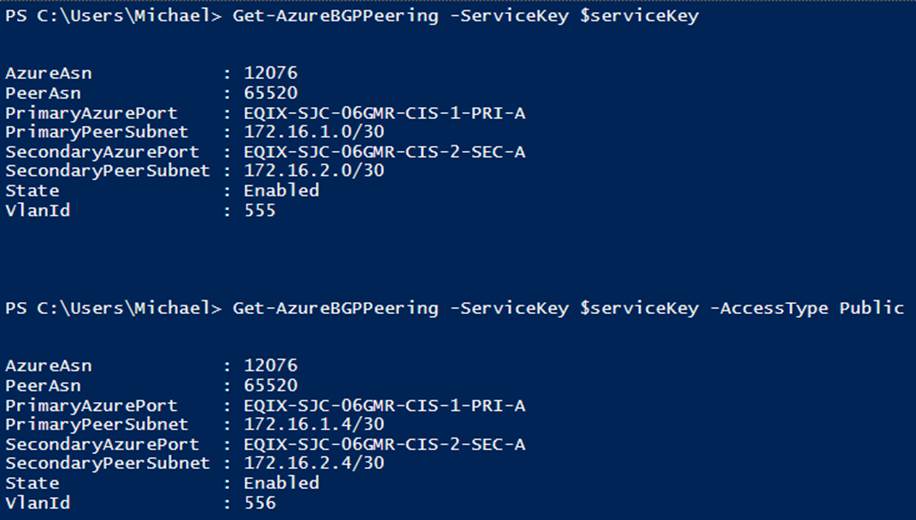
Figure 6-14. Viewing BGP peering configuration
The final cmdlet to use with Microsoft Azure ExpressRoute is the New-AzureDedicatedCircuitLink cmdlet (see Figure 6-15). This cmdlet accepts the -ServiceKey that uniquely identifies your circuit and a virtual network that you would like to link to the circuit. You can link multiple virtual networks to your ExpressRoute circuits, as long as the virtual network and circuit are on the same continent.
When you link the virtual network, as shown in Example 6-38, Microsoft Azure will then publish the routes to your private address space to your on-premises routers. It is important that you wait until your service provider has completed provisioning before executing this command.
Example 6-38. Linking a virtual network to an ExpressRoute circuit
New-AzureDedicatedCircuitLink -ServiceKey $serviceKey -VNetName $vnetName

Figure 6-15. Linking a virtual network to the provisioned circuit
Summary
In this chapter we explored Microsoft Azure Virtual Networks from the perspective of a PowerShell user. You learned that to automate the modification of your virtual networking configuration, you need to brush up on your PowerShell XML skills and use the Get-AzureVNetConfig andSet-AzureVNetConfig cmdlets. From there, we discussed how to provision gateways and view their status. We also covered how to configure internal load balancing, which can be used for intranet or load-balanced middle-tier workloads. Finally, we ended the discussion on the newest member of the networking family, ExpressRoute. In the next chapter we will discuss several advanced techniques for automating virtual machines.