Automating Microsoft Azure Infrastructure Services
Chapter 7. Advanced Virtual Machines
This final chapter will cover the advanced features of virtual machine provisioning, virtual machine extensions, remote PowerShell, and some tips and tricks I have found that can be very useful when managing virtual machines.
Virtual Machine Provisioning
The provisioning engine for Microsoft Azure Virtual Machines has several features that can be used in certain situations that have not yet been discussed in detail. For instance, you can provision Linux-based virtual machines, you can set the time zone, enable or disable Windows Update, enable or disable remote management options, domain-join a virtual machine, and even specify certificates to be automatically uploaded and deployed on your behalf.
Some of the provisioning settings can be specified with New-AzureQuickVM and some only when composing a virtual machine with New-AzureVMConfig, Add-AzureProvisioningConfig, and New-AzureVM. I’ll tackle these one at a time using the PowerShell cmdlets and highlight how they can be used.
Provisioning Linux Virtual Machines
One of the first surprises to many new users of Microsoft Azure is the extent of support for Linux-based virtual machines. Microsoft has embraced openness in its cloud-computing platform with support of Linux and various open source languages and developer frameworks. With this in mind, it should not come as a total surprise that the PowerShell cmdlets also have rich support for provisioning virtual machines based on Linux (see Example 7-1 and Figure 7-1).
You can view the images available by using the Get-AzureVMImage cmdlet and filtering on the OS property to show only the Linux images.
Example 7-1. Viewing available Linux images (Console pane)
Get-AzureVMImage | where OS -eq "Linux" | sort PublishedDate -Descending
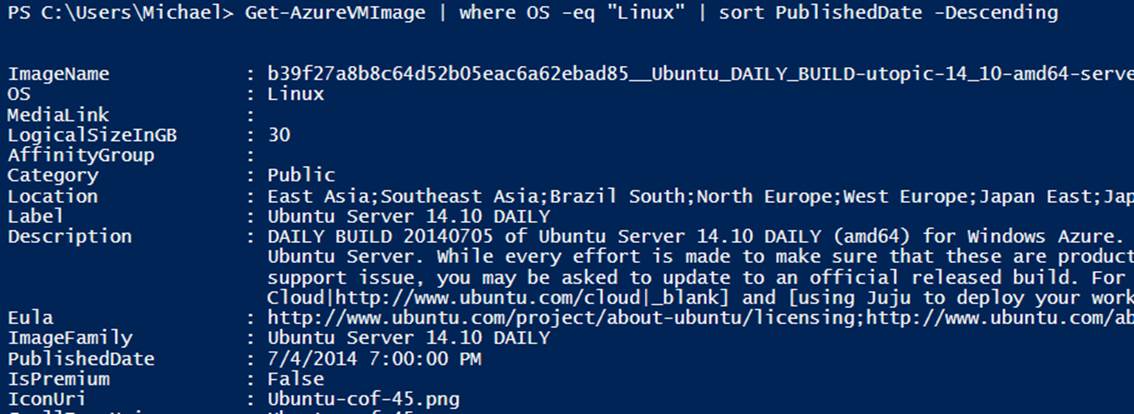
Figure 7-1. Linux images
At a high level, provisioning a Linux-based virtual machine is not significantly different from provisioning a Windows-based virtual machine. There are some differences in the more advanced provisioning options, but at the simplest level they are almost identical.
You can provision a Linux virtual machine by using username and password authentication; specifying an SSH certificate is also supported. To try out creating a Linux-based virtual machine with a username and password, create a new PowerShell script named chapter7linuxuserpass.ps1and add the code shown in Example 7-2. Ensure that you change the placeholder values with real values.
Example 7-2. Creating a Linux virtual machine with username and password (Script pane)
$subscription = "[subscription name]"
$linuxUser = "[username]"
$password = "[your password]"
$serviceName = "[cloud service name]"
$location = "[region name]"
$vmSize = "Small"
Select-AzureSubscription $subscription
$vmName = "linuxVM1"
$imageFamily = "Ubuntu Server 14.10 DAILY"
$imageName = Get-AzureVMImage |
where { $_.ImageFamily -eq $imageFamily } |
sort PublishedDate -Descending |
select -ExpandProperty ImageName -First 1
New-AzureVMConfig -Name $vmName -InstanceSize $vmSize -ImageName $imageName |
Add-AzureProvisioningConfig -Linux -LinuxUser $linuxUser -Password $password |
New-azureVM -ServiceName $serviceName -Location $location
Execute the script by pressing F5 or by highlighting all of the text and pressing F8. When the virtual machine has completed provisioning, you can connect using SSH with the username and password specified.
Provisioning Linux virtual machines by using an SSH certificate requires you to create the SSH certificate first. The SSH certificate must be encapsulated within an X509 certificate for the provisioning engine. For details on creating the SSH certificate in this fashion, the Microsoft Azure documentation will be the best place to start.
Deploying the certificate from PowerShell requires a slightly different process than we have seen from previous examples of virtual machine creation. The SSH certificate must be installed on the cloud service container first to be referenced and deployed to the virtual machine. This means that if you are creating the first virtual machine in the cloud service, the creation of the cloud service and the creation of the virtual machine need to be split into separate operations.
In the following example, the cloud service is created first by using the New-AzureService cmdlet, and the SSH certificate is uploaded to the cloud service by using the Add-AzureCertificate cmdlet.
The association of the certificate to the Linux virtual machine as an SSH key is made using the New-AzureSSHKey cmdlet. This cmdlet simply makes a configuration object that maps the certificate to be deployed on the virtual machine when it is provisioned.
To try out creating a Linux-based virtual machine with a username, password, and SSH certificate, create a new PowerShell script named chapter7linuxsshcert.ps1 and add the code shown in Example 7-3. Ensure that you replace the placeholder values with real values. Since this example creates the cloud service, you should specify a new, unique cloud service name.
Example 7-3. Creating a Linux virtual machine with an SSH certificate (Script pane)
$subscription = "[subscription name]"
$linuxUser = "[username]"
$password = "[your password]"
$serviceName = "[cloud service name]"
$location = "[region name]"
$vmSize = "Small"
# Ensure you have created the certificate - example C:\Scripts\mycert.cer
# http://azure.microsoft.com/en-us/documentation/articles/linux-use-ssh-key/
$certPath = "[path to your certificate]"
Select-AzureSubscription $subscription
New-AzureService -ServiceName $serviceName -Location $location
Add-AzureCertificate -CertToDeploy $certPath -ServiceName $serviceName
$cert = Get-PfxCertificate -FilePath $certPath
# Create a certificate in the user's home directory
$sshkey = New-AzureSSHKey -PublicKey -Fingerprint $cert.Thumbprint `
-Path "/home/$linuxUser/.ssh/authorized_keys"
$vmName = "linuxVMSSH"
$imageFamily = "Ubuntu Server 14.10 DAILY"
$imageName = Get-AzureVMImage |
where { $_.ImageFamily -eq $imageFamily } |
sort PublishedDate -Descending |
select -ExpandProperty ImageName -First 1
New-AzureVMConfig -Name $vmName -InstanceSize $vmSize -ImageName $imageName |
Add-AzureProvisioningConfig -Linux -LinuxUser $linuxUser `
-Password $password -SSHPublicKeys $sshkey |
New-AzureVM -ServiceName $serviceName
USING ONLY SSH CERTIFICATES
In the Linux world it is common practice to not log in with a username and password at all and authenticate using only an SSH certificate. To accomplish this with PowerShell, you can specify the -NoSSHPassword parameter, and only certificate authentication will be available.
Availability Sets
An availability set is a feature used with Microsoft Azure Virtual Machines that allows you to group virtual machines that perform identical workloads into a logical grouping that tells Microsoft Azure to treat them in a highly available manner.
What does it mean to treat two virtual machines in a highly available manner? To answer, let’s take a look at a possible deployment of two web servers (IISVM1 and IISVM2) in a Microsoft Azure data center without using an availability set (see Figure 7-2).
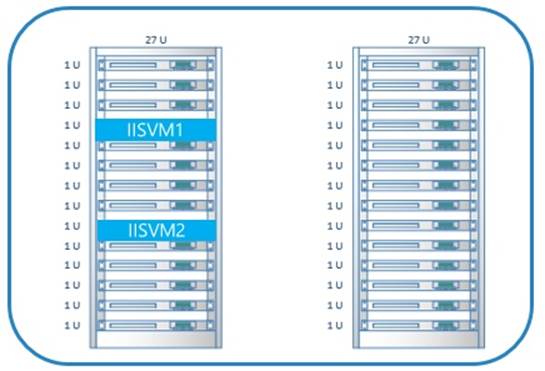
Figure 7-2. Virtual machines outside of an availability set
The two virtual machines could be deployed on the same physical rack in the data center. This means that there are single points of failure, such as the power supply and the top of the rack switch. This also means that Microsoft Azure has no knowledge of which virtual machines are performing the same workload. Microsoft Azure needs to know that your virtual machines are performing the same workload because it periodically updates the host machines that are hosting your virtual machines. When this happens, the host machines require rebooting. This means that your servers will also be rebooted as part of the host update process.
With the knowledge of which servers are performing the same workload, Microsoft Azure can reboot them in an intelligent manner and not take all of them down at the same time to cause your deployment downtime.
In addition to performing intelligent host updates, virtual machines grouped in an availability set will be deployed onto separate racks in the data center. The number of separate physical racks depends on the number of virtual machines in the availability set (see Figure 7-3). This gives your application high availability at the physical level:
§ Redundant power supply
§ Redundant network paths
§ Redundant physical server
Deploying virtual machines in availability sets is critical for uptime and is, in fact, currently required to achieve the 99.95 percent service-level agreement (SLA) within Microsoft Azure.
For more details on availability sets and the underlying details of how they work, visit the Microsoft Azure documentation center.
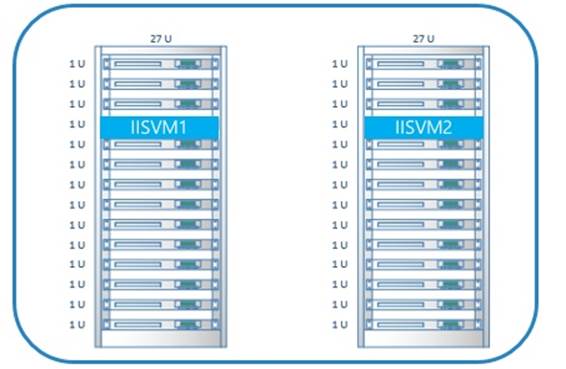
Figure 7-3. Virtual machines deployed in an availability set
Now that you know what an availability set is, how do you put your virtual machines into one?
Provisioning Virtual Machines in an Availability Set
Putting virtual machines into an availability set at creation time is very simple. You just have to specify a name for your availability set by using the -AvailabilitySetName parameter, which is supported with New-AzureVMConfig and New-AzureQuickVM. Each virtual machine that should be part of the same set should be in the same cloud service and created with the same availability set name. All virtual machines performing the same workload that also share the same life cycle should be in the same availability set.
The following example uses a for loop to create configuration objects for multiple virtual machines. When the virtual machine configuations are created, the availability set name webavset is assigned to each virtual machine.
To try this on your own, create a new PowerShell script named chapter7createavset.ps1. Add the code shown in Example 7-4 to the script and ensure that you replace the placeholder values with real ones.
Example 7-4. Creating multiple virtual machines in an availability set (Script pane)
Select-AzureSubscription "[subscription name]"
$adminUser = "[admin username]"
$password = "[admin password]"
$serviceName = "[cloud service name]"
$location = "[region name]"
# The name of the availability set
$avset = "webavset"
$vmSize = "Small"
$imageFamily = "Windows Server 2012 R2 Datacenter"
$imageName = Get-AzureVMImage |
where { $_.ImageFamily -eq $imageFamily } |
sort PublishedDate -Descending |
select -ExpandProperty ImageName -First 1
$vmConfigs = @()
for($i=1; $i -le 2; $i++)
{
# Change the VM name to match the instance number
$vmName = "webserver$i"
$vmConfig = New-AzureVMConfig -Name $vmName `
-InstanceSize $vmSize `
-ImageName $imageName `
-AvailabilitySetName $avset
$vmConfig | Add-AzureProvisioningConfig -Windows `
-AdminUsername $adminUser `
-Password $password
$vmConfig | Add-AzureEndpoint -Name "http" `
-Protocol tcp `
-LocalPort 80 `
-PublicPort 80 `
-LBSetName "LBHTTP" `
-DefaultProbe
$vmConfigs += $vmConfig
}
New-AzureVM -ServiceName $serviceName `
-Location $Location `
-VMs $vmConfigs
Adding Existing Virtual Machines to an Availability Set
Adding existing virtual machines to an availability set requires the same steps used previously to update a virtual machine:
1. Use Get-AzureVM to retrieve the virtual machine configuration.
2. Modify the configuration with the Set-AzureAvailabilitySet name.
3. Pass the modified configuration to the Update-AzureVM cmdlet.
If you would like to try this for yourself using the virtual machines created in Chapter 3 (or any cloud service with more than one virtual machine), create a new file named chapter7updateavset.ps1 and add the code shown in Example 7-5 and Figure 7-4. Ensure that you modify the placeholder values to use real values.
Example 7-5. Adding existing virtual machines to an availability set
Select-AzureSubscription "[subscription name]"
$serviceName = "[cloud service name]"
Get-AzureVM -ServiceName $serviceName |
Set-AzureAvailabilitySet -AvailabilitySetName "webavset" |
Update-AzureVM
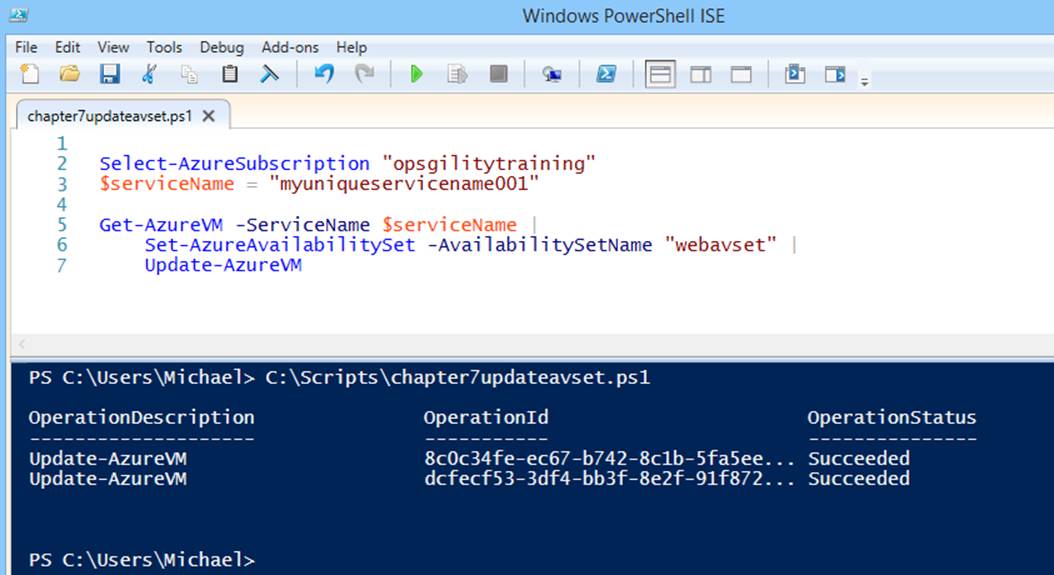
Figure 7-4. Adding existing virtual machines to an availability set
MAY CAUSE REBOOT!
Adding existing virtual machines to an availability set might cause downtime as the Microsoft Azure fabric controller tries to locate appropriate resources and restarts your virtual machine(s).
Specifying the Time Zone
You can set the time zone for a Windows-based virtual machine by using Add-AzureProvisioningConfig, since the provisioning engine under the covers is actually passing parameters using a standard Windows unattended installation. The documentation for unattended install is the best place to look for the correct values.
For example, to create a virtual machine that will be deployed with the Tokyo time zone set, simply specify -TimeZone "Tokyo Standard Time" as a parameter to Add-AzureProvisioningConfig.
Configuring Windows Update
On Windows-based virtual machines, Windows Update is enabled by default. You can disable it during provisioning time for virtual machines created using an image by specifying the -DisableAutomaticUpdates parameter in the call to Add-AzureProvisioningConfig.
Deploying Certificates
Image-based deployment with Add-AzureProvisioningConfig and New-AzureQuickVM both support automatic deployment of certificates. For example, if you need to automatically deploy a certificate for a virtual machine that is available on boot, you can specify a certificate to be automatically uploaded for you.
To deploy a certificate, you need to load the certifcate into an X509Certificate2 .NET object and then pass it to the -X509Certificates parameter in the Add-AzureProvisioningConfig or the New-AzureQuickVM cmdlet. The cmdlets will take the certificate; repackage it as a.pfx file in memory, automatically generating the password; and then deploy the certificate to the Local Machine\MY certificate store.
Example 7-6 is a partial example of how a certificate could be uploaded and deployed automatically for your virtual machine.
Example 7-6. Certificate deployment example
# Assumes the .pfx file is in the same path as the script
$pfxName = Join-Path $PSScriptRoot "MyServerCertificate.pfx"
$cert = New-Object System.Security.Cryptography.X509Certificates.X509Certificate2
$cert.Import($pfxName,$pwd,'Exportable')
$vmConfig | Add-AzureProvisioningConfig -Windows -AdminUserName $user `
-Password $adminPwd -X509Certificates $cert
DEPLOYING MULTIPLE CERTIFICATES
The -X509Certificates parameter accepts an array, so more than one certificate can be specified.
PRIVATE KEYS ARE EXPORTED
By default, deploying a certificate using this method will include the exported private key. To deploy the certificate without the private key, specify the -NoExportPrivateKey parameter.
Managing Access Control Options
Tables 7-1 and 7-2 list several options that you can use for fine-grained control of access to your image-based virtual machines at provisioning time.
Table 7-1. Windows access control options
|
-ResetPasswordOnFirstLogon |
Prompt the administrative user to reset the password on first login. |
|
-NoWinRMEndpoint |
Do not create a WinRM (PowerShell remoting) endpoint at all. |
|
-EnableWinRMHttp |
Enable WinRM HTTP (off by default). This is for VM-to-VM Remote PowerShell using internal IPs. |
|
-DisableWinRMHttps |
Disable PowerShell remoting (HTTPs) (on by default). |
|
-WinRMCertificate |
Specify an X509 certificate to use for PowerShell remoting authentication instead of the generated certificate. |
|
-NoRDPEndpoint |
Do not create an endpoint for remote desktop. |
Table 7-2. Linux access control options
|
-NoSSHEndpoint |
Do not create an endpoint for SSH. |
|
-DisableSSH |
Do not enable SSH at all. |
The New-AzureQuickVM cmdlet supports a subset of these options related to PowerShell remoting: -NoWinRMEndpoint, -EnableWinRMHttp, -DisableWinRMHttps, and -WinRMCertificate. All of the options can be accessed using the composition model with the Add-AzureProvisioningConfig and New-AzureVM cmdlets.
Domain Join
Using the Microsoft Azure PowerShell cmdlets, you can automatically domain-join a Windows-based virtual machine at provision time. Domain join works by passing domain-join information directly to the unattended install parameters for Windows setup at provision time.
To specify the domain-join information, use the Add-AzureProvisioningConfig cmdlet with the -WindowsDomain parameter. Several properties are required to successfully join a virtual machine to the domain. You will need domain credentials that have rights in Active Directory to join the new computer to the domain, the domain name itself (NetBIOS and fully qualified), and optionally, you may specify an organizational unit (OU) in which to create the new computer account.
ACTIVE DIRECTORY PREREQUISITE
I am not going into detail on how to deploy Active Directory in Microsoft Azure. There is a great tutorial on the Microsoft Azure website that covers this in full detail.
Example 7-7 is a partial example that shows how you could use the -WindowsDomain parameter to specify domain-join information for an existing Active Directory deployment. Assuming that the virtual network is configured to reference an Active Directory DNS server when the virtual machine is provisioned, it will automatically join the domain.
Example 7-7. Using the -WindowsDomain parameter for domain join
# Domain join information
$domain = "contoso"
$domFQDN = "contoso.com"
$domUser = "[domain admin user]"
$domPass = "[domain password]"
# Adding the virtual machine to an organizational unit is optional
# The OU must already exist
$domOU = 'OU=AzureVMs,DC=contoso,DC=com'
# End domain join information
$serviceName = "[cloud service name]"
$vmName = "[vm name]"
$VNET = "[virtual network name]"
$Subnet = "[subnet name]"
$Location = "[region name]"
$imageFamily = "Windows Server 2012 R2 Datacenter"
$imageName = Get-AzureVMImage |
where { $_.ImageFamily -eq $imageFamily } |
sort PublishedDate -Descending |
select -ExpandProperty ImageName -First 1
$vmConfig = New-AzureVMConfig -Name $vmName -InstanceSize Small `
-ImageName $imageName
$vmConfig | Add-AzureProvisioningConfig -WindowsDomain `
-AdminUsername $adminUser `
-Password $password `
-Domain $domain `
-JoinDomain $domFQDN `
-DomainUserName $domUser `
-DomainPassword $domPass `
-MachineObjectOU $domOU
$vmConfig | Set-AzureSubnet -SubnetNames $Subnet
$vmConfig | New-AzureVM -ServiceName $serviceName `
-Location $location -VNetName $VNET
Using PowerShell Remoting
PowerShell commands can be executed remotely on Windows-based virtual machines. Access can be enabled for connectivity over the Internet by using HTTPS, or virtual machine to virtual machine by using HTTP and internal IP addresses. External access (HTTPS) is enabled by default, and internal access is limited to the default configuration of Windows (which is limited to virtual machines on the same subnet) unless otherwise specified. For external (HTTPS) access, Microsoft Azure will automatically generate a self-signed certificate that you can use to secure your connection to the virtual machine over the Internet. You can specify your own certificate at provisioning time with the -WinRMCertificate if you want to use your own.
You can change the default behavior by specifying the -EnableWinRMHttp parameter at provisioning time to extend the internal WinRM configuration to allow remote commands to work across subnets. You can also pass the -NoWinRMEndpoint or -DisableWinRMHttps parameters to change the default external capabilities for PowerShell.
ENABLING POWERSHELL REMOTING IS A PROVISION-TIME FEATURE
Specifying -DisableWinRMHttps will tell the provisioning engine to not create the self-signed (or your own) certificate and to not configure WinRM on the virtual machine as part of the provisioning process. There is currently no cmdlet to enable this functionality after the virtual machine has been provisioned.
Configuring a Secure Connection
The first step to secure a PowerShell session is either to deploy your own certificate or to allow Microsoft Azure to generate a self-signed certificate for you.
Deploying your own certificate is as easy as passing an X509Certificate to the -WinRMCertificate parameter of Add-AzureProvisioningConfig or New-AzureQuickVM. If you want to use the automatically generated certificate, there are a few prerequisites.
To use the self-signed certificate generated by Microsoft Azure securely, you need to download that certificate and install it into your local certificate store. The code to do this is fairly complex, so a helper script has been created that can be downloaded from the TechNet Script Center.
ELEVATION REQUIRED
The TechNet script requires PowerShell to run elevated because it installs the self-signed certificate into the certificate store of your local machine.
To try this on your own, download the script from the TechNet Script Center gallery into a local directory (I used C:\Scripts). When it is downloaded, use the Unblock-File cmdlet to unblock it (Unblock-File "C:\Scripts\InstallWinRMCertAzureVM.ps1"). Next, create a new elevated PowerShell session. You can launch PowerShell ISE or just PowerShell.exe for this example. Finally, to simplify paths from within PowerShell, change the directory to the download folder: CD C:\Scripts.
You will need to specify an existing virtual machine and cloud service that have been deployed using an image (see Example 7-8 and Figure 7-5). I am using one of the virtual machines that was created as part of Chapter 3.
Example 7-8. Using the sample script to enable secure access (Console pane)
$subscription = "[subscription name]"
$serviceName = "[cloud service name]"
$vmName = "ps-vm1"
.\InstallWinRMCertAzureVM.ps1 -SubscriptionName $subscription `
-ServiceName $serviceName -Name $vmName

Figure 7-5. Installing the Microsoft Azure-generated certificate
When the script has completed, the certificate is downloaded and installed to your client machine’s certificate store. You can now securely connect to the virtual machine in Microsoft Azure by using PowerShell.
You will need to specify the connection URI and credentials to connect to the virtual machine. Get-AzureWinRMUri is a helper cmdlet that queries all of the network endpoints for the specified virtual machine and returns the URI with the public port for the WinRM endpoint. The URI can then be passed to the remote PowerShell cmdlets to open or create a new session or to invoke a script block.
Example 7-9 uses the Get-AzureWinRMUri cmdlet to return the remote PowerShell URI and store it in the $uri variable. Get-Credential is then called to prompt for login credentials for the virtual machine, which are then stored in the $cred variable. Both the $uri and $credvariables are then passed to the Enter-PSSession cmdlet, which establishes the remote PowerShell session (see Figure 7-6).
Example 7-9. Entering a remote PowerShell session (Console pane)
$uri = Get-AzureWinRMUri -ServiceName $serviceName -Name $vmName
$cred = Get-Credential
Enter-PSSession -ConnectionUri $uri -Credential $cred
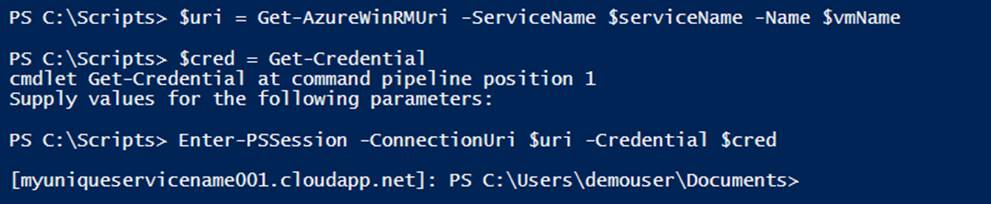
Figure 7-6. Entering a remote PowerShell session
Invoking PowerShell Commands
Using these same techniques, it is easy to execute a PowerShell script remotely on one or more of your virtual machines. Executing commands this way allows you to automate the configuration of roles and features; monitor, download, and install software; update registry settings; or whatever task you can dream up and deliver through PowerShell.
In Example 7-10 I am using the same cmdlets as before—Get-AzureWinRMUri and Get-Credential—and instead of starting an interactive PowerShell session, I am just executing a script that installs IIS by using the Invoke-Command cmdlet (see Figure 7-7). Combine this code withGet-AzureVM and you can see how you could easily execute scripts against multiple virtual machines as part of an automation task.
Example 7-10. Executing a script block (Console pane)
$uri = Get-AzureWinRMUri -ServiceName $serviceName -Name $vmName
$cred = Get-Credential
Invoke-Command -ConnectionUri $uri `
-Credential $cred `
-ScriptBlock { Install-WindowsFeature -Name "Web-Server" }
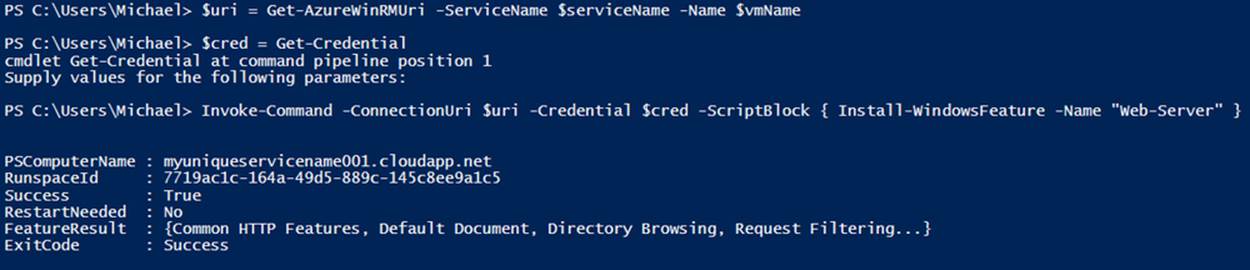
Figure 7-7. Executing a script block to install IIS
The Invoke-Command cmdlet can also accept a -FilePath parameter, which allows you to specify a file path to a local script instead of a script block. You can also pass parameters using either method with the -ArgumentList parameter.
Multiple Hops Using Remote PowerShell
One common problem most people run into when using PowerShell remotely is the multihop dilemma. A remote PowerShell session allows you to execute commands on the computer to which you are connected. This privilege is not delegated to other computers on the remote network by default. This means that for you to access files from a remote file server or to connect to another service using the credentials you used with your PowerShell session, you will be out of luck without additional configuration steps.
If you do need the ability to make multiple hops from your PowerShell session, you can enable CredSSP on your client machine and on the server running your PowerShell session. For more details on how to enable this and the security ramifications involved, see the following articles:http://bit.ly/multi-hop_support and http://bit.ly/CredSSP.
Virtual Machine Agent and Extensions
By default, Windows-based virtual machines will have the Microsoft Azure Virtual Machine Agent installed when they are provisioned. This agent is a lightweight process that allows for extensibility points or extensions. If you wish to deploy a virtual machine without the agent installed, you just need to pass the -DisableGuestAgent parameter to New-AzureQuickVM or Add-AzureProvisioningConfig at virtual machine creation time. Keep in mind that this is the only way to automatically install the agent. If you want to install the agent outside of the provisioning process, it is a manual option (http://bit.ly/VM_agent).
Virtual Machine Extensions
Extensions are written by Microsoft and various third-party publishers to enable additional capabilities on your virtual machines. Extensions can be enabled or disabled at any time by using the correct Get/Set/Remove cmdlet for each extension (assuming you have not provisioned without the virtual machine agent).
In this section, I will review some of the extensions published directly from Microsoft and show how they can be used. Virtual machine extensions follow a similar pattern for deployment. This means that when you learn how to add an extension to a virtual machine, you know the core concepts for any extension.
To see the extensions that are configurable through PowerShell, you can use Get-Command to filter on the Name property for AzureVM and Extension. The extension cmdlets have a naming convention, where all virtual machine extension cmdlets have AzureVM and Extension built into the name. This makes it easy to identify extension capabilities (see Example 7-11 and Figure 7-8).
Example 7-11. Viewing available virtual machine extensions (Console pane)
Get-Command | where { $_.Name -Like "*AzureVM*Extension" }
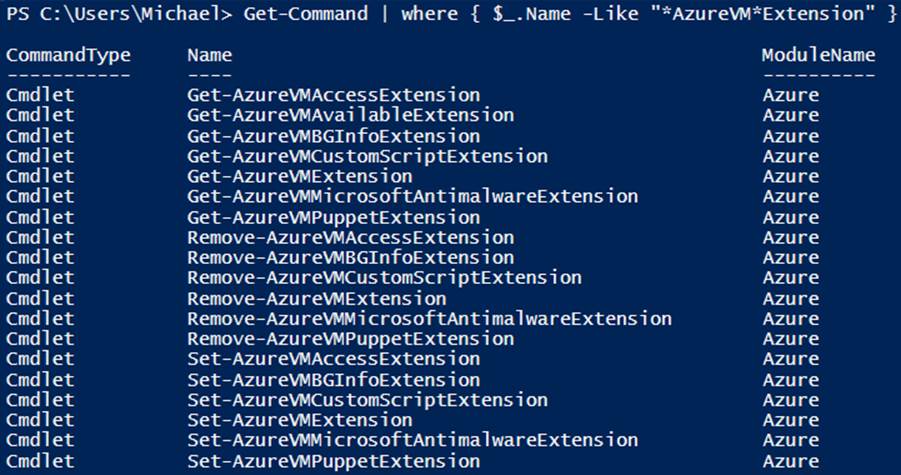
Figure 7-8. Available virtual machine extensions
SERVICE EXTENSIONS
You will likely notice another set of extension cmdlets that have AzureService as part of the name instead of AzureVM. These cmdlets are similar to virtual machine extensions except they are designed for Microsoft Azure Cloud Services (web and worker roles).
BgInfo Extension
The BgInfo extension is enabled by default when you create a Windows-based virtual machine. The extension simply installs and enables the Sysinternals BgInfo utility on the virtual machine to display configuration information for the virtual machine on the desktop (see Figure 7-9).
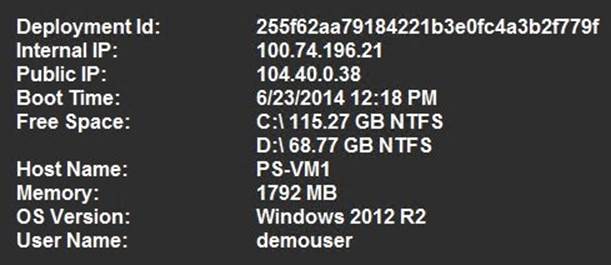
Figure 7-9. BgInfo
Access Extension
The virtual machine access extension can enable the remote desktop and its associated firewall rule on a virtual machine if it is accidentally (or intentionally) disabled. This extension can also reset the local administrator username and password if they are forgotten.
This extension works in two modes. The first mode is enabling the remote desktop and the associated firewall rules. To execute the extension in this mode, pass the virtual machine configuration to the Set-AzureVMAccessExtension cmdlet to enable the extension on the configuration. Then pipe the modified configuration to Update-AzureVM. This will trigger a call to execute the extension and allow you back into your virtual machine using the remote desktop (see Example 7-12).
Example 7-12. Enabling remote desktop and firewall rules (Console pane)
$serviceName = "[cloud service name]"
$vmName = "[VM name]"
$vmConfig = Get-AzureVM -ServiceName $serviceName -Name $vmName
$vmConfig | Set-AzureVMAccessExtension
$vmConfig | Update-AzureVM
The second mode allows you to reset the username and password for the local adminstrator account. This is a great feature if you have forgotten either the local admin username or the password, because it allows you to quickly gain access to your virtual machine (see Example 7-13). This extension works only with local accounts. There is no support for resetting domain credentials.
Example 7-13. Resetting the username and password of the local administrator account (Console pane)
$serviceName = "[cloud service name]"
$vmName = "[VM name]"
$newAdminUser = "[new user]"
$newPassword = "[new password]"
$vmConfig = Get-AzureVM -ServiceName $serviceName -Name $vmName
$vmConfig | Set-AzureVMAccessExtension -UserName $newAdminUser -Password $newPassword
$vmConfig | Update-AzureVM
REQUIRES A RESTART
In my testing of the VM access extension, the first time I used the extension to reset the username and password of the local administrator account, the change was immediate. However, in subsequent updates I needed to restart the virtual machine using Restart-AzureVM for the new username and password to be applied.
Custom Script Extension
The virtual machine custom script extension provides the ability to specify a script located in a Microsoft Azure storage account that will be executed on the virtual machine where the extension is executed. You can specify the script to execute at provision time to automatically bootstrap the virtual machine or after provision time as part of an update.
The extension supports passing a string parameter to the script so the customization can be as dynamic as you want to make it.
The best way to learn how this extension works is through a practical example. One of the most common tasks to automate with a virtual machine is to format data disks at boot time. Without automation, this quickly becomes a very tedious task.
Create a new PowerShell script named ch7formatdisks.ps1 and add the code shown in Example 7-14.
Example 7-14. PowerShell script to format raw disks (Script pane)
param(
$labels
)
# Split the passed-in labels using ; as the delimeter
$labelsArr = $labels.Split(";")
# Format disks
$disks = Get-Disk | where partitionstyle -eq 'raw' | sort number
# Start at F cast to a char
$letters = 70..89 | foreach { ([char] $_ ) }
$count = 0
foreach ($d in $disks) {
$driveLetter = $letters[$count].ToString()
$d |
Initialize-Disk -PartitionStyle MBR -PassThru |
New-Partition -UseMaximumSize -DriveLetter $driveLetter |
Format-Volume -FileSystem NTFS -NewFileSystemLabel $labelsArr[$count] `
-Confirm:$false -Force
$count++
}
As you can see, this code does not contain any references to the Microsoft Azure PowerShell cmdlets. It is a simple PowerShell script that uses the Windows Server storage cmdlets to identify all of the raw disks on the computer and format them. This script does accept a parameter that we can pass in from the extension. To keep things simple, this is a semicolon-delimited string that contains a list of labels to set on the disks as they are formatted.
When you have saved this script locally, you will next need to upload it to Microsoft Azure storage.
Since this book is focused on PowerShell, the following code below will upload the newly created file to a storage account. However, if you feel the need to use a third-party tool with a GUI to upload the file, be my guest.
If you decide to upload the file by using PowerShell, ensure that you specify a valid storage account name (you can use Get-AzureStorageAccount to identify your storage accounts) and specify the full path where the folder where you saved the ch7formatdisks.ps1 script in the$fileLocation variable.
The code in Example 7-15 and Figure 7-10 has some lines that are split using the line continuation character (`). When executing the commands, they do not have to be split.
Example 7-15. Uploading a script to storage (Console pane)
$fileName = "ch7formatdisks.ps1"
$fileLocation = "[full directory path to file (c:\Scripts)]"
$storageAccountName = "[storage account name]"
$filePath = Join-Path $fileLocation $fileName
$Container = "bootstrap"
$storageAccountKey = (Get-AzureStorageKey $storageAccountName).Primary
$context = New-AzureStorageContext -StorageAccountName $StorageAccountName `
-StorageAccountKey $storageAccountKey
New-AzureStorageContainer $Container -Permission Container -Context $context
Set-AzureStorageBlobContent -Blob $fileName -Container $Container `
-File $filePath -Context $context
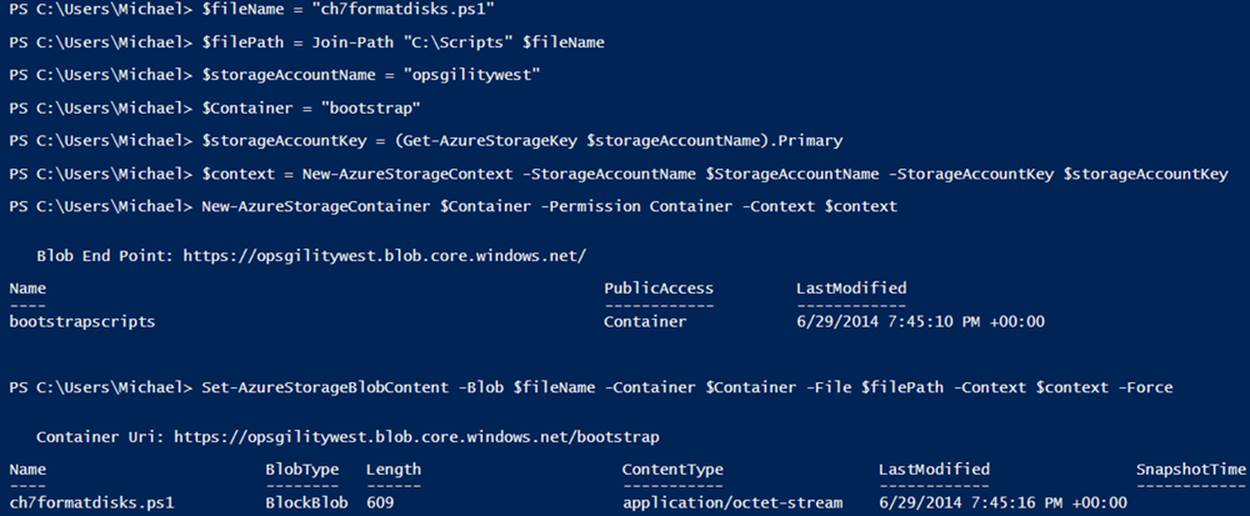
Figure 7-10. Uploading a script to storage
When the script has finished uploading, you can use the Set-AzureVMCustomScriptExtension cmdlet on an existing virtual machine or a new virtual machine. This scenario is about formatting disks—a task normally reserved for initial provisioning.
Create a new script using the PowerShell ISE named ch7bootstrapvm.ps1 and add the code shown in Example 7-16. As always, ensure you replace the placeholder values with real values. The $storageAccount variable should contain the name of the storage account where you uploaded the ch7formatdisks.ps1 script.
Example 7-16. Executing a script at provision time (Script pane)
$subscription = "[subscription name]"
$serviceName = "[cloud service name]"
$storageAccount = "[storage account name]"
$location = "[region name]"
Select-AzureSubscription $subscription
# Script file URI
$uri = "http://$storageAccount.blob.core.windows.net/bootstrap/ch7formatdisks.ps1"
$scriptname = "ch7formatdisks.ps1"
# The number of labels should match the number of data disks you are attaching
$diskLabels = "Label1;Label2"
$size = "Small"
$imageFamily = "Windows Server 2012 R2 Datacenter"
$vmName = "bootstrappedvm"
$imageName = Get-AzureVMImage |
where { $_.ImageFamily -eq $imageFamily } |
sort PublishedDate -Descending |
select -ExpandProperty ImageName -First 1
$cfg = New-AzureVMConfig -Name $vmName -InstanceSize $size -ImageName $imageName
$cfg | Add-AzureProvisioningConfig -Windows `
-AdminUsername $adminUser `
-Password $password
$cfg | Add-AzureDataDisk -CreateNew -DiskSizeInGB 100 -DiskLabel "Label1" -LUN 0
$cfg | Add-AzureDataDisk -CreateNew -DiskSizeInGB 100 -DiskLabel "Label2" -LUN 1
$cfg | Set-AzureVMCustomScriptExtension -FileUri $uri `
-Run $scriptname `
-Argument $diskLabels
$cfg | New-AzureVM -ServiceName $serviceName -Location $location
Execute the script by pressing F5, or by highlighting the script and pressing F8. When the virtual machine has completed provisioning, log in using remote desktop to validate that the two disks are attached and formatted using the correct drive labels (see Example 7-17 and Figure 7-11).
Example 7-17. Logging in to validate script execution (Console pane)
Get-AzureRemoteDesktopFile -ServiceName $serviceName -Name $vmName -Launch

Figure 7-11. Automatically formatted data disks at boot
Deleting Virtual Machines
One of the most important concepts to grasp with Microsoft Azure and the cloud in general is the idea that resources are programmable. To be programmable, a resource needs to support some or all of the CRUD properties (create, read, update, and delete) in a programmatic fashion. So far in this book we have seen how to programmatically create, view the configuration, and update a virtual machine by modifying the network, storage, or started state. The final operation to understand is how to delete one or more virtual machines and their associated disk resources.
Deleting a Single Virtual Machine
The simplest method of deleting a virtual machine is to use the Remove-AzureVM cmdlet. Similar to Stop-AzureVM and Start-AzureVM, this cmdlet works directly on the virtual machine and requires you to specify the cloud service name and the virtual machine name to accomplish its task (see Example 7-18).
Example 7-18. Deleting a virtual machine
$serviceName = "[cloud service name]"
$vmName = "[VM name]"
Remove-AzureVM -ServiceName $serviceName -Name $vmName
When the code is executed, the Remove-AzureVM cmdlet will delete the virtual machine and, by default, will leave the OS disk and any data disks alone and untouched. This behavior gives you the option of re-creating the virtual machine at a later date using the same disks.
If you would like the disks to be automatically deleted as part of the virtual machine delete operation, you can also specify the -DeleteVHD parameter to Remove-AzureVM. The -DeleteVHD parameter tells the cmdlet to delete the disks and the underlying VHDs from your storage account. One thing to remember about this parameter is that the delete action is asynchronous. This means that when the virtual machine is deleted, the disks will be automatically deleted some time later by Microsoft Azure (usually within several minutes).
Deleting Multiple Virtual Machines
The previous example showed how to delete a single virtual machine and its associated disks. What if you have an entire environment to delete? PowerShell is known for its amazing ability to automate repetitive tasks such as deleting multiple virtual machines, so let’s see how it can be done.
There are two techniques for deleting more than one virtual machine. The first technique is using the Get-AzureVM cmdlet and sending the results of that query to Remove-AzureVM for deletion.
In Example 7-19, Get-AzureVM is passed the cloud service name and returns the properties of all the virtual machines in the cloud service as an array of configuration objects. Each result in the array is passed to the pipeline separately, so Remove-AzureVM is called for each virtual machine. The end result is that all of the virtual machines in the cloud service are deleted. The cloud service itself continues to exist.
Example 7-19. Deleting virtual machines using the PowerShell pipeline
Get-AzureVM -ServiceName $serviceName |
Remove-AzureVM -DeleteVHD
Since the output of Get-AzureVM is written to the PowerShell pipeline, you can modify it by using other PowerShell cmdlets. In Example 7-20, I have added a call to the where command so that only virtual machines in the cloud service that start with the name iis will be deleted.
Example 7-20. Filtering the deletion of virtual machines
Get-AzureVM -ServiceName $serviceName |
Where { $_.Name -like 'iis*'} |
Remove-AzureVM -DeleteVHD
OPTIONAL—VALIDATE WHAT YOU ARE DELETING
When operating on virtual machines in a batch like this, it is advisable to validate what is being returned before executing the final command. In the preceding example, simply remove the final pipe | and the call to Remove-AzureVM to validate which virtual machines are being returned before the final delete.
The other method of deleting virtual machines is to delete the cloud service in which they are hosted. This technique has the advantage of cleaning up all of the virtual machines—and optionally their disks—along with the cloud service itself in one call to the API (see Example 7-21).
Example 7-21. Deleting all virtual machines by deleting the cloud service
Remove-AzureService $serviceName -DeleteAll
OPTIONAL—USE -DELETEALL TO DELETE ALL DISKS
Using the -DeleteAll parameter is equivalent to passing the -DeleteVHD parameter to Remove-AzureVM. The underlying disks, including the VHDs, will be deleted with the virtual machine.
Importing and Exporting Virtual Machine Configurations
Another set of cmdlets that can be very useful in certain situations are the Import-AzureVM and Export-AzureVM cmdlets. Using the Export-AzureVM cmdlet, you can save the configuration of a virtual machine to disk as an XML file. The Import-AzureVM cmdlet can be used to restore the configuration back into an object usable by PowerShell.
There are several use cases for these cmdlets:
§ Moving a virtual machine from one cloud service to another
§ Moving a virtual machine into or out of a virtual network
§ Moving a virtual machine between subscriptions or regions
The last use case requires quite a bit more effort than the first two.
To demonstrate how these cmdlets work in more detail, I will walk you through exporting a virtual machine configuration, removing the virtual machine, and then re-creating it from the configuration in a new cloud service.
In Example 7-22, the Export-AzureVM cmdlet exports the configuration to the C:\Scripts folder. Feel free to place it wherever you want.
Example 7-22. Exporting a virtual machine configuration (Console pane)
$serviceName = "[cloud service name]"
$vmName = "ps-vm1"
$localPath = "C:\Scripts\$vmName.xml"
Export-AzureVM -ServiceName $serviceName -Name $vmName -Path $localPath
When the cmdlet has executed, you can open the file up directly in Notepad or an XML editor to view the contents. You should see the network endpoint configuration, and references to the disk names and their associated cache settings.
To import the virtual machine configuration and then re-create it, you first need to delete the virtual machine (see Example 7-23).
Example 7-23. Removing the virtual machine (Console pane)
Remove-AzureVM -ServiceName $serviceName -Name $vmName
DO NOT DELETE DISKS
When you use the Import-AzureVM and Export-AzureVM cmdlets, it is important to remember that the configuration references existing disks. If you delete the disks when deleting the virtual machine, you will no longer be able to import the virtual machine configuration.
Example 7-24 shows how you can import the configuration from the saved path. When the configuration is loaded, you can treat it just like you would a virtual machine configuration created from the New-AzureVMConfig cmdlet. The following code simply passes the $vmConfig to New-AzureVM for it to be re-created in a new cloud service. You could easily specify a virtual network here and migrate the virtual machine to the virtual network.
Example 7-24. Importing the virtual machine configuration (Console pane)
# Specify a new cloud service name
$newServiceName = "[new cloud service name]"
# The region for the new virtual machine must be the same as the disk location
$location = "[region name]"
# Load the configuration
$vmConfig = Import-AzureVM -Path $localPath
# Create the virtual machine using the imported configuration
$vmConfig | New-AzureVM -ServiceName $newServiceName -Location $location
The use case I mentioned about moving virtual machines between regions or subscriptions is relatively complicated but entirely doable in conjunction with the async blob copy cmdlet Start-AzureStorageBlobCopy.
Here is the general flow of how you could build a solution yourself:
1. Export the existing configuration for the virtual machine.
2. Copy the VHDs from the source subscription to the destination subscription (use Select-AzureSubscription to switch).
3. Register the copied VHDs in the destination subscription with Add-AzureDisk using the same disk names as the source.
4. Import the existing configuration files and create the virtual machine in a new cloud service.
A complete example is posted in the TechNet Script Center for reference.
All materials on the site are licensed Creative Commons Attribution-Sharealike 3.0 Unported CC BY-SA 3.0 & GNU Free Documentation License (GFDL)
If you are the copyright holder of any material contained on our site and intend to remove it, please contact our site administrator for approval.
© 2016-2026 All site design rights belong to S.Y.A.