Easy Computer Basics, Windows 10 Edition (2016)
Chapter 4. Setting Up a Wireless Home Network
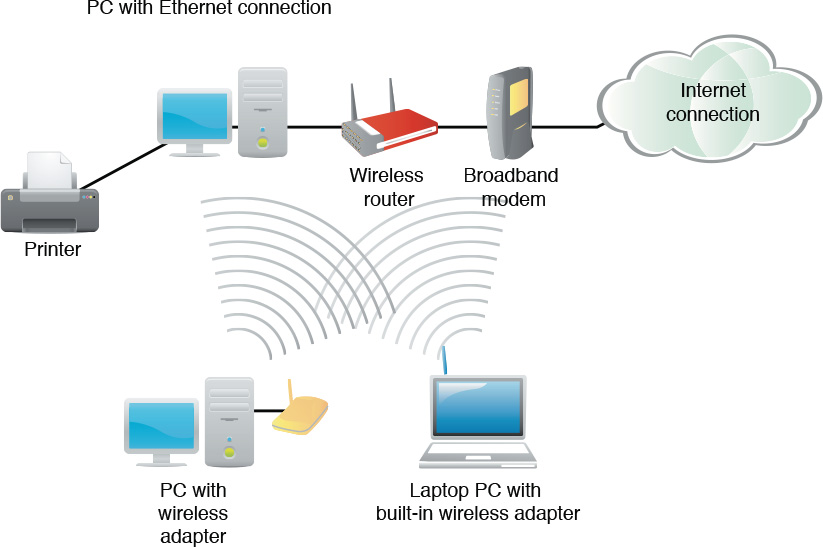
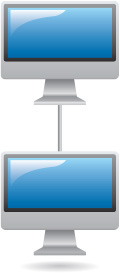
When you want to connect two or more computers in your home, you need to create a computer network. A network is all about sharing; you can use your network to share files, peripherals (such as printers), and even a broadbandInternet connection.
There are two ways to connect your network: wired and wireless. A wireless network is more convenient (no wires to run), which makes it the network of choice for most home users. Wireless networks use radio frequency (RF) signals to connect one computer to another. The most popular type of wireless network uses the Wi-Fi standard and can transfer data at 11Mbps (802.11b), 54Mbps (802.11g), 600Mbps (802.11n), or 1Gbps (802.11ac).
Understanding How Wireless Networks Work
Setting Up Your Network’s Main PC
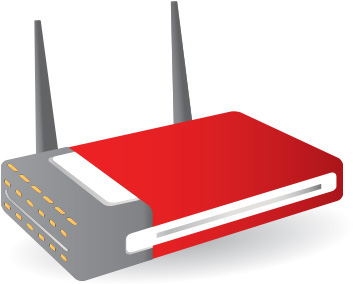
The focal point of your wireless network is the wireless router. The wireless PCs on your network must be connected to or contain wireless adapters, which function as mini-transmitters/receivers to communicate with the base station.

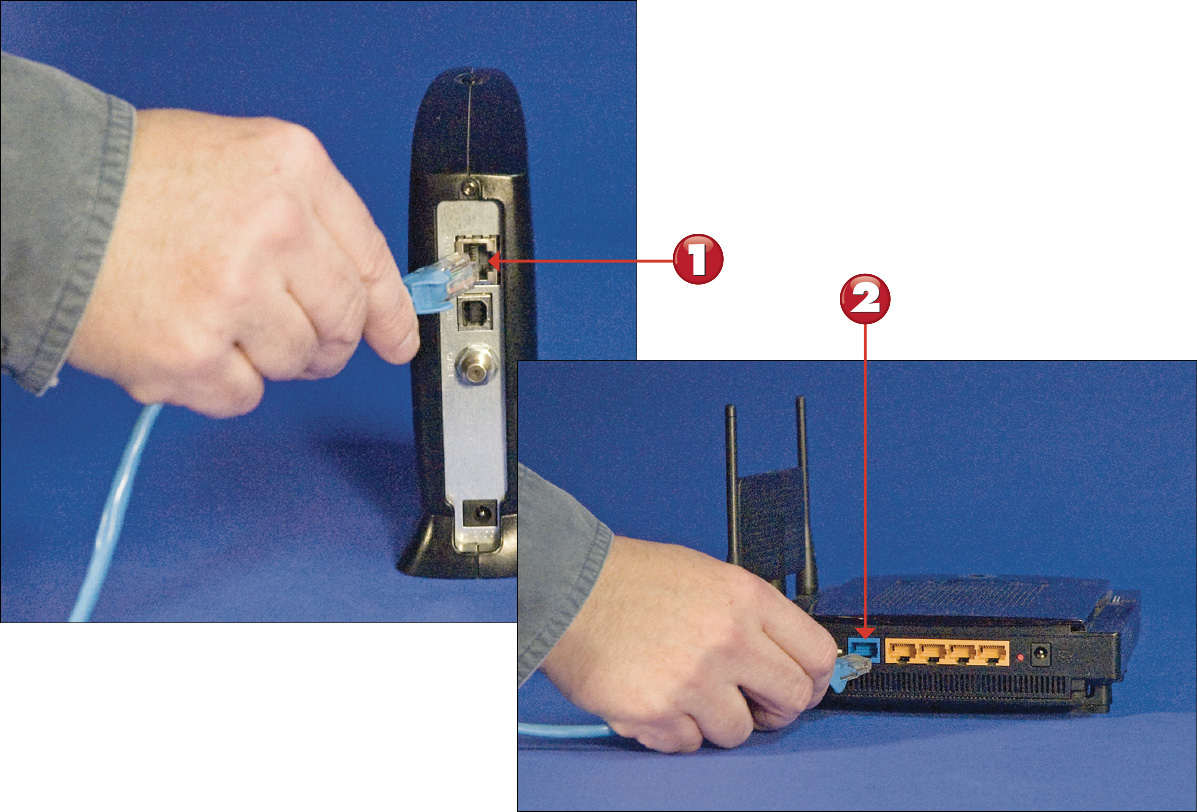
![]() Connect one end of an Ethernet cable to the Ethernet port on your broadband modem.
Connect one end of an Ethernet cable to the Ethernet port on your broadband modem.
![]() Connect the other end of the Ethernet cable to one of the Ethernet ports on your wireless router—preferably the one labeled Internet or WAN.
Connect the other end of the Ethernet cable to one of the Ethernet ports on your wireless router—preferably the one labeled Internet or WAN.
 Tip: Internet Port
Most routers have a dedicated input for your broadband modem, sometimes labeled Internet—although the modem can be connected to any open Ethernet input on the router.
 Note: Internet Gateway
Some Internet service providers (ISPs) provide broadband modems that include built-in wireless routers, often called an Internet gateway. If you have one of these devices, you don’t need to buy a separate router.
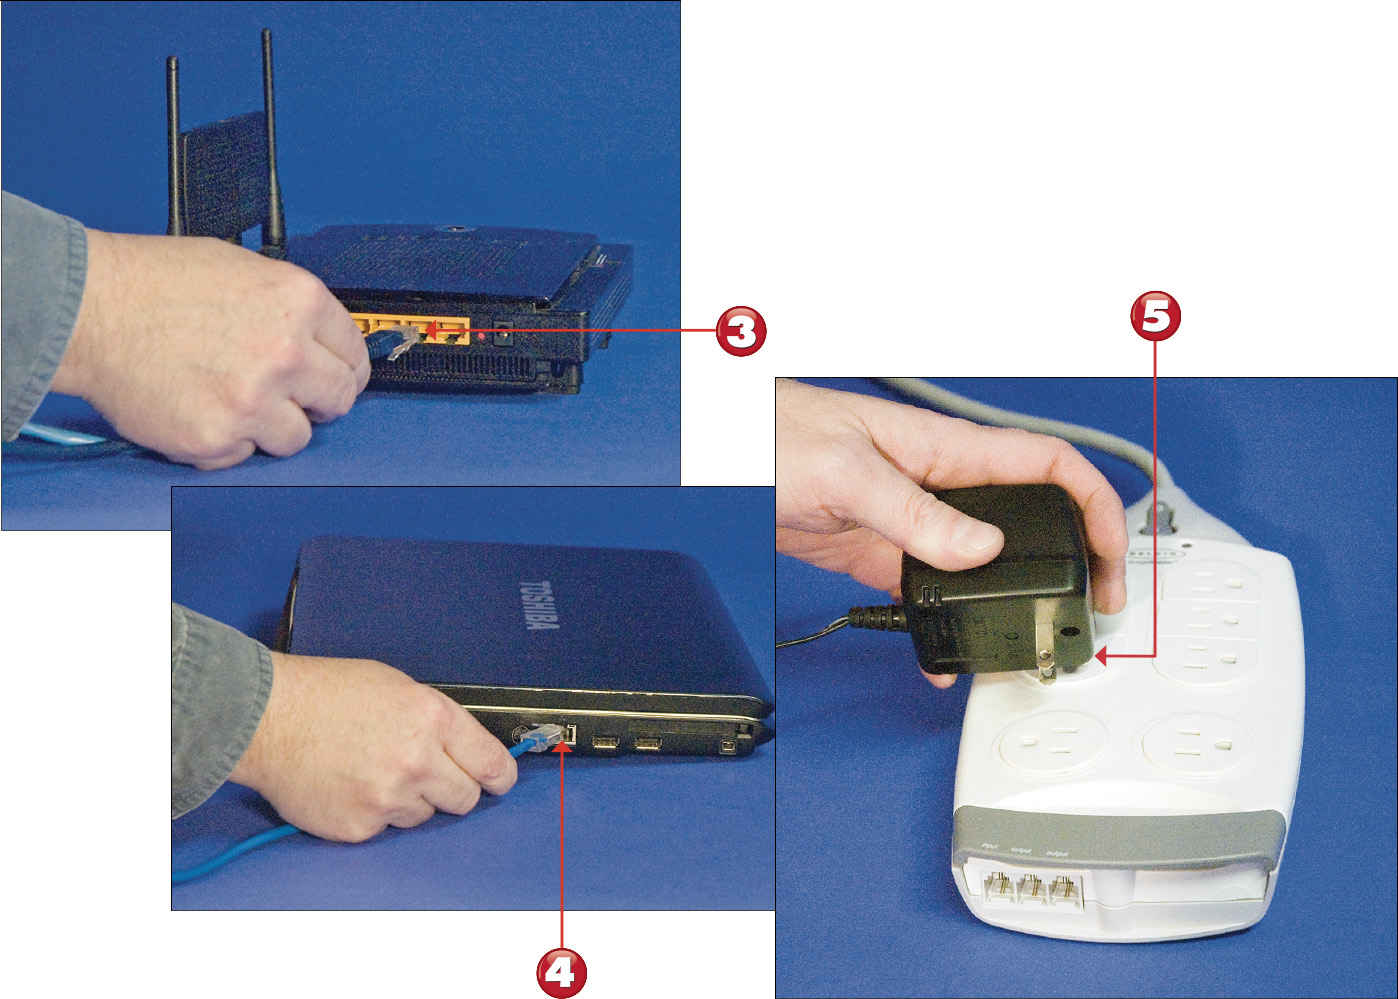
![]() Connect one end of an Ethernet cable to another Ethernet port on your wireless router.
Connect one end of an Ethernet cable to another Ethernet port on your wireless router.
![]() Connect the other end of the Ethernet cable to the Ethernet port on your main PC.
Connect the other end of the Ethernet cable to the Ethernet port on your main PC.
![]() Connect your wireless router to a power source and, if it has a power switch, turn it on. Your computer should now be connected to the router and your network.
Connect your wireless router to a power source and, if it has a power switch, turn it on. Your computer should now be connected to the router and your network.

Tip: Router Configuration
Some wireless routers require you to connect your main computer via Ethernet for initial configuration, as described here. Other routers will connect wirelessly to your main computer for the entire configuration process. When in doubt, follow the instructions that came with your router.
Tip: Wireless Security
To keep outsiders from tapping into your wireless network, you need to enable wireless security for the network. This adds an encryption key to your wireless connection; no other computer can access your network without this key.
Connecting Additional PCs to Your Wireless Network
Each additional PC on your network requires its own wireless adapter. Most notebook PCs come with a wireless adapter built in. Some desktop PCs come with built-in wireless adapters; others might require you to connect an external adapter.
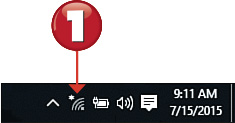
![]() In the notification area of the taskbar, click the Connections icon to display the Settings window with the Wi-Fi panel displayed.
In the notification area of the taskbar, click the Connections icon to display the Settings window with the Wi-Fi panel displayed.
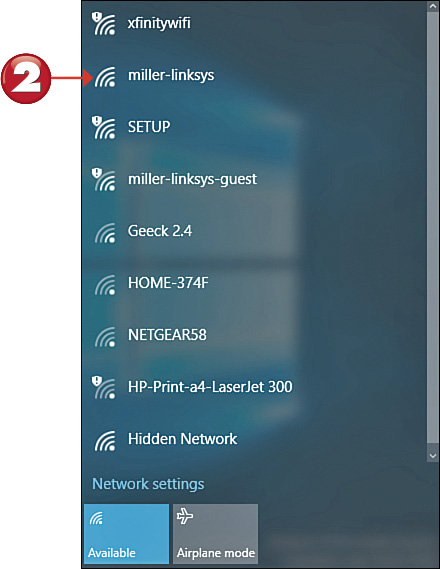
![]() Click your wireless network; this expands the panel for this network.
Click your wireless network; this expands the panel for this network.
Note: Connections Icon
If no network is currently connected, the Connections icon should be labeled Not Connected—Connections Are Available.
Tip: Wireless Adapters
A wireless adapter can be a small external device that connects to the PC via USB, an expansion card that installs inside your system unit, or a PC card that inserts into a laptop PC’s card slot.
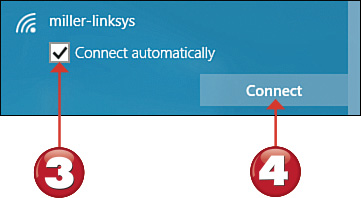
![]() To connect automatically to this network in the future, check the Connect Automatically box.
To connect automatically to this network in the future, check the Connect Automatically box.
![]() Click Connect.
Click Connect.
Tip: Connect Automatically
When you’re connecting to your home network, it’s a good idea to enable the Connect Automatically feature. This lets your computer connect to your network without additional prompting or interaction on your part.
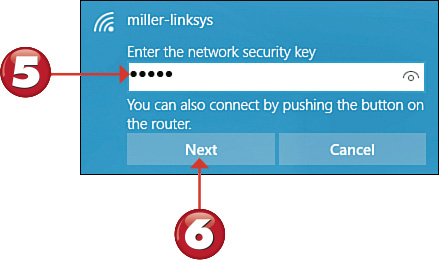
![]() When prompted, enter the password (called the network security key) for your network.
When prompted, enter the password (called the network security key) for your network.
![]() Click Next.
Click Next.
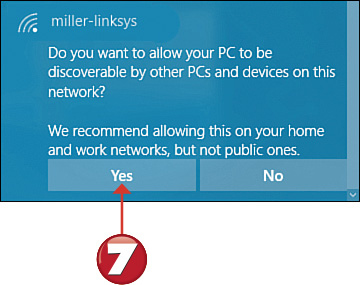
![]() When the next screen appears, click Yes to connect with other PCs and devices on your home network. You’re now connected to your wireless router and should have access to the Internet.
When the next screen appears, click Yes to connect with other PCs and devices on your home network. You’re now connected to your wireless router and should have access to the Internet.
Tip: Connecting Securely
If you’ve enabled wireless security on your wireless router, you will be prompted to enter the passphrase or security key assigned during the router setup, as noted in steps 5 and 6. If you haven’t enabled wireless security, you should.
Tip: One-Button Connect
If your router supports “one-button wireless setup” (based on the Wi-Fi Protected Setup technology), you’ll be prompted to press the “connect” button on the router to connect. You can connect via this button or by entering the network password as normal.
Adding Your Computer to a Homegroup
The easiest way to connect multiple home computers is to create a homegroup for your network. A homegroup is kind of a simplified network that lets you automatically share files and printers between connected computers.
![]() Right-click the Start button to display the quick Access Menu, and then click Control Panel.
Right-click the Start button to display the quick Access Menu, and then click Control Panel.

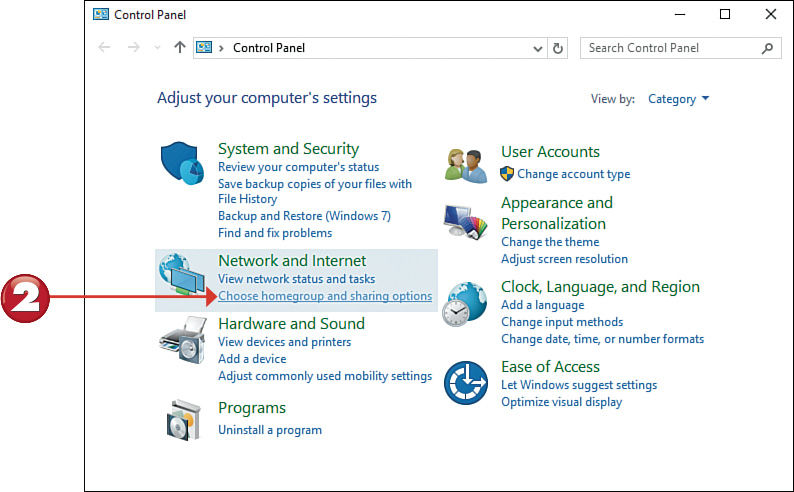
![]() In the Network and Internet section, click Choose Homegroup and Sharing Options to display the Share with Other Home Computers page.
In the Network and Internet section, click Choose Homegroup and Sharing Options to display the Share with Other Home Computers page.
Note: For Newer Windows
Only PCs running Windows 7 or above can be part of a homegroup. PCs running older versions of Windows do not have the homegroup feature and must use the normal Windows networking functions instead.
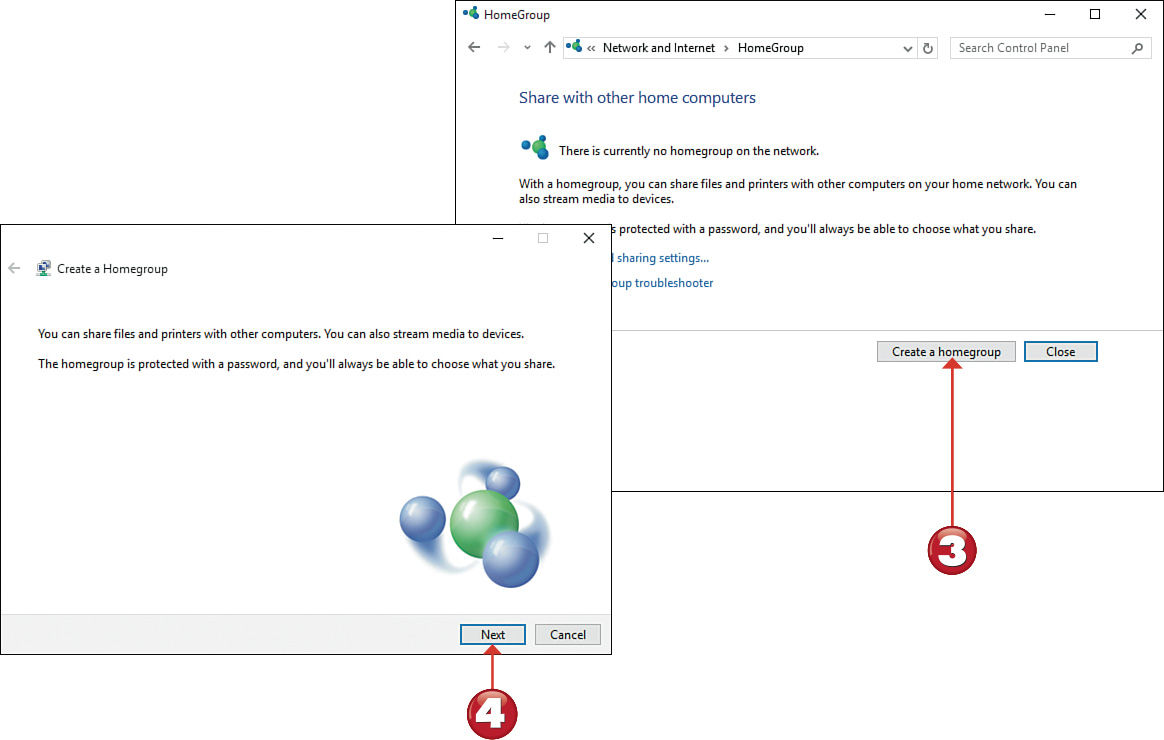
![]() Click the Create a Homegroup button to display the Create a Homegroup page.
Click the Create a Homegroup button to display the Create a Homegroup page.
![]() Click Next to display the Share with Other Homegroup Members page.
Click Next to display the Share with Other Homegroup Members page.
Tip: File/Printer Sharing
When configuring your homegroup, you can choose to share your Documents, Music, Pictures, Videos, or Printers and Devices.
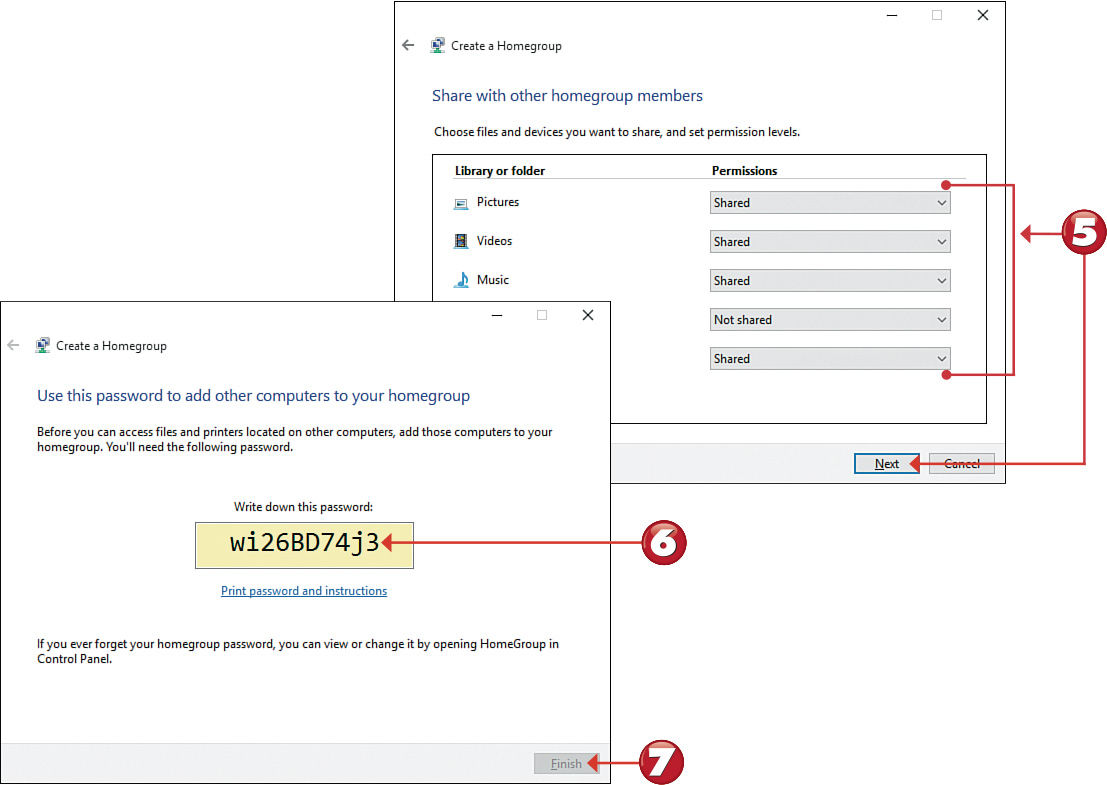
![]() By default, Windows will share your pictures, videos, music, and printers and other devices—but not your documents—with other homegroup members. Make a selection in the drop-down list for each item to change the sharing permissions, then click Next.
By default, Windows will share your pictures, videos, music, and printers and other devices—but not your documents—with other homegroup members. Make a selection in the drop-down list for each item to change the sharing permissions, then click Next.
![]() Windows now displays the password for your new homegroup. You’ll need to provide this to users of other computers on your network who want to join your homegroup, so write it down and keep it in a safe place.
Windows now displays the password for your new homegroup. You’ll need to provide this to users of other computers on your network who want to join your homegroup, so write it down and keep it in a safe place.
![]() Click the Finish button.
Click the Finish button.
Note: Configuring Other PCs
You’ll need to configure each computer on your network to join your new homegroup. Enter the original homegroup password as instructed.

Accessing Other Computers in Your Homegroup
After you have your home network set up, you can access shared content stored on other computers on your network. How you do so depends on whether the other computer is part of your homegroup. We’ll look at homegroup access first.
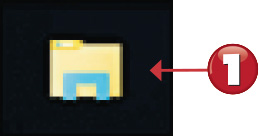
![]() Click the File Explorer icon on the Windows taskbar or on the Start menu.
Click the File Explorer icon on the Windows taskbar or on the Start menu.
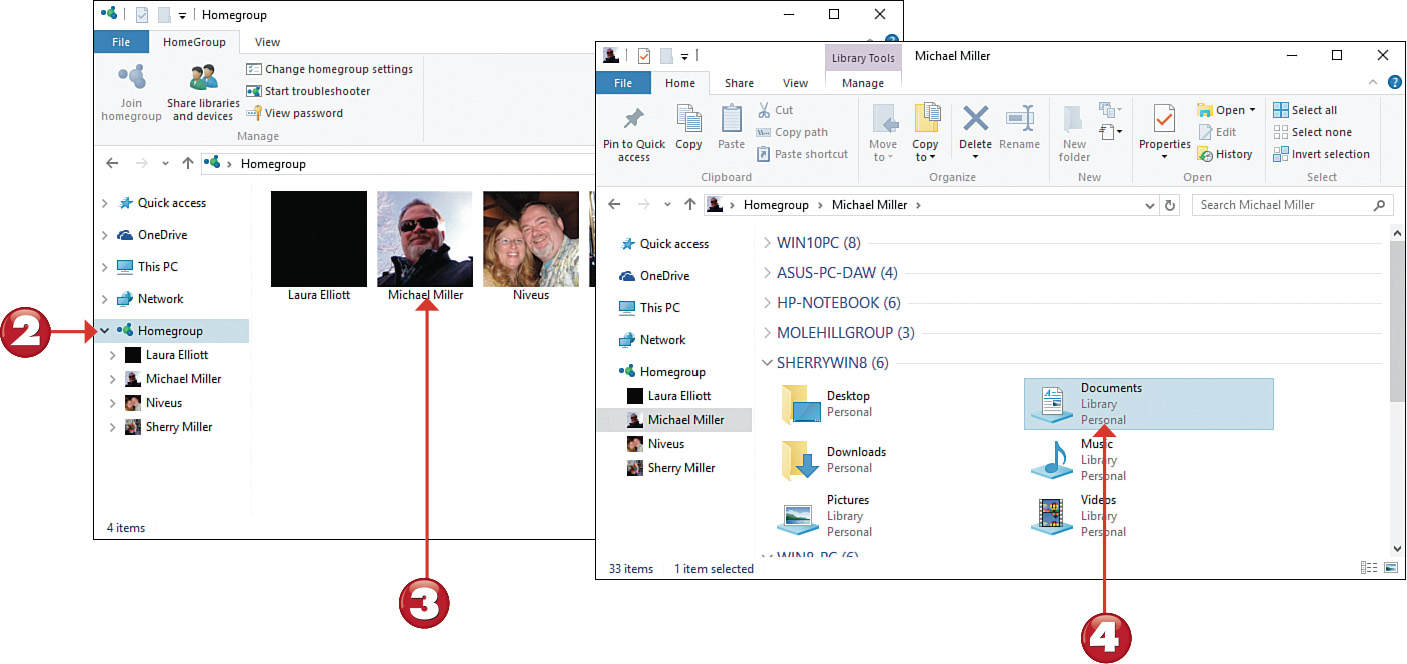
![]() When File Explorer opens, click Homegroup in the navigation pane to display all the users in your homegroup.
When File Explorer opens, click Homegroup in the navigation pane to display all the users in your homegroup.
![]() Double-click the user whose files you want to access.
Double-click the user whose files you want to access.
![]() Windows now displays the folders shared by that user. Double-click a folder to access that particular content.
Windows now displays the folders shared by that user. Double-click a folder to access that particular content.
Note: Organized by User
The Homegroup section of File Explorer is organized by user, not by computer. Any given user might have accounts on multiple computers.

Accessing Other Computers on Your Network
A computer doesn’t have to be connected to your homegroup for you to access its content. Windows lets you access any computer connected to your home network—although you can share only content that the computer’s owner has configured as sharable.
![]() Click the File Explorer icon on the Windows taskbar or on the Start menu.
Click the File Explorer icon on the Windows taskbar or on the Start menu.

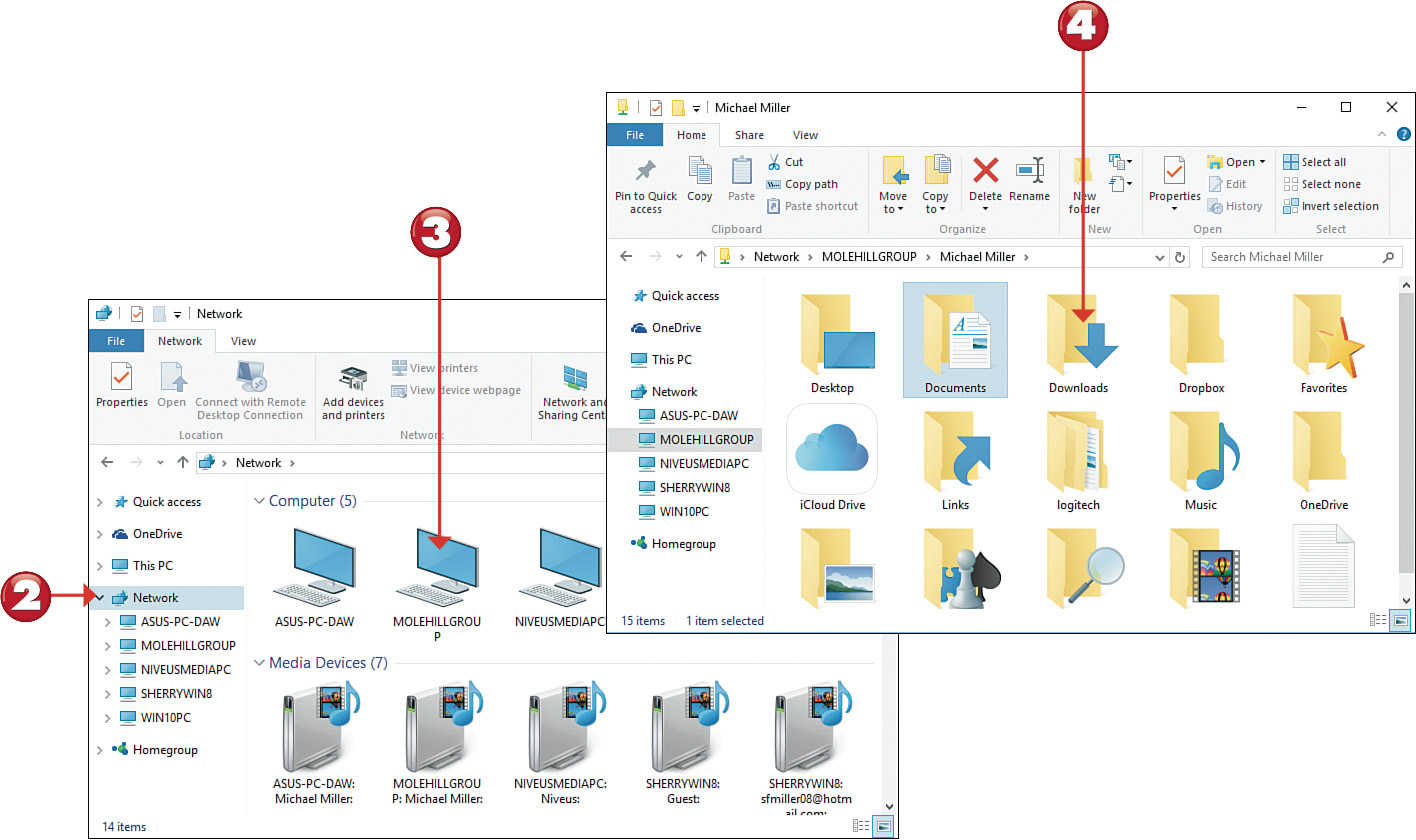
![]() When File Explorer opens, click Network in the navigation pane. This displays all the computers and devices connected to your network.
When File Explorer opens, click Network in the navigation pane. This displays all the computers and devices connected to your network.
![]() Double-click the computer you want to access.
Double-click the computer you want to access.
![]() Windows now displays the shared folders on the selected computer. Double-click a folder to view that folder’s content.
Windows now displays the shared folders on the selected computer. Double-click a folder to view that folder’s content.
Tip: Look for the Public Folder
On most older computers, shared files are stored in the Public folder. Look in this folder first for the files you want.
All materials on the site are licensed Creative Commons Attribution-Sharealike 3.0 Unported CC BY-SA 3.0 & GNU Free Documentation License (GFDL)
If you are the copyright holder of any material contained on our site and intend to remove it, please contact our site administrator for approval.
© 2016-2026 All site design rights belong to S.Y.A.