Exam Ref 70-695 Deploying Windows Devices and Enterprise Apps (2015)
Chapter 3. Implement a Zero-Touch deployment
In the first two chapters, you learned about implementing an operating system deployment (OSD) infrastructure and Lite-Touch deployments. To take further advantage of the technologies discussed in Chapter 1, “Implement an operating system deployment infrastructure,” you need to learn about Zero-Touch deployments. A Zero-Touch installation (ZTI) is the most automated installation available and reduces administrative overhead and maintenance for your OSD infrastructure. In this chapter, you learn more about Configuration Manager, including how to configure it for ZTIs and integrate the Microsoft Deployment Toolkit (MDT) and Configuration Manager, which enables new functionality and automation.
Objectives in this chapter:
![]() Objective 3.1: Configure Configuration Manager for OSD
Objective 3.1: Configure Configuration Manager for OSD
![]() Objective 3.2: Configure distribution points
Objective 3.2: Configure distribution points
![]() Objective 3.3: Configure MDT and Configuration Manager integration
Objective 3.3: Configure MDT and Configuration Manager integration
Objective 3.1: Configure Configuration Manager for OSD
Configuration Manager enhances the technologies discussed in Chapter 2, “Implement a Lite-Touch deployment,” by incorporating all the benefits of end-to-end client management. Tasks such as migrating an enterprise full of Windows 7 devices to Windows 8.1 can now be accomplished through a ZTI deployment, using a single solution, all while gaining the ability to monitor and report on the results. To take advantage of these enhancements, you must understand the various components that make up the deployment process and how they are connected within Configuration Manager.
This objective covers how to:
![]() Configure deployment packages and applications
Configure deployment packages and applications
![]() Configure task sequences
Configure task sequences
![]() Manage the driver pool
Manage the driver pool
![]() Manage boot and deployment images
Manage boot and deployment images
Configuring deployment packages and applications
Since the introduction of System Center 2012 R2 Configuration Manager, two solutions have become available for distributing content to endpoint devices. These two solutions are deployment packages and applications. Each has its own strengths and weaknesses, but both can be used with OSD. Understand the benefits of each to prepare for your deployment.
Deployment packages
Deployment packages are referred to as packages and programs from within the Configuration Manager console. Deployment packages handle basic distribution and workflow options while giving you the flexibility to do simple and quick deployment or management tasks. The benefits of a deployment package include:
![]() The ability to deploy a script quickly that initiates a management task on an endpoint device, such as configuring a scheduled task.
The ability to deploy a script quickly that initiates a management task on an endpoint device, such as configuring a scheduled task.
![]() The ability to distribute a payload of files to an endpoint device.
The ability to distribute a payload of files to an endpoint device.
![]() The ability to run a single command such as an application uninstall.
The ability to run a single command such as an application uninstall.
![]() The option to use a recurring deployment schedule.
The option to use a recurring deployment schedule.
![]() A simple solution for packaging software and including it in OSDs.
A simple solution for packaging software and including it in OSDs.
The deployment package life cycle includes the following ordered tasks:
1. Creating the package. A package can contain content such as a payload of files, a script, or a program. Alternatively, a package can be configured without any content and be used to run a simple command such as a registry edit.
2. Distributing the package. Any package that contains content must be distributed to the relative distribution points before it can be deployed to clients. A breakdown about distributing content is covered in more detail in Objective 3.2, “Configure distribution points.”
3. Deploying the package. The deployment process oversees which person or device the content will go to, based on Configuration Manager collections. A collection is a grouping of users or computing devices. In Configuration Manager, you can target actions, such as deployments, at collections. Common uses of collections include grouping all client computers, grouping all client computers running a specific operating system, and grouping all laptop computers. In addition, the deployment is configured for a specific date and time and can be a one-time deployment or a recurring scheduled deployment.
4. Monitoring the deployment. You can view success and failure status messages from the Monitoring workspace in the management console or through the built-in reports included with Configuration Manager.
5. Managing the package. Maintenance for a package or deployment is common and easily completed from the Software Library workspace in the management console. This includes modifying the package contents, updating the run command, and adjusting the deployment schedule.
The prerequisites for creating a deployment package include the following items:
![]() A functional Configuration Manager server infrastructure and prior implementation of all the related prerequisites for content distribution and client management.
A functional Configuration Manager server infrastructure and prior implementation of all the related prerequisites for content distribution and client management.
![]() An understanding of the package or program that you need to deploy. You need to know basic details such as the name, version, and manufacturer as well as the installation requirements and command-line arguments being deployed.
An understanding of the package or program that you need to deploy. You need to know basic details such as the name, version, and manufacturer as well as the installation requirements and command-line arguments being deployed.
![]() The target audience you are deploying the package or program to and whether the deployment will be required (known as mandatory in Configuration Manager 2007) or available (known as optional in Configuration Manager 2007).
The target audience you are deploying the package or program to and whether the deployment will be required (known as mandatory in Configuration Manager 2007) or available (known as optional in Configuration Manager 2007).
![]() The desired schedule for the deployment.
The desired schedule for the deployment.
More Info: Configuration Manager Prerequisites
For more information about the supported configurations and server prerequisites, see http://technet.microsoft.com/en-us/library/gg682077.aspx.
In the following example, you create a software package by using the management console. For this demonstration, you prepare the HP HotKey software for deployment. This software-based driver is included with most HP EliteBook portable computers and adds additional functionality to the integrated keyboard. When it’s complete, this package can be used for distribution to managed devices or included in an operating system deployment.
1. In the Configuration Manager console, click the Software Library workspace.
2. In the left pane, expand Application Management.
3. Right-click Packages and click Create Package.
4. On the Package page, as shown in Figure 3-1, fill in the program Name and other fields if needed for your deployment. Select the This Package Contains Source Files check box.
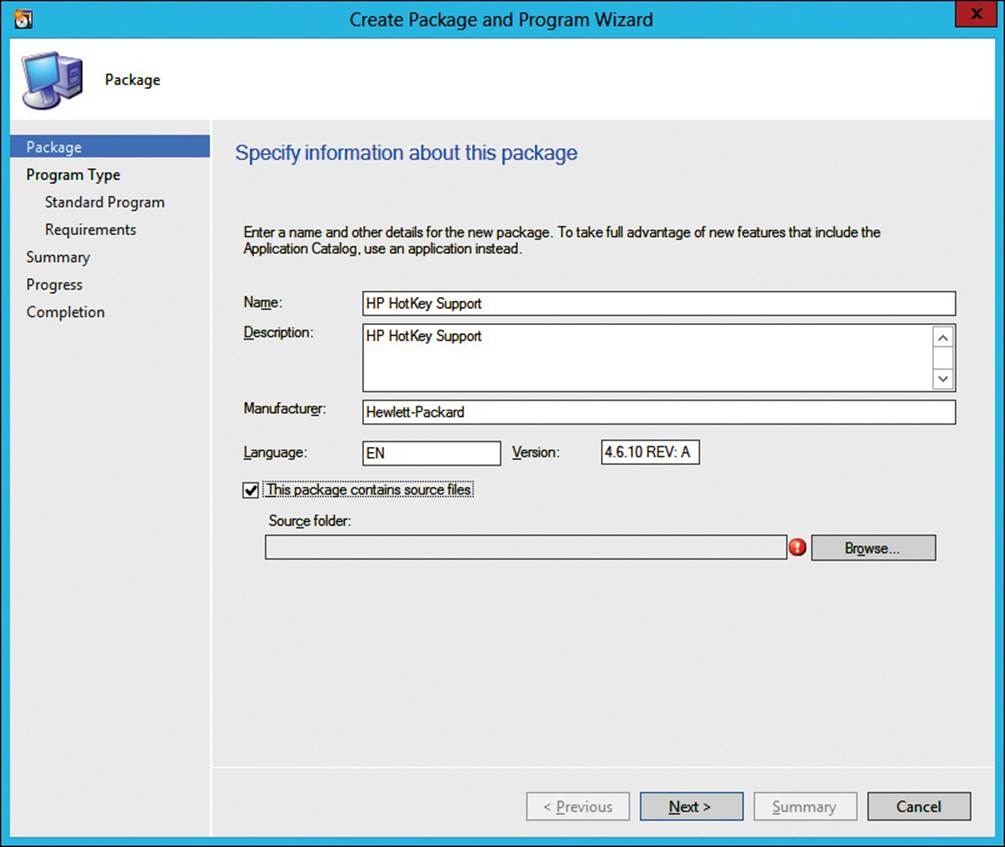
FIGURE 3-1 Create Package And Program Wizard, Package page
5. Click Browse to define your package source files.
The site server computer account must have Read permissions to the package source files.
6. On the Set Source Folder page, as shown in Figure 3-2, choose the source directory for your program and then click OK.
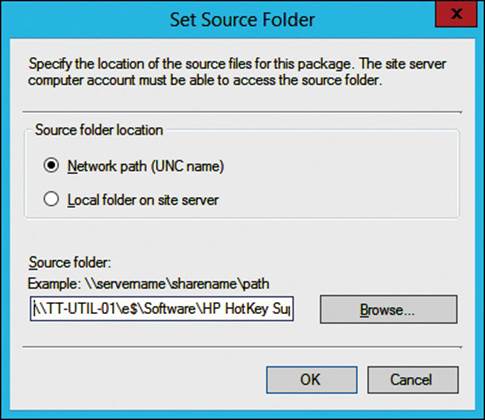
FIGURE 3-2 Create Package And Program Wizard, Set Source Folder dialog box
It is a good practice to use Uniform Naming Convention (UNC) paths. One consequence of not using UNC paths occurs during a migration from an older version of Configuration Manager to a newer version. If you don’t use UNC paths, you have to move all your existing packages manually.
7. Click Next on the Package page.
8. On the Program Type page, as shown in Figure 3-3, select Standard Program and then click Next.
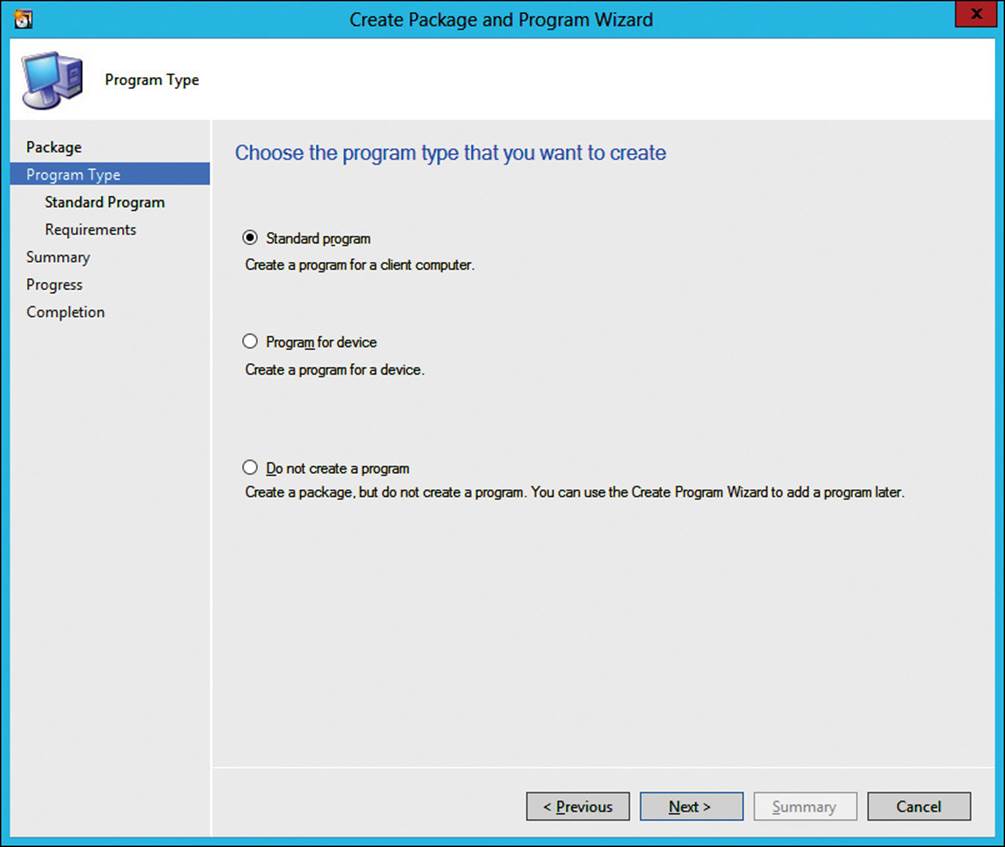
FIGURE 3-3 The Create Package And Program Wizard, Program Type page
You use Program For Device for Windows CE mobile devices. Using Do Not Create A Program would make this a payload package without a run command.
9. On the Standard Program page, as shown in Figure 3-4, type a name in the Name text box and a command in the Command Line text box. Be sure to test the install outside of Configuration Manager.
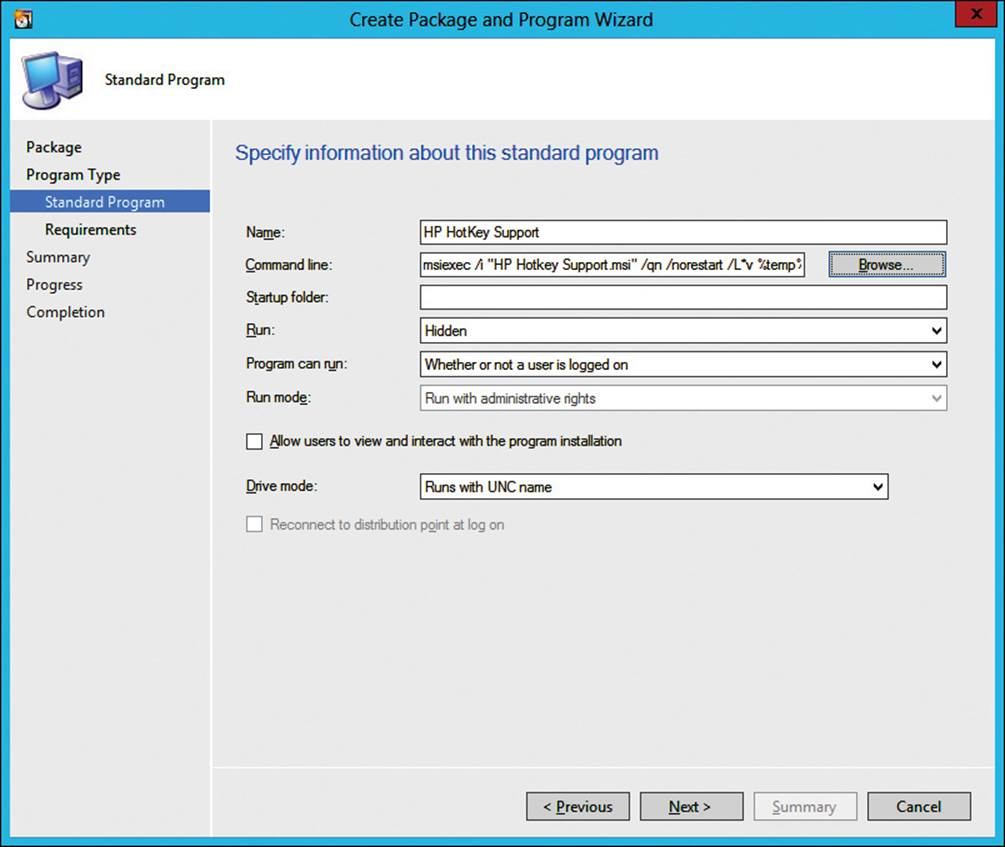
FIGURE 3-4 Create Package And Program Wizard, Standard Program page
You must ensure that the installation works locally on a client computer and from a UNC path to ensure that it works when you deploy it with Configuration Manager. A fully silent installation is required for OSD. You can set the Run drop-down box to Hidden for a fully silent installation. It is also recommended to halt automatic reboots and add an appropriate log file on supported programs.
10. In the Program Can Run drop-down menu, choose Whether Or Not A User Is Logged On.
The Allow Users To View And Interact With The Program Installation is an optional setting that enables users to interact with the installation program. This is useful when users need to choose an installation option or other configuration setting during an installation. For most deployments, automating the installation and not allowing users to interact with the installation is the preferred choice. Startup Folder enables you to specify the folder that the program runs from.
11. Click Next.
The Requirements page, shown in Figure 3-5, contains a few options for tuning your program, none of which is required to be changed. Run Another Program First enables you to run another program prior to this one. You might use this option to make sure a required component, such as the Microsoft .NET Framework, is installed first. The Platform Requirements section enables you to narrow the scope of supported operating systems. Estimated Disk Space is useful because it prevents the program from downloading if disk space is insufficient. Maximum Allowed Run Time prevents a program from running indefinitely in case of a silent failure.
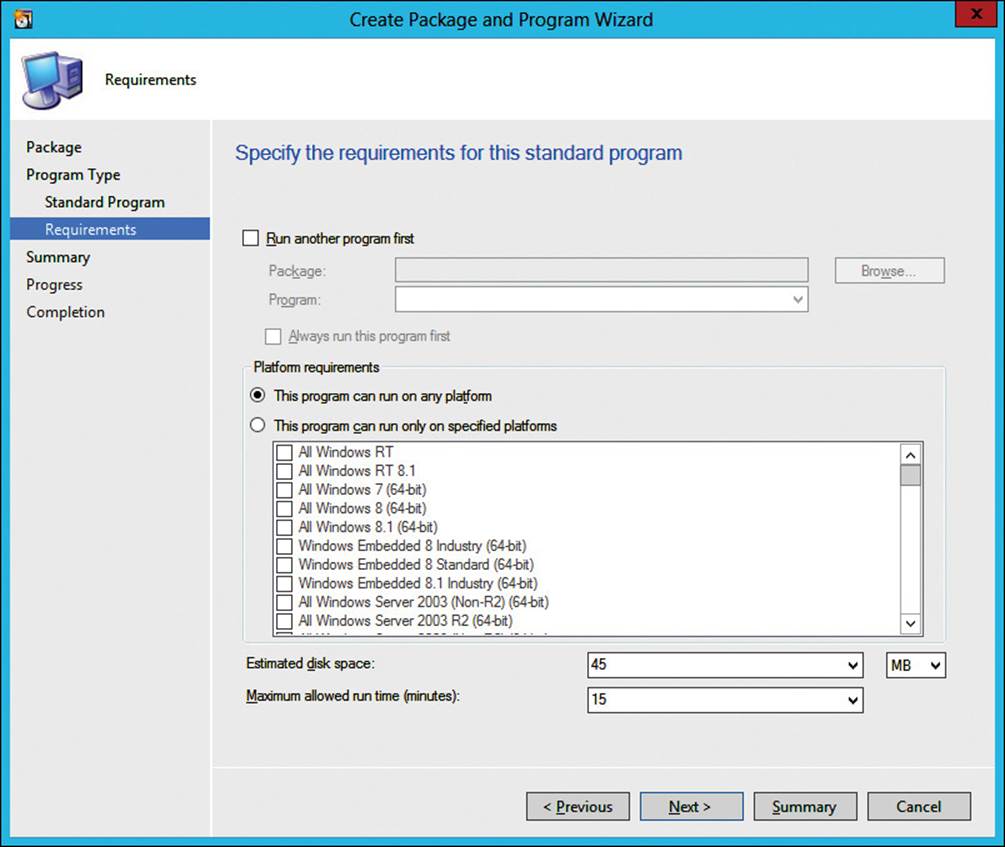
FIGURE 3-5 Create Package And Program Wizard, Requirements page
12. Click Next on the Requirements page.
13. On the Summary page, confirm your configuration and click Next to begin the build process.
14. After the The Create Package And Program Wizard Completed Successfully message appears on the Completion page, click Close.
With the package and program configured, one more item needs to be completed through the console to ensure that the program will run properly in a task sequence.
1. Navigate to the package you created and select the Programs tab in the lower third of the management console. If this section is not visible, click the expansion arrow in the lower right.
2. Right-click the HP HotKey Support program and select Properties.
3. Click the Advanced tab. Click Allow This Program To Be Installed From The Install Package Task Sequence Without Being Deployed, as shown in Figure 3-6. This option allows the package to be used in a task sequence without an active deployment.
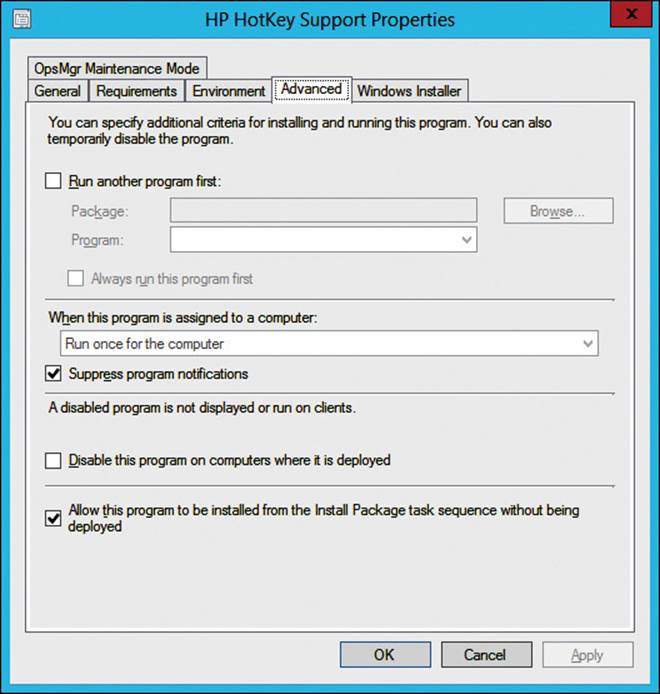
FIGURE 3-6 Program properties window, Advanced tab
4. Click OK to apply the change.
At this stage, a new package and corresponding program are available in the management console. Now look at how to complete the same steps by using Windows PowerShell. To create these items, use the New-CMPackage and New-CMProgram cmdlets.
1. Open the management console.
2. Click the drop-down menu in the upper-left corner and select Connect Via Windows PowerShell, as shown in Figure 3-7.
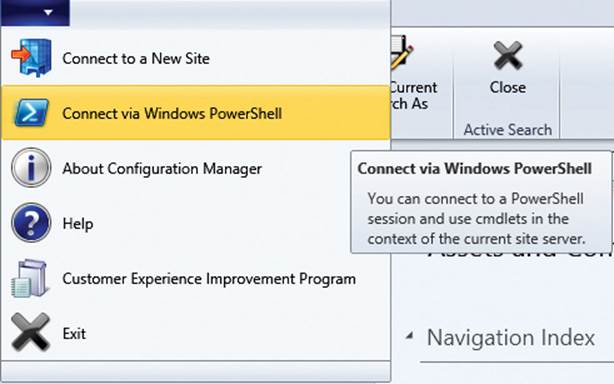
FIGURE 3-7 Management console, Connect Via Windows PowerShell
3. Run the following command to create the HP HotKey package:
New-CMPackage –Name 'HP HotKey Support (PS)' –Description 'HP HotKey
Support – Created with PS'' -Version '4.6.10 REV: A' -Manufacturer 'Hewlett
-Packard' -Language 'EN' –Path '\\TT-UTIL-01\e$\Software\WebEx Productivity Tools'
4. Run the following command to create the corresponding program:
New-CMProgram –PackageName 'HP HotKey Support (PS)' –StandardProgramName
'HP HotKey Support' –CommandLine 'msiexec /i "HP Hotkey Support.msi"
/qn /norestart /L*v %temp%\HPhotkey_install.log' –RunType Hidden
–ProgramRunType WhetherOrNotUserIsLoggedOn –RunMode RunWithAdministrativeRights
-DiskSpaceRequirement 45 -DiskSpaceUnit MB -Duration 15
More Info: Additional cmdlets
Use the Get-CMPackage and Get-CMProgram cmdlets to review the configuration of the items. To make additional changes, use the Set-CMPackage and Set-CMProgram cmdlets.
Next, distribute the source files for the program to the distribution point. This is discussed again, briefly, in Objective 3.2 for OSD. Knowing where content needs to be distributed to will depend on the server infrastructure in your environment. Perform the following steps:
1. Right-click the package that must be distributed and click Distribute Content.
2. On the General page, click Next.
3. On the Content Destination page, as shown in Figure 3-8, click the Add button and select Distribution Point from the drop-down menu. Select the preferred distribution point from the list of available servers and click OK.
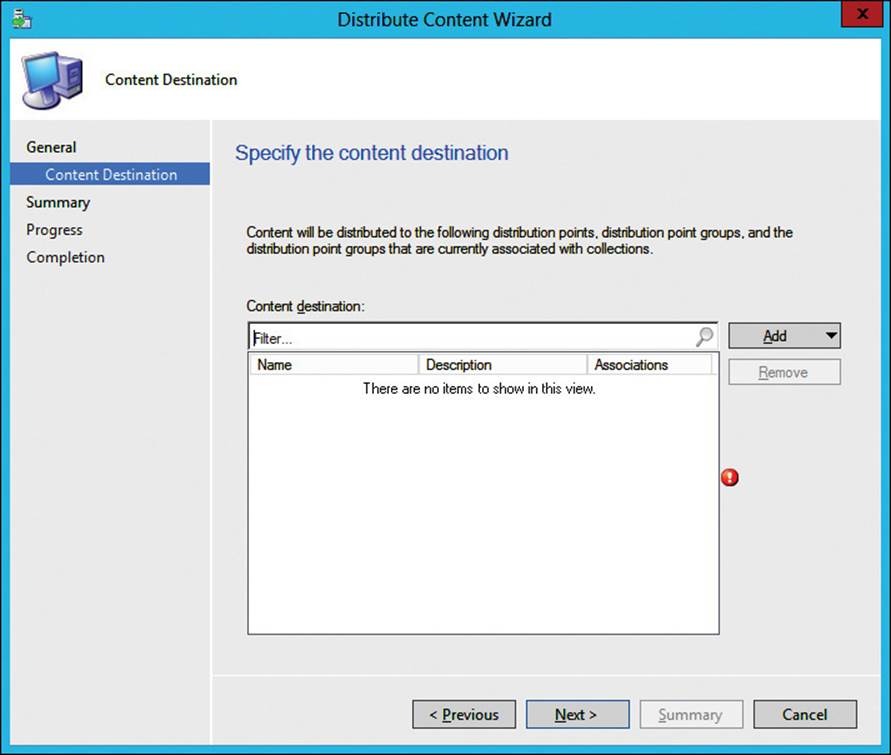
FIGURE 3-8 Distribute Content Wizard, Content Destination page
4. On the Summary page, confirm your selection and then click Next.
5. On the Completion page, click Close.
There are multiple ways to review the status of content after distribution. The first point of interest is the summary tab of the package, shown in the lower third of the management console. Under the Content Status section, you see a pie chart, as shown in Figure 3-9.
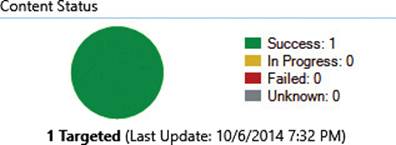
FIGURE 3-9 Program summary, content status
A common maintenance task is managing updates or installation changes for your packages. For example, if you decide to change the installation parameters for Office 2013, you might need to update the .msp file, which is part of the source files of the package. When you need to update the source files for a package, redistribute the content so that distribution points have the updated source files. This is a very simple task and can be completed by right-clicking the package and selecting Update Distribution Point.
After you distribute the package contents successfully, you can deploy the package to client devices. In this example, you deploy the program you created to a group of test systems to confirm that the software installs as expected. To deploy the program, perform the following steps:
1. Right-click the package and select Deploy.
2. Next to the Collection text box on the General page, as shown in Figure 3-10, click the Browse button.
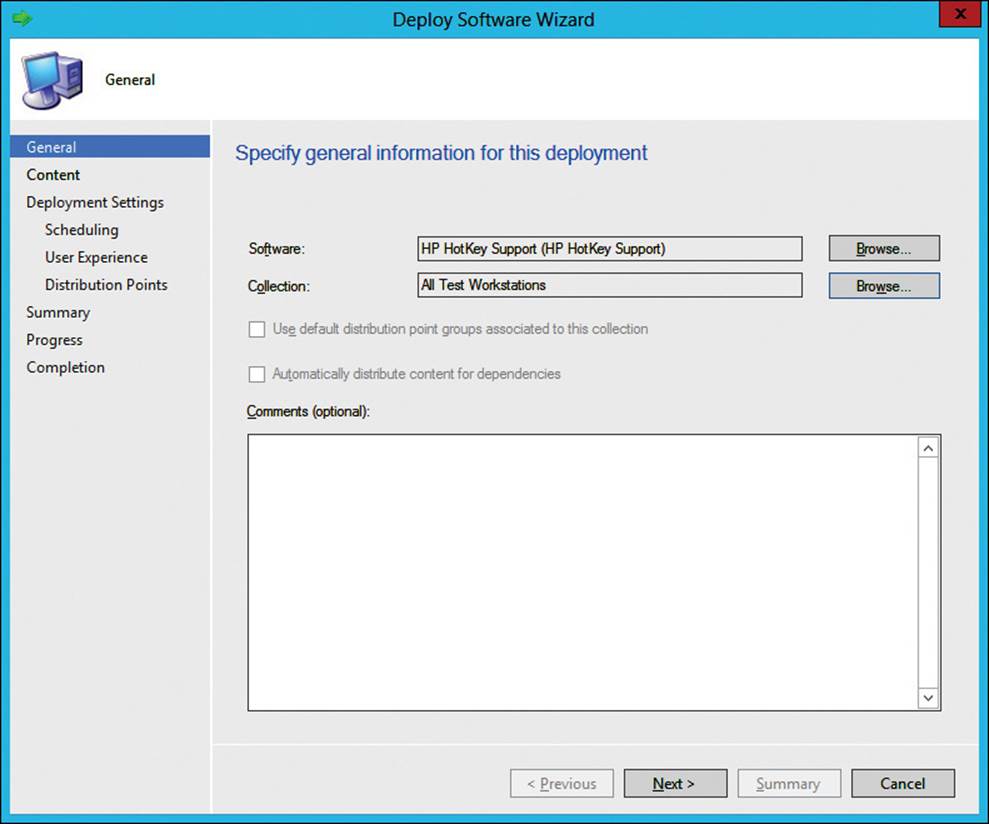
FIGURE 3-10 Deploy Software Wizard, General page
3. Select the desired collection and then click OK. Click Next.
4. On the Content page, confirm that your distribution point is listed in the top section and then click Next.
Note that you can add other distribution points and distribution point groups on this page.
5. On the Deployment Settings page, as shown in Figure 3-11, click the Purpose drop-down menu, click Available, and then click Next.
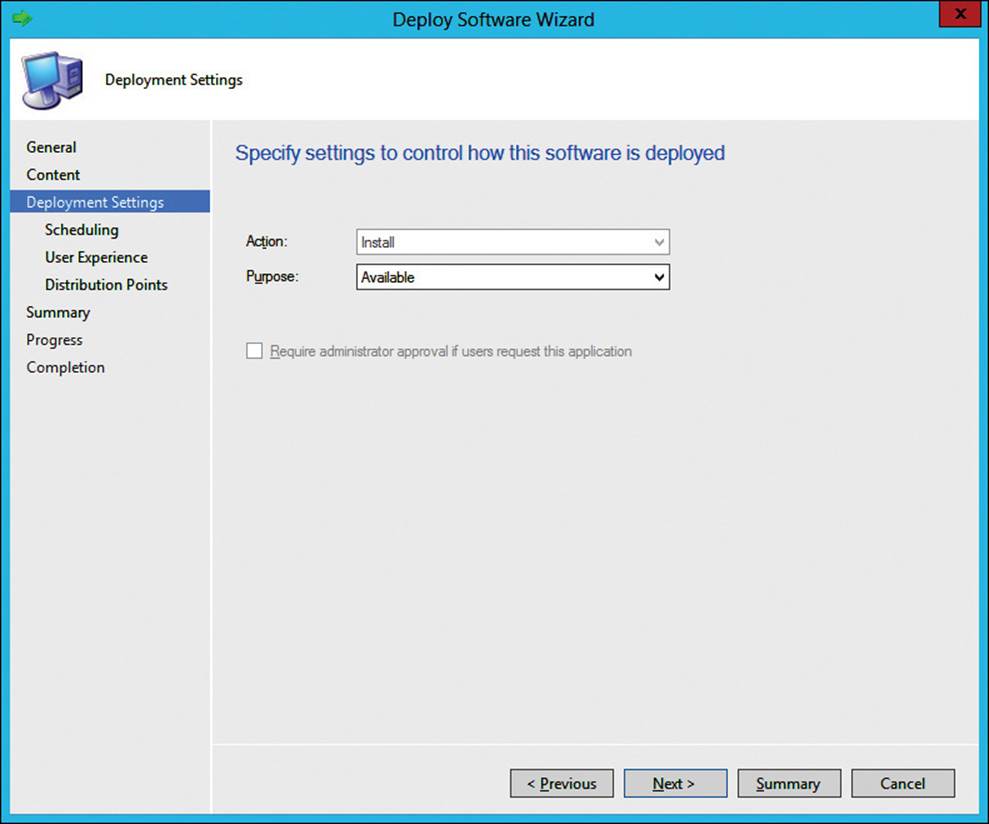
FIGURE 3-11 Deployment Software Wizard, Deployment Settings page
By selecting Available in Purpose, you enable users to install the software at their convenience or not at all. If you select Required in Purpose, you are making the software installation mandatory, and users cannot opt out of the installation.
6. On the Scheduling page, enable Schedule When This Deployment Will Become Available. The date and time will align with when you started the wizard.
7. Click Next.
Note the other options on the Scheduling page. Not every setting is covered here, but you should familiarize yourself with the settings as part of your exam preparation.
8. On the User Experience page, click Next.
9. On the Distribution Points page, click Next.
10. On the Summary page, confirm your deployment settings and then click Next.
11. On the Completion page, click Close.
With the deployment active, the devices in the collection will receive the new content the next time they check in. The HP HotKey software will appear in the Software Center application as an optional installation.
With Configuration Manager, you can monitor deployments from within the management console, as follows:
1. Open the management console and navigate to the Monitoring workspace.
2. Select Deployments in the left pane.
3. Type HP HotKey in the search field and click Search.
The filtered results provide a pie chart along with compliance and error messages for troubleshooting.
Real World: Operating System Deployments and Packages
Packages that only contain source files are commonly used with OSD. Task sequences include their own Run Command action, which can reference a package of source files that you’ve already distributed. I use this in customer environments to handle tasks such as running a BIOS configuration utility or including a prestart command in a boot image. Packages are still very relevant in Configuration Manager, even with the introduction of Applications.
More Info: Learn More about Packages and Programs
For more information about creating, deploying, monitoring, and managing packages and programs, see http://technet.microsoft.com/en-us/library/gg699369.aspx.
Applications
With a better understanding of how packages and programs are structured you can now move on to applications. The application framework is a new addition supported in Configuration Manager 2012 and Configuration Manager 2012 R2 and offers a much more robust solution for deploying, tracking, and remediating applications. The benefits of an application include:
![]() Install and uninstall triggers. Use these to uninstall software easily that was previously deployed.
Install and uninstall triggers. Use these to uninstall software easily that was previously deployed.
![]() True dependency support. Ensure that all the proper updates or software prerequisites are installed in their given order.
True dependency support. Ensure that all the proper updates or software prerequisites are installed in their given order.
![]() Enhanced system requirements. Set a requirement to check for free disk space or available memory.
Enhanced system requirements. Set a requirement to check for free disk space or available memory.
![]() Ability to supersede applications with new updates.
Ability to supersede applications with new updates.
![]() Ability to publish your application to the web-based Application Catalog.
Ability to publish your application to the web-based Application Catalog.
![]() A variety of detection methods to ensure that your application installed or uninstalled successfully.
A variety of detection methods to ensure that your application installed or uninstalled successfully.
![]() State-based Application model. This takes the conventional Programs model to a new level, incorporating dependencies and requirements for more granular application management and distribution. You can use state-based deployments to determine whether an application is already installed on a computing device. If it is, the content is not downloaded to that computing device. In addition, you can use rules to limit the targeting of a deployment. For example, you could limit the installation of Office 2013 to computing devices with at least 1 GB of RAM.
State-based Application model. This takes the conventional Programs model to a new level, incorporating dependencies and requirements for more granular application management and distribution. You can use state-based deployments to determine whether an application is already installed on a computing device. If it is, the content is not downloaded to that computing device. In addition, you can use rules to limit the targeting of a deployment. For example, you could limit the installation of Office 2013 to computing devices with at least 1 GB of RAM.
![]() Configuration Manager 2012 with a more user-centric focus. New features have been introduced, such as User Device Affinity, which can help you associate users to one or more devices. Application deployments are now user focused rather than device focused. Moving a user from one device to another can now offer a seamless transition.
Configuration Manager 2012 with a more user-centric focus. New features have been introduced, such as User Device Affinity, which can help you associate users to one or more devices. Application deployments are now user focused rather than device focused. Moving a user from one device to another can now offer a seamless transition.
The application life cycle shares many similarities with the deployment package but expands the capabilities:
1. Creating the application. An application will always contain content. The creation process includes a completely new model and workflow.
2. Distributing the application. Similar to a package, content must be distributed to distribution points after the application has been created.
3. Deploying the application.
4. Monitoring the deployment.
5. Managing the application. The application model is more complex, and, because of this, several more knobs can be tuned to perfect your deployment.
The prerequisites for creating an application are summarized as follows:
![]() A working Configuration Manager 2012 server infrastructure and all related prerequisites for content distribution and client management.
A working Configuration Manager 2012 server infrastructure and all related prerequisites for content distribution and client management.
![]() A working Application Catalog for self-service capabilities.
A working Application Catalog for self-service capabilities.
![]() An understanding of the package or program that you need to deploy. This includes basic details, such as the name, version, and manufacturer, as well as the installation requirements and command-line arguments being deployed.
An understanding of the package or program that you need to deploy. This includes basic details, such as the name, version, and manufacturer, as well as the installation requirements and command-line arguments being deployed.
![]() The target audience that you are deploying the package or program to and whether the deployment will be required or available.
The target audience that you are deploying the package or program to and whether the deployment will be required or available.
![]() The desired schedule for the deployment.
The desired schedule for the deployment.
More Info: Application Catalog Prerequisites
For more information about the prerequisites for application management, see http://technet.microsoft.com/en-us/library/gg682145.aspx.
In the following process, you see the creation of an application by using the management console. In this example, you prepare the WebEx Productivity Tools for a self-service installation. This gives users the ability to browse the application catalog, find the software they need, and install it at their convenience. You should keep OSD in mind to ensure that this same package can be used in the task sequence.
1. In the Configuration Manager console, click the Software Library workspace.
2. In the left pane, expand Application Management.
3. Right-click Applications and click Create Application.
4. On the General page of the Create Application Wizard, as shown in Figure 3-12, fill in the Location field by using the full UNC path to the MSI file or other supported file type that you select and then click Next.
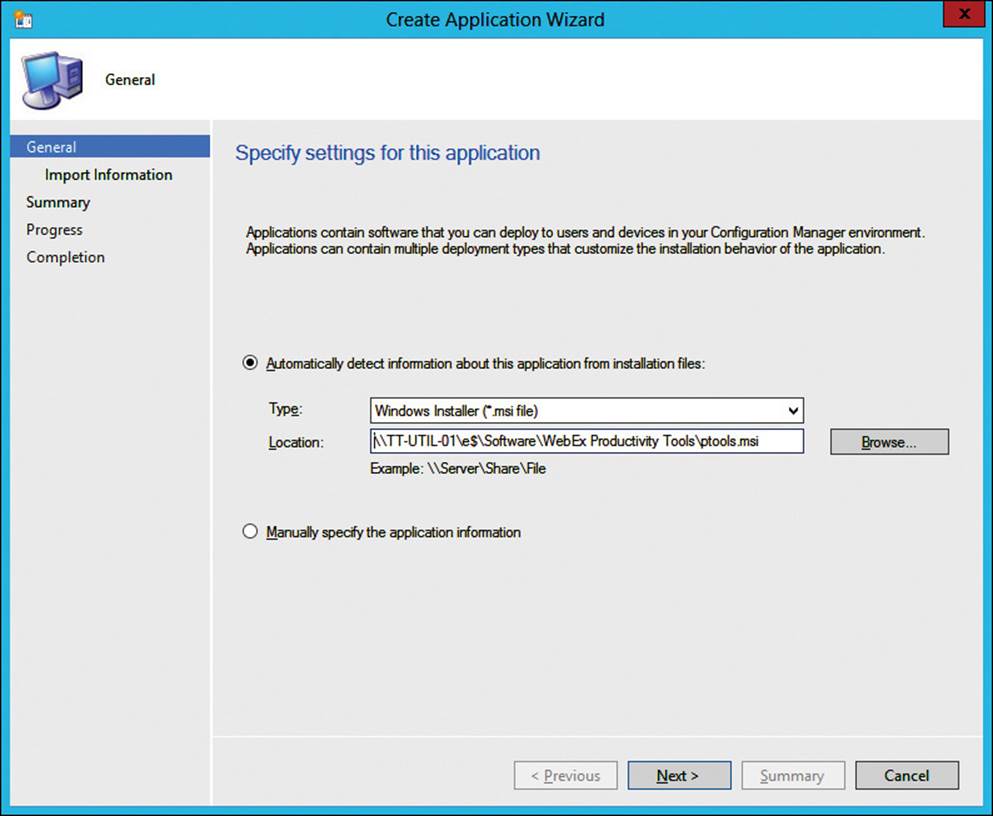
FIGURE 3-12 Create Application Wizard, General page
Note that Configuration Manager 2012 R2 supports the following file types: Windows Installer (.msi), Windows app package (.appx or .appxbundle), Windows app package in the Windows Store, App-V v4, App-V v5, Windows Phone app package (.xap), Windows Phone app package in the Windows Phone store, Windows Mobile Cabinet, app package for iOS (.ipa), app package for iOS from App Store, app package for Android (.apk), app package for Android on Google Play, Nokia SIS file, Mac OS X, and Web Application. The wizard reads the MSI file and creates the basic application for you.
5. On the Important Information page, confirm the configuration and then click Next.
6. On the General Information page, as shown in Figure 3-13, fill in the application details.
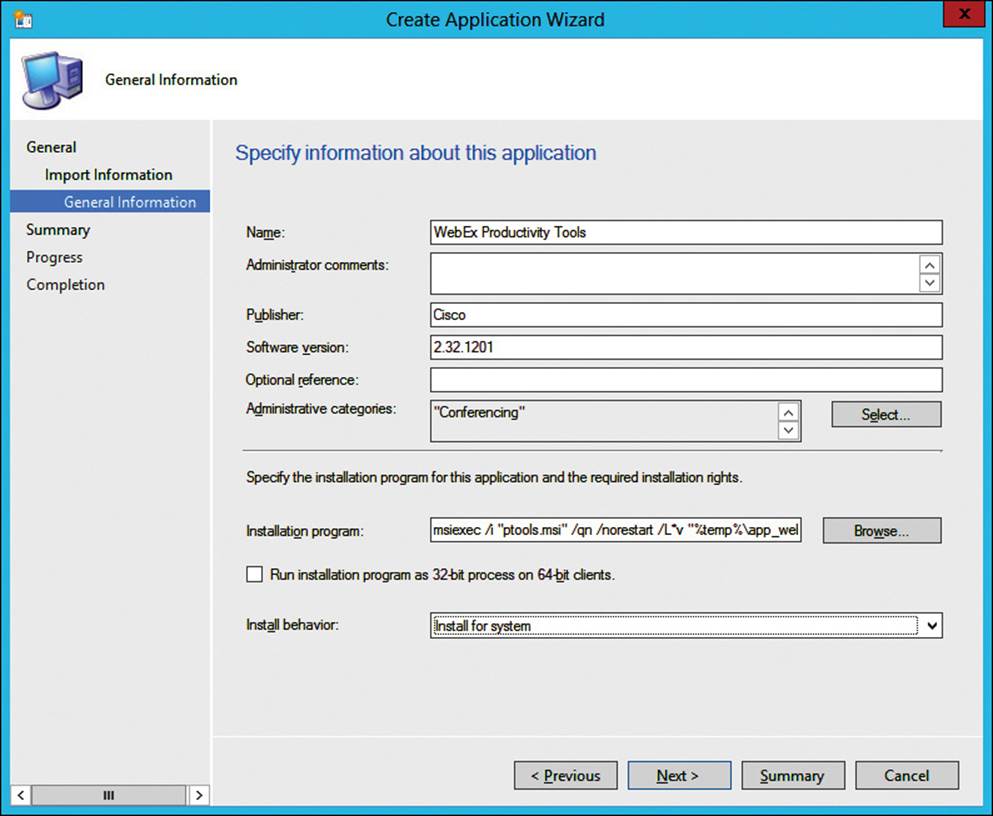
FIGURE 3-13 Create Application Wizard, General Information page
For this deployment, you update the default Installation program argument to add some additional functionality such as MSI logging. The install behavior also changes to Install For System, which ensures that the application installs by using the local system account. Alternatively, you can use Install For User, which runs the application as the current user. In this example, the application will be included in the imaging task sequence.
7. Click Next when you are ready to proceed.
8. On the Summary page, confirm the configuration and click Next.
9. On the Completion page, click Close.
The application is now built, but before distributing it, a few more options are available.
1. Right-click the application and click Properties.
2. On the General Information tab, choose Allow This Application To Be Installed From The Install Application Task Sequence Action Without Being Deployed.
3. On the Deployment Types tab, select WebEx Productivity Tools and then click Edit.
4. On the Requirements tab, click Add.
5. On the Create Requirement page, as shown in Figure 3-14, change the condition to Operating System and select Windows 7, Windows 8, and Windows 8.1. Click OK to save the requirement.
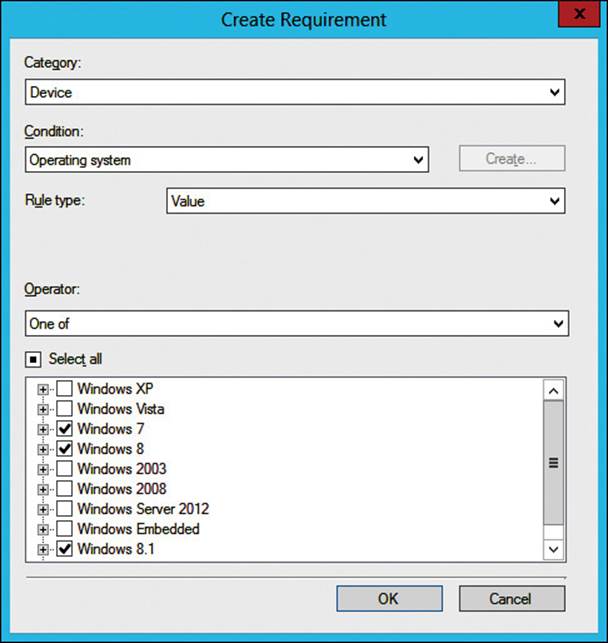
FIGURE 3-14 Create Requirement, operating system requirement
6. Click OK to save the deployment type.
7. Click OK to save the application.
This application is now ready for distribution. Perform the following steps to distribute the content to your distribution point:
1. Right-click the application and select Distribute Content.
2. On the General page of the Distribute Content Wizard, click Next.
3. On the Content page, click Next.
4. On the Content Destination page, click Add and then click Distribution Point. Select the distribution point and then click OK. Click Next.
5. On the Summary page, review your selections and then click Next.
6. On the Completion page, click Close.
7. Monitor your distribution by using the Content Status summary.
With the application content distributed, you can move on to the deployment.
1. Right-click the application and select Deploy.
2. On the General page of the Deploy Software Wizard, as shown in Figure 3-15, click the Browse button next to the Collection text box. You want this application to appear in the catalog, so choose the All Users collection and click OK. (Mobile devices do not support the catalog.) Click Next.
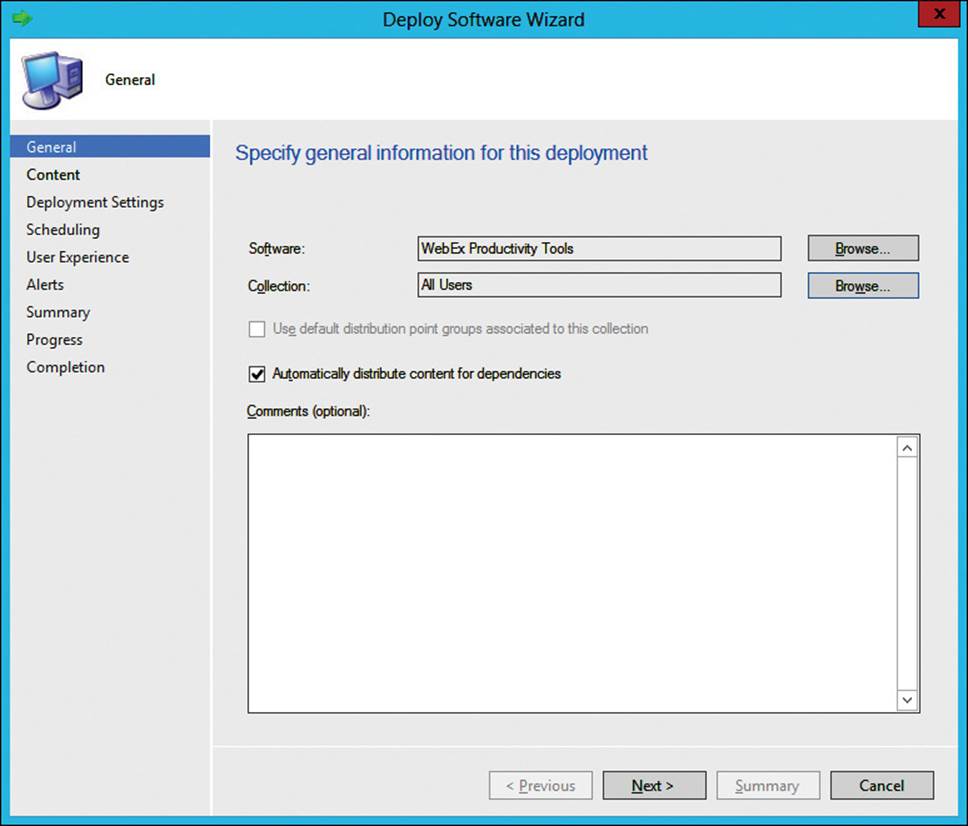
FIGURE 3-15 Deploy Software Wizard, General page
3. On the Content page, confirm that your distribution point is listed in the top section and then click Next.
4. On the Deployment Settings screen, leave Action set to Install and Purpose set to Available.
Note that you can require an administrator to approve user requests by selecting Next. Approval requests are handled under the Approval Requests section in the left pane of the Software Library workspace. Leave this option as is for your deployment.
5. Click Next.
6. On the Scheduling page, click Next.
The default time makes this application available immediately.
7. On the User Experience page, click Next.
The default user notification settings display a confirmation window after the installation completes.
8. On the Alerts page, click Next.
You can trigger an alert if the deployment reaches a specific failure rate. These alerts appear on the Overview screen when you launch the management console.
9. On the Summary page, confirm your deployment settings and then click Next.
10. On the Completion screen, click Close.
The WebEx Productivity Tools are now readily available to all users through the Application Catalog. This empowers users to install the software they need in a familiar app store environment.
More Info: Learn More about the Application Catalog
For more information about the Application Catalog, user experience, and configuration options, see http://technet.microsoft.com/en-us/library/hh489603.aspx.
Besides the management console, you can also use Windows PowerShell to improve your automation workflow. For application creation, use the New-CMApplication and Add-CMDeploymentType cmdlets.
Run the following command to create the WebEx Productivity Tools application:
New-CMApplication -Name "WebEx Productivity Tools (PS)" -Description "WebEx Productivity
Tools - created with PS" -Publisher "Cisco" -SoftwareVersion "2.32.1201" -AutoInstall
$true
Run the following command to create the corresponding deployment type:
Add-CMDeploymentType -ApplicationName "WebEx Productivity Tools (PS)"
-InstallationFileLocation "\\TT-UTIL-01\e$\Software\WebEx Productivity Tools\ptools
.msi" -MsiInstaller -AutoIdentifyFromInstallationFile -ForceForUnknownPublisher $true
-InstallationBehaviorType InstallForSystem -InstallationProgram 'msiexec /i "ptools.msi"
/qn /norestart /L*v "%temp%\app_webexpt_install.log"'
After re-creating the application and deployment type by using Windows PowerShell, you can review their configuration by using the Get-CMApplication and Get-CMDeploymentType cmdlets.
Run the following command to review the application configuration:
Get-CMApplication -Name "WebEx Productivity Tools"
Run the following command to review the deployment type configuration:
Get-CMDeploymentType -ApplicationName "WebEx Productivity Tools"
Configuring task sequences
Task sequences are an ordered list of steps or actions that take place on the client computer at the command-line level without requiring user intervention. Task sequences are commonly used for LTI and ZTI operating system deployments but also offer a wide range of options in other areas such as migrating a user from one computer to another.
MDT uses the same task sequence engine and can be integrated with Configuration Manager to provide a more robust workflow. MDT integration is covered in Objective 3.3.
More Info: Getting Started with Task Sequences
For more information about how to manage task sequences, see http://technet.microsoft.com/en-us/library/hh273490.aspx.
Configuration Manager 2012 introduced an updated version of the Create Task Sequence Wizard, as shown in Figure 3-16. Now you have four task sequence templates to choose from, one of which creates a blank task sequence.
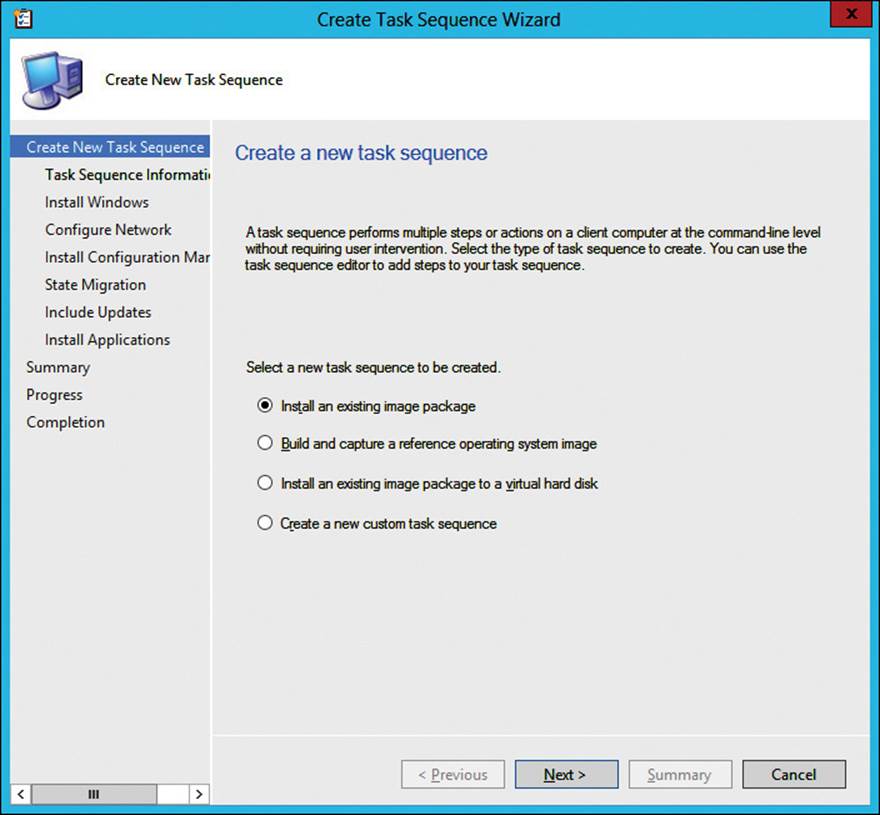
FIGURE 3-16 Create Task Sequence Wizard, Create New Task Sequence page
The template you choose determines which pages appear in the wizard. The following task sequence templates are available by default:
![]() Install An Existing Image Package This option creates a basic task sequence that uses an existing image package. Before using this option, import and capture an image into the console.
Install An Existing Image Package This option creates a basic task sequence that uses an existing image package. Before using this option, import and capture an image into the console.
![]() Build And Capture A Reference Operating System Image This option creates a task sequence to assist in capturing your first reference image or to update your preexisting reference image.
Build And Capture A Reference Operating System Image This option creates a task sequence to assist in capturing your first reference image or to update your preexisting reference image.
![]() Install An Existing Image Package To A Virtual Hard Disk This option creates a task sequence to assist in creating a VHD, which can then be published to Virtual Machine Manager.
Install An Existing Image Package To A Virtual Hard Disk This option creates a task sequence to assist in creating a VHD, which can then be published to Virtual Machine Manager.
![]() Create A Custom Task Sequence This option creates a blank task sequence.
Create A Custom Task Sequence This option creates a blank task sequence.
Before proceeding with the following build and capture task sequence steps, you should be familiar with the following OSD prerequisites:
![]() You must be running Configuration Manager 2012 R2 to deploy Windows 8.1.
You must be running Configuration Manager 2012 R2 to deploy Windows 8.1.
![]() If you intend to use PXE, make sure it is enabled on your distribution point.
If you intend to use PXE, make sure it is enabled on your distribution point.
![]() Create and distribute your boot images or distribute the Windows default boot images.
Create and distribute your boot images or distribute the Windows default boot images.
![]() Add your Windows 8.1 install.wim to the list of available operating system images and distribute it.
Add your Windows 8.1 install.wim to the list of available operating system images and distribute it.
More Info: Operating System Deployment Prerequisites
For more information about the operating system prerequisites for Configuration Manager, see http://technet.microsoft.com/en-us/library/gg682187.aspx.
Create the build and capture task sequence
In the following example, you create a build and capture task sequence for Tailspin Toys. If a reference image does not already exist, the build and capture task sequence is the first step to take. This task sequence builds a Windows 8.1 reference image.
1. In the Configuration Manager console, click the Software Library workspace.
2. In the left pane, expand Operating Systems.
3. Right-click Task Sequences and then click Create Task Sequence.
4. On the Create New Task Sequence page, select Build And Capture A Reference Operating System Image and then click Next.
5. On the Task Sequence information page, as shown in Figure 3-17, enter a name in the Task Sequence Name text box and then select your boot image. Click Next.
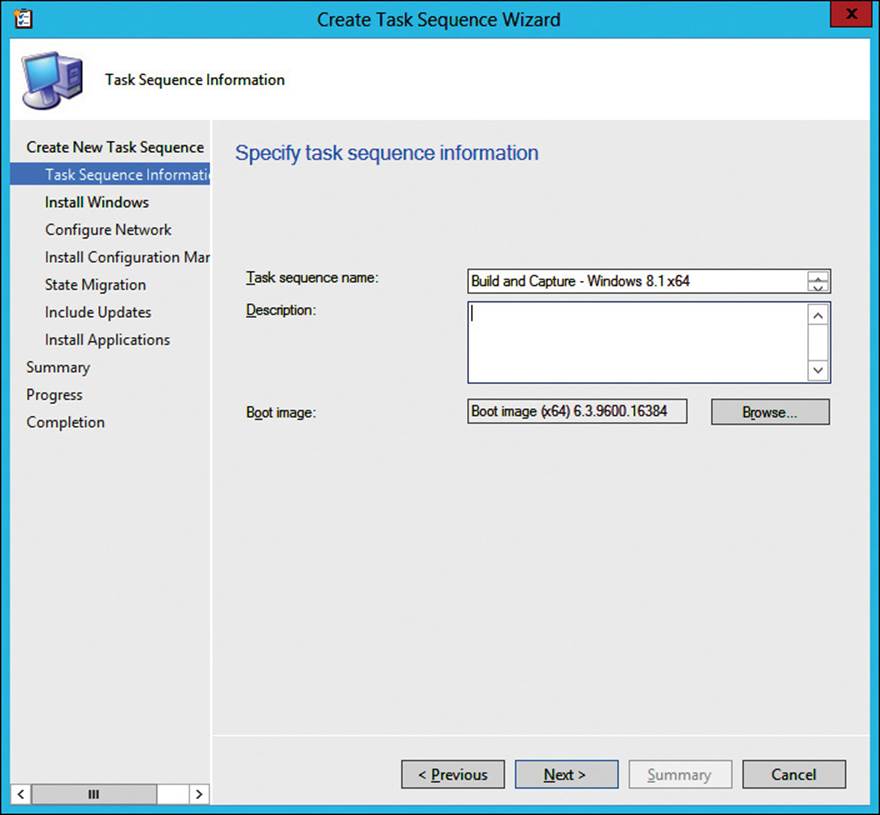
FIGURE 3-17 Create Task Sequence Wizard, Task Sequence Information page
6. On the Install Windows page, as shown in Figure 3-18, click Browse and select the Windows 8.1 operating system image that you imported. Under Specify The Licensing Information For The Windows Installation, enter your product key.
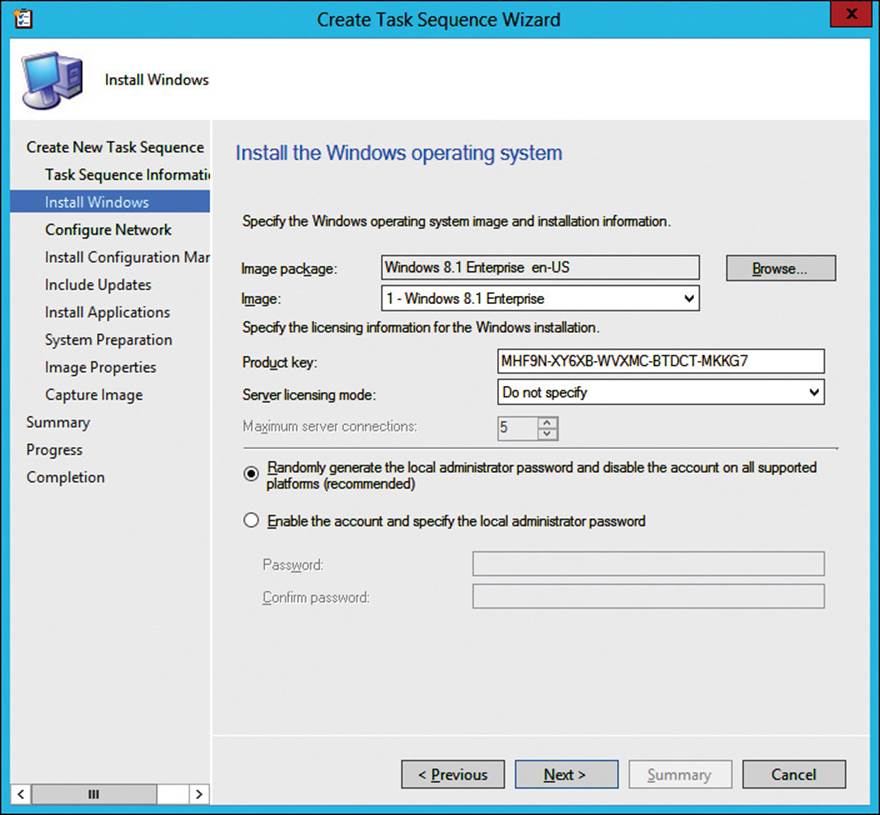
FIGURE 3-18 Create Task Sequence Wizard, Install Windows page
In this example, the Windows 8.1 KMS key has been entered. The last section on this page deals with the local administrator account. The password has been randomly generated and the account disabled. Instead of using the built-in Administrator account, you should create a new local administrator account with a different name, which you can do later in your deployment task sequence.
7. On the Configure Network page, select Join A Workgroup and type workgroup as the name.
If your deployment will be captured, you should not join a domain at this time. Joining a domain might alter the operating system configuration because the computer will then be subject to any applicable Group Policy Objects (GPOs). Click Next.
8. On the Install Configuration Manager page, leave the default package and click Next.
9. On the Include Updates page, select Do Not Install Any Software Updates and then click Next.
10. On the Install Applications page, add any applications that you want to include in the reference image. For this example, don’t install any applications. Click Next.
11. On the System Preparation page, click Next.
12. On the Image Properties page, fill in the requested criteria and then click Next.
13. On the Capture Image page, as shown in Figure 3-19, specify the UNC path, including the name of the image file where the image capture will be saved, along with an account that has permission to write to this directory. Click Next.
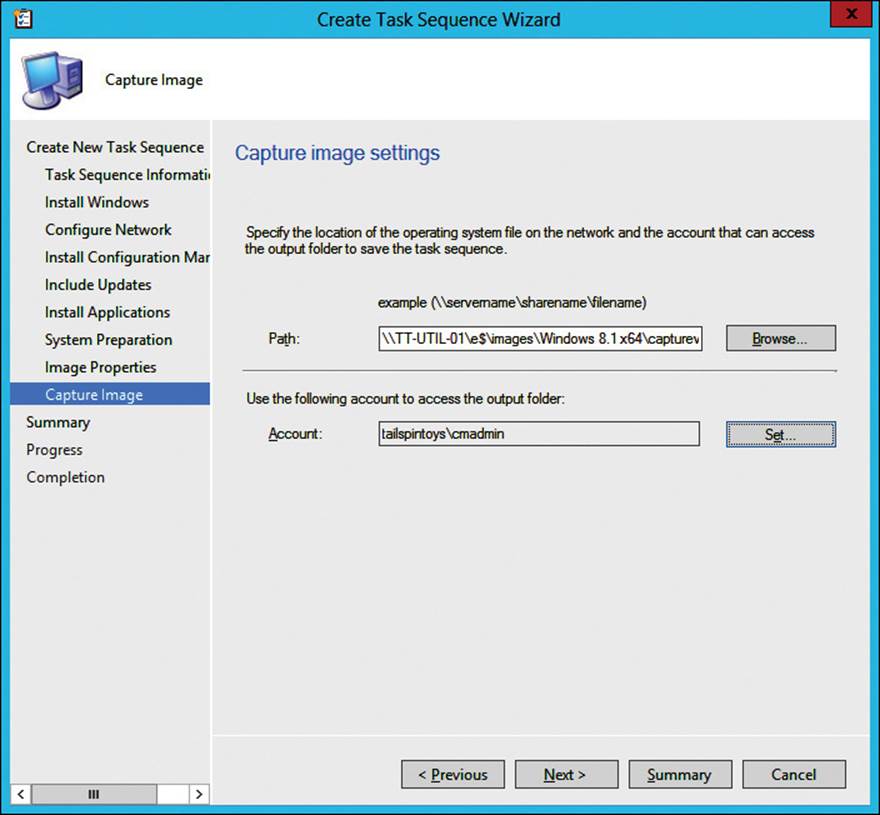
FIGURE 3-19 Create Task Sequence Wizard, Capture Image page
14. On the Summary page, confirm the configuration and then click Next.
15. On the Completion page, click Close.
Deploy the build and capture task sequence
Next, you must deploy the task sequence to a reference computer so the image can be installed, captured, and saved to the path provided in the preceding steps. Perform the following steps to deploy the task sequence:
1. Right-click the new task sequence and click Deploy.
2. On the General page of the Deploy Software Wizard, as shown in Figure 3-20, browse to the collection that contains your reference computer. If your reference computer has not been added to Configuration Manager, you can target the All Unknown Computers collection. Click Next.
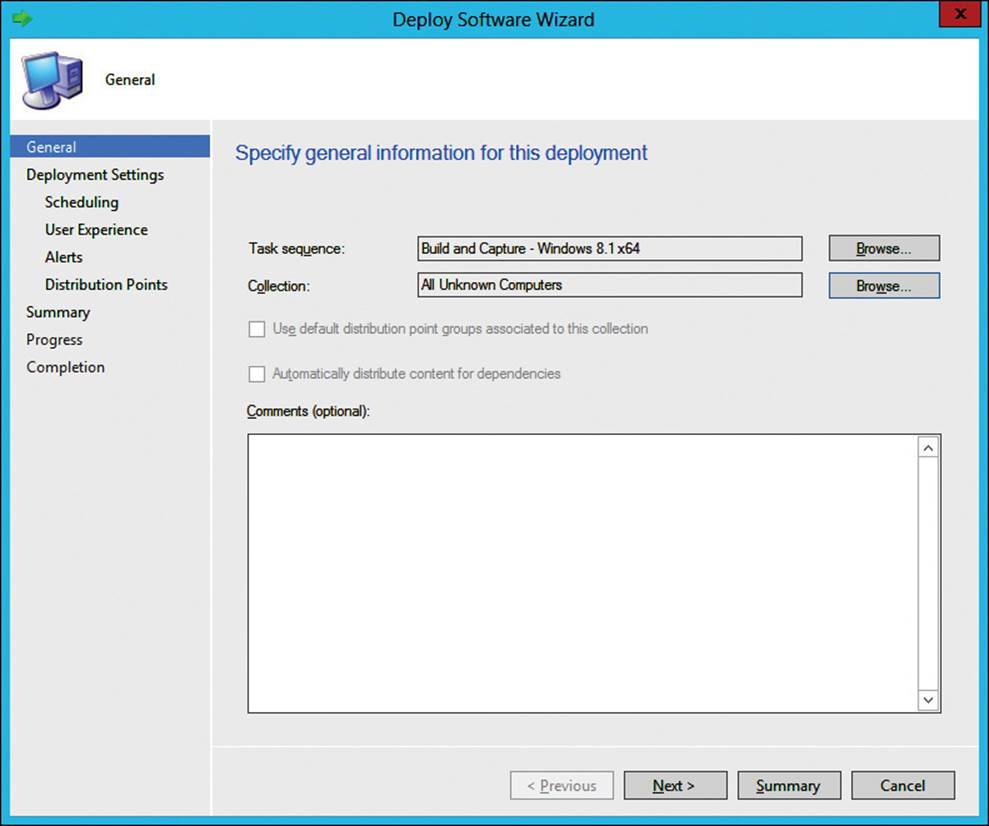
FIGURE 3-20 Deploy Software Wizard, General page
3. On the Deployment Settings page, as shown in Figure 3-21, set Purpose to Available. Set Make Available To The Following to Only Media And PXE.
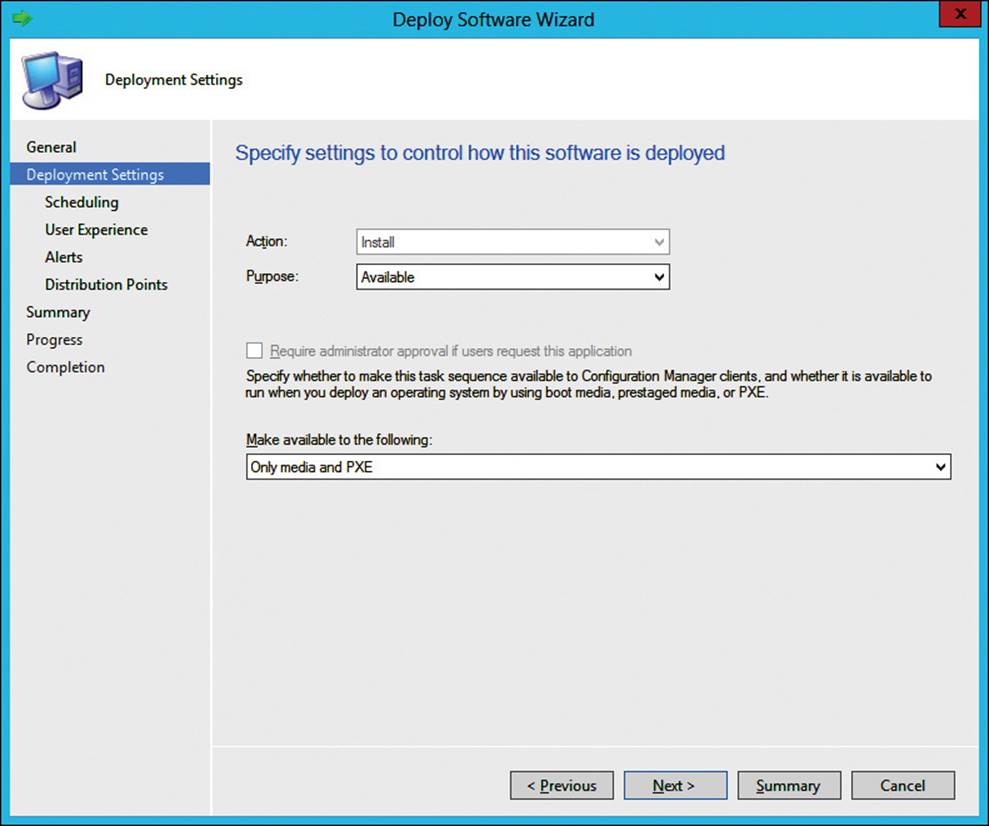
FIGURE 3-21 Deploy Software Wizard, Deployment Settings page
These changes ensure that the deployment is not required and is only available to clients booting from the network or local media. This can help prevent accidental reimaging of client computers.
4. On the Scheduling page, click Next. This makes the deployment available immediately.
5. On the User Experience page, click Next.
The default options are suitable for a build and capture.
6. On the Alerts page, click Next.
7. On the Distribution Points page, click Next.
The default options are suitable for a build and capture.
8. On the Summary page, confirm the configuration and then click Next.
9. On the Completion page, click Close.
Run the build and capture task sequence
At this stage, your build and capture task sequence has been deployed. You can now boot your reference computer by using PXE or local media. After the computer boots into the Create Task Sequence Wizard, the workflow will consist of the following steps:
1. Select the Build And Capture task sequence and click Next.
The Windows 8.1 operating system will be downloaded and installed on the reference computer, along with the settings, updates, and applications that you specified when creating the task sequence. Configuration Manager captures the reference computer and uploads the .wim file to the provided UNC path.
2. When uploaded, you can use the Create Task Sequence Wizard again to create another task sequence for installing the new reference image.
More Info: Understanding Task Sequence Variables
Task sequence variables are a powerful addition to any deployment, enabling you to store relative information and call it when needed. For more information about the available task sequence variables, see http://technet.microsoft.com/en-us/library/gg712685.aspx.
Managing the driver pool
Device drivers are a key component to any ZTI deployment, and Configuration Manager is a tool that excels at managing drivers. The driver pool, also referred to as the driver catalog, stores all your hardware drivers in a single location. By using category assignments and some basic Windows Management Instrumentation (WMI) filters, you can ensure that your task sequence assigns the appropriate drivers to each of the hardware models you support.
The device driver life cycle includes the following items:
![]() Retrieving the drivers First and foremost, you need access to the raw hardware drivers. Most manufacturers today offer precompiled driver packages. Alternatively, you can look at third-party solutions for extracting drivers from an active host.
Retrieving the drivers First and foremost, you need access to the raw hardware drivers. Most manufacturers today offer precompiled driver packages. Alternatively, you can look at third-party solutions for extracting drivers from an active host.
![]() Importing the drivers The drivers must be imported into the driver catalog. Configuration Manager needs the drivers in the database before you can do anything with them.
Importing the drivers The drivers must be imported into the driver catalog. Configuration Manager needs the drivers in the database before you can do anything with them.
![]() Assigning categories Categories are an administrative tool in Configuration Manager that you can use to organize and manage drivers. You can assign categories during the driver import, or you can assign and manage categories after drivers are imported. Assigning information such as the hardware model number can help with building driver packages and maintaining a manageable driver catalog.
Assigning categories Categories are an administrative tool in Configuration Manager that you can use to organize and manage drivers. You can assign categories during the driver import, or you can assign and manage categories after drivers are imported. Assigning information such as the hardware model number can help with building driver packages and maintaining a manageable driver catalog.
![]() Creating driver packages Driver packages contain a set of predefined drivers based on your selections. A good practice is to create a driver package based on hardware model.
Creating driver packages Driver packages contain a set of predefined drivers based on your selections. A good practice is to create a driver package based on hardware model.
![]() Updating boot images After the drivers are in the database, you might need to add some to your boot image, such as a network card driver or a storage driver. Without these drivers in your boot image, you might experience issues using the boot image on certain hardware.
Updating boot images After the drivers are in the database, you might need to add some to your boot image, such as a network card driver or a storage driver. Without these drivers in your boot image, you might experience issues using the boot image on certain hardware.
![]() Updating the task sequence Start integrating those hardware drivers with your task sequence.
Updating the task sequence Start integrating those hardware drivers with your task sequence.
![]() Managing the drivers Over time, you will want to add, update, or remove drivers.
Managing the drivers Over time, you will want to add, update, or remove drivers.
Importing device drivers and creating packages
In the following example, you import a new set of hardware drivers for an HP EliteBook 8470p portable computer. These drivers were captured from one of Tailspin Toys’ client computers. The drivers will be imported, added to a package, and included in a preexisting Windows 8.1 task sequence.
1. In the Configuration Manager console, click the Software Library workspace.
2. In the left pane, expand Operating Systems.
3. Right-click Drivers and then click Import Driver.
4. On the Locate Driver page of the Import New Driver Wizard, enter the full UNC path to the drivers that you are importing, as shown in Figure 3-22. Leave the default option for duplicate drivers enabled and then click Next.
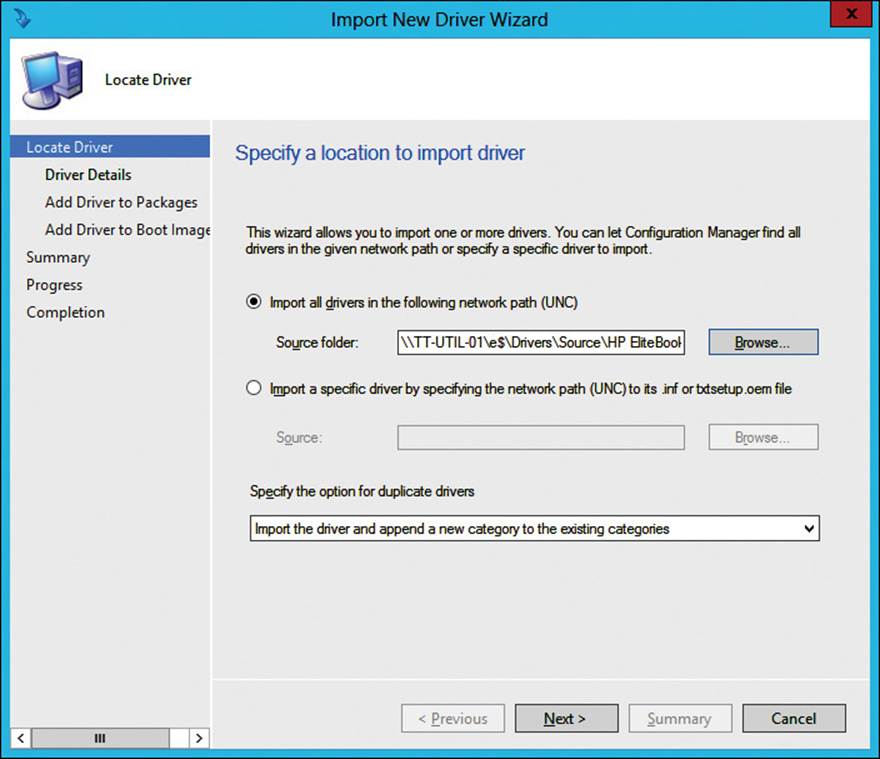
FIGURE 3-22 Import New Driver Wizard, Locate Driver page
5. On the Driver Details page, confirm that the drivers you want to import are listed in the top section.
6. Click the Categories button to create a new category for the drivers you are importing.
7. Click Create and type the name for the new driver category. Refer to Figure 3-23 for the driver import summary and click Next.
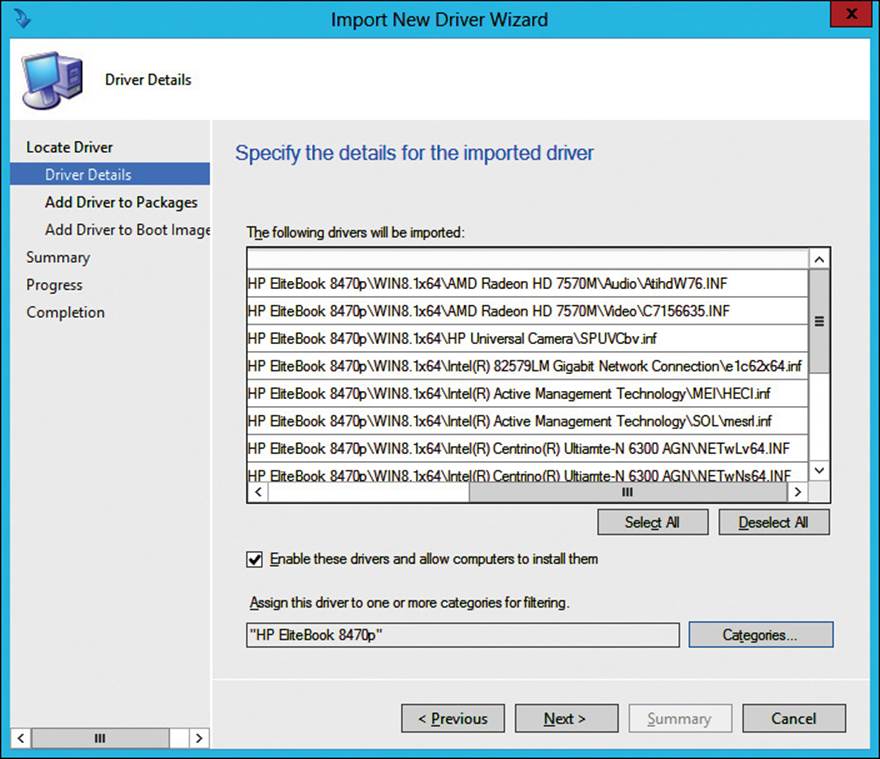
FIGURE 3-23 Import New Driver Wizard, Driver Details page
8. On the Add Driver To Packages page, click New Package. Name the package accordingly and provide the full UNC path to the packages folder that Configuration Manager will use to store the drivers, as shown in Figure 3-24. Click OK to create the package. Click Next.
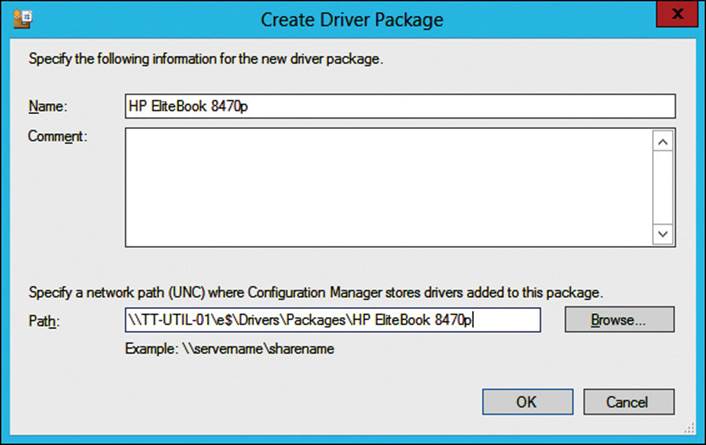
FIGURE 3-24 Import New Driver Wizard, Create Driver Package window
9. On the Add Driver To Boot Image page, click Next.
In this example, these drivers do not need to be added to boot images.
10. On the Summary page, confirm your configuration and then click Next.
11. On the Completion page, click Close.
Note: Import Drivers with Windows PowerShell
Use the Import-CMDriver cmdlet to import new drivers by using Windows PowerShell. For example, to import a new USB driver, run the following command.
Import-CMDriver -UncFileLocation "\\TT-CONFIGMGR-01\E$\Source Files\Drivers
\Source\USB3\iusb3xhc.inf" -ImportDuplicateDriverOption OverwriteCategory
-EnableAndAllowInstall $True"
After the process completes, the following items should now appear in the Configuration Manager console:
![]() The new hardware drivers are recorded in the catalog. They are visible when selecting the Drivers node in the left pane.
The new hardware drivers are recorded in the catalog. They are visible when selecting the Drivers node in the left pane.
![]() A corresponding category is assigned to the new hardware drivers, also visible from the Drivers node. As more drivers are added, these categories keep things organized.
A corresponding category is assigned to the new hardware drivers, also visible from the Drivers node. As more drivers are added, these categories keep things organized.
![]() A new driver package is created that includes the drivers you imported. Packages are visible when selecting the Driver Packages node in the left pane.
A new driver package is created that includes the drivers you imported. Packages are visible when selecting the Driver Packages node in the left pane.
More Info: Planning a Device Driver Strategy
For more information about managing your device driver strategy, see http://technet.microsoft.com/en-us/library/gg712674.aspx.
Distributing driver packages
Distribute the driver package to your distribution point so you can start using these drivers in your task sequence.
1. Select the Driver Packages node in the left pane.
2. Right-click the new driver package and then click Distribute Content.
3. On the General page of the Distribute Content Wizard, click Next.
4. On the Content Destination page, click Add and then click Distribution Point. Select the desired distribution point and then click OK. Click Next.
5. On the Summary page, confirm your selections and then click Next.
6. On the Completion page, click Close.
Managing drivers
The steps in the previous section demonstrated how to import new drivers into your environment. Now you need to understand how to manage existing drivers, as shown in the following tasks:
![]() Updating driver packages and boot images This includes adding and removing drivers to and from packages and boot images.
Updating driver packages and boot images This includes adding and removing drivers to and from packages and boot images.
![]() Updating categories Categories are a key tool for keeping drivers organized and manageable.
Updating categories Categories are a key tool for keeping drivers organized and manageable.
![]() Removing drivers from the catalog Over time, drivers need to be updated. Leaving outdated drivers in the catalog adds unwanted bloat and makes things difficult to navigate.
Removing drivers from the catalog Over time, drivers need to be updated. Leaving outdated drivers in the catalog adds unwanted bloat and makes things difficult to navigate.
![]() Enabling and disabling drivers.
Enabling and disabling drivers.
To update existing driver packages, perform the following steps:
1. Select the Drivers node in the left pane.
2. Locate the desired driver by using the search field or filtering options in the main window of the management console.
3. Right-click the driver, highlight Edit, and then click Driver Packages. Refer to Figure 3-25 for reference.
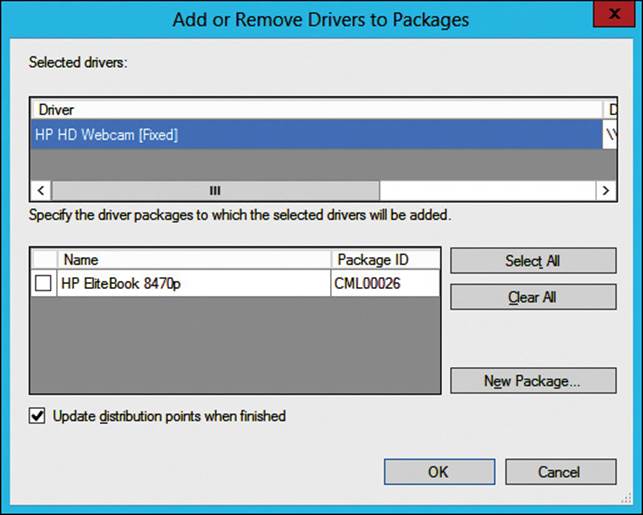
FIGURE 3-25 Add Or Remove Drivers To Packages dialog box
4. Locate the driver package that you need to update.
![]() Selecting the box for that package adds the driver.
Selecting the box for that package adds the driver.
![]() Clearing the box removes the driver.
Clearing the box removes the driver.
![]() Clicking the New Package button prompts you to create a new package.
Clicking the New Package button prompts you to create a new package.
![]() Choosing the Update Distribution Points check box immediately pushes these changes to all the corresponding distribution points for this driver package.
Choosing the Update Distribution Points check box immediately pushes these changes to all the corresponding distribution points for this driver package.
5. Click OK to apply the changes.
To update boot images, perform the following steps:
1. Click the Drivers node in the left pane.
2. Locate the desired driver by using the search field or filtering options in the main window of the management console.
3. Right-click the driver, highlight Edit, and select Boot Images. Refer to Figure 3-26 for reference.
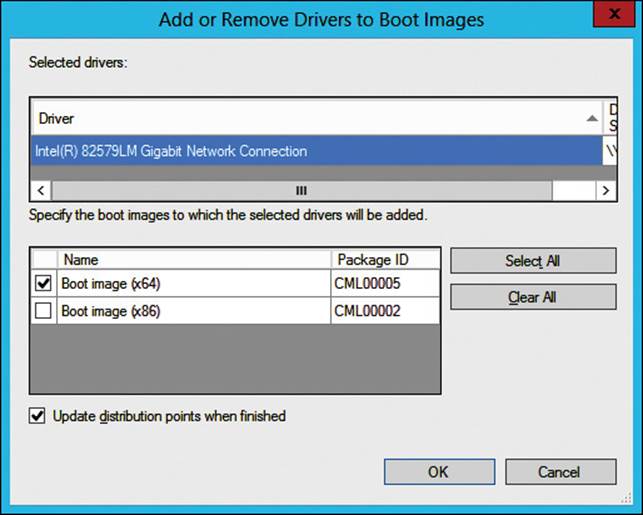
FIGURE 3-26 Add Or Remove Drivers To Boot Images dialog box
4. Locate the boot image you need to update.
![]() Selecting the box for that boot image adds the driver.
Selecting the box for that boot image adds the driver.
![]() Clearing the box removes the driver.
Clearing the box removes the driver.
![]() Selecting the Update Distribution Points check box immediately pushes the changes to all the corresponding distribution points for this boot image.
Selecting the Update Distribution Points check box immediately pushes the changes to all the corresponding distribution points for this boot image.
5. Click OK to apply the changes.
To update driver categories, perform the following steps:
1. Click the Drivers node in the left pane.
2. Locate the desired driver by using the search field or filtering options in the main window of the management console.
3. Right-click the driver, highlight Categorize, and then click Manage Categories. See Figure 3-27 for reference.
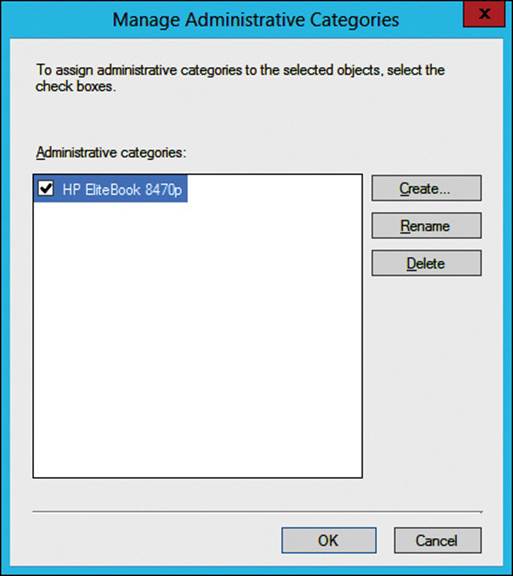
FIGURE 3-27 Manage Administrative Categories dialog box
4. Locate the category you need to update and take the appropriate actions:
![]() Selecting the check box for that category adds the driver.
Selecting the check box for that category adds the driver.
![]() Clearing or not selecting the check box removes the driver.
Clearing or not selecting the check box removes the driver.
![]() Clicking Create prompts you to create a new category.
Clicking Create prompts you to create a new category.
![]() Clicking Rename enables you to rename an existing category.
Clicking Rename enables you to rename an existing category.
![]() Clicking Delete deletes a current category and all driver associations.
Clicking Delete deletes a current category and all driver associations.
5. Click OK to apply the changes.
To remove drivers from the catalog, perform the following steps:
1. Click the Drivers node in the left pane.
2. Locate the desired driver by using the search field or filtering options in the main window of the management console.
3. Right-click the driver and then click Delete.
4. On the Delete Driver page, click the Show Reference button to reveal any associations with existing driver packages and/or boot images. Click OK to confirm the deletion.
The selected driver will be removed from any corresponding categories, packages, and boot images.
To enable and disable drivers, perform the following steps:
1. Click the Drivers node in the left pane.
2. Locate the desired driver by using the search field or filtering options in the main window of the management console.
3. Right-click the driver.
![]() Click Disable to prevent further use.
Click Disable to prevent further use.
![]() Click Enable to resume usage.
Click Enable to resume usage.
Alternatively, use the Enable-CMDriver and Disable-CMDriver cmdlets to complete enabling and disabling drivers by using Windows PowerShell. For example, you can run the Enable-CMDriver -Name “iusb3xhc.inf” command to enable the USB driver or the Disable-CMDriver -Name “iusb3xhc.inf” command to disable the USB driver.
Managing boot and deployment images
Configuration Manager has OSD built into its framework. Part of this framework deals with image building, distribution, and deployment. As an OSD administrator, it will be your responsibility also to manage the images. There are two basic types of images to manage:
![]() Boot images Used to boot a client computer into Windows PE. Windows PE provides a lightweight environment, separate from whatever is installed on the local disk. This enables you to complete system-wide changes such as reformatting a system and installing Windows 8.1. In Configuration Manager, two boot images come preloaded during the initial product installation, specifically x86 and x64. Boot images are usually identified as boot.wim files. The out-of-box images are stored under \Microsoft Configuration Manager\OSD\boot and will be visible in the management console.
Boot images Used to boot a client computer into Windows PE. Windows PE provides a lightweight environment, separate from whatever is installed on the local disk. This enables you to complete system-wide changes such as reformatting a system and installing Windows 8.1. In Configuration Manager, two boot images come preloaded during the initial product installation, specifically x86 and x64. Boot images are usually identified as boot.wim files. The out-of-box images are stored under \Microsoft Configuration Manager\OSD\boot and will be visible in the management console.
![]() Deployment images Complete operating system images, whether direct from the installation media or a reference image that has been imported. Deployment images are called from within a task sequence by using Apply Operating System Image. The image is then downloaded from the local distribution point and installed on the client computer.
Deployment images Complete operating system images, whether direct from the installation media or a reference image that has been imported. Deployment images are called from within a task sequence by using Apply Operating System Image. The image is then downloaded from the local distribution point and installed on the client computer.
With every major release of Configuration Manager, the built-in boot images are upgraded to the latest available version. You will experience issues trying to deploy Windows 8.1 with an incompatible boot image.
![]() Configuration Manager 2012 includes Windows PE 3, which supports deploying Windows 7.
Configuration Manager 2012 includes Windows PE 3, which supports deploying Windows 7.
![]() Configuration Manager 2012 SP1 includes Windows PE 4, which supports deploying Windows 8.
Configuration Manager 2012 SP1 includes Windows PE 4, which supports deploying Windows 8.
![]() Configuration Manager 2012 R2 includes Windows PE 5, which supports deploying Windows 8.1.
Configuration Manager 2012 R2 includes Windows PE 5, which supports deploying Windows 8.1.
Add a boot image
As mentioned previously, the boot images are preloaded in Configuration Manager as part of the product installation. Use the following steps if you ever need to re-add the boot images.
1. In the Configuration Manager console, click the Software Library workspace.
2. In the left pane, expand Operating Systems.
3. Right-click Boot Images and then click Add Boot Image.
4. On the Data Source page of the Add Boot Image Wizard, specify the path to the boot.wim file, select the x86 or x64 architecture for your environment, select the boot image, and then click Next.
5. On the General page, enter a name, version, and comments relevant to the boot image. Click Next.
6. On the Summary page, confirm your selection and then click Next.
7. On the Completion page, click Close.
You can also use New-CMBootImage, Get-CMBootImage, Set-CMBootImage, and Remove-CMBootImage to manage boot images by using Windows PowerShell. For example:
![]() To create a new boot image named WinPE Boot Image, run the following command:
To create a new boot image named WinPE Boot Image, run the following command:
New-CMBootImage -Path "\\TT-CONFIGMGR-01\E$\SMS_SFO\osd\boot\i386\boot.wim" -Index
1 -Name "WinPE Boot Image" -Version 1.0 -Description "WinPE Boot Image x86"
![]() To retrieve the detailed properties of a boot image named WinPE Boot Image, run the following command:
To retrieve the detailed properties of a boot image named WinPE Boot Image, run the following command:
Get-CMBootImage -Name "WinPE Boot Image"
![]() To rename a boot image named WinPE Boot Image to WinPE Boot Image (x86), run the following command:
To rename a boot image named WinPE Boot Image to WinPE Boot Image (x86), run the following command:
Set-CMBootImage -Name "WinPE Boot Image" -NewName "WinPE Boot Image (x86)"
![]() To remove a boot image named WinPE Boot Image (x86), run the following command:
To remove a boot image named WinPE Boot Image (x86), run the following command:
Remove-CMBootImage -Name "WinPE Boot Image (x86)" –Confirm
Distribute a boot image
Boot images need to be distributed to all relative distribution points, the same as a standard package does.
1. Click Boot Images in the left pane.
2. Right-click the boot image in the main window and then click Distribute Content.
3. On the General page of the Distribute Content Wizard, click Next.
4. On the Content Destination page, click Add and then click Distribution Point. Mark the desired distribution point(s) and then click OK. Click Next.
5. On the Summary page, confirm your selections and then click Next.
6. On the Completion page, click Close.
Modify a boot image
After a boot image is created, additional configuration options become available. These items are accessible through the properties page of the target boot image, as shown in Figure 3-28.
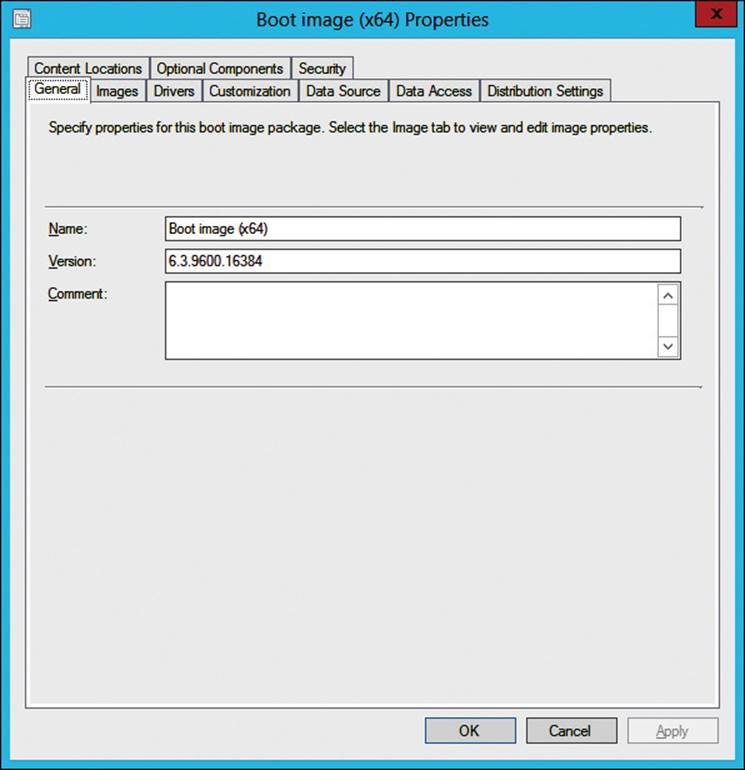
FIGURE 3-28 Boot Image (x64) Properties window
Following are a few of the property pages applicable to boot images:
![]() Images Use this tab to change the description.
Images Use this tab to change the description.
![]() Drivers Use this tab to inject any drivers available in the driver catalog.
Drivers Use this tab to inject any drivers available in the driver catalog.
![]() Customization Use this tab for the following:
Customization Use this tab for the following:
![]() Enable Prestart Command This can be a single command with the option to include files from a package. You might use a prestart command if you want to run a script or prompt for information from the Windows PE environment.
Enable Prestart Command This can be a single command with the option to include files from a package. You might use a prestart command if you want to run a script or prompt for information from the Windows PE environment.
![]() Windows PE Background This enables you to customize the default background image.
Windows PE Background This enables you to customize the default background image.
![]() Windows PE Scratch Space (MB) Scratch space is temporary space Windows PE uses to store data such as log files. In previous versions of Windows PE, before version 5.0, scratch space was set to 32 MB by default, and that often wasn’t enough space. It was often necessary to configure scratch space by setting it to 128 MB or more. Now, with Windows PE 5.0 and later, scratch space is dynamically allocated based on the amount of RAM in the computer. For computers with 1 GB or more of RAM, the scratch space is set to 512 MB.
Windows PE Scratch Space (MB) Scratch space is temporary space Windows PE uses to store data such as log files. In previous versions of Windows PE, before version 5.0, scratch space was set to 32 MB by default, and that often wasn’t enough space. It was often necessary to configure scratch space by setting it to 128 MB or more. Now, with Windows PE 5.0 and later, scratch space is dynamically allocated based on the amount of RAM in the computer. For computers with 1 GB or more of RAM, the scratch space is set to 512 MB.
![]() Enable Command Support This feature enables you to access a command prompt while inside Windows PE by pressing F8. Enabling command support is highly recommended for simplifying troubleshooting.
Enable Command Support This feature enables you to access a command prompt while inside Windows PE by pressing F8. Enabling command support is highly recommended for simplifying troubleshooting.
![]() Data Source This tab deals with the original file source and how it is distributed. The available options include the image path, image index, distribution point update schedule, and distribution options such as persisting content in the client cache, enabling binary differential replication, and enabling automatic deployment of the boot image to PXE-enabled distribution points.
Data Source This tab deals with the original file source and how it is distributed. The available options include the image path, image index, distribution point update schedule, and distribution options such as persisting content in the client cache, enabling binary differential replication, and enabling automatic deployment of the boot image to PXE-enabled distribution points.
![]() Optional Components Use this tab to add additional components to the boot image, making them available in Windows PE. Some examples include Windows PowerShell and Microsoft .NET.
Optional Components Use this tab to add additional components to the boot image, making them available in Windows PE. Some examples include Windows PowerShell and Microsoft .NET.
Add a deployment image
The first operating system image that you import into Configuration Manager will likely be from the Windows installation media. If you already have a built image, perhaps from another platform, such as Windows Deployment Services (WDS) or MDT, you can import that .wim file as well. The process is very similar to boot images, as shown in the following steps:
1. In the Configuration Manager console, click the Software Library workspace.
2. In the left pane, expand Operating Systems.
3. Right-click Operating System Images and then click Add Operating System Image.
4. On the Data Source page of the Add Operating System Wizard, specify the path to the .wim file and then click Next.
5. On the General page, enter an appropriate name and fill in the version and comments if desired. Click Next.
6. On the Summary page, confirm the selections and then click Next.
7. On the Completion page, click Close.
Distribute a deployment image
Boot images need to be distributed to all relative distribution points, just like a standard package.
1. Click Operating System Images in the left pane.
2. Right-click the operating system image in the main window and then click Distribute Content.
3. On the General page of the Distribute Content Wizard, click Next.
4. On the Content Destination page, click Add and then click Distribution Point. Mark the desired distribution point and click OK. Click Next.
5. On the Summary page, confirm the selections and then click Next.
6. On the Completion page, click Close.
Modify a deployment image
After an operating system image is imported, additional configuration options become available. These items are accessible through the Properties page of the target image, as shown in Figure 3-29.
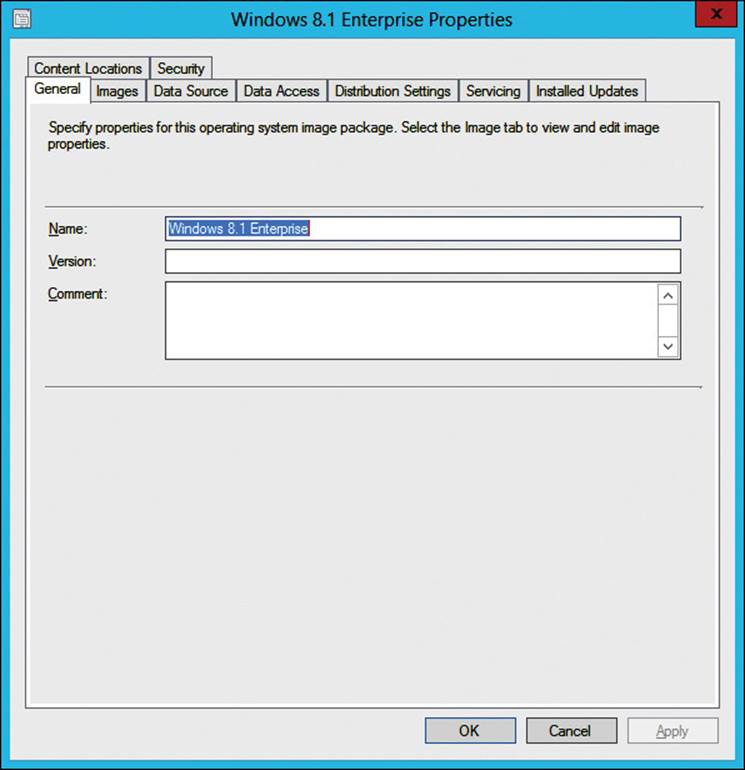
FIGURE 3-29 Operating system Properties window, General tab
Following are a few of the property pages unique to operating system images:
![]() Images Gives you the ability to change Description, Created By, and Image Version.
Images Gives you the ability to change Description, Created By, and Image Version.
![]() Data Source Deals with the original file source and how it is distributed. The available options include the image path, image index, distribution point update schedule, and distribution options such as persisting content in the client cache, enabling binary differential replication, and enabling automatic deployment of the boot image to PXE-enabled distribution points.
Data Source Deals with the original file source and how it is distributed. The available options include the image path, image index, distribution point update schedule, and distribution options such as persisting content in the client cache, enabling binary differential replication, and enabling automatic deployment of the boot image to PXE-enabled distribution points.
![]() Servicing Shows you a read-only view for any associated servicing schedules. Software updates can be scheduled to install automatically, and those entries are recorded here.
Servicing Shows you a read-only view for any associated servicing schedules. Software updates can be scheduled to install automatically, and those entries are recorded here.
![]() Installed Updates Provides a read-only view of the updates that have been installed using the scheduled updates feature.
Installed Updates Provides a read-only view of the updates that have been installed using the scheduled updates feature.
 Thought experiment: Windows 8.1 deployment at Tailspin Toys
Tailspin Toys has one office. The company has approximately 3,000 client computers, half of which are portable computers. There are several hardware vendors and multiple platforms. All client computers run Windows 7 Enterprise. A reference computer has been built and is ready for use.
The company plans to upgrade all client computers to Windows 8.1. In addition, the company is planning to roll out some new productivity applications to all employees. You plan to use the existing deployment infrastructure consisting of Configuration Manager, MDT, and WDS. To help you assess your knowledge, answer the following questions:
1. For the applications that you will deploy, you’ve specified a command to install the application. What else should you specify?
2. To simplify management of the drivers, what should you do?
3. Which task sequence template should you use to create your reference image?
Objective summary
![]() Boot images offer some unique customization options, such as command-line support for advanced troubleshooting.
Boot images offer some unique customization options, such as command-line support for advanced troubleshooting.
![]() Deployment images offer some unique customization options such as automated Windows Update servicing.
Deployment images offer some unique customization options such as automated Windows Update servicing.
![]() There are two options for deploying content to client devices: deployment packages or applications.
There are two options for deploying content to client devices: deployment packages or applications.
![]() Deployment packages can be set up to distribute a payload of files, run a command, or both.
Deployment packages can be set up to distribute a payload of files, run a command, or both.
![]() Applications require both an install and a detection method.
Applications require both an install and a detection method.
![]() Windows PowerShell can be used to create, view, and modify programs, packages, applications, and deployment types.
Windows PowerShell can be used to create, view, and modify programs, packages, applications, and deployment types.
![]() The build and capture template is the first step to create a reference image.
The build and capture template is the first step to create a reference image.
![]() Task sequences are commonly used for deploying operating systems but are also capable of simple management tasks such as uninstalling a software update.
Task sequences are commonly used for deploying operating systems but are also capable of simple management tasks such as uninstalling a software update.
![]() The operating system image that you deploy must be compatible with the boot image that you are using. For example, if you are deploying the 32-bit version of Windows 8.1, use a 32-bit boot image.
The operating system image that you deploy must be compatible with the boot image that you are using. For example, if you are deploying the 32-bit version of Windows 8.1, use a 32-bit boot image.
![]() The driver catalog uses categories to organize content.
The driver catalog uses categories to organize content.
![]() Driver packages can be created and modified through the Import Driver Wizard or on a per-driver basis through the driver catalog.
Driver packages can be created and modified through the Import Driver Wizard or on a per-driver basis through the driver catalog.
Objective review
Answer the following questions to test your knowledge of the information in this objective. You can find the answers to these questions and explanations of why each answer choice is correct or incorrect in the “Answers” section at the end of this chapter.
1. You are beginning a large migration to Windows 8.1. The deployment will be auto-mated by using Configuration Manager and WDS. You want to simplify the troubleshooting process if any issues arise during deployments. What should you do?
A. Adjust the Windows PE scratch space.
B. Enable command support.
C. Import the WDS module for Windows PowerShell.
D. Run a prestart command to launch cmd.exe.
2. You are preparing to enhance an existing Windows 8.1 deployment in Configuration Manager. You need to repartition the disks of client computers automatically before your image is deployed on them. What should you do?
A. Run a prestart command.
B. Enable command support.
C. Upon boot, press F8 and then manually repartition the disks.
D. Use an operating system install package.
3. You’ve just updated the source files for a package. You need to ensure that the updated files are used. What should you do?
A. Validate the content on the distribution point.
B. Set the content validation job to run at the highest priority.
C. Redistribute the content on the distribution point.
D. Run the Add-Content Windows PowerShell command.
Objective 3.2: Configure distribution points
Distribution points are a foundational technology of Configuration Manager. Without them, most of the functionality in Configuration Manager is not available. To prepare for the exam and administer Configuration Manager, you must understand the role of distribution points, the different functions a distribution point can perform, and how and when to group distribution points. Finally, you have to understand how to configure distribution points based on specific organizational requirements.
This objective covers how to:
![]() Configure unicast/multicast
Configure unicast/multicast
![]() Configure PXE
Configure PXE
![]() Configure deployments to distribution points and distribution point groups
Configure deployments to distribution points and distribution point groups
Configuring unicast and multicast
Chapter 2 covered unicast and multicast in detail. In this chapter, you configure unicast and multicast from a Configuration Manager viewpoint. Although the underlying technologies work in the same way, the configuration is completely different.
Configure unicast
The default network deployment protocol in Configuration Manager is unicast. Unlike multicast, unicast doesn’t have a dedicated configuration area in Configuration Manager. Instead, you configure settings related to deployment, and those settings are applicable to unicast and multicast. For a refresher on unicast, see the “Configuring unicast and multicast deployment methods” section in Chapter 2.
Configure multicast
From a purely protocol perspective, you learned the differences between unicast and multicast in Chapter 2. You also learned when multicast makes sense, such as in deployments that will handle a large number of simultaneous installations. In this section, you walk through the configuration tasks related to multicast.
More Info: Multicast Versus Broadcast
Broadcast traffic is sent to all hosts on a network. Multicast traffic is sent only to specific hosts on a network. In the case of operating system deployments, multicast traffic only goes to multicast clients that have joined a multicast transmission.
The first step in configuring multicast in Configuration Manager is the enabling step. By default, multicast is not enabled. Walk through the Multicast tab that is on the Distribution point Properties page as shown in Figure 3-30.
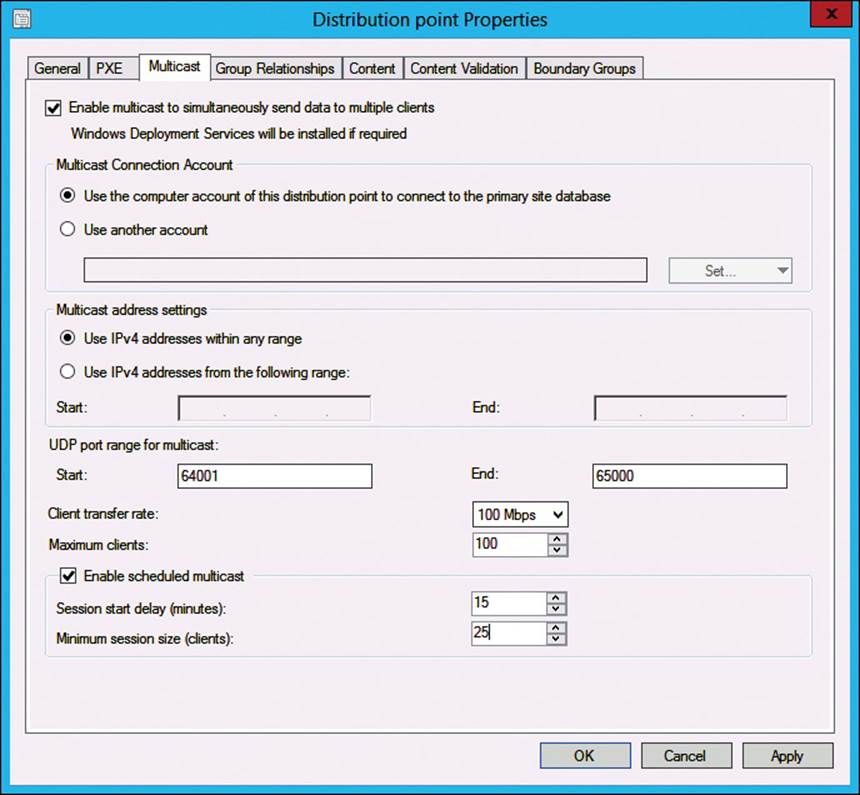
FIGURE 3-30 Distribution Point Properties window, Multicast tab
There are several configurable areas of the Multicast tab, as follows:
![]() Enable Multicast Enable this option first. By doing so, you unlock the rest of the configurable settings. Note that if WDS is not already installed on the server, it will be automatically added when multicast is enabled.
Enable Multicast Enable this option first. By doing so, you unlock the rest of the configurable settings. Note that if WDS is not already installed on the server, it will be automatically added when multicast is enabled.
![]() Multicast Connection Account By default, the computer account of the distribution point server connects to the primary site database. You can configure another account, such as a user account, instead. However, it is a good practice to leave this at the default setting because the only time this account is needed is when communicating with a remote site database in an untrusted forest.
Multicast Connection Account By default, the computer account of the distribution point server connects to the primary site database. You can configure another account, such as a user account, instead. However, it is a good practice to leave this at the default setting because the only time this account is needed is when communicating with a remote site database in an untrusted forest.
![]() Multicast Address Settings By default, IP addresses will be used within any multicast range. The multicast range is 239.0.0.0 to 239.255.255.255. However, if you have other multicasting activities on your network, you can narrow the IP address range so that there aren’t any conflicts.
Multicast Address Settings By default, IP addresses will be used within any multicast range. The multicast range is 239.0.0.0 to 239.255.255.255. However, if you have other multicasting activities on your network, you can narrow the IP address range so that there aren’t any conflicts.
![]() UDP Port Range for Multicast The default starting port is 64001, and the default ending port is 65000. Unless these ports are conflicting with other network activity on your network, you should keep the port range at the default setting.
UDP Port Range for Multicast The default starting port is 64001, and the default ending port is 65000. Unless these ports are conflicting with other network activity on your network, you should keep the port range at the default setting.
![]() Client Transfer Rate The client transfer rate is set to 100 megabits per second by default. You can customize this setting to a value that is appropriate for your environment.
Client Transfer Rate The client transfer rate is set to 100 megabits per second by default. You can customize this setting to a value that is appropriate for your environment.
![]() Maximum Clients By default, up to 100 multicast clients can participate in a multicast stream. You can adjust this up or down, based on your use case. If you plan to image a large number of computers simultaneously, you should test some deployments while monitoring your network and distribution point server performance. After you’ve gathered the performance data, you can adjust the maximum number of clients to a level that allows the service to operate at maximum performance.
Maximum Clients By default, up to 100 multicast clients can participate in a multicast stream. You can adjust this up or down, based on your use case. If you plan to image a large number of computers simultaneously, you should test some deployments while monitoring your network and distribution point server performance. After you’ve gathered the performance data, you can adjust the maximum number of clients to a level that allows the service to operate at maximum performance.
![]() Enable Scheduled Multicast Similar to WDS Scheduled-Cast, you can schedule a multicast deployment. You can choose to wait for a specific number of clients before starting, or you can wait a specific amount of time before starting.
Enable Scheduled Multicast Similar to WDS Scheduled-Cast, you can schedule a multicast deployment. You can choose to wait for a specific number of clients before starting, or you can wait a specific amount of time before starting.
In addition to the Multicast tab, you must also configure your operating system images for multicast deployment, as shown in Figure 3-31.
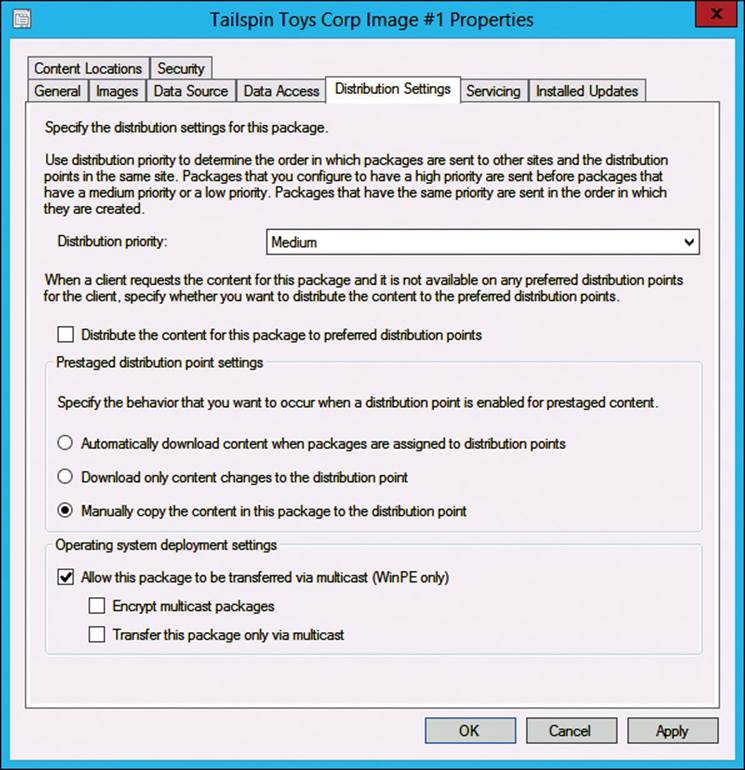
FIGURE 3-31 Operating system image Properties, Distribution Settings tab
After you’ve enabled Allow This Package To Be Transferred Via Multicast (WinPE Only) on an image, there are two import settings that you should be aware of when configuring an operating system image for multicast:
![]() Encrypt Multicast Packages You can encrypt multicast packages. This option is useful in high-security environments where confidential or sensitive information is present in your operating system image.
Encrypt Multicast Packages You can encrypt multicast packages. This option is useful in high-security environments where confidential or sensitive information is present in your operating system image.
![]() Transfer This Package Only Via Multicast You can limit the use of the package to just multicast. This prevents the image from being deployed outside of a multicast deployment.
Transfer This Package Only Via Multicast You can limit the use of the package to just multicast. This prevents the image from being deployed outside of a multicast deployment.
Configuring PXE
Preboot Execution Environment (PXE) is an industry-standard method to boot computers from the network instead of by the traditional approach of booting computers to a locally installed operating system. PXE is most often used as a way to deploy operating system images to computers over the network without using media. You can take advantage of PXE in WDS deployments and in Configuration Manager deployments. By default, PXE is not enabled on distribution points.
To use PXE for your deployments, enable PXE and configure the PXE options. You can enable and configure PXE on the PXE tab of the Distribution Point Properties page, as shown in Figure 3-32.
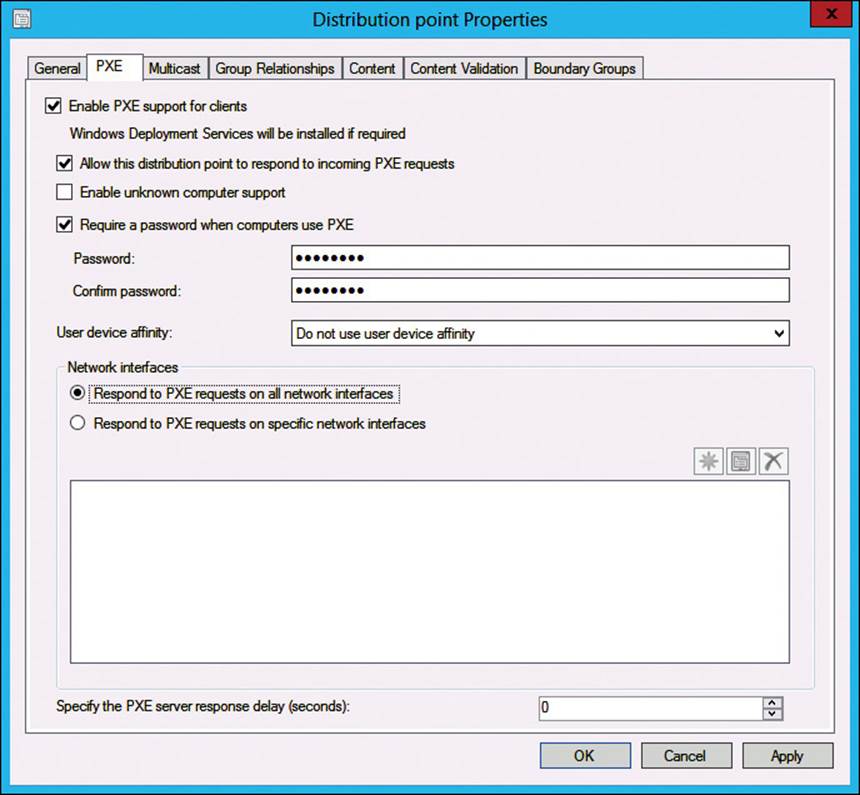
FIGURE 3-32 Distribution Point Properties window, PXE tab
There are several configuration items on the PXE tab, as follows:
![]() Enable PXE Support For Clients Select this option to enable PXE. This is the first step in your PXE configuration because the rest of the PXE configuration items are not modifiable until PXE is enabled. Note that WDS, if not already installed, will be automatically installed when PXE is first enabled.
Enable PXE Support For Clients Select this option to enable PXE. This is the first step in your PXE configuration because the rest of the PXE configuration items are not modifiable until PXE is enabled. Note that WDS, if not already installed, will be automatically installed when PXE is first enabled.
![]() Allow This Distribution Point To Respond To Incoming PXE Requests Use this setting to halt PXE responses temporarily on a distribution point. Alternatively, you can disable PXE support.
Allow This Distribution Point To Respond To Incoming PXE Requests Use this setting to halt PXE responses temporarily on a distribution point. Alternatively, you can disable PXE support.
![]() Enable Unknown Computer Support Use this option to enable deployments to computers that are not managed by Configuration Manager. If you plan to deploy only to computers that are already managed by Configuration Manager, you should not enable unknown computer support. Enabling unknown computer support reduces the security of your environment because it opens up the imaging process potentially to any computer and any users, depending on the configured permissions. In most environments, only authorized IT staff should perform computer imaging.
Enable Unknown Computer Support Use this option to enable deployments to computers that are not managed by Configuration Manager. If you plan to deploy only to computers that are already managed by Configuration Manager, you should not enable unknown computer support. Enabling unknown computer support reduces the security of your environment because it opens up the imaging process potentially to any computer and any users, depending on the configured permissions. In most environments, only authorized IT staff should perform computer imaging.
![]() Require A Password When Computers Use PXE By default, you can boot to PXE without specifying a password. However, to restrict PXE functionality only to those who know a password, you can enable the option to require a password for PXE. This setting is most often used in high-security environments.
Require A Password When Computers Use PXE By default, you can boot to PXE without specifying a password. However, to restrict PXE functionality only to those who know a password, you can enable the option to require a password for PXE. This setting is most often used in high-security environments.
![]() User Device Affinity Use user device affinity to associate users with specific computers. You can then deploy applications to users instead of to computers. This improves the administrator user experience. There are three options for user device affinity for PXE:
User Device Affinity Use user device affinity to associate users with specific computers. You can then deploy applications to users instead of to computers. This improves the administrator user experience. There are three options for user device affinity for PXE:
![]() Do Not Use User Device Affinity (Default) With this option, you do not use user device affinity.
Do Not Use User Device Affinity (Default) With this option, you do not use user device affinity.
![]() Allow User Device Affinity With Manual Approval With this option, you have to approve user device affinity manually.
Allow User Device Affinity With Manual Approval With this option, you have to approve user device affinity manually.
![]() Allow User Device Affinity With Automatic Approval With this option, Configuration Manager automatically approves user device affinity.
Allow User Device Affinity With Automatic Approval With this option, Configuration Manager automatically approves user device affinity.
![]() Network Interfaces Listen for PXE requests on all network interface cards (NICs) or just specific NICs. This setting is useful if you have a multihomed server and want to restrict PXE to a specific NIC.
Network Interfaces Listen for PXE requests on all network interface cards (NICs) or just specific NICs. This setting is useful if you have a multihomed server and want to restrict PXE to a specific NIC.
![]() Specify The PXE Server Response Delay Use this setting when there is more than one PXE server and they are both servicing the same subnets. By adding a small delay, you can ensure that a specific PXE server handles the majority of PXE requests.
Specify The PXE Server Response Delay Use this setting when there is more than one PXE server and they are both servicing the same subnets. By adding a small delay, you can ensure that a specific PXE server handles the majority of PXE requests.
 Exam Tip
Although there are multiple ways to perform tasks in Configuration Manager, this book primarily shows you how to perform tasks in the Configuration Manager console. Instances will be pointed out when, for example, Windows PowerShell is a good alternative or even a better method. For the exam, expect some questions to ask you how to perform a task and the answer choices to present only Windows PowerShell methods. To prepare, see the Configuration Manager cmdlet reference athttp://technet.microsoft.com/library/jj821831(v=sc.20).aspx. Don’t spend time memorizing all the cmdlets, though. Instead, try using a few of them to perform routine configuration tasks.
Configuring deployments to distribution points and distribution point groups
To build and maintain an effective Configuration Manager environment, spend time planning for and configuring distribution points. Distribution points store packages. Packages contain items such as drivers, applications, operating system images, boot images, and task sequences. For this exam objective, this section is focused on OSD, so it focuses on distribution points for OSD.
Distribute operating system images to distribution points
First, walk through distributing an operating system image to a distribution point. Before you begin, make sure that you have added an existing operating system image in Configuration Manager.
1. In the Configuration Manager console, click the Software Library workspace. In the left pane, expand Operating Systems and then click Operating System Images.
2. In the right pane, right-click your operating system image and then click Distribute Content.
The Distribute Content Wizard launches, as shown in Figure 3-33.
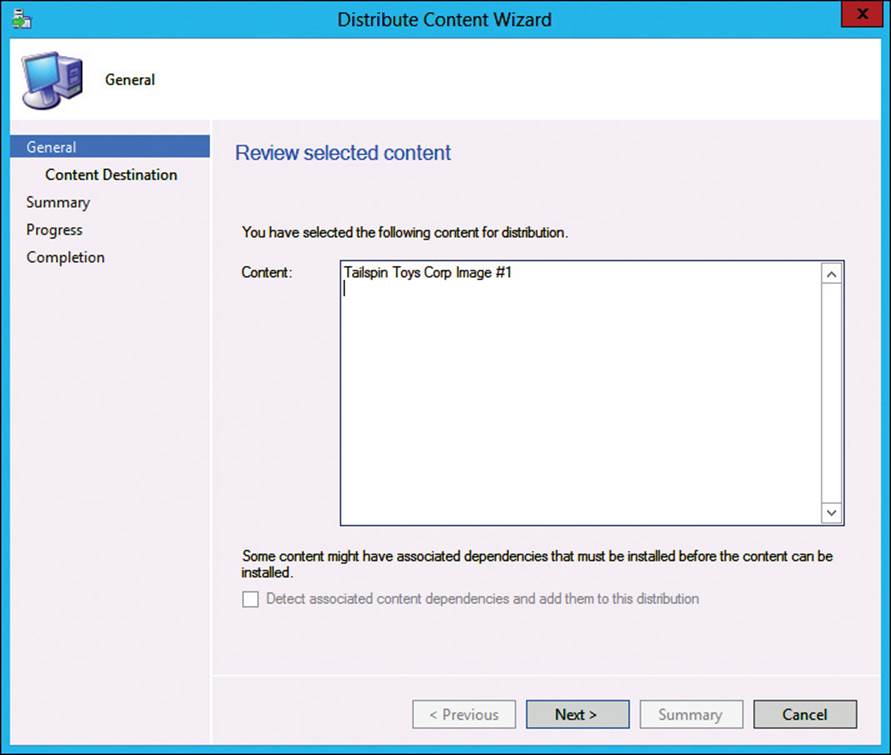
FIGURE 3-33 Distribute Content Wizard, General page
3. On the Content Destination page, as shown in Figure 3-34, click Add and then click Distribution Point.
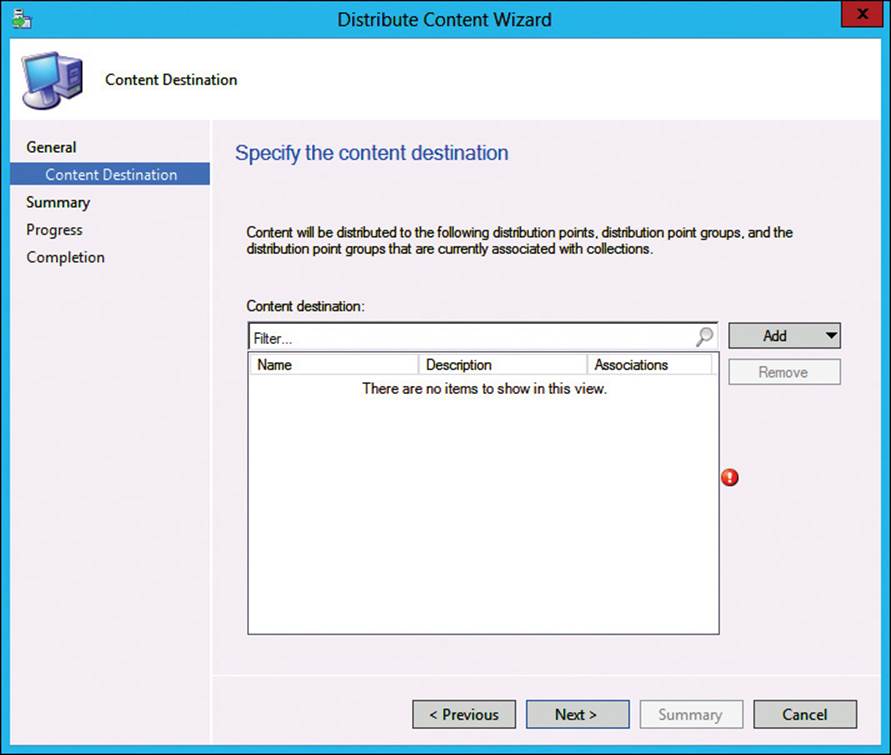
FIGURE 3-34 Distribute Content Wizard, Content Destination page
4. In the Add Distribution Points window, as shown in Figure 3-35, select the available distribution point you want to use and then click OK. If you do not see an available distribution point, check to ensure that the content is not already stored on the distribution point.
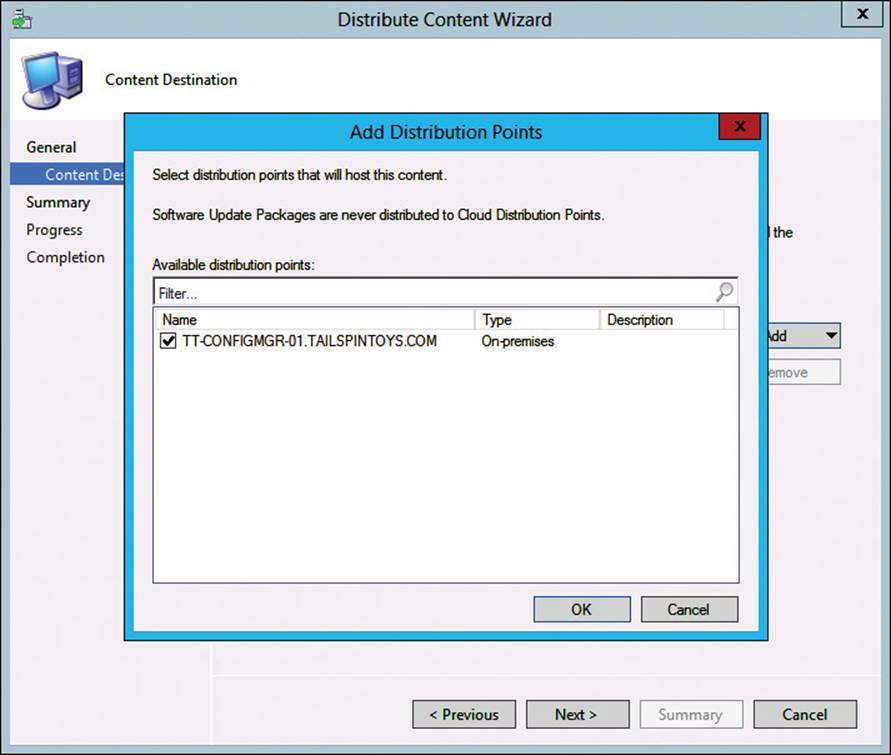
FIGURE 3-35 Distribute Content Wizard, Add Distribution Points dialog box
5. In the Summary window, as shown in Figure 3-36, validate the settings to ensure accuracy and then click Next.

FIGURE 3-36 Distribute Content Wizard, Summary page
6. On the Completion page, as shown in Figure 3-37, you should see a message indicating that the distribution was successful. Click Close to complete the wizard.
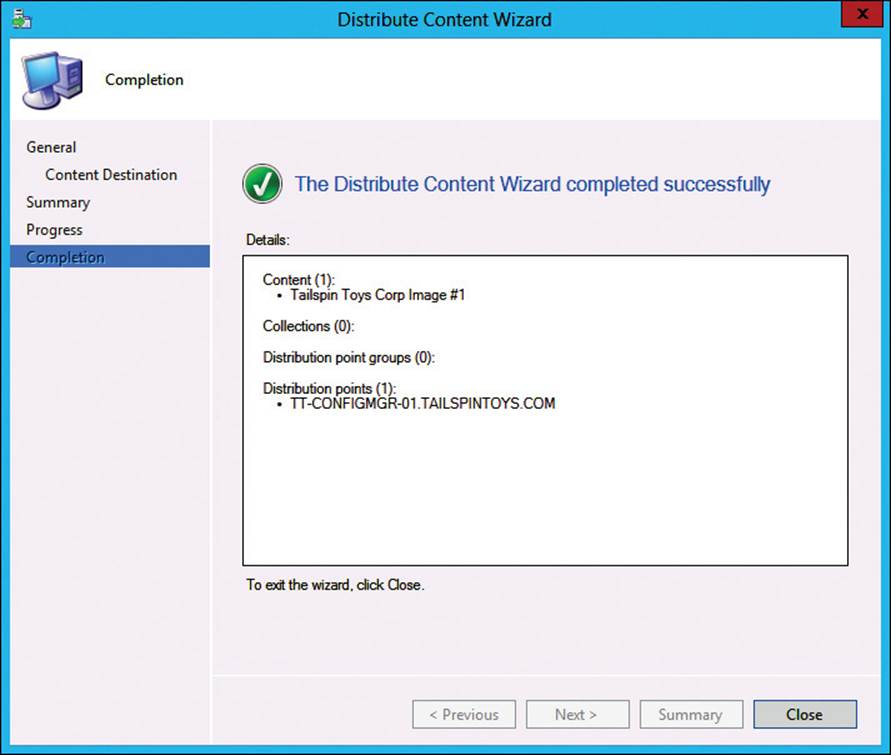
FIGURE 3-37 Distribute Content Wizard, Completion page
There are several configuration tabs for distribution points. The following section covers the remaining tabs while staying focused on OSD.
The General tab, as shown in Figure 3-38, contains a couple of settings related to OSD:
![]() BranchCache BranchCache is a Windows feature that enables more efficient use of a wide area network (WAN) by caching content locally when users or computers access content over the WAN. For deployments, it means that if you are imaging over a WAN, you can reduce the amount of network bandwidth used. After one client requests your image, the image is cached, and subsequent clients can retrieve that data on their local area network (LAN). You can take advantage of BranchCache by performing the following high-level steps:
BranchCache BranchCache is a Windows feature that enables more efficient use of a wide area network (WAN) by caching content locally when users or computers access content over the WAN. For deployments, it means that if you are imaging over a WAN, you can reduce the amount of network bandwidth used. After one client requests your image, the image is cached, and subsequent clients can retrieve that data on their local area network (LAN). You can take advantage of BranchCache by performing the following high-level steps:
A. Add the BranchCache Windows feature on your distribution point. You can add the feature by using Server Manager.
B. Enable the BranchCache feature on the clients. You can use Group Policy to enable and configure BranchCache on the clients.
C. Enable BranchCache on the distribution point.
![]() Prestaged content You can enable a distribution point for prestaged content. When you have slow WAN links and remote distribution points, prestaging content can help you avoid long delays when you need to get content to the distribution point. Instead of copying large amounts of data over a slow WAN link, you can ship data on an external hard drive to have it copied and ready for use.
Prestaged content You can enable a distribution point for prestaged content. When you have slow WAN links and remote distribution points, prestaging content can help you avoid long delays when you need to get content to the distribution point. Instead of copying large amounts of data over a slow WAN link, you can ship data on an external hard drive to have it copied and ready for use.
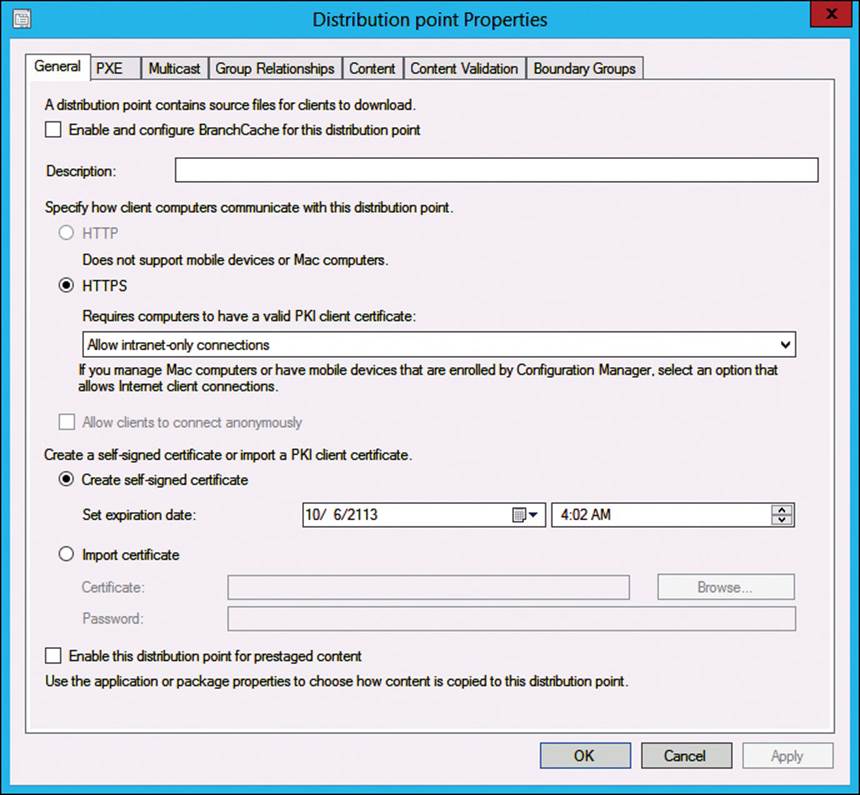
FIGURE 3-38 Distribution Point Properties window, General tab
More Info: Setting Up BranchCache
To learn more about BranchCache deployment options and how to set up BranchCache, see the Windows Server 2012 BranchCache Deployment Guide at http://www.microsoft.com/en-us/download/details.aspx?id=30418. It contains additional details not covered in this book.
The Content tab, as shown below in Figure 3-39, shows you a listing of the content on the distribution point. It includes all the deployment package types, such as packages and operating system images. You can perform three tasks from the Content tab:
![]() Validate content To validate a package, click the package in the list and then click Validate. This starts a validation job that verifies the integrity of the files. You can view the status of the job in the Monitoring workspace. Note that, by default, a content validation job runs once a week.
Validate content To validate a package, click the package in the list and then click Validate. This starts a validation job that verifies the integrity of the files. You can view the status of the job in the Monitoring workspace. Note that, by default, a content validation job runs once a week.
![]() Redistribute content To redistribute the package to the distribution point, click the Redistribute button. This action copies the files from the site server to the distribution point. The existing files are overwritten by this action. You would redistribute content to repair corrupt content.
Redistribute content To redistribute the package to the distribution point, click the Redistribute button. This action copies the files from the site server to the distribution point. The existing files are overwritten by this action. You would redistribute content to repair corrupt content.
![]() Remove content If you no longer need a package on a distribution point, you can click it in the package list and then click Remove to remove the content from the distribution point.
Remove content If you no longer need a package on a distribution point, you can click it in the package list and then click Remove to remove the content from the distribution point.
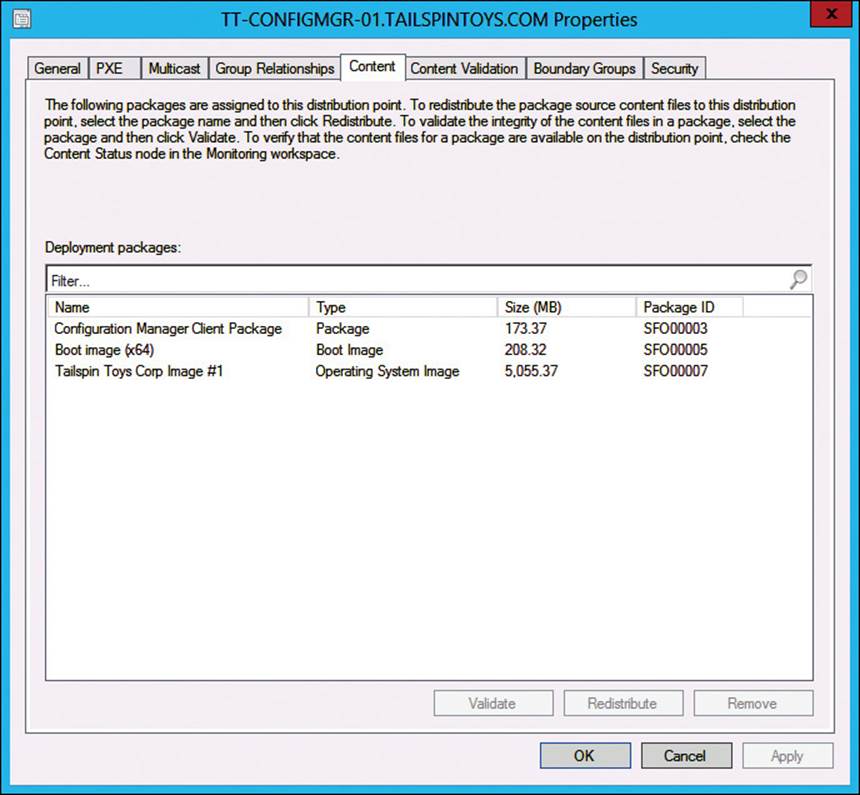
FIGURE 3-39 Distribution Point Properties window, Content tab
The Boundary Groups tab, as shown in Figure 3-40, shows the existing boundary groups. It also enables you to create new boundary groups and add existing boundary groups. A boundary group is a group of boundaries. A boundary can be a subnet, an IP address range or IPv6 prefix, or an Active Directory site. Every boundary must be assigned to a boundary group to use it. The majority of your clients will be associated with a boundary and boundary group. However, Internet clients do not use boundaries. You associate distribution points or state migration points with a boundary group. Boundary groups help internal Configuration Manager clients locate content and a site. Without the proper boundary setup, clients at a site with a distribution point might retrieve content from a remote distribution point instead of the local distribution point.
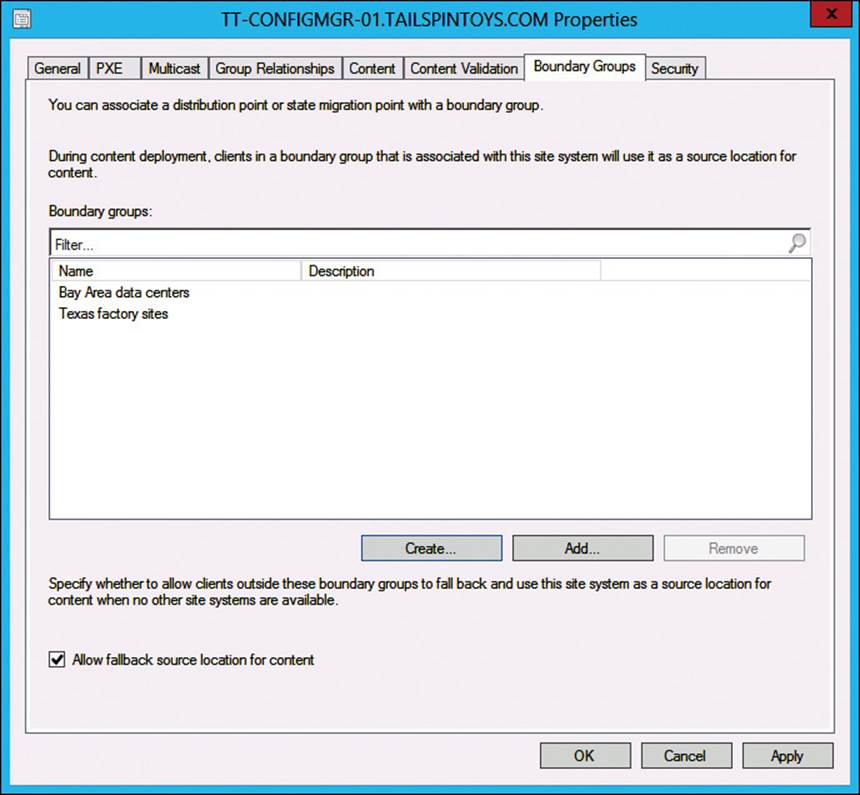
FIGURE 3-40 Distribution Point Properties window, Boundary Groups tab
More Info: Boundaries and Boundary Groups
If you haven’t worked with boundaries and boundary groups, spend a few minutes reading the “Planning for Boundaries and Boundary Groups in Configuration Manager” content at http://technet.microsoft.com/en-us/library/gg712679.aspx. It contains additional details not covered in this book.
Create and configure distribution point groups
A distribution point group is a collection of distribution points and Configuration Manager collections. A distribution point group can be created without any distribution points or collections. Distribution point groups have the following benefits:
![]() When you use a distribution point group for distribution, you can seamlessly add distribution points to the group later. When you add distribution points, they automatically receive all the content that was previously distributed to the distribution point group.
When you use a distribution point group for distribution, you can seamlessly add distribution points to the group later. When you add distribution points, they automatically receive all the content that was previously distributed to the distribution point group.
![]() When you add collections to a distribution point group, the associated distribution point members automatically receive the content whenever you distribute content to the collections.
When you add collections to a distribution point group, the associated distribution point members automatically receive the content whenever you distribute content to the collections.
![]() You can specify a single entity, in this case a distribution point group, to distribute content such as operating system images to multiple distribution points. This reduces administrative overhead in a couple of ways: you don’t have to remember all the distribution points, and you don’t have to specify multiple distribution points.
You can specify a single entity, in this case a distribution point group, to distribute content such as operating system images to multiple distribution points. This reduces administrative overhead in a couple of ways: you don’t have to remember all the distribution points, and you don’t have to specify multiple distribution points.
You can add a new distribution point group by using Windows PowerShell or by using the Configuration Manager console.
To add a new and empty distribution point group named “Sales offices” by using Windows PowerShell, run the following command:
New-CMDistributionPointGroup –Name "Sales offices"
To add a new distribution point group in the Configuration Manager console, perform the following steps:
1. Click the Administration workspace. In the left pane, expand Security, right-click Distribution Point Groups, and then click Create Group.
2. In the Create New Distribution Point Group window, shown in Figure 3-41, type a name and a description. On the Members tab, click Add. In the Add Distribution Points window, shown in Figure 3-42, select an available distribution point and then click OK.
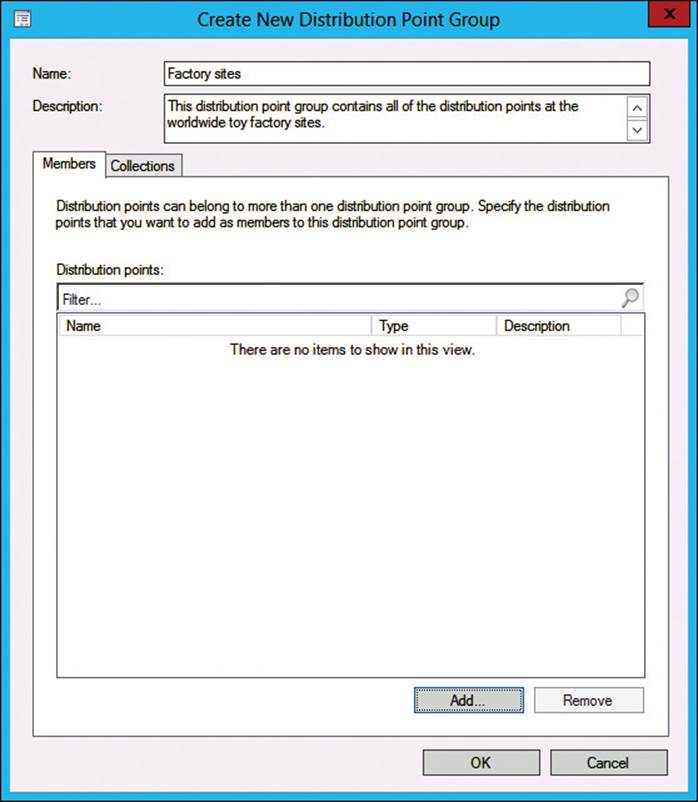
FIGURE 3-41 Create New Distribution Point Group window
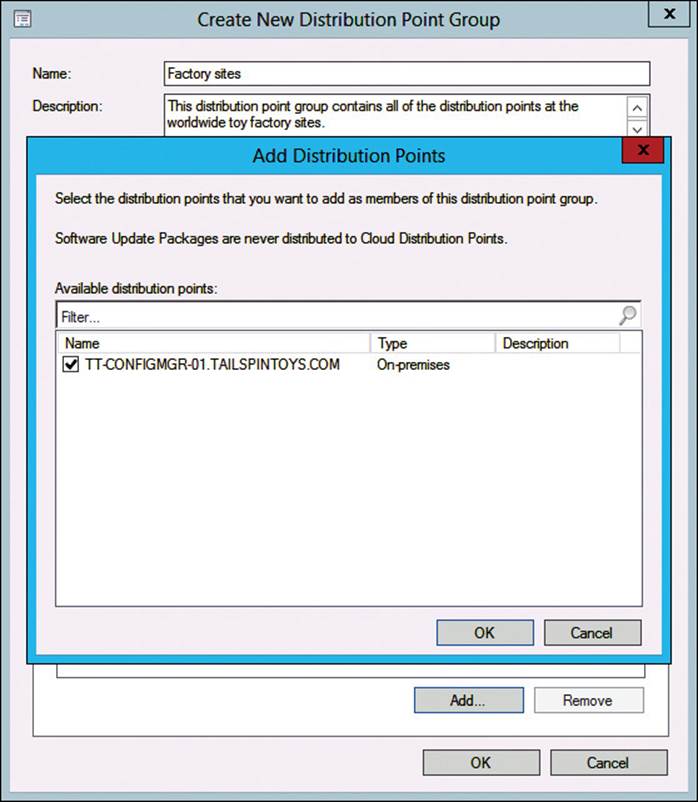
FIGURE 3-42 Add Distribution Points window
3. In the Create New Distribution Point Group window, click OK to complete the creation process. After the creation, you should see the distribution point group listed in the console.
You distribute content to distribution point groups just as you distribute content to distribution points; you use the same wizard. The only difference is that you choose a distribution group as the target.
Thought experiment: Windows 8.1 deployment at Tailspin Toys
Tailspin Toys has five offices. The main office is in San Francisco, and the other offices are in Mexico City, Houston, Miami, and Toronto. The offices are connected by a Multiprotocol Label Switching (MPLS) network. The office in Houston has a 1.5 MB connection, and the rest of the offices have a 10 MB connection. Each office has approximately 300 client computers, half of which are portable. All client computers run Windows 7 Enterprise.
The company plans to upgrade all client computers to Windows 8.1. The plan is to use five operating system images based on the specific requirements of various departments. The management team wants to automate the installation process but minimize disruption to the network. To meet the project schedule, a minimum of 10 computers a day must be imaged. In addition, the security team has requested you to maximize the security of the deployments. You decide to use Configuration Manager with PXE to automate the deployments. To help you assess your knowledge, answer the following questions:
1. In which offices should you have distribution points?
2. What should you do to maximize the security of the deployments?
3. What should you do to minimize administrative overhead?
Objective summary
![]() When you enable multicast or PXE on a distribution point, WDS will be automatically installed.
When you enable multicast or PXE on a distribution point, WDS will be automatically installed.
![]() If you have two PXE servers on a network, you can add a PXE server response delay to direct PXE requests to a specific PXE server.
If you have two PXE servers on a network, you can add a PXE server response delay to direct PXE requests to a specific PXE server.
![]() Configuration Manager packages can contain drivers, applications, operating system images, boot images, and task sequences.
Configuration Manager packages can contain drivers, applications, operating system images, boot images, and task sequences.
![]() Create distribution point groups to group distribution points and collections. This reduces administrative overhead by automating content distribution for future distribution point group members.
Create distribution point groups to group distribution points and collections. This reduces administrative overhead by automating content distribution for future distribution point group members.
![]() Use BranchCache to reduce usage of your WAN by enabling clients to retrieve cached content from the LAN.
Use BranchCache to reduce usage of your WAN by enabling clients to retrieve cached content from the LAN.
![]() Create boundaries and boundary groups to ensure that clients use their local or closest distribution point. This minimizes latency and improves overall performance.
Create boundaries and boundary groups to ensure that clients use their local or closest distribution point. This minimizes latency and improves overall performance.
Objective review
Answer the following questions to test your knowledge of the information in this objective. You can find the answers to these questions and explanations of why each answer choice is correct or incorrect in the “Answers” section at the end of this chapter.
1. You have two offices in San Francisco and two offices in New York. One office in San Francisco has a distribution point, and one office in New York has a distribution point. Which technology should you use to ensure that all clients use the closest distribution point?
A. Boundary groups
B. Distribution point groups
C. BranchCache
D. Management point
2. You are attempting to distribute an operating system image to a distribution point named DP1. When you get to the step to add the distribution point, it isn’t available to select. What should you do?
A. Run the Set-CMDistributionPointGroup -Force command and then try again.
B. Redistribute all content on the distribution point and then try again.
C. Remove the existing deployment package on the distribution point and then try again.
D. Manually run a content validation job on all existing content and then try again.
3. You plan to use BranchCache for your client computer operating system deployments in Configuration Manager. What should you do? (Choose all that apply.)
A. Create a GPO to enable and configure BranchCache on client computers.
B. Create a GPO to enable and configure BranchCache on domain controllers.
C. Add the BranchCache feature on distribution points.
D. Enable BranchCache in the Configuration Manager console on the distribution points.
E. Deploy a BranchCache certificate to all of the client computers.
4. You need to be able to image any computer by using your deployment infrastructure, which consists of Configuration Manager, WDS, and MDT. Which two methods should you use? (Choose two. Each correct answer provides part of a complete solution.)
A. Enable unknown computer support.
B. Enable user device affinity.
C. Grant the Everyone group Read permissions on your images.
D. Prestage computers in Active Directory.
Objective 3.3: Configure MDT and Configuration Manager integration
As discussed in Chapter 2, MDT enables you to prepare and customize various aspects of the deployment process. MDT can also be integrated with System Center Configuration Manager. This section further expands on MDT by introducing integration with Configuration Manager and discussing additional management tasks.
This objective covers how to:
![]() Use MDT-specific task sequences
Use MDT-specific task sequences
![]() Create MDT boot images
Create MDT boot images
![]() Create custom task sequences using MDT components
Create custom task sequences using MDT components
After it’s integrated with MDT, Configuration Manager can use the task sequences and other information defined in MDT. To configure the integration between the two, use the Configure ConfigMgr Integration Wizard, as shown in Figure 3-43. As part of the MDT install, you have a Configure ConfigMgr Integration program on the MDT server. The Options menu of the wizard specifies the options to install or remove the integration as well as the site server name and site code of the ConfigMgr deployment.
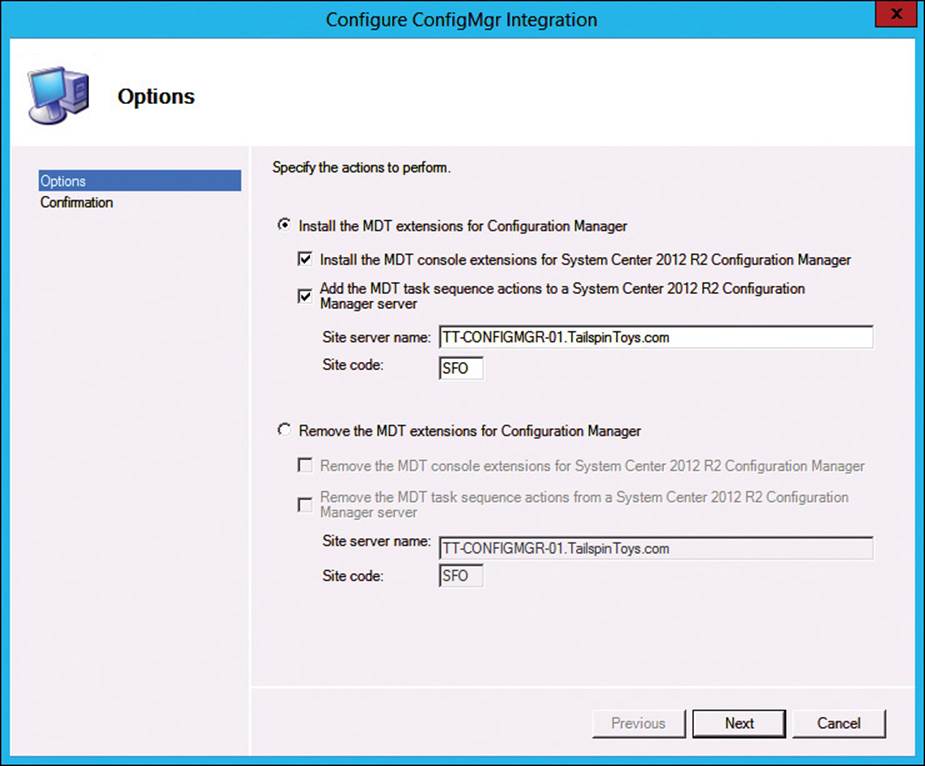
FIGURE 3-43 Configure ConfigMgr Integration, Options page
By default, if MDT is not integrated, the installation option will be selected. If MDT is already integrated, the removal option will be selected by default. Click Next to complete the wizard to integrate MDT with ConfigMgr. If successful, the success message appears in the Confirmation screen of the Configure ConfigMgr Integration Wizard.
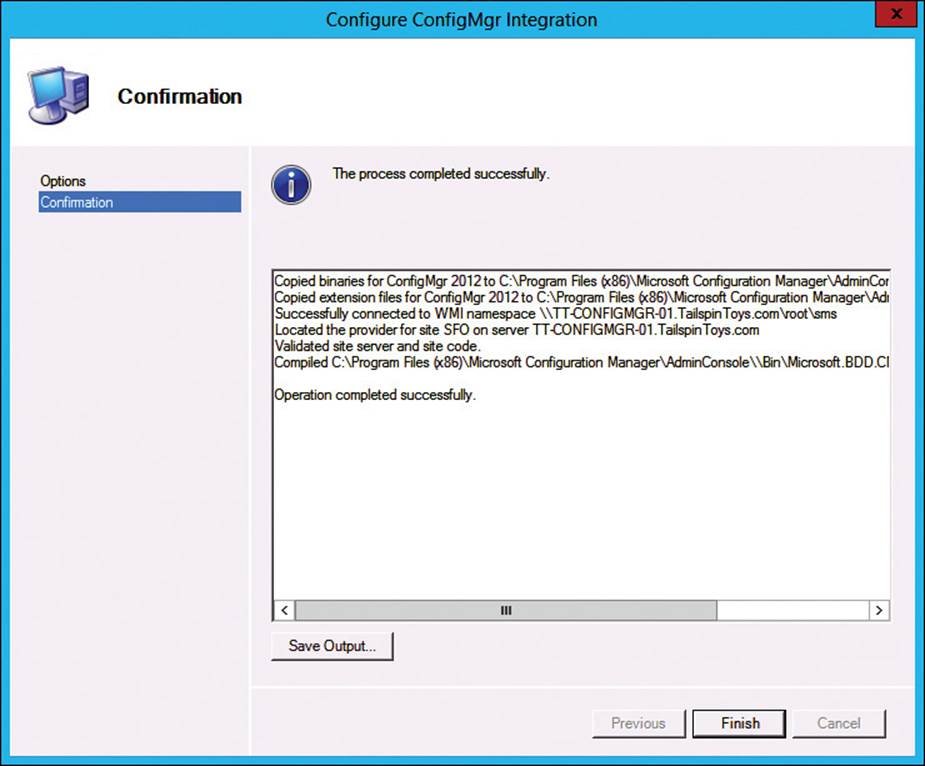
FIGURE 3-44 Configure ConfigMgr Integration, Confirmation page
More Info: Integrate Configuration Manager with MDT 2013
For more information about integrating MDT with ConfigMgr, see http://technet.microsoft.com/en-us/library/dn744295.aspx.
Using MDT-specific task sequences
After integrating MDT with Configuration Manager, you can use the MDT-specific task sequences and components within Configuration Manager. Some of the features included in the integration are:
![]() Dynamic Deployments This feature enables you to use the CustomSettings.ini file for a broader range of imaging scenarios without the need for multiple task sequences.
Dynamic Deployments This feature enables you to use the CustomSettings.ini file for a broader range of imaging scenarios without the need for multiple task sequences.
![]() Real-time Monitoring Real-time monitoring enables you to view current and recently completed image deployments. The monitoring provides percentage results of completion, errors, and time remaining until completion.
Real-time Monitoring Real-time monitoring enables you to view current and recently completed image deployments. The monitoring provides percentage results of completion, errors, and time remaining until completion.
![]() User-Driven Installation (UDI) UDI introduces a customizable wizard for images that require user interaction. Users can now respond to deployment-related questions during the deployment.
User-Driven Installation (UDI) UDI introduces a customizable wizard for images that require user interaction. Users can now respond to deployment-related questions during the deployment.
MDT integration with Configuration Manager gives you the best tools to achieve a ZTI deployment.
Following the integration steps, you can manage the majority of your MDT-specific task sequences and deployments directly from the Configuration Manager console. They all reside side by side with other task sequences that are already there. As you go through the task sequence architecture for MDT, notice a few key components that are required to generate and use an MDT task sequence. These include the following:
![]() MDT boot image Before you can deploy an MDT-specific task sequence, you must add an MDT boot image and distribute it from the Configuration Manager console.
MDT boot image Before you can deploy an MDT-specific task sequence, you must add an MDT boot image and distribute it from the Configuration Manager console.
![]() MDT toolkit package This package contains the various scripts and tools that make up MDT.
MDT toolkit package This package contains the various scripts and tools that make up MDT.
![]() Settings package The settings package contains the CustomSettings.ini file. As you familiarize yourself with this package, notice the convenience of having this single settings file isolated from the rest of the MDT components. This makes it an easy package to update and distribute as things in your environment evolve.
Settings package The settings package contains the CustomSettings.ini file. As you familiarize yourself with this package, notice the convenience of having this single settings file isolated from the rest of the MDT components. This makes it an easy package to update and distribute as things in your environment evolve.
![]() ConfigMgr Client package This package is also required by non-MDT operating system deployment task sequences and contains the Configuration Manager client.
ConfigMgr Client package This package is also required by non-MDT operating system deployment task sequences and contains the Configuration Manager client.
![]() USMT package This package is optional for both MDT and non-MDT operating system deployment task sequences, but if you will be focusing on ZTI deployments, it will be a key component.
USMT package This package is optional for both MDT and non-MDT operating system deployment task sequences, but if you will be focusing on ZTI deployments, it will be a key component.
Each of these components makes up an MDT operating system deployment task sequence. One of the other nice aspects of the MDT integration is the simplicity of generating these packages, which is covered in more detail throughout this objective.
Creating MDT boot images
Chapter 2 covered an overview of boot images and how they are used. This section discusses how to create an MDTboot image for ConfigMgr. When integrated with ConfigMgr, a boot image can be created with Windows Preinstallation Environment (Windows PE) 5.0 that includes customized components and features. To proceed, make sure that you have already integrated MDT with Configuration Manager and then perform the following steps:
1. In the Configuration Manager console, click the Software Library workspace, expand Operating Systems, right-click Boot Images, and then click Create Boot Image Using MDT.
The Create Boot Image Using MDT Wizard starts. If you do not see the menu option, you must integrate MDT with Configuration Manager as discussed earlier in this chapter. If you did the integration but still don’t see this menu option, close the Configuration Manager console, reopen it, and try again.
2. On the Package Source page, shown in Figure 3-45, specify the UNC path of the source folder that will be used as the source directory for the new boot image.
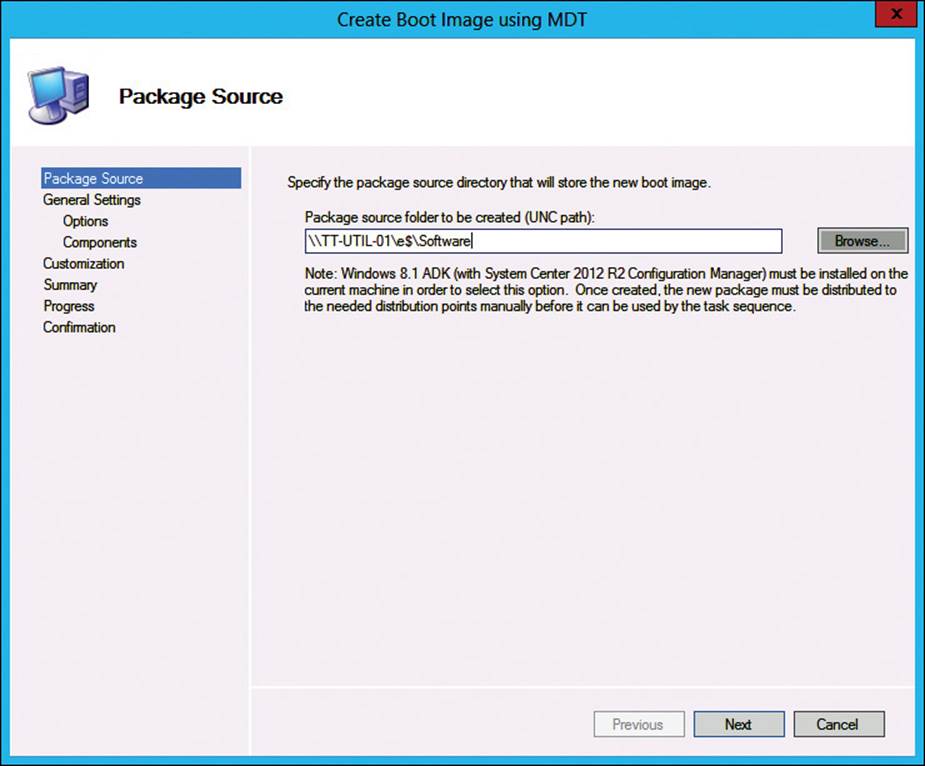
FIGURE 3-45 Create Boot Image Using MDT Wizard, Package Source page
3. The General Settings page, as shown in Figure 3-46, enables you to specify name, version, and comments for the customized Windows PE boot image. Enter the desired name and then click Next.
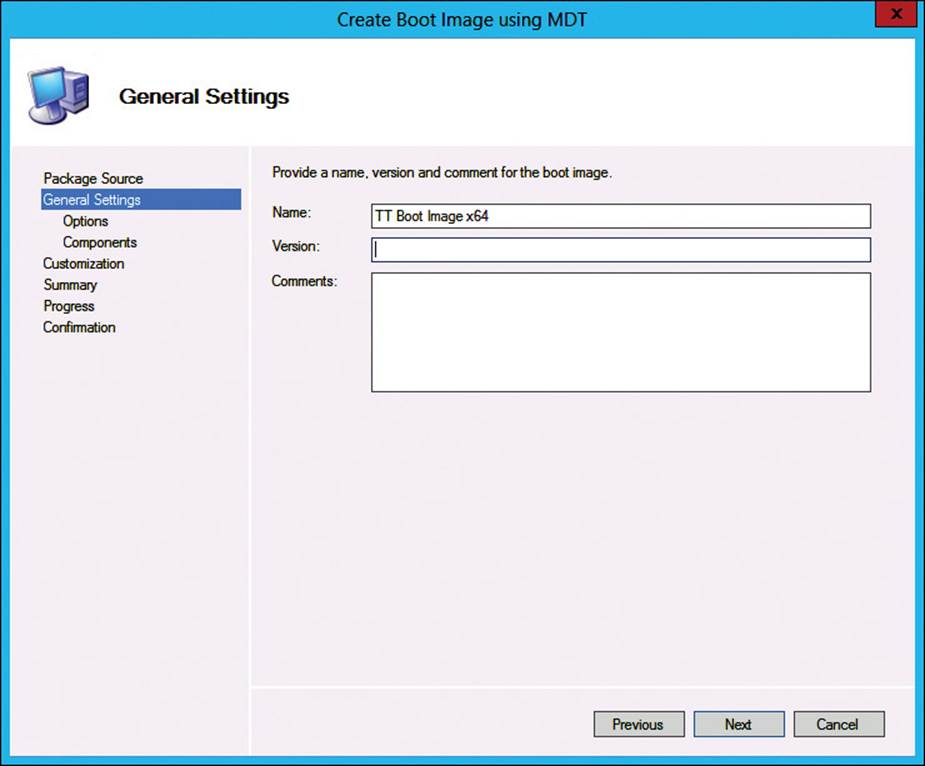
FIGURE 3-46 Create Boot Image Using MDT Wizard, General Settings page
4. Select the appropriate architecture platform when the Options page appears, as shown in Figure 3-47.
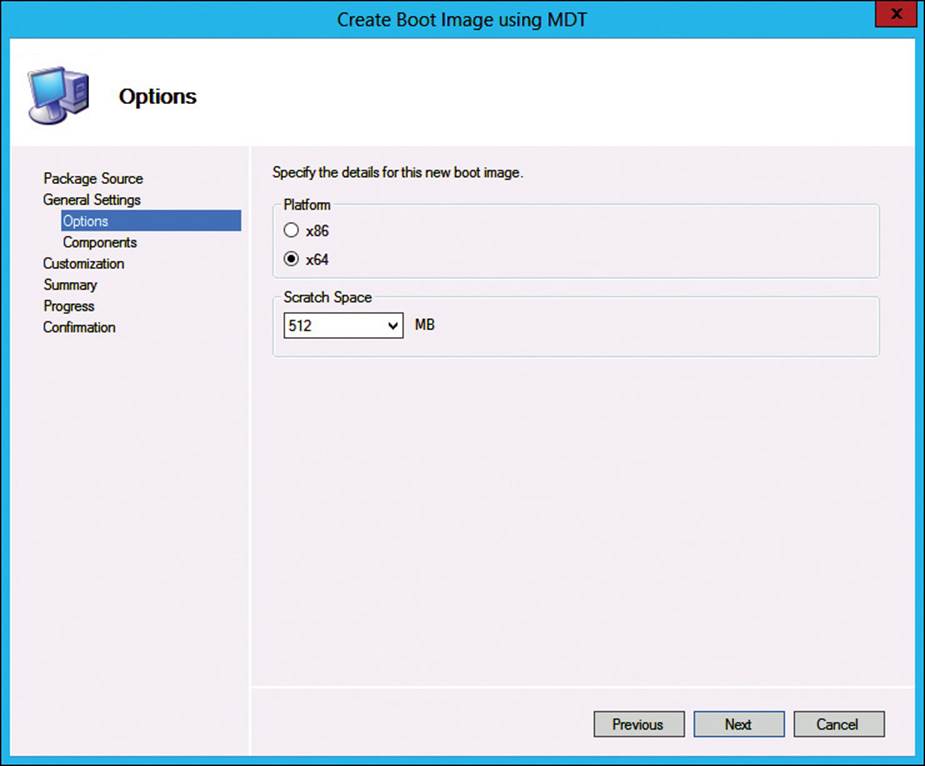
FIGURE 3-47 Create Boot Image Using MDT Wizard, Options page
The platform of the boot image must match the platform of the operating system image that you plan to deploy. Scratch space is space set aside in memory to use for additional space if needed. This space can be used by items such as drivers and log files. Historically, you needed to set the scratch space higher than the default to deal with large drivers or other issues. After you select the architecture, you can add components to the Windows PE image.
5. On the Components page, as shown in Figure 3-48, select the desired components of the image and then continue with the wizard.

FIGURE 3-48 Create Boot Image Using MDT Wizard, Components page
6. On the Customization page, shown in Figure 3-49, run a command to clean the disk on the destination computer.
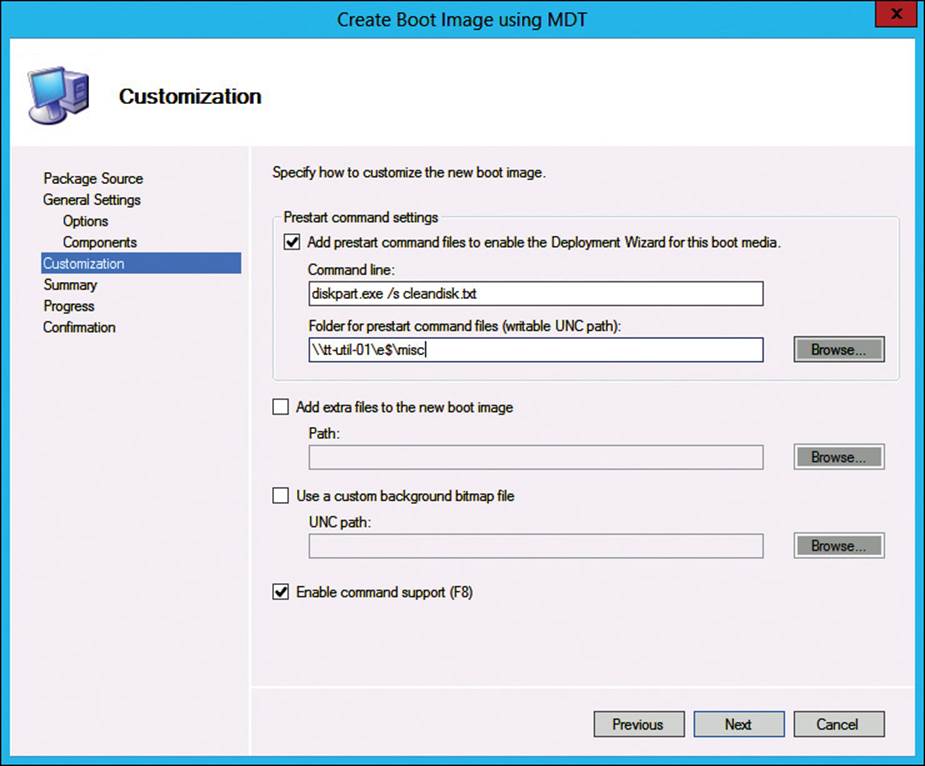
FIGURE 3-49 Create Boot Image Using MDT Wizard, Customization page
Although you can also use an MDT task sequence to take care of partitioning, it is often necessary to clean the disk if you are reimaging computers that have BitLocker-encrypted volumes. The cleandisk.txt file is stored in the \\tt-util-01\e$\misc folder.
7. If desired, you can also set a custom background by specifying the UNC path of an image to use as the background. When you finish with your desired settings, click Next.
8. On the Summary page, shown in Figure 3-50, review the settings and then click Next.

FIGURE 3-50 Create Boot Image Using MDT Wizard, Summary page
After you have configured all the wizard settings, the boot image will be generated and stored in the folder you specified on the Package Source page. The boot image can then be distributed to a distribution point for use when deploying operating systems.
More Info: WinPE Optional Components
For more information about WinPE optional components, see the optional components reference at http://technet.microsoft.com/en-us/library/hh824926.aspx.
Creating custom task sequences by using MDT components
Chapter 2 discussed how to create task sequences by using MDT as a stand-alone application. This section examines the MDT-specific task sequences and how to create them after integrating with Configuration Manager. Perform the following steps to get started:
1. In the Configuration Manager console, click the Software Library workspace.
2. In the left pane, expand Operating Systems.
3. Right-click Task Sequences and then click Create MDT Task Sequence.
4. On the Choose Template page of the Create MDT Task Sequence Wizard, click the drop-down menu to display the available task sequence templates. Because you integrated MDT and Configuration Manager, you can now take advantage of the following task sequence templates:
![]() Client Task Sequence This task sequence covers the deployment of client operating systems for all scenarios with the exception of the MDT replacement scenario.
Client Task Sequence This task sequence covers the deployment of client operating systems for all scenarios with the exception of the MDT replacement scenario.
![]() Client Replace Task Sequence This task sequence captures user state data for computer migrations through the Computer deployment scenario.
Client Replace Task Sequence This task sequence captures user state data for computer migrations through the Computer deployment scenario.
![]() Microsoft Deployment Custom Task Sequence This task sequence provides a skeleton framework from which you build your desired configuration.
Microsoft Deployment Custom Task Sequence This task sequence provides a skeleton framework from which you build your desired configuration.
![]() Server Task Sequence This task sequence covers the deployment of server operating systems for all scenarios.
Server Task Sequence This task sequence covers the deployment of server operating systems for all scenarios.
![]() User Driven Installation Replace Task Sequence This task sequence captures user state data for computer migrations through the computer deployment scenario by using UDI.
User Driven Installation Replace Task Sequence This task sequence captures user state data for computer migrations through the computer deployment scenario by using UDI.
Based on the template you choose, the wizard automatically adjusts the information gathering to accommodate the necessary values for the task sequence. For this example, you use Client Task Sequence.
5. On the Choose Template page, select Client Task Sequence, as shown in Figure 3-51, from the drop-down menu and click Next.
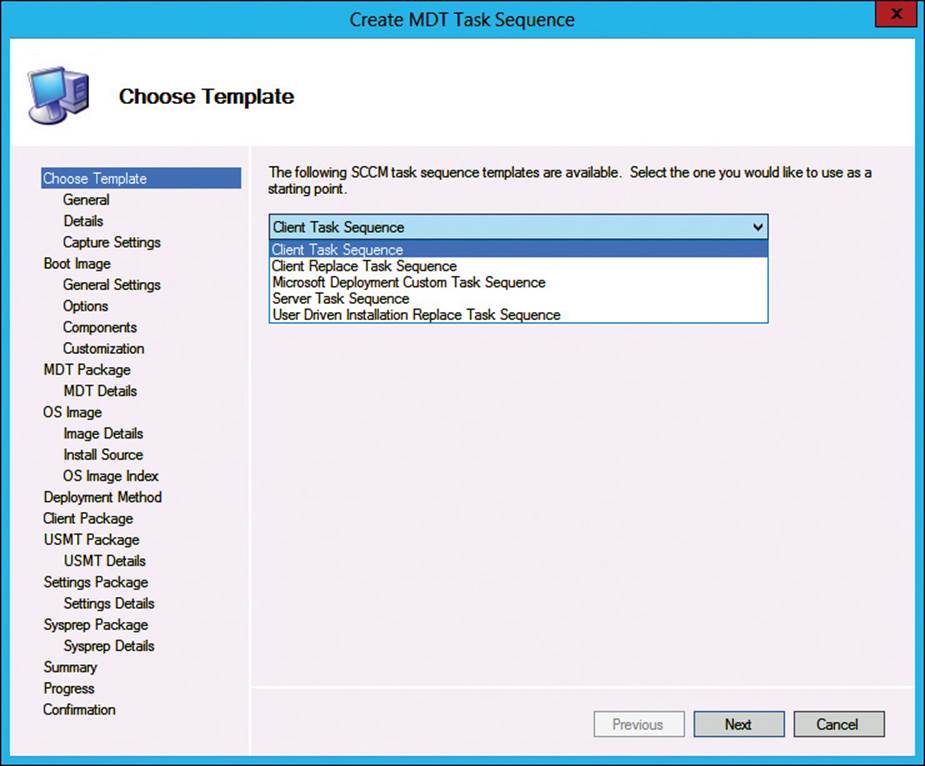
FIGURE 3-51 Create MDT Task Sequence, Choose Template page
6. On the General page, provide a name for the task sequence and any important administrative comments. Click Next.
7. On the Details page under Join Workgroup Or Domain, type a workgroup name or domain. If you provide a domain, use the Set button to enter credentials with permission to join computers to the domain. Under Windows Settings, enter a user name, organization name, and product key. Click Next.
8. On the Capture Settings page, you can optionally provide a share location and instruct the task sequence to capture a copy of the image to that destination. (This might be useful if you want to use this task sequence to build and capture a reference image.) Select This Task Sequence Will Never Be Used To Capture An Image. Click Next.
9. On the Boot Image page, specify the path to a preexisting MDT boot image or create one directly from the wizard. (Note that MDT-specific task sequences must use an MDT boot image.) Select Create A New Boot Image Package and then specify a UNC path for the package to be stored. Click Next.
10. On the General Settings page, provide a name, version, and administrative comments. Click Next.
11. On the Options page, specify the platform you are booting from (x86 or x64). Configuration Manager dynamically adjusts the scratch space, so leave it at the default setting. Click Next.
12. On the Components page, select any of the available components to have them available in Windows PE. Select Windows PowerShell. Click Next.
13. On the Customization page, you have a few options:
![]() Prestart Command Settings Select this box to add the MDT prestart command files. This is a helpful tool if you need to prompt for information before a task sequence is selected.
Prestart Command Settings Select this box to add the MDT prestart command files. This is a helpful tool if you need to prompt for information before a task sequence is selected.
![]() Add Extra Files To The New Boot Image Select this box and specify a path to any additional files you need to include in your image. This is helpful if you need to have any files available within Windows PE, such as a BIOS configuration utility for enabling the Trusted Platform Module (TPM) chip for BitLocker.
Add Extra Files To The New Boot Image Select this box and specify a path to any additional files you need to include in your image. This is helpful if you need to have any files available within Windows PE, such as a BIOS configuration utility for enabling the Trusted Platform Module (TPM) chip for BitLocker.
![]() Use A Custom Background Bitmap File Select this box and specify a path to your organization’s custom branding.
Use A Custom Background Bitmap File Select this box and specify a path to your organization’s custom branding.
![]() Enable Command Support (F8) Select this box if you want to have quick access to command-line support. For security purposes, it is recommended that you leave this box cleared for production imaging. With it selected, you can press F8 anytime outside of a reboot to access a command prompt.
Enable Command Support (F8) Select this box if you want to have quick access to command-line support. For security purposes, it is recommended that you leave this box cleared for production imaging. With it selected, you can press F8 anytime outside of a reboot to access a command prompt.
14. On the MDT Package page, specify the path to a preexisting MDT package or create one directly from the wizard.
The MDT package is a required component for all MDT-specific task sequences and contains the various components that make the task sequence run.
15. Select Create A New Microsoft Deployment Toolkit Files Package and specify a path to save the files to. Click Next.
16. On the MDT Details page, provide a name, version, language, manufacturer, and any administrative comments for the MDT package. The name is the only required entry. Click Next.
17. On the OS Image page, you have a few options:
![]() Specify An Existing OS Image If you have already created and imported an image into Configuration Manager, you can select it here.
Specify An Existing OS Image If you have already created and imported an image into Configuration Manager, you can select it here.
![]() Create A New OS Image If you have not imported an image into Configuration Manager, you can point to an image file—your reference image or the version from the installation media—and provide a source folder to create the corresponding package automatically.
Create A New OS Image If you have not imported an image into Configuration Manager, you can point to an image file—your reference image or the version from the installation media—and provide a source folder to create the corresponding package automatically.
![]() Specify An Existing OS Install Package If you have imported the Windows install package into Configuration Manager, you can select that for your operating system install.
Specify An Existing OS Install Package If you have imported the Windows install package into Configuration Manager, you can select that for your operating system install.
![]() Create A New OS Install Package If you have not imported the Windows install package and would like to use it, you can point to the installation media and provide a source folder to create the corresponding package automatically.
Create A New OS Install Package If you have not imported the Windows install package and would like to use it, you can point to the installation media and provide a source folder to create the corresponding package automatically.
18. On the OS Image Index page, if you are using an image file that includes multiple images, specify the appropriate index number for the image you wish to install. Click Next.
19. On the Deployment Method page, specify whether this image will be a Zero Touch Installation or User-Driven Installation. The user-driven installation will incorporate a custom wizard that enables the end user to customize the image at deployment time. Choose Zero Touch Installation. Click Next.
20. On the Client Package page, specify a preexisting ConfigMgr client package or have the wizard create a new one for you. Use the preexisting package for this example. Click Next.
21. On the USMT Package page, specify a preexisting USMT package or have the wizard create one for you. Create one using the wizard for this example. To do this, select Create A New USMT Package. The wizard automatically identifies the files, and you enter a source folder to create the package in Configuration Manager. Click Next.
22. On the USMT Details page, provide a name, version, language, manufacturer, and any administrative comments for the USMT package. The name is the only required field. Click Next.
23. On the Settings Package page, specify a preexisting MDT settings package or have the wizard create one for you. For this example, create one using the wizard. To do this, select Create A New Settings Package and specify a source folder to create the package in Configuration Manager. Click Next.
24. On the Settings Details page, provide a name, version, language, manufacturer, and any administrative comments for this settings package. Note the check box that tags this settings package for Server Core installations. Click Next.
25. On the Sysprep Package page, there is nothing to change or enter. Click Next.
26. On the Summary page, review the configuration and then click Next.
27. On the Confirmation page, ensure that there were no errors or warnings. Click Close.
After completing this process, you are left with a new task sequence and all the corresponding components required to use it. MDT integration simplifies many of the prerequisites by including the option to create them from directly within the wizard. However, as with all packages in Configuration Manager, you must distribute the content of those new packages before using the new task sequence.
More Info: Create a Task Sequence with Configuration Manager and MDT
For more information about creating a task sequence with MDT, see the article at http://technet.microsoft.com/en-us/library/dn744302.aspx.
Thought experiment: New Windows 8.1 deployment with multiple languages
You are the desktop engineer at your company. Your company has two offices in the United States and two offices in France. You are planning to deploy 500 new client computers that run Windows 8.1. The following deployment requirements have been agreed on:
![]() There will be one keyboard layout for the United States and a different keyboard layout for France.
There will be one keyboard layout for the United States and a different keyboard layout for France.
![]() A different product key will be used in each country/region.
A different product key will be used in each country/region.
![]() Installed languages must be customized based on the country/region.
Installed languages must be customized based on the country/region.
![]() The new computers must have BitLocker enabled automatically.
The new computers must have BitLocker enabled automatically.
You need to plan for the deployment based on these requirements.
1. How many custom task sequences would you need to create?
2. How would a custom Windows PE boot image assist in this deployment scenario?
3. How should you enable BitLocker?
Objective summary
![]() You can configure MDT to integrate with Configuration Manager.
You can configure MDT to integrate with Configuration Manager.
![]() You can use MDT task sequences to customize an operating system deployment.
You can use MDT task sequences to customize an operating system deployment.
![]() You can use tasks with the LiteTouch.wsf file in the \DeploymentShare\Scripts\directory.
You can use tasks with the LiteTouch.wsf file in the \DeploymentShare\Scripts\directory.
![]() You can create MDT boot images and customize them by using Configuration Manager.
You can create MDT boot images and customize them by using Configuration Manager.
![]() After you create a boot image, you can add it to a distribution point.
After you create a boot image, you can add it to a distribution point.
![]() You can customize task sequence templates by using MDT.
You can customize task sequence templates by using MDT.
Objective review
Answer the following questions to test your knowledge of the information in this objective. You can find the answers to these questions and explanations of why each answer choice is correct or incorrect in the “Answers” section at the end of this chapter.
1. What information is needed to configure Configuration Manager Integration with MDT?
A. Server name and site code
B. Server name and user credentials
C. Site code and user credentials
D. User credentials
2. What is the default scratch space if a target system has at least 1 GB of RAM?
A. 256 MB
B. 512 MB
C. 1 GB
D. 2 GB
3. Where is a new boot image stored when creating a boot image by using the Create Boot Image Using MDT Wizard?
A. Deployment share folder
B. Specified UNC path
C. C:\Program Files (x86)\Microsoft Configuration Manager
D. C:\Windows\Boot
4. After being created with MDT, how can a boot image be used with Configuration Manager?
A. Add the boot image to a Windows Deployment Services server.
B. Distribute the boot image to a distribution point.
C. Associate the boot image with a task sequence.
D. Create a custom task sequence that uses the boot image.
Answers
This section contains the solutions to the thought experiments and answers to the objective review questions in this chapter.
Objective 3.1
Thought experiment
1. You should specify an uninstall command. This is a good practice to help you maintain applications in your environment.
2. You should use driver categories. Driver categories enable you to find drivers easily. In addition, you can filter the output for a specific category to simplify driver updates.
3. You should use a build and capture template. When capturing a computer, you need to have a capture action.
Objective review
1. Correct answer: B
A. Incorrect: Scratch space is not relevant to simplifying the troubleshooting process; it is used as extra space for Windows PE for items such as drivers.
B. Correct: Command support should be enabled. It enables you to press F8 and display a command prompt for troubleshooting purposes.
C. Incorrect: Importing the WDS module isn’t relevant to troubleshooting issues that arise during deployment, especially when the infrastructure is using Configuration Manager and MDT.
D. Incorrect: A prestart command that launches cmd.exe wouldn’t be helpful because it would run for every deployment, even deployments that aren’t having trouble.
2. Correct answer: A
A. Correct: A prestart command is a good way to repartition and clean disks prior to deploying the operating system image. This is a common tactic to use when you are reimaging computers that have BitLocker-encrypted volumes.
B. Incorrect: Command support enables you to open a command prompt from Windows PE, but it is not useful for automating repartitioning.
C. Incorrect: Manually repartitioning the disks isn’t an activity that scales well, and this answer doesn’t meet the requirement to repartition automatically.
D. Incorrect: An operating system install package is not relevant to cleaning the disk.
3. Correct answer: C
A. Incorrect: Validating the content doesn’t update the content, which is what is needed after updating source files.
B. Incorrect: The content validation job only runs once a week. Updating the priority doesn’t change the schedule, so you could still have to wait a week before the updated source files are used.
C. Correct: Redistributing the content is the best way to ensure that the updated source files are used because the redistribution ensures that the distribution point has the latest files.
D. Incorrect: The Add-Content Windows PowerShell command adds text to the end of a text file and is not relevant to this question.
Objective 3.2
Thought experiment
1. You should have a distribution point at each office. Because you have multiple images and need to image 10 computers per day while minimizing network disruptions, your solution should minimize the amount of data that has to travel over the MPLS network. By placing a distribution point in each office, you can meet the goals. Other factors are the number of clients at each office and the available bandwidth. In this case, there are enough clients to warrant a distribution server.
2. You should require a PXE password, use multicast encryption, set permissions on the operating system images, and configure your environment so that only prestaged computers can be imaged. Security is enhanced with a multilayered strategy, so it is a good practice to use as many of the security options as you can without affecting needed functionality.
3. One way to minimize administrative overhead is to automate manual tasks that are performed routinely. Another way is to delegate tasks. Don’t force the entire IT team to come to you or your team for every action needed. For operating system deployments, strive for a ZTI, automate as many of the preinstallation tasks (such as prestaging computer accounts) and post-installation tasks (such as importing the user state data) as possible, and take advantage of small and incremental improvements such as using distribution point groups and boundary groups.
Objective review
1. Correct answer: A
A. Correct: Boundary groups should be used to ensure that clients use the closest distribution point.
B. Incorrect: Distribution point groups are used to group multiple distribution points, not to control which distribution points clients use.
C. Incorrect: BranchCache reduces bandwidth use over the WAN but does not control which distribution points clients use.
D. Incorrect: A management point is used for managing your environment and isn’t related to controlling client connectivity to distribution points.
2. Correct answer: C
A. Incorrect: The Set-CMDistributionPointGroup -Force command won’t actually do anything without additional parameters. Furthermore, the command isn’t relevant to the problem.
B. Incorrect: Redistributing all content won’t help because you can’t add the image when it is already there.
C. Correct: By removing the existing package, you can add it again. When content is already stored on a distribution point, it cannot be added again until removed.
D. Incorrect: Content validation can fix corruption for existing content, but that will not fix the problem.
3. Correct answers: A, C, and D
A. Correct: To take advantage of BranchCache, it must be enabled and configured on all clients. You can use Group Policy to enable and configure clients.
B. Incorrect: BranchCache is not needed on the domain controllers for operating system deployments to take advantage of BranchCache.
C. Correct: BranchCache must be added to distribution points that take part in your deployments.
D. Correct: To take advantage of BranchCache, you need to enable it on the distribution points.
E. Incorrect: Although a BranchCache certificate is plausible, it isn’t needed.
4. Correct answers: A and D
A. Correct: There are two ways to ensure that you can image any computer. One is by enabling unknown computer support, and the other is by prestaging computers.
B. Incorrect: User device affinity isn’t relevant to the imaging task but instead is part of associating a user with a computer after imaging.
C. Incorrect: The default permissions for operating system images are sufficient to image computers. Additional permissions would not help in this situation.
D. Correct: There are two ways to ensure that you can image any computer. One is by enabling unknown computer support, and the other is by prestaging computers.
Objective 3.3
Thought experiment
1. You should create a custom task sequence for France and one for the United States. This would enable you to meet the deployment requirements, which dictated different settings for each country/region.
2. You could customize a Windows PE boot image for each country/region so that each country/region used its own language. In addition, you could customize the support information for each country/region as well as perform other customizations.
3. You should use the Pre-provision BitLocker task sequence step in Windows PE and then follow that by using the Enable BitLocker task sequence after Windows 8.1 is deployed.
Objective review
1. Correct answer: A
A. Correct: You need the server name and site code to perform the integration.
B. Incorrect: You need the server name and site code, not the server name and user credentials, to perform the integration.
C. Incorrect: You need the server name and site code, not the site code and user credentials, to perform the integration.
D. Incorrect: You need the server name and site code, not just the user credentials, to perform the integration.
2. Correct answer: B
A. Incorrect: The default scratch space for computers with at least 1 GB of memory is 512 MB, not 256 MB.
B. Correct: The default scratch space for computers with at least 1 GB of memory is 512 MB.
C. Incorrect: The default scratch space for computers with at least 1 GB of memory is 512 MB, not 1 GB.
D. Incorrect: The default scratch space for computers with at least 1 GB of memory is 512 MB, not 2 GB. The maximum size is also 512 MB.
3. Correct answer: B
A. Incorrect: As with most of the Configuration Manager storage locations, a UNC path is used, and it is requested during the wizard.
B. Correct: The UNC path specified during the wizard is the path that is used.
C. Incorrect: The default installation path for ConfigMgr is not used for the image.
D. Incorrect: C:\Windows\Boot is not used for the image.
4. Correct answer: B
A. Incorrect: WDS is not relevant here.
B. Correct: A distribution point stores all images as well as other content.
C. Incorrect: Associating the boot image with a task sequence won’t work because the boot image must be added to the distribution point before it can be used.
D. Incorrect: Creating a custom task sequence that uses the boot image won’t work because the boot image must be added to the distribution point before it can be used.
All materials on the site are licensed Creative Commons Attribution-Sharealike 3.0 Unported CC BY-SA 3.0 & GNU Free Documentation License (GFDL)
If you are the copyright holder of any material contained on our site and intend to remove it, please contact our site administrator for approval.
© 2016-2026 All site design rights belong to S.Y.A.