Exam Ref 70-695 Deploying Windows Devices and Enterprise Apps (2015)
Chapter 2. Implement a Lite-Touch deployment
When you automate your first operating system deployment, it can be rather exciting. Often, your first automated deployment is nothing more than an answer file. Soon, administrators realize that additional areas of automation are possible. Many administrators begin testing additional automation tools such as Windows Deployment Services (WDS) and Microsoft Deployment Toolkit (MDT) and exploring automation options to reduce the administrative overhead of deploying operating systems. The keys to implementing a Lite-Touch deployment infrastructure successfully are knowing the available tools and capabilities, understanding the pros and cons of the configuration settings, and being able to implement the tools to meet your requirements.
Objectives in this chapter:
![]() Objective 2.1: Install and configure WDS
Objective 2.1: Install and configure WDS
![]() Objective 2.2: Configure MDT
Objective 2.2: Configure MDT
![]() Objective 2.3: Create and manage answer files
Objective 2.3: Create and manage answer files
Objective 2.1: Install and configure WDS
WDS is a foundation for many automated deployment infrastructures, especially as an infrastructure for Lite-Touch installation (LTI) deployments. WDS is often one of the first technologies you deploy when you build out your deployment infrastructure. You need to understand how to install it and configure it for an LTI deployment so that you can ensure a high-performing and trouble-free deployment infrastructure.
This objective covers how to:
![]() Configure unicast and multicast deployment methods
Configure unicast and multicast deployment methods
![]() Add images to WDS
Add images to WDS
![]() Configure scheduling
Configure scheduling
![]() Restrict who can receive images
Restrict who can receive images
Configuring unicast and multicast deployment methods
WDS has two methods to deploy images to computers—unicast and multicast. You must become intimately familiar with both of these methods and understand environments and situations in which one would be superior to the other.
With unicast, the WDS server sends one network transmission to one computer. Thus, if you are deploying an operating system image to five computers, the WDS server sends five network transmissions, as shown in Figure 2-1.
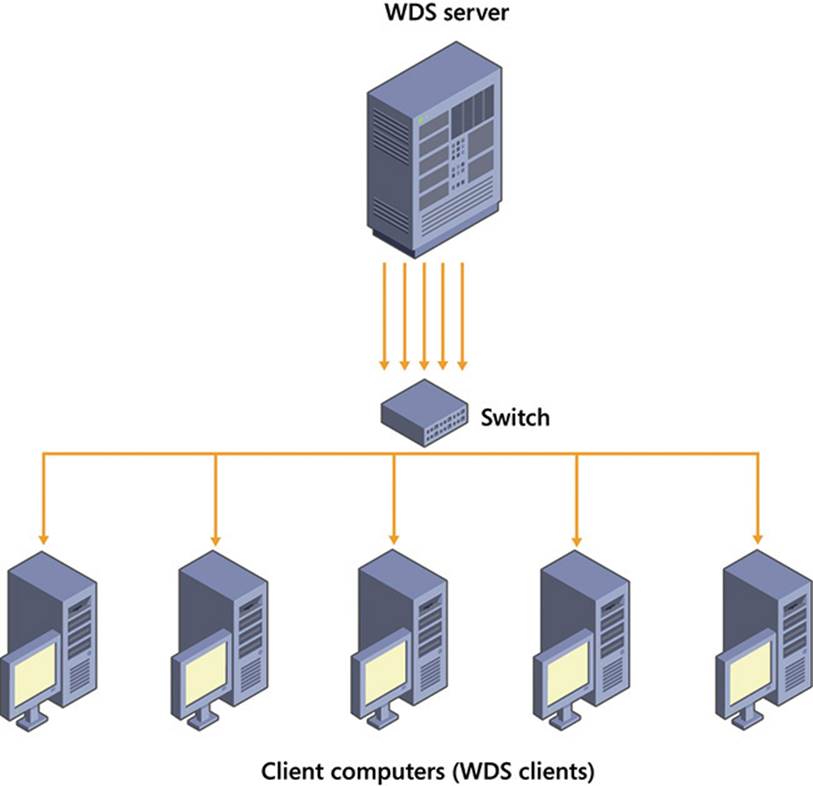
FIGURE 2-1 Unicast deployment diagram
Familiarize yourself with the following characteristics of unicast:
![]() Unicast is the easiest method to use for deploying computers because it doesn’t require additional network setup as multicast does. Unicast works right out of the box.
Unicast is the easiest method to use for deploying computers because it doesn’t require additional network setup as multicast does. Unicast works right out of the box.
![]() Unicast uses more network bandwidth than multicast when deploying operating system images to several computers or more.
Unicast uses more network bandwidth than multicast when deploying operating system images to several computers or more.
![]() Although unicast uses more network bandwidth, it isn’t necessarily slower when deploying to several computers at one time than the same deployment by using multicast. It just means that it takes up more network bandwidth. The performance differences often aren’t visible until you try to image many computers at a time with unicast.
Although unicast uses more network bandwidth, it isn’t necessarily slower when deploying to several computers at one time than the same deployment by using multicast. It just means that it takes up more network bandwidth. The performance differences often aren’t visible until you try to image many computers at a time with unicast.
With multicast, the WDS server sends one network transmission to multiple computers, as shown in Figure 2-2.
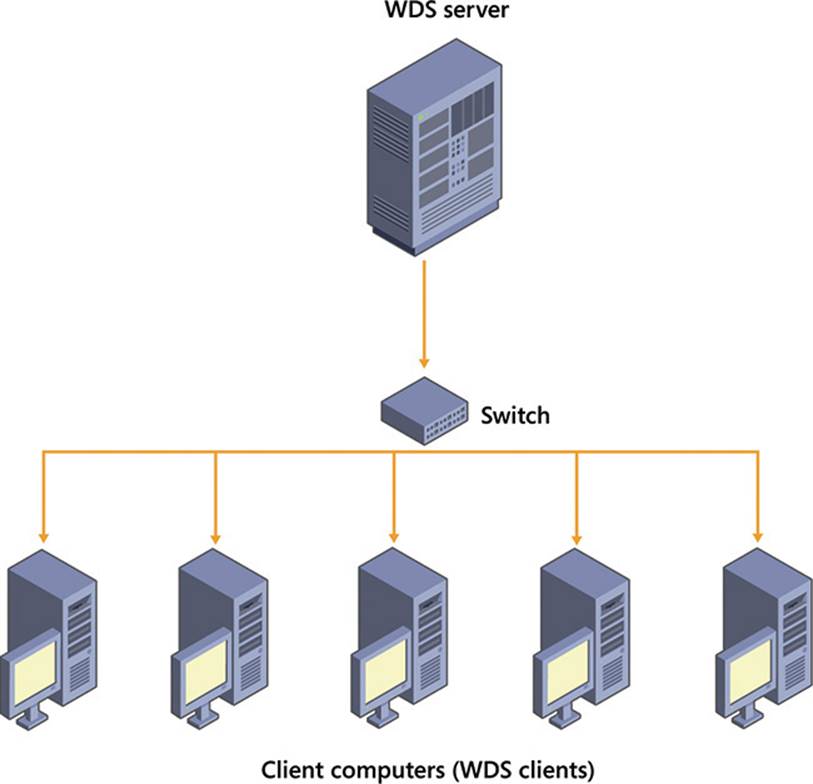
FIGURE 2-2 Multicast deployment diagram
You should be familiar with the following characteristics of multicast:
![]() Your network team must enable Internet Group Management Protocol (IGMP) snooping on your network devices. This ensures that multicast transmissions are not broadcast to every computer on the subnet, which can cause network flooding.
Your network team must enable Internet Group Management Protocol (IGMP) snooping on your network devices. This ensures that multicast transmissions are not broadcast to every computer on the subnet, which can cause network flooding.
![]() You must create a multicast transmission before you can deploy images by using multicast. The process to create a multicast transmission is shown later in this chapter.
You must create a multicast transmission before you can deploy images by using multicast. The process to create a multicast transmission is shown later in this chapter.
![]() Multicast is best suited for environments where you will deploy images to several or more computers simultaneously. If you are only deploying images to one or two computers at a time, opt for unicast instead.
Multicast is best suited for environments where you will deploy images to several or more computers simultaneously. If you are only deploying images to one or two computers at a time, opt for unicast instead.
Before you deploy images by using multicast, look at the default multicast configuration to ensure that it meets your needs. The following settings represent the default multicast settings in WDS:
![]() Multicast IP addresses are allocated from a static pool. For IPv4, the range is from 239.192.0.2 to 239.192.0.254. For IPv6, the range is from FF15::1:1 to FF15::1:FF. Talk to your network team to ensure that this range won’t conflict with any existing multicasting on your network.
Multicast IP addresses are allocated from a static pool. For IPv4, the range is from 239.192.0.2 to 239.192.0.254. For IPv6, the range is from FF15::1:1 to FF15::1:FF. Talk to your network team to ensure that this range won’t conflict with any existing multicasting on your network.
![]() The multicast transfer settings ensure that all multicast clients operate at the same speed during the multicast transmission. In such a situation, if you have an older computer with a slow network interface card (NIC) and a new computer with a fast NIC, the multicast transmission will operate at the speed of the slow NIC, which degrades
The multicast transfer settings ensure that all multicast clients operate at the same speed during the multicast transmission. In such a situation, if you have an older computer with a slow network interface card (NIC) and a new computer with a fast NIC, the multicast transmission will operate at the speed of the slow NIC, which degrades
Real World: WDS vs. Multicast
I worked on a project to reimage client computers for a school district. As part of the project, I implemented WDS. The plan was to image a classroom of 20 or 30 computers at a time. There were a lot of computers to reimage, so I decided to test unicast and multicast deployments to see whether one would prove better for the situation. One big factor was that school was out for the summer, so there weren’t any concerns about bandwidth—nobody was working or using the network. In this case, testing indicated that unicast performed faster for imaging classrooms. This might have been due to a faulty router or switch or other factors. Because it takes time to prepare an environment for multicast, it might not always make sense for a project, especially if you have to involve additional teams for network configuration and troubleshooting. In this situation, unicast was the appropriate choice and enabled us to begin imaging immediately.
When you are ready to proceed with your first multicast-based deployment, make sure you have an existing image group and an installation image. Image groups and installation images are discussed in detail in Chapter 4, “Create and maintain desktop images.” Perform the following steps to proceed with your deployment:
1. In the Windows Deployment Services console, right-click Multicast Transmissions and then click Create Multicast Transmission.
2. On the Transmission Name page, as shown in Figure 2-3, enter a descriptive name for the transmission and then click Next.
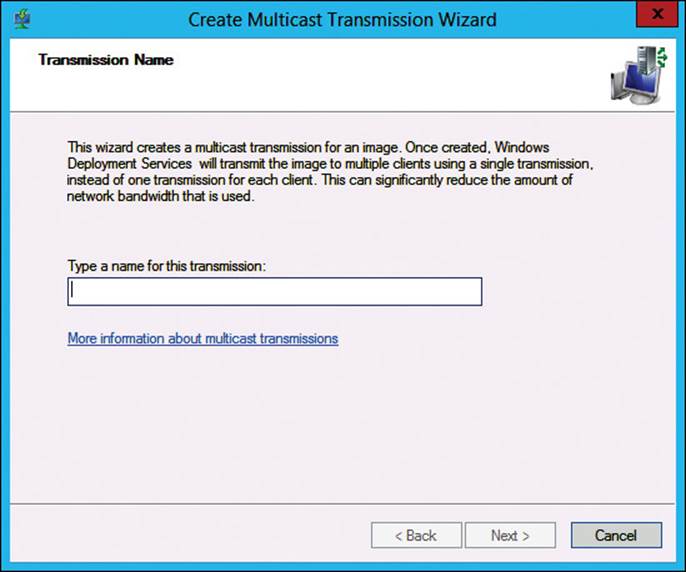
FIGURE 2-3 Multicast transmission creation process, Transmission Name page
3. On the Image Selection page, as shown in Figure 2-4, ensure that the image group that contains your installation image is selected, click the image you want to transmit, and then click Next.
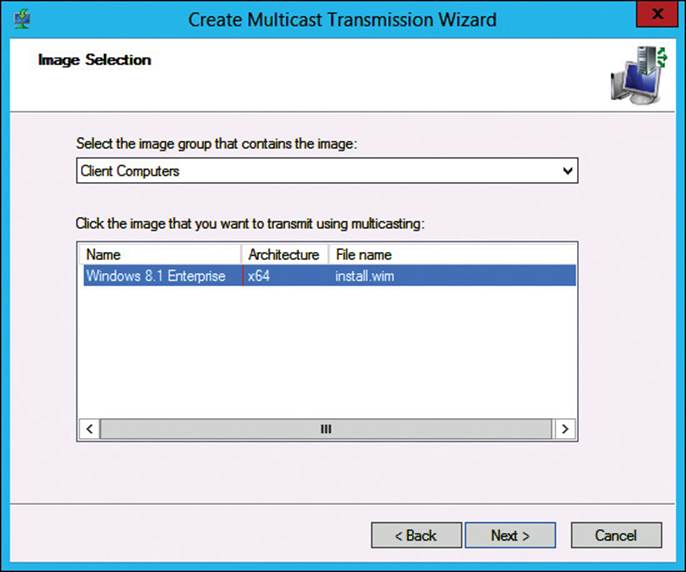
FIGURE 2-4 Multicast transmission creation process, Image Selection page
4. On the Multicast Type page, as shown in Figure 2-5, select when the transmission will start.
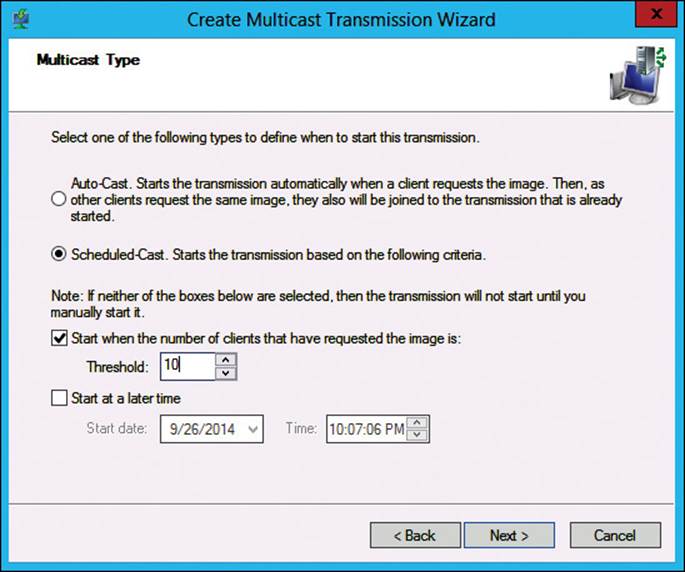
FIGURE 2-5 Multicast transmission creation process, Multicast Type page
You can use the default setting, which starts the transmission when the first multicast client makes a request, or you can opt to start the transmission on a schedule. An Auto-Cast transmission starts when the first client requests the image while subsequent clients join the existing transmission. Clients that join a transmission after it has started will download the missed parts of the transmission after the initial transmission completes. Scheduled-Cast transmission is one that starts after a specified number of clients have requested the image or at a specified date and time. If you are imaging a classroom full of computers and plan to walk around and manually power them up, you should opt for a scheduled cast and start it 15 minutes out or after a specific number of computers have joined the transmission. This enables all the computers to start and finish at the same time.
5. On the Operation Complete page, as shown in Figure 2-6, review the multicast transmission settings that you selected and then click Finish.
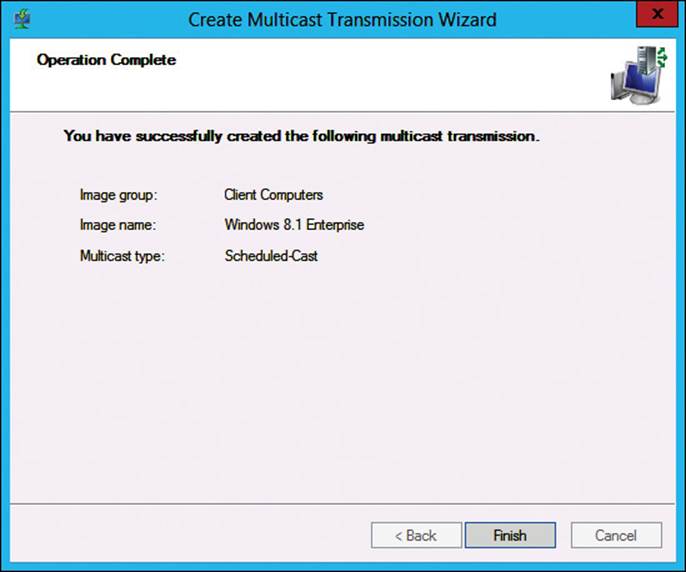
FIGURE 2-6 Multicast transmission creation process, Operation Complete page
6. After you create the multicast transmission, view the status of the transmission in the WDS console, as shown in Figure 2-7. You can view the transmission speed for active clients by looking at the Transfer Rate column. You can disconnect a client by right-clicking a client and then clicking Disconnect. Alternatively, you can also force a specific client to use unicast by right-clicking the client and then clicking Bypass Multicast.
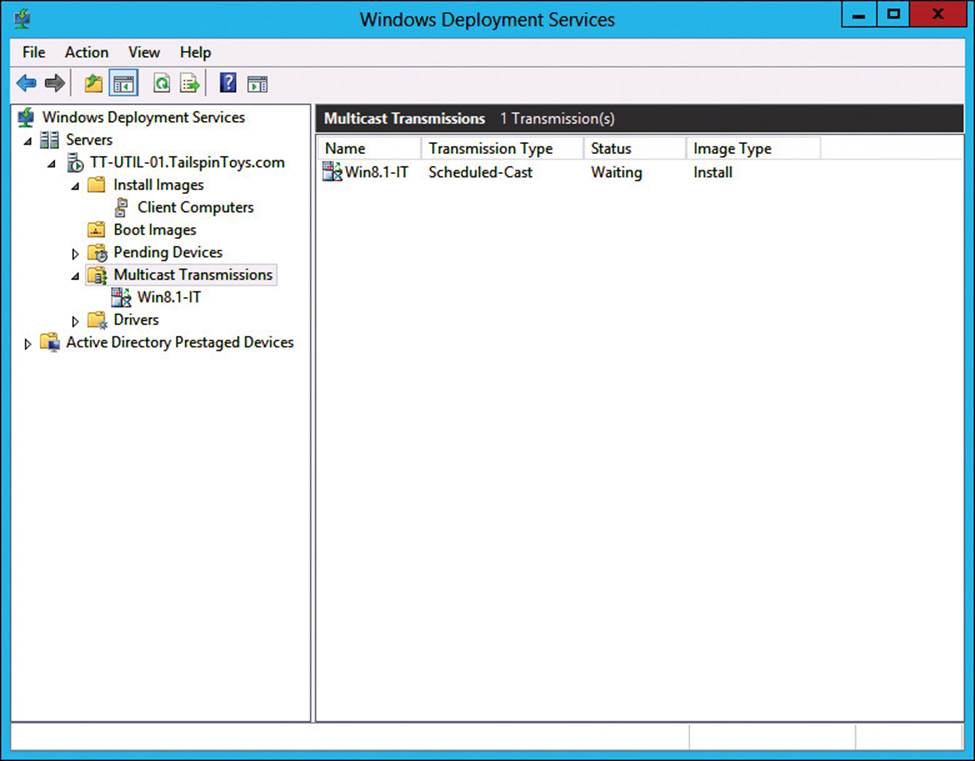
FIGURE 2-7 Multicast transmission status
 Exam Tip
This exam objective specifically calls out installing and configuring WDS. Although the typical methods of configuring WDS are covered here, familiarize yourself also with WDSutil, which is a command-line utility that can handle most aspects of WDS management. Prior to Windows PowerShell functionality for WDS, WDSutil was the primary command-line tool for administration. See http://technet.microsoft.com/en-us/library/cc771206.aspx for a breakdown of the command-line options for WDSutil.
Adding images to WDS
One of the primary operational tasks you will perform in WDS is adding images. Before you learn about the planning and operational tasks of adding images to WDS, review the four images that you will work with in WDS:
![]() Boot images You use a boot image to boot a WDS client computer before selecting an install image to deploy to it. A boot image contains Windows PE, which is used to boot a WDS client computer, and the WDS client, which is used to select the install image to deploy. For the vast majority of deployments, you will use the boot.wim file available as part of the Windows installation media. You can find boot.wim in the \Sources\ folder in the root of the Windows installation media.
Boot images You use a boot image to boot a WDS client computer before selecting an install image to deploy to it. A boot image contains Windows PE, which is used to boot a WDS client computer, and the WDS client, which is used to select the install image to deploy. For the vast majority of deployments, you will use the boot.wim file available as part of the Windows installation media. You can find boot.wim in the \Sources\ folder in the root of the Windows installation media.
![]() Install images You use an install image to deploy an operating system to WDS client computers. Usually, the install image is created from a reference computer that is configured to meet your company requirements. However, it can also be the install.wim file that is part of the Windows installation media. The install.wim file is located in the \Sources\ folder in the root of the Windows installation media.
Install images You use an install image to deploy an operating system to WDS client computers. Usually, the install image is created from a reference computer that is configured to meet your company requirements. However, it can also be the install.wim file that is part of the Windows installation media. The install.wim file is located in the \Sources\ folder in the root of the Windows installation media.
![]() Capture images You use a capture image to create an install image from a reference computer. A capture image is a customized boot image. After you configure a reference computer to use for your install image, you should restart the reference computer and boot to a capture image. A capture image is made up of Windows PE and a WDS image capture wizard. After the reference computer is captured, a .wim file is created. As part of the capture, you have the option to upload the image automatically to WDS. Don’t forget, before capturing a computer with a capture image, you must run Sysprep and generalize the computer.
Capture images You use a capture image to create an install image from a reference computer. A capture image is a customized boot image. After you configure a reference computer to use for your install image, you should restart the reference computer and boot to a capture image. A capture image is made up of Windows PE and a WDS image capture wizard. After the reference computer is captured, a .wim file is created. As part of the capture, you have the option to upload the image automatically to WDS. Don’t forget, before capturing a computer with a capture image, you must run Sysprep and generalize the computer.
![]() Discover images A discover image is a customized boot image that you use for computers that don’t support Preboot Excecution Environment (PXE). A discover image facilitates such computers in booting up, finding a WDS server, and having an install image deployed.
Discover images A discover image is a customized boot image that you use for computers that don’t support Preboot Excecution Environment (PXE). A discover image facilitates such computers in booting up, finding a WDS server, and having an install image deployed.
Add boot images to WDS
There isn’t much planning to do for boot images in WDS. Often, you just need to add boot images for the operating systems, such as Windows, that you are planning to deploy with WDS. On the operational side, adding boot images from the WDS console is straightforward. You just right-click Boot Images in the left pane of the WDS console, click Add Boot Image, browse to the location of boot.wim (located in the \Sources\ folder in the root of the Windows installation media), and enter a name and description (or use the default name and description). From an exam perspective, there really isn’t much to test. One exception is adding boot images by using Windows PowerShell. New for Windows Server 2012 R2 is a WDS module that includes 33 functions. To use Windows PowerShell to add a boot image from the Windows 8.1 installation media mounted on the D:\ drive, run the following Windows PowerShell command.
Import-WdsBootImage –Path D:\sources\boot.wim –NewImageName "Windows 8.1" –NewFileName
"Win8.1.wim"
After running the command, you should see output similar to running a Get-WdsBootImage command, as shown in Figure 2-8.

FIGURE 2-8 Adding a boot image by using Windows PowerShell
Add install images to WDS
Of all the images that you’ll work with in WDS, the install image is the most important one. It is the image that your computers will run, so a mistake in your reference computer, and thus your install image, could be spread across all your computers. You should be familiar with two types of install images for the exam:
![]() Default Windows install images A default Windows install image is just an image of the Windows installation media. If you deploy a default Windows install image to a computer, the result would be the same as if you had inserted the Windows installation DVD in the computer and performed a manual installation of Windows. Each Windows installation medium has an install.wim file that you can use as an install image. It is located in the \Sources\ directory at the root of the installation media. Often, a default Windows install image is used to perform initial testing of a new WDS deployment. Thereafter, most organizations choose to create a customized install image by capturing a reference computer.
Default Windows install images A default Windows install image is just an image of the Windows installation media. If you deploy a default Windows install image to a computer, the result would be the same as if you had inserted the Windows installation DVD in the computer and performed a manual installation of Windows. Each Windows installation medium has an install.wim file that you can use as an install image. It is located in the \Sources\ directory at the root of the installation media. Often, a default Windows install image is used to perform initial testing of a new WDS deployment. Thereafter, most organizations choose to create a customized install image by capturing a reference computer.
![]() Custom install image A custom install image is one that is built to meet company requirements. It often contains a core set of applications such as Microsoft Office and antivirus software. It is typically customized to adhere to company standards. Many companies customize the theme, background, and support information to help standardize the look of their computers. Custom install images require a capture image to be created first. Without the capture image, you would have no way to capture the reference computer to an install image.
Custom install image A custom install image is one that is built to meet company requirements. It often contains a core set of applications such as Microsoft Office and antivirus software. It is typically customized to adhere to company standards. Many companies customize the theme, background, and support information to help standardize the look of their computers. Custom install images require a capture image to be created first. Without the capture image, you would have no way to capture the reference computer to an install image.
In Chapter 4, in the “Capture an image to an existing or new WIM file” section, you walk through the process of capturing an image for use as an install image.
Add capture images to WDS
Before you can create a custom install image, you must have a capture image, and before you can create a capture image, you must have a boot image. This information is important for the exam. You must understand how all the images work together, which images require which other images, and the order in which to perform core WDS tasks. In this section, you create a capture image.
Before beginning, ensure that you have a boot image; those steps were covered earlier in this chapter. To create a capture image, perform the following steps.
1. In the WDS console, click Boot Images in the left pane.
2. In the right pane, right-click your boot image and then click Create Capture Image.
The Create Capture Image Wizard window appears.
3. On the Metadata And Location page, enter an image name, image description, and location of the .wim file, as shown in Figure 2-9. It is recommended to use a descriptive word such as capture in the name so that administrators can differentiate capture images from install images when booting to PXE. Click Next to continue.
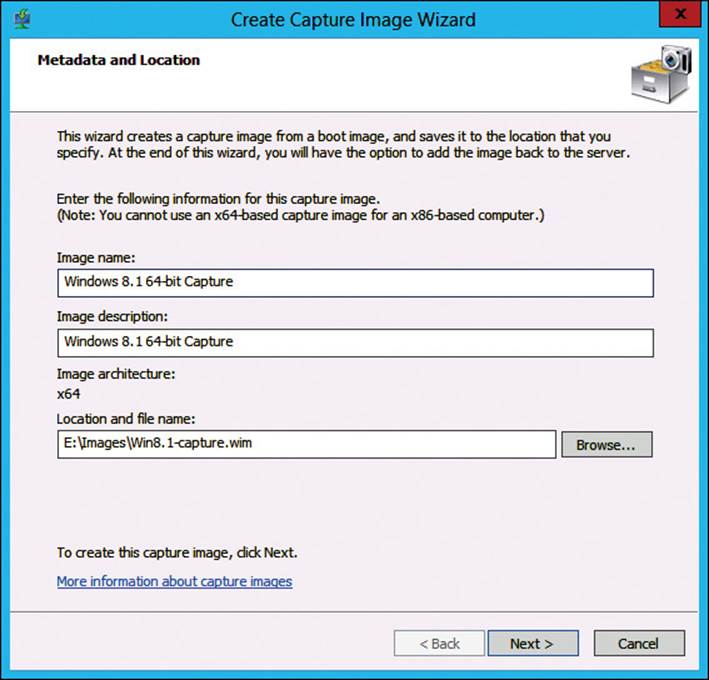
FIGURE 2-9 WDS Create Capture Image Wizard, Metadata And Location page
4. On the Task Progress page, as shown in Figure 2-10, wait until the capture image creation completes, click Add Image To The Windows Deployment Server Now, and then click Finish.
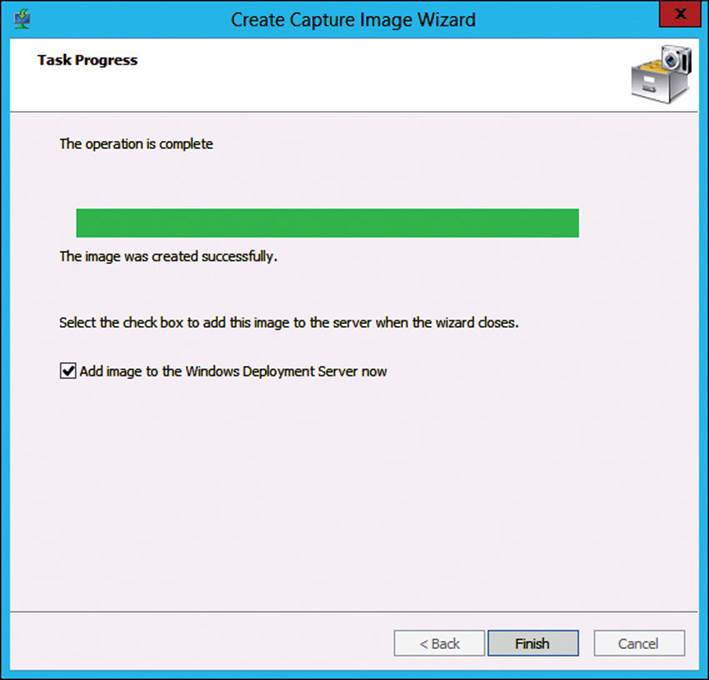
FIGURE 2-10 WDS Create Capture Image Wizard, Task Progress page
5. The Add Image Wizard starts automatically. On the Image File page, as shown in Figure 2-11, verify the location that you saved the capture image to and then click Next.
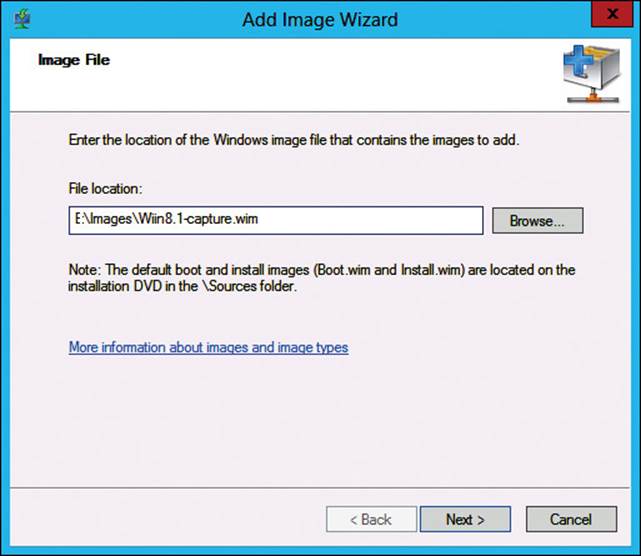
FIGURE 2-11 WDS Add Image Wizard, Image File page
6. On the Image Metadata page, as shown in Figure 2-12, click Next to accept the name and description entered previously.
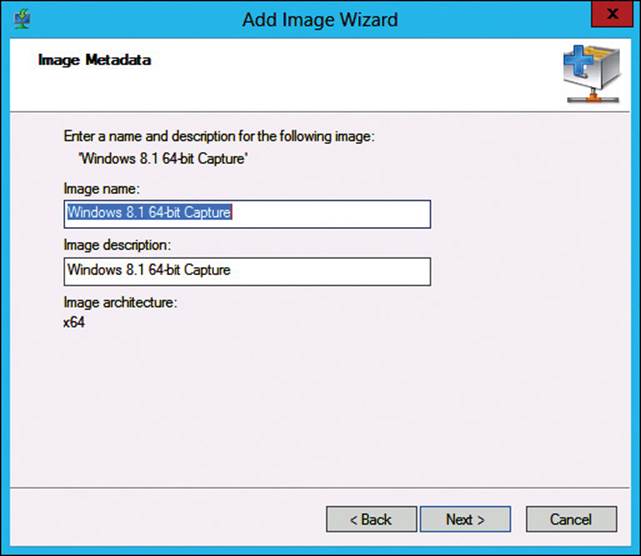
FIGURE 2-12 WDS Add Image Wizard, Image Metadata page
7. On the Summary page, shown in Figure 2-13, click Next.
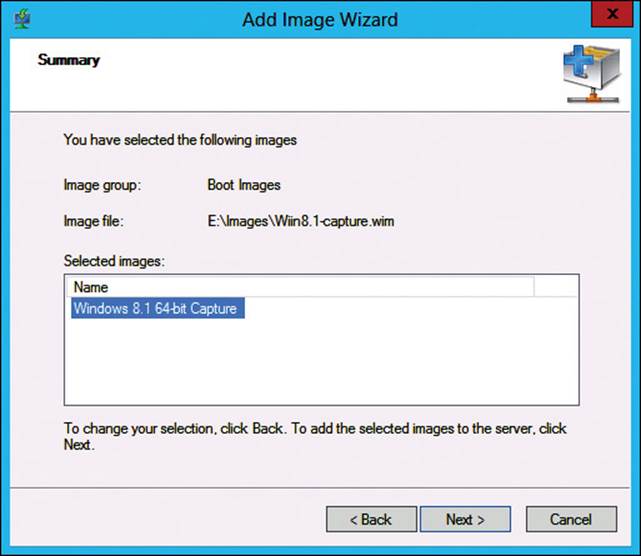
FIGURE 2-13 WDS Add Image Wizard, Summary page
On the Task Progress page, the creation progress appears.
8. When the image is successfully added to the server, as shown in Figure 2-14, click Finish.
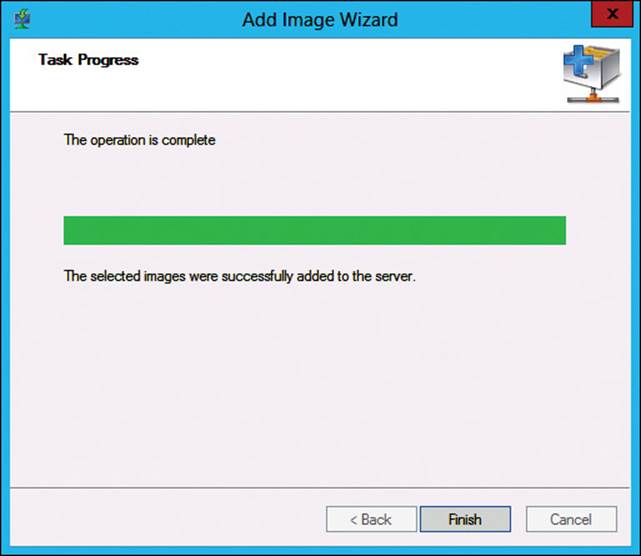
FIGURE 2-14 WDS Add Image Wizard, Task Progress page
Add discover images to WDS
Of all the images you’ll work with in WDS, the discover image is probably the least used. However, it is still important to know how to create a discover image in WDS. To do so, you need an existing boot image. To create a discover image in WDS, perform the following steps.
1. In the WDS console, in the left pane, click Boot Images.
2. In the right pane, right-click a boot image and then click Create Discover Image.
The Create Discover Image Wizard window appears.
3. On the Metadata And Location page, as shown in Figure 2-15, type an image name, an image description, a location and file name, and the name of the WDS server that the discover image will use.
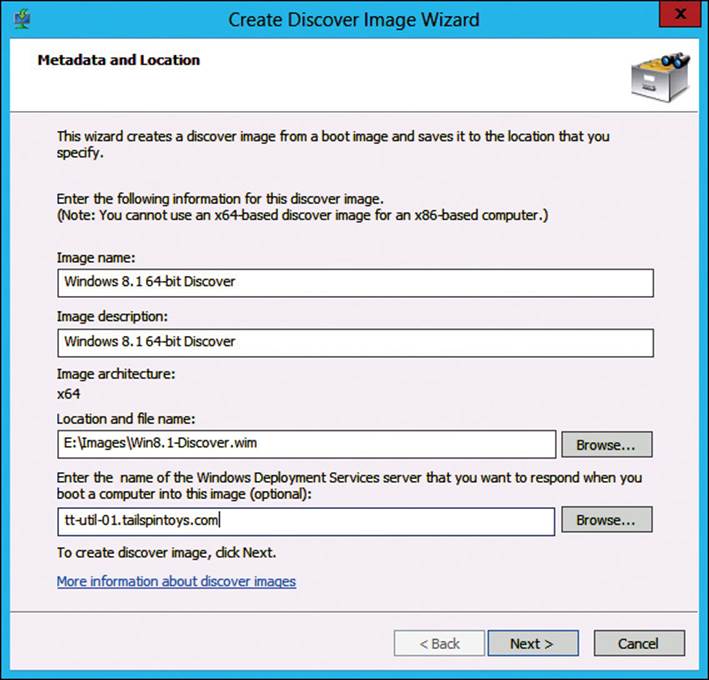
FIGURE 2-15 WDS Create Discover Image Wizard, Metadata And Location page
On the Task Progress page, the progress appears. When it’s finished, a message appears indicating that the image was successfully created, as shown in Figure 2-16.

FIGURE 2-16 WDS Create Discover Image Wizard, Task Progress page
4. Click Finish to complete the process.
More Info: New Features and Functionality
Certification exams often cover new and enhanced functionality as well as deprecated technology. See http://technet.microsoft.com/en-us/library/dn281955.aspx for more detail.
Configuring scheduling
WDS offers limited scheduling capabilities. All the available scheduling capabilities are available for multicast deployments only. Although scheduling was touched on briefly earlier when discussing multicast deployment, the scheduling options are examined in greater detail here. The skills measured on the exam specifically call out the configuration of scheduling.
In WDS, when scheduling a multicast deployment, you are creating a Scheduled-Cast transmission. When configuring a Scheduled-Cast transmission, two options are available:
![]() Start when the number of clients that have requested the image meets a specified threshold. For this option, you specify a threshold, and when that threshold is met, the multicast transmission begins. Often, this option is useful when you image a group of computers and you want the imaging process to complete at the same time for all of them. If you don’t schedule the transmission, multicast clients can join the transmission at any time. For clients that join late, the beginning part of the transmission will have to be re-sent after the initial transmission completes.
Start when the number of clients that have requested the image meets a specified threshold. For this option, you specify a threshold, and when that threshold is met, the multicast transmission begins. Often, this option is useful when you image a group of computers and you want the imaging process to complete at the same time for all of them. If you don’t schedule the transmission, multicast clients can join the transmission at any time. For clients that join late, the beginning part of the transmission will have to be re-sent after the initial transmission completes.
![]() Start at a later time. Instead of waiting for a specific number of multicast clients to join a transmission, you can choose a date and time to start the transmission. This option is often used when an organization doesn’t want to saturate a network link during business hours. In such cases, you would select a time after business hours. The benefit of this approach is that the prep work can be performed during business hours, and the deployment can take place later.
Start at a later time. Instead of waiting for a specific number of multicast clients to join a transmission, you can choose a date and time to start the transmission. This option is often used when an organization doesn’t want to saturate a network link during business hours. In such cases, you would select a time after business hours. The benefit of this approach is that the prep work can be performed during business hours, and the deployment can take place later.
Microsoft Virtual Academy: Windows 8.1 Deployment Jump Start
The Microsoft Virtual Academy offers free online courses delivered by industry experts, including a course relevant to this exam. Look at the available MVA training that is relevant to areas you don’t have a lot of experience in, starting with the Windows 8.1 Deployment Jump Start. You can access the course at http://www.microsoftvirtualacademy.com/training-courses/windows-8-1-deployment-jump-start.
Restricting who can receive images
An important but often overlooked aspect of automated operating system deployments is security. Consider some security considerations to take into account during your deployment planning.
![]() Licensed software Some of your images will contain licensed software. Often, the license keys are stored on the computer that makes them available to users. For images that contain licensed software, you should plan to prevent standard users from deploying your image with licensed software to their computer.
Licensed software Some of your images will contain licensed software. Often, the license keys are stored on the computer that makes them available to users. For images that contain licensed software, you should plan to prevent standard users from deploying your image with licensed software to their computer.
![]() Minimizing accidents or mistakes With a fully automated operating system deployment infrastructure, you run a risk of someone accidentally booting a computer to the network and the computer being reimaged. For a client computer, this might be a minor inconvenience for an employee. However, for a critical server, this could result in a major outage for the entire organization.
Minimizing accidents or mistakes With a fully automated operating system deployment infrastructure, you run a risk of someone accidentally booting a computer to the network and the computer being reimaged. For a client computer, this might be a minor inconvenience for an employee. However, for a critical server, this could result in a major outage for the entire organization.
![]() Network Deploying images over the network takes a lot of bandwidth. If you have a WDS server in Los Angeles, you do not want an administrator in Shanghai to reimage a computer by using the WDS server in Los Angeles.
Network Deploying images over the network takes a lot of bandwidth. If you have a WDS server in Los Angeles, you do not want an administrator in Shanghai to reimage a computer by using the WDS server in Los Angeles.
Fortunately, WDS offers multiple ways to restrict who can access WDS images. You should use one or more of the following methods to enhance the security of your company images:
![]() Authentication You must be able to authenticate to the domain to which the WDS server is joined to use WDS images. Although this opens up WDS images to all authenticated users by default, it also prevents anonymous users from using WDS images.
Authentication You must be able to authenticate to the domain to which the WDS server is joined to use WDS images. Although this opens up WDS images to all authenticated users by default, it also prevents anonymous users from using WDS images.
![]() Filters You can use filters to narrow down the computers that can use an install image. By default, not many filters are applied, and any computer can use any image as long as the appropriate permissions are in place. Filters can be inclusive so that only the computers that match a filter can use an install image. In addition, filters can exclude computers that match a filter so that only computers that do not match the filter can use an install image. You can add filters based on the following computer characteristics:
Filters You can use filters to narrow down the computers that can use an install image. By default, not many filters are applied, and any computer can use any image as long as the appropriate permissions are in place. Filters can be inclusive so that only the computers that match a filter can use an install image. In addition, filters can exclude computers that match a filter so that only computers that do not match the filter can use an install image. You can add filters based on the following computer characteristics:
![]() Manufacturer
Manufacturer
![]() Model
Model
![]() BIOS vendor
BIOS vendor
![]() BIOS version
BIOS version
![]() Chassis type
Chassis type
![]() UUID
UUID
![]() Device group
Device group
![]() Permissions There are two places to configure permissions. You can configure permissions on the User Permissions tab of an image’s properties, as shown in Figure 2-17, or you can configure permissions in an image group’s security settings. By default, authenticated users have Read and Read & Execute permissions, which allow them to access WDS images. The advanced permissions, which show more granular permission entries, show that authenticated users have the following permissions:
Permissions There are two places to configure permissions. You can configure permissions on the User Permissions tab of an image’s properties, as shown in Figure 2-17, or you can configure permissions in an image group’s security settings. By default, authenticated users have Read and Read & Execute permissions, which allow them to access WDS images. The advanced permissions, which show more granular permission entries, show that authenticated users have the following permissions:
![]() Traverse Folder/Execute File
Traverse Folder/Execute File
![]() List Folder/Read Data
List Folder/Read Data
![]() Read Attributes
Read Attributes
![]() Read Extended Attributes
Read Extended Attributes
![]() Read Permissions
Read Permissions
![]() Multiple WDS servers For environments in which you need to restrict WDS imaging to local IT administrators, you can create geographically based security groups and configure the WDS images so that only the local group can deploy images. In such cases, you should deploy a WDS server in each geographic location that plans to use automated operating system deployments. Although not related to restricting who can receive images, it is important to know that WDS servers do not communicate with each other or share a common configuration. Thus, setting up and maintaining an infrastructure with multiple WDS servers requires extra administrative effort when compared to solutions such as MDT with linked deployment shares.
Multiple WDS servers For environments in which you need to restrict WDS imaging to local IT administrators, you can create geographically based security groups and configure the WDS images so that only the local group can deploy images. In such cases, you should deploy a WDS server in each geographic location that plans to use automated operating system deployments. Although not related to restricting who can receive images, it is important to know that WDS servers do not communicate with each other or share a common configuration. Thus, setting up and maintaining an infrastructure with multiple WDS servers requires extra administrative effort when compared to solutions such as MDT with linked deployment shares.
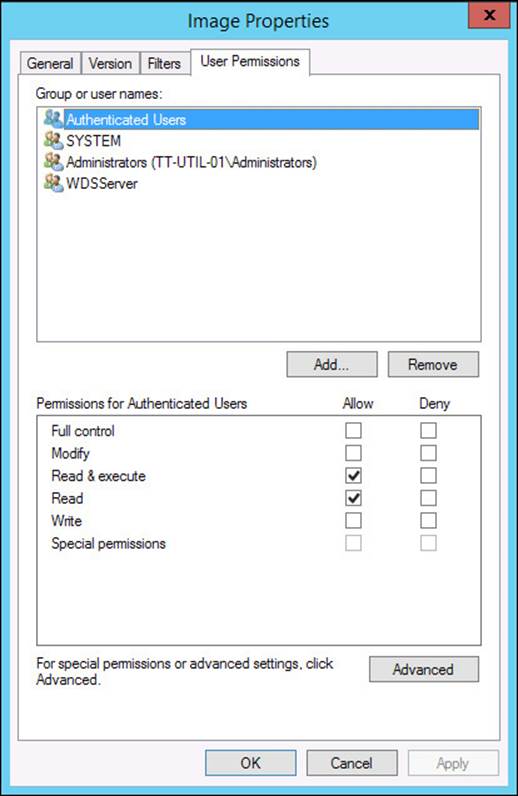
FIGURE 2-17 WDS image permissions
Finally, don’t forget about enhancing security indirectly. For example, as discussed earlier in this chapter, you can configure the PXE response so that WDS responds only to prestaged computers, or you can configure WDS to respond to all computers but then require an administrator to approve unknown computers manually. If you configure the PXE response so that an administrator must approve unknown computers, the administrator will have three options in the WDS console for the unknown devices:
![]() Approve By approving a pending device, the administrator enables the deployment process to continue.
Approve By approving a pending device, the administrator enables the deployment process to continue.
![]() Name And Approve An administrator can specify a host name for the computer and approve it so that the deployment process continues.
Name And Approve An administrator can specify a host name for the computer and approve it so that the deployment process continues.
![]() Reject By rejecting a pending device, an administrator cancels the deployment.
Reject By rejecting a pending device, an administrator cancels the deployment.
Often, in high-security environments, you should take advantage of most or all of the WDS security options. Combining multiple security methods in your solution is known as a layered security approach.
 Thought experiment: Windows 8.1 deployment at Tailspin Toys
Tailspin Toys has two offices. One office is in San Francisco and the other office is in New York. The offices are connected by a 10-megabit (Mb) network. Each office has about 300 client computers, half of which are portable computers. All client computers run Windows 7 Enterprise.
The company plans to upgrade all portable computers to Windows 8.1. The management team wants to automate the installation process. To minimize disruption, users will be reimaged independently, a couple of computers at a time. You decide to use WDS to automate the deployments. To help you assess your knowledge, answer the following questions:
1. To which office should you deploy WDS?
2. Should you use a unicast or multicast method for the deployments?
3. What should you do to ensure that WDS can image only portable computers?
Objective summary
![]() A unicast deployment sends one network transmission to each WDS client.
A unicast deployment sends one network transmission to each WDS client.
![]() A multicast deployment sends one network transmission to multiple WDS clients, which reduces network bandwidth.
A multicast deployment sends one network transmission to multiple WDS clients, which reduces network bandwidth.
![]() A boot image is used to boot a WDS client computer to Windows PE and a WDS client prior to beginning the imaging process.
A boot image is used to boot a WDS client computer to Windows PE and a WDS client prior to beginning the imaging process.
![]() You use an install image to deploy a customized version of Windows or a default installation of Windows. A customized install image is captured from a reference computer.
You use an install image to deploy a customized version of Windows or a default installation of Windows. A customized install image is captured from a reference computer.
![]() A capture image is used to create an install image from a reference computer. You should capture the reference computer after it is configured and after you run Sysprep /Generalize /OOBE.
A capture image is used to create an install image from a reference computer. You should capture the reference computer after it is configured and after you run Sysprep /Generalize /OOBE.
![]() A discover image is used to boot a computer that cannot boot to PXE so that you can deploy a WDS install image.
A discover image is used to boot a computer that cannot boot to PXE so that you can deploy a WDS install image.
![]() You can configure scheduling of multicast deployments by choosing a date and time or setting a threshold for the number of computers that have to join a transmission before it starts.
You can configure scheduling of multicast deployments by choosing a date and time or setting a threshold for the number of computers that have to join a transmission before it starts.
![]() You can restrict access to WDS images by using filters and permissions. Permissions can be set on an individual image or on an image group.
You can restrict access to WDS images by using filters and permissions. Permissions can be set on an individual image or on an image group.
Objective review
Answer the following questions to test your knowledge of the information in this objective. You can find the answers to these questions and explanations of why each answer choice is correct or incorrect in the “Answers” section at the end of this chapter.
1. You have a WDS server running on Windows Server 2012 R2. You need to automate some WDS configuration tasks. Which solution should you use? (Choose all that apply.)
A. Windows PowerShell WDS module
B. WDSutil.exe
C. WDSdiag.exe
D. WDSmgmt.msc
2. You are attempting to capture an image of a reference computer. When you boot to the capture image, the WDS Image Capture Wizard does not see the system volume. What should you do?
A. Reboot to Windows and then run the Sysprep /Generalize /OOBE /Shutdown command.
B. Press Shift+F10 to open a Windows PE command prompt and then run the Sysprep /Generalize /OOBE /Reboot command.
C. Reboot to Windows and then grant the SYSTEM account Full Control on the system drive.
D. Press Shift+F10 to open a Windows PE command prompt and then use XCALCS to grant the SYSTEM account Full Control on the system drive.
3. You are running a default installation of WDS on Windows Server 2012 R2. Your immediate need is to create a discover image. What should you do first?
A. Create a capture image.
B. Create an install image.
C. Add a boot image.
D. Import the Windows PowerShell WDS module.
4. You are planning to image 100 client computers by using WDS. The network team has asked that the imaging take place after business hours, so you need to set up the imaging to take place at a future time. What should you do?
A. Use unicast and schedule a transmission for a future time.
B. Use multicast and schedule a transmission for a future time.
C. Use unicast and a WDS filter.
D. Use multicast and a WDS filter.
5. Your company has recently switched from Dell to HP for its laptop computers. A new batch of HP EliteBook 840 G1 laptops has arrived for imaging, but an advisory was sent out that recommends that all laptops of this model running a BIOS prior to F03 be updated before using. You need to ensure that your image is only installed on the HP laptops running the F03 bios. Which WDS filters should you apply?
A. UUID and BIOS Version
B. BIOS Vendor and BIOS Version
C. Model and BIOS Version
D. Model and BIOS Vendor
Objective 2.2: Configure MDT
The Microsoft Deployment Toolkit (MDT) provides you with the ability to prepare and customize various aspects of the deployment process. MDT enables administrators to automate deployments and minimize the time that is required to complete a deployment.
This objective covers how to:
![]() Configure deployment shares
Configure deployment shares
![]() Manage the driver pool
Manage the driver pool
![]() Configure task sequences
Configure task sequences
![]() Configure customsettings.ini
Configure customsettings.ini
Configuring deployment shares
Deployment shares are folders that contain images and files such as drivers, applications, and scripts for use in an LTI deployment. Deployment shares can be located in a variety of locations, including:
![]() Local drives
Local drives
![]() Network shared folders
Network shared folders
![]() Standalone Distributed File System (DFS) folder
Standalone Distributed File System (DFS) folder
Deployment shares hold data that is needed for part of the deployment process, including:
![]() Operating systems
Operating systems
![]() Packages
Packages
![]() Applications
Applications
![]() Device drivers
Device drivers
![]() Task sequences
Task sequences
There are two methods of creating a deployment share. First, after MDT has been installed, you can use the Deployment Workbench, which has a built-in wizard that creates a shared folder as a deployment share. By default, the share will be hidden and thus end with a dollar sign. The wizard will ask for the path that the folder should reside in and accepts local and network paths, as shown in Figure 2-18. If a local path is specified, the share name can also be customized. If a network path is specified, a UNC path must be used.
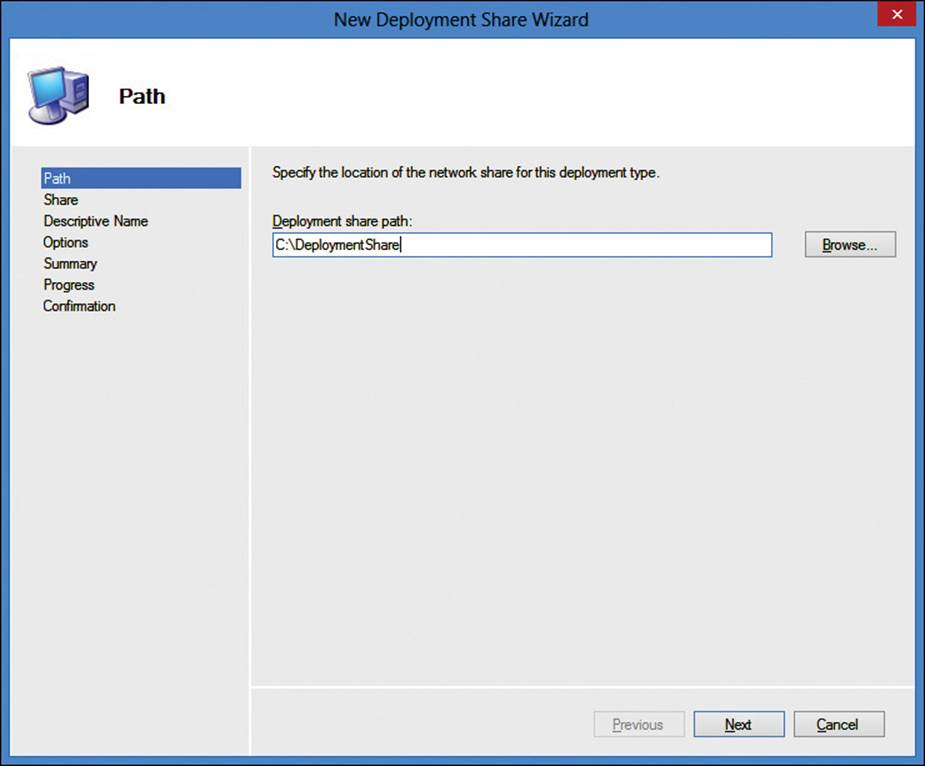
FIGURE 2-18 MDT New Deployment Share Wizard, Path page
When you create deployment shares, you have a number of configuration options, which include:
![]() Ask If A Computer Backup Should Be Performed
Ask If A Computer Backup Should Be Performed
![]() Ask For A Product Key
Ask For A Product Key
![]() Ask To Set The Local Administrator Password
Ask To Set The Local Administrator Password
![]() Ask If An Image Should Be Captured
Ask If An Image Should Be Captured
![]() Ask If Bitlocker Should Be Enabled
Ask If Bitlocker Should Be Enabled
The computer backup, image capture, and BitLocker options are enabled by default when using the wizard. All, none, or any combination of options can be configured when completing the wizard, which is shown in Figure 2-19. The options can be changed later. See the “Configuring customsettings.ini” section later in this chapter for additional detail.
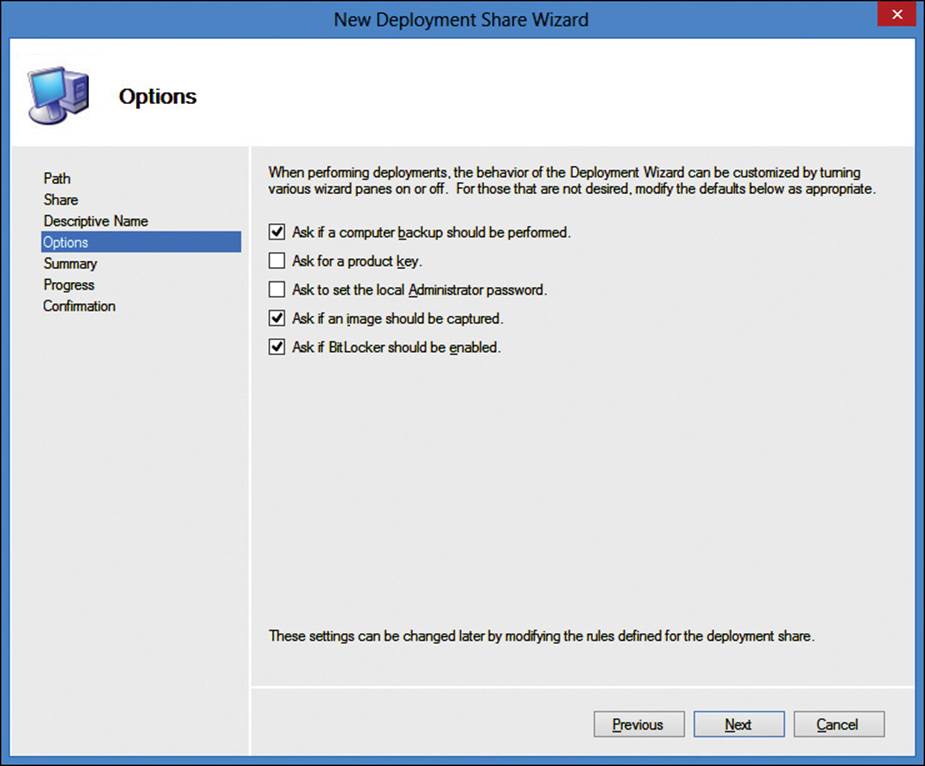
FIGURE 2-19 MDT New Deployment Share Wizard, Options page
Alternatively, if a shared folder already exists, you can use Windows PowerShell to create a deployment share. However, before using Windows PowerShell, add the BDD snapin manually by running the Add-PSSnapIn Microsoft.BDD.PSSnapIn command. Business Desktop Deployment (BDD) is the original name for early versions of MDT, and its name is still displayed in a few places in the MDT product. The cmdlet to use to create a deployment share manually, Add-MDTPersistentDrive, requires a Windows PowerShell drive to exist, which can then be used from the Deployment Workbench. Deployment shares that are configured through Windows PowerShell are stored in a user’s profile and will automatically be opened by the Deployment Workbench. The following command is an example of a Windows PowerShell method to configure both a drive and a deployment share:
New-PSDrive -Name "DS001" -PSProvider "MDTProvider" -Root "C:\DeploymentShare"
-Description "MDT Deployment Share" -Force -Verbose | Add-MDTPersistentDrive -Verbose
Exam Tip
When using Windows PowerShell to add a deployment share, you do not specifically create or share a directory. You only configure the Deployment Workbench to use an existing share.
After a deployment share has been created, it can be used from within the Deployment Workbench, as shown in the Open Deployment Share Wizard in Figure 2-20. If the deployment share was created with the previous version of MDT, the contents of the share can be upgraded when opened for the first time by using MDT 2013.
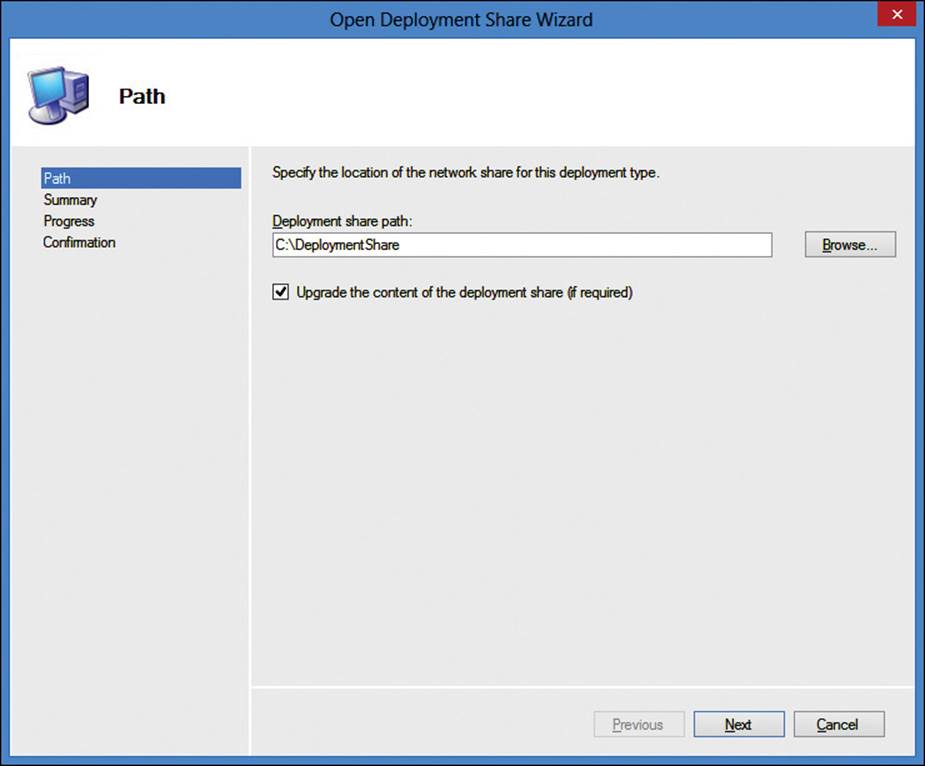
FIGURE 2-20 Open Deployment Share Wizard, Path page
After a deployment share has been created or opened within the Deployment Workbench, your next steps include copying data to the share, such as:
![]() Operating systems
Operating systems
![]() Applications
Applications
![]() Packages
Packages
![]() Drivers
Drivers
If you plan to perform multicast deployments by using MDT and WDS, enable multicast for the deployment share. To do so, perform the following steps:
1. Open the MDT Deployment Workbench.
2. Right-click the MDT Deployment Share in the left pane and then click Properties.
3. In the MDT Deployment Share Properties window, on the General tab, click Enable Multicast For This Deployment Share (requires Windows Server 2008 R2 Windows Deployment Services).
4. Click OK.
When adding an operating system in MDT, as shown in Figure 2-21, you have a few choices for the type of operating system that you are adding:
![]() A full set of source files such as those found on the installation media
A full set of source files such as those found on the installation media
![]() A custom image file that has been deployed and captured
A custom image file that has been deployed and captured
![]() All existing images available on the WDS server
All existing images available on the WDS server
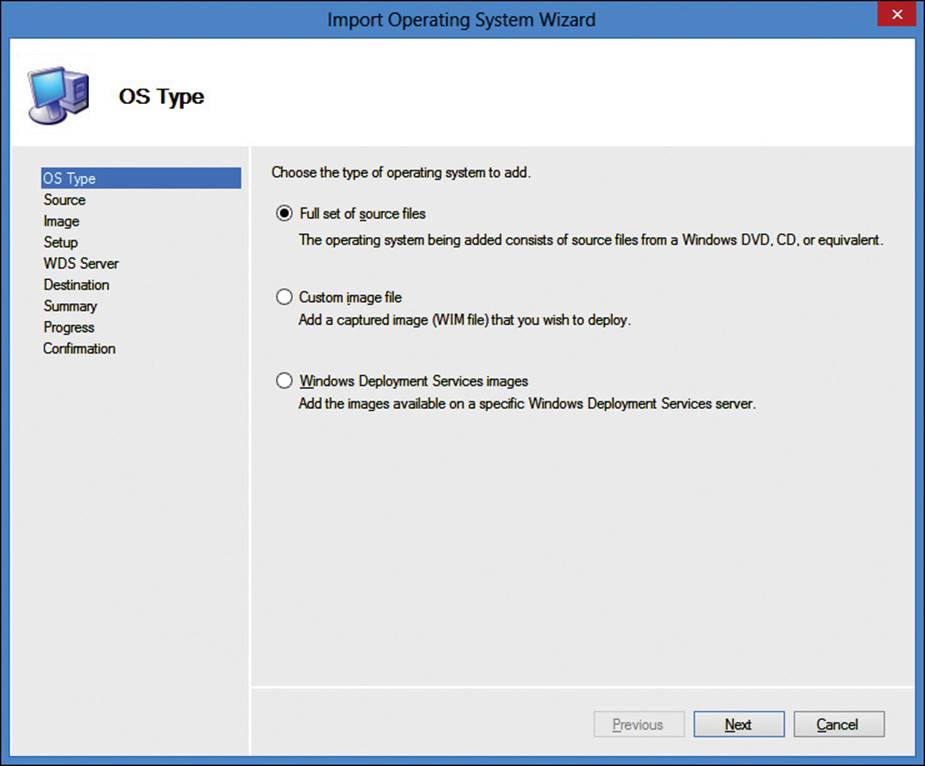
FIGURE 2-21 Import Operating System Wizard, OS Type page
Operating systems can also be imported by using Windows PowerShell. To import the operating system named Windows 8 Enterprise x86 with source files that are located on the E:\ drive, run the following command:
Import-MDTOperatingSystem -Path "DS001:\Operating Systems" -SourcePath "E:\"
-DestinationFolder "Windows 8 Enterprise x86"
You can also add applications and configure the type of application to add, as shown in Figure 2-22. The options include:
![]() Application with source files, as typically used with a local installation.
Application with source files, as typically used with a local installation.
![]() Application without source files, or elsewhere on the network, as typically used with network installations.
Application without source files, or elsewhere on the network, as typically used with network installations.
![]() Application bundle, which installs the application and the dependencies of the application.
Application bundle, which installs the application and the dependencies of the application.
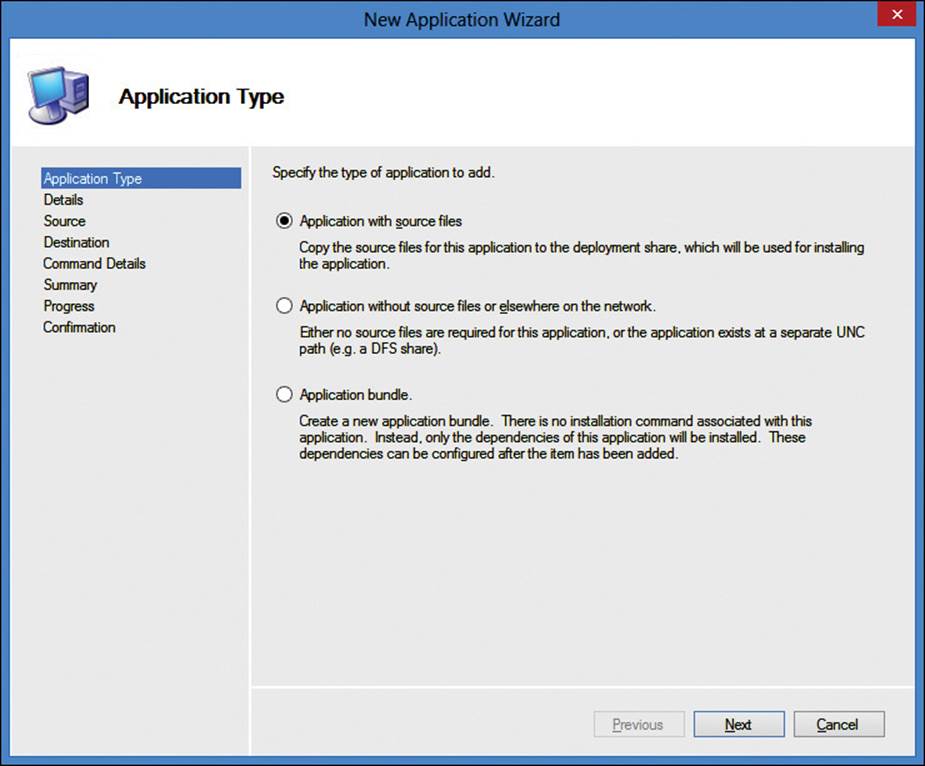
FIGURE 2-22 New Application Wizard, Application Type page
You can also deploy applications by using Windows PowerShell. To import a package named App1 that is located on the E:\ drive and requires the command-line switch “-q”, run the following command:
Import-MDTApplication -Path "DS001:\Applications" -enable "True" -Name "App1" -ShortName
"App1" -CommandLine "-q" -WorkingDirectory ".\Applications\App1" -ApplicationSourcePath
"E:\" -DestinationFolder "App1"
Packages are defined as Windows packages that contain software features, updates, or hotfixes. Packages will have either a .cab or .msu file extension. You can add packages to the Deployment Workbench, as shown in Figure 2-23, for use with images and task sequences to enhance and customize a deployment further.
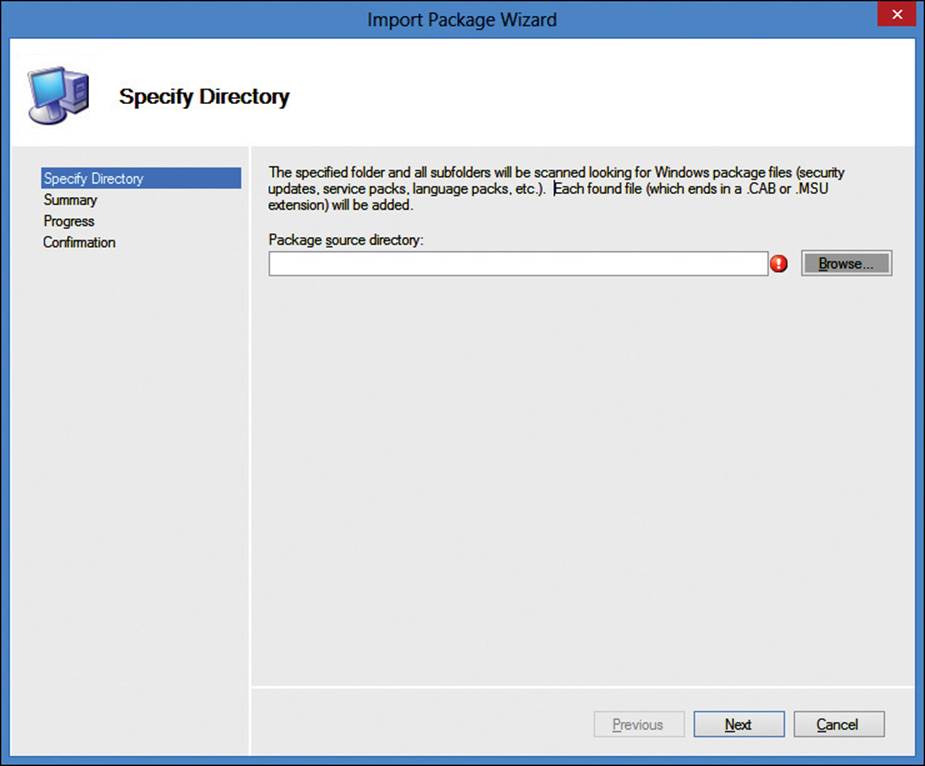
FIGURE 2-23 Import Package Wizard, Specify Directory page
You can also import packages by using Windows PowerShell. You can run the following command to import packages that are located in the E:\Data folder and all folders under the Data folder:
Import-MDTPackage -Path "DS001:\Packages" -SourcePath "E:\Data"
Deployment shares can also be configured to support specific platforms, or reconfigured for a different local or network path, as shown in Figure 2-24.
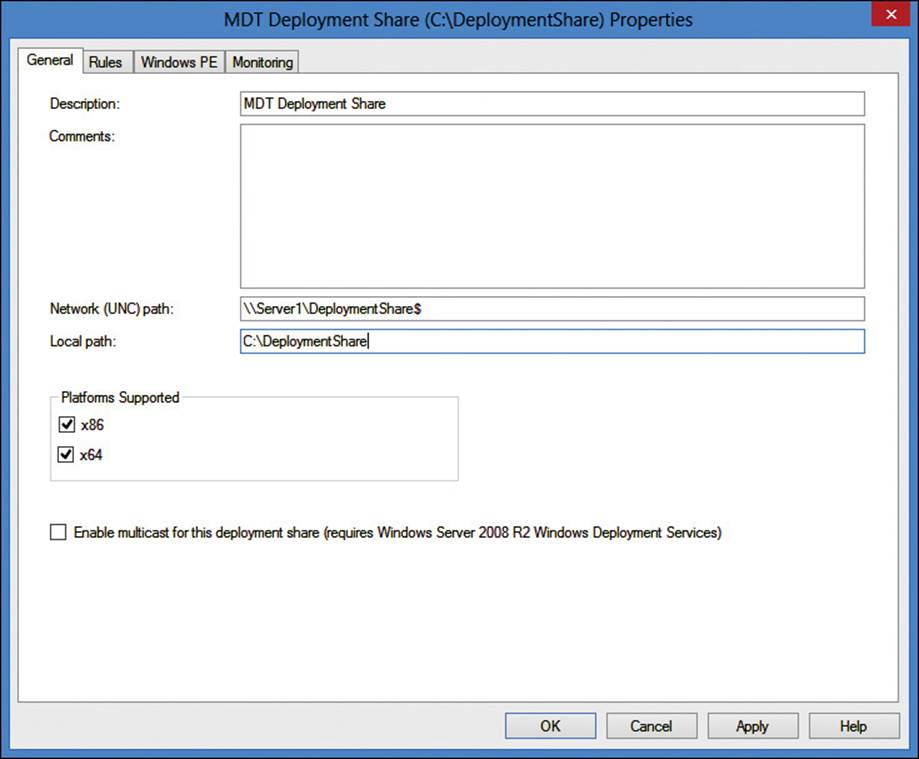
FIGURE 2-24 MDT Deployment Share Properties, General tab
More Info: Microsoft Deployment Toolkit 2013
For more information about MDT 2013, see http://technet.microsoft.com/en-us/windows/dn475741.aspx.
Managing the driver pool
MDT includes a systematic approach for managing and deploying device drivers. In large environments that support multiple platforms, driver management can be a big challenge. With MDT, drivers can now be imported into the driver pool for easy sorting, versioning, and injection, ensuring that the target hardware is fully functional after the image has been deployed. Device drivers could be required to use specific hardware on a computer to which an image is being deployed or, optionally, for printers and peripherals that might be installed in the future. The Import Driver Wizard loads the drivers as specified in the associated .inf file types.
MDT will scan a specified directory for drivers, as shown in Figure 2-25.
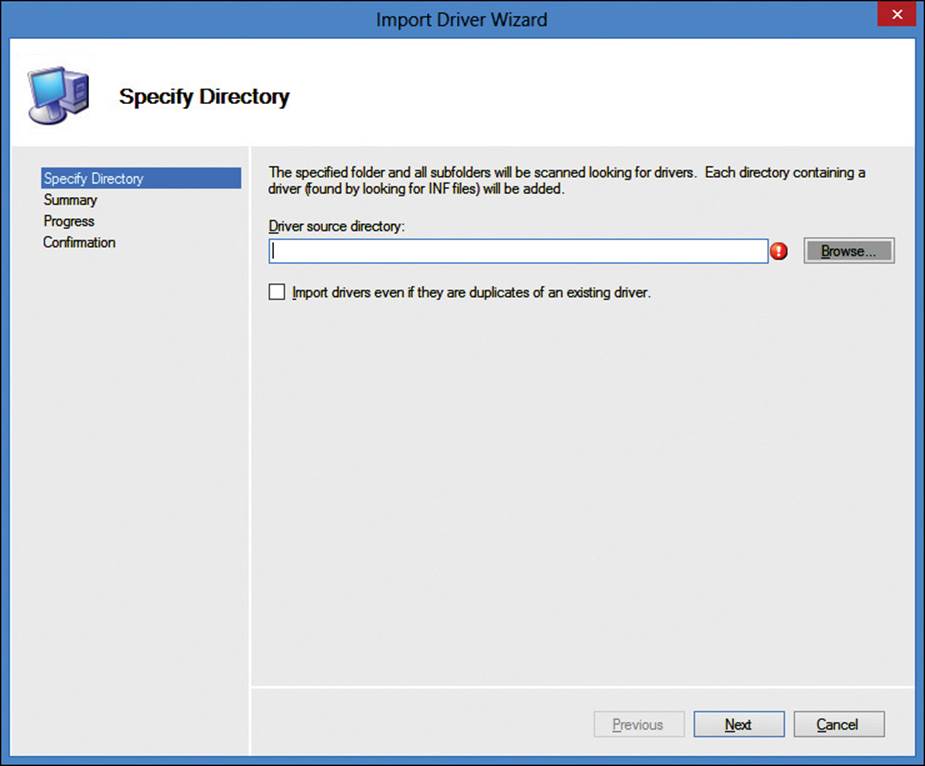
FIGURE 2-25 Import Driver Wizard, Specify Directory page
You can also import device drivers by using Windows PowerShell. You can run the following command to import a driver that is located on the E:\Data drive:
Import-MDTDriver -Path "DS001:\Out-of-Box Drivers" -SourcePath "E:\Data"
-ImportDuplicates
You can customize the Windows PE boot images for x86 and x64 platforms with drivers that have been loaded into the Deployment Workbench, as shown in Figure 2-26. You can configure the Windows PE image to include all drivers from the configured selection profile or any combination of the following settings:
![]() Include All Network Drivers In The Selection Profile
Include All Network Drivers In The Selection Profile
![]() Include All Mass Storage Drivers In The Selection Profile
Include All Mass Storage Drivers In The Selection Profile
![]() Include All Video Drivers In The Selection Profile
Include All Video Drivers In The Selection Profile
![]() Include All System-Class Drivers In The Selection Profile
Include All System-Class Drivers In The Selection Profile
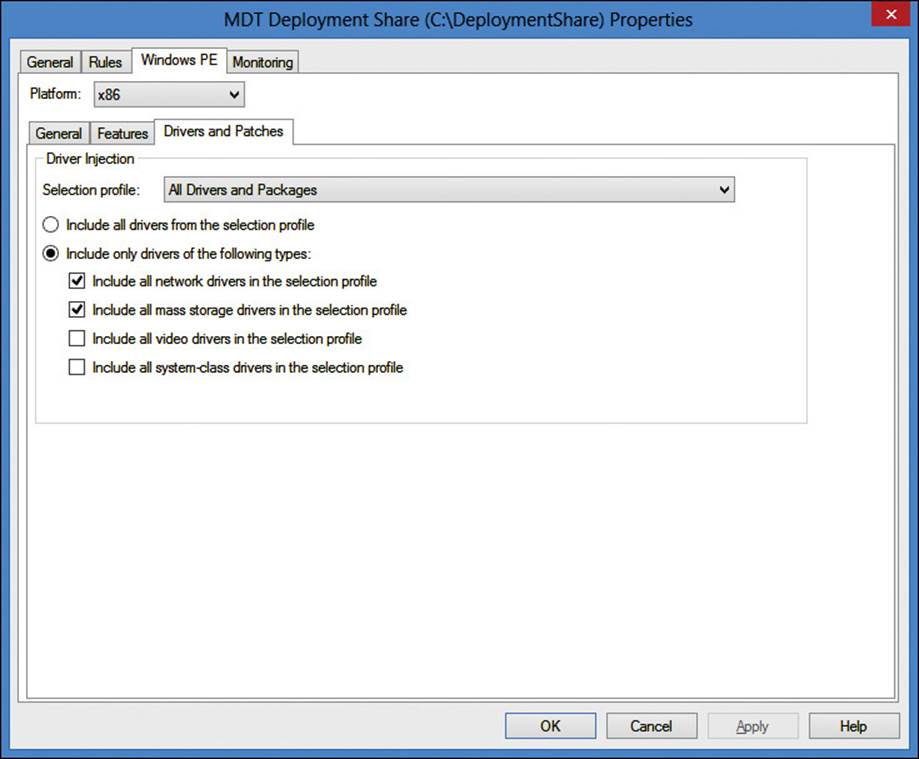
FIGURE 2-26 MDT Deployment Share Properties, Windows PE tab
Configuring task sequences
Task sequences are the steps that will be taken in order as part of an LTI deployment. An MDT task sequence uses the same task sequence engine as System Center Configuration Manager, although Configuration Manager is not required to run MDT task sequences. MDT includes a New Task Sequence Wizard, as shown in Figure 2-27, which walks you through creating a new task sequence.
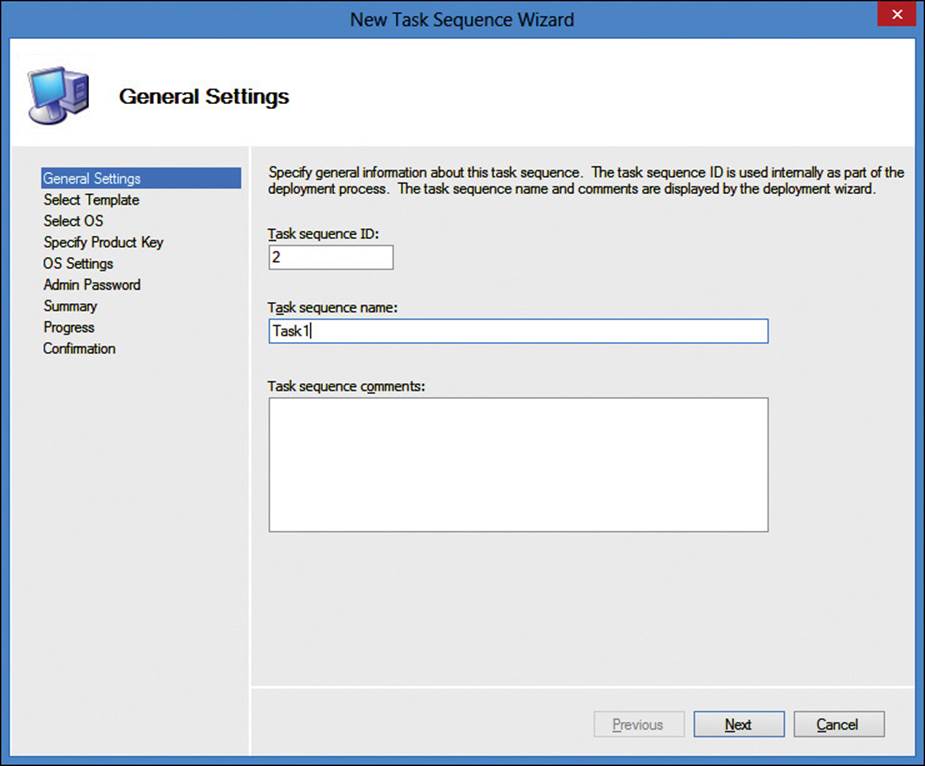
FIGURE 2-27 New Task Sequence Wizard, General Settings page
MDT 2013 has the following nine default task sequence templates:
![]() Sysprep and Capture Runs Sysprep on a reference computer and then captures the image of that computer.
Sysprep and Capture Runs Sysprep on a reference computer and then captures the image of that computer.
![]() Standard Client Task Sequence Creates and deploys reference images for computers.
Standard Client Task Sequence Creates and deploys reference images for computers.
![]() Standard Client Replace Task Sequence Runs the User State Migration Tool (USMT) backup and the optional full Windows Images backup actions. This sequence can also be used to perform a secure wipe of a computer that will be removed from the network.
Standard Client Replace Task Sequence Runs the User State Migration Tool (USMT) backup and the optional full Windows Images backup actions. This sequence can also be used to perform a secure wipe of a computer that will be removed from the network.
![]() Custom Task Sequence Can be customized to meet your requirements. It has one default task, which is for an application installation.
Custom Task Sequence Can be customized to meet your requirements. It has one default task, which is for an application installation.
![]() Standard Server Task Sequence Has default sequence for deploying server operating systems. The difference between this template and the client template is that the server template does not use USMT.
Standard Server Task Sequence Has default sequence for deploying server operating systems. The difference between this template and the client template is that the server template does not use USMT.
![]() Litetouch OEM Task Sequence Preloads operating system images onto the computer. This is normally used for factory installations but can also be used in an enterprise environment.
Litetouch OEM Task Sequence Preloads operating system images onto the computer. This is normally used for factory installations but can also be used in an enterprise environment.
![]() Post OS Installation Task Sequence Contains tasks that should be run after the operating system installation has completed.
Post OS Installation Task Sequence Contains tasks that should be run after the operating system installation has completed.
![]() Deploy to VHD Client Task Sequence Creates a virtual hard disk (VHD) on the destination computer and deploys the image to the VHD, similar to the standard client task sequence template.
Deploy to VHD Client Task Sequence Creates a virtual hard disk (VHD) on the destination computer and deploys the image to the VHD, similar to the standard client task sequence template.
![]() Deploy to VHD Server Task Sequence Provides the same template as the VHD client template but is used for servers.
Deploy to VHD Server Task Sequence Provides the same template as the VHD client template but is used for servers.
The default task sequences are shown in Figure 2-28.
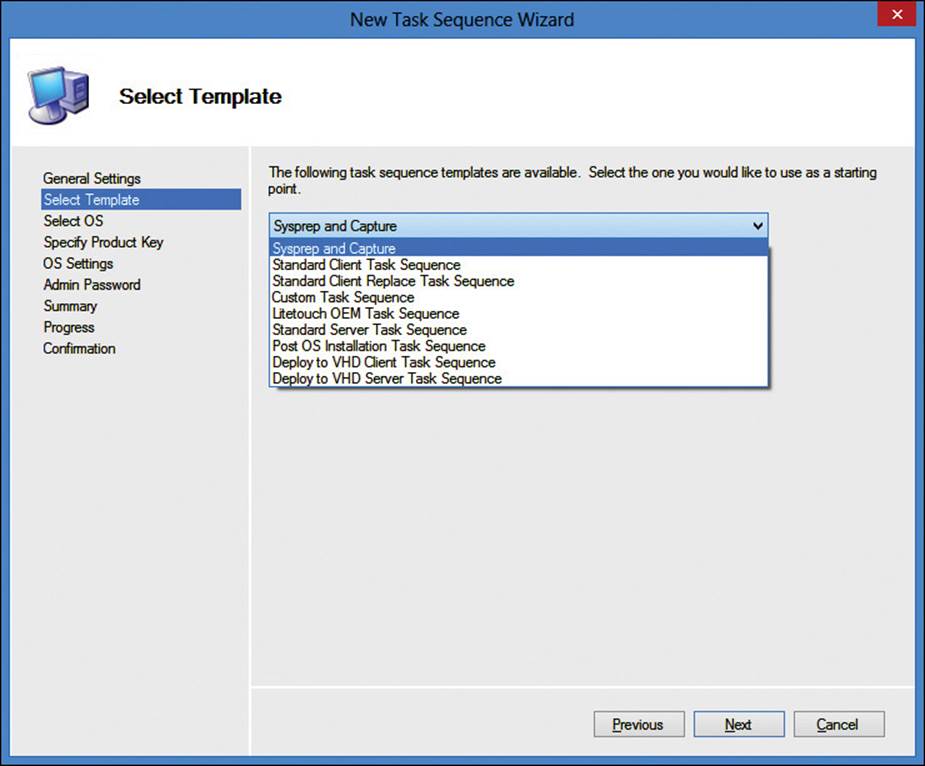
FIGURE 2-28 New Task Sequence Wizard, Select Template page
The template that you choose determines which pages of the wizard are shown to you. For example, if you select the Custom Task Sequence template, it will take you directly to the summary screen to create the task. However, if you select the Standard Client Task Sequence template, it prompts you to select the operating system, product key, operating system settings, and password. Figure 2-29 shows the Specify Product Key page of the wizard.
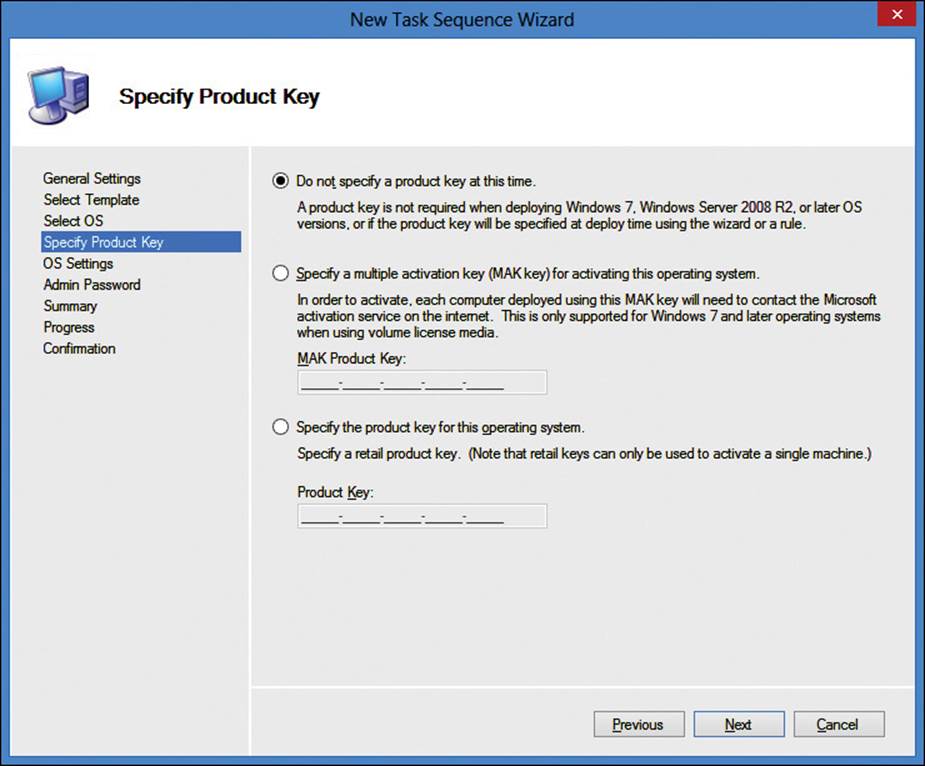
FIGURE 2-29 New Task Sequence Wizard, Specify Product Key page
More Info: Create a Task Sequence with MDT
For more information about creating a task sequence, see the article at http://technet.microsoft.com/en-us/library/dn744302.aspx.
Configuring customsettings.ini
MDT 2013 is highly customizable by using a settings configuration file. The configuration file, named customsettings.ini, contains information that will be used during an LTI deployment. To automate deployments as much as possible, you must work with the customsettings.ini file. Otherwise, you must answer several installation questions manually during deployments. A customsettings.ini file contains
![]() Sections
Sections
![]() Properties
Properties
![]() Settings
Settings
The following is a sample customsettings.ini file:
[Settings]
Priority=Default, MACAddress
Properties=CustomProperty
[Default]
OSInstall=Y
ScanStateArgs=/v:5 /o /c
LoadStateArgs=/v:5 /c /lac
UserDataLocation=NONE
[00:0F:20:35:DE:AC]
CustomProperty=TRUE
When customizing a customsettings.ini file, the only section that is required is Settings. All the other sections in the file are optional. The optional settings can set the configuration for either an individual computer, as identified by the MAC address, or a group of computers, as identified by a specified characteristic such as the make, model, or geographic location.
The properties that can be defined in the customsettings.ini file are predefined in the ZTIGather.wsf file, which is used for both Zero Touch Installation (ZTI) and LTI deployments, and automatically sets the values for properties that can be defined. You can run the ZTIGather.wsf script on computers, which then outputs a very large amount of data about the computers, to ensure that you use the right values for properties in the customsettings.ini file. When customizing a customsettings.ini file, ensure that all the properties you use are considered customizable.
Although the way properties are used for both ZTI and LTI deployments are similar, some properties are unique for each deployment scenario. In an LTI deployment, most of the properties relate to the deployment wizard, such as
![]() SkipadministratorPassword
SkipadministratorPassword
![]() SkipCapture
SkipCapture
![]() SkipUserData
SkipUserData
 Exam Tip
There are more than 300 customizable properties that you can use in customsettings.ini. Although you don’t need to be familiar with all of them for the exam, you should look at the complete list and familiarize yourself with some of them. On a computer on which MDT is installed, you’ll find the Microsoft Deployment Toolkit Documentation Library. In the documentation library, expand Toolkit Reference and then look at Properties.
 Thought experiment: Going to LDI deployments at Fabrikam
You are the system administrator for Fabrikam. You, along with three other IT administrators, handle all aspects of the computing environment. Fabrikam is a small organization with one main office and 350 client computers. You are preparing to deploy WDS and MDT as part of a project to bring LTI operating system deployments to your organization.
You need to prepare the infrastructure for LTI deployments. To help you plan better for the project, answer the following questions:
1. MDT is deployed, but WDS isn’t yet. Where should you put the operating system images that you want to deploy?
2. You just finished configuring a computer to use as a reference computer. Now, you want to use the computer to create the installation image. Which MDT task sequence should you use?
3. You are preparing to add some packages to your deployment share. Which file extensions are valid for packages?
Objective summary
![]() Deployment shares store information used during a deployment.
Deployment shares store information used during a deployment.
![]() Deployment shares can have operating systems, packages, applications, and device drivers.
Deployment shares can have operating systems, packages, applications, and device drivers.
![]() Windows PowerShell can be used to configure components of a deployment share.
Windows PowerShell can be used to configure components of a deployment share.
![]() You can use packages, applications, and device drivers to streamline the update process of an operating system deployment.
You can use packages, applications, and device drivers to streamline the update process of an operating system deployment.
![]() Device drivers can be used with specific Windows PE selection profiles.
Device drivers can be used with specific Windows PE selection profiles.
![]() Task sequences can be used to customize a deployment.
Task sequences can be used to customize a deployment.
![]() Nine task sequence templates are available to customize a deployment.
Nine task sequence templates are available to customize a deployment.
![]() The customsettings.ini file provides additional customization capabilities, which can help automate more of the deployment process.
The customsettings.ini file provides additional customization capabilities, which can help automate more of the deployment process.
Objective review
Answer the following questions to test your knowledge of the information in this objective. You can find the answers to these questions and explanations of why each answer choice is correct or incorrect in the “Answers” section at the end of this chapter.
1. MDT task sequences use the same engine as which other product?
A. Windows Server 2012
B. System Center 2012 R2 Configuration Manager
C. Exchange Server 2013
D. SharePoint Server 2013
2. You need to automate several aspects of a deployment to minimize the number of manual deployment steps required. Which file should you use?
A. Bootstrap.ini
B. Customsettings.ini
C. Deploy.xml
D. Settings.xml
3. You have an existing MDT deployment share. You deploy a new MDT server. You need to add the existing share to the new MDT server. What should you do?
A. In the MDT console, create a new deployment share and specify the path to the existing deployment share.
B. In the MDT console, open the existing deployment share.
C. Run the Add-MDTPersistentDrive Windows PowerShell command.
D. Run the Get-MDTPersistentDrive Windows PowerShell command.
4. Which storage locations can a deployment share be located on? (Choose all that apply.)
A. Network share
B. Local storage
C. Microsoft Access database
D. SQL Server database
5. You are attempting to run the Get-MDTDeploymentShareStatistics command on your MDT server, but an error message appears. The error is “Get-MDTDeploymentShareStatistics : The term ‘Get-MDTDeploymentShareStatistics’ is not recognized as the name of a cmdlet, function, script file, or operable program.” You need to be able to run MDT Windows PowerShell commands. What should you do?
A. Run the Import-Module Microsoft.BDD.PSSnapIn command.
B. Run the Add-PSSnapIn Microsoft.BDD.PSSnapIn command.
C. At the Windows PowerShell prompt, change the directory to C:\Windows\System32.
D. Open the Windows PowerShell prompt as Administrator.
Objective 2.3: Create and manage answer files
Answer files are a crucial part of implementing an LTI deployment method with the MDT. Answer files are XML files that contain settings and responses to virtually all aspects of the Windows setup process. Answer files can be used with any type of deployment image and can include settings about items such as:
![]() User accounts
User accounts
![]() Display settings
Display settings
![]() Product key
Product key
![]() Time zone
Time zone
Many other settings can also be configured with an answer file.
This objective covers how to:
![]() Identify the appropriate location for answer files
Identify the appropriate location for answer files
![]() Identify the required number of answer files
Identify the required number of answer files
![]() Identify the appropriate setup phase for answer files
Identify the appropriate setup phase for answer files
![]() Configure answer file settings
Configure answer file settings
![]() Create Autounattended.xml answer files
Create Autounattended.xml answer files
Identifying the appropriate location for answer files
Before implementing an unattended installation using answer files, you should be familiar with how Windows Setup interprets the files. First, to ensure that an answer file is read and interpreted during the Windows Setup process, it must be stored in the appropriate working directory. In some cases, answer files must also have specific names. The files can be located in a number of locations, and each location has a different precedence. The answer file that has the highest precedence is used for the customization of that installation. Second, the Windows Setup process starts by taking an inventory of all valid answer files based on the order of precedence. The files are validated and cached to the local computer. During the WindowsPE and offlineServicing passes, valid answer files are cached to $Windows.~BT\Sources\Panther. After the image has been extracted to the local disk, answer files are cached to %WINDIR%\panther. The following table lists the valid locations for an answer file.
Exam Tip
Be expected to know the difference between Unattend.xml and Autounattend.xml, including the locations that specifically require one file name or the other.
Identifying the required number of answer files
Theoretically, you could place an answer file in all seven of the locations specified in Table 2-1. However, the installation process will only use answer files that have valid configuration data for the configuration pass it is currently working in. As a good practice, you should use the minimum number of answer files that are needed for your deployment. From an exam perspective, the best way to identify the required number of answer files is to understand the answer files and what they do, where they are stored, and how they are processed. You might be presented with an exam scenario to meet a specified set of deployment requirements and then be asked to figure out which answer file(s) are required. The following sections in this chapter discuss the details of answer files and their role in automated deployments.

TABLE 2-1 Answer file precedence table
Identifying the appropriate setup phase for answer files
An answer file is composed of seven configuration passes, each representing a different phase within the Windows Setup procedure. Within each configuration pass, you are given a series of components that can be added to your answer file and manipulated to meet the needs of your image deployment. It is important to note that these components are not always unique to a specific configuration pass. In some cases, the same component can be referenced across multiple passes.
You should be familiar with the Windows Setup procedure and how each configuration pass is used. The following are the seven configuration passes:
![]() windowsPE
windowsPE
![]() offlineServicing
offlineServicing
![]() generalize
generalize
![]() specialize
specialize
![]() auditSystem
auditSystem
![]() auditUser
auditUser
![]() oobeSystem
oobeSystem
Although there are seven configuration passes, only the windowsPE, specialize, and oobeSystem passes are used for every deployment. The other configuration passes are used only as needed. The windowsPE configuration pass, as shown in Figure 2-30, configures settings that are specific to the preinstallation environment as well as to installation settings. The Windows Setup settings that can be configured include:
![]() Disk drive partitions and formatting
Disk drive partitions and formatting
![]() Windows image location and credentials
Windows image location and credentials
![]() Destination partition
Destination partition
![]() Windows product key
Windows product key
![]() Local Administrator account password
Local Administrator account password
![]() Specific commands that must run during setup
Specific commands that must run during setup
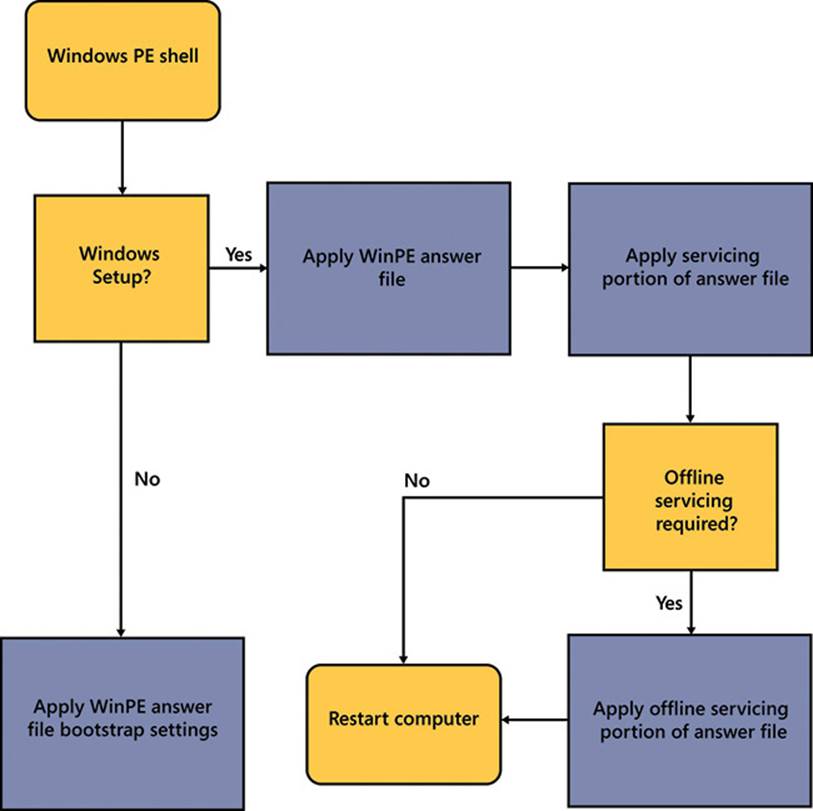
FIGURE 2-30 The windowsPE configuration pass logical order
You can use the offlineServicing pass of the configuration to apply Windows Setup settings to an offline Windows image. During this pass, packages can be added to the offline Windows image. The offlineServicing pass uses Package Manager (Pkgmgr.exe) to apply packages.
The generalize pass of the configuration, shown in Figure 2-31, is used to create a custom image of a Windows installation that can then be deployed to multiple computers. Settings defined in the generalize pass can be used to automate aspects of a deployment of the image. During the generalize pass, specific details of the Windows installation are removed from the image, such as the security identifier (SID) and other hardware-specific settings. The generalize pass is only used when the /generalize switch is provided with the Sysprep command. Other answer file settings are applied to the Windows image before the Sysprep generalization occurs.
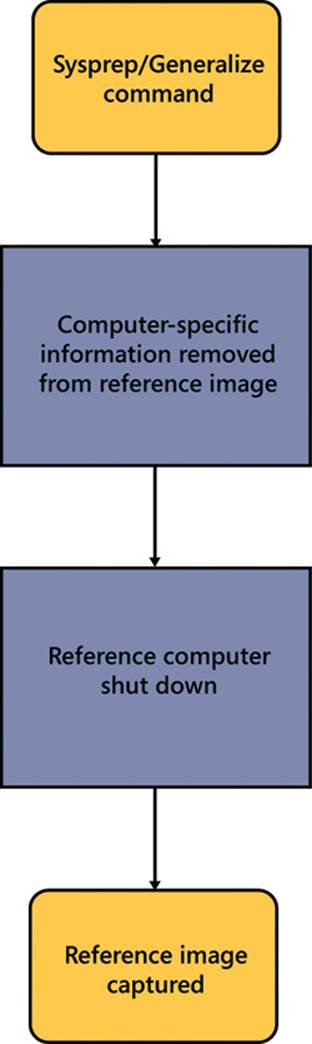
FIGURE 2-31 The generalize pass logical order
More Info: What is Sysprep?
For more information about Sysprep, see the article at http://technet.microsoft.com/en-us/library/cc721940(v=ws.10).aspx.
The specialize pass of the installation, shown in Figure 2-32, allows settings to be configured for an individual machine. These settings can include:
![]() Network settings
Network settings
![]() International and language settings
International and language settings
![]() Domain information
Domain information
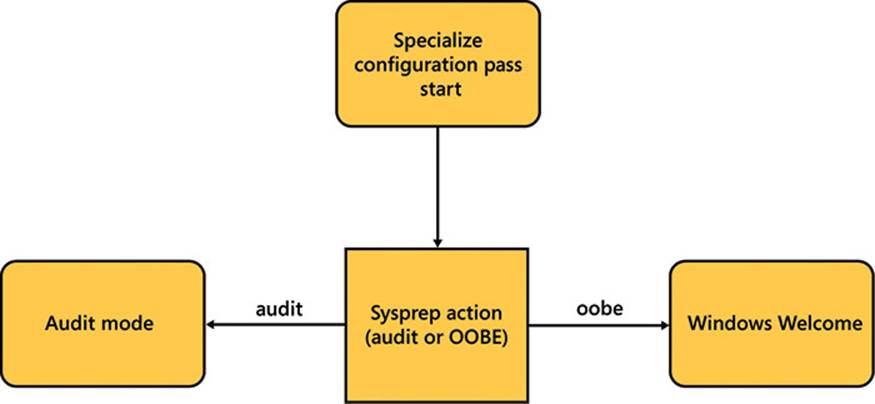
FIGURE 2-32 The specialize pass logical order
The specialize pass can be used to enhance or customize settings further that were made in the generalize pass.
The auditSystem pass of the installation is only used if the system has been booted into audit mode. When a computer has been started by using the audit mode, the auditSystem and auditUser passes are processed. The auditSystem pass can be used to add additional drivers to a Windows image.
The auditUser pass of the installation is typically used for RunSynchronous and RunAsynchronous commands that might include scripts, applications, or other executables.
More Info: The AuditSystem Pass
For more information about the auditSystem pass as well as about a detailed decision tree, see http://technet.microsoft.com/en-us/library/cc749062(v=ws.10).aspx.
The oobeSystem pass of the installation, as shown in Figure 2-33, configures the settings that are typically used during the first power on for end users, known as Windows Welcome. The oobeSystem settings are applied before the first user logs on to Windows. The out-of-box experience (OOBE) runs the first time an end user powers on a new computer. OOBE runs before the user logs on or runs additional software, and it performs the tasks that are necessary to configure Windows for first use.
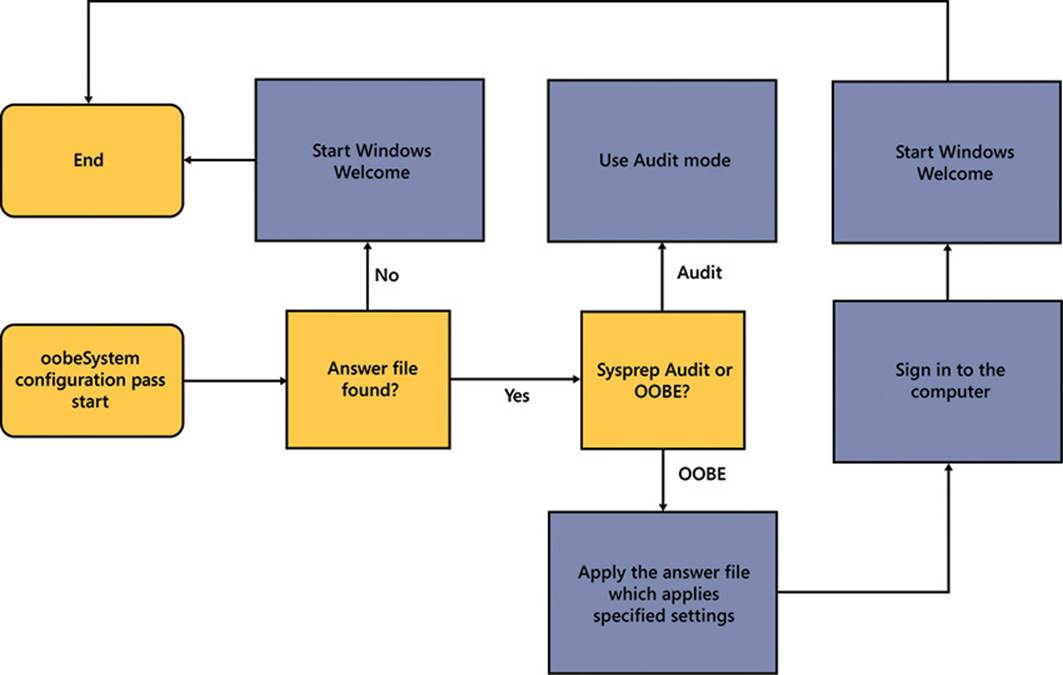
FIGURE 2-33 The oobeSystem pass high-level order
More Info: Windows Setup Configuration Passes
For more information about the Windows Setup passes, see the article at http://technet.microsoft.com/en-us/library/hh825044.aspx.
Configuring answer file settings
Each of the components you add to your answer file will include a series of settings that can be adjusted. Changing the value of these settings is straightforward. You can edit an answer file by using a text editor or by using Windows System Image Manager (SIM).
One example of a quick edit using a text editor is to include changing the input language from en-US to fr-FR. To do so, open the existing answer file, search for the <InputLocale> tag, and replace en-US with fr-FR. You should also confirm that the <settings pass=””> tag is set to the appropriate pass because <InputLocale> can be modified during pass 4: specialize and pass 7: oobeSystem.
Settings can also be edited in Windows SIM. SIM includes a detailed description of each setting and several examples to work from. The following example demonstrates how to use Windows SIM to make setting changes to your answer file. Refer to Figure 2-34.
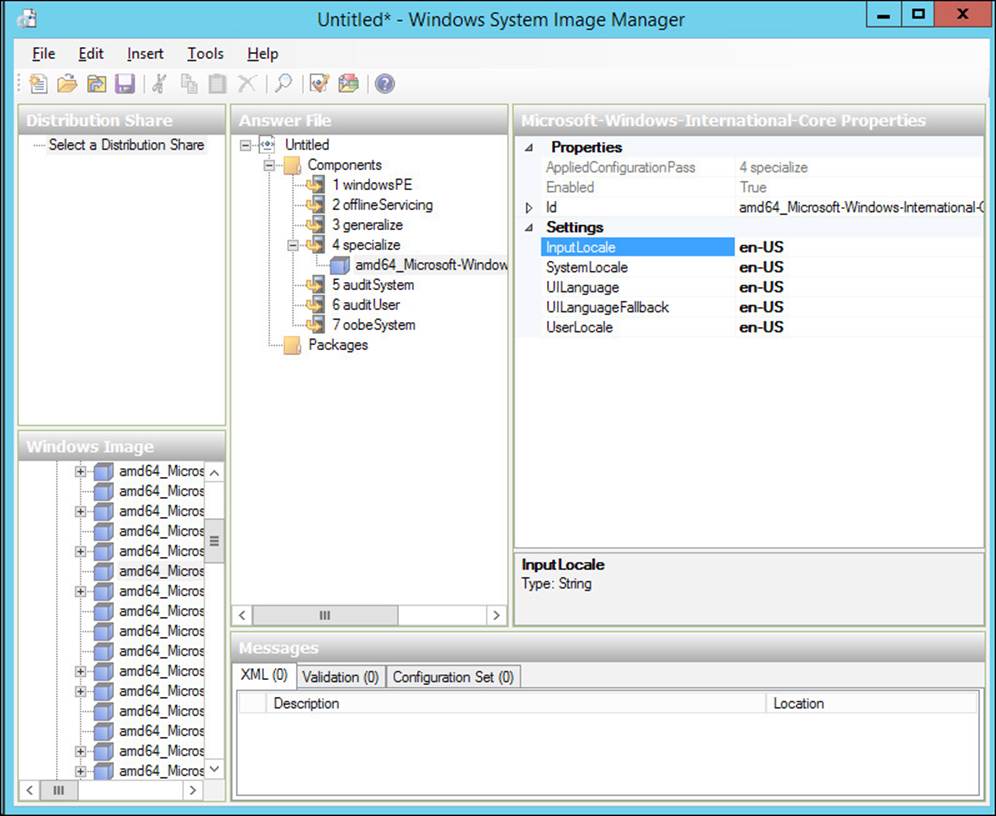
FIGURE 2-34 Windows System Image Manager, setting values
1. Add the desired component to your answer file. In this example, you work with Microsoft-Windows-International-Core.
2. Select the component within your answer file. The available settings appear in the right pane.
3. Click in the field to the right of the setting label and enter your desired value. For a better understanding of the setting, right-click the setting label and select Help.
Creating Autounattend.xml answer files
You can create answer files manually or by using the Windows SIM, as shown in Figure 2-35.
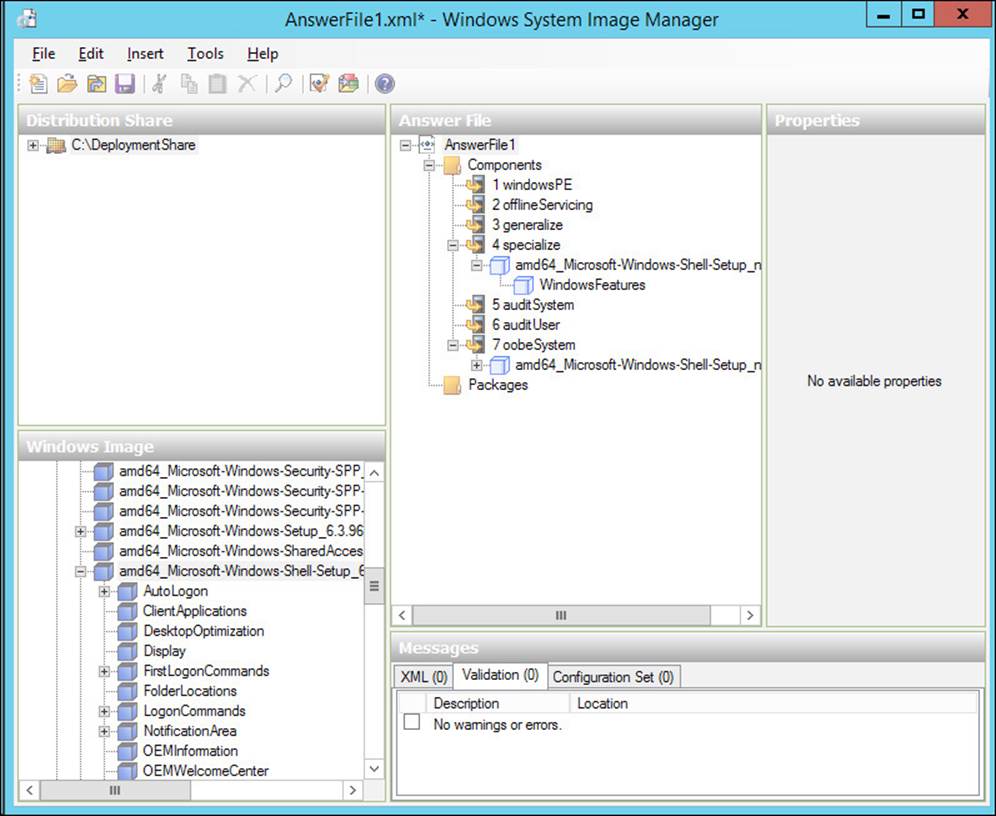
FIGURE 2-35 Windows System Image Manager with a validated answer file
As part of creating an answer file in Windows SIM, you must specify the Windows image file and a catalog file. A catalog file is a binary file that is associated to a specific Windows image file and contains the packages and settings in that WIM file. Often, the WIM file and the catalog file (.clg) are stored in the same folder. Windows SIM prompts you if it cannot locate a catalog file for a specified WIM file. In such a scenario, Windows SIM can create a catalog file. Alternatively, you can create an answer file in advance in Windows SIM. By using Windows SIM, you can verify that the configuration settings within an answer file are valid for the installation. Figure 2-36 shows an answer file that has a validation error.
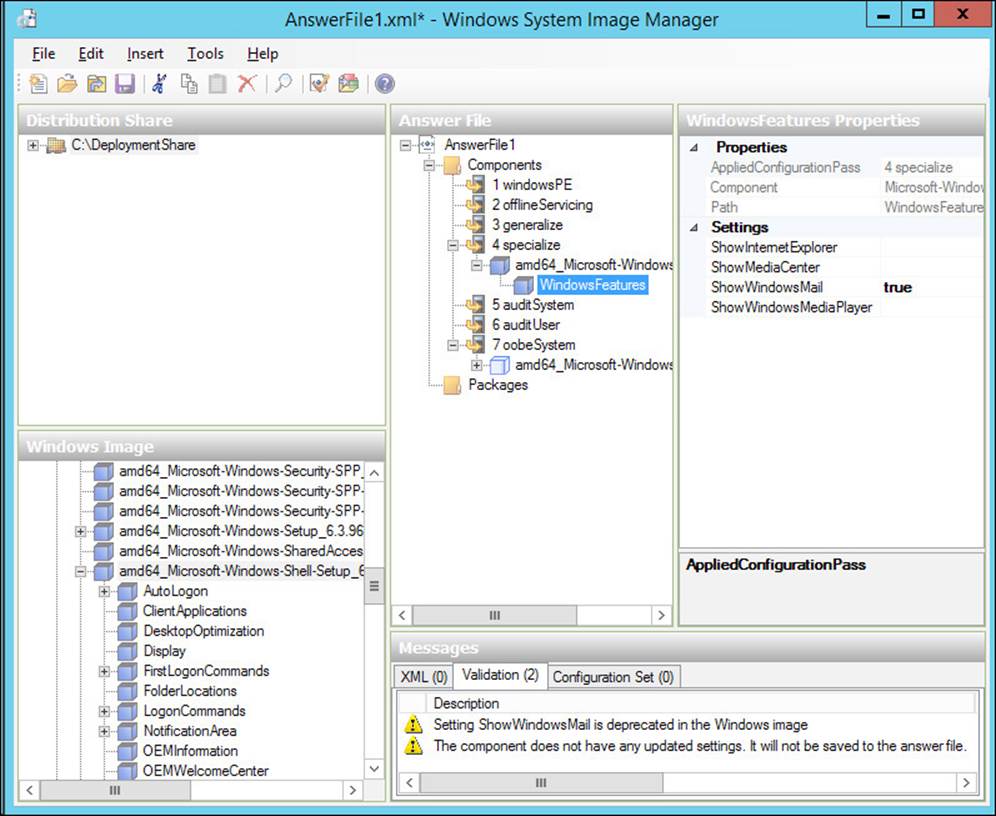
FIGURE 2-36 Windows System Image Manager with a validation error
Answer files can also be created or modified manually. As mentioned earlier, the answer file is an XML file that can be edited by using a text editor. Here is a sample answer file:
<?xml version="1.0" encoding="utf-8"?>
<unattend xmlns="urn:schemas-microsoft-com:unattend">
<settings pass="oobeSystem">
<component name="Microsoft-Windows-Shell-Setup" processorArchitecture="amd64"
publicKeyToken="31bf3856ad364e35" language="neutral" versionScope="nonSxS"
xmlns:wcm="http://schemas.microsoft.com/WMIConfig/2002/State" xmlns:xsi="http://www
.w3.org/2001/XMLSchema-instance">
<OOBE>
<HideEULAPage>true</HideEULAPage>
<HideOEMRegistrationScreen>true</HideOEMRegistrationScreen>
</OOBE>
<UserAccounts>
<AdministratorPassword>
<Value>UABAACQAJAB3ADAAcgBkAAUAMAcwB3AG8AcgBkAA==</Value>
<PlainText>false</PlainText>
</AdministratorPassword>
</UserAccounts>
</component>
</settings>
<cpi:offlineImage cpi:source="wim://client01/deploymentshare$/operating%20
systems/windows%208%20enterprise%20x64/sources/install.wim#Windows 8 Enterprise"
xmlns:cpi="urn:schemas-microsoft-com:cpi" />
</unattend>
When you create answer files, avoid adding settings that you don’t need. Windows SIM will not create empty settings in an answer file, but you can manually introduce empty strings in an answer file. Your goal should be to reduce answer file bloat such as empty strings, which can increase deployment times.
Answer files often contain sensitive data such as the password of the local Administrator account. Windows SIM enables you to obfuscate local computer passwords in answer files. To obfuscate a password in an answer file with Windows SIM, perform the following steps:
1. In Windows SIM, open an answer file that contains a password you want to obfuscate.
2. Click the Tools menu and then click Hide Sensitive Data.
3. Save the answer file and then validate that the password is obfuscated.
Note that you cannot obfuscate domain-based passwords or other sensitive data such as product keys. By default in Windows SIM 6.3, Hide Sensitive Data is enabled by default when you create new answer files.
When you are finished creating an answer file, use Windows SIM to validate the answer file. Validating an answer file is an important step to ensure that everything is in order. If you have a validation error, such as the one displayed in Figure 2-36, you can double-click the validation error to find the exact setting causing the validation error.
Thought experiment: Windows 8.1 deployment at Alpine Ski House
Alpine Ski House is a premier winter sports destination with locations in Jackson, Wyoming, and Whistler, BC, Canada. The company has 1,000 client computers running Windows 7 and 100 servers running Windows Server 2008 R2. An existing Active Directory Domain Services domain named alpineskihouse.com exists, and all computers are joined to the domain. The company is investing in a technology upgrade. As part of the upgrade, Windows 8.1 will be deployed to all client computers. The company plans to automate many of the deployment tasks, but the project budget won’t allow for a fully automated deployment. To provide the company with an appropriate deployment solution, answer the following questions:
1. Which two deployment technologies can you combine to automate most of the deployment tasks while minimizing licensing costs?
2. How can you prevent users from booting to the network and reimaging their computers to Windows 8.1?
3. Which tools should you introduce to the IT administrators so that they are prepared to support the deployment infrastructure?
Objective summary
![]() An answer file may be stored in one of several locations. Each answer file location has a precedence value, which determines the answer file that is used.
An answer file may be stored in one of several locations. Each answer file location has a precedence value, which determines the answer file that is used.
![]() An installation might go through seven customization passes when using an answer file:
An installation might go through seven customization passes when using an answer file:
![]() windowsPE
windowsPE
![]() offlineServicing
offlineServicing
![]() generalize
generalize
![]() specialize
specialize
![]() auditSystem
auditSystem
![]() auditUser
auditUser
![]() oobeSystem
oobeSystem
![]() Windows SIM can be used to create and validate answer files.
Windows SIM can be used to create and validate answer files.
Objective review
Answer the following questions to test your knowledge of the information in this objective. You can find the answers to these questions and explanations of why each answer choice is correct or incorrect in the “Answers” section at the end of this chapter.
1. Which tool can you use to create an answer file?
A. DISM
B. Windows SIM
C. Sysprep
D. Setup.exe
2. Which pass of the Windows Setup process removes the security identifier from a reference computer?
A. generalize
B. oobeSystem
C. specialize
D. offlineServicing
3. Which pass of the Windows Setup process configures unique settings for different departments?
A. generalize
B. oobeSystem
C. specialize
D. offlineServicing
4. You are planning to use removable media to store answer files for automating Windows 8.1 deployments. You need to store an answer file to a removable media drive with a drive letter of F:\. What should you name the file and where you should save it?
A. Name the file Unattend.xml and save it in the F:\Sysprep folder.
B. Name the file Unattend.xml and save it in the root of the F:\ drive.
C. Name the file Autounattend.xml and save it in the F:\Panther folder.
D. Name the file Unattended.xml and save it in the root of the F:\ drive.
5. You are planning to add packages to an offline Windows 8.1 image. Which tool should you use?
A. Setup.exe
B. LoadState
C. Windows SIM
D. DISM
Answers
This section contains the solutions to the thought experiments and answers to the lesson review questions in this chapter.
Objective 2.1
Thought experiment
1. You should deploy WDS to both offices. It is a good practice to avoid imaging computers over a wide area network (WAN) link because images are often very large and will saturate a WAN link, which will degrade the network. By deploying WDS to both offices, imaging will take place on the local area network (LAN).
2. You should use unicast for the deployments. Because you will image only one or two computers at a time, unicast makes sense because it doesn’t require any changes to your existing network.
3. You should use filters in WDS to ensure that WDS can image only portable computers. You can use a Chassis Type filter, Manufacturer filter, or Model filter to target only portable computers.
Objective review
1. Correct answers: A and B
A. Correct: The Windows PowerShell WDS module is new for Windows Server 2012 R2, and it can automate configuration tasks.
B. Correct: Prior to the Windows PowerShell WDS module, WDSutil was the only command-line tool for WDS. It can automate configuration tasks for WDS.
C. Incorrect: WDSdiag exists as a .dll, not as a .exe. It cannot automate WDS configuration tasks.
D. Incorrect: WDSmgmt.msc is the WDS graphic user interface console. It is used to perform one-time configuration tasks but isn’t used to automate tasks like a script can do.
2. Correct answer: A
A. Correct: To ensure that the WDS Image Capture Wizard sees the system volume, generalize the image by using Sysprep.
B. Incorrect: Although Shift+F10 opens a Windows PE command prompt, you can’t generalize the existing Windows installation from Windows PE.
C. Incorrect: The permissions on the system volume do not need to be modified from default settings to be seen by the WDS Image Capture Wizard.
D. Incorrect: The permissions on the system volume do not need to be modified from default settings to be seen by the WDS Image Capture Wizard.
3. Correct answer: C
A. Incorrect: A capture image is built from a boot image. Thus, a boot image must be created first.
B. Incorrect: An install image can be a default Windows installation or a customized Windows installation. However, an install image is not related to creating a discover image.
C. Correct: A capture image is built from a boot image. Thus, you must first add a boot image before you can create a discover image.
D. Incorrect: You can create images with the WDS console. The Windows PowerShell WDS module is automatically imported when you use cmdlets from the module, so you do not need to import the module manually.
4. Correct answer: B
A. Incorrect: Unicast cannot be scheduled at a future time.
B. Correct: Multicast transmissions can be scheduled at a future time by using a Scheduled-Cast transmission.
C. Incorrect: You can use a WDS filter to filter images based on specified computer attributes such as the manufacturer and chassis type. However, you cannot use a filter to schedule future deployments.
D. Incorrect: You can use a WDS filter to filter images based on specified computer attributes such as the manufacturer and chassis type. However, you cannot use a filter to schedule future deployments.
5. Correct answer: C
A. Incorrect: Although the BIOS Version is helpful, the UUID will be unique to each computer.
B. Incorrect: Although the BIOS Version is helpful, the BIOS Vendor does not identify the hardware model number.
C. Correct: The BIOS Version and Model will help identify all HP Elitebook laptops running the F03 version of the BIOS.
D. Incorrect: Although the Model information is useful, the BIOS Vendor does not identify the current BIOS version.
Objective 2.2
Thought experiment
1. You should put your operating system images in the deployment share. The deployment share is where your images should be placed when using MDT.
2. You should use the Sysprep and Capture task sequence template. It prepares the reference computer with Sysprep and then captures the image.
3. The valid file extensions for packages are .cab and .msu.
Objective review
1. Correct answer: B
A. Incorrect: The MDT task sequences use the same engine as Configuration Manager but not the same as Windows Server 2012.
B. Correct: MDT and Configuration Manager use the same task sequence engine.
C. Incorrect: The MDT task sequences use the same engine as Configuration Manager but not the same as Exchange Server 2013.
D. Incorrect: The MDT task sequences use the same engine as Configuration Manager but not the same as SharePoint Server 2013.
2. Correct answer: B
A. Incorrect: Bootstrap.ini is a file that you can customize to point the deployment wizard to different locations on the network. It is not relevant to the question, which focuses on reducing the manual deployment steps in a deployment.
B. Correct: The customsettings.ini file controls a wide range of deployment settings that enable you to cut down drastically on manual steps in a deployment.
C. Incorrect: Deploy.xml is a file that should not be modified because MDT manages it.
D. Incorrect: Settings.xml is a file that MDT manages and should not be modified.
3. Correct answer: B
A. Incorrect: When you create a new deployment share, you can’t point it to the path of an existing share because the wizard will not allow you to continue.
B. Correct: By opening the existing deployment share, you add it to MDT.
C. Incorrect: The Add-MDTPersistentDrive cmdlet is valid only if you have an existing Windows PowerShell drive.
D. Incorrect: The Get-MDTPersistentDrive cmdlet retrieves information but does not perform any modifications.
4. Correct answers: A and B
A. Correct: A deployment share can be located on a network share. It can also be located on local storage.
B. Correct: A deployment share can be located on local storage. It can also be located on a network share.
C. Incorrect: A deployment share cannot be located in a Microsoft Access database.
D. Incorrect: A deployment share cannot be located in a SQL Server database.
5. Correct answer: B
A. Incorrect: The MDT cmdlets are part of a snap-in, not a module, so you must add a snap-in.
B. Correct: Because the MDT cmdlets are part of a snap-in, adding the snap-in is the correct answer.
C. Incorrect: The path from which you run the command is not relevant.
D. Incorrect: The error message is indicative of a snap-in or module not loaded. Running Windows PowerShell as Administrator will not fix this issue.
Objective 2.3
Thought experiment
1. To automate most operating system deployment tasks while minimizing costs, deploy WDS and MDT. WDS is built into Windows Server as a role, and MDT is a free download. Each tool can stand alone to automate some deployment tasks. However, combining them brings the best results because you can use WDS for PXE to eliminate the need for media.
2. To prevent users from reimaging their own computers, you can set restrictive permissions on each image. Create a security group in Active Directory. Add the IT administrators to the group and then add the group to the image permissions and assign Read and Read & Execute permissions to the group. Finally, remove the Authenticated Users group from the permissions. Do not use deny permissions for Authenticated Users because that will override the allow permissions for IT administrators, which will prevent them from using the image too.
3. To prepare IT administrators to support and maintain the deployment infrastructure, introduce the Deployment Workbench, the WDS console, WDSutil, Windows SIM, Windows ADK, and the WDS commands in Windows PowerShell. In addition, it is a good idea to show the IT administrators the answer files and customization files that are being used.
Objective review
1. Correct answer: B
A. Incorrect: DISM is used for other tasks such as adding packages to offline Windows images.
B. Correct: Windows SIM is used to create answer files.
C. Incorrect: Sysprep prepares a reference computer for capturing.
D. Incorrect: Setup.exe is often used for installing applications or a manual installation of a Windows operating system.
2. Correct answer: A
A. Correct: The generalize pass is when the security identifier is removed from a reference computer.
B. Incorrect: The oobeSystem pass configures settings that are part of the initial boot of a computer and is not related to removing the security identifier from a reference computer.
C. Incorrect: The specialize pass is used to configure some settings such as language and time zone, but it is not related to removing the security identifier from a reference computer.
D. Incorrect: The offlineServicing pass is used to add packages or updates to an offline image but can’t be used to remove the security identifier from a reference computer.
3. Correct answer: C
A. Incorrect: The generalize pass is used to configure all computers equally and can’t be used to configure different department computers with different settings.
B. Incorrect: The oobeSystem pass is used to configure the initial boot of a computer and is not related to configuring different department computers with different settings.
C. Correct: The specialize pass is often used in addition to the generalize pass to configure unique settings for different department computers.
D. Incorrect: The offlineServicing pass is used to add packages or updates to an offline image but can’t be used to configure different department computers with different settings.
4. Correct answer: B
A. Incorrect: Although the Unattend.xml file name is valid, the location must be in the root of the removable media drive.
B. Correct: The file must be named Unattend.xml or Autounattend.xml, and the location must be in the root of the removable media drive.
C. Incorrect: Although the Autounattend.xml file name is valid, the location must be in the root of the removable media drive.
D. Incorrect: The file must be named Unattend.xml or Autounattend.xml.
5. Correct answer: D
A. Incorrect: Setup.exe is a generic name for an installation file and is not used to add packages to an offline image.
B. Incorrect: LoadState transfers user state data from a migration store to a destination computer but does not add packages to an offline image.
C. Incorrect: Windows SIM creates answer files but does not add packages to an offline image.
D. Correct: DISM adds packages to an offline image.