Exam Ref 70-696 Managing Enterprise Devices and Apps (2014)
Chapter 2. Deploy and manage desktop and mobile applications
The ability to manage desktop and mobile applications is one of the main reasons that many organizations deploy System Center 2012 R2 Configuration Manager. Understanding how you deploy and manage software to computers and mobile devices by using Configuration Manager and the cloud-based Microsoft Intune is critical for someone interested in passing the Managing Enterprise Devices and Apps Using System Center Configuration Manager exam.
Objectives in this chapter:
![]() Objective 2.1: Plan an application distribution strategy.
Objective 2.1: Plan an application distribution strategy.
![]() Objective 2.2: Deploy applications using Microsoft System Center 2012 Configuration Manager.
Objective 2.2: Deploy applications using Microsoft System Center 2012 Configuration Manager.
![]() Objective 2.3: Deploy applications using Microsoft Intune.
Objective 2.3: Deploy applications using Microsoft Intune.
![]() Objective 2.4: Plan for application upgrades.
Objective 2.4: Plan for application upgrades.
![]() Objective 2.5: Monitor applications.
Objective 2.5: Monitor applications.
![]() Objective 2.6: Manage content distribution.
Objective 2.6: Manage content distribution.
Objective 2.1: Plan an application distribution strategy
Configuration Manager provides organizations with a variety of features for comprehensively managing the application life cycle. This includes the ability to manage the process of initial application deployment, application maintenance and monitoring, and application supersedence and removal.
This section covers the following topics:
![]() Application management by using Configuration Manager
Application management by using Configuration Manager
![]() Applications and packages
Applications and packages
![]() Application management features
Application management features
![]() Application management server roles
Application management server roles
![]() Software Center
Software Center
![]() Application Catalog
Application Catalog
Application management by using Configuration Manager
In System Center 2012 R2 Configuration Manager, you can deploy software by configuring what are termed applications, or you can use the traditional method of configuring what are termed packages and programs. Although they have separate names and function in different ways, both these methods enable you to deploy software to client computers.
Applications contain built-in intelligence, such as the ability to deploy different types of software based on the properties of the client device. Many administrators find packages and programs a more efficient method for running simple commands or running custom scripts on Configuration Manager clients.
When using packages and programs for software distribution, the process consists of the following elements:
![]() Packages Package objects represent the actual files the targeted client requires to run a program that Configuration Manager deploys. For example, a package could contain the installation files that Configuration Manager uses to install a software application on the client computer. Alternatively, a package might not contain any source files if Configuration Manager only uses it to run an executable that is present on the computers of the members of the targeted collection. When you create a package, you can specify many of its properties, such as the package’s name, the location of source files that it contains, and whether it includes one or more programs. For example, you can use the Microsoft PowerPoint Viewer files to create a package.
Packages Package objects represent the actual files the targeted client requires to run a program that Configuration Manager deploys. For example, a package could contain the installation files that Configuration Manager uses to install a software application on the client computer. Alternatively, a package might not contain any source files if Configuration Manager only uses it to run an executable that is present on the computers of the members of the targeted collection. When you create a package, you can specify many of its properties, such as the package’s name, the location of source files that it contains, and whether it includes one or more programs. For example, you can use the Microsoft PowerPoint Viewer files to create a package.
![]() Programs A program is the command that indicates how to manage the package files. You can create a program only after you create the package in which you define the program. Programs include commands that the client runs during software deployment. For example, a package that you use to install an application will include a program that runs a command, such as Setup.exe, which installs the application. A package must contain at least one program before you can deploy it to clients, but you can create multiple programs for a package. For example, you could create one program that installs an application silently and another program that installs the same application by using an installation wizard. In addition, the program includes information about how the command will run, such as whether user or administrative rights are necessary to run the command, the basic requirements to run the program, and whether another program must be run first.
Programs A program is the command that indicates how to manage the package files. You can create a program only after you create the package in which you define the program. Programs include commands that the client runs during software deployment. For example, a package that you use to install an application will include a program that runs a command, such as Setup.exe, which installs the application. A package must contain at least one program before you can deploy it to clients, but you can create multiple programs for a package. For example, you could create one program that installs an application silently and another program that installs the same application by using an installation wizard. In addition, the program includes information about how the command will run, such as whether user or administrative rights are necessary to run the command, the basic requirements to run the program, and whether another program must be run first.
![]() Deployments Deployments, which are similar to advertisements in prior versions of Configuration Manager, associate a program with a target collection. In addition, deployments specify other options regarding how the source files for a program should be accessed by clients and run. For example, you can configure a software deployment to be available as an optional installation or as a required installation on the client. A deployment also can specify an installation schedule and how a program should run, depending on whether the client’s current boundary group has a fast or slow connection to the distribution point. For example, you can specify that the program will not run if the client’s boundary group has a slow connection to the selected distribution point. Traditional software distribution uses the following process: packages contain programs, and you use deployments to make the programs available to the collections.
Deployments Deployments, which are similar to advertisements in prior versions of Configuration Manager, associate a program with a target collection. In addition, deployments specify other options regarding how the source files for a program should be accessed by clients and run. For example, you can configure a software deployment to be available as an optional installation or as a required installation on the client. A deployment also can specify an installation schedule and how a program should run, depending on whether the client’s current boundary group has a fast or slow connection to the distribution point. For example, you can specify that the program will not run if the client’s boundary group has a slow connection to the selected distribution point. Traditional software distribution uses the following process: packages contain programs, and you use deployments to make the programs available to the collections.
Software deployment also involves a number of other components and concepts:
![]() Distribution points Distribution points are site systems that store the package files, which clients access when running a deployed program. After you create a new package that contains source files, you must distribute the package to at least one distribution point before clients can access it and run any of its programs. Typically, you should place the content on a distribution point that is closest to the clients to which you want to deploy it.
Distribution points Distribution points are site systems that store the package files, which clients access when running a deployed program. After you create a new package that contains source files, you must distribute the package to at least one distribution point before clients can access it and run any of its programs. Typically, you should place the content on a distribution point that is closest to the clients to which you want to deploy it.
![]() Package definition files You do not always need to create all packages and programs manually. Many software publishers provide package definition files for their applications, which allow for automatic creation of packages and programs. Package definition files specify a package’s properties, such as its name and version, and one or more program definitions. Program definitions in package definition files include the program command and can include other properties such as disk-space requirements and supported client architectures and operating systems.
Package definition files You do not always need to create all packages and programs manually. Many software publishers provide package definition files for their applications, which allow for automatic creation of packages and programs. Package definition files specify a package’s properties, such as its name and version, and one or more program definitions. Program definitions in package definition files include the program command and can include other properties such as disk-space requirements and supported client architectures and operating systems.
![]() Access accounts If you need to restrict access to a package, you configure which accounts or groups have permission to access it. By default, administrators have Full permissions, which enable them to perform any action on a package; users have Read permissions.
Access accounts If you need to restrict access to a package, you configure which accounts or groups have permission to access it. By default, administrators have Full permissions, which enable them to perform any action on a package; users have Read permissions.
Applications and packages
Table 2-1 describes the differences between applications and packages based on application management features.
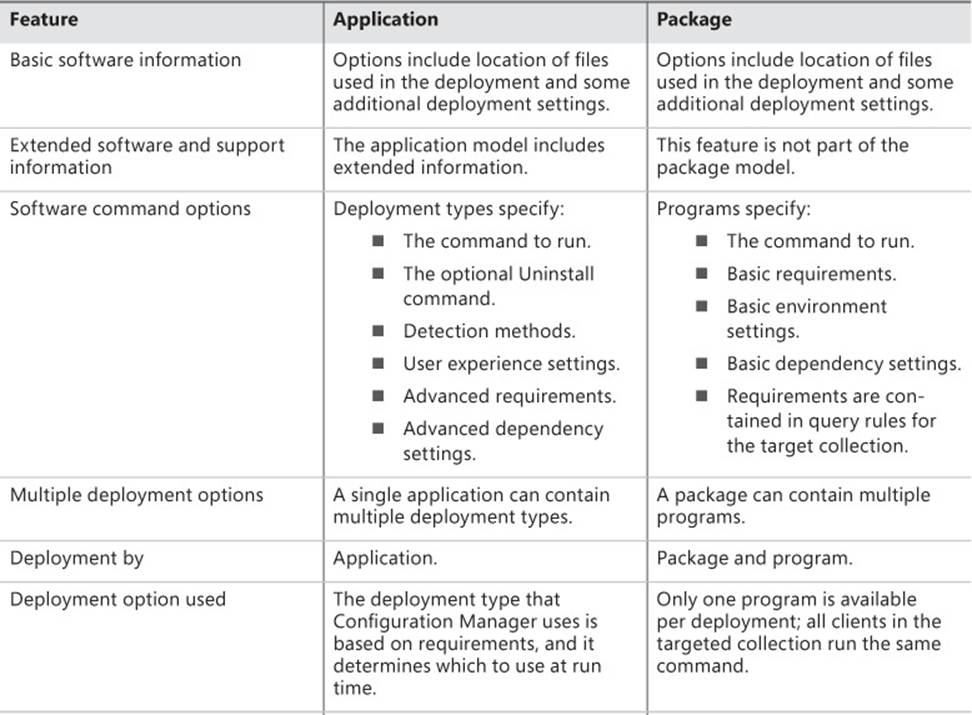
TABLE 2-1 Applications and packages
There is some additional information that you can include in an application and not in a package. This information includes:
![]() General information, including administrative categories, date published, owners, and support contacts.
General information, including administrative categories, date published, owners, and support contacts.
![]() Application Catalog information, including localization information, keywords, and user categories that help users search in the Application Catalog and user documentation.
Application Catalog information, including localization information, keywords, and user categories that help users search in the Application Catalog and user documentation.
![]() Relationship information between the application and other applications.
Relationship information between the application and other applications.
You will typically use applications to deploy software because of the advanced deployment options and monitoring features that they provide. Put another way, applications are the method you should use going forward, even though you might still need packages to support the way you performed software deployment in the past. The exception to this generalization is scripts. You are likely to use packages to deploy software when working with:
![]() Scripts that do not install any software on the computer, such as a script to restart a number of services in a specific order. These scripts typically do not have any detection methods that can determine their state.
Scripts that do not install any software on the computer, such as a script to restart a number of services in a specific order. These scripts typically do not have any detection methods that can determine their state.
![]() Scripts that will run only once. These scripts will be part of an operating system deployment, and you do not need to monitor them continually.
Scripts that will run only once. These scripts will be part of an operating system deployment, and you do not need to monitor them continually.
There are other methods, such as Group Policy Preferences, that you can also use to run scripts on computers, but packages remain the best way to run scripts on a computer if you want to perform that task by using Configuration Manager.
 Exam Tip
Using a package is the best way to accomplish the goal of running a script by using Configuration Manager.
Application management features
Application management uses the following Configuration Manager features:
![]() Requirements
Requirements
![]() Global conditions
Global conditions
![]() Detection methods
Detection methods
![]() Supersedence
Supersedence
![]() Deployment action and purpose
Deployment action and purpose
![]() State-based deployment
State-based deployment
![]() User device affinity
User device affinity
![]() Monitoring
Monitoring
These features are described in the following pages.
Requirements and global conditions
Global conditions enable you to set conditions you can use to create requirements in a deployment type to determine whether the deployment type is suitable for a particular user or client device—for example, whether the computer is the user’s primary device. Several global conditions are already defined in Configuration Manager, and you can create more as necessary.
A requirement is a global condition with an operator and a value that is associated with a deployment type. Configuration Manager evaluates application requirements on a schedule to determine whether the deployment type is applicable to the clients in a targeted collection.
Detection methods
Detection methods enable you to define how Configuration Manager determines an application’s installation state. Detection methods can query many aspects of the client operating system, including the file system and registry. For example, a detection method to determine whether an application is installed would involve checking for a specific registry key and value.
Supersedence
Supersedence enables you to configure a relationship between a new application and an existing application that you have deployed. After you configure supersedence, all future deployments and Application Catalog requests receive the new application.
Deployment action and purpose
When you deploy an application in Configuration Manager, you choose a deployment action and a deployment purpose that define what the deployment should do. Together, the deployment action and the deployment purpose represent your intent for the application.
The available deployment actions are:
![]() Install This action specifies that the deployment will install the application.
Install This action specifies that the deployment will install the application.
![]() Uninstall This action specifies that the deployment will uninstall the application.
Uninstall This action specifies that the deployment will uninstall the application.
The possible deployment purposes are:
![]() Available If you deploy the application to a user, the user sees the published application in Application Catalog. If you deploy the application to a device, the user sees it in Software Center.
Available If you deploy the application to a user, the user sees the published application in Application Catalog. If you deploy the application to a device, the user sees it in Software Center.
![]() Required If you deploy the application to either a user or a device, the application is deployed automatically according to the schedule you have configured. However, you can allow a user to install the application before the deadline by using Software Center.
Required If you deploy the application to either a user or a device, the application is deployed automatically according to the schedule you have configured. However, you can allow a user to install the application before the deadline by using Software Center.
When you specify the user-targeted deployment purpose as available, you can specify whether users need to request approval from an administrator before they can install the application. After an administrator provides approval, which can be done from the Configuration Manager console, the application will install.
State-based deployment
The Configuration Manager client periodically reevaluates the state of deployed applications to verify that the current state matches the deployment purpose. For example, if an application has been deployed as required and the user has uninstalled it, Configuration Manager will reinstall the required application. Similarly, if a required deployment uninstalls an application and the user reinstalls it, Configuration Manager will uninstall the application during the evaluation cycle.
User device affinity
User device affinity enables a user to be associated with one or more specific devices. You can use this feature to deploy applications to the user and ensure that the application is installed on only those specific devices with which the user is associated. For example, you can ensure that an application is installed on the user’s primary device rather than on any other device he happens to sign on to. You can use user device affinity to predeploy software on a user’s device even when the user is not logged on. You are most likely to use user device affinity as a requirement when configuring a deployment type.
Monitoring
An important aspect of the application management process is to monitor deployments for success or failure. Monitoring can involve several activities, including:
![]() Examining status in the Monitoring workspace.
Examining status in the Monitoring workspace.
![]() Reviewing application management reports.
Reviewing application management reports.
![]() Reviewing status messages.
Reviewing status messages.
![]() Examining log files.
Examining log files.
Application management server roles
Server roles that assist in application management include the Application Catalog web service point, Application Catalog website point, and the reporting services point.
Application Catalog
Application Catalog enables users to select and install applications automatically by placing requests in a portal, which administrators can approve for installation, or, if specially configured, allow installation to occur.
You can implement Application Catalog by using the following two site roles:
![]() Application Catalog Web Service Point This role provides software information from the software library. As an administrator, you configure this information for each application that publishes in the catalog.
Application Catalog Web Service Point This role provides software information from the software library. As an administrator, you configure this information for each application that publishes in the catalog.
![]() Application Catalog Website Point This role is the web interface for end users. Users can use this portal to view the list of available applications and request and install applications.
Application Catalog Website Point This role is the web interface for end users. Users can use this portal to view the list of available applications and request and install applications.
When planning for Application Catalog, you should keep in mind that:
![]() Application Catalog is a hierarchy-wide role. Typically, in a hierarchy with multiple primary sites, you install one instance of each role in each primary site, although multiple instances are supported.
Application Catalog is a hierarchy-wide role. Typically, in a hierarchy with multiple primary sites, you install one instance of each role in each primary site, although multiple instances are supported.
![]() You cannot install Application Catalog in a secondary site or on a central administration site, only in a primary site.
You cannot install Application Catalog in a secondary site or on a central administration site, only in a primary site.
![]() Application Catalog enables users to install deployed applications or request available applications, which deploy after approval.
Application Catalog enables users to install deployed applications or request available applications, which deploy after approval.
![]() Application Catalog enables users to configure some preferences and wipe their mobile devices that are being managed through Configuration Manager.
Application Catalog enables users to configure some preferences and wipe their mobile devices that are being managed through Configuration Manager.
![]() You can integrate Application Catalog with Microsoft SharePoint.
You can integrate Application Catalog with Microsoft SharePoint.
Reporting services
The reporting services point is a site system that you install on a server that is running Microsoft SQL Server Reporting Services (SSRS), which provides advanced reporting capabilities and authoring tools for building reports. Use this server role to generate reports related to application management.
You can run reports from the Configuration Manager console or directly from the reporting services point website. You can save reports in a variety of formats. In addition to running reports manually, the reporting services point supports report subscriptions, which are recurring requests to deliver reports at specific times or in response to events. In the subscription, you can specify the application file format of the report.
When you are planning for the reporting services point, consider the following:
![]() You must install the reporting services point on a computer that is running the same version of SSRS as that of the site database.
You must install the reporting services point on a computer that is running the same version of SSRS as that of the site database.
![]() Each SSRS instance can support one site only.
Each SSRS instance can support one site only.
![]() You can install multiple reporting services points in your hierarchy.
You can install multiple reporting services points in your hierarchy.
![]() If you install a reporting services point in a primary site, the reports show the data collected from that site. However, reports that you run on a reporting services point in the central administration site return data collected from the entire hierarchy.
If you install a reporting services point in a primary site, the reports show the data collected from that site. However, reports that you run on a reporting services point in the central administration site return data collected from the entire hierarchy.
Software Center
Software Center is a tool used for installing and monitoring software deployments targeted to devices. Software Center is installed as part of the Configuration Manager client. Figure 2-1 shows Software Center.
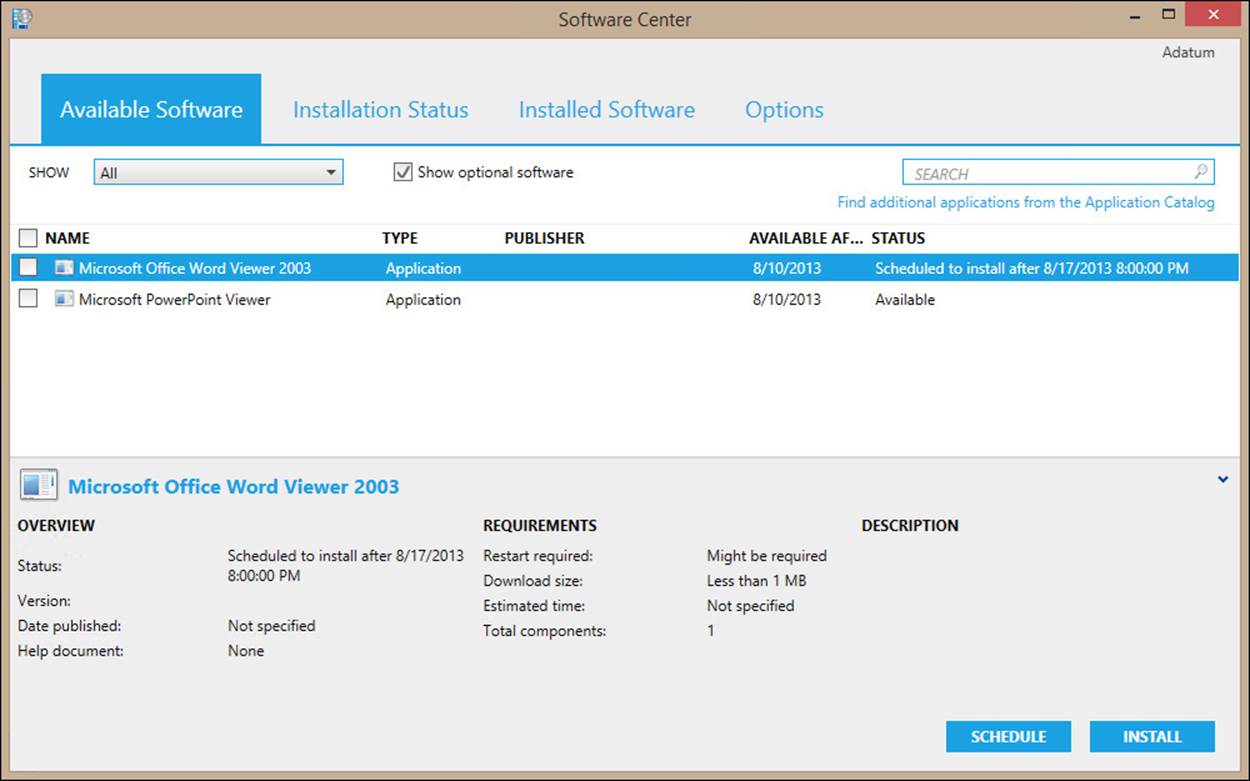
FIGURE 2-1 Software Center showing available software
Software Center provides users with some control over how and when software installs on their devices. Users can perform the following actions by using Software Center:
![]() Install software that has been deployed as Required to a user collection of which they are members if the deployment deadline has not passed and they are allowed to do so.
Install software that has been deployed as Required to a user collection of which they are members if the deployment deadline has not passed and they are allowed to do so.
![]() Install software that has been deployed as Available to a device-based collection of which the system is a member.
Install software that has been deployed as Available to a device-based collection of which the system is a member.
![]() Monitor the status of deployed software. The statuses include Available, Install After, Installing, Installed, or Failed.
Monitor the status of deployed software. The statuses include Available, Install After, Installing, Installed, or Failed.
![]() Retry an installation that has failed.
Retry an installation that has failed.
![]() Uninstall installed software if you configure an uninstall command on the application and do not require the software.
Uninstall installed software if you configure an uninstall command on the application and do not require the software.
![]() Manage their personal settings. On the Options tab, users can configure the following settings, provided the policies set in the applicable client settings allow them to do so:
Manage their personal settings. On the Options tab, users can configure the following settings, provided the policies set in the applicable client settings allow them to do so:
![]() Business Hours And Days Users can configure their business hours and days and configure settings so their systems do not install software during business hours.
Business Hours And Days Users can configure their business hours and days and configure settings so their systems do not install software during business hours.
![]() Computer Maintenance Users can configure a setting to allow the required software to deploy only outside their business hours. In addition, they can configure a setting to suspend Software Center activity while in the presentation mode.
Computer Maintenance Users can configure a setting to allow the required software to deploy only outside their business hours. In addition, they can configure a setting to suspend Software Center activity while in the presentation mode.
![]() Power Management Users can specify whether this computer will use the power management policies that have been configured through Configuration Manager.
Power Management Users can specify whether this computer will use the power management policies that have been configured through Configuration Manager.
![]() Remote Control Users can specify the level of remote control allowed or whether administrators must ask permission before obtaining remote control or other related settings.
Remote Control Users can specify the level of remote control allowed or whether administrators must ask permission before obtaining remote control or other related settings.
Application Catalog
Application Catalog is an optional component you can install for both intranet-based clients and Internet-based clients. It functions as a self-service catalog from which users can request software for installation.
Application Catalog uses two roles: the Application Catalog Web Service Point and the Application Catalog Website Point roles. The Web Service Point role communicates with the site server to retrieve application information. The Website Point role is the interface for Application Catalog, and this role depends on the Web Service role. When users connect to Application Catalog, the Website Point role passes requests and other communications to the Web Service Point role, which in turn passes those communications to the site server.
You can customize the look of the Application Catalog website by using the Application Catalog website point Properties dialog box. A user can navigate to the Application Catalog website directly. Alternatively, Software Center provides a link to Application Catalog when you configure the Default Application Catalog website point in the applicable client settings.
Users can use the Application Catalog website point to:
![]() Find available software.
Find available software.
![]() Specify primary devices.
Specify primary devices.
![]() Manage available applications. On the Application Catalog tab, users can:
Manage available applications. On the Application Catalog tab, users can:
![]() Search or browse Application Catalog for available software.
Search or browse Application Catalog for available software.
![]() Install software available to a user-based collection of which they are members.
Install software available to a user-based collection of which they are members.
![]() Request software that requires administrator approval.
Request software that requires administrator approval.
![]() Monitor the status of software requests on the My Application Requests tab.
Monitor the status of software requests on the My Application Requests tab.
![]() Manage their primary devices. On the My Devices tab, users can:
Manage their primary devices. On the My Devices tab, users can:
![]() Designate the current system as a primary device.
Designate the current system as a primary device.
![]() Manage their mobile devices. Users can view the status of their mobile devices and wipe them remotely if necessary.
Manage their mobile devices. Users can view the status of their mobile devices and wipe them remotely if necessary.
More Info: Application Catalog and Software Center
You can learn more about Application Catalog and Software Center at http://technet.microsoft.com/en-us/library/hh489603.aspx.
Software distribution to mobile devices
Integrate Configuration Manager with Microsoft Intune to deploy and manage devices that are running Windows Phone 8, Windows RT, Apple iOS, and Android operating systems. You integrate Configuration Manager with Intune by using the Intune connector, which acts as a gateway between Configuration Manager and Intune. In this method, the mobile devices connect to the cloud to receive configuration information and software. Only System Center 2012 R2 Configuration Manager and System Center 2012 Configuration Manager Service Pack 1 (SP1) support this method.
Users can perform self-enrollment by using Company Portal, which is an app Microsoft publishes and is available in the following locations:
![]() The Apple App Store for iOS devices
The Apple App Store for iOS devices
![]() The Google Play store for Android devices
The Google Play store for Android devices
![]() The Windows Store for Windows devices
The Windows Store for Windows devices
 Thought experiment: Configuration Manager at Wingtip Toys
You are planning the use of Configuration Manager for software deployment at Tailspin Toys. You want to run a command from the C:\Windows\System32 folder on all of the 15,000 Configuration Manager clients in your organization but to do so only once. You also want to ensure that the App-V version of an application is deployed only on computers that are not a user’s primary device. With this information in mind, answer the following questions:
1. What’s the best way to get Configuration Manager to run the command?
2. What’s the best way to ensure that the App-V version of the application is deployed correctly?
Objective summary
![]() In System Center 2012 R2 Configuration Manager, you can choose to deploy software by configuring what are termed applications, or you can use the traditional method of configuring what are termed packages and programs.
In System Center 2012 R2 Configuration Manager, you can choose to deploy software by configuring what are termed applications, or you can use the traditional method of configuring what are termed packages and programs.
![]() Applications contain built-in intelligence, such as the ability to deploy different types of software based on the properties of the client device.
Applications contain built-in intelligence, such as the ability to deploy different types of software based on the properties of the client device.
![]() Package objects represent the actual files the targeted client requires to run a program that Configuration Manager deploys.
Package objects represent the actual files the targeted client requires to run a program that Configuration Manager deploys.
![]() A program is the command that indicates how to manage the package files.
A program is the command that indicates how to manage the package files.
![]() Deployments associate a program with a target collection.
Deployments associate a program with a target collection.
![]() Distribution points are site systems that store the package files, which clients access when running a deployed program.
Distribution points are site systems that store the package files, which clients access when running a deployed program.
![]() Global conditions enable you to set conditions that you can use to create requirements in a deployment type to determine whether the deployment type is suitable for a particular user or client device.
Global conditions enable you to set conditions that you can use to create requirements in a deployment type to determine whether the deployment type is suitable for a particular user or client device.
![]() Detection methods enable you to define how Configuration Manager determines an application’s installation state.
Detection methods enable you to define how Configuration Manager determines an application’s installation state.
![]() Supersedence enables you to configure a relationship between a new application and an existing application that you have deployed.
Supersedence enables you to configure a relationship between a new application and an existing application that you have deployed.
![]() The available deployment actions are Install and Uninstall.
The available deployment actions are Install and Uninstall.
![]() The possible deployment purposes are Available and Required.
The possible deployment purposes are Available and Required.
![]() User device affinity is the process of associating a user with one or more specific devices.
User device affinity is the process of associating a user with one or more specific devices.
![]() Software Center is a tool used for installing and monitoring software deployments targeted to devices.
Software Center is a tool used for installing and monitoring software deployments targeted to devices.
![]() Application Catalog functions as a self-service catalog from which users can request software for installation.
Application Catalog functions as a self-service catalog from which users can request software for installation.
![]() Integrate Configuration Manager with Intune to deploy and manage devices that are running Windows Phone 8, Windows RT, Apple iOS, and Android operating systems.
Integrate Configuration Manager with Intune to deploy and manage devices that are running Windows Phone 8, Windows RT, Apple iOS, and Android operating systems.
Objective review
Answer the following questions to test your knowledge of the information in this objective. You can find the answers to these questions and explanations of why each answer choice is correct or incorrect in the “Answers” section at the end of the chapter.
1. Which of the following Configuration Manager features is used to determine whether an application has already been installed on a computer?
A. Detection method
B. Supersedence
C. User device affinity
D. Application Catalog
2. Which of the following Configuration Manager features enables end users to request software they can, after approval, deploy to their computers?
A. User device affinity
B. Application Catalog
C. Supersedence
D. Detection method
3. Which of the following Configuration Manager features would you use if you wanted to target a deployment so that a particular application was installed only on a user’s primary computer?
A. Detection method
B. Supersedence
C. Application Catalog
D. User device affinity
4. Microsoft Word 2010 is deployed on all computers in your organization. You want this version of Word to replace Microsoft Word 2013 automatically. Which of the following Configuration Manager features would you employ to accomplish this goal?
A. User device affinity
B. Application Catalog
C. Supersedence
D. Detection method
Objective 2.2: Deploy applications using Microsoft System Center 2012 Configuration Manager
This objective deals with deploying applications to clients by using Configuration Manager. It covers how you can create applications; perform application deployment; and configure detection methods, dependencies, global conditions, requirements, and user device affinity.
This section covers the following topics:
![]() Application creation
Application creation
![]() Application deployment
Application deployment
![]() Detection methods
Detection methods
![]() Dependencies
Dependencies
![]() Global conditions
Global conditions
![]() Requirements
Requirements
![]() User device affinity
User device affinity
![]() Deploy Software Wizard
Deploy Software Wizard
![]() Simulated deployments
Simulated deployments
Creating applications
You can create applications in Configuration Manager by using the Create Application Wizard. Access this wizard by navigating to the Applications node in the Application Management folder in the Software Library workspace and then clicking Create Application in the shortcut menu or on the ribbon. When creating an application, you can set the wizard to detect settings automatically from the installation files or use the wizard to create the application manually.
When using the Create Application Wizard to create an application from an installation file, the wizard reads the installation files from the standard deployment types and automatically populates several fields for the application. The Create Application Wizard can read the same installation files as the Create Deployment Type Wizard except that it does not display a separate Script Installer option. When creating an application from a script, you select Manually Specify The Application Information in the Create Application Wizard on the Specify Settings For This Application page.
Automatic detection of settings
When you create applications, you select the type of application you will create on the Specify Settings For This Application page of the Create Application Wizard—for example, Windows-based, such as Windows Installer (*.msi file) or Microsoft Application Virtualization 5, or mobile-based, such as the Windows Phone app package. After specifying the type, specify the location of the installation file to be imported.
Depending on the imported file, some of the application information will be read from the file. You can add to or modify the existing information. After completing the wizard, you can customize the application with requirements and other information.
Modifying application settings
Table 2-2 lists application settings that you can modify after creating an .msi-based application.
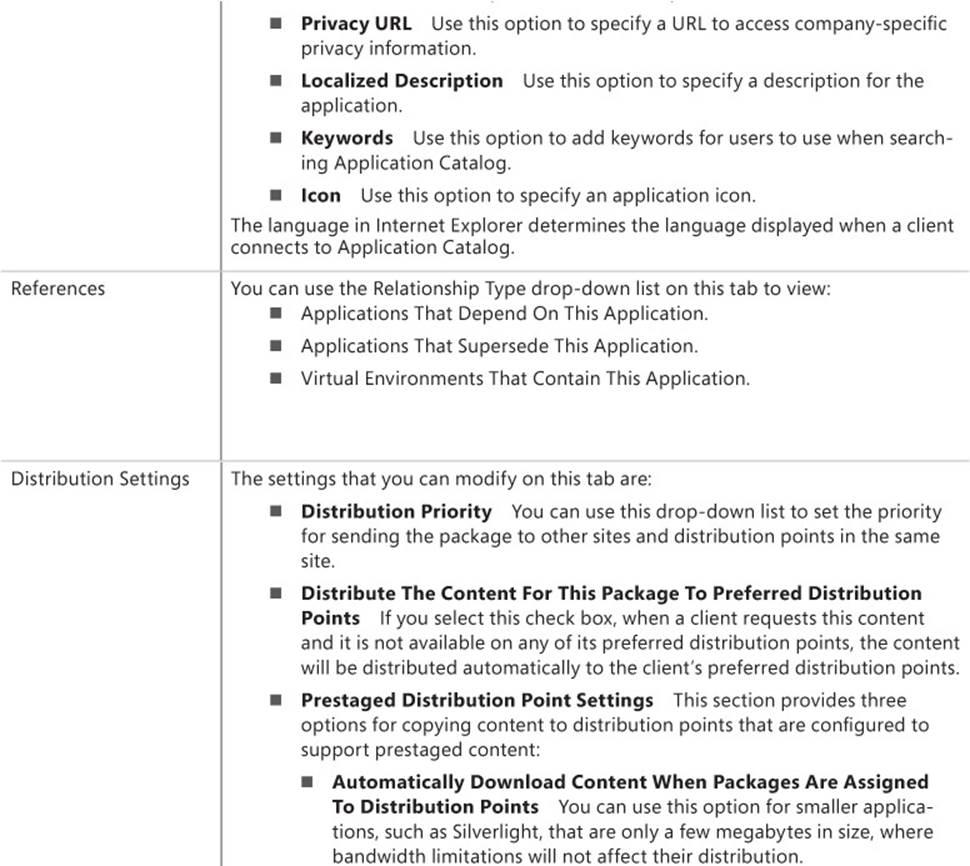
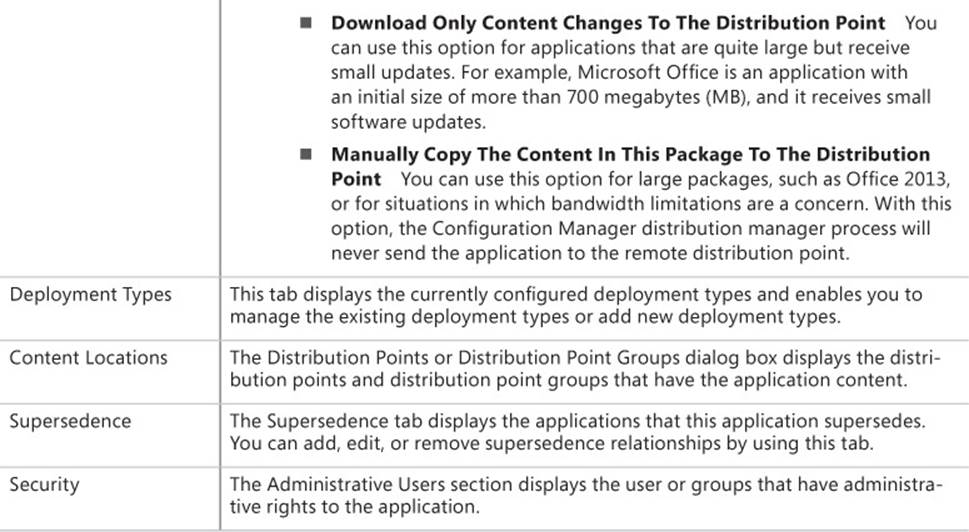
TABLE 2-2 Application settings
Application deployment
The software deployment process in Configuration Manager consists of determining the users or devices to which you want to deploy the application and the way you want to present the software. The deployment can be deployed automatically (required), presented in Software Center (available to devices), or deployed from Application Catalog (available to users).
You can deploy applications to either user collections or device collections. To deploy an application, select the application and then, on the shortcut menu or ribbon, click Deploy. This launches the Deploy Software Wizard.
By default, the installation behavior on a Windows Installer (*.msi file) deployment type is set according to the information in the .msi file. When using the Install For System If Resource Is Device; Otherwise Install For User Deployment Type on the User Experience tab, there are some differences between deploying to a user and deploying to a device.
Table 2-3 describes these differences.
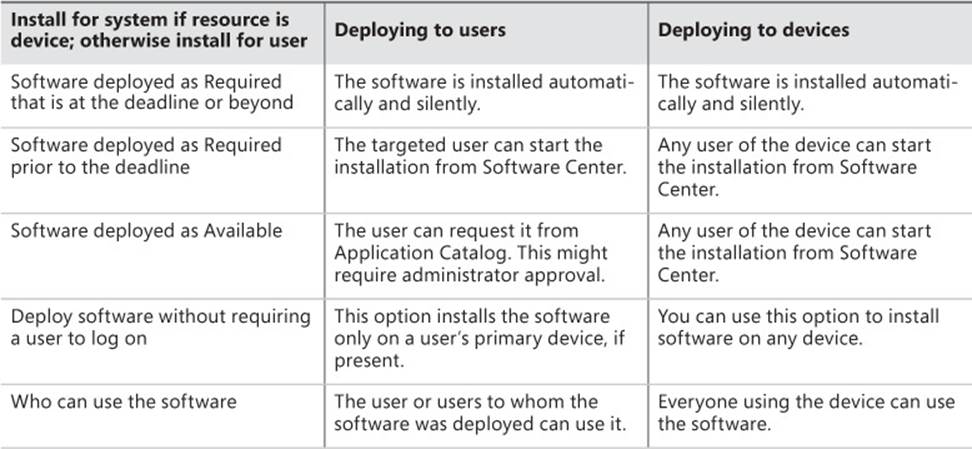
TABLE 2-3 Deployment type differences
Software types
The Application Management feature supports different kinds of software, including Windows-based software and mobile device software. You can perform multiple actions with software through System Center 2012 R2 Configuration Manager, including installing standard installations, performing custom installations, installing virtualized applications, and uninstalling software. Each installation method that you define is classified as a deployment type.
Applications contain deployment types, which in turn contain information about the files, commands, and programs used to install or uninstall software by using a particular method or command.
When creating a new deployment type, the Create Deployment Type Wizard reads the installation files from the standard deployment types and automatically populates several fields based on the deployment type. System Center 2012 Configuration Manager and newer versions work with many of the application packages available for installation on computers and mobile devices. The installer files in each of these software packages include all the information required to install the software. Figure 2-2 shows the list of supported automatic installation method detection types.

FIGURE 2-2 Deployment type settings
The Create Deployment Type Wizard uses the following standard installation files to create the application and initial deployment type:
![]() Windows Installer (*.msi File) This deployment type creates an application from a Windows Installer file.
Windows Installer (*.msi File) This deployment type creates an application from a Windows Installer file.
![]() Windows App Package This deployment type uses Windows Store apps (.appx files).
Windows App Package This deployment type uses Windows Store apps (.appx files).
![]() Windows App Package (In The Windows Store) This deployment type enables you to deploy applications directly from the Windows Store. This requires the users to have a valid account for the Windows Store.
Windows App Package (In The Windows Store) This deployment type enables you to deploy applications directly from the Windows Store. This requires the users to have a valid account for the Windows Store.
![]() Script Installer This deployment type creates custom applications. For example, you use this deployment type for *.exe files or to deploy installation scripts.
Script Installer This deployment type creates custom applications. For example, you use this deployment type for *.exe files or to deploy installation scripts.
![]() Microsoft Application Virtualization 4 This deployment type creates an application from a Microsoft Application Virtualization 4 manifest (.xml) file.
Microsoft Application Virtualization 4 This deployment type creates an application from a Microsoft Application Virtualization 4 manifest (.xml) file.
![]() Microsoft Application Virtualization 5 This deployment type creates an application from a Microsoft Application Virtualization 5 package (.appv) file.
Microsoft Application Virtualization 5 This deployment type creates an application from a Microsoft Application Virtualization 5 package (.appv) file.
![]() Windows Phone App Package (*.xap File) This deployment type creates an application by using a Windows Phone app package (.xap) file.
Windows Phone App Package (*.xap File) This deployment type creates an application by using a Windows Phone app package (.xap) file.
![]() Windows Phone App Package (In The Windows Phone Store) This deployment type creates an application deployment based on a link to the application in the Windows Phone Store.
Windows Phone App Package (In The Windows Phone Store) This deployment type creates an application deployment based on a link to the application in the Windows Phone Store.
![]() Windows Mobile Cabinet This deployment type creates an application from a Windows Mobile Cabinet (.cab) file for supported Windows-based mobile devices.
Windows Mobile Cabinet This deployment type creates an application from a Windows Mobile Cabinet (.cab) file for supported Windows-based mobile devices.
![]() App Package For iOS (*.ipa File) This deployment type creates an application from an app package for Apple iOS (.ipa) file.
App Package For iOS (*.ipa File) This deployment type creates an application from an app package for Apple iOS (.ipa) file.
![]() App Package For iOS From App Store This deployment type creates an application by specifying a link to the app in the App Store.
App Package For iOS From App Store This deployment type creates an application by specifying a link to the app in the App Store.
![]() App Package For Android (*.apk File) This deployment type creates an application from an app package for an Android (.apk) file.
App Package For Android (*.apk File) This deployment type creates an application from an app package for an Android (.apk) file.
![]() App Package For Android On Google Play This deployment type creates an application by specifying a link to the app on Google Play.
App Package For Android On Google Play This deployment type creates an application by specifying a link to the app on Google Play.
![]() Nokia SIS File This deployment type creates an application from files that are in Symbian Installation System (sis or sisx) format for supported Nokia Symbian–based mobile devices.
Nokia SIS File This deployment type creates an application from files that are in Symbian Installation System (sis or sisx) format for supported Nokia Symbian–based mobile devices.
![]() Mac OS X This deployment type creates an application from a Mac OS X Installer (.cmmac) file that was created by using the CMAppUtil tool.
Mac OS X This deployment type creates an application from a Mac OS X Installer (.cmmac) file that was created by using the CMAppUtil tool.
![]() Web Application This deployment type creates a shortcut on a user’s device to the web application.
Web Application This deployment type creates a shortcut on a user’s device to the web application.
Manual information entry
You can enter information manually into a deployment type or import a file that contains information to the deployment type. A deployment type can include the following information:
![]() General information about the deployment type, including the name of the deployment type, the technology the deployment type uses, and all the languages the deployment type supports
General information about the deployment type, including the name of the deployment type, the technology the deployment type uses, and all the languages the deployment type supports
![]() Location of any content that the installation requires and the expected behavior when communicating with a distribution point
Location of any content that the installation requires and the expected behavior when communicating with a distribution point
![]() Installation commands and uninstall commands
Installation commands and uninstall commands
![]() Detection method used to determine whether the application is installed on a client device
Detection method used to determine whether the application is installed on a client device
![]() User experience settings, including installation behavior and visibility
User experience settings, including installation behavior and visibility
![]() Requirements that must be met for the deployment type to install
Requirements that must be met for the deployment type to install
![]() Return codes used to determine whether a restart is required, the installation is complete, or any other events you want to communicate to the user
Return codes used to determine whether a restart is required, the installation is complete, or any other events you want to communicate to the user
![]() Dependencies—additional deployment types from a separate application—that this deployment type requires
Dependencies—additional deployment types from a separate application—that this deployment type requires
Considerations when deploying to Mac computers
Deploying applications to supported Mac computers is similar to deploying applications to computers that are running Windows operating systems. However, due to the differences in the platforms, consider the following:
![]() You must package Mac OS X applications by using the CMAppUtil tool on a Mac computer. This renders them in a format that System Center 2012 R2 Configuration Manager can read.
You must package Mac OS X applications by using the CMAppUtil tool on a Mac computer. This renders them in a format that System Center 2012 R2 Configuration Manager can read.
![]() You can deploy Mac OS X applications only to devices, not to users.
You can deploy Mac OS X applications only to devices, not to users.
![]() Mac OS X applications support simulated deployments.
Mac OS X applications support simulated deployments.
![]() You cannot deploy Mac OS X applications as Available.
You cannot deploy Mac OS X applications as Available.
![]() You cannot send wake-up packets to Mac OS X computers to start a deployment.
You cannot send wake-up packets to Mac OS X computers to start a deployment.
![]() Mac OS X computers do not support Background Intelligent Transfer System (BITS).
Mac OS X computers do not support Background Intelligent Transfer System (BITS).
![]() Mac OS X deployments do not support global conditions. However, they do support requirements such as operating system.
Mac OS X deployments do not support global conditions. However, they do support requirements such as operating system.
More Info: Deploying Software to Mac Computers
You can learn more about deploying software to Mac computers at http://technet.microsoft.com/en-us/library/jj687950.aspx.
Using deployment types
To create a new deployment type in an existing application, open the application’s Properties dialog box, click the Deployment Types tab, and then click the Add button. The Create Deployment Type Wizard opens, and you can select the deployment type you are creating. You can choose Automatically Identify Information About This Deployment Type From Installation Files or Manually Specify The Deployment Type Information.
When retrieving the information from an installer file, you import the required information and possibly some optional information. You can edit the deployment type afterward to supply additional optional information or modify the imported information.
When creating a deployment type manually, you must supply all required information in addition to any optional information. For example, when you work with the Windows Installer (*.msi file) deployment type, you can use:
![]() Automatic creation The required fields and some optional fields are populated automatically. They usually include Name, Installation Program, Installation Behavior, Detection Method, and Uninstall Program. The Detection Method and Uninstall Program fields do not appear in the Create Deployment Type Wizard. Additional information that you can provide in the wizard includes Requirements and Dependencies.
Automatic creation The required fields and some optional fields are populated automatically. They usually include Name, Installation Program, Installation Behavior, Detection Method, and Uninstall Program. The Detection Method and Uninstall Program fields do not appear in the Create Deployment Type Wizard. Additional information that you can provide in the wizard includes Requirements and Dependencies.
![]() Manual creation You must specify Name, Installation Program, and Detection Method. Additional information that you can provide in the wizard includes Uninstall Program, Requirements, Dependencies, and User Experience settings.
Manual creation You must specify Name, Installation Program, and Detection Method. Additional information that you can provide in the wizard includes Uninstall Program, Requirements, Dependencies, and User Experience settings.
The following list describes the sections in the Create Deployment Type Wizard and considerations to keep in mind when configuring them.
![]() General Contains basic information about the deployment type, including the name and type of deployment. You can add additional information as reference information for the Configuration Manager administrators.
General Contains basic information about the deployment type, including the name and type of deployment. You can add additional information as reference information for the Configuration Manager administrators.
![]() Content Contains information about the source files and how this deployment type will use them. If you are creating a deployment type for files that already exist on the client devices, you need not specify the content location.
Content Contains information about the source files and how this deployment type will use them. If you are creating a deployment type for files that already exist on the client devices, you need not specify the content location.
![]() Programs Contains information about the install and uninstall commands in this deployment type. There are some optional fields to ensure that applications install correctly and enable Windows source management.
Programs Contains information about the install and uninstall commands in this deployment type. There are some optional fields to ensure that applications install correctly and enable Windows source management.
![]() Detection Method Contains information about how the success of an installation will be determined. You must specify at least one detection method. For complex installations, you can create a script to detect the installation.
Detection Method Contains information about how the success of an installation will be determined. You must specify at least one detection method. For complex installations, you can create a script to detect the installation.
![]() User Experience Contains information about how the user will view and interact with the deployment.
User Experience Contains information about how the user will view and interact with the deployment.
![]() Requirements Contains the conditions that will determine whether to install this deployment type.
Requirements Contains the conditions that will determine whether to install this deployment type.
![]() Return Codes Contains the codes the program will return when it finishes running. Return codes can indicate successful installation, failed installation, or some other condition such as when the installation process requires a restart.
Return Codes Contains the codes the program will return when it finishes running. Return codes can indicate successful installation, failed installation, or some other condition such as when the installation process requires a restart.
![]() Dependencies Contains information about the deployment types you must install before you can install this deployment type. You can configure the dependencies to be autoinstalled during a deployment.
Dependencies Contains information about the deployment types you must install before you can install this deployment type. You can configure the dependencies to be autoinstalled during a deployment.
Detection methods
A detection method is a procedure that enables the deployment process to determine whether an application is present on a system. Detection occurs before the content is installed and at regular intervals afterward and provides the following functions:
![]() Preventing Configuration Manager from reinstalling the application needlessly
Preventing Configuration Manager from reinstalling the application needlessly
![]() Reinstalling a required application that the user has uninstalled, for example, through Control Panel
Reinstalling a required application that the user has uninstalled, for example, through Control Panel
![]() Determining whether an application is present before running a deployed uninstall command
Determining whether an application is present before running a deployed uninstall command
When you create an application by using one of the automatic methods, Configuration Manager creates a detection method based on the installer file used to create the application. Generally, this is sufficient for most deployments. However, when you create a deployment type manually or when you need more refinement, you can create enhanced detection methods.
To create a new detection method, open the properties of the deployment type that you wish to modify, click the Detection Methods tab, and then click Add Clause. There are three types of detection rules in the Detection Rule dialog box:
![]() File System You can detect an application based on the existence of a specific file or folder. You can also create a detection method that uses the Date Modified or Date Created properties for either a file or folder, or the Version or Size properties for a file.
File System You can detect an application based on the existence of a specific file or folder. You can also create a detection method that uses the Date Modified or Date Created properties for either a file or folder, or the Version or Size properties for a file.
![]() Registry You can detect an application by searching in any of the registry hives for the existence of a specific key or value. You can also refine this detection method by specifying a value for comparison.
Registry You can detect an application by searching in any of the registry hives for the existence of a specific key or value. You can also refine this detection method by specifying a value for comparison.
![]() Windows Installer You can detect an application by using the Windows Installer database of installed applications. You can base this detection method on the existence of a specific product code, or you can specify values for comparison of the Version property or the Upgrade Code property.
Windows Installer You can detect an application by using the Windows Installer database of installed applications. You can base this detection method on the existence of a specific product code, or you can specify values for comparison of the Version property or the Upgrade Code property.
You can create multiple detection rules in a single detection method and use either the AND or the OR operator to connect them. In addition, you can group detection methods to make complex detection methods.
Finally, instead of using the detection methods, you can create a Windows PowerShell, Microsoft Visual Basic Scripting Edition (VBScript), or JScript script to detect an installed application.
Dependencies
Dependencies define one or more applications that must be installed before you run a specific deployment type. You can configure dependent applications to install automatically before a deployment type installs.
Dependencies are application deployment types that are added as a prerequisite for another application’s deployment type. For example, assume that you have a custom application that requires installation of a particular run time before the application installs. In this case, you would create an application with the appropriate deployment type, which installs the run time as a dependency on the custom application.
When defining a dependency, you create dependency groups. All dependent applications are in one or more dependency groups. When you choose to allow dependent applications to install automatically, each application in the group attempts to install in the order that the group specifies, until one of the dependencies from the group is installed.
When creating a dependency, be careful not to create a circular reference, because then the installation process will not install the applications.
Global conditions
Global conditions define the attributes that Configuration Manager evaluates to determine whether a deployment type applies to a particular user or device. However, they do not define the particular values for which you are checking. You use global conditions to build requirements that will contain the values for which you are checking. You can use the predefined global conditions to define a requirement within any applicable deployment type; however, you cannot modify the predefined global conditions. There are two categories of predefined global conditions for both mobile and Windows-based device types: User and Device.
Table 2-4 lists the predefined global conditions and the requirements for which you should use them.
TABLE 2-4 Global conditions
If the predefined global conditions do not meet your needs, you can create custom global conditions. Administrator-created global conditions allow for a high level of customization. You can create global conditions for Windows-based devices, Windows Mobile–based devices, and Nokia devices. The available settings vary depending on the type of global condition you are creating.
Examples of custom global conditions include:
![]() Checking for a registry setting on a device.
Checking for a registry setting on a device.
![]() Checking for a specific configuration of an application that the registry defines.
Checking for a specific configuration of an application that the registry defines.
![]() Verifying that a specific .NET assembly is available.
Verifying that a specific .NET assembly is available.
![]() Verifying an application version for an upgrade.
Verifying an application version for an upgrade.
To create custom global conditions, in the Software Library workspace, in the Global Conditions node, click Create Global Condition.
When you create a Windows-based global condition, you can check several aspects of Windows-based computers. Table 2-5 describes the setting types you can configure for evaluation of applications to Windows-based computers.

TABLE 2-5 Conditions
Requirements
Applications in System Center 2012 R2 Configuration Manager and newer versions support using multiple deployment types in each application. This is similar to a package containing multiple programs. However, there are several differences. When you deploy a package and program to a collection, the program will attempt to run on every member of the collection. Deployment types have intelligence in the form of detection methods, dependencies, and requirements that are not available with programs. This difference means that deployment types run the installation software only on clients whose installation meets all the specified criteria and, therefore, is more likely to be successful.
With applications, you deploy the application and not the deployment types. When clients receive a policy that includes an application deployment, the clients use the requirements in the deployment types to determine the deployment type, if any, that they will use. You can create multiple deployment types of the same type, such as a suite deploying different combinations of programs, depending on the department to which the user belongs.
When you deploy an application with multiple deployment types, the application-deployment evaluation cycle evaluates requirements for each deployment type for the target device or user. After the target device or user satisfies the requirements for a deployment type, no other deployment types are evaluated, and Configuration Manager uses the satisfying deployment type. If the target device or user cannot satisfy the requirements for any of the deployment types, the application does not attempt to run. When this happens, the status shows that the device has not met the requirements of the application.
When there are multiple deployment types and the target device or user could match the requirements for more than one deployment type, application installation occurs using the highest-priority deployment type. When using multiple deployment types in an application, you must be sure to set the requirements accurately for each deployment type and carefully set the priorities of the deployment types. For example, if the highest-priority deployment type does not have any defined requirements, it will be the only deployment type used for all installations of that application.
Global conditions have three categories that define requirements: User, Device, and Custom. The User and Device categories contain the predefined global conditions that you can use to create requirements. When the existing conditions are not sufficient, you can use the Custom category to create custom global conditions by using the Create button within the Create Requirement dialog box.
When defining requirements, you can use one of two rule types:
![]() Value This condition type compares a value on the client system to the value that you specify. All the predefined requirements are of the Value type. You can create custom global conditions to define value condition types. Each condition has an operator that defines how you are comparing the existing value on the client system to the desired value in the condition. There are many possible operators, including the standard relational operators such as Equals, Not Equal To, Greater Than, Less Than, Between, Greater Than Or Equal To, and Less Than Or Equal To.
Value This condition type compares a value on the client system to the value that you specify. All the predefined requirements are of the Value type. You can create custom global conditions to define value condition types. Each condition has an operator that defines how you are comparing the existing value on the client system to the desired value in the condition. There are many possible operators, including the standard relational operators such as Equals, Not Equal To, Greater Than, Less Than, Between, Greater Than Or Equal To, and Less Than Or Equal To.
![]() Existential This condition type checks whether the condition exists. There are no predefined existential global conditions. You can create custom global conditions to define existential types.
Existential This condition type checks whether the condition exists. There are no predefined existential global conditions. You can create custom global conditions to define existential types.
When creating or editing a deployment type manually, you can specify multiple requirements. However, if you specify multiple requirements, all the requirements must be met before deployment occurs.
Table 2-6 lists the categories for requirements.

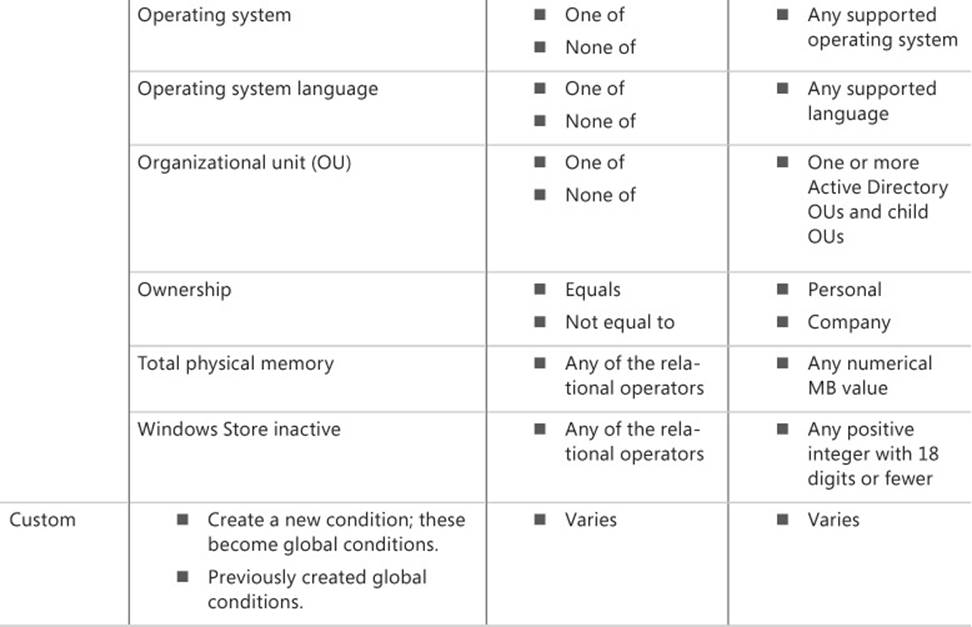
TABLE 2-6 Requirement categories
After creating or adding deployment types, you can adjust the priority with the Increase and Decrease priority buttons on the Deployment Types tab in the application properties.
There are many reasons for creating requirements and as many ways to define them:
![]() To ensure that the application is installed only on a user’s primary device, use the primary device requirement from the User category.
To ensure that the application is installed only on a user’s primary device, use the primary device requirement from the User category.
![]() To ensure that the hardware is capable of supporting the application (such as memory requirements), use the total physical memory requirement from the Device category.
To ensure that the hardware is capable of supporting the application (such as memory requirements), use the total physical memory requirement from the Device category.
![]() To ensure that a prerequisite is installed or configured correctly, use a custom requirement to check for a specific file and version or check for registry entries.
To ensure that a prerequisite is installed or configured correctly, use a custom requirement to check for a specific file and version or check for registry entries.
More Info: Chassis Global Condition
You can learn more about chassis global condition at http://blogs.technet.com/b/brandonlinton/archive/2013/01/30/configmgr-2012-chassis-type-global-condition.aspx.
User device affinity
System Center 2012 R2 Configuration Manager and newer versions include a User Device Affinity feature. User device affinity enables a user to associate one or more devices. These devices are the user’s primary devices. Similarly, a device can have an affinity with more than one user. You can use user device affinity as a requirement for deployment types to deploy an application to a user-based collection so that the application deploys only to the user’s primary devices. However, this requires the user’s primary devices to meet the application’s other requirements, such as any hardware requirements. Typically, a primary device is the device that the user uses on a daily basis to perform her work.
Using user device affinity as a requirement provides further options for deploying software. For example, a required line-of-business (LOB) application is created with multiple deployment types, such as the Windows Installer (*.msi file) deployment type and the Application Virtualization 5 deployment type. You could configure the requirements for the deployment types to use the Windows Installer (*.msi file) deployment type only for a user’s primary device. The application is then deployed as Required for the user. When the user logs on to his primary device, the application is installed locally by using a Windows Installer (*.msi file) deployment type. If the same user accesses a device that is not his primary device, the application is installed by using the Microsoft Application Virtualization 5 deployment type.
In addition, you can deploy an application as Required and then specify to predeploy software to the user’s primary device. This allows the application to install before the user logs on so that the user can run the application as soon as she logs on.
Automatically configured affinity
You can configure a site to assign user device affinity automatically based on the usage of the devices. You can control this through Client Settings, either in Default Client Settings in Administration and the Client Settings node or in a custom client setting. There are three settings in the User And Device Affinity group that you can use to control automatic assignment of device affinity:
![]() User Device Affinity Usage Threshold (Minutes) Specify the number of minutes of usage before a user device affinity is created.
User Device Affinity Usage Threshold (Minutes) Specify the number of minutes of usage before a user device affinity is created.
![]() User Device Affinity Usage Threshold (Days) Specify the number of days over which the usage-based affinity threshold is measured.
User Device Affinity Usage Threshold (Days) Specify the number of days over which the usage-based affinity threshold is measured.
![]() Automatically Configure User Device Affinity From Usage Data In the drop-down list box, click Yes to enable the site to create user device affinities automatically. If you select No, an administrator must approve all user device affinity assignments.
Automatically Configure User Device Affinity From Usage Data In the drop-down list box, click Yes to enable the site to create user device affinities automatically. If you select No, an administrator must approve all user device affinity assignments.
You manage device affinity requests in the Assets And Compliance workspace. Select the Device Collections node and then click Manage Affinity Requests to approve or reject affinity requests. When using automatic affinity assignment, the thresholds are monitored continuously. If a user falls below the specified threshold, the affinity relationship will be removed.
User-defined affinity
You also can enable users to define their own primary devices through Application Catalog. First, configure the Allow User To Define Their Primary Devices user setting either in Default Client Settings or in a custom client setting as shown in Figure 2-3:
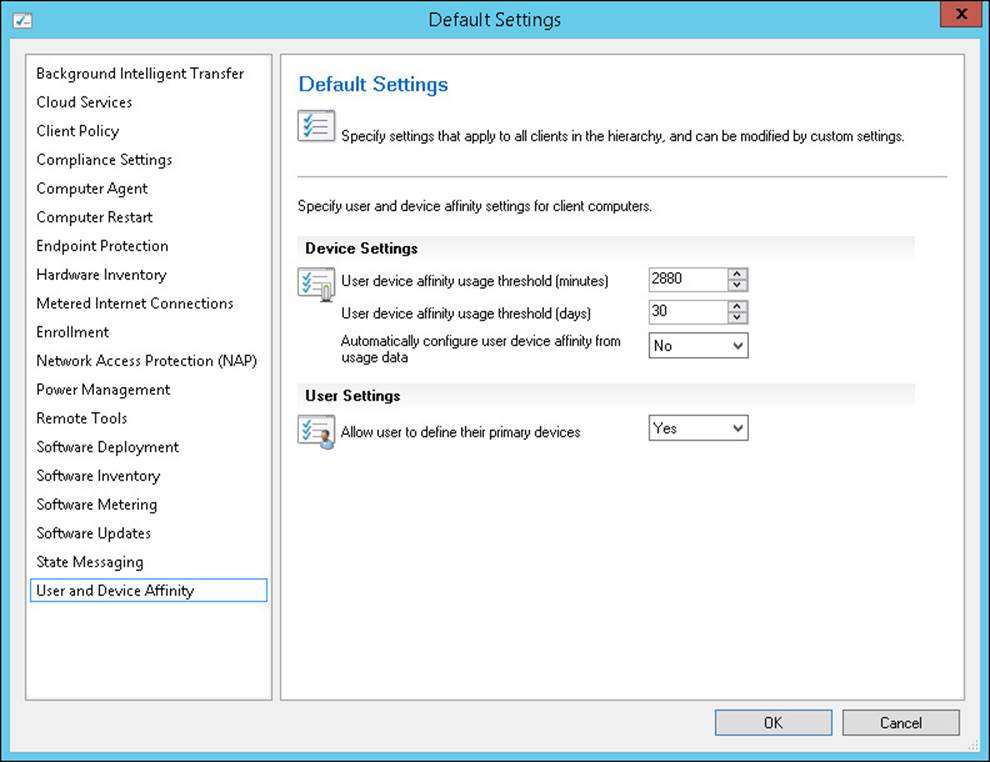
FIGURE 2-3 User device affinity
Users then must start Application Catalog from the device they want to set as a primary device, click the My Devices link, and then select the I Regularly Use This Computer To Do My Work check box.
Administrator-defined affinity
There are three ways for administrators to define user device affinity manually from the Assets And Compliance workspace:
![]() Select a device and then, on the ribbon, click Edit Primary Users.
Select a device and then, on the ribbon, click Edit Primary Users.
![]() Select a user and then, on the ribbon, click Edit Primary Devices.
Select a user and then, on the ribbon, click Edit Primary Devices.
![]() Import a .csv file.
Import a .csv file.
To import a .csv file, select either the Users node or the Devices node and then, on the ribbon, click Import User Device Affinity. Each user and device in the file must already exist in the Configuration Manager database. You must format the file you import in the following manner: <Domain\user name>,<Device NetBIOS name>.
Operating system deployment–defined affinity
During operating system deployment, you can use task sequence variables to aid in defining user device affinity:
![]() SMSTSAssignUsersMode There are three options for this variable:
SMSTSAssignUsersMode There are three options for this variable:
![]() Auto The Auto setting defines user device affinity automatically.
Auto The Auto setting defines user device affinity automatically.
![]() Pending The Pending setting creates a user device affinity request that requires administrator approval.
Pending The Pending setting creates a user device affinity request that requires administrator approval.
![]() Disabled The Disabled setting causes the task to skip user device affinity processing.
Disabled The Disabled setting causes the task to skip user device affinity processing.
![]() SMSTSUdaUsers You can assign one or more users to this variable in the format of DOMAIN\Username.
SMSTSUdaUsers You can assign one or more users to this variable in the format of DOMAIN\Username.
More Info: Task Sequence Action Variables
You can learn more about task sequence action variables at http://technet.microsoft.com/en-us/library/hh273365.aspx.
Deploy software wizard
Before a user or client can run a deployment, you must distribute the appropriate content to one or more distribution points. You can either distribute the content to the distribution points ahead of time or distribute it while completing the Deploy Software Wizard.
After you are ready to deploy an application, you create a deployment that targets either users or devices. The client software checks the management point periodically for changes to user and machine policies. When the client has detected the deployment and reached the scheduled time of the deployment, and there is an applicable deployment type, the client system contacts the management point to locate an available distribution point containing the content. After the client system selects a distribution point with the content, the client system downloads the content and runs the appropriate application deployment type.
You use the Deploy Software Wizard to deploy applications to users and computers. You can launch this wizard either by selecting the application that you want to deploy and then clicking the Deploy button on the ribbon or by selecting Deploy on the shortcut menu.
The following sections describe each page of the Deploy Software Wizard.
General
The Specify General Information For This Deployment page of the Deploy Software Wizard is the General page, shown in Figure 2-4. You can configure the following settings on this page:
![]() Software This setting refers to the name of the application that you are deploying.
Software This setting refers to the name of the application that you are deploying.
![]() Collection This setting refers to the targeted device or user collection.
Collection This setting refers to the targeted device or user collection.
![]() Use Default Distribution Point Groups Associated To This Collection This check box is cleared by default.
Use Default Distribution Point Groups Associated To This Collection This check box is cleared by default.
![]() Automatically Distribute Content For Dependencies This check box is selected by default. Typically, you should not change this setting. Selecting it ensures that any dependent content is distributed and available.
Automatically Distribute Content For Dependencies This check box is selected by default. Typically, you should not change this setting. Selecting it ensures that any dependent content is distributed and available.
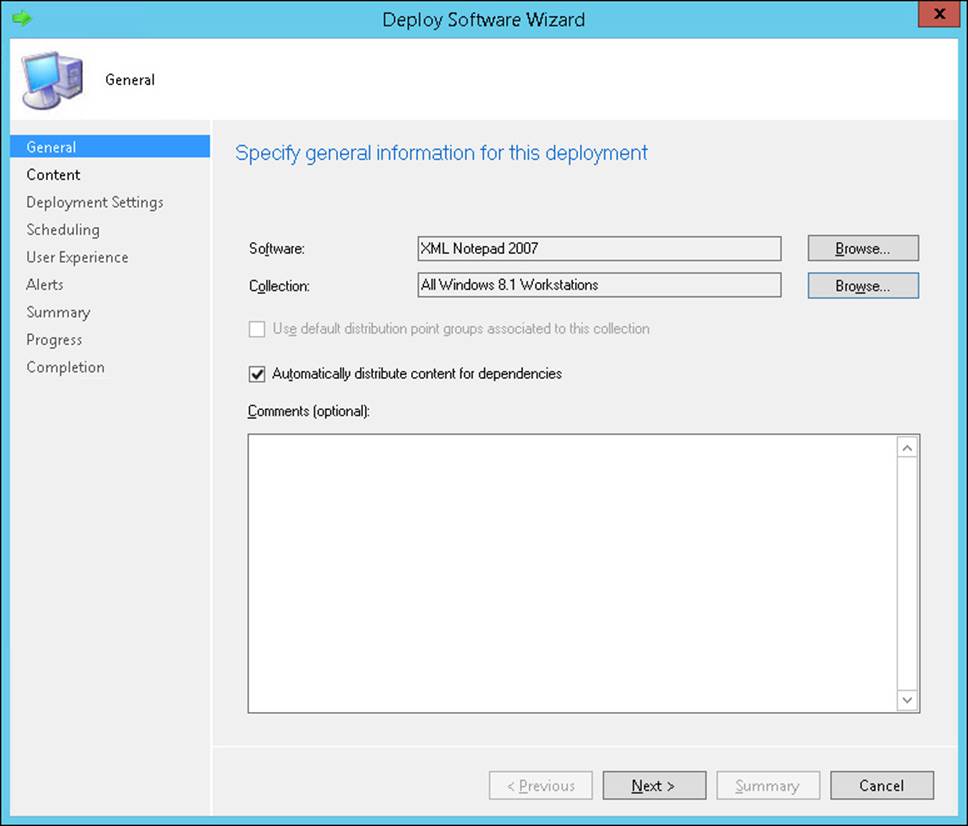
FIGURE 2-4 Deploy Software Wizard
Content
You use the Content page, shown in Figure 2-5, to specify one or more distribution points or distribution point groups that contain the content. If you have not previously distributed the content to at least one distribution point or distribution point group, you must designate the target distribution points or distribution point group at this time.
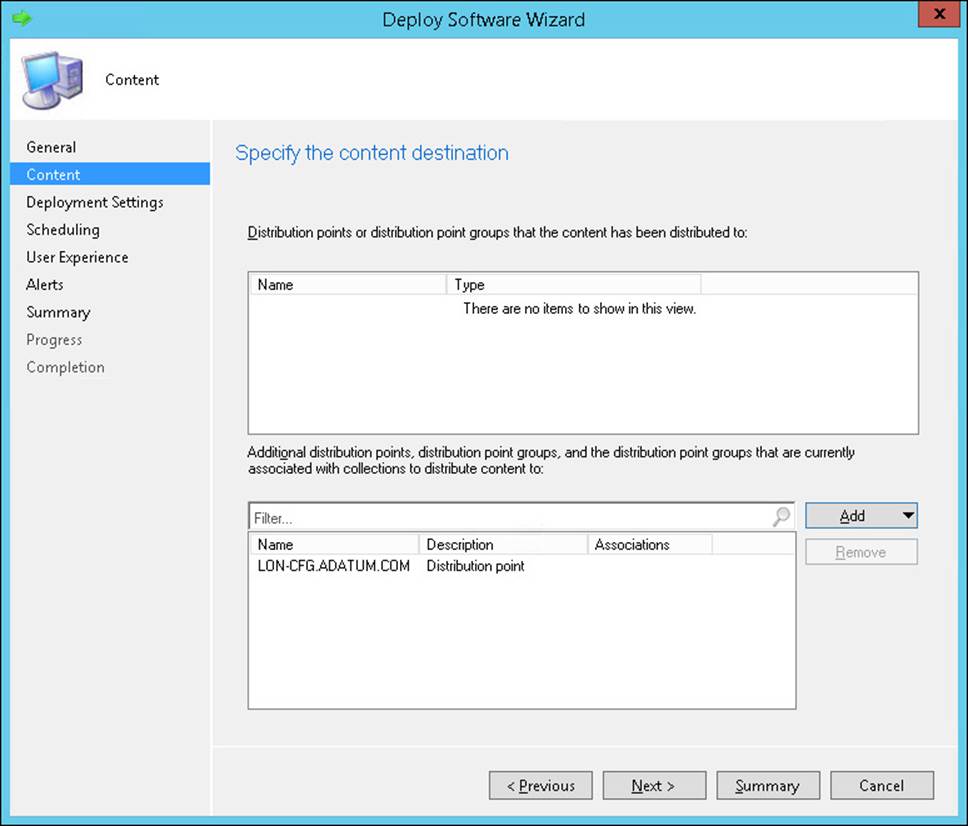
FIGURE 2-5 Specify The Content Destination page
Deployment settings
On the Specify Settings To Control How This Software Is Deployed page, shown in Figure 2-6, you can configure the following settings:
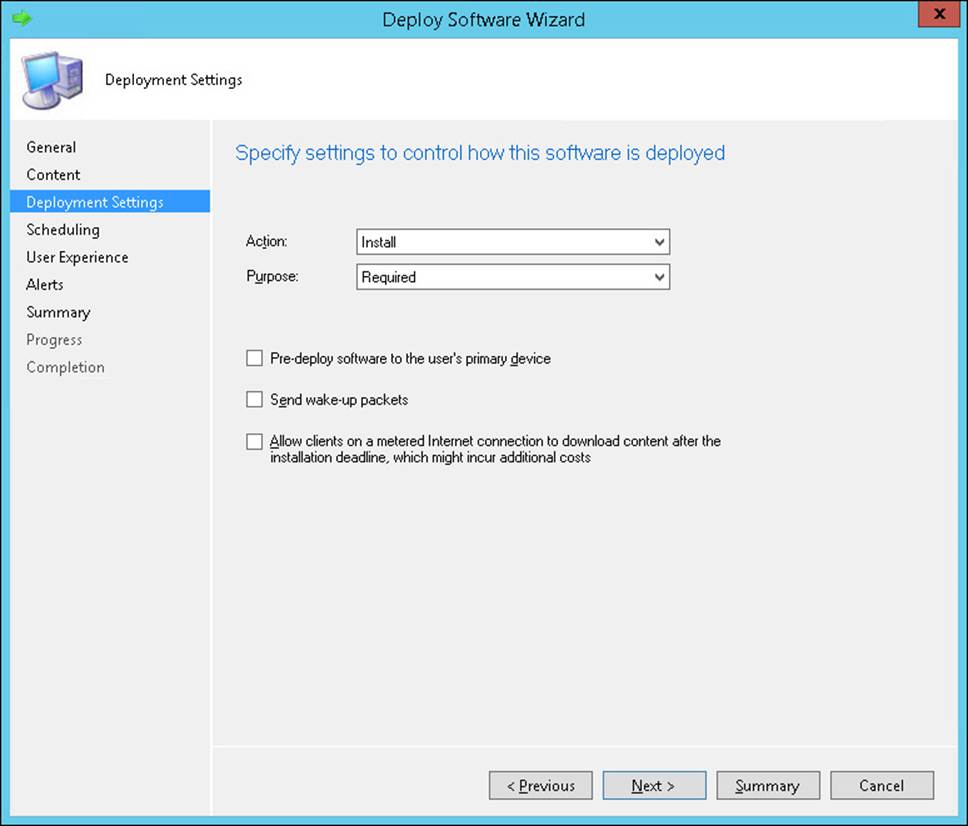
FIGURE 2-6 Deployment Settings
![]() Action This setting has two options: Install and Uninstall.
Action This setting has two options: Install and Uninstall.
![]() Purpose When the action is set to Install, this setting has two options: Available and Required. When deploying an Uninstall action, the purpose is always Required.
Purpose When the action is set to Install, this setting has two options: Available and Required. When deploying an Uninstall action, the purpose is always Required.
If you select Required, the following settings are available:
![]() Pre-deploy Software To The User’s Primary Device This check box is cleared by default. Selecting this check box allows the software to be installed on a user’s primary device without requiring the user to be logged on.
Pre-deploy Software To The User’s Primary Device This check box is cleared by default. Selecting this check box allows the software to be installed on a user’s primary device without requiring the user to be logged on.
![]() Send Wake-up Packets This check box is cleared by default. Selecting this check box causes a wake-up packet to be sent to devices when the application is scheduled to be deployed. If the device supports Wake On LAN and if the device is turned off, the device is turned on to begin the deployment.
Send Wake-up Packets This check box is cleared by default. Selecting this check box causes a wake-up packet to be sent to devices when the application is scheduled to be deployed. If the device supports Wake On LAN and if the device is turned off, the device is turned on to begin the deployment.
![]() Allow Clients On A Metered Internet Connection To Download Content After The Installation Deadline, Which Might Incur Additional Costs When you enable this option, clients on metered connections download content automatically when the specified deadline is reached. If the mobile client is on a limited mobile Internet access plan, this could result in many overage minutes.
Allow Clients On A Metered Internet Connection To Download Content After The Installation Deadline, Which Might Incur Additional Costs When you enable this option, clients on metered connections download content automatically when the specified deadline is reached. If the mobile client is on a limited mobile Internet access plan, this could result in many overage minutes.
When deploying to a user, the same settings are available, with one additional option. If the Install action with the Available purpose is selected, the Require Administrator Approval If Users Request This Application check box appears and is cleared by default. If you select this check box, users can request the application from Application Catalog. However, the application will not be deployed until an appropriate Configuration Manager administrator approves it.
Scheduling
On the Specify The Schedule For This Deployment page, shown in Figure 2-7, the options that are visible in this section depend on how you deploy the application. When deploying an application, consider the following scheduling options:
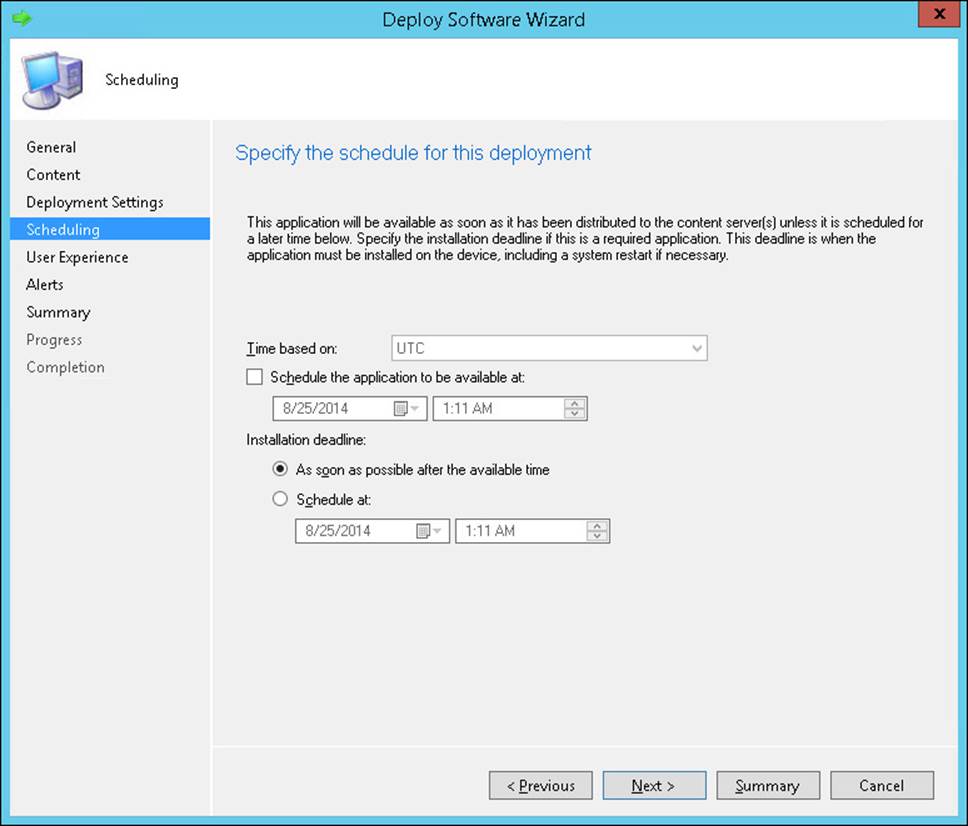
FIGURE 2-7 Specify The Schedule For This Deployment
![]() The default setting is to make the application available as soon as possible to ensure that applications are available immediately.
The default setting is to make the application available as soon as possible to ensure that applications are available immediately.
![]() You can configure the application to be available at a specific time.
You can configure the application to be available at a specific time.
![]() When the application is deployed with the Available purpose, the available time is based on Coordinated Universal Time (UTC).
When the application is deployed with the Available purpose, the available time is based on Coordinated Universal Time (UTC).
![]() When the application is deployed with the Required purpose, the action deadline is As Soon As Possible After The Available Time.
When the application is deployed with the Required purpose, the action deadline is As Soon As Possible After The Available Time.
![]() You can change the action deadline to a specific time. If the action deadline is set to a specific time, you can configure the time to be either UTC or Client Local Time.
You can change the action deadline to a specific time. If the action deadline is set to a specific time, you can configure the time to be either UTC or Client Local Time.
User experience
On the Specify The User Experience For The Installation Of This Software On The Selected Devices page, shown in Figure 2-8, you can configure settings related to how end users interact with the application deployment.
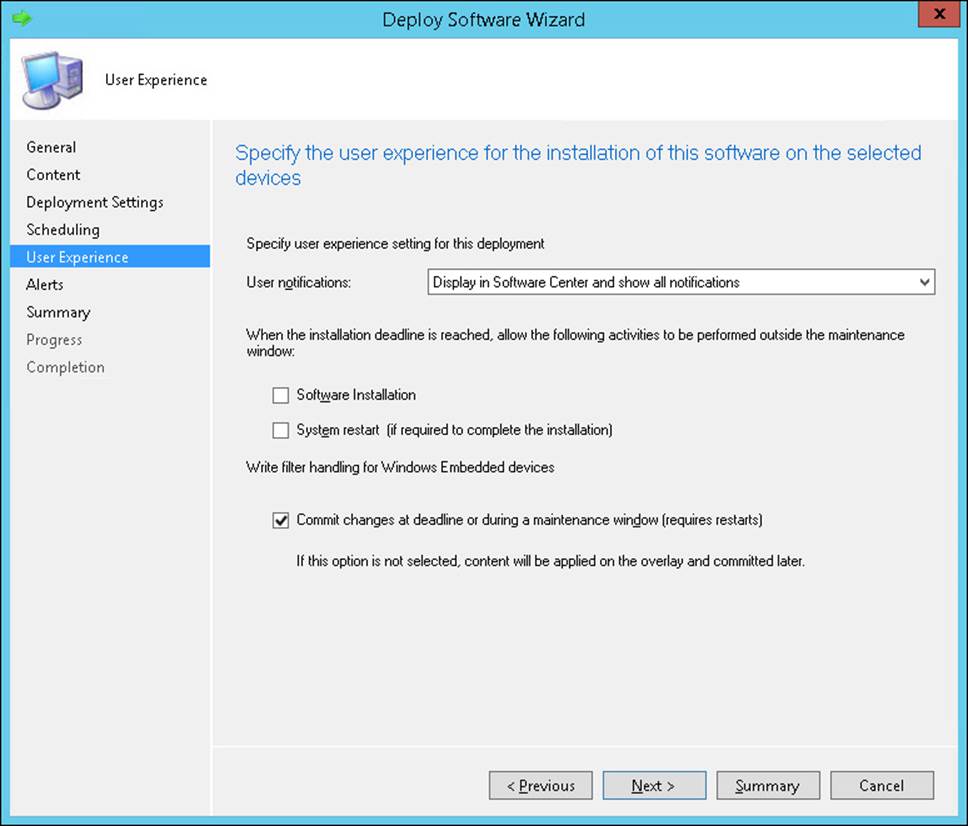
FIGURE 2-8 Specify The User Experience For The Installation Of This Software On The Selected Devices
If you deploy the application as Available, you can select one of the following options to determine how users see user notifications:
![]() Display In Software Center And Show All Notifications
Display In Software Center And Show All Notifications
![]() Display In Software Center, And Only Show Notifications For Computer Restarts
Display In Software Center, And Only Show Notifications For Computer Restarts
If you deploy the application as Required, an additional user notification option becomes available: Hide In Software Center And All Notifications. In addition, the following two check boxes become available for allowing actions outside a maintenance window when the installation deadline is reached:
![]() Software Installation or Software Uninstall
Software Installation or Software Uninstall
![]() System Restart (If Required To Complete The Installation) or Computer Restart (If Required To Complete The Software Uninstall)
System Restart (If Required To Complete The Installation) or Computer Restart (If Required To Complete The Software Uninstall)
To support the deployment to Windows Embedded devices, System Center 2012 Configuration Manager SP1 introduced the Commit Changes At Deadline Or During A Maintenance Window (Requires Restarts) setting under Write Filter Handling For Windows Embedded Devices.
Alerts
On the Specify Configuration Manager And Operations Manager Alert Options page, you configure what information you get back about deployments. The settings that you configure depend on whether you deploy the software as Available or as Required.
If you deploy the software as Available, you can create a deployment alert when the threshold is higher than a specific value. You can configure the threshold as a percentage of failure; when a certain percentage of deployed clients report a failure, an alert is generated. For example, if you configure the percentage as 10 for a deployment that is targeting 1,000 devices and 100 deployments fail, an alert is generated.
If you also are using System Center 2012 R2 Operations Manager or System Center 2012 Operations Manager, you can specify the following Operations Manager–related settings:
![]() Enable System Center Operations Manager Maintenance Mode This check box is disabled by default. If you enable this setting, the Operations Manager agent on the computer will not generate any alerts during the deployment of the application.
Enable System Center Operations Manager Maintenance Mode This check box is disabled by default. If you enable this setting, the Operations Manager agent on the computer will not generate any alerts during the deployment of the application.
![]() Generate System Center Operations Manager Alert When A Software Installation Fails or Generate System Center Operations Manager Alert When The Software Removal Fails This check box is disabled by default. If the Enable System Center Operations Manager maintenance mode is enabled and this setting is not enabled, Operations Manager administrators might not notice failed installations (or uninstallations). This can leave a critical, monitored system in a nonfunctioning state without notifying the Operations Manager administrators.
Generate System Center Operations Manager Alert When A Software Installation Fails or Generate System Center Operations Manager Alert When The Software Removal Fails This check box is disabled by default. If the Enable System Center Operations Manager maintenance mode is enabled and this setting is not enabled, Operations Manager administrators might not notice failed installations (or uninstallations). This can leave a critical, monitored system in a nonfunctioning state without notifying the Operations Manager administrators.
If you deploy the software as Required, in addition to the options displayed for the Available deployment, the following settings are available:
![]() Create A Deployment Alert When The Threshold Is Lower Than The Following or Create A Removal Alert When The Threshold Is Lower Than The Following The following two settings are available under this check box:
Create A Deployment Alert When The Threshold Is Lower Than The Following or Create A Removal Alert When The Threshold Is Lower Than The Following The following two settings are available under this check box:
![]() Percent Success You can specify a number between 0 and 99.
Percent Success You can specify a number between 0 and 99.
![]() After You specify a date and time, and, if the specified percentage success is not met at this time, an alert is generated.
After You specify a date and time, and, if the specified percentage success is not met at this time, an alert is generated.
![]() Create A Deployment Alert When The Threshold Is Higher Than The Following or Create A Removal Alert When The Threshold Is Higher Than The Following The following setting is available under this check box:
Create A Deployment Alert When The Threshold Is Higher Than The Following or Create A Removal Alert When The Threshold Is Higher Than The Following The following setting is available under this check box:
![]() Percent Failure You can specify a number between 0 and 99.
Percent Failure You can specify a number between 0 and 99.
By specifying these settings, you ensure that an alert is generated if the specified percentage of targeted devices has not reported a successful deployment by the specified date and time. For example, you can configure the percent success to 90 by December 12, 2014, for a deployment that is targeting 1,000 devices. On December 13, 2014, if 900 deployments have not been successful, an alert is generated.
Simulated deployment
A simulated deployment is a special deployment in which you can test the evaluation of the requirements in the application’s deployment types without distributing any files. You create a simulated deployment by selecting your application and then clicking the Simulate Deployment button on the ribbon. When using simulated deployment, you do not specify a distribution point because target clients do not use content.
A simulated deployment is evaluated like any deployment, and the results are in the Monitoring workspace under the Deployments node along with all the other deployments. When examining the status of the simulated deployment, you see the following results:
![]() Success This includes targets when a deployment type for the application is installed already, including the deployment type with which they comply.
Success This includes targets when a deployment type for the application is installed already, including the deployment type with which they comply.
![]() Simulate Success This includes targets that comply with a deployment type in the application, including the deployment type with which they comply.
Simulate Success This includes targets that comply with a deployment type in the application, including the deployment type with which they comply.
![]() Requirements Not Met This includes targets that do not comply with any deployment type in the application, including the deployment types with which they do not comply.
Requirements Not Met This includes targets that do not comply with any deployment type in the application, including the deployment types with which they do not comply.
![]() Unknown This includes targets that have not yet reported results.
Unknown This includes targets that have not yet reported results.
You create a simulated deployment the same way as any other deployment. Therefore, you cannot create a regular deployment for the same application and collection until you delete the simulated deployment.
Thought experiment: Application deployment at Contoso
You want to deploy a new application to some of the computers in your organization. A small number of computers in your organization don’t have enough memory to run the application, and you want to avoid deploying the application to these computers. You also want to verify that the deployment you have configured will reach all targeted computers. With this information in mind, answer the following questions:
1. What can you do to ensure that the new application is deployed only to computers with enough RAM?
2. What should you do to verify that the deployment settings are correct?
Objective summary
![]() When creating an application, you can either allow the wizard to detect settings automatically from the installation files or use the wizard to create the application manually.
When creating an application, you can either allow the wizard to detect settings automatically from the installation files or use the wizard to create the application manually.
![]() The software deployment process in Configuration Manager consists of determining the users or devices to which you want to deploy the application and the way in which you want to present the software.
The software deployment process in Configuration Manager consists of determining the users or devices to which you want to deploy the application and the way in which you want to present the software.
![]() The deployment can be deployed automatically (required), presented in Software Center (available to devices), or deployed from Application Catalog (available to users).
The deployment can be deployed automatically (required), presented in Software Center (available to devices), or deployed from Application Catalog (available to users).
![]() You can deploy applications to either user collections or device collections.
You can deploy applications to either user collections or device collections.
![]() A detection method is a procedure that enables the deployment process to determine whether an application is present on a system.
A detection method is a procedure that enables the deployment process to determine whether an application is present on a system.
![]() Dependencies define one or more applications that must be installed before you run a specific deployment type.
Dependencies define one or more applications that must be installed before you run a specific deployment type.
![]() Global conditions define the attributes that Configuration Manager evaluates to determine whether a deployment type applies to a particular user or device.
Global conditions define the attributes that Configuration Manager evaluates to determine whether a deployment type applies to a particular user or device.
![]() Applications in System Center 2012 R2 Configuration Manager and newer versions support using multiple deployment types in each application.
Applications in System Center 2012 R2 Configuration Manager and newer versions support using multiple deployment types in each application.
![]() Deployment types run the installation software only on clients on which the installation meets all the specified criteria and, therefore, is likely to be successful.
Deployment types run the installation software only on clients on which the installation meets all the specified criteria and, therefore, is likely to be successful.
![]() When there are multiple deployment types and the target device or user could match the requirements for more than one deployment type, application installation occurs using the highest-priority deployment type.
When there are multiple deployment types and the target device or user could match the requirements for more than one deployment type, application installation occurs using the highest-priority deployment type.
![]() User device affinity enables a user to associate a primary device with one or more devices. Typically, a primary device is the device the user uses on a daily basis to perform her work.
User device affinity enables a user to associate a primary device with one or more devices. Typically, a primary device is the device the user uses on a daily basis to perform her work.
![]() You can configure a site to assign user device affinity automatically based on the usage of the devices. You also can allow users to define their own primary devices through Application Catalog.
You can configure a site to assign user device affinity automatically based on the usage of the devices. You also can allow users to define their own primary devices through Application Catalog.
![]() Before a user or client can run a deployment, you must distribute the appropriate content to one or more distribution points.
Before a user or client can run a deployment, you must distribute the appropriate content to one or more distribution points.
![]() A simulated deployment is a special deployment in which you can test the evaluation of the requirements in the application’s deployment types without distributing any files.
A simulated deployment is a special deployment in which you can test the evaluation of the requirements in the application’s deployment types without distributing any files.
Objective review
Answer the following questions to test your knowledge of the information in this objective. You can find the answers to these questions and explanations of why each answer choice is correct or incorrect in the “Answers” section at the end of the chapter.
1. You want to make an application available to a user through Software Center, but the application should be installed only if the user chooses to install it. Which of the following deployment settings would you configure when running the Deploy Software Wizard? (Choose two. Each correct answer forms part of a complete solution.)
A. Action: Install
B. Action: Uninstall
C. Purpose: Available
D. Purpose: Required
2. You want to ensure that a particular application is installed on all computers within the scope of the deployment. Deployment of this software is mandatory. Which of the following deployment settings would you configure when running the Deploy Software Wizard? (Choose two. Each correct answer forms part of a complete solution.)
A. Action: Install
B. Action: Uninstall
C. Purpose: Available
D. Purpose: Required
3. In which of the following situations will software install automatically and silently? (Choose all that apply.)
A. You deploy the software to a user collection. The software is deployed as Required, and the deadline is set to a point in time prior to the current date.
B. Software is deployed as Available to a user collection.
C. Software is deployed as Available to a device collection.
D. You deploy the software to a device collection. The software is deployed as Required, and the deadline is set to a point in time prior to the current date.
4. In which of the following scenarios will a user be able to request an application from Application Catalog?
A. You deploy the software to a device collection. The software is deployed as Required, and the deadline is set to a point in time prior to the current date.
B. Software is deployed as Available to a device collection.
C. Software is deployed as Available to a user collection.
D. You deploy the software to a user collection. The software is deployed as Required, and the deadline is set to a point in time prior to the current date.
Objective 2.3: Deploy applications using Microsoft Intune
Microsoft Intune is a cloud-based management suite that enables you to perform a variety of client computer and device management and monitoring tasks. Intune is suitable for managing clients that might be located on remote networks on the Internet. You can use Intune to manage the deployment of applications to computers and mobile devices such as those running the Windows Phone, iOS, and Android operating systems.
This section covers the following topics:
![]() Intune operating system support
Intune operating system support
![]() Deploying software to the company portal
Deploying software to the company portal
![]() Deploying software for automatic installation
Deploying software for automatic installation
![]() Windows Intune update policies
Windows Intune update policies
Intune operating system support
Intune supports management of clients that are running the following operating systems:
![]() Windows 8.1, Windows 8, Windows 7, Windows Vista
Windows 8.1, Windows 8, Windows 7, Windows Vista
![]() Windows RT 8.1, Windows RT
Windows RT 8.1, Windows RT
![]() Windows Phone 8.1, Windows Phone 8
Windows Phone 8.1, Windows Phone 8
![]() Apple iOS 7, iOS 6, and iOS 5
Apple iOS 7, iOS 6, and iOS 5
![]() Android (requires Exchange ActiveSync)
Android (requires Exchange ActiveSync)
Intune can manage mobile devices directly or through Exchange ActiveSync and supports direct management for mobile devices that are running Windows RT, Windows Phone 8, Windows Phone 8.1, and iOS.
To deploy applications directly to mobile devices that are running Windows RT, you must obtain sideloading keys, and you must have a code-signing certificate to sign the applications. The Windows RT or Windows Phone 8 device must trust this code-signing certificate. Furthermore, you can use a process known as deep linking to deploy an application directly from the appropriate Windows Store to mobile devices that are running the Windows RT or Windows Phone 8 mobile operating systems.
You can use Intune to deploy applications to iOS devices by deep linking to the Apple App Store or by sideloading apps, which means you are installing them by using direct access to the source files. To deploy applications to iOS devices, you must obtain the appropriate mobile device management certificates from Apple. You can use a similar process for devices that are running the Android operating system.
Users can enroll devices by downloading the appropriate app from the online store for their mobile device operating system. Alternatively, if they are using a computer running Windows 7 or Windows Vista, they can download and run the Intune client installer.
Certificate requirements
Depending on the mobile device operating system, you need certificates or keys to enroll mobile devices into your organization’s Intune subscription.
Table 2-7 details these specifications.

TABLE 2-7 Intune certificate requirements
Preparing for software deployment
You use the Software workspace of the Intune administrator console to view information about software that has been detected on Intune client computers. Software inventory is only generated for computers, and you can’t use this workspace to view the software inventory of managed mobile devices. In the Detected Software section, you can view the properties of detected software and add license agreement information for detected software.
Through the Managed Software page of the Software workspace, you can perform the following tasks:
![]() View and modify software properties
View and modify software properties
![]() Add license agreements to managed software
Add license agreements to managed software
![]() Manage software deployments
Manage software deployments
![]() Delete software
Delete software
![]() Add software
Add software
You add software to Intune using the Windows Intune Software Publisher. You can upload software in the form of programs for computers or apps for mobile devices. This software will be stored within Intune’s cloud storage. You can also use the Windows Intune Software Publisher to add a link to an app in the Microsoft, Google, or Apple stores and to link to a web application.
Links to an app in the app store are supported by devices running the following operating systems:
![]() Windows 8
Windows 8
![]() Windows 8.1
Windows 8.1
![]() Windows RT
Windows RT
![]() Windows Phone 8
Windows Phone 8
![]() iOS
iOS
![]() Android devices
Android devices
Links to web apps can be deployed to any device Intune supports.
More Info: Preparing for Intune Software Deployment
You can learn more about preparing for Intune software deployment at http://technet.microsoft.com/en-us/library/dn646955.aspx.
Deploy software to the company portal
The company portal is a self-service portal that is available to users who have installed the Intune client on their computers or mobile devices. Deploying software to the company portal makes that software optionally available through the company portal on those computers or devices.
To make the software available, you deploy the software package to a particular user group or device group with the deployment action set to Available Install. Members of these groups can then select the software for installation.
Deploy software for automatic installation
You can use Intune to deploy software that will automatically install on computers or devices that are Intune clients. You deploy software for automatic installation by selecting the user or device groups to which you wish to deploy the software and by setting the deployment action to Required Install.
When you set the deployment action to Required Install, you can specify a deadline for the deployment. You can select from among the following deadlines:
![]() None The software will deploy based on agent policy settings.
None The software will deploy based on agent policy settings.
![]() As Soon As Possible The software will deploy directly after the next synchronization.
As Soon As Possible The software will deploy directly after the next synchronization.
![]() One Week The software will deploy one calendar week after the current day.
One Week The software will deploy one calendar week after the current day.
![]() Two Weeks The software will deploy two calendar weeks after the current day.
Two Weeks The software will deploy two calendar weeks after the current day.
![]() One Month The software will deploy one calendar month after the current day.
One Month The software will deploy one calendar month after the current day.
![]() Custom Use this option to select a specific date and time for software package deployment.
Custom Use this option to select a specific date and time for software package deployment.
More Info: Intune Software Deployment
You can learn more about Intune software deployment at http://technet.microsoft.com/en-us/library/dn646961.aspx.
Intune update policies
Intune update policies determine the frequency with which the Intune client checks for and performs the installation of a new application. These are the same settings that are used to control the installation of software updates and are shown in Figure 2-9.
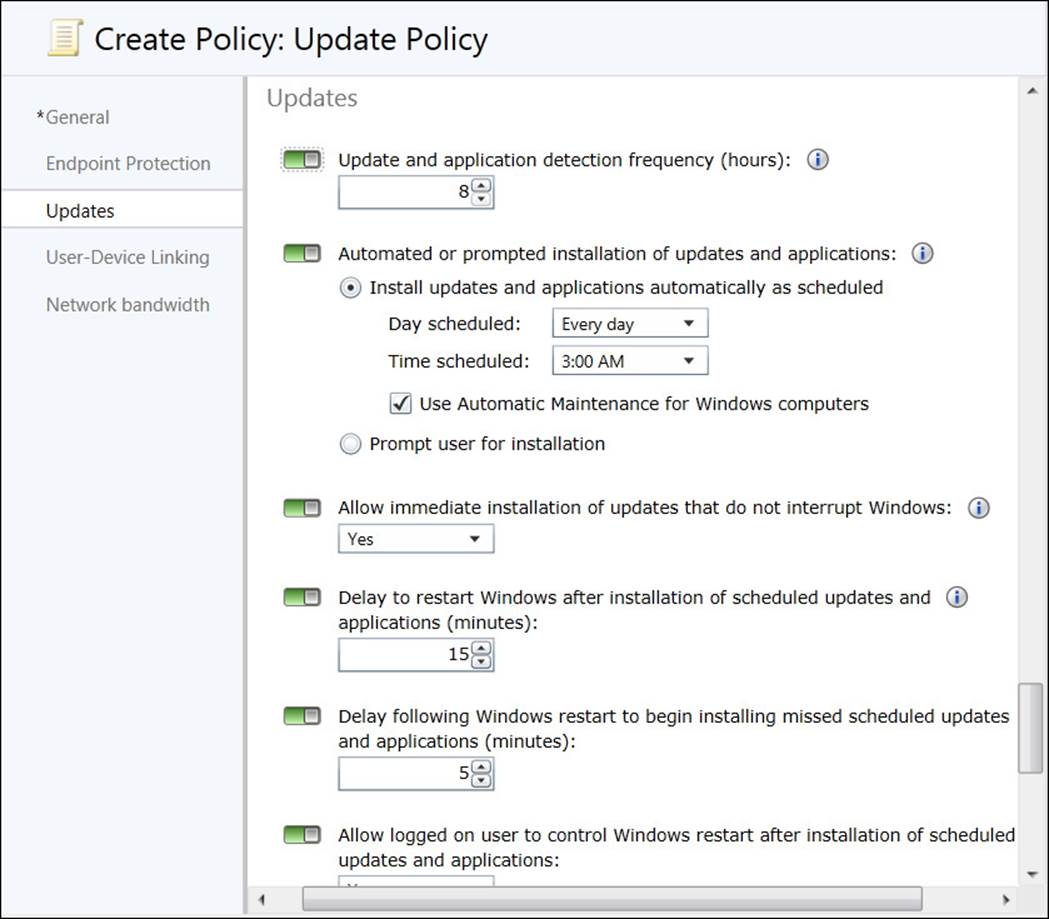
FIGURE 2-9 Update policy
The policies related to application installation are as follows:
![]() Update And Application Detection Frequency (Hours) Specify how often the Intune client waits between checking for new updates and applications.
Update And Application Detection Frequency (Hours) Specify how often the Intune client waits between checking for new updates and applications.
![]() Automated Or Prompted Installation Of Updates And Applications Configure when either automatic or prompted installation of applications or updates will occur.
Automated Or Prompted Installation Of Updates And Applications Configure when either automatic or prompted installation of applications or updates will occur.
![]() Delay To Restart Windows After Installation Of Scheduled Updates And Applications (Minutes) Set the length of time the computer will wait before performing a restart after the installation of applications or updates.
Delay To Restart Windows After Installation Of Scheduled Updates And Applications (Minutes) Set the length of time the computer will wait before performing a restart after the installation of applications or updates.
![]() Delay Following Windows Restart To Begin Installing Missed Scheduled Updates And Applications (Minutes) Set how long the computer will wait to install applications or updates if a scheduled installation time was missed.
Delay Following Windows Restart To Begin Installing Missed Scheduled Updates And Applications (Minutes) Set how long the computer will wait to install applications or updates if a scheduled installation time was missed.
![]() Allow Logged On User To Control Windows Restart After Installation Of Scheduled Updates And Applications Configure whether a user who is logged on to the computer may control whether the computer restarts after update installation.
Allow Logged On User To Control Windows Restart After Installation Of Scheduled Updates And Applications Configure whether a user who is logged on to the computer may control whether the computer restarts after update installation.
![]() Delay Between Prompts To Restart Windows After Installation Of Scheduled Updates And Applications (Minutes) Specify the amount of time that the computer will wait before restart prompts.
Delay Between Prompts To Restart Windows After Installation Of Scheduled Updates And Applications (Minutes) Specify the amount of time that the computer will wait before restart prompts.
More Info: Intune Installation Policies
You can learn more about Intune installation polices at http://blogs.technet.com/b/windowsintune/archive/2013/01/09/policy-settings-for-mandatory-updates.aspx.
Exam Tip
Remember the differences between deployment actions.
Thought experiment: Intune at Fabrikam
Fabrikam has just purchased a large number of Surface 2 devices for remote users. Intune will manage these devices. Users must perform their own enrollment, and then administrators at Fabrikam will deploy an important custom application that runs on Windows RT. With this information in mind, answer the following questions:
1. How will Surface 2 users enroll in Intune?
2. Which keys and certificates are required to deploy custom software to the Surface 2 devices by using Intune?
Objective summary
![]() Intune supports managing clients that are running Windows 8.1 (x86, x64), Windows 8 (x86, x64), Windows 7, Windows Vista, Windows RT 8.1, Windows RT, Windows Phone 8, Windows Phone 8.1, Apple iOS 7, iOS 6, iOS5, Android (requires Exchange ActiveSync).
Intune supports managing clients that are running Windows 8.1 (x86, x64), Windows 8 (x86, x64), Windows 7, Windows Vista, Windows RT 8.1, Windows RT, Windows Phone 8, Windows Phone 8.1, Apple iOS 7, iOS 6, iOS5, Android (requires Exchange ActiveSync).
![]() To deploy applications directly to mobile devices that are running Windows RT, you must obtain sideloading keys, and you must have a code-signing certificate to sign the applications.
To deploy applications directly to mobile devices that are running Windows RT, you must obtain sideloading keys, and you must have a code-signing certificate to sign the applications.
![]() You can use Intune to deploy applications to iOS devices by deep linking to the Apple App Store or by sideloading apps to install them by using direct access to the source files.
You can use Intune to deploy applications to iOS devices by deep linking to the Apple App Store or by sideloading apps to install them by using direct access to the source files.
![]() Users can enroll devices by downloading the appropriate app from the online store for their mobile device operating system. Alternatively, if they are using a computer running Windows 7 or Windows Vista, they can download and run the Intune client installer.
Users can enroll devices by downloading the appropriate app from the online store for their mobile device operating system. Alternatively, if they are using a computer running Windows 7 or Windows Vista, they can download and run the Intune client installer.
![]() You use the Software workspace of the Intune administrator console to view information about software that has been detected on Intune client computers.
You use the Software workspace of the Intune administrator console to view information about software that has been detected on Intune client computers.
![]() To make software available in the company portal, you deploy the software package to a particular user group or device group with the deployment action set to Available Install.
To make software available in the company portal, you deploy the software package to a particular user group or device group with the deployment action set to Available Install.
![]() You deploy software for automatic installation by selecting the user or device groups to which you wish to deploy the software and by setting the deployment action to Required Install.
You deploy software for automatic installation by selecting the user or device groups to which you wish to deploy the software and by setting the deployment action to Required Install.
![]() Intune update policies determine the frequency with which the Intune client checks for and performs the installation of new applications.
Intune update policies determine the frequency with which the Intune client checks for and performs the installation of new applications.
Objective review
Answer the following questions to test your knowledge of the information in this objective. You can find the answers to these questions and explanations of why each answer choice is correct or incorrect in the “Answers” section at the end of the chapter.
1. Which of the following Intune policy settings would you configure to set the deployed application installation time to 4 P.M. each weekday?
A. Update And Application Detection Frequency
B. Automated Or Prompted Installation Of Updates And Applications
C. Allow Immediate Installation Of Updates That Do Not Interrupt Windows
D. Allow Logged On User To Control Windows Restart After Installation Of Scheduled Updates And Applications
2. You want to allow users at your organization to choose when to restart their computers after you deploy an application that requires a restart to complete the installation process. Which of the following Windows Intune policies would you configure to accomplish this goal?
A. Update And Application Detection Frequency
B. Allow Logged On User To Control Windows Restart After Installation Of Scheduled Updates And Applications
C. Allow Immediate Installation Of Updates That Do Not Interrupt Windows
D. Automated Or Prompted Installation Of Updates And Applications
3. You want to increase the frequency with which applications newly deployed to the company portal become visible to Intune clients. Which of the following Intune policies would you configure to accomplish this goal?
A. Allow Immediate Installation Of Updates That Do Not Interrupt Windows
B. Automated Or Prompted Installation Of Updates And Applications
C. Update And Application Detection Frequency
D. Allow Logged On User To Control Windows Restart After Installation Of Scheduled Updates And Applications
Objective 2.4: Plan for application upgrades
Applications in Configuration Manager might require ongoing management. Over time, you might modify an application or decide that you no longer need to deploy it. In addition, you might decide to stop deploying an application for a period of time or even uninstall the application from clients. Finally, you likely will upgrade and replace existing applications. In this lesson, you learn about several of the management options that are available for ongoing maintenance of applications.
This section covers the following topics:
![]() Application supersedence
Application supersedence
![]() Application revision history
Application revision history
![]() Retiring applications
Retiring applications
![]() Uninstalling applications
Uninstalling applications
Application supersedence
Application management in Configuration Manager enables you to upgrade or replace existing applications by using a supersedence relationship. When you supersede an application, you can specify a new deployment type to replace that of the superseded application. In addition, you can configure whether to uninstall the superseded application.
When you supersede an application, the supersedence applies to all future deployments and Application Catalog requests. The effect on existing deployments depends on the options that you choose. To leave the superseded application in place, you can choose Do Not Replace, or you can specify a new deployment type to replace the old deployment type. If the superseded application has multiple deployment types, you specify a new deployment type for each old deployment type that you want to replace. Whether you choose a new deployment type or not, you can uninstall the application by selecting the Uninstall check box for each old deployment type. Supersedence options are as follows:
![]() You configure the supersedence to uninstall the old deployment type, and you deploy the application with the required action. When you do this, the existing application is uninstalled, and the new application is installed.
You configure the supersedence to uninstall the old deployment type, and you deploy the application with the required action. When you do this, the existing application is uninstalled, and the new application is installed.
![]() You specify a new deployment type and do not configure the supersedence to unin-stall the old deployment type. If successful, the existing application will not be unin-stalled, and the new application will perform an in-place upgrade of the old application where possible. If not successful (for example, replacing a software title with a competitor’s product), the old application is not removed from the target, and the new application is installed.
You specify a new deployment type and do not configure the supersedence to unin-stall the old deployment type. If successful, the existing application will not be unin-stalled, and the new application will perform an in-place upgrade of the old application where possible. If not successful (for example, replacing a software title with a competitor’s product), the old application is not removed from the target, and the new application is installed.
You can view the supersedence and dependency relationships between applications, as shown in Figure 2-10, in a variety of ways:
![]() In the application’s Properties dialog box of the superseding application, on the Supersedence tab, you can view the applications this application supersedes.
In the application’s Properties dialog box of the superseding application, on the Supersedence tab, you can view the applications this application supersedes.
![]() In the application’s Properties dialog box of the superseded application, on the References tab, you can use these options: Applications That Depend On This Application and Applications That Supersede This Application.
In the application’s Properties dialog box of the superseded application, on the References tab, you can use these options: Applications That Depend On This Application and Applications That Supersede This Application.
![]() With a superseding application selected, on the ribbon, you can click View Relationships to view dependencies, supersedence, and global conditions related to the selected application.
With a superseding application selected, on the ribbon, you can click View Relationships to view dependencies, supersedence, and global conditions related to the selected application.
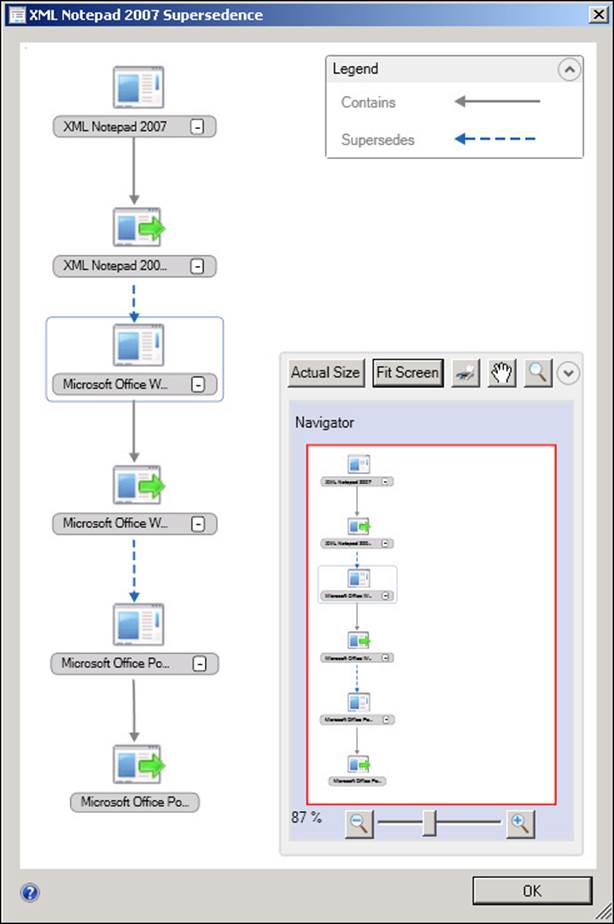
FIGURE 2-10 Supersedence
Application revision history
You can change applications in several ways, including complex tasks such as editing or creating a deployment type and simple tasks such as editing the administrator comments field. When you make any such changes to an application, Configuration Manager creates a new revision of the application. By using the Configuration Manager console, you can access the revision history for each application. After you access the revision history, you can view the properties of each revision, restore a previous revision, or delete an old revision.
To view the revision history of an application, you select the application in Software Library and then click the Revision History button on the ribbon. Figure 2-11 shows revision history.
FIGURE 2-11 Revision history
When you view a past revision, you are viewing a read-only copy of it. When you restore a previous version of an application, Configuration Manager creates a new revision.
If you no longer need to maintain a revision, you can delete it by clicking the Delete button. You cannot delete the latest revision. If you do not need the application or any of its revisions, you can delete the application. However, you cannot delete an application if it is:
![]() Referenced by any deployments.
Referenced by any deployments.
![]() Specified as a dependency for another application.
Specified as a dependency for another application.
![]() Referenced in a task sequence.
Referenced in a task sequence.
![]() Part of a virtual environment.
Part of a virtual environment.
Retiring applications
You can retire an application at any time. Retiring an application prevents new deployments of the application without uninstalling it. By retiring an application, you save all the work and time you spent creating and customizing the application. Deployments based on retired applications will continue to work as expected; however, you cannot create any new deployments from a retired application.
Although you cannot modify a retired application, you can reinstate the application when desired. After reinstating an application, you can create new deployments of it. If a retired application is not referenced in any deployments, Configuration Manager will delete it automatically after 60 days. However, this will not uninstall the application from any client machines.
Uninstalling applications
If you do not require an application in your environment, you can deploy it with an uninstall action. However, the uninstall deployment will fail if an existing install deployment for the software affects the clients targeted with the uninstall action. Therefore, before deploying an uninstall action, remove the install deployments for the application that you are uninstalling.
You need to remove the install deployments affecting only the clients on which you want to uninstall the application. If the uninstall deployment is in a separate application from the install deployment, you can retire it with the install deployment.
Uninstalling an application will not uninstall any dependent applications. The uninstall action uninstalls all instances of the software regardless of whether the application was installed by Configuration Manager, a manual process, or any other method. However, the software to be uninstalled must be created as an application in Configuration Manager with an appropriate uninstall command.
Thought experiment: End of application life cycle at Contoso
An application that is widely deployed on computers will no longer be needed in several months. With this information in mind, you are considering what strategies to pursue when the application is no longer required. As part of the planning process, answer the following questions:
1. What is the difference between retiring an application and uninstalling an application?
2. What might cause an uninstall deployment to fail?
Objective summary
![]() Application management in Configuration Manager enables you to upgrade or replace existing applications by using a supersedence relationship.
Application management in Configuration Manager enables you to upgrade or replace existing applications by using a supersedence relationship.
![]() When you supersede an application, you can specify a new deployment type to replace that of the superseded application.
When you supersede an application, you can specify a new deployment type to replace that of the superseded application.
![]() You can configure whether to uninstall the superseded application.
You can configure whether to uninstall the superseded application.
![]() When you supersede an application, the supersedence applies to all future deployments and Application Catalog requests.
When you supersede an application, the supersedence applies to all future deployments and Application Catalog requests.
![]() You can retire an application at any time. Retiring an application prevents new deployments of the application without uninstalling the application.
You can retire an application at any time. Retiring an application prevents new deployments of the application without uninstalling the application.
Objective review
Answer the following questions to test your knowledge of the information in this objective. You can find the answers to these questions and explanations of why each answer choice is correct or incorrect in the “Answers” section at the end of the chapter.
1. An application has been deployed on 30 percent of the desktop computers at your organization. You want to stop new deployments of this application but don’t want to remove existing instances of the application. Which of the following steps could you take to accomplish this goal?
A. Retire the application.
B. Uninstall the application.
C. Supersede the application.
D. Install the application.
2. An application is deployed on 40 percent of the desktop computers at your organization. Your superiors have chosen not to continue licensing the application, so now you have to make sure that it is removed from these computers. No replacement application has been chosen at this time. Which of the following steps could you take to accomplish this goal?
A. Install the application.
B. Supersede the application.
C. Uninstall the application.
D. Retire the application.
3. You have decided to switch from one vendor’s application to another’s. The original vendor’s application is present on 80 percent of the desktop computers at your organization. Which of the following steps could you take to replace the original vendor’s application with a minimum of administrative effort?
A. Supersede the application.
B. Retire the application.
C. Uninstall the application.
D. Install the application.
Objective 2.5: Monitor applications
Configuration Manager enables you to monitor the process of application deployment, perform tasks to inventory the applications that are present on Configuration Manager clients, and measure how often users run applications in your organization.
This section covers the following topics:
![]() Monitoring application deployment
Monitoring application deployment
![]() Asset Intelligence
Asset Intelligence
![]() Software metering
Software metering
Monitoring application deployment
In the Monitoring workspace of the Configuration Manager console, you can monitor all deployments, including software updates, compliance settings, applications, task sequences, packages, and programs.
Applications in Configuration Manager support state-based monitoring, which you can use to track the last application deployment state for users and devices. These state messages display information about individual devices.
You can view the states on several tabs in the Monitoring workspace. Each tab displays the individual users or devices reporting that state. The compliance states that may be displayed include:
![]() Success The application deployment was successful.
Success The application deployment was successful.
![]() In Progress The application deployment is in progress.
In Progress The application deployment is in progress.
![]() Unknown The state of the application deployment is undetermined, so no state messages have been returned. For example, when a device is turned off for a device-targeted deployment or when a user has not logged on to receive a user-targeted deployment, the state is Unknown.
Unknown The state of the application deployment is undetermined, so no state messages have been returned. For example, when a device is turned off for a device-targeted deployment or when a user has not logged on to receive a user-targeted deployment, the state is Unknown.
![]() Requirements Not Met The application did not deploy because it did not comply with a dependency or a requirement.
Requirements Not Met The application did not deploy because it did not comply with a dependency or a requirement.
![]() Error The application failed to deploy because of an error.
Error The application failed to deploy because of an error.
Each compliance state includes subcategories that contain additional information on the deployment state and information on the number of users and devices in this category. For example, the Error compliance state contains the following three subcategories:
![]() Error evaluating policy
Error evaluating policy
![]() Content related errors
Content related errors
![]() Installation errors
Installation errors
When more than one compliance state applies for an application deployment to a user who has more than one associated device, the aggregate state that you see is the lowest level of compliance. For example, if a user logs on to two devices, and the application installs successfully on one device but fails to install on the second device, the application’s aggregate deployment state for that user displays as Error.
You can use these subcategories to help you quickly identify any important issues with an application deployment. You also can view additional information to determine the devices that fall into a particular subcategory of a compliance state.
Asset Intelligence
Asset Intelligence enhances Configuration Manager’s inventory capabilities by extending hardware inventory and adding functionality for license reporting. Enabling additional hardware-inventory Windows Management Instrumentation (WMI) reporting classes helps improve the range of information that Asset Intelligence gathers about software titles in use.
In System Center 2012 R2 Configuration Manager, Asset Intelligence supports the mandatory software identification tags specified in the International Organization for Standardization (ISO)/International Electrotechnical Commission (IEC) 19770-2 standard. These tags include authoritative data that System Center 2012 R2 Configuration Manager can use to identify software installed on client computers. Because a standard defines the tags, an increasing number of software vendors include them in their applications. If you want System Center 2012 R2 Configuration Manager to use mandatory software identification tags, you must enable the SMS_SoftwareTag Asset Intelligence Hardware Inventory Reporting class.
In System Center 2012 R2 Configuration Manager, Asset Intelligence also collects information about Application Virtualization 5 and Application Virtualization 4 applications even though these applications run through the Microsoft Application Virtualization (App-V) client and are not installed on the client computer in a traditional manner.
Asset Intelligence provides organizations with the following benefits over software inventory:
![]() It provides more accurate representation of software titles that are present on managed computers.
It provides more accurate representation of software titles that are present on managed computers.
![]() It provides information about the license usage for specific products rather than just information about the software itself.
It provides information about the license usage for specific products rather than just information about the software itself.
![]() It can be used in conjunction with software metering to rationalize licensing by determining instances when software has deployed but is not being used.
It can be used in conjunction with software metering to rationalize licensing by determining instances when software has deployed but is not being used.
![]() It uses Software Inventory Agent to detect software titles by scanning client storage. Asset intelligence retrieves information about installed software through the Hardware Inventory Client Agent.
It uses Software Inventory Agent to detect software titles by scanning client storage. Asset intelligence retrieves information about installed software through the Hardware Inventory Client Agent.
Asset Intelligence has several components, including:
![]() The Asset Intelligence catalog Asset Intelligence relies on a set of database tables, which contain software identification, categorization information, and hardware requirements for software titles. Collectively, these tables are the Asset Intelligence catalog and are stored within the site database. The Asset Intelligence catalog can provide data for reports on installed software titles, organize the information within software categories and families, and provide a predefined set of hardware requirements for the software titles. You also can customize the organization of your information by creating custom software categories and families and adding new user-defined hardware requirements for specific software titles. By using an Asset Intelligence synchronization point, you can download periodic updates dynamically fromMicrosoft to the Asset Intelligence catalog. These updates contain information about newly released or validated software.
The Asset Intelligence catalog Asset Intelligence relies on a set of database tables, which contain software identification, categorization information, and hardware requirements for software titles. Collectively, these tables are the Asset Intelligence catalog and are stored within the site database. The Asset Intelligence catalog can provide data for reports on installed software titles, organize the information within software categories and families, and provide a predefined set of hardware requirements for the software titles. You also can customize the organization of your information by creating custom software categories and families and adding new user-defined hardware requirements for specific software titles. By using an Asset Intelligence synchronization point, you can download periodic updates dynamically fromMicrosoft to the Asset Intelligence catalog. These updates contain information about newly released or validated software.
![]() Asset Intelligence synchronization point This is a Configuration Manager site system role that you can use to connect to an online service that Microsoft hosts, known as System Center Online, and then download Asset Intelligence catalog updates. You can either schedule or manually initiate catalog synchronization. You also can use the Asset Intelligence synchronization point to upload custom software title information to System Center Online. Microsoft will then categorize it.
Asset Intelligence synchronization point This is a Configuration Manager site system role that you can use to connect to an online service that Microsoft hosts, known as System Center Online, and then download Asset Intelligence catalog updates. You can either schedule or manually initiate catalog synchronization. You also can use the Asset Intelligence synchronization point to upload custom software title information to System Center Online. Microsoft will then categorize it.
![]() Asset Intelligence home page The Asset Intelligence node in the Asset And Compliance workspace displays a summary dashboard of Asset Intelligence information. It includes summaries of the Asset Intelligence component status, the catalog synchronization status, and inventoried software status.
Asset Intelligence home page The Asset Intelligence node in the Asset And Compliance workspace displays a summary dashboard of Asset Intelligence information. It includes summaries of the Asset Intelligence component status, the catalog synchronization status, and inventoried software status.
![]() Asset Intelligence reports More than 50 reports present Asset Intelligence information in an easy-to-use format. Many of these reports link to more specific reports, which enable you to query for general information and procure detailed information. Report categories include hardware, license management, and software.
Asset Intelligence reports More than 50 reports present Asset Intelligence information in an easy-to-use format. Many of these reports link to more specific reports, which enable you to query for general information and procure detailed information. Report categories include hardware, license management, and software.
More Info: Asset Intelligence
You can learn more about Asset Intelligence at http://technet.microsoft.com/en-us/library/gg681998.aspx.
Asset Intelligence catalog
The Asset Intelligence catalog contains information for more than 500,000 software titles and versions, representing more than 20 families and 90 specific categories, and includes the following:
![]() Support for manually importing software license information for software titles in use, including both Microsoft and non-Microsoft titles
Support for manually importing software license information for software titles in use, including both Microsoft and non-Microsoft titles
![]() Hardware requirements for many software titles in the catalogSupport for adding custom software categories, families, and software labels
Hardware requirements for many software titles in the catalogSupport for adding custom software categories, families, and software labels
![]() Support for uploading software title information to the System Center Online service, which then categorizes it
Support for uploading software title information to the System Center Online service, which then categorizes it
You can review contents of the Asset Intelligence catalog and customize certain elements by clicking the Asset Intelligence node in the Assets And Compliance workspace. The Asset Intelligence folder includes the following nodes:
![]() Catalog
Catalog
![]() Inventoried Software
Inventoried Software
![]() Hardware Requirements
Hardware Requirements
Catalog
The catalog includes most of the catalog segments that administrators can update and the following:
![]() Software Categories Asset Intelligence software categories broadly categorize inventoried software titles. By default, there are a number of predefined software categories, such as Line Of Business, Original Equipment Manufacturer (OEM), and Office Suites And Productivity. You can create additional user-defined categories to classify inventoried software further.
Software Categories Asset Intelligence software categories broadly categorize inventoried software titles. By default, there are a number of predefined software categories, such as Line Of Business, Original Equipment Manufacturer (OEM), and Office Suites And Productivity. You can create additional user-defined categories to classify inventoried software further.
![]() Software Families Asset Intelligence software families further define inventoried software titles. By default, the Asset Intelligence catalog includes approximately 20 predefined software families. Some examples of these predefined software families are Components And Peripherals, Equipment, Home And Entertainment, Industry Specific, Line Of Business, and Productivity And Viewers. You can create additional user-defined software families to classify inventoried software further.
Software Families Asset Intelligence software families further define inventoried software titles. By default, the Asset Intelligence catalog includes approximately 20 predefined software families. Some examples of these predefined software families are Components And Peripherals, Equipment, Home And Entertainment, Industry Specific, Line Of Business, and Productivity And Viewers. You can create additional user-defined software families to classify inventoried software further.
![]() Custom Labels Custom labels enable further classification of inventoried software according to attributes that administrators define. For example, you might create a custom label known as Shareware and associate that label with inventoried shareware titles. You then can run a report to display all software titles with which the custom label Shareware is associated.
Custom Labels Custom labels enable further classification of inventoried software according to attributes that administrators define. For example, you might create a custom label known as Shareware and associate that label with inventoried shareware titles. You then can run a report to display all software titles with which the custom label Shareware is associated.
Inventoried Software
The list of inventoried software titles includes information about software that the Hardware Inventory Agent reports. This node displays the following information by default for each inventoried software title:
![]() Product Name The name of the inventoried software
Product Name The name of the inventoried software
![]() Publisher The name of the vendor that developed the software
Publisher The name of the vendor that developed the software
![]() Version The product version of the software title
Version The product version of the software title
![]() Category The currently assigned software category
Category The currently assigned software category
![]() Family The currently assigned software family
Family The currently assigned software family
![]() Label (1, 2, and 3) The custom labels that have been assigned with the software title, to a maximum of three
Label (1, 2, and 3) The custom labels that have been assigned with the software title, to a maximum of three
![]() Software Count The number of Configuration Manager clients that have inventoried the software title
Software Count The number of Configuration Manager clients that have inventoried the software title
Hardware Requirements
You can use Asset Intelligence hardware requirements to provide data to help verify that computers meet hardware requirements for software titles before you target them for deployment. Asset Intelligence retrieves from its catalog the hardware requirements that appear in the Configuration Manager console. The list is not based on inventoried software title information from Configuration Manager clients. You can add, modify, or delete custom hardware requirements for software titles that the Asset Intelligence catalog does not predefine. However, existing, noncustom hardware requirement information that the Asset Intelligence catalog stores is read-only, which means you cannot modify or delete it. The following information appears for each hardware requirement listed:
![]() Software Title The software title name with which the hardware requirement is associated.
Software Title The software title name with which the hardware requirement is associated.
![]() Minimum CPU (MHz) The minimum central processing unit (CPU) speed, in megahertz (MHz), that the software title requires.
Minimum CPU (MHz) The minimum central processing unit (CPU) speed, in megahertz (MHz), that the software title requires.
![]() Minimum RAM (KB) The minimum random access memory (RAM), in KB, that the software title requires.
Minimum RAM (KB) The minimum random access memory (RAM), in KB, that the software title requires.
![]() Minimum Disk Space (KB) The minimum free disk space, in KB, that the software title requires.
Minimum Disk Space (KB) The minimum free disk space, in KB, that the software title requires.
![]() Minimum Disk Size (KB) The minimum hard-disk size, in KB, that the software title requires.
Minimum Disk Size (KB) The minimum hard-disk size, in KB, that the software title requires.
![]() Validation State The validation state for the hardware requirement. Valid states include Validated and User Defined.
Validation State The validation state for the hardware requirement. Valid states include Validated and User Defined.
Asset Intelligence data collection
You must configure several settings and tasks so that Asset Intelligence performs optimally, including the following:
![]() Enable Hardware Inventory Asset Intelligence reports depend on information the Hardware Inventory Agent collects. Ensure that you enable the Hardware Inventory Agent on clients.
Enable Hardware Inventory Asset Intelligence reports depend on information the Hardware Inventory Agent collects. Ensure that you enable the Hardware Inventory Agent on clients.
![]() Enable Software Metering The software-related Asset Intelligence reports depend on the Software Metering Client Agent to provide data. These reports include the following:
Enable Software Metering The software-related Asset Intelligence reports depend on the Software Metering Client Agent to provide data. These reports include the following:
![]() Software 07A - Recently used executables by number of computers
Software 07A - Recently used executables by number of computers
![]() Software 07B - Computers that recently used a specified executable
Software 07B - Computers that recently used a specified executable
![]() Software 07C - Recently used executables on a specific computer
Software 07C - Recently used executables on a specific computer
![]() Software 08A - Recently used executables by number of users
Software 08A - Recently used executables by number of users
![]() Software 08B - Users that recently used a specified executable
Software 08B - Users that recently used a specified executable
![]() Software 08C - Recently used executables by a specified user
Software 08C - Recently used executables by a specified user
![]() Enable Asset Intelligence Inventory reporting classes To enable the Asset Intelligence Inventory reporting classes, right-click the Asset Intelligence node and then click Edit Inventory Classes. You can enable the Asset Intelligence reporting classes you need per the type of reporting that you require. Note that from within the Edit Inventory Classes dialog box, as you point to each reporting class, a tooltip displays information about the reports that depend on each reporting class.
Enable Asset Intelligence Inventory reporting classes To enable the Asset Intelligence Inventory reporting classes, right-click the Asset Intelligence node and then click Edit Inventory Classes. You can enable the Asset Intelligence reporting classes you need per the type of reporting that you require. Note that from within the Edit Inventory Classes dialog box, as you point to each reporting class, a tooltip displays information about the reports that depend on each reporting class.
![]() Enable Windows event log settings Several Asset Intelligence reports rely on information that Windows security event logs gather on client computers. To support these reports, you must modify the event log settings for Windows security on clients so that it logs all Success logon events. These reports include the following:
Enable Windows event log settings Several Asset Intelligence reports rely on information that Windows security event logs gather on client computers. To support these reports, you must modify the event log settings for Windows security on clients so that it logs all Success logon events. These reports include the following:
![]() Hardware 03A - Primary computer users
Hardware 03A - Primary computer users
![]() Hardware 03B - Computers for a specific primary console user
Hardware 03B - Computers for a specific primary console user
![]() Hardware 04A - Computers with multiple users (shared)
Hardware 04A - Computers with multiple users (shared)
![]() Hardware 05A - Console users on a specific computer
Hardware 05A - Console users on a specific computer
![]() Import software license information Use the Import Software Licenses Wizard to import Microsoft Volume License Statements and General License Statements from non-Microsoft vendors into the Asset Intelligence catalog.
Import software license information Use the Import Software Licenses Wizard to import Microsoft Volume License Statements and General License Statements from non-Microsoft vendors into the Asset Intelligence catalog.
![]() Install an Asset Intelligence synchronization point The site system role for the Asset Intelligence synchronization point connects to System Center Online to download and synchronize Asset Intelligence catalog information. You must install this role on a site system in the central administration site for hierarchy configurations. This requires Internet access by using Transmission Control Protocol (TCP) port 443. You can configure a synchronization schedule, which by default is set to run every seven days.
Install an Asset Intelligence synchronization point The site system role for the Asset Intelligence synchronization point connects to System Center Online to download and synchronize Asset Intelligence catalog information. You must install this role on a site system in the central administration site for hierarchy configurations. This requires Internet access by using Transmission Control Protocol (TCP) port 443. You can configure a synchronization schedule, which by default is set to run every seven days.
![]() Configure Asset Intelligence maintenance tasks By default, this Asset Intelligence feature uses two maintenance tasks:
Configure Asset Intelligence maintenance tasks By default, this Asset Intelligence feature uses two maintenance tasks:
![]() Check Application Title With Inventory Information Checks that the software title the software inventory reports reconciles with the software title in the Asset Intelligence catalog.
Check Application Title With Inventory Information Checks that the software title the software inventory reports reconciles with the software title in the Asset Intelligence catalog.
![]() Summarize Installed Software Data Provides information that appears in the Inventoried Software node. This task is available only on primary sites.
Summarize Installed Software Data Provides information that appears in the Inventoried Software node. This task is available only on primary sites.
![]() Configure Asset Intelligence Security You can use the Asset Manager security role to provide the required permissions to manage the Asset Intelligence synchronization point and modify the Asset Intelligence reporting classes and permissions related to software inventory, hardware inventory, and software metering.
Configure Asset Intelligence Security You can use the Asset Manager security role to provide the required permissions to manage the Asset Intelligence synchronization point and modify the Asset Intelligence reporting classes and permissions related to software inventory, hardware inventory, and software metering.
Software metering
Software metering enables you to monitor program usage on Configuration Manager client computers. You can summarize software-metering data to produce useful reports that can help you plan for your organization’s software purchases.
Software metering can collect the following information:
![]() Program usage information Includes start time, end time, meter data ID, resource ID, user name, users of Terminal Services sessions, and whether Terminal Services is running
Program usage information Includes start time, end time, meter data ID, resource ID, user name, users of Terminal Services sessions, and whether Terminal Services is running
![]() File information Includes file ID, file name, file version, file description, and file size (in KB)
File information Includes file ID, file name, file version, file description, and file size (in KB)
![]() Program information Includes company name, product name, product version, and product language
Program information Includes company name, product name, product version, and product language
Software metering uses two main components to perform data-collection tasks: the Software Metering Agent and software-metering rules. When enabled, the Software Metering Agent reports software-metering data based on the site’s software-metering rules. You must configure software-metering rules before data collection about a program’s usage begins.
The software-metering process includes the following steps:
1. The Software Metering Agent examines each program that runs on the client and determines whether the program file’s information matches any software-metering rule. The agent collects usage data each time an actively monitored program runs on the client regardless of whether the client is connected to the network.
2. The agent uploads the data to the management point on its next Software Metering Usage Report Cycle. If the client is not connected to the network, the data remains on the client and then uploads to the management point the next time the client connects to the network.
3. The management point forwards the data to the site server.
4. The site server adds the data to the site database.
Software-metering data is summarized on a specified schedule, and it replicates to the central administration site, which contains usage data from all client computers within the hierarchy.
After the site server summarizes client data, you can view the information by using queries and reports. This data, combined with data from software inventory and Asset Intelligence, can assist your organization in determining its software usage. You can configure three elements of software metering: Software Metering Agent, software-metering rules, and automatic generation of software-metering rules.
Configuring the Software Metering Agent
When enabled, the Software Metering Agent collects usage data for programs specified in software-metering rules. Typically, the agent is enabled by default. However, if the agent has been disabled, you can enable it in Client Settings within the Configuration Manager console. You can also customize the software-metering data collection schedule, which is every seven days by default.
Configuring software-metering rules
After ensuring that the Software Metering Agent is enabled, configure software-metering rules. You must create and configure software-metering rules to specify the applications you want the Software Metering Agent to monitor. The Create Software Metering Rule Wizard leads you through the creation of a new software-metering rule.
Automatic software-metering rules
Configuration Manager enables you to generate software-metering rules automatically, based on recent usage-inventory data. If Configuration Manager automatically generates a software-metering rule, the generated rule will be disabled. You must enable that rule if you want clients to report usage of the software specified in the automatically generated rule. In addition, you might want to disable a software-metering rule but keep it for later use.
You can configure the automatic generation of rules as follows:
1. Open the Software Metering Properties dialog box and then select the Automatically Create Disabled Metering Rules From Recent Usage Inventory Data check box if it is not already selected. This option is selected by default.
2. Specify the percentage of a site’s computers that must use a particular program before a software-metering rule for that program is created automatically. The default value is 10 percent.
3. To protect against auto-generating an unmanageable number of disabled rules, specify the number of rules after which no new software-metering rules are created automatically. The default value is 100 rules.
4. Configure the length of time the software-metering data stays stored in the site database. The default value is 90 days.
To enable or disable a software-metering rule, you must perform the following procedure:
1. In the Configuration Manager console, click the Assets And Compliance workspace and then click Software Metering.
2. Select and then right-click one or more software-metering rules and then click either Enable or Disable.
Summarization tasks
The Summarize Software Metering tasks perform data summarization to reduce the amount of data the Configuration Manager site database stores. Data summarization runs daily and only runs against usage data that is older than 12 hours. Data summarization is required for all Configuration Manager software-metering reports to display meaningful data.
You should know when the summarization last occurred if you want to understand what data the most current set of summary data contains. You can refer to the Software Metering Summarization Progress report in Configuration Manager to determine when the summarization last occurred.
The software-metering summarization tasks are:
![]() Summarize Software Metering File Usage Data The Summarize Software Metering File Usage Data task condenses software-metering file usage data from multiple records into one general record. This record provides information about the program name, version, language, and number of distinct users over intervals of 15 minutes and 1 hour. This process compresses and optimizes the amount of data stored in the Configuration Manager site database. By default, the Summarize Software Metering File Usage Data task runs daily. For every hour, and every 15-minute interval within the hour, the task calculates the total number of distinct user/computer combinations that are running the matching program. Within the 15-minute intervals, this approximates the number of concurrent users. For example:
Summarize Software Metering File Usage Data The Summarize Software Metering File Usage Data task condenses software-metering file usage data from multiple records into one general record. This record provides information about the program name, version, language, and number of distinct users over intervals of 15 minutes and 1 hour. This process compresses and optimizes the amount of data stored in the Configuration Manager site database. By default, the Summarize Software Metering File Usage Data task runs daily. For every hour, and every 15-minute interval within the hour, the task calculates the total number of distinct user/computer combinations that are running the matching program. Within the 15-minute intervals, this approximates the number of concurrent users. For example:
![]() If a single user is using a software program and signs in to three computers simultaneously, this counts as three usages.
If a single user is using a software program and signs in to three computers simultaneously, this counts as three usages.
![]() If three users sign in to a computer that is running Terminal Services or Remote Desktop Services, and all three are running the software program, this counts as three usages.
If three users sign in to a computer that is running Terminal Services or Remote Desktop Services, and all three are running the software program, this counts as three usages.
![]() If a single user starts and stops the software program on the same computer three times during the hour, this counts as one usage for that user.
If a single user starts and stops the software program on the same computer three times during the hour, this counts as one usage for that user.
![]() Summarize Software Metering Monthly Usage Data This task condenses detailed software-metering usage data from multiple records into one general record. This record provides information about the program name, program version and language, program running times, number of usages, last usage, user name, and computer name. Data summarization helps compress the amount of data in the Configuration Manager site database. Monthly software usage data replicates to the central administration site. The summarization information includes the number of times each matching software program runs on a particular computer and by a particular user during the month. By default, the task runs daily, and the summarization period is one month.
Summarize Software Metering Monthly Usage Data This task condenses detailed software-metering usage data from multiple records into one general record. This record provides information about the program name, program version and language, program running times, number of usages, last usage, user name, and computer name. Data summarization helps compress the amount of data in the Configuration Manager site database. Monthly software usage data replicates to the central administration site. The summarization information includes the number of times each matching software program runs on a particular computer and by a particular user during the month. By default, the task runs daily, and the summarization period is one month.
The following maintenance tasks remove old software-metering data and summarized data from the Configuration Manager site database:
![]() Delete Aged Software Metering Data This task deletes all unsummarized software-metering data that is older than the number of days specified. By default, the task runs every day and deletes software-metering data that is older than five days. You can configure the number of days to be any number from 2 through 255.
Delete Aged Software Metering Data This task deletes all unsummarized software-metering data that is older than the number of days specified. By default, the task runs every day and deletes software-metering data that is older than five days. You can configure the number of days to be any number from 2 through 255.
![]() Delete Aged Software Metering Summary Data This task deletes summarized software-metering summary data that is older than the number of days specified. By default, the task runs every Sunday to delete software-metering summary data that is older than 270 days.
Delete Aged Software Metering Summary Data This task deletes summarized software-metering summary data that is older than the number of days specified. By default, the task runs every Sunday to delete software-metering summary data that is older than 270 days.
 Exam Tip
Remember the purpose of software-metering rules.
 Thought experiment: Contoso Asset Intelligence
You want to find out more about how applications are being used at Contoso. To accomplish this goal, you have implemented Configuration Manager. After experimenting with the various settings, determine the answers to the following questions:
1. What must you enable to view information about users who have run a specific executable?
2. You run an Asset Intelligence report to find computers that multiple users are using, but the report displays no records. How can you troubleshoot and correct the issue?
Objective summary
![]() In the Monitoring workspace of the Configuration Manager console, you can monitor all deployments, including software updates, compliance settings, applications, task sequences, packages, and programs.
In the Monitoring workspace of the Configuration Manager console, you can monitor all deployments, including software updates, compliance settings, applications, task sequences, packages, and programs.
![]() Applications in Configuration Manager support state-based monitoring, which you can use to track the last application deployment state for users and devices.
Applications in Configuration Manager support state-based monitoring, which you can use to track the last application deployment state for users and devices.
![]() Asset Intelligence enhances Configuration Manager’s inventory capabilities by extending hardware inventory and adding functionality for license reporting.
Asset Intelligence enhances Configuration Manager’s inventory capabilities by extending hardware inventory and adding functionality for license reporting.
![]() You can use Asset Intelligence hardware requirements to provide data to help verify that computers meet hardware requirements for software titles before you target them for deployment.
You can use Asset Intelligence hardware requirements to provide data to help verify that computers meet hardware requirements for software titles before you target them for deployment.
![]() Software metering enables you to monitor program usage on Configuration Manager client computers.
Software metering enables you to monitor program usage on Configuration Manager client computers.
![]() The Software Metering Agent reports software-metering data based on the site’s software-metering rules.
The Software Metering Agent reports software-metering data based on the site’s software-metering rules.
![]() The Summarize Software Metering tasks perform data summarization to reduce the amount of data that the Configuration Manager site database stores.
The Summarize Software Metering tasks perform data summarization to reduce the amount of data that the Configuration Manager site database stores.
Objective review
Answer the following questions to test your knowledge of the information in this objective. You can find the answers to these questions and explanations of why each answer choice is correct or incorrect in the “Answers” section at the end of the chapter.
1. By default, what is the maximum number of automatically created Configuration Manager software-metering rules?
A. 10
B. 50
C. 100
D. 1,000
2. By default, what percentage of a site’s computers must use a particular program before a software-metering rule for that program is created automatically?
A. 5 percent
B. 10 percent
C. 15 percent
D. 20 percent
3. You are monitoring application deployment for computers in a specific collection. Which of the following compliance states indicates that a requirement or dependency wasn’t met?
A. In Progress
B. Error
C. Requirements Not Met
D. Success
Objective 2.6: Manage content distribution
Distribution points store content such as applications, packages, software updates, and operating system images. Configuration Manager clients access this content as instructed by specific deployment tasks. Deploying and managing distribution points requires considering the amount of content on the distribution point, available network bandwidth, and the ability to monitor the status of the distribution point.
This section covers the following topics:
![]() Content management
Content management
![]() Distribution points
Distribution points
![]() Network bandwidth considerations
Network bandwidth considerations
![]() Content library
Content library
![]() Content management
Content management
![]() Content distribution
Content distribution
![]() Prestaging content
Prestaging content
Content management
Distribution points provide content to Configuration Manager clients. Before you can use Configuration Manager to deploy software to a client device, you must have at least one distribution point that the client can access. Depending on the size of your environment, you can implement additional distribution points as necessary to ensure efficient access to content for Configuration Manager clients.
Distribution points host content files for:
![]() Applications.
Applications.
![]() Packages.
Packages.
![]() Software updates.
Software updates.
![]() Operating system deployments.
Operating system deployments.
The efficiency of your distribution points depends on two main considerations:
![]() Managing content distribution to your distribution points in a way that minimizes impact to network bandwidth. You don’t want to block clients from accessing content each time you move new data to the distribution point.
Managing content distribution to your distribution points in a way that minimizes impact to network bandwidth. You don’t want to block clients from accessing content each time you move new data to the distribution point.
![]() Ensuring that Configuration Manager clients connect to appropriate distribution points to access content for deployments. You want to ensure that clients have access to a local distribution point rather than connecting to one on the other side of the country or even one on another continent.
Ensuring that Configuration Manager clients connect to appropriate distribution points to access content for deployments. You want to ensure that clients have access to a local distribution point rather than connecting to one on the other side of the country or even one on another continent.
In Configuration Manager, the distribution point site system role includes a number of features to utilize network bandwidth and store content efficiently. These include:
![]() Scheduling and throttling You can schedule a specific time for availability and limit the transfer rate you use when you distribute content to a distribution point over a network connection. You can restrict rate limits to a percentage of available bandwidth, or you can configure throttling based on the size of data blocks, in kilobytes (KB), and the time delay between sending each data block (in seconds). Note that these options do not apply when the distribution point is on a site server or when you configure it as a pull-distribution point.
Scheduling and throttling You can schedule a specific time for availability and limit the transfer rate you use when you distribute content to a distribution point over a network connection. You can restrict rate limits to a percentage of available bandwidth, or you can configure throttling based on the size of data blocks, in kilobytes (KB), and the time delay between sending each data block (in seconds). Note that these options do not apply when the distribution point is on a site server or when you configure it as a pull-distribution point.
![]() Content library The content library is a common repository that stores all content files for packages, applications, software updates, and operating system deployments. Single-instance storage prevents storage of multiple copies of the same content files on the distribution point. This provides a huge benefit by decreasing hard disk space requirements for content. The content library is on the site server and on each distribution point. The Package Transfer Manager site server component transfers content from the site server to a distribution point.
Content library The content library is a common repository that stores all content files for packages, applications, software updates, and operating system deployments. Single-instance storage prevents storage of multiple copies of the same content files on the distribution point. This provides a huge benefit by decreasing hard disk space requirements for content. The content library is on the site server and on each distribution point. The Package Transfer Manager site server component transfers content from the site server to a distribution point.
![]() Content validation You can use content validation to ensure the integrity of content that the content library stores. You can run content validation on a schedule that you configure for the distribution point, or you can validate content manually from the properties of any instance of content. You can view the validation status on the Content Status node of the Monitoring workspace.
Content validation You can use content validation to ensure the integrity of content that the content library stores. You can run content validation on a schedule that you configure for the distribution point, or you can validate content manually from the properties of any instance of content. You can view the validation status on the Content Status node of the Monitoring workspace.
Distribution points
You can deploy distribution points on computers running server operating systems such as Windows Server 2012 R2, on client operating systems such as Windows 8, and to Microsoft Azure. Before you deploy a new distribution point, consider the following:
![]() Association to boundary groups When you can associate a distribution point with one or more boundary groups, it becomes a preferred distribution point for clients within the boundary group’s boundaries. When you associate a distribution point with a boundary group, you configure the connection speed to the distribution point as either Fast (the default) or Slow. Clients that are in an assigned boundary group attempt to use their preferred distribution points for accessing content. For clients outside the assigned boundary groups, you have the option of allowing fallback access to the distribution point. If a preferred distribution point is not available to the client, the client uses an available fallback distribution point.
Association to boundary groups When you can associate a distribution point with one or more boundary groups, it becomes a preferred distribution point for clients within the boundary group’s boundaries. When you associate a distribution point with a boundary group, you configure the connection speed to the distribution point as either Fast (the default) or Slow. Clients that are in an assigned boundary group attempt to use their preferred distribution points for accessing content. For clients outside the assigned boundary groups, you have the option of allowing fallback access to the distribution point. If a preferred distribution point is not available to the client, the client uses an available fallback distribution point.
![]() Use of distribution point groups A distribution point group is a logical grouping of distribution points that you can use to simplify content distribution to multiple distribution points. For example, if you distribute content to a distribution point group, all distribution points that are group members receive the content. Beginning with System Center 2012 R2 Configuration Manager, if you add a new distribution point to an existing distribution point group, the content hosted on other members of the group will automatically be added to the new distribution point.
Use of distribution point groups A distribution point group is a logical grouping of distribution points that you can use to simplify content distribution to multiple distribution points. For example, if you distribute content to a distribution point group, all distribution points that are group members receive the content. Beginning with System Center 2012 R2 Configuration Manager, if you add a new distribution point to an existing distribution point group, the content hosted on other members of the group will automatically be added to the new distribution point.
You can associate collections with distribution point groups. This enables you to distribute content to collections directly rather than having to specify distribution point groups during deployment. Any distribution points that are members of a distribution point group that you associate with a collection will receive the content that has been distributed to that collection.
![]() Support for Internet-based or mobile clients To support Internet-based clients or mobile clients, you must configure the distribution point to accept HTTPS communication. The distribution point must have a valid public key infrastructure (PKI) web server certificate to use HTTPS communication. In addition, to support client authentication, client computers must have a valid PKI client certificate installed from a trusted certification authority (CA). Internet client support requires additional configuration, such as configuring a fully qualified domain name (FQDN), firewall access rules, and the distribution point to support Internet-based clients. In many scenarios, cloud-based distribution points replicate this functionality without the complexity of configuring communication.
Support for Internet-based or mobile clients To support Internet-based clients or mobile clients, you must configure the distribution point to accept HTTPS communication. The distribution point must have a valid public key infrastructure (PKI) web server certificate to use HTTPS communication. In addition, to support client authentication, client computers must have a valid PKI client certificate installed from a trusted certification authority (CA). Internet client support requires additional configuration, such as configuring a fully qualified domain name (FQDN), firewall access rules, and the distribution point to support Internet-based clients. In many scenarios, cloud-based distribution points replicate this functionality without the complexity of configuring communication.
![]() Network connection speed to the content source location By default, all distribution points in a boundary group are configured with a fast connection. When a client is connecting to a fallback distribution point, which is one used when the one to which the client was going to connect is unavailable, Configuration Manager automatically classifies the connection as Slow. You can also specify a distribution point as having a slow connection in relation to a boundary group on which it is a member. It is also possible to configure deployments to behave differently, depending on the connection speed.
Network connection speed to the content source location By default, all distribution points in a boundary group are configured with a fast connection. When a client is connecting to a fallback distribution point, which is one used when the one to which the client was going to connect is unavailable, Configuration Manager automatically classifies the connection as Slow. You can also specify a distribution point as having a slow connection in relation to a boundary group on which it is a member. It is also possible to configure deployments to behave differently, depending on the connection speed.
![]() Content on demand You can enable the Distribute The Content For This Package To Preferred Distribution Points property for an application or package to enable on-demand content distribution to preferred distribution points. If you enable this setting, when a client requests content that is not available on a preferred distribution point, the content downloads to all preferred distribution points.
Content on demand You can enable the Distribute The Content For This Package To Preferred Distribution Points property for an application or package to enable on-demand content distribution to preferred distribution points. If you enable this setting, when a client requests content that is not available on a preferred distribution point, the content downloads to all preferred distribution points.
![]() Scheduling and throttling requirements You can configure rate limits on distribution points to control the bandwidth used to copy the content from the site server. You can do this on all distribution points with the exception of a distribution point on a site server or a distribution point that you configure as a pull-distribution point. You can configure rate limits by specifying the amount of bandwidth a transfer can use. In addition, you can schedule when the transfer can occur.
Scheduling and throttling requirements You can configure rate limits on distribution points to control the bandwidth used to copy the content from the site server. You can do this on all distribution points with the exception of a distribution point on a site server or a distribution point that you configure as a pull-distribution point. You can configure rate limits by specifying the amount of bandwidth a transfer can use. In addition, you can schedule when the transfer can occur.
![]() Prestaged content requirements When scheduling and throttling do not provide the desired control over the content-transfer process, you can configure the Enable This Distribution Point For Prestaged Content setting in the distribution point properties on the General tab. When you enable this setting, you can control how content is copied to a distribution point on a per-package basis. The following options are available:
Prestaged content requirements When scheduling and throttling do not provide the desired control over the content-transfer process, you can configure the Enable This Distribution Point For Prestaged Content setting in the distribution point properties on the General tab. When you enable this setting, you can control how content is copied to a distribution point on a per-package basis. The following options are available:
![]() Automatically Download Content When Packages Are Assigned To Distribution Points
Automatically Download Content When Packages Are Assigned To Distribution Points
![]() Download Only Content Changes To The Distribution Point
Download Only Content Changes To The Distribution Point
![]() Manually Copy The Content In This Package To The Distribution Point
Manually Copy The Content In This Package To The Distribution Point
![]() Support for operating system deployment In System Center 2012 R2 Configuration Manager, you can enable distribution points to support Pre-Boot Execution Environment (PXE) and multicast. You can use both of these configurations for operating system deployment tasks. PXE enables distribution points to respond to incoming PXE boot requests by clients on the local network. Multicast enables deploying operating system images by sending data to multiple clients simultaneously instead of by using a separate connection to each client. If you enable PXE or multicast settings on a distribution point, the Windows Deployment Services server role installs automatically on the server. PXE and multicast are not supported on a workstation-based distribution point.
Support for operating system deployment In System Center 2012 R2 Configuration Manager, you can enable distribution points to support Pre-Boot Execution Environment (PXE) and multicast. You can use both of these configurations for operating system deployment tasks. PXE enables distribution points to respond to incoming PXE boot requests by clients on the local network. Multicast enables deploying operating system images by sending data to multiple clients simultaneously instead of by using a separate connection to each client. If you enable PXE or multicast settings on a distribution point, the Windows Deployment Services server role installs automatically on the server. PXE and multicast are not supported on a workstation-based distribution point.
![]() BranchCache System Center 2012 R2 Configuration Manager and newer versions support BranchCache distributed mode. You can configure software deployments to support BranchCache. When a BranchCache-enabled client downloads BranchCache-enabled content from a BranchCache-enabled distribution point, the client caches the software locally. When additional BranchCache-enabled clients on the same subnet need to download the content, they download it from a peer and then cache it. When you use BranchCache in a remote location, only the initial client needs to download the content from a distribution point.
BranchCache System Center 2012 R2 Configuration Manager and newer versions support BranchCache distributed mode. You can configure software deployments to support BranchCache. When a BranchCache-enabled client downloads BranchCache-enabled content from a BranchCache-enabled distribution point, the client caches the software locally. When additional BranchCache-enabled clients on the same subnet need to download the content, they download it from a peer and then cache it. When you use BranchCache in a remote location, only the initial client needs to download the content from a distribution point.
Pull-distribution points
When you assign content to a pull-distribution point, the pull-distribution point copies the content files from the specified distribution point. This reduces the processing usage of the site server when distributing content to a large number of distribution points. Pull-distribution points support the same configurations and functionality as typical Configuration Manager distribution points with the following exceptions:
![]() You cannot configure a cloud-based distribution point as a pull-distribution point or as a source server for pull distributions.
You cannot configure a cloud-based distribution point as a pull-distribution point or as a source server for pull distributions.
![]() You cannot configure a distribution point on a site server as a pull-distribution point.
You cannot configure a distribution point on a site server as a pull-distribution point.
![]() Prestaged content distribution settings override pull distribution. If you configure the content for prestaging, a pull-distribution point will not pull it.
Prestaged content distribution settings override pull distribution. If you configure the content for prestaging, a pull-distribution point will not pull it.
![]() Rate limit configurations do not apply to pull-distribution points.
Rate limit configurations do not apply to pull-distribution points.
![]() Retry settings do not apply to pull-distribution points. The Package Transfer Manager service on the site server does not notify the pull-distribution point to start downloading the content until it has verified that the pull-distribution point is available on a source server.
Retry settings do not apply to pull-distribution points. The Package Transfer Manager service on the site server does not notify the pull-distribution point to start downloading the content until it has verified that the pull-distribution point is available on a source server.
![]() If the pull-distribution point is in a remote forest, the Configuration Manager client must be installed on the distribution point, and the Network Access Account must be able to access the source distribution point.
If the pull-distribution point is in a remote forest, the Configuration Manager client must be installed on the distribution point, and the Network Access Account must be able to access the source distribution point.
You can configure a distribution point as a pull-distribution point during the creation of the distribution point or after the distribution point is in place. When configuring a distribution point as a pull-distribution point, you must also specify one or more source distribution points. You can use only distribution points that support HTTP as source distribution points if you are using the Configuration Manager console. When configuring multiple source distribution points, you can assign priorities to each.
More Info: Pull-Distribution Points
You can learn more about pull-distribution points at http://technet.microsoft.com/en-us/library/gg682083.aspx.
Cloud-based distribution points
System Center 2012 Configuration Manager Service Pack 1 (SP1) and later support cloud-based distribution points in Microsoft Azure. You configure cloud-based distribution points in the Cloud services node in the Administration workspace. You must also configure a client settings policy to allow clients to use cloud-based distribution points. Finally, to help control the costs associated with a cloud-based distribution point, you can configure thresholds for the amount of storage the distribution point uses and the amount of client traffic to the distribution point.
Cloud-based distribution points include the following distribution point features:
![]() Support for individual or group-based management
Support for individual or group-based management
![]() A possible fallback distribution point
A possible fallback distribution point
![]() Support for intranet and Internet-based clients
Support for intranet and Internet-based clients
![]() Support for BranchCache-configured systems to download content from the cloud-based distribution point
Support for BranchCache-configured systems to download content from the cloud-based distribution point
There are additional features specific to using a cloud-based distribution point in Microsoft Azure. When content is sent to a Microsoft Azure–based distribution point, the content is encrypted while traversing the Internet. In addition, you can quickly scale the size of your distribution points as necessary without investing in additional hardware.
Cloud-based distribution points have the following limitations:
![]() Cannot host software update packages
Cannot host software update packages
![]() Cannot be configured for PXE or multicast deployments
Cannot be configured for PXE or multicast deployments
![]() Cannot be used with task sequences that use the Download Content Locally When Needed By Running Task Sequence deployment option
Cannot be used with task sequences that use the Download Content Locally When Needed By Running Task Sequence deployment option
![]() Do not support packages that run from the distribution point
Do not support packages that run from the distribution point
![]() Do not support streaming packages
Do not support streaming packages
![]() Cannot be configured for prestaged content
Cannot be configured for prestaged content
![]() Cannot be configured as pull-distribution points
Cannot be configured as pull-distribution points
Network bandwidth considerations
Distributing content in a Configuration Manager infrastructure generates network traffic at various points in the distribution process:
![]() When content files are copied from the source path to the site server if the source path is on a different server from the site server. For this scenario, files transfers use the Server Message Block (SMB) protocol. The effect of this traffic on the network is usually negligible because it occurs over a high-speed network.
When content files are copied from the source path to the site server if the source path is on a different server from the site server. For this scenario, files transfers use the Server Message Block (SMB) protocol. The effect of this traffic on the network is usually negligible because it occurs over a high-speed network.
![]() When content files are copied from the site server to remote distribution points. In this situation, file transfers use the SMB protocol, which can have a significant impact on network usage, especially over low-speed network connections. You can manage this traffic by using content throttling and distribution scheduling except for distribution points that are located on site servers.
When content files are copied from the site server to remote distribution points. In this situation, file transfers use the SMB protocol, which can have a significant impact on network usage, especially over low-speed network connections. You can manage this traffic by using content throttling and distribution scheduling except for distribution points that are located on site servers.
Consider the following when configuring content throttling and scheduling:
![]() Content distribution detects updated files so that only the new or updated files are distributed when content source files are updated.
Content distribution detects updated files so that only the new or updated files are distributed when content source files are updated.
![]() You can configure scheduling and set specific throttling settings that determine when and how much bandwidth is consumed during content distribution to remote distribution points. You can configure the throttling settings on the Rate Limits tab and the scheduling settings on the Schedule tab. The Rate Limits and Schedule tabs appear only in the properties for distribution points that are not installed on a site server.
You can configure scheduling and set specific throttling settings that determine when and how much bandwidth is consumed during content distribution to remote distribution points. You can configure the throttling settings on the Rate Limits tab and the scheduling settings on the Schedule tab. The Rate Limits and Schedule tabs appear only in the properties for distribution points that are not installed on a site server.
![]() You can configure remote distribution points with different settings based on the network bandwidth limitations from the site server to the remote distribution point. Each remote distribution point that you configure as a pull-distribution point uses its own throttling settings and schedule to transfer content.
You can configure remote distribution points with different settings based on the network bandwidth limitations from the site server to the remote distribution point. Each remote distribution point that you configure as a pull-distribution point uses its own throttling settings and schedule to transfer content.
Distribution point priority
Beginning with System Center 2012 R2 Configuration Manager, Configuration Manager assigns a priority to each distribution point. This priority is based on how long content distribution has taken in prior distributions, on average. This priority is evaluated constantly as you distribute content. When you distribute content to multiple distribution points at the same time, the highest-priority distribution point receives content first. The Configuration Manager console does not include any options for managing the distribution point priority settings.
Bandwidth management planning
When planning for network bandwidth management in Configuration Manager, consider how you can reduce the content distribution network traffic:
![]() Configure scheduling and bandwidth throttling settings on distribution points and senders.
Configure scheduling and bandwidth throttling settings on distribution points and senders.
![]() Use content prestaging to transfer the content offline.
Use content prestaging to transfer the content offline.
![]() Place distribution points on the same high-speed networks as clients.
Place distribution points on the same high-speed networks as clients.
![]() Install standard applications as part of the operating system images.
Install standard applications as part of the operating system images.
![]() Include standard application installer files in the operating system image and use custom task sequence commands to install those applications from the local source files.
Include standard application installer files in the operating system image and use custom task sequence commands to install those applications from the local source files.
Both senders and the Package Transfer Manager service use file-based replication and the SMB protocol. Any firewalls placed between sites or between the site server and distribution points must allow SMB traffic.
More Info: Configuration Manager Firewall Ports
You can learn more about Configuration Manager firewall ports at http://technet.microsoft.com/en-us/library/hh427328.aspx.
Content library
The content library hosts content files. These files include software updates, operating system deployment images, and files related to packages and applications. Each site server and distribution point hosts a content library. The content library uses a single-instance store for the files it hosts to reduce the amount of disk space that content consumes. Before content files are transferred to a content library, a check is performed to determine whether the file is already present. Files are not added if they are already present in the content library. An association is made between the existing file and the newly transferred application or package.
When you deploy a Configuration Manager distribution point, you can specify the volumes that will host the content library. When you specify multiple volumes, you specify a priority for each volume. Configuration Manager transfers content to volumes based on priority until the highest-priority volume has less than the minimum amount of configured available free space. You must configure these settings when you deploy the distribution point because you cannot alter them after you deploy it.
In environments where site servers and distribution points are hosted on servers running the Windows Server 2012 and Windows Server 2012 R2 operating systems, you can enable deduplication on volumes that store the content library to increase storage efficiency. You should also consider placing the content library on volumes hosted on Storage Spaces. Storage Spaces simplify the process of increasing storage later.
System Center 2012 Configuration Manager SP1 and System Center 2012 R2 Configuration Manager enable you to move content to a different location by using the Content Library Transfer tool, which is available as part of the System Center 2012 Configuration Manager toolkit. You can download this toolkit from the Microsoft Download Center.
Prerequisites for content management
When you deploy a distribution point, Configuration Manager can install and configure Internet Information Services (IIS) automatically. IIS must be present on all distribution points. The only time that you should not have Configuration Manager deploy and configure IIS is when IIS is present already on the distribution point.
When you deploy a distribution point to a site server, you can use only the computer account of the site server as the Site System Installation Account. When you deploy a distribution point to a computer that is a member of the same Active Directory forest, ensure that the site server’s computer account is a member of the local Administrators group on a target computer.
If all the management points in the Configuration Manager site are configured for HTTP, you can use self-signed certificates with the distribution point. When all management points in the Configuration Manager site are configured to use HTTPS, you should use a certificate issued by a trusted CA. This certificate must be configured with an intended use that includes client authentication, and it must allow the private key to be exported.
If you use Windows Server 2012 or Windows Server 2012 R2, consider enabling deduplication on the volume that hosts the distribution point. This minimizes the amount of space consumed by content storage.
You can add the Distribution Point Site System role to an existing site system, or you can add a new site system server and then add the Distribution Point Site System role to the new site system server. Before installing the Distribution Point Site System role, ensure that the account you use to install the site system role is a member of the local Administrators group on the site system.
Use the following set of instructions to install and configure a distribution point site system role:
1. In the System Center 2012 R2 Configuration Manager console, click the Administration workspace.
2. Expand Site Configuration and then click the Servers And Site System Roles node.
3. To create a new site system role, right-click Servers And Site System Roles and then click Create Site System Server. To add a new role to an existing site server, in the results pane, right-click the server and then click Add Site System Roles. Both methods open the General page of the Create Site System Server Wizard.
4. On the Select A Server To Use As A Site System page, configure the following options as necessary:
![]() Name For a new site system server, you must provide either the NetBIOS or FQDN of the computer that will host the system role. If you supply the NetBIOS name, it resolves automatically to the required FQDN for use. For existing site system servers, this value will be configured already.
Name For a new site system server, you must provide either the NetBIOS or FQDN of the computer that will host the system role. If you supply the NetBIOS name, it resolves automatically to the required FQDN for use. For existing site system servers, this value will be configured already.
![]() Site Code For a new site system server, select the site code that will be associated with this site system. For existing site system servers, this value will be configured already.
Site Code For a new site system server, select the site code that will be associated with this site system. For existing site system servers, this value will be configured already.
![]() Specify An FQDN For This Site System For Use On The Internet If you use this site system to communicate with Internet-based clients, you need to specify the FQDN that is resolvable from the Internet. This setting is optional, depending on whether you support Internet-based clients.
Specify An FQDN For This Site System For Use On The Internet If you use this site system to communicate with Internet-based clients, you need to specify the FQDN that is resolvable from the Internet. This setting is optional, depending on whether you support Internet-based clients.
![]() Require The Site Server To Initiate Connections To This Site System The default behavior of site systems is to initiate a connection to the site server to send status information. However, in untrusted locations, such as a perimeter network or an untrusted domain, this might not be desirable. The setting ensures that the site server always initiates connections with the site system.
Require The Site Server To Initiate Connections To This Site System The default behavior of site systems is to initiate a connection to the site server to send status information. However, in untrusted locations, such as a perimeter network or an untrusted domain, this might not be desirable. The setting ensures that the site server always initiates connections with the site system.
![]() Use The Site Server’s Computer Account To Install This Site System By default, the site server’s computer account is used to install the site system. To install the site system successfully, be sure that the site server’s computer account is added to the local Administrators group on the computer to which you are adding this site system role.
Use The Site Server’s Computer Account To Install This Site System By default, the site server’s computer account is used to install the site system. To install the site system successfully, be sure that the site server’s computer account is added to the local Administrators group on the computer to which you are adding this site system role.
![]() Use Another Account For Installing This Site System You may choose to use a specific account for the site system’s installation account. If you use a standard user account, make sure that the account is a member of the local Administrators group on the site system.
Use Another Account For Installing This Site System You may choose to use a specific account for the site system’s installation account. If you use a standard user account, make sure that the account is a member of the local Administrators group on the site system.
5. On the Specify Internet Proxy Server page, specify any proxy information required to connect to the Internet.
6. On the Specify Roles For This Server page, select the Distribution Point check box.
7. On the Distribution Point page, configure the following options as necessary:
![]() Install And Configure IIS If Required By Configuration Manager This option allows Configuration Manager to install and configure IIS on the site system server. If IIS is installed on the site system already, this option ensures that Configuration Manager configures it as necessary during the distribution point site system role-installation process.
Install And Configure IIS If Required By Configuration Manager This option allows Configuration Manager to install and configure IIS on the site system server. If IIS is installed on the site system already, this option ensures that Configuration Manager configures it as necessary during the distribution point site system role-installation process.
![]() Description This is a text box in which you can provide a brief description of the distribution point.
Description This is a text box in which you can provide a brief description of the distribution point.
![]() Specify How Client Computers Communicate With This Distribution Point Depending on how you configure your site, you might have the option to specify whether clients use HTTP or HTTPS to communicate with the distribution point. If this distribution point is intended to support mobile, Mac OS X, or Internet-based clients, you must configure HTTPS.
Specify How Client Computers Communicate With This Distribution Point Depending on how you configure your site, you might have the option to specify whether clients use HTTP or HTTPS to communicate with the distribution point. If this distribution point is intended to support mobile, Mac OS X, or Internet-based clients, you must configure HTTPS.
![]() Create A Self-signed Certificate Or Import A PKI Client Certificate By default, a distribution point creates a self-signed certificate to use for PXE communications during operating system deployments. If you use HTTPS for client communication, import a certificate that a trusted CA issues.
Create A Self-signed Certificate Or Import A PKI Client Certificate By default, a distribution point creates a self-signed certificate to use for PXE communications during operating system deployments. If you use HTTPS for client communication, import a certificate that a trusted CA issues.
![]() Enable This Distribution Point For Prestaged Content When you enable this option, the site server adheres to the content properties that govern the transfer to prestaged, content-enabled distribution points.
Enable This Distribution Point For Prestaged Content When you enable this option, the site server adheres to the content properties that govern the transfer to prestaged, content-enabled distribution points.
8. On the Drive Settings page, specify the drive settings for the distribution point. Configure the following options as necessary:
![]() Drive Space Reserve (MB) This setting enables you to specify the amount of space on the drive that should be reserved and the amount that should remain free. Configuration Manager will not use the specified free space for distribution point content storage.
Drive Space Reserve (MB) This setting enables you to specify the amount of space on the drive that should be reserved and the amount that should remain free. Configuration Manager will not use the specified free space for distribution point content storage.
![]() Specify The Locations For The Content Library And Package Share On This Distribution Point You can specify two disk drives for the content library location and two disk drives for the package share location. By default, Automatic is selected for all options, so the drive with the most available disk space is used. To ensure that you control the content library and package share locations, we recommend specifying a drive letter for primary and secondary locations.
Specify The Locations For The Content Library And Package Share On This Distribution Point You can specify two disk drives for the content library location and two disk drives for the package share location. By default, Automatic is selected for all options, so the drive with the most available disk space is used. To ensure that you control the content library and package share locations, we recommend specifying a drive letter for primary and secondary locations.
9. If this is a pull-based distribution point, on the Pull Distribution Point page, select the Enable This Distribution Point To Pull Content From Other Distribution Points check box. If you select this option, you must configure the source distribution points.
10. On the PXE Settings page, select the Enable PXE Support For Clients check box if necessary. This setting enables or disables PXE support on the distribution point. If you enable this option, you can configure additional options, such as enabling unknown computer support and requiring a password when computers start by using PXE.
11. On the Multicast page, select the Enable Multicast To Simultaneously Send Data To Multiple Clients check box if necessary. If you enable this option, you can configure additional options such as initiating a Multicast Connection Account, specifying multicast address settings, and enabling scheduled multicast sessions. Furthermore, note that if you select this option, Windows Deployment Services will be installed if necessary.
12. On the Content Validation page, select the Validate Content On A Schedule check box if necessary. If you enable this option, you can configure a schedule for content validation. Content validation verifies the integrity of the content files that the distribution point stores.
On the Boundary Groups page, you can associate existing boundary groups with the distribution point. This creates a protected distribution point for boundaries that are members of the associated boundary groups. You also can use this page to create new boundary groups as necessary. You can use Allow Fallback Source Location For Content to enable clients outside the boundary groups to use the distribution point when no other distribution point is available.
Distribution point monitoring
In the Monitoring workspace of the Configuration Manager console, you can use the Distribution Status folder to perform monitoring for:
![]() Content status This includes the status of individual packages, applications, and driver packages in relation to their distribution points. When viewing the content status, you can cancel an in-progress distribution.
Content status This includes the status of individual packages, applications, and driver packages in relation to their distribution points. When viewing the content status, you can cancel an in-progress distribution.
![]() Distribution point group status This includes the aggregate status of content assigned to a specific distribution point group.
Distribution point group status This includes the aggregate status of content assigned to a specific distribution point group.
![]() Distribution point configuration status This includes the aggregate status of the content assigned to a distribution point and the status of the optional components (PXE and multicast).
Distribution point configuration status This includes the aggregate status of the content assigned to a distribution point and the status of the optional components (PXE and multicast).
To troubleshoot content distribution, you can use:
![]() Configuration Manager reports.
Configuration Manager reports.
![]() Configuration Manager status messages.
Configuration Manager status messages.
![]() Configuration Manager logs.
Configuration Manager logs.
To troubleshoot issues with content management, you can use the following Configuration Manager logs:
![]() SMSProv.log Troubleshoot actions started from the user interface (UI) or the software development kit (SDK).
SMSProv.log Troubleshoot actions started from the user interface (UI) or the software development kit (SDK).
![]() DistMgr.log Troubleshoot content creation, update, deletion, and start of distribution. You can use this log on the site server from the source site to verify that Distribution Manager processes the content.
DistMgr.log Troubleshoot content creation, update, deletion, and start of distribution. You can use this log on the site server from the source site to verify that Distribution Manager processes the content.
![]() Scheduler.log View the current status of the sender job. You can use this log on the site server from the source site to verify that the content was queued for the sender.
Scheduler.log View the current status of the sender job. You can use this log on the site server from the source site to verify that the content was queued for the sender.
![]() Sender.log Troubleshoot the copy of the compressed content to the destination site. You can use this log on the site server from the source site to determine whether the sender has transferred the content to a different site.
Sender.log Troubleshoot the copy of the compressed content to the destination site. You can use this log on the site server from the source site to determine whether the sender has transferred the content to a different site.
![]() Despooler.log Troubleshoot the extraction of the compressed copy to the content library on the destination site. You can use this log file on the site server from the destination site to verify that the despooler received and processed the content.
Despooler.log Troubleshoot the extraction of the compressed copy to the content library on the destination site. You can use this log file on the site server from the destination site to verify that the despooler received and processed the content.
![]() PkgXferMgr.log Troubleshoot the distribution of content from the site server to the distribution point. You can use this log on the site server to determine whether the Package Transfer Manager processed the content and transferred it to a distribution point located in the same site as the site server.
PkgXferMgr.log Troubleshoot the distribution of content from the site server to the distribution point. You can use this log on the site server to determine whether the Package Transfer Manager processed the content and transferred it to a distribution point located in the same site as the site server.
![]() SMSDPProv.log Troubleshoot the addition of content to the content library on the distribution point. You can use this log on a distribution point to verify that content was added to the content library.
SMSDPProv.log Troubleshoot the addition of content to the content library on the distribution point. You can use this log on a distribution point to verify that content was added to the content library.
![]() SMSPXE.log Troubleshoot the PXE provider. You can find this log on a distribution point that is configured to use PXE.
SMSPXE.log Troubleshoot the PXE provider. You can find this log on a distribution point that is configured to use PXE.
Content distribution
Client computers can access only content that has been distributed to distribution points. Configuration Manager places content files in containers called packages. The distribution process copies these packages to distribution points from the source files in the source path. Packages can host application deployment types, packages, deployment packages, operating system images, driver packages, boot images, and task sequences.
To distribute content to distribution points, perform the following procedure:
1. In the Configuration Manager console, click the Software Library workspace.
2. Expand the appropriate folder (Application Management, Software Updates, or Operating Systems).
3. Access the node for the content that you need to distribute.
4. Select the content and then, on the ribbon, click Distribute Content.
5. In the Distribute Content Wizard, on the Review Selected Content page, verify that the content that is listed is the content you want to distribute. If you are distributing an application, you can select the Detect Associated Content Dependencies And Add Them To This Distribution check box.
6. On the Specify The Content Destination page, click Add. You can add a content destination that is associated with collections, a distribution point, or a distribution point group.
By default, Configuration Manager grants access to the package folder on a distribution account to the Users And Administrators groups. If necessary, you can mediate access to the package folder by configuring access for additional accounts and groups. You do not have to configure the Network Access account as a Package Access account because the Users group already has this account as a member. Mobile devices always access package content anonymously. This means that you cannot use Package Access accounts to mediate access to package content for mobile devices.
Updating content
When you change the source files for specific content, update the copy of the content on the distribution points. When you update content on distribution points, Configuration Manager increments the package version and updates only the files with changes.
To update content on distribution points, perform the following procedure:
1. On the Configuration Manager console, click the Software Library workspace.
2. Expand the appropriate folder: Application Management, Software Updates, or Operating Systems.
3. Access the node for the content you want to update.
4. Select the content and then, on the ribbon, click Update Distribution Points.
5. In the Configuration Manager message that asks whether you want to refresh the content, click Yes.
Redistributing, validating, or removing content
Sometimes you might need to redistribute content to distribution points, such as when you need to repair corrupted content files. You can use one of the following three methods to perform content redistribution:
![]() From the Software Library workspace, select the content and then open the Properties dialog box. Click the Content Locations tab, select the distribution point or distribution point group, and then click Redistribute.
From the Software Library workspace, select the content and then open the Properties dialog box. Click the Content Locations tab, select the distribution point or distribution point group, and then click Redistribute.
![]() From the Administration workspace, open the Distribution Points node. Right-click a distribution point and then click Properties. On the Content tab, select the content and then click Redistribute.
From the Administration workspace, open the Distribution Points node. Right-click a distribution point and then click Properties. On the Content tab, select the content and then click Redistribute.
![]() From the Administration workspace, open the Distribution Point Groups node. Right-click a distribution point group and then click Properties. On the Content tab, select the content and then click Redistribute.
From the Administration workspace, open the Distribution Point Groups node. Right-click a distribution point group and then click Properties. On the Content tab, select the content and then click Redistribute.
Managing content in progress
System Center 2012 R2 Configuration Manager introduces the ability to manage content while it is copying to a distribution point. From the Monitoring workspace, you can cancel distributions in progress if necessary. In addition, you can redistribute content that fails to distribute. To cancel content distribution:
1. From the Monitoring workspace, open the Distribution Status node and then select Content Status.
2. Select the distribution that you want to manage and then click the View Status link.
3. On the In Progress tab, in the Asset Details section, right-click the target server and then select Cancel.
Monitoring content status
Configuration Manager provides extensive content monitoring capabilities, including content status, number of failures, pending distributions, and successful distributions. Methods that you can use to monitor content status on distribution points include:
![]() Content Status In the Monitoring workspace, under the Distribution Status folder, click Content Status. When you click this node, the results pane displays a list of all content. You can right-click specific content and then click View Status to display status information that pertains to content distribution and validation.
Content Status In the Monitoring workspace, under the Distribution Status folder, click Content Status. When you click this node, the results pane displays a list of all content. You can right-click specific content and then click View Status to display status information that pertains to content distribution and validation.
![]() Package Transfer Manager The Package Transfer Manager component (SMS _PACKAGE_TRANSFER_MANAGER) provides status information that pertains to package transfers to distribution points.
Package Transfer Manager The Package Transfer Manager component (SMS _PACKAGE_TRANSFER_MANAGER) provides status information that pertains to package transfers to distribution points.
![]() Package Transfer Manager component log file (PkgXferMgr.log) You can find the PkgXferMgr.log file on the primary site server in the <Configuration Manager Installation Path>\Logs folder. This log file provides extensive information related to content distribution to remote distribution points.
Package Transfer Manager component log file (PkgXferMgr.log) You can find the PkgXferMgr.log file on the primary site server in the <Configuration Manager Installation Path>\Logs folder. This log file provides extensive information related to content distribution to remote distribution points.
![]() Software Deployment Content reports System Center 2012 R2 Configuration Manager includes several reports that pertain to content management and distribution. You can find these reports when you expand the Reporting node in the Monitoring workspace.
Software Deployment Content reports System Center 2012 R2 Configuration Manager includes several reports that pertain to content management and distribution. You can find these reports when you expand the Reporting node in the Monitoring workspace.
Prestaging content
Content prestaging enables you to transfer and preload content by using an offline method such as shipping media from a site server to a distribution point. You can use this method instead of file-based replication to reduce network traffic between the site server and the distribution point. Content prestaging:
![]() Works with all content types.
Works with all content types.
![]() Works with content libraries and package shares.
Works with content libraries and package shares.
![]() Registers content availability automatically with the site server upon content extraction on the distribution point.
Registers content availability automatically with the site server upon content extraction on the distribution point.
![]() Uses a compressed, prestaged content file with the .pkgx extension.
Uses a compressed, prestaged content file with the .pkgx extension.
![]() Can be used to prestage multiple content files in a single operation.
Can be used to prestage multiple content files in a single operation.
![]() Offers a conflict detection mechanism as part of the extraction tool to prevent earlier versions of content from being prestaged on a distribution point.
Offers a conflict detection mechanism as part of the extraction tool to prevent earlier versions of content from being prestaged on a distribution point.
Consider prestaging content for applications and packages when:
![]() You have limited network bandwidth between the site server and the distribution point. While distributing content over the network to a remote distribution point, and when scheduling and throttling do not reduce network traffic sufficiently, consider prestaging the content on the distribution point.
You have limited network bandwidth between the site server and the distribution point. While distributing content over the network to a remote distribution point, and when scheduling and throttling do not reduce network traffic sufficiently, consider prestaging the content on the distribution point.
![]() You need to restore the content library on a site server. If a site server fails, information about packages and applications in the content library is restored to the site database as part of the restore process. However, the site backup does not include content library files by default. If you do not have a file system backup to restore the content library, you can create a prestaged content file from another site that contains the packages and applications that you need and then extract the prestaged content file on the recovered site server.
You need to restore the content library on a site server. If a site server fails, information about packages and applications in the content library is restored to the site database as part of the restore process. However, the site backup does not include content library files by default. If you do not have a file system backup to restore the content library, you can create a prestaged content file from another site that contains the packages and applications that you need and then extract the prestaged content file on the recovered site server.
Prior to prestaging content, you must perform the following steps on the distribution point that will receive prestaged content:
1. On the General tab of the Distribution Point Properties dialog box, select the Enable This Distribution Point For Prestaged Content check box.
2. On the Distribution Settings tab of the dialog box for content type properties, ensure that you configure the Prestaged Distribution Point settings. These settings include:
![]() Automatically Download Content When Packages Are Assigned To Distribution Points.
Automatically Download Content When Packages Are Assigned To Distribution Points.
![]() Download Only Content Changes To The Distribution Point.
Download Only Content Changes To The Distribution Point.
![]() Manually Copy The Content In This Package To The Distribution Point.
Manually Copy The Content In This Package To The Distribution Point.
To prestage the content, use the following procedure:
1. Create a prestaged content file. You can create a prestaged content file for any type of content. To create the prestaged content file, right-click the content or multiselect two or more instances of content and right-click them and then click Create Prestaged Content File.
2. In the Create Prestaged Content File Wizard, specify the name and location for the content file and then complete the wizard. The Create Prestaged Content File Wizard creates a single file with a .pkgx extension.
3. Distribute the content to the distribution point. You can copy the file to a portable drive or to removable media and then send the drive or media to the location that hosts the distribution point that requires the content.
4. Import the prestaged content file to the distribution point. On the distribution point, open a command prompt and then browse to \SMS_DP$\sms\Tools. At the command prompt, type the following command and then press Enter:
ExtractContent /P:<PrestagedFileLocation>[\<PrestagedFileName>] /S
Exam Tip
Remember the limitations of pull-distribution points.
Thought experiment: Content distribution at Contoso
You are reviewing the distribution of content at Contoso. You are particularly concerned about when to prestage content and how to respond to application file corruption. With this information in mind, answer the following questions:
1. You suspect that the content for a specific software application is corrupt on a distribution point. How can you fix the problem?
2. In which scenarios would you prestage content?
Objective summary
![]() Before you can use Configuration Manager to deploy software to a client device, you must have at least one distribution point that the client can access.
Before you can use Configuration Manager to deploy software to a client device, you must have at least one distribution point that the client can access.
![]() When you can associate a distribution point with one or more boundary groups, it becomes a preferred distribution point for clients within the boundary group’s boundaries.
When you can associate a distribution point with one or more boundary groups, it becomes a preferred distribution point for clients within the boundary group’s boundaries.
![]() When you associate a distribution point with a boundary group, you configure the connection speed to the distribution point as either Fast (the default) or Slow.
When you associate a distribution point with a boundary group, you configure the connection speed to the distribution point as either Fast (the default) or Slow.
![]() A distribution point group is a logical grouping of distribution points that you can use to simplify content distribution to multiple distribution points simultaneously.
A distribution point group is a logical grouping of distribution points that you can use to simplify content distribution to multiple distribution points simultaneously.
![]() Associating a collection with a distribution point group enables you to distribute content to collections directly.
Associating a collection with a distribution point group enables you to distribute content to collections directly.
![]() When you assign content to a pull-distribution point, the pull-distribution point copies the content files from the specified distribution point.
When you assign content to a pull-distribution point, the pull-distribution point copies the content files from the specified distribution point.
![]() Beginning with System Center 2012 Configuration Manager SP1, you can use cloud-based distribution points in Microsoft Azure to host a distribution point.
Beginning with System Center 2012 Configuration Manager SP1, you can use cloud-based distribution points in Microsoft Azure to host a distribution point.
![]() The content library hosts content files. These files include software updates, operating system deployment images, and files related to packages and applications.
The content library hosts content files. These files include software updates, operating system deployment images, and files related to packages and applications.
![]() When you change the source files for specific content, you need to update the copy of the content on the distribution points.
When you change the source files for specific content, you need to update the copy of the content on the distribution points.
![]() Content prestaging enables you to transfer and preload content by using an offline method such as shipping media from a site server to a distribution point.
Content prestaging enables you to transfer and preload content by using an offline method such as shipping media from a site server to a distribution point.
Objective review
Answer the following questions to test your knowledge of the information in this objective. You can find the answers to these questions and explanations of why each answer choice is correct or incorrect in the “Answers” section at the end of the chapter.
1. Which of the following cannot be used with cloud distribution points? (Choose all that apply.)
A. App-V streaming packages
B. Software update packages
C. Applications that are installed after being downloaded from the distribution point
D. Prestaged content
2. Which of the following Configuration Manager log files would you use to troubleshoot the distribution of content from the site server to the distribution point?
A. Scheduler.log
B. Sender.log
C. PkgXferMgr.log
D. SMSPXE.log
3. Which of the following Configuration Manager log files would you use to view the current status of the sender job to verify that content is queued properly for distribution?
A. SMSPXE.log
B. Scheduler.log
C. Sender.log
D. PkgXferMgr.log
4. Which of the following Configuration Manager log files would you use to troubleshoot the copying of compressed content to the destination site during content distribution?
A. PkgXferMgr.log
B. Scheduler.log
C. Sender.log
D. SMSPXE.log
Answers
Objective 2.1
Thought experiment
1. Configure a program to run the command.
2. Use user device affinity as a requirement when configuring a deployment type.
Objective review
1. Correct answer: A
A. Correct: Detection methods enable you to define how Configuration Manager determines an application’s installation state.
B. Incorrect: Supersedence enables you to configure a relationship between a new application and an existing application that you have deployed.
C. Incorrect: User device affinity is the process of associating a user with one or more specific devices.
D. Incorrect: Application Catalog functions as a self-service catalog from which users can request software for installation.
2. Correct answer: B
A. Incorrect: User device affinity is the process of associating a user with one or more specific devices.
B. Correct: Application Catalog functions as a self-service catalog from which users can request software for installation.
C. Incorrect: Supersedence enables you to configure a relationship between a new application and an existing application that you have deployed.
D. Incorrect: Detection methods enable you to define how Configuration Manager determines an application’s installation state.
3. Correct answer: D
A. Incorrect: Detection methods enable you to define how Configuration Manager determines an application’s installation state.
B. Incorrect: Supersedence enables you to configure a relationship between a new application and an existing application that you have deployed.
C. Incorrect: Application Catalog functions as a self-service catalog from which users can request software for installation.
D. Correct: User device affinity is the process of associating a user with one or more specific devices.
4. Correct answer: C
A. Incorrect: User device affinity is the process of associating a user with one or more specific devices.
B. Incorrect: Application Catalog functions as a self-service catalog from which users can request software for installation.
C. Correct: Supersedence enables you to configure a relationship between a new application and an existing application that you have deployed.
D. Incorrect: Detection methods enable you to define how Configuration Manager determines an application’s installation state.
Objective 2.2
Thought experiment
1. Configure a global condition related to the amount of memory and use it with a requirement so that deployment will occur only if the minimum amount of memory is available.
2. You can perform a simulated deployment to verify that the deployment settings are correct.
Objective review
1. Correct answers: A and C
A. Correct: You must choose the Install action to make the application available through Software Center.
B. Incorrect: The Uninstall action removes an application.
C. Correct: The Purpose of Available makes the application available in Software Center.
D. Incorrect: Choosing this option would ensure that the software was deployed, independent of the user’s choice.
2. Correct answers: A and D
A. Correct: You must choose the Install action to make the application available through Software Center.
B. Incorrect: The Uninstall action removes an application.
C. Incorrect: The Purpose of Available makes the application available in Software Center.
D. Correct: Choosing this option would ensure that the software was deployed, independent of the user’s choice.
3. Correct answers: A and D
A. Correct: When the software is deployed as Required and the deadline has passed, software will install automatically and silently.
B. Incorrect: In this scenario, the user can request it from Application Catalog.
C. Incorrect: In this scenario, the user can request it from Software Center.
D. Correct: When the software is deployed as Required and the deadline has passed, software will install automatically and silently.
4. Correct answer: C
A. Incorrect: When the software is deployed as Required and the deadline has passed, software will install automatically and silently.
B. Incorrect: In this scenario, the user can request it from Software Center.
C. Correct: In this scenario, the user can request it from Application Catalog.
D. Incorrect: When the software is deployed as Required and the deadline has passed, software will install automatically and silently.
Objective 2.3
Thought experiment
1. Users will download the Company Portal app from the Windows Store and use it to enroll in Intune.
2. A sideloading key is necessary to sideload software. A code-signing certificate the Surface 2 devices trust is required to sign the custom software digitally.
Objective review
1. Correct answer: B
A. Incorrect: This policy setting determines the frequency with which new application deployments will be detected.
B. Correct: This policy setting determines when updates and applications are installed as scheduled and whether a user is prompted for installation.
C. Incorrect: This policy setting determines whether updates that don’t require a restart are installed automatically.
D. Incorrect: This setting determines whether a logged-on user may control when Windows restarts after the installation of an update or application that requires a restart.
2. Correct answer: B
A. Incorrect: This policy setting determines the frequency with which new application deployments will be detected.
B. Correct: This setting determines whether a logged-on user may control when Windows restarts after the installation of an update or application that requires a restart.
C. Incorrect: This policy setting determines whether updates that don’t require a restart are installed automatically.
D. Incorrect: This policy setting determines when updates and applications are installed as scheduled and whether a user is prompted for installation.
3. Correct answer: C
A. Incorrect: This policy setting determines whether updates that don’t require a restart are installed automatically.
B. Incorrect: This policy setting determines when updates and applications are installed as scheduled and whether a user is prompted for installation.
C. Correct: This policy setting determines the frequency with which new application deployments will be detected.
D. Incorrect: This setting determines whether a logged-on user may control when Windows restarts after the installation of an update or application that requires a restart.
Objective 2.4
Thought experiment
1. Retiring an application prevents new deployments of the application without uninstalling the application. Uninstalling an application removes the application.
2. Uninstall deployments fail if there is an existing install deployment.
Objective review
1. Correct answer: A
A. Correct: Retiring an application blocks new deployments but doesn’t remove existing deployed software.
B. Incorrect: Uninstalling an application removes it from computers on which it is installed.
C. Incorrect: Superseding an application replaces one application with another.
D. Incorrect: Installing an application deploys a new application. It does not remove or replace other applications.
2. Correct answer: C
A. Incorrect: Installing an application deploys a new application. It does not remove or replace other applications.
B. Incorrect: Superseding an application replaces one application with another. Because no replacement was chosen, you would not select this option.
C. Correct: Uninstalling an application removes it from computers on which it is installed.
D. Incorrect: Retiring an application blocks new deployments but doesn’t remove existing deployed software.
3. Correct answer: A
A. Correct: Superseding an application replaces one application with another.
B. Incorrect: Retiring an application blocks new deployments but doesn’t remove existing deployed software.
C. Incorrect: Uninstalling an application removes it from computers on which it is installed. Although you could uninstall and then configure a new installation, this would require more administrative effort than superseding the application.
D. Incorrect: Installing an application deploys a new application. It does not remove or replace other applications. Although you could uninstall and then configure a new installation, this would require more administrative effort than superseding the application.
Objective 2.5
Thought experiment
1. You must enable Software Metering to view information about users who have run a specific executable.
2. Ensure that all computers are configured to audit logon events. Typically, you would do this by using Group Policy.
Objective review
1. Correct answer: C
A. Incorrect: The default maximum number of automatically generated Configuration Manager software-metering rules is 100.
B. Incorrect: The default maximum number of automatically generated Configuration Manager software-metering rules is 100.
C. Correct: The default maximum number of automatically generated Configuration Manager software-metering rules is 100.
D. Incorrect: The default maximum number of automatically generated Configuration Manager software-metering rules is 100.
2. Correct answer: B
A. Incorrect: By default, 10 percent of a site’s computers must use a particular program to trigger the automatic creation of a software-metering rule.
B. Correct: By default, 10 percent of a site’s computers must use a particular program to trigger the automatic creation of a software-metering rule.
C. Incorrect: By default, 10 percent of a site’s computers must use a particular program to trigger the automatic creation of a software-metering rule.
D. Incorrect: By default, 10 percent of a site’s computers must use a particular program to trigger the automatic creation of a software-metering rule.
3. Correct answer: C
A. Incorrect: In Progress status indicates that the application deployment is in progress.
B. Incorrect: Error status indicates that the application failed to deploy because of an error.
C. Correct: Requirements Not Met status indicates that the application did not deploy because it did not comply with a dependency or a requirement.
D. Incorrect: Success status indicates that the application deployment was successful.
Objective 2.6
Thought experiment
1. You can redistribute the content to the distribution point, either from the properties of the software application or package or from the distribution point itself.
2. You would prestage content when you need to distribute large files to remote locations for which the time or expense required to transfer the content across wide area network (WAN) links is prohibitive.
Objective review
1. Correct answers: A, B and D
A. Correct: You can’t use App-V streaming packages with cloud-based distribution points.
B. Correct: You can’t use software update packages with cloud-based distribution points.
C. Incorrect: You can use applications that are installed after being downloaded from the distribution point with cloud-based distribution points.
D. Correct: You can’t use prestaged content with cloud distribution points.
2. Correct answer: C
A. Incorrect: You use the Scheduler.log log to view the current status of the sender job. You can use this log on the site server from the source site to verify that the content was queued for the sender.
B. Incorrect: You use the Sender.log log to troubleshoot the copy of the compressed content to the destination site. You can use this log on the site server from the source site to determine whether the sender has transferred the content to a different site.
C. Correct: You use the PkgXferMgr.log log to troubleshoot the distribution of content from the site server to the distribution point. You can use this log on the site server to determine whether the Package Transfer Manager processed the content and transferred it to a distribution point located in the same site as the site server.
D. Incorrect: You use the SMSPXE.log log to troubleshoot the PXE provider. You can find this log on a distribution point that is configured to use PXE.
3. Correct answer: B
A. Incorrect: You use the SMSPXE.log log to troubleshoot the PXE provider. You can find this log on a distribution point that is configured to use PXE.
B. Correct: You use the Scheduler.log log to view the current status of the sender job. You can use this log on the site server from the source site to verify that the content was queued for the sender.
C. Incorrect: You use the Sender.log log to troubleshoot the copy of the compressed content to the destination site. You can use this log on the site server from the source site to determine whether the sender has transferred the content to a different site.
D. Incorrect: You use the PkgXferMgr.log log to troubleshoot the distribution of content from the site server to the distribution point. You can use this log on the site server to determine whether the Package Transfer Manager processed the content and transferred it to a distribution point located in the same site as the site server.
4. Correct answer: C
A. Incorrect: You use the PkgXferMgr.log log to troubleshoot the distribution of content from the site server to the distribution point. You can use this log on the site server to determine whether the Package Transfer Manager processed the content and transferred it to a distribution point located in the same site as the site server.
B. Incorrect: You use the Scheduler.log log to view the current status of the sender job. You can use this log on the site server from the source site to verify that the content was queued for the sender.
C. Correct: You use the Sender.log log to troubleshoot the copy of the compressed content to the destination site. You can use this log on the site server from the source site to determine whether the sender has transferred the content to a different site.
D. Incorrect: You use the SMSPXE.log log to troubleshoot the PXE provider. You can find this log on a distribution point that is configured to use PXE.
All materials on the site are licensed Creative Commons Attribution-Sharealike 3.0 Unported CC BY-SA 3.0 & GNU Free Documentation License (GFDL)
If you are the copyright holder of any material contained on our site and intend to remove it, please contact our site administrator for approval.
© 2016-2026 All site design rights belong to S.Y.A.