Code-First Development with Entity Framework (2015)
Chapter 2. Your First Entity Framework Application
In this chapter, we will work through the creation of a brand new project that uses Entity Framework. We will create classes that map to tables in the target database. We will then insert a row into that table using the Entity Framework API. We will also query this using LINQ. Next, we will update and delete our test data. Finally, we will take a look at how to handle schema changes.
In this chapter, we will cover the following topics:
· Creating a new project using Entity Framework
· Adding the necessary references to be able to write Entity Framework code
· Creating a new database based on written classes
· Saving a new record
· Querying the saved data
· Deleting and updating the data in the database
· An introduction to schema changes
Creating a new project that uses Entity Framework
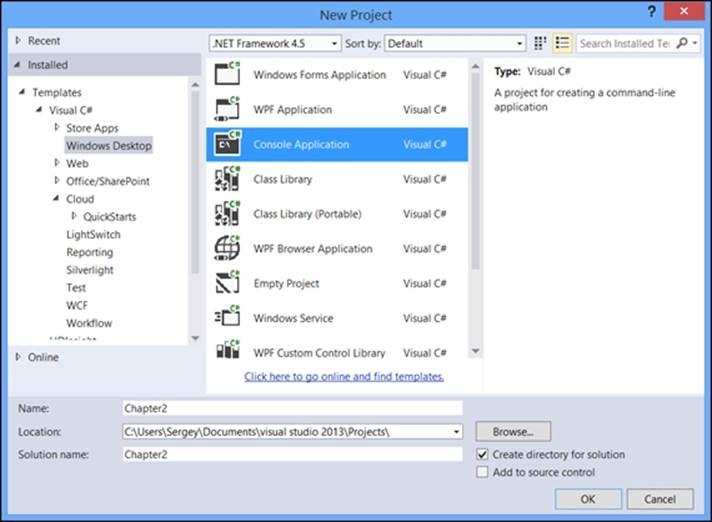
First of all, it is important to understand how Entity Framework is distributed. Even though it is an open source project, Microsoft employees curate the project as well as write the lion's share of all the code. You can actually download the source code from CodePlex at https://entityframework.codeplex.com/. However, the easiest way to add this technology to your project is to use NuGet. The NuGet technology allows anyone to create useful libraries and publish them on the web to let other developers take advantage of it. Microsoft is in charge of publishing Entity Framework on the NuGet website. The package is simply called Entity Framework. In addition to the core Entity Framework, it also contains the Entity Framework provider for SQL Server. We will work with the latest version of it. You can add it to any .NET project. Let's just create a Console Application for our project first, and then add the Entity Framework package to it. Create your project and solution by going through File | New | Project, then picking either C# or VB.NET, and then finally selecting Console Application under the Windows Desktop node, as shown in the following screenshot:
Now, you can use either the Package Manager Console window or Manage NuGet Packages for the Solution window, to add the EntityFramework package to your solution. Both windows are available by navigating to Tools | NuGet Package Manager for theSolution menu in Visual Studio. If you are using the Package Manager Console window, just type Install-Package EntityFramework.
In this window, hit Enter key. If you are using Manage Packages for the Solution window, type EntityFramework in the search box, click on Search, and then add the package with the ID of Entity Framework, which should be the first package in the result set. Once the package has been added, the project will contain all the necessary references. You are now ready to start writing code.
Tip
You must be connected to the Internet to use the NuGet online package repository.
Creating a new database based on .NET classes
When it comes to working with data, we will need to create at least two types of classes. We need to create one or more classes to map the tables in the database, where each class represents a row of data in the corresponding table. You also need at least one class that represents the database itself, which will inherit from DbContext. To start with, let's create a class with the same structure as the Person table from the Chapter 1, Introducing Entity Framework, with properties for id and the first and last names. Here is how the class looks in C#:
public class Person
{
public int PersonId { get; set; }
public string FirstName { get; set; }
public string LastName { get; set; }
}
Tip
Downloading the example code
You can download the example code fies from your account at http://www.packtpub.com for all the Packt Publishing books you have purchased. If you purchased this book elsewhere, you can visit http://www.packtpub.com/support and register to have the fies e-mailed directly to you.
As you can see, we need to define properties with types that match our desired database types. In this case, the String type in .NET will map to all possible character types in an RDBMS. Numeric types are easier. In our case, the Integer type in .NET will map to the int type in SQL Server. Most of the time, you do not need to be concerned with this level of detail. Just model your classes to represent the data you need, using the standard .NET types for its properties, and let Entity Framework figure out what native RDBMS types are needed to persist this data. The same class in VB.NET looks as follows:
Public Class Person
Property PersonId() As Integer
Property FirstName() As String
Property LastName() As String
End Class
Now, let's write out a context, which will be our database abstraction with a single table: Person. By this logic, we only need a single property in our context to represent this table. Since a table consists of rows, it is logical to assume that this property must be a collection of persons. Entity Framework has a specific class for this exact purpose: DbSet. Here is what our context class looks like:
public class Context : DbContext
{
public Context()
: base("name=chapter2")
{
}
public DbSet<Person> People { get; set; }
}
It was mentioned before that DbContext needs to be the base class for all our Entity-Framework-based context classes, and you can see this in the preceding example. You also see the constructor that calls the base constructor. We pass the connection string configuration, and in this case, we specify that we will use a connecting string with the key of chapter2 defined in the application configuration file, which can be app.config or web.config depending on your application type. Here is how this configuration looks inapp.config file in our console application:
<connectionStrings>
<add name="chapter2"
connectionString="Data Source=.;Initial Catalog=Chapter2;Integrated Security=SSPI"
providerName="System.Data.SqlClient"/>
</connectionStrings>
It is important to notice is that we are using a standard connection string that does not contain anything specific to Entity Framework. This allows you to use the same connection string for other purposes, such as reports. Here is how the same Context class looks in VB.NET:
Public Class Context
Inherits DbContext
Public Sub New()
MyBase.New("name=chapter2")
End Sub
Property People As DbSet(Of Person)
End Class
Apply Code[packt] and CodeEnd[packt]style
We are actually ready to run our application and see what happens. We need to make sure that the Chapter2 database specified in the connection string as the initial catalog (database) does not exist in the default instance of SQL Server, specified by "." inside the connection string. You will learn more about database creation in Chapter 7, Database Migrations and Additional Features. In this chapter, you will learn one other important thing: The database is created upon the first access to the results of a query or an update/insert operation. We can also create it using the Entity Framework database API. Here is how we do it inside our console application:
static void Main(string[] args)
{
using (var context = new Context())
{
context.Database.CreateIfNotExists();
}
}
What you see in the preceding code is the use of the database object that forces the creation of the database if it does not already exist. Alternatively, we can access any data via the Entity Framework API to cause database creation to occur. Here is the DbContextdefinition code in VB.NET:
Sub Main()
Using context = New Context()
context.Database.CreateIfNotExists()
End Using
End Sub
Finally, we just need to make sure that the connection strings match your computer setup. Now we can run your console application. After we run it, we can open SQL Server Management Studio (SSMS) and verify the results of our application. Alternatively, we can use the Server Explorer window in Visual Studio. You should see the Chapter2 database with one table in it, as seen in the following screenshot:
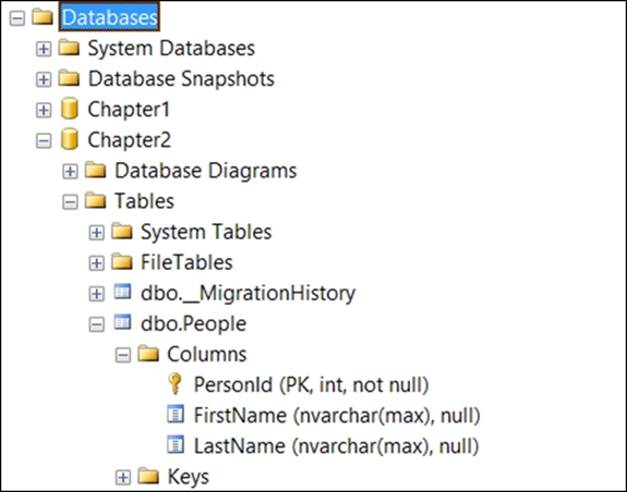
You probably noticed that the first and last name columns are of the type nvarchar(max). This is due to defaults that Entity Framework uses. It makes a lot of assumptions on the developers' behalf when it comes to defining database types and structures. In the preceding example, Entity Framework guessed that the PersonId property should map to the primary key. Because it was of the type integer, the column was also set up as the identity column in SQL Server. On top of that, our class name Person was pluralized when the table was defined in SQL Server. What this means is that a lot of decisions are made based on conventions in Entity Framework. We will learn a lot more about conventions in subsequent chapters.
Saving a new record to the database
It is time to add some data to our table in the created database. We will insert a row, which is sometimes called a record. A record in the People table consists of values in three columns: PersonId, FirstName, and LastName. These values are going to be based onproperty values of an instance of the Person class, which is mapped to the People table. This is an important concept to remember. When we create entity classes, their purpose is to map to tables. There are some exceptions to this rule, which we will see in later chapters. This table is represented by a collection-based property in our Context class.
This property's type is DbSet of Person and its name is People. Conceptually, you can think of adding objects to that collection to be equivalent to inserting rows into the database's corresponding table. You need to use the Add method of DbSet to implement the addition of new data. The DbContext class has the SaveChanges method, which is responsible for committing all the pending changes to the database. It does so by examining the state of all the objects in the context. All such objects are housed within each of the collection properties based on DbSet in the context class. In our case, there is only one such collection in the Context class: the People property. Context tracks the state of each one of the objects in all its DbSet properties. This state can be "Deleted", "Added", "Modified", or "Unchanged". We can easily decipher how each of the states, with the exception of "Unchanged", will result in a corresponding query sent to the RDMBS. If you want to create multiple rows in a table, you just need to add multiple instances of. NET object based on the class that corresponds to the table in question. The next step is to commit your changes to the database using the SaveChanges method. This method runs as a single transaction. As a result, all pending database changes are persisted as a single unit of work, participating in this transaction. If one of the commits fails, the entire batch of changes will be rolled back upon exception. The DbContext.SaveChanges method is transactional. This enables you to commit a batch of logically related changes as a single operation, thus ensuring transactional consistency and data integrity.
Let's take a look at the code that adds a row to the People table:
static void Main(string[] args)
{
using (var context = new Context())
{
context.Database.CreateIfNotExists();
var person = new Person
{
FirstName = "John",
LastName = "Doe"
};
context.People.Add(person);
context.SaveChanges();
}
}
In this sample code, we are creating a new instance of the Person class, populating the first and last names. You will notice that we did not set a value for the PersonId property. The reason for this is that this property corresponds to the identity column in SQL Server, which means its value is generated by the database. This value will be automatically populated in the person variable's object immediately after the save. You can verify this by setting a breakpoint on the line after the SaveChanges call, and checking the value of thePersonId property of the person variable. Another thing to notice is that the instance of the Context class is wrapped inside the Using statement. It is important to always follow this coding pattern. DbContext implements an IDisposable interface. It does so because it contains an instance of DbConnection that points to the database specified in the connection string. It is very important to properly dispose of the database connection in Entity Framework, just like it was important in ADO.NET. Here is the same code in VB.NET:
Sub Main()
Using context = New Context()
context.Database.CreateIfNotExists()
Dim person = New Person With {
.FirstName = "John",
.LastName = "Doe"
}
context.People.Add(person)
context.SaveChanges()
End Using
End Sub
If you would like to add one more row, just create another instance of the Person class and add it to the same People collection. To verify that the data was successfully inserted, you can just open SQL Server Management Studio or SQL Server Object Explorer inside Visual Studio, and look at the data in the People table. Now, let's see how we can retrieve the data in the database using Entity Framework.
Tip
SQL Server Object Explorer can be found under the View menu in Visual Studio. If you cannot find this window, you may need to install SSDT or SQL Server Data Tools from https://msdn.microsoft.com/en-us/data/tools.aspx.
Querying data in a database
In this section, we are going to look at our data using the query capabilities of Entity Framework. Typically, we will use LINQ to do this. We are going to start with a simple example though, accessing the data directly through DbSet. We will take a deeper look at LINQ in subsequent chapters. The code is quite simple and is as follows:
using (var context = new Context())
{
var savedPeople = context.People;
}
If you set a breakpoint on the line with the last curly brace and look at the savedPeople variable in the Watch window, you will see one peculiar thing, something called Results View, shown in the following screenshot:

This illustrates an important concept. Entity Framework is using delayed query execution. In other words, the actual query command is sent to the database when the results of that LINQ query are accessed or enumerated. Entity Framework is doing so based on the IQueryable interface that DbSet implements. We can enumerate the results of our query using a simple loop, thus causing the SQL execution, for example:
using (var context = new Context())
{
var savedPeople = context.People;
foreach (var person in savedPeople)
{
Console.WriteLine("Last name:{0},first name:{1},id {2}",
person.LastName, person.FirstName, person.PersonId);
}
}
Console.ReadKey();
If you run the preceding code, you will see the list of people in the console window. It will show the people you just added to the database in the previous step. What we do is simply access the entire DbSet or table data by pointing our variable to the property of the context that contains the people collection. This is roughly equivalent to the SQL query SELECT * FROM PEOPLE. Entity Framework then reads in the results, creating actual instances of the Person class, then organizing them into a collection. This process is called materialization, that is, the creation of .NET objects from DbDataReader that is reading the data from the database. If you only see a single row in the output and would like to see more than a single record, just run your insert code a few more times. The same code in VB.NET looks as follows:
Using context = New Context()
Dim savedPeople = context.People
For Each person In savedPeople
Console.WriteLine("Last name:{0},first name:{1},id {2}",
person.LastName, person.FirstName, person.PersonId)
Next
End Using
To summarize what we have seen in the preceding code, we insert rows into the database by simply adding objects to a collection that corresponds to the table we are targeting.
Updating a record
Let's take a look at how we can change the data after inserting it. This is done in the SQL world by issuing an UPDATE command. In the Entity Framework world, you do not need to perform this step. Instead, we just need to find an instance of an object in the collection, change its properties, and then call the familiar SaveChanges method. Now, we just need to get an object from the database to update. You just saw how to do this in the Querying data in a database section. Here is what the update code looks like:
using (var context = new Context())
{
var savedPeople = context.People;
if (savedPeople.Any())
{
var person = savedPeople.First();
person.FirstName = "Johnny";
person.LastName = "Benson";
context.SaveChanges();
}
}
As you can see, we simply point to the People property of the context. Then, we check to make sure that there is at least one entity in the collection using the Any() method, which is part of LINQ. Then, we get the first object in the collection using the First() method. We could have just as easily pointed to any other object in the collection. After this, we set two properties of the found Person object to some new values. Finally, we issue SaveChange() just like in the example of the insert operation. If you run this code while SQL Server Profiler is running, you will see the SQL queries that Entity Framework creates and issues in conjunction with the SQL Server Entity Framework provider. Entity Framework maintains the state of changed objects and is responsible for generating appropriate update queries. Here is how the same code looks in VB.NET:
Using context = New Context()
Dim savedPeople = context.People
If savedPeople.Any() Then
With savedPeople.First()
.FirstName = "Johnny"
.LastName = "Benson"
End With
context.SaveChanges()
End If
End Using
Deleting a row from the database
Now let's try to delete a record from the database. First of all, we need to find a row to delete. If you look at the update example, you will see exactly how you can do this. In this example, we will employ a slightly different technique, finding a row by its primary key. In our example, it is the PersonId property's value. Just find a value to delete by running the code from a query example and writing down the appropriate value of the PersonId property. Once we have this value, we can use the Find method of DbSet to locate the correct object. Finally, we will mark the object as deleted using the DbContext API's Remove method, as shown in the following code:
using (var context = new Context())
{
var personId = 2;
var person = context.People.Find(personId);
if (person != null)
{
context.People.Remove(person);
context.SaveChanges();
}
}
You will notice that we also have a check to make sure that the Find operation was successful in checking its results, making sure that the object retrieved is not null. The delete operation is performed by calling the Remove method on DbSet. As we saw in the preceding example, we always need to call SaveChanges when we want to persist our modifications to the database. These modifications can include update or insert, or delete in this case. In subsequent chapters, we will see other API calls that perform the same tasks. Here is how this code looks in VB.NET:
Using context = New Context()
Dim personId As Integer = 4
Dim person = context.People.Find(personId)
If person IsNot Nothing Then
context.People.Remove(person)
context.SaveChanges()
End If
End Using
The value 4 in the preceding example contains the primary key value for a row in the Person table and does not carry any specific meaning beyond that.
Introduction to schema changes
It is good for everyone to experiment with his or her first application. However, it is very likely that we will encounter an exception if we make changes to the Person class or add another collection to the Context class. Let's take a look at what happens when we add more classes and properties to the context. In this example, we are going to create a Company class and add it the context as a collection. Here is another simple class that represents a second table in our database:
public class Company
{
public int CompanyId { get; set; }
public string Name { get; set; }
}
Here is how our context class definition looks after the addition of the new collection:
public class Context : DbContext
{
public Context()
: base("name=chapter2")
{
}
public DbSet<Person> People { get; set; }
public DbSet<Company> Companies { get; set; }
}
This code illustrates an important concept. We can now see that our context represents the entire database, consisting of multiple tables. Each one becomes a property on our context class. Here is how the same code looks in VB.NET:
Public Class Company
Property CompanyId() As Integer
Property Name() As String
End Class
Public Class Context
Inherits DbContext
Public Sub New()
MyBase.New("name=chapter2")
End Sub
Property People As DbSet(Of Person)
Property Companies() As DbSet(of Company)
End Class
Now if we try to run the project and enumerate the Companies collection by accessing context.Companies inside a for each loop, we will get an exception, as seen in the following screenshot:
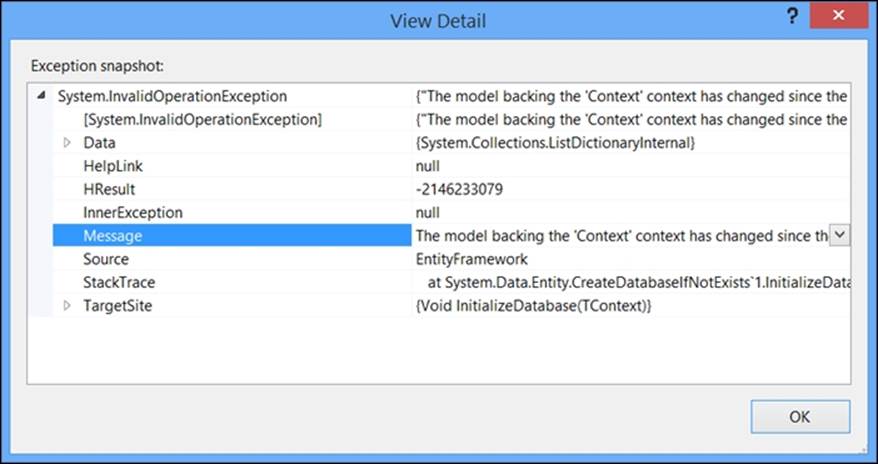
The entire error text is The model backing the 'Context' context has changed since the database was created. Consider using Code First Migrations to update the database (http://go.microsoft.com/fwlink/?LinkId=238269). Sometimes you will get a different error message that states that a specific table does not exist in the database. The point, however, is the same—you cannot change the context, that is the database schema without adding code to handle this situation. You will learn a lot more about this circumstance in Chapter 7, Migrating Databases and Existing Databases on migrations, but let's address the immediate need to handle schema changes in our Entity Framework experiments. This is where the concept of initializers come in. Initializers are run when Entity Framework accesses the database for the first time during the instantiation process or during the first access of data. There are three initializers in Entity Framework that we need to be concerned with right now:
· CreateDatabaseIfNotExists<TContext>
· DropCreateDatabaseIfModelChanges<TContext>
· DropCreateDatabaseAlways<TContext>
When it comes to VB.NET, we use slightly different syntax, for example CreateDatabaseIfNotExists(Of TContext). If we look at the names of these classes, it quite clear what these initializers do. CreateDatabaseIfNotExistsinitializer is the default that is run when you do not specify another one. It will check whether the database exists, and if not, create it along with the structure specified by the context and classes that it refers to in its properties. The second initializer in the list recreates the database when the model specified in the context class changes. This could be caused by changes to any class that maps to a table, as well as the addition or removal of collections from the context. Finally, the last initializer always recreates the database; in other words, every run of the software that uses it will result in a new database. Let's create and use the second one, as shown: DropCreateDatabaseIfModelChanges:
public class Initializer : DropCreateDatabaseIfModelChanges<Context>
{
}
In order to use this new initializer, we must let Entity Framework know before we create an instance of our context for the first time in our application. We can do so by accessing the static method SetInitializer on the Database class, which is also part of the Entity Framework API. In our console application, we need to do it in the first line of code that is executed in our application, for example:
static void Main(string[] args)
{
Database.SetInitializer(new Initializer());
// more code follows
All we need to do is to create a new instance of the initializer and set it on the database object. Now, if we run our application again, we will not see the exception. Instead, our database will be recreated with the new structure.
Note
If you have the database in question open inside another application, such as SQL Server Management Studio, you will get a different exception, informing you that Entity Framework cannot obtain an exclusive lock on the database in order to drop it. Just close all other applications and you will be able to proceed.
Here is how the same code looks in VB.NET:
Public Class Initializer
Inherits DropCreateDatabaseIfModelChanges(Of Context)
End Class
Sub Main()
Database.SetInitializer(New Initializer)
' more code follows
There is one more important note to make here. Because the initializers we mentioned drop databases, you will lose all of the data you accumulated in the database. Obviously, this makes the initializer we just used unsuitable for production purposes. However, these initializers come in quite handy when you are learning Entity Framework and early in your projects' lifetimes, that is, during the rapid prototyping phase. We can also call Database.SetInitializer and pass in null (nothing in VB.NET) instead of the actual instance. This will override the default behavior and always throw an exception if your class-based model/context does not match the database any longer. This will include when the database does not exist. Initializers have one more interesting feature we want to look at. They allow you to run the code after the target database is created. You can do so by overwriting the Seed method. This method takes one parameter, which is an instance of your Context class, for example in the following code:
public class Initializer : DropCreateDatabaseIfModelChanges<Context>
{
protected override void Seed(Context context)
{
context.Companies.Add(new Company
{
Name = "My company"
});
}
}
As you can see, I am using familiar code to add a company object to the Companies collection of my context. Unlike the standard addition code, I do not need to call SaveChanges, although there is no harm in doing so. Here is how the same code looks in VB.NET:
Public Class Initializer
Inherits DropCreateDatabaseIfModelChanges(Of Context)
Protected Overrides Sub Seed(ByVal context As Context)
context.Companies.Add(New Company() With {
.Name = "My company"
})
End Sub
End Class
Note
We can use Entity Framework migrations in order to update the production database.
I hope you will now take some time to experiment with what you have learned in this chapter.
Self-test questions
Q1. What base class can be used to represent a table in a database inside the DbContext collection's property?
1. List<T>/List(of T)
2. DbSet<T>/DbSet(of T)
3. ICollection<T>/ICollection(of T)
Q2. You do not have to call Dispose on DbContext after use, true or false?
Q3. Which method can be used to locate a row in the database using the primary key in Entity Framework?
1. Find
2. Locate
3. Define
Q4. Which method of DbSet can you use after finding a record to delete it?
1. Delete
2. Remove
3. Erase
Q5. You want to easily update the last name of a person in a record stored in the database. You can do so in Entity Framework by:
1. Issuing a SQL command
2. Getting the corresponding object, setting the LastName property, and calling SaveChanges
3. Creating an instance with the same id and different values for LastName, then adding it to DbSet using the Add method, and then calling SaveChanges
Q6. You have changed a class that is mapped to a table by adding another property to it. What happens if you set the database initializer to null and run the program?
1. All other columns' data is shown
2. An exception is thrown
3. The database is changed to match the new schema, but the data is lost
Summary
In this chapter, we created our first Entity Framework-based application. We started by creating a new console application .NET project. We then added the Entity Framework reference using NuGet. Then, we decided what data we wanted to store in the database and created a class that maps to a table in the database, that is, the Person class. Then, we created our database abstraction, the Context class, inheriting from DbContext. We specified the desired connection string in its constructor and added this connection string to the application configuration file. Then, we added a single property to our context, People, which was a collection of Persons object, of the type DbSet of Person. At this point, we ran our application. We observed that a database was created with a single table, based on the this property. The database creation process used many conventions, including the table name and making the PersonId column unique (by identity) and primary key.
We then worked on adding a row to the preceding table. We created an instance of the Person class, setting some properties on it at the same time. We created an instance of Context, following the IDisposable pattern. We then added the instance of Person to the collection specified by the People property of Context using the Add method. Finally, we called SaveChanges to commit our in-memory objects to the database, thus making them rows in the Person table. Updating the inserted data was easy, as well. We queried the rows from the database by enumerating the objects inside the People property of Context. We picked a row, changed its properties, and called SaveChanges to update the data. Deletion was done using the Find method instead of enumerating a query, and then marking the object for deletion by calling Remove method of DbSet and calling SaveChanges yet again, thus deleting the data from the database. We finished the chapter by mentioning that Entity Framework has many ways to perform some actions, and this includes CRUD operations. We will see other ways to archive these tasks in subsequent chapters. Congratulations on getting your first app working!
All materials on the site are licensed Creative Commons Attribution-Sharealike 3.0 Unported CC BY-SA 3.0 & GNU Free Documentation License (GFDL)
If you are the copyright holder of any material contained on our site and intend to remove it, please contact our site administrator for approval.
© 2016-2026 All site design rights belong to S.Y.A.