Microsoft Excel 2016 BIBLE (2016)
Part IV
Using Advanced Excel Features
Chapter 30
Protecting Your Work
IN THIS CHAPTER
1. Protecting worksheets
2. Protecting workbooks
3. Protecting Visual Basic Projects
4. Creating PDFs and checking documents
The concept of “protection” gets a lot of attention in the Excel forums. It seems that many users want to learn how to protect various workbook elements from being overwritten or copied. Excel has several protection-related features, and those features are covered in this chapter.
Types of Protection
Excel's protection-related features fall into three categories:
· Worksheet protection: Protecting all or part of a worksheet from being modified or restricting the modifications to certain users
· Workbook protection: Protecting a workbook from having sheets inserted or deleted and requiring the use of a password to open the workbook
· Visual Basic (VB) protection: Using a password to prevent others from viewing or modifying your VBA code
Caution
Before I discuss these features, you should understand the notion of security. Using a password to protect some aspect of your work doesn't guarantee that it's secure. Password-cracking utilities (and some simple tricks) have been around for a long time. Using passwords works in the majority of cases, but if someone is truly intent on getting to your data, he can usually find a way. If absolute security is critical, perhaps Excel isn't the proper tool.
Protecting a Worksheet
You may want to protect a worksheet for a variety of reasons. One common reason is to prevent yourself or others from accidentally deleting formulas or other critical data. A typical scenario is to protect a worksheet so that the data can be changed, but the formulas can't be.
To protect a worksheet, activate the worksheet and choose Review ![]() Changes
Changes ![]() Protect Sheet. Excel displays the Protect Sheet dialog box, shown in Figure 30.1. Providing a password is optional. If you enter a password, that password will be required to unprotect the worksheet. If you accept the default options in the Protect Sheet dialog box (and if you haven't unlocked any cells), none of the cells on the worksheet can be modified.
Protect Sheet. Excel displays the Protect Sheet dialog box, shown in Figure 30.1. Providing a password is optional. If you enter a password, that password will be required to unprotect the worksheet. If you accept the default options in the Protect Sheet dialog box (and if you haven't unlocked any cells), none of the cells on the worksheet can be modified.
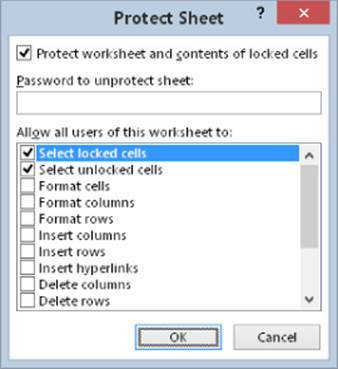
Figure 30.1 Use the Protect Sheet dialog box to protect a worksheet.
To unprotect a protected sheet, choose Review ![]() Changes
Changes ![]() Unprotect Sheet. If the sheet was protected with a password, you're prompted to enter that password.
Unprotect Sheet. If the sheet was protected with a password, you're prompted to enter that password.
Unlocking cells
In many cases, you'll want to allow some cells to be changed when the worksheet is protected. For example, your worksheet may have some input cells that are used by formula cells. In such a case, you would want the user to be able to change the input cells but not the formula cells. Every cell has a Locked attribute, and that attribute determines whether the cell can be changed when the sheet is protected.
By default, all cells are locked. To change the Locked attribute, select the cell or range, right-click, and choose Format Cells from the shortcut menu (or press Ctrl+1). Select the Protection tab of the Format Cells dialog box, clear the Locked check box, and then click OK (see Figure 30.2).
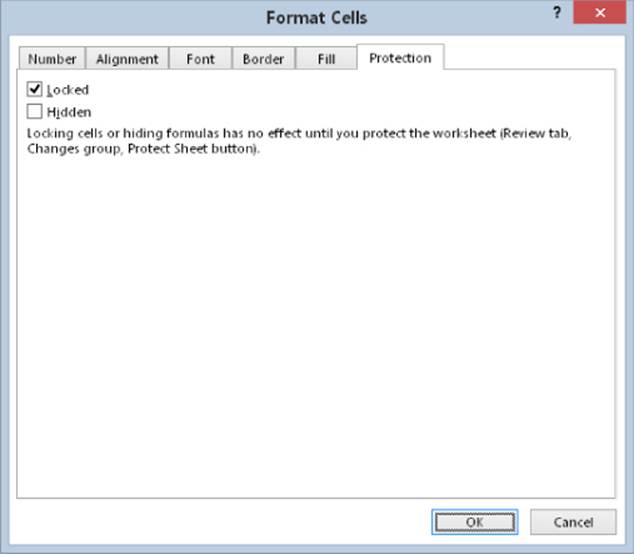
Figure 30.2 Use the Protection tab in the Format Cells dialog box to change the Locked attribute of a cell or range.
Note
The Protection tab of the Format Cells dialog box has another attribute: Hidden. If this check box is selected, the contents of the cell don't appear in the Formula bar when the sheet is protected. The cell isn't hidden in the worksheet. You may want to set the Hidden attribute for formula cells to prevent users from seeing the formula when the cell is selected.
After you unlock the desired cells, choose Review ![]() Changes
Changes ![]() Protect Sheet to protect the sheet. Then you can change the unlocked cells, but if you attempt to change a locked cell, Excel displays the warning alert shown in Figure 30.3.
Protect Sheet to protect the sheet. Then you can change the unlocked cells, but if you attempt to change a locked cell, Excel displays the warning alert shown in Figure 30.3.

Figure 30.3 Excel warns you if you attempt to change a locked cell.
Sheet protection options
The Protect Sheet dialog box has several options, which determine what the user can do when the worksheet is protected:
· Select Locked Cells: If this is checked, the user can select locked cells using the mouse or the keyboard. This setting is enabled by default.
· Select Unlocked Cells: If this is checked, the user can select unlocked cells using the mouse or the keyboard. This setting is enabled by default.
· Format Cells: If this is checked, the user can apply formatting to locked cells.
· Format Columns: If this is checked, the user can hide or change the width of columns.
· Format Rows: If this is checked, the user can hide or change the height of rows.
· Insert Columns: If this is checked, the user can insert new columns.
· Insert Rows: If this is checked, the user can insert new rows.
· Insert Hyperlinks: If this is checked, the user can insert hyperlinks (even in locked cells).
· Delete Columns: If this is checked, the user can delete columns.
· Delete Rows: If this is checked, the user can delete rows.
· Sort: If this is checked, the user can sort data in a range as long as the range doesn't contain locked cells.
· Use AutoFilter: If this is checked, the user can use existing autofiltering.
· Use PivotTable & PivotChart: If this is checked, the user can change the layout of pivot tables or create new pivot tables. This setting also applies to pivot charts.
· Edit Objects: If this is checked, the user can make changes to objects (such as Shapes) and charts, as well as insert or delete comments.
· Edit Scenarios: If this is checked, the user can use scenario management features.
 See Chapter 35, “Performing Spreadsheet What-If Analysis,” for more on creating and using scenarios.
Tip
When the worksheet is protected and the Select Unlocked Cells option is set, pressing Tab moves to the next unlocked cell (and skips locked cells), making data entry much easier.
Assigning user permissions
Excel also offers the ability to assign user-level permissions to different areas on a protected worksheet. You can specify which users can edit a particular range while the worksheet is protected. As an option, you can require a password to make changes.
This feature is rarely used, and the setup procedure is rather complicated. But if you need this level of protection, setting it up might be worth the effort.
1. Unprotect the worksheet if it's protected.
2. Choose Review ![]() Changes
Changes ![]() Allow Users to Edit Ranges. The Allow Users to Edit Ranges dialog box, shown in Figure 30.4, appears.
Allow Users to Edit Ranges. The Allow Users to Edit Ranges dialog box, shown in Figure 30.4, appears.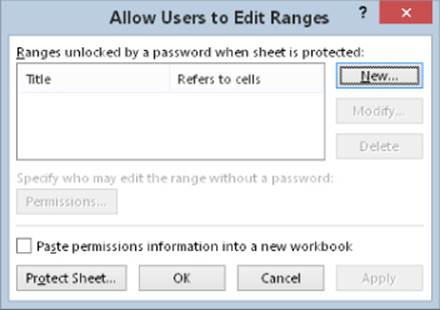
Figure 30.4 The Allow Users to Edit Ranges dialog box.
3. Click the New button and follow the prompts in the series of dialog boxes that follow.
4. Protect the sheet.
Protecting a Workbook
Excel provides two ways to protect a workbook:
· Require a password to open the workbook.
· Prevent users from adding sheets, deleting sheets, hiding sheets, and unhiding sheets.
These are not mutually exclusive, so both methods can be applied to a workbook. I discuss each of these methods in the sections that follow.
Requiring a password to open a workbook
Excel lets you save a workbook with a password. After you do so, whoever tries to open the workbook must enter the password.
To add a password to a workbook, follow these steps:
1. Choose File ![]() Info
Info ![]() Protect Workbook
Protect Workbook ![]() Encrypt with Password. The Encrypt Document dialog box, shown in Figure 30.5, appears.
Encrypt with Password. The Encrypt Document dialog box, shown in Figure 30.5, appears.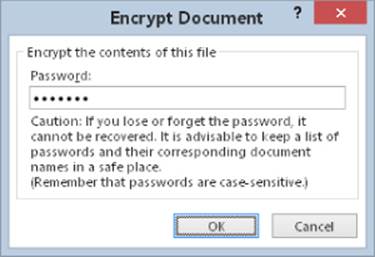
Figure 30.5 Specify a workbook password in the Encrypt Document dialog box.
2. Type a password and click OK.
3. Type the password again and click OK.
4. Save the workbook.
Note
You need to perform these steps only once. You don't need to specify the password every time you resave the workbook.
To remove a password from a workbook, repeat the same procedure. In step 2, however, delete the existing password symbols from the Encrypt Document dialog box, click OK, and save your workbook.
Figure 30.6 shows the Password dialog box that appears when you try to open a file saved with a password.
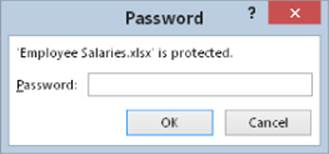
Figure 30.6 Opening this workbook requires a password.
Excel provides another way to add a password to a document:
1. Choose File ![]() Save As and click Browse. The Save As dialog box appears.
Save As and click Browse. The Save As dialog box appears.
2. Click the Tools drop-down and choose General Options. The General Options dialog appears.
3. Enter a password in the Password to Open field.
4. Click OK. You're asked to reenter the password before you return to the Save As dialog box.
5. In the Save As dialog box, make sure that the filename, location, and type are correct; then click Save.
Note
The General Options dialog box has another password field: Password to Modify. If you specify a password for this field, the file opens in read-only mode (it can't be saved under the same name) unless the user knows the password. If you use the Read-Only Recommended check box without a password, Excel suggests that the file be opened in read-only mode, but the user can override this suggestion.
Protecting a workbook's structure
To prevent others (or yourself) from performing certain actions in a workbook, you can protect the workbook's structure. When a workbook's structure is protected, the user may not
· Add a sheet
· Delete a sheet
· Hide a sheet
· Unhide a sheet
· Rename a sheet
· Move a sheet
To protect a workbook's structure, follow these steps:
1. Choose Review ![]() Changes
Changes ![]() Protect Workbook. The Protect Structure and Windows dialog box, shown in Figure 30.7, appears.
Protect Workbook. The Protect Structure and Windows dialog box, shown in Figure 30.7, appears.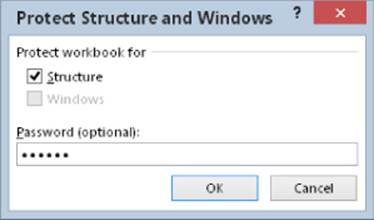
Figure 30.7 The Protect Structure and Windows dialog box.
2. Select the Structure check box.
3. (Optional) Enter a password.
4. Click OK.
To unprotect the workbook's structure, choose Review ![]() Changes
Changes ![]() Unprotect Workbook. If the workbook's structure was protected with a password, you're prompted to enter the password.
Unprotect Workbook. If the workbook's structure was protected with a password, you're prompted to enter the password.
Note
In previous versions of Excel, you could also protect a workbook's windows. This type of protection prevented others (or yourself) from changing the size and the position of a workbook's windows. Because of the single-document interface introduced in Excel 2013, the ability to protect windows is no longer available.
VBA Project Protection
If your workbook contains VBA macros, you may want to protect the VBA Project to prevent others from viewing or modifying your macros. To protect a VBA Project, follow these steps:
1. Press Alt+F11 to activate the VB Editor.
2. Select your project in the Projects window.
3. Choose Tools -<Project Name>Properties (where<Project Name> corresponds to your Project name). The Project Properties dialog box appears.
4. Select the Protection tab (see Figure 30.8).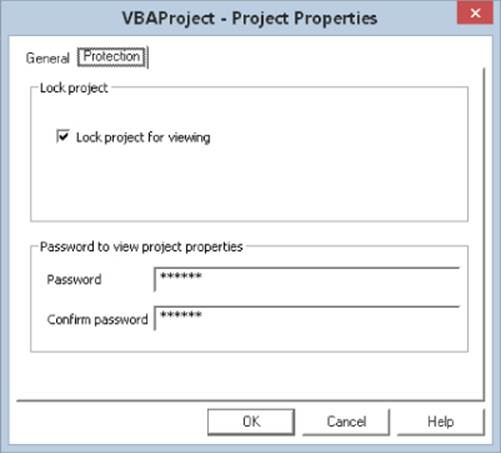
Figure 30.8 Protecting a VBA Project with a password.
5. Select the Lock Project for Viewing check box.
6. Enter a password (twice).
7. Click OK and then save your file. When the file is closed and then reopened, a password will be required to view or modify the VBA code.
 Part VI, “Programming Excel with VBA,” discusses VBA macros.
Related Topics
This section covers additional topics related to protecting and distributing your work.
Saving a worksheet as a PDF file
The Portable Document Format (PDF) file format is widely used as a way to present information in a read-only manner, with precise control over the layout. Software to display PDF files is available from a number of sources. Excel can create PDF files, but it can't open them.
XPS is another “electronic paper” format, developed by Microsoft as an alternative to the PDF format. At this time, there is little third-party support for the XPS format.
Save a worksheet in PDF or XPS format by choosing File ![]() Export
Export ![]() Create PDF/XPS Document
Create PDF/XPS Document ![]() Create a PDF/XPS. The Publish as PDF or XPS dialog box appears; here, you can specify a filename and location and set some other options.
Create a PDF/XPS. The Publish as PDF or XPS dialog box appears; here, you can specify a filename and location and set some other options.
Marking a workbook final
Excel lets you mark a workbook as final. This action makes two changes to the workbook:
· It makes the workbook read only so that the file can't be saved using the same name.
· It makes the workbook view only so that nothing may be changed.
When you open a finalized document, you see a message below the Ribbon. You can override its final status by clicking the Edit Anyway button.
To finalize a workbook, choose File ![]() Info
Info ![]() Protect Workbook
Protect Workbook ![]() Mark as Final. A dialog box appears, where you can confirm your choice.
Mark as Final. A dialog box appears, where you can confirm your choice.
Caution
Marking a document as final is not a security measure. Anyone who opens the workbook can cancel the mark-as-final designation. Therefore, this method doesn't guarantee that others will not change the workbook.
Inspecting a workbook
If you plan to distribute a workbook to others, you may want to have Excel check the file for hidden data and personal information. This tool can locate hidden information about you, your organization, or the workbook. In some situations, you may not want to share this information with others.
To inspect a workbook, choose File ![]() Info
Info ![]() Check for Issues
Check for Issues ![]() Inspect Document. The Document Inspector dialog box, shown in Figure 30.9, appears. Click Inspect, and Excel displays the results of the inspection and gives you the opportunity to remove the items it finds.
Inspect Document. The Document Inspector dialog box, shown in Figure 30.9, appears. Click Inspect, and Excel displays the results of the inspection and gives you the opportunity to remove the items it finds.
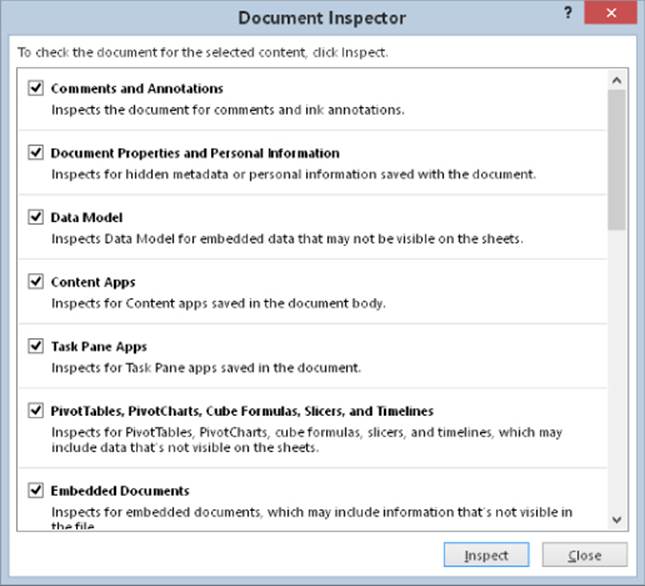
Figure 30.9 The Document Inspector dialog box identifies hidden and personal information in a workbook.
Caution
If Excel identifies items in the Document Inspector, it doesn't necessarily mean that they should be removed. In other words, you shouldn't blindly use the Remove All buttons to remove the items that Excel locates. For example, you may have a hidden sheet that serves a critical purpose. Excel will identify that hidden sheet and make it easy for you to delete it. To be on the safe side, always make a backup copy of your workbook before running the Document Inspector.
Two other commands are available in the File ![]() Info
Info ![]() Check for Issues menu:
Check for Issues menu:
· Check Accessibility: Checks the workbook for content that people with disabilities might find difficult to read
· Check Compatibility: Checks the workbook for the presence of features that may not work in previous versions of Excel
 See Chapter 7, “Understanding Excel Files,” for more about checking file compatibility.
Using a digital signature
Excel lets you add a digital signature to a workbook. Using a digital signature is somewhat analogous to signing a paper document. A digital signature helps to ensure the authenticity of the workbook and ensure that the content hasn't been modified since it was signed.
After you sign a workbook, the signature is valid until you make changes and resave the file.
Getting a digital ID
To digitally sign a workbook, you must obtain a certificate from a certified authority that is able to verify the authenticity of your signature. Prices vary, depending on the certificate-granting company.
Signing a workbook
Excel supports two types of digital signatures: a visible signature and an invisible signature.
To add a visible digital signature, choose Insert ![]() Text
Text ![]() Signature Line
Signature Line ![]() Microsoft Office Signature Line. The Signature Setup dialog box appears, and you're prompted for the information for the signature. After you add the signature box, double-click it, and the Sign dialog box appears; here, you actually sign the document either by typing your name or by uploading a scanned image of your signature. After signing the document, it will be marked as final. Any change to the file will invalidate the signature.
Microsoft Office Signature Line. The Signature Setup dialog box appears, and you're prompted for the information for the signature. After you add the signature box, double-click it, and the Sign dialog box appears; here, you actually sign the document either by typing your name or by uploading a scanned image of your signature. After signing the document, it will be marked as final. Any change to the file will invalidate the signature.
To add an invisible digital signature, choose File ![]() Info
Info ![]() Protect Workbook
Protect Workbook ![]() Add a Digital Signature. If the signed workbook is changed in any way, the digital signature is invalidated.
Add a Digital Signature. If the signed workbook is changed in any way, the digital signature is invalidated.