Microsoft Excel 2016 BIBLE (2016)
Part IV
Using Advanced Excel Features
Chapter 29
Excel and the Internet
IN THIS CHAPTER
1. Saving a workbook to an Internet location
2. Saving Excel files in HTML format
3. Creating hyperlinks
4. Using Office Apps
Most people who use a computer are connected to the Internet. The web has become an important way to share, collaborate, and gather information from myriad sources. To help you with these tasks, Excel has the capability to create files that you can use on the Internet and to gather and process data from the Web. This chapter covers topics related to Excel and the Internet.
Saving a Workbook on the Internet
Excel 2016 makes it easy to save your work to your OneDrive account or to a SharePoint site. Doing so lets you access the workbook from any computer that has Internet access, no matter where you are. And the computer doesn't have to have Excel installed. Sign in to your OneDrive or SharePoint account, and you can download the file and work on it locally or view it (and perhaps do minor editing) directly in your web browser using Microsoft Office Online.
To save a file to the Internet, choose File ![]() Save As, and then select OneDrive or SharePoint in the left section of the Save As screen. Click Browse, and choose a directory for the file. If you want, you can share the workbook with others, but only one person at a time can edit the file. You must be signed in to your SkyDrive or SharePoint account to save a file to one of these locations.
Save As, and then select OneDrive or SharePoint in the left section of the Save As screen. Click Browse, and choose a directory for the file. If you want, you can share the workbook with others, but only one person at a time can edit the file. You must be signed in to your SkyDrive or SharePoint account to save a file to one of these locations.
Figure 29.1 shows an Excel workbook that was saved to a OneDrive account. It's displayed in a browser using Excel Online. The file is a three-sheet workbook, with sheet tabs at the bottom. As you can see, the Excel Online includes a modified Ribbon, and it works much like the standard desktop version of Excel. Note the Open in Excel option, which opens the workbook in your desktop version of Excel.
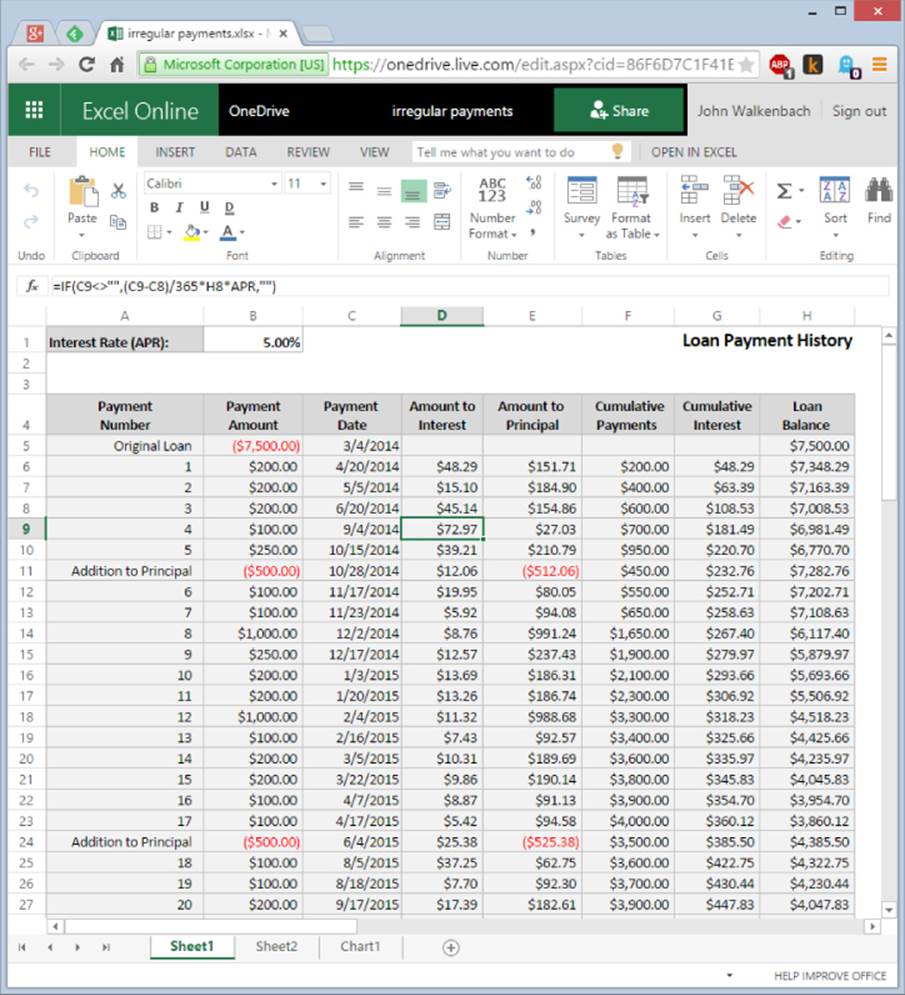
Figure 29.1 A workbook displayed in a browser using Excel Online.
Compared to the desktop version, Excel Online has quite a few limitations. For example, formatting options are limited, it can't run VBA macros, and it can't create pivot tables —but you can view and manipulate them. There's also a size limitation. If your file is too large, you can't open it with Excel Online. But overall, it's impressive software and can be useful if you tend to work from multiple computers.
Saving Workbooks in HTML Format
Hypertext Markup Language (HTML) is the language of the World Wide Web. When you browse the Web, most documents that your browser retrieves and displays are in HTML format. An HTML file consists of text information plus special tags that describe how the text is to be formatted. The browser interprets the tags, applies the formatting, and displays the information.
You can save an Excel workbook so that it's viewable in a web browser. When you save an Excel workbook for viewing on the Web, you have two options:
· An HTML file: Produces a static web page, plus a folder that contains support files. You can create the HTML file from the entire workbook or from a specific sheet.
· A single file web page: Produces a MIME HTML file (*.mht; *.mhtml). Not all browsers can open these files.
These options are described in the following sections. Both examples use a simple two-sheet workbook file. Each sheet has a table and a chart. Figure 29.2 shows one of these worksheets.
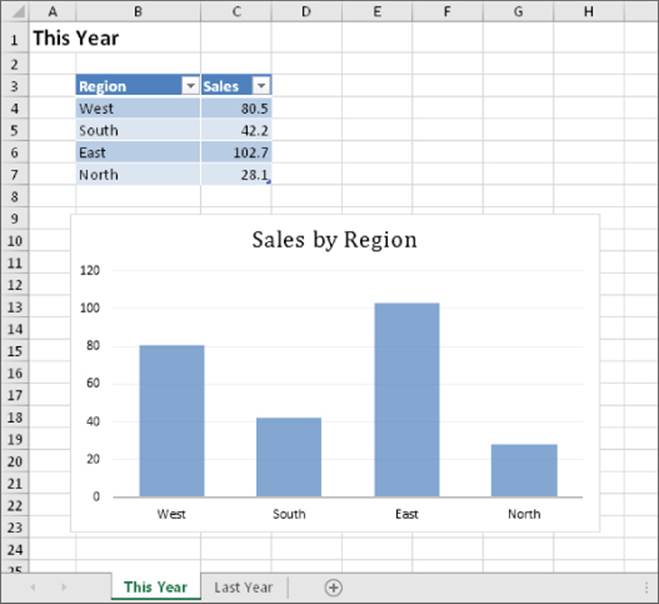
Figure 29.2 This workbook will be saved in a format that be opened in a web browser.
Keep in mind that these files are intended to be displayed only by a web browser. They are not interactive files. In other words, the user can't make changes while viewing the file.
Tip
To create an interactive version, save your workbook to your OneDrive site. Then you can share the workbook and open it using Excel Online.
 This workbook, named webpage.xlsx, is available on this book's website at www.wiley.com/go/excel2016bible.
Creating an HTML file
To save a workbook as an HTML file, follow these steps:
1. (Optional but recommended) Save the workbook as a normal Excel file.
2. Choose File ![]() Save As, and choose a location.
Save As, and choose a location.
3. Click Browse. The Save As dialog box appears.
4. Select Web Page (*.htm; *.html) from the Save as Type drop-down list.
5. Specify what to save (either entire workbook or the active sheet).
6. Specify a filename and then choose a location for the file.
7. Click Save to create the HTML file. Excel may display a message warning you that some features in the workbook are not compatible with the web page format. You can ignore this message.
Caution
Although Excel can open the HTML files that it creates, essential information is lost. For example, formulas are lost, and charts appear as static graphic images. Therefore, if you might need to make changes later on, make sure you keep a copy of your work in a standard Excel file format.
Figure 29.3 shows how one of the worksheets in the example file looks in a browser — Google Chrome, in this case. Notice that the workbook's sheet tabs appear along the bottom, and you can switch sheets just as you do in Excel.
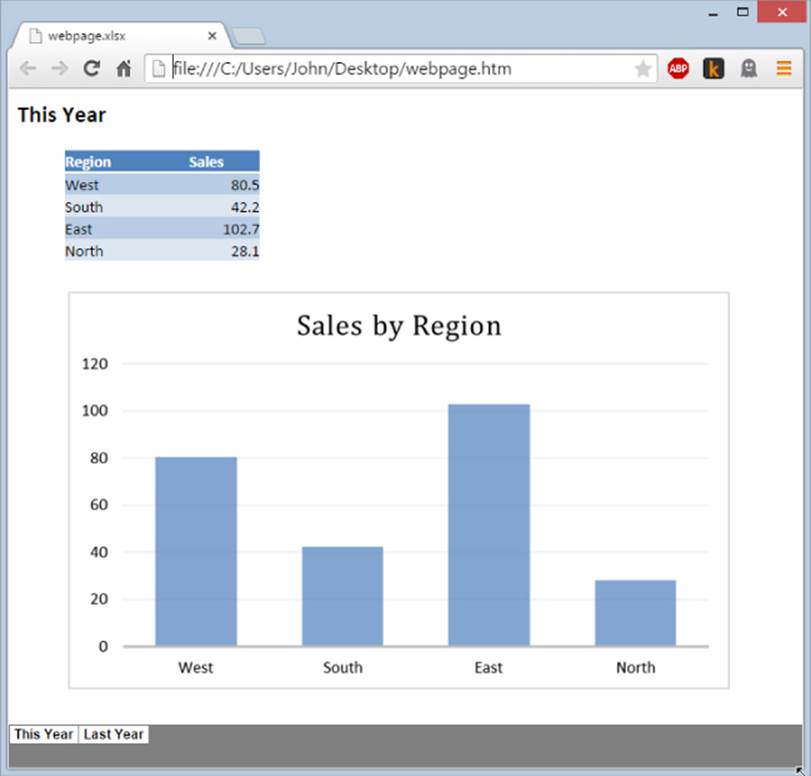
Figure 29.3 Viewing the HTML file in a browser.
In addition to the webpage.htm file, Excel created a folder named webpage_files. This folder contains additional files that must be kept with the main HTML file. Therefore, if you post such a file on a web server, don't forget to also post the accompanying directory.
Tip
If you create a lot of HTML files from Excel workbooks, you should add the Web Page Preview tool to your Quick Access toolbar. Right-click the Quick Access toolbar and choose Customize Quick Access Toolbar. Choose the Commands Not in the Ribbon category, and then add Web Page Preview. Clicking that command provides an instant preview (in your default web browser) of the active workbook.
Creating a single-file web page
In the previous section, I discussed how creating an HTML file with Excel also creates a folder of additional files. The procedure for creating a web page that uses a single file is the same, except for step 4. In step 4, select Single File Web Page (*.mht; *.mhtml) from the Save as Type drop-down list.
Figure 29.4 shows the example file displayed in Internet Explorer. Other browsers may not support this file format or may require an extension.
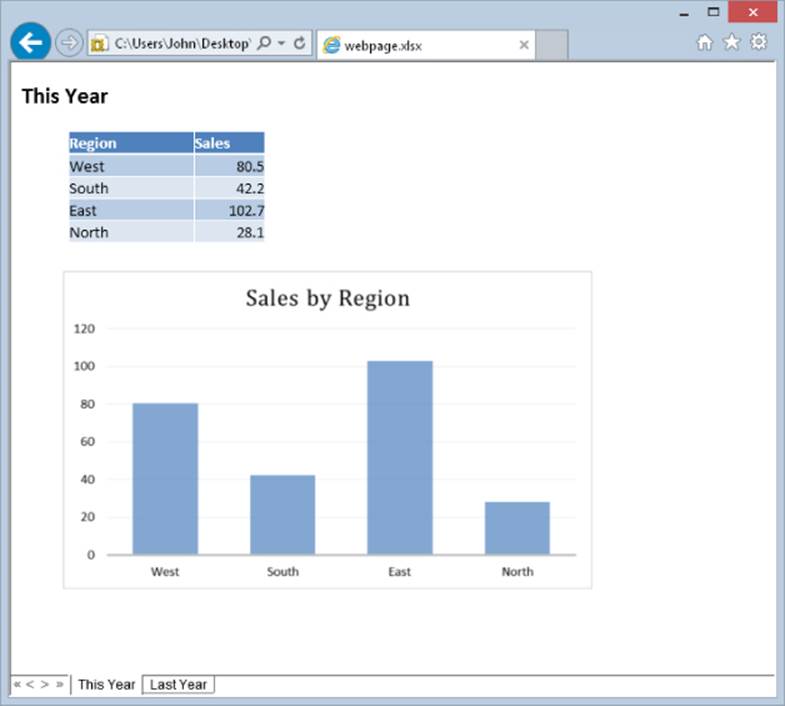
Figure 29.4 Viewing the single-file web page in Internet Explorer.
Setting Web Options
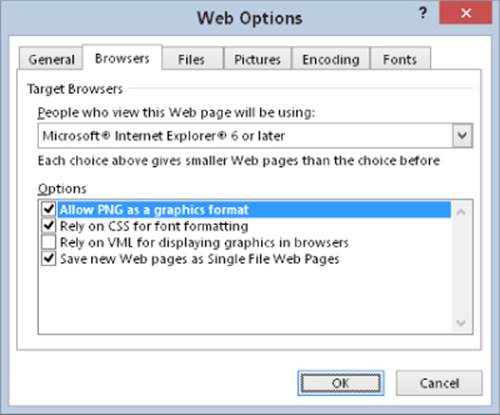
If you save your work in HTML format, you should be aware of some additional options. In the Save As dialog box, click Tools and then choose Web Options to display the Web Options dialog box. You can also access this dialog box from the Advanced tab of the Excel Options dialog box. (The button is in the General section.) From this dialog box, you can control some aspects of the HTML file, such as target browser version (Internet Explorer only), target monitor resolution, and fonts.
For the best-quality images, make sure you choose Allow PNG as a Graphics Format. (It's on the Browsers tab.)
Opening an HTML File
Excel can open most HTML files, which can be stored on your local drive or on a web server. Choose File ![]() Open and locate the HTML file. If the file is on a web server, you'll need to copy the URL and paste it into the File Name field in the Open dialog box. Files opened directly from a web server are opened in read-only mode. The way the HTML code renders in Excel varies considerably. Sometimes the HTML file may look exactly as it does in a browser. Other times, it may bear little resemblance, especially if the HTML file uses Cascading Style Sheets (CSS) for layout.
Open and locate the HTML file. If the file is on a web server, you'll need to copy the URL and paste it into the File Name field in the Open dialog box. Files opened directly from a web server are opened in read-only mode. The way the HTML code renders in Excel varies considerably. Sometimes the HTML file may look exactly as it does in a browser. Other times, it may bear little resemblance, especially if the HTML file uses Cascading Style Sheets (CSS) for layout.
After opening an HTML file, you can work with the information using the normal Excel tools.
Another way to open an HTML file from a web server is to use Get & Transform, which is discussed in Chapter 38, “Working with Get & Transform.”
Using the Insights task pane
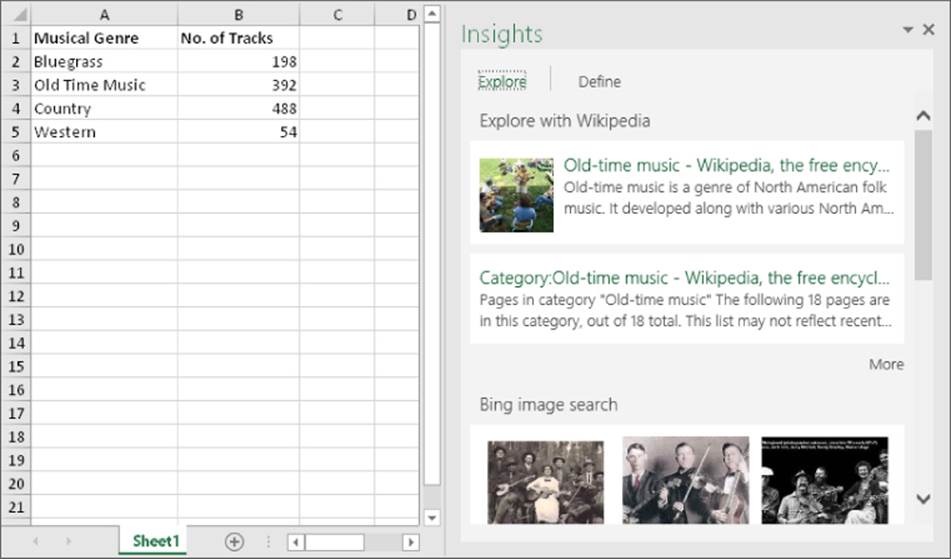
Somewhat related to the topic of this chapter is the Insights task pane. Start by selecting a cell that contains text, and then choose Review ![]() Insights
Insights ![]() Smart Lookup. The task pane displays information related to the cell contents. Clicking a hyperlink in the search results displays the website in your browser.
Smart Lookup. The task pane displays information related to the cell contents. Clicking a hyperlink in the search results displays the website in your browser.
Working with Hyperlinks
A hyperlink is clickable text that provides a quick way to jump to other workbooks and files. You can set up hyperlinks to display files stored on your own computer, your network, and the web. For example, you can create a series of hyperlinks to serve as a table of contents for a workbook. Or you can insert a hyperlink that displays a web page in your default web browser.
Inserting a hyperlink
You can create hyperlinks from cell text or graphics objects, such as shapes and pictures. To create a text hyperlink in a cell, select the cell and choose Insert ![]() Links
Links ![]() Hyperlink (or press Ctrl+K). The Insert Hyperlink dialog box, shown in Figure 29.5, appears.
Hyperlink (or press Ctrl+K). The Insert Hyperlink dialog box, shown in Figure 29.5, appears.
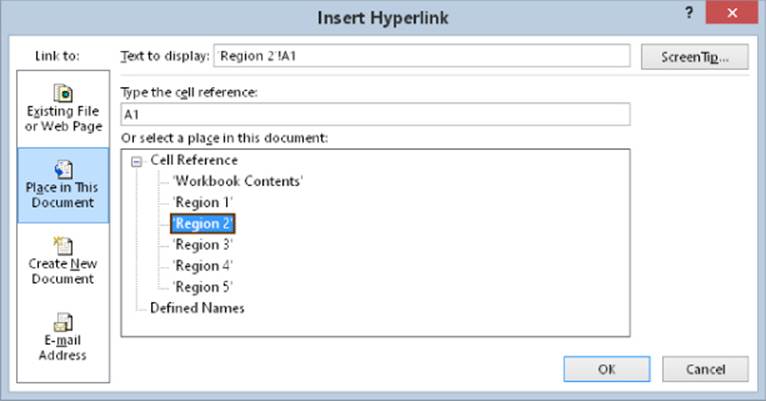
Figure 29.5 Use the Insert Hyperlink dialog box to add hyperlinks to your Excel worksheets.
Select an icon in the Link To column that represents the type of hyperlink you want to create. You can create hyperlinks to a file on your hard drive, a web page on the Internet, a new document, or a location in your current workbook. In addition, you can create a hyperlink that consists of an e-mail address. Then specify the location of the file that you want to link to. The dialog box changes, depending on the icon selected. If you like, click the ScreenTip button to provide some additional text that appears as a mouse-hover-activated ToolTip. Click OK, and Excel creates the hyperlink in the active cell.
Figure 29.6 shows a worksheet with hyperlinks that function as a table of contents for a workbook. Clicking a link activates a worksheet in the workbook. The example also shows an e-mail address that, when clicked, activates the default e-mail program.
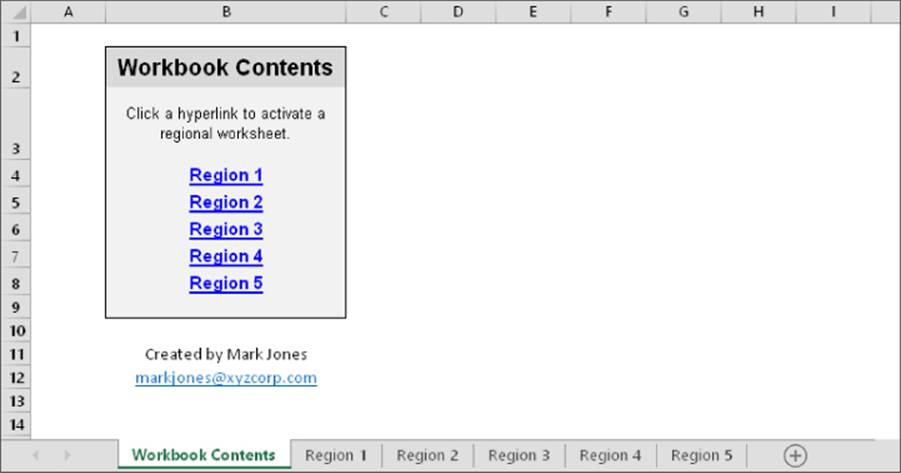
Figure 29.6 Hyperlinks in a workbook.
 This workbook is available on this book's website at www.wiley.com/go/excel2016bible. The file is named hyperlinks.xlsx.
The appearance of hyperlinks in cells is controlled by two styles in the Style Gallery. The Hyperlink style controls the appearance of hyperlinks that haven't been clicked, and the Followed Hyperlink style controls the appearance of “visited” hyperlinks. To change the appearance of your hyperlinks, modify either or both of those styles.
 See Chapter 6, “Worksheet Formatting,” for information about using and modifying document styles.
To add a hyperlink to a Shape, select the Shape and then choose Insert ![]() Links
Links ![]() Hyperlink (or press Ctrl+K). Specify the required information in the Insert Hyperlink dialog box, as outlined earlier in this section.
Hyperlink (or press Ctrl+K). Specify the required information in the Insert Hyperlink dialog box, as outlined earlier in this section.
 You can read more about Shapes in Chapter 23, “Enhancing Your Work with Pictures and Drawings.”
Using hyperlinks
When you hover your mouse pointer over a cell that contains a hyperlink, the mouse pointer turns into a hand. Click the hyperlink, and you're taken to the hyperlinked document.
Tip
To select a hyperlinked cell with your mouse (without following the hyperlink), position your mouse over the cell, click, and hold for a second or two before you release the mouse button. Or just activate a nearby cell and use the navigation keys to select the cell that contains the hyperlink.
When you hover your pointer over a Shape that contains a hyperlink, the mouse pointer turns into a hand. To follow a hyperlink from a Shape, just point to the Shape and click.
If the hyperlink contains an e-mail address, your default e-mail program launches so that you can send an e-mail to the address specified when you created the hyperlink.
E-Mail Features
Excel makes it easy to e-mail your work to others. You can access the e-mail features from the Share tab of Backstage view. (Choose File ![]() Share.)
Share.)
You can send the active workbook to one or more recipients via e-mail. The file can be the actual workbook, a PDF file, or an XPS file. If the workbook is saved to a shared location, you can send a link to the file (rather than the actual file). An additional option lets you fax the workbook (assuming that your system has a fax service provider).
Discovering Office Add-Ins
The final topic in this chapter deals with Office Add-ins. An Office Add-in is an embeddable object that resides on a worksheet's draw layer. Some Office Add-ins take the form of a task pane. Office Add-ins are download from the Office Store, and most of them are free. To access Office Add-ins, use the tools in the Insert ![]() Add-ins group.
Add-ins group.
Note that these Office Add-ins have nothing at all in common with traditional Excel add-ins that are created in VBA. For example, see Chapter 45, “Creating Custom Excel Add-Ins.” In Excel 2013, this feature was referred to as Office Apps. I don't know why Microsoft used the same name for two entirely different features.
A wide variety of Office Add-ins are available, and some of them are useful. Note that the quality varies, and there is little standardization in terms of user interface.
Figure 29.7 shows an Office Add-in called Geographic Heat Map, which displays a U.S. map, with colors to indicate values.
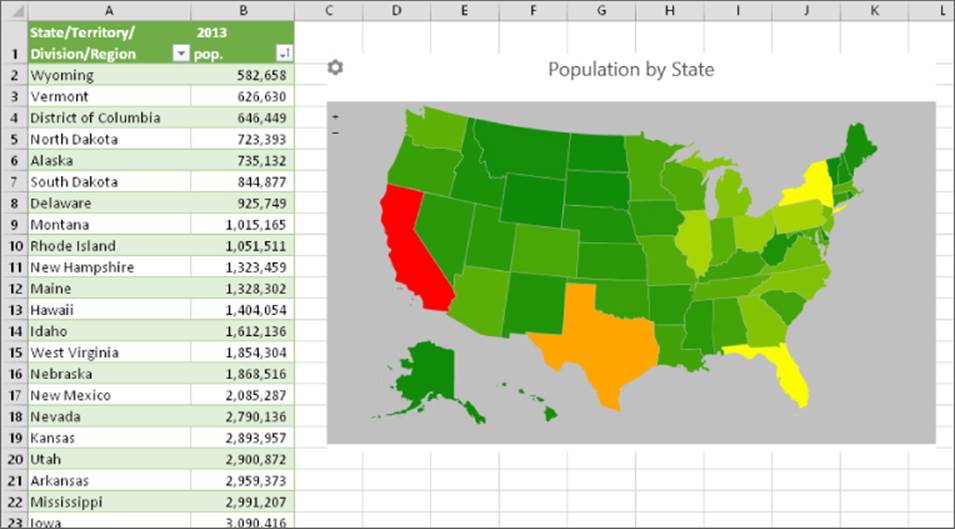
Figure 29.7 An example of an Office Add-in embedded in a worksheet.
All materials on the site are licensed Creative Commons Attribution-Sharealike 3.0 Unported CC BY-SA 3.0 & GNU Free Documentation License (GFDL)
If you are the copyright holder of any material contained on our site and intend to remove it, please contact our site administrator for approval.
© 2016-2026 All site design rights belong to S.Y.A.